

GOBC M SERIES User Manual

GB1
Notice
Thank you for purchasing a HUMAX product. Please read this user’s manual
carefully to be able to safely install, use and maintain the product at maximum
performance. Keep this user’s manual next to your product for future reference.
The information in this user’s manual is subject to change without notice.
Copyright (Copyright © 2016 HUMAX Corporation)
Not to be copied, used or translated in part or whole without HUMAX’s prior
consent in writing except approval of ownership of copyright and copyright law.
Meaning of Symbols
To reduce the risk of electric shock, do not remove cover (or back).
No user serviceable parts inside. Refer servicing to qualified service
personnel.
This symbol indicates dangerous voltage inside the product that
presents a risk of electric shock or personal injury.
This symbol indicates important instructions accompanying the
product.
Warnings, Cautions and Notes
Throughout this manual, pay special attention to the following marks that indicate
hazardous situations.
Warning
Indicates a hazardous situation which could result in serious injury
Caution
Indicates a situation which could damage the equipment or other apparatus
Note
Indicates additional information to make the user aware of possible problems
and information of importance to help understand, install, use and maintain the
device.
Warranty
The warranty does not cover parts which may become defective due to misuse of
the information contained in this manual.
‘WEEE’ Instructions
This product should not be disposed with other household wastes at the end
of its working life. Please separate this from other types of wastes and recycle
it responsibly to promote the sustainable reuse of material resources. This will
prevent possible harm to the environment or human health from uncontrolled
waste disposal.
Domestic users:
Please contact either the retailer where you purchased this product or their
local government office for details of where and how they can take this item for
environmentally safe recycling.
Business users:
Contact your supplier and check the terms and conditions of the purchase
contract. This product should not be mixed with other commercial wastes for
disposal.
Trademarks
• Irdeto is a trademark of Irdeto Access B.V.
• Manufactured under license from Dolby Laboratories. Dolby, Dolby Audio and
the double-D symbol are trademarks of Dolby Laboratories.
• the HDMI Logo, and High-Definition Multimedia interface
are trademarks and registered trademarks of HDMI
Licensing LLC.
• This item incorporates copy protection technology that is protected by U.S.
patents and other intellectual property rights of Rovi Corporation. Reverse
engineering and disassembly are prohibited.
Note: The model name is located on the bottom of this product.
Notice

GB2
For Your Safety
For Your Safety
Safety Instructions
1. POWER SUPPLY
• Operate this product only from the type of power supply
shown on the marking label. If you do not know the
type of power supplied to your home, contact your local
power company.
• Disconnect the power supply before you start any
maintenance or installation procedures.
2. OVERLOADING
• Make sure that the wall outlet, extension cord and
adapter have a sufficient power rating for the appliance.
If not, this can cause an electric shock or fire.
3. LIQUID
• Do not expose this product to liquids. Do not put
objects filled with liquid on the product.
4. CLEANING
• Disconnect the product from the wall outlet before you
clean it.
• Use a moist cloth to clean the product. Do not use
solvents. Wipe the surface gently with a soft cloth as it
may get scratched.
5. VENTILATION
• Make sure that the slots on top of the product are not
blocked. It is necessary to have a sufficient airflow into
the unit.
• Do not put electronic equipment on the product.
• Do not put objects on the product. This will block the
ventilation or cause damage to the surface.
• Maintain a minimum distance of 10cm around the
product for sufficient ventilation.
6. ATTACHMENTS
• Do not use any unsupported attachments as these may
be hazardous or cause damage to the product.
7. LIGHTNING, STORM OR NOT IN USE
• Unplug the product from the wall outlet and disconnect
the antenna during a thunderstorm or when left
unattended and unused for long periods of time. This
will prevent damage to the unit due to lightning and
power-surges.
8. EXTRANEOUS OBJECTS
• Do not insert anything through the openings in the
unit, where they can touch dangerous voltage points or
damage parts.
9. REPLACEMENT OF PARTS
• When replacement of parts is required, be sure the
service technician uses replacement parts specified
by the manufacturer or those that have the same
characteristics as the original part. Unauthorised
substitution may result in additional damage to the unit.
10. CONNECTION TO THE SATELLITE DISH
• Disconnect the power supply before you connect or
disconnect the cable from the satellite dish/cable TV
signal/aerial. If not, this can cause damage to the LNB/
cable TV line/aerial.
11. CONNECTION TO THE TV
• Disconnect the power supply before you connect or
disconnect the cable from the TV. If not, this can cause
damage to the TV.
12. EARTHING (satellite only)
• Earth the LNB cable to the system earth for the satellite
dish.
13. LOCATION
• Place the product indoors to avoid exposure to
lightning, rain or sun. Do not place it near a radiator or
heat register.
• Keep at least 10 cm clearance from any other appliances
susceptible to electromagnetic influences such as a TV
or a VCR.
• If you place the product on a rack or a bookcase, make
sure that there is adequate ventilation and that you have
followed the manufacturer’s instructions for mounting.
• Do not place the product on an unstable surface where
it can fall. A falling product can cause serious injury to a
personnel and serious damage to the appliance.
14. ENVIRONMENT
• Attention should be drawn to the environmental aspects
of battery disposal.
• Care is required for the use of this apparatus in tropical
and/or moderate climates.
Cautions and Warnings
1. To avoid damage of the power adaptor
• Do not modify or process the power cord or plug
arbitrarily.
• Do not bend or twist the power cord.
• Make sure to disconnect the power cord while you hold
the plug.
• Keep heating appliances as far as possible from the
power cord to prevent the cover vinyl from melting.
• The mains plug, as a disconnection device, shall remain
readily accessible by the user.
• All-pole main switch shall remain readily operable. (For
products with power switch)
2. To avoid electrical shock
• Do not open the main body.
• Do not insert metal or inflammable objects inside the
product.
• Do not touch the power plug with wet hands.
• Disconnect the power cord in case of lightning.
• Unplug the power cable before you install the antenna
cable.
3. To avoid damage of product
• Do not use the product when it is out of order. If you
continue to use the product when defective, this
may cause serious damage. Make sure to contact the
customer service centre if the product is out of order.
• Do not insert metal or alien substance into the slots for
the modules or Smartcards. It may cause damage to the
product and reduce its life span.
• Do not overly pile objects on the product. It may cause
cracks, deformation and discoloration.

GB3
AccessoriesContents
Note: Accessories may vary according to
location.
Contents & Accessories
Notice ........................................ 1
For Your Safety ................................ 2
Contents & Accessories ........................ 3
Contents
Accessories
Getting Started ............................... 4
Front & Rear
Connections
Remote Control
Wizard
Watching TV .................................. 8
Home
Channel List
Smart Search
TV Guide
System Settings
Settings ......................................13
General Settings
Network Settings
Channel Settings
Search Channels [Fixed Antenna]
Search Channels [SCD Antenna]
Appendix ..................................... 18
Specification
Trouble Shooting
HUMAX Customer Support
Glossary
Open Source Software Notice
Warranty Certificate
OMAN-TRA
R/3405/16
D100428
Quick Start Guide
User’s Manual
Remote Control
/ Batteries
Quick Start Guide/
User's Manual
HDMI Cable
Power Adaptor
GB4
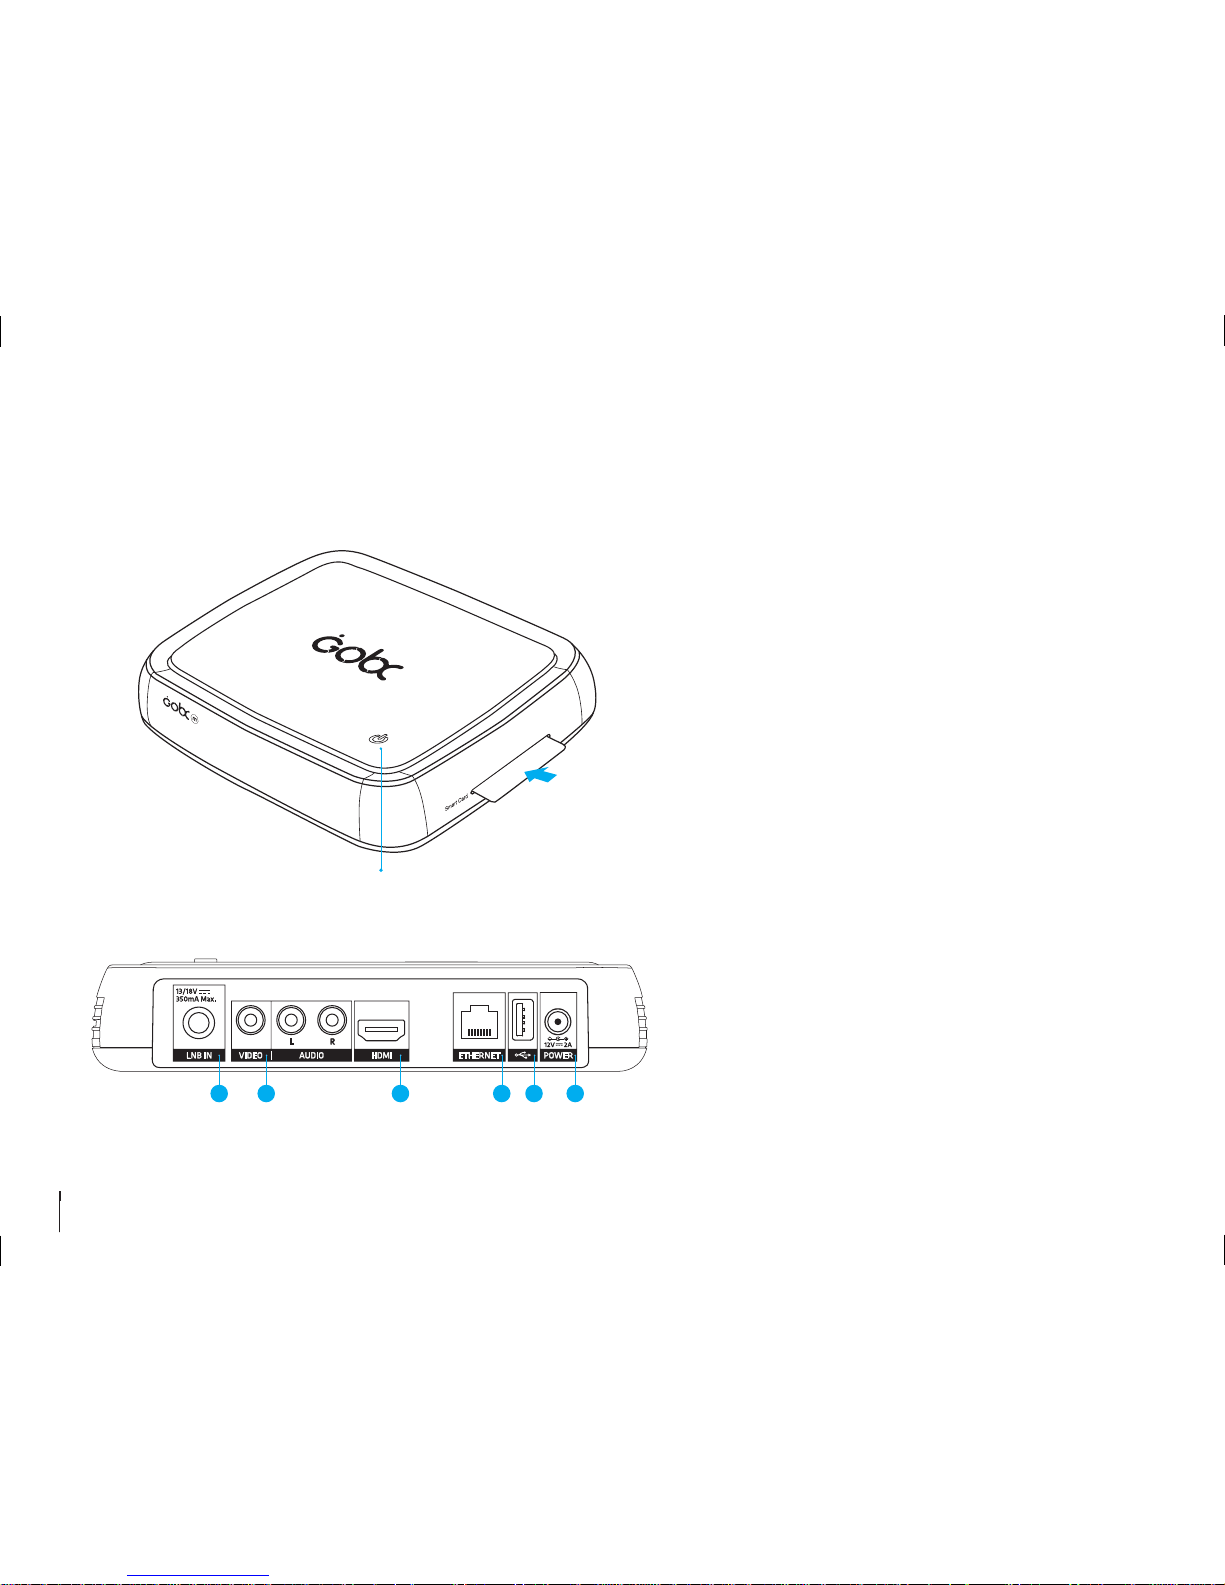
Front & Rear
Note: The image may differ from the actual product.
Getting Started
Inserting the Smartcard
1. Hold the Smartcard horizontally with the
electronic chip facing downwards.
2. Insert the Smartcard into the slot.
1 LNB IN: Connect a satellite antenna cable.
2 VIDEO/AUDIO: Use an RCA cable to connect to the TV.
3 HDMI: Use an HDMI cable to connect to the TV.
4 Ethernet: Connect an Ethernet cable.
5 USB: For technical support only.
6 Power Adaptor: Use the power adaptor to connect to the power
supply.
Standby
1 2 3 4 5 6
STANDBY
Switches between operation and standby modes
GB5
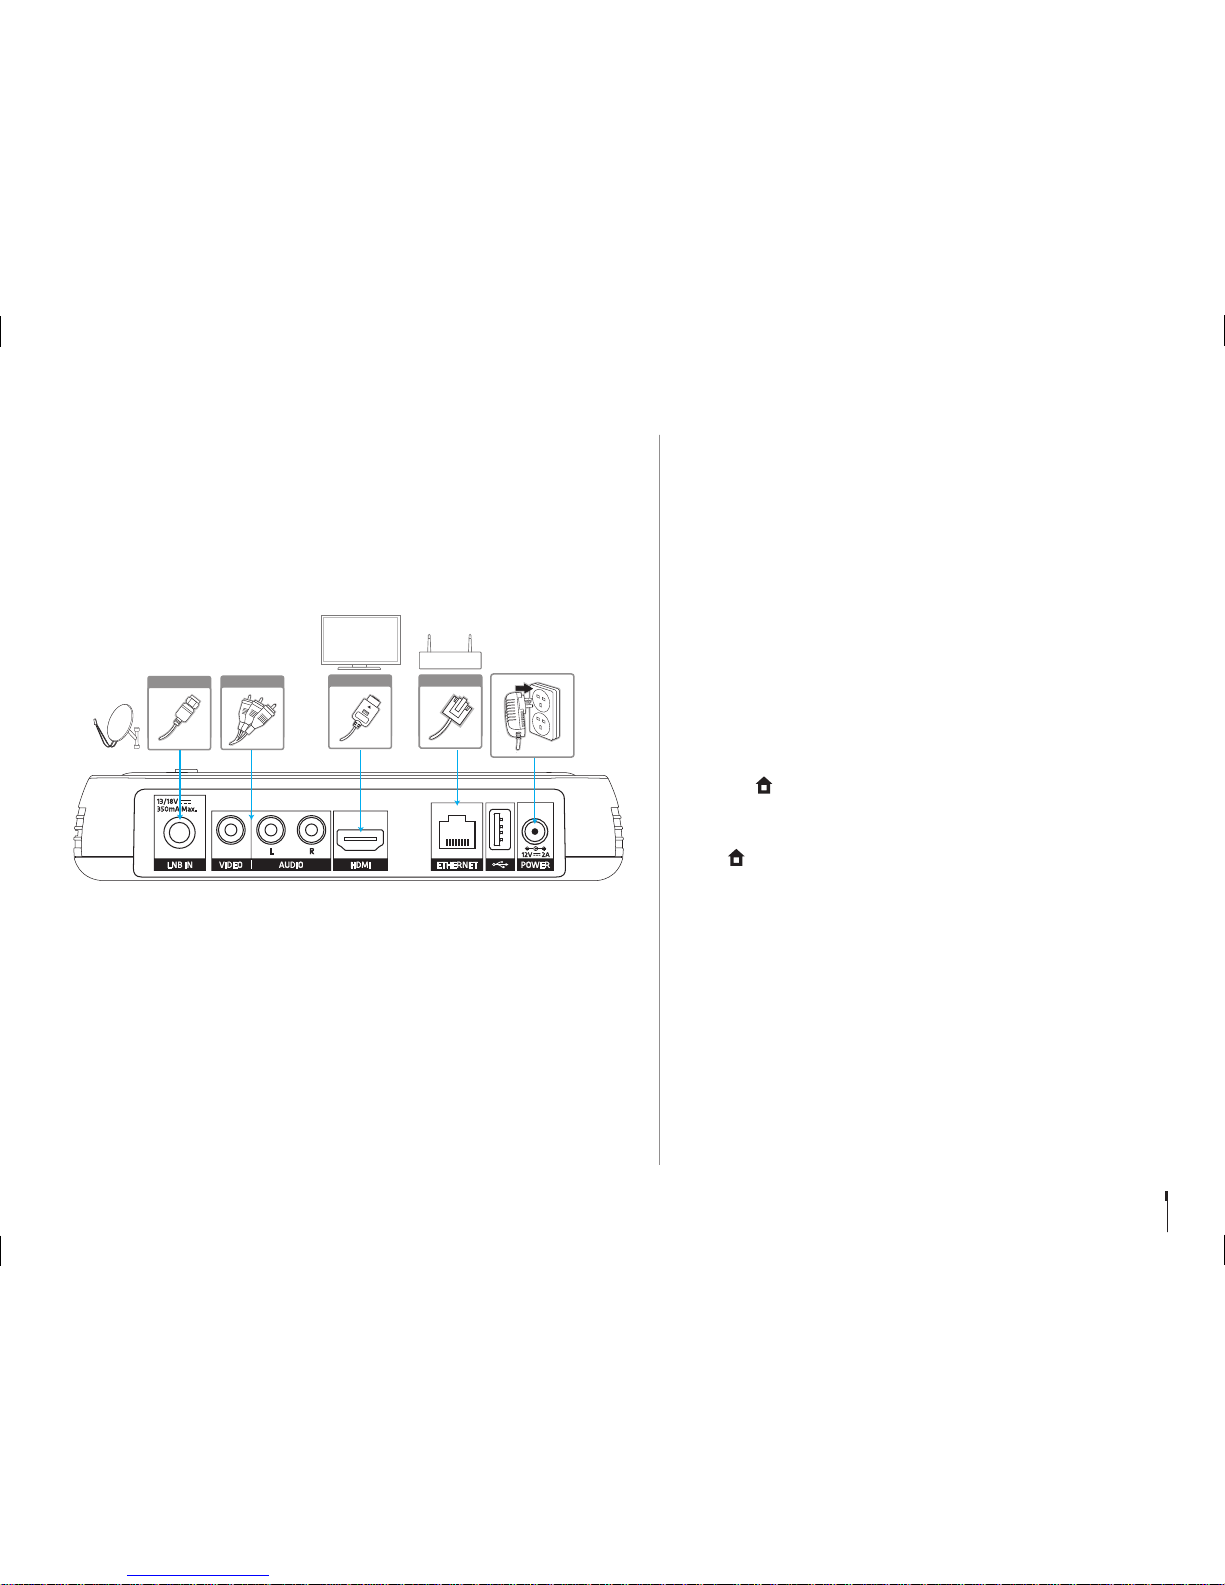
Connections
This section describes how to connect your product to match your particular devices and
to gain optimum signal quality.
Warning: Connect all devices before you plug any power cords into the wall outlet.
Always turn off the product, TV and other devices before you connect or
disconnect any cables.
Note:
• If you encounter any problems setting up your product, please contact your local
retailer or HUMAX Customer Service.
• Connecting your TV directly to the audio/video output of the product will assure a
more vivid picture and enhance your viewing enjoyment.
Connecting the Antenna
1 Connect the Antenna to the LNB IN.
Connecting the TV
2-1 Using an HDMI cable
For the best picture quality, use an HDMI cable to connect to the TV.
2-2 Using an RCA cable
Using an RCA cable provides a lower resolution because the HD signal
cannot be received in full resolution.
Connecting the Network
3-1 Connecting to the LAN
1. Use the Ethernet cable to connect the product to the LAN router.
2. Set the options for the LAN.
(Go to > SETTINGS > Network Settings to set the network
options.)
3-2 Connecting to the Wireless LAN
Go to > SETTINGS > Network Settings > Configure WLAN and set
the options for the wireless LAN.
Note:
• We recommend the network connection over a direct LAN.
• Make sure that the distance between the Wireless LAN access point
and the product is not too far away. This may lower the quality of
service.
Connecting the Power
4 Use the power adaptor to connect the power supply.
Getting Started
6
Router
3-1
Ethernet
TV
HDMI
2-1
RCA Cable
2-2
Antenna
1
4
GB6
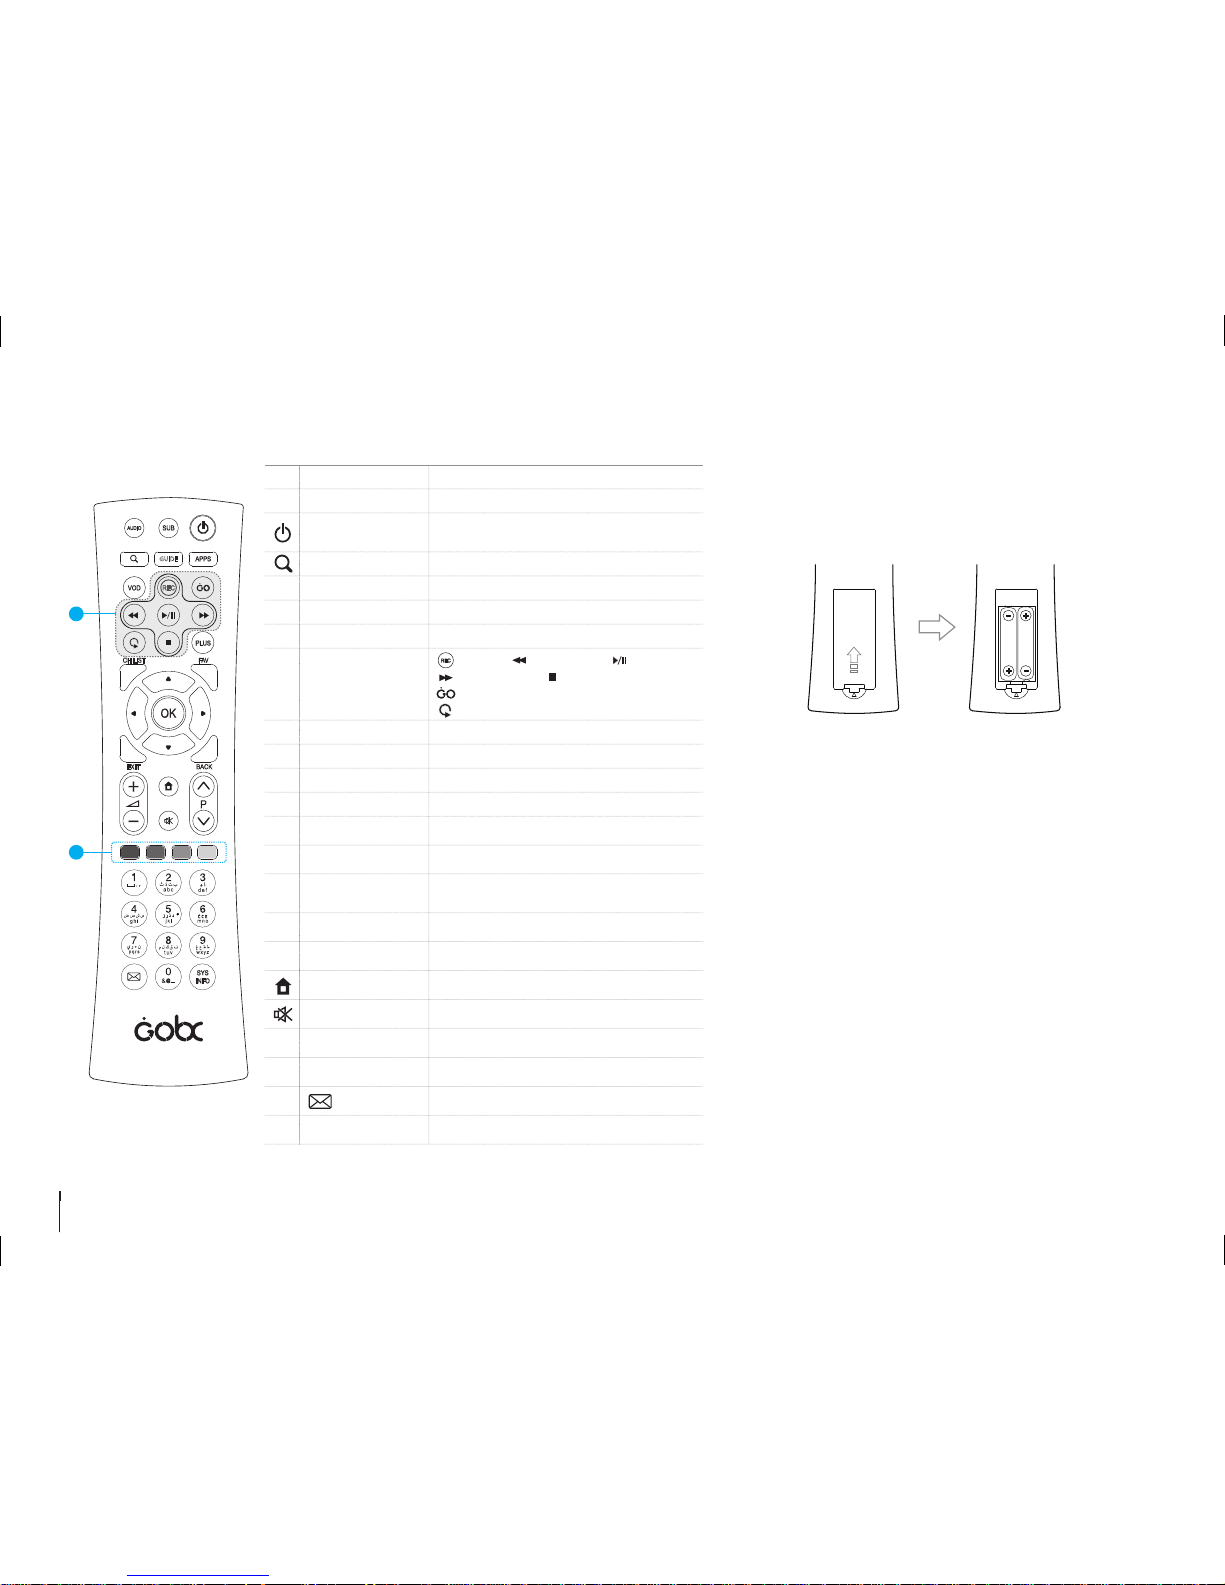
Remote Control
Getting Started
AUDIO Displays the audio list
SUB Displays subtitle
STANDBY
Switches between operation and standby
modes
SEARCH Run Smart Search
GUIDE Displays the programme guide
APPS Goes to TV APPS (Currently not supported)
VOD Goes to VOD services
1
Playback Control
Buttons (Currently
not supported)
Record, Fast Rewind, Play/Pause,
Fast Forward, Stop
Displays the recording list
Instant Replay
PLUS Displays option menus
CH LIST Displays the channel list
FAV Displays the favourite channel list
ARROW Buttons Moves the cursor up, down, left or right
OK Selects a menu or confirms
EXIT Exits all On-Screen Display (OSD) screens
BACK
Returns to the previous channel or the
previous screen
⊿
+/-
Changes the audio volume
P ∧/∨
Changes the channel or page
HOME Displays the HOME menu
MUTE Mutes audio
2
COLOUR Buttons For interactive applications
NUMERIC (0-9)
Displays mail messages
SYSINFO Displays system information
Note: Playback control buttons may not be enabled on your
product.
Inserting Batteries
Insert the batteries matching the plus(+) and minus(-) at each end.
Important notice
The batteries of your remote control are 2 x AAA type, 1,5VDC.
Do not mix different types of batteries or new and old batteries.
Do not use rechargeable batteries. In order to avoid any risk
of explosion, observe polarities indicated inside the battery
compartment. Replace only with the type of batteries specified
above. Do not subject to excess heat such as SUN and Fire,
do not recharge them. If you are not using the remote control
for a long period of time, remove the batteries. Please respect
the environment and prevailing regulations! Batteries must be
collected separately from other refuse! Before you dispose of
batteries, ask your dealer whether they are subject to special
recycling and if he will accept them for disposal.
1
2
GUIDE
Battery

GB7
Getting Started
Wizard
The installation wizard operates automatically when you power on the product
for the first time or do factory default in menu.
Note: If you exit the installation wizard without fully completing the channel
searching procedure, you may not have all of the channels available. In this
case, go to > SETTINGS > Channel Settings > Search Channels and
search for more channels.
1. Language
Select the appropriate language from the list.
2. Network Connection
Make sure that the Ethernet cable is connected to the Ethernet port or the
wireless network is enabled. Configure the network setting.
3. Terms and conditions
Agree or disagree to share anonymous data about how you use your products. If
you agree, this is very helpful for us to make better products.
Note: You cannot skip this step to proceed the installation wizard.
4. Country Selection
Select your country. This step will be shown if the network is not connected.
5. Channel Search
All of the MBC channels will be searched automatically. To search more channels,
go to SETTINGS > Channel Settings > Search Channels.
6. Customer Registration
Register your GOBX to enjoy more various channels MBC provides. You can visit
GOBX.com to register.
7. Result
The result of the installation wizard will show. Select EXIT.
GB8
Watching TV
Home
You can go to the home menu by pressing the button. From the home menu,
you can easily reach the main menus.
• Press the
/
button to go to CHANNELS, GUIDE or SETTINGS.
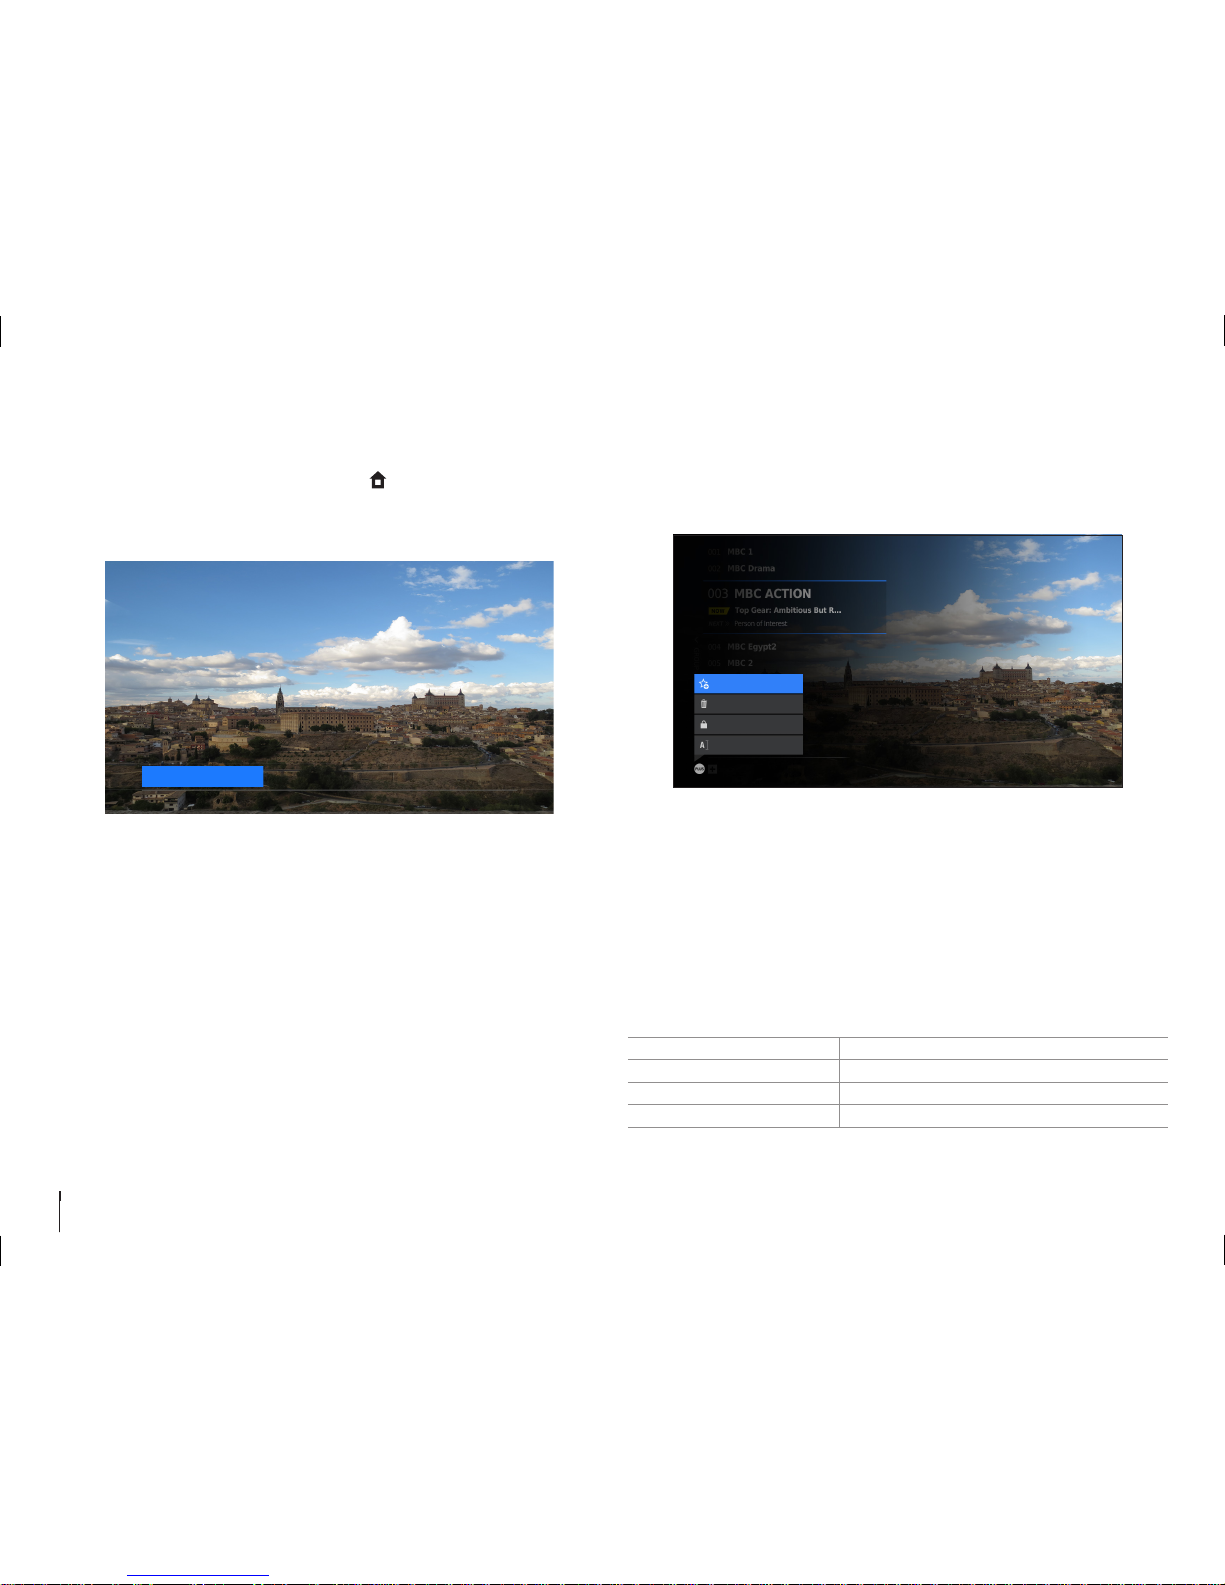
Channel List
You can access the channel list.
• Press the CH LIST button while watching live TV.
Changing Channels
Select a programme and press the OK button.
You can also enter the channel number directly.
Changing Channel Group
1. Press the button while the channel list is displayed.
2. Select a channel group and press the OK button.
Editing Channels in Channel List
Select the channel you want to edit and press the PLUS button.
ADD TO / EDIT FAV Add/Edit favourite channels.
DELETE Delete channels from channel list.
PARENTAL LOCK/UNLOCK Lock channels to block access.
RENAME Change channel name.
Note: You cannot delete or rename MBC channels.
CHANNELS GUIDE SETTINGS
ADD TO FAV.
DELETE
OPTION - TV
PARENTAL LOCK
RENAME
 Loading...