

Page 1

MOUNTING PLATE
PRO 4000 ATTACHMENT
INSTALL GUIDE
Page 2
DISCLAIMER
Please read all warnings, instructions and cautions carefully
before use to avoid personal injury, property damage or
damage to your Goal Zero product. Goal Zero reserves
the right to update this document without prior notice.
Please visit www.goalzero.com to find the latest product
information and the most recent version of the User Guide.
The mounting plate keeps your Yeti PRO and Tank PRO 4000
units secure and stationary whether you set them up at home
or take them on the road.
Table of Contents
Hardware Recommendations 3
Installation 5
Français 10
Deutsch 19
Español 28
Italiano 37
Portugués 46
日本語
55
Suomalainen 64
Nederlands 73
Svenska 82
For assistance with your device in the United States, visit our contact page
at www.goalzero.com/contact or call 1-888-794-6250. For assistance with
your device outside of the United States, contact the local distributor. If you
do not have contact information for the local distributor, contact us in the
United States and we will help connect you to the local representative.
Page 3
Hardware Recommendations
Required tools:
1: Measuring Tape
2: Marking Tool (Paint Pen, Marker, Pencil)
3: Screwdriver or Power Drill & Drill Bit(s)
(Dependent on where you are installing)
4: Wrench set (May be necessary for some installations)
Required Hardware:
1: Mounting Plate
2: Bolts to secure the plate (4 minimum for home installation,
8 or more for RV installation)
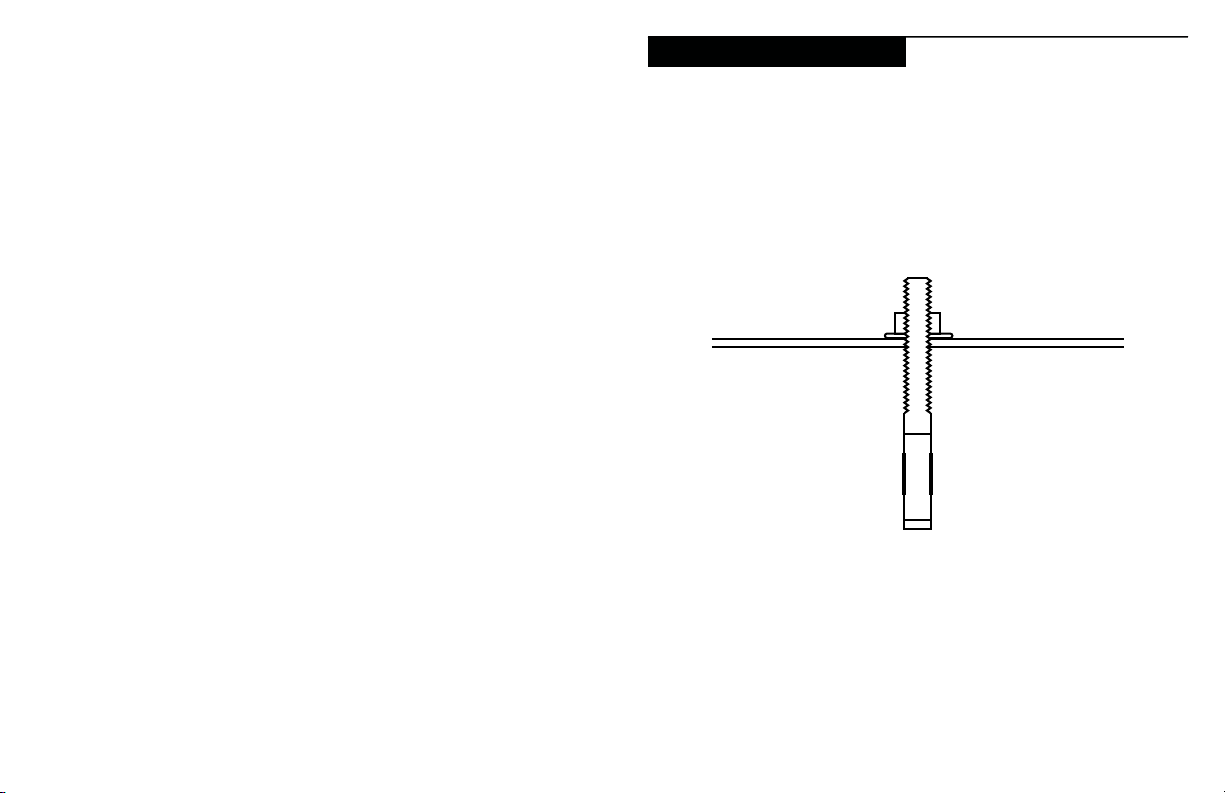
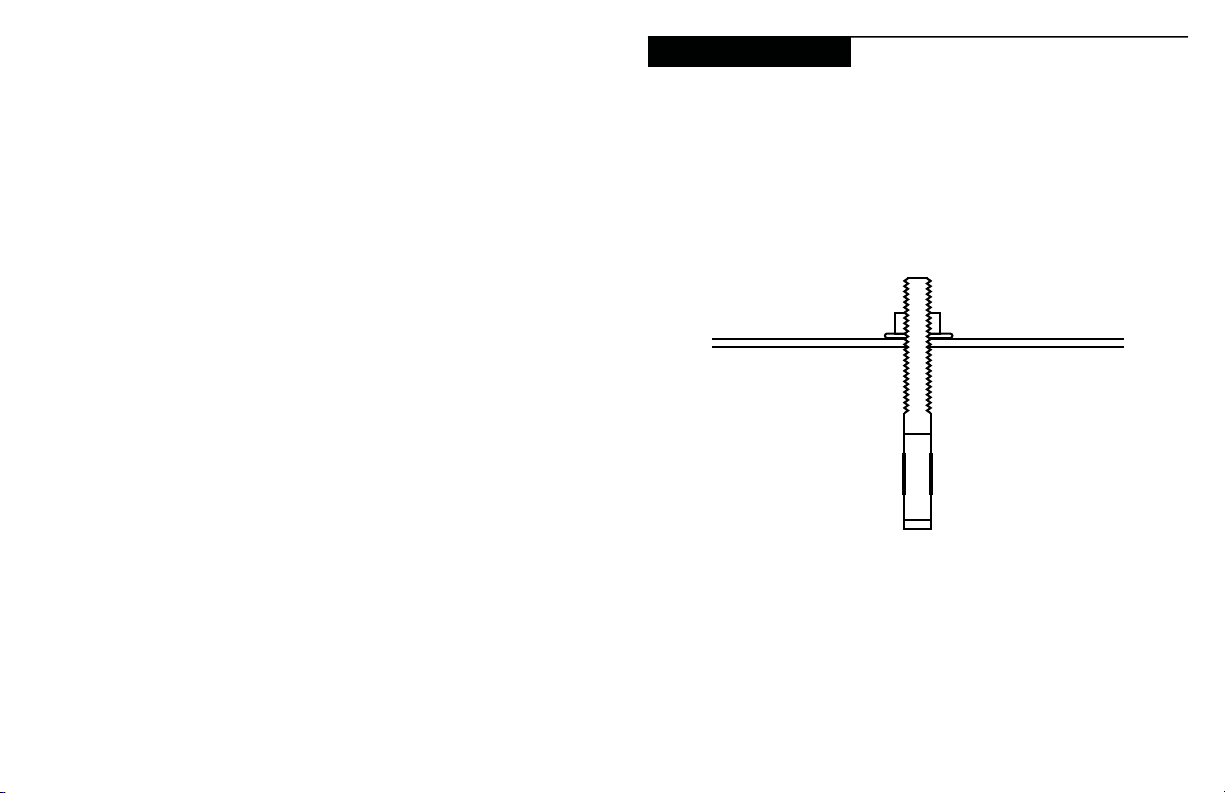
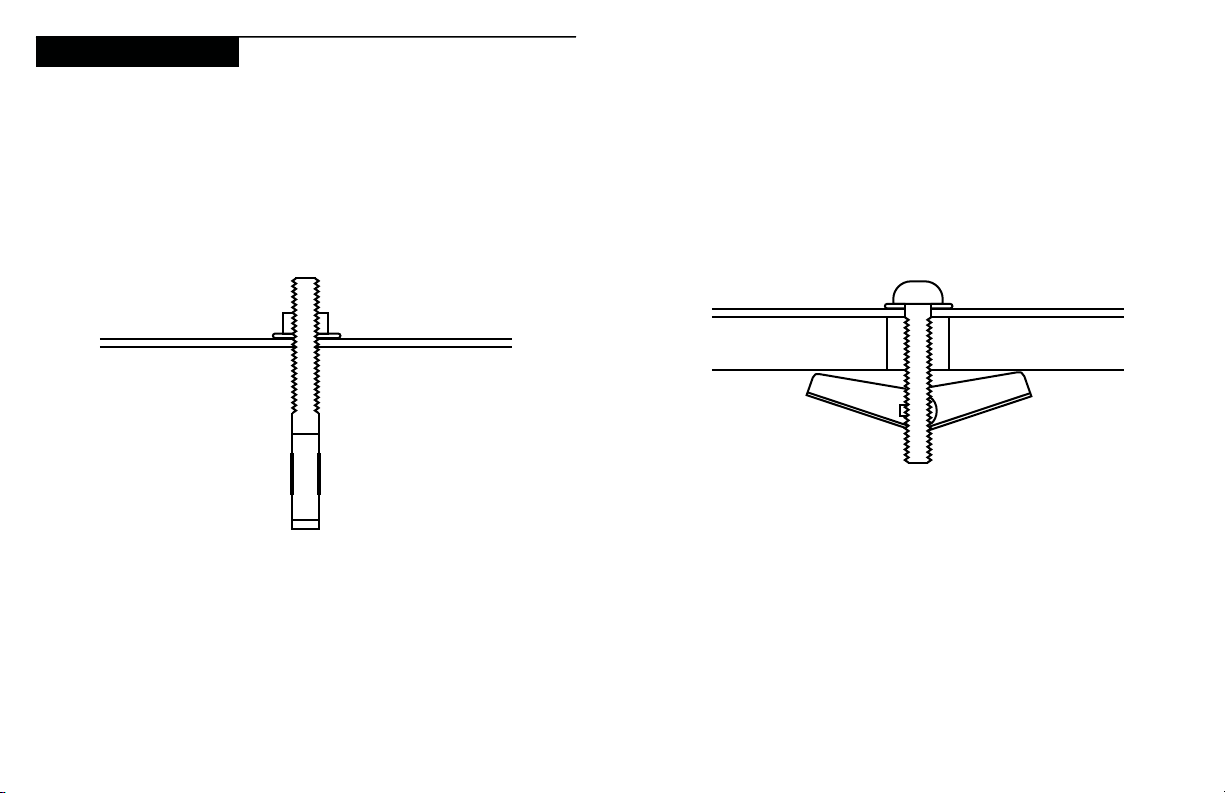
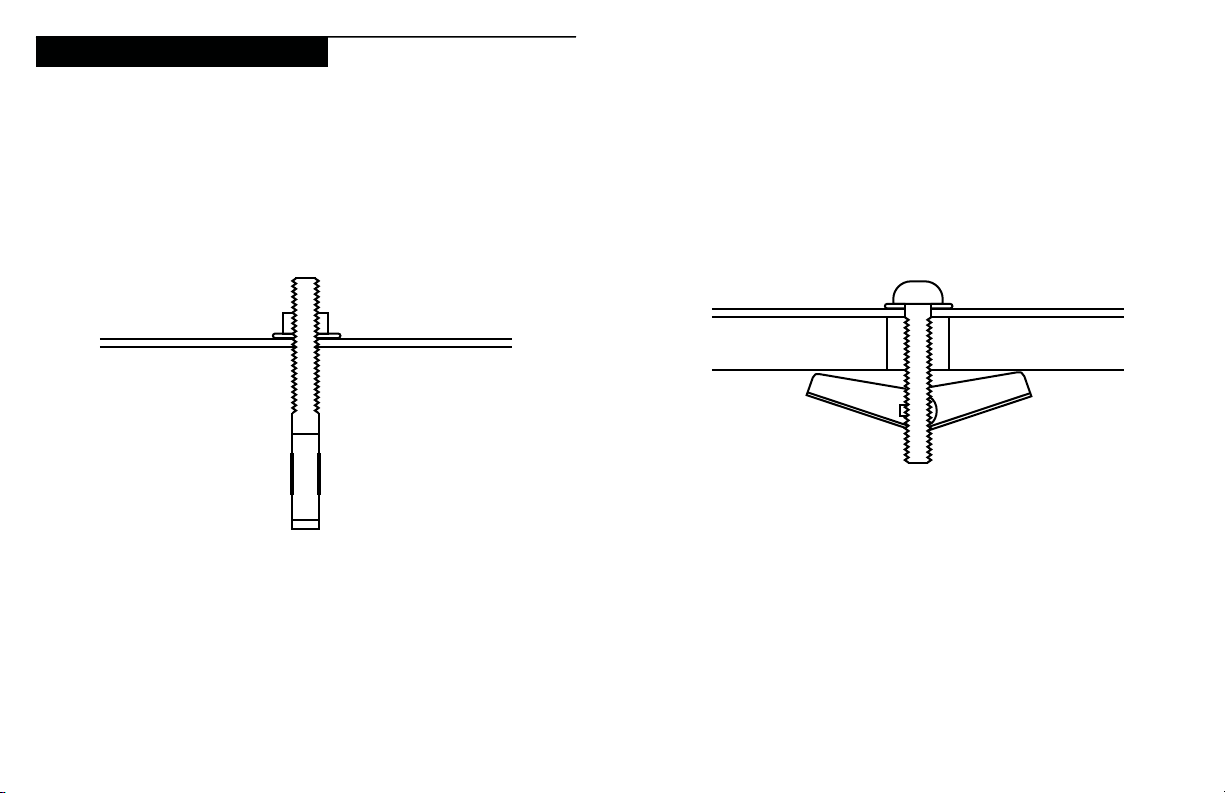
Cement
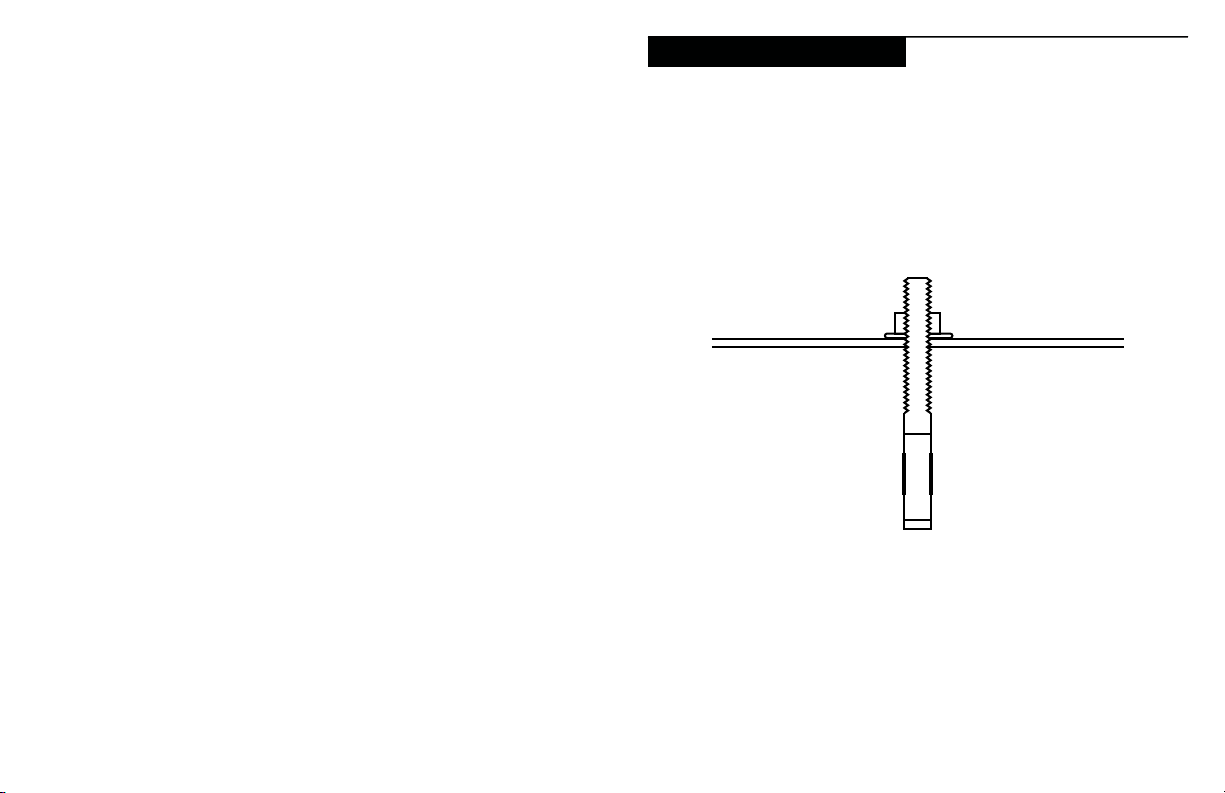
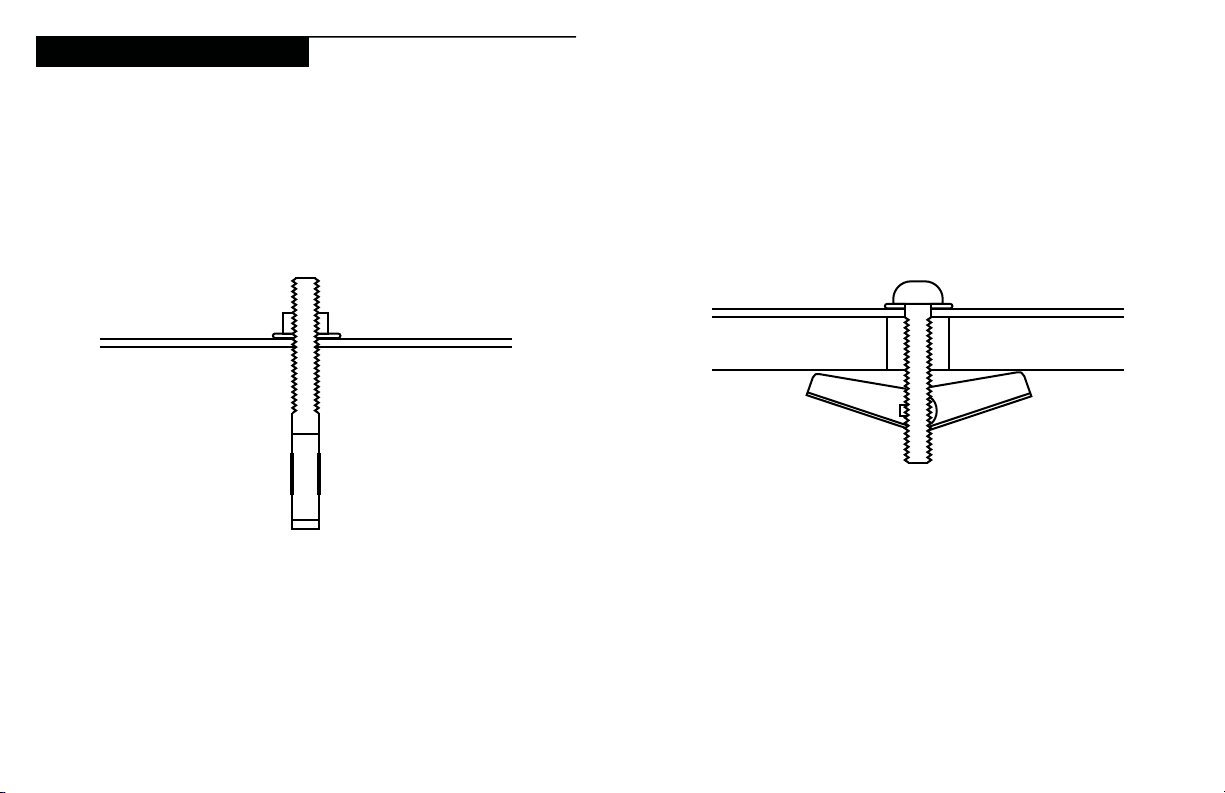
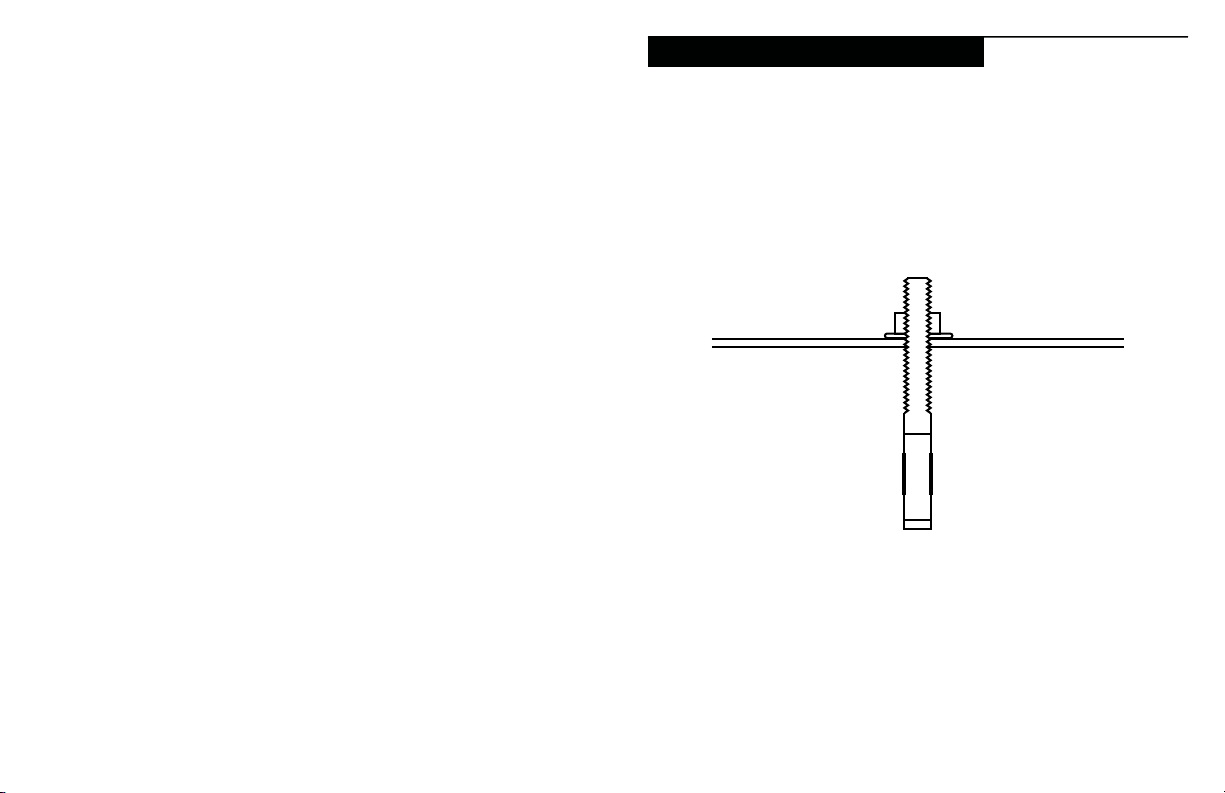
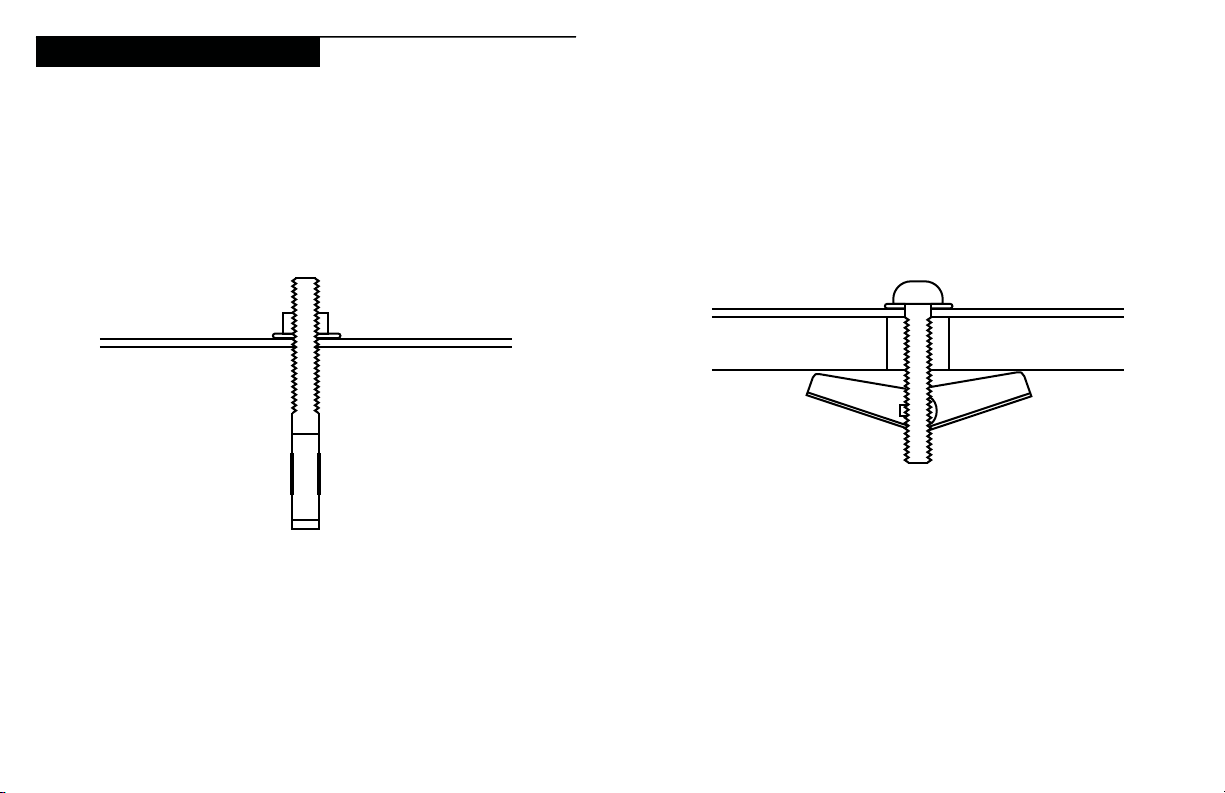
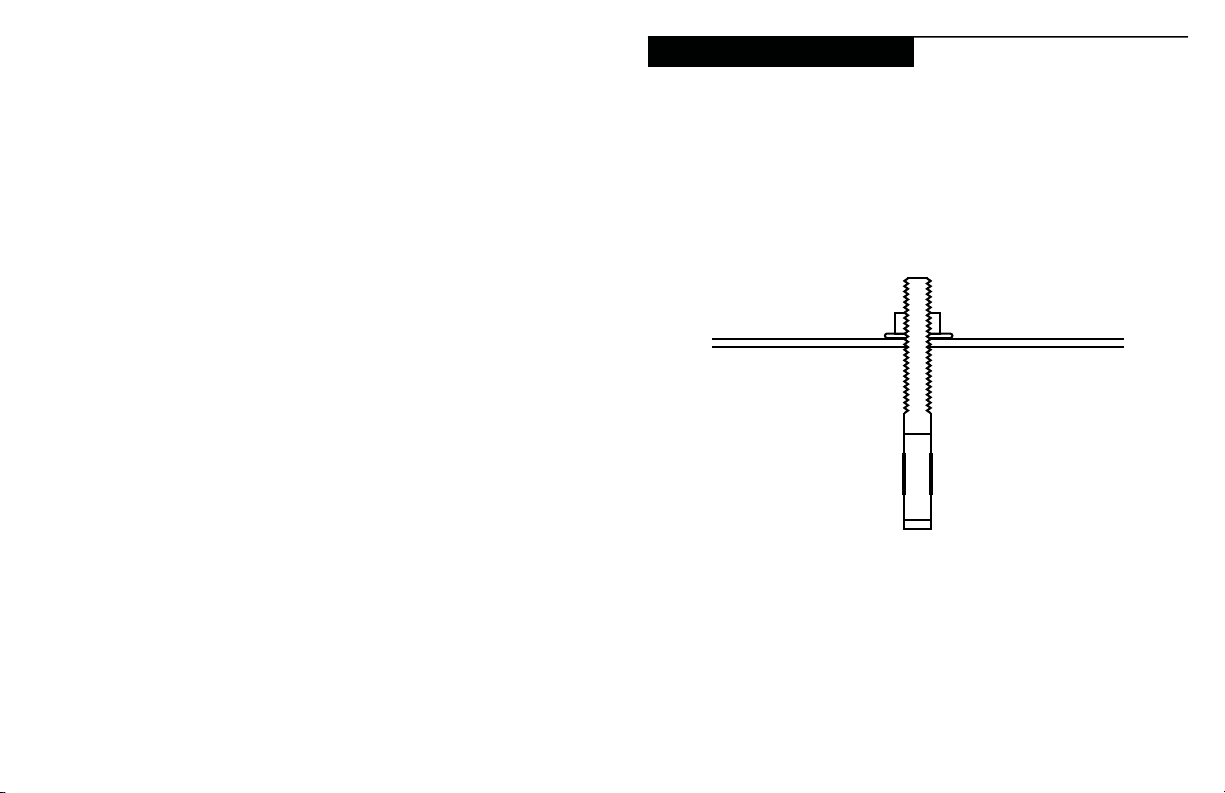
We recommend using a 6mm or ¼” x 20 anchor bolt.
ANCHOR BOLT
FOR CEMENT
2
3
Page 4
Installation
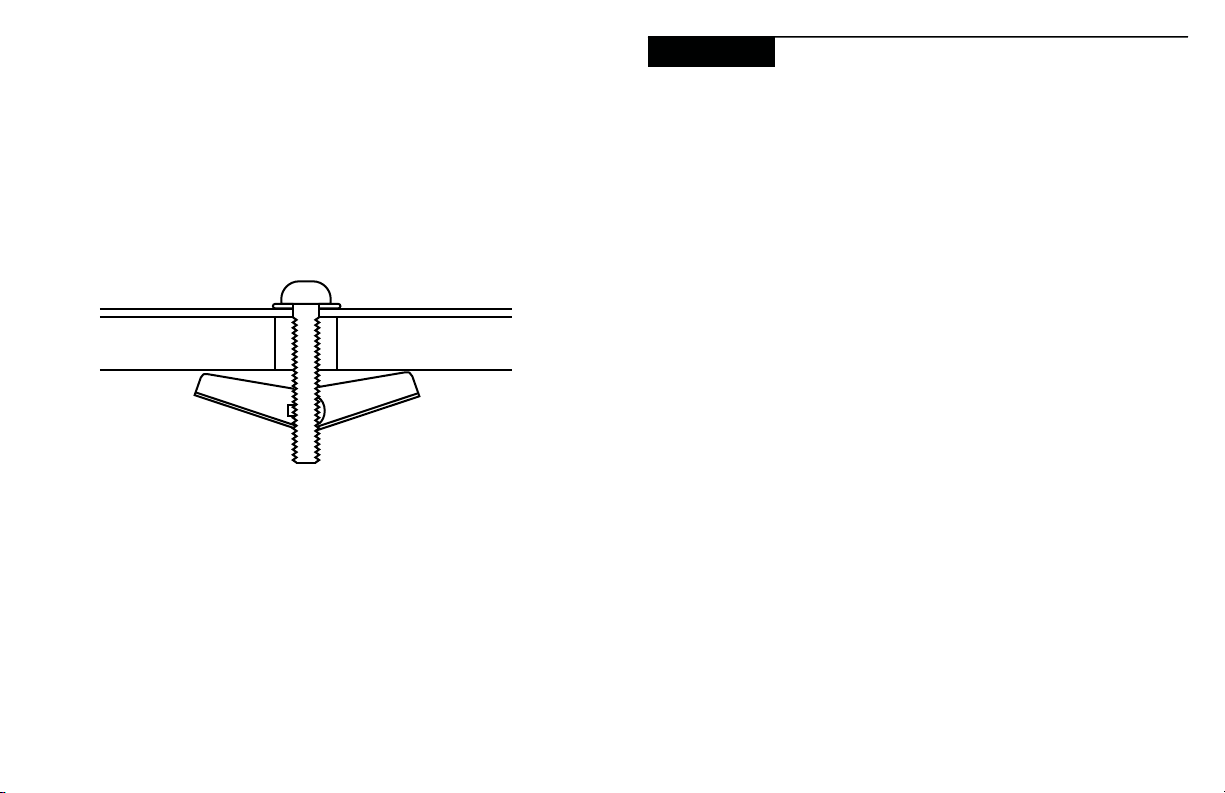
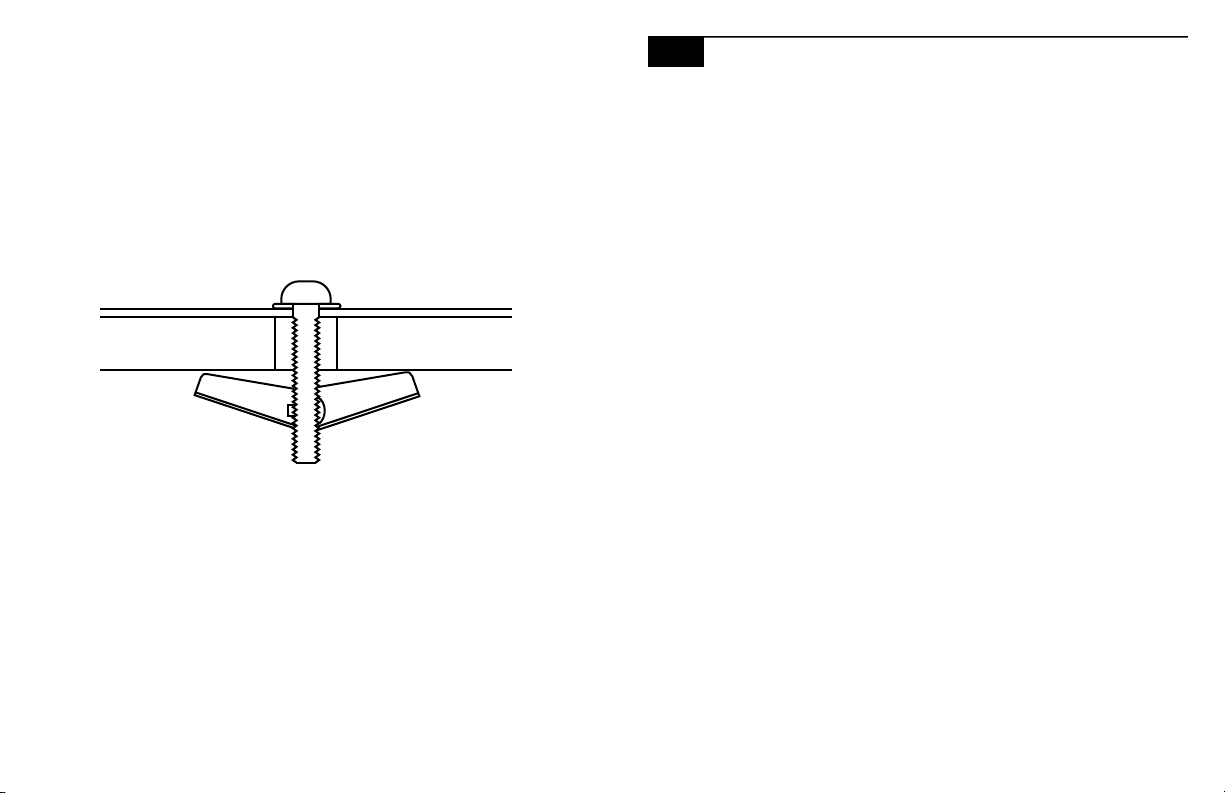
Wood or Metal
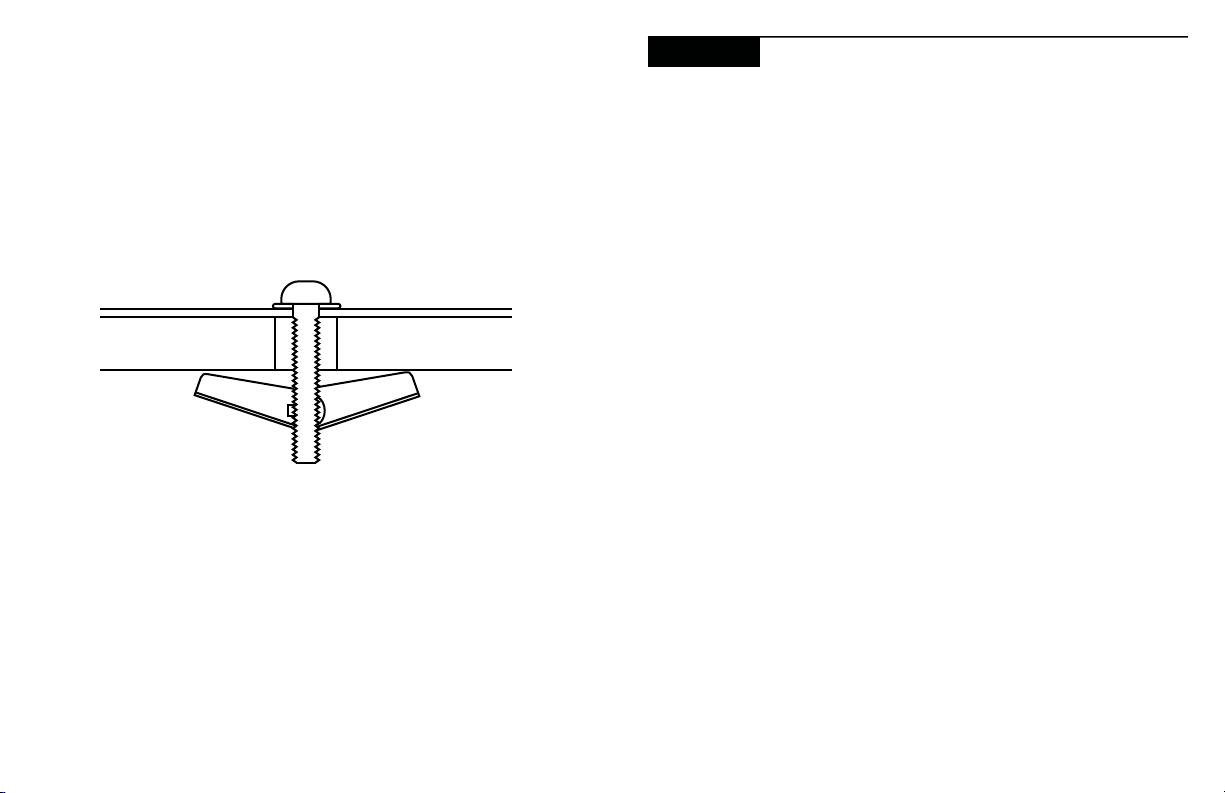
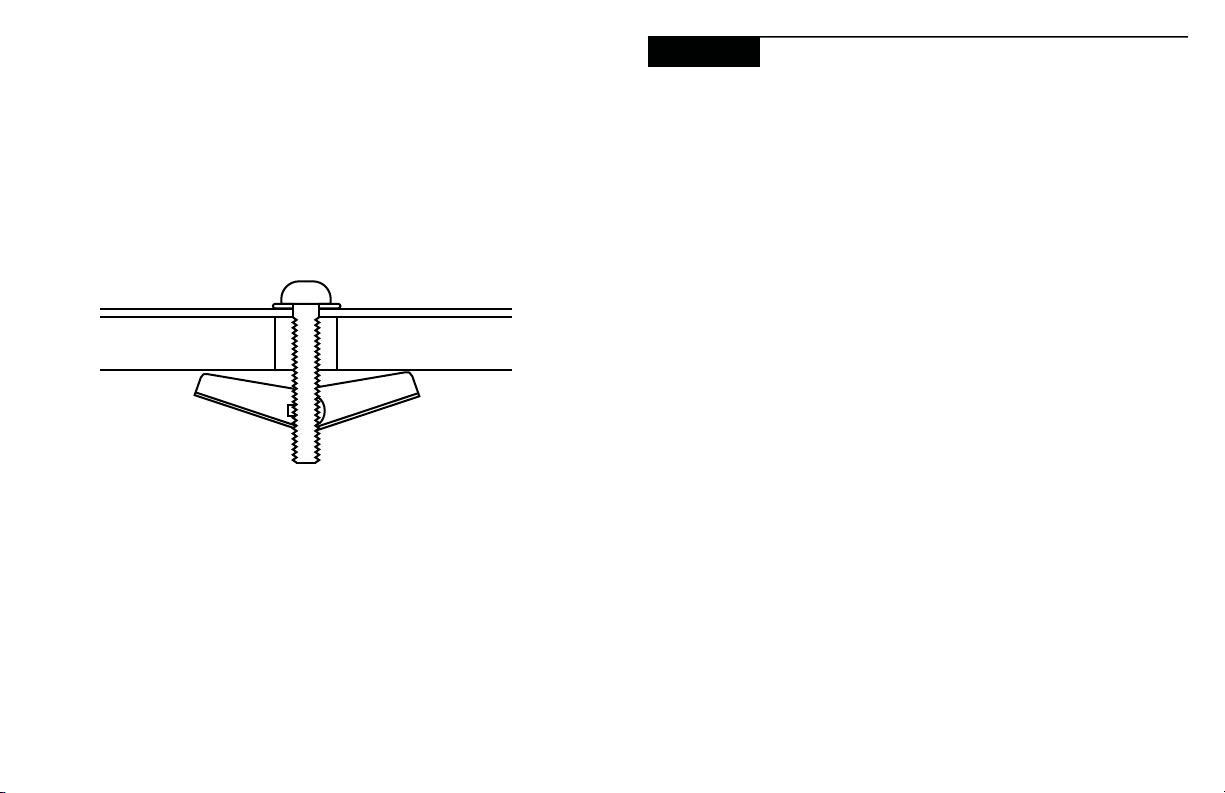
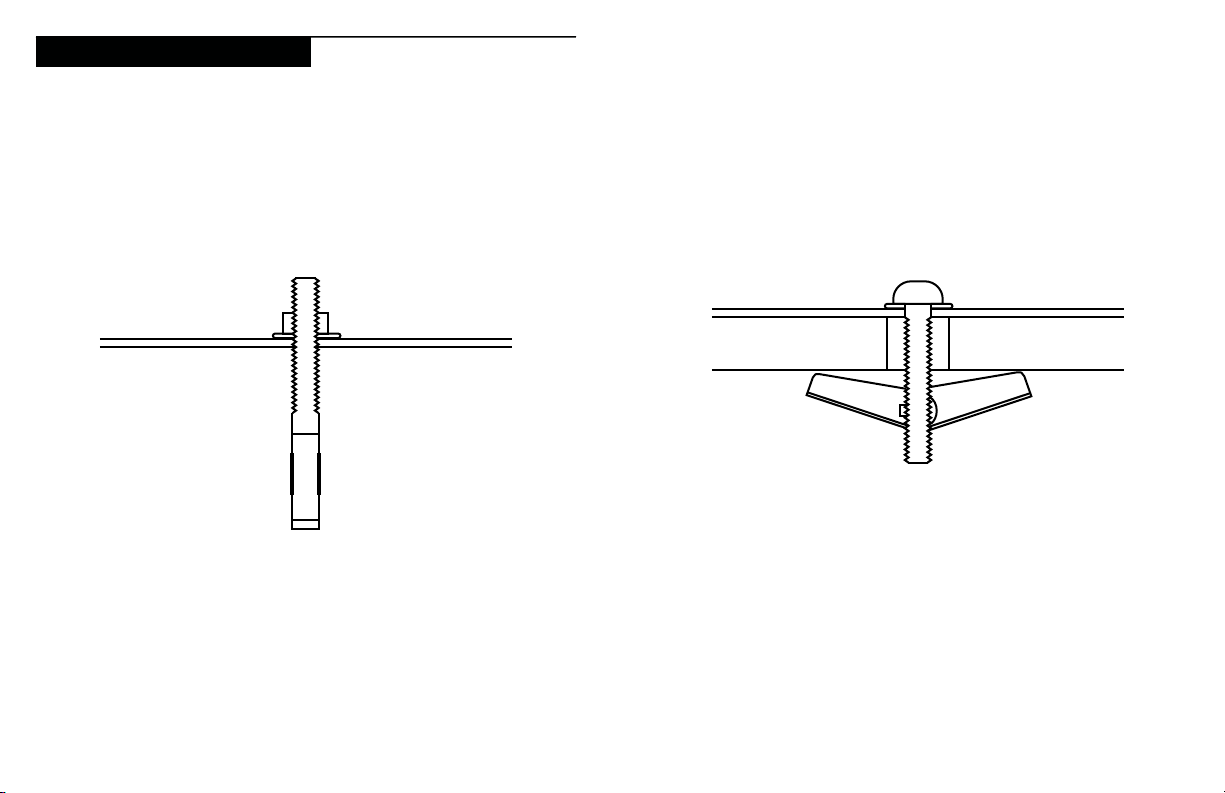
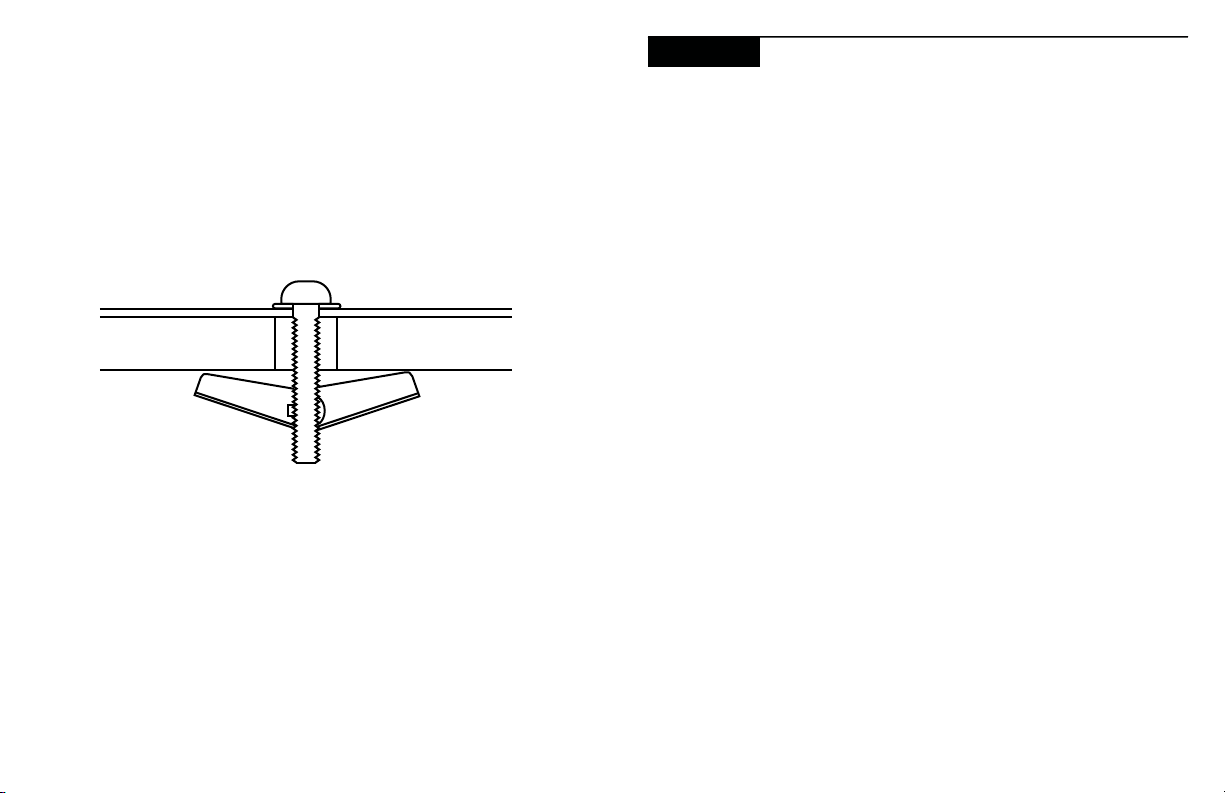
We recommend using a 6mm or ¼” x 20 toggle bolt with washer.
TOGGLE BOLT
WITH WASHER
*It is the responsibility of the installer to determine hardware
quantity, length, and type to meet the needs of the specific
mounting application.
**It is also the responsibility of the installer to ensure that proper
tools, personal protective equipment, and safe practices are
implemented to ensure the safety of the installer and the quality of
the installation.
4
1. Choose a spot for your Yeti PRO 4000 and mounting plate.
If you plan to expand your system in the future with a second
Yeti PRO 4000, leave enough space for an additional mounting
plate next to the spot you choose.
2. Mark mounting hole locations that will be drilled out to support
installation of hardware.
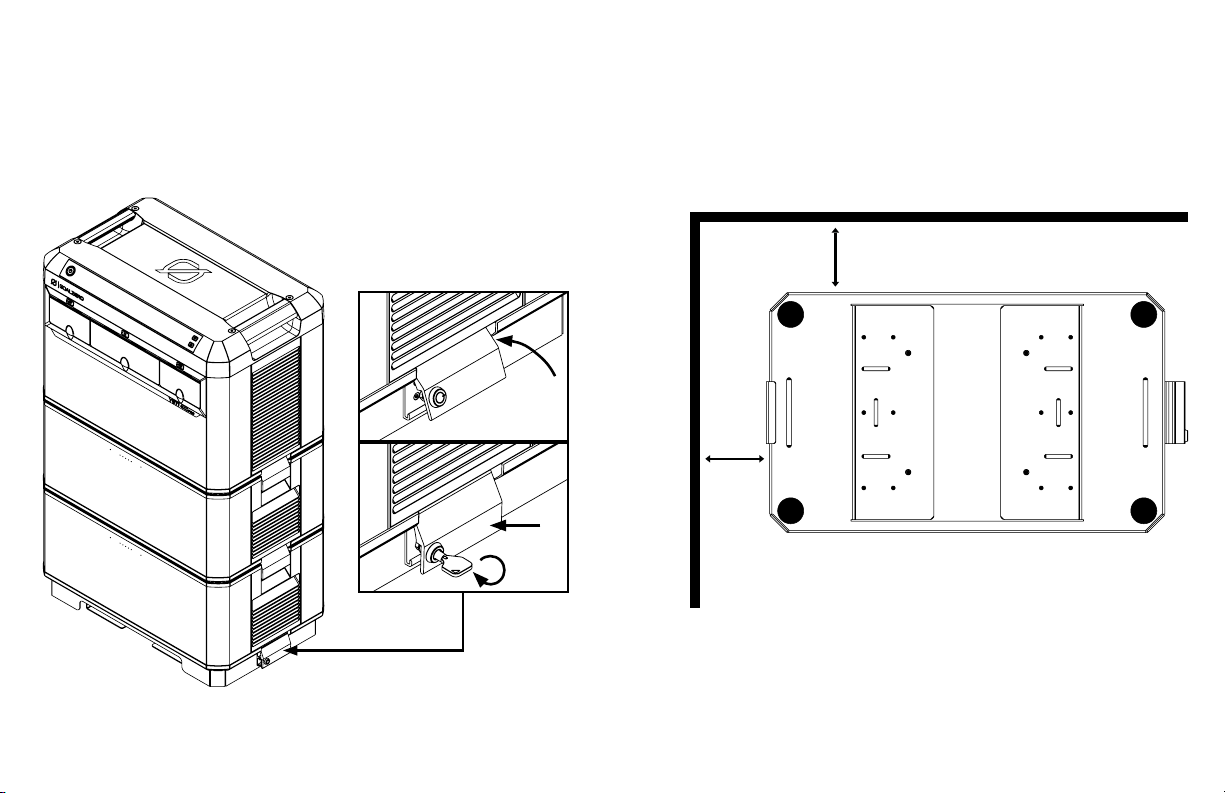
3. Install the mounting plate in a direction that allows the latches
to be opened and closed.
4. Insert your bolts and tighten until secure. Use at least 4 bolts
for home installations.
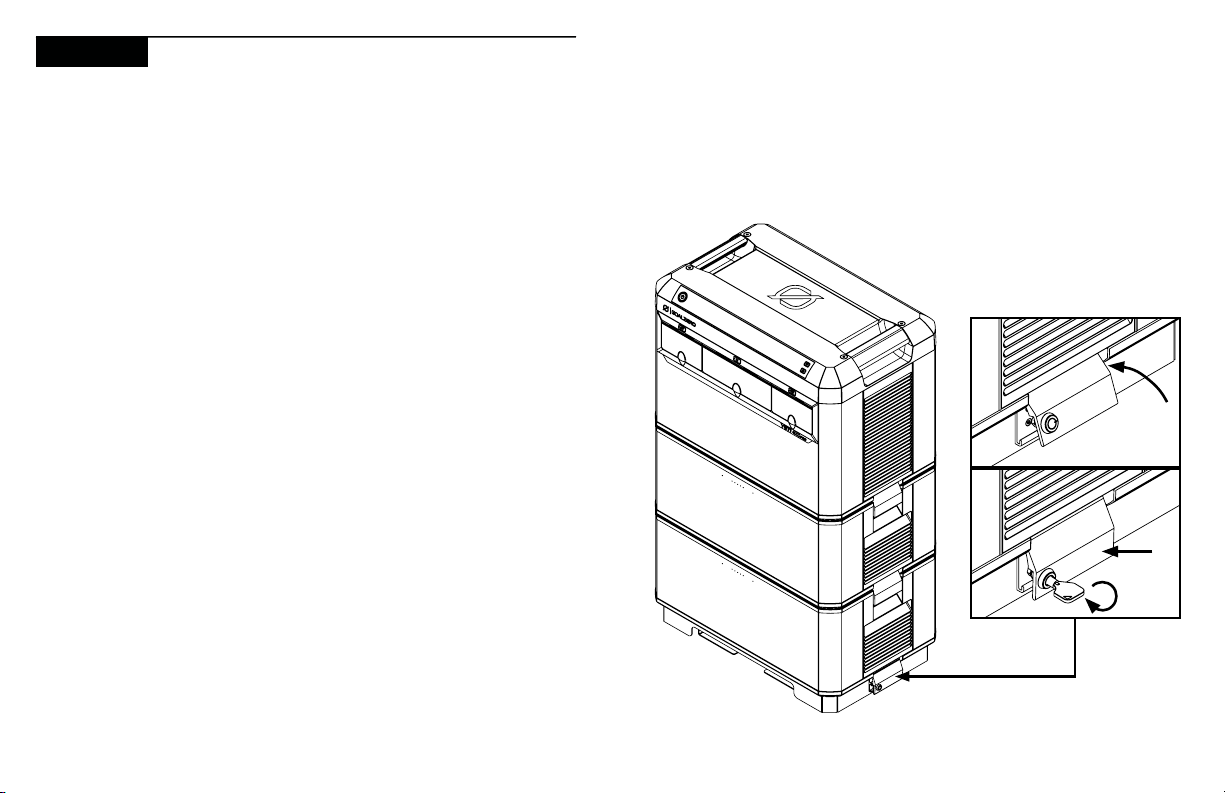
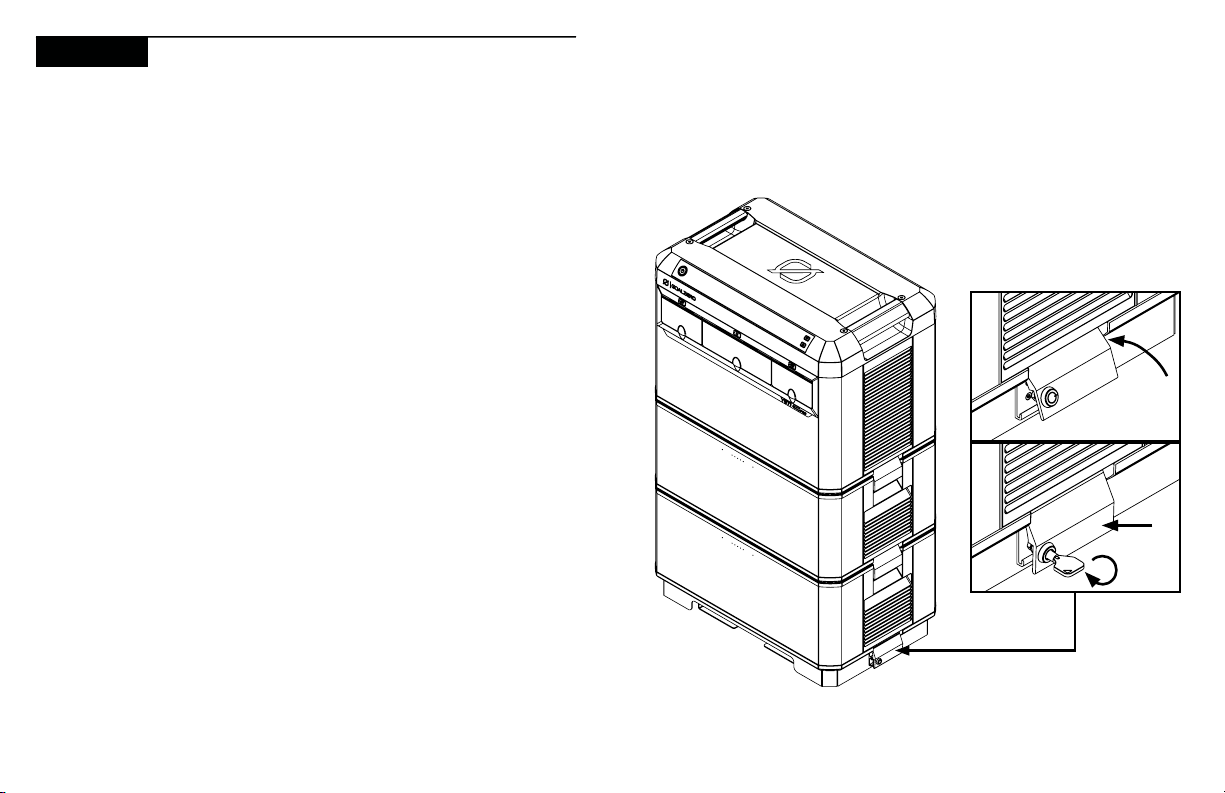
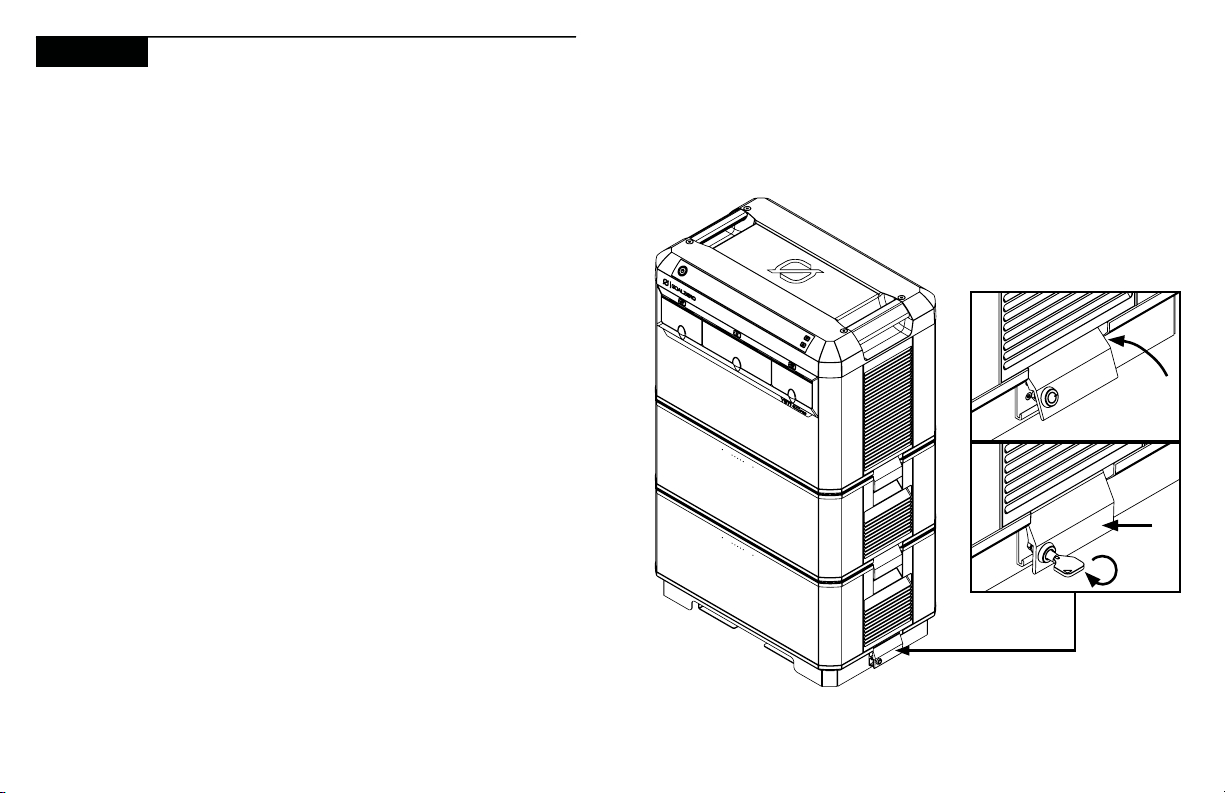
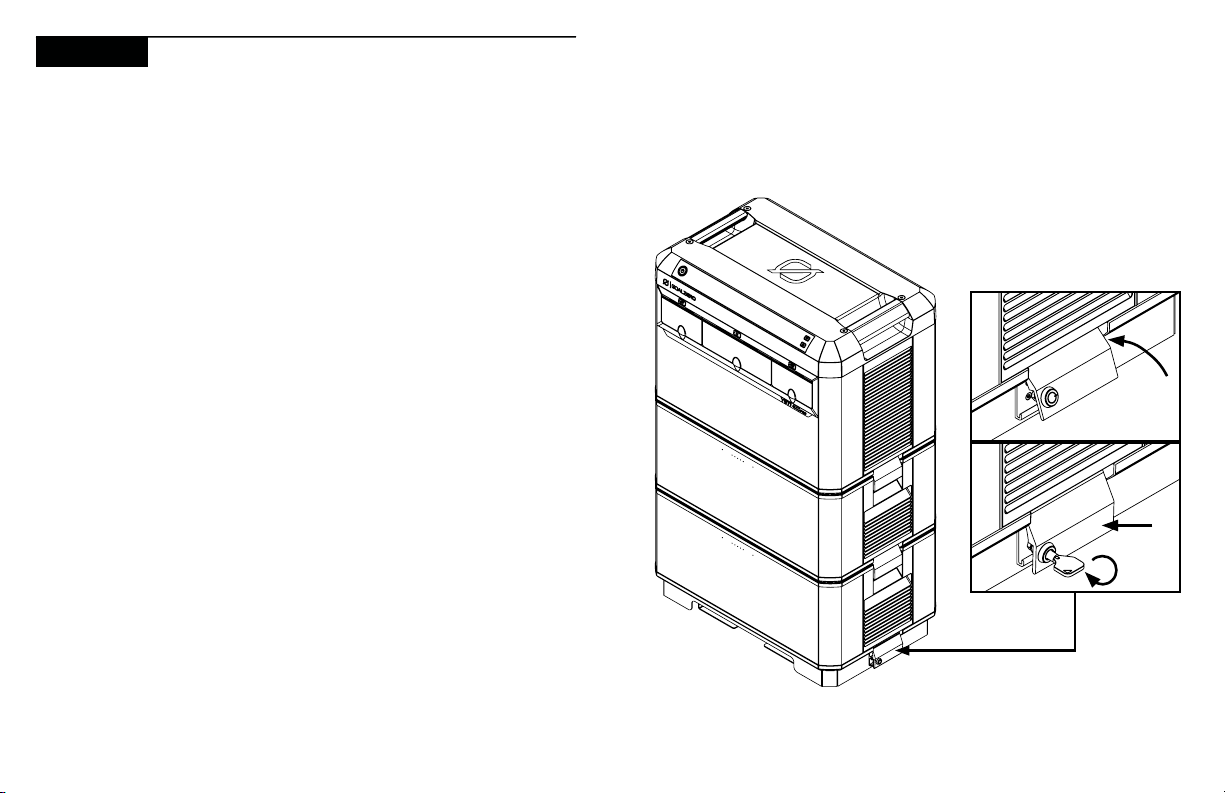
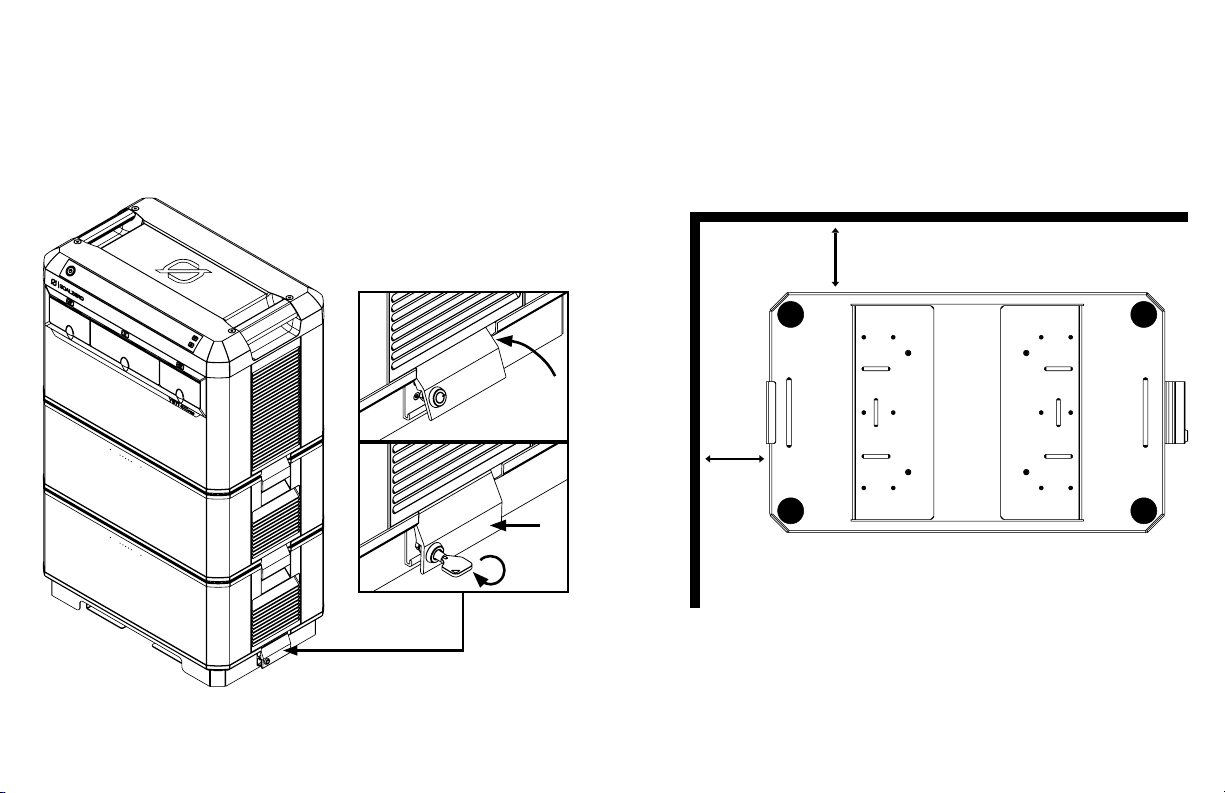
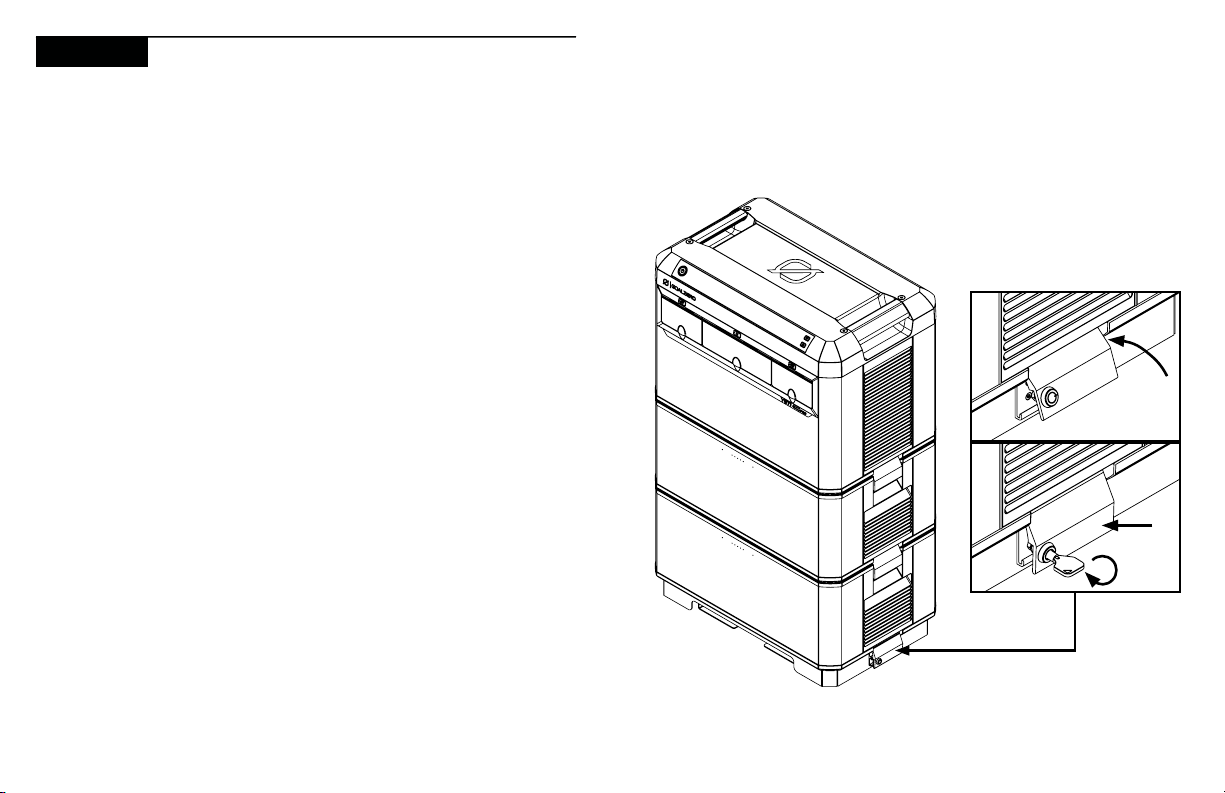
5. Attach the Yeti PRO 4000 to the mounting plate and secure
with the locking latch by inserting the key into the lock cylinder
and turning the key clockwise, bringing the locking arm into the
locked position. See illustration on page 6.
6. If installing in an RV or van, be sure the unit is secure before
transporting.
5
Page 5
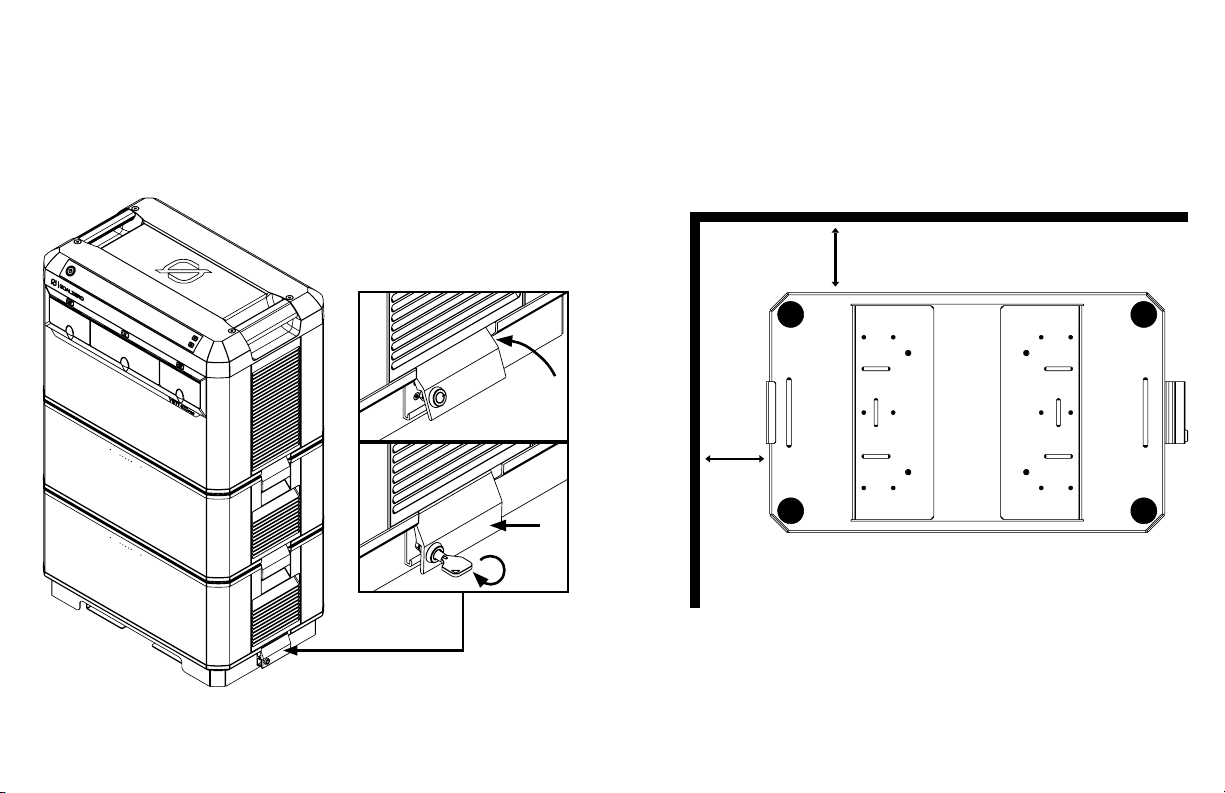
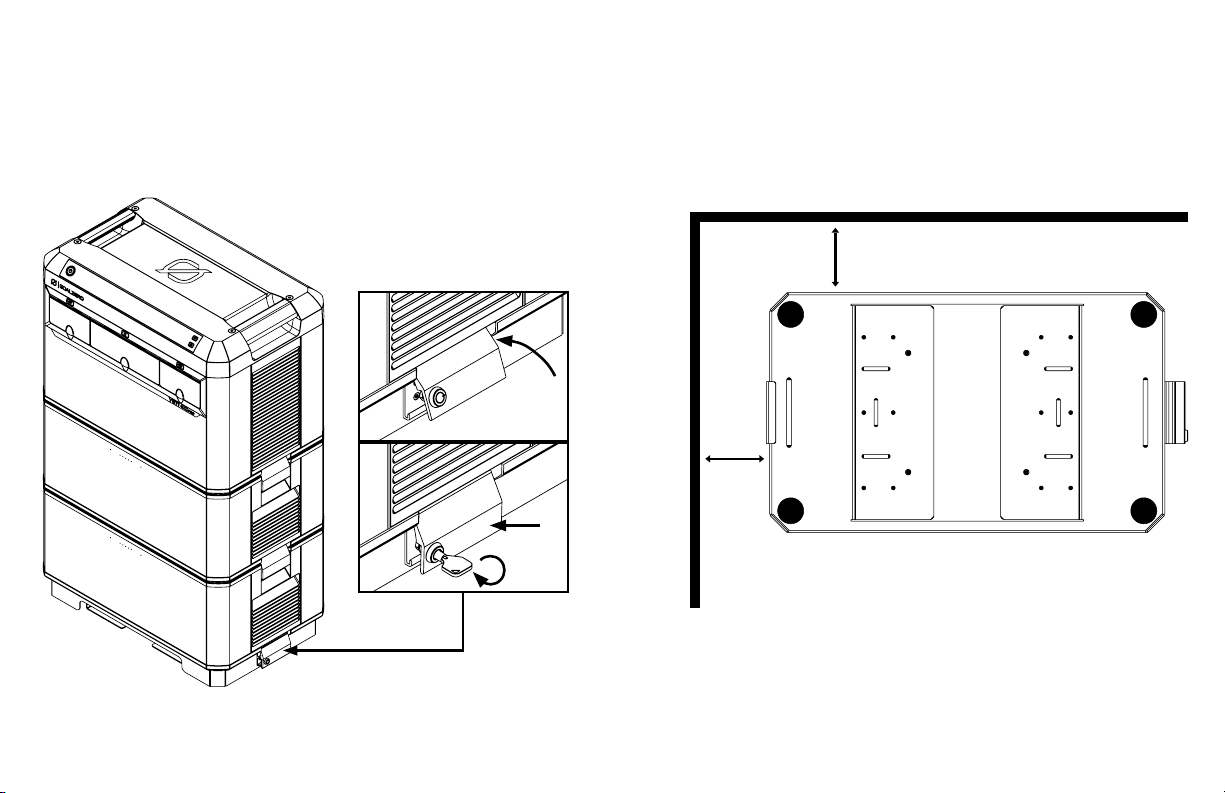
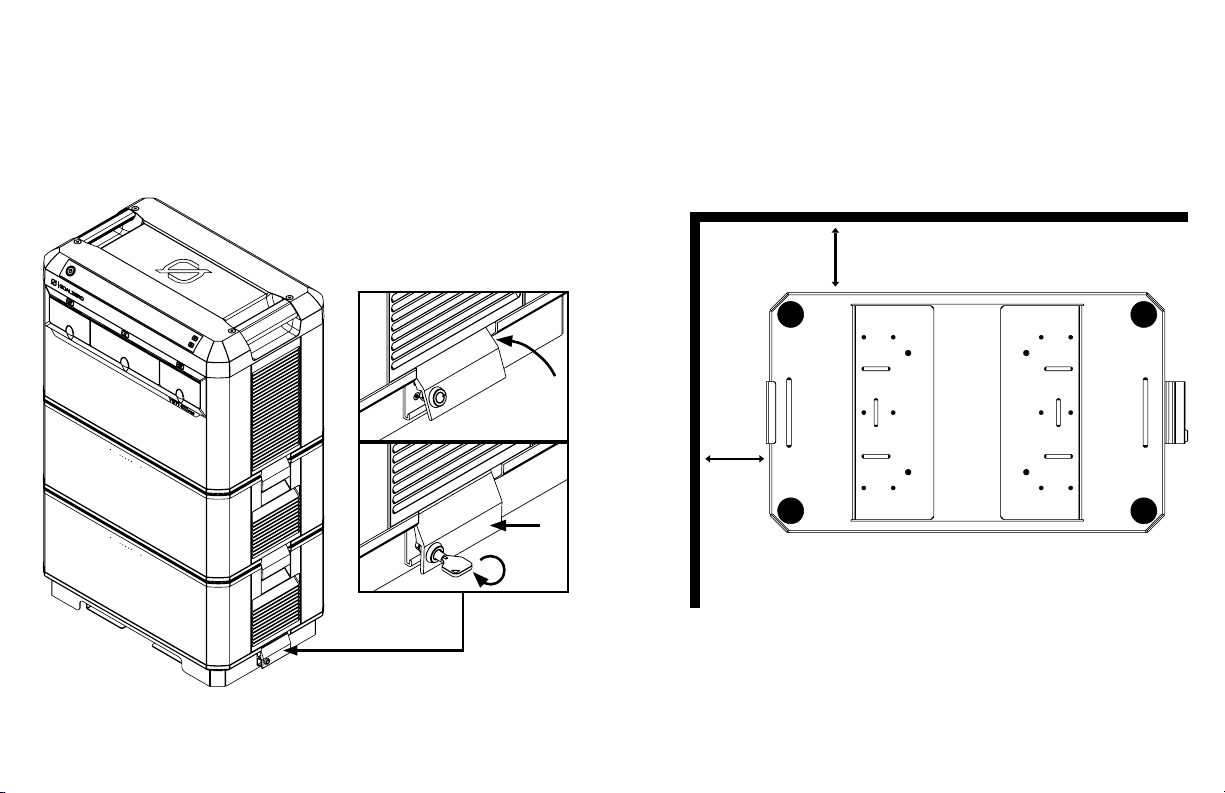
NOTE: If stacking multiple Units, the Yeti PRO 4000 should always
be on top. If you are stacking units in an RV, be certain the units are
all latched together.
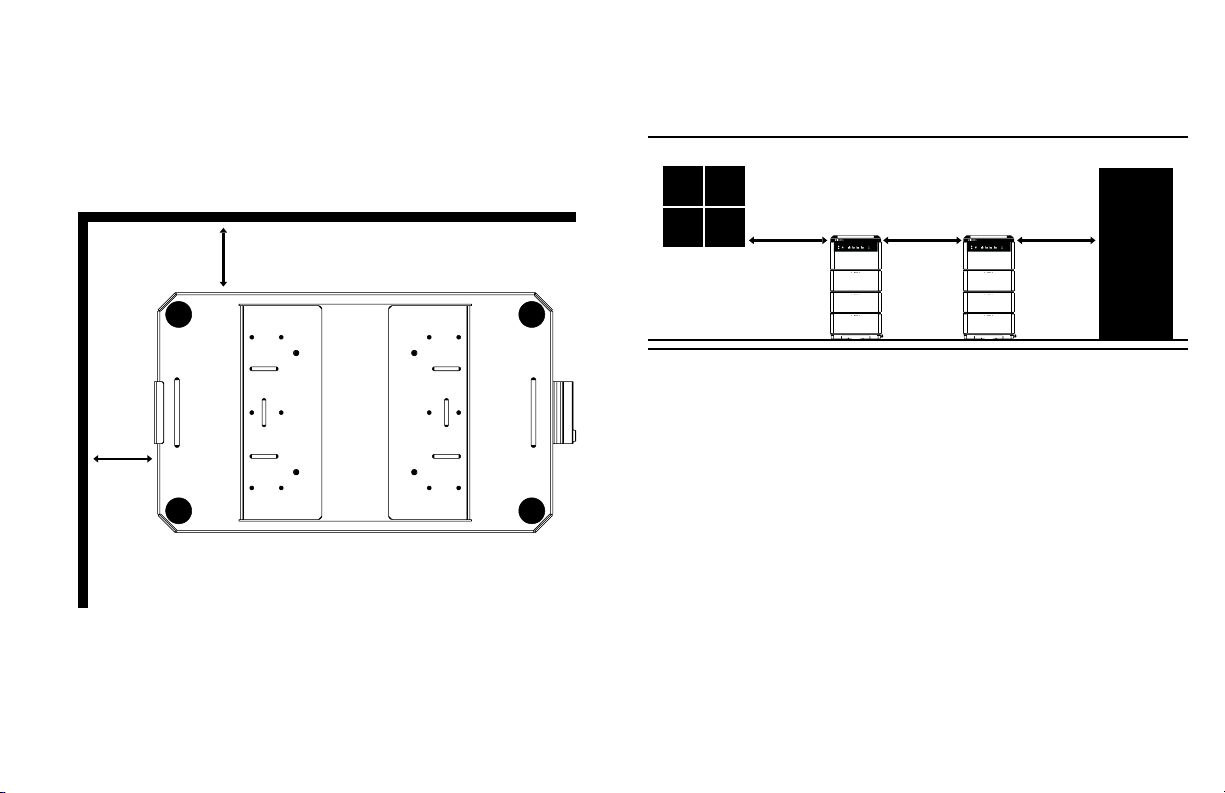
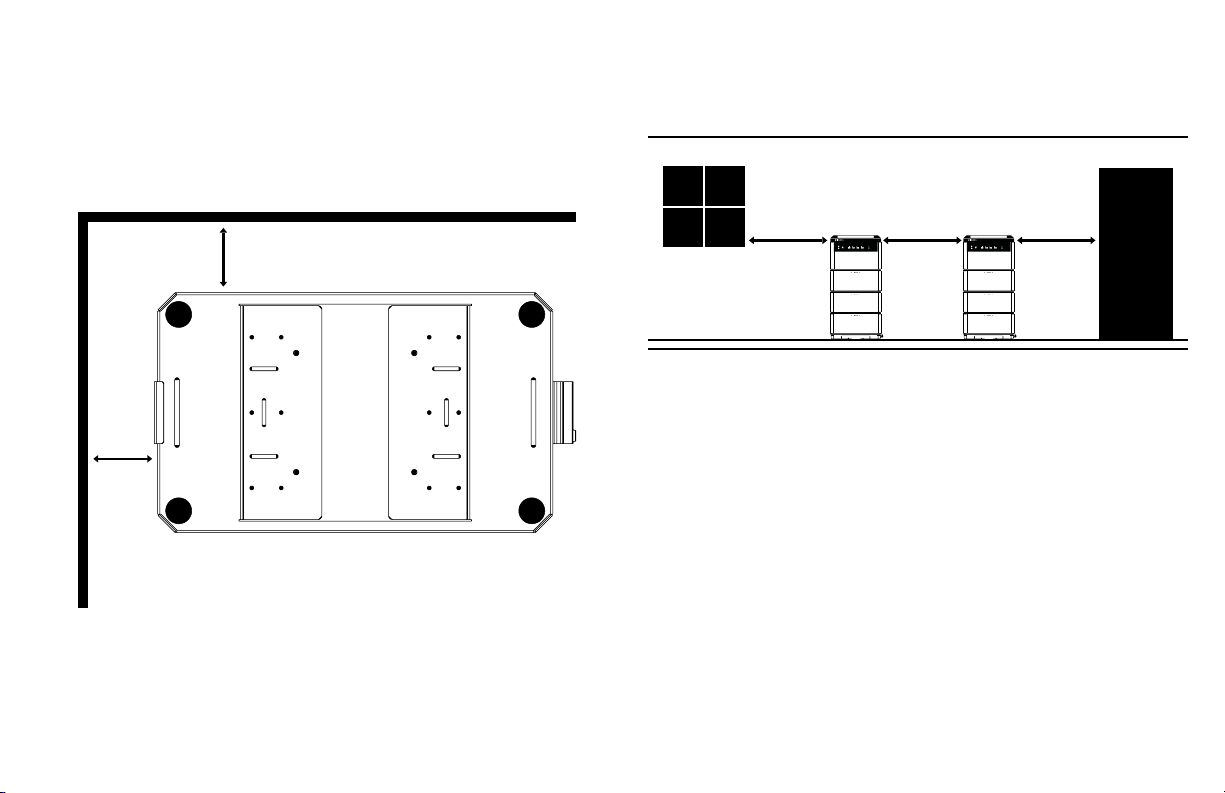
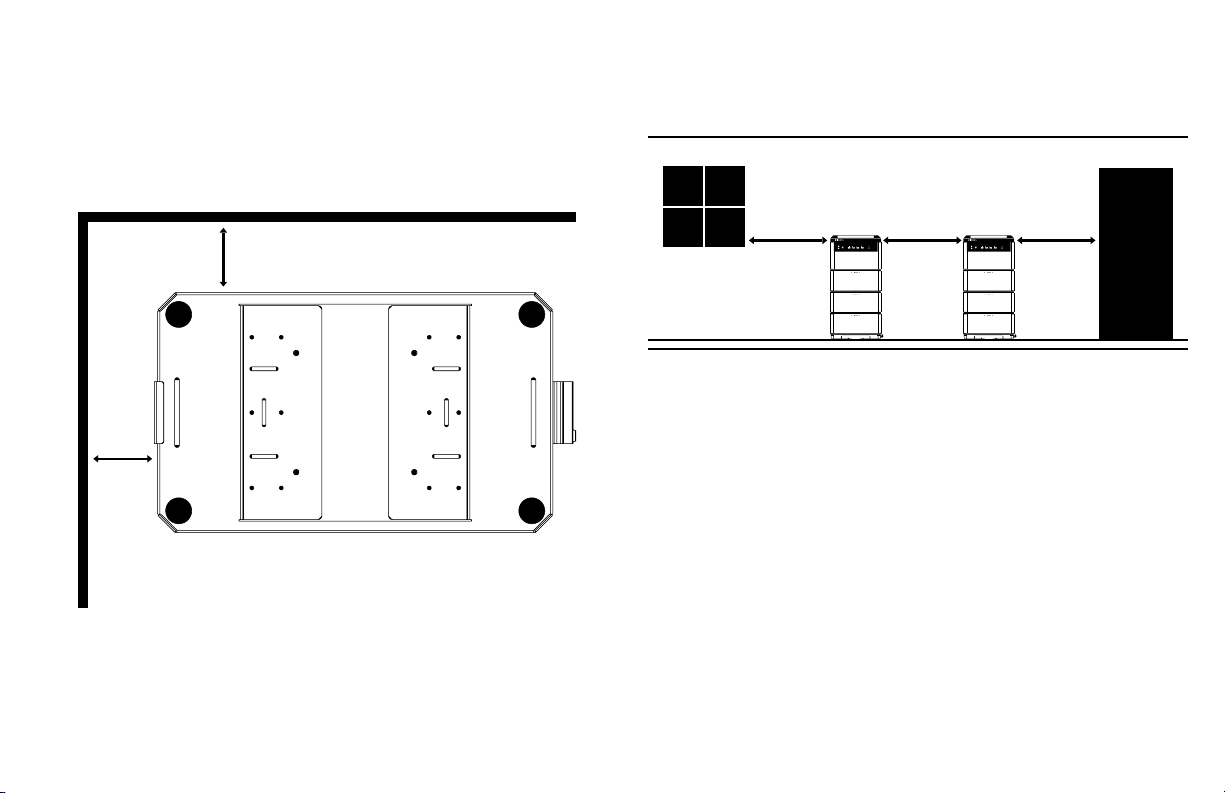
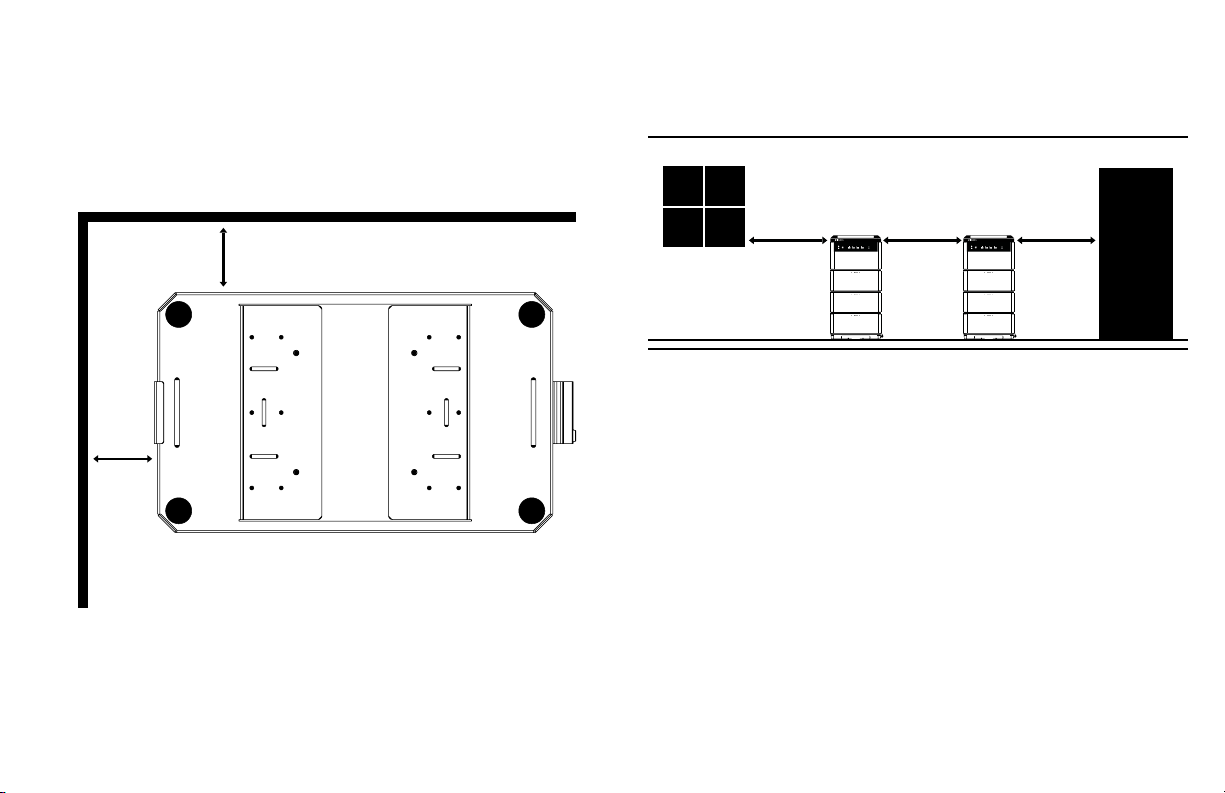
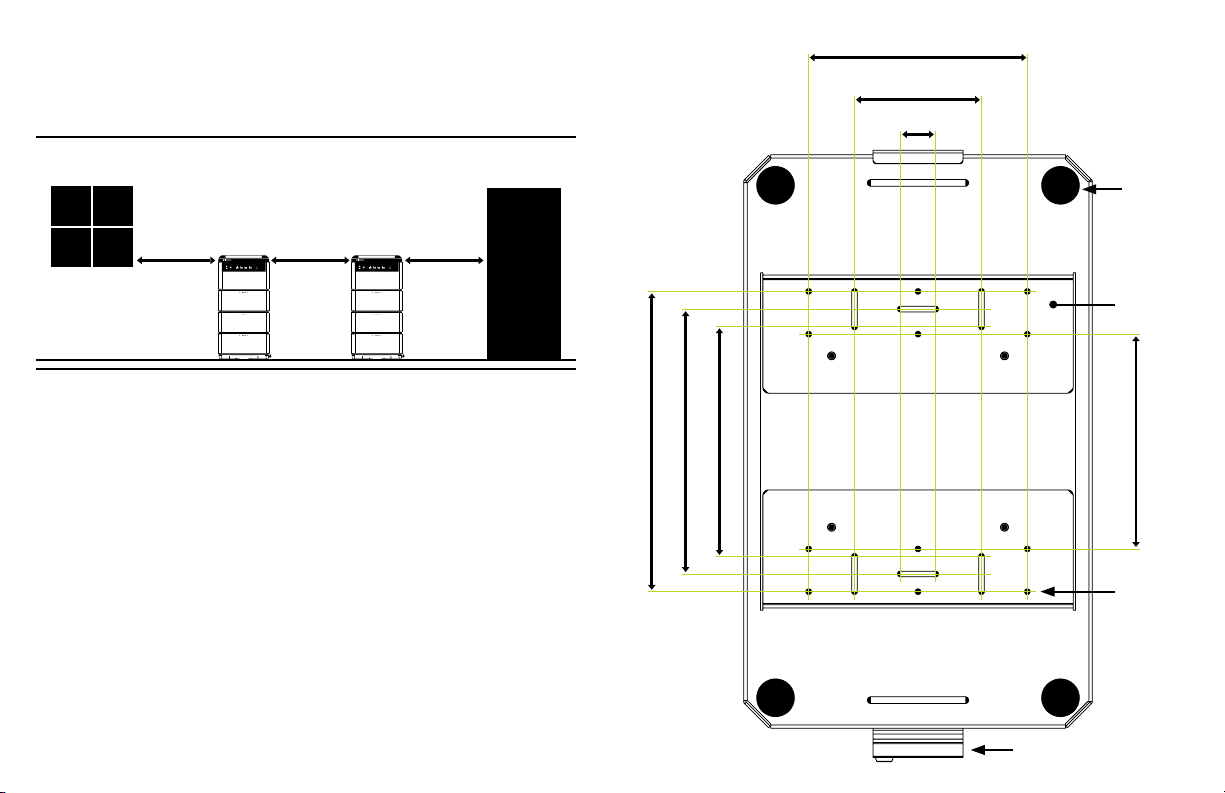
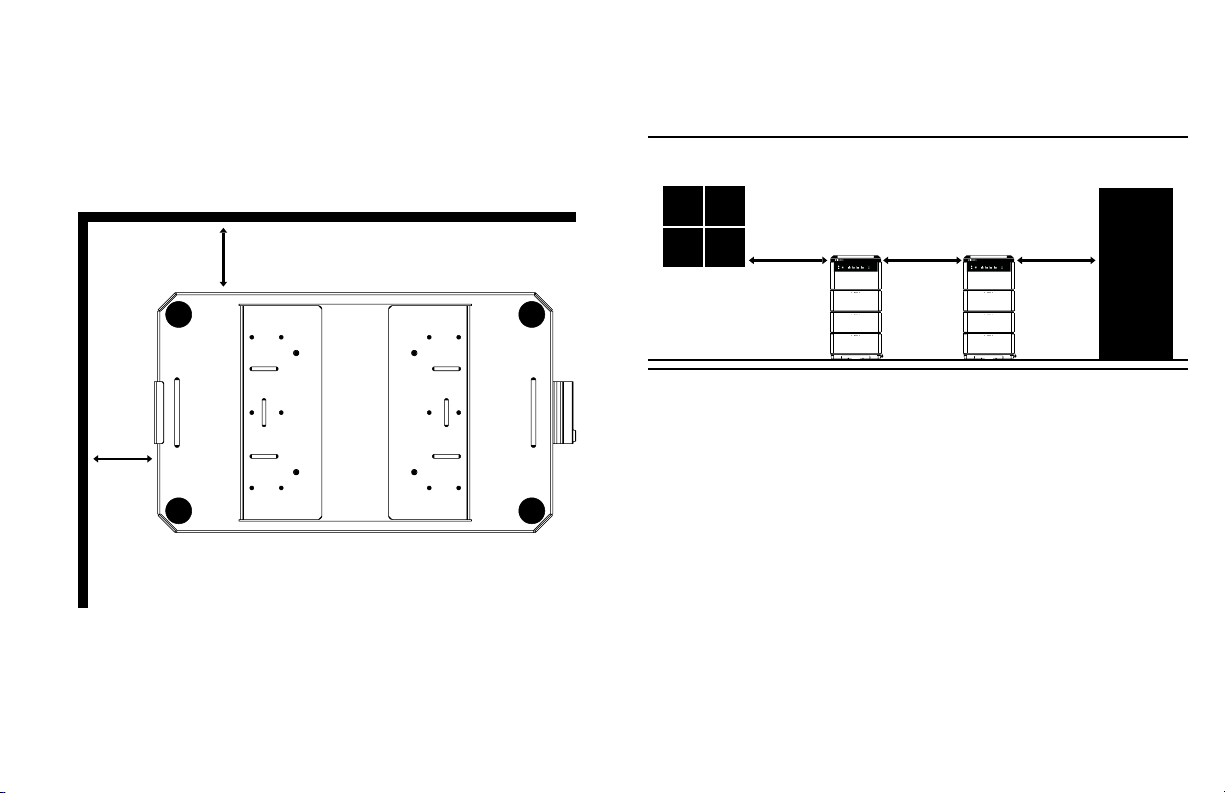
Ensure that the mounting plate is spaced
a minimum of 5” from any wall.
WALL
5 IN
123 MM
MINIMUM
1. Latch onto lip
2. Push in
and lock
6
WALL
5 IN
123 MM
MINIMUM
7
Page 6
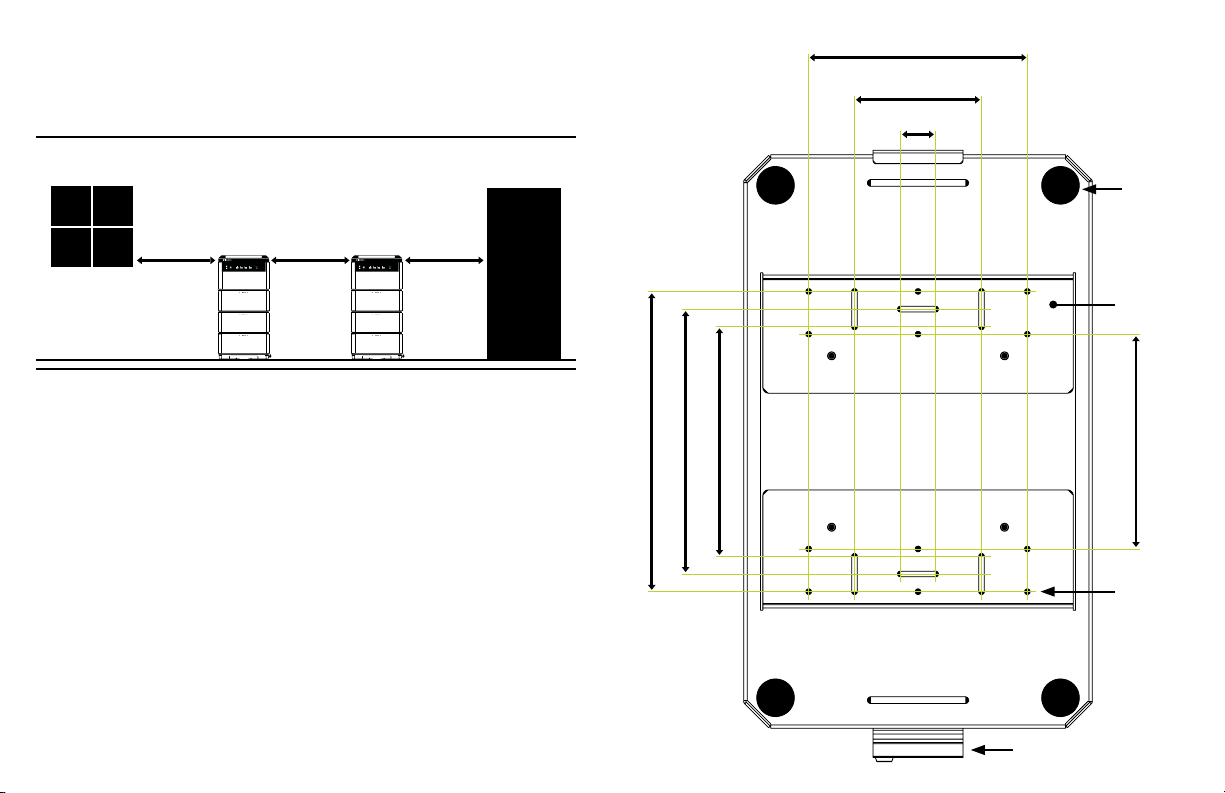
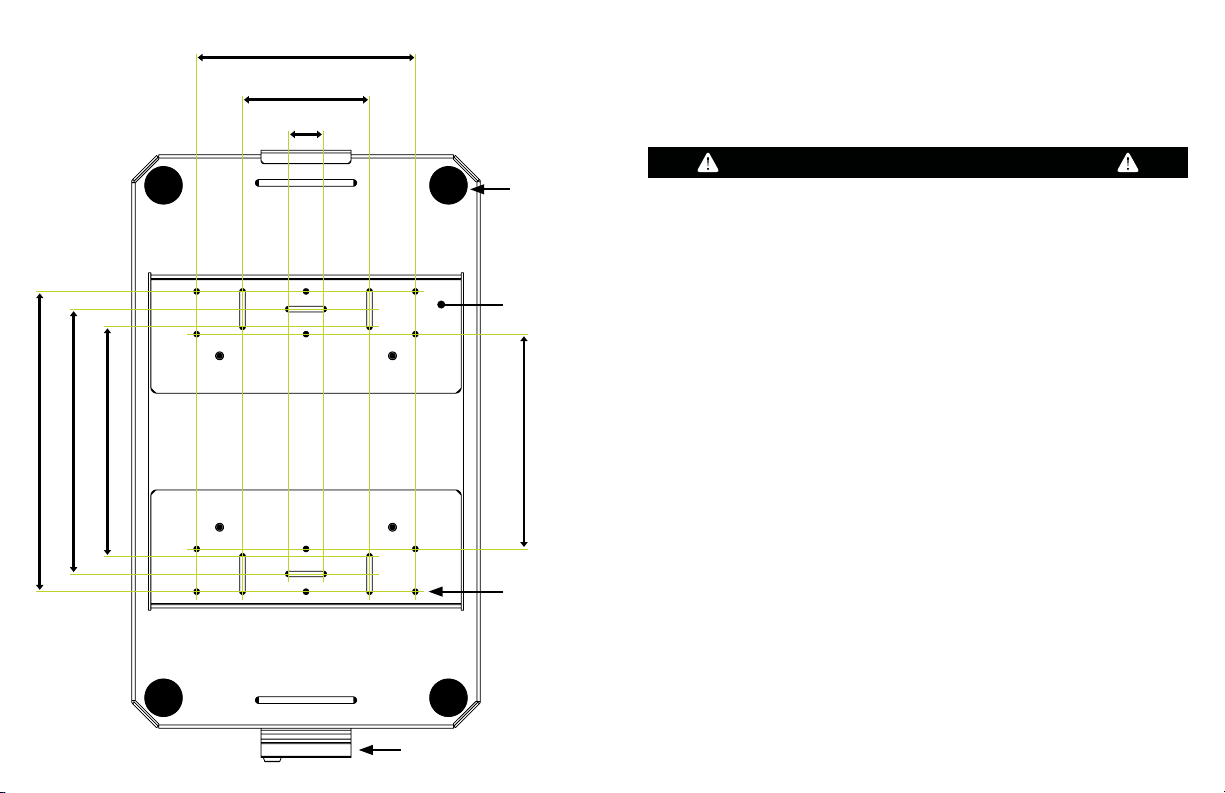
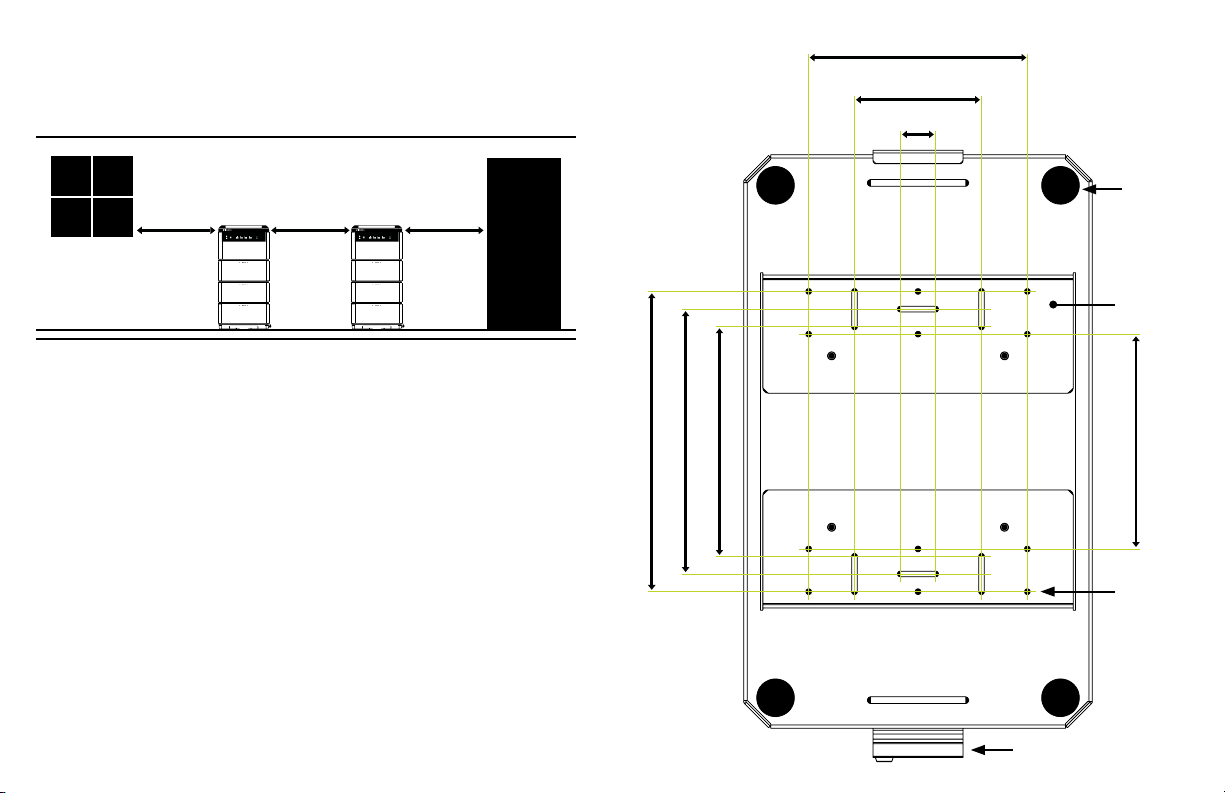
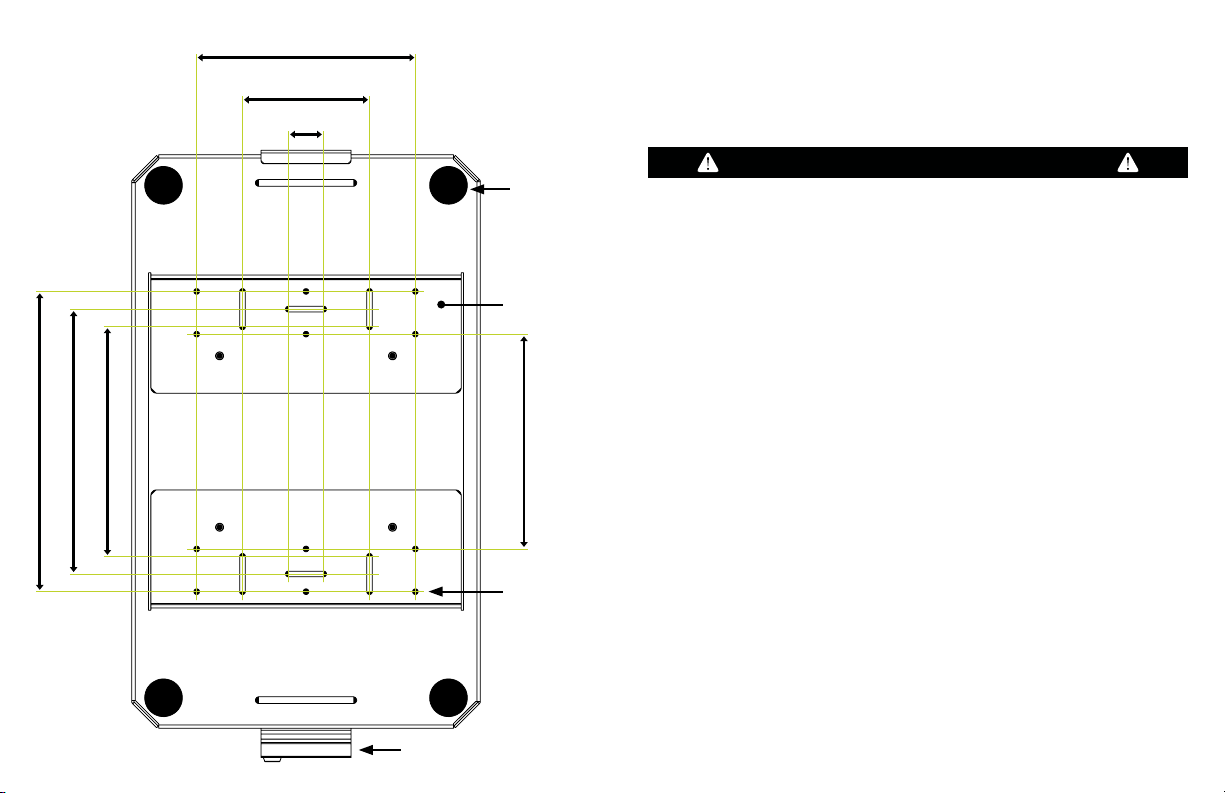
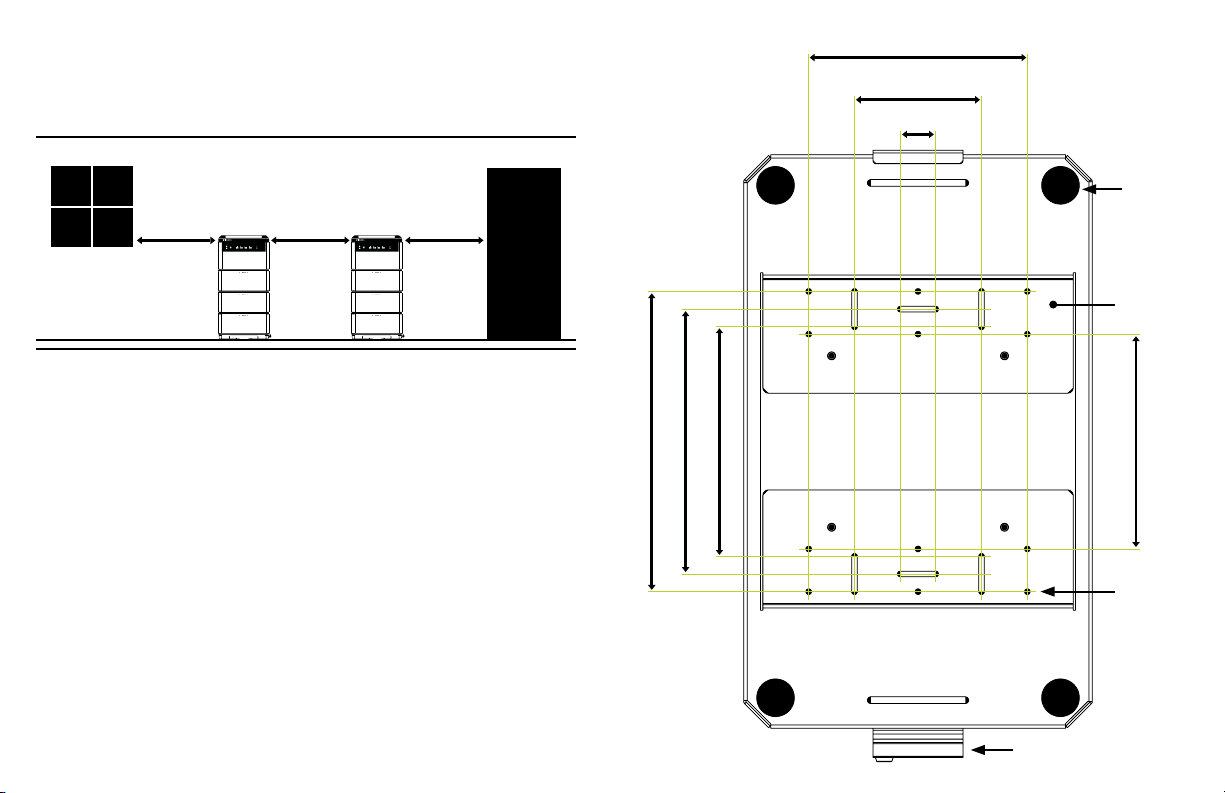
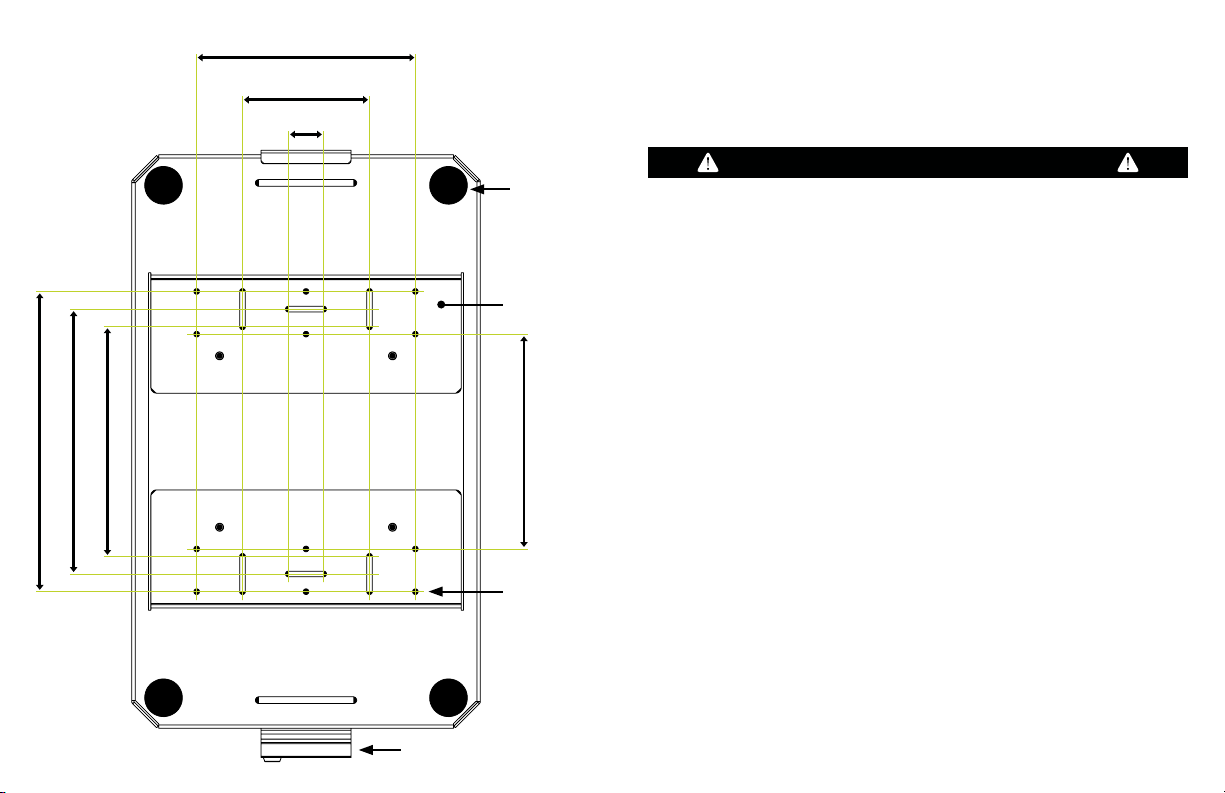
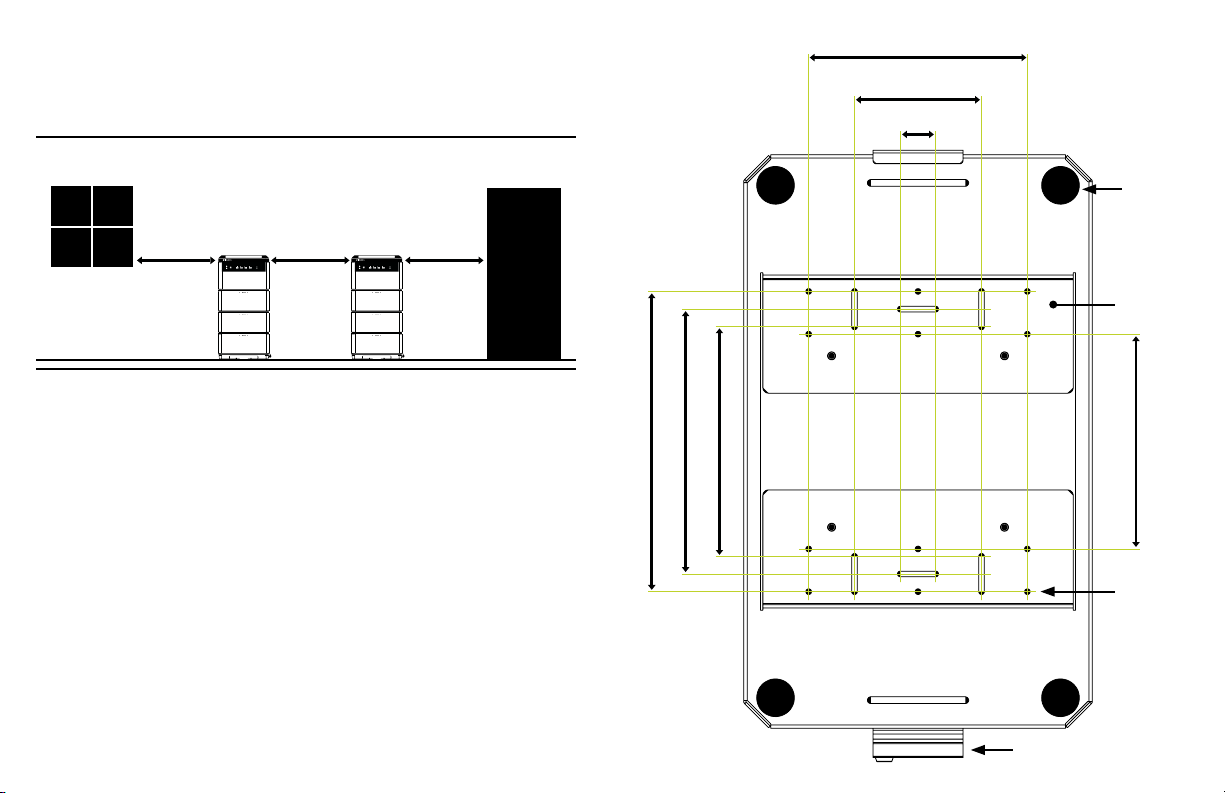
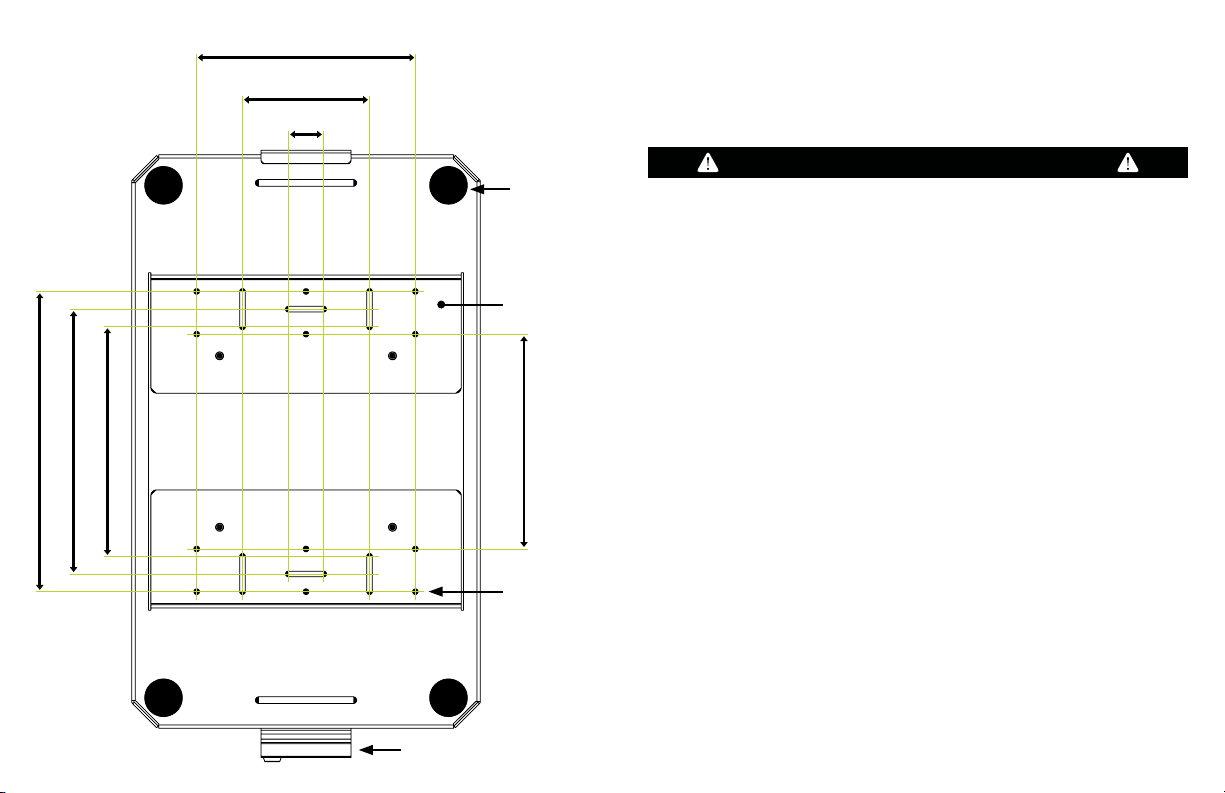
7.7 IN 195.6 MM
Ensure the mounting plate is spaced a minimum of 36” from any
door or window.
DOOR
WINDOW
36 IN
915 MM
36 IN
915 MM
36 IN
915 MM
If you’re installing multiple stacks of Yeti PRO 4000 power stations
and Tank PRO 4000 expansion batteries, ensure that each stack is
a minimum of 36” apart.
IMPORTANT: Do not stack more than 5 units high. (1 Yeti PRO
4000 and up to 4 Tank PRO 4000 units).
WARNING - Always utilize the Mounting Plate (SKU 96155) and
ensure all latches are tightly secured when stacking the Yeti PRO
4000 and Tank PRO 4000 units. Never stack more than 4 Tanks with
one Yeti PRO 4000. Stacking products without the mounting bracket
can constitute a tipping hazard and lead to injury. Stacking more
products than recommended can lead to damage to the products
and an injury hazard. Never step or climb on any Goal Zero products
and never allow a child to step or climb on or around the products.
8
10.45 IN 265.5 MM
9.26 IN 235.1 MM
8.06 IN 204.8 MM
4.45 IN 113 MM
1.2 IN 30.4 MM
Locking Latch
Place
Yeti/Tank
feet here
Mounting
Hardware
7.49 IN 190.3 MM
.26 IN 6.5 MM
9
Page 7

AVIS DE NON-RESPONSABILITÉ
Veuillez lire attentivement toutes les instructions et les
étiquettes d’avertissement avant d’utiliser l’appareil afin
d’éviter des blessures et/ou des dommages à l’appareil et à
tout produit branché. Goal Zero se réserve le droit de mettre
à jour ce document sans préavis. Veuillez consulter le site
www.goalzero.com pour obtenir les dernières informations
sur le produit et la version la plus récente du guide de
l’utilisateur.
La plaque de montage maintient vos Yeti PRO et Tank PRO
4000 en sécurité et à l’arrêt, à la maison ou sur la route.
Pour obtenir de l’aide concernant votre appareil aux États-Unis, consultez
notre page de contacts à www.goalzero.com/contact ou appelez le 1 888
794-6250. Pour obtenir de l’aide concernant votre appareil en dehors des
États-Unis, contactez le distributeur local. Si vous n’avez pas les coordonnées
du distributeur local, contactez-nous aux États-Unis et nous vous mettrons en
contact avec le représentant local.
Outils nécessaires:
1: Ruban à mesurer
2: Outil de marquage (stylo à peinture, marqueur, crayon)
3: Tournevis ou perceuse électrique et mèche(s) (en fonction de
l’emplacement de l’installation)
4: Trousse de clés à douille (peut être nécessaire pour certaines
installations)
Matériel nécessaire:
1: Plaque de montage
2: Boulons pour fixer la plaque (4 minimum pour une installation
domestique, 8 ou plus pour une installation en véhicule récréatif)
10
11
Page 8
Recommandations de matériel
Ciment
Nous vous recommandons d’utiliser un boulon d’ancrage de 6 mm
ou ¼ po x 20.
BOULON D’ANCRAGE
POUR LE CIMENT
12
Bois ou métal
Nous vous recommandons d’utiliser un boulon à ailettes de 6 mm ou
¼po x 20 avec une rondelle.
LE BOULON À AILETTES
AVEC LA RONDELLE
* Il incombe à l’installateur de déterminer la quantité, la longueur
et le type de matériel nécessaire pour répondre aux exigences de
l’application de montage particulière.
** Il incombe également à l’installateur de s’assurer que les outils
appropriés, l’équipement de protection individuelle et les pratiques
sécuritaires sont mis en œuvre pour garantir la sécurité de
l’installateur et la qualité de l’installation.
13
Page 9
Installation
1. Choisissez un emplacement pour votre Yeti PRO4000 et la
plaque de montage. Si vous prévoyez d’étendre votre système
avec un deuxième Yeti PRO4000, laissez suffisamment
d’espace pour une plaque de montage supplémentaire à côté
de l’emplacement choisi.
2. Marquez les emplacements des trous de montage à percer
pour appuyer l’installation de la quincaillerie.
3. Installez la plaque de montage dans un sens permettant
d’ouvrir et de fermer les loquets.
4. Insérez vos boulons et serrez-les jusqu’à ce qu’ils soient bien
fixés. Utilisez au moins 4 boulons pour les installations à domicile.
5. Fixez la Yeti PRO4000 à la plaque de montage et sécurisez-la
avec le loquet de verrouillage en insérant la clé dans le cylindre
de verrouillage et en tournant la clé dans le sens des aiguilles
d’une montre, amenant le bras de verrouillage en position
verrouillée. Voir l’illustration à la page 6.
6. Si vous installez l’appareil dans un véhicule récréatif ou une
camionnette, assurez-vous qu’il est bien fixé avant de le
transporter.
REMARQUE: Si vous empilez plusieurs unités, la Yeti PRO4000
doit toujours être sur le dessus. Si vous empilez des unités dans
un véhicule récréatif, assurez-vous que les unités sont toutes
verrouillées ensemble.
1. le loquet
sur le bord
2. Enfoncer
et
verrouiller
14
15
Page 10
Assurez-vous que la plaque de montage
est espacée d’au moins 5 po de tout mur.
MUR
Assurez-vous que la plaque de montage est espacée d’au moins 36"
de toute porte ou fenêtre.
MUR
16
5PO
123MM
MINIMUM
5PO
123MM
MINIMUM
PORTE
MATÉRIEL
36PO
915 MM
36PO
915 MM
36PO
915 MM
Si vous installez plusieurs piles de puissance Yeti PRO4000 et des
piles d’extension Tank PRO4000, assurez-vous que chaque pile est
séparée d’au moins 36 po.
IMPORTANT: N’empilez pas plus de 5 unités. (1 Yeti PRO4000 et
jusqu’à 4 batteries Tank PRO4000).
AVERTISSEMENT - Utilisez toujours la plaque de montage
(UGS96155) et assurez-vous que tous les loquets sont bien fixés
lorsque vous empilez les unités Yeti PRO4000 et Tank PRO4000.
N’empilez jamais plus de 4 batteries Tank avec une Yeti PRO4000.
Empiler des produits sans le support de montage peut constituer
un risque de basculement et entraîner des blessures. Empiler
plus de produits que recommandé peut entraîner des blessures
ou endommager le produit. Ne marchez ou ne grimpez jamais sur
les produits Goal Zero et ne laissez jamais un enfant marcher ou
grimper sur ou autour des produits.
17
Page 11
7,7 PO 195.6 MM
4,45 PO 113 MM
1,2 PO 30,4 MM
10,45 PO 265,5 MM
18
9,26 PO 235,1 MM
8,06 PO 204,8 MM
Placer les
pieds de la
Yeti/Tank
de montage
pour fenêtres
0,26PO 6,5MM
Loquet de verrouillage
ici
7,49 PO 190,3 MM
HAFTUNGSAUSSCHLUSS
Lesen Sie vor der Verwendung bitte alle Anweisungen
und Hinweisaufkleber aufmerksam, um Verletzungen
oder Beschädigungen am Gerät und an angeschlossenen
Produkten zu vermeiden. Goal Zero behält sich das Recht
vor, dieses Dokument ohne vorherige Ankündigung zu
aktualisieren. Die neuesten Produktinformationen und die
aktuellste Version der Bedienungsanleitung finden Sie auf
www.goalzero.com.
Mithilfe der Montageplatte bleibt der Yeti PRO und Tank PRO
4000 sicher an Ort und Stelle befestigt, ob zuhause oder
unterwegs.
Support für Ihr Gerät erhalten Sie in den Vereinigten Staaten auf unserer
Kontaktseite auf www.goalzero.com/contact oder unter der Telefonnummer
1-888-794-6250. Um außerhalb der Vereinigten Staaten Support für Ihr
Gerät zu erhalten, wenden Sie sich an Ihren örtlichen Händler. Falls Ihnen
keine Kontaktdaten für den örtlichen Händler vorliegen, wenden Sie sich an
uns in den Vereinigten Staaten. Wir helfen Ihnen bei der Kontaktaufnahmen zu
Ihrem örtlichen Vertreter.
19
Page 12
Empfehlungen zur Geräteausstattung
Erforderliches Werkzeug:
1: Maßband
2: Markierwerkzeug (Lackstift, Marker, Bleistift)
3: Schraubendreher oder Bohrmaschine & Bohreinsätze
(je nach Installationsort)
4: Steckschlüssel-Satz (kann für einige Installationen erforderlich sein)
Erforderliche Geräteausstattung:
1: Montageplatte
2: Schrauben zur Befestigung der Platte (mindestens 4 für die
Installation zuhause, 8 oder mehr für die Installation im Wohnmobil)
Zement
Wir empfehlen die Verwendung eines 6 mm oder ¼" x
20Ankerbolzens.
ANKERBOLZEN FÜR
DEN ZEMENT
20
21
Page 13
Installation
Holz oder Metall
Wir empfehlen die Verwendung eines 6 mm oder ¼" x
20Klappdübels mit Unterlegscheibe.
KLAPPDÜBEL MIT
UNTERLEGSCHEIBE
*Es liegt in der Verantwortung des Monteurs, zu bestimmen, ob
Menge, Länge und Typ der Geräteausstattung die Anforderungen
der konkreten Montageanwendung erfüllen.
**Außerdem liegt es in der Verantwortung des Monteurs, zu
gewährleisten, dass angemessene Werkzeuge, persönliche
Schutzausrüstung und sichere Praktiken angewendet werden,
um die Sicherheit des Monteurs und die Qualität der Installation
sicherzustellen.
22
1. Wählen Sie einen Standort für den Yeti PRO 4000 und die
Montageplatte aus. Falls Sie Ihr System zukünftig mit einem
zweiten Yeti PRO 4000 erweitern möchten, lassen Sie neben
der ausgewählten Stelle ausreichend Platz für eine zusätzliche
Montageplatte.
2. Markieren Sie die Stelle für die Bohrlöcher zur Befestigung der
Installation.
3. Installieren Sie die Montageplatte so, dass die Verriegelungen
geöffnet und geschlossen werden können.
4. Führen Sie die Schrauben ein und ziehen Sie diese fest.
Verwenden Sie mindestens 4 Schrauben für die Installation
zuhause.
5. Befestigen Sie den Yeti PRO 4000 an der Montageplatte
und fixieren Sie ihn mithilfe der Verriegelung, indem Sie den
Schlüssel in den Schließzylinder einführen und den Schlüssel
im Uhrzeigersinn drehen, sodass der Sicherungsarm in
verriegelter Position ist. Siehe Illustration auf Seite 6.
6. Stellen Sie bei der Installation in einem Wohnmobil oder Van
sicher, dass das Gerät vor dem Transport sicher befestigt ist.
23
Page 14
HINWEIS: Beim Aufeinanderstapeln von mehreren Geräten muss
sich der Yeti PRO 4000 immer oben befinden. Wenn Sie Geräte in
einem Wohnmobil stapeln, stellen Sie sicher, dass alle befestigt sind.
Stellen Sie sicher, dass der Abstand zwischen
Montageplatte und Wand mindestens 12,7 cm beträgt.
WAND
5 IN
123 MM
MINDESTENS
24
1. Verriegelung
am Rand
2.
Hineinschieben
und
verriegeln
WAND
5 IN
123 MM
MINDESTENS
25
Page 15
7,7 IN 195,6 MM
Stellen Sie sicher, dass der Abstand zwischen Montageplatte und
Türen und Fenstern mindestens 91 cm beträgt.
TÜR
FENSTER
36 IN
915 MM
36 IN
915 MM
36 IN
915 MM
Installieren Sie mehrere Stapel aus Yeti PRO 4000 Power Stations
und Tank PRO 4000 Erweiterungsbatterien, sorgen Sie für einen
Abstand von mindestens 91 cm zwischen den Stapeln.
WICHTIG: Stapeln Sie nicht mehr als 5 Geräte übereinander.
(1 Yeti PRO 4000 und bis zu 4 Tank PRO 4000-Geräte).
WARNUNG - Verwenden Sie stets die Montageplatte (SKU 96155)
und stellen Sie sicher, dass alle Verriegelungen fest eingerastet
sind, wenn Sie Yeti PRO 4000 und Tank PRO 4000-Geräte
übereinanderstapeln. Stapeln Sie niemals mehr als vier Tanks
unter einem Yeti PRO 4000. Das Übereinanderstapeln der
Produkte ohne Montagewinkel kann eine Kippgefahr darstellen
und zu Verletzungen führen. Werden mehr Produkte gestapelt als
empfohlen, besteht die Gefahr der Beschädigung des Produkts
und der Verletzung. Treten oder klettern Sie niemals auf Goal Zero
Produkte und lassen Sie niemals Kinder auf die Produkte treten
oder darauf oder in der Umgebung klettern.
26
10,45 IN 265,5 MM
9,26 IN 235,1 MM
8,06 IN 204,8 MM
4,45 IN 113 MM
1,2 IN 30,4 MM
Einrastende
Verriegelung
Platzieren
Sie die Füße
des Yeti
Tanks hier
Montage-
geräte
7,49 IN 190,3 MM
.26 IN 6,5 MM
27
Page 16

DESCARGO DE RESPONSABILIDAD
Lea atentamente todas las etiquetas de instrucciones y
precauciones antes de utilizar el aparato para evitar lesiones
y/o daños a la unidad y a los productos conectados. Goal
Zero se reserva el derecho de actualizar este documento
sin previo aviso. Visite www.goalzero.com para encontrar la
información más reciente sobre el producto y la versión más
reciente de la Guía del usuario.
La placa de montaje mantiene sus unidades Yeti PRO y
Tank PRO 4000 seguras e inmóviles, tanto si las instala
en casa como si las lleva de viaje.
Para obtener asistencia con su dispositivo en Estados Unidos, visite nuestra
página de contacto en www.goalzero.com/contact o llame al 1-888-794-
6250. Para obtener ayuda con su dispositivo fuera de Estados Unidos,
póngase en contacto con el distribuidor local. Si no dispone de información de
contacto del distribuidor local, póngase en contacto con nosotros en Estados
Unidos y le ayudaremos a ponerse en contacto con el representante local.
Herramientas necesarias:
1: Cinta de medir
2: Herramienta de marcado (rotulador, marcador, lápiz)
3: Destornillador o taladro eléctrico y brocas (según el lugar de
instalación)
4: Juego de llaves (puede ser necesario para algunas instalaciones)
Hardware necesario:
1: Placa de montaje
2: Pernos para fijar la placa (4 como mínimo para la instalación
doméstica, 8 o más para la instalación en vehículos recreativos)
28
29
Page 17
Recomendaciones de hardware
Cemento
Recomendamos utilizar un perno de anclaje de 6 mm o ¼" x 20.
PERNO DE ANCLAJE
PARA CEMENTO
30
Madera o Metal
Recomendamos utilizar un tornillo de 6 mm o ¼" x 20 con arandela.
TORNILLO DE PALANCA
CON ARANDELA
*Es responsabilidad del instalador determinar la cantidad, longitud
ytipo de herrajes para satisfacer las necesidades de la aplicación
de montaje específica.
**También es responsabilidad del instalador asegurarse de que
se aplican las herramientas adecuadas, el equipo de protección
personal y las prácticas seguras para garantizar la seguridad del
instalador y la calidad de la instalación.
31
Page 18
Instalación
1. Elija un lugar para su Yeti PRO 4000 y la placa de montaje.
Si planea ampliar su sistema en el futuro con un segundo Yeti
PRO 4000, deje espacio suficiente para una placa de montaje
adicional junto al lugar que elija.
2. Marque las ubicaciones de los orificios de montaje que se
perforarán para apoyar la instalación de los herrajes.
3. Instale la placa de montaje en una dirección que permita abrir
ycerrar los pestillos.
4. Inserte los pernos y apriételos hasta que estén seguros. Utilice
al menos 4 pernos para las instalaciones domésticas.
5. Fije el Yeti PRO 4000 a la placa de montaje y asegúrelo con el
pestillo de bloqueo insertando la llave en el cilindro de bloqueo
y girando la llave en el sentido de las agujas del reloj, llevando el
brazo de bloqueo a la posición de bloqueo. Véase la ilustración
de la página 6.
6. Si se instala en una caravana o furgoneta, asegúrese de que la
unidad está bien asegurada antes de transportarla
NOTA: Si se apilan varias Unidades, el Yeti PRO 4000 siempre debe
estar en la parte superior. Si está apilando unidades en un vehículo
recreativo, asegúrese de que todas las unidades estén cerradas.
1. Enganche
en el borde
2. Empujar
y bloquear
32
33
Page 19
Asegúrese de que la placa de montaje está
separada un mínimo de 5" de cualquier pared.
PARED
Asegúrese de que la placa de montaje está separada un mínimo de
36" de cualquier puerta o ventana.
PARED
34
5
PULGADAS
123 MM
MÍNIMO
5 PULGADAS
123 MM
MÍNIMO
PUERTA
VENTANA
36
PULGADAS
915 MM
36
PULGADAS
915 MM
36
PULGADAS
915 MM
Si va a instalar varias pilas de centrales Yeti PRO 4000 y baterías
de expansión Tank PRO 4000, asegúrese de que cada pila tenga
una separación mínima de 36".
IMPORTANTE: No apilar más de 5 unidades. (1 Yeti PRO 4000
yhasta 4 unidades Tank PRO 4000).
ADVERTENCIA - Utilice siempre la placa de montaje (SKU 96155)
yasegúrese de que todos los pestillos estén bien sujetos cuando
apile las unidades Yeti PRO 4000 y Tank PRO 4000. Nunca apile más
de 4 Tanques con un Yeti PRO 4000. El apilamiento de productos sin
el soporte de montaje puede constituir un peligro de vuelco y provocar
lesiones. Apilar más productos de los recomendados puede provocar
daños en los productos y peligro de lesiones. Nunca pise ni se suba a
ningún producto Goal Zero y nunca permita que un niño pise o se suba
sobre o alrededor de los productos.
35
Page 20
7.7 PULGADAS 195.6 MM
4.45 PULGADAS 113 MM
1.2 PULGADAS 30.4 MM
10.45 PULGADAS 265.5 MM
36
9.26 PULGADAS 235.1 MM
8.06 PULGADAS 204.8 MM
Cierre de seguridad
Colocar Yeti/
Tanque
pies aquí
Montaje
Hardware
7.49 PULGADAS 190.3 MM
0,26 PULGADAS
6.5 MM
DISCLAIMER
Leggere attentamente tutte le istruzioni e le precauzioni
prima dell'uso, in modo da evitare lesioni personali o danni
all'unità e ai prodotti collegati. Goal Zero si riserva il diritto
di aggiornare questo documento senza preavviso. Visitare il
sito www.goalzero.com per trovare le informazioni più recenti
sul prodotto e la versione più recente della Guida per l'utente.
La piastra di montaggio mantiene le unità Yeti PRO e Tank
PRO 4000 sicure e ferme, sia che le si monti a casa sia
che le si porti in viaggio.
Per assistenza sul dispositivo negli Stati Uniti, visitare la pagina dei contatti
all'indirizzo www.goalzero.com/contact o chiamare il numero 1-888-794-
6250. Per assistenza sul dispositivo al di fuori degli Stati Uniti, contattare
il distributore locale. Se non si dispone delle informazioni di contatto per il
distributore locale, contattare il nostro ufficio negli Stati Uniti e ci metteremo
in contatto con il rappresentante locale.
37
Page 21
Raccomandazioni Hardware
Strumenti necessari:
1: Nastro di Misurazione
2: Strumento di Marcatura (Penna a vernice, Pennarello, Matita)
3: Cacciavite o Trapano a Percussione e Punte (a seconda del luogo
di installazione)
4: Set di chiavi ("Può essere necessario per alcune installazioni")
Hardware Necessario:
1: Piastra di Montaggio
2: Bulloni per fissare la piastra (minimo 4 per l'installazione
domestica, 8 o più per l'installazione su camper)
Cemento
Si consiglia di utilizzare un bullone di ancoraggio da 6 mm o ¼" x 20.
BULLONE DI ANCORAGGIO
PER CEMENTO
38
39
Page 22
Installazione
Legno o Metallo
Si consiglia di utilizzare un bullone a ginocchiera da 6 mm o ¼" x 20
con rondella.
BULLONE A LEVETTA
CON RONDELLA
*È responsabilità dell'installatore determinare la quantità, la
lunghezza e il tipo di ferramenta per soddisfare le esigenze della
specifica applicazione di montaggio.
**È inoltre responsabilità dell'installatore assicurarsi che vengano
utilizzati strumenti adeguati, dispositivi di protezione personale
epratiche sicure per garantire la sicurezza dell'installatore e la
qualità dell'installazione.
40
1. Scegliete un posto per il vostro Yeti PRO 4000 e la piastra di
montaggio. Se si prevede di espandere il sistema in futuro con
un secondo Yeti PRO 4000, lasciare spazio sufficiente per una
piastra di montaggio aggiuntiva accanto al punto scelto.
2. Segnare le posizioni dei fori di montaggio che dovranno essere
praticati per supportare l'installazione della ferramenta.
3. Installare la piastra di montaggio in una direzione che consenta
l'apertura e la chiusura delle chiusure.
4. Inserire i bulloni e serrare fino a quando non sono ben saldi.
Utilizzare almeno 4 bulloni per le installazioni domestiche.
5. Fissare Yeti PRO 4000 alla piastra di montaggio e fissarlo
con la chiusura di sicurezza inserendo la chiave nel cilindro
di chiusura e ruotando la chiave in senso orario, portando il
braccio di chiusura in posizione di blocco. Vedere l'illustrazione
a pagina 6.
6. Se si installa in un camper o in un furgone, assicurarsi che
l'unità sia ben salda prima di trasportarla.
41
Page 23
ATTENZIONE: Se si impilano più unità, Yeti PRO 4000 deve
sempre trovarsi in cima. Se si impilano le unità in un camper,
accertarsi che tutte le unità siano agganciate tra loro.
Assicurarsi che la piastra di montaggio sia
distanziata di almeno 5" da qualsiasi parete.
MURO
5 POLLICI
123 MM
MINIMO
42
1. Agganciare
al Bordo
2. Premere
e bloccare
MURO
5 POLLICI
123 MM
MINIMO
43
Page 24
7,7 POLLICI 195,6 MM
Assicurarsi che la piastra di montaggio sia distanziata di almeno
36" da qualsiasi porta o finestra.
PORTA
HARDWARE
36
POLLICI
915 MM
36
POLLICI
915 MM
36
POLLICI
915 MM
Se si installano più pile di centrali Yeti PRO 4000 e batterie
di espansione Tank PRO 4000, assicurarsi che ogni pila sia
distanziata di almeno 36".
IMPORTANTE: Non impilare più di 5 unità. (1 Yeti PRO 4000 e fino
a 4 unità Tank PRO 4000).
AVVERTENZA - Utilizzare sempre la piastra di montaggio
(SKU96155) e assicurarsi che tutte le chiusure siano ben fissate
quando si impilano le unità Yeti PRO 4000 e Tank PRO 4000.
Non impilare mai più di quattro Tank con uno Yeti PRO 4000.
L'impilamento dei prodotti senza la staffa di montaggio può costituire
un pericolo di ribaltamento e causare lesioni. L'impilamento di un
numero di prodotti superiore a quello raccomandato può danneggiare
i prodotti e causare lesioni. Non calpestare o arrampicarsi mai sui
prodotti Goal Zero e non permettere mai a un bambino di calpestare
o arrampicarsi sui prodotti o intorno ad essi.
44
10,45 POLLICI 265,5 MM
9,26 POLLICI 235,1 MM
8,06 POLLICI 204,8 MM
4,45 POLLICI 113 MM
1,2 POLLICI 30,4 MM
Posizionare
Montaggio
alla Finestra
26 POLLICI
6,5 MM
Chiusura di Sicurezza
Yeti/Tank
pollici
per il
7,49 POLLICI 190,3 MM
45
Page 25

RESPONSABILIDADE
Leia todas as instruções e cuidados atentamente antes de
utilizar a unidade para evitar danos pessoais ou danos ao
aparelho e a quaisquer produtos conectados. A Goal Zero
reserva-se ao direito de atualizar este documento sem
aviso prévio. Visite www.goalzero.com para encontrar as
informações mais recentes sobre o produto e a versão mais
recente do Guia do Utilizador.
A placa de montagem mantém as suas unidades Yeti PRO
e Tank PRO 4000 seguras e fixas, quer as instale em casa
quer as leve para a estrada.
Para obter assistência com seu dispositivo nos Estados Unidos, visite nossa
página de contato em www.goalzero.com/contact ou ligue para 1-888794-6250. Para obter assistência com o seu dispositivo fora dos Estados
Unidos, contacte o distribuidor local. Se não tiver informações de contato
para o distribuidor local, entre em contato connosco nos Estados Unidos e
ajudaremos a conectá-lo ao representante local.
Ferramentas necessárias:
1: Fita métrica
2: Ferramenta de marcação (caneta de tinta, marcador, lápis)
3: Chave de fenda ou Berbequim(s) (Dependente de onde está
ainstalar)
4: Conjunto de chaves (pode ser necessário para algumas
instalações)
Equipamento Necessário:
1: Base de Montagem
2: Parafusos para fixar a placa (mínimo de 4 para instalação em
casa, 8 ou mais para instalação de RV)
46
47
Page 26
Equipamentos Recomendados
Cimento
Recomendamos o uso de um parafuso de ancoragem de 6mm ou
¼"x 20.
PARAFUSO DE
ANCORAGEM
PARA CIMENTO
48
Madeira ou Metal
Recomendamos o uso de um parafuso de alternância de 6mm ou
¼"x 20 com anilha.
PRESSIONE O
PARAFUSO
*É da responsabilidade do instalador determinar a quantidade,
comprimento e tipo de equipamento para responder às
necessidades da aplicação de montagem específica.
**É também da responsabilidade do instalador garantir que as
ferramentas adequadas, equipamentos de proteção individual
epráticas seguras são implementadas para garantir a segurança
doinstalador e a qualidade da instalação.
49
Page 27
Instalação
1. Escolha um local para o seu Yeti PRO 4000 e placa de
montagem. Se planeia expandir o seu sistema no futuro com
um segundo Yeti PRO 4000, deixe espaço suficiente para uma
placa de montagem adicional junto ao local que escolher.
2. Marque os locais de furos de montagem que serão perfurados
para suportar a instalação de hardware.
3. Instale a placa de montagem numa direção que permita que os
fechos sejam abertos e fechados.
4. Insira os parafusos e aperte até ficar seguro. Use pelo menos
4parafusos para instalações domésticas.
5. Segure o Yeti PRO 4000 à placa de montagem e prenda
com o fecho de bloqueio inserindo a chave no cilindro de
bloqueio erodando a chave no sentido dos ponteiros do
relógio, colocando o braço de bloqueio na posição bloqueada.
Vejaailustração na página 6.
6. Se instalar numa RV ou carrinha, certifique-se de que a unidade
está segura antes de transportar.
ATENÇÃO: Se empilhar várias unidades, o Yeti PRO 4000 deve
estar sempre no topo. Se estiver a juntar unidades numa RV,
certifique-se de que as unidades estão todas presas juntas.
1. Bloqueio
2. Pressione
e bloqueie.
50
51
Page 28
Certifique-se de que a placa de montagem está
espaçada no mínimo 5" de qualquer parede.
PAREDE
Certifique-se de que a placa de montagem está espaçada no
mínimo 36" de qualquer parede.
PAREDE
52
5 IN.
123 MM
MÍNIMO
5 IN.
123 MM
MÍNIMO
PORTA
JANELA
36 IN
915 MM
36 IN
915 MM
36 IN
915 MM
Se estiver a instalar várias baterias de armazenamento de energia
Yeti PRO 4000 e baterias de expansão Tank PRO 4000, certifiquese de que cada bateria está a um mínimo de 36" de distância.
IMPORTANTE: Não empilhar mais de 5 unidades de altura.
(1 Yeti PRO 4000 e até 4 unidades Tank PRO 4000).
AVISO - Utilize sempre a placa de montagem (SKU 96155)
ecertifique-se de que todas as FITAS estão firmemente presas
ao empilhar as unidades Yeti PRO 4000 e Tank PRO 4000. Nunca
empilhar mais de 4 tanques com um Yeti PRO 4000. O empilhamento
de produtos sem o suporte de montagem pode constituir um risco
de tombamento e levar a lesões. Empilhar mais produtos do que o
recomendado pode levar a danos aos produtos e a um risco de lesão.
Nunca pise ou suba em qualquer produto Goal Zero e nunca permita
que uma criança pise ou suba sobre ou em torno dos produtos.
53
Page 29
7.7 IN 195.6 MM
4.45 IN 113 MM
1.2 IN 30.4 MM
10.45 IN 265.5 MM
9.26 IN 235.1 MM
54
8.06 IN 204.8 MM
Bloqueio
Coloque a base
do tanque
Yeti aqui
Montagem
Equipamento
7.49 IN 190.3 MM
.26 IN 6.5 MM
免責事項
人身傷害やユニットおよび接続された製品への損傷を避けるため、
使用前にすべての指示と注意ラベルをよくお読みください。Goal
Zeroは、予告なくこの文書を更新する権利を留保します。最新の
製品情報とユーザー ガイドの最新版については、www.goalzero.
com にアクセスしてください。
取付板は、Yeti PROおよびTank PRO 4000ユ ニット を 自 宅 に
設置する場合でも、外出時に持ち出す場合でも、安全かつ固定し
た状 態 に 保 ちます。
米国でのデバイスに関するサポートが必要な場合は、お問い合わせページ (www.
goalzero.com/contact) にアクセスするか、1-888-794-6250 ま で お 電 話くだ さ
い。米国外でのデバイスに関するサポートについては、現地の販売代理店にお問い合
わせください。現地の販売代理店の連絡先情報をお持ちでない場合は、米国の当社に
ご連絡ください。現地の代理店におつなぎいたします。
55
Page 30
ハードウェアの 推 奨 事 項
必 要 な ツ ー ル:
1:巻 き 尺
2:マーキングツール(ペイントペン、マーカー、鉛筆)
3:ドライバ ー ま た は 電 動ドリルおよ びドリルビット (設置場所によって異な
ります )
4:レンチセット(取り付けによっては必要な場合があります)
必 要 なハードウェア:
1:取付板
2:プ レ ー ト を 固 定 す る ボ ル ト (家庭用設置の場合は最低4本、RV 設置の場
合は8本以上)
セメント
6mmまたは1/4インチx 20アンカー ボルトの使用をお勧めします。
セメント 用 ア
ンカー ボルト
56
57
Page 31
設置
木材または金属
6mmまたは1/4インチx20ワッシャー 付 きト グ ル ボ ルトを使 用 することを
お勧 めします。
ワッ シャ ー 付 きト
グル ボ ルト
*特 定 の 取り付け用 途 のニーズを満たすた めにハ ードウェアの 数 量 、長さ、タ
イプを決定するのは設置者の責任です。
**設置者の安全と設置の品質を確保するために、適切な工具、個人用保護
具、および安全慣行が確実に実施されていることを確認することも設置者
の責 任です。
1. Yeti PRO 4000と取付板を取り付ける場所を選択してください。将
来、2台目のYeti PRO 4000を使用してシステムを拡張する予定があ
る場合は、選択した場所の隣に追加の取付板用の十分なスペースを残
してくだ さ い 。
2. ハ ードウェアの取り付けをサポートするた め に開 けら れる取り付 け 穴
の位 置 にマー クを付 け ます。
3. 取付板はラッチが開閉できる方向に取り付けてください。
4.
ボルトを挿入し、しっかりと固定されるまで締めます。家庭での設置に
は 少 なくと も 4本 の ボ ルトを 使 用 してくだ さ い 。
5. Yeti PRO 4000を取付板に取り付け、キーをロック シリンダー に 挿 入
してキーを時計回りに回し、ロッキング アームをロック位置にしてロッ
キング ラッチで固 定 し ます。6ページの図を参照してください。
6. RVまたはバンに取り付ける場合は、輸送する前にユニットがしっかり
と固定されていることを確認してください。
58
59
Page 32
注 意:複数のユニットを積み重ねる場合は、Yeti PRO 4000を常に一番上
に 置く必 要 が あ ります。RV内 に ユ ニット を 積 み 重 ね る 場 合 は 、ユ ニット が す
べて一 緒 にラッチ さ れて いるこ とを確 認 してくだ さ い 。
取付板が壁から少なくとも5インチ離 れている
ことを 確 認 し てくだ さ い 。
壁
5 インチ
(123 MM)
最小
60
1.リップ に ラッチす る
2.押し込 んで
ロックする
壁
5 インチ
(123 MM)
最小
61
Page 33
7.7 インチ (195.6 MM)
取 り 付 け プ レ ート がド ア や ウ ィンドウ か ら 少 なくとも 36 インチ 離 れて いるこ
とを 確 認 し てくだ さ い 。
ドア
ウィン ドウ
36 インチ
(915 MM)
36 インチ
(915 MM)
36 インチ
(915 MM)
Yeti PRO 4000 パワー ステ ー ションとTank PRO 4000拡張 バッテリー
の複数のスタックを設置する場合は、各スタックの間隔が少なくとも36イン
チであることを確認してください。
重 要:5ユニット以上積み重ねないでください。(Yeti PRO 4000は1
台、Tank PRO 4000は最大4台)。
警告 - Yeti PRO 4000およびTank PRO 4000 ユ ニ ット を 積 み 重 ね る と
きは、必ず取付板 (SKU 96155) を使用し、すべてのラッチがしっかりと固
定 さ れ て いることを 確 認 してくだ さ い 。1台のYeti PRO 4000に4台を超え
るタンクを積み重ねないでください。取り付けブラケットなしで製品を積み
重ねると、転倒の危険が生じ、怪我につながる可能性があります。推奨され
ている以上に製品を積み重ねると、製品の損傷や怪我の危険が生じる可能
性 が あります。Goal Zero製品の上に乗ったり、登ったり、子供が製品の上や
周囲に乗ったりしないようにしてください。
62
10.45 インチ (265.5 MM)
9.26 インチ (235.1 MM)
8.06 インチ (204.8 MM)
4.45 インチ (113 MM)
1.2 インチ (30.4 MM)
ロッキ ングラッチ
Yeti/Tankを配
置する
ここに 足 を入 れ
てくだ さ い
取り付 け
ハードウェア
7.49 インチ (190.3 MM)
0.26 インチ
(6.5 MM)
63
Page 34

VASTUUVAPAUSLAUSEKE
Lue kaikki ohjeet ja varoitustarrat huolellisesti ennen käyttöä,
jotta vältät henkilövahingot ja/tai laitteen ja liitettyjen
tuotteiden vahingoittumisen. Goal Zero pidättää oikeuden
päivittää tätä asiakirjaa ilman ennakkoilmoitusta. Uusimmat
tuotetiedot ja käyttöoppaan uusin versio löytyvät osoitteesta
www.goalzero.com.
Lue kaikki varoitukset, ohjeet ja varoitukset huolellisesti
ennen käyttöä, jotta vältät henkilövahingot,
omaisuusvahingot tai Goal Zero -tuotteen
vahingoittumisen.
Jos haluat apua laitteesi kanssa Yhdysvalloissa, käy yhteystietosivullamme
osoitteessa www.goalzero.com/contact tai soita numeroon 1-888-794-
6250. Jos haluat apua laitteen kanssa Yhdysvaltojen ulkopuolella, ota yhteyttä
paikalliseen jakelijaan. Jos sinulla ei ole paikallisen jakelijan yhteystietoja,
ota yhteyttä meihin Yhdysvalloissa, niin autamme sinua saamaan yhteyden
paikalliseen edustajaan.
Tarpeelliset välineet:
1: Mittanauha
2: Merkintätyökalu (maalikynä, tussi, lyijykynä)
3: Ruuvimeisseli tai porakone ja poranterä(t) (asennuspaikasta
riippuen).
4: Kiintoavainsarja (saattaa olla tarpeen joissakin asennuksissa)
Tarvittava laitteisto:
1: Kiinnityslevy
2: Pultit levyn kiinnittämiseksi (vähintään 4 kotiasennuksessa,
vähintään 8 asuntoauton asennuksessa).
64
65
Page 35
Laitteistosuositukset
Sementti
Suosittelemme käyttämään 6mm tai ¼" x 20 ankkuripulttia.
ANKKURIPULTTI
SEMENTTIÄ VARTEN
Puu tai metalli
Suosittelemme käyttämään 6mm tai ¼" x 20 kääntöpulttia ja
aluslevyä.
KÄÄNTÖPULTTI
JA ALUSLEVY
*Asennusasentajan vastuulla on määrittää laitteiston määrä, pituus
ja tyyppi tietyn asennussovelluksen tarpeita varten.
**Asennusasentajan vastuulla on myös varmistaa, että
asianmukaisia työkaluja, henkilökohtaisia suojavarusteita ja
turvallisia käytäntöjä käytetään asentajan turvallisuuden ja
asennuksen laadun varmistamiseksi.
66
67
Page 36
Asennus
1. Valitse paikka Yeti PRO 4000:lle ja asennuslevylle. Jos aiot
laajentaa järjestelmääsi tulevaisuudessa toisella Yeti PRO 4000
-laitteella, jätä riittävästi tilaa ylimääräiselle asennuslevylle
valitsemasi paikan viereen.
2. Merkitse kiinnitysreikien paikat, jotka porataan laitteiston
asennusta varten.
3. Asenna asennuslevy sellaiseen suuntaan, että salvat voidaan
avata ja sulkea.
4. Aseta pultit paikalleen ja kiristä, kunnes ne ovat tiukasti kiinni.
Käytä kotiasennuksissa vähintään 4 pulttia.
5. Kiinnitä Yeti PRO 4000 kiinnityslevyyn ja varmista lukitussalvalla
asettamalla avain lukkosylinteriin ja kääntämällä avainta
myötäpäivään, jolloin lukitusvarsi asettuu lukitusasentoon.
Katsokuva sivulla 6.
6. Jos asennat laitteen asuntoautoon tai pakettiautoon, varmista,
että laite on kiinnitetty ennen kuljetusta.
HUOMAUTUS: Jos pinoat useita yksiköitä, Yeti PRO 4000:n on
aina oltava päällimmäisenä. Jos pinoat yksiköitä asuntoautossa,
varmista, että kaikki yksiköt on lukittu yhteen.
1. Kiinnitä huuliin
2. Työnnä
sisään
ja lukitse
68
69
Page 37
Varmista, että asennuslevy on vähintään
5 tuuman etäisyydellä seinästä.
SEINÄ
Varmista, että asennuslevyn etäisyys ovesta tai ikkunasta on
vähintään 36 tuumaa.
SEINÄ
70
5 TUUMAA
123 MM
VÄHINTÄÄN
5 TUUMAA
123 MM
VÄHINTÄÄN
OVI
IKKUNA
36
TUUMAA
915 MM
36
TUUMAA
915 MM
36
TUUMAA
915 MM
Jos asennat useita Yeti PRO 4000 -voimalaitepinoja ja Tank
PRO4000 -laajennusakkuja, varmista, että jokainen pino on
vähintään 36 tuuman etäisyydellä toisistaan.
TÄRKEÄÄ: Älä pinoa yli 5 yksikköä korkeammalle. (1 Yeti PRO 4000
ja enintään 4 Tank PRO 4000 -yksikköä).
VAROITUS - Käytä aina kiinnityslevyä (SKU 96155) ja varmista,
että kaikki salvat on kiinnitetty tiukasti, kun pinoat Yeti PRO 4000ja Tank PRO 4000 -yksiköitä. Älä koskaan pinoa yli 4 säiliötä yhteen
Yeti PRO 4000:een. Tuotteiden pinoaminen ilman kiinnikettä
voi aiheuttaa kaatumisvaaran ja johtaa loukkaantumiseen. Jos
tuotteita pinotaan suositeltua enemmän, tuotteet voivat vaurioitua
ja loukkaantumisvaara voi syntyä. Älä koskaan astu tai kiipeä
Goal Zeron tuotteiden päälle äläkä anna lapsen astua tai kiivetä
tuotteiden päälle tai niiden ympärille.
71
Page 38
7.7 TUUMAA 195.6 MM
4,45 TUUMAA 113 MM
1,2 TUUMAA 30,4 MM
10,45 TUUMAA 265,5 MM
9,26 TUUMAA 235,1 MM
72
8,06 TUUMAA 204,8 MM
Lukitussalpa
Paikka
Yeti/Tankki
jalka tähän
Kiinnitys
Koneisto
7,49 TUUMAA 190,3 MM
.26 TUUMAA
6,5 MM
DISCLAIMER
Lees voor gebruik alle instructies en voorzorgsmaatregelen
zorgvuldig om persoonlijk letsel en/of schade aan het
apparaat en alle aangesloten producten te voorkomen. Goal
Zero behoudt zich het recht voor dit document bij te werken
zonder voorafgaande kennisgeving. Ga naar www.goalzero.
com voor de meest recente productinformatie en de meest
recente versie van de handleiding.
De montageplaat houdt uw Yeti PRO en Tank PRO 4000
veilig en stationair, of u ze nu thuis opzet of meeneemt op
de weg.
Ga voor hulp met uw apparaat in de Verenigde Staten naar onze contactpagina
op www.goalzero.com/contact of bel 1-888-794-6250. Neem voor hulp
met uw apparaat buiten de Verenigde Staten contact op met de plaatselijke
distributeur. Als u niet beschikt over de contactgegevens van de plaatselijke
distributeur, neem dan contact met ons op in de Verenigde Staten en wij
helpen u om in contact te komen met de plaatselijke vertegenwoordiger.
73
Page 39
Aanbevelingen voor hardware
Vereist gereedschap:
1: Meetlint
2: Markeergereedschap (verfstift, marker, potlood)
3: Schroevendraaier of boormachine & boorbit(ten) (afhankelijk van
waar je gaat installeren)
4: Moersleutelset (kan nodig zijn voor sommige installaties)
Vereiste hardware:
1: Montageplaat
2: Bouten om de plaat vast te zetten (minimaal 4 voor installatie
thuis, 8 of meer voor installatie in camper)
Cement
We raden aan een ankerbout van 6 mm of ¼" x 20 te gebruiken.
ANKERBOUT
VOOR CEMENT
74
75
Page 40
Installatie
Hout of metaal
We raden aan een 6 mm of ¼" x 20 keilbout met sluitring te
gebruiken.
KNEVELBOUT
MET SLUITRING
*Het is de verantwoordelijkheid van de installateur om het aantal,
de lengte en het type hardware te bepalen voor de specifieke
montagetoepassing.
**Het is ook de verantwoordelijkheid van de installateur om
ervoor te zorgen dat de juiste gereedschappen, persoonlijke
beschermingsmiddelen en veilige praktijken worden toegepast om
de veiligheid van de installateur en de kwaliteit van de installatie te
garanderen.
76
1. Kies een plek voor uw Yeti PRO 4000 en montageplaat. Als u
van plan bent om je systeem in de toekomst uit te breiden met
een tweede Yeti PRO 4000, laat dan genoeg ruimte over voor
een extra montageplaat naast de plek die u kiest.
2. Markeer de locaties van de montagegaten die uitgeboord
moeten worden om de installatie van de hardware te
ondersteunen.
3. Installeer de montageplaat in een richting waarin de
vergrendelingen geopend en gesloten kunnen worden.
4. Plaats de bouten en draai ze vast tot ze stevig vastzitten.
Gebruik minstens 4 bouten voor installaties thuis.
5. Bevestig de Yeti PRO 4000 aan de montageplaat en zet hem
vast met de vergrendeling door de sleutel in de slotcilinder
te steken en de sleutel rechtsom te draaien, waardoor de
vergrendelingsarm in de vergrendelde positie komt. Zie
illustratie op pagina 6.
6. Als u het apparaat in een camper of bestelwagen installeert,
zorg er dan voor dat het goed vastzit voordat u het vervoert.
77
Page 41
OPMERKING: Als u meerdere units stapelt, moet de Yeti PRO
4000 altijd bovenop liggen. Als u eenheden in een camper stapelt,
zorg er dan voor dat alle eenheden aan elkaar gekoppeld zijn.
Zorg ervoor dat de montageplaat
minstens 5" van de muur verwijderd is.
MUUR
123 MM
5 IN
MINIMUM
78
1. Vastklikken
aan de lip
2. Indrukken
en vergren
delen
MUUR
123 MM
5 IN
MINIMUM
-
79
Page 42
195.6 MM 7.7 IN
Zorg ervoor dat de montageplaat minimaal 36" van een deur of
raam verwijderd is.
DEUR
RAAM
915 MM
36 IN
915 MM
36 IN
915 MM
36 IN
Als u meerdere stapels Yeti PRO 4000-stations en Tank PRO
4000-uitbreidingsbatterijen installeert, moet u ervoor zorgen dat
elke stapel minstens 36" uit elkaar ligt.
BELANGRIJKE OPMERKING: Stapel niet meer dan 5 eenheden op
elkaar. (1 Yeti PRO 4000 en maximaal 4 Tank PRO 4000-eenheden).
WAARSCHUWING - Gebruik altijd de montageplaat (SKU 96155)
en zorg ervoor dat alle vergrendelingen goed vastzitten wanneer
ude Yeti PRO 4000 en Tank PRO 4000 stapelt. Stapel nooit meer
dan 4 tanks op één Yeti PRO 4000. Producten stapelen zonder de
montagebeugel kan kantelgevaar opleveren en letsel veroorzaken.
Meer producten stapelen dan aanbevolen kan leiden tot schade aan
de producten en letselgevaar. Stap of klim nooit op een Goal Zero
product en laat nooit kinderen op de producten lopen of klimmen.
80
265.5 MM 10.45 IN
235.1 MM 9.26 IN
204.8 MM 8.06 IN
113 MM 4.45 IN
30.4 MM 1.2 IN
Vergrendelingsslot
Plaats hier
Yeti/Tank
voeten
Montage
Hardware
190.3 MM 7.49 IN
6.5 MM .26 IN
81
Page 43

ANSVARSFRISKRIVNING
Läs alla instruktioner och varningsetiketter noggrant innan
du användning för att undvika personskador och/eller skador
på enheten och eventuella anslutna produkter. Goal Zero
förbehåller sig rätten att uppdatera detta dokument utan
föregående meddelande. Besök www.goalzero.com för att
hitta den senaste produktinformationen och den senaste
versionen av bruksanvisningen.
Monteringsplattan håller dina Yeti PRO- och Tank PRO
4000-enheter säkra och stationära oavsett om du ställer
upp dem hemma eller tar med dem på resan.
Om du vill ha hjälp med din enhet i USA kan du besöka vår kontaktsida på
www.goalzero.com/contact eller ringa 1-888-794-6250. Om du behöver
hjälp med din enhet utanför USA kontaktar du den lokala distributören. Om du
inte har kontaktuppgifter till den lokala distributören, kontakta oss i USA så
hjälper vi dig att komma i kontakt med den lokala representanten.
Verktyg som krävs:
1: Måttband
2: Markeringsverktyg (färgpenna, tuschpenna, blyertspenna)
3: Skruvmejsel eller borrmaskin och borr (beroende på var du
installerar)
4: Blocknyckelsats (kan behövas för vissa installationer)
Hårdvara som krävs:
1: Monteringsplatta
2: Bultar för att fästa plattan (minst 4 för heminstallation, 8 eller
fler för installation i husbil)
82
83
Page 44
Rekommendationer för hårdvara
Cement
Vi rekommenderar att du använder en 6 mm eller ¼" x 20 ankarbult.
ANKARBULT
FÖR CEMENT
Trä eller metall
Vi rekommenderar att du använder en 6 mm eller ¼" x 20 vippbult
med bricka.
VIPPBULT MED
BRICKA
*Det är installatörens ansvar att bestämma hårdvarukvantitet,
längd och typ för att uppfylla behoven hos den specifika
monteringsapplikationen.
**Det är också installatörens ansvar att se till att lämpliga verktyg,
personlig skyddsutrustning och säkra rutiner implementeras för att
säkerställa installatörens säkerhet och installationens kvalitet.
84
85
Page 45
Installation
1. Välj en plats för din Yeti PRO 4000 och monteringsplatta.
Omdu planerar att utöka ditt system i framtiden med en andra
Yeti PRO 4000, lämna tillräckligt med utrymme för en extra
monteringsplatta bredvid den plats du väljer.
2. Markera monteringshålen som ska borras för att stödja
installationen av hårdvaran.
3. Montera monteringsplattan i en riktning som gör att låsen kan
öppnas och stängas.
4. Sätt i bultarna och dra åt tills de sitter ordentligt. Använd minst
4 bultar vid heminstallationer.
5. Fäst Yeti PRO 4000 på monteringsplattan och säkra med
låsspärren genom att sätta in nyckeln i låscylindern och vrida
nyckeln medurs och föra låsarmen i låst läge. Se illustration
påsida 6.
6. Om du installerar i en husbil, se till att enheten sitter ordentligt
innan transport.
OBS: Om du staplar flera enheter ska Yeti PRO 4000 alltid vara
överst. Om du staplar enheter i en husbil, se till att alla enheter är
ihoplåsta.
1. Fäst på läppen
2. Tryck
in och lås
fast
86
87
Page 46
Se till att monteringsplattan är placerad
minst 123 mm från en vägg.
VÄGG
Se till att monteringsplattan är placerad minst 915 mm från vägg
eller fönster.
VÄGG
88
5 TUM
123 MM
MINIMUM
5 TUM
123 MM
MINIMUM
DÖRR
FÖNSTER
36 TUM
915 MM
36 TUM
915 MM
36 TUM
915 MM
Om du installerar flera staplar av Yeti PRO 4000 kraftstationer och
Tank PRO 4000 expansionsbatterier, se till att varje stapel är minst
915 mm från varandra.
VIKTIGT: Stapla inte fler än 5 enheter på varandra. (1 Yeti PRO
4000 och upp till 4 Tank PRO 4000-enheter).
VARNING - Använd alltid monteringsplattan (SKU 96155) och se till
att alla spärrar sitter ordentligt när du staplar enheterna Yeti PRO
4000 och Tank PRO 4000. Stapla aldrig fler än fyra Tank med en Yeti
PRO 4000. Stapling av produkter utan monteringsfäste kan utgöra
tippningsrisk och leda till personskador. Om du staplar fler produkter
än rekommenderat kan det leda till skador på produkterna och risk
för personskador. Kliv eller klättra aldrig på Goal Zero-produkter och
tillåt aldrig barn att kliva eller klättra på eller runt produkterna.
89
Page 47
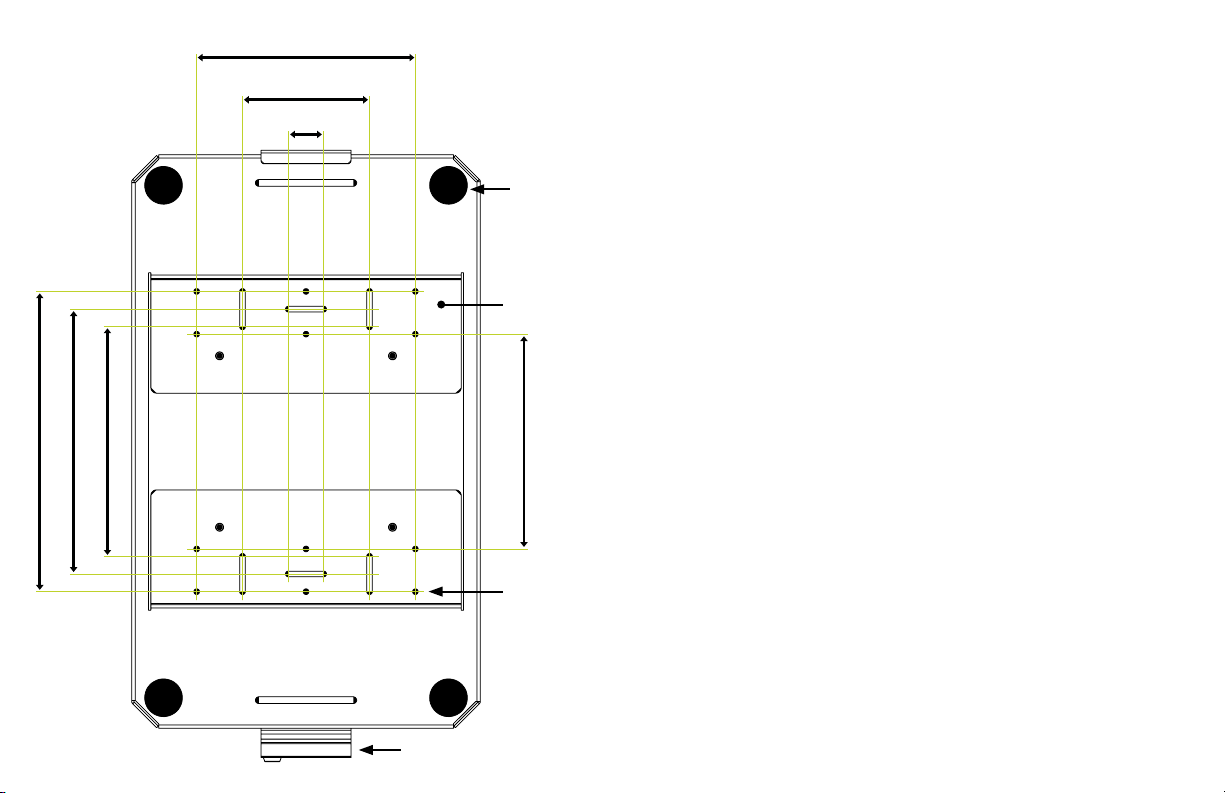
265,5 MM 10,45 TUM
235,1 MM 9,26 TUM
204,8 MM 8,06 TUM
195,6 MM 7,7 TUM
113 MM 4,45 TUM
30,4 MM 1,2 TUM
Placera
Yeti/Tank
fot här
Monterings-
hårdvara
190,3 MM 7,49 TUM
6,5 MM
0,26 TUM
90
Låsspärr
91
Page 48

929394
Page 49

GOAL ZERO HEADQUARTERS
Draper, UT 84020
1-888-794-6250
Designed in the U.S.A.
Made in China
Goal Zero Yeti is a trademark of Goal Zero.
REV C
 Loading...