

Page 1

Page 2

1
Table of Contents
Get to Know Your Gear 2
Charge Before Use 3
Solar Ready™ 3
Charge Your Gear 4
Smart Charge Sequence 5
Flashlight 5
Waterproof, Rugged Design 6
Troubleshooting 6
Technical Specifications 7
Français 8-13
日本語
14-19
Deutsch 20-25
Español 26-31
Page 3

32
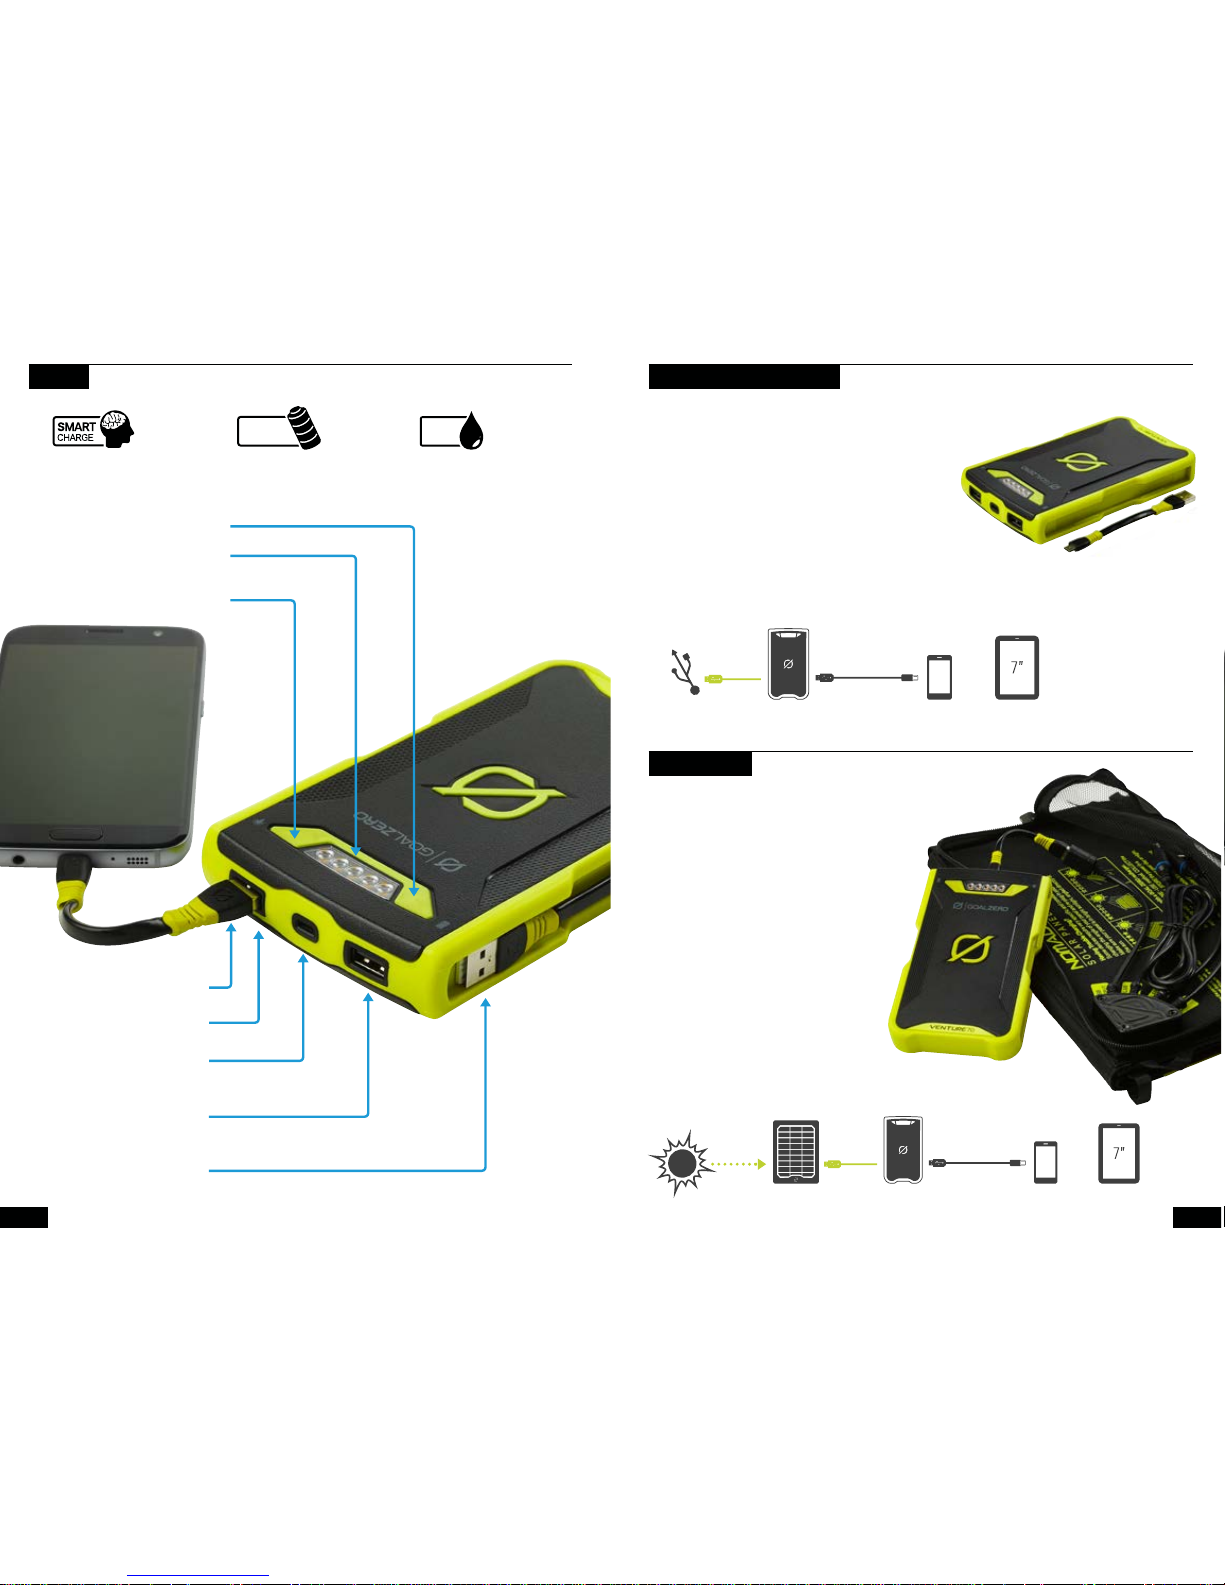
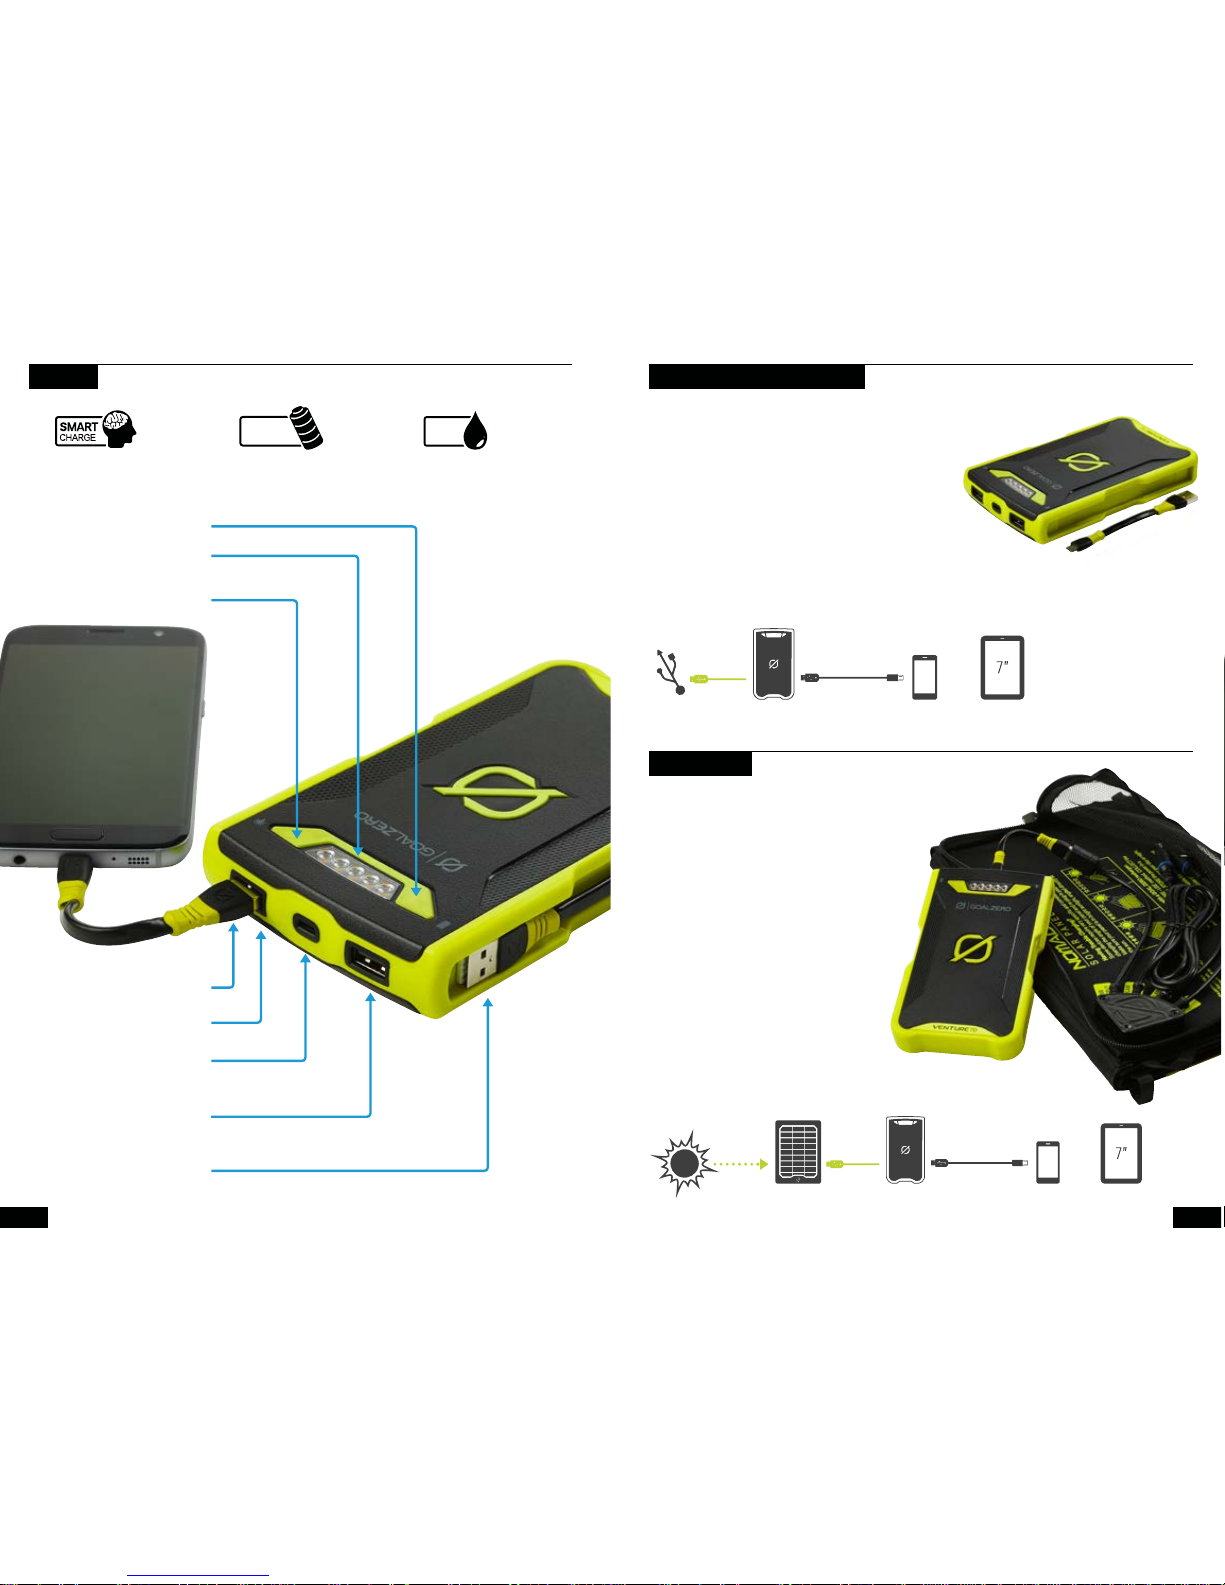
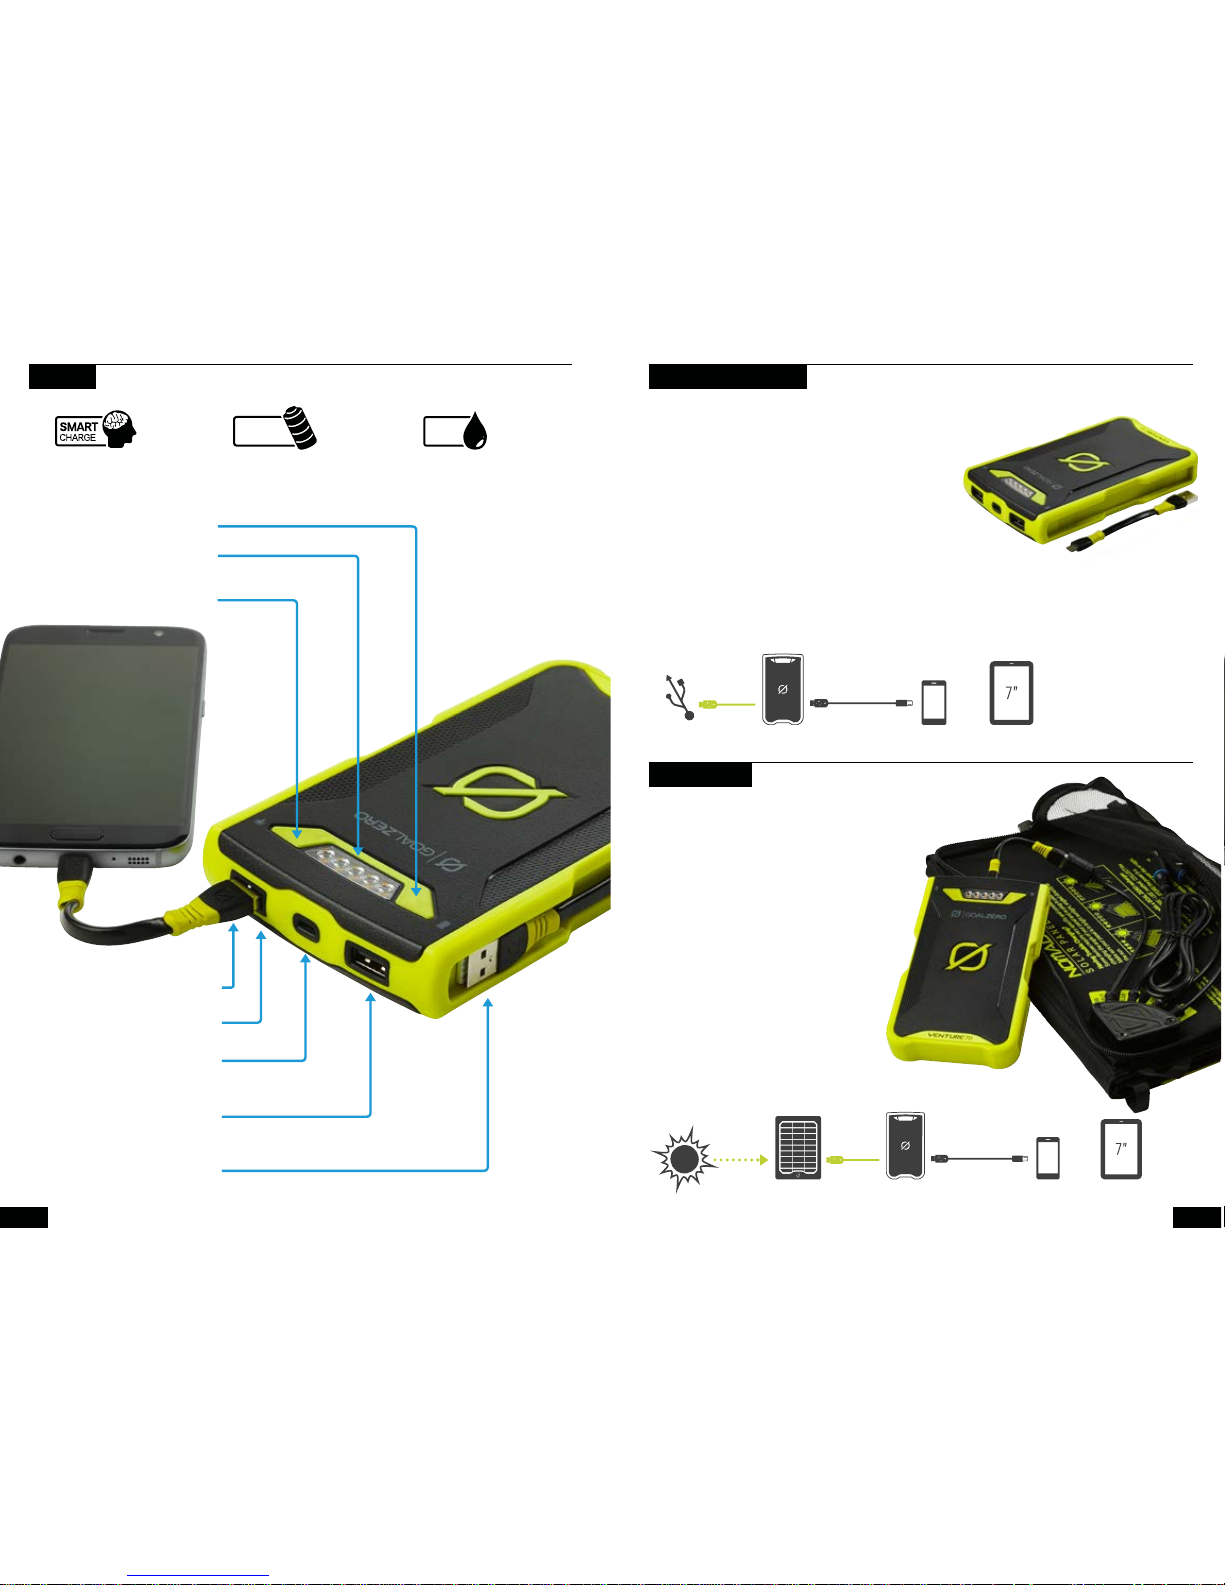
GET TO KNOW YOUR GEAR
19,200 mAh
Advanced, long-lasting
lithium internal battery.
IP67 Waterproof,
shock-proof design.
Rugged DesignSmart 2.4A USB
Charge a phone and a
tablet – at the same time.
71Wh
19,200mAh
Battery Indicator
One-touch charge indicator +
65 lumen multi-mode flashlight
Charge It
Recharge from USB
or solar panel. Fast.
Included Micro USB
to USB Cable
USB Port
Recharge your device
USB Port
Recharge your device
Flashlight Button
Battery Button
Included USB to Micro USB Cable
or USB to Lightning® Cable
IP67
RATING
Use a micro-USB cable to charge up Venture 70 from a
live USB source.
1. Plug Venture 70 into any USB source using a
micro-USB cable, like the one included with Venture 70.
2. Know it’s charging when blue indicator lights on the top
illuminate and pulse. Each blue indicator light represents
20% battery capacity. Blue indicator lights will flash
according to how quickly Venture 70 is charging. A slow
flash indicates a slow charge, while quicker flashing
indicates faster charging.
3. Venture 70 is full and ready to go when all lights
are solid.
Venture 70 allows for pass-through power so you can charge your gear and Venture 70 at the same time.
When Venture 70’s battery is dead, the first blue indicator light will flash when the battery button is pushed
8 Hours
2.4 A USB Port
Nomad® 20
Solar Panel
CHARGE BEFORE USE
Venture 70 is engineered to charge quickly from
Goal Zero Nomad Solar Panels.
4. Plug Venture 70 into the USB port on a
Nomad Solar Panel using a micro-USB cable.
5. Know it’s charging when blue indicator lights
illuminate and pulse. Each blue indicator light
represents 20% battery capacity.
6. Venture 70 is full and ready to go when all
lights are pulsing together.
7. Blue indicator lights will flash according
to how quickly Venture 70 is charging.
A slow flash indicates a slow charge,
while quicker flashing indicates faster
charging.
8. When charging from solar, angle your
panel toward the sun to see how it
affects charging.
SOLAR READY™
or
or
Phone
8 Hours
Full Sun
Phone Tablet
Tablet
Page 4

54
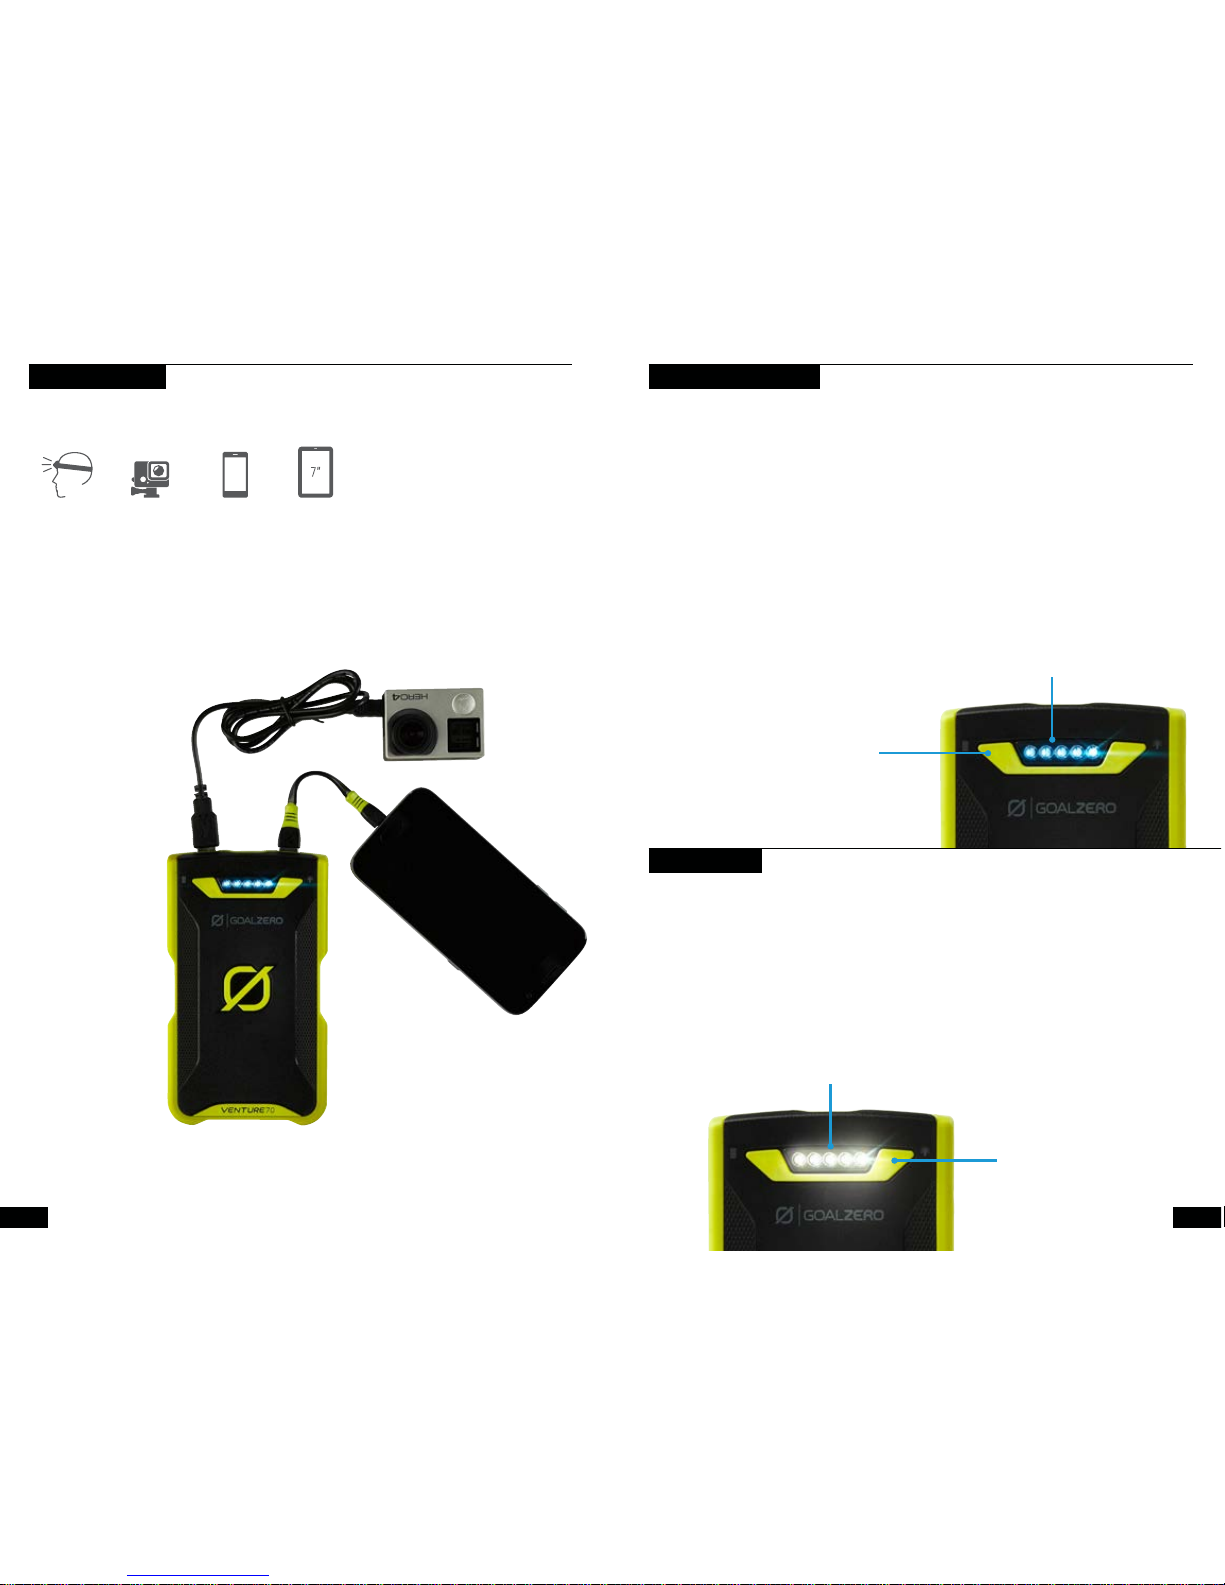
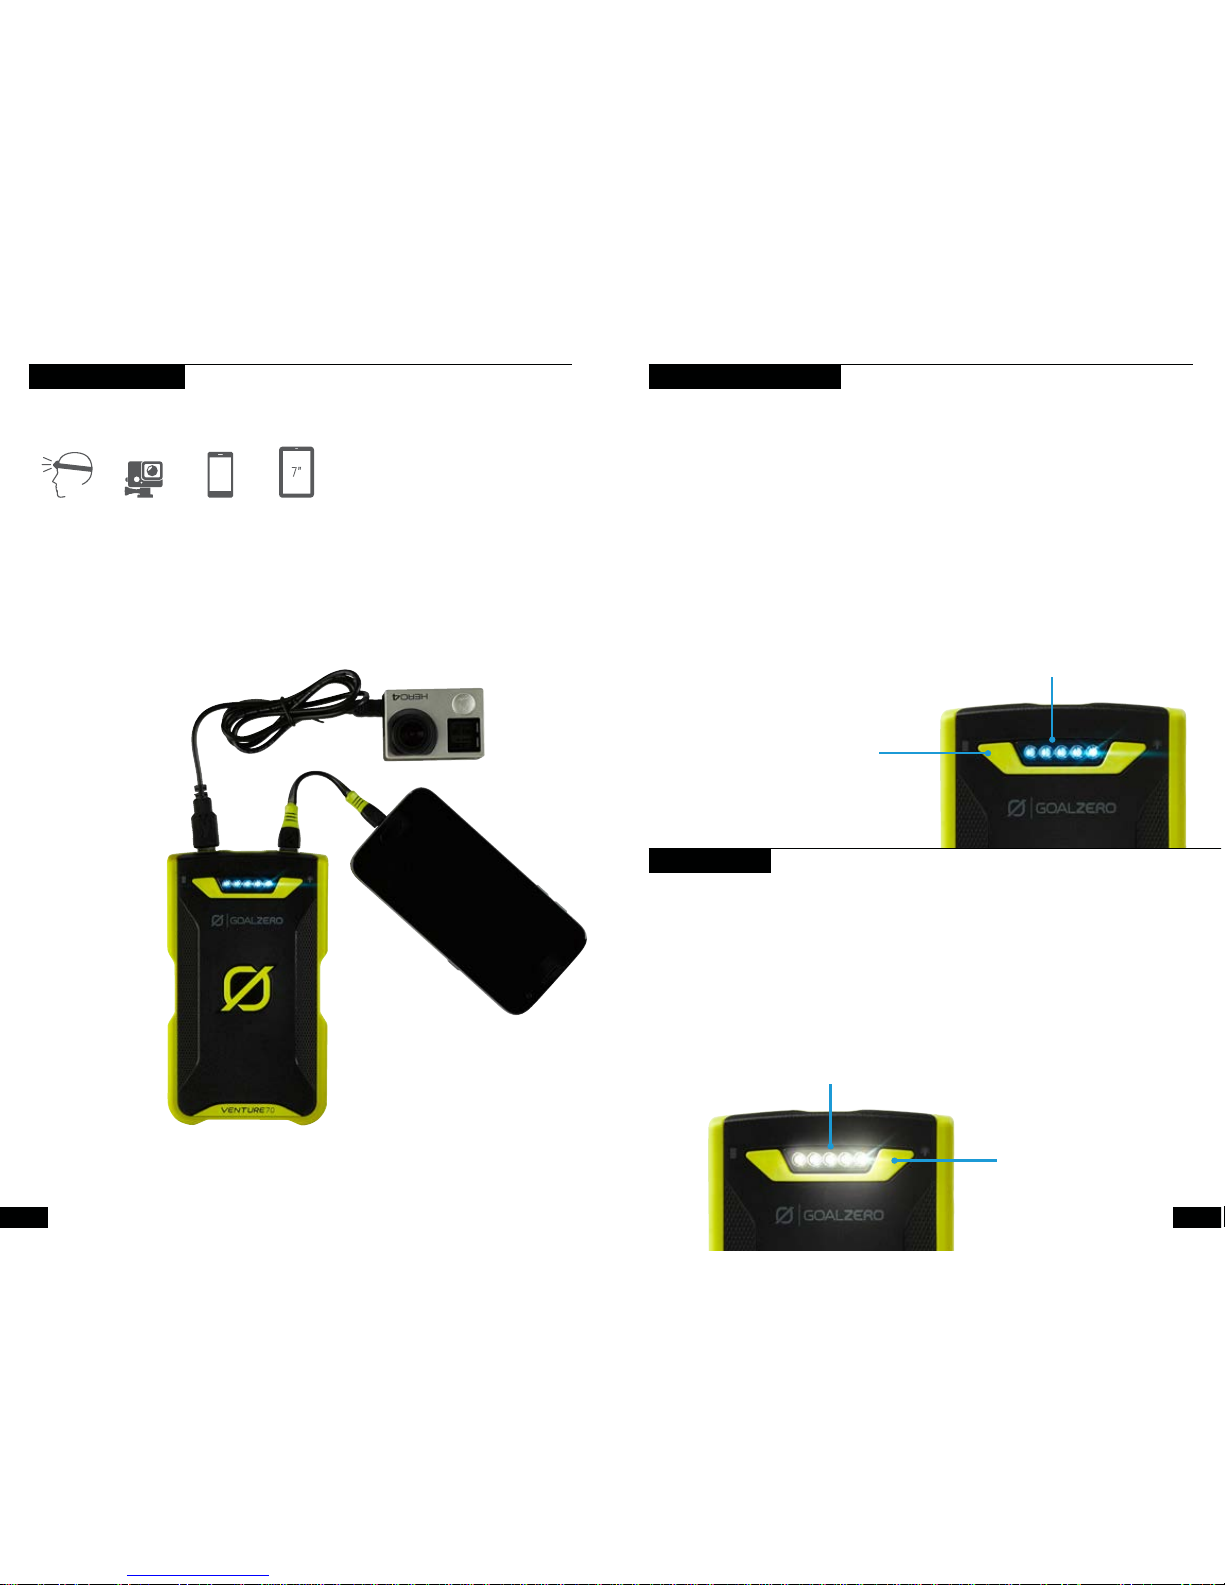
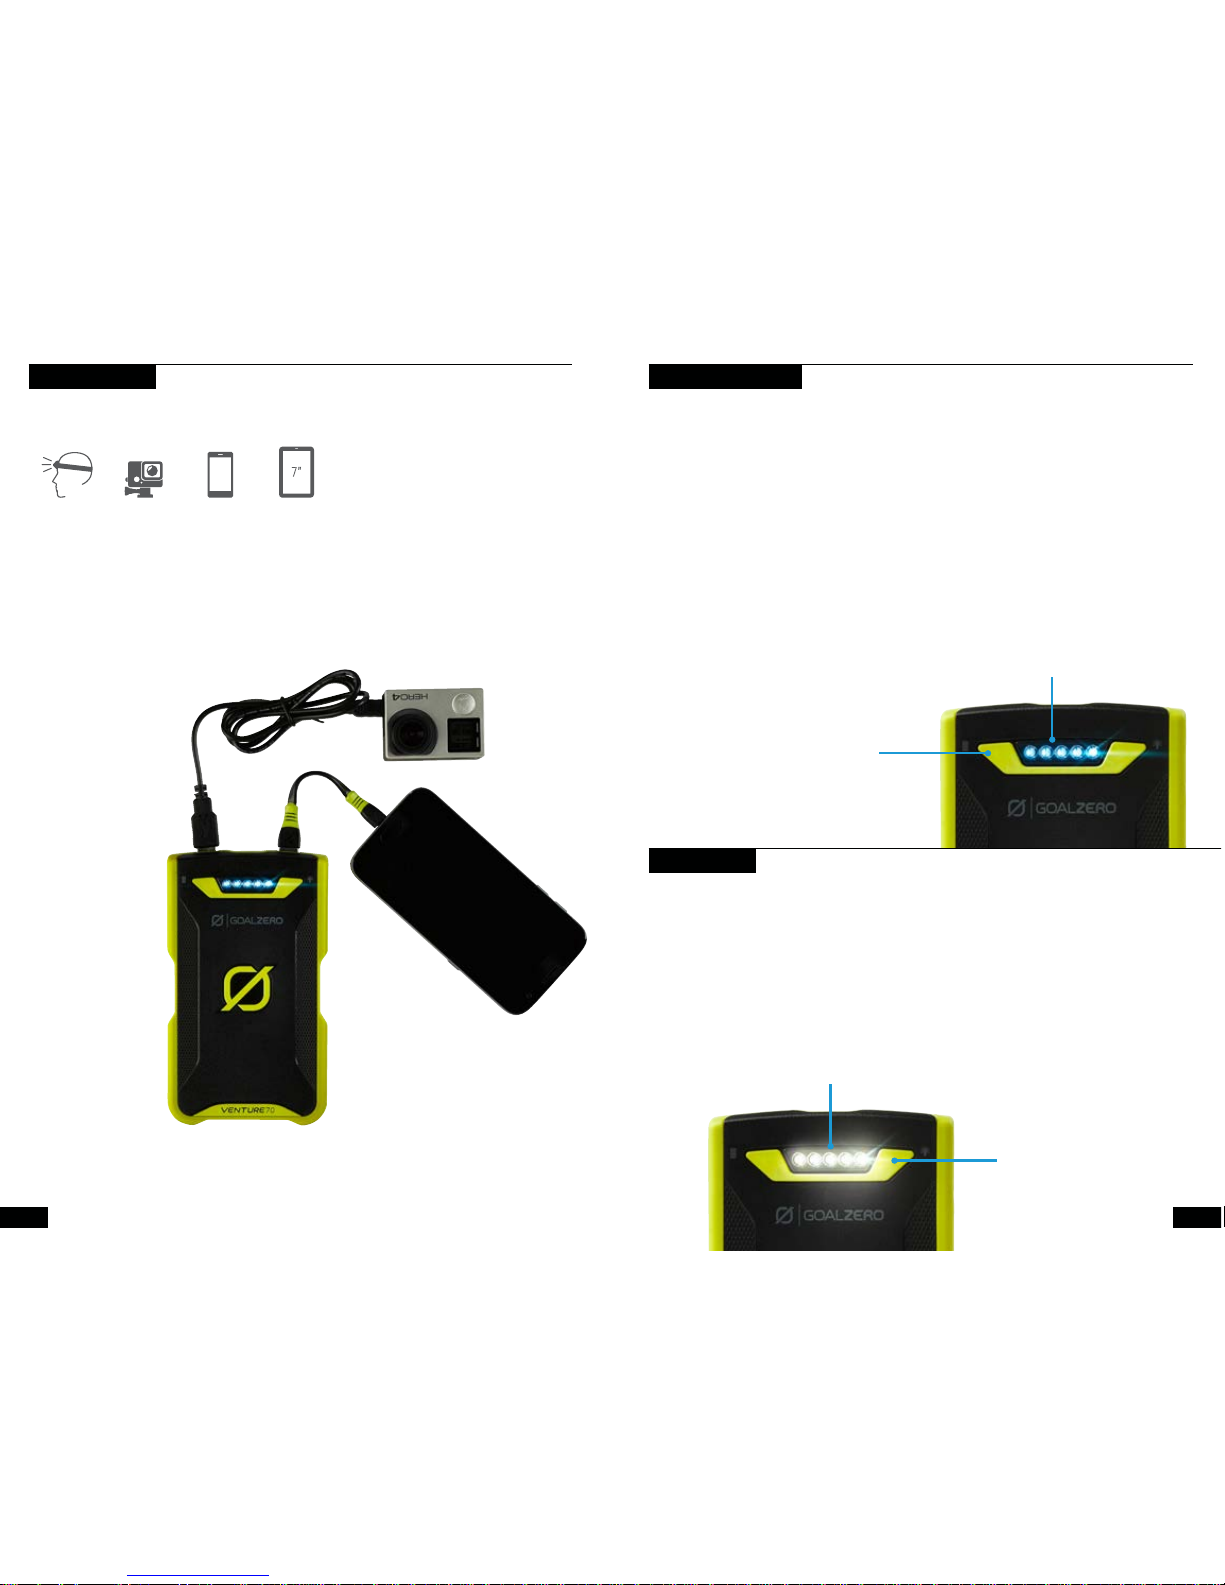
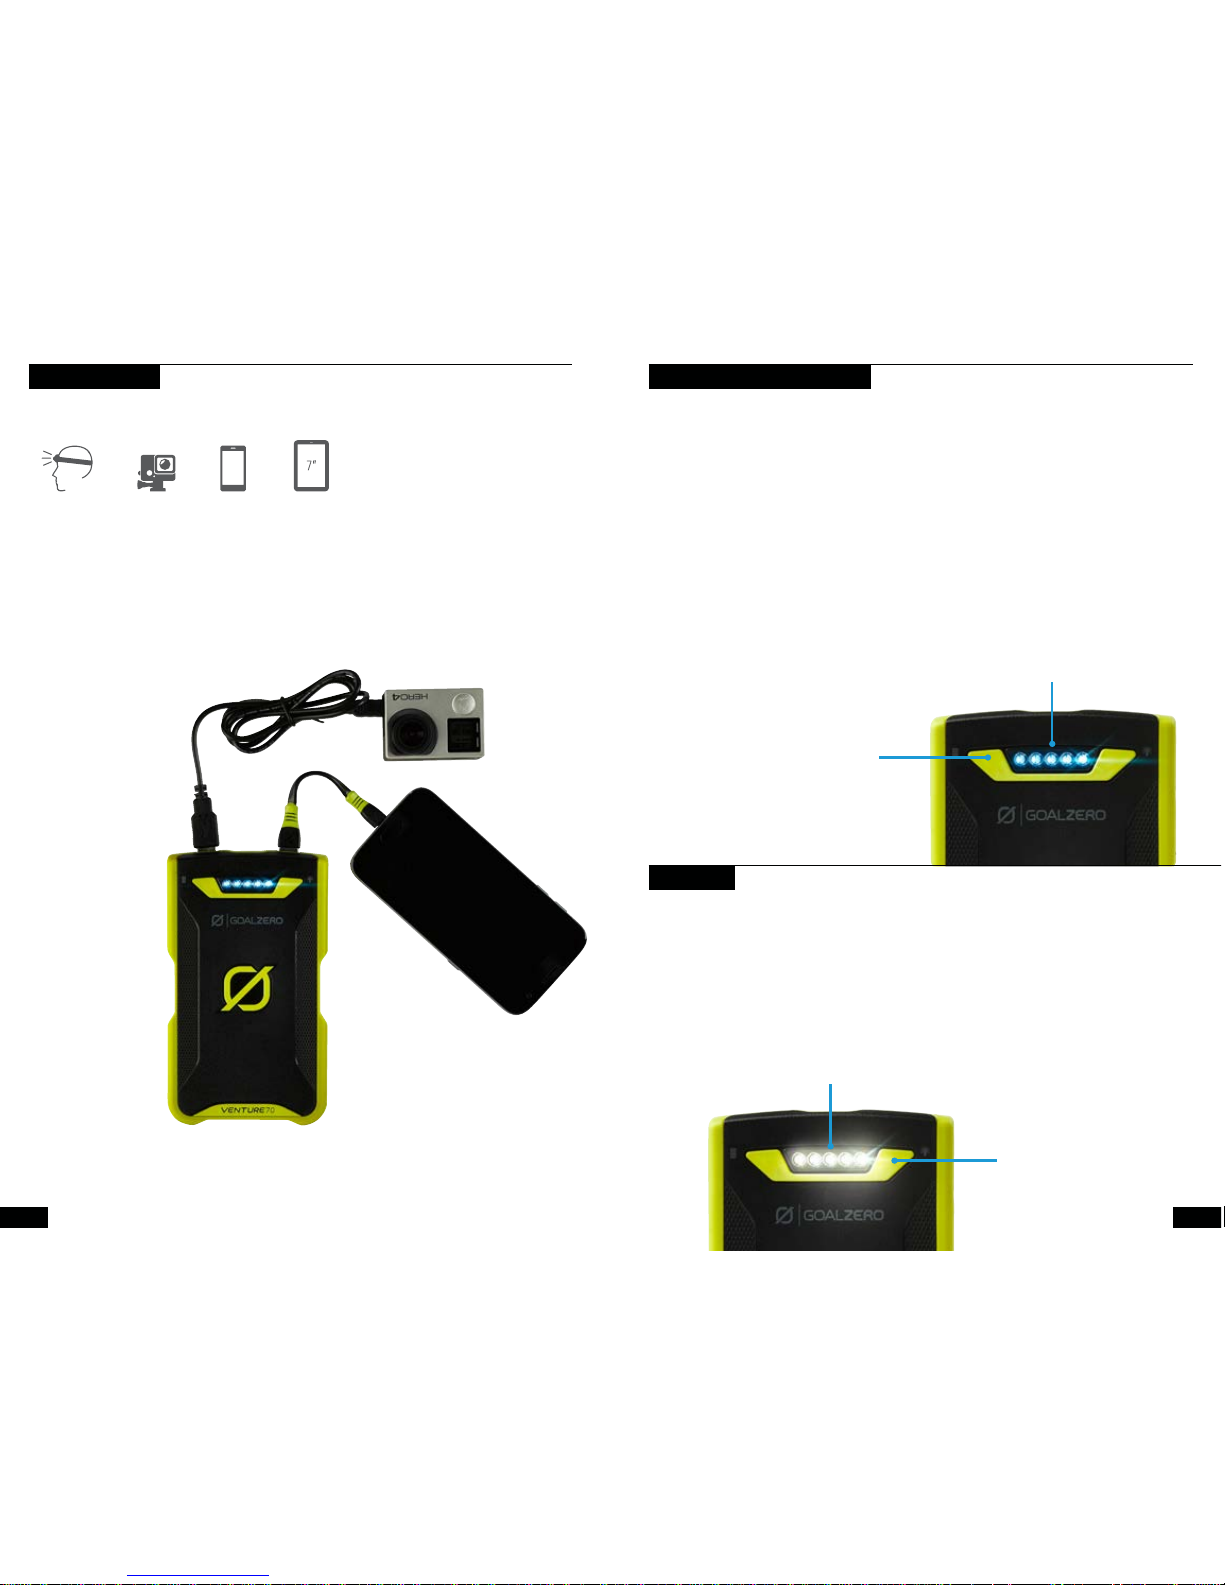
Venture 70 is designed to charge POV cameras, phones, tablets, and other USB-powered devices.
CHARGE YOUR GEAR
Headlamp
10-20 Recharges
POV Camera
10 Recharges
Phone
5-6 Recharges
Tablet
2 Recharges
1. Using your charging cable or the included cables, plug into Venture 70’s USB ports – they’ll both work at
the same time so you can share power with a buddy.
2. The blue indicator lights will flash according to how quickly your gear is charging. A slow flash indicates a
slow charge, while quicker flashing indicates faster charging. If you’re experiencing slow charge times, run
the smart charge sequence (see next section).
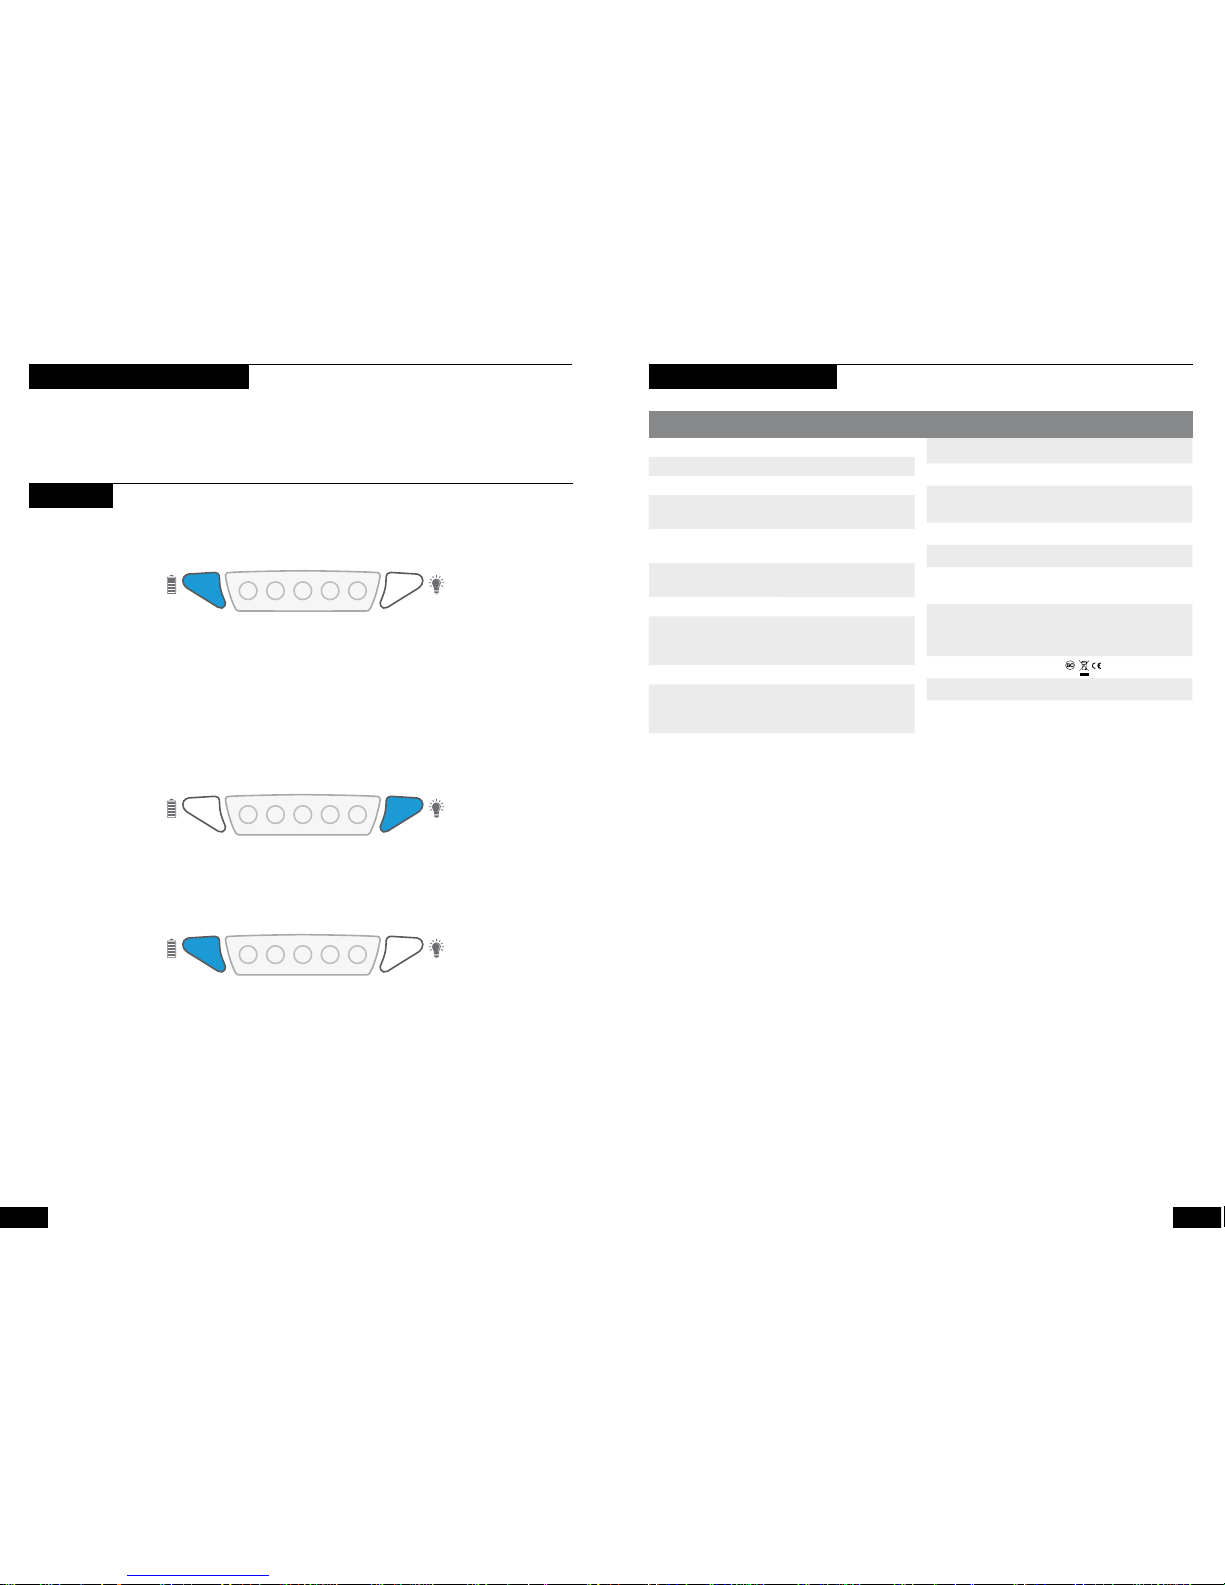
SMART CHARGE SEQUENCE
Venture 70’s advanced smart charging feature allows you to optimize and adapt its USB outputs to charge your
gear as fast as possible. This sequence runs independently for both USB ports – meaning you can set different
charging profiles for each port. Fastest profiles will be applied and saved until reset or the sequence is run again.
1. With your gear plugged into Venture 70’s USB port, press and hold the battery button for approximately 5
seconds to activate the smart charge sequence.
2. The blue indicator lights will begin to flash as different profiles are tested with your gear.
3. When the lights finish flashing, the fastest profile has been selected.
HOW IT WORKS: You might have noticed if you plug your device into a charger claiming a high output your
device still charges slowly. How quickly your device charges comes down to communication between the
charger and what you plug in. Every device has its own preference when it comes to charging, the challenge
is identifying the language used by the manufacturer to decode that preference. Venture 70’s smart charging
feature acts as a translator, identifying your device’s language, decoding and applying the fastest charging
profile possible, without overcharging or overheating. This feature makes Venture 70 one of the most
compatible chargers on the market.
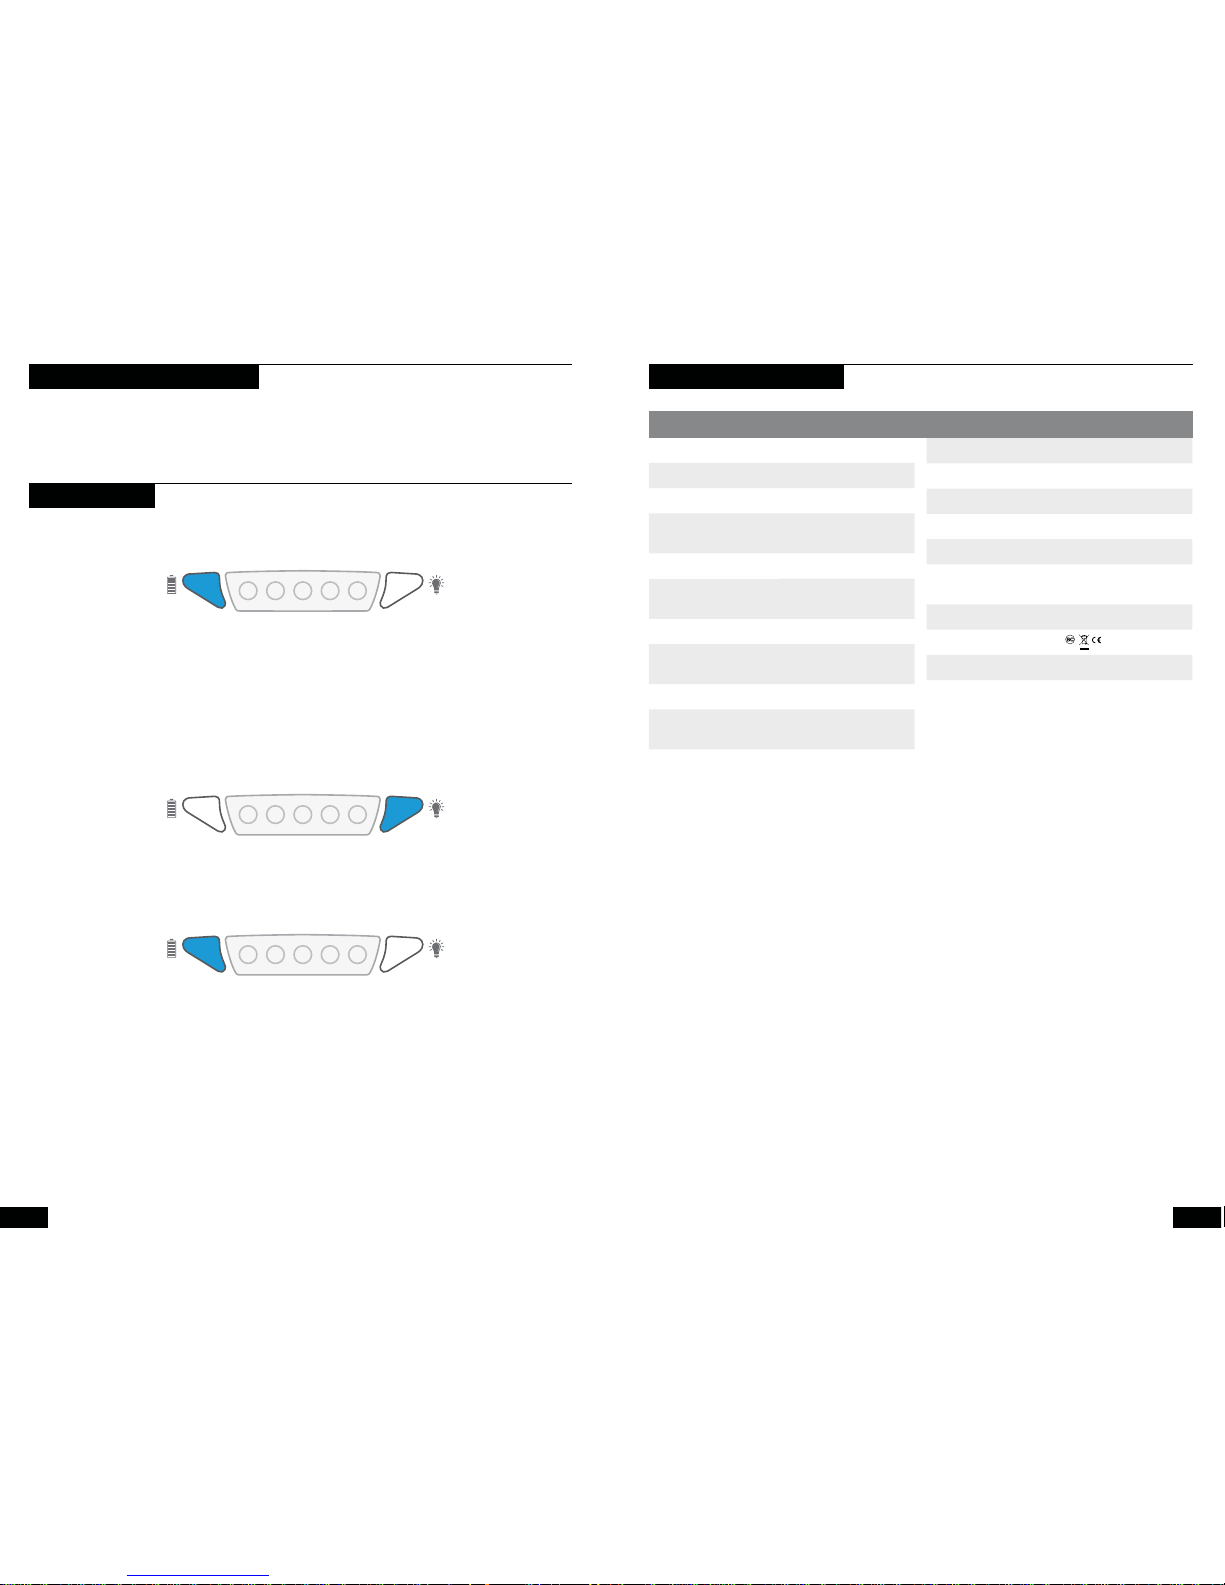
Blue Indicator Lights
Battery Button
FLASHLIGHT
We recommend running the smart charge sequence
anytime you experience slow charge times or when
plugging in new gear.
Venture 70 comes with a built-in 65 lumen multimode flashlight with five settings: high, low, and
multiple strobe modes (including SOS).
1. Press the flashlight button to activate the
flashlight.
2. Press and hold the flashlight button for
approximately 5 seconds – all the lights will
flash once indicating you’ve entered flashlight
selection mode.
Flashlight
Flashlight Button
3. With the flashlight button still held down, press
the battery button to cycle through 5 light
modes. The SOS setting is the 5th light.
Whichever mode you are in when you release the
flashlight button will become the default mode.
Avoid looking into the light when you turn it on – it’s
pretty dang bright.
Page 5

76
Venture 70 comes equipped with an IP67 rating. Spray it down, take it to the beach, leave it in the rain – and
never worry about rubber plugs. It’s engineered to get out, stay out and handle whatever Mother Nature can
throw your way – even a drop in a puddle.
WATERPROOF, RUGGED DESIGN
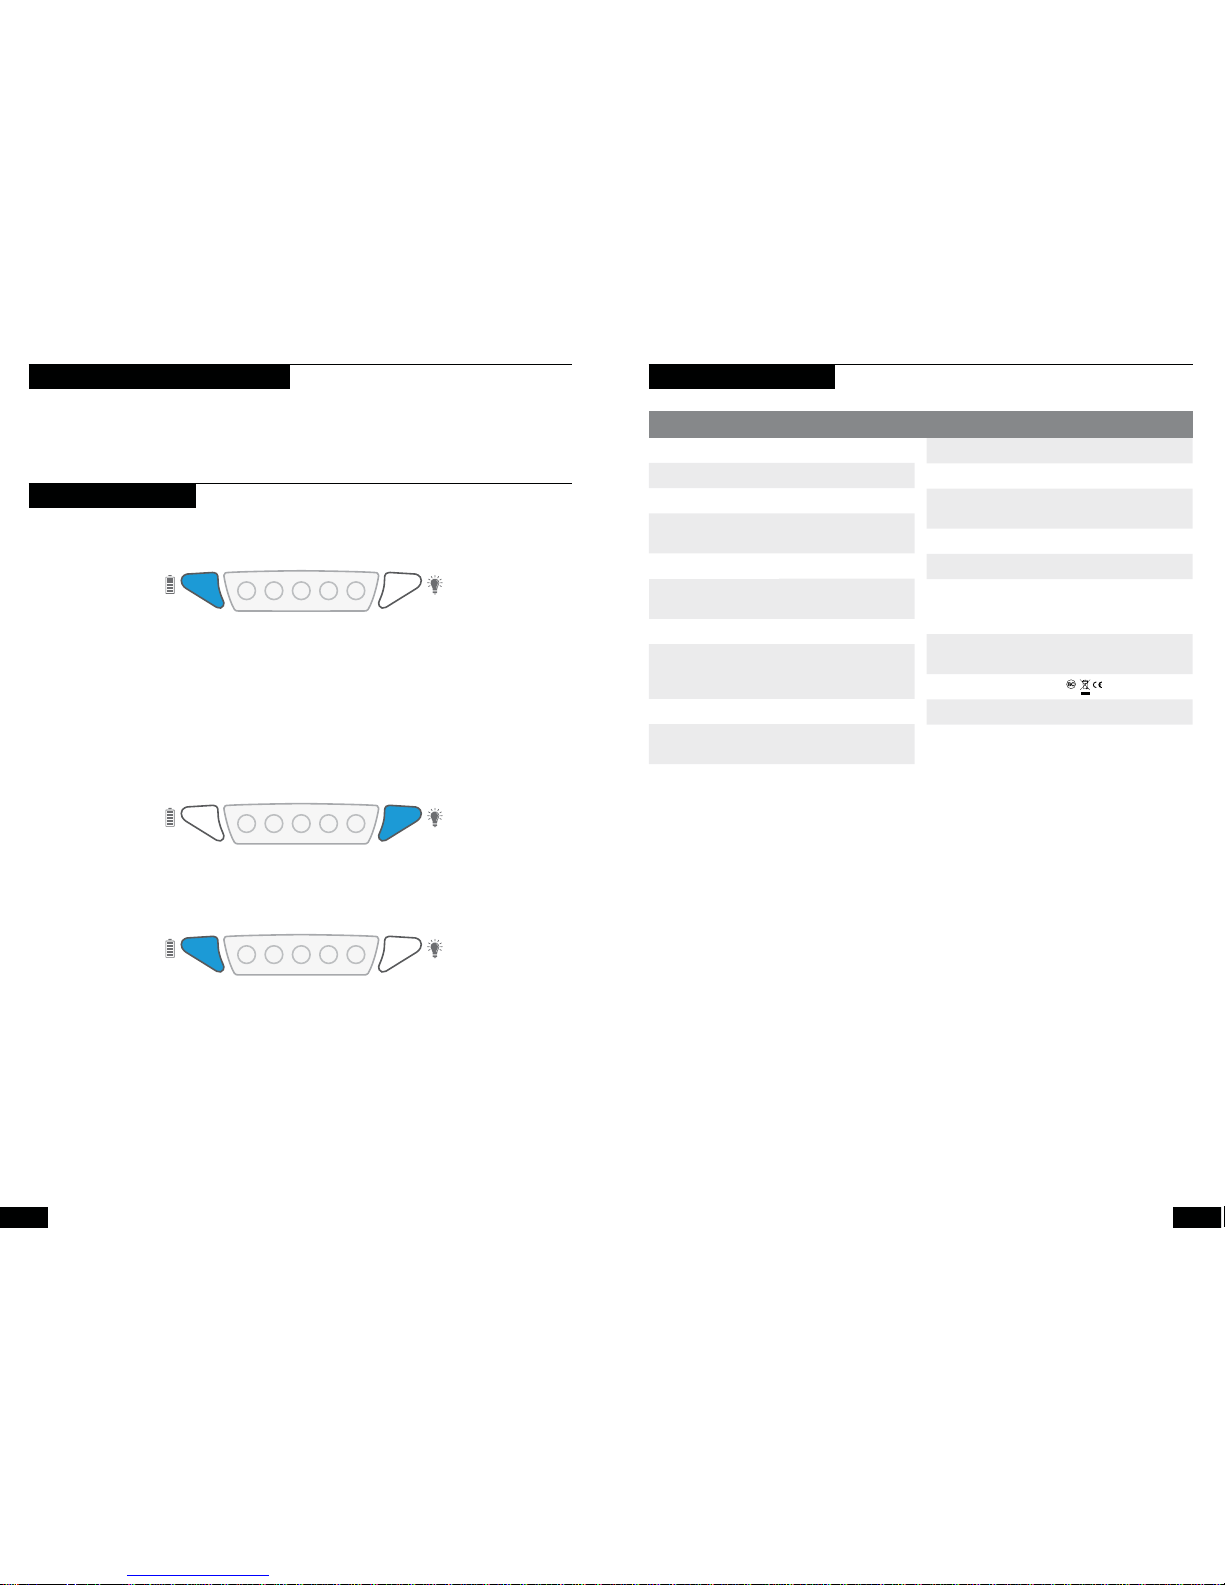
1. Check the battery level of Venture 70 by pressing the battery button. When Venture 70’s battery is dead,
the first blue indicator light will flash when the battery button is pushed.
TROUBLESHOOTING
2. Charge up Venture 70 by using an included cable.
3. Try a soft reset of Venture 70 (see below).
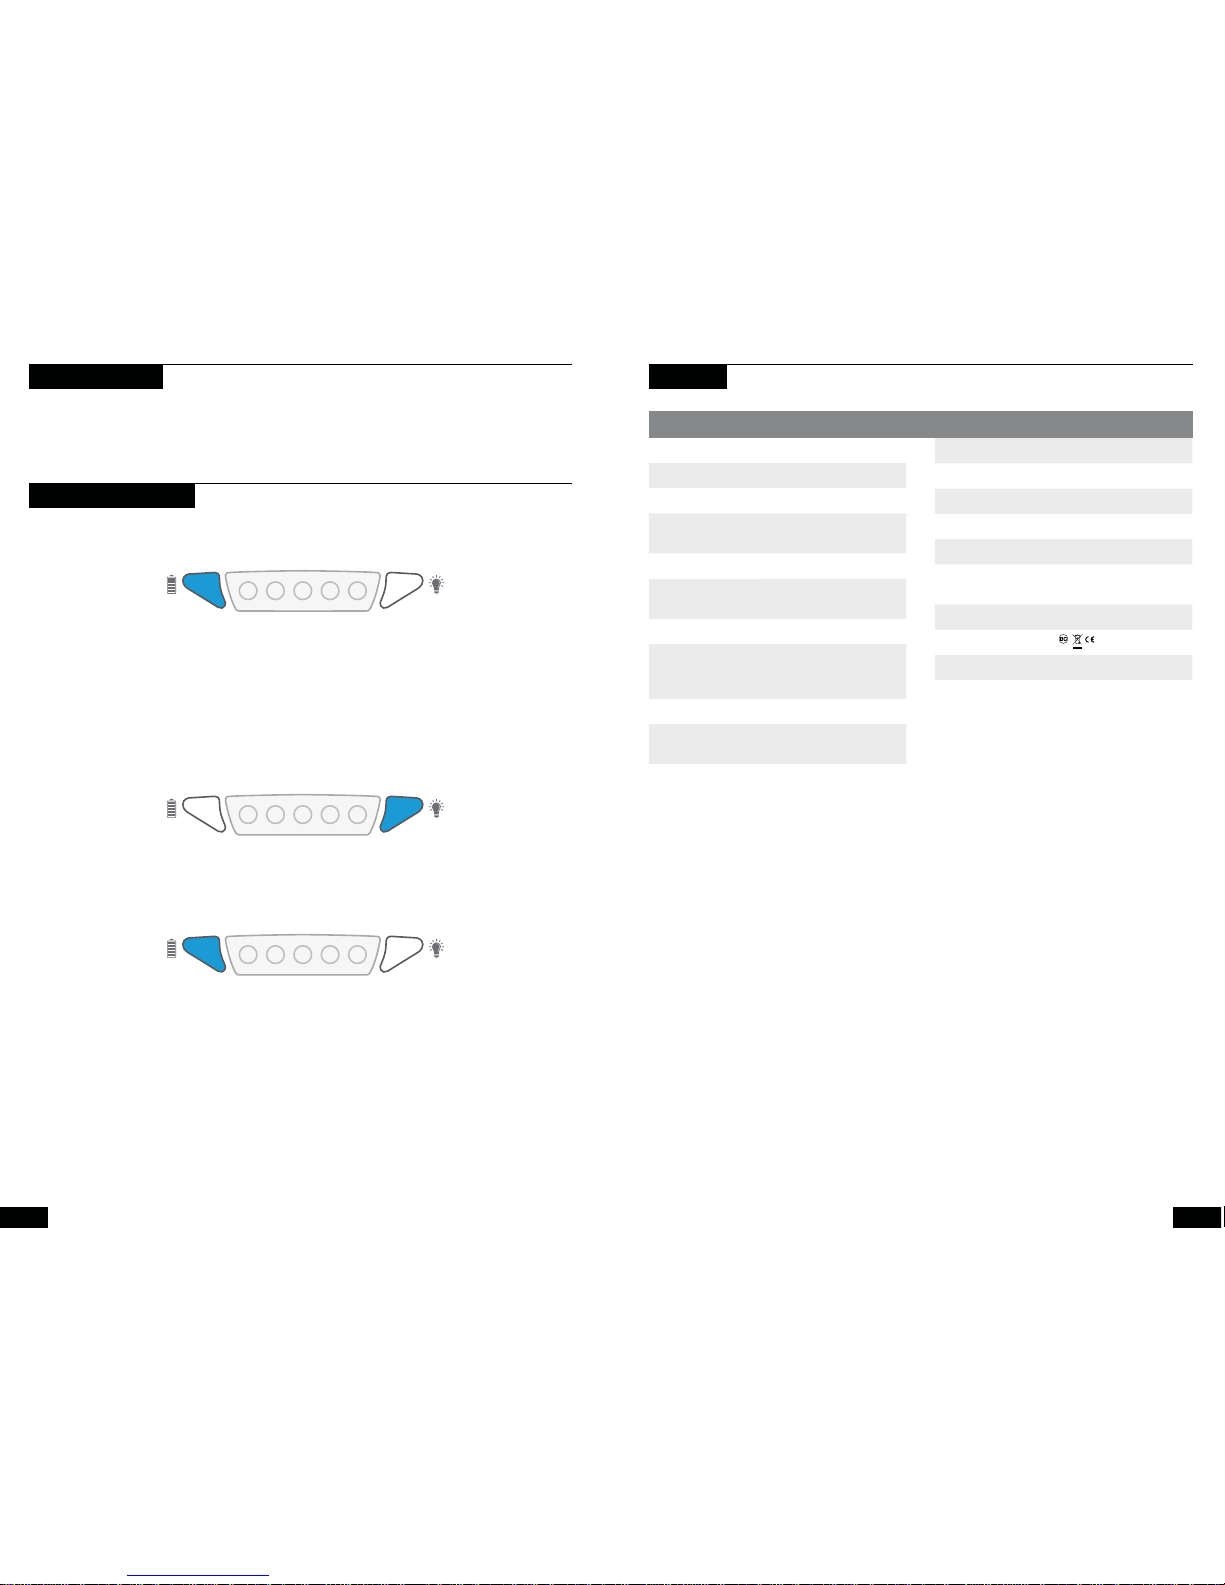
Soft Reset: Used to restart a frozen Venture 70, or if you’re having trouble charging gear.
1. Press and hold the flashlight button for approximately 35 seconds. You’ll see an initial flash of the lights,
indicating you’re entering flashlight selection mode.
2. When you release you will see the middle blue LED, indicating a successful reset.
3. Press the battery button or wait 5 seconds to resume normal operation.
General:
IP Rating IP67
LED (output) 65 Lumens, white LED
Chainable No
Weight 1 lb (454 g)
Dimensions 6.4 x 3.7 x 0.9 in
(16.3 x 9.5 x 2.35 cm)
Operating Usage Temp. 32-113F (0-45C)
Certs
Warranty 12 months
Be sure to activate your warranty
at goalzero.com/warranty
TECHNICAL SPECIFCATIONS
Battery:
Cell Chemistry Li-ion NMC
Cell Type 18650
Cell Capacity 71Wh
(3.7V, 19,200 mAh)
Lifecycles hundreds of cycles
Shelf-life Charge every 3-6
months
Fuses none
Management System Charging and low-
battery protection
built-in
Ports:
USB Port (output) 5V, up to 2.4A each
(12W max), regulated
USB-micro Port (input) 5V, up to 3A (15W max)
Venture 70
Page 6

98
FRANÇAIS
19,200 mAh
Batterie interne au lithium
longue durée avancée.
Étanchéité IP67,
conception antichocs.
Conception robusteUSB 2.4A Intelligent
Recharge de téléphone et
de tablette simultanée.
71Wh
19,200 mAh
Indicateur de batterie
Indicateur de charge à simple toucher +
lampe de poche multi-mode 65lumens
Le recharger
Charge à partir d’une prise USB
ou d’un panneau solaire. Rapide.
Cordon Micro-USB
vers USB inclus
Port USB
Recharger l’appareil
Port USB
Recharger l’appareil
Bouton lampe de poche
Bouton batterie
Cordon USB vers Micro USB inclus
ou cordon USB vers Lightning®
IP67
RATING
À l’aide d’un cordon micro-USB , recharger le Venture70 à partir
d’une source USB en direct.
1. Brancher le Venture70 dans n’importe quelle source USB à l’aide
d’un cordon micro-USB, comme celui fourni avec le Venture70.
2. La recharge est activée lorsque les voyants bleus du dessus
clignotent. Chaque voyant bleu représente 20% de la
capacité de la batterie. La vitesse de clignotement des voyants
bleus correspond à celle du chargement du Venture70. Un
clignotement lent indique un chargement lent, un clignotement
rapide indique un chargement rapide.
3. Le Venture70 est pleinement chargé et prêt à l’emploi lorsque
tous les voyants cessent de clignoter.
Le Venture70 permet l’alimentation simultanée vous permettant de
recharger l’appareil et le Venture70 en
même temps.
Lorsque la batterie du Venture70 est épuisée, le premier voyant bleu clignote quand on presse le bouton de la
batterie.
8heures
Port USB 2.4A
Nomad® 20
Panneau solaire
RECHARGE AVANT UTILISATION
Le Venture70 est conçu pour se recharger
rapidement avec les panneaux solaires Nomad de
Goal Zero.
4. Brancher le Venture70 dans le port USB d’un
panneau solaire Nomad avec un cordon microUSB.
5. La charge est activée lorsque les voyants bleus
clignotent. Chaque voyant bleu représente 20%
de la capacité de la batterie.
6. Le Venture70 est pleinement chargé et prêt à
l’emploi lorsque tous les voyants clignotent
ensemble.
7. La vitesse de clignotement des voyants
bleus correspond à celle du chargement du
Venture70. Un clignotement lent indique un
chargement lent, un
clignotement rapide
indique un chargement rapide.
8. Lorsque vous rechargez le produit à
l’énergie solaire, orientez le panneau vers le
soleil et constatez l’effet sur le chargement.
SOLAR READY™
or
or
Téléphone
8heures
Plein soleil
Téléphone Tablette
Tablette
Page 7
1110
Le Venture70 est conçu pour recharger les caméras subjectives, les téléphones portables, les tablettes et d’autres
appareils à alimentation USB.
CHARGER L’APPAREIL
Lampe frontale
10à20re
charges
Caméra subjective
10recharges
Téléphone
5à6recharges
Tablette
2recharges
1.
Brancher le cordon de recharge ou les cordons fournis dans les ports USB du Venture70 – les deux
fonctionnent simultanément; vous pouvez partager l’alimentation avec un ami.
2. La vitesse de clignotement des voyants bleus correspond à celle du chargement de l’appareil. Un
clignotement lent indique un chargement lent, un clignotement rapide indique un chargement rapide. Si les
temps de chargement sont trop lents, procéder à la séquence de recharge intelligente (voir section suivante).
SÉQUENCE SMART CHARGE
La fonctionnalité de recharge intelligente du Venture 70 vous permet d’ optimiser et d’adapter ses sorties
USB pour recharger l’appareil aussi vite que possible. Cette séquence s’exécute de façon indépendante pour
les deux ports USB – vous pouvez donc définir un profil de charge différent pour chacun. Les profils les plus
rapides s’appliqueront et seront sauvegardés jusqu’à la réinitialisation ou la prochaine exécution de la séquence.
1. Une fois branché l’appareil dans le port USB du Venture70, presser et maintenir enfoncé le bouton de la
batterie pendant environ 5secondes pour activer la séquence de recharge intelligente.
2. Les voyants bleus se mettent à clignoter pendant que différents profils sont testés pour l’appareil.
3. Lorsque les voyants cessent de clignoter, c’est que le profil le plus rapide a été sélectionné.
COMMENT ÇA MARCHE: Vous aurez peut-être remarqué que si vous branchez l’appareil dans un chargeur
revendiquant un niveau de sortie élevé, il se recharge lentement malgré tout. La vitesse du chargement de l’appareil
tient à la communication entre le chargeur et ce que vous branchez dessus. Chaque appareil possède ses propres
préférences en matière de chargement, la difficulté consiste à déterminer la langue utilisée par le fabricant pour
décoder cette préférence. La fonctionnalité de recharge intelligente du Venture70 opère comme un traducteur, elle
trouve la langue de l’appareil, la décode et applique le profil de chargement le plus rapide qui soit, sans surcharge ni
surchauffe. Cette fonctionnalité fait du Venture70 l’un des chargeurs les plus compatibles sur le marché.
Voyants bleus
Bouton batterie
LAMPE DE POCHE
Nous vous recommandons d’utiliser la séquence
de recharge intelligente chaque fois que le temps
de chargement est lent ou que vous branchez un
nouvel appareil.
Le Venture70 est équipé d’une lampe de poche
multi-mode intégrée de 65lumens offrant
cinq réglages: fort, faible, et plusieurs modes
clignotants (dont le SOS).
1. Presser le bouton lampe de poche pour activer
la lampe de poche.
2. Presser et maintenir enfoncé le bouton lampe de
poche pendant environ 5secondes – toutes les
lampes clignotent une fois pour indiquer l’entrée
Lampe de poche
Bouton lampe de poche
en mode de sélection de lampe de poche.
3. En maintenant toujours le bouton lampe de
poche enfoncé, presser le bouton batterie pour
parcourir les 5modes d’éclairage. Le SOS est le
5e mode.
Le mode dans lequel vous vous trouvez au moment
de relâcher le
bouton lampe de poche deviendra le mode par
défaut. Éviter de regarder la lumière une fois
allumée; elle est franchement éblouissante.
Page 8
1312
Le Venture70 est noté IP67. Éclaboussez-le, emmenez-le à la plage, laissez-le sous la pluie, sans jamais
vous inquiéter des prises en caoutchouc. Il est conçu pour rester dehors et résister à tout les caprices de
Dame nature, même une chute dans une flaque.
CONCEPTION ÉTANCHE ET ROBUSTE
1. Vérifier le niveau de la batterie du Venture70 en pressant le bouton batterie. Lorsque la batterie du
Venture70 est épuisée, le premier voyant bleu clignote quand on presse le bouton de la batterie .
DÉPANNAGE
2. Recharger le Venture70 à l’aide du cordon fourni.
3. Tenter une réinitialisation logicielle du Venture70 (voir ci-dessous)
Réinitialisation logicielle: Sert à redémarrer un Venture70 bloqué, ou en cas de difficulté à recharger un appareil.
1. Presser et maintenir enfoncé le bouton lampe de poche pendant environ 35secondes. Les lampes
clignoteront, indiquant l’entrée en mode de sélection de lampe de poche.
2. En relâchant, la DEL bleue du milieu s’allumera, indiquant que la réinitialisation a réussi.
3. Presser le bouton batterie ou attendre 5secondes avant de revenir à une utilisation normale.
Général:
Indice IP IP67
DEL (sortie) 65Lumens, DEL
blanche
Connexion en série Non
Poids 454g (1lb)
Dimensions 16,3x9,5x2,35 cm
(6,4x3,7x0,9po)
Température de
fonctionnement à
l’usage
0 à 45°C (32 à 113°F)
Certifications
Garantie 12mois
Ne pas oublier d’activer la garantie
sur goalzero.com/warranty
SPÉCIFICATIONS TECHNIQUES
Batterie:
Type de batterie Li-ion NMC
Type de pile 18650
Capacité des cellules 71Wh
(3.7V, 19,200 mAh)
Cycles de vie plusieurs centaines de
cycles
Durée de vie À recharger tous les 3à
6mois
Fusibles aucuns
Système de gestion Protection de charge
et de batterie faible
intégrée
Ports:
Port USB (sortie) 5V, jusqu’à 2,4A
chacun (12W max.), à
régulation
Port micro-USB
(entrée)
5V, jusqu’à 3A (15W
max)
Venture 70
Page 9
1514
日本語
19,200 mAh
高性能、長寿命の内蔵リ
チウム バッテリー 。
IP67 防水、耐衝撃設計。
屈強な設計スマート 2.4A USB
携帯電話とタブレットを
同時に充電できます。
71Wh
19,200 mAh
バッテリー インジ ケータ ー
ワンタッチ充 電インジ ケーター +
65 ル ーメン マル チモ ードフラッシュライト
USB 電源また は
ソーラーパネ ルから
充電できます。高 速。
Micro USB -
USB ケーブル 同梱
USB ポート
お使いの機器を充電
USB ポート
お使いの機器を充電
フラッシュライトボ タン
バッテリー ボタン
USB - Micro USB ケーブル
または USB - Lightning®
ケーブル 同梱
IP67
RATING
micro-USB ケーブルを使用して USB 電源から Venture 70 を
充電し ます。
1. Venture 70 を製品 に同梱されているタイプの micro-USB ケ
ーブルを使用して USB 電源に繋ぎます。
2. 上部の青色インジケーターライトが点滅すると、充電中を表
します。それぞれの青色インジケーターライトが 20% の充
電容量を表します。青色インジケーターライトの点滅速度が
Venture 70 の充電速度を表します。点滅が遅い場合は低速
充電、点滅が速い場合は急速充電です。
3. すべてのライトが点灯すると、Venture 70 の充電が完了し、
利用可能であることを表します。
Venture 70 はパススルー充電に対応しているため、Venture 70 と他の機器を同時に充電することができます。
バッテリーボ タンを押し たときに 一つ目 の青 色インジ ケーター ライトが点滅 すると、Venture 70 のバッテリーが切れて
いることを示しま す。
8 時間
2.4 A USB ポ ート
Nomad® 20
ソーラーパネ ル
使用前に充電してください
Venture 70 は、Goal Zero Nomad ソーラー パネル
から急速充電が可能な設計。
4. Venture 70 を Nomad ソーラーパネ ルの USB
ポ ートに micro-USB ケーブルを使用して接続。
5. 上部の青色インジケーターライトが点滅すると、
充電中を表します。それぞれの青色インジケータ
ーライトが 20% の充電容量を表します。
6. すべてのライトが同時に点滅すると Venture 70
の充電が完了し、利用可能であることを表します。
7. 青色インジケーターライトの点滅速度が
Venture 70 の充電速度を表します。点滅が
遅い場合は低速充電、点滅が速い場合は急
速充電です。
8. ソーラーパネルからの充電時は、パネルを太
陽の方向に向けて充電状況の変化を確かめ
ます。
SOLAR READY™
or
or
携帯電話
8 時間
直射日光
携帯電話
または
または
タ ブレ ット
タ ブレ ット
Page 10
1716
Venture 70 は POV カメラ、携帯電話、タブレット、その他 USB 電源機器を充電できるよう設計されています。
お使いの機器の充電
ヘッドランプ
再充電
10 〜 20回
POVカメラ
再充電
10 回
携帯電話
再充電
5 〜 6 回
タ ブレ ット
再充電
2 回
1. お手持ちの充電ケーブルまたは同梱のケーブルを使用して、Venture 70 の USB ポートに接続します – 同時にどちらの
機器も使用できるので、仲間と電源を共有できます。
2. 青色インジケーターライトの点滅速度が Venture 70 の充電速度を表します。点滅が遅い場合は低速充電、点滅が速い
場合は急速充電です。充電速度が遅い場合、スマート充電シーケンスをお試しください (次のセクションを参照)。
スマートな充電シーケンス
Venture 70 の高性能充電機能を使うと、USB 出力を最適化し、お使いの機器を出来る限り短時間で充電できるよう適応
することができます。このシーケンスは両方の USB ポートで 別々に動 作します – つまり、それぞれのポートに異なる充電
プロファイルを設定できます。リセットまたは再びシーケンスを実行するまで、一番高速なプロファイルが適用および保
存されます。
1. Venture 70 の USB ポートに機器を接続した状態で、バッテリ ーボ タンを約 5 秒間押したままにして、スマート充電
シーケンス を起動します。
2. 接続された機器に対して異なるプロファイルを試す際に、青 色インジケーターライトが点滅し始めます。
3. ライトの点滅が止まると、最も高速なプロファイルが選択されたことを示します。
仕組み:高出力をうたう充電器に機器を接続したにも関わらず充電速度が遅いことに気づくことがあります。機器の充電
速度は、充電器と接続されている機器間の通信に掛かってきます。それぞれの機器には独自の充電設定があり、こうした
設定を解読するために各メーカーが使用する言語を判別するのは容易ではありません。Venture 70 のスマート充電機
能は翻訳機の役目を果たし、お使いの機器の言語を判別して、過充電または過熱させることなしに、可能な限り高速な充
電プロファイルを解読および適用します。この機能により、Venture 70 は市場で最も高い互換性を誇る機器と言われて
います。
青色バッテリーインジ ケーター
バッテリー ボタン
フラッシュライト
充電速度が遅いと感じる時、新しい機器を接続するとき
には、ぜひスマート充電シーケンスをお試しください。
Venture 70 には。65 ルーメンのマルチモードフラッ
シュライトが内蔵されており、次の 5 種類の設定が使え
ます: ハイ、ロー、マルチストロボ・モード (SOS を含む)。
1. フラッシュライトボ タンを 押して、フラッ シュライトを作
動させます。
2. フラッシュライトボ タンを約 5 秒 間押したままにする
と、すべてのライトが点滅し、フラッシュライト選択モ
ードに 入ります。
フラッシュライト
フラッシュライトボ タン
3. フラッシュライトボ タンをそのまま押し続け、バッテリ
ーボ タンを 押して 5 種類 のライトモ ードを切り替 えま
す。5 番目の ライトが SOS 設定です。
どのモードに切り替えた時でも、フラッシュライトボ タン
を離すと、そのモードがデフォルトになります。ライトは
非常に明るいため、ライト点灯時はのぞき込まないよう
にします。
Page 11
1918
Venture 70 は IP67 規格に対応しています。水しぶきを掛けても、ビーチへ持っていっても、雨に濡らしても大丈夫。ゴ
ム製のプラグなら心配ありません。自然のさまざまな状況で使えるよう設計されており、水たまりに落としてしまっても問
題ありません。
防水、頑丈な設計
1. バッテリー ボタン を押して Venture 70 のバッテリーレ ベ ルを 確認し ます。バッテリー ボタン を押し たときに一つ目の
青色インジケーターライトが点滅すると、Venture 70 のバ ッテリーが 切れ ていることを表し ます。
トラブ ル シュ ー ティング
2. 同梱のケーブルを使用して Venture 70 を充電します。
3. Venture 70 のソフトリセットを 行い ます (下記参照)。
ソフトリセット:動作停止した Venture 70 の再起動または機器の充電で問題がある時に使用します。
1. フラッシュライトボ タンを約 35 秒間押したままにします。ライトが点滅すると、フラッシュライト選択モードに入ったこ
とが わかります。
2. ボタンを離すと真ん中の青色 LED が光り、リセットが 完了したことを表しま す。
3. バッテリー ボタン を押すか、5 秒待って通常の操作を再開します。
全 般:
IP 規格 IP67
LED (出力) 65 ル ー メ ン 、白 色 LED
チェーン 接 続 不可
重量 454 g
寸法 6.4 x 3.7 x 0.9 インチ
(16.3 x 9.5 x 2.35 cm)
使用可能温度域 0 〜 45C
安全規格
保証 12か月
必ず goalzero.com/warranty から
保証を有効にしてください
技術仕様
バッテリー:
電池化学特性 リチウムイオン NMC
セル種類 18650
電池容量 71Wh
(3.7V, 19.200 mAh)
耐用回数 数百サイクル
未使用期間 3 〜 6 か 月ごとに充 電して
くだ さい
フューズ なし
制御 システム Charging Protection およ
び Low Battery Protection
内蔵
ポ ー ト:
USB ポート(出力) それぞれ 5V 最大 2.4A (最
高 12W) 定格
micro-USB ポ ート
(入力)
5V, 最大 3A (最大15W)
製品名
Page 12
2120
DEUTSCH
19.200 mAh
Fortschrittlicher,
langanhaltender Lithiumakku
IP67 wasserdichtes,
schlagfestes Design.
Robustes DesignSmart 2,4A USB
Laden Sie ein Telefon und ein
Tablet - zur gleichen Zeit.
71Wh
19.200 mAh
Akkuanzeige
One-Touch Ladeanzeige +
65 Lumen Multi-Modus Taschenlampe
Laden Sie es
Wiederaufladen von USB
oder Solarpanel. Schnell.
Einschließlich Micro-USB
zu USB-Kabel
USB-Anschluss
Wiederaufladen Ihres
Geräts
USB-Anschluss
Wiederaufladen Ihres Geräts
Taschenlampen-Knopf
Akkuknopf
Einschließlich USB zu
Micro-USB Kabel oder USB zu
Lightning® Cable
IP67
RATING
Verwenden Sie ein Micro-USB Kabel, um Venture 70 von einer
geladenen USB-Quelle zu laden.
1. Stecken Sie Venture 70 an irgendeine USB-Quelle an, indem
Sie ein Micro-USB Kabel verwenden, wie das, das mit Venture
70 mitgeliefert wird.
2. Sie erkennen, dass es lädt, wenn blaue Leuchtanzeigen oben
beleuchtet sind und blinken. Jede blaue Leuchtanzeige stellt
20% Akkukapazität dar. Blaue Leuchtanzeigen blinken je
nachdem wie schnell Venture 70 lädt. Ein langsames Blinken
zeigt langsames Laden an, während schnelleres Blinken
schnelleres Laden anzeigt.
3. Venture 70 ist voll und betriebsbereit, wenn alle Lichter
leuchten.
Venture 70 ermöglicht durchlaufenden Strom, also können Sie Ihre Ausrüstung und Venture 70 gleichzeitig aufladen.
Wenn der Akku von Venture 70 leer ist, blinkt die erste blaue Leuchtanzeige wenn der Akkuknopf gedrückt wird.
8 Stunden
2,4 A USB Port
Nomad® 20
Solarmodul
VOR DER VERWENDUNG AUFLADEN
Venture 70 wurde konstruiert, um schnell von Goal
Zero Nomad Solarpanelen aufzuladen.
4. Stecken Sie Venture 70 mithilfe eines MicroUSB Kabels an den USB-Anschluss eines Nomad
Solarpanels an.
5. Sie erkennen, dass es lädt, wenn blaue
Leuchtanzeigen beleuchtet sind und blinken.
Jede blaue Leuchtanzeige stellt 20%
Akkukapazität dar.
6. Venture 70 ist voll und betriebsbereit, wenn
alle Lichter gleichzeitig leuchten.
7. Blaue Leuchtanzeigen blinken je nachdem
wie schnell Venture 70 lädt. Ein langsames
Blinken zeigt langsames Laden an, während
schnelleres Blinken schnelleres Laden
anzeigt.
8. Beim Laden mit Solar, richten Sie Ihr Panel
in Richtung Sonne aus, um den Effekt auf das
Laden zu sehen.
SOLAR READY™
or
or
Telefon
8 Stunden
Volle Sonne
Telefon Tablet
Tablet
Page 13
2322
Venture 70 wurde entwickelt, POV-Kameras, Telefone, Tablets und andere USB-betriebenen Geräte aufzuladen.
LADEN DES GERÄTS
Stirnlampe
10-20 x Aufladen
POV-Kamera
10 x Aufladen
Telefon
5-6 x Aufladen
Tablet
2 x Aufladen
1. Stecken Sie Ihr Ladekabel oder die mitgelieferten Kabel an die USB-Anschlüsse des Venture 70 an - beide
funktionieren gleichzeitig, so dass Sie Strom mit Ihrem Freund teilen können.
2. Die blauen Leuchtanzeigen blinken je nachdem wie schnell Ihre Geräte laden. Ein langsames Blinken
zeigt langsames Laden an, während schnelleres Blinken schnelleres Laden anzeigt. Sollten Sie langsame
Ladezeiten feststellen, lassen Sie Smart Charge ablaufen (siehe nächsten Abschnitt).
SMART CHARGE ABLAUF
Die moderne Smart Charge Funktionalität von Venture 70 ermöglicht es Ihnen, dessen USB-Ausgänge zu optimieren
und anzupassen, um Ihre Geräte so schnell wie möglich zu laden. Dieser Ablauf erfolgt unabhängig für beide
USB-Anschlüsse - dies bedeutet, dass Sie für jeden Anschluss unterschiedliche Ladeprofile erstellen können. Die
schnellsten Profile werden angewendet und gespeichert bis sie zurückgesetzt werden oder der Ablauf erneut erfolgt.
1. Wenn Ihre Geräte an den USB-Port von Venture 70 angesteckt sind, drücken und halten Sie den Akkuknopf etwa 5
Sekunden gedrückt, um den Smart Charge Ablauf zu aktivieren
2. Die blauen Lichtanzeigen fangen an zu blinken, während verschiedene Profile mit Ihren Geräten getestet werden.
3. Wenn die Lichter aufhören zu blinken, wurde das schnellste Profil ausgewählt.
SO FUNKTIONIERT ES:
Vielleicht haben Sie bemerkt, dass Ihr Gerät immer noch langsam lädt, wenn Sie es an ein
Ladegerät anschließen, das behauptet eine hohe Leistung zu haben. Wie schnell Ihr Gerät lädt, liegt an der Kommunikation
zwischen dem Ladegerät und was Sie anschließen. Jedes Gerät hat seine eigene Präferenz was das Laden anbelangt,
die Herausforderung ist, die von dem Hersteller verwendete Sprache zu identifizieren, um diese Präferenz zu dekodieren.
Die Smart Charge Funktionalität von Venture 70 agiert als Übersetzer, indem sie die Sprache Ihres Gerätes identifiziert,
dekodiert und das schnellstmögliche Ladeprofil anwendet, ohne zu überladen oder überhitzen. Diese Funktionalität macht
Venture 70 zu einem der kompatibelsten Ladegeräte auf dem Markt.
Blaue Lichtanzeigen
Akkuknopf
TASCHENLAMPE
Wir empfehlen, immer Smart Charge ablaufen zu
lassen, wenn Sie langsame Ladezeiten feststellen
oder neue Geräte anschließen.
Venture 70 wird mit einer eingebauten 65 Lumen
Mulit-Modus Taschenlampe mit fünf Einstellungen
geliefert: stark, schwach und verschiedene
Stroboskop-Modi (einschließlich SOS).
1. Drücken Sie den Taschenlampen-Knopf, um die
Taschenlampe zu aktivieren.
2. Drücken Sie den Taschenlampen-Knopf und
halten Sie ihn etwa 5 Sekunden gedrückt – alle
Lichter blinken einmal, um anzuzeigen, dass Sie
Taschenlampe
Taschenlampen-Knopf
im Taschenlampen-Auswahlmodus sind.
3. Halten Sie den Taschenlampen-Knopf weiter
gedrückt und drücken Sie den Akku-Knopf ,
um durch die 5 Lichtmodi zu springen. Die SOS
Einstellung ist das 5. Licht.
Der Modus, in dem Sie sind, wenn Sie den
Taschenlampen-Knopf loslassen, wird zum
Standardmodus. Vermeiden Sie, in das Licht zu
schauen, wenn Sie es anschalten - es ist ganz
schön hell.
Page 14
2524
Venture 70 ist ausgestattet mit einem IP67 Schutz. Spritzen Sie es ab, nehmen Sie es mit an den Strand,
lassen Sie es im Regen liegen - und kümmern Sie sich nie um Gummistopfen. Es wurde konzipiert, um draußen
zu sein, draußen zu bleiben und klar zu kommen mit allem, was Mutter Natur für Sie bereithält - sogar in eine
Pfütze zu fallen.
WASSERDICHTES, ROBUSTES DESIGN
1. Prüfen Sie den Akkustand des Venture 70, indem Sie den Akku-Knopfdrücken. Wenn die Batterie von
Venture 70 tot ist, blinkt die erste blaue Leuchtanzeige wenn der Batterieknopf gedrückt wird.
FEHLERBEHEBUNG
2. Laden Sie Venture 70 mithilfe eines mitgelieferten Kabels.
3. Versuchen Sie einen Warmstart von Venture 70 (siehe unten).
Warmstart: Verwendet, um ein Venture 70, das sich aufgehängt hat, neu zu starten oder wenn Sie
Probleme haben, Geräte zu laden.
1. Drücken Sie den Taschenlampen-Knopf und halten Sie ihn etwa 35 Sekunden lang gedrückt. Sie werden
ein erstes Aufblinken der Lichter sehen, um anzuzeigen, dass Sie im Taschenlampen-Modus sind.
2. Wenn Sie loslassen, sehen Sie die mittlere blaue LED, was ein erfolgreiches Zurücksetzen anzeigt.
3. Drücken Sie den Akku-Knopf oder warten Sie 5 Sekunden, um wieder in den normalen Betrieb überzugehen.
Allgemein:
IP-Schutz IP67
LED (Ausgang) 65 Lumen, weiße LED
Verkettbar Nein
Gewicht 454 g (1 lb)
Abmessungen 16,3 x 9,5 x 2,35 cm
(6,4 x 3,7 x 0,9 in)
Betriebstemperatur 32-113F (0-45C)
Zertifikate
Garantie 12 Monate
Vergessen Sie nicht, die Garantie zu aktivieren
bei goalzero.com/warranty
TECHNISCHE SPEZIFIKATIONEN
Akku:
Zellchemie Li-Ion NMC
Zelltyp 18650
Zellkapazität 71Wh
(3,7V, 19.200 mAh)
Lebenszyklen Hunderte von Zyklen
Haltbarkeit Alle 3-6 Monate
aufladen
Sicherungen keine
Managementsystem Eingebauter Lade- und
Tiefentladeschutz
Anschlüsse:
USB-Anschluss
(Ausgang)
5V, je bis zu 2,4A (12W
max.), reguliert
USB-Micro Anschluss
(Eingang)
5V bis zu 3A (max.
15W)
Venture 70
Page 15
2726
ESPAÑOL
19.200mAh
Batería interna de litio,
avanzada y de larga duración.
Diseño IP67
resistente a los golpes y al agua.
Diseño duraderoUSB inteligente de 2.4A
Cargue un teléfono y una
tableta al mismo tiempo.
71Wh
19.200 mAh
Indicador de la batería
Indicador de carga de un solo toque +
linterna de modo múltzle y 65lúmenes
Cárguelo
Recárguelo mediante un USB
o un panel solar. Rápido.
Cable micro USB
a USB incluido
Puerto USB
Recargue su dispositivo
Puerto USB
Recargue su dispositivo
Botón de la linterna
Botón de la batería
Cable USB a micro USB o cable
USB a Lightning® incluido
IP67
RATING
Utilice un cable micro USB para cargar Venture 70 desde una
fuente USB en directo.
1. Conecte Venture 70 a cualquier fuente USB mediante un
cable micro USB, como el que se incluye con Venture 70.
2. Sepa que Venture 70 está cargando cuando las luces
indicadoras azules en la parte superior se iluminen y
oscilen. Cada luz indicadora azul representa 20% de
la capacidad de la batería. Las luces indicadoras azules
parpadearán de acuerdo a la rapidez con la que cargue
Venture 70. Un parpadeo lento indica una carga lenta,
mientras que un parpadeo más rápido indica una carga más
rápida.
3. Venture 70 está listo para usarse cuando todas las luces
se encuentran estables.
Venture 70 habilita una potencia de paso para que pueda cargar su equipo y Venture 70 al mismo tiempo.
Cuando la batería del Venture 70 esté sin carga, la primera luz indicadora azul parpadeará cuando se
presione el botón de la batería
8horas
Puerto USB de 2.4A
Nomad® 20
Panel solar
CARGUE ANTES DE USAR
Venture 70 está diseñado para cargar de manera
rápida con los paneles solares Nomad de Goal Zero.
4. Conecte Venture 70 en el puerto USB de un
panel solar Nomad mediante un cable micro USB.
5. Sepa que Venture 70 está cargando cuando las
luces indicadoras azules se iluminen y oscilen.
Cada luz indicadora azul representa 20% de la
capacidad de la batería.
6. Venture 70 está listo para usarse cuando todas
las luces oscilen juntas.
7. Las luces indicadoras azules parpadearán
de acuerdo a la rapidez con la que cargue
Venture 70. Un parpadeo lento indica una
carga lenta, mientras que un parpadeo más
rápido indica una carga más rápida.
8. Cuando la carga sea mediante paneles
solares, posicione su panel hacia el sol para
ver cómo afecta a la carga.
SOLAR READY™
or
or
Teléfono
8horas
A pleno sol
Teléfono Tableta
Tableta
Page 16
2928
Venture 70 está diseñado para cargar cámaras POV, teléfonos, tabletas y otros dispositivos
alimentados mediante USB.
CARGUE SU EQUIPO
Lámpara para cabeza
10 a 20 recargas
Cámara POV
10 recargas
Teléfono
5 a 6 recargas
Tableta
2 recargas
1. Conecte su cable de carga o los cables incluidos a los puertos USB del Venture 70, ambos van a funcionar al
mismo tiempo para que pueda compartir potencia con un compañero.
2. Las luces indicadoras azules parpadearán de acuerdo a la rapidez con la que cargue su equipo. Un parpadeo
lento indica una carga lenta, mientras que un parpadeo más rápido indica una carga más rápida. Si está
experimentando tiempos de carga lentos, ejecute la secuencia de carga inteligente (vea la siguiente sección).
SECUENCIA DE CARGA INTELIGENTE
La característica avanzada de carga inteligente de Venture 70 le permite optimizar y adaptar sus salidas USB
para cargar su equipo lo más rápido posible. Esta secuencia se ejecuta de manera independiente para los dos
puertos USB, lo que significa que usted puede establecer diferentes perfiles de carga para cada puerto. Se
aplicarán y guardarán perfiles más rápidos hasta que se restablezca o se ejecute la secuencia nuevamente.
1. Con su equipo conectado al puerto USB de Venture 70, mantenga pulsado el botón de la batería por
aproximadamente 5 segundos para activar la secuencia de carga inteligente.
2. Las luces indicadores azules empezarán a parpadear a medida que se prueben diferentes perfiles con su
equipo.
3. Cuando las luces terminen de parpadear, el perfil más rápido ha sido seleccionado.
CÓMO FUNCIONA: Puede haber notado si conecta su dispositivo a un cargador que demanda una alta
potencia de salida, su dispositivo todavía carga lentamente. La rapidez con la que cargue su dispositivo
dependerá de la comunicación entre el cargador y lo que conecta. Cada dispositivo tiene su propia
preferencia cuando se trata de la carga, el desafío es identificar el lenguaje utilizado por el fabricante para
decodificar esa preferencia. La característica de carga inteligente de Venture 70 funciona como un traductor,
identificando el lenguaje del dispositivo, decodificando y aplicando el perfil de carga más rápido posible, sin
sobrecargarse o sobrecalentarse. Esta característica hace que Venture70 sea uno de los cargadores más
compatibles en el mercado.
Luces indicadoras azules
Botón de la batería
LINTERNA
Recomendamos ejecutar la secuencia de carga
inteligente cada vez que experimente tiempos
de carga lentos o al conectar un nuevo equipo.
Venture 70 viene con una linterna de modo
múltiple y 65 lúmenes integrada con cinco tipos
de configuración: alta, baja, y estroboscópicas
múltiples (incluido SOS).
1. Presione el botón de la linterna para activar la
linterna.
2. Mantenga pulsado el botón de la linterna
durante aproximadamente 5segundos, todas las
luces parpadearán una vez, lo que indica que ha
Linterna
Botón de la linterna
entrado al modo de selección de la linterna.
3. Con el botón de la linterna todavía presionado,
pulse el botón de la batería para cambiar entre 5
modos de luz. La configuración SOS es la quinta
luz.
Sea cual sea el modo en el que se encuentre cuando
suelte el
botón de la linterna, este se convertirá en el modo
predeterminado. Evite mirar hacia la luz cuando la
encienda, es demasiado brillante.
Page 17
3130
Venture 70 viene equipado con una clasificación IP67. Rocíelo, llévelo a la playa, déjelo en la lluvia, y no se
preocupe nunca por los tapones de goma. Está diseñado para poder sacarlo, dejarlo fuera y tratar con lo que
la madre naturaleza pueda lanzar en su camino, incluso soporta una caída en el charco.
DISEÑO DURADERO Y RESISTENTE AL AGUA
1. Compruebe el nivel de la batería del Venture 70 al pulsar el botón de la batería. Cuando la batería del
Venture 70 esté sin carga, la primera luz indicadora azul parpadeará cuando se pulse el botón de la
batería.
SOLUCIÓN DE PROBLEMAS
2. Cargue Venture 70 mediante el uso del cable que viene incluido.
3. Intente un soft reset de Venture 70 (vea más adelante).
Soft reset: Se utiliza para restablecer un Venture 70 congelado, o si tiene problemas para cargar un equipo.
1. Mantenga pulsado el botón de la linterna por aproximadamente 35segundos. Verá un destello inicial de
las luces, lo que indica que está entrando en el modo de selección de la linterna.
2. Al soltar, verá el LED azul del medio, lo que indica un restablecimiento exitoso.
3. Presione el botón de la batería o espere 5 segundos para reanudar el funcionamiento normal.
General:
Clasificación IP IP67
LED (salida) 65lúmenes, LED
blanco
Se puede enlazar no
Peso 1lb (454g)
Dimensiones 6,4 x 3,7 x
0,9pulgadas
(16,3 x 9,5 x 2,35cm)
Temperatura en
operación
32-113F (0-45C)
Certificaciones
Garantía 12meses
Asegúrese de activar su garantía
en goalzero.com/warranty
ESPECIFICACIONES TÉCNICAS
Batería:
Química de la celda Li-ion NMC
Tipo de celda 18650
Capacidad de la
batería
71Wh
(3,7V, 19.200 mAh)
Ciclos de vida Cientos de ciclos
Vida útil Carga cada 3 a
6meses
Fusibles Ninguno
Sistema de
administración
Protección para
carga y batería baja
incorporada
Puertos:
Puerto de USB (salida) 5V, hasta 2.4A (12W
máx.), regulado
Puerto micro USB
(entrada)
5V, hasta 3A (15W
máximo)
Venture 70
Page 18

Page 19

34
GOAL ZERO HEADQUARTERS
675 West 14600 South
Bluffdale, UT 84065
Designed in the U.S.A.
Made in China
1-888-794-6250
Venture and Nomad are trademarks of Goal Zero.
Hero and Apple are registered trademarks
of GoPro, Inc. and Apple, Inc. respectively.
SM111617
This equipment has been tested and found to comply with the limits for a Class
B digital device, pursuant to part 15 of the FCC Rules. These limits are designed
to provide reasonable protection against harmful interference in a residential
installation. This equipment generates, uses and can radiate radio frequency
energy and, if not installed and used in accordance with the instructions, may
cause harmful interference to radio communications. However, there is no
guarantee that interference will not occur in a particular installation. If this
equipment does cause harmful interference to radio or television reception,
which can be determined by turning the equipment off and on, the user is
encouraged to try to correct the interference by one or more of the following
measures:
—Reorient or relocate the receiving antenna.
—Increase the separation between the equipment and receiver.
—Connect the equipment into an outlet on a circuit different from that to which
the receiver is connected.
—Consult the dealer or an experienced radio/TV technician for help.
This device complies with part 15 of the FCC Rules. Operation is subject to the
following two conditions: (1) This device may not cause harmful interference, and
(2) this device must accept any interference received, including interference that
may cause undesired operation.
 Loading...