


Operation Instruction
Please read this manual carefully before you use
this unit, and keep it well for further checking.
Vega X1
Extreme
GO4 Vega X1 user guide

FCC Verificatio n
NOTE: This equipment has been tested and found to comply with the limits for
Class B digital device, pursuant to part 15 of the FCC Rules. These limits are
designed to provide reasonable protection against harmful interference in a
residential installation. This equipment generates, uses and can radiate radio
frequency energy and, if not installed and used in accordance with the
instructions, may cause harmful interference to radio or television reception,
which can be determined by turning the equipment off and on, the user is
encouraged to try to correct the interference by one or more of the following
measures:
• Reorient or relocate the receiving antenna
• Increase the separation between the equipment and the receiver
• Connect the equipment into an outlet on a circuit dif
ferent from that to which
the receiver is connected
• Consult the dealer or an experienced radio/TV technician for help.
IMPORTAN T NOTE: Prohibit ion ag ainst eavesdropping
Except for the operations of law enforcement officers conducted under lawful
authority, no person shall use, either directly or indirectly, a device operated
pursuant to the provisions of this Part for the purpose of overhearing or
recording the private conversations of others unless such use is authorized
by all of the parties engaging in the conversation.
(Impor tant) Le gal Mumbo Jumbo
GO4 Vega X1 user guide

1
2
3
4
5
7
8
9
10
14
15
19
22
23
24
Contents
Introduction
Getting Started
MicroSD Card
Charging
Button Definitions
How to Record and Take a Photo
Useful Functions
Delete and Copy Files
Video Setup
System Setup
FAQ
What's in the Package?
Specifications
LED Definitions
About Record Quality
File Playback
12
GO4 Vega X1 user guide

L
USB | HDMI
MicroSD card slot
Microphone
Scr een Icons
1
Lens
LED indicator
Speaker
OK/Playback
Mode/Return
LED indicator
Zoom out/
Fast forward/
Volume -/Down
Zoom in/
Fast backward/
Volume +/UP
Power/Record/Photo
Product Layout
Introduction
1
Mute recording
2
Recording mode
3
Recording resolution
4
Remaining time of memory
(in recording, it will show recorded time)
5
Motion detection symbol
6
Cycle recording symbol
7
Current storage memory card
(1 means internal memory; 2 means card)
8
Battery indicator
9
GPS symbol
10
Date indicator( Day/month/year)
11
Time indicator (hour/min./sec.)
12
Car plate number
13
GPS coordinate
1
00: 37:58
30/ 11/201 2 10: 23:41
CAR D V
M C
1
N:0 0.000 00° E:000 .00000°
2
3
4 5 6 7 8
9
10
11
12
13
FUL L HD30
L
GO4 Vega X1 user guide
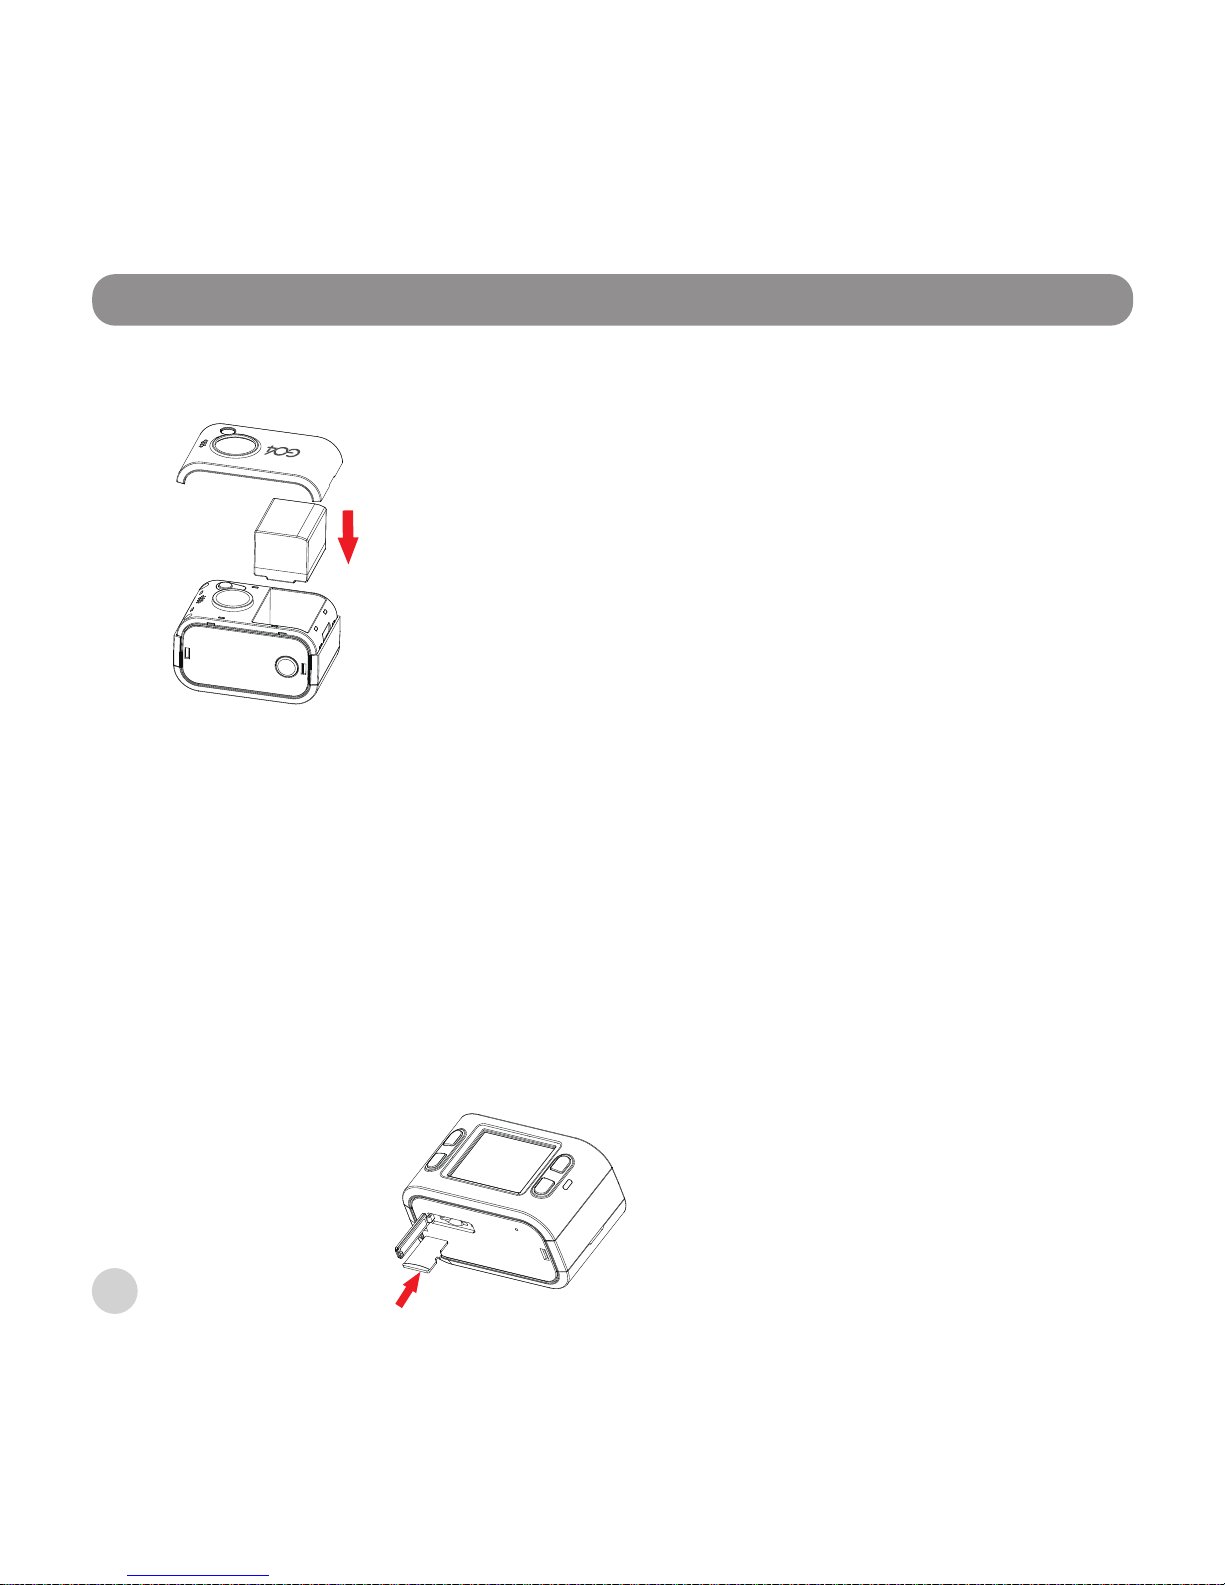
Install batteries
Charging
Connect the USB cable to camera USB port, insert the charger to socket and wait
for 2-3 hours. During charging, the LED is yellow. When the battery is full, yellow
LED will turn off.
Getting Star ted
Inser t Micro SD Car d
Hold the camera; make sure buttons are upward; Confirm the Micro SD Card
direction and the side with words towards to display screen; Push Micro SD
Card into card slot gently, and pay attention to the directions. If insert the
card wrongly, it will get stuck; When fully insert the card, it will remind you with
sound; Press the card and take the card out, this will release the lock, and card
will be pop out. Please take out the Micro SD Card gently for the spring is very
powerful.
2
GO4 Vega X1 user guide
Setup your DVR menu
Connect your camera to TV or display screen through LCD or HDMI cable, enter into
menu by pressing button. The best steps are:
Set the recording Quality.
Select the video resolution.
Set up the video mode(Auto/Sunny/Cloudy/Rainy/Snowy) .
Format your SD Card.
Set up time and date(If you have GPS, time will be updated automatically, but
you need to select the time zone you located).
Select the video split option for your video.
Micro SD Card
Select Micro SD Car d
Your camera supports max memory is up to 32GB.
1 GB can store 7-30 minutes video. For more information about image and quality
please refer to details below.
We recommend using 8GB card minimum. 16GB or 32GB card will be better for
full HD recording.
To ensure the card transfer speed, we highly recommend using a class 4 or higher
card.
Find out these icons
MicroSD Card
3
GO4 Vega X1 user guide

Charging
You can charge your camera by USB por t left side
Plug mini- USB to USB adaptor, and the other end to your camera USB interface.
Plug USB adaptor to your power socket.
Do not connect this camera to any power source that is not 5V. It is safe
to connect it to your computer or the wall charger in the package.
Charging via computer
It is not enough for currency (5V 500mA) via computer USB Port,
although the battery is small, but it is very strong, so need more
power. With our charger (5V 1000mA), you can get it worked perfectly.
Charging status indicator
When the camera is charging, the yellow LED on right side will light on, when it is
fully charged, this LED will off;
It need about 2.5 hours to be fully charged if you use the attached USB charger;
But if you charge via computer with the USB cable, it will take more time;
Charging
4
GO4 Vega X1 user guide

Button definitions
Power on: press this button and hold it down for 2 seconds to power on.
Power off: in preview mode, press this button and hold it down for 2
seconds.
Record: in record mode, press this button, it will start recording.
Stop Recording: when recording, press this button to stop.
Photo: in photo mode, press this button to take a photo. Snapshot: during
play backing, press to take a snapshot.
[Power / Record/ Photo]
Button Definitions
Change to playback mode
In record preview mode, press to enter video playback.
In photo mode, press to enter photo playback.
Photo slide view: during photo play backing, press to make slide view.
In playback
Start playback.
Pause playback.
Resume normal playbacks in fast forward or fast backward.
Confirm in menu settings
OK Button
Mute recording
while recording, press OK button to turn off microphone.
5
GO4 Vega X1 user guide

Mode Button
Mode change
in preview mode, press and change between the recording mode, photo
mode, and setting mode.
Delete or copy file
in 6 blocks preview mode, hold this button, to delete or copy file.
Return to original mode
in 6 blocks preview mode, press this button to switch to record mode or
photo mode.
Quit playback
while playing video, press to exit playing and get back to 6 blocks
preview mode.
Exit menu
in setting mode, press to exit.
File protect
in recording, press to protect this video file. This file will not be erased by
normal cycle recording.
Digital zoom
While in recording mode, no matter preview or recording mode, press [<</+/ ]
to zoom in and [>>/-/ ] to zoom no zoom function for 1920*1280
and 1280*720@50 resolution.
Photo zoom
In photo mode, press [<</+/ ] to zoom in and [>>/-/ ] to zoom out.
and
6
GO4 Vega X1 user guide

Left/Right navigation
In 6 blocks playback mode, press this button to choose file.
Fast forward and fast backward
In play backing, hold [>>/-/ ] to make fast forward; hold [<</+/ ]to fast backward.
You can choose between 4x/8x/16x three different speeds.
Volume /
While playback video, press this button to adjust the volume. You can choose
the volume between off, 1, 2, and 3.
Menu select
In setting mode, press this button to select function or select between main page and
second page.
Blue
Blue means the device is idle now, and it is waiting for your instructions. If it is flashing,
means it is low power now.
Red
Flashing red means it is recording now. It is red, but no flashing.
It means the card is full now.
Green
Flashing green means it is searching for satellite signal.
Green but no flash means satellite signal is ready.
LED definitions
Yellow
Battery is under charging now. If the yellow LED turns off, the battery is full now.
LED Definitions
7
GO4 Vega X1 user guide

How to r ecor d?
How to take a photo?
Record
After the camera is powered on, press power button to start.
The red LED is blinking now.
Quick Record
Before the camera is powered on, hold the power button for 2 seconds,
it will power on and start recording. The red LED is blinking now.
*This function need to set up in the menu.
After the camera is powered on, you can press [mode] button to switch to
photo mode. Press the power button, it will take a phone.
*You can choose 0.9/2/3/3.5M definition. You can set it in the menu.
After you set the definition, it will show on the screen.
* About the rec LED, you can turn it off in the menu.
1
2
1
3M
30/11/ 2012 10:23 :41
1633
1
CAR DV
L
2
How to record and take a photo?
8
GO4 Vega X1 user guide

Resolution and quality will affect badly how many you can record, please read
these data carefully:
Video Quality
Resolution
720p
1080p
L
4007kbps
( 30 min/GB)
8109kbps
( 15 min/GB)
M
6270kbps
( 20 min/GB)
10284kbps
( 11 min/GB)
H
8334kbps
( 15 min/GB)
12361kbps
( 9min/GB)
Photo quality
3.5M
3M
2M
0.9M
Photo quality
Photo resolution
2560 x 1440
2403 x 1296
1920 x 1080
1280 x 720
Size
900 photos/GB
1000 photos/GB
1500 photos/GB
3500 photos/GB
About Recording Quality
9
GO4 Vega X1 user guide

This Mini- HDMI port is a good interface, you can connect it to HD TV or Display
screen. You need a HDTV or High Resolution Display screen with HDMI input.
Connect HDMI Cable to Mini HDMI port of your camera.
Playback via Mini HDMI
Set up your TV or Display screen to the corresponding channel.
Container: MP4
Compression: MPEG-4 AVC (Advanced Video Codec)
Audio Bitrate: 128kbps
Audio Channels: 2 (stereo)
Sample Rate: 48KHz
Video File infor mation
You can enter into the video or photo file list when you press OK key on Video
monitoring or photographing interface, select the file you want, and press OK to
play, you can press left or right key to adjust the voice, press for about 2 seconds to fast
forward or rewind operation, convenient for operation!
Playback using the LCD scr eens
In recording preview mode, press OK to switch to video playback Mode(It shows
six blocks videos), select the file that you want to play and press OK to play.
When playing files, press 【 】/【 】 key to adjust the volume.
When playing files, press 【 】/ 【 】 key longer to fast forward or rewind files;
to stop it, press OK shortly, then continue to play files;
During play backing, press Mode button shortly, can go back to file list; When Play is
paused, press OK key to resume; Press Mode Key to select other mode.
You have 3 ways to playback files. It depends on your requirement and
what devices you have.
File Playback
10
GO4 Vega X1 user guide

You can transfer data from the microSD card onto a computer for the highest quality
playback possible.
There are two options for downloading data to a computer:
Playback on a computer
USB Cable
Connect this camera to your computer using the USB cable. The microSD
card’s contents will be detected by the computer, and will be accessible in
the same way as a USB flash drive.
Remember: It will be charged when connectin
g to computer.
Removing the microSD car d
At the bottom of this camera, push the microSD card out.
Use your card reader and connect to your computer.
If your card reader do not support microSD card, maybe you need
a microSD-to-SD adapter.
Folder Str ucture
Removable Disk DCIM 100MEDIA
101MEDIA
102MEDIA
“ Protected file”
20121114-1432_0001
20121114-1432_0002
…etc
MISC
( Usually empty)
11
GO4 Vega X1 user guide

File protection
This device is always thoughtful for you. To avoid some important files to be deleted
carelessly or recovered, you can press the [mode] button during recording, and then
this video will be saved to 100MEDIA folder of micro SD card automatically. These
video files will be locked and won’t be deleted during cycled recording.
Please note: the total protected files can be up to 30 files. After that, the old video will be
overwritten. Please copy or delete the files in your computer.
G-Sensor
When there is crash occurred, it can detect the collision direction by the change of
XYZ axis, and lock the recording file, and then this file will not be deleted from
cycle recording. If you device is on preview mode but not recording, then according
to sensitive set up, device will record automatically and protect the current file.
Microphone
When you are recording, if you don’t want your conversation be recorded, what will
you do? It’s easy, press the [OK] button, the mute icon on screen will remind
you that microphone is closed! Of course you can set it closed by System set up menu.
GPS
GPS is the best accessory for this device, it can add GPS position coordinates for your
video, and show the speed when you are driving. Share your video with location tag to
YouTube, it is really a very interesting and amazing.
12
Useful Functions
Moive Recover y
when the recorder is shut down unexpectly,the system can save the interrupted video
when power on again.
GO4 Vega X1 user guide

Connect the camera to computer via USB cable.
Create new folder and name it SYS on root of your card.
In this SYS folder, create a new txt file, and name it ID.TXT.
Type your car license no. in this txt file (max 15 character).
13
Setup Your License Plate Number
GO4 Vega X1 user guide

Please kindly note: Files copying means that copy files from the current card
to another card! If you want to copy files from built in card to extended card,
please make sure after you insert the extended card, enter into system menu and
select current memory to be build in card, then select files to start copying.
When using the copy function, you need to wait a moment, and make sure your
battery have enough power.
Delete and Copy files
Choose “ save as… ” a nd select code as “Unicode” .
Unplug the USB storage from your computer and plug out USB cable,and turn off
the device normally. When you restart, the numbers you just input will be added
to your video as a stamp on the right-up corner.
To make you to manage your files conveniently, you can choose 2 cards(build in card
and extended card) to copy from each other, and you can delete the files that you don’t
need now to make sure there is enough storage for further recording. In file listing,
hold [mode] button, you will see menu. Do it as we guide, it is so easy and simple
for operation.
Delete and Copy files
14
GO4 Vega X1 user guide

RESOLUTION
1920× 1080P30
It is 1920× 1080 resolution at about 30fps, it
works fine with NTSC TV system( USA,
Canada, Japan, etc).
1920× 1080P25
It is 1920× 1080 resolution at about 25fps, it
works fine with PAL TV system(for Europe,
Australia, China etc).
It is 1280× 720 resolution at about 60fps, it
works fine with NTSC TV system.
It is 1920× 1080 resolution at about 50fps,
it
works fine with PAL TV system.
It is 1280× 720 resolution at about 30fps, it
works fine with NTSC TV system.
It is 1920× 1080 resolution at about 25fps, it
works fine with PAL TV system.
It is 848× 480 resolution at about 50fps, it
works fine with PAL TV system.
1280× 720P60
1280× 720P50
1280× 720P30
1280× 720P25
848× 480P50
It is 848× 480 resolution at about 60fps, it
works fine with NTSC TV system.
848× 480P60
It is 320× 240 resolution at about 120fps, it
works fine with NTSC TV system.
320× 240P120
Video Setup
15
GO4 Vega X1 user guide

You can choose different record scenes to get
perfect video. If you are not sure of that, just let
it be [Auto].
RECORD
SCENE
AUTO
NIGHT SCENE
Useful under low light condition
SUNNY
For shooting in natural daylight on a clear
day. For “white light” (approximately 5600° K)
CLOUDY
Suited to shooting on an overcast day, where
the light appears slightly blue (approximately
6500° K)
RAINY
Suited when raining
SAND SNOW
Suited under snowy conditions
The best recording quality possible,
approximately 8Mbps for 720p and 12Mbps for
1080p. This does require a lot of storage space.
A middle-ground data rate, approximately
6Mbps for 720p and 10Mbps for 1080p.
The lowest data rate, approximately 4Mbps
for 720p and 8Mbps for 1080p. This will maximize
your recording time at the expense of quality
.
H
M
L
When your car’s light shed on the car plate in
front of you, most of the time, you cannot see
the plate no., just because it is too bright. Try this.
The max file size is about 3.6G
This is to set the file segment, so it will be much
easier to share the file or upload.
The camera will record until the storage is full
and it will beep.
It will show your choice automatic in according
of your card storage.
ON/OFF
OFF
1/5/10/15
/30/45MIN
OFF
1/5/10/15
/30/45MIN
QUALITY
ANTI-GLARE
SPLIT MODE
RECORD
LOOP
16
GO4 Vega X1 user guide

2560 x 1440
2403 x 1296
1920 x 1080
[Yes]: it will rotate right away.
[No]: it will not rotate anyway.
[Auto]: the device will rotate automatically, no
need to worry about whether you record in the
right direction
3.5M
3M
2M
PHOTO SIZE
OFF
ON
AUTO
VIDEO
ROTATION
You can choose different capture scenes to
get perfect video. If you are not sure of that,
just let is [Auto], and this little camera will
set automatically.
1280 x 7200.9M
CAPTURE
SCENE
AUTO
SUNSET
PORTRAIT
LANDSCAPE
SPORTS
NIGHT
SPOTLIGHT
WATER
SAND SNOW
Better effect in sunset
Better for a portrait
If you take landscapes, this is better
To take fast sports photos, this will help.
At low light condit
ion, you need this.
Under fluorescent condition, get the right color.
Some improvement in water recording
Under very bright snow condition, it will help.
If you like take photo of yourself, this setting is
just for you. Default is OFF.
Set the timer you need and enjoy the moment.
OFF
The device will take a photo between the set
intervals.
OFF
5/10/20/30/60S
OFF
1/2/5/10/30/60S
SELF CAPTURE
INTERVAL
CAPT
URE
17
GO4 Vega X1 user guide

For filming under artificial lights (tungsten bulbs
and equivalent) and for light that appears
slightly orange (approximately 3000° K)
For shooting in natural daylight on a clear day.
For “white light” (approximately 5600° K)
Suited to shooting on an overcast day, where the
light appears slightly blue (approximately
6500° K)
For shooting under artificial light from
fluorescent lights, which are typically slightly
green (approximately 4500° K)
To get a different style of your video, try the
digital effects.
INCANDESCENT
SUNNY
CLOUDY
FLUORESCENT
OFF / ART / SEPIA
/ NEGATIVE /
BLACK & WHITE / VIVID
AUTO
DIGITAL
EFFECT
ISO
Though video is always the best choice, but you
can also try this.
The device will take the [set] numbers of photos
at a shot.
The color balance is automatically adjusted by
the camera.
OFF
3/5/10/20 PHOTOS
AUTO
CONTINUE
CAPTURE
WHITE
BALANCE
To the correct ISO setting most of the time, you
can choose [Auto]
Choose the different setting to get different ISO
exposure.
You can see the different just in the video
preview mode.
Contrast mean: dark becomes darker, and
white becomes whiter. It can be useful if you
need to see the car plate number in front of you.
100/200/400/800/
1600
EV-2.0-----+2.0
STANDARD, HARD,
AND SOFT
AE BIAS
CONTRAST
18
GO4 Vega X1 user guide

System Setup
Sharpness means the object shape inside the
video clear or not. Hard means the shape
becomes clearer. It is useful for a Car DVR to
identify the face.
Motion detection is OFF
If the device detects some object moves in front
of the lens, it will start recording.
This is to set the G-Sensor off. This device will
not be activated from it and will not protect this file.
Change this to set the XYZ axis s
ensitivity. 1
means very sensitive.
If you turn on GPS, the GPS coordinators will
show on your vide.
Turn GPS off. The green LED will turn off.
The satellite time is GMT time. So you need to
set your time zone to get the correct time in your
country. For example, Russia is [+4]
When the real speed is bigger than what you set
in the menu, the GPS coordinator stamp will
hide in the video.
This is to input your car plate number or any
characters you
like in to the video.
If [Quick Record] is ON, just press the power
button, it will record immediately.
STANDARD, HARD,
AND SOFT
OFF
ON
OFF
1-----6
ON
OFF
- 12------+12
25------170
ON/OFF
OFF/ON
CAR ID
QUICK
RECORD
When you connect this device to car power via a
car adaptor, it will power on the device and
start recording. After you turn off your engine,
the device will power off in 30 seconds.
OFF/ONCAR MODE
SHARPNESS
MOTION
DETECTION
G-SENSOR
GPS SWITCH
TIME ZONE
STAMP
SPEED
System Setup
19
GO4 Vega X1 user guide

Select the current file storage. This camera
has a built-in memory.
Change the storage to SD card.
GPS coordinators and speed will show in the video.
GPS coordinators and speed will not show in
the video.
GPS will show in the video.
Speed will show in the video.
Date & Time will show in the video.
Date & Time will not show in the video.
You can turn off the LED in the front panel.
The screen will not enter into power-save mod.
You know the screen will drain the battery power.
The screen will turn off after the set timer.
The camera will not turn off automatically.
The device will be powered OFF in set time
is no operation.
if
there
It will record video and sound.
It will not record sound anyhow.
All of the sound will be turned off, including button
sound, playback sound, and the beep sound.
This is to set all of the device sound. [3]means it is
very loud.
If the voltage in your country is 220V,
[50Hz]
ple
ase
select
If the voltage in your country is 110V
,
[6
0Hz]
please
select
STORAGE
SELECT
GPS OSD
TIME STAMP
REC LED
LCD OFF
POWER OFF
MICROPHONE
VOLUME
FLICKER
INTERNAL MEMORY
SD CARD
GPS/SPEED
OFF
GPS
SPEED
ON
OFF
ON/OFF
OFF
30S/1/2/3/5MIN
OFF
30S/1/2/3/5MIN
ON
OFF
OFF
1---3
50HZ
60HZ
20
GO4 Vega X1 user guide

Format SD or the internal memory. Please
make sure before you do it. This will delete all
of the data in the current storage.
This will restore all of the settings to factory
default.
This shows the firmware version. If you need
technical support, this information is useful.
FORMAT
DEFAULT
SETTING
FIRMWARE
NO, YES
NO, YES
FIRMWARE VERSION
You will enter an interface to set it.
The default is day / month / year.
TIME AND DATE
SET TIME AND DATE
LANGUAGES
SELECT CURRENT
LANGUAGE
You can select up to 10 languages: English
/Ð ó ñ ñ ê è é/Español/Deutsch/ Italiano/日本語
/한국어/Français/ 体中文/繁体中文
Records at approximately 30 frames per second,
for playback on NTSC systems. (USA, Japan)
Records at 25 frames per second, for playback
on PAL systems (Australia, Europe)
TV TYPE
NTSC
PAL
21
GO4 Vega X1 user guide

Q It won't turn on!:
A:Try turning it on and off again.
Has the camera been left on/recording for a while? Is it charged?
If not, check out “You got the Power: Charging the Battery”.
Also, try to charge from a computer's USB socket.
Q: I can't play back footage on my computer.
A: Try using a different program, such as KMPLAYER Media Player
It works with a huge range of operating systems. You may need to
drag and drop the file onto the KMPLAYER window if the default
file association isn't right.
Q: The audio sounds distorted/weird/too loud.
A: This can often happen if you attach the it to a vehicle, skateboard,
bicycle or anything else which vibrates when in use. Try it
with microphone off directly. Try using a different mounting option.
Try attaching the camera to your clothing using the hook& loop
patches-cloth usually muffles vibrations and might improve the
audio quality. Finally, remember that in certain situations you're
just not going to be able to get any decent audio-for example, when
the background noise level is simply too high. It sucks but sometimes
there's nothing that can be done: Physics is a harsh mistress.
FAQ
22
GO4 Vega X1 user guide

What’s in the package?
1
2
3
Water proof Case
What’s in the package?
Power/Record/Photo
23
4
Operation Instruction
Please read this manual carefully before you use
this unit, and keep it well for further checking.
Camer a USB Cab l e
User Manual
GO4 Vega X1 user guide

Chipset
Ambarella A2S70
Image Sensor
1/2.7" 2M Sensor
Video Resolution
1920x1080(30/25fps) | 1280x720(60/50fps) |
WVGA(60/50fps) | QVGA(120fps)
Vdeo Record Format
.mp4
Photo Resolution
0.9/2/3/3.5M
Photo Record Format
JPG
Lens Specs
F/NO=2.8 f=2.8
Lens Angle
720P: 120° ; 1080P: 170°
Lens Digital Zoom
Yes
LCD Size
1.5”
LCD Resolution
480x240
GPS (Int./Ext.)
EXT
G-Sensor
Yes
Built-in Memory Size
512MB
Storage Card
MicroSD up to32GB
Microphone/Speaker
Yes
Other Input/Output Ports
USB, HDMI
Battery Capa
city
900mAh
Charge Port
USB
Body Dimensions
65.2*39.3*39mm
Weight
75g
Bracket Type
Window holder
Specification
24
GO4 Vega X1 user guide

Operation Instruction
Please read this manual carefully before you use
this unit, and keep it well for further checking.
Vega X1
Wearable Action Video Camera
GO4 Vega X1 user guide
 Loading...