

Vega N1
User Guide
Waterproof Bullet Full HD Sports Camera

2
Reorient or relocate the receiving antenna
Increase the separation between the equipment and the receiver
Connect the equipment into an outlet on a circuit different from
that to which the receiver is connected
Consult the dealer or an experienced radio/TV technician for help
NOTE:This equipment has been tested and found to comply with the
limits for Class B digital device, pursuant to part 15 0f the FCC Rules.
These limits are designed to provide reasonable protection against
harmful interference in a residential installation. This equipment
generates, uses and can radiate radio frequency energy and, if not
installed and used in accordance with the instructions, may cause
harmful interference to radio or television reception, which can
be
determined by turning the equipment o仟 a
nd on, the user is
encouraged to try to correct the interference by one or more of the
following measures:
FCC Verification:
IMPORTANT NOTE: Prohibition against eavesdropping
Except for the operations of law enforcement officers conducted
under lawful authority, no person shall use, either directly or
indirectly, a device operated pursuant to the provisions of this Part
for the purpose of overhearing or recording the private conversations
of others unless such use is authorized by all of the parties engaging
in the conversation.
WARNING: Modifications not approved by the party responsible for
compliance could void user's authority to operate the equipment.
GO4 Vega N1 user guide

Settings
: "Operating Guide"
0
7
(
Contents
Introduction
Where Stuff is At (The Layout)
Getting Started
Your microSD Card and You
You Got the Power: Charging the Battery
The Button
Resolution: Choosing It
Seeing how cool you are (Playback)
Playback on a Computer
HDMI & Composite Video Playback
The Remote Control
Showing your Quality
Shooting Your Troubles
Technically Speaking (Specifications)
Warranty l Helpdesk
Important) Legal Mumbo Jumbo
2
3
4
5
6
8
9
1
11
12
13
14
15
17
1
8
1
9
Rear Cover
3
GO4 Vega N1 user guide

You've gone and done it now. Really taken the cake. You've bought
a 1080p Waterproof GO4 Vega N1 - miniature,waterproof,easy to use.
You've nabbed yourself a camera that's
perfect for capturing your insane antics
and displays of immense skill.
lt's great for recording biking , skating,
skiing or snowboarding , surfing or
throwing yourself out of a perfectly
good aircraft . Or just about anything
else you can think of!
Strap it to your head, arms, legs, butt , bike , board , gear, rigging or
shoes. Or you can think outside the box .
Use it to capture video to show your
friends and share your videos online.
4
GO4 Vega N1 user guide
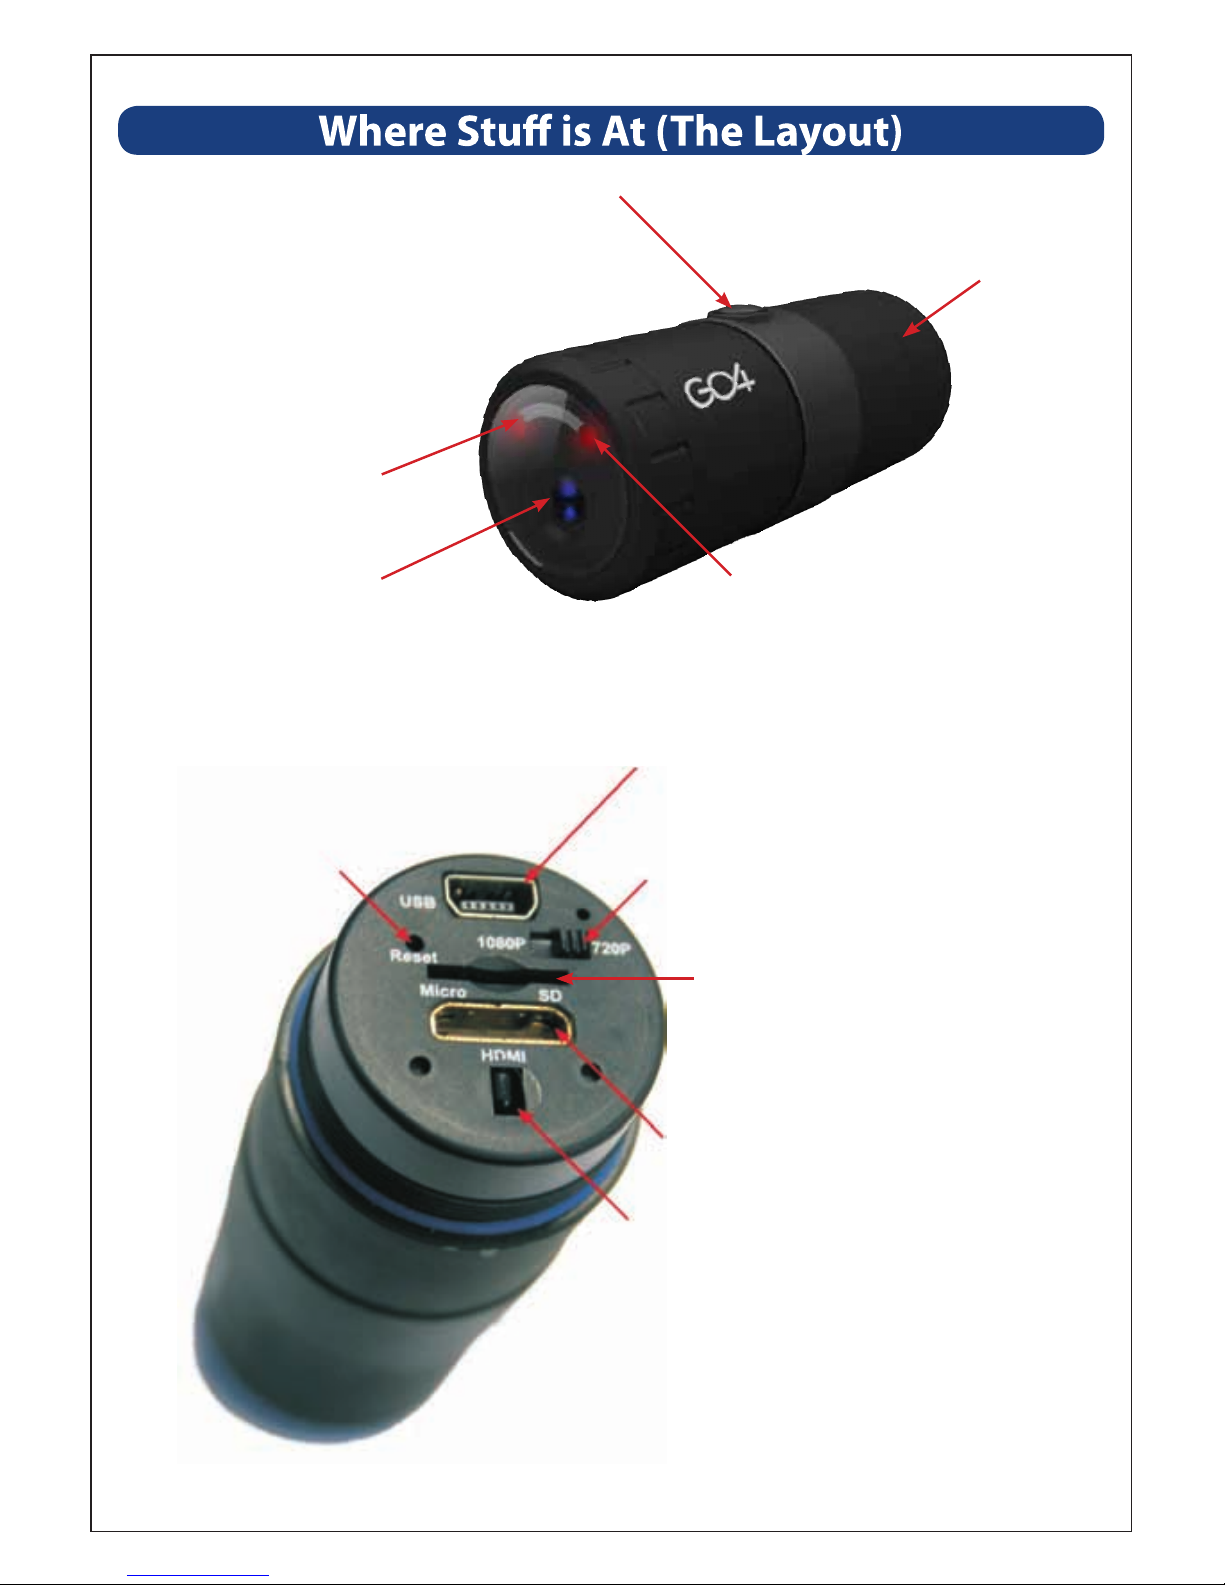
Power/ Record Button Heck,
we might as well call it "the
button" - it is all on its lonesome.
The Frontside
Rear Cap
Targeting Laser
Lasers make
everything cooler.
Lens
A bit of high-quality
gloss used to focus stuff.
Reset
Sets everything
back to the .
factory
defaults.
Indicator LED
The Backside
USB Port
For charging, computers and
composite video output.
1080p / 720p Switch
Choose between 720p (nice) and
1080p (seriously nice).
microSD Card Slot
For insert
ing a microSD card
and nothing else.
Mini-HDMI Port
Pure awesomeness in one output.
Infrared Sensor (for Remote)
5
GO4 Vega N1 user guideGO4 Vega N1 user guide
Right. So, you've got the SportsCam. lt's Friday afternoon, and you're
headed out skating on Saturday morning and you want to get the
SportsCam setup and ready to rock and/or roll.
1. Charge the battery.
Short version: Plug the little end of the USB cable into the SportsCam,
and the big end into the included power adapter. Plug the power
adapter into a wall socket. Wait two to three hours. Bam!
Check out page 8 for the long version on getting yourself some power.
2. Jam a microSD car
d in it. Gently.
Short version: Ensure there's nothing on the microSD card you want
to keep, as we'II be formatting it in a moment (that erases all the data
and preps it for recording video). The SportsCam shoots high-def video,
so grab yourself a decently big card - we reckon that 8GB is a realistic
minimum, with 16GB or 32GB cards recommended.
Check out page 7 for the long version regarding microSD cards.
3. Set up your Camera using the On-Screen Menus
Short version: Connect the S
portsCam to a television or monitor using
either the mini-HDMI output or the COMPOSITE VIDEO output (that's
the weird USB to RCA cable - one end goes into the USB port on the
SportsCam and the other to the VIDEO IN on a TV). Use the Remote
Control to access the menus see(“The Remote Control" on page 1 4).
We think the best course of action is to:
Choose your recording format (PAL or NTSC).
Format your microSD card.
Set the Date and Time.
Choose your Resolution.
Choose your Quality settings.
6
GO4 Vega N1 user guide

Choosing a microSD card:
The SportsCam will accept a microSD card up to 32GB in capacity.
You can store between 7— 30 minutes worth of video per gigabyte
(GB). Check out page 17 for more information on recording times
versus quality settings.
We recommend using cards of at least 8GB to ensure that the SportsCam
won't run out of storage space whilst you're filming, 16GB or 32GB are
recommended for recording in 1080p at high quality.
Of course, if you only want to record ten minutes at a time, you could
get away with a much smaller card. But remember, when it runs out -
that'II be all she wrote!
For reliable performance, we strongly suggest that you
use a card with a speed rating of “Class 4”or higher.
Hold the SportsCam so that the rear panel is facing you, and
the power/record button is facing up.
Orient the microSD card so that the text is facing up.
Gently push the microSD card into the slot. Be careful that it
goes in correctly - if it misses the slot or is inserted at an angle,
it could become jammed.
The card will "click" into place once fully inserted.
To remove the card, simply push it in. This will release the
locking mechanism, and the card will sprin
g out. Be careful when
removing the microSD card - the little spring that pushes it
out is quite powerful.
Look for these symbols:
Inserting a microSD card:
7
GO4 Vega N1 user guide

The SportsCam charges via the mini USB socket on the rear panel.
◇ Insert the mini-USB plug on the USB adapter or USB cable in to
the USB socket on the rear of the SportsCam.
◇Connect one end of the USB adapter or cable to the USB port on
the included power adapter.
Under no circumstances ever connect the SportsCam to any
power source supplying anything other than 5V. lt's safe to
connect it to a USB port on a computer (see below!)
and the included power adapter.
The current supplie
d by most computer's USB ports (sv 500mA) is not
sufficient to properly charge the SportsCam.The SportsCam's battery
is small, but powerful, and it needs more juice to charge. The supplied
adapter (5V 1000mA) is perfect for the job, and you'II get much better
results using that.
While the SportsCam is charging, the LED on the rear panel
Will Light up. It will go out when the SportsCam is fully charged.
The LED will light up whenever the SportsCam is connected
to power.
red
gr
een
As the and LEDs are located
very close to one another, you might
need to tilt the SportsCam slightly
relative to your eye to see what both of
them are doing!
green red
Computers don't cut it!
Charging Status Indicator LEDs
The LEDs
are here...
right here.
The SportsCam takes 2 hours to charge
using the included USB charger. It will
take much longer from a USB port,
if it charges at all.
8
GO4 Vega N1 user guide

Button, button, who's got the button? Oh, it's where we left it,
right in the middle on the top. Pretty obvious, really.
While the camera is off charged and disconnected from any USB or HDMI connection (PC,
composite video, HDMI or charger) press and
hold the button down for approximately 2~3
seconds.The camera will beep three times.
The LED on the front of the camera will light
up for a moment,and will flash red while recording video. The targeting laser will come on
for a few seconds unless disabled, then automatically go out.
While the camera is on, press the button and
hold for a quarter o
f a second and then release.
The targeting laser will come on for a few
seconds and then automatically switch off.
While the camera is recording, press and hold
the button for about three seconds.The camera
will beep twice, and the green LED will light up
for a moment.
When the SportsCam is turned OFF, insert the
cable associated with your desired outcome
(USB cable for a computer, USB-to-RCA cable
for Composite Video or the HDMI cable for
HDMI). Connect the other end of th
e cable to
the desired device (computer, monitor or TV,
as applicable).Press and hold the button for three
seconds to turn the camera on. The SportsCam
will automatically boot into the appropriate
mode for the cable connected.
Things that Pressing The Button will do
Turning the
Camera on
and
Recording
Video
Engage the
Targeting
Laser
Stop
Recording
and
Shutdown
Camera
Booting the
Camera into
HDMI,
USB or
Composite
Video
Modes
T he But t on: "Ope rat ing Guide ”
9
GO4 Vega N1 user guide

Re s o l ut i on : C h o os in g I t
The SportsCam can record at two different resolutions: 720p (1280 x720)
and 1080p (1920 x 1080). To select your resolution, use the switch on
the rear panel of the camera.
Why would you want to record at a lower resolution? Believe it or not,
there are actually a few really good reasons to record at 720p. Here
are a couple, presented in reverse order of pretentiousness:
◇lt's very, very slightly more retro, and (ergo) cooler. (Hipsters only.)
◇Not everyone can playback 1080p - many TWs (even some
marked "HD" can't playback 1080p - most systems that can will
claim "Full HD" or "1080p" somewhere on the unit or the packaging
(most likely both).
◇If your TV supports 1080i but not 1080p (again, this will be written
on it somewhere), then playback of 720p may actually have a
slightly higher vertical resolution (720 lines versus 540) when d
isplaying rapid motion.
◇720p is often less prone to artefacting when recording rapid
motion than 1080p.
◇720p uses less space than 1080p - SO, if you're trying to get the
most possible out of your memory card, then it's a good option.
1080p requires approximately 8000~13000kbps, whereas 720p
uses 4000~8000kbps (it varies by your Quality setting). You'II get
about 40 minutes of 1080p to the same space as l hour of 720p.
10
GO4 Vega N1 user guide

There are two ways to playback videos from the SportsCam, depending
on your needs and access to equipment. The options are:
Playback via a Computer
Provided your computer meets the minimum specs to playback the
SportsCam's videos (most modern computers will).
Playback via the mini-HDMI Port
The mini-HDMI port on the camera is great connecting to a high
definition television or monitor with HDMI inputs.
Playback via the Composite Video Out
The included USB to RCA cable
can be used to connect the SportsCam
to an old-school television with RCA inputs. These are often labeled as
Video In, Composite In, AV, or similar.
The composite video out puts out a standard definition signal (480
lines for NTSC, 576 lines for PAL) - so, there is a noticable drop in
quality. Also, due to the analog nature of the technology, there's the
chance of some noise or distortion. However, it's a great way to quickly
review footage when you don't have your full HD hundred
-and- fifty
inch plasma panel handy.
S e e i n g h ow c oo l y ou a r e ( P la y ba c k )
Cont a ine r:MOV
Compre ssion:MPEG-4 AVC (Advanced Video Codec)
Bitrat e :4000kbps (720p, low) t0 12000kbps (1080p high)
Audio Bit r at e:128kbps
Audio Cha nne ls:2 (stereo)
Sa m ple Rat e:48KHz
11
GO4 Vega N1 user guide

P l a y b a c k o n a C o m p u t e r
You can transfer data from the microSD card onto a computer for the
highest quality playback possible.
There are two options for downloading data to a computer:
USB Cable
◇Turn the SportsCam off.
◇Connect the SportsCam to your comp uter using the USB cable.
◇Press and hold the button for three seconds. TheSportsCam will
start up in USB storage mode.
◇The microSD card's contents will be detected by the computer, and
will be accessible in the same way as a USB flash drive.
◇R
emember: the SportsCam will not charge while connected to a
computer - it needs more juice!
Removing the microSD card
◇Remove the rear cap of the SportsCam then Push the microSD card
in to remove it. Be careful - the spring that pushes it out is pretty
powerful.
◇Use a USB card reader connected to your computer to access the
files on the card. You may need an SD to microSD card converter, if
your card reader doesn't support the microSD format.
Folder Format
Removable Disk
DCIM
100MEDIA
101MEDIA
102MEDIA
MOVI001
MOVI002
MOVI003
...more files
MISC
usually empty
...etc
12
GO4 Vega N1 user guide

H D M I A n d C o m p o s i t e V i d e o P l a y b a c k
You'II need A HD-TV or high resolution monitor with HDMI IN
and a mini-HDMI to HDMI cable.
◇
◇Connect an HDMI cable to the mini-HDMI output on the rear panel
of the SportsCam
◇Connect the other end of the mini-HDMI cable to an HDMI input on
your television/monitor.
◇Set your television/monitor to the appropriate channel.
◇Turn the SportsCam on (press and hold the button for about three
seconds).
Remove the rear cap from the SportsCam
Playback via Composite Video Out
◇
◇Connect the included USB to RCA cable to the mini-USB port on
the rear panel of the SportsCam.
◇Connect the Video Out plug (the one) to a Video Input on
your television, monitor or recording device (as applicable). It will
most likely also be .
◇If you want to hear the action, connect the (left) and
(right) plugs to your Audio Inputs. If your device is MONO, connect
the
(left) one only.
◇Set your television/monitor to the appropriate channel.
◇Turn the Sports Cam (press and hold the button for about three
seconds).
Remove the rear cap from the SportsCam.
y
ellow
ye llow
w hit e
w hit e
re d
13
GO4 Vega N1 user guide

Using the Remote Control during Playback
◇Press MENU to open the on-screen menu.
◇Press MODE to enter playback mode, and to switch from MOVIE to
PHOTO playback mode.
◇Use the arrow buttons to highlight the item you want to view, and
press OK to initiate playback.
◇Press STOP to end playback.
Power Off
Menu
Mode
Left / Rewinc
OK
OSD
(On Screen Display)
DEL
(Delete)
Down / Volume -
Record
Snapshot
Right /
Fast Forward
STOP
LOCK
N/P
(NTSC / PAL select)
Laser On/Off
14
GO4 Vega N1 user guide

15
Settings
GO4 Vega N1 user guide

16
When it is active, there will be c on the screen.
It will File every 5 minutes.
GO4 Vega N1 user guide

How much can I store on a microSD card?
That depends on a few things. First, how big is your SD card? Secondly,
what are you recording, and at what quality?
The resolution and quality is going to have a huge impact on how
much you'II be able to record. Seriously - check it out:
Low
4007kbps
(30 min per GB)
8109kbps
(15 min per GB)
Medium
6270kbps
(20 min per GB)
10284kbps
(11 min per GB)
High
8334kbps
(15 min per GB)
12361kbps
(7 min per GB)
Photo Quality
3M
4M
5M
8M
12M
What happens when you lower the Quality?
Basically, the camera tries to use less data to represent the same image.
This means the compression needs to work harder. 720p @ LOW quality
uses only half the data of 720p @ HIGH quality, and it looks about
half as sharp. However, you'II be able to store twice as much to your
microSD card.
It becomes more noticeable when you pause the video. Even at low
quality, during real-time playback, the video still looks reasonable
(and better than, say, most videos on YouTube or similar online video
services).
17
GO4 Vega N1 user guide

Q: It won't turn on!
A: Tryturning it on and off again. Has the camera been left on/recording
for a while for a while? Is the SportsCam charged?lf not, check out "You
Got the Power: Charging the Battery" on page 9. Also, don't try to
charge from a computer's USB socket, because it probably won't.
Q: l can't play back footage on my computer.
A: Try using a different program, such as VLC Media Player (a favorite
around the Swann office).
lt's available free from and works with a huge
range of operating systems. You may need to drag and drop the file
onto the VLC (or appropriate program) window if the default file
association isn't right.
Q: The audio sounds muffled.
A: Are you using the waterproof cap? Unfortunately, sound doesn't
travel so well through solid plastic.
That's the downside about making it waterproof - it's pretty soundproof, too. You can use this to your advantage - in many high wind
situations (anything 65mph [100km/h] or faster) it can actually make
the audio quality better.
If you're not using the SportsCam in or around water , try using the nonwaterproof cap (the one with the little holes). Sound travels better
through holes (or so we've heard).
Q:The audio sounds distorted/weird/too loud.
A: This can often happen if you attach the SportsCam to a vehicle,
skateboard, bicycle or anything else which vibrates when in use. Try
it with and without the water-proof cap (unless you need it to be
waterproof). Try using a di忏eerent mounting option. Try attaching the
camera to your clothing using the hook & loop patches - cloth usually
muffles vibrations and might improve the audio quality. Finally,
remember that in certain situations you're just not going to be able to
get any decent audio - for example, when the background noise level
is simply too high. It sucks but sometimes there's nothing that can be
done: physics is a harsh mistress.
www.videolan.org/vlc,
18
GO4 Vega N1 user guide

CMOS 2592x1944
135 degrees @ 720p
110 degrees @ 1080p
1200+ (2048 x 1536)
950 (2592 x 1728)
770 (2592 x 1944)
570 (3200 x 2400)
416 (4000 x 3000)
High: 15 min / Medium: 25 min/
Low: 30 min
High: 30 min / Medium: 40 min/
Low: 60 min
.MOV MPEG-4 AVC
1080p (1920x1080) @ 25fps (PAL)/
30fps (NTSC)
720p (1280x720) @ 25fps (PAL)/
30fps (NTSC)
2048 x 1536
2592 x 1728
2592 x 1944
3200 x 2400
4000 x 3000
Sensor type
Viewing angle
Storage
consumption
based on 2GB
micro-SD
(approx)
Snapshot
3M
Snapshot
4M
Snapshot
5M
Snapshot
8M
Snapshot
12M
Storage
consumption
based on 2GB
microSD
1080p
720p
Recording format
Video Record Resolution
Photo
Resolution
Snapshot
3M
Snapshot
4M
Snapshot
5M
Snapshot
8M
Snapshot
12M
19
GO4 Vega N1 user guide

None
Composite NTSC/PAL via USB to RCA cable
mini-HDMI
USB 2.0 for data transfer
Included charger (5V, 1A) or via USB 2.0 Port
2 built in microphones (stereo)
Approx. 400mA@3.7V (max.)
600mAh
90 min
1mW
-4°F ~140°F/-20°C ~60°C
-4°F ~122°F/-20°C ~50°C
15~85%RH
USB Interface
Charging
Microphone
Power
Consumption
Lithium Battery
Record Time
Laser power
Storage
temperature
Operating
temperate range
Operating humidity
range
Due to product improvements, specifications are subject to
change without notice
AV
output
AV
output
HDMI
Digital Zoom
20
GO4 Vega N1 user guide

GO4 Vega N1 Sports Camera
Quick Installation
Pa r t I : G e t S t a r t e d
Before you get started, you need to put this small adaptor onto
the camera. If you use the helmet mount, skip this step. Check
point 4 below.
Pa r t I I : D i f f e r e n t A p p li c a t i o ns
1.For bike
After you finish this, you can put this construction on to your bike.
There is one rubber insert. If your bike bar is a little small, you can
use that. Also you can rotate and lock that position.
21
GO4 Vega N1 user guide

Mount it on your car window. You can rotate it. If you need auto
recording function, you need another USB charging cable. Of
course, you need to take off the cap for charging.
4.Helmet mount
Put the camera inside this mount, and stick it to your helmet.
Here you go!
Tips: if you need to record the sound and not use underwater,
you can change the wind cap which has holes in it.
3.Mount in a car
2.For Surf board
After you finish this, you can stick it to your surf board or any
surface. And you can tilt or rotate the camera. After you got the
right position, use the screw to lock that position.
22
GO4 Vega N1 user guide
 Loading...