

Page 1
2LC
Page 2

Page 3

PRECAUTIONS
On the Road
Using a phone while driving is illegal in many countries. Please refrain from using
your mobile while driving.
Near Sensive Electronics or Medical Equipment
Don’t use your phone near sensive electronic equipment – parcularly medical
devices such as pacemakers – as it could cause them to malfuncon. It can also
interfere with the operaon of fire detectors and other automac-control
equipment.
While Flying
Your phone can cause interference with aircra equipment. So it’s essenal you
follow airline regulaons. And if airline personnel ask you to switch off your
phone, or disable its wireless funcons, please do as they say.
At a Petrol Staon
Don’t use your phone at petrol staons. In fact, it’s always best to switch off
whenever you’re near fuels, chemicals or explosives.
Making Repairs
Never take your phone apart. Please leave that to the professionals.
Unauthorized repairs could break the terms of your warranty. Don’t use your
phone if the antenna is damaged, as it could cause injury.
Around Children
Keep your mobile out of children’s reach. It should never be used as a toy as this
is hazardous.
Near Explosives
Turn off your phone in or near areas where explosive materials are used. Always
obey local laws and turn off your phone when requested.
Emergency Calls
To make an emergency call your phone must be turned on and in an area where
there’s network coverage. Dial the naonal emergency number and press
“Send.” Explain exactly where you are and don’t hang up unl help has arrived.
Working Temperature
The working temperature for the phone is between 0 and 40 degree Celsius.
Please don’t use the phone outside the range. Using the phone under too high
or too low temperature might cause problems.
At very high volume, prolonged listening to a mobile phone can damage your
hearing.
2
Page 4
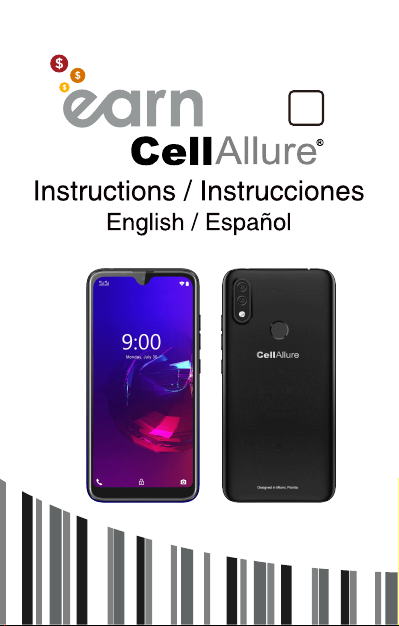
1. UNDERSTANDING YOUR PHONE
1 Speaker
2 5MP front camera
3 Sensor
4 Volume up
5 Volume down
6 Power key
7 Touch buon/Calling
8 Touch buon/Unlock phone
9 Touch buon/Camera
10 Flash/Flashlight
11 8MP camera
12 3.5mm headphone jack
13 Fingerprint sensor
14 USB charging port
15 Loudspeaker
3
Page 5
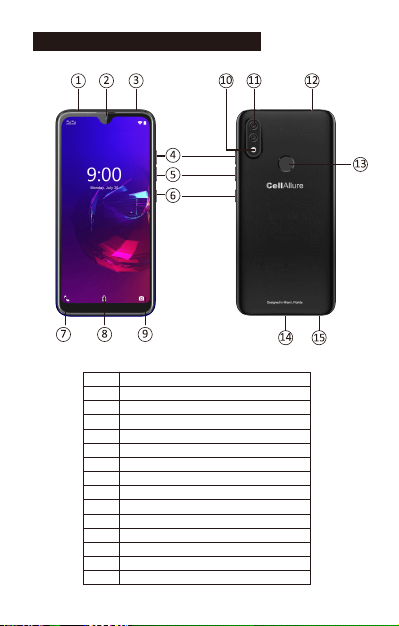
2. REMOVING BACK COVER/BATTERY INSTALLATION
1. Li and remove rear case as shown below on the boom le corner of the
phone.
2. Insert the baery matching up the gold terminals on the top le of the
baery and clip in place.
3. Reinstall the back cover and click in place.
MICRO
SD
card
NANO
WCDMA850/900/1700/1900 GSM850/900/1800/1900
EARN2 CL
CAPHG58
IMEI 1: 000000000000000
IMEI 2: 000000000000000
SN: CellAllure000001
MARCA: CellAllure
3.8V
GENTLY LIFT AND UNCLIP
THE BACK COVER HERE
3. INSERTING/REMOVING SIM CARDS
• Note: Please ensure your phone is powered “OFF” before inserng SIM cards.
1. SIM Slot 1 takes a standard SIM. Please insert SIM 1 with gold connectors
facing “DOWN” as indicated on the phone itself, taking special note of the
direcon to be inserted. Follow this carefully to avoid damaging your phone
or the SIM. Push gently unl in place.
2. SIM Slot 2 takes a micro SIM, Note: Please insert SIM 2 with gold connectors
facing down as indicated on the phone itself, taking special note of the
direcon to be inserted, follow this carefully to avoid damaging your phone or
the SIM card. Push the SIM gently to lock in place. To remove the SIM cards
gently slide the SIM cards downwards.
4
MICRO SD slot
MICRO SIM slot 1
NANO SIM slot 2
Page 6
Inserng/Removing SD Card
• The SD card slot is located next to the SIM card slots near the baery terminals
as indicated on the phone itself.
• Gently insert the SD card nong the correct direcon as indicated on the
phone and push unl the SD card clicks in place.
• To remove simply pull gently.
Power ON/OFF
ON
Press the POWER buon for a connuous 5 seconds unl the phone turns “ON.”
OFF
Press the POWER buon for a connuous 5 seconds. A selecon menu will
appear.
Select “OFF” to power “OFF.”
Other selecons are “REBOOT” to restart the mobile and “AIRPLANE MODE” to
put the mobile in flight mode.
4. GETTING STARTED
Charging the Baery
The mobile has a rechargeable Polymer baery.
1. To charge, connect the AC power adapter to the micro USB jack on the top
side of the mobile.
2. The baery icon shows the baery status and charging status.
3. The mobile can be used even if the baery is being charged.
4. Recharge the baery for at least half an hour if it has been idling for a long
me and fails to start itself.
5. Regularly recharge the phone at least once a month.
Disposal of Baeries
The baery contains pollung material. Please hand it in to a recycling to
dispose of.
5
Page 7
5. TOUCH BUTTONS
The buon displays a menu of recently opened applicaons.
The buon returns immediately to the main screen.
The buon moves back one step to the previous menu/page.
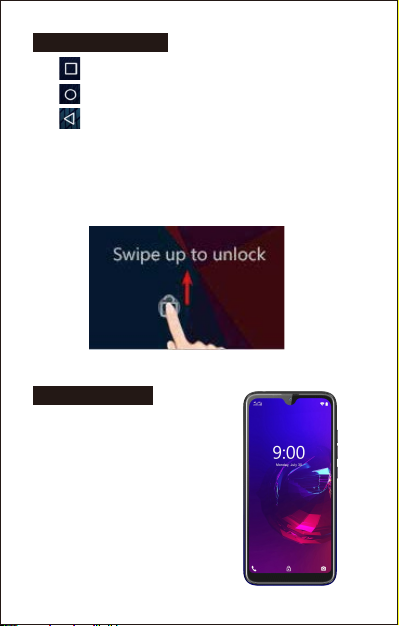
Screen Lock
To lock the phone’s screen, simply press the “POWER BUTTON.”
Screen Unlock
When the phone is in idle mode, press the “POWER BUTTON” once to wake up
the phone.
Screen unlock: To unlock, swipe up as illustrated below:
6. HOME SCREEN
The home screen will look similar to the
picture opposite. To switch between
screens, simply slide your finger le or
right across the display.
The status bar and navigaon buons
are always visible, no maer which
home screen you are currently viewing.
The desktop contains shortcuts to your
most-used applicaons and widgets.
The icon will launch the Applicaon
menu.
6
Page 8
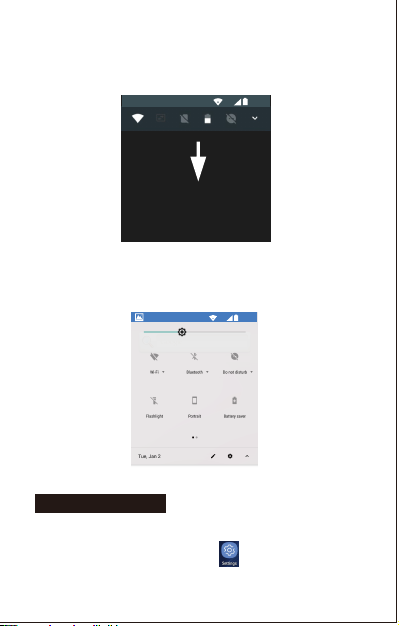
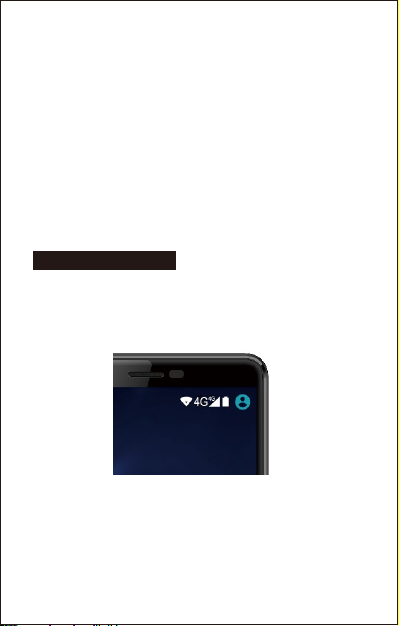
The status bar displays system informaon, such as current me, wireless
connecvity and baery charge status.
From the home screen, slide your finger from the top of the screen down
to the center to access the noficaon panel as illustrated below.
4G
9:00
4G
09:00
2019/01/01
Drag the noficaon menu down to display the second fast access menu.
Through this menu it is possible to modify the funcons such as brightness, auto
rotaon, Wi-Fi, Bluetooth and more as displayed below.
4G
9:00
4G
7. SETTINGS MENU
The sengs menu allows you to adjust your phone’s system configuraon.
• To change sengs first press the Sengs icon.
• Touch a category tle to view further opons on the right side of the screen.
7
Page 9

• Wi-Fi – Connect to/disconnect from wireless networks, view connecon status.
• Data usage – Enable/disable mobile data, view current usage, set mobile data
limit. (note: this funcon is available only on devices supplied with 3G card
funconality)
• Bluetooth – Connect or disconnect Bluetooth devices.
• Display – Adjust display sengs.
• Smart Gesture Sengs – “ON” / “OFF.”
• Audio Profiles – Adjust the various audio sengs such as ringtones.
• Prompts and noficaons – Adjust various noficaon sengs.
• Storage – View your phone’s internal and external storage sengs.
• Baery – View the status of your baery and make adjustments to power
consumpon.
• Apps – A list of all apps downloaded and running.
• Delete applicaons – Select apps to delete.
• Locaon services – Change approximate locaon detecon, improve search
results, GPS satellites.
• Security – Adjust phone’s security sengs.
• Accounts – Add or remove email and Google™ accounts such as Gmail,
Google.
• Language & input – Select Language Add to the diconary, edit on-screen
keyboard sengs, vocal search, etc.
• Backup & Reset – Backup and restore data, perform factory reset, etc.
• Date & Time – Set date, me zone, me, clock format etc.
• Accessibility – Set up large text, auto-rotate screen, speak password etc.
• About Phone – Displays informaon about your phone.
8. MAKING AND RECEIVING CALLS
Once your SIM cards are
installed turn on your phone
and wait a few minutes for
your phone to find a network.
Then select the Call icon.
Here you can dial a number or
select a contact from your
stored contacts list to call. You
can also view outgoing and
incoming calls that have been
made, as well as adding or
removing contacts.
8
4G
9:00
4G
Page 10
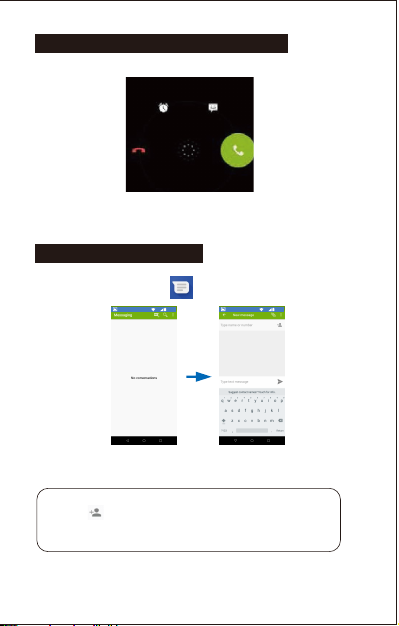
9. ANSWERING AND REJECTING CALLS
To answer a call – Slide your finger to the Green Call answer key.
To reject a Call – Slide your finger to the Red Call End key.
To message – touch the message icon.
10. SENDING A MESSAGE
On the home screen, Messaging , enter message edit interface.
For Text Message
1. Input recipient number on the Type name or number. While you input the
number, matching contacts will appear under the bar for you to select.
Note:
• Click to open contact search screen and select any contact to
add to recipient bar.
• Please use commas between each recipient.
2. Click Compose to start composing a message.
3. Aer you finish typing, click Send.
4G
9:00
4G
4G
9:00
4G
9
Page 11

11. FOR MULTIMEDIA MESSAGE
1. Input recipient number on the Type name or number bar.
2. Click Menu > Add Subject, then type the Subject.
3. Click Compose to start composing a message.
4. Click add Aach.
Note:
• You can select Capture picture, Pictures, Capture videos, Videos,
Record audio, Audio, Contact, Calendar, Slideshow from the
aachment list.
5. Aer you finish typing, click Send.
12. SOFTWARE KEYBOARD
Touchscreen
The touchscreen responds to finger touch.
Note:
• Don’t place any object on the touchscreen for it may damage or
crush the screen.
Single Click: Single click one icon to choose the icon or opon you want.
Long Press: Press and hold an icon to delete or move an icon or app.
Drag: Press the icon and drag it to a different screen.
10
Page 12

13. HOW TO CONNECT TO A COMPUTER
Note:
• Turn on your phone before connecng it to a PC by USB cable.
1. Use a USB cable to connect the phone with a computer. The phone will
automacally detect a USB connecon.
2. A noficaon will pop up “USB connected” – Select the desired funconality.
3. The PC will detect an external disc named “EARN2 CL” this is the internal
memory of the phone.
4. The USB connecon has been successful.
14. CONNECTION TO INTERNET
Wireless:
1. Select “ Sengs”
2. Select “Wi-Fi” and,to turn ON slide to ON. Then to turn OFF slide to OFF.
3. All detected wireless networks in the area will be listed. Click to select desired
wireless connecon.
4. Enter network key or password if necessary.
5. Once connected to a wireless network, sengs will be saved.
6. Wireless icon will appear on the taskbar when connected successfully.
Note:
• When the phone detects the same wireless network in the future,
the device will connect to the network automacally with the same
password record.
15. MOBILE DATA AND INTERNET CONNECTION
Please note: Cell Data may be turned “OFF” from the factory sengs, to allow
Data to flow through your network provider. Please turn Cell Data “ON” either
from your quick drop down menu or in Sengs – Cell Data. You will not be able
to access the Internet when Cell Data is “OFF” without being connected to Wi-Fi.
Note: Mobile data chargers apply when this seng is “ON.”
11
Page 13

Web Browsing
Connect to the Internet and launch the browser.
4G
9:00
4G
16. BLUETOOTH
Select “Bluetooth” and, to turn ON slide to ON. Then to turn OFF slide to OFF.
Search for the device you would like to pair with and select “PAIR.”
You will see a message “Connected Successfully.”
17. CAMERA
Touch the icon to enter camera mode and the interface is shown as follows:
12
Page 14

1. Touch the icon to take a photo.
2. Touch the icon to start camera recording.
3. Touch the icon on the top right to see the previous picture and to delete,
share or set it as wallpaper. Click return buon to exit camera interface.
4. Touch the icon to switch from front to back camera.
18.TROUBLE SHOOTING
Close Applicaon
When an applicaon is not responding you can manually shut the app down in
“Running Services” menu. This will ensure the system responds as desired.
Please shut down all idle applicaons to release memory and get the system
speed back to normal.
To close the applicaon, click the icon on the shortcut bar to enter the
system configuraon interface. Select the Apps and the interface is shown as
follows:
Tap the applicaon you want to close. A pop-up window will be displayed.
Tap “Stop” to close that applicaon.
Restore Default Seng
If you want to reset the phone to factory sengs and erase all materials, please
press Sengs → Backup & Reset → Factory Data Reset.
4G
9:00
4G
13
Page 15

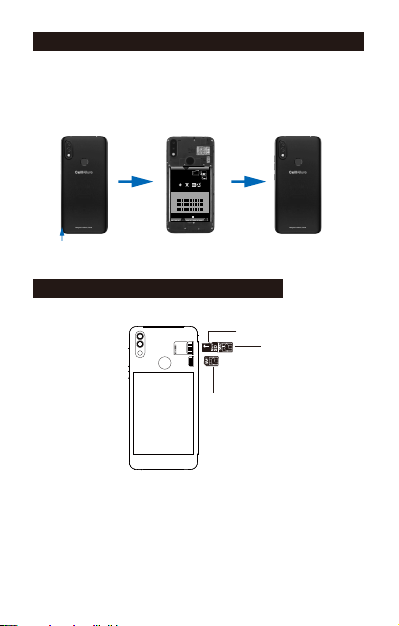
19. HOW TO INSERT THE SIM CARD & MEMORY CARD
NANO
SIM CARD 2
MICRO SD card
MICRO SIM card 1
NANO SIM card 2
14
MICRO
SIM CARD 1
Page 16

WARNING:
Factory Data Reset seng will delete ALL your data and system
configuraon as well as any downloaded apps. Please use this
funcon carefully.
SPECIFICATIONS
CPU/PCB soluon:
Display:
SIM card support:
Memory:
Storage:
GSM:
WCDMA:
FDD-LTE: B2/B4/B5/B7/B12/B17
Wi-Fi:
Front camera:
Rear camera:
Bluetooth:
GPS:
Fingerprint sensor: Yes
SD card support:
Charger:
USB:
Audio jack:
Baery capacity (mAh):
Supplied accessories:
OS:
Other:
Images used are for illustraon purposes only and may differ from actual
product. Restricons Apply.
Thank you for your purchase of the CellAllure EARN2 CL
MTK 6739
5.7” HD+IPS touch
Dual SIM
2GB
16GB
850/900/1800/1900MHz
850/900/1700/1900MHz
Yes
5MP
8MP
Yes
Yes
Up to 64GB
Telephone 3.8V
Input: 100-240V 50/60 Hz, 0.15A
Output: DC 5.0V ca 1A
Micro USB
3.5mm jack
2400mAh Polymer baery
1 Handset, 1 Baery, 1 Charger,
1 Data cable, 1 Headset,
1 User manual, 1 Screen protector.
TM
9.0
Android
FM radio, Flashlight.
Smartphone.
15
Page 17

16
Page 18

PRECAUCIONES
En el camino
Ulizar un teléfono mientras conduce es ilegal en muchos países. Por favor
absténgase de ulizar su teléfono móvil mientras conduce.
Equipos electrónicos o equipo médico cercano.
No ulice su teléfono cerca de equipos electrónicos – disposivos médicos como
marcapasos especialmente, ya que podría causar un mal funcionamiento del
mismo. También pueden interferir con el funcionamiento de los detectores de
fuego y otros equipos de control automáco.
Mientras viaja
Su teléfono puede causar interferencia con equipos del avión. Por lo que es
esencial seguir las regulaciones de la aerolínea, cuando el personal de la
aerolínea pide apagar el teléfono o desacvar las funciones inalámbricas, por
favor, hágalo.
En una gasolinera
No ulice el teléfono en estaciones de servicio. De hecho, siempre es mejor
tenerlo apagado cuando estás cerca de combusbles, productos químicos o
explosivos.
En una reparación
Nunca desmonte el teléfono. Por favor déjeselo a los profesionales.
Reparaciones no autorizadas podrían anular los términos de la garana. No
ulice el teléfono si la antena está dañada, ya que podría causar lesiones.
Alrededor de los niños
Mantenga su móvil fuera del alcance de los niños. Nunca debe ser ulizado
como un juguete ya que es peligroso.
Explosivos cercanos
Apague su teléfono en o cerca de áreas donde se ulizan materiales explosivos.
Siempre obedezca las leyes locales y apague su teléfono cuando se le solicite.
Llamadas de emergencia
Para hacer una llamada de emergencia el teléfono debe estar encendido en un
área donde haya cobertura de red. Marque el número nacional de emergencia y
pulse “Enviar.” Explicar exactamente donde estás y no colgar hasta que haya
llegado la ayuda.
Temperatura del teléfono
La temperatura de operación del teléfono es entre 0 y 40 grados Celsius. Por
favor, no ulice el teléfono fuera de este rango. Usar el teléfono en temperatura
demasiado alta o demasiado baja puede causar problemas. Escuchar a
volumen muy alto su teléfono móvil durante periodos prolongados, puede
dañar su oído.
17
Page 19

1. CONOCE EL TELÉFONO
1 Auricular
2 Cámara Frontal de 5MP
3 Sensores
4 Subir Volumen
5 Bajar Volumen
6 Tecla de encendido
7 Botón tácl/ Llamando
8 Botón tácl / Desbloquear teléfono
9 Botón tácl /Cámara
10 Flash / Linterna
11 Cámara de 8MP
12 Entrada para el auricular 3.5mm
13 Escáner de huellas daclares
14 Puerto de carga USB
15 Altavoz
18
Page 20

2. REMOVER LA CUBIERTA TRASERA/INSTALACIÓN DE LA BATERÍA
1.Levante y rere la tapa trasera como se muestra abajo en la esquina inferior
izquierda del teléfono.
2.Inserte la batería emparejando los terminales dorados en la parte superior
izquierda de la batería y presionando hasta que quede en su lugar.
3.Vuelva a instalar la tapa trasera y haga clic para que quede en su lugar.
MICRO
SD
card
NANO
WCDMA850/900/1700/1900 GSM850/900/1800/1900
EARN2 CL
CAPHG58
IMEI 1: 000000000000000
IMEI 2: 000000000000000
SN: CellAllure000001
MARCA: CellAllure
3.8V
LEVANTE Y SAQUE CUIDADOSAMENTE
LA CUBIERTA AQUI
3. INSERTAR/REMOVER SIM CARDS
• Nota: por favor, asegúrese de que su teléfono esté “APAGADO” antes de .
insertar las tarjetas SIM.
1. La Ranura SIM 1 está diseñada para una SIM estándar. Por favor, inserte la SIM 1
con los conectores dorados hacia abajo como se indica en la imagen superior,
tomando en cuenta la dirección de la SIM que se insertará. Insértela con cuidado
para evitar dañar su teléfono o la tarjeta SIM. Empuje la SIM suavemente hasta
que quede en su lugar.
2. La Ranura SIM 2 está diseñada para una micro SIM. Por favor inserte la SIM 2
con los conectores dorados hacia abajo como se indica en la imagen superior,
tomando en cuenta la dirección de la SIM a insertarse Insértela con cuidado para
evitar dañar el teléfono o la tarjeta SIM. Empuje la SIM suavemente hasta que
quede en su lugar. Para quitar la tarjeta SIM deslice suavemente hacia abajo.
19
MICRO SD slot
MICRO SIM slot 1
NANO SIM slot 2
Page 21

Insertar o quitar la tarjeta del Micro SD
• La ranura para la tarjeta Micro SD se encuentra al lado de las ranuras de las
tarjetas SIM cerca de los terminales de la batería como se indica en el propio
teléfono.
• Inserte suavemente la tarjeta Micro SD señalando la dirección correcta como
se indica en el teléfono y presione hasta que la tarjeta del Micro SD quede en su
lugar.
• Para quitar simplemente re suavemente la tarjeta.
ENCENDIDO
Pulse el botón de encendido durante 5 segundos hasta que el teléfono se
encienda.
APAGADO
Presione el botón de encendido durante 5 segundos. Aparecerá un menú de
selección para el cual:
Seleccione “APAGAR” para apagar su teléfono.
Otras opciones son “REINICIAR” para reiniciar el móvil y el “Modo avión” para
poner el móvil en modo de vuelo.
4. INTRODUCCIÓN
Carga de la batería
El móvil ene una batería recargable de polímero.
1. Para la carga, conecte el adaptador de corriente al micro conector USB en la
parte superior del móvil.
2. El icono de batería muestra el estado de la batería y estado de carga.
3. El móvil se puede ulizar incluso si la batería se está cargando.
4. Recargue la batería durante al menos media hora si el teléfono ha estado
apagado por mucho empo y no prende por sí mismo.
5. Recargue la batería del teléfono al menos una vez al mes.
Desecho de baterías
La batería conene material contaminante para el ambiente. Para desecharla,
favor de entregarla en un centro de reciclaje.
20
Page 22

5. BOTONES TÁCTILES
El Botón muestra un menú de aplicaciones recientemente abiertas.
El Botón retorna inmediatamente a la pantalla principal.
El Botón retrocede un paso hacia la página de menú anterior.
Bloqueo de pantalla
Para bloquear la pantalla del teléfono, simplemente pulse la tecla “ENCENDIDO.”
Pantalla de desbloqueo
Cuando el teléfono está en modo inacvo, presione el botón “ENCENDIDO” una
vez para acvar el teléfono.
Pantalla de desbloqueo: Para desbloquear, realice un movimiento como se
muestra en la ilustración:
6. PANTALLA INICIO
La pantalla de inicio se verá similar a la
imagen mostrada. Para cambiar entre
pantallas, simplemente deslice el dedo
de izquierda a derecha en la pantalla.
La barra de estado y navegación
siempre serán visibles, no importa que
pantalla de inicio está viendo.
El escritorio conene accesos directos a
tus aplicaciones más usadas y widgets.
El icono iniciará el menú de
aplicaciones.
21
Page 23

La barra de estado muestra información del sistema, tal como hora, conecvidad
inalámbrica y estado de carga de batería.
Desde la pantalla principal, deslice su dedo desde la parte superior de la pantalla
hasta el centro para acceder al panel de noficación tal como se ilustra a
connuación.
4G
9:00
4G
09:00
2019/01/01
Arrastre el menú de noficación hacia abajo para mostrar el segundo menú de
acceso rápido.
A través de este menú es posible modificar las funciones como el brillo, rotación
automáca, Wi-Fi, Bluetooth y mucho más como se muestra a connuación.
4G
9:00
4G
7. MENÚ DE AJUSTES
El menú de ajustes o configuración le permite modificar la configuración del
sistema de su teléfono.
1. Para cambiar la configuración, primero presione el ícono Configuración .
2. Toque un tulo de categoría para ver más opciones en la parte derecha de la
pantalla.
22
Page 24

• Uso de datos: Acvar o desacvar los datos móviles, uso actual, establecer el
límite de uso de datos móviles (Nota: esta función sólo está disponible en
disposivos de funcionalidad 3G).
• Bluetooth: Conectar o desconectar los disposivos Bluetooth.
• Pantalla: Configuración de la pantalla.
• Configuración para Smart Gesture: Acvar o desacvar la función.
• Perfiles de audio: Ajustar las diferentes configuraciones de audio como tonos
de llamada.
• Avisos y noficaciones: Configurar avisos y noficaciones
• Almacenamiento: Administrar y configurar el uso del almacenamiento interno
y externo del teléfono.
• Batería: Configurar y monitorear el estado de la batería.
• Aplicaciones: Listado de todas las aplicaciones instaladas y su configuración.
• Eliminar aplicaciones: Desinstalar aplicaciones del sistema.
• Servicios de localización: Acvar o desacvar funciones de localización GPS.
• Seguridad: Ajustes de seguridad del teléfono.
• Cuentas: Agregar o eliminar cuentas de correo electrónico de Google y Gmail.
• Lenguaje y entrada: Seleccionar idioma, agregar diccionarios, configurar el
teclado en pantalla, búsqueda por voz, etc.
• Copia de seguridad y restauración: Configuración de las copias de seguridad y
restablecimiento de fábrica.
• Fecha y hora: Establecer fecha, horario, formato del reloj, etc.
• Accesibilidad: Configuración de tamaño del texto, rotación de pantalla
automáca, reconocimiento de voz, etc.
• Acerca del teléfono: Muestra información sobre su teléfono.
8. HACER Y RECIBIR LLAMADAS
Una vez instaladas sus tarjetas SIM encienda
el teléfono y espere unos minutos para que su
teléfono entre a una red. Seleccione el icono
de llamada .
Aquí puede marcar un número o seleccionar
un contacto de tu lista de contactos
almacenados para llamar. También puede ver
las llamadas salientes y entrantes que se han
realizado, así como agregar o eliminar
contactos.
23
Page 25

9. RESPONDER Y RECHAZAR LLAMADAS
Para contestar una llamada, deslice el dedo a la tecla de respuesta de color
verde.
Para rechazar una llamada, deslice el dedo a la tecla fin de llamada de color rojo.
Para mensajes, toque el icono de mensaje.
10. ENVIAR UN MENSAJE
En la pantalla de inicio, Mensajería , se introducirá a la interfaz de editar
un mensaje.
Para mensajes de texto
1. Ingrese el número o nombre de receptor en la barra de desnatario, mientras
inserta el número, contactos que coincidan con los datos, aparecerán debajo
de la barra para seleccionar.
Nota:
• Haga clic para abrir la pantalla de búsqueda de contacto y
seleccione cualquier contacto para añadir a la barra de desnatario.
• Si va a enviar a más de un desnatario, ulice comas entre cada uno
de ellos para separarlos.
2. Haga clic en redactar para comenzar a componer un mensaje.
3. Cuándo termine de escribir, haga clic en enviar.
4G
9:00
4G
4G
9:00
4G
24
Page 26

11. MENSAJES MULTIMEDIA
1. Ingrese el número o nombre de receptor en la barra de desnatario, mientras
inserta el número, contactos que coincidan con los datos, aparecerán debajo
de la barra para seleccionar.
2. Haga clic en Menú > Agregar tema, a connuación, escriba el asunto.
3. Haga clic en redactar para comenzar a componer un mensaje.
4. Haga clic para agregar adjuntar para agregar archivos adjuntos.
Nota:
• Puede seleccionar imagen, fotos, captura de videos, Videos, grabar
audio, sonido, contacto, Calendario, presentación de diaposivas de
la lista adjuntos.
5. Cuando termine de escribir, haga clic en enviar.
12. SOFTWARE DEL TECLADO
Pantalla tácl
La pantalla tácl responde al toque del dedo.
Nota:
• No coloque ningún objeto sobre la pantalla tácl porque puede
dañar o Quebrar la pantalla.
1 Solo clic: Solo haga clic en un icono para seleccionar el icono o la opción que
desee.
Pulsación larga: Presione y mantenga presionado un icono para borrar o mover
un icono o aprox.
Arrastre: Pulse el icono y arrástrelo a una pantalla diferente.
25
Page 27

13. CÓMO CONECTARSE A UNA COMPUTADORA
Nota:
Encienda el teléfono antes de conectarlo a una computadora a través
de cable USB.
1. Ulice un cable USB para conectar el teléfono con un ordenador. El teléfono
detecta automácamente una conexión USB.
2. Una noficación aparecerá “USB conectado” – seleccione la funcionalidad
deseada.
3. El PC te detecta un disco externo llamado "EARN2 CL" está es la memoria
interna del teléfono.
4. La conexión de USB ha sido exitosa.
14. CONEXIÓN A INTERNET
Wireless:
1. Seleccione “Configuración.”
2. Selecciona “Conexión Wi-Fi” y deslice “apagado” o “encendido.”
3. Todas las redes inalámbricas detectadas en el área se enlistarán. Haga clic
para seleccionar la conexión inalámbrica deseada.
4. Introduzca la clave de red si es necesario.
5. Una vez conectado a una red inalámbrica, la configuración se guardará.
6. El icono Wireless aparecerá en la barra de tarea cuando se conecta con éxito.
Nota:
• Cuando el teléfono detecta en el futuro la misma red inalámbrica, el
disposivo se conectará a la Red automácamente con el mismo
registro de contraseña.
15. DATOS MÓVILES Y CONEXIÓN A INTERNET
Nota: La opción de datos puede venir apagada de fábrica, para permir que
La conexión de datos sea a través de su proveedor de red. Por favor, encienda la
opción de su menú rápido deslizando de arriba a abajo o en el menú de
configuración “DATOS.”
Usted no podrá acceder a Internet cuando la opción de datos esté “APAGADO” y
sin estar conectado tampoco a una red Wi-Fi.
Nota: Los cargos por uso de datos móviles pueden aplicar cuando la opción
“Encendido” se encuentre seleccionada.
26
Page 28

Navegación por la web
Conectarse a Internet y poner en marcha el navegador.
4G
9:00
4G
16. BLUETOOTH
Seleccione “Configuración” --- Seleccione Bluetooth a “ENCENDIDO.”
Buscar el disposivo que desea conectar y seleccione "EMPAREJAR.”
Usted verá un mensaje “Conectado correctamente.”
17. CÁMARA
Toque el icono para entrar en modo de cámara y la interfaz se muestra
como lo siguiente:
27
Page 29

1. Toca el icono de para tomar una foto.
2. Toca el icono de para iniciar la grabación de la cámara.
3. Toca el icono de en la parte superior derecha para ver la imagen
anterior y borrar, comparr o definirlas como papel tapiz. Haga clic en volver
para salir de cámara interfaz .
4. Toca el icono de para cambiar entre cámara frontal y cámara trasera.
18. SOLUCIÓN DE PROBLEMAS
Cerrar aplicación
Cuándo una aplicación no responde, usted puede cerrarla manualmente en el
menú de “Servicios Acvos/Corriendo.” Esta opción asegurará que el sistema
responda cómo es debido.
Por favor cierre todas las aplicaciones para liberar memoria y hacer que la
velocidad del sistema vuelva a la normalidad.
Para cerrar la aplicación, haga clic en el icono en la barra de acceso
directo para entrar en el interfaz de configuración del sistema. Seleccione la
aplicación y la interfaz se mostrara como lo siguiente.
Toque la aplicación que desea cerrar. Se mostrará una ventana emergente.
Pulse “Detener” para cerrar la aplicación.
Restaurar la configuración predeterminada
Si desea restablecer el teléfono a valores de fábrica y borrar todos los
Contenidos, por favor Presione Configuración → Respaldo & Restauración
→ Restablecer datos de fábrica.
4G
9:00
4G
28
Page 30

19. CÓMO INSERTAR LA TARJETA SIM Y LA TARJETA DE MEMORIA
MICRO
SIM CARD 1
NANO
SIM CARD 2
Tarjeta de memoria
Tarjeta SIM 1
Tarjeta SIM 2
29
Page 31

ALERTA:
Restablecer Datos de Fábrica borrará toda la información en el
sistema al igual que configuraciones y Aplicaciones descargadas.
Por favor use esta función cuidadosamente.
ESPECIFICACIONES
CPU:
Pantalla:
Soporte tarjeta SIM:
Memoria:
Almacenaje:
GSM:
WCDMA:
FDD-LTE:
Wi-Fi:
Cámara Frontal:
Cámara Trasera
Bluetooth:
GPS:
Escáner de huellas daclares:
Soporta Tarjeta SD
Cargador:
USB:
Audio jack:
Capacidad Batería (mAh):
Accesorios Incluidos:
OS:
Otros:
La operación de este equipo está sujeta a las siguientes dos condiciones:
1. Es posible que este equipo o disposivo no cause interferencia perjudicial.
2. Este equipo o disposivo debe aceptar cualquier interferencia. Incluyendo
la que pueda causar su operación no deseada.
Las imágenes ulizadas son sólo con fines ilustravos y pueden diferir del
producto real. Aplican Restricciones.
Esperamos que disfrute su nuevo smartphone EARN2 CL.
MTK 6739
5.7” HD IPS tácl
Doble SIM
2GB
16GB
850/900/1800/1900MHz
850/900/1700/1900MHz
B2/B4/B5/B7/B12/B17
SI
5MP
8MP
SI
SI
SI
Hasta 64GB
Caracteríscas Eléctricas:
Teléfono 3.8V
Entrada: 100-240V 50/60 Hz,
Salida: DC 5.0V ca 1A
0.15A
Micro USB
3.5mm jack
Polymer 2400 mAh de alto desempeño
1 Auricular, 1 Batería, 1 Cargador,
1 Cable de Conexión, 1 Manos Libres,
1 Manual de Usuario, 1 Protector de Pantalla.
AndroidTM 9.0
Radio FM, Literna.
Gracias por preferir CellAllure .
30
Page 32

This device complies with part 15 of the FCC
conditions: ( 1) This device may not cause harmful interference, and (2) this device must accept
any interference received, including interference that may cause undesired operation.
15.21 Information to the user.
Any changes or modifications not expressly approved by the party responsible for compliance
could void the user's authority to operate the equipment. 15.105 Information for the user.
Note: This equipment has been tested and found to comply with the limits for a Class B digital
device, pursuant to part 15 of the FCC rules. These limits are designed to provide reasonable
protection against harmful interference in a residential installation. This equipment generates, uses
and can radiate radio frequency energy and, if not installed and used in accordance with
theinstructions, may cause interference to radio communications. However, there is no guarantee
that interference will not occur in a particular installation. If this equipment does cause harmful
interference to radio or television reception, which ca n be determined by turning the equipment off
and on, the user is encouraged to try to correct the interference by one or more of the following
measures:
- Reorient or relocate the receiving antenna.
- Increase the separation between the equipment and receiver.
- Connecting the equipment to a socket on a circuit different from that to which the receiver is
connected.
- Contact with the provider or a radio f TV technician for help.
Specific absorption rate (SAR):
This mobile phone meets the government's requirements for exposure to radio
waves. The guidelines are based on standards developed by independent scientific organizations
through periodic and thorough evaluation of scientific studies. The standards include a margin of
safety designed to ensure the safety of all people regardless of their age or health.
The FCC Statement of Exposure to RF and the SAR limit for the United States (FCC) is 1.6 W/kg
average for each gram of tissue. This device was tested for typical operations of use on the body,
with the back of the phone at l0mm from the body. To maintain compliance with FCC RF
exposure requirements, use accessories that maintain a distance of 10mm between the user's body
and the back of the phone. The use of belt clips, covers and similar accessories must not contain
metallic components in their assembly. The use of accessories that do not meet these requirements
may not meet FCC RF exposure requirements and should be avoided.
Functioning in the body
This device was tested for typical operations of use in the body. To comply with RF exposure
requirements, a minimum separation distance of 10mm must be maintained between the user's
body and the telephone, including the antenna. Third-party accessories such as belt clips. covers
and similar accessories used with this device should not contain metallic components, accessories
that do not meet these RF exposure requirements and should be avoided from use on the body. Use
only the supplied antenna or an approved antenna.
rules. Operation is subject to the following two
Page 33

2LC
 Loading...