

Page 1

FASHION
PLUS
Page 2
Page 3

PRECAUTIONS
On the Road
Using a phone while driving is illegal in many countries. Please refrain from using
your mobile while driving.
Near Sensive Electronics or Medical Equipment
Don’t use your phone near sensive electronic equipment – parcularly medical
devices such as pacemakers – as it could cause them to malfuncon. It can also
interfere with the operaon of fire detectors and other automac-control
equipment.
While Flying
Your phone can cause interference with aircra equipment. So it’s essenal you
follow airline regulaons. And if airline personnel ask you to switch off your
phone, or disable its wireless funcons, please do as they say.
At a Petrol Staon
Don’t use your phone at petrol staons. In fact, it’s always best to switch off
whenever you’re near fuels, chemicals or explosives.
Making Repairs
Never take your phone apart. Please leave that to the professionals.
Unauthorized repairs could break the terms of your warranty. Don’t use your
phone if the antenna is damaged, as it could cause injury.
Around Children
Keep your mobile out of children’s reach. It should never be used as a toy as this
is hazardous.
Near Explosives
Turn off your phone in or near areas where explosive materials are used. Always
obey local laws and turn off your phone when requested.
Emergency Calls
To make an emergency call your phone must be turned on and in an area where
there’s network coverage. Dial the naonal emergency number and press
“Send.” Explain exactly where you are and don’t hang up unl help has arrived.
Working Temperature
The working temperature for the phone is between 0 and 40 degree Celsius.
Please don’t use the phone outside the range. Using the phone under too high
or too low temperature might cause problems.
At very high volume, prolonged listening to a mobile phone can damage your
hearing.
2
Page 4
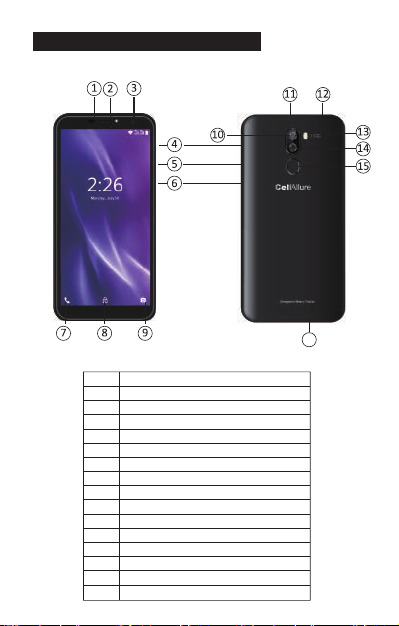
1. UNDERSTANDING YOUR PHONE
1 Sensor
2 Speaker
3 8MP front camera
4 Volume up
5 Volume down
6 Power key
7 Touch buon/Moves back one step
8 Touch buon/Takes you to home page
9 Touch buon/Opens recently visited pages
10 13MP camera
11 USB charging port
12 3.5mm headphone jack
13 Flash/Torchlight
14 2MP camera
15 Fingerprint Scanner
16 Loudspeaker
16
3
Page 5
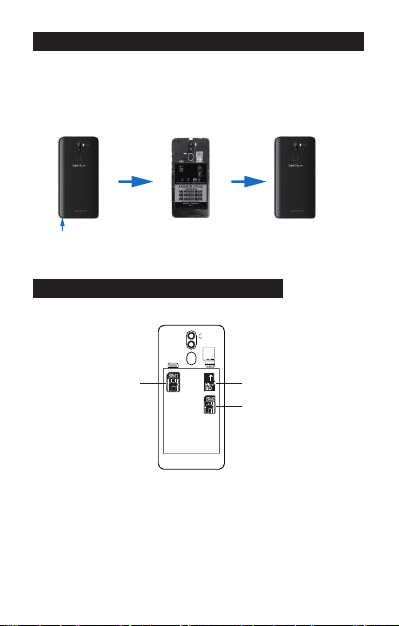
2. REMOVING BACK COVER/BATTERY INSTALLATION
1. Li and remove rear case as shown below on the boom le corner of the
phone.
2. Insert the baery matching up the gold terminals on the top le of the
baery and clip in place.
3. Reinstall the back cover and click in place.
GENTLY LIFT AND UNCLIP
THE BACK COVER HERE
3. INSERTING/REMOVING SIM CARDS
• Note: Please ensure your phone is powered “OFF” before inserng SIM cards.
MICRO SIM slot 1
MICRO SD slot
MICRO SIM slot 2
1. SIM Slot 1 takes a standard SIM. Please insert SIM 1 with gold connectors
facing “DOWN” as indicated on the phone itself, taking special note of the
direcon to be inserted. Follow this carefully to avoid damaging your phone
or the SIM. Push gently unl in place.
2. SIM Slot 2 takes a micro SIM, Note: Please insert SIM 2 with gold connectors
facing down as indicated on the phone itself, taking special note of the
direcon to be inserted, follow this carefully to avoid damaging your phone or
the SIM card. Push the SIM gently to lock in place. To remove the SIM cards
gently slide the SIM cards downwards.
4
Page 6
Inserng/Removing SD Card
• The SD card slot is located next to the SIM card slots near the baery terminals
as indicated on the phone itself.
• Gently insert the SD card nong the correct direcon as indicated on the
phone and push unl the SD card clicks in place.
• To remove simply pull gently.
Power ON/OFF
ON
Press the POWER buon for a connuous 5 seconds unl the phone turns “ON.”
OFF
Press the POWER buon for a connuous 5 seconds. A selecon menu will
appear.
Select “OFF” to power “OFF.”
Other selecons are “REBOOT” to restart the mobile and “AIRPLANE MODE” to
put the mobile in flight mode.
4. GETTING STARTED
Charging the Baery
The mobile has a rechargeable Lithium-ion baery.
1. To charge, connect the AC power adapter to the micro USB jack on the top
side of the mobile.
2. The baery icon shows the baery status and charging status.
3. The mobile can be used even if the baery is being charged.
4. Recharge the baery for at least half an hour if it has been idling for a long
me and fails to start itself.
5. Regularly recharge the phone at least once a month.
Disposal of Baeries
The baery contains pollung material. Please hand it in to a recycling centre to
dispose of.
5
Page 7

5. TOUCH BUTTONS
The buon displays a menu of recently opened applicaons.
The buon returns immediately to the main screen.
The buon moves back one step to the previous menu/page.
Screen Lock
To lock the phone’s screen, simply press the “POWER BUTTON.”
Screen Unlock
When the phone is in idle mode, press the “POWER BUTTON” once to wake up
the phone.
Screen unlock: To unlock, swipe up as illustrated below:
6. HOME SCREEN
The home screen will look similar to the
picture opposite. To switch between
screens, simply slide your finger le or
right across the display.
The status bar and navigaon buons
are always visible, no maer which
home screen you are currently viewing.
The desktop contains shortcuts to your
most-used applicaons and widgets.
The icon will launch the Applicaon
menu.
6
Page 8

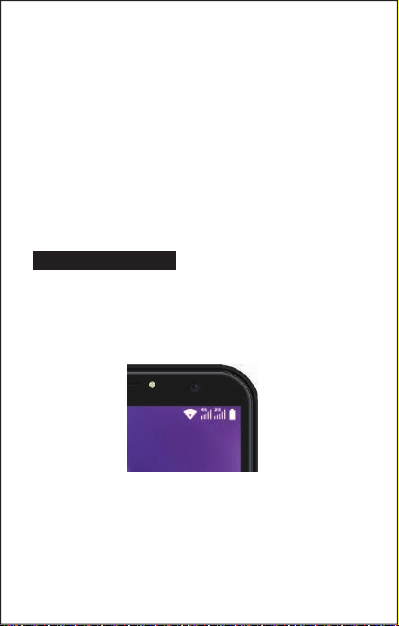
The status bar displays system informaon, such as current me, wireless
connecvity and baery charge status.
From the home screen, slide your finger from the top of the screen down
to the centre to access the noficaon panel as illustrated below.
Drag the noficaon menu down to display the second fast access menu.
Through this menu it is possible to modify the funcons such as brightness, auto
rotaon, Wi-Fi, Bluetooth and more as displayed below.
7. SETTINGS MENU
The sengs menu allows you to adjust your phone’s system configuraon.
• To change sengs first press the Sengs icon.
• Touch a category tle to view further opons on the right side of the screen.
7
Page 9

• Wi-Fi – Connect to/disconnect from wireless networks, view connecon status.
• Data usage – Enable/disable mobile data, view current usage, set mobile data
limit. (note: this funcon is available only on devices supplied with 3G card
funconality)
• Bluetooth – Connect or disconnect Bluetooth devices.
• Display – Adjust display sengs.
• Smart Gesture Sengs – “ON” / “OFF.”
• Audio Profiles – Adjust the various audio sengs such as ringtones.
• Prompts and noficaons – Adjust various noficaon sengs.
• Storage – View your phone’s internal and external storage sengs.
• Baery – View the status of your baery and make adjustments to power
consumpon.
• Apps – A list of all apps downloaded and running.
• Delete applicaons – Select apps to delete.
• Locaon services – Change approximate locaon detecon, improve search
results, GPS satellites.
• Security – Adjust phone’s security sengs.
• Accounts – Add or remove email and Google™ accounts such as gmail,
Google.
• Language & input – Select Language Add to the diconary, edit on-screen
keyboard sengs, vocal search, etc.
• Backup & Reset – Backup and restore data, perform factory reset, etc.
• Date & Time – Set date, me zone, me, clock format etc.
• Accessibility – Set up large text, auto-rotate screen, speak password etc.
• About Phone – Displays informaon about your phone.
8. MAKING AND RECEIVING CALLS
Once your SIM cards are
installed turn on your phone
and wait a few minutes for
your phone to find a network.
Then select the Call icon.
Here you can dial a number or
select a contact from your
stored contacts list to call. You
can also view outgoing and
incoming calls that have been
made, as well as adding or
removing contacts.
· Google is a trademark of Google LLC.
8
Page 10

9. ANSWERING AND REJECTING CALLS
To answer a call – Slide your finger to the Green Call answer key.
To reject a Call – Slide your finger to the Red Call End key.
To message – touch the message icon.
10. SENDING A MESSAGE
On the home screen, Messaging , enter message edit interface.
For Text Message
1. Input recipient number on the Type name or number. While you input the
number, matching contacts will appear under the bar for you to select.
Note:
• Click to open contact search screen and select any contact to
add to recipient bar.
• Please use commas between each recipient.
2. Click Compose to start composing a message.
3. Aer you finish typing, click Send.
9
Page 11

11. FOR MULTIMEDIA MESSAGE
1. Input recipient number on the Type name or number bar.
2. Click Menu > Add Subject, then type the Subject.
3. Click Compose to start composing a message.
4. Click add Aach.
Note:
• You can select Capture picture, Pictures, Capture videos, Videos,
Record audio, Audio, Contact, Calendar, Slideshow from the
aachment list.
5. Aer you finish typing, click Send.
12. SOFTWARE KEYBOARD
Touchscreen
The touchscreen responds to finger touch.
Note:
• Don’t place any object on the touchscreen for it may damage or
crush the screen.
Single Click: Single click one icon to choose the icon or opon you want.
Long Press: Press and hold an icon to delete or move an icon or app.
Drag: Press the icon and drag it to a different screen.
10
Page 12

13. HOW TO CONNECT TO A COMPUTER
Note:
• Turn on your phone before connecng it to a PC by USB cable.
1. Use a USB cable to connect the phone with a computer. The phone will
automacally detect a USB connecon.
2. A noficaon will pop up “USB connected” – Select the desired funconality.
3. The PC will detect an external disc named “FASHION 2 PLUS” this is the
internal
memory of the phone.
4. The USB connecon has been successful.
14. CONNECTION TO INTERNET
Wireless:
1. Select “ Sengs”
2. Select “Wi-Fi” and slide OFF to ON status.
3. All detected wireless networks in the area will be listed. Click to select desired
wireless connecon.
4. Enter network key if necessary.
5. Once connected to a wireless network, sengs will be saved.
6. Wireless icon will appear on the taskbar when connected successfully.
Note:
• When the phone detects the same wireless network in the future,
the device will connect to the network automacally with the same
password record.
15. MOBILE DATA AND INTERNET CONNECTION
Please note: Cell Data may be turned “OFF” from the factory, to allow Data to
flow through your network provider. Please turn Cell Data “ON” either from your
quick drop down menu or in Sengs – Cell Data. You will not be able to access
the Internet when Cell Data is “OFF” without being connected to Wi-Fi.
Note: Mobile data chargers apply when this seng is “ON.”
11
Page 13

Web Browsing
Connect to the Internet and launch the browser.
16. BLUETOOTH
Select “Sengs”, select Bluetooth from “OFF” to “ON.”
Search for the device you would like to pair with and select “PAIR.”
You will see a message “Connected Successfully.”
17. CAMERA
Touch the icon to enter camera mode and the interface is shown as follows:
12
Page 14

1. Touch the icon to take a photo.
2. Touch the icon to start camera recording.
3. Touch the icon on the top right to see the previous picture and to delete,
share or set it as wallpaper. Click return buon to exit camera interface.
4. Touch the icon to switch from front to back camera.
18.TROUBLE SHOOTING
Close Applicaon
When an applicaon is not responding you can manually shut the app down in
“Running Services” menu. This will ensure the system responds as desired.
Please shut down all idle applicaons to release memory and get the system
speed back to normal.
To close the applicaon, click the icon on the shortcut bar to enter the
system configuraon interface. Select the Apps & noficaons and the interface
is shown as follows:
Tap the applicaon you want to close. A pop-up window will be displayed.
Tap “Stop” to close that applicaon.
Restore Default Seng
If you want to reset the phone to factory sengs and erase all materials, please
press Sengs → Backup & Reset → Factory Data Reset.
13
Page 15

19. HOW TO INSERT THE SIM CARD & MEMORY CARD
MICRO SD slot
MICRO SIM slot 1
MICRO SIM card 1
MICRO SD card
MICRO SIM card 2
MICRO SIM slot 2
Page 16

WARNING:
Factory Data Reset seng will delete ALL your data and system
configuraon as well as any downloaded apps. Please use this
funcon carefully.
SPECIFICATIONS
CPU/PCB soluon:
Display:
SIM card support:
Memory:
Storage:
GSM:
WCDMA:
Wi-Fi:
Front camera:
Rear camera:
Bluetooth:
GPS:
SD card support:
Charger:
USB:
Audio jack:
Baery capacity (mAh):
Supplied accessories:
OS:
Other:
Images used are for illustraon purposes only and may differ from actual
product. Restricons Apply.
Thank you for your purchase of the CellAllure FASHION 2 PLUS
Google and Android are trademarks of Google LLC.
MTK 6580
5.72” HD IPS touch
Dual SIM
1GB
16GB
850/900/1800/1900MHz
850/1700/1900MHz
Yes
8MP
13+2MP
Yes
Yes
Up to 64GB
Telephone 3.8V
Input: 100-240V 50/60 Hz, 300mA
Output: DC 5.0V 1A ca
Micro USB
3.5mm jack
2800mAh
Li-ion
1 Handset, 1 Baery, 1 Charger,
1 Data cable, 1 Headset,
1 User manual, 1 Screen protector.
Android™ 8.1 (Go edion)
FM radio, Flashlight.
high performance
Smartphone.
15
Page 17

FCC Statement
1. This device complies with Part 15 of the FCC Rules. Operation is subject to the following two conditions:
(1) This device may not cause harmful interference.
(2) This device must accept any interference received, including interference that may cause undesired operation.
2. Changes or modifications not expressly approved by the party responsible for compliance could void the user's authority to operate
the equipment.
NOTE:
This equipment has been tested and found to comply with the limits for a Class B digital device, pursuant to Part 15 of the FCC Rules.
These limits are designed to provide reasonable protection against harmful interference in a residential installation.
This equipment generates uses and can radiate radio frequency energy and, if not installed and used in accordance with the
instructions, may cause harmful interference to radio communications. However, there is no guarantee that interference will not occur
in a particular installation. If this equipment does cause harmful interference to radio or television reception, which can be determined
by turning the equipment off and on, the user is encouraged to try to correct the interference by one or more of the following measures:
Reorient or relocate the receiving antenna.
Increase the separation between the equipment and receiver.
Connect the equipment into an outlet on a circuit different from that to which the receiver is connected.
Consult the dealer or an experienced radio/TV technician for help.
SAR Information Statement
Your wireless phone is a radio transmitter and receiver. It is designed and manufactured not to exceed the emission limits for exposure
to radiofrequency (RF) energy set by the Federal Communications Commission of the U.S. Government. These limits are part of
comprehensive guidelines and establish permitted levels of RF energy for the general population. The guidelines are based on
standards that were developed by independent scientific organizations through periodic and thorough evaluation of scientific studies.
The standards include a substantial safety margin designed to assure the safety of all persons, regardless of age and health. The
exposure standard for wireless mobile phones employs a unit of measurement known as the Specific Absorption Rate, or SAR. The
SAR limit set by the FCC is 1.6 W/kg. * Tests for SAR are conducted with the phone transmitting at its highest certified power level in all
tested frequency bands. Although the SAR is determined at the highest certified power level, the actual SAR level of the phone while
operating can be well below the maximum value. This is because the phone is designed to operate at multiple power levels so as to use
only the power required to reach the network. In general, the closer you are to a wireless base station antenna, the lower the power
output. Before a phone model is available for sale to the public, it must be tested and certified to the FCC that it does not exceed the
limit established by the government adopted requirement for safe exposure. The tests are performed in positions and locations (e.g., at
the ear and worn on the body) as required by the FCC for each model. The highest SAR value for this model phone when tested for use
at the ear is 0.157W/Kg and when worn on the body, as described in this user guide, is 0.287W/Kg(Body-worn measurements differ
among phone models, depending upon available accessories and FCC requirements). The maximum scaled SAR in hotspot mode is
0.335W/Kg. While there may be differences between the SAR levels of various phones and at various positions, they all meet the
government requirement for safe exposure. The FCC has granted an Equipment Authorization for this model phone with all reported
SAR levels evaluated as in compliance with the FCC RFexposure guidelines. SAR information on this model phone is on file with the
FCC and can be found under the Display Grant section of http://www.fcc.gov/ oet/fccid after searching on
FCC ID: 2AAE9CAPHG53 Additional information on Specific Absorption Rates (SAR) can be found on the Cellular
Telecommunications Industry Asso-ciation (CTIA) web-site at http://www.wow-com.com. * In the United States and Canada, the SAR
limit for mobile phones used by the public is 1.6 watts/kg (W/kg) averaged over one gram of tissue. The standard incorporates a
sub-stantial margin of safety to give additional protection for the public and to account for any variations in measurements.
Body-worn Operation
This device was tested for typical body-worn operations. To comply with RF exposure requirements, a minimum separation distance
of 10mm must be maintained between the user’s body and the handset, including the antenna. Third-party belt-clips, holsters,
Page 18

and similar accessories used by this device should not contain any metallic components. Body-worn accessories that do not meet
these requirements may not comply with RF exposure requirements and should be avoided. Use only the supplied or an approved
antenna.
 Loading...