

Page 1

0
CHIC MINI
Smart Phone-CHIC MINI Series
CAPHG22-01
User manual
Page 2

1
Table of Contents
1 THE BASICS ............................................................. 4
1.1
OVERVIEW ............................................................. 4
1.2
SAFETY GUIDE ....................................................... 5
1.3
SAFETY WARNINGS AND NOTICES ........................ 7
1.3.1 General attention ................................................ 7
1.3.2 Notices when using your phone .......................... 8
1.3.3 Notices when using the battery ......................... 11
1.3.4 Charging your phone ........................................ 13
1.3.5 Cleaning and maintenance ............................... 17
2 GETTING STARTED ................................................... 18
2.1. Icons ............................................................... 18
2.2
KEY EXPLANATIONS ............................................. 19
2.3
USING THE TOUCHSCREEN ................................. 20
2.4
CONNECT ING TO THE NE TWORK......................... 20
2.4.1 Inserting and removing the SIM card................ 20
2.4.2 Turning your phone on and off .......................... 21
2.4.3 Unlocking the SIM card .................................... 22
2.4.4 Unlocking your phone ....................................... 22
2.4.5 Connecting to the network ................................ 23
2.4.6 Making a call .................................................... 23
2.4.7 Making a domestic call ..................................... 23
Page 3

2
2.4.8 Making an international call ............................ 24
2.4.9 Making a call from the list ................................ 24
2.4.10 Making an emergency call .............................. 25
2.4.11 Call menu ........................................................ 25
3 FUNCTIONAL MENU ................................................. 27
3.1
FILE MANAGEMENT............................................. 27
3.2
SENDING AN EMAIL ............................................. 27
3.3
DIALING ............................................................... 28
3.4
3G VIDEO C ALL ................................................... 29
3.5
CALCULATOR ...................................................... 30
3.6
BROWSER............................................................ 31
3.7
VOICE RECORDER............................................... 32
3.8
CALENDAR .......................................................... 33
3.9
SETTINGS ............................................................ 34
3.10
CLOCK ............................................................... 35
3.11
RADIO ................................................................ 36
3.12
SEARCH............................................................. 37
3.13
CONTACTS ........................................................ 38
3.14
GALLERY ........................................................... 40
3.15
CAMERA ............................................................ 40
3.16
MESSAGING ...................................................... 41
3.17
NOTIFICATION MENU ........................................ 43
3.18
DOWNLOAD CONTENT ...................................... 43
Page 4

3
3.19 MUSIC ................................................................ 44
3.20
CALL RECORDS ................................................ 45
3.21
ANALOG TV ...................................................... 46
3.22
FLASH PLAYER ................................................. 47
3.23
MOBOPLAYER .................................................. 47
3.24
WIDGET ............................................................. 48
3.25
SELECTING WALLPAPER SOURCE................... 49
4. TEXT INPUT ......................................................... 50
5 SD CARD INTRODUCTION ................................. 52
6 FAQS AND SOLUTIONS ...................................... 58
Page 5

4
1 The Basics
1.1 Overview
Thank you for choosing the GSM/GPRS digital
mobile phone. After reading this guide you will be able
to full y m aster the use of your p hone and appreci ate
all its functions and ease of use.
Not only does the Smart Phone-CHIC MINI Series
pr ov i de you w i t h basi c call func ti ons suc h as c al l
Register, but also with many practical functions and
servic es, to improv e the time you sp end worki ng and
playing.
The color screen mobile phone complies with the
GSM/GPRS technology and has been approved by
certification authorities both domestically and abroad.
The availability of some services and features
described in this m anual dep ends on the n etw ork and
your subscription. Therefore, some menu items may
not be available in your phone. The shortcuts to
menus and features may also vary from phone to
phone.
Our company reserves the right to revise this
Page 6

5
manual content without prior notice.
1.2 Safety guide
If your mobile phone is lost or stolen, please
contact the telecommunications authorities or a
sales agent immediately to have a hold on the
phone and the SIM card. This will prevent
economic loss caused by unauthorized calls
made from your mobile phone.
When you contact the telecommunications
authorities or a sales agent, they will need to
know the IMEI number of our mobile phone
(remov e b att er y to exp os e number loc ated on t h e
label on back of phone). Please copy this number
and keep in a safe place for future use.
In order to avoid the misuse of your mobile
phone please take the following preventative
measures:
- Set the PIN number of your m obile phone’s
SIM card and change this number
immediately if it becomes known to a third
party.
- Please keep the phone out of sight when
leaving it in a v ehicle. It is best to carr y the
Page 7

6
phone with you, or lock it in the trunk.
- Set call barring.
Page 8

1.3 Safety warnings and notices
Before using your mobile phone, read and
understand the following notices carefully to ensure
you will use it safely and properly.
1.3.1 General attention
Only the battery and battery charger specified
by our company should be used in your
phone. Other p roducts mig ht result i n battery
leakage, overheating, fire or explosion.
To avoid your phone malfunctioning, or
catching fire, please do not violently impact,
jolt or throw your phone.
Please do not place the battery, mobile phone,
or charger in a microwave oven or
high-pressure equipment. Otherwise it could
lead to unexpected accidents such as
damage to the circuitry or fire hazard.
Please do not use your phone near flammable
or explosive gases, otherwise it could caus e
malfunction of your phone or fire hazard.
Please do not subject your phone to high
temperatures, hig h hum idity or dusty places ;
otherw ise this m ay lead to the m alf unction of
7
Page 9

your phone.
Keep your phone out of the reach of small
children. Your phone is not a toy. Children
could hurt themselves.
To avoid your phone falling and
malf unctioning or b eing damaged, p lease do
not place it on uneven or unstable surfaces.
1.3.2 Notices when using your phone
Turn off your mobile phone w here the phone
is not all owed, suc h as, on the air plane or in
hospitals. Using the mobile phone in those
places may impact the normal operation of
electronic devices and medical instruments.
Follow r elevant regulations w hen using your
mobile phone in those places. Your mobile
phone has the auto turn-on feature. Check
your alarm clock s etti ng s to confi rm that your
mobile phone will not be turned on
automatically during flight.
Please do not use your mobile phone near
the weak signal or high precision electronic
devices. RF interference might cause
malfunctioning of such electronic devices and
other problems. Special tips must be paid
8
Page 10

near the following equipment: hearing aids,
pace makers and other medical electronic
devices , fire detectors, autom atic doors and
other automatic control installations. To find
out the effect of mobile phones on a
pacemaker or other pieces of electronic
medical equipment please contact the
manufacturers or local sales agents of the
equipment.
Please do no t subject the LCD t o im pact or
use the screen to strike things, as this will
damage the LCD board and cause leakage of
the liqui d cr ystal. There is a r isk of b li ndness
if the liquid crystal substance gets into the
eyes. If this occurs rinse eyes immediately
with clear water ( under no c i r c umstances rub
your eyes) and g o immediatel y to a hospital
for treatment.
Do not disassemble or modify your mobile
phone, as it will l ead to damage to the p hone
such as battery leakage or circuitry failure.
Under very rare circumstances using the
mobile phone in certain model cars may
negatively affect the internal electronic
9
Page 11

equipment. In order to assure your safety
under such ci rcum s tances pl ease do not use
the mobile phone.
Please d o not us e n eedl es, pen tips , or ot h er
sharp objects on the keypad as this may
damage the mobile phone or cause it to
malfunction.
In the event of antenna malfunction, do not
use your phone, as it could be harmful to
human body.
Avoid letting the phone come into close
contact with magnetic objects such as
magneti c c ar ds as the ra di ati on waves of t he
mobile phone may erase the information
stored on fl oppy disks, pay car ds and credit
cards.
Please keep small metal objects, such as
thumbtacks far away from the receiver. When
the receiver is in use it becomes magnetic
and may attract these small metal objects
and thus thes e may cause inj ury or dam age
the mobile phone.
Avoid having the mobile phone come into
contact w ith water or other liquids. If liqui ds
10
Page 12

enter the phone, this could cause a short
circuit, battery leakage or other malfunction.
1.3.3 Notices when using the battery
The battery has a limited service life. The
remaining life gets shorter as the times of
charging increase. If the battery becomes
feebl e even after the char ging , this indi cates
the serv i ce l i fe is over and yo u h ave to use a
new battery.
Do not di sp os e of old batter i es wit h everyday
domestic garbage. Please dispose of old
batteri es at the direc ted places w ith specific
rules for their disposal.
Please do not throw batter ies into a fire, as
this will cause the batter to catch fire and
explode.
W hen installing the b attery, do not use force
or pres sure, as this will cause the batt ery to
leak, overheat, crack and catch fire.
Please do not use wires, needles or other
metal objects to short-circuit the battery. Also,
do not put the battery near necklaces or other
metal objects, as this will cause the battery to
leak, overheat, crack and catch fire.
11
Page 13

Please do not solder the contact points of the
battery, as this wil l cause the batt ery to leak,
overheat, crack and catch fire.
If the liquid in the batteries goes into the eyes,
there is a risk of blindness . If this occ urs do
not rub the e yes, but i mmedi ately rins e eyes
with clear water and go to the hospital for
treatment.
Please do not disassemble or modify the
battery, as this wil l cause the batt ery to leak,
overheat, crack and catch fire.
Please do no t use or place the b atter i es near
high temp erature plac es such as near a fir e
or heating vessel, as this will cause the
battery to leak, overheat, crack and catch
fire.
If the battery overheats, changes color, or
becomes distorted during use, charging, or
storage, please stop using and replace it with
a new battery.
If the liq ui d from t he b att er y comes in contact
with ski n or c l othi ng this coul d cause bur ning
of the skin. Immediately use clear water to
rinse and seek medical tips if necessary.
12
Page 14

If the battery leaks or gives off a strange odor,
please r em ov e the battery f r om the v i ci ni t y of
the open fire to avoid a fire or explosion.
Please do no l et the battery b ecome wet as
this will cause the battery to overheat, smoke
and corrode.
Please do not use or place batteries in places
of high temperature such as in direct sunlight,
as this will cause the battery to leak and
overheat, lower performance, and shorten
the battery’s life.
Please d o not continu ously charge f or more
than 24 hours.
1.3.4 Charging your phone
Connect the connector of charger to the mobile
phone. Th e battery lev el indic ator fl ashes on the
screen. Even if the phone has been turned off, the
charging image still appears, indicating that the
battery is being charged. If the phone is overused
when the current is i ns uffi cient , i t m ay take longer
time for the charging indicator to appear on the
screen after the charging begins.
When the battery level indicator does not flash
and indicat es the batt ery is f ull, thi s indic ates the
13
Page 15

chargi ng has been compl eted. If the phone is off
during charging, the charging being completed
image al so app ears on the screen. The charg ing
process often takes 3 to 4 hours. During the
charging, the battery, phone and charger gets
warm, this is a normal phenomenon.
Upon the completion of charging , disconnect the
charger from AC power socket, and from the
mobile phone.
Notes:
During charging, the phone must be placed in
well-ventilated environment of +5℃ ~ +40℃.
Always use the charger sup plied by your phon e
manufacturer. Using an unauthorized charger
might cause danger and invalidate the
authorization and warranty clauses for your
phone.
The standby time and call duration provided by
the manufacturer are based on ideal operating
environment. In practice, the battery's operating
time varies depending on network conditions,
operating environment and usage methods.
Make sure the battery has been installed before
charging. It is best not to remove the battery while
14
Page 16

charging.
Upon completion of charging, disconnect the
charger from your phone and the power supply.
If yo u have n ot disconnected th e char ger f rom your
phone and th e p ower supply, the charger wi ll c onti nue
to charge the battery after about 5 to 8 hours when the
batter level decreases substantially. We advise you
not to do like this, as it lowers your phone performance
and shortens your phone life.
Notices when usi ng your charger
Please use AC 220 volts. The use of any
other vol tage will c ause battery l eakage, fi re
and cause d amag e to the mob ile p hone and
charger.
It is forb idden to s hort cir cuit t he char ger, as
this wi ll cause electri cal shock, sm oking and
damage to the charger.
Please do no use the charger if the power
cord is damaged, as this will cause fire or
electrical shock.
Please i mm ediately clea n an y dust gat hered
on the electrical outlet.
Please d o no place v essels with w ater near
15
Page 17

the charger in or der to av oi d water splas hing
onto the charger and causing an electrical
shortage, leakage or other malfunction.
If t he charg er c om es in c ontact w i th water or
other liquid the power must immediately be
switched off to avoid an electrical short or
shock, fire or malfunction of the charger.
Please do not disassemble or modify the
charger, as it will lead to bodily harm,
electrical shock, fire or damage to the
charger.
Please do not use the charger in the
bathroom or other excessively moist areas,
as this will cause electrical chock, fire or
damage to the charger.
Please do not touch the charger with wet
hands, as this will cause electrical shock.
Do not modify or place heav y objects on the
power cord, as this will cause electrical shock
or fire.
Befor e cleaning or carrying out m aintenance
please unp lug the char ger fr om the el ectr ical
outlet.
W hen unpl uggi ng c harg er, do not pull on t he
16
Page 18

cord, but rather hold on to the body of the
charger, as pulling on the cord will damage
the cord and lead to electrical shock or fire.
1.3.5 Cleaning and maintenanc e
The m obile phone, batter y, and ch arger are
not water resistant. Please do not use them
in the bathroom or other excessively moist
areas and likewise avoid allowing them to get
wet in the rain.
Use a soft, dry cloth to clean the mobile
phone, battery and charger.
Please do not use alcohol, thinner, benze ne
or other solvents to wipe the mobile phone.
A dirty outlet will cause poor electrical contact,
lose of p ower and ev en inabil ity to rechar ge.
Please clean regularly.
17
Page 19
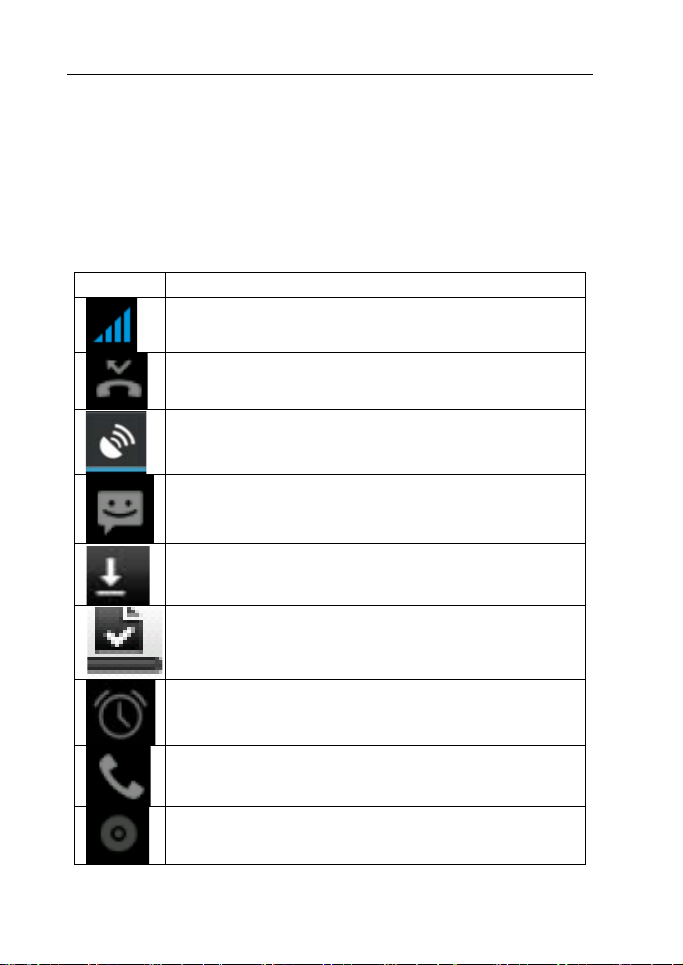
Icon
Description
2 Getting Started
2.1 Icons In the standby mode, the following icons may
appear in standby screen:
Indicate the intensity of network signals.
Show missed calls.
Location by satellite.
Receive a new message.
An application is being downloaded.
The downloading is over.
The alarm clock has been set and
activated.
A ca ll is in progress.
The phone is playing a song.
18
Page 20
Key
Explanations
Return key
●Return to the previous menu.
Menu key
●Show options of current menu.
Home key
●At any status, press the key to
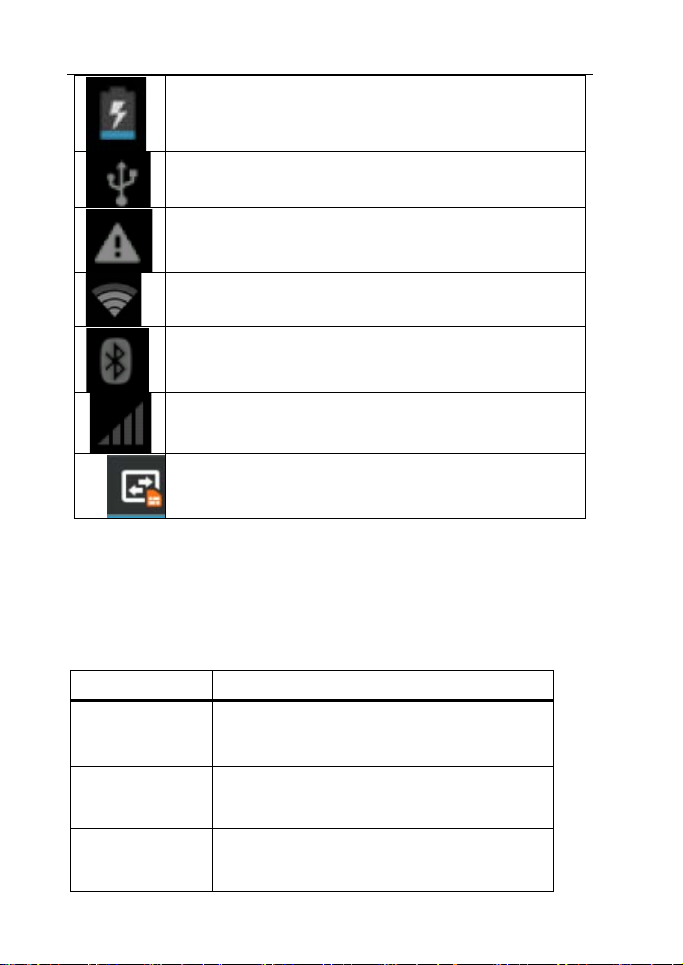
Show battery level.
Enable USB.
The access is blocked.
Get connected to the wireless network
Turn on the Bluetooth.
No SIM card is installed in the phone.
GPRS data connection is on.
2.2 Key explanations
return to the standby screen.
19
Page 21

Power key
● Hold down this key to turn your
the mobile phone.
Side volume
● During the conversation, press
phone off and on.
● Gener ally, press thi s ke y to l ock
keys
the two keys to adjust the volume.
● While playing an audio file,
press the two keys to adjust the
volume.
Note: In this g uide, t he phr ase “p ress the key” ref ers to
pressing and thereafter releasi ng a key. “Hold down a
key” ref ers to pressi ng a key and keeping it depressed
for 2 seconds or longer.
The desc riptions and f unctions of keys dep end on
the model of your phone.
2.3 Using the touchscreen
Your phone provides many touch keys in the Main
screen. To use these keys correctly, c alibr ate the touc h
screen in advance (see “Calibrator”). Meanwhile please
follow the instructions:
■Do not touch the screen with wet hands.
■Do not touch the screen with great forces.
■Do not touch the screen with metallic or
conductive objects.
2.4 Connecting to the network
2.4.1 Inserting and removing the SIM card
Turn off the phone; r emov e the batter y and unplug
other ext ernal pow er suppli es. Insert the SIM card
into the SIM holder as shown in the phone.
20
Page 22

When you need to remove the SIM card, turn off the
phone, remove the battery and then remove the
SIM card from the holder.
Warning: Do turn off your phone before removing the
SIM card. Never insert or remove the SIM card when an
external p ower supply is connected, as thi s may cause
damage to the SIM card.
2.4.2 Tur ni ng your phone on and off
To turn on the p hone, hold dow n the POW ER key
on the side; to turn off the phone, hold down the
POWER key.
If you hav e turne d on your phone w ithout inserting
the SIM card, the phone will prompt you to install the
SIM card. With the SIM card already inserted, your
phone automatic ally verifies the avai lability of the SIM
Card.
Then, the screen shows the following:
Enter PIN1 —— if your have set the SIM card
password.
Enter phone password —— if you have set your
phone password
Search for net work—— the phone searches for the
appropriate network.
Notes
:
If when you tur n on the mob ile phone, an excl amation
mark appears on the screen and does not disappear,
this is possibly caused by misoperation, that is, you
press the Power key and the Volume Up key at the
same time. Such misoperation activates the recovery
mode, hence the occurrence of exclamation mark. If you
just turn of f the phone, next tim e when you turn i t on, it
will still come to the recovery mode.
21
Page 23

Solution:
Press the Home key when the exclamation mark and
robot appear, a menu will pop up. Use the Menu key to
select "reboot system now" to restart the phone.
2.4.3 Unlocking the SIM card
The PIN 1 (p ers onal iden ti fi cati on numb er) secur es
your SIM card from being misused by others. If you
have selected this function, you must enter the PIN1
code each tim e you turn on th e phone so that y ou m ay
unlock the SIM card and then make or answer calls. You
can deactivate SIM card protection (see “Safety
settings”). In this case, the misuse of your SIM card
cannot be prevented.
Press the Hang Up key to turn on your phone;
Enter your PI N1 code. C lear the incorrect digits by
using the right soft key, and press OK for
confirmation. e.g. if your PIN1 is 1234, please
enter:
1 2 3 4
If you enter incorrect numbers for three times in
succession, your SIM card will be locked and your
phone will ask you to enter PUK 1 number. If you do not
know the PU K1 code, do not try. Instead, contact your
network service provider. See “Safety settings”.
Note: your network service provider sets a standard
PIN1 code (4 to 8 di gits) for your SIM card. You shoul d
immediately change this number. See “Safety settings”.
2.4.4 Unl ocking your phone
To prevent unauthorized use, you can set phone
protection. If you hav e selected thi s function, you must
draw unlocking pattern each time you turn on your
phone, to unlock the phone and t hen make or answ er
22
Page 24

calls. You may clear the unl ocking patter n (see “Sa fety
settings”). In this case, the unauthorized use of your
phone cannot be protected.
If you forget your phone password, you must
contact the retailer or loc al authoriz ed serv ice center to
unlock your phone.
2.4.5 Connecting to the network
Once your SIM card is unlocked, your phone
searches for available network automatically (the screen
will show the network searching is underway). If your
phone has found the available network, the name of
network service provider appears at the center of
screen.
Note: Making an emergency call。Note: If “only for
emergency calls” appears on the screen, it indicates
that you are beyond the network coverage (service
area), and that you can still make emergency calls
depending on the signal intensity.
2.4.6 Making a call
When the l ogo of netw ork serv ice p rov ider appear s
on the screen, yo u can make or answer a call. The bar s
at the upper left corner of screen indicate the intensity of
network signal.
Conversation quality is significantly affected by
obstacles, thus moving within a small area while making
or answering a call can improve the conversation
quality.
2.4.7 Making a domestic call
In the Dial screen, enter a number, and pres s the
23
Page 25

Dial key to make a cal l. To chang e the num ber, delete
the digits you have entered. During dialing, the
animation appears on the screen. After the call is picked
up, the screen will show call status information. If the
connectio n al er t tone has b een set, your phone will ring
the alert tone (network dependent).
To end a call, press the Hang Up key.
Zone code Phone number Dial key
2.4.8 Making an international call
To make an i nternational call, hol d down the 0 key
on the Diali ng s cr een until the i nter national prefix "+” for
appears. This allows you to dial an international number
without knowing its international fix (e.g. 00 for China).
Followi ng t he entry of inter natio nal pr efi x, enter the
country code and complete phone number. For the
country codes, follow the general conventions, for
example, 49 for Germany, 44 for UK, and 46 for
Sweden.
Like making an international call via a fixed
telephone, omit the “0” at the head of a city code.
For example, to call our hotline from another
country, you can dial:
+86 21 114
+ Country code Complete phone number
Dial key
2.4.9 Making a call from the list
All calls dialed and received are stored w i thin a l ist
in your p hone. Those dialed and received recently are
exhibited at th e top of the lis t (see “Call Register”). All
the numbers ar e s or ted b y Dialed Calls, Received Calls
24
Page 26

and Mi ssed C all s. Your p hone als o pr ov ides op tions for
you to v iew all c alls. W hen the call Reg ister is full, the
old numb ers w ill be deleted autom atically. To view the
list, do the following:
To view the dialed calls, press the Dial key
You can dial any number from the list by pressi ng
the Dial key.
When the cal l l i st app ear s , pr es s O K to s ee details ,
or go to Op tions -> Sav e to place the num ber into y our
Phonebook.
2.4.10 Making an emergency call
If you are beyond the network coverage (see
network-signal-intensity bars at the upper l eft corner of
the screen) , yo u can still m ak e em ergency cal ls . If your
network service provider does not provide roaming
service to the area, the screen will show “only for
emergency calls”, alert ing you that you ca n only make
such call s. If you are w ithin the netw ork cov erage, you
can also make emergency calls even without the SIM
card.
2.4.11 Call menu
The Call m enu is only v isible dur ing an activ e call,
and featur es such as Call Waiti ng, Call Div erting, and
Multiple-party Call are network dependent. Contact your
network service provider.
The call options include:
Mute
Do not send local voice.
Handsfree
Switch on the loudspeaker to amplify the voice.
25
Page 27

Hold
Put the c urrent call on hold or retriev e the call o n
hold.
End a call.
End the current call.
More
*Start voice recording
Start voice recording.
*Turn on Bluetooth
The Bluetooth device, if any, can be used.
*New call
Make another new call.
26
Page 28

3 Functional Menu
(※The following features depends on specific models)
3.1 File Management
The file management is composed of sdcard and
sdcard 2, while sdcard is the memory of the phone,
sdcard 2 is the external SD card. In the file management,
files can be searched rap id, deleted or e dited in eac h
card and new filescan be created.
3.2 Sending an Email
You can send an Email to anyone who has an Email
address.
Entering the procedure and set an account, you
can clic k the ac c o unt s o that you come into th e ac c o unt
already created, you can also activate, compile and
27
Page 29

create an account and then delete the operating. The
email can be sent a nd r eceived j ust li ke in a com p uter.
This procedure requires the network support.
3.3 Dialing
When dialing, you can have a quick acess to the
call rec ords, contacts and dig it dial keyboar d (used f or
manual dialing) by the menu key on the screen.
28
Page 30

3.4 3G video call
Click a num ber portrai t in th e phoneb ook, an d you
can do these thi ng s i nsta ntl y : di al , s e nd a messag e and
make a v ideo cal l. Dur ing the v ideo cal l, y ou ca n sel ect
applications such as adjusting it to mute mode,
switching to robot portrait, turning off the voice and
intercepting photos to SD card.
29
Page 31

3.5 Calculator
Your phone provides a calculator with 4 basic
functions for the convenience of your calculating.
Press this button
, and you delete the input
and output in bitwise.
Notice: this calcutor is of limited accuracy and
sometimes it causes error, please forgive us for the
inconvenience.
30
Page 32

3.6 Browser
The browser allows you to surf on the net and
browse the page just like on the computer. You can
create on the phone a bookmark and synchronize it with
computer. You can have a quic k ac ces s to your favori te
sites on the main screen.
You could view web pages in longitudinal or
transverse mode. The page rotates according to the
rotation of the phone a nd automaticall y adjusts to f i t the
page.
31
Page 33

3.7 Voice Recorder
The recorder could be used to record audio files.
To start voice recording: Tap
32
Page 34

To end voice recording: Tap
To play back voice recording: Tap
The audio files are automatically stored on your
phone. Click the Menu key,
and you can operate and set the recorded voice. The file
can be in d ocument management and var ious players
can be selected to play the voices.
3.8 Calendar
Calendar allows you to view your schedules and
events at any time. You may view schedules one by one
or several ones at the same time.
Select to s how c alendar b y day, w eek or m onth. If
“by week (or month)”, the calendar will be shown by
week (or m onth). This ap pli cation is conveni ent for you
to view schedule or add events.
33
Page 35

3.9 Settings
Reach the menu and customize your phone
settings. SIM card management: SIM card can be
managed and made settings.
WLAN: WLAN can be turned on and off and made
some settings.
Bluetooth: Bl uetooth ca n be turne d o n an d off and
settings are made.
The information flow usage: It makes you in full
awareness of the usage of the information.
More: Cl ick more and you w ill set up fli ght mode
and VPN and more.
Audio profiles: General, silent, meeting and
outdorr optional. In the meanwhile, customized
setting-up of some scene modes are allowed.
34
Page 36

Select a mode and enter the customized
setting-up, oper ati onal ar e v ib r ati on, v ol um e, r i ng tones,
notifications and key beep, etc.
Display: Customized setting-up of the phone
luminance, wallpaper, the screen and screen time-out
and font size is allowed.
Storage: The i nternal m emor y of the storag e card
and of the phone is shown.
Battery: The usage detail of the batteryis shown.
Applications: View, manage and delete the
applications on your phone.
Account and synchronization: Set the
synchronization of your phone account with your phone.
Location service: Set the service during the
locating.
Safety: Set unl ocking pattern; l ock the SIM card;
set the SD card.
Language and keypad: Select a language and
input method.
Backup and res et: R eset DRM and r es tor e factory
settings to clear all personal data on your phone.
Date and time: Set current time and date.
Schedule p ower on/of f: set th e time to turn on or
off your phone.
Auxiliary function: Some auxiliary functions can be
set.
Developers’ options: Set some options used by
developers.
About phone: View the model, service status,
mobile software and hardware information, etc.
3.10 Clock
Alarms
Your phone pr ovides many g roup s of alarm clocks.
35
Page 37

Select one of them to edit and customize alarm clock.
World Cloc k
You can set the time in any part of the world.
Stop Watch
You can used it to record the time.
Timer
You can used it to record the time.
Sit Watch
Enter the menu to display the current time.
.
3.11 Radio
Wear your earp ieces of radi o before searching for
channels.
36
Page 38

Glossary:
Channel li st : D i splay the list of F M r adi o channels.
You can select t o p l ay o ne of t h em. (the l i st can c on tai n
20 channels maximum)
Search: Selec t this op tion to automatically search
for channels and generate the list of channels.
Loudspeaker: Press the button to use the radio
loudspeaker.
and : Tap to move to another channel.
► and : Tap to broadcast and pause.
3.12 Search
You can locally search for the information you
need.
37
Page 39

3.13 Contacts
The “contacts ” lets you easily cal l your coll eagurs
or friends , or send emails or short messages to them.
You may add contacts directly from your phone, or
synchronize “contacts” with any application on your
computer. You may open “contacts ” directly f rom the
Main screen, or open it via the “Dialing” application.
38
Page 40

Add a contact:
To add a contact, direc tly enter the nam e and phone
number, or import the name and phone number from the
SIM card. (The number of contacts you can add is
limited by the memory of your phone.)
Search for contacts:
To search for a contact, press the Search key in
search screen, and a search box will pop up. In the
search box, enter the key words, such as first name,
second name and company name. While you are
entering the key word, the matching contacts
immediately appear.
Edit a contact:
To edit details of a contact, select “Edit a contact”.
Delete a contact:
To delete the current contact, select “Delete a
contact”.
39
Page 41

From the menu, you can also synchronize with or
share an account or import or export a contact.
3.14 Gallery
Gallery is a p icture m anager that typic ally exhibits
miniatur es, sup ports t he features of “save p icture”, “set
pictures as desktop” and “share picture”.
3.15 Camera
Your phone provides the camera and video
recorder features. Wherever you go, you can take
high-resolution photos and videos. It also supports
advanced cam era f eatures suc h as im age stab ilization,
face embelishment, panorama shooting, high dynamic
range and zero delay shutter, which can also be
customized.
40
Page 42

3.16 Messaging
Messaging lets you send text and multimedia
mess ages to any con tact that has an SMS dev ice. The
multimedia messages include photos, video clips (for
iPhone 3GS or other new style phones), contacts
information, and voice memos. What’s more, you can
send messages to several contacts at the same time.
41
Page 43

Note: Perhaps Messaging is not available in all
countries and r eg ions. Pr obab ly you ne ed pay f or us ing
Messaging. For more inf ormati on, consult your network
operator.
As long as you are w i t hi n the n etwork, you c an us e
“Messaging”. As long as you can make a cal l, you can
send mes sages. You probably hav e to pay for sendi ng
or receiving messages, depending on your network
operator.
Send a message: Tap it, enter the number and
name of the contact or select the contact from Contacts.
Tap the text box above keypad, enter the information
and then tap “Send”.
After selecting the number, you can select such
options as Call, Add subject, Attach, Insert facial
expression, and more.
Tap Setti ngs to set ringtone, D elivery reports, and
maximum quantity of messages.
42
Page 44
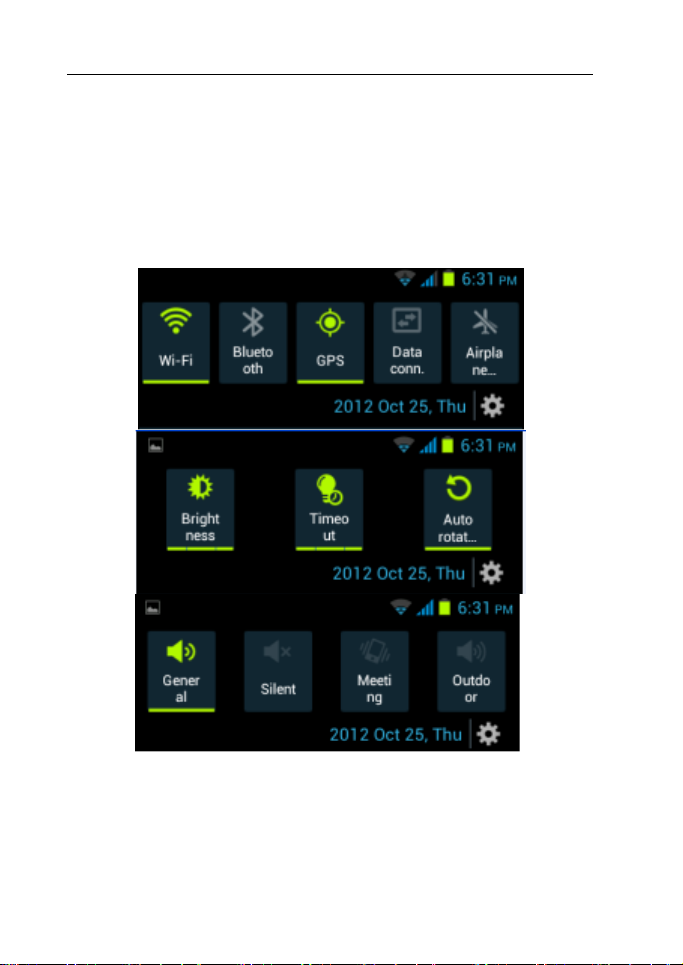
3.17 Notification Menu
Slide and pull down menu on the main interface,
you can see the message notice and choose whether to
turn on or off WIFI, Bluetooth, GPS, off-line mode. In the
data connection, the current SIM is available to make
data connecti on of GPRS . Slide it around you can see
the options of profile for your convenience.
3.18 Download Content
You can dow nload through the b rows er things and
pictures you want and list them in the Download Content
menu.
43
Page 45

3.19 Music
Music is used for enjoying the stored audio files.
Select Mus i c , you can see the menus of “ List of p l ayed
songs”, “Songs”, “Specialists” and “Artists”.
44
Page 46

To pause playing a song
Tap
To resume playing a song
To skip to the next song
Return to the previous
Tap
longer you hold, the more songs you
skipped.
To skip to any point in a
Drag the progress bar .
Tap ►
or reading material
song or reading material
To move fast backward or
forward
song
Tap
Touch and hold or . The
3.20 Call Records
Come into the call records, you can view missed
calls, rev eiv ed c al ls and out g oi ng c all s . The calling time
45
Page 47

is vi ewed in each record and features such as call ing,
sending m essages and adding to new c ontacts can b e
set. Deleting call rec ords and seting up speed dial can
be done in the menu.
3.21 Analog TV
You ca n s el ec t l ocat i on to sc an t he c ha nnel to w at ch
TV.
46
Page 48

3.22 Flash Playe r
Device manager, Control your applications running.
3.23 MoboPlayer
You can play movies with it.
47
Page 49

3.24 Widget
The widget is on the right of applications in Main
Menu, holding down this widget, you can drag it
anywher e you w ant in the m ain sc reen. It i s conv enient
for you to enter that procedure.
48
Page 50

3.25 Selecting Wallpaper Source
Hold down t he m ain sc reen, the op tions of s elec ti ng
wallpaper source will appear, then you can set up
wallpapers you like.
49
Page 51

4. Text Input
Enter text v ia t he ke ypad. E xam ples of tex t incl ude
contact detail s, emails, short messages, and w ebsites.
The keypad provides the functions of spelling prediction,
spelling correction and learning while using.
The smart keypad m ay giv e you promp ts of corr ect
spelling, depending on which application you are using.
Enter text:
1 Tap the text box (memo, or new contact) to cal l
the keypad.
2 Tap the keys on keypad.
At the initi al s tag e, you can tap keys using either of
50
Page 52

your index fingers. Once you get familiar with the
keypad, you can try tapping keys using both of your
thumbs.
While tapping a key, the corresponding letter will
appear above your thum b or another f inger. If you are
tapping a wrong key, you may slide to the correct o ne.
Only when your tapping finger leaves a key, can the
corresponding letter be entered in the text box.
To del ete a ch arac ter
To enter an
upper-case letter
51
Tap
Tap
letter.
。
, and then tap that
Page 53

Press t he space key t wice
To enter a digit
To enter a symbol
Quickl y enter a space
To toggle input
methods
Tap
Tap
symbol.
successively.
Hold down to
the keyboard.
, and then tap that digit.
, and then tap that
to bring up
5 SD Card Introduction
Your mobile phone supports SD card to expand the
memory. Install the SD card according to the indication.
As one of storages for your phone, SD card has
been set as the default storage at factory. You can
directly use it without making any settings.
Use as flash disk: If “Phone——Data
Wire——PC” is well connected, the PC will prompt “New
hardware is found”, and “MT65xx Android Phone
requires to be installed” will appear in the dialog box,
see the figure below:
52
Page 54

Check the relevant menus in the phone are opened
or closed, selecting one by one as follows:
Main Menu - Settings - Application - Development USB debugging. Uncheck “USB debugging”.
53
Page 55

After c hecking and c onfirm ation, reconnec t “Phone
- Data Wire - PC”, and pull down notification menu in the
standby interface:
54
Page 56

55
Page 57

Select “USB st orage dev ice”, and such dialogue box
pops up:
56
Page 58

You c an synchronize fil es on the computer with those
on the phone according to your needs or you can manage
files on the storage card.
Select “MTP storage” t o support the phone to function as a
U-disk. If your computer is not supported by WIN7, you
need to install M TP drive (you can directl y update window
player to the latest wm p11 whic h c om es with MTP drive) .
Follow the prompts appearing in the phone to
operate, so that data uploading and downl oading with U
disk can be achieved.
Select “Camera PTP”, you can export photos on the
phone to the computer.
Note:
Your mobile phone supports the plug-in feature.
Without turning off your phone, however, it does not
suppor t inserting or r emove T card. Generally, it is not
recommended to remove and install the SD card.
57
Page 59

FAQs
Causes
Solutions
Poor
When you use your
effectively.
Avoid this as far a s
When you use your
reception.
Avoid this as f ar as
This is related to the
Y ou may ask the
map.
Echoes or
The trunk line of
regional problem.
Hang off the call
In some areas, the
condition.
6 FAQs and Solutions
If yo u have a ny q uesti ons ab out the phone, pl ease
find the solutions from the table below.
reception
noises
phone at poor
reception areas , for
example, near high
ri se buildings or
base rooms, the
radio wave cannot
be transmitted
phone at network
traffic congestion,
such as working
time and off -duty
time, the congestion
can result in poor
distance to b ase
station i n question.
network is in bad
condition. It is a
call lines are in ba d
58
you can.
you can.
network service
provider to provide
service coverage
and dial again.
Choose another
better l ine.
Page 60

Shorter
The standby time is
settings.
In poor reception
phone temporarily.
Replace the
batteries
Change with a new
battery.
When no si gnal s
Use your phone at
Failed to turn
phone
The battery powe r is
Chec k th e battery
charge the battery .
SIM card
The SIM card is
Contact your
provider.
The SIM card is not
Ensure the SIM
installed.
The metallic face of
Wipe the face with
Failed to
The SIM card is
Contact your
provider.
Beyond the GS M
Consult the network
service ar eas.
The s ign al is feeble.
Retry at a stronger
signal area.
Failed to
The call barring
feature is used.
Cancel the call
barring settings.
The fixed dialing
used.
Cancel the fixed
settings.
standby time
on your
error
connect to
the network
relevant to network
are received, yo ur
phone will continue
searching for base
stations, thus
consuming a large
amount o f battery
power and reducing
standby time.
used up.
damaged.
properly installed.
the SIM card is
contaminated.
invalid.
coverage.
areas, turn of f your
strong signal areas
or Turn off the
phone temporarily.
power level or
network service
card is properly
a clean cloth.
network service
service provider for
make a call
number feature is
59
dialing number
Page 61

PIN code
Enter incorrect PIN
times in succession.
Contact your
provider.
Failed to
The b attery or the
damaged.
Change a new
Charge the battery
temperature is
Change the
Poor connection.
Chec k whether the
connected.
Failed to add
phonebook
The storage space
used up.
Delete so me
phonebook.
Failed to set
Your network
them.
Contact your
error
charge the
battery
codes for three
charger is
when ambient
lower than -10℃
or above 55℃.
contacts to
up some
features
of phonebook is
service pro vider
does not provide the
services, or you
haven’t subscribed
FCC Statement
1. This device complies with Part 15 of the FCC Rules.
Operation is subject to the following two conditions:
(1) This device may not cause harmful interference.
(2) This device must accept any interference received,
including interference that may cause undesired operation.
2. Changes or modifications not expressly approved by the
party responsible for compliance could void the user's
authority to operate the equipment.
NOTE:
network service
battery or charger.
environment.
plug is properly
contacts from the
network service
provider.
60
Page 62

This equipment has been tested and found to comply with
the limits for a Class B digital device, pursuant to Part 15 of
the FCC Rules. These limits are designed to provide
reasonable protection against harmful interference in a
residential installation.
This equipment generates uses and can radiate radio
frequency energy and, if not installed and used in accordance
with the instructions, may cause harmful interference to
radio communications. However, there is no guarantee that
interference will not occur in a particular installation. If this
equipment does cause harmful interference to radio or
television reception, which can be determined by turning the
equipment off and on, the user is encouraged
to try to correct
the interference by one or
61
Page 63

more of the following measures:
Reorient or relocate the receiving antenna.
Increase the separation between the equipment
and receiver.
Connect the equipment into an outlet on a circuit different
from that to which the receiver is connected.
Consult the dealer or an experienced radio/TV technician for
help.
SAR Information Statement
Your wireless phone is a radio transmitter and receiver. It is
designed and manufactured not to exceed the emission
limits for exposure to radiofrequency (RF) energy set by the
Federal Communications Commission of the U.S.
Government. These limits are part of comprehensive
guidelines and establish permitted levels of RF energy for
the general population. The guidelines are based on
standards that were developed by independent scientific
organizations through perio
scientific studies. The standards include a substantial safety
margin designed to assure the safety of all persons,
regardless of age and health. The exposure standard for
wireless mobile phones employs a unit of measurement
known as the Specific Absorption Rate, or SAR. The SAR
limit set by the FCC is 1.6 W/kg. * Tests for SAR are
conducted with the phone transmitting at its highest
certified power level in all tested frequency
the SAR is determined at the highest certified power level,
the actual SAR level of the phone while operating can be
well below the maximum value. This is
dic and thorough evaluation of
bands. Although
62
Page 64

because the phone is designed to operate at multiple power
levels so as to use only the power required to reach the
network. In general, the closer you are to a wireless base
station antenna, the lower the power output. Before a
phone model is available for sale to the pu blic, it must be
tested and certified to the FCC that it does not exceed the
limit established by the government adopted requirement for
safe exposure. The tests are performed in positions and
l
ocations (e.g., at the ear and worn on the body) as
required by the FCC for each model. The highest SAR
value for this model phone when tested for use at the ear is
0.448W/Kg and when worn on the body, as described in
this user guide, is 0.65W/Kg(Body-worn measurements
differ among phone models, depending upon available
accessories and FCC requirements). The maximum scaled
SAR in hotspot mode is 0.65W/Kg
differences between the
SAR levels of various phones and
.While there may be
at various positions, they all meet the government
requirement for safe exposure. The FCC has granted an
Equipment Authorization for this model phone with all
reported SAR levels evaluated as in compliance with the
FCC RFexposure guidelines. SAR information on this
model phone is on file with the FCC and can be found
under the Display Grant section of http://www.fcc.gov/
oet/fccid after searching on
FCC ID: 2AAE9CAPHG22-0X Additional information on
Specific Absorption Rates (SAR) can be found on the
Cellular Telecommunications Industry Asso-ciation (CTIA)
web-site at
http://www.wow-com.com. * In the United
States and Canada, the SAR limit for mobile phones used by
the public is 1.6 watts/kg (W/kg) averaged over one gram of
tissue. The standard incorporates a
sub-stantial margin of safety to give additional protection
for the public and to account for any variations in
63
Page 65

measurements.
Body-worn
Operation
This device was tested for typical body-worn
operations. To comply with RF exposure
requirements, a minimum separation distance
of 10mm must be maintained between the
user’s body and the handset, including the antenna.
Third-party belt-clips, holsters, and similar
accessories used by this device should not contain
any metallic components. Body-worn accessories
that do not meet these requirements ma
y not comply
with RF exposure requirements and should be
avoided. Use only the supplied or an approved
antenna.
64
 Loading...