

PRESENTATION OF MANUAL
INSTRUCTIONS FOR USE
EQUIPMENT:
Technical Name: Dental Delivery Units and Accessories
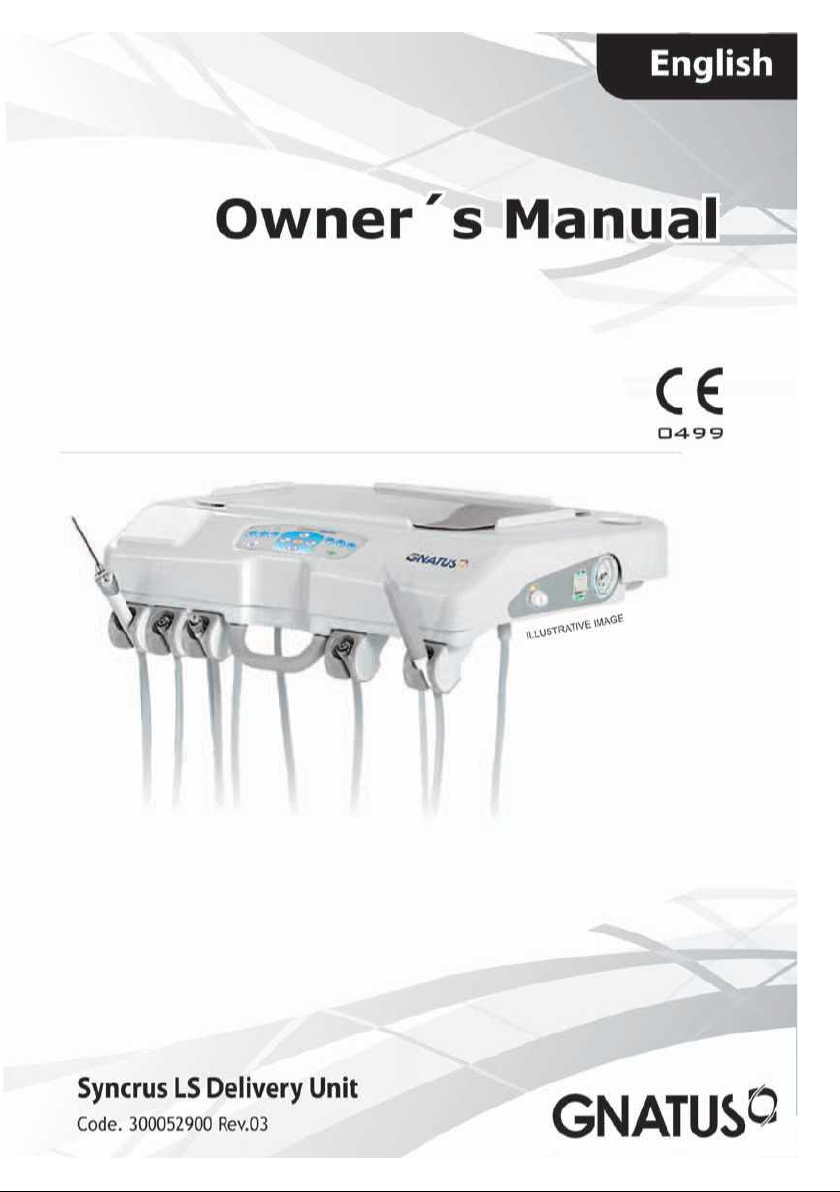
Trade Name: Syncrus LS Delivery Unit
Brand: GNATUS
Manufacturer/ Distribuitor:
GNATUS - EQUIPAMENTOS MÉDICO-ODONTOLÓGICOS LTDA.
Rod. Abrão Assed , Km 53+450m - Cx. Postal 782 CEP 14097-500
Ribeirão Preto - S.P. - Brasil
Fone +55 (16) 2102-5000 - Fax +55 (16) 2102-5001
C.N.P.J. 48.015.119/0001-64 - Insc. Est. 582.329.957.115
www.gnatus.com.br - gnatus@gnatus.com.br
Technical Duties: Gilberto Henrique Canesin Nomelini
CREA-SP: 0600891412
Registration ANVISA #: 10229030047
ATTENTION
For greater safety:
Read and understand all the instructions contained in these
Instructions for Use before installing or operating this Equipment.
Note: These Instructions for Use must be read by all the operators
of this Equipment.
2

INDEX
PRESENTATION OF MANUAL ........................................................................02
DESCRIPTION OF THE EQUIPMENT ...............................................................04
- Dear Customer .............................................................................................04
- Identification ................................................................................................04
- Principles and bases applied to the functioning of the product .............................05
- Description of Equipment ..............................................................................05
- Indication of Equipment ................................................................................07
MODULES, ACCESSORIES, OPTIONS AND TYPES OF COUPLING .....................08
TECHNICAL SPECIFICATIONS .......................................................................12
- Technical features of the Delivery Unit and its accessories ................................... 12
- Eletromagnetic emissions ...............................................................................15
- Standards applied .........................................................................................18
- Dimension ....................................................................................................19
- Packing symbols ............................................................................................20
- Product symbols ............................................................................................20
- Content of accessible and non-accessible demarcations ......................................22
INSTALLATION OF EQUIPMENT ...................................................................22
OPERATION OF EQUIPMENT .........................................................................23
- Turning on / off the dental set ......................................................................... 23
- Positioning ...................................................................................................23
- Activation of Terminals ...................................................................................23
- Adjustment of Spray ......................................................................................23
- Driving to the water in the basin to the model without the control panel ...............24
- Use of 3-Way Syringe ...................................................................................24
- Curing Light Activation ...................................................................................24
- Laser Hand Activation ....................................................................................25
- Ultrasound Activation ...................................................................................26
- “Ultrasound” techniques and applications ..........................................................27
- Activation of Bicarbonate jet ...........................................................................29
- Equipment activation by the delivery unit panel ................................................30
- How to supply the reservoirs ...........................................................................31
PRECAUTIONS, RESTRICTIONS AND WARNINGS .........................................32
- Transportation, storage and operation ..............................................................33
- Sensitivity to environmental conditions in normal situationsof use ........................33
- Precautions and warnings “during the installation” of equipment ..........................33
- Precautions and warnings “during the use” of equipment ....................................34
- Precautions and warnings “after” the use of equipment ......................................34
- Precautions and warnings during the “cleaning and disinfection” of equipment .......34
- Precautions in case of alteration in the functioning of equipment ..........................35
- Precautions to be adopted against foreseeable or uncommon risks,
related to the deactivation and abandoning of equipment .....................................35
CORRECTIVE AND PREVENTIVE MAINTENANCE AND PRESERVATION............36
- Additional procedures for reuse .......................................................................36
- Cleaning ......................................................................................................36
- Preventive maintenance .................................................................................39
- Corrective maintenance..................................................................................39
UNFORESEEN EVENTS – SOLUTION OF PROBLEMS ........................................40
WARRANTY OF EQUIPMENT ..........................................................................41
FINAL CONSIDERATIONS ..............................................................................42
3
DESCRIPTION OF THE EQUIPMENT
Dear Customer
Congratulations. You have made a good choice when you decided to buy a GNATUS
QUALITY product comparable to the best products available in the World. This manual is a
general presentation of your product and it will give you important details to help you to
solve possible problems.
Please, read it and keep this with you.
Identication
Technical Name: Dental Delivery Units and Accessories
Trade Name: Syncrus LS Delivery Unit
Brand: GNATUS
4

DESCRIPTION OF THE EQUIPMENT
Principles and bases applied to the functioning of the product
It has hoses with compressed air and connectors for the supply of handpieces (high and
low rotation) and a syringe with air and water outlet.
Description of Equipment
Delivery unit for dental use, for the activation and control of the syringe, rotary
instruments, etc., providing greater proximity in the work field.
It has a side panel and central control panel (optional).
Structure made of steel with surface treatment via nanotechnology. Smooth painting
with a high gloss and epoxy base, polymerized in an oven at 250ºC, resistant to corrosion
and cleaning materials.
Auxiliary tray made of steel with horizontal movement.
Delivery unit body made of high impact polyethylene.
Smooth hoses, without grooves or riing, rounded, light and exible.
It has translucent reservoirs easy to access with automatic pressurization of water for
syringe/spray of the handpieces and chlorinated water for the “optional” Bio-System. The
Bio-System is a disinfection system, which provides internal cleaning of the hoses and
terminals via bactericidal liquid, preventing risks of cross contamination.
Connecting box, made of high impact polyethylene and having rounded corners.
Interchangeable coupling system, adaptable as per the requirement of the professional.
Available in the pneumatic FLEX, mechanical FLEX and CART models (optional).
PNEUMATIC FLEX: coupled to the dental chair, with horizontal movements, swivel arm
with horizontal and vertical movements, with a pneumatic locking device for the vertical
movements, activated by a button located in the body of the delivery unit, and smooth
movements due to the bushing system of Teon with bronze.
MECHANICAL FLEX: coupled to the dental chair, with horizontal movements and
adjustment of the vertical position through the snap ring.
CART: with the base on four casters, made of steel with smooth painting and rounded
corners.
To guarantee the safe functioning of your equipment, use only the assemble configurations
(Dental Chair, Dental and Water Units and Dental Light) supplied by Gnatus authorized
Dealers / Technical Assistance.
EN ISO 9001/2008 and EN ISO 13485/2003 Quality System, assuryng the products
are manufactured under standart procedures.
Products manufactured in agreement with RDC 59/2000 - ANVISA - (Sanitary Surveillance
National Agency).
5

DESCRIPTION OF THE EQUIPMENT
Laser Hand Kit (optional item) – Features of the product:
See the Owner’s Manual - Laser Hand
Curing light (optional item) – Features of the product:
The Curing Light belongs to the newest generation of LED photo-activation devices. This
abbreviation stands for Light Emitting Diode, a totally different type of light emission, if
compared to conventional halogen equipment.
Unlike traditional devices, which generate wide-spectrum light and heat, this technology
uses a cold light of the precise wave length needed to activate various dental products.
LED technology, which was recently introduced in Dentistry, brought about several useful
features to those light-curing devices used in composite resin restoration. Besides being
more durable, LED technology turned devices more compact, ergonomic and easier to install
and transport. The emission of cold light within a precise wave length range ensures the
safe cure of camphorquinone-activated composites, preventing dental heating, pulp damage
or discomfort for both patient and dentist. Although being relatively new, this technology
is nowadays in its second generation. LED safety and efficiency, now allied to high-energy
emission, are available to all clinic procedures which require light-curing power, including
bleaching treatments.
The light of 440nm-460nm wave length, allied to the high energy emitted by Curing
Light, makes possible the multi-functionality of this device:
- Direct restoration procedures: composite resins, ionomers and adhesives.
- Indirect restorations: adhesive cementation of laminates, inlays, esthetic pins and
metal-free crowns.
- Dental Bleaching: activation of bleaching gel and polymerization of gingival barriers.
Compatible with 35% hydrogen peroxide-based bleaching gels.
- Attachment of braces and orthodontic accessories.
- Activation of light-cure materials, such as sealants, surgical cements and covering
bases.
Designed and built with cutting-edge technology, it meets the highest standards specified
by world’s dental authorities.
Operation control display in handpiece, sound alarm with beep every 10 seconds and 4
beeps at the end of the cycle.
Advantages offered by Curing Light:
- More spectrally-selective light than conventional lamps.*
- Cold light, it doesn’t heat up the resin nor the tooth**
• Light compact equipment that provides handling comfort.
• Low power consumption.
• Longer useful life of the light emitting diode (equivalent to 36.000.000 cycles of 10
seconds).
• It does not use optical filter.
• It does not require forced ventilation, thus avoiding noise emission.
We noted that the light emitted by the Curing Light is completely contained within the
absorption interval of the photo starter, therefore it’s 100% used, whereas the conventional
equipment running on halogen lamps has non-used wave-length regions.
The Curing Light doesn’t generate heat since it uses light emitting diodes.
The light conductor is removable, made out of high resistance polymer and of easy
maintenance.
6

DESCRIPTION OF THE EQUIPMENT
Ultrasound (optional item) – Features of the product:
Piezoelectric Ultrasound, frequency of 30,000 Hz.
The Transducer with the piezoelectric system allows the insert to make precise and linear
movements, being able to be used in widely differing dental specialties.
Fine adjustment of power, suited to each type of procedure.
In the procedures with cooling, it offers constant irrigation with control of ow.
It also allows dry work to be executed (condensation of amalgam, cementing of inlays/
onlays etc).
FUNCTIONAL APPLICATIONS
• Periodontics
• Endodontics
• Dentistics and Prosthesis
Bicarbonate jet (optional item) – Features of the product:
The bicarbonate jet removes dark stains from teeth, caused by cigarette smoke, coffee,
tea, etc, associated with bacterial plaque and not tartar.
Irrigation with a pneumatic system.
Autoclavable bicarbonate jet handpiece.
Internal pressurization through the terminal of the micro motor of the delivery unit,
facilitating its functioning.
It dispenses with external air and water connections.
Internal depressurization through automatic bicarbonate sweeping.
Indication of Equipment
This equipment is for dental use use only. It must be operated and utilized by specialized
professional (certified professional, according to the legislation of the country) and following
the instructions of the manual. The operation of the equipment required, for the professional,
the utilization of correct instruments and it should to be in perfect conditions of the use, and
to protect the professional, the patients and others, in the eventual danger situation.
7
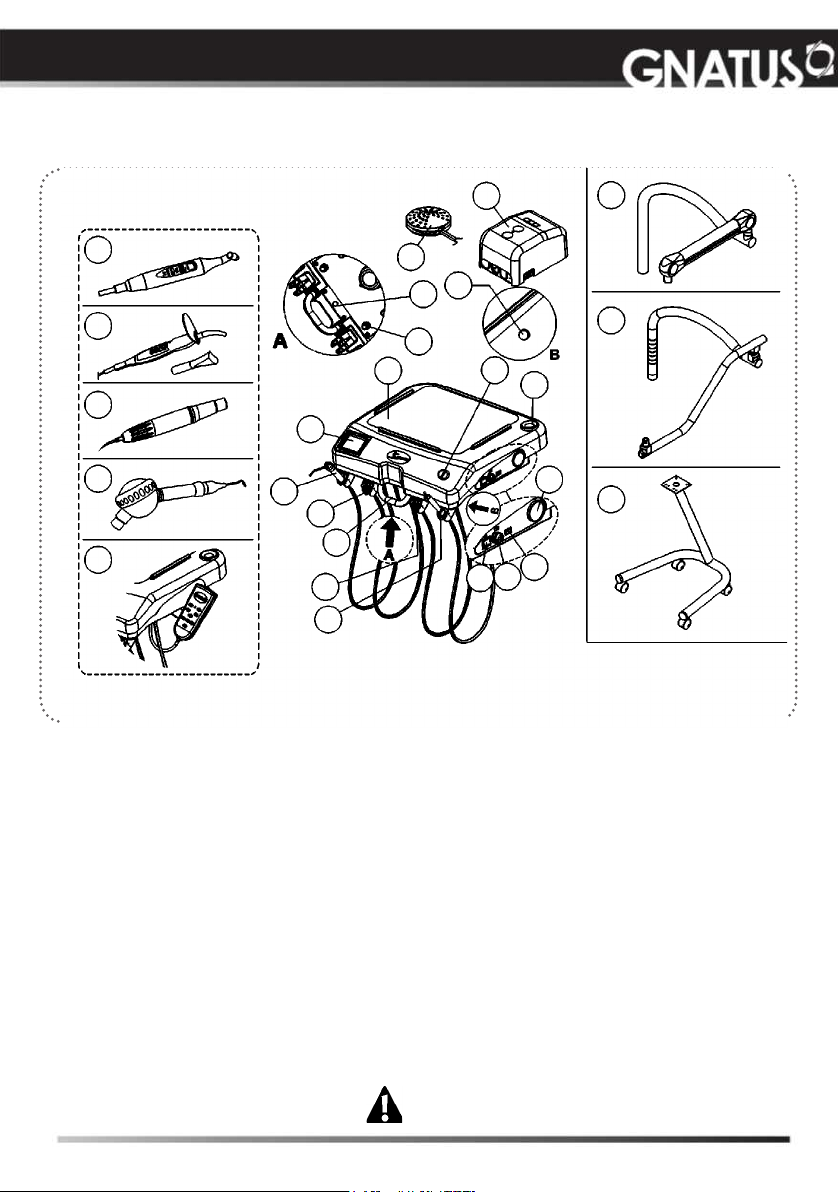
MODULES, ACCESSORIES, OPTIONS AND TYPES
OF COUPLING SUPPORTS
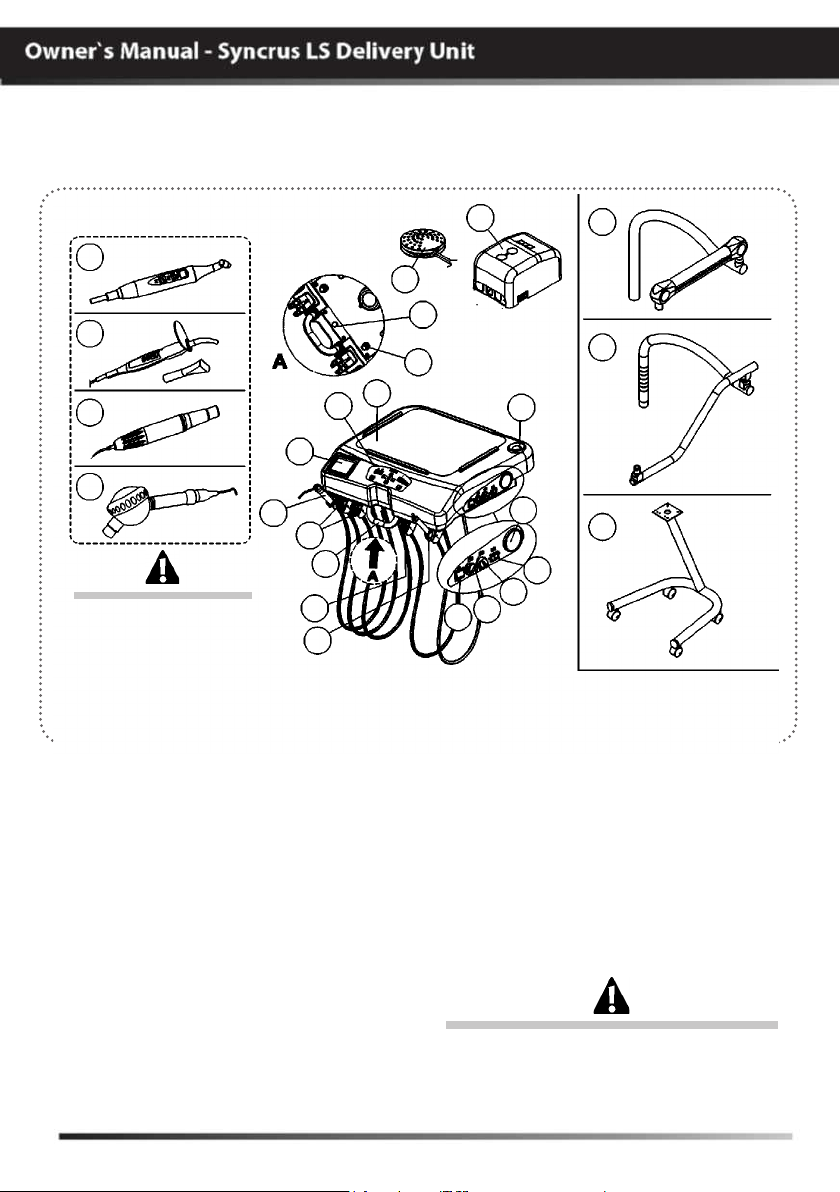
Syncrus LS Delivery Unit (with panel)
14
10
15
16
17
03
The Drawing illustrates
the equipment with all
the optional items. Your
delivery unit will only be
composed of the items
chosen during your
purchase option.
01 - Control panel
02 - X ray view (optional)
03 - Triple syringe
04 - High-speed-motor terminals (optional)
05 - Centered handle
06 - Low-speed-motor terminal (optional)
07 - Bicarbonate jet (optional)
08 - Bicarbonate reservoir (optional)
“available in the delivery units
configured with bicarbonate jet”
09 - Connection box
10 - Foot control
11 - Arm brake valve (optional) “used in the
pneumatic Flex couplings”
12 - Water valve for Syringe /FO/MME/
Scaler/bicarbonate jet (optional)
13 - Auxiliary trays
14 - Kit Laser Hand (optional)
15 - Curing Light (optional)
01
02
04
05
06
07
Basic configuration of the product (composed of)
G Coupling: Mechanical Flex, 1-3-Way Syringe, 2- TB/TM/FO high rotation
terminals, 1-Terminal for TB/TM micro motor.
11
12
13
09
08
E
D
C
B
A
16 - Ultrasound (optional)
17 - Bicarbonate jet “Hand”(optional)
Side command (see page 11)
A - Main switch of delivery unit
B - Regulator of ultrasonic power
C - Regulator of MME rotation
D - Inversion of MME rotation
E - Manometer
Couplings (options upon inquiry)
F - Pneumatic Flex
G - Mechanical Flex
H - Cart
The contents of this page are of an informative
nature, the equipment being able to differ from
that illustrated. So, upon acquiring the product
check the technical compatibilty between
equipment, coupling and accessories.
F
G
H
8
MODULES, ACCESSORIES, OPTIONS AND TYPES
OF COUPLING SUPPORTS
Syncrus LS Delivery Unit (without panel)
13
14
15
01
16
18
01 - X ray view (optional)
02 - Triple syringe
03 - High-speed-motor terminals (optional)
04 - Centered handle
05 - Low-speed-motor terminal (optional)
06 - Bicarbonate jet (optional)
07 - Bicarbonate reservoir (optional)
“available in the delivery units
configured with bicarbonate jet”
08 - Connection box
09 - Foot control
10 - Arm brake valve (optional) “used in the
pneumatic Flex couplings”
11 - Water valve for Syringe /FO/MME/
Scaler/bicarbonate jet (optional)
12 - Auxiliary trays
13 - Kit Laser Hand (optional)
14 - Curing Light (optional)
15 - Ultrasound (optional)
02
03
04
05
06
Basic configuration of the product (composed of)
G Coupling: Mechanical Flex, 1-3-Way Syringe, 2- TB/TM/FO high rotation
terminals, 1-Terminal for TB/TM micro motor.
09
19
10
11
12
16 - Bicarbonate jet “Hand”(optional)
17 - Drive button of the water in the basin
(optional)
18 - Control Panel Kit (optional)
19 - Bio-System operation (optional)
Side command (see page 11)
A - Main switch of delivery unit
B - Regulator of ultrasonic power
C - X-ray viewer activation (optional)
Couplings (options upon inquiry)
F - Pneumatic Flex
G - Mechanical Flex
H - Cart
The contents of this page are of an informative nature, the
equipment being able to differ from that illustrated. So,
upon acquiring the product check the technical compatibilty
between equipment, coupling and accessories. The
Drawing illustrates the equipment with all the optional
items. Your delivery unit will only be composed of the
items chosen during your purchase option.
A
08
17
F
G
07
D
H
C
B
9
MODULES, ACCESSORIES, OPTIONS AND TYPES
OF COUPLING SUPPORTS
01
04
07
02
05
08
03
06
09
10
10
11
12
13

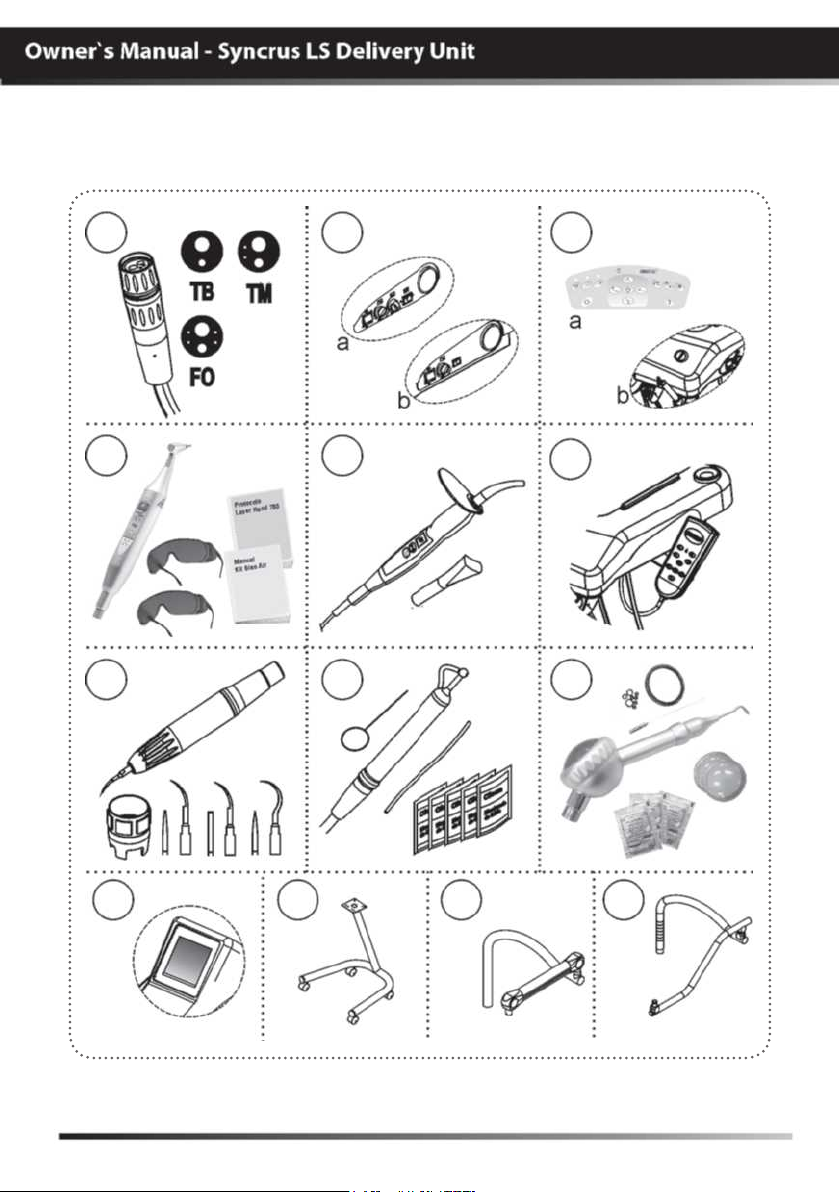
MODULES, ACCESSORIES, OPTIONS AND TYPES
OF COUPLING SUPPORTS
01 - Terminals (optional)
- MME:Electrical micro motor terminal
- FO:Optical fiber terminal
- TM:Midwest terminal
- TB:Borden terminal
02.a - Side command (with panel)
- Main switch of delivery unit
(optional)
- Regulator of ultrasonic power
“available in the delivery units
configured with scaler”
- Regulator of MME rotation (optional)
“available in the delivery units
configured with MME”
- Inversion of MME rotation (optional)
“available in the delivery units
configured with MME”
- Manometer (optional)
02.b - Side command (without panel)
- Main switch of delivery unit
(optional)
- Regulator of ultrasonic
power “available in the delivery units
configured with scaler”
- Manometer (optional)
- Activation of X-ray viewer (optional)
“available in the delivery units
configured with X-ray viewer”
03.a - Control panel (optional)
05 - Curing light + tip for 3 teeth
(optional)
06 - Control Panel Kit (optional)
- Up/down backrest keys
- Up/down seat keys
- Reector activation key
- Working positions 1, 2 and 3 keys
- Key Return to zero
07 - Ultrasound kit (optional)
- Ultrasound
- Tightening wrench
- Inserts “nº 1, 2 and 10P
08 - Bicarbonate jet kit (optional)
- Bicarbonate jet
- Opener
- Hose
- Sachet of bicarbonate
09 - Bicarbonate jet kit “Jet
Hand”(optional)
- Bicarbonate jet
- Opener
- Covers for reservoir
- Rings for sealing
- Sachet of bicarbonate
- Manual
10 - X-ray viewer (optional)
03.b - Drive button of the water in
the basin (optional)
04 - Hand Laser kit (optional)
(Registration # Anvisa 80051420005)
- Laser Hand
- Safety goggles “patient and
professional”
- Manuals
The use of any part, accessory or material not specified or foreseen
in these instructions for use is entirely the user’s responsibility.
The accessories described above shall never be able to be sold separately
from the product.
11 - CART coupling (optional)
12 - Pneumatic FLEX coupling (optional)
13 - Mechanical FLEX coupling (optional)
11
TECHNICAL SPECIFICATIONS
Technical features of the Delivery Unit and its accessories
General
Model
Syncrus LS Delivery Unit
Classification of Equipment as per ANVISA:
Class II
Classification of Equipment as per standard IEC 60601-1:
Protection against Electric Shock - Type B and Class I Equipment (IEC 60601-1)
Degree of safety of application in presence:
Equipment not suited to an anesthetic mixture inammable with air, oxygen or nitrous
oxide.
Mode of Operation
Continuous operation with intermittent load
Power Supply
Power Supply Voltage (coming from dental chair)
127/220 V~ (Selectable)
Frequency
50/60 Hz
# phases
Single Phase / Biphasic
Input fuse (coming from dental chair)
5A Delayed action
Voltage in equipment (coming from dental chair)
12 and 24 V~
Other specications
Inlet air pressure
80 PSI (5,52 BAR)
Inlet air pressure - Syringe
40 PSI (2,76 BAR)
Maximum consumption of air (dental set)
80 l/min
12

TECHNICAL SPECIFICATIONS
Capacity of water reservoir
800ml
High rotation air consumption
9 l/min
High rotation water consumption
0,02 l/min
Syringe air consumption
17 l/min
Syringe water consumption
0,1 l/min
Delivery unit tray`s maximum load capacity
2Kgf
Net weight of Delivery Unit with “Pneumatic FLEX” coupling (with all the options)
22,5 Kg
Gross weight of Delivery Unit with “Pneumatic FLEX” coupling (with all the options)
27,5 Kg
Net weight of Delivery Unit with “Mechanical FLEX” coupling (with all the options)
17 Kg
Gross weight of Delivery Unit with “Mechanical FLEX” coupling (with all the options)
22 Kg
Net weight of Delivery Unit with “CART” coupling (with all the options)
15,10 Kg
Gross weight of Delivery Unit with “CART” coupling (with all the options)
18,80 Kg
Specications of Curring Light
Power
5,2VA
Light source
1 LED
Active medium
Semicondutor LED (InGaN)
Wavelength
440nm - 460nm
13
TECHNICAL SPECIFICATIONS
Timer
90 seconds
Timer alarm
sound alarm with beep every 10 seconds and 4 beeps at the end of the cycle
Activation
Through the hand-piece button
Light conductor
Made out of special polymer, rotational, removable and reuse sable.
Hand-piece body
ABS injected
Specications of Ultrasound
Frequency of Vibrations of Ultrasound
30,000Hz
Consumption of irrigating liquid
28 ml/min
Power consumed
15VA ±10%
Transducer system
Piezoelectric ceramic
14

TECHNICAL SPECIFICATIONS
Eletromagnetic emissions
15

TECHNICAL SPECIFICATIONS
16

TECHNICAL SPECIFICATIONS
17

TECHNICAL SPECIFICATIONS
Standards applied
This product was tested and approved as per the standards:
NBR 60601-1:1997 - Equipamento Eletromédico- Parte 1: Prescrições gerais para
segurança;
NBR ISO 14971:2009- Produtos para a saúde - Aplicação de gerenciamento de risco a
produtos para a saúde;
EN ISO 13485-2003 - Quality Systems - Medical Devices;
IEC 60601-1-2:2007 - Collateral Standard - Eletromagnetic Compatibility.
EN ISO 9001:2008 - Quality Management System - Requirements
RDC 59/2000 - Boas práticas de fabricação de produtos médicos - ANVISA
The Equipment maintains its condition of safety and efficacy, provided that
it is maintained (stored) as mentioned in this instruction for use. Thus, the
equipment will not lose or alter its physical and dimensional features.
18

TECHNICAL SPECIFICATIONS
Dimensions (mm)
Delivery Unit with CART coupling
Delivery Unit with Pneumatic FLEX coupling
Delivery Unit with Mechanical FLEX coupling
19

TECHNICAL SPECIFICATIONS
Packing symbols
Maximum stacking:
It determines the maximum
quantity of boxes which can be
stacked during transportation
and storage “as per packaging”.
Packing to be transported and / or
stored with the harrows up.
Packing to be transported and /
or stored with care (should not
suffer drop and neither receive
impact).
Product symbols
Careful: It indicates an important
instruction for the operation of the
product. Not following it can cause
dangerous malfunctioning.
Note: It indicates useful
information for operation of the
product.
Packing to be transported and
/ or stored avoiding humidity,
rains and wet oor.
The packing must be stored and
transported away from direct
sun light exposure.
Temperature limit for the
packing to be stored or
transported.
Turned on
Turned off
B type equipment
Important: It indicates an
instruction of safety for operation
of the product. Not following it,
can lead to serious danger to the
patient.
Landing (in many parts of the
equipment) indicates the condition
of being landed.
Lift backrest.
20
Warning - see the manual
Emergency stop
Lower backrest.

TECHNICAL SPECIFICATIONS
Product symbols
Lift seat. Lower seat.
Determines the working position 1
Determines the working position 2
Determines the working position 3
Bio-System operation X ray view operation
Bowl’s water ow Cup filling
High-speed with FO
Bicarbonate Jet
It determines to spitting position /
last position.
Determines the position Return to
zero.
Reector actuation
Electric low-speed-motor
Curring Light
Triple syringe
Electric low-speed-motor
rotation inverter
Ultrasound
21

TECHNICAL SPECIFICATIONS
Content of accessible and non-accessible demarcations
INSTALLATION OF EQUIPMENT
The installation of this equipment requires specialized technical
assistance (Gnatus).
OBS: These information also make part of the Manual of Installation
and Maintenance of the equipment that can be found with the
authorized Gnatus technician.
- This equipment shall only be able to be unpacked and installed by a Gnatus authorized
technician, under penalty of losing the warranty, as only (s)he has the information, suitable
tools and training required to execute this task.
- Gnatus bears no responsibility for damages or accidents caused by poor installation
executed by a technician not authorized by Gnatus.
- Only after the equipment has been installed and duly tested by the authorized technician
representing Gnatus, will it be ready to start work operations.
22

OPERATION OF EQUIPMENT
Turning on / o the dental set
- Turn on the main switch of the Dental Chair. All the functions of the equipment will be
enabled.
- The main switch has an internal LED which goes on when the dental chair is turned on.
- Turn the ON/OFF switch located on the side of the delivery unit.
Positioning
- The FLEX coupling “item F, page 08” has horizontal and vertical movements, with
pneumatic locking device.
Maintaining the button “Arm brake valve” (item 11, page 08) pressed, place the delivery
unit in the position desired, holding it by the handle, and release it to fasten it in this
position.
Activation of the Terminals
- For the functioning of the rotary
instruments, remove the instrument to be
used from the support, activate the foot
control pressing it with your feet.
The power (air power supply) can be
controlled by the operator with greater or
less pressure on the foot control.
Adjustment of Spray of “TB/TM
high and low rotation terminals”
- The adjustment is made via a valve
positioned in the terminal. Turn it in a
clockwise direction to reduce the spray and
in a counter- clockwise direction to increase
it.
Note: As the “TB” double terminal does
not have a spray this adjustment is not
required.
Adjustment of Spray of “MME/FO
high and low rotation terminals”
- The adjustment is made via the valves
positioned under the box of the delivery unit
(01). Turn it in a clockwise direction to reduce
the spray and in a counterclockwise direction
to increase it.
View from underneath
01
23

OPERATION OF EQUIPMENT
Driving to the water in the
basin to the model without
the control panel
To drive the water in the basin press the
button 17 and press it again to disable.
Use of 3-Way Syringe
- Press button (A) for water to come
out, (B) for air to come out or both
simultaneously to obtain a spray.
Curing Light Activation
- Select application time, press time
selection button (01), which values are: 10s
(standard mode), 20s, 60s, 80s and 90s.
- To initiate a polymerization cycle, press
the timer trigger (02), which generates a
short beep every 10 seconds and a 4 beeps
at the end of cycle.
- To interrupt a polymerization cycle just
activate the timer trigger again (02).
02
01
04
03
IMPORTANT:
- Keep the light conductor tip (03) at least 2mm away from the restoration.
- Keep the light conductor (03) always protected by an expendable PVC film, which must
be changed for every patient. This procedure protects the light conductor from scratches
and other residues.
- Use the polymerization time recommended by the compound resin manufacturer and
always perform restorations in incremental layers with a maximum thickness of 2mm.
WARNING
- Never aim the blue light beam towards the eyes
- Use the eyesight protection (04)
- In order to protect the eyes, the eyesight protection (04) filters only the blue light used
for the resins polimerization, and it allows ambient light to pass through.
24

OPERATION OF EQUIPMENT
Laser Hand (optional)
The “Laser Hand Kit” is low intensity (780nm) and provides relief of acute and chronic pain,
and speeds repair of damaged tissue by means of biostimulation effects of radiation.
Eminently analgesic, anti-inammatory and biomodulation effect.
Applications:
• Inammations;
• Oral mucous lesions;
• Dental hypersensitivity;
• Analgesia;
• Paresthesia;
• Alveolitis and pericoronitis;
• Acceleration of post surgical and
injury cicatrisation;
Activation of the “Laser Hand”
Turn on the main unit power switch, which will
automatically turn on the laser.
To select application time, press the time selection
button (01) with variations of: 01s to 90s. Maintain
pressure on the key until desired time selection,
which can be at 1-second intervals (1s, 2s, 3s, 4s,
5s, 6s, 7s...) or 10-second intervals (10s, 20s, 30s,
40s, 50s..).
To start, press timer activation button (01). A
single beep will be heard, followed by 5 beeps at each
conclusion.
The laser will remain active with a 10-minute
program. After 10 minutes, a beep will inform that the
laser is in standby mode.
To restart the cycle, press the key (02) which will
sound 2 beeps and the last programmed selection will
appear on the screen. To interrupt the cycle, press
button (03).
• Decrease of edemas, bruising and
scabbing;
• Distension, muscular spraining and
articular pain;
• Acupuncture (optional).
03
02
01
Note: For a new program, in case desired time is less than the previous program,
press (01) until the start of time “00”.
WARNING: Never direct the red light towards eyes;
25

OPERATION OF EQUIPMENT
Ultrasound Activation
Remove the scaler handpiece from the support;
Choose the suitable insert for the operation desired as per “Techniques and
Applications”;
Thread the insert chosen in the handpiece with the aid of the fastening wrench (01)
and a slight tightening;
Activate the foot control and position the selector power (05) as per the sensitivity of
the operation;
Adjust the water ow via the valve (06) located in the lower part of the dental unit.
At the end of the procedure release the foot control and place the handpiece in the
support.
01
Side view
05
06
View from underneath
IMPORTANT RECOMMENDATION
The shape and the weight of each insert are important facts to obtain a maximum
performance of the generator of ultrasounds, the operator attention to these two
characteristics, will assure the maintenance of the best performances of the units, however,
we recommended that the structure of the insert is not altered (limiting it or twisting it), in
the same way the aging of an inserted drives to an alteration of its original characteristic,
becoming it ineffective.
Any insert that has been damaged by use or accidental impact should be changed.
26

OPERATION OF EQUIPMENT
Technical and applications
All the inserts of the Ultrasound have the particularity of
vibrating in an only plane (front vibrations to back, and in the
axis of the insert).
The lateral vibrations common to other destartarizators don’t
exit, the rectilinear displacement favors more precise approach
of the tooth and of the gum.
The enamel and the cement are protected of the inutile
shocks.
Inside of this main plane of vibration, the end of each insert
is driven by small vibratory movements.
To abtain the maximum performance ot the Ultrasound
the operator should pay attention to the specific vibrations
regulations of each insert.
Periodontics
Insert Nº 1 “Removal of supragengival calculus”
Tip Nº1 is used for lingual, buccal and approximal
supragingival scaling. Recommended for the removal of gross
calculus.
Recommended power setting: 10-50%.
Insert Nº 2 “Removal of supragengival calculus”
Tip Nº2 is used for lingual and buccal supragingival scaling.
Recommended for the removal of gross calculus.
Recommended power setting: 10-100%.
(it comes with the Ultrasound kit)
(it comes with the Ultrasound kit)
Insert Nº 10-P “Universal”
- Tip 10-P is used for lingual and buccal supragingival scaling.
It’s one of the most popular Tips and is recommended for the
removal of heavy calculus.
Recommended power setting: 10-70%.
Insert Nº H-3 “Universal”
- Tip H-3 was designed for subgingival scaling and can also
be used on furcations.
Recommended power setting: 10-70%.
Endodontia
Insert Nº ET-20 “Preparation of canal”
- Tip ET-20 is used in the pulp chamber for removing pulp
stones, dentin and old fillings. Length: 17 mm.
Recommended power setting: 10-25%.
(it comes with the Ultrasound kit)
(optional item)
(optional item)
27

OPERATION OF EQUIPMENT
Technical and applications
Insert Nº ET-40 “Preparation of canal”
- Tip ET-40 is used in the coronal and apical part of root canals.
Among other things the tip can be used to remove posts, widen
calcified canals and remove hard fillings. Length: 24 mm.
Recommended power setting: 10-15%.
Inserto Nº S-04 “Preparo do canal”
- Tip S-04 is made of titanium and has no diamond coating.
Its primary area of use is the isolation and removal of broken
instruments. Length: 24 mm.
Recommended power setting: 10-15%.
Insert Nº S12-90 “Apical surgery”
- Tip S12-90 is angled at 110° and is used in combination
with the instrument holders A-120 and A-90 With the aid of
the instrument holder, the S12-90 can be precisely positioned
at the angle needed for the treatment.
Recommended power setting: 10-50%.
Insert Nº P-14 “Apical surgery”
- Tip P-14 is angled at 100° and it’s also used in combination
with the instrument holders A-120 and A-90. It has a slimmer
design and is therefore better suited for small roots.
Recommended power setting: 10-50%.
Insert Nº A-120 “Removal of broken instruments”
- Tip A-120 is a holder for files and instruments with a
diameter of 0.8 mm. It can be used with implant tips and AP
tips. A-120 has an angle of 120°.
Recommended power setting: 10-50%.
(optional item)
(optional item)
(optional item)
(optional item)
(optional item)
Insert Nº A-90 “Removal of broken instruments”
- Tip A-90 is a holder for files and instruments with a
diameter of 0.8 mm. It can be used with implant tips and AP
tips. It has an angle of 90°.
Recommended power setting: 10-50%.
Dentistry and Prosthesis
Insert Nº 5-AE “Removal of posts and crowns”
- Tip 5-AE is used for removing crowns and inlays. Its small
diameter enables access to difficult-to-reach areas.
Recommended power setting: 10-100%.
Insert Nº 6-A “Amalgam condensation”
- Tip 6-A is used for amalgam condensation.
Recommended power setting: 10-50%.
28
(optional item)
(optional item)
(optional item)

OPERATION OF EQUIPMENT
Activation of Bicarbonate jet
Bicarbonate jet removes dark stains from
teeth, caused by tobacco, coffee, tea, etc. related
to plaque. In order to obtain better results of its
use, we recommend a distance of 5mm between
the handpiece and the teeth, with an angle from
30 to 45º, describing circular movements over
the teeth.
The bicarbonate jet must be directed to the
occlusal edge and not to the gingival edge in order
to avoid an unpleasant sensation to the patient.
Remove the upper lid (01), add 20 to 40
sodium bicarbonate, this quantity is enough to
meet prophylaxis needs.
ATTENTION
In order to avoid clogging, don’t add more
than 40g of bicarbonate. Bicarbonate level can be
checked through the transparent lid.
To adjust the bicarbonate jet power, use the
selector (12) pag.08; to increase pressure, turn it
clockwise, to decrease, counterclockwise.
01
- The efficacy depends on the perfect dosage of the volume of water and quantity of
powder.
- The quantity of water in excess will cause a reduction in the effect of the powder, due
to the washing.
- Reducing the water too much will make the powder more aggressive.
29

OPERATION OF EQUIPMENT
Equipment activation by the delivery unit panel
01
14
09
08
07
05 06
10
1112
13
02
03
04
Control panel:
The configuration
of the delivery unit
without the control
panel doe not interfere
in the functioning of
the product.
01 - LED of emergency
02 - It determines the work position
03 - Zero position
04 - Dental light operation
05 - X ray view operation
06 - Bio-System operation (optional)
07 - Last position / Spitting position
Warning:
To preset the cup filling time, press the “Cup filling” key (08) for 3 seconds (a long beep
will be heard and the LED will keep blinking).
When the desired time is reached, press the “Cup filling” key again. The cup filling time
is then set.
To preset the bowl’s water ow, pres the “Bowl water” key (09) for 3 seconds (a long
beep will be heard and the LED will keep blinking)
When the desired time is reached, press the “Bowl water” key again. The cup filling
time is then set.
The “Cup filling” and “Bowl water” time functions have a limited preset ow time, 1
minute for the cup filling and 4 minutes for the bowl’s water ow.
When the key “Last position/Spitting position” (07) is pressed, the dental light will go
off (if it was on), the bowl will drain (for the preset time, and if it was not programmed yet,
for four minutes) and the backrest will go up to the spitting position. When pressed again,
the backrest will return to the last position and the dental light will go on (if it was on).
After pressing the “Last position/spitting position” key (07), any other operation will
trigger the “Stop”, and automatically the backrest current position will be defined as “Last
position”.
When the “Emergency stop” (14) key is pressed, the LED (01) will be on and all chair
movements are interrupted until pressed again (14).
08 - Cup lling
09 - Bowl’s water ow
10 - Lift seat
11 - Lower seat
12 - Lift backrest
13 - Lower backrest
14 - Emergency stop
30

OPERATION OF EQUIPMENT
Drive through the Control Panel Kit (optional)
02
03 04
06
07
08
01 - Indication LED on
02 - Backrest up
03 - backrest down
04 - Seat up
05 - Seat down
Working positions
To program the working positions just put the chair into the position and the reector in the desired
intensity and keep it pressed regarding what working position you want to schedule until a beep
sounds.
Reector
To change the brightness, keep the key (06) pressed, the brightness will increase or decrease
gradually, according to the reector specications (see the reector manual).
Attention: After activated the “Return to zero” operation (10), any other operation could perform the
“Stop”.
06 - Reector actuation
07 - Determines the working position 1
08 - Determines the working position 2
09 - Determines the working position 3
10 - Determines the position Return to zero
01
05
09
10
Control panel:
The configuration
of the delivery unit
without the control
panel doe not interfere
in the functioning of
the product.
How to provision the reservoirs
Water - Syringe / Handpieces
Remove the reservoir (01) uncoiling it on clockwise and make the replacement of water.
After the replacement put it back coiling on anticlockwise. Always use filtered water or
aseptic products.
31

OPERATION OF EQUIPMENT
Bio-System (Optional)
Remove the reservoir (02) uncoiling it on clockwise and make the replacement. Use a
chlorinated water solution 1:500
Preparing the solution:
From a solution of hypochlorite of sodium at 1% a solution of chlorine at 500 p.p.m. is
prepared.
How to prepare the solution: Take 25ml of hypochlorite of sodium at 1% and dilute
it in 500 ml of water (1 to 20). Such solution should be prepared daily.
IMPORTANT:
Follow this proportion strictly to avoid damages in the equipment and to have an efficient
result in the disinfection.
02
01
supply thro ugh the dental chair.
PRECAUTIONS, RESTRICTIONS AND WARNINGS
Transportation and storage
This equipment must be transported and stored observing the following directions:
- Avoid falls and impacts;
- Keep it dry, do not expose it to rain, water drops or wet oor;
- Keep it away from water and direct sunlight, and in it original wrapping;
- Don’t move it over irregular surfaces, protect it from rain and observe the maximum
stack quantity specified in the packaging;
- Transportation and storage temperature range: -12°C to 50°C;
- Transportation and storage relative humidity range: 0°C to 90°C;
- Atmospheric pressure range: 500hPa to 1060hPa (375 mmHg to 795 mmHg).
32

PRECAUTIONS, RESTRICTIONS AND WARNINGS
Transportation, storage and operation
This equipment must be transported and stored observing the following directions:
- Avoid falls and impacts;
- Keep it dry, do not expose it to rain, water drops or wet oor;
- Keep it away from water and direct sunlight, and in it original wrapping;
- Don’t move it over irregular surfaces, protect it from rain and observe the maximum
stack quantity specified in the packaging;
- Transportation and storage temperature range: -12°C to 50°C.
- Ambient temperature range recommended by Gnatus +10 ° C to +35 ° C.
Sensitivity to environmental conditions in normal situations
of use
- The equipment has been planned not to be sensitive to interference such as magnetic
fields, external electrical factors, electrostatic discharge, pressure or variance of pressure,
provided that the equipment is installed, maintained, clean, preserved, transported and
operated as per this instruction for use.
Precautions and warnings “during the installation” of
quipment
- The equipment should only be installed by Gnatus authorized technical assistance or
technicians.
- Check that the socket in which the device will be connected has a ground connection.
According to the ABNT standard, this is essential for the safe operation of the system;
- Position the unit in a place where it will not get wet.
- Install the unit in a place where it will not be damaged by the pressure, temperature,
humidity, direct sunlight, dust, salts, or sulfur compounds.
- The unit should not be submitted to inclination, excessive vibrations, or blows (including
during transportation and handling).
- This equipment was not planned for use in an environment where vapors, anesthetic
mixtures inammable with air, or oxygen and nitrous oxide can be detected.
- Check the voltage of the equipment at the moment of executing the electrical
installation.
- The equipment must be grounded correctly.
- Before the first use and/or after long interruptions from work such as vacations, clean
and disinfect the equipment; eliminate air and water deposited in the internal hoses.
These information also make part of the Manual of Installation and
Maintenance of the equipment that can be found with the authorized
Gnatus technician.
Recommendations for the dental equipment maintenance.
Your Gnatus equipment has been designed and developed according to the standards
of modern techology. Similarly to other kinds of equipment, it requires special care, which
is many times neglected due to several reasons and circunstances.
Therefore, here are some important reminders for your daily routine. Try to follow these
simple rules, which will save you a lot of time and will avoid unnecessary expenses once
they start making part of your working procedure.
33

PRECAUTIONS, RESTRICTIONS AND WARNINGS
Precautions and warnings “during the use” of equipment
- The equipment should only be operated by duly enabled and trained technicians (Dental
Surgeons, Capacitated Professionals)
- If any maintenance should be required, only use services of the Gnatus Authorized
Technical Assistance.
- The equipment has been manufactured to handle both continuous and intermittent
operation; so follow the cycles described in these Instructions for Use.
- Although this equipment has been planned in accordance with the standards of
electromagnetic compatibility, it can, in very extreme conditions, cause interference with
other equipment. Do not use this equipment together with other devices very sensitive to
interference or with devices which create high electromagnetic disturbance.
- Do not expose the plastic parts to contact with chemical substances, use in the routines
of dental treatment, such as: acids, mercury, acrylic liquids, amalgams, etc.
Ultrasound:
- The use of the Ultrasound is not advisable for patients and dental surgeons using
pacemakers.
Bicarbonate Jet:
- It is not advisable to use this equipment in patients who have serious renal or respiratory
alterations, or who undergo hemodialysis. These cases should be followed be followed by
a doctor.
- We recommend the use of a mask and goggles for applying the bicarbonate jet.
- Avoid leaving sodium bicarbonate in the container for long periods without use.
The effect of residual humidity in the air may alter the properties of the powder and
cause blocking.
Gnatus shall not be responsible for:
- Use of the equipment differing from that for which it is intended.
- Damages caused to the equipment, the professional and/or the patient by the incorrect
installation and erroneous procedures of maintenance, differing from those described in these
Instructions for use which come with the equipment or by the incorrect operation of it.
Precautions and warnings “after” the use of equipment
- Turn off the main switch of the dental set when it is not in use for an extended period
of time.
- Always maintain the equipment clean for the next operation.
- Do not modify any part of the equipment. Do not disconnect the cable or other
connections without need.
- After using the equipment, clean and disinfect all the parts which may be in contact
with the patient.
- Upon noticing irremovable stains, splits or cracks in the light conductor or in the eye
protector, replace the damaged components.
Precautions and warnings during the “cleaning and disinfection”
of equipment
Delivery Unit:
- Before cleaning the equipment, turn off the main switch.
- Avoid spilling water, even accidentally, or other liquids inside the equipment, which
34

PRECAUTIONS, RESTRICTIONS AND WARNINGS
could cause short circuits.
- Do not use microabrasive material or steel wool when cleaning, or employ organic
solvents or detergents which contain solvents such as ether, stain remover, gasoline etc.
Curring Light:
- The equipment and the light conductor cannot be placed in the oven or autoclaves.
- The conductor can’t be immersed in solvents or substances that contain acetone in its
composition.
- Avoid the light conductor to terminal to touch the resin to be polymerized.
- When using the Curring Light check if the light conductor output doesn’t have residues
that might obstruct the light beam.
Ultra-som:
- After use, remove the insert to avoid damage.
- The part should be packaged duly clean.
- Do not sterilize the transducer in contact with other types of material.
- The inserts should be cleaned beforehand eliminating all the resin residue.
- After removing the insert from the transducer, it should be disinfected with surgical
spirit and taken to be sterilized in autoclave.
- Before placing or removing the cover of the transducer, it is advisable first to remove
the insert from the transducer, in order to avoid any damage to the cover.
- Never expose the covers of the transducer to any type of oil, as this may
modify the structure of the material, jeopardizing its useful life.
Bicarbonate Jet:
- Before the sterilization procedure, the part should be packed duly clean.
- Do not sterilize the part in contact with other types of material.
- Before the sterilization procedure, remove the hose from the nozzle of the sodium
bicarbonate jet handpiece, as it is not autoclavable.
Hand Laser:
For further information, please see the Jet Hand manual which comes with the
product.
Precautions in case of alteration in the functioning of equipment
- If the equipment has any abnormality, check if the problem is related to any item
listed in the topic of unforeseen events (failures, causes and solutions). If it is not possible
to resolve the problem, turn off the equipment, remove the power supply cable from the
socket and contact your representative (Gnatus).
Precautions to be adopted against foreseeable or uncommon
risks, related to the deactivation and abandoning of equipment
In order to avoid environmental contamination or undue use of the Equipment after it
has become useless, it should be discarded in the suitable place (as per the local legislation
of the country).
- Pay attention to the local legislation of the country for the conditions of installation
and disposal of residue.
35

CORRECTIVE AND PREVENTIVE MAINTENANCE
AND PRESERVATION
Additional procedures for reuse
The equipment can be reused in undetermined, i.e. unlimited, quantities, only needing
to be cleaned and disinfected.
Disinfection
Use clean and soft cloth dampened in alcohol 70% to disinfection of the equipment.
Never use corrosive disinfectants or solvents.
Cleaning
The cleaning procedure below should be executed at the start of the
working day and after each patient.
Always turn off the main switch before executing the procedures of
daily maintenance.
To clean the equipment, we recommend the use of “BactSpray
(Reg nº MS: 3.2079.0041.001-5) or any other similar product:
Active component: Benzalkonium chloride (tri-quaternary
ammonium)
Solution 50%................................................. 0.329%
Chemical composition: Butyl Glycol, Decyl polyglucose, Sodium
Benzoate, Sodium Nitrate, Essence, Deodorized Propane / Butane,
demineralized Water.
For more information concerning cleaning procedures, see
manufacturer’s instructions.
WARNING:
- In order to prevent risks and damages to equipment, make
sure that the liquid does not enter into the unit.
- The application of other solvent-based cleaning products or
sodium hypochloride isn’t recommended, because they may damage
the equipment.
NOTE: The registration at the Ministry of Health of the
“BactSpray” is executed separately from the product described in
this manual, as the “BactSpray” is not manufactured by Gnatus.
Note: Use gloves
and other systems of
protection, during the
disinfection.
36

CORRECTIVE AND PREVENTIVE MAINTENANCE
AND PRESERVATION
Cleaning
Curring Light
The light conductor cleaning and the optical protector must be done using only neutral
soap and cotton. To the exterior of the pen use neutral soap or alcohol 70% vol.
Never use any other chemical based product than previous mentioned, because along
the time these products attack the surface of the instrument.
Never immerse the instrument in disinfection baths.
Ultrasound / Bicarbonate Jet
The equipment is reusable in undetermined, i.e. unlimited, quantities, only requiring
cleaning and disinfection.
Cleaning of the terminal, transducer cover and hose:
We recommend using a clean cloth, moistened with water and neutral soap.
Cleaning of the bicarbonate container:
Locate the bicarbonate container (item 08 page 8) through the side access, remove it
rotating it in a clockwise direction and clean it with a dry cloth. Check that the thread has
absolutely no powder in it, and replace it, rotating it in a counterclockwise direction.
Autoclavable:
Transducer cover, inserts and wrench are autoclavable in the following conditions:
- Maximum temperature of 134ºC.
01
01 02
02
Sterilization of the transducer cover:
Remove the insert from the transducer.
Carefully remove the cover (01) from the
transducer (02) and then take it to be
sterilized in autoclave (packaged).
Recommendations for sterilization in autoclave:
- The piece must be wrapped clean.
- Don’t sterilize the transducer cover in contact with other materials.
- The insert should be cleaned before eliminated all the resin residues.
- After removing the insert from the transducer, it should be disinfected with surgical
spirit and taken for sterilization in autoclave.
- The material of the transducer’s cover was specially developed to resist up to 200
cycles of sterilization by autoclave, provided that recommendations mentioned above were
observed.
WARNING: Never expose the transducer’s cover to any kind of oil, because it may modify
the material’s structure, affecting its useful life.
Sterilization of the Bicarbonate Jet:
Remove the adapter (02) from the jet of
bicarbonate point (01) uncoiling it anticlockwise and take the jet of bicarbonate point
for sterilization in auto-key (loaded).
37

CORRECTIVE AND PREVENTIVE MAINTENANCE
AND PRESERVATION
Cleaning
Unblocking of the bicarbonate Jet
Avoid leaving sodium bicarbonate on the
reservoir for long periods without using it.
The air humidity could change the powder
properties and cause a blockage.
If this happens, proceed as follows: find
the bicarbonate container (01), remove it
unscrewing it clockwise and, using a dry
piece of cloth, clean it. Check the thread is
free from powder and put it back screwing
it counter-clockwise.
The Delivery Units with bicarbonate
jet features an unpressuring, hose and
handpiece internal cleaning automatic
system.
When pedal is loosed, an internal air jet
will clean the system. If the system were
clogged, proceed as follows:
a) Withdraw hose (02) from tip (03), aim
somewhere safe (cuspidor, sink, etc.) and
actuate the pedal in order to check if the tip
is clogged (03).
b) Clean orifice with an auger (04),
getting it in and out many times.
c) Put the hose back (02) on tip (03). If
it was necessary, replace the hose (02).
04
01
03
02
Hand Laser
For further information, please see the Hand Laser manual which comes with the
product.
38

CORRECTIVE AND PREVENTIVE MAINTENANCE
AND PRESERVATION
Cleaning
Bio-System (optional)
Remove hanpieces from terminals. Take terminals to
bowl or water unit’s sink.
Open the terminal’s spray valves completelly.
Press the Bio-system key (06), which is located in
the command panel, for some seconds, to disinfect the
equipment’s components internally with disinfectant.
Then, press the command pedal for some seconds to
rinse, in order to eliminate the disinfectant residues that
could have remained.
IMPORTANT:
Repeat this procedure before working day and after
each patient.
Reservoirs
It’s highly recommended the cleaning of the water reservoirs, using chlorinated water
solution 1:500 (as described previously).
Triple syringe
Only the syringe tip is autoclavable (01). The other pieces
must be cleaned using a piece of cotton wool and alcohol
70% vol. Never use a hot air sterilizer.
01
Preventive Maintenance
The equipment should be calibrated routinely, as per the
legislation in force in the country.
But never with a period exceeding 3 years.
In order to protect your equipment, seek Gnatus technical assistance for periodic revisions
of preventive maintenance.
Corrective Maintenance
If the equipment has any abnormality, check if the problem is related to any of the items
listed in the item Unforeseen Events (situation, cause and solution).
If it is not possible to solve the problem, turn off the equipment, and request Gnatus
technical assistance.
39

UNFORESEEN EVENTS SOLUTION OF PROBLEMS
Upon coming across any problem in operation, follow the instructions below to
check and repair the problem, and/or get in touch with your representative.
Problem Probable cause Solution
Delivery Unit
-Handpiece is not working. - Compressor disconnected.
-Plug the compressor in.
-Handpiece with low speed. -Inlet pressure below speci-
-No water from syringe. -Reservoir run out of water.
-When Bio-system is operated no disinfectant come
from handpiece terminals.
- X ray view does not
work
Curring Light
-Equipment’s not working.
-Equipment is not polymerizing resins.
Ultrasound
-The equipment doesn’t
work.
-Lack of power to the ultrasound.
fied (80 PSI).
-Compressor disconnected.
-Bio-system reservoir run
out of water.
-Chair fuse burned.
-Main or chair switch is off
-Chair’s fuse burned
-Main or chair switch is off.
-Power cut.
-Chair’s fuse burned.
-Resin is not appropriate for
LEDs photopolymerizer wave
length range.
-Burned fuse.
- Deformed insert.
- Loosen insert.
- Bad utilization (incorrect
attack angle).
-Adjust inlet pressure (80
PSI).
-Put filtered water in reservoir.
-Plug compressor in.
-Put disinfectant in the reservoir.
-Replace chair fuse.
-Switch main/chair switch
on.
-Replace chair’s fuse
-Switch main/ chair switch
on.
-Check power supply.
-Replace chair’s fuse.
-Get the indicated resin for
the photopolymerizer’s wave
length range, one with contains photoinitiators based
on camphorquinone.
-Change the plug.
- Change the insert.
- Hold the insert with the key
- See item “Technical and
applications”.
-There is no water in the
hand piece.
40
- Inadequate alimentacion
pressure water.
- Bad regulating of the water
ux.
- Correct the water filter.
- Adjust the water ux throu-
gh the actuator.

UNFORESEEN EVENTS SOLUTION OF PROBLEMS
Upon coming across any problem in operation, follow the instructions below to
check and repair the problem, and/or get in touch with your representative.
Problem Probable cause Solution
Bicarbonate Jet
- Not enough bicarbonate
in jet.
- Low pressure in jet. - Compressor disconnected - Plug compressor in
- Few water in jet. - Water valve is closed.
- Lack of bicarbonate in rerservoir.
- Spout or reservoir outlet is
clogged.
- Bicarbonate excess in reservoir.
- Wrong jet position.
- Jet water reservoir is empty.
- Add bicarbonate to reservoir (max. 40g).
- Clean clogged parts
- Remove excess.
- Change position
- Open valve.
- Put water in reservoir.
WARRANTY OF EQUIPMENT
This equipment is covered by the warranty terms counting from the date of installation,
as specified below; provided that the defect has occurred in normal conditions of use and
that the equipment has not remained stored for more than 06 months counting from the
issue date of the sales document until the date of the actual installation.
- WARRANTY TERMS: 24 months;
- LOSS OF THE WARRANTY:
A) Attempt to repair using an inadequate tool or by unauthorized technicians;
B) Installation of the equipment by an unauthorized technician;
C) Damage arising from inappropriate storage or signs of infringement;
D) Incorrect use of the equipment;
E) Use of a cleaning product not indicated by the factory;
F) Falls or blows which the equipment may undergo or lack of observation of an compliance
with the guidelines of the Owner’s Manual, which was delivered with the present document,
together with the equipment. Repair or replacement of parts during the warranty period
shall not extend the validity term of their warranty.
- This warranty doe snot exempt the customer from paying the service charge for the visit
and the travel expenses of the technician, except when the customer sends the equipment
to execute the maintenance inside the establishment of the technical assistance.
“Consumer Defense Code - art. 50, unique paragraph”.
- The Warranty Certificate comes with the product and must be filled in upon the date
of installation by the Gnatus Authorized Technician.
- Queries and information: GNATUS Help Desk (+55) 16 2102-5000.
- Check the warranty term attached to this manual.
41

FINAL CONSIDERATIONS
The most important aspect related to equipment care is that concerning spare parts.
To guarantee the life span of your equipment, use only original Gnatus spare parts.
They are sure to follow the technical specifications and standards required by Gnatus.
We must also point out to you our chain of authorized dealers. Only dealers that make
part of this chain will be able to keep your equipment constantly new for they count on
technical assistants who have been trained and on spedific tools for the correct maintenance
of your equipment.
Doubts and information: GNATUS Call center (55-16) 2102-5000.
42

43

 Loading...