

GMX MOTORBIKES EXTREME 125cc User Manual

Read and understand this entire manual before riding!
DO NOT RETURN TO STORE!
WWW.GMXMOTORBIKES.COM.AU
EXTREME 125ccDIRT BIKE
NOTE: Manual illustrations are for demonstration purposes only. Illustrations man not reflect exact appearance of actual product.
RIDE SAFE
- Never let children ride this product that are meant for adults – even as passengers.
- Do not carry any passengers on product that are meant for one person.
- ATV(s) are not “all-terrain vehicles” so they may not be able to go safely on all types of terrain. Avoid riding on rough terrain or steep slopes.
- Ride on familiar tracks and beware of obstacles.
- Never ride under the inuence of alcohol/drugs.
- Ensure children are supervised at all times on or around any activity on motorised vehicles.
- Always carry a mobile phone or radio device so you can contact help in case of an emergency.
WEAR SAFE
- Always wear a helmet.
- Wear protective clothing and gear such as goggles, long sleeves, long pants, boots and gloves/hand protection.
Ensure that you understand your quad bike by reading & going over the manual before assembly.
PLEASE NOT: MINOR ASSEMBLY IS REQUIRED, BUT IN THE INTEREST OF SAFETY IT IS RECOMMENDED THAT YOU HAVE THIS PRODUCT
ASSEMBLED BY A SKILL MOTORCYCLE MECHANIC.

CHECK BRAKES
ARE ADJUSTED
CORRECTLY PRIOR
TO RIDING.
YOU MUST CHECK
THAT THE CHAIN
IS ADJUSTED
CORRECTLY PRIOR
TO RIDING.
Swing tags have been placed on your vehicle for you to identify checks that are located within this manual. Once you have performed the
check required remove these swing tags and nylon loops attaching them to the vehicle.
MAKE SURE TO REMOVE THE SWING TAGS AND TAKE SPECIAL NOTICE TO REMOVE THE NYLON LOOP.
The tags and loops that need to be removed from this model: GMX 110cc RIPPER Quad Bike
ONCE SWING TAGS AND NYLON LOOPS ARE REMOVED YOU ARE ACKNOWLEDGING THAT THESE CHECKS HAVE BEEN PERFORMED
There may be a “Spare Parts Package” within the carton so please check all of the packaging and DO NOT THROW OUT
WARNINGS
SWING TAG’S & WARNINGS
BRAKE ADJUSTMENT x2GEAR LEAVER CHAIN ADJUSTMENT
WARNING
Please use unleaded fuel
90 Octane or above
UNLEADED FUEL ONLY
WARNING: This product is powered by a 4 stroke engine and comes with transport oil in the engine.
THE OIL NEEDS TO BE DRAINED AND REPLACED WITH MOTORCYCLE OIL 10W/40 or 10W/50 IS REQUIRED
IF THE OIL CHANGE IS NOT PERFORMED YOU MAY INTERNALLY DAMAGE THE ENGINE AND CLUTCH AND VOID YOUR WARRANTY
DO NOT USE MOTOR CAR OIL
DO NOT USE OIL WITH FRICTION MODIFIERS
Oil will need to be changed every 3 months in HOTTER climates or in the NORTHERN HEMISPHERE
- There is an oil drain (SUMP) plug located underneath your PRODUCT and is highlighted with an oil drain sticker.. This is a 14mm bolt.
- DO NOT remove the other bolt located under the engine.
- Place an oil receptacle under the drain hole, undo bolt and let oil drain from the vehicle. Please note: Dispose of oil correctly
- Tighten bolt back up, remove dipstick (oil ll point) and ll the vehicle with suggested correct amount of oil required. Tighten
PLEASE READ AND UNDERSTAND ALL INSTRUCTIONS AND WARNINGS PRIOR TO ASSEMBLY AND OPERATION OF YOUR VEHICLE.
TO AVOID DAMAGE TO GEARBOX AND
MOTOR. WHEN SELECTING GEAR AND
CHANGING GEARS, RELEASE THE
THROTTLE. DO NOT USE EXCESSIVE
FORCE ON GEAR LEVER.
GMX MOTORBIKES WARRANTY
Our goods come with guarantees that cannot be excluded under the Australian Consumer Law. You are entitled to a replacement or refund for a major
failure and compensation for any other reasonably foreseeable loss or damage. You are also entitled to have the goods repaired or replaced if the goods
fail to be of acceptable quality and the failure does not amount to a major failure.
The manufacturer warrants this product to be free of manufacturing defects for a period of 12 months from date of purchase. This Limited Warranty does
not cover normal wear and tear (exclusions apply) or any damage, failure or loss caused by improper assembly, maintenance or storage or use of the GMX
product. Some parts will have a limited warranty period, please see below. This warranty is a part replacement warranty.
3 Month Parts Replacement Parts
Electrical components, suspension, drivetrain and brakes/ttings.
30 Days Parts Replacement Parts
Bearings, tires, tubes, cables, clutches, brake pads, seats.
Minor assembly is required. In the interest of safety and future warranty claims, it is recommended that you have this product assembled by a qualied, skilled
motorcycle mechanic.
You may need to provide proof for this product of being assembled by a skilled motorcycle mechanic or small engine mechanic a report dvising of the issues may
be needed to process your warranty claims.
The warranty is a parts replacement warranty and labor is not included, defective parts may need to be sent back for inspection.
This Limited Warranty will be void if the product is ever;
- Used in a manner other than for recreation.
- Modied in anyway.
- Rented or commercial use.
The manufacturer is not liable for incidental or consequential loss or damage due directly or indirectly misuse of this product.
Always adhere to the maximum load of the product, over loading the product will void the warranty.
How a claim is made
When making a claim, you will need to provide proof of purchase, condition photos of the item. This information is required to be submitted via the
support center and communication is made through the support center. When the claim is created, the customer will receive the claim number and the
customer support team will reply within 24 hours.

1. Remove strapping.
2. Remove tape and open the box.
3. Remove the box from the protective framing.
4. Using a screwdriver and a spanner remove the bolts from the framing.
5. Using a Wire cutter, remove the rear wheel steadying wire.
6. Using a wire cutter, remove the front wheel steadying wire.
7. Using a wire cutter, remove the fork steadying wire
8. Whilst steadying the bike remove the protective frame
(2 people minimum).
UNPACKING AND ASSEMBLY INSTRUCTIONS
9. Engage the side stand for the bike.
10. Using an Allen key and a spanner remove the
handle bar “block” from the fork assembly.
11. Remove the protective membrane from the fork
assembly.
12. Lift handlebar into correct position and fasten bolts
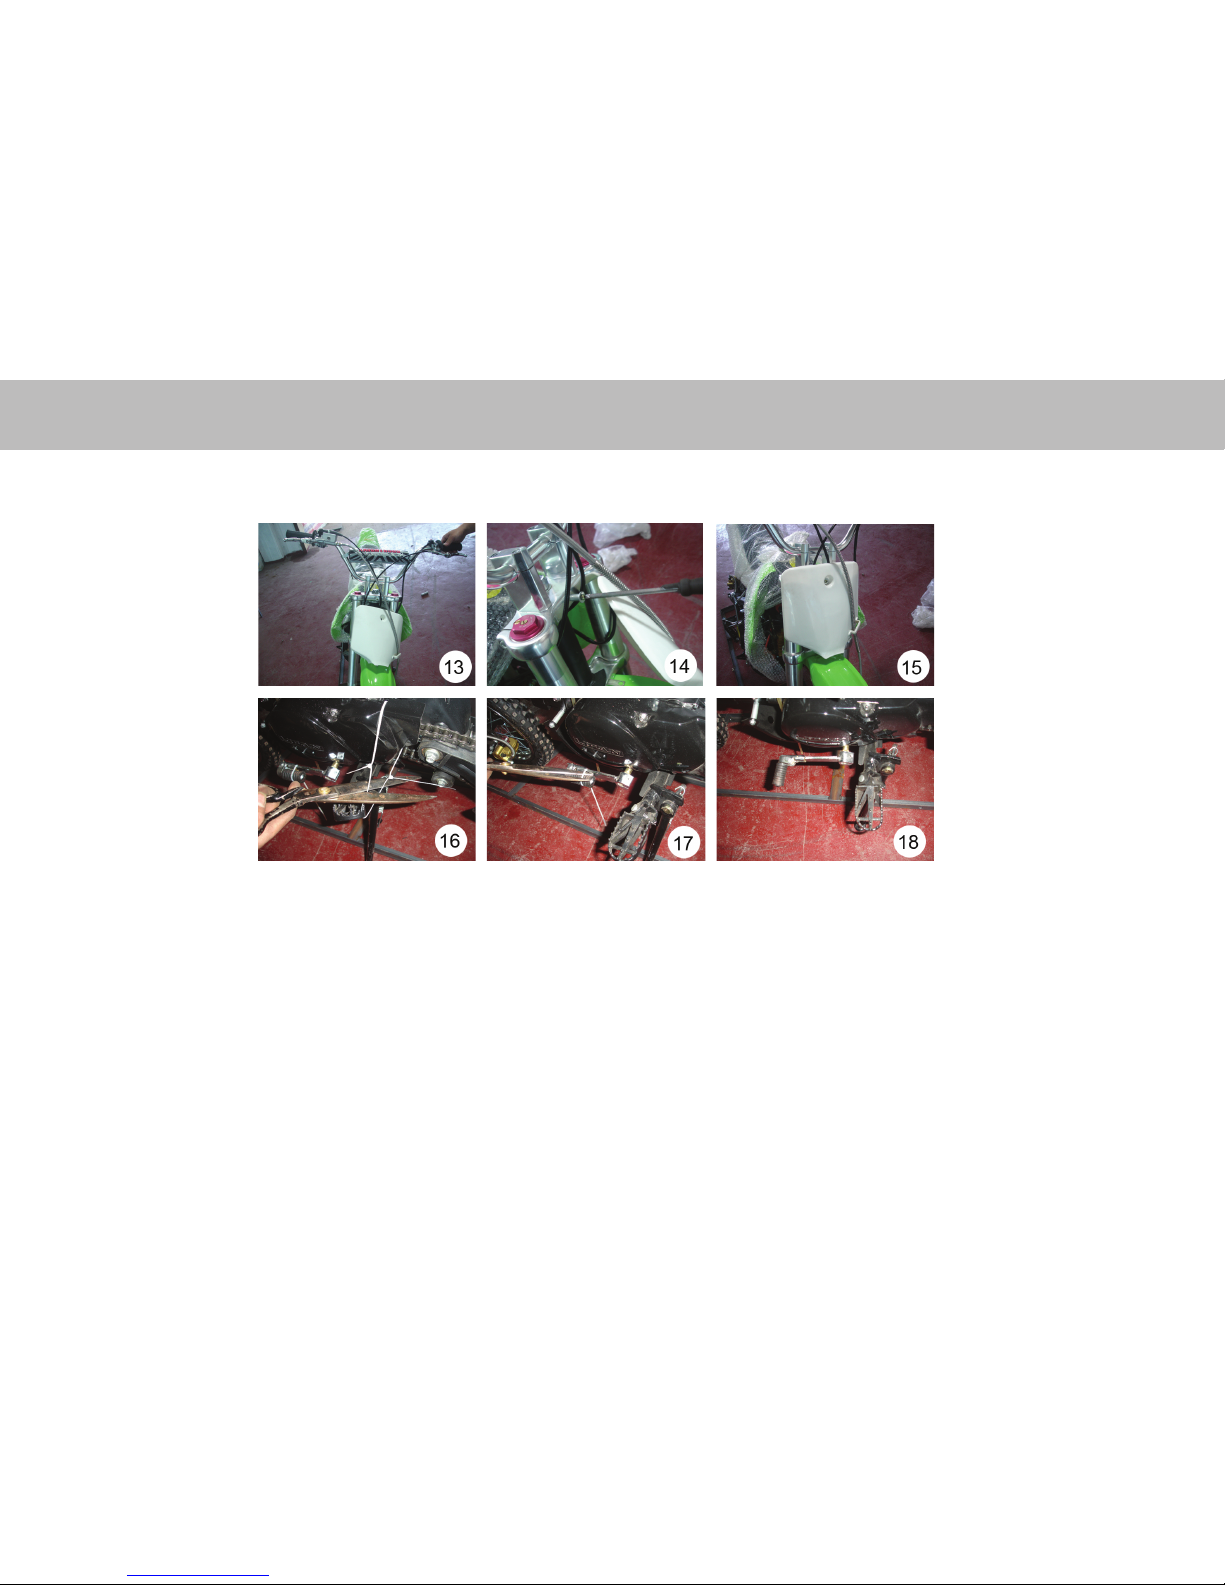
13. Ensure the handle bar and fork assembly are very secure. Failure to tighten these
component parts can result in a major failure, if in doubt consult a skilled mechanic
14. Using a screwdriver, remove the number plate spacer from the fork assembly
15. Install the number plate
16. Remove the strapping from the left foot pegs
17. Remove the strapping from the gear lever
18. Check these component parts for clear movement
UNPACKING AND ASSEMBLY INSTRUCTIONS
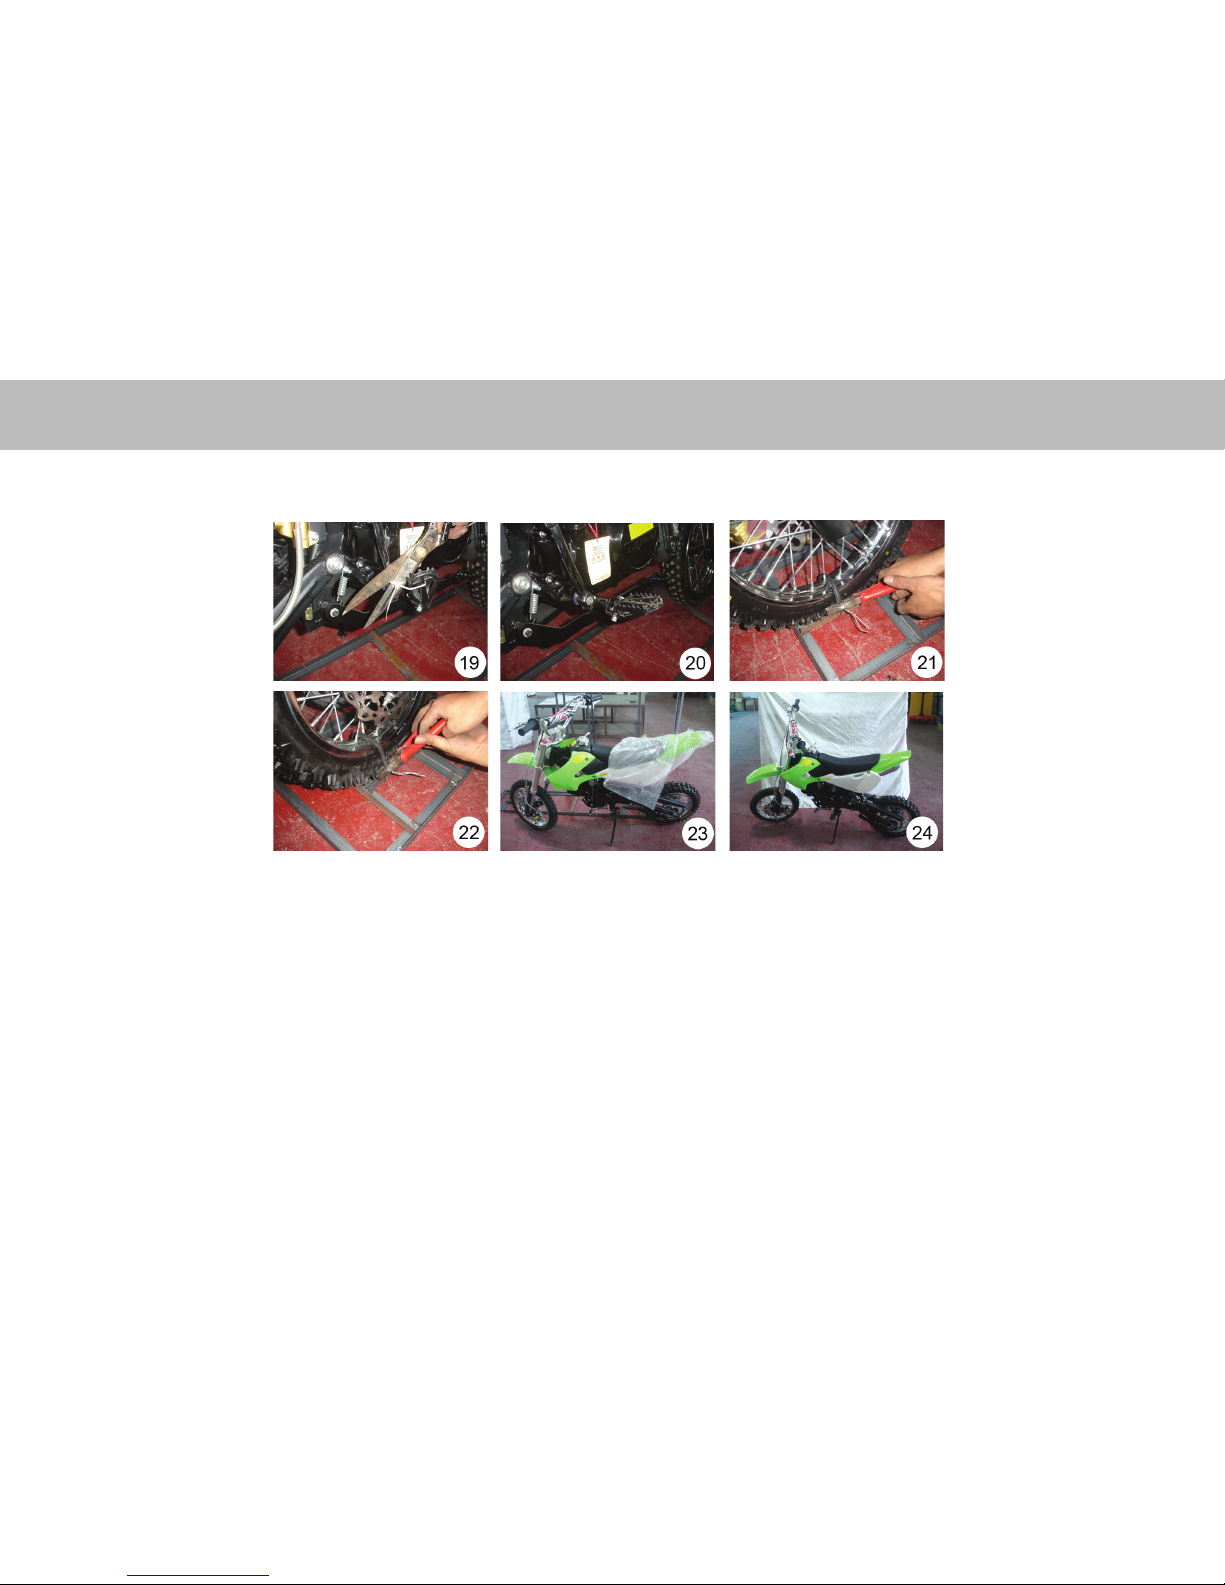
19. Remove the strapping from the right foot peg
20. Check the peg for clear movement
21. Remove the securing wire for the front wheel
22. Remove the securing wire for the rear wheel
23. Remove the clear protective membrane from all the component parts of the bike
24. The bike is ready for inspection. At this point it is highly advised that a skilled and
qualified mechanic check over all mechanical parts all nuts and bolts and the
engine itself. Things to pay particular attention to may include, but are not limited
to, header bolts engine mount bolts, suspension, carburettor, axles and braking
components.
UNPACKING AND ASSEMBLY INSTRUCTIONS
Improper ATV use can result in severe injury or death always use an Australian approved helmet and protective gear.
NEVER OPERATE
Without proper training or instructions.
At speeds too fast for your skills or conditions.
On public roads – a collision may occur with another vehicle.
Operating with a passenger may aect balance and steering and poses an increased risk of losing control.
Use proper riding techniques & avoid turning vehicle on hills and rough terrain.
Avoid paved surfaces as pavements may seriously aect handling control.
Locate and read your owner’s manual. Follow all instructions and warnings.
ALWAYS USE AN AUSTRALIA
APPROVED HELMET
& PROTECTIVE GEAR.
NEVER CARRY
PASSENGERS OR
TRANSPORT LOADS
NEVER USE ON
PUBLIC ROADS
OR PROPERTY
NEVER USE WITH
DRUGS OR ALCOHOL
This label should be seen as a permanent part of your ATV, if it becomes damaged or removed please contact
a member of our team through our website.
www.gmxmotorbikes.com.au
This is the most ecient way to get the most up to date information regarding our products.

GMX Motorbikes strongly recommend that anyone considering
operating any of our products follow these instructions to avoid
product damage, serious injury and/or death:
1. Read this manual carefully and follow the operating procedures
described.
2. Never operate this product without proper training or instruction. Beginners should receive training from a certified instructor.
3. Always follow the age recommendation of the specific GMX
model.
4. Children under the age of 16 should be supervised by an adult
at all times. (Safety is the sole responsibility of parental guardians)
5. Never operate an ATV without wearing an approved motorcycle
helmet that fits correctly. For more information on correctly fitting
a helmet please contact your local transport authority. These can
be found at the following government link.
http://australia.gov.au/topics/transport
6.GMX strongly recommend the use of eye protection (goggles
and/or face shield), gloves, boots, long-sleeved shirt or jacket,
and long pants.
7. Never consume alcohol or drugs before or while operating any
ATV.
8. Never operate at speeds too fast for your skills or the conditions. Always go at a speed that is appropriate for the terrain,
visibility and your experience.
9. Never attempt any kind of stunts/jumps.
10. Always inspect your product before each use to make sure it
is in safe operating condition.
11. Always keep both hands on the handlebars and both feet on
the footboards of the product during operation.
12. Always be alert to changing conditions of terrain, weather
and visibility when operating the product.
13. Never operate on excessively rough, slippery or loose
terrain.
14. Always follow proper procedures for turning as described in
this manual.
15. Never operate the product on hills.
16. Always follow proper procedures for climbing slopes as
described in this manual. Check the terrain carefully before you
start up any slope. Never go over the top of a slope at a high
speed.
17. Always follow proper procedures for going down slopes and
for braking on slopes as described in this manual. Check the
terrain carefully before you start down any slope. Never go
down a slope at high speed. Go straight down the slope where
possible.
18. Never attempt to turn the product around on any slope until
you have mastered the turning technique described in this
manual on level ground. Avoid crossing the side of a steep
slope if possible.
19. Never attempt to operate over large obstacles, such as
large rocks or fallen trees. Always follow proper procedures
when operating over obstacles as described in this manual.
20. Never operate this product in fast flowing water deeper
than that recommended in this manual.
21. Wet brakes may have reduced operating ability. Test your
brakes after contact with water. If necessary, apply them
several times to let friction dry out the linings.
 Loading...