

Page 1

AUTHOR(s):
magicGNSS Team
GMV
APPROVAL:
NAME
COMPANY
SIGNATURE
Technical Manager:
María D. Laínez Samper
GMV
PA Manager:
Santiago Ledesma
Subirán
GMV
Project Manager:
Julián Barrios Lerma
GMV
Code:
GMV-magicGNSS-MAN-0002
Issue:
1
Revision:
2
Date:
05 July 2018
GMV Code:
GMV 20391/18 V3/18
GMV
Isaac Newton 11, PTM Tres Cantos, 28760 Madrid
Tel. +34 918072100, Fax. +34 918072199, www.gmv.com
Property of GMV
© GMV, 2018; all rights reserved.
MAGICGNSS USER TERMINAL
MANUAL
MAGICGNSS
Page 2
UNCLASSIFIED
Code:
Date:
Issue:
Revision:
Page:
GMV-magicGNSS-MAN-0002
05 July 2018
1
2
2 of 44
magicGNSSUT
GMV 2018; all rights reserved
UNCLASSIFIED
magicGNSS User Terminal Manual
DOCUMENT STATUS SHEET
Issue
Revision
Date
Pages
Changes
1
0
2 February 2018
44
First version of the document.
1
1
20 February 2018
44
Second version of the document, including:
Comments coming from the certification process
Comments coming the training process
Comments from internal reviews
Other minor editorial changes
1 2 05 July 2018
44
Third version of the document, aligned with FW+SW version 1.10.0,
generated for compliance with EMC Directive 2014/30/EU and
RoHS2 Directive 2011/65/EU, and forcing Wi-Fi module always on,
and Bluetooth module always off.
Page 3

UNCLASSIFIED
Code:
Date:
Issue:
Revision:
Page:
GMV-magicGNSS-MAN-0002
05 July 2018
1
2
3 of 44
magicGNSSUT
GMV 2018; all rights reserved
UNCLASSIFIED
magicGNSS User Terminal Manual
TABLE OF CONTENTS
1. INTRODUCTION ................................................................................................................................ 4
1.1. PURPOSE AND SCOPE .............................................................................................................. 4
1.2. DOCUMENT OUTLINE ............................................................................................................... 4
2. MAGICGNSS USER TERMINAL DEVICE USER MANUAL ......................................................................... 5
2.1. BEFORE YOU START ................................................................................................................. 5
2.2. GETTING STARTED .................................................................................................................. 6
2.3. HOME SCREEN ...................................................................................................................... 11
2.4. SETTINGS ............................................................................................................................. 13
2.5. TIPS ..................................................................................................................................... 17
2.6. APPENDICES ......................................................................................................................... 18
3. MAGICPPP CLIENT APPLICATION USER MANUAL................................................................................ 20
3.1. THE MAGICPPP OVERVIEW ..................................................................................................... 20
3.2. FIRST STEPS WITH MAGICPPP ................................................................................................ 20
3.3. FOUR MAIN STEPS FOR THE FIRST EXECUTION OF THE MAGICPPP APPLICATION ...................... 27
3.3.1. STEP 1 - CONFIGURATION THE MAGICPPP APPLICATION ................................................................... 27
3.3.2. STEP 2 - LAUNCHING THE PPP PROCESSING ..................................................................................... 27
3.3.3. STOPPING THE PPP PROCESS ........................................................................................................... 28
3.3.4. COLLECTING THE OUTPUT DATA....................................................................................................... 28
3.3.4.1. Configuring an External Receiver ........................................................................... 29
3.3.4.1.1. TCP/IP ...................................................................................................... 29
3.3.4.2. PPP Outputs ....................................................................................................... 29
3.4. TROUBLESHOOTING .............................................................................................................. 32
4. MAGICSBAS USER MODULE APPLICATION USER MANUAL .................................................................. 34
4.1. THE MAGICSBAS USER MODULE APPLICATION OVERVIEW ....................................................... 34
4.2. THE MAGICSBAS UM GRAPHICAL INTERFACE .......................................................................... 34
4.3. THE MAGICSBAS UM SETTINGS .............................................................................................. 36
4.3.1. SBAS RECEIVER SETTINGS .............................................................................................................. 36
4.3.2. RECEIVER OUTPUTS ........................................................................................................................ 38
4.3.3. NOTIFICATIONS .............................................................................................................................. 38
4.4. THE MAGICSBAS UM OUTPUTS ............................................................................................... 39
4.4.1. OUTPUT FILES ................................................................................................................................. 40
4.4.2. REAL TIME OUTPUTS ........................................................................................................................ 40
4.4.3. OUTPUT FORMATS ........................................................................................................................... 40
4.5. F.A.Q. ................................................................................................................................... 42
Page 4

UNCLASSIFIED
Code:
Date:
Issue:
Revision:
Page:
GMV-magicGNSS-MAN-0002
05 July 2018
1
2
4 of 44
magicGNSSUT
GMV 2018; all rights reserved
UNCLASSIFIED
magicGNSS User Terminal Manual
1. INTRODUCTION
1.1. PURPOSE AND SCOPE
This guide provides and overview of the most relevant features and basic instructions for setting un
and operating the magicGNSS user Terminal for PPP and SBAS solutions and the installed PPP and
SBAS User Terminal Applications, in the context of the Australia and New Zealand Test Bed.
About this Manual:
Please red this manual carefully before using your device.
Some of the images and screenshots shown in this manual may differ slightly from those of
the final product. Likewise, due to firmware updates, it is possible that some of the
information in this manual does not correspond exactly to the operation of your device.
GMV shall not be held liable for any issues relating to performance or incompatibility resulting
from modification of the registry settings by the user.
Icon guide:
Danger: This icon indicates situations that could pose a risk to personal safety or health.
Warning: Situations which pose a risk to the correct functioning of the device but not to
personal safety or health.
Tip: Additional information to help you get the best out of your device.
Trademarks:
The Google™ logo, Android™ and other brands, are registered trademarks of Google Inc.
Wi-Fi® is a registered trademark of the Wi-Fi Alliance.
Bluetooth® is a registered trademark of Bluetooth SIG, Inc.
MicroSDTM and the corresponding logo are registered trademarks of SD-3D, LLC.
Qualcomm is a registered trademark of Qualcomm Incorporated, registered in the USA and other
countries.
All other trademarks are the property of their respective owners. All rights reserved.
1.2. DOCUMENT OUTLINE
This document is structured as follows:
Chapter 1 gives an introduction of this document with its scope and outline.
Chapter 2 contains the magicGNSS User Terminal Device User Manual. This section has been
prepared by the magicGNSS User Terminal Device manufacturer.
Chapter 3 contains the magicPPP User Terminal Application User Manual.
Chapter 4 contains the magicSBAS User Terminal Application User Manual.
Page 5
UNCLASSIFIED
Code:
Date:
Issue:
Revision:
Page:
GMV-magicGNSS-MAN-0002
05 July 2018
1
2
5 of 44
magicGNSSUT
GMV 2018; all rights reserved
UNCLASSIFIED
magicGNSS User Terminal Manual
2. MAGICGNSS USER TERMINAL DEVICE USER MANUAL
This information applies to the magicGNSS User Terminal device, incorporating firmware version
1.8.0.
2.1. BEFORE YOU START
Box Contents
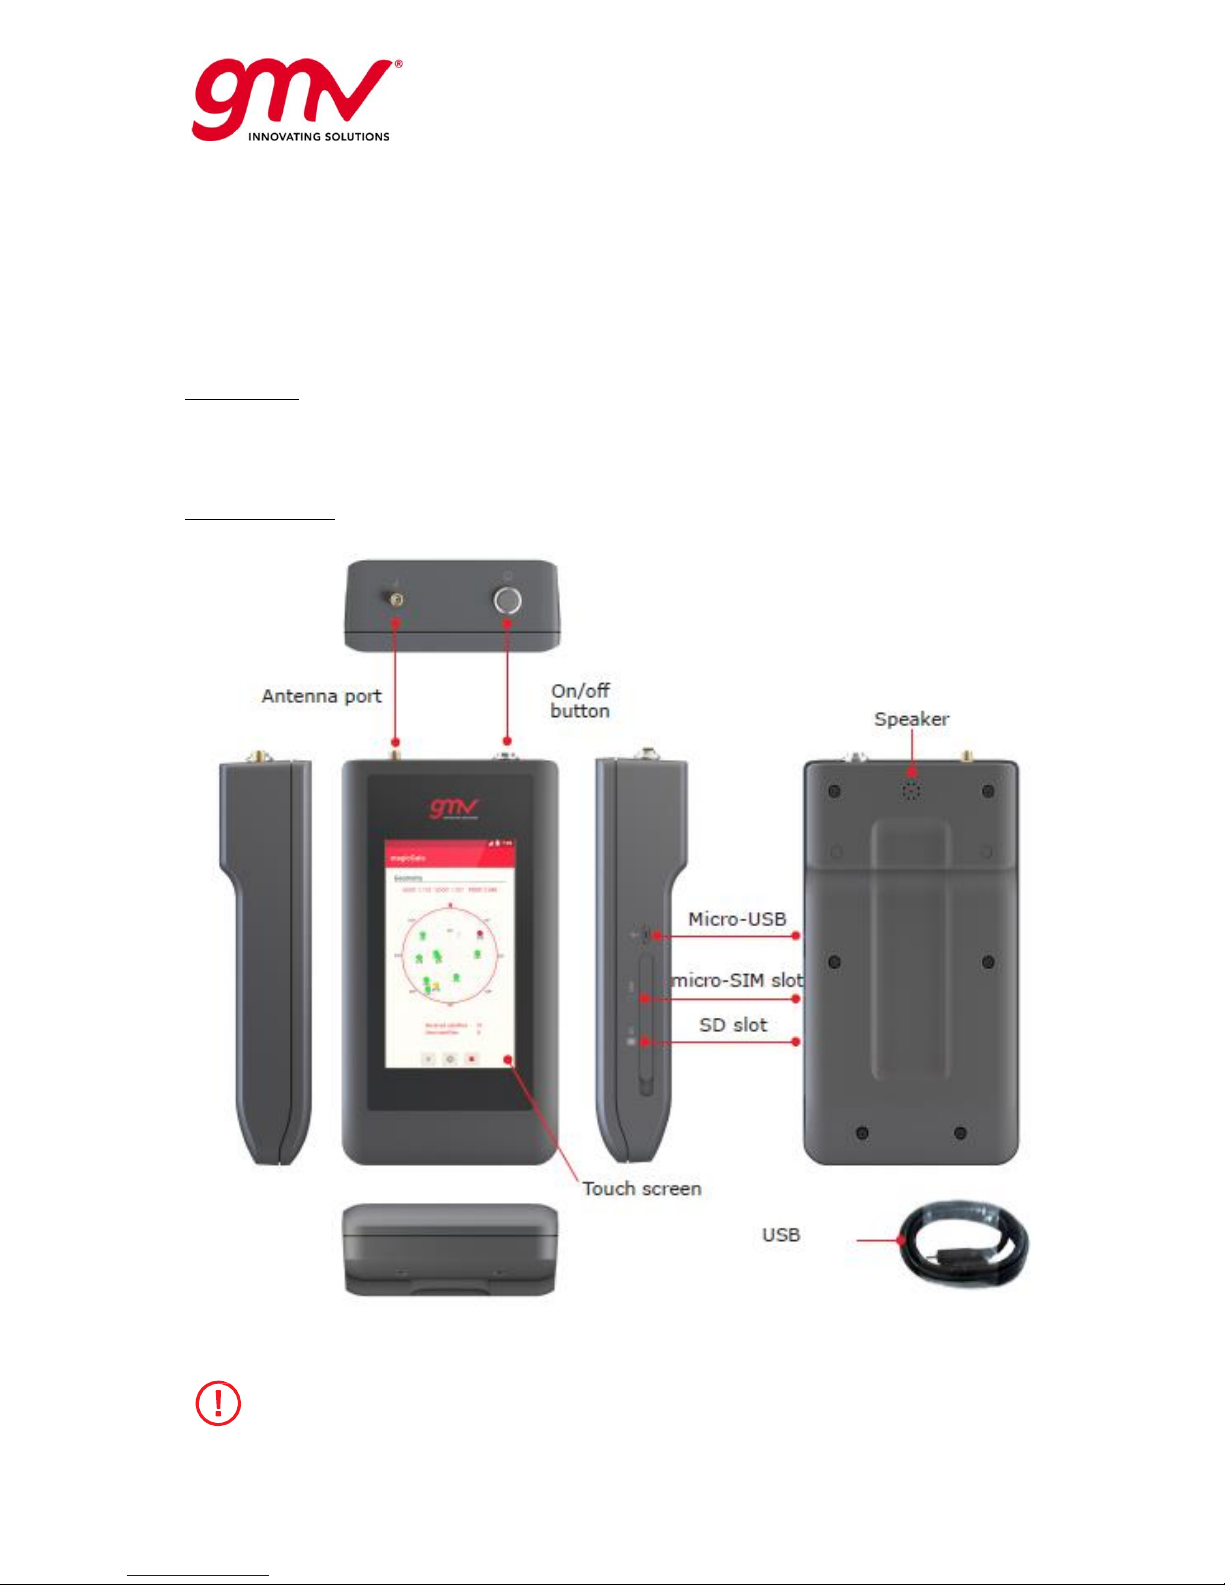
Before using your magicGNSS User Terminal for the first time, please check the contents of the box. If
any of the following items are missing, contact GMV:
magicGNSS User Terminal
USB (type A) to micro-USB (type A)
Product Overview
Components not included in the packaging:
Micro-SIM card
Adaptor
Antenna
Page 6
UNCLASSIFIED
Code:
Date:
Issue:
Revision:
Page:
GMV-magicGNSS-MAN-0002
05 July 2018
1
2
6 of 44
magicGNSSUT
GMV 2018; all rights reserved
UNCLASSIFIED
magicGNSS User Terminal Manual
The SD card element is not currently in use, but could be exploited in future evolutions of the
magicGNSS User Terminal device.
2.2. GETTING STARTED
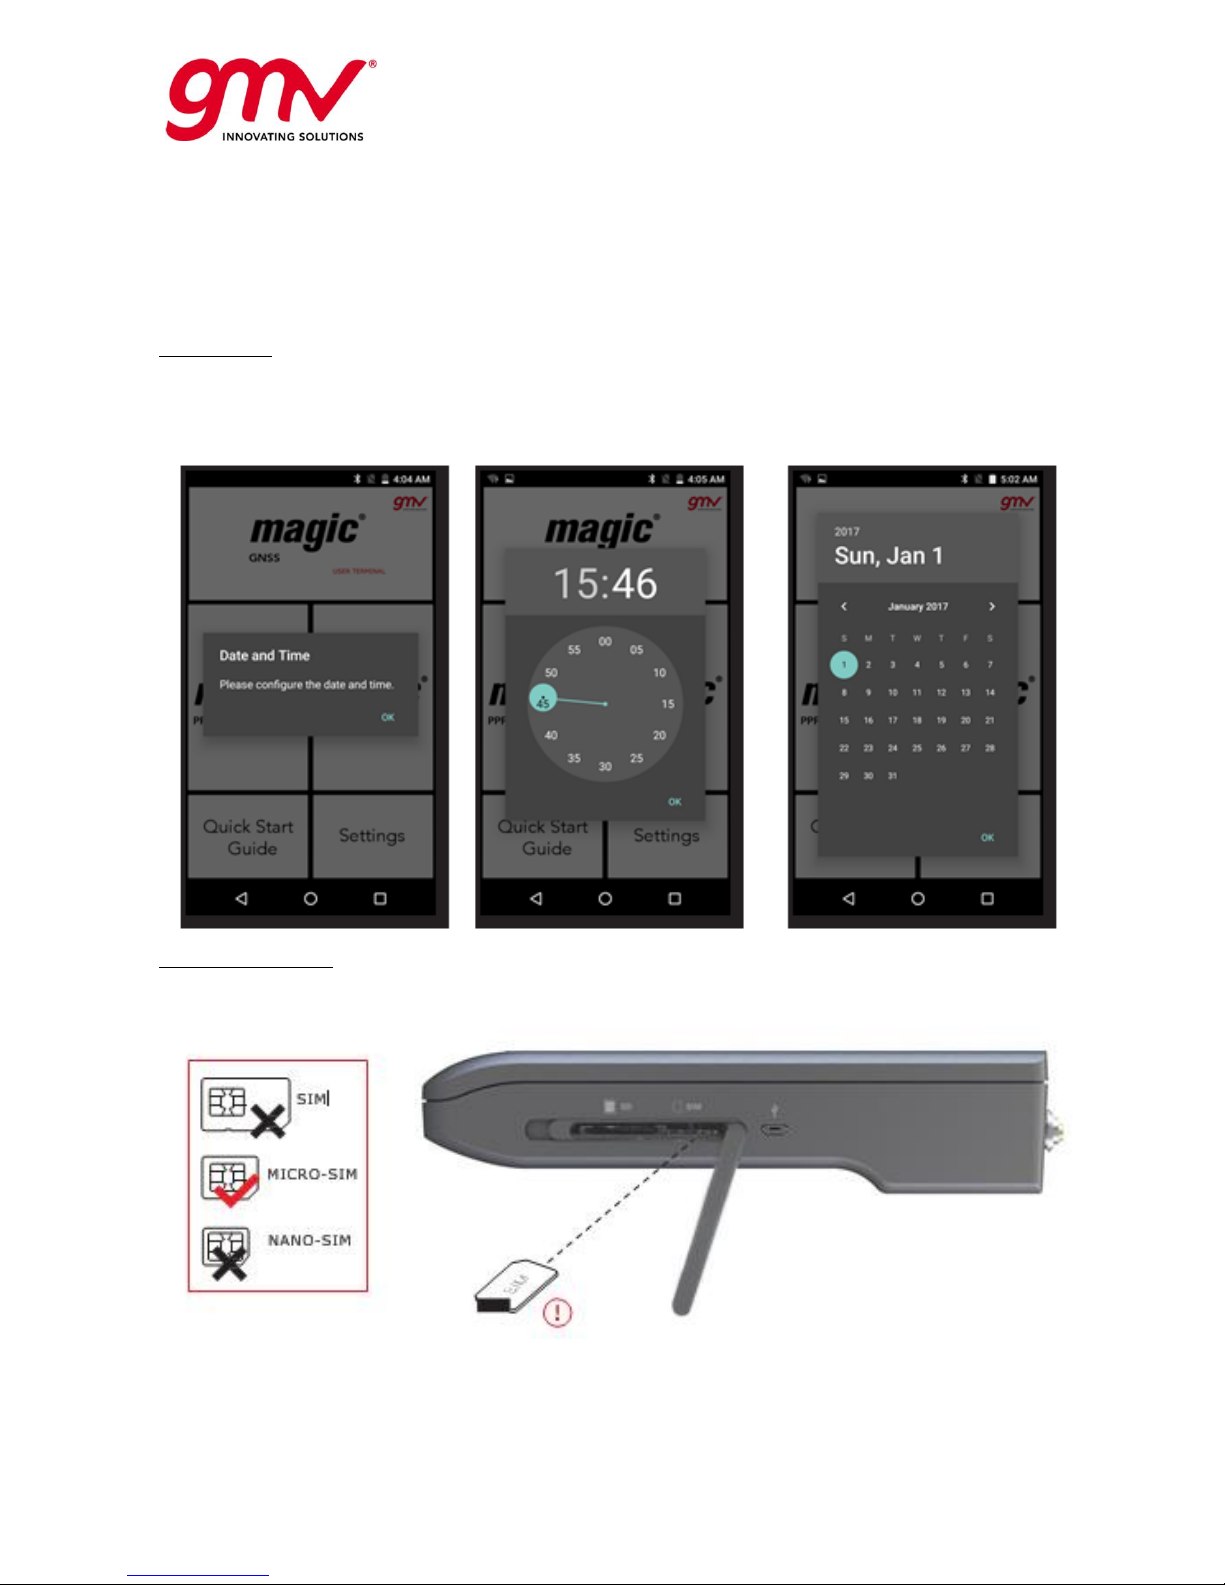
Setup Wizard
The first time you switch on your magicGNSS User Terminal, a setup wizard will help you to configure
the basic settings for your device:
Date
Time
Inserting a SIM card
Your device accepts one micro-SIM card in the slot.
You can access the SIM tray from the exterior of the device.
Page 7
UNCLASSIFIED
Code:
Date:
Issue:
Revision:
Page:
GMV-magicGNSS-MAN-0002
05 July 2018
1
2
7 of 44
magicGNSSUT
GMV 2018; all rights reserved
UNCLASSIFIED
magicGNSS User Terminal Manual
Remove the cover that protects the micro-SIM and SD slot
(located at the right side of your device).
Insert the micro-SIM card into the slot, making sure the metal
pins are at the bottom and facing backwards (i.e. towards the
back of the device).
Push the card in until you notice a slight click, which indicates
that it has been inserted correctly. If the card is not inserted
correctly, the device may not recognise it and its content will not
be available.
Make sure you replace the protective cover so that dust and dirt
cannot enter the device, and to avoid accidentally ejecting the
micro-SIM card.
To remove the micro-SIM card, follow the steps above in reverse.
Pushing the card in until you notice a slight click. This action will
extract the card with your fingers.
Make sure you replace the protective cover so that dust and dirt
cannot enter the device, and to avoid accidentally ejecting the
micro-SIM card.
Your magicGNSS User Terminal only accepts micro-SIM card.
The SIM card can be provided by a local cellular network service provider.
To prevent damaging the equipment insert/remove the micro-SIM card carefully.
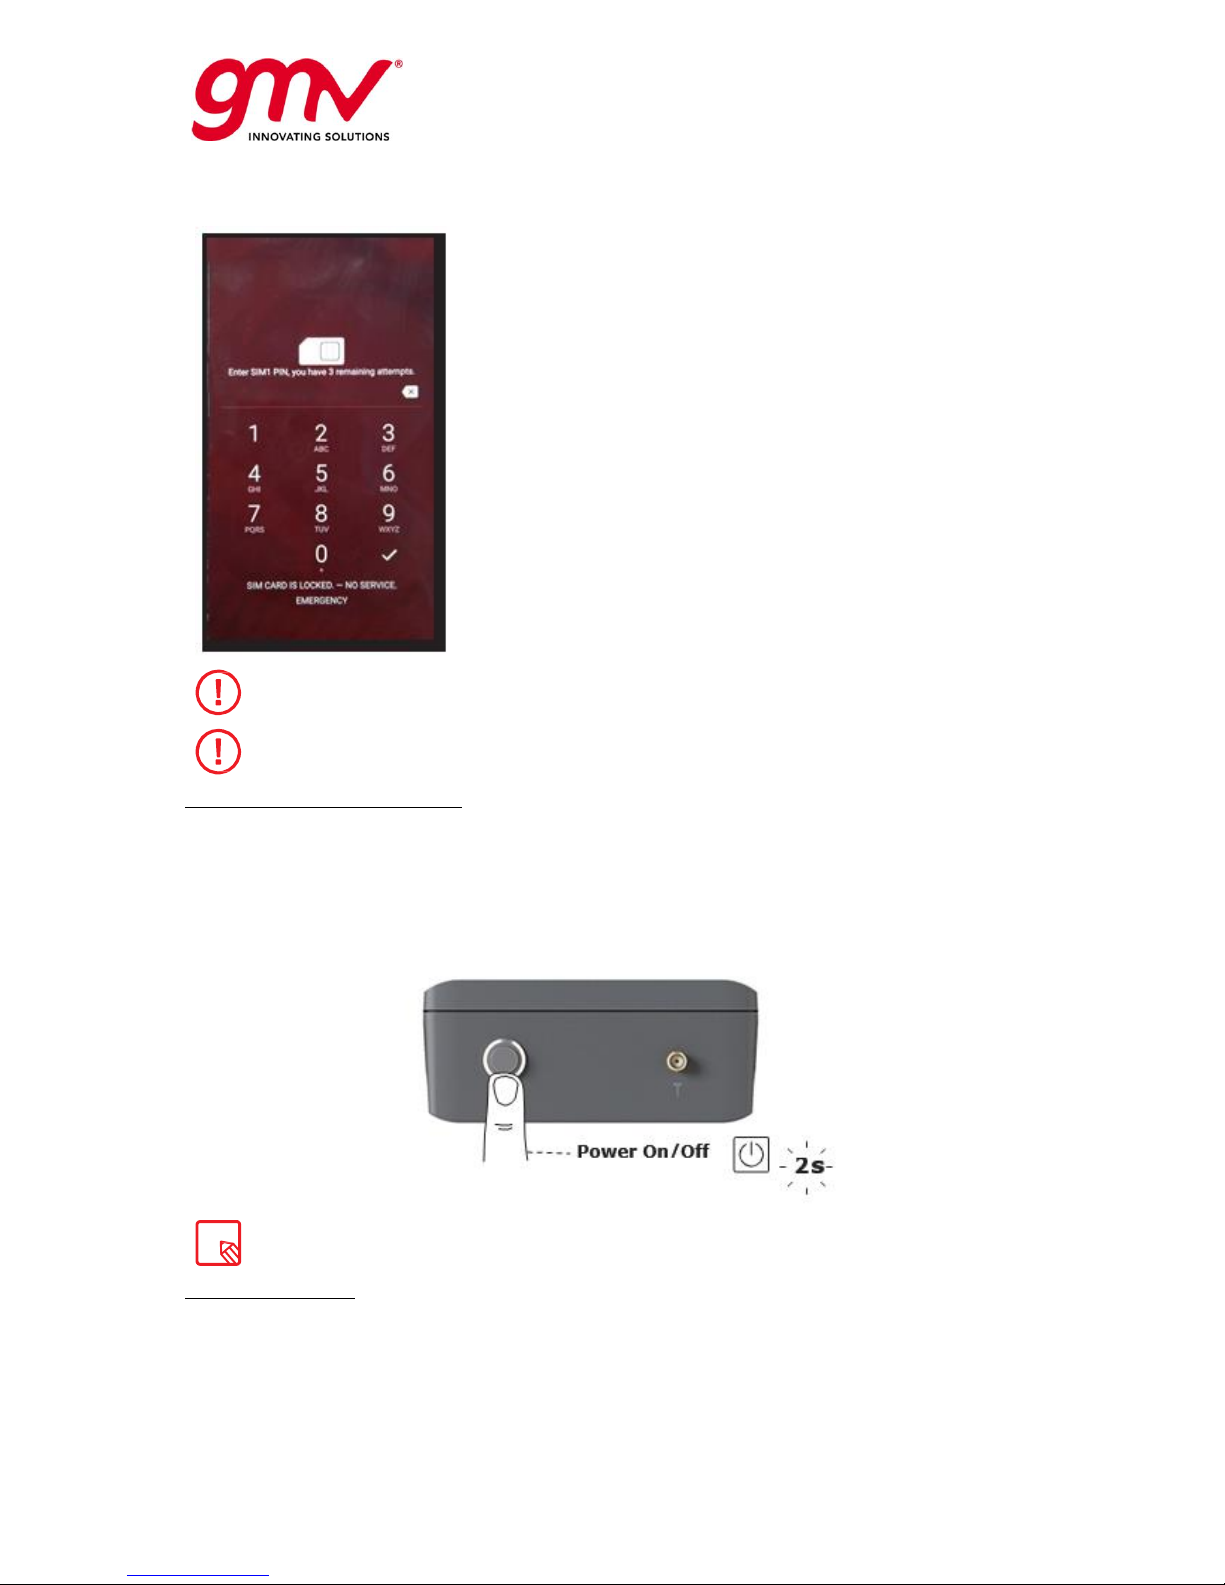
Switching the Device On and Off
To switch on your magicGNSS User Terminal press and hold down the power button located on the top
of the device for a few seconds.
To switch off your device, hold down the power button for a few seconds. Select Power off.
If you have inserted micro-SIM card into your device, you will need to enter the PIN when you switch
it on. Every time your device detects a new SIM, a pop-up window will appear informing you to enter
the new PIN.
If you briefly press the power button, the screen will switch off but not the device.
Charging the device
Your magicGNSS User Terminal contains a rechargeable (non-removable) 3100 mAh battery, which is
charged via the micro-USB port located at the right side of the device. A USB (type A) to micro-USB
(type A) cable is provided with the device for charging the battery. To charge it, follow these simple
steps:
a. Using a mains adapter (not included):
1. Plug the USB cable into the mains adapter.
2. Connect the mains adapter to any standard plug socket (220 V/50 Hz).
3. Connect the other end of the cable to the micro-USB port on your device.
Page 8
UNCLASSIFIED
Code:
Date:
Issue:
Revision:
Page:
GMV-magicGNSS-MAN-0002
05 July 2018
1
2
8 of 44
magicGNSSUT
GMV 2018; all rights reserved
UNCLASSIFIED
magicGNSS User Terminal Manual
b. Using a laptop or desktop computer:
1. Connect the USB cable to a compatible USB port on your computer.
2. Connect the other end of the cable to the micro-USB port on your device.
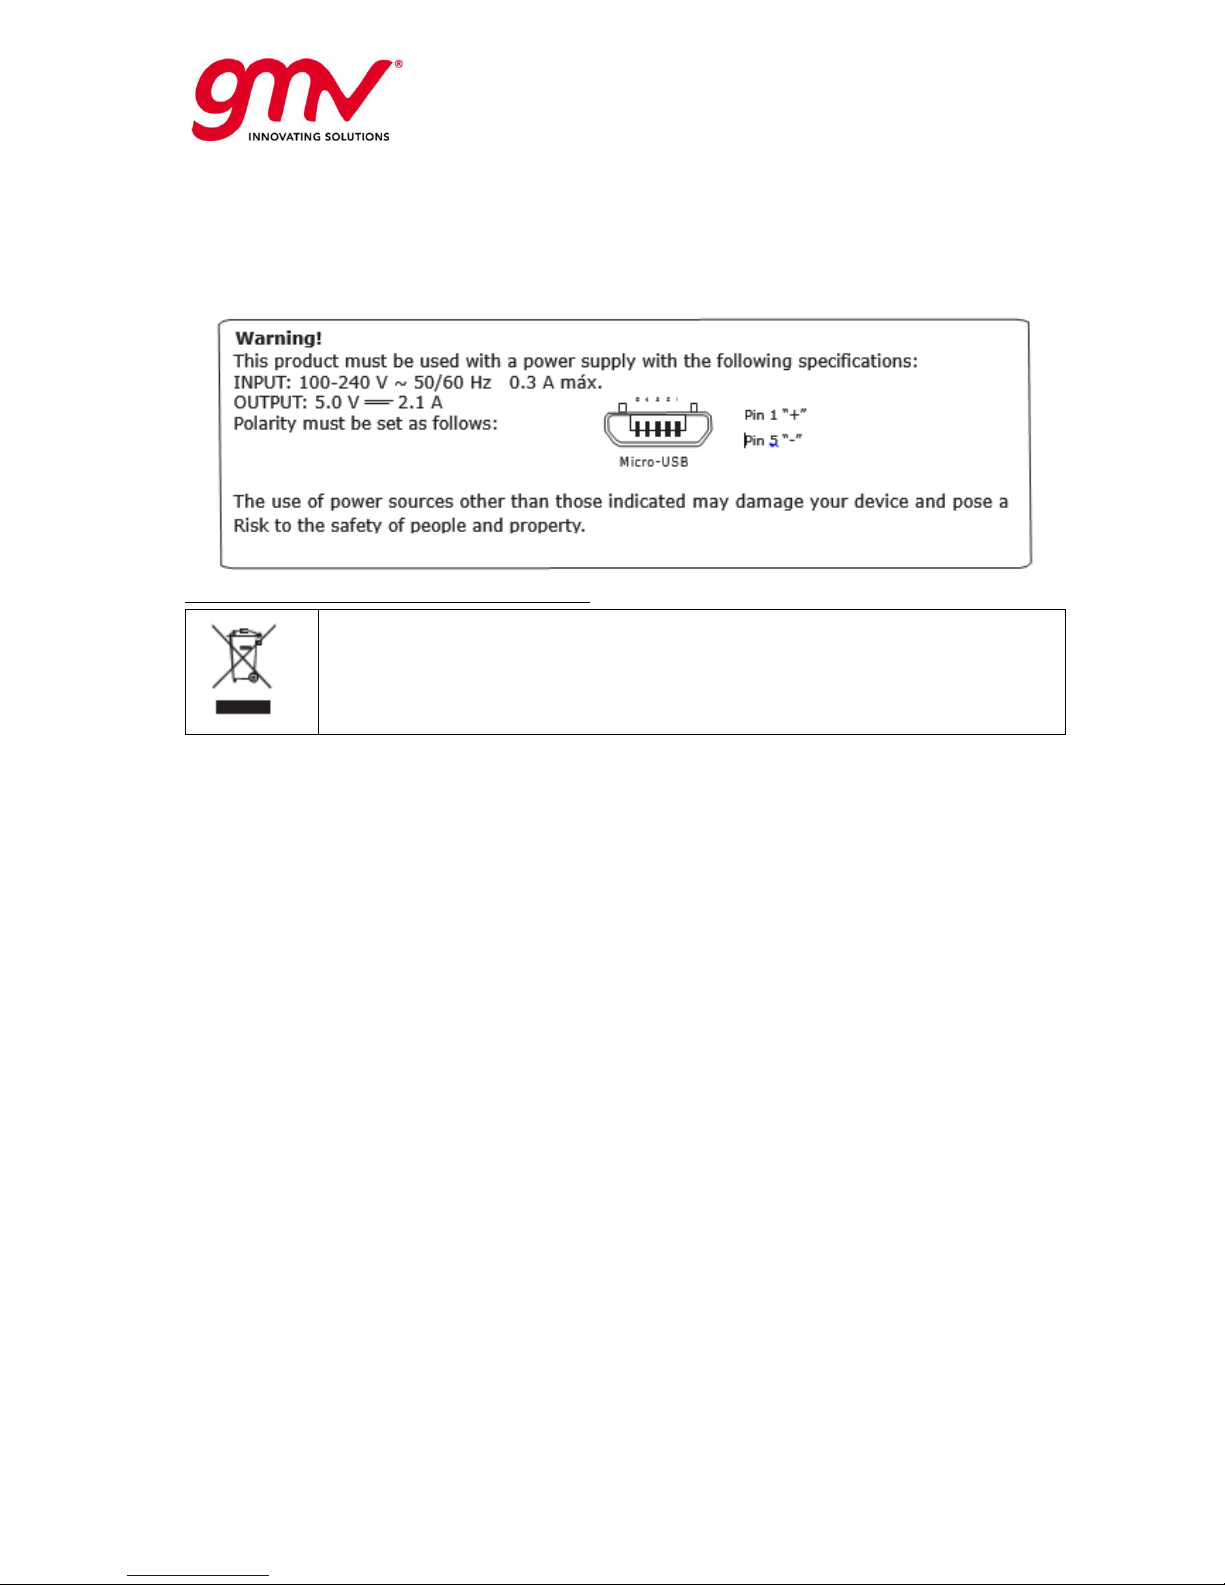
For optimum charging, we recommend using a 5 V 2.1 A charger with your device.
If you foresee that the remaining battery charge could be not enough for completing the
SBAS/PPP process, we recommend to connect the device to an external power source
and to select the “charge” option before starting the SBAS/PPP execution.
Charging times and recommendations
The battery in your magicGNSS User Terminal is non-removable. If it is removed by anyone other
than the magicGNSS User Terminal Technical Support your device could be damaged and the
Warranty invalidated.
Allowing the battery to charge fully (approx. 2h 30 min) is recommended when you charge it for the
first time as this will help calibrate the battery meter. Bear in mind that some batteries perform better
after completing a number of charge/ discharge cycles.
The battery can be charged and discharged hundreds of times, but it will eventually wear out. Use and
standby times are estimates only.
Charging times
USB output port
Performance
Supply time
5V 2A
UT Device power OFF
143 min
5V 2A
UT Device ON– screen OFF
146 min
5V 1A
UT Device ON– screen OFF
320 min
Battery autonomy
Performance
Supply time
UT Device ON, screen ON, NovAtel ON
120 min
Note: Estimated times using NovAtel card operating and consuming but without a GPS
antenna connection.
Page 9
UNCLASSIFIED
Code:
Date:
Issue:
Revision:
Page:
GMV-magicGNSS-MAN-0002
05 July 2018
1
2
9 of 44
magicGNSSUT
GMV 2018; all rights reserved
UNCLASSIFIED
magicGNSS User Terminal Manual
The time required to charge your device may vary slightly depending on whether it is charged via the
mains adapter or via a computer USB port, affected by, for example, device settings, features being
used, battery condition, and temperature.
If you are going to perform a test and to avoid interrupting the work in the middle of the process,
keep in mind the following recommendations. Anticipate the duration of the test, and if you foresee
that you can exceed the autonomy time of the device (2 h max performance) and will not have a plug
nearby, we suggest the use of Powerbanks as an external support.
If the battery is completely discharged, it may take several minutes before the charging
indicator is displayed. When your charger is not in use, unplug it from the electrical plug
and the device. Do not leave a fully charged battery connected to a charger, as
overcharging may shorten the battery’s lifetime. If left unused, a fully charged battery
will lose its charge over time.
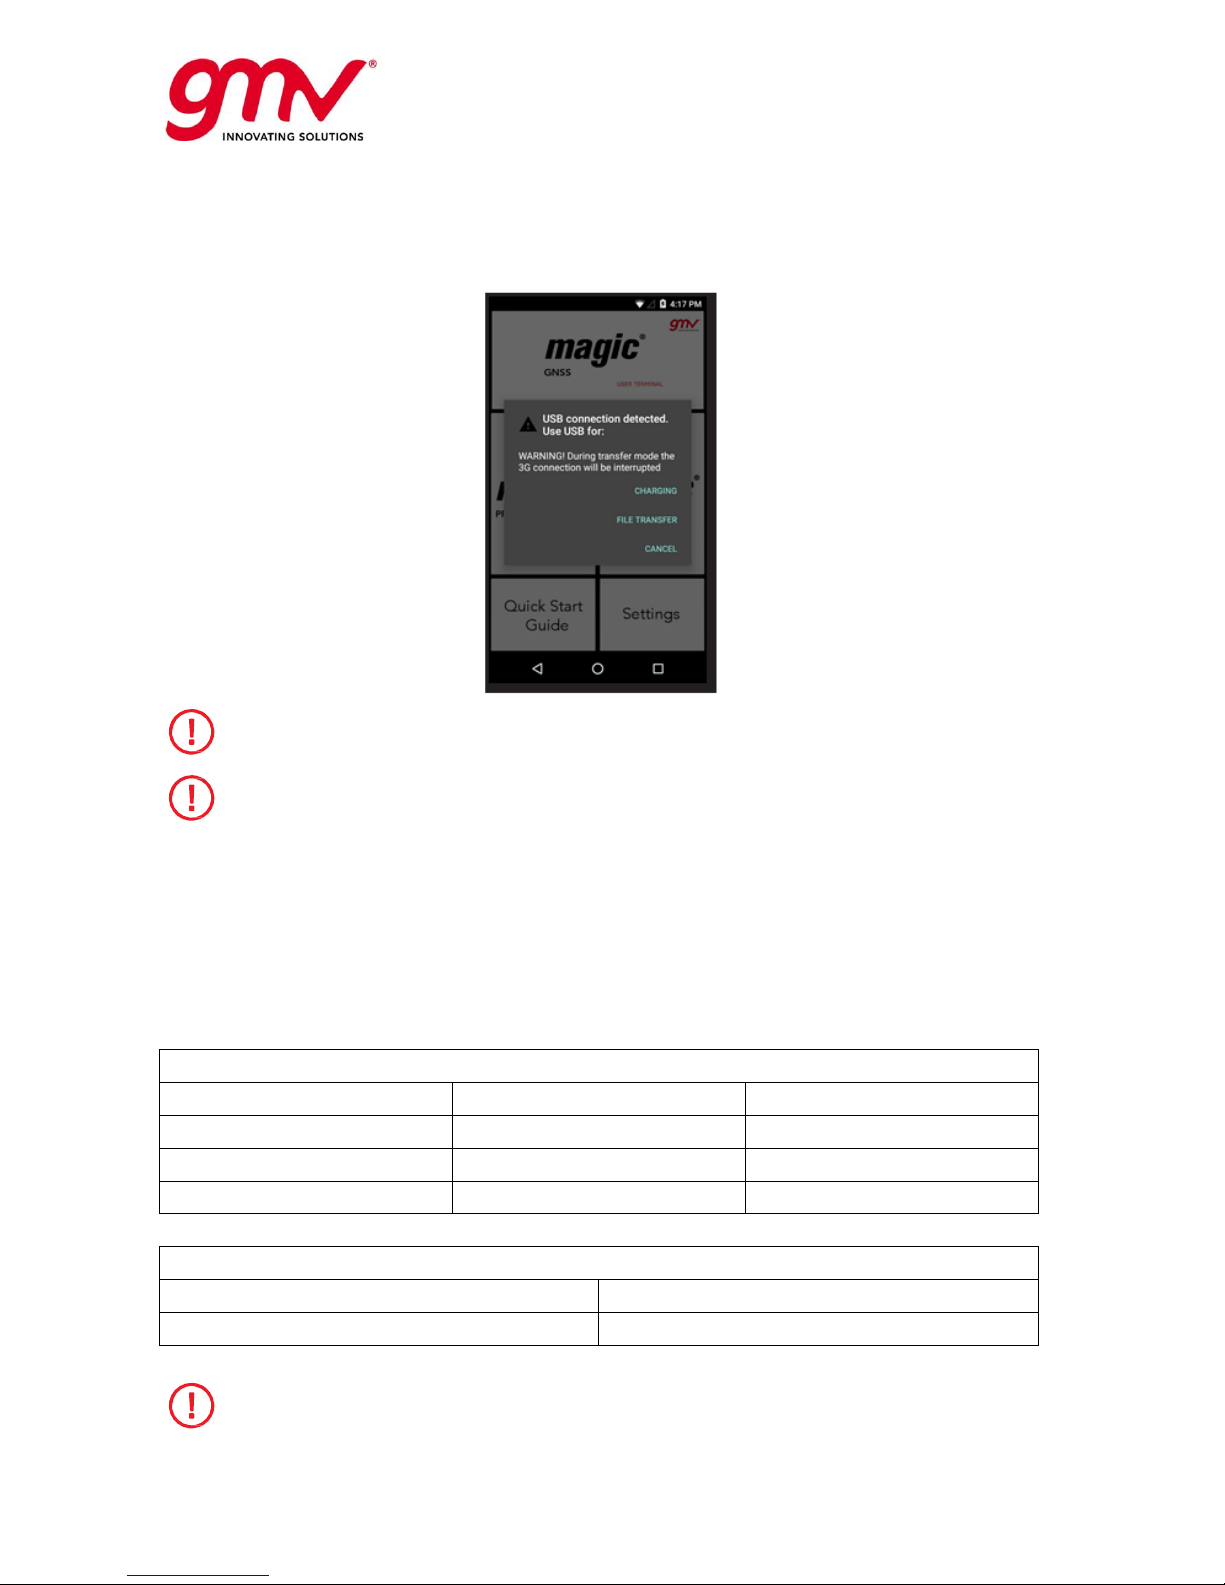
Transferring Files
If you connect your device to a computer using the USB cable, you can also transfer files between the
two devices to/from the internal memory. This will allow you to use, copy or store data, images and
text documents on one or both devices.
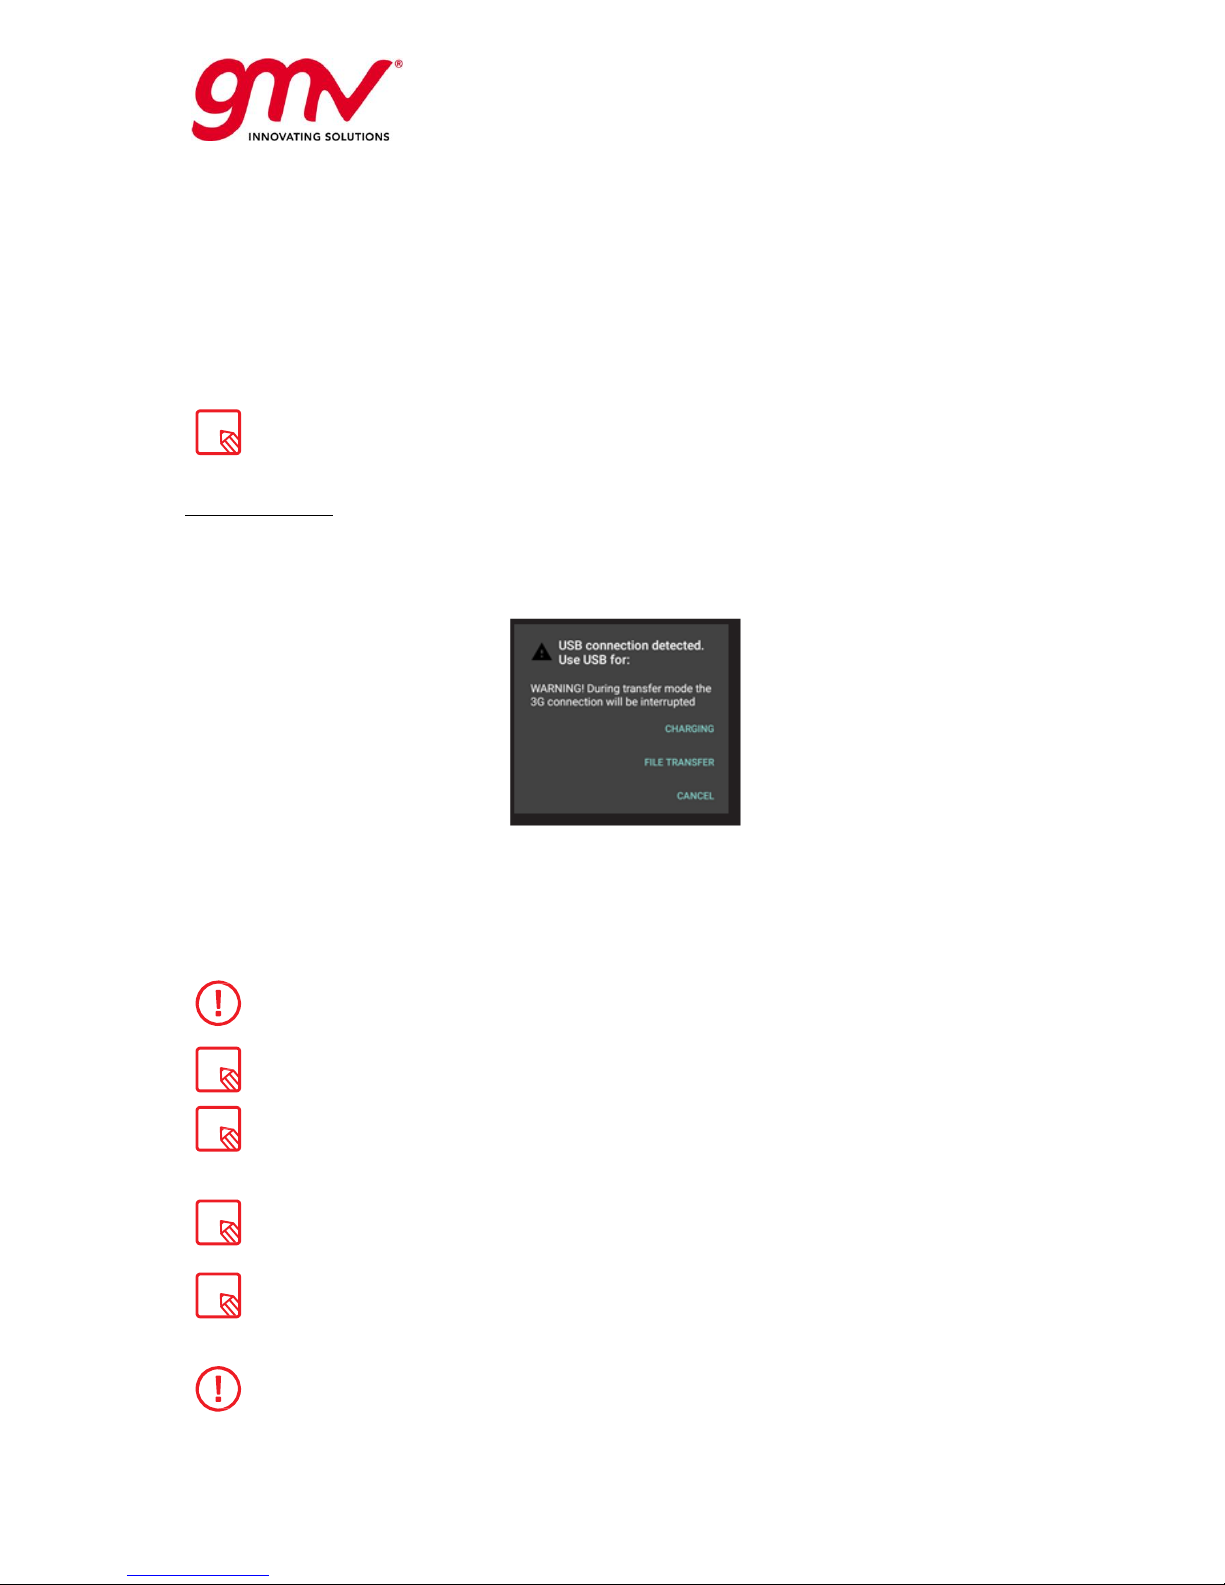
You can select the file transfer mode when you connect your magicGNSS User Terminal to a computer.
There are a number of ways to transfer files. The steps below will show you how to transfer them via
USB:
1. Connect your magicGNSS User Terminal to a computer using the micro-USB to USB cable
provided. Insert the micro-USB connector into the corresponding micro-USB port on the
device and the generic USB connector into the corresponding USB port on the computer.
2. Select and copy the desired files onto your device or computer.
3G connection will be interrupted during transfer mode. To recover the 3G connection, it
is necessary to finish the file transfer process. Once you disconnect USB cable, PIN code
will be required.
After having suspended the 3G connection, caused by file transfer mode, it may take up
to 1 minute since the USB is disconnected until it is reconnected to the 3G network.
The first time you want to transfer files from your device to a computer running
Windows and vice versa, Windows will attempt to install the relevant drivers. Go to
Device manager > magicGNSS, select Update driver / Search Driver software manually.
From the common hardware list choose Portable devices and select USB MTP device.
To transfer files from your device to a computer running Mac OS and vice versa, you will
need to download and install the free Android File Transfer app to your computer:
www.android.com/filetransfer/.
It could be the case that the latest sessions stored on the internal memory seemed to be
non-accessible from the USB port. In that case, please turn-off and then turn-on
(reboot) the magicGNSS User Terminal device, connect the USB and select the “transfer”
mode, and the stored sessions and files will be made accessible.
Do not disconnect the cable while files are being transferred.
Page 10
UNCLASSIFIED
Code:
Date:
Issue:
Revision:
Page:
GMV-magicGNSS-MAN-0002
05 July 2018
1
2
10 of 44
magicGNSSUT
GMV 2018; all rights reserved
UNCLASSIFIED
magicGNSS User Terminal Manual
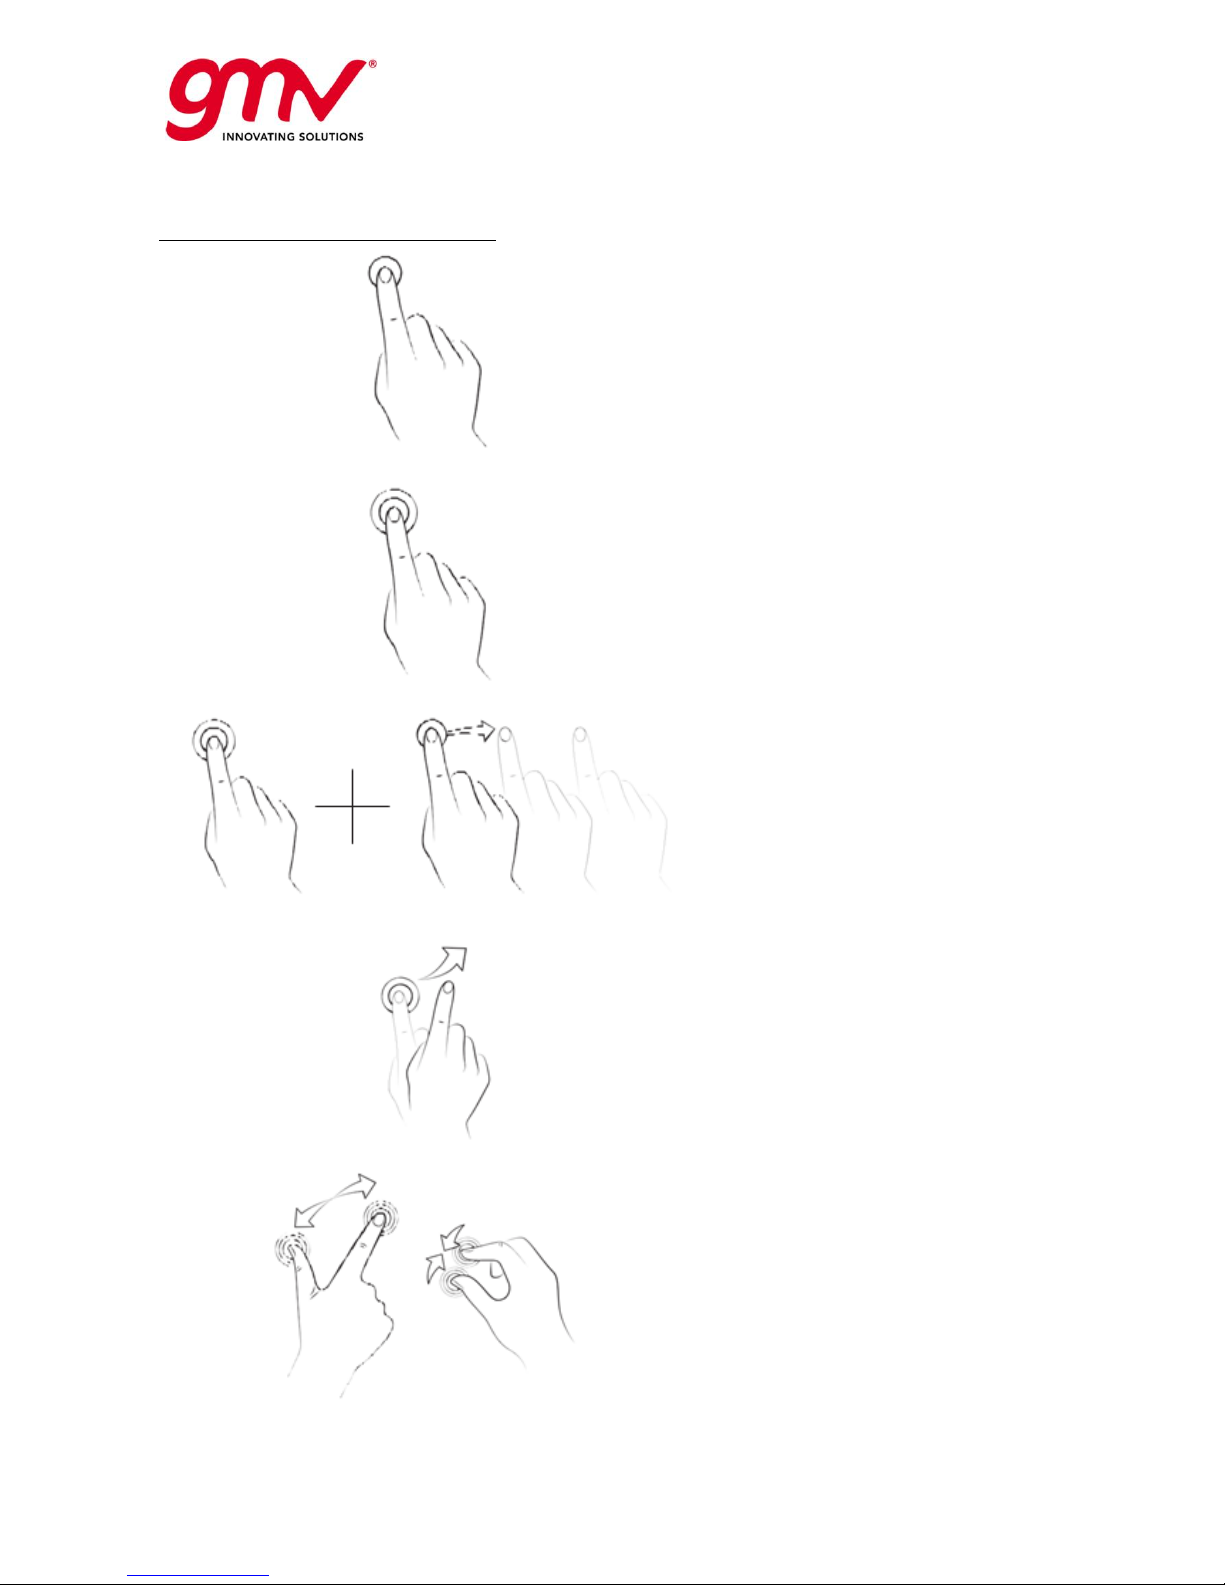
Learning to Use the Multi-Touch Screen
Touch. Touch the screen briefly to
select an icon, open an app,
activate a text-entry box, etc.
Touch and hold. Touch the screen
and hold for approximately 2
seconds to display the menu of
available options.
Drag. To move an icon, press and
hold down, drag it to the desired
position and then release.
Swipe or slide. Press briefly on the
Home screen and slide your finger
left or right across it to access the
extended screens, or slide your
finger up and down the screen to
scroll through a website, list or
menu.
Pinch. Place two fingers on the
screen at the same time and move
them towards one another or
spread them apart to reduce or
enlarge an image.
Page 11
UNCLASSIFIED
Code:
Date:
Issue:
Revision:
Page:
GMV-magicGNSS-MAN-0002
05 July 2018
1
2
11 of 44
magicGNSSUT
GMV 2018; all rights reserved
UNCLASSIFIED
magicGNSS User Terminal Manual
2.3. HOME SCREEN
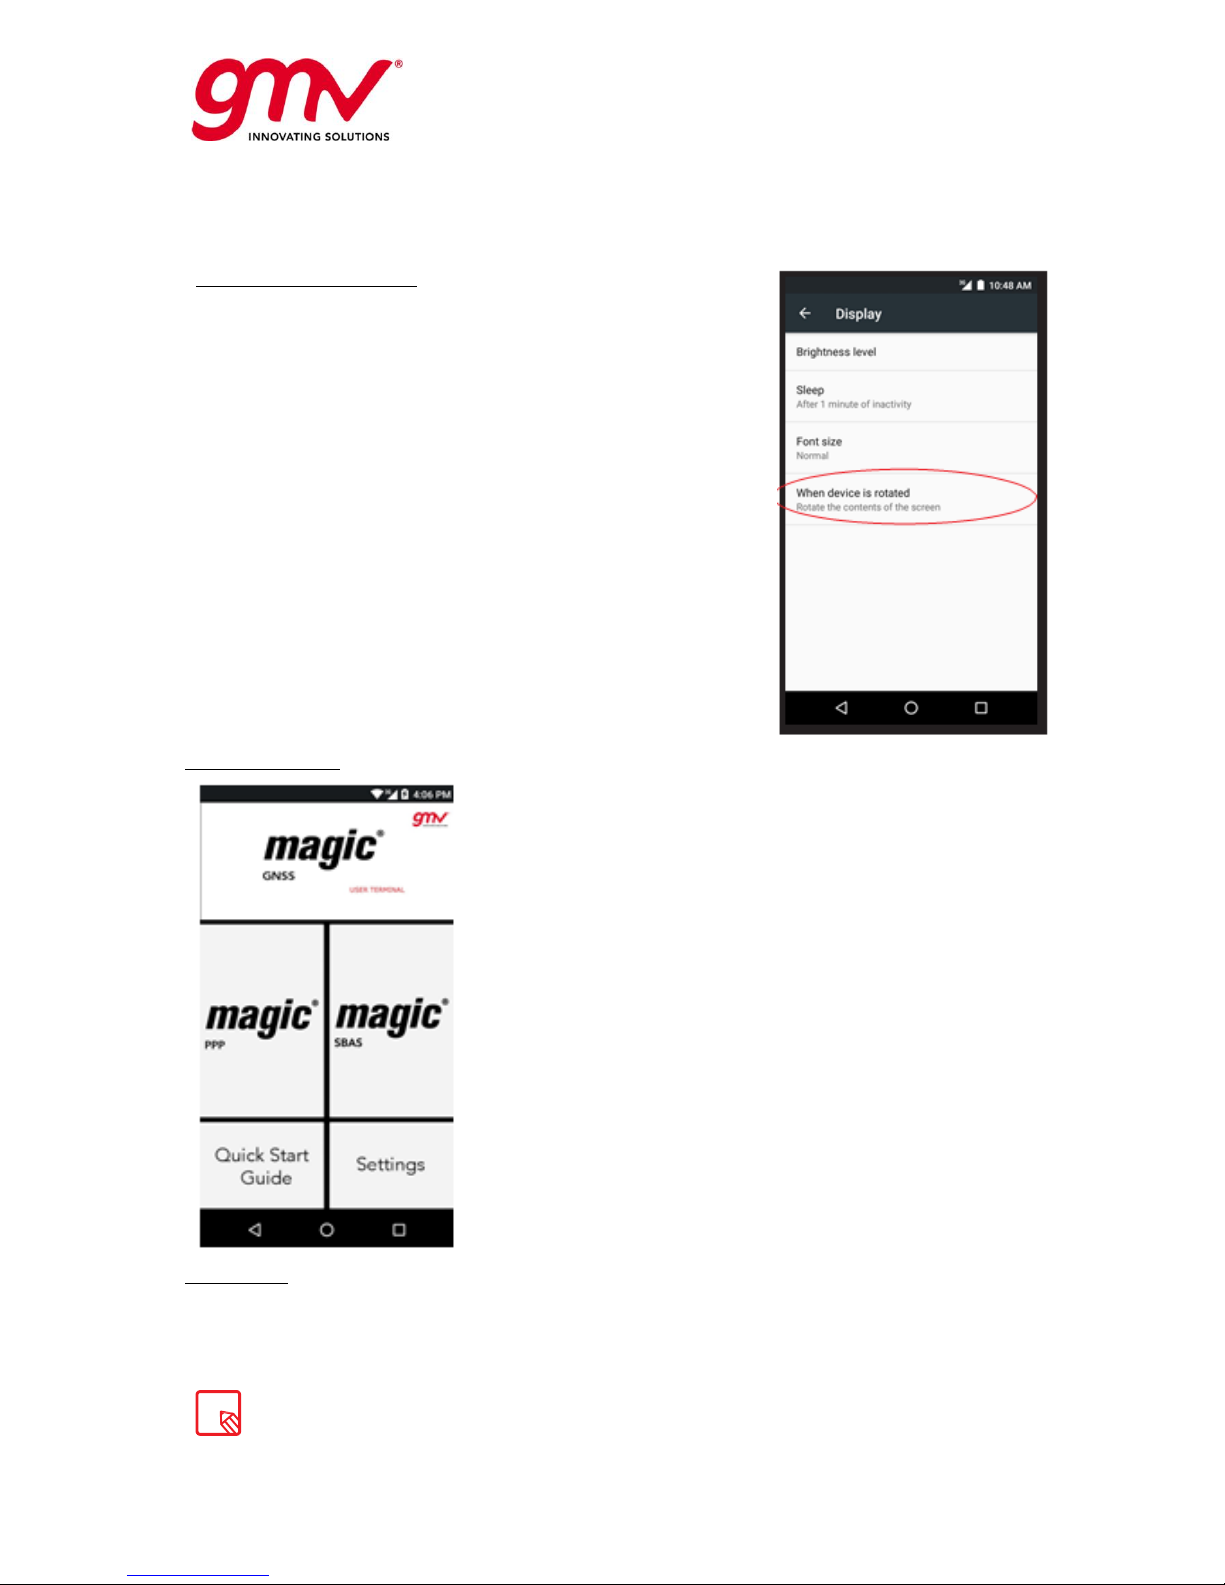
Adjusting Screen Rotation
For some apps, the screen will rotate automatically from portrait
(vertical) to landscape (horizontal) mode and vice versa,
depending on how you are holding your device. To lock the
screen rotation, go to Settings > Display > When device is
rotated and select Stay in current orientation.
Buttons and Icons
The navbar is shown by default on screen to enable you to navigate
through your device more easily.
When using an app, you can return to the previous screen by
pressing the Back icon .
You can go to the Home screen at any time by pressing the
Home button .
You can access the recent applications list by pressing the Menu
button .
Screen Lock
Your device screen will lock itself automatically by default after a prolonged period of inactivity. To
configure the screen timeout interval, go to Settings > Display > Sleep and select the desired interval.
The default setting time is 1 min. To switch the screen off manually, press the power button briefly.
Having the screen switched off will help to improve battery life reducing power consumption.
Having the screen switched off will help to reduce power consumption without affecting
GPS performance, device is able to maintain GPS communications with the screen
locked.
Page 12
UNCLASSIFIED
Code:
Date:
Issue:
Revision:
Page:
GMV-magicGNSS-MAN-0002
05 July 2018
1
2
12 of 44
magicGNSSUT
GMV 2018; all rights reserved
UNCLASSIFIED
magicGNSS User Terminal Manual
Status Bar
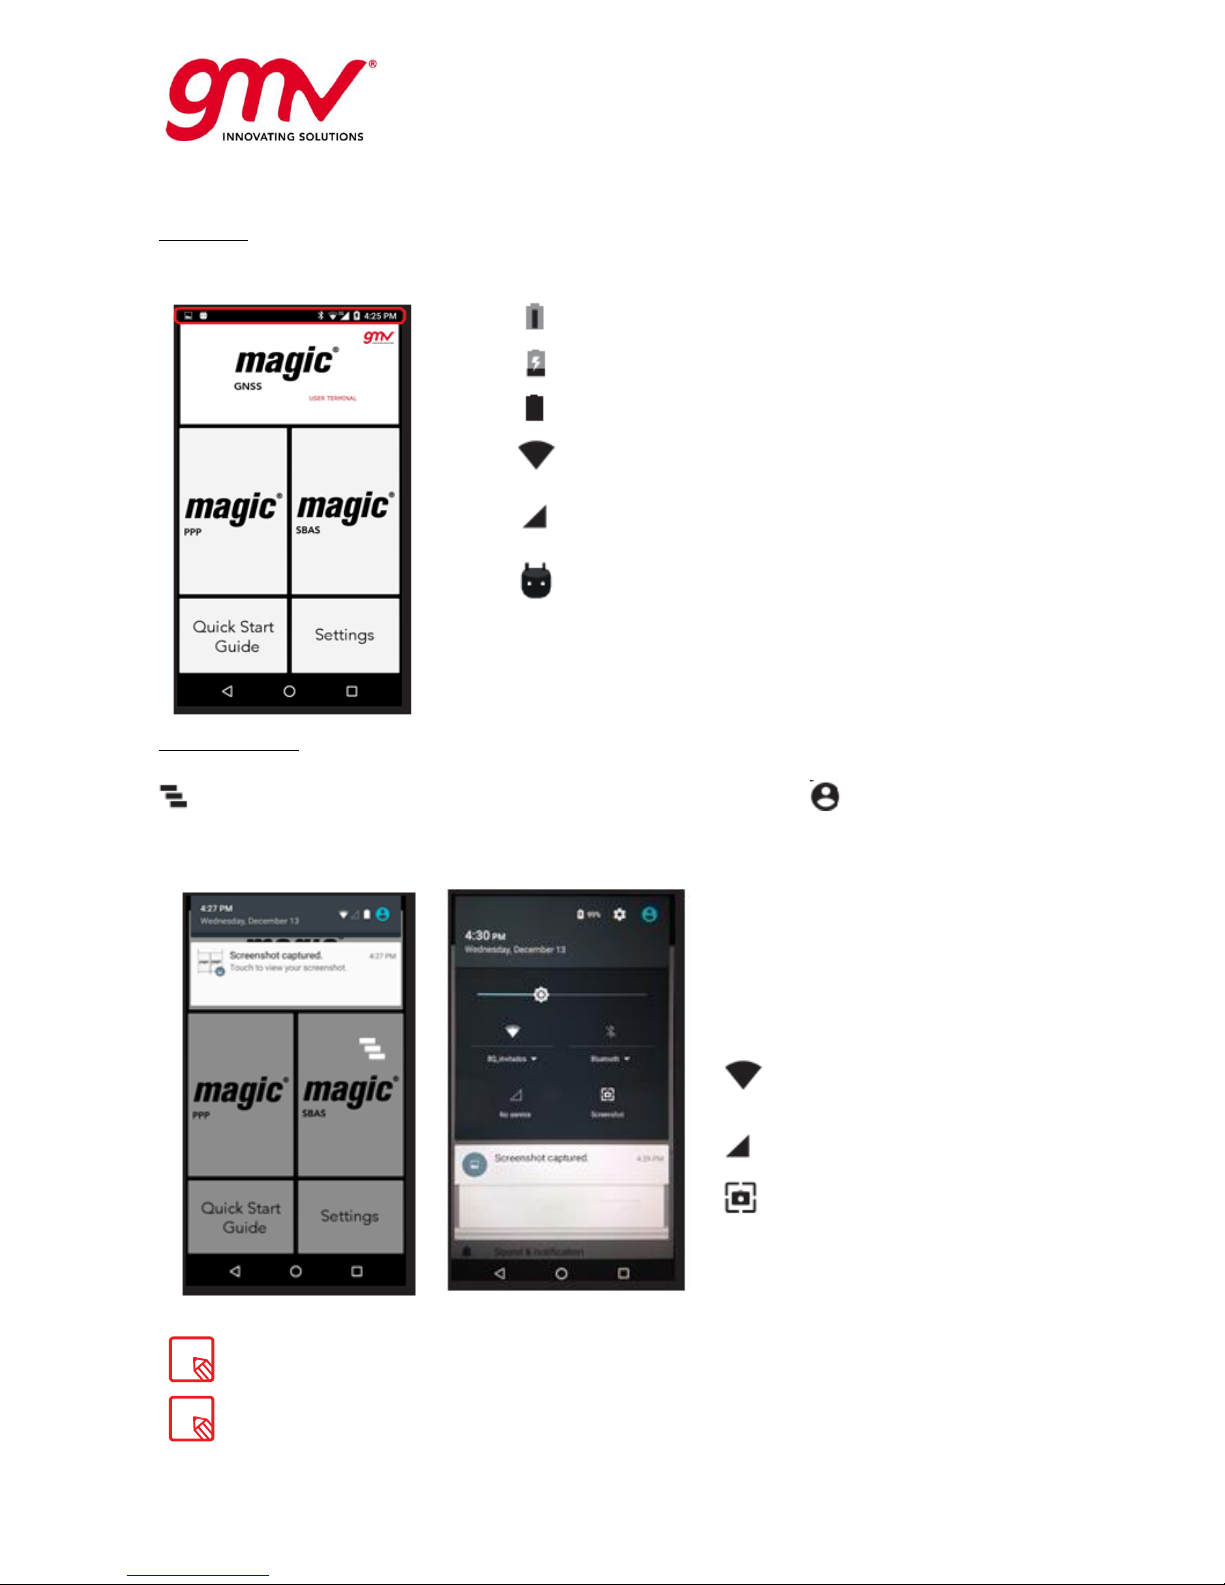
The Status bar contains important information on the device and is always visible at the top of the
screen:
Battery almost empty.
Battery charging.
Battery fully charged.
Wi-Fi enabled and connected to a network.
Data services enabled (this could be H+, H, 3G, E
or G, according to the type of data connection and
transfer speed).
USB connected.
Notifications Bar
To view your notifications, pull the bar down with one finger. Delete all notifications by pressing the
icon, or delete them individually by swiping them to the side. Using the icon, you can access
the other quick settings and the multi-user option. You can also access this screen by swiping the top
bar down with two fingers. The notifications and quick settings have now been integrated into one
screen. To go back to the Home screen, slide the bar upwards.
Swipe with one finger
Swipe with two fingers
When you swipe the bar down with
two fingers, a list of options appears
providing quick and easy access to
many settings.
The following options can be
enabled/
disabled via the pull-down menu:
Wi-Fi: Allows the
selection of the Wi-Fi
network.
SIM: SIM data usage
check.
Screenshot: Take a
picture of the screen via
the pull-down menu.
You can access advanced settings for certain functions such as Wi-Fi by touching
and holding the corresponding icon on the list.
When automatic brightness is deactivated, you can adjust the brightness level of
the screen by sliding your finger to the left or right.
Page 13
UNCLASSIFIED
Code:
Date:
Issue:
Revision:
Page:
GMV-magicGNSS-MAN-0002
05 July 2018
1
2
13 of 44
magicGNSSUT
GMV 2018; all rights reserved
UNCLASSIFIED
magicGNSS User Terminal Manual
Keyboard
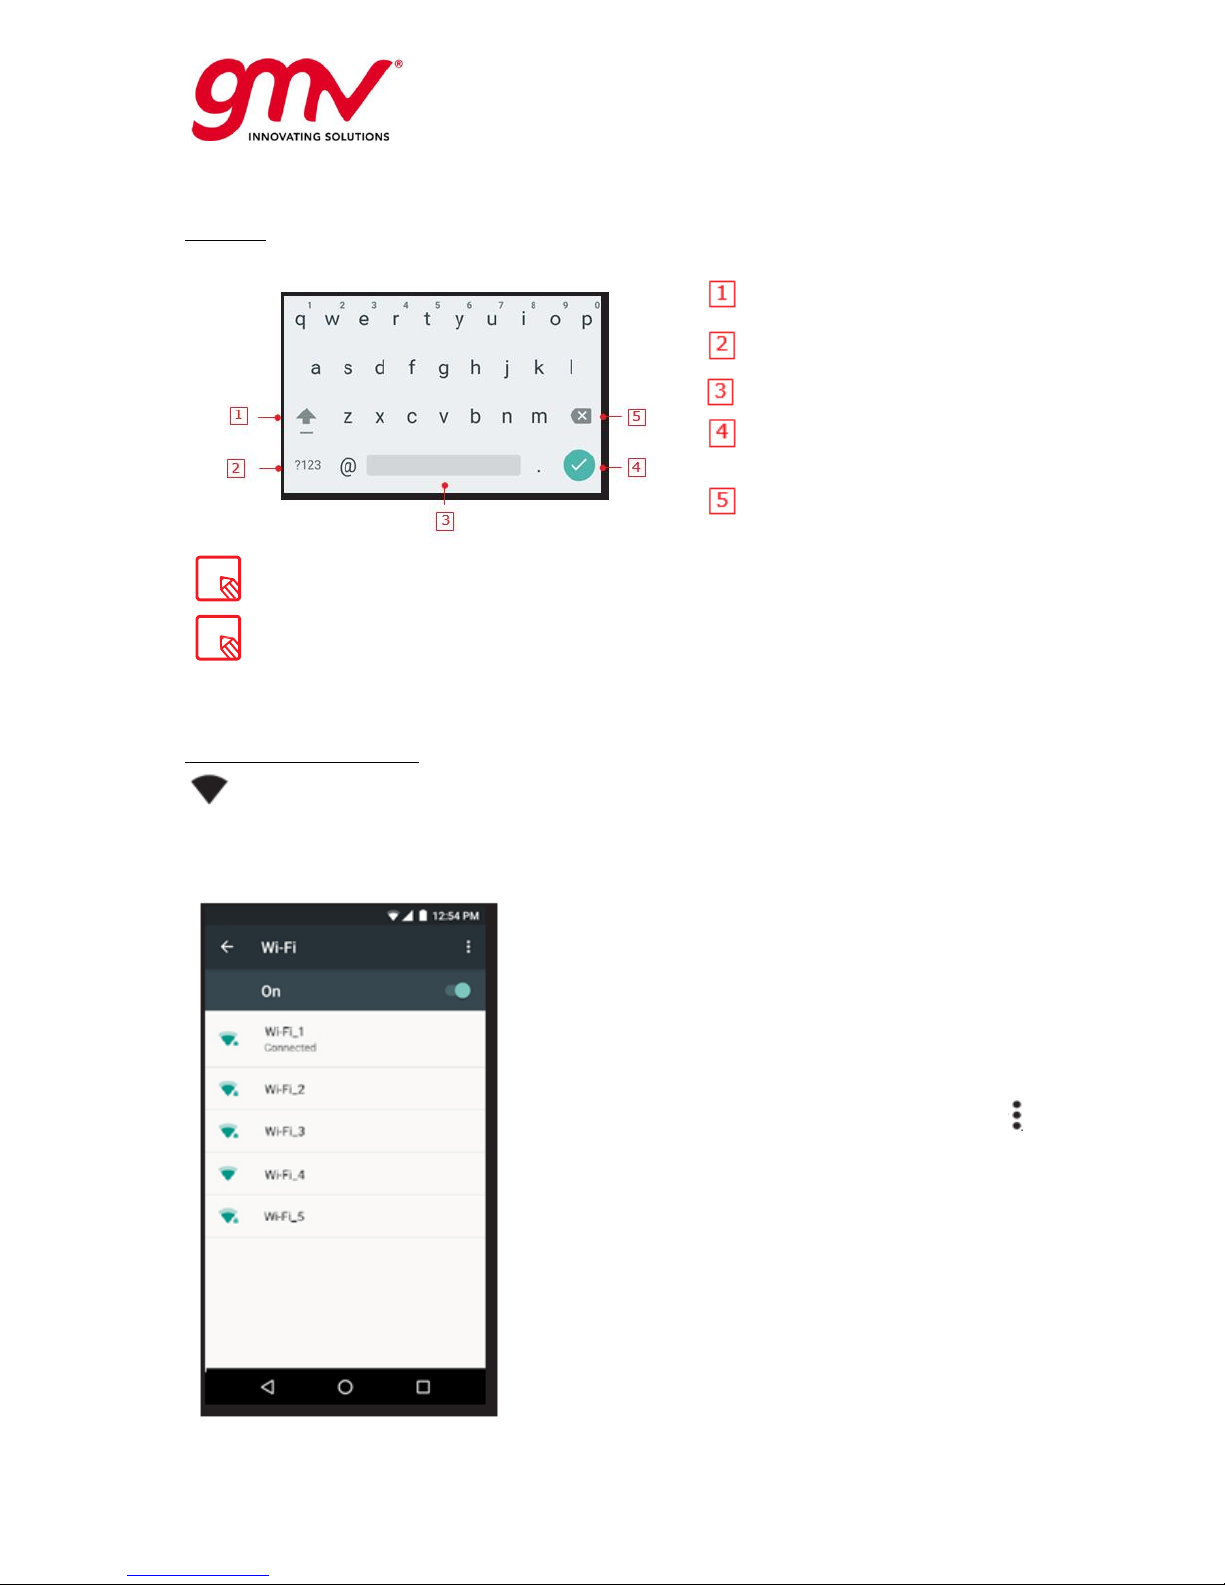
Pressing on any text field will bring up the virtual keyboard.
Enable/disable caps lock.
Change from letters to numbers
and symbols, or vice versa.
Space.
Enter/return.
Delete.
The keyboard options may vary depending on which application you are using.
You can find more information on the keyboard settings and languages for text entry via
Settings > Personal > Language & input.
2.4. SETTINGS
Wi-Fi and Network Settings
Wi-Fi
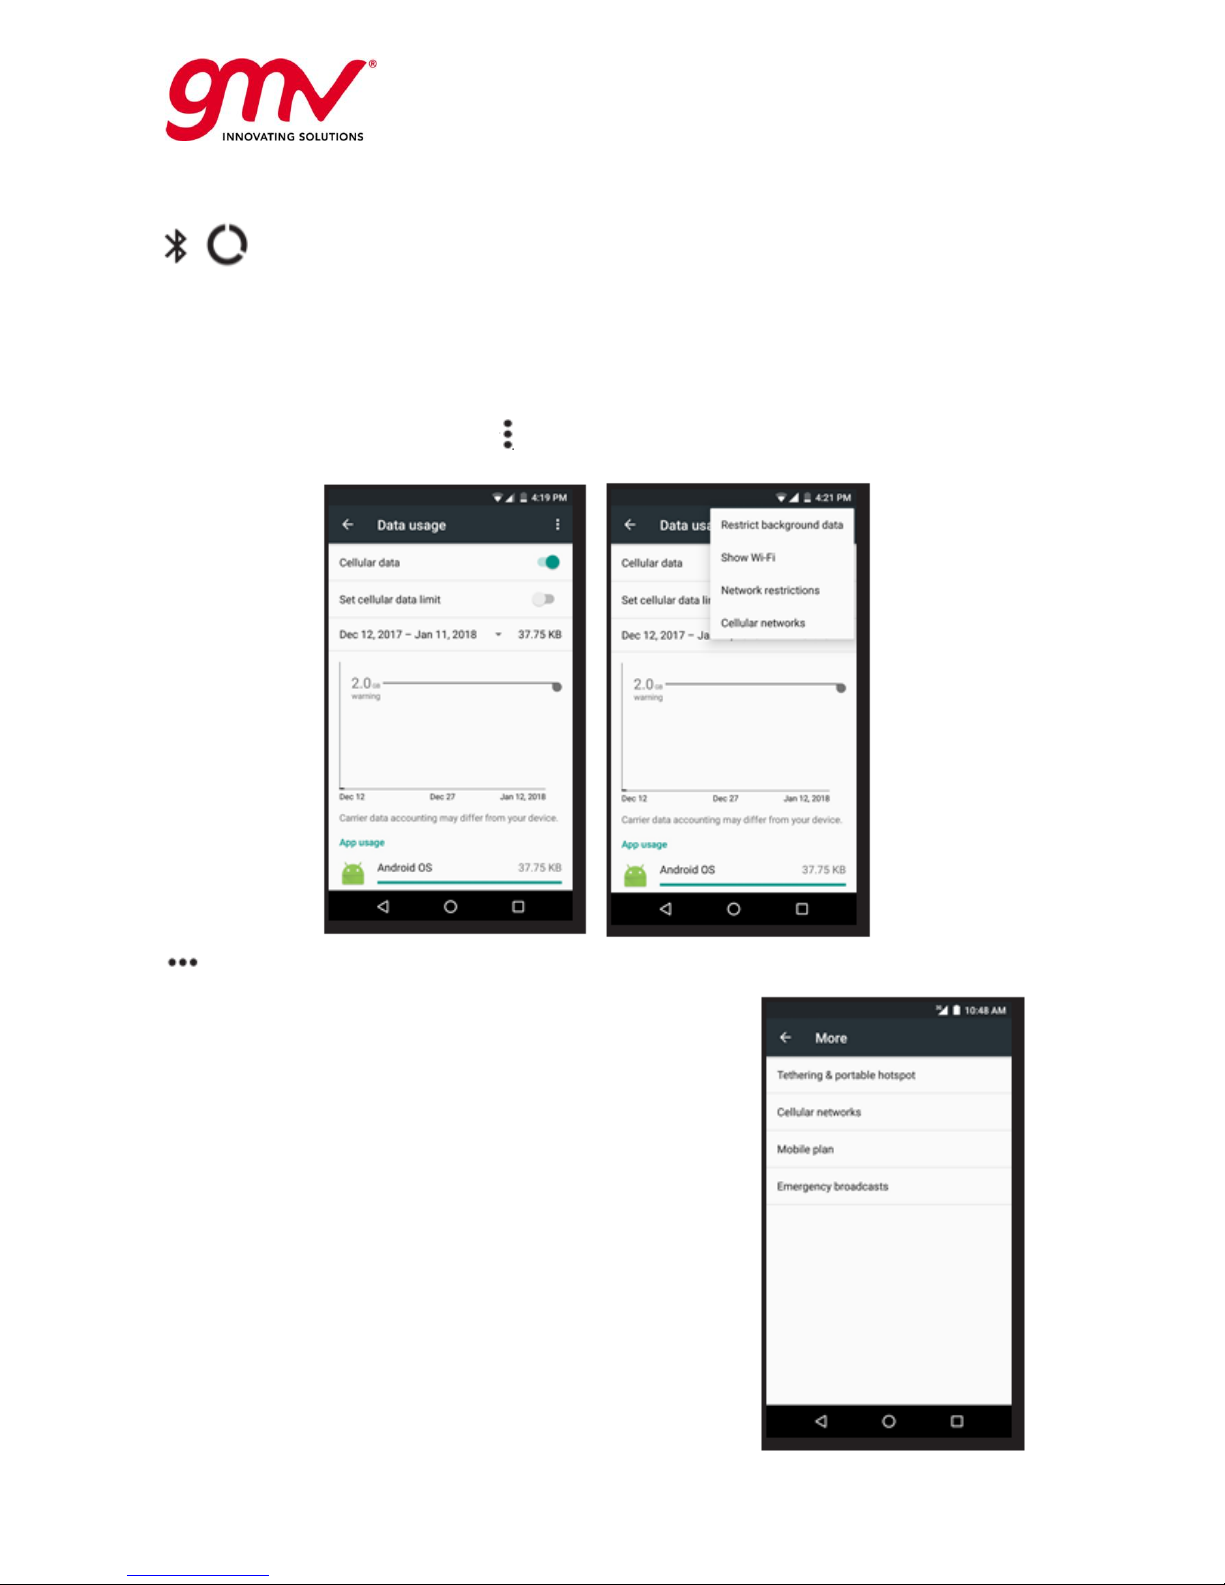
Go to Settings > Wireless and networks > Wi-Fi.
The Wi-Fi is always enabled. Your device will automatically search for and display a list of available
Wi-Fi networks, which updates automatically.
Press the name of the network you want to connect to, enter
the password if necessary and press Connect. If it connects
successfully, Connected will appear below the name of the
network.
We recommend selecting the Show password option
beforehand, so that you can write it quickly and correctly.
The device will automatically connect to the chosen network.
Your device will notify you when it detects a network that you
have never configured.
Select Settings > Wi-Fi to access and configure, tap the
icon and select Advanced Settings.
Page 14
UNCLASSIFIED
Code:
Date:
Issue:
Revision:
Page:
GMV-magicGNSS-MAN-0002
05 July 2018
1
2
14 of 44
magicGNSSUT
GMV 2018; all rights reserved
UNCLASSIFIED
magicGNSS User Terminal Manual
Data Usage
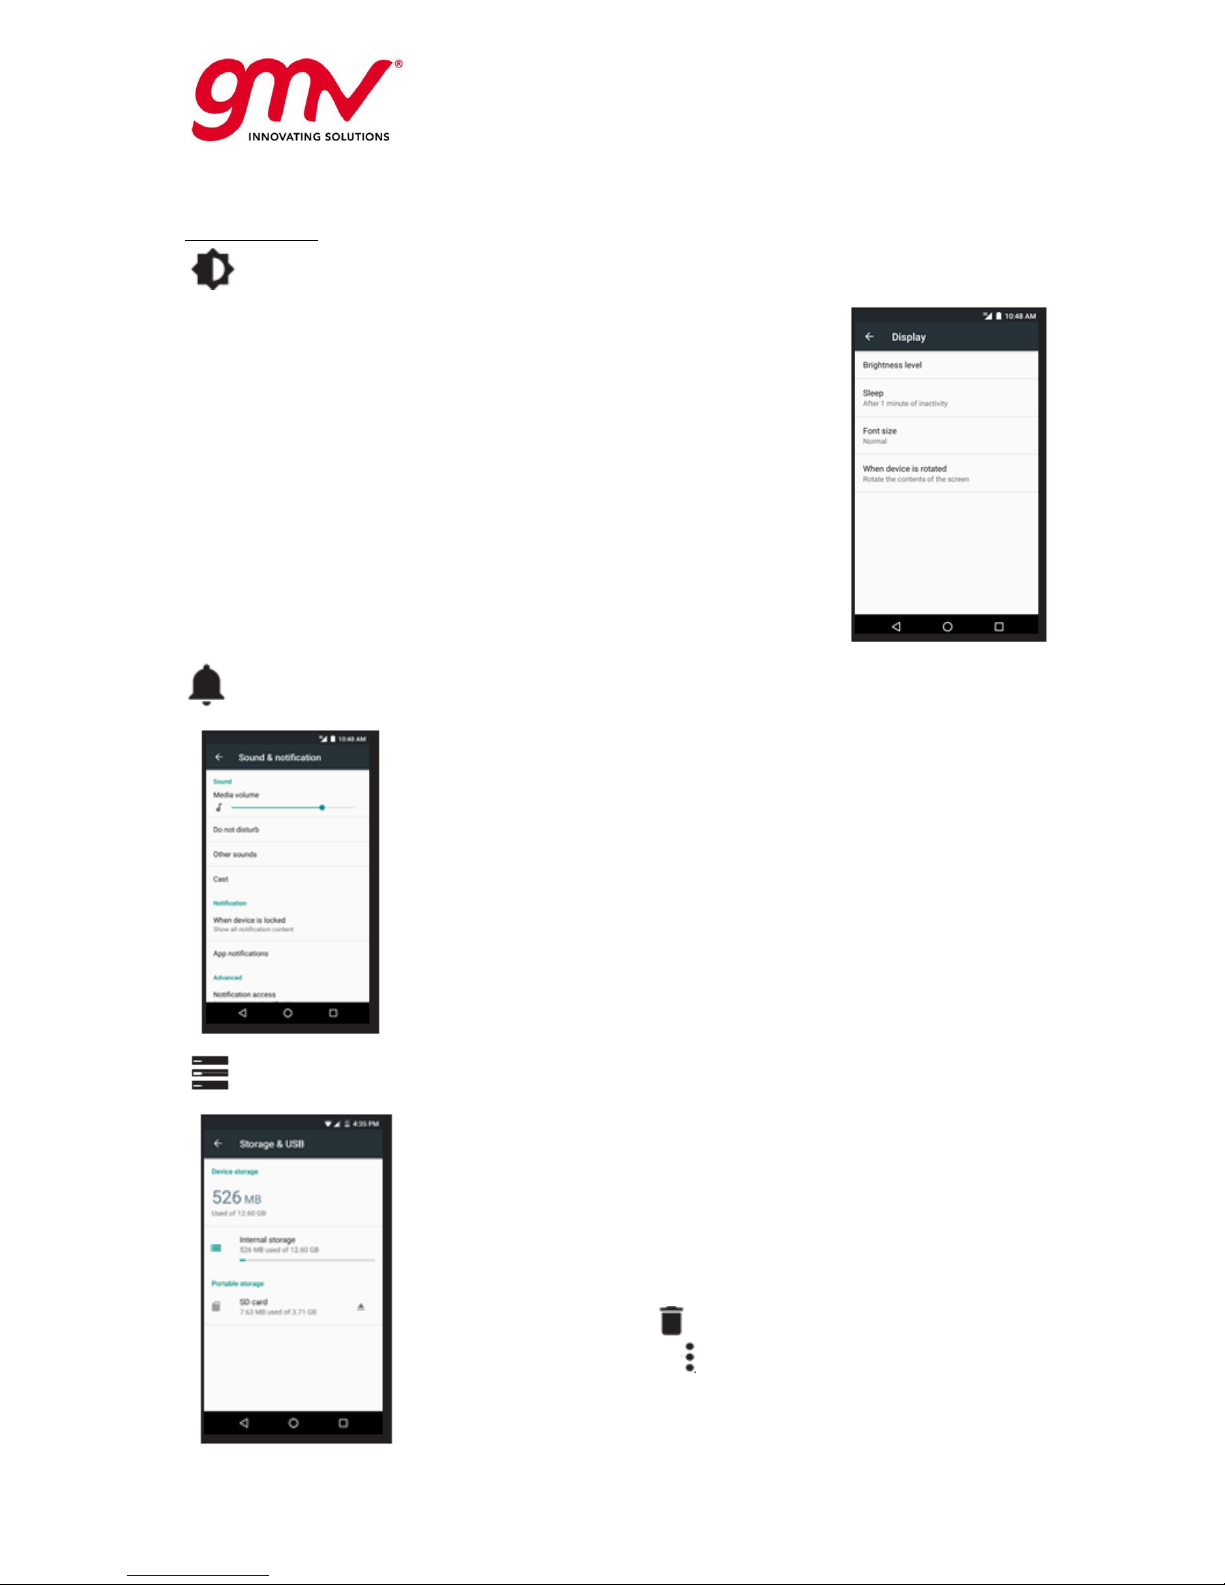
In this section, you can view each application’s statistics for data transfers via Wi-Fi or mobile
internet.
You can also Restrict background data, Show data consumption on the Lock screen and see how
much data is consumed by the various resources.
You can also set a limit to mobile data usage. If you set a limit for mobile data usage, the data
connection will be disabled once this limit has been reached.
To access Advanced settings, press the icon. Here you can turn-off Auto sync data, Show Wi-Fi
usage, Disable networks and access Cellular networks for which you can enable data roaming.
More
Here you can enable the following:
Tethering and portable hotspots: You can convert your device
into a Wi-Fi or USB access point to share the connection with one
or multiple devices.
Cellular networks: Access the settings where you can enable
data roaming, select the preferred network type, set up the APN
and select a network operator.
Emergency broadcasts: Displays the emergency alerts that you
have selected.
Page 15
UNCLASSIFIED
Code:
Date:
Issue:
Revision:
Page:
GMV-magicGNSS-MAN-0002
05 July 2018
1
2
15 of 44
magicGNSSUT
GMV 2018; all rights reserved
UNCLASSIFIED
magicGNSS User Terminal Manual
Device Settings
Display
Brightness level: Adjusts the brightness of your screen.
Sleep: Sets the time delay before the screen automatically switches off.
Font Size: Changes the size of the characters (there are four different
sizes to choose from).
When device is rotated: Enables or disables automatic screen rotation
when you turn your device sideways.
Sound and Notifications
You can adjust the volume of your device. To do this, slide the bar to
the right or to the left.
Here you can set up notifications sounds and configure the priority of
your notifications and create automatic rules. Rules are used to set ‘do
not disturb’ times or events according to your personal circumstances.
Storage and USB
You can query the total and used amount of space on the device. The
amount of space taken up by each file type is listed below this
information.
This setting includes an internal file browser to explore the contents of
your device’s internal storage without having to use an external file
manager. You can access this browser via Settings > Storage and USB
> Internal storage > Explore. You can use this file manager to open,
delete and copy content to other folders.
You can delete a file by pressing and holding your finger down
on it then tap the icon that appears.
· To share a file, tap , select Copy to… and then select the
location where you want to copy it.
Page 16
UNCLASSIFIED
Code:
Date:
Issue:
Revision:
Page:
GMV-magicGNSS-MAN-0002
05 July 2018
1
2
16 of 44
magicGNSSUT
GMV 2018; all rights reserved
UNCLASSIFIED
magicGNSS User Terminal Manual
Language and Input
Here you can set up the system language, activate the spell checker and the personal dictionary. You
can also configure the keyboard, text input methods, and pointer speed.
Reset and Storage Mode
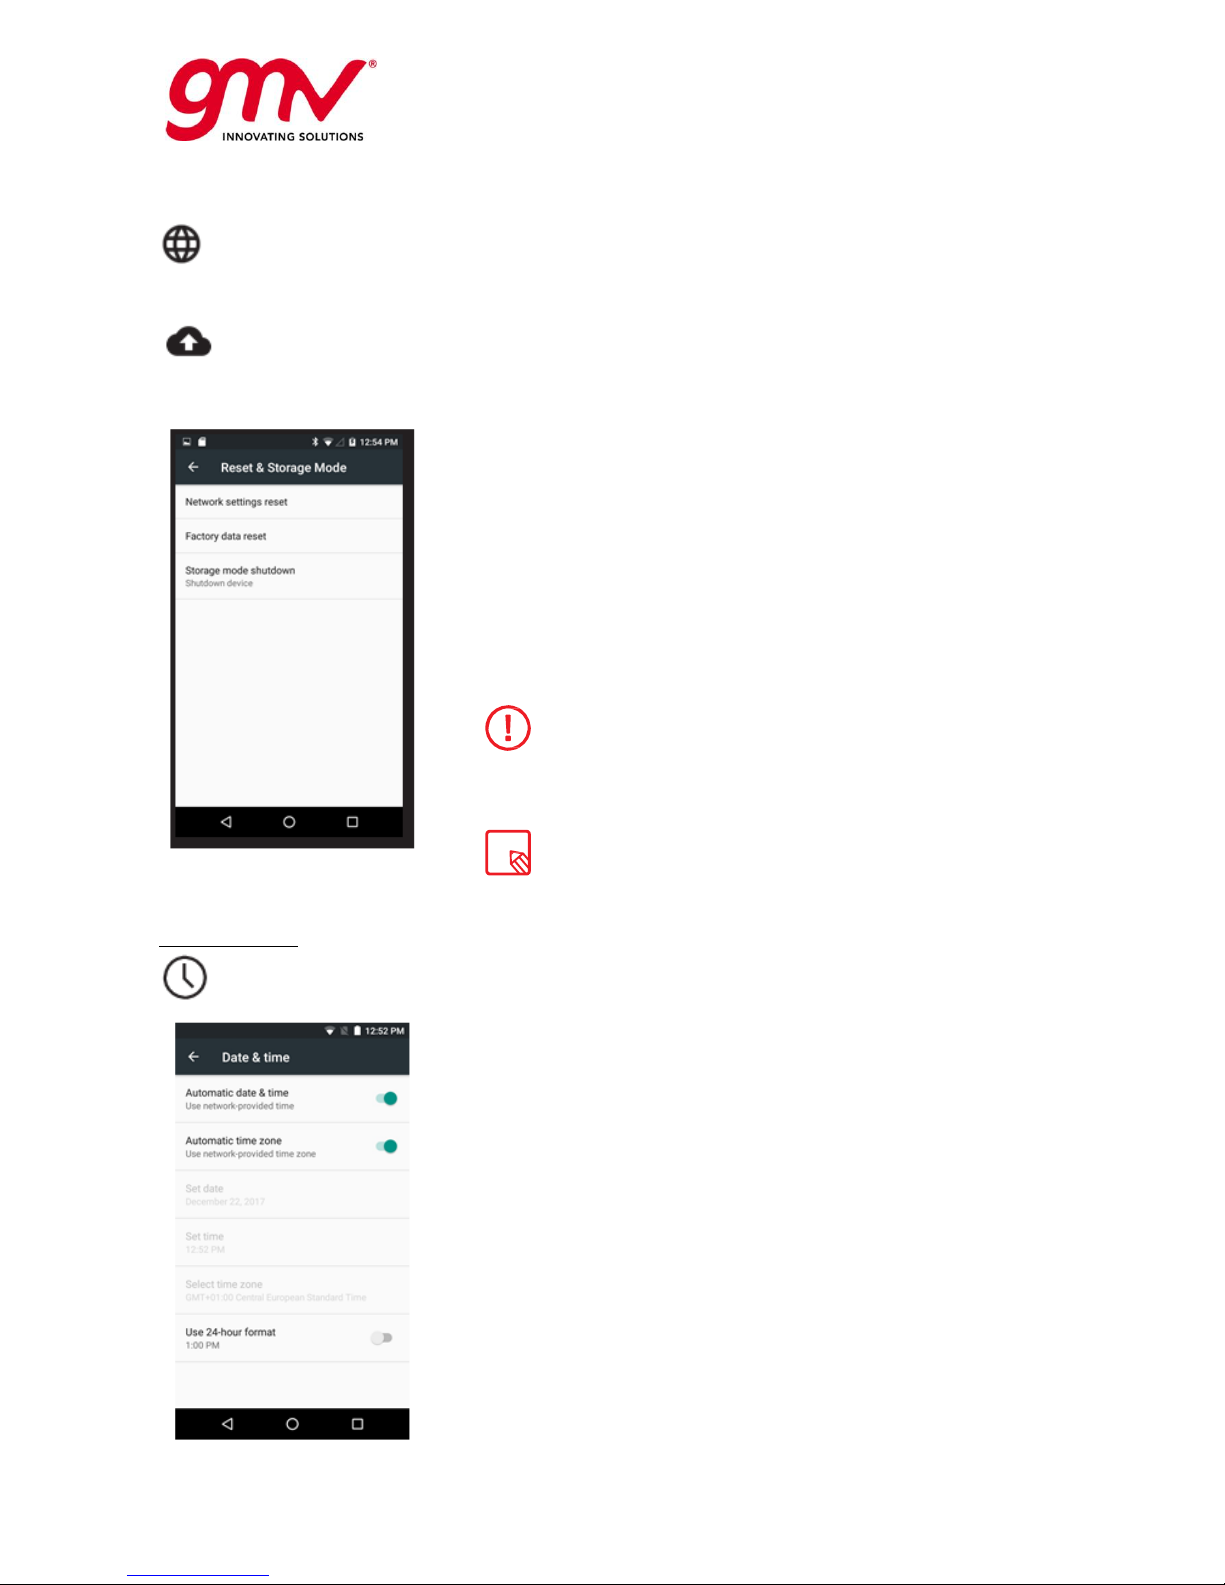
Here you can reset all network settings, carry out a factory data reset and storage shutdown
mode to use in case we need to maintain the device shutdown for a long period of time.
Storage mode shutdown:
It is highly recommended to use storage mode when the device
is going to be switched off for a long period of time. Battery life
is notably lengthened in such a scenario.
After selecting this shutdown mode, the device must be
switched on following these steps:
1. Connect the device to a power supply (mains or a PC
microUSB)
2. Press the Power ON button
1. 3. Basic settings (Date and Time) will be required to
reconfigure after using this storage mode.
Just use Storage mode shutdown option if you
aren´t going to use the device for a long period of
time. To switch off your device hold down the
power button for a few seconds and select Power
off.
If you restore your device to factory default
settings you will delete all the installed programs
and apps. It is recommended to save all
multimedia files and make backup copies before
restoring your device to the factory default
settings.
System Settings
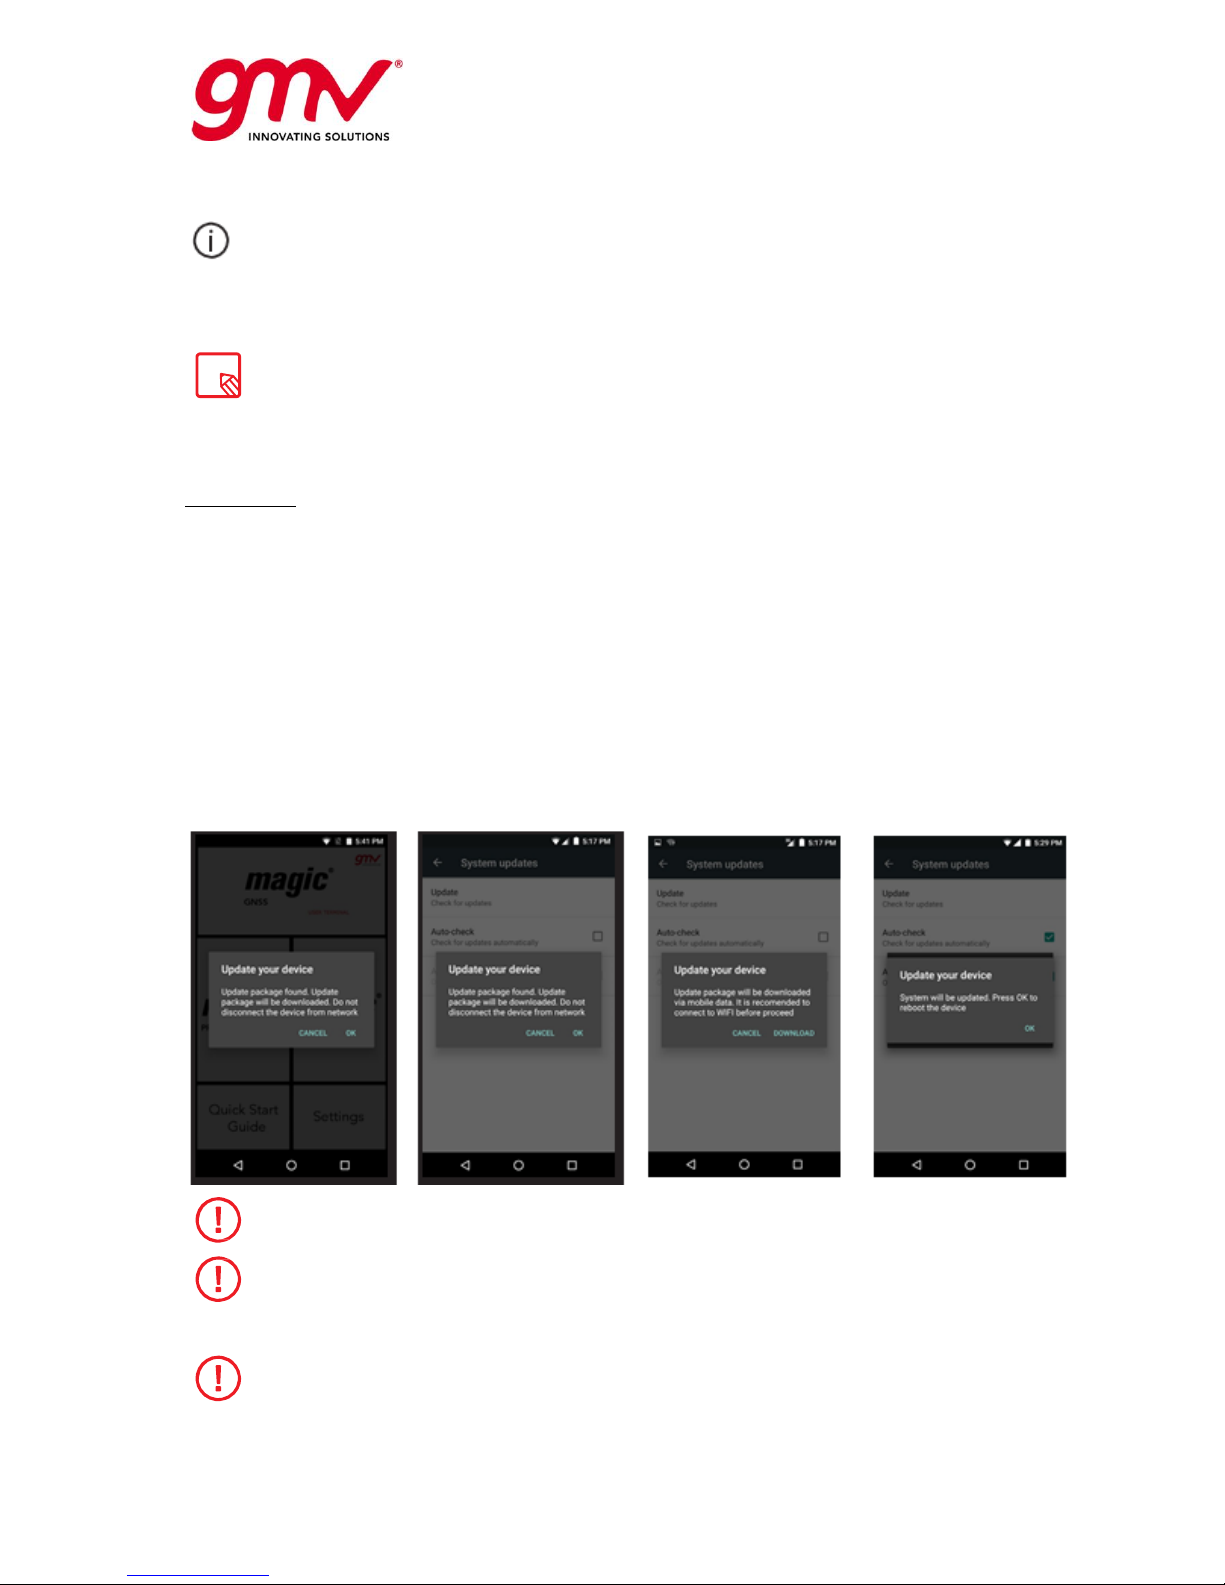
Date and Time
Automatic date & time: Adjusts the time automatically based
on location information or the mobile network. Disabling this
option will activate manual date and time configuration.
Automatic time zone: Enables/disables the automatic time
zone provided by the network. Disabling this means that the
Select time zone option will have to be manually configured.
Use 24-hour format: Enables/disables the 24-hour time
display format.
Page 17
UNCLASSIFIED
Code:
Date:
Issue:
Revision:
Page:
GMV-magicGNSS-MAN-0002
05 July 2018
1
2
17 of 44
magicGNSSUT
GMV 2018; all rights reserved
UNCLASSIFIED
magicGNSS User Terminal Manual
About Device
This section displays the status of the device (battery, SIM data, serial number, etc.), legal
information, Android version, model number, baseband, kernel versions and the build number. Here
you can manually check for updates (for more information on firmware updates go to OTA Updates).
If you need assistance, you probably need to provide the serial number of the device.
You can find it in the original package of your product, or you can also check it on your
device by going to Settings > About phone > Status > Serial Number.
2.5. TIPS
OTA Updates
OTA stands for “Over the Air”, which refers to the way that firmware updates are sent to your device;
i.e. via your data connection or Wi-Fi, with minimal intervention required on the part of the user and
without the need for complex update procedures.
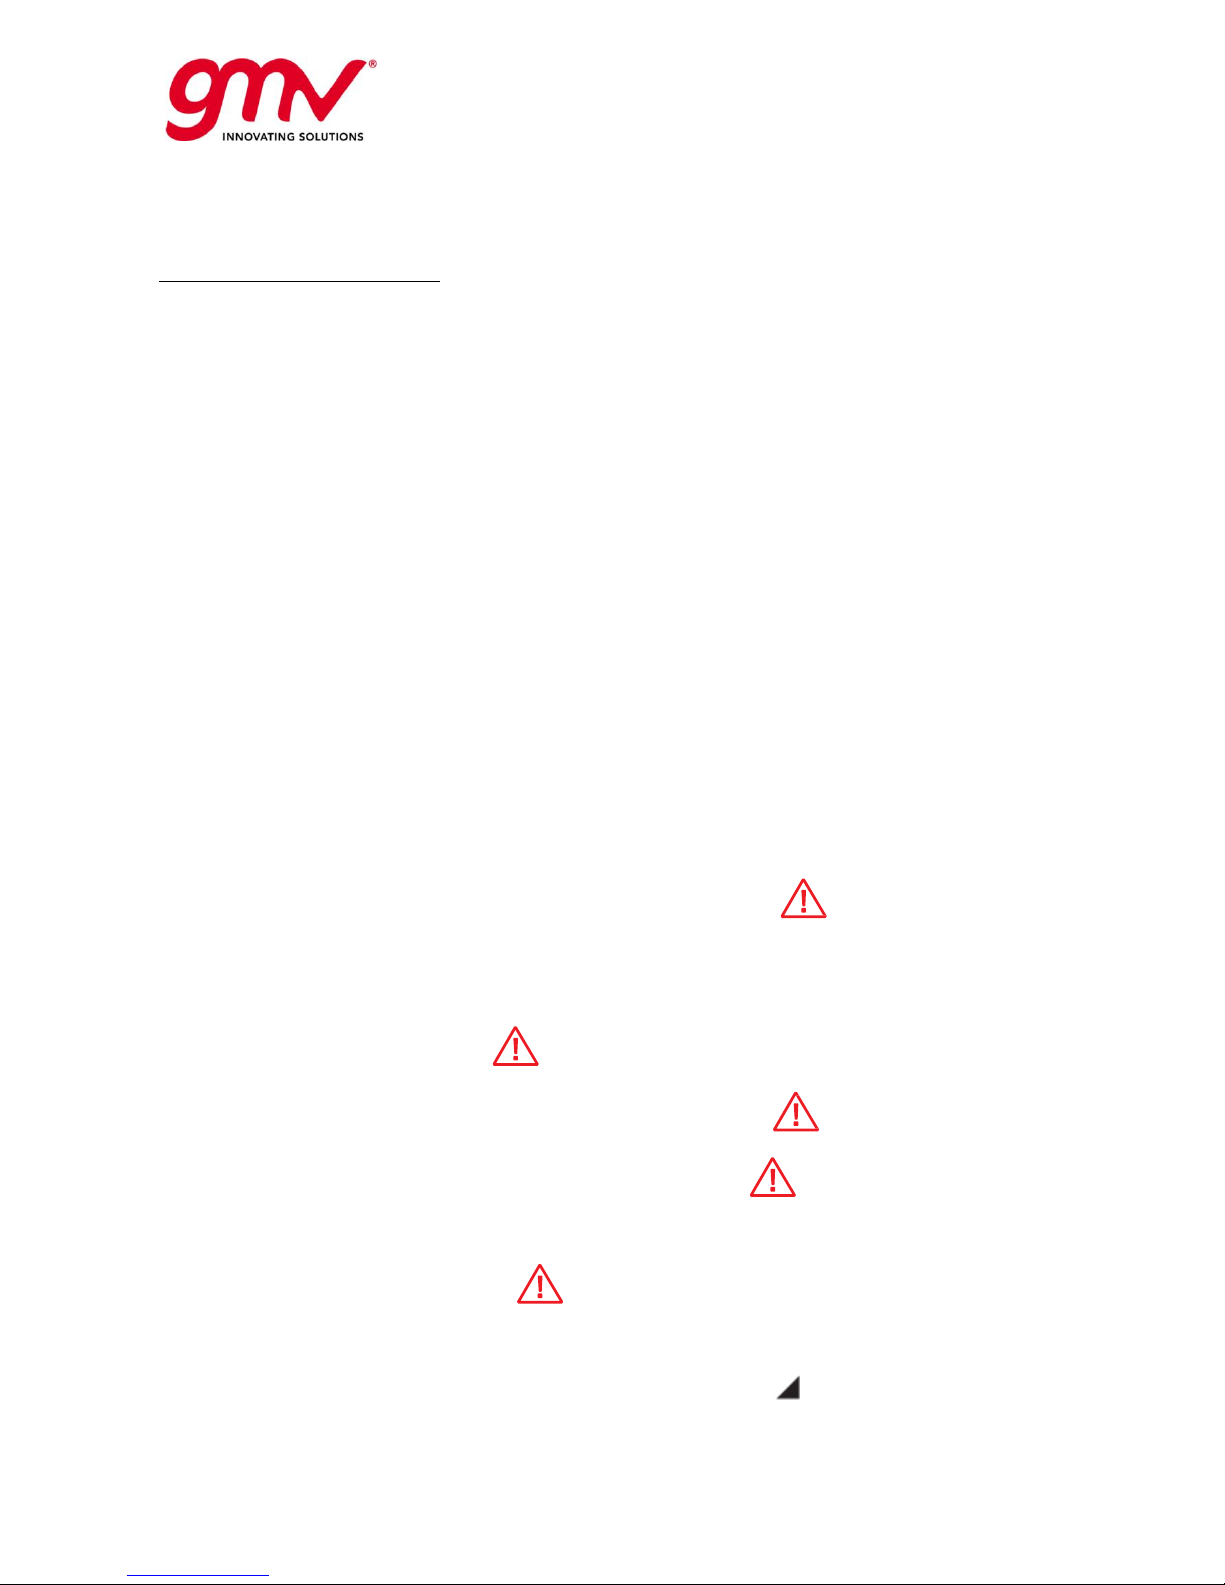
Having autocheck option activated your device will periodically check for new updates to the operating
system (autocheck option is activated by default). If it were not enabled by going to Settings > About
phone > System updates > Update, this action would have to be done manually. These usually include
performance improvements or additional features for your magicGNSS User Terminal.
When the system detects that an update is available, a pop-up window will notify you of this and will
request confirmation to install it. We recommend using a Wi- Fi connection to download the update
package.
The system will guide you through the installation process to ensure that it is completed as quickly
and conveniently as possible. You can also check for updates manually by going to Settings > About
phone > System updates > Update. A message will appear informing you that the system is searching
for available updates. If an update exists, the installation process is the same as described previously.
It is necessary to have connectivity (Wi-Fi or 3G) so that the device can perform the
verification update task autonomously.
If you have a SIM inserted and you are not connected to Wi-Fi, it will allow you to
download the OTA by using data but authorization will be requested.
As OTA package is a big a pop up notification will suggest to connect it to the Wi-Fi
service to avoid data consumption.
To complete the update successfully it is necessary to have 30% of battery. If the
battery percentage it´s below that value, the process won´t be completed, and a pop-up
will request to charge the device.
Page 18
UNCLASSIFIED
Code:
Date:
Issue:
Revision:
Page:
GMV-magicGNSS-MAN-0002
05 July 2018
1
2
18 of 44
magicGNSSUT
GMV 2018; all rights reserved
UNCLASSIFIED
magicGNSS User Terminal Manual
2.6. APPENDICES
Appendix A: Cleaning and Safety
Cleaning:
Before cleaning your device, make sure you have switched it off and disconnected all cables and
power. After cleaning, make sure the screen is completely dry before reconnecting any cables and
switching the device back on. Do not pour or spray any liquids directly onto the device.
Screen: Use a clean, soft, lint-free cloth to remove dust and dirt from the screen. To remove
fingerprints and marks, you may apply a small amount of mild cleaning product to the cloth.
Casing: Use a soft cloth with a small amount of mild cleaning product. After cleaning, rinse the cloth
in clean water, wring it out thoroughly and wipe the casing to remove any leftover cleaning product.
Safety:
To reduce the risk of an accident, follow these safety instructions:
Do not use power cables, connectors or plugs that are damaged or contain loose wiring. Do
not bend or damage the power cable. Do not touch the power cable with wet hands. Do not
pull on the cable to unplug the charger.
Do not pour or spray any liquids directly onto the device. This device is not water resistant.
Do not hit the device or cause it to fall.
You can use the device when you are charging even though the battery will take longer to
charge fully. Avoid handling the device with wet hands when charging.
Do not hit the charger or cause it to fall. For optimum charging, we recommend using a 5 V
2.1 A charger.
Do not use the device during electrical storms.
Do not handle Li-ion batteries that are damaged or leaking.
Your magicGNSS User Terminal contains a rechargeable non-removable battery. The device
has a warranty seal, please avoid opening the device cause will invalid the warranty. Defects
caused by the fact that the battery has been subjected to a short circuit or the seals on the
battery have been broken or show evidence of manipulation will invalid the warranty.
Do not use the device in the vicinity of a pacemaker. If possible, try to use it at a distance of
at least 15 cm from the pacemaker, as it could interfere with the pacemaker’s operation. Hold
the device on the opposite side to the implant when operating it .
Do not use the device in a hospital or in the vicinity of any medical equipment that may be
susceptible to radio frequency interference.
If you regularly use medical equipment, make sure it is protected against radio frequency
interference.
In potentially explosive environments, switch the device off. Always observe regulations,
instructions and warning signs .
Do not use the device in refuelling areas (e.g. petrol stations), underground parking zones or
in the vicinity of flammable and/or explosive chemical products .
Do not store or transport flammable liquids, gases or explosive materials in the same
compartment as the device or any of its parts or accessories .
Switch off the device upon boarding an aeroplane. The electronic components of a motor
vehicle may malfunction as a result of radio frequency interference from the device.
Avoid placing the device near the abdominal and genital area, and in particular pregnant
women, children and adolescents .
Using or handling a device whilst driving a land motor vehicle is strictly prohibited.
Use the GNSS function with caution and ensure you are not distracted while driving.
The use of your device in good reception conditions reduces the amount of signals received.
To ensure good reception parameters, check the coverage icon on the screen.
This device is designed to operate within a temperature range of -5 to 45 ºC. As this is a high-
technology device, extreme climatic conditions have a negative impact on its operation. We
advise against using it in ambient temperatures under -5 ºC or above 40 ºC. Doing so may
Page 19
UNCLASSIFIED
Code:
Date:
Issue:
Revision:
Page:
GMV-magicGNSS-MAN-0002
05 July 2018
1
2
19 of 44
magicGNSSUT
GMV 2018; all rights reserved
UNCLASSIFIED
magicGNSS User Terminal Manual
cause faults or damage to the device (or even explosions in more extreme cases). It is also
inadvisable to use it continually at the limits of this range (internal or ambient temperature
under 0 ºC, for example) or in adverse climatic conditions as this may cause performance
drops that temporarily affect device functionality and battery life.
Appendix B: Disposing of this Product Correctly
(Electrical and electronic waste).
(Applies within the European Union and in European countries with selective waste
collection systems).
If this symbol is on the product, or any of its accessories or informative material, this means that
when it reaches the end of its useful life, you must not throw away the product or its electrical
accessories (charger, cables, etc.) with domestic waste.
To prevent any damage to the environment or human health, separate these products from other
types of waste and recycle them correctly. If you do this you are encouraging the sustainable
recycling of material resources and preventing finite resources from depleting.
Domestic users should contact the vendor that they purchased the product from or the relevant local
authorities to find out how and where they can recycle this product safely, without harming the
environment.
Business users should contact their supplier and consult the terms and conditions of the purchase
agreement. This product and its electronic accessories should not be disposed of with other
commercial waste.
Page 20
UNCLASSIFIED
Code:
Date:
Issue:
Revision:
Page:
GMV-magicGNSS-MAN-0002
05 July 2018
1
2
20 of 44
magicGNSSUT
GMV 2018; all rights reserved
UNCLASSIFIED
magicGNSS User Terminal Manual
3. MAGICPPP CLIENT APPLICATION USER MANUAL
3.1. THE MAGICPPP OVERVIEW
The magicPPP client application installed in the magicGNSS User Terminal device is a flexible SW tool
providing real-time PPP solutions. It processes real-time observations provided by the built-in GNSS
receiver or remote data sources, and navigation data and real-time corrections obtained from different
provision channels. The magicPPP engine generates a real-time PPP solution in the ITRF14 reference
frame, together with other complementary and ancillary outputs.
3.2. FIRST STEPS WITH MAGICPPP
magicPPP User Terminal application first launch will show to the user the Status and Control panel of
the application. This view allows the selection of the receiver to be used, launch the application,
recording sessions and visualize the status of the processing. In other words, it allows to perform
most of the typical operations performed during the test execution.
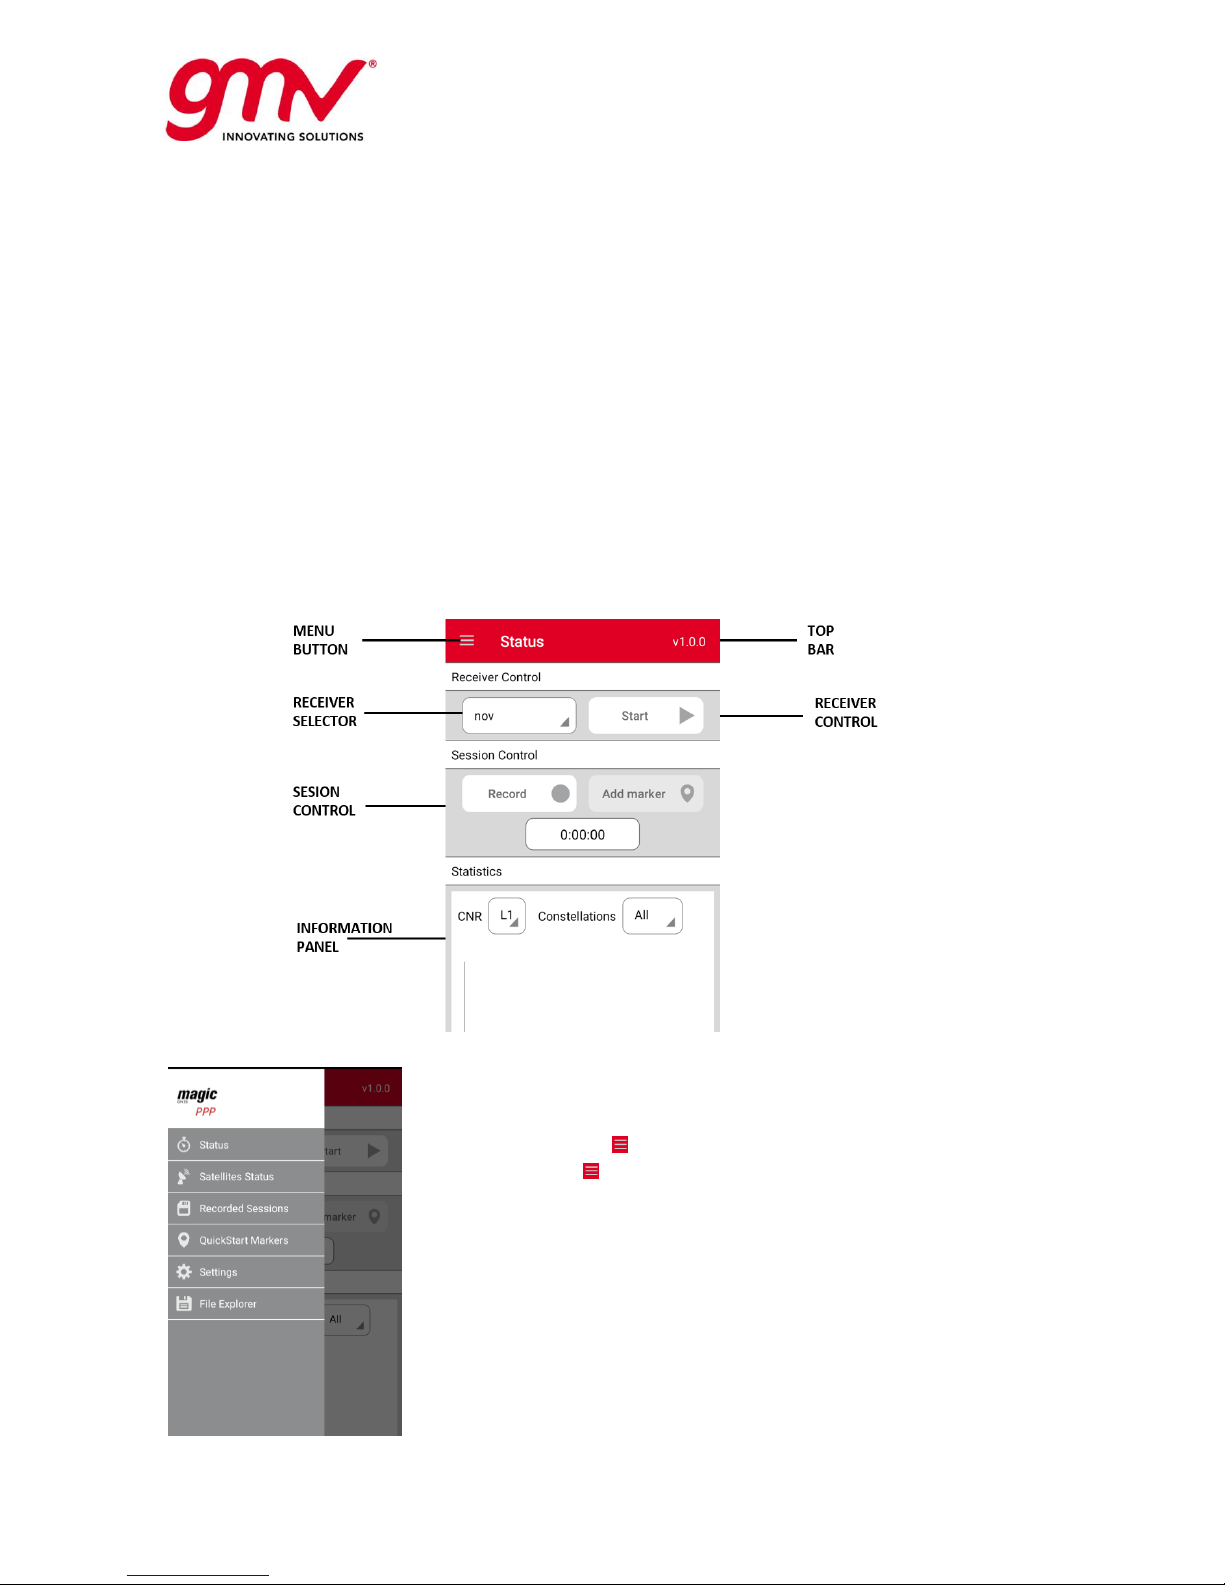
Top Bar and Menu Button
The application top bar indicates the view being visualized in each
moment, the version of the application under execution and in the topleft the Menu Button ( ) can be found.
The Menu Button ( ) is a key element for the customer since it allows
to navigate through the different control, configuration and monitoring
panels of the application, mainly:
1. Status and Control
2. Satellite Status
3. Recorded Sessions
4. QuickStart Markers
5. Settings
6. File Explorer
The features and capabilities of each view are described below.
Page 21
UNCLASSIFIED
Code:
Date:
Issue:
Revision:
Page:
GMV-magicGNSS-MAN-0002
05 July 2018
1
2
21 of 44
magicGNSSUT
GMV 2018; all rights reserved
UNCLASSIFIED
magicGNSS User Terminal Manual
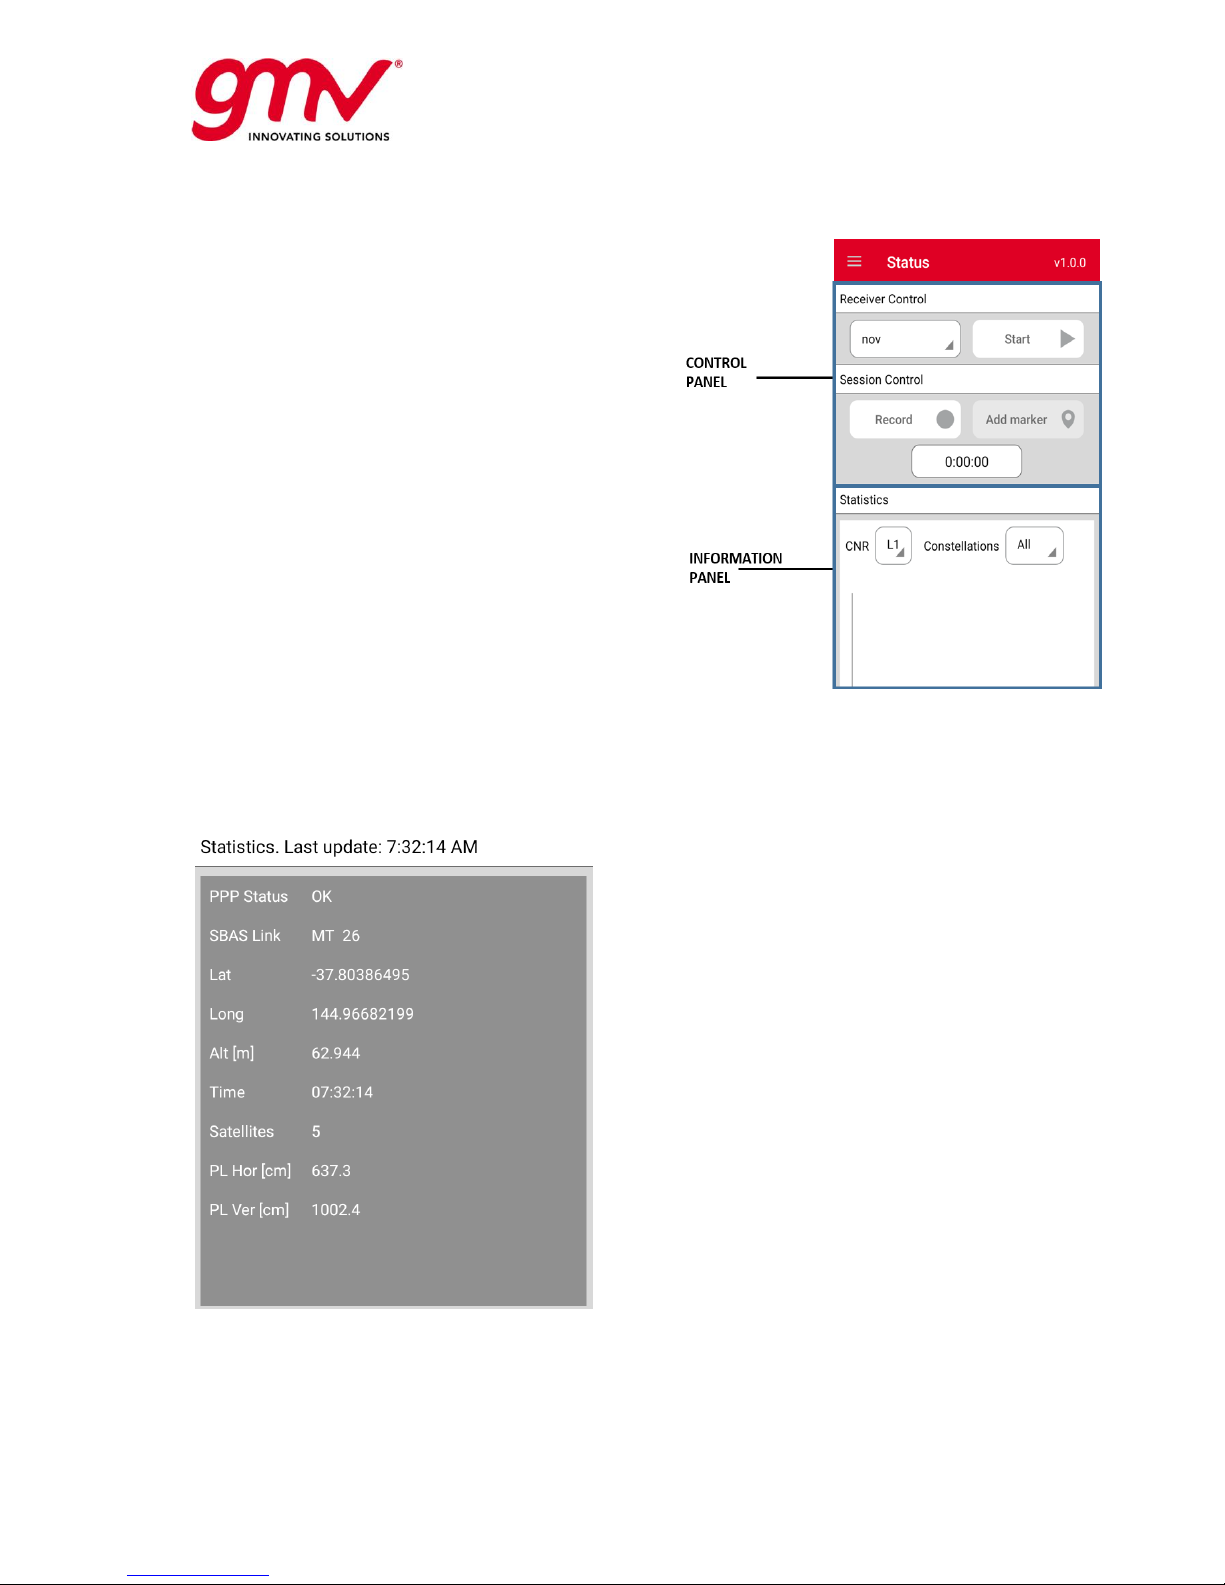
Status and Control View
The status and control view is divided into two sub
frames. The top subframe - called the control panel allows the user to select one of the configured receivers
as well as launching and stopping the PPP processing.
Once the session is running operator can start/stop
recording the session and store specific positioning
markers in the application memory to be later used and
exported. Record the session means making positions
available for being exported to a KML file and having
the option to save some them as markers. Output files
are generated and stored even if the Record option has
not been activated.
The bottom subframe is used to present information
about the processing in real time. In particular it
contains five different visualizations:
1. PPP processing status
2. Receiver Observations CNR
3. User skyplot
4. PPP Horizontal Displacement
5. PPP Vertical Displacement
6. PPP Protection Levels
The user can browse between the different option of the bottom frame just sliding left and right the
frame view.
The PPP Status Summary presents the
evolution of the PPP solution in real-time. The
following fields are depicted:
PPP Status provides a global indicator
of the PPP processing (e.g.: Ok,
Missing orbits, low number of
corrections)
SBAS Link provides a global indicator
of the SBAS (GEO or SISNET) status
Latitude presents the positioning
latitude for the last processed epoch
Longitude presents the positioning
longitude for the last processed epoch
Altitude presents the positioning
altitude for the last processed epoch
Time provides the GPSt (Global
Positioning System time) of the last
processed epoch
Satellites shows the number of
satellites used in the last processed
epoch
PL Horizontal indicates the horizontal
protection level
PV Vertical indicates the vertical
protection level
Page 22
UNCLASSIFIED
Code:
Date:
Issue:
Revision:
Page:
GMV-magicGNSS-MAN-0002
05 July 2018
1
2
22 of 44
magicGNSSUT
GMV 2018; all rights reserved
UNCLASSIFIED
magicGNSS User Terminal Manual
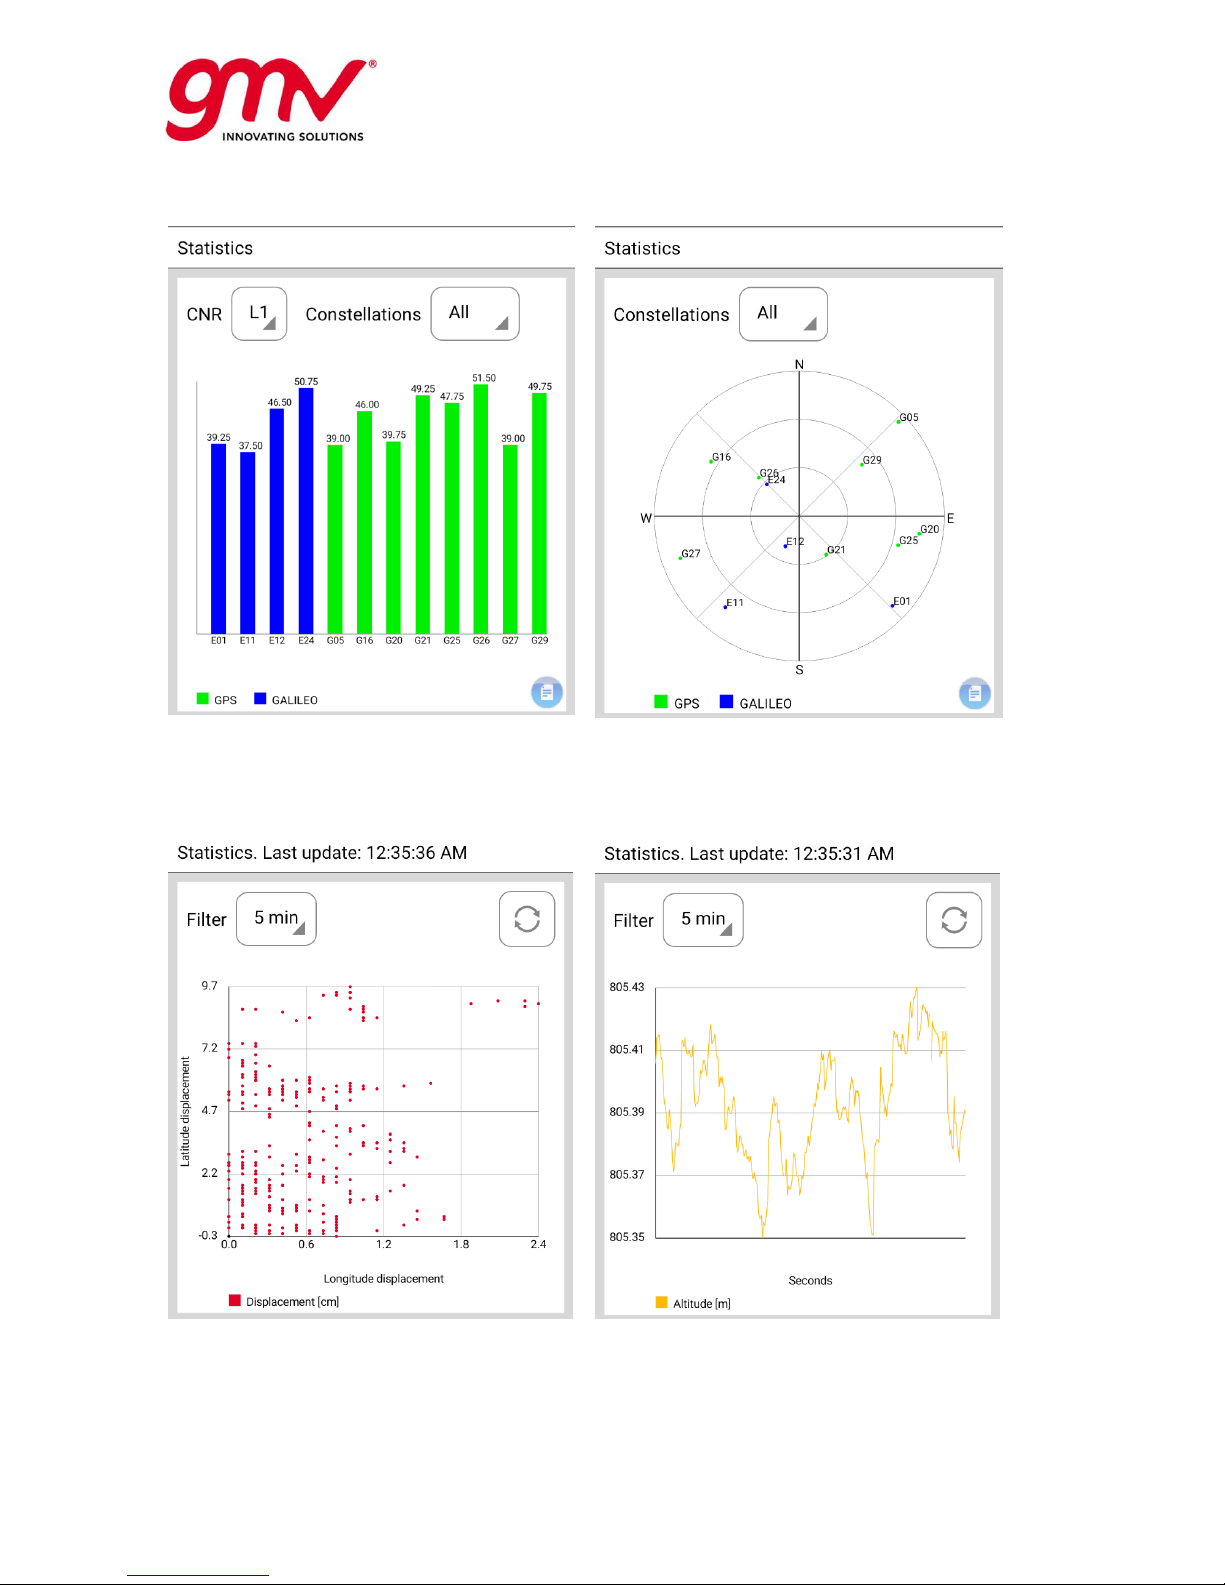
The CNR (Carrier-to Noise Ratio) frame shows
the CNR values for each satellite in view being
processed by the PPP. The CNR for the different
avaiable frequencies can be chosen i.e L1, L2,
L5.
The skyplot shows the geometry distribution of
the satellites in the sky (azimuth and elevation
for each of them).
The horizontal displacement frame shows a
sliding window with the displacement for the
latest epochs. The number of epochs can be
filtered by the user through the time of the
sliding window.
The vertical displacement frame shows a sliding
window with the vertical evolution for the latest
epochs. The number of epochs shown can be
filtered by the user through the time of the
sliding window.
Page 23
UNCLASSIFIED
Code:
Date:
Issue:
Revision:
Page:
GMV-magicGNSS-MAN-0002
05 July 2018
1
2
23 of 44
magicGNSSUT
GMV 2018; all rights reserved
UNCLASSIFIED
magicGNSS User Terminal Manual
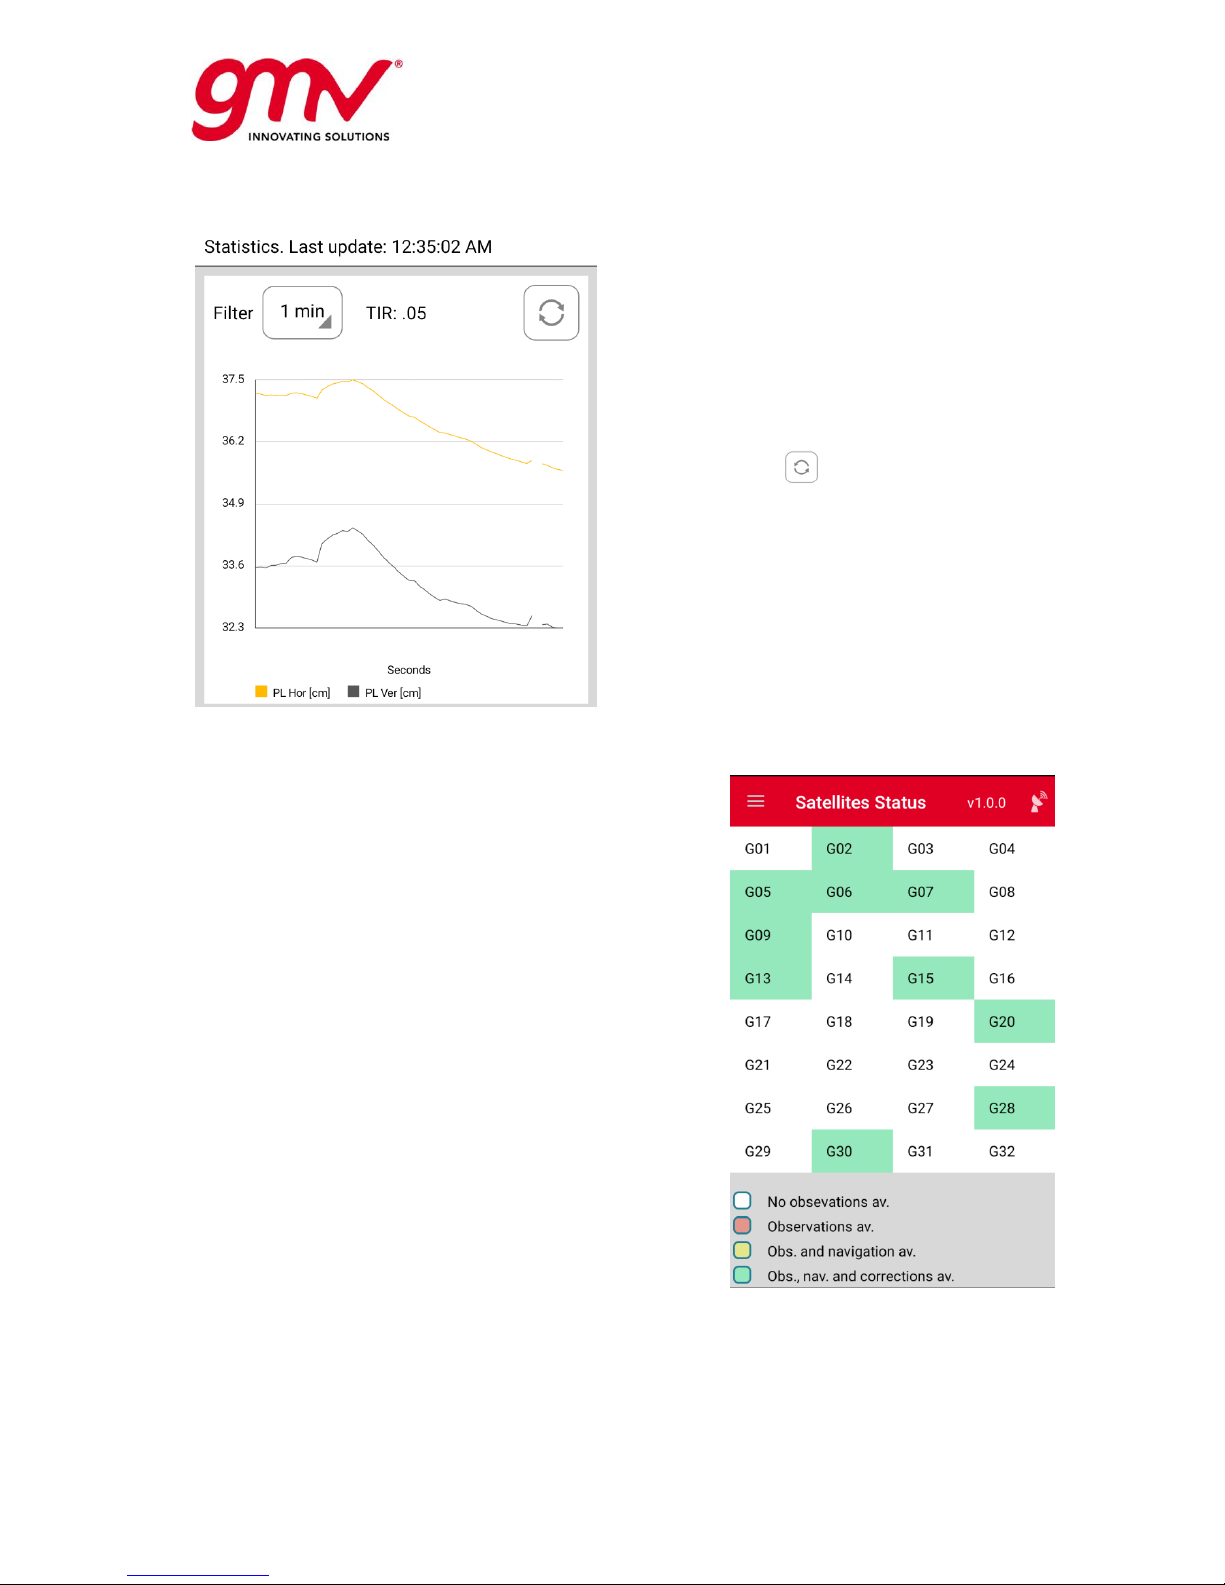
The protections level frame presents the
horizontal and vertical protection levels
calculated for a given Target Integrity Risk
(TIR), in the example 0.05.
Target Integrity Risk value can be configured in
the settings tab by the user previous to the
execution start. Note that different applications
may require different TIR, so a TIR of 0.05 is
noticeably less restrictive than a TIR of 0.001.
The refresh button allows the user to delete
all previous positions/PLs and consider
subsequent positions/PLs only for being plotted.
This action cannot be undone, in the sense that
once the refresh button has been touched,
deleted position/PL cannot be recovered for
being plotted. However, they are still available
in the output position files.
Satellite Status
Satellite status view provides the real time status of the PPP
processing in a per satellite basis. In this sense the view
presents a grid with all the satellites in operation per
constellation, and highlights the satellites with different
colours depending on the status at the last processed epoch.
The legend distinguishes between four different status:
No observation: Typically this happens when the
satellite is not in view or the signal status flag is not
healthy. This satellite is not used in the PPP
computation.
Observation available: Observations for the satellite
are received, but no valid navigation data is available,
hence the satellite cannot be used in the PPP
processing.
Observation and Navigation available: Observations
and valid navigation is available for the satellite,
nevertheless there is not corrections to augment the
orbit and clock. In this conditions the satellite is not
used in the PPP processing.
Observation, navigation and corrections available: all
the required information to use the satellite in the PPP
processing is avaiable.
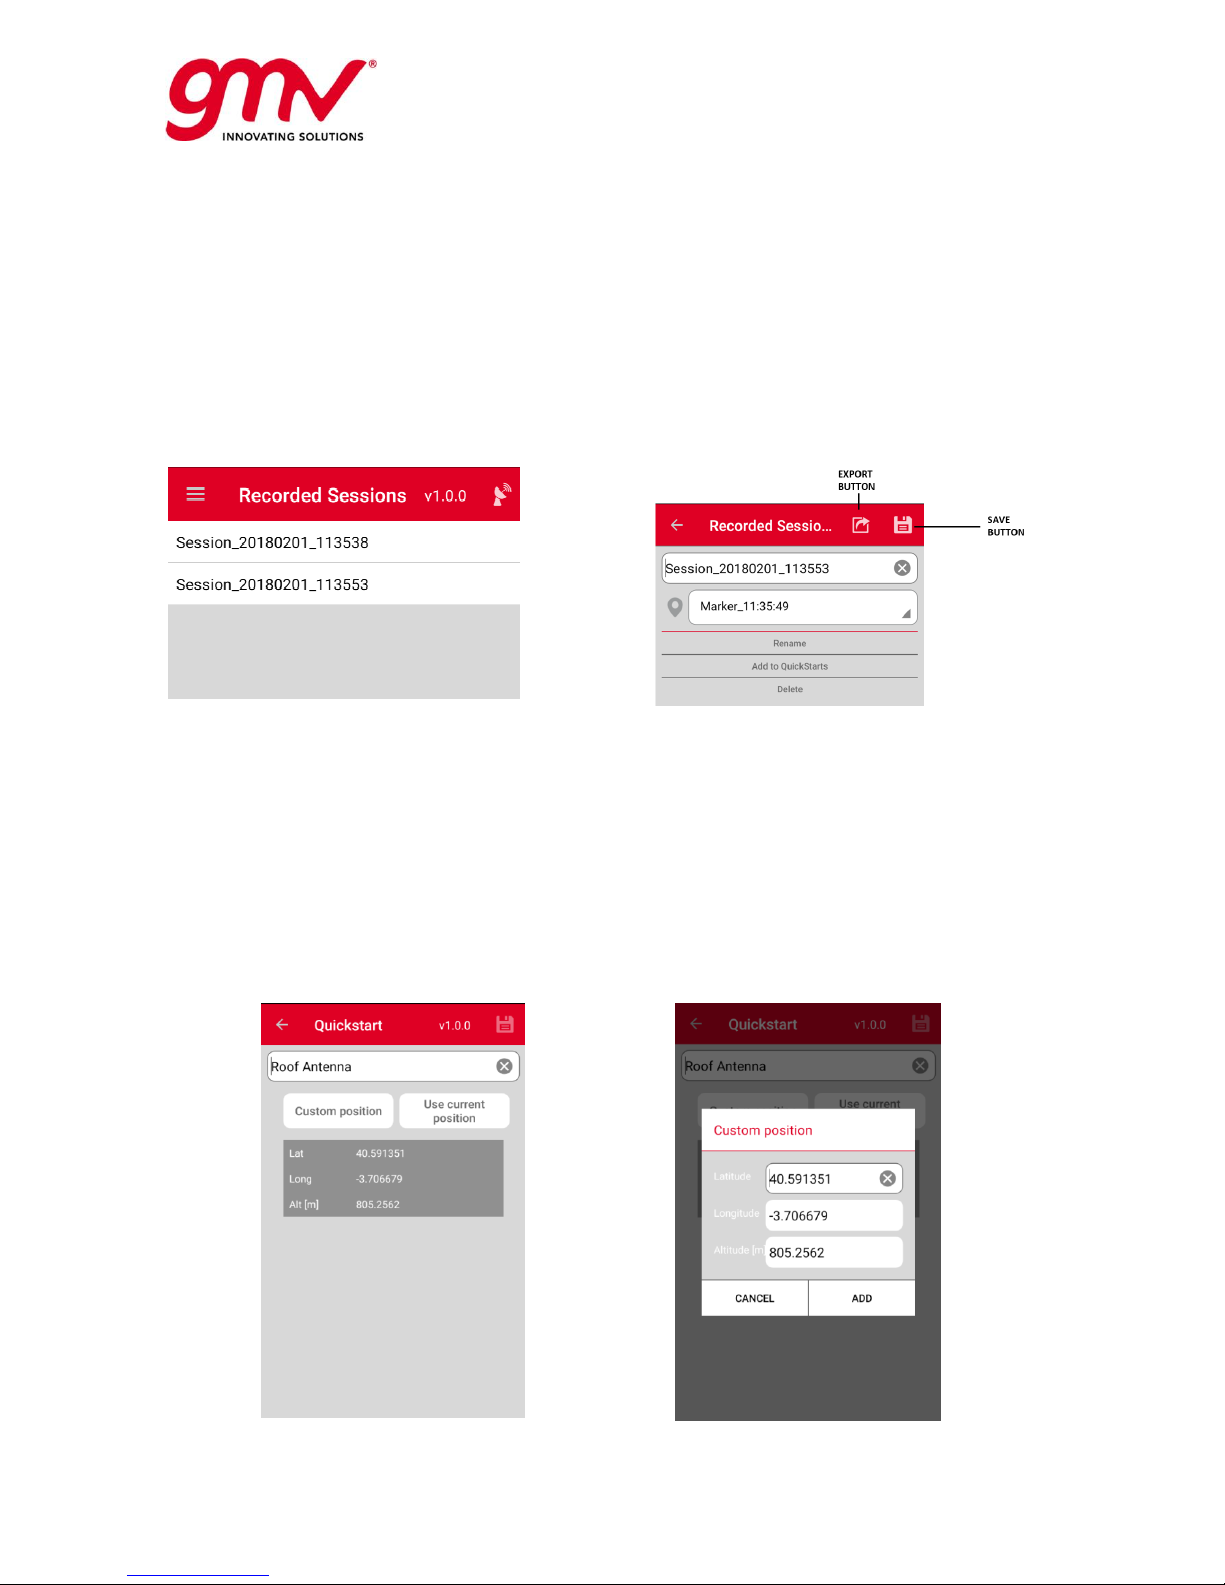
Recorded Sessions
The recorded session view allows the user to see the list of recorded sessions during the PPP processing.
Sessions information can be extracted, edited and removed.
The extraction of the session information is done in KML format compatible with mapping applications
like Google Earth. The KML includes all the epochs and positions estimates associated to the timestamp
as well as the land markers introduced by the user. The KML is exported to the user terminal storage
Page 24
UNCLASSIFIED
Code:
Date:
Issue:
Revision:
Page:
GMV-magicGNSS-MAN-0002
05 July 2018
1
2
24 of 44
magicGNSSUT
GMV 2018; all rights reserved
UNCLASSIFIED
magicGNSS User Terminal Manual
and can be retrieved by the user through a USB connection. In order to generate the KML file, export
button is to be pressed, and the process begins (this action may take several minutes depending on the
session size).
When editing the session information, the user will be able to rename the session from the default name
based on date and time of the recording and also check the list of markers recorded and manage them.
Markers can be renamed, removed or upgraded to quick-start markers.
In order to delete a certain session, keep touching the session until its colour changes to red, and then
just touch the trash icon in the Top Bar.
QuickStart Markers
The quickstart (QS) markers are calibrated landmark places (centimetre-level accuracy) which can be
used by the user to speed-up the convergence process of the PPP engine.
A QS marker can be created while running the PPP (with the possibility of using current position), or
while stopped by upgrading a simple marker from a session previously recorded or by introducing the
latitude/longitude/height parameters.
In order to delete a certain QS marker, keep touching the marker name until its colour changes to red,
and then just touch the trash icon in the menu bar.
They can be accessed from the Recorded Sessions menu, choosing the session in which the marker was
created and selecting from the available markers drop-down list.
When a new PPP execution is started, the user is asked to select between both options: a cold-start run
or warm-start using one of the a-priori known positions.
Quickstart markers are really useful when the user typically starts working from the same location, since
it will reduce the convergence period from several minutes to a few seconds.
Page 25
UNCLASSIFIED
Code:
Date:
Issue:
Revision:
Page:
GMV-magicGNSS-MAN-0002
05 July 2018
1
2
25 of 44
magicGNSSUT
GMV 2018; all rights reserved
UNCLASSIFIED
magicGNSS User Terminal Manual
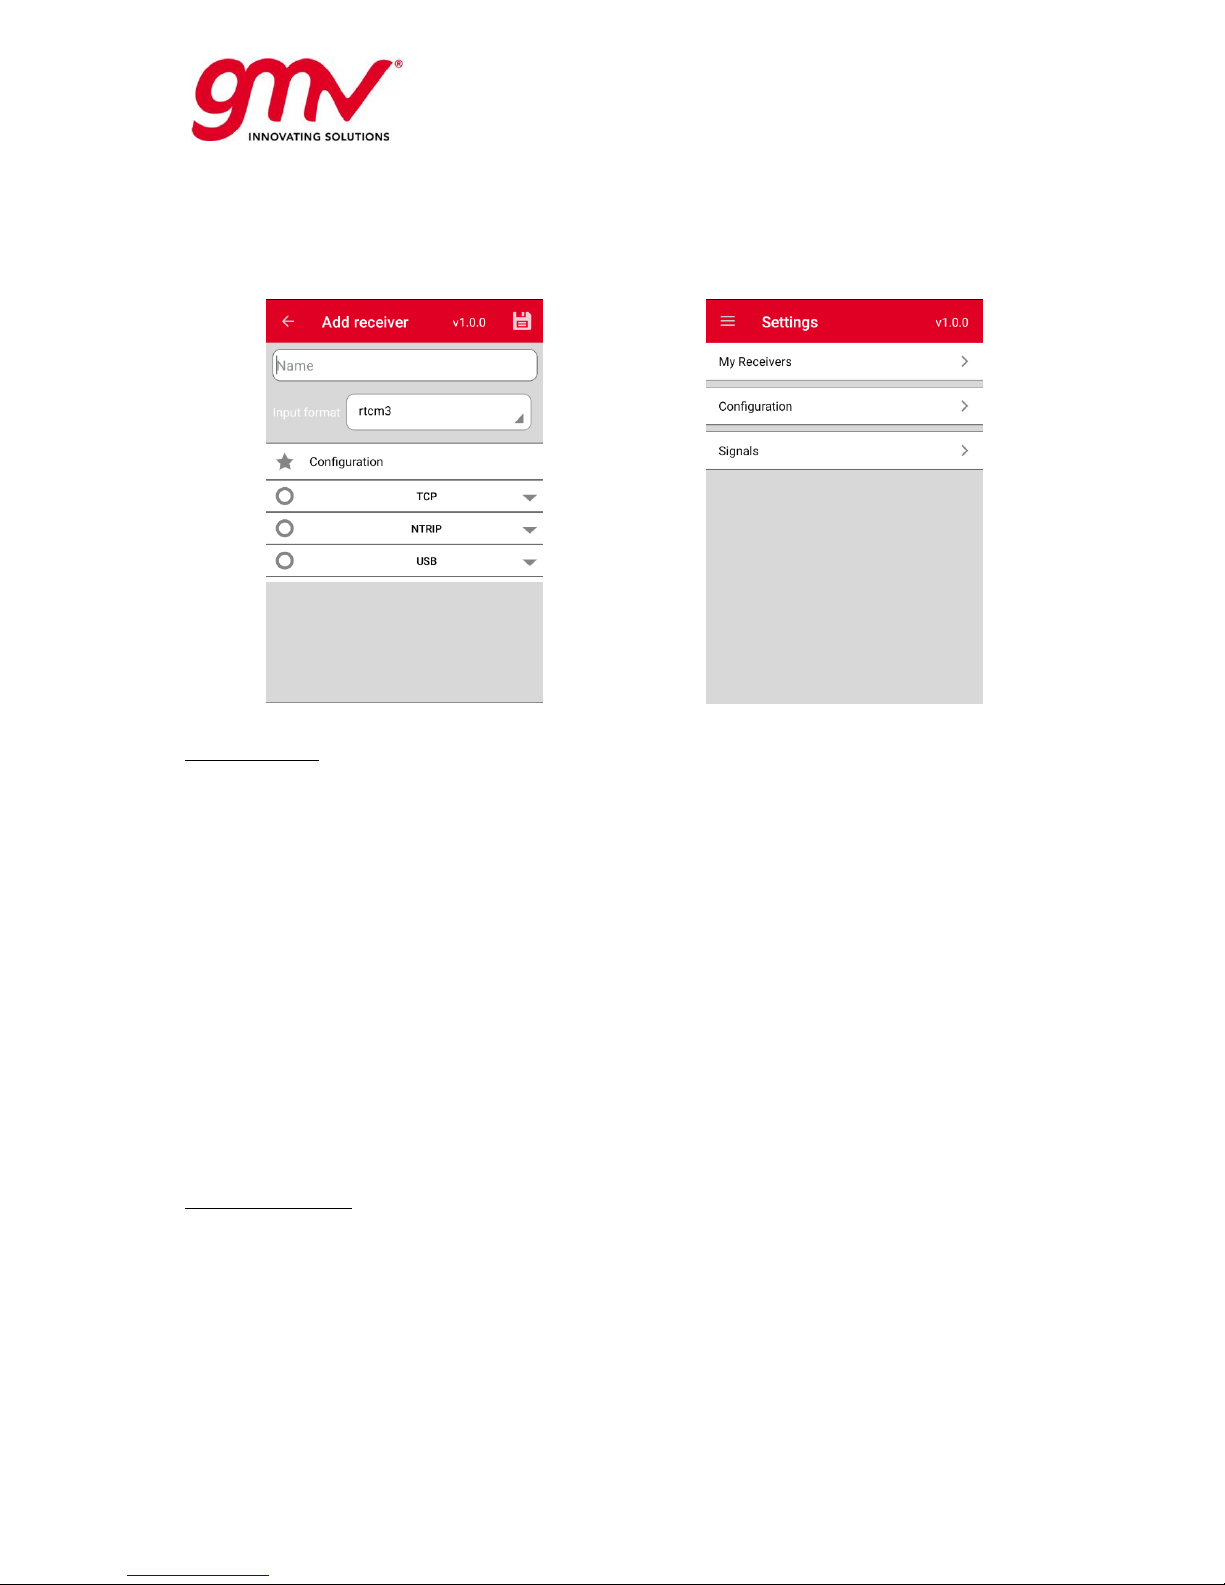
Settings
magicPPP application settings allows to configure three different set of options: the receivers, the
processing configuration and the signals.
Receivers Panel
The User Terminal contains a built-in receiver which provides all the capabilities needed to exploit the
magicPPP engine.
In addition to this, the magicPPP application allows the configuration of external GNSS receivers. There
are four different modes to connect a external receiver to the user terminal:
1. TCP: An IP and port are configured and the application connects to the given address using a TCP
Client.
2. NTRIP: An IP, port, user, password and mountpoint are configured. The application connects to the
ntrip caster using an ntrip client and starts retrieving the information.
3. USB: A direct connection with an USB-OTG interface can be also established. It shall be noted that
this option is not recommended as specfic drivers may be required for each receiver model, so it is
possible to find limitations with this mode.
In all this modes, the PPP engine supports standard rtcm3 format.
Created receivers and their associated info are stored in the application and can be selected in the
Status and Control View for the PPP processing configuration.
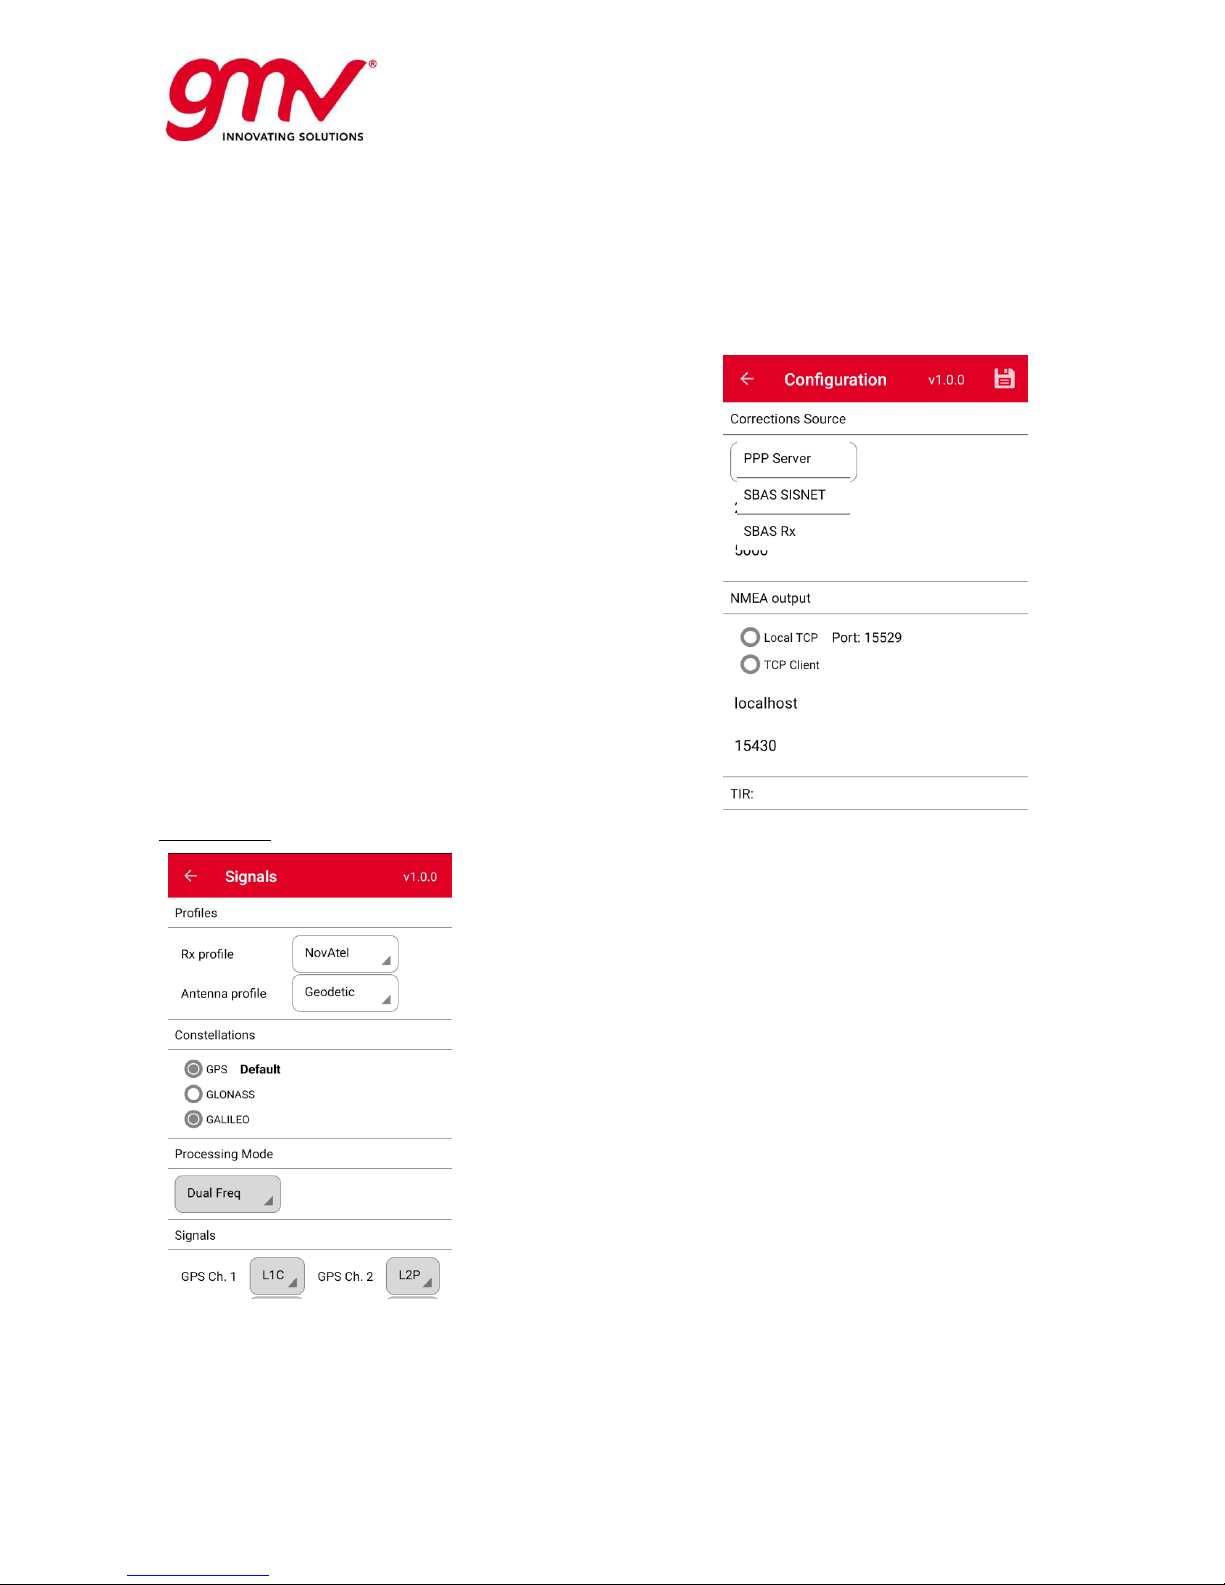
Configuration Panel
The second panel for configuration is related to the augmentation inputs and generated outputs. The
application supports the following sources of augmentation information:
PPP Server: a direct connection to the PPP augmentation information thought the internet is
used in this mode. The main benefit is the zero-delay in the reception of the information due
to the absence or minimal bandwidth limitation in the channel. This option is recommendable
to obtain the better performances when an internet link (Wi-Fi/3G) is available. For choosing
this option, the corresponding IP address and port number shall be configured and the user
shall be previously registered in the server side.
SISNET Server: a direct connection to the GEO-like augmentation information thought the
internet is used in this mode. Main benefit is the simulation of similar conditions as when
working with the GEO except for the signal blocking and fading. This option can be used when
Page 26
UNCLASSIFIED
Code:
Date:
Issue:
Revision:
Page:
GMV-magicGNSS-MAN-0002
05 July 2018
1
2
26 of 44
magicGNSSUT
GMV 2018; all rights reserved
UNCLASSIFIED
magicGNSS User Terminal Manual
an internet link (Wi-Fi/3G) is available. For choosing this option, the corresponding signal
frequency (L1, L5), IP address, port number, user and password shall be configured.
SBAS Receiver: this option relies on the built-in receiver capabilities to track both SBAS L1
and SBAS L5 information being transmited by an SBAS satellite. This option can be used in the
region where a GEO is augmenting PPP. For using this option, the corresponding signal
frequency shall be configured (L1, L5).
The PPP application generates a solution stream in NMEA
format. The output stream is published twofold: in a local port
in the device and a TCP client can send it to a remote server
when an internet connection is avaiable. The NMEA
information provided is standard GPGGA message and a
proprietary message, PGMVP, with extended information later
described in the PPP Outputs section.
Target Integrity Risk (TIR) used for the calculation of the PPP
protection Levels can be also configured. It shall be noted that
the PLs for all the available TIRs are calculated and dumped in
files for post-processing purposes but the one herein
configured will be monitored in the Status views of the
application interface. Following TIR values are supported:
0.05, 0.01, 1e-3, 1e-5 and 1e-7.
This view also allows to switch between INFO and DEBUG
mode. Nominally the application shall be configured as INFO,
and only if requested by the helpdesk the debug mode shall
be activated.
Signals Panel
The signals view allows the user to configure the receivers and
antenna profiles.
For the receiver preset profile is configure for the NovAtel builtin receiver. For the antenna the user can select between highend geodetic antenna, and patch mass market antenna. This
information is used to tune the alogorithm set up.
Second configurable option allows to choose the constellations
to be used. Noted that this configuration is limited by the
constellations supported by the used receiver. i.e., for the builtin one, only GPS and Galileo is processed.
Processing mode is set to Dual Frequency as the NovAtel
receiver is providing at least two frequencies information for
each constellation. Only at least dual-frequency receivers are
supported. If receiving single-frequency data, PPP will not start.
Finally, the signals used for each constellation and channel can
be selected and the Galileo navigation services can be
configured (F/NAV by default, I/NAV optional).
As stated above, the preconfigured profiles fix most of this
options. When using a different configuration the user shall
check the receiver configuration and modify the PPP
configuration accordingly through the Custom Rx profile,
configuring Constellations, Signals and Services.
File Explorer
A File Explorer is available to browse in the internal storage of the user terminal device at any moment
of the configuration, during processing or after it has finished.
Page 27
UNCLASSIFIED
Code:
Date:
Issue:
Revision:
Page:
GMV-magicGNSS-MAN-0002
05 July 2018
1
2
27 of 44
magicGNSSUT
GMV 2018; all rights reserved
UNCLASSIFIED
magicGNSS User Terminal Manual
3.3. FOUR MAIN STEPS FOR THE FIRST EXECUTION OF THE MAGICPPP
APPLICATION
This user manual provides a detailed description of the relevant features and instructions for using the
magicPPP application with the built-in receiver. The nominal operation requires four main steps are:
o Step 1 Configuration of magicPPP application.
o Step 2 Launching the PPP process.
o Step 3 Stopping the PPP process.
o Step 4 Collecting output data.
3.3.1. STEP 1 - CONFIGURATION THE MAGICPPP APPLICATION
The configuration of the user terminal and magicPPP is done in two stages:
1- HW set-up: The UT requires the connection of an external GNSS antenna to the SMA port at the
user terminal.
2- Application set-up: Configuration of the application properties.
For the second stage, the user shall go the Settings panels by tapping the Menu Button in the application
Top Bar and selection “Settings”. After that the signal and configuration views shall be carefully reviewed
to ensure that the configurations are correctly introduced.
In the configuration panel, the user shall select the source of augmentation data to be used, and in case
of extra information is needed fill the required fields. This information can be the address to the PPP
server or SISNET servers. The generated NMEA gateway shall be also configured, selecting the subset
of channels to be used. Again extra information may be needed. Finally, the Target Integrity Risk is
selected among the available choices.
Once the configuration is completed, the user shall browse to the “Signals” view. In this panel it is
important to configure the NovAtel receiver profile which will autoselect most of the configuration
parameters. In addition, the type of antenna is to be selected and the constellations to be used.
3.3.2. STEP 2 - LAUNCHING THE PPP PROCESSING
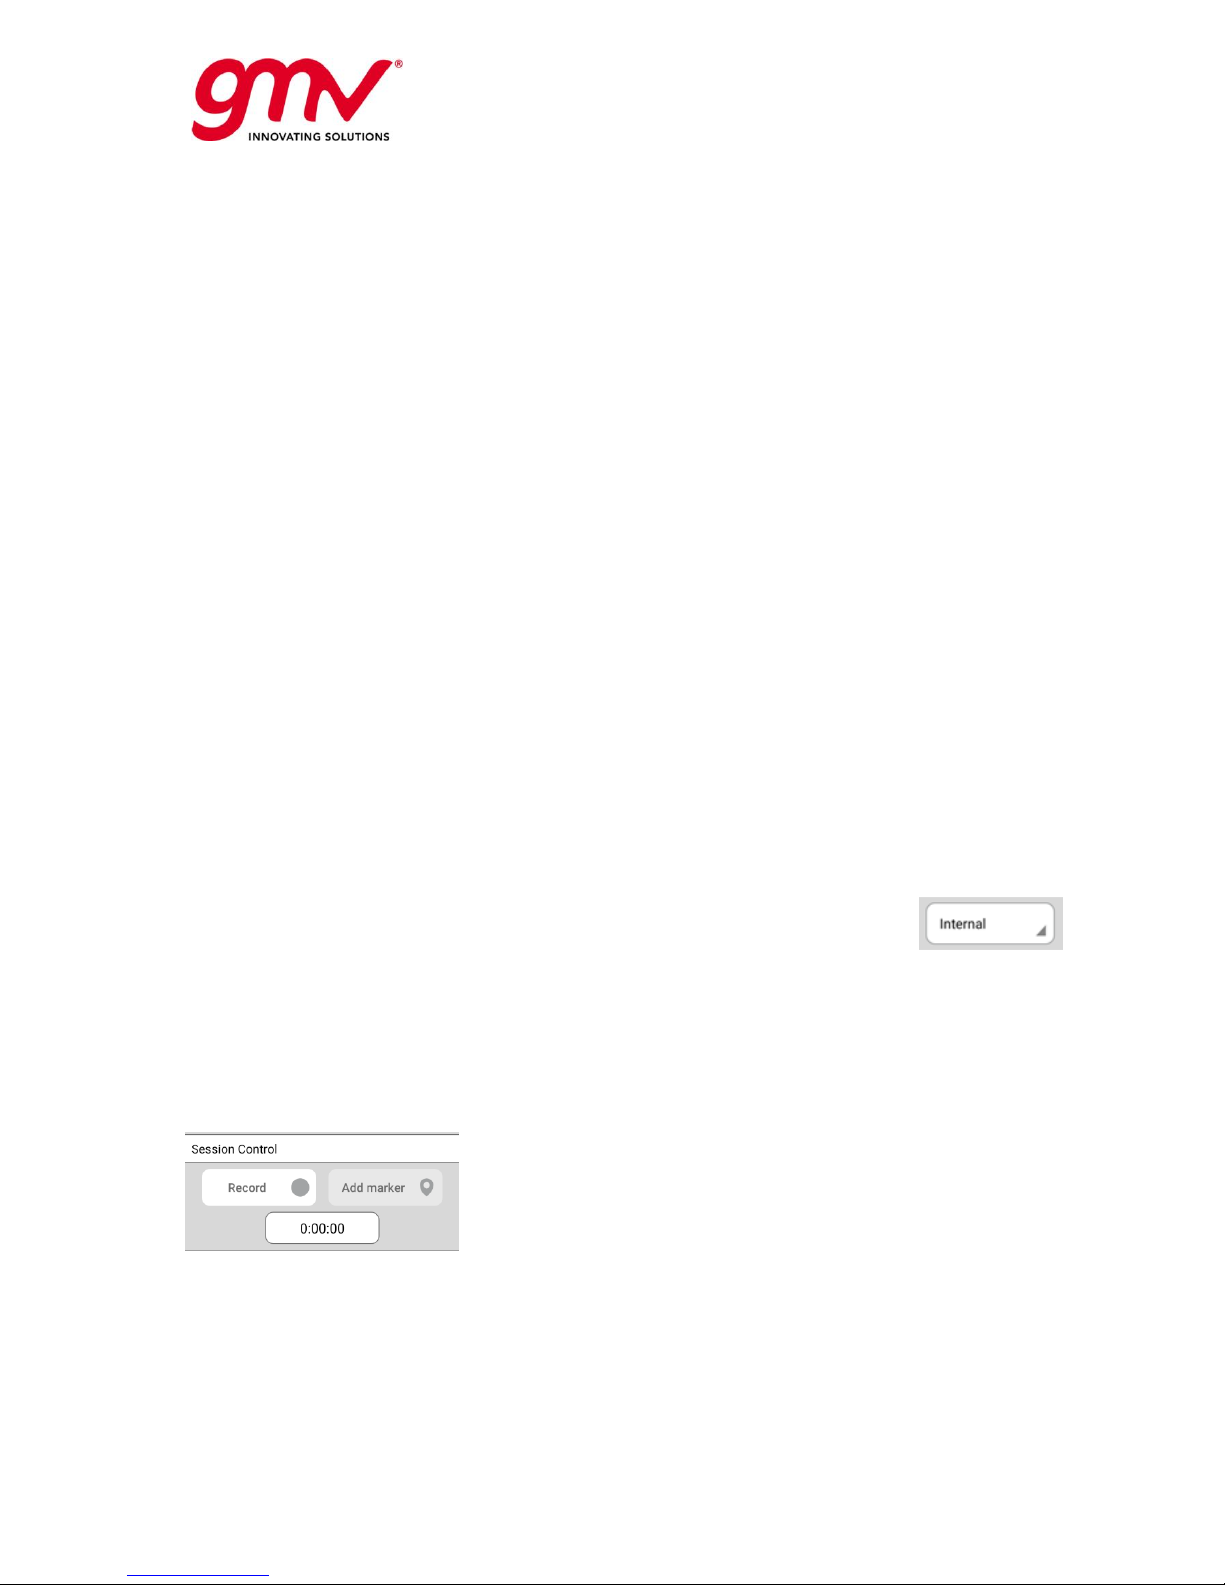
The user shall ensure that the NovAtel (i.e. “Internal” in the spinner) receiver is
configured to be used in the PPP processing. For that, the spinner under the receiver
control box can be used to select the “Internal” receiver.
Once the receiver is selected, the “Start” button in the Receiver Control box should be pressed in order
to launch the configured session. Once touched, the “Start” button is replaced by a “Stop” button, which
allows the user to stop the PPP session.
Just after the “Start” button is selected, a dialog box is displayed on the screen, allowing the user to
choose between a standard cold start, or selecting one of the previously configured Quick Start points.
The start command can be invalidated by touching the “Cancel” button. In this example, the “Cold Start”
option is selected.
Once the PPP process has been started, the user can access the
Session Control options in the Status & Control view. The Record
option, when selected, starts recording the PPP session output. When
the Record option is active, the timer below will show the duration of
the recorded period. The session recording can be stopped at any time
during the PPP process without stopping it.
While the recording is on-going, the user will be able to add land
markers at any time during the PPP processing. When the “Add marker” button is touched, a window is
displayed on the screen for the insertion. In the window, the user will be able to proceed with the
generation of the marker or cancel it. In case the user proceeds with the generation, it may be recorded
either with an automatic identifier containing the hour of the epoch corresponding to the maker location,
or with a specific identifier selected by the user. Markers created this way, will be kept as session
markers unless they are converted to QuickStart marker in the session menu. Alternatively, QuickStart
markers will be able to be directly created via the QuickStart Markers menu by touching the “use current
position button”.
Page 28
UNCLASSIFIED
Code:
Date:
Issue:
Revision:
Page:
GMV-magicGNSS-MAN-0002
05 July 2018
1
2
28 of 44
magicGNSSUT
GMV 2018; all rights reserved
UNCLASSIFIED
magicGNSS User Terminal Manual
Once the PPP process has been started, the user can access the Statistics data and plots in the Status
menu. The available statistics, data and plots are described in the previous section and briefly
summarised below:
1. Summary table which includes overall PPP processing flag, latitude (N, degrees), longitude (E,
degrees), altitude (meters), time (GPST), number of satellites being processed by the PPP,
horizontal protection level (meters), vertical protection level (meters).
2. CNR (Carrier to Noise Ratio) plot.
3. Sky-plot of the satellite in view.
4. Longitude(X)-Latitude(Y) displacement plot, in centimeters, with respect to a reference position.
The first epoch position is used as reference.
5. Altitude: absolute height, in metres.
6. Horizontal and Vertical Protection levels, in centimetres, for the configured Target Integrity Risk
(displayed at the chart).
Note that in the Longitude(X)-Latitude(Y) displacement, Altitude and PLs plots, the plot axes are rescaled
when the time window filter is changed. The options for the time window filter are: 30 sec, 1 min, 5
min, 10 min, 30 min and 60 min. The refresh button on the right, allows the user to delete all previous
positions/PLs and consider subsequent positions/PLs only for being plotted. This action cannot be
undone, in the sense that once the refresh button has been touched, deleted position/PL cannot be
recovered for being plotted. However, they are still available in the output PPP position/PL files.
As the PPP process is running, the real-time positions are accessible through a specified TCP/IP port,
and distributed via Wi-Fi/3G following the standard NMEA format. These positions can be used for
feeding a further user application, running on a different device (tablet, PC, etc.), accepting and using
real-time NMEA format positions for different purposes, such as kinematic vehicle location, topography,
etc.
Other actions that are compatible with the PPP processing are:
Charging the magicGNSS User Terminal device internal battery, via micro-USB port.
Transferring files, via micro-USB port.
Taking screenshots, by pulling down the notification panel to reach the setting option, and
touching the screenshot icon. Screenshots are stored in the default pictures path (i.e. Internal
storage/Pictures/Screenshots).
During transfer mode the 3G connection will be interrupted. The user will need to reinsert
SIM PIN to connect again once the transfer has been deactivated.
3.3.3. STOPPING THE PPP PROCESS
When a PPP process is running, the user can stop it by touching the “Stop” button of the Receiver control
option in the Status View.
3.3.4. COLLECTING THE OUTPUT DATA
Once the PPP process is finished, all the generated output data files can be found in a dedicated folder
in the user terminal (Internal storage/rtppp/sessions/), identified with the following naming convention
“PPP_YYYY-MM-DD_HHMMSS”, where:
YYYY-MM-DD is the last session epoch date (year in 4 digits, month and date in 2 digits)
HHMMSS is the last session epoch hour (local hour, minute and second in 2 digits each).
The list of generated files and description is specified below.
The session KML and landmarks can be extracted from the Session View as explained before.
Page 29

UNCLASSIFIED
Code:
Date:
Issue:
Revision:
Page:
GMV-magicGNSS-MAN-0002
05 July 2018
1
2
29 of 44
magicGNSSUT
GMV 2018; all rights reserved
UNCLASSIFIED
magicGNSS User Terminal Manual
3.3.4.1. Configuring an External Receiver
3.3.4.1.1. TCP/IP
From the Add Receiver panel (Settings/My Receivers/Add receiver), select TCP, and a panel will expand
with the Host (IP or URL) and Port fields, to be filled by the user. Once filled, the user shall touch the
“Test” button, and the app will indicate whether the connection was successful or not. Once properly
filled and checked, the user shall name the receiver and click the Save button i.e. disk in the Top Bar.
3.3.4.2. PPP Outputs
NMEA GPGGA definition:
Standard GPGGA NMEA (please see standard NMEA reference for this message):
Timestamp
Latitude
Longitude
Latitude direction
Longitude direction
GPS Quality Indicator
Number of Satellites in Use
Horizontal Dilution of Precision
Antenna altitude above sea level
Units of altitude
Geoidal separation
Units of geoidal separation
Age of DGPS data
DGPS reference station id
Example:
$GPGGA,235942.00,4035.48110204,N,00342.40079690,W,9,11,0.0,753.094,M,51.938,M,,*7F
NMEA PGMVP definition:
Same as GPGGA with extended fields:
Timestamp
Latitude
Longitude
Latitude direction
Longitude direction
GPS Quality Indicator
Number of Satellites in Use
Horizontal Dilution of Precision
Antenna altitude above sea level
Units of altitude
Geoidal separation
Units of geoidal separation
Age of DGPS data
DGPS reference station id.
Kalman Sigma North [m]
Kalman Sigma East [m]
Kalman Sigma Up [m]
Clock Bias [ns]
Tropospheric Zenith Delay [m]
Horizontal Protection Level [m]
Vertical Protection Level [m]
Number of GPS satellites used
Number of GLONASS satellites used
Number of Galileo satellites used
Number of BeiDou satellites used
Number of QZSS satellites used
Example:
$PGMVP,235942.00,4035.48110204,N,00342.40079690,W,9,11,0.0,753.094,M,51.938,M,,,0.0028
90,0.003533,0.006412,8.373966,2.223864,0.152078,0.197840,7,0,4,0,0*5B
NMEA PGMVA definition:
Same as GPGGA with protection levels in meters:
Timestamp
Latitude
Longitude
Latitude direction
Longitude direction
GPS Quality Indicator
Number of Satellites in Use
Horizontal Dilution of Precision
Antenna altitude above sea level
Units of altitude
Geoidal separation
Units of geoidal separation
Age of DGPS data
DGPS reference station id.
Horizontal Protection Level [m]
Vertical Protection Level [m]
Page 30

UNCLASSIFIED
Code:
Date:
Issue:
Revision:
Page:
GMV-magicGNSS-MAN-0002
05 July 2018
1
2
30 of 44
magicGNSSUT
GMV 2018; all rights reserved
UNCLASSIFIED
magicGNSS User Terminal Manual
Example:
$PGMVA,084854.00,3748.23268630,S,14458.01523430,E,9,09,0.0,45.496,M,4.672,M,,,4.285554
,3.993219*68
GPGGA, PGMVA and PGMVP are all sent in real time via local TCP port and TCP client according to the
configuration options (as seen in the Configuration panel).
PPP File-based Outputs
Nominally the PPP Engine generates the following information:
Observation RINEX (RINEX v3.03) logging information for all the received measurements,
even if they have not been used in the process execution.
Input navigation RINEX (RINEX v3.03)
SBAS EMS 2.0
Standard NMEA file containing positioning data (GPGGA)
Proprietary NMEA extension file containing positioning and integrity data (protection levels)
(PGMVP)
PPP Positions file
KML file containing positioning data and landmark positions
Navigation Corrections file, containing information about navigation data and corrections, per
satellite and epoch
PPP Summary files containing measurements residuals both by satellite and by iteration, in
addition to information related to measurement outlier detection and rejection.
PPP Indicators file containing information of the PPP process on an epoch basis.
PPV Indicators file containing information of the pre-processing and validation of the
observation measurements.
* Debug option shall be only activated on helpdesk request to investigate potential issues or
improvements.
Further information about the output files generated under the Info option, is provided next. For
standard format files, links to the formats descriptions are provided. For relevant proprietary formats,
detailed descriptions are included.
Observation RINEX (RINEX v3.03) logging information for all the received measurements,
even if they have not been used in the process execution. The generated output file follows
the RINEX 3.03 standard format, which can be consulted here: https://kb.igs.org/hc/en-
us/article_attachments/202583897/RINEX_303.pdf. File naming convention following the
mentioned standard directives.
Input navigation RINEX (RINEX v3.03). As for the observation RINEX files, see format at
https://kb.igs.org/hc/en-us/article_attachments/202583897/RINEX_303.pdf. File naming
convention following the mentioned standard directives.
Receiver clock estimation RINEX (RINEX v3.03). As for previous files, see format at
https://kb.igs.org/hc/en-us/article_attachments/202583897/RINEX_303.pdf. File naming
convention following the mentioned standard directives.
SBAS EMS 2.0. See format here: http://www.egnos-pro.esa.int/ems/EMS_UID_2_0.pdf. File
naming convention following the mentioned standard directives.
Standard NMEA file containing positioning data. For further information about NMEA format:
https://www.nmea.org/content/nmea_standards/nmea_0183_v_410.asp. File naming
convention: GPGGA_yyyymmdd.txt, e.g. GPGGA_20180119.txt.
Proprietary NMEA extension file containing positioning and integrity data (protection levels).
Format. File naming convention: PGMVA_yyyymmdd.txt, e.g. PGMVA_20180119.txt
PPP Positions file, containing the following information:
Parameter
Description
Units
Year
Year of position solution
Mth
Month of position solution
Day
Day of position solution
Hou
Hour of position solution
Min
Minutes of position solution
Page 31

UNCLASSIFIED
Code:
Date:
Issue:
Revision:
Page:
GMV-magicGNSS-MAN-0002
05 July 2018
1
2
31 of 44
magicGNSSUT
GMV 2018; all rights reserved
UNCLASSIFIED
magicGNSS User Terminal Manual
Parameter
Description
Units
Sec
Seconds of position solution
X
PPP positioning solution X in ECEF
m
Y
PPP positioning solution Y in ECEF
m
Z
PPP positioning solution Z in ECEF
m
Lat
PPP positioning solution Latitude
ddd mm
ss.sssss
Lon
PPP positioning solution Longitude
ddd mm
ss.sssss
Hei
PPP positioning solution Height above the ellipsoid
m
SigLat
Sigma of PPP positioning solution Latitude
m
SigLon
Sigma of PPP positioning solution Longitude
m
SigHei
Sigma of PPP positioning solution Height
m
Clock
Estimated clock bias
ns
Tropo
Tropospheric delay
m
All
Number of total satellites used
-
SVG
Number of GPS satellites used
-
SVR
Number of GLONASS satellites used
-
SVE
Number of GALILEO satellites used
-
SVC
Number of Beidou satellites used
-
SVJ
Number of QZSS satellites used
-
SVI
Number of IRNSS satellites used
-
DEGRADED
Flag indicating if the solution is degraded. 1 indicates
degraded solution. 0 indicates valid solution.
-
VALID_PL
Flag indicating the validity of Protection Levels (PLs). 1
indicates valid PL. 0 indicates not valid PL.
PL_H (5e-02)
Horizontal protection level at 0.05% target integrity risk.
m
PL_V (5e-02)
Vertical protection level at 0.05% target integrity risk.
m
PL_H (1e-02)
Horizontal protection level at 0.01% target integrity risk.
m
PL_V (1e-02)
Vertical protection level at 0.01% target integrity risk.
m
PL_H (1e-03)
Horizontal protection level at 0.001% target integrity risk.
m
PL_V (1e-03)
Vertical protection level at 0.001% target integrity risk.
m
PL_H (1e-04)
Horizontal protection level at 0.0001% target integrity risk.
m
PL_V (1e-04)
Vertical protection level at 0.0001% target integrity risk.
m
PL_H (1e-05)
Horizontal protection level at 0.00001% target integrity risk.
m
PL_V (1e-05)
Vertical protection level at 0.00001% target integrity risk.
m
PL_H (1e-07)
Horizontal protection level at 0.0000001% target integrity
risk.
m
PL_V (1e-07)
Vertical protection level at 0.0000001% target integrity risk.
m
Page 32

UNCLASSIFIED
Code:
Date:
Issue:
Revision:
Page:
GMV-magicGNSS-MAN-0002
05 July 2018
1
2
32 of 44
magicGNSSUT
GMV 2018; all rights reserved
UNCLASSIFIED
magicGNSS User Terminal Manual
KML file containing positioning data and landmark positions, able to be opened with Earth
browsers such as Google Earth. See https://developers.google.com/kml/. File naming
convention: same as the session with .kml extension.
Navigation Corrections file, containing information about navigation data and corrections, per
satellite and epoch. Format. File naming convention “nav_yyyymmdd.txt”.
PPP Summary file containing measurements residuals both by satellite and by iteration, in
addition to information related to measurement outlier detection and rejection. These files are
mainly used for helpdesk debugging purposes. PPP Indicators file containing information of the
PPP process on an epoch basis. These files are mainly used for helpdesk debugging purposes.
PPV Indicators file containing information of the pre-processing and validation of the
observation measurements. These files are mainly used for helpdesk debugging purposes.
3.4. TROUBLESHOOTING
Here you can find the most common problems that can occur while using the magicPPP application, and
some hints for solving them:
Problem
Solution
After touching the “Start”
button the PPP process
does not begin.
Please check that the signals configured are correct with respect to the
receiver and it gives information about two frequencies.
When working with PPPServer or SISNET check the availability of internet
connection.
If not using neither PPP Server nor SISNET corrections source, check if
the receiver is sending both observations, navigation data and SBAS
information.
CNRs are presented, but
no position nor time is
given
Please check your internet connection if using PPP Server or SISNET. If
you are using the SBAS GEO option, check the signal availability of it in
your area.
Battery runs out while the
PPP process is running.
Data should be stored until the moment of the shutdown.
Geoid file not present
message
Please contact our helpdesk.
Configuration not present
or corrupted
Configuration files should not be edited by the user, they are
automatically managed by the app. Please contact our helpdesk.
PPP already running
message
Please reset the magicPPP application.
The magicPPP
application, after showing
nominal behaviour for a
long time period, starts
providing non expected
results.
It could be the case the device temperature exceeds some thresholds,
above which the microprocessor is forced to slow down the processing
velocity. Please check that the device is not running under direct
sunlight or near some heat source.
The number of tracked
satellites seem to be low,
or the performances are
not as good as expected.
Please check that the antenna is not being shadowed by any obstacle,
or that there is no reflecting surface close to it which can be severely
increasing the effect of the multipath. The antenna has to be installed
in a location which maximizes the sky view and thus the satellite sight.
Page 33
UNCLASSIFIED
Code:
Date:
Issue:
Revision:
Page:
GMV-magicGNSS-MAN-0002
05 July 2018
1
2
33 of 44
magicGNSSUT
GMV 2018; all rights reserved
UNCLASSIFIED
magicGNSS User Terminal Manual
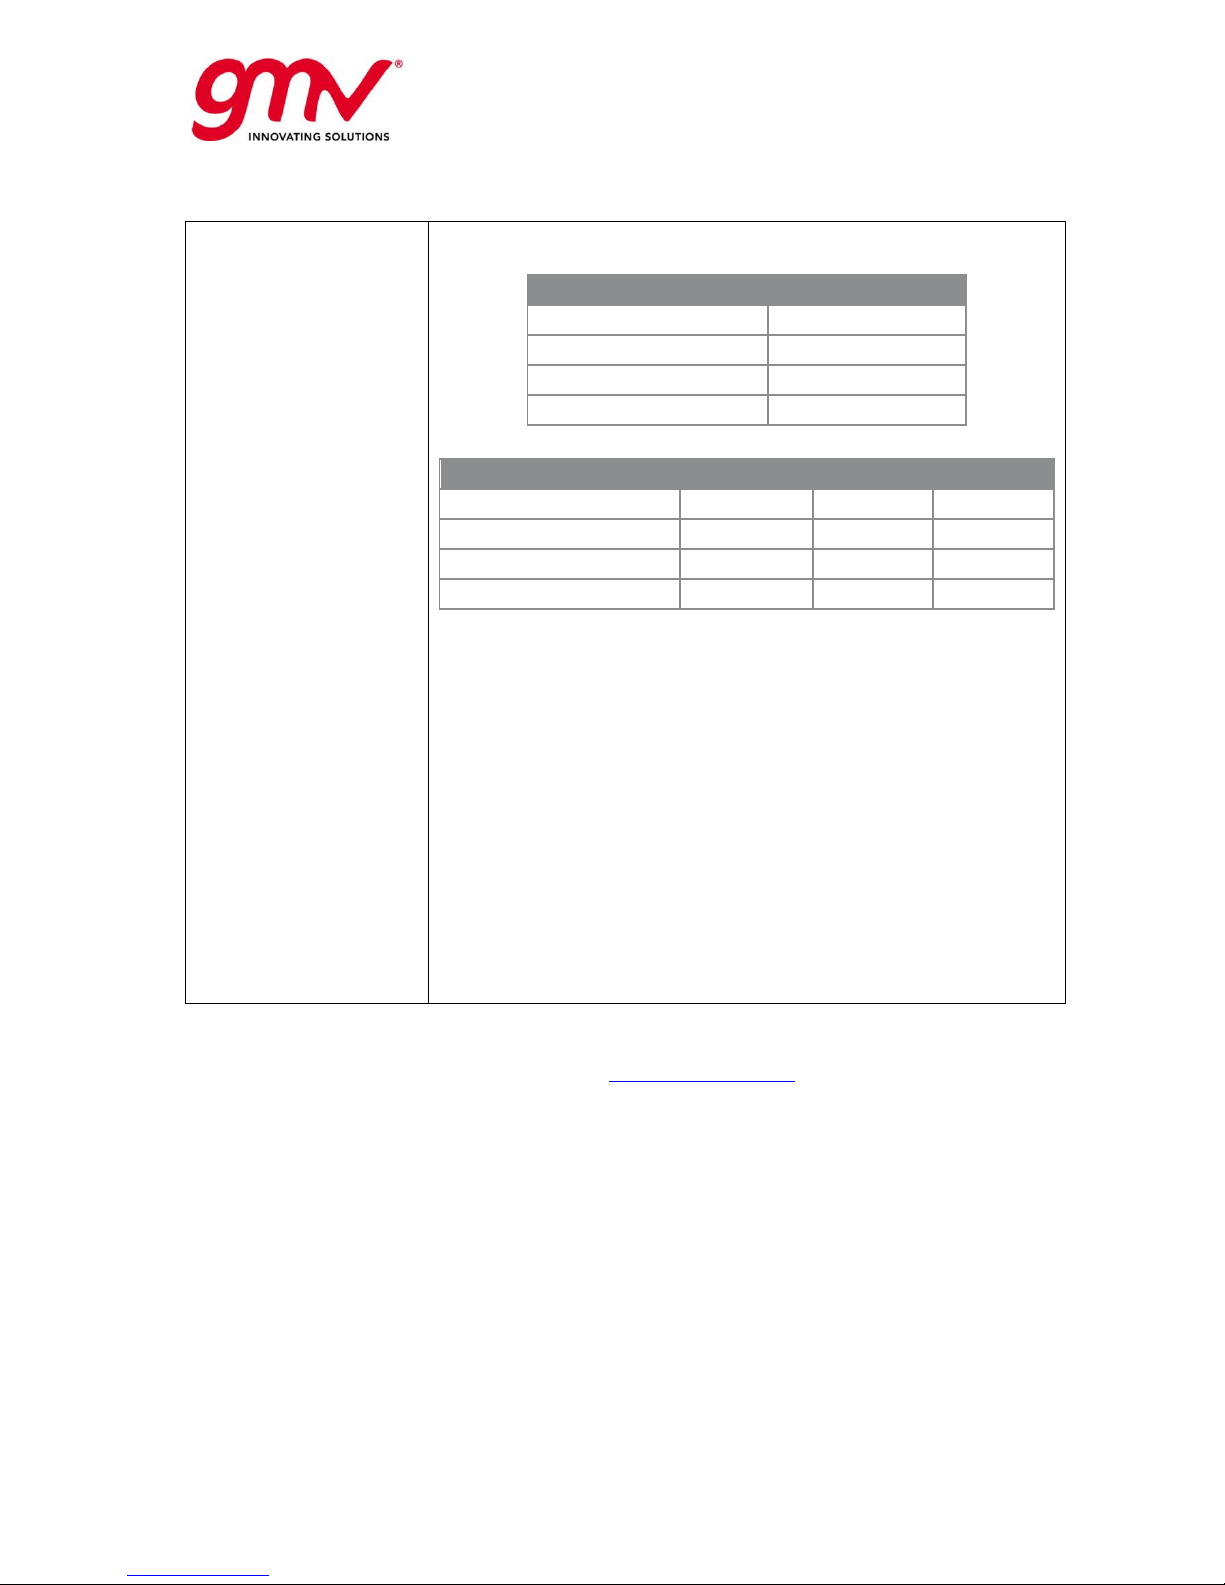
The magicPPP solution is
noisier than expected.
Please check the following tables for typical PPP convergence time and
typical accuracy (RMS):
PPP Mode
Convergence Time
SBAS L5 GPS + Galileo
40 min
SBAS L1 GPS
50 min
Internet GPS + Galileo
30 min
Internet GPS
45 min
PPP Mode
Height RMS
North RMS
East RMS
SBAS L5 GPS + Galileo
10 - 20 cm
5 - 15 cm
5 - 15 cm
SBAS L1 GPS
10 - 30 cm
10 - 20 cm
10 - 20 cm
Internet GPS + Galileo
10 - 15 cm
5 - 10 cm
5 - 10 cm
Internet GPS
10 - 20 cm
5 - 15 cm
5 - 15 cm
In order to improve the PPP attainable performances, please consider
the following recommendations:
Please define the minimum test duration as double the length
of the convergence time (e.g. 80 min duration for a PPP
through SBAS with GPS and Galileo test).
Convergence period is especially significant in kinematic tests.
Please make sure that during the convergence period, the
receiver is a relatively clean environment, so that when the
kinematic tests begins, the PPP starts from a converged
position.
Please use the quick start functionality if convergence is not a
critical issue in the context of your test. Note that a well
calibrated initial position is needed.
Please use the internet connection, if available, as corrections
transmission method, rather than through the satellite,
especially in urban and sub-urban scenarios, where the GEO
lines of sight can be easily obstructed by buildings.
magicPPP application support
For magicPPP application support, please contact [email protected].
Page 34
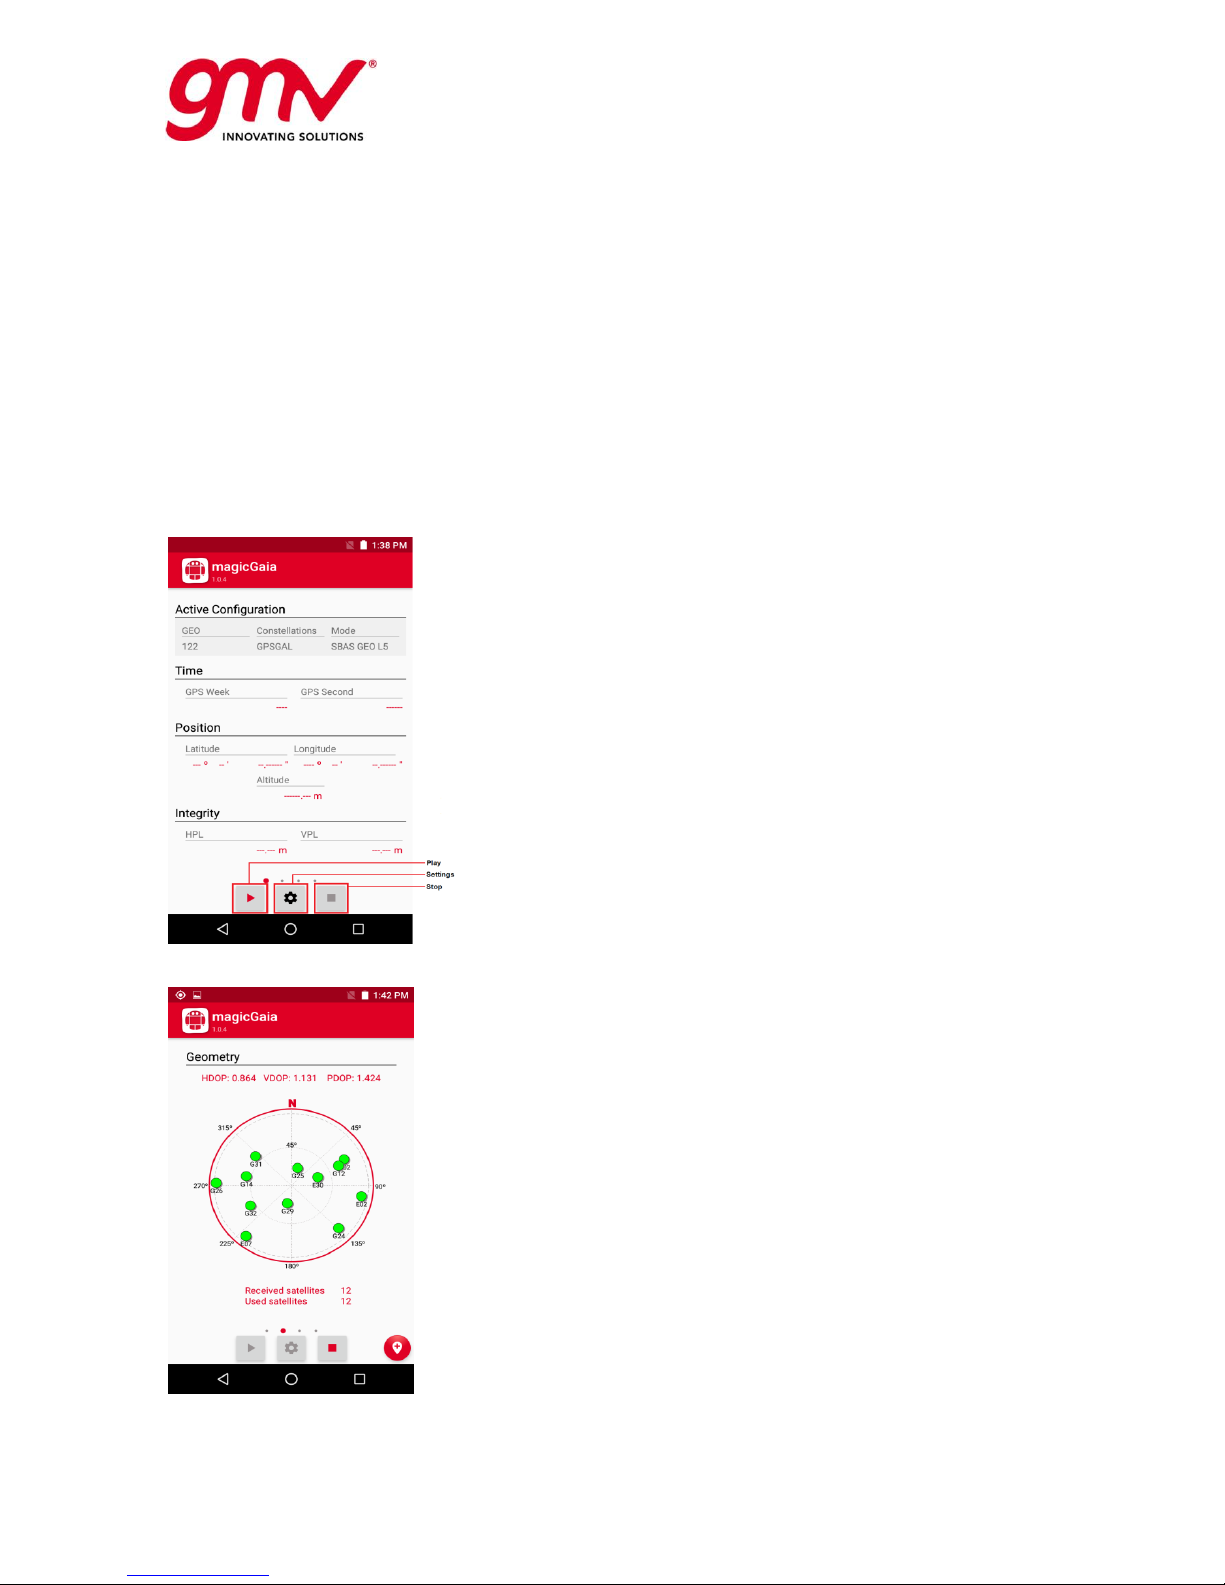
UNCLASSIFIED
Code:
Date:
Issue:
Revision:
Page:
GMV-magicGNSS-MAN-0002
05 July 2018
1
2
34 of 44
magicGNSSUT
GMV 2018; all rights reserved
UNCLASSIFIED
magicGNSS User Terminal Manual
4. MAGICSBAS USER MODULE APPLICATION USER MANUAL
4.1. THE MAGICSBAS USER MODULE APPLICATION OVERVIEW
The magicSBAS User Module (UM) application installed in the magicGNSS User Terminal device is
a SW tool providing real-time SBAS solutions. It processes real-time observations provided by the
magicGNSS User Terminal device internal GNSS receiver, navigation data and SBAS augmentation
information to generate real-time SBAS positions.
4.2. THE MAGICSBAS UM GRAPHICAL INTERFACE
When accessing magicSBAS UM through the magicGNSS User Terminal launcher the main
application display is shown.
This display is arranged into different sections:
o Active Configuration: Shows a summary of the
current configuration.
o Time: Shows the GPS time computed.
o Position: shows the position computed.
o Integrity: shows the protection levels computed
At the bottom, control buttons are displayed:
o Play: starts the execution.
o Settings: opens the configuration interface.
o Stop: stops the execution.
This buttons are available in all display windows of the
tool except in configuration.
From this window it is possible to swipe to the right to open the sky polar view:
In this window, when a position can be computed, the values
of the Dilution of Precision (DOP) are shown for horizontal,
vertical and positioning dimensions.
On the centre of the screen, a polar view of the satellites in
view is shown. Satellites are identified with a letter (“G” for
GPS and “E” for Galileo) and a number (the PRN of the
satellite).
Satellites plotted in green are those satellites that have been
used in the computation of the solution. Those plotted in red
are visible but have not been used in the computation of the
solution.
Below the polar plot the number of visible and used satellites
is displayed.
Page 35
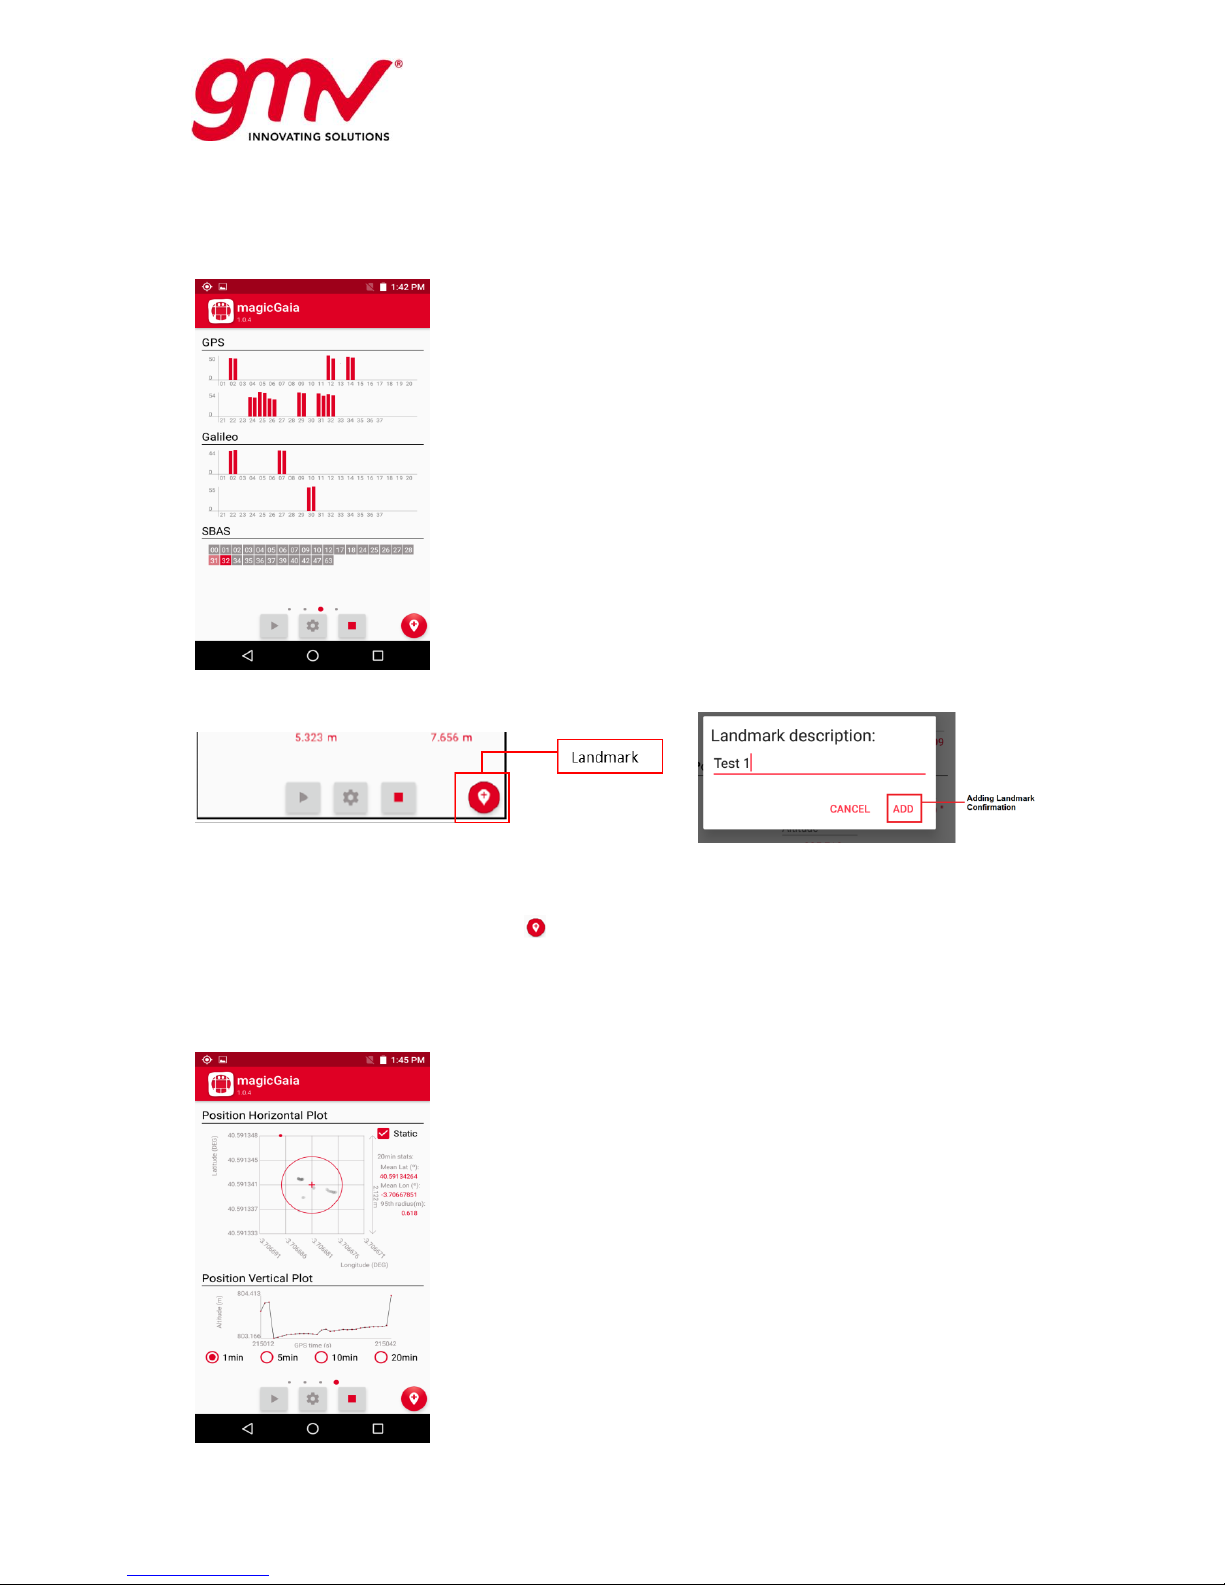
UNCLASSIFIED
Code:
Date:
Issue:
Revision:
Page:
GMV-magicGNSS-MAN-0002
05 July 2018
1
2
35 of 44
magicGNSSUT
GMV 2018; all rights reserved
UNCLASSIFIED
magicGNSS User Terminal Manual
The next screen on the right displays information about the received signals.
It is divided into three sections. The first two sections
show the carrier to noise ratio (CN0) of the signals
received from each satellite in dB-Hz. For each PRN two
bars appear corresponding to the configured primary and
secondary signals.
At the bottom, the sequence of received SBAS messages
is shown. The message at present epoch is shown in dark
red. Those messages that have not been received or
being received have time-out are shown in grey. Finally,
messages received in the past which remain valid in the
present epoch are shown in light red.
When position can be computed, a new button appears at the bottom of the screen.
When touched, the current position and time are stored in Real-Time in the landmark output file. An
additional comment can be added during this process. Please, note that to be able to store landmark
the outputs files has to be enabled. The landmark position correspond with the position computed in
the moment that the landmark button ( ) is pressed, not with the position at the moment the ADD
button is pressed.
The next screen on the right displays information about the position.
It is divided into three sections. The first two sections
show the historical horizontal and vertical positon.
The current and previous horizontal positions are
displayed in a latitude versus longitude plot. For static
scenarios the "Static" checkbox can be selected to
include some statistics as the mean latitude, the mean
longitude and the radius of the 95th percentile for the
samples computed for the latest 20 min. Below this
graph, it is plot the temporal evolution of the vertical
positions.
At the bottom, the time length to be plotted on the
previous graphics can be configured.
Page 36
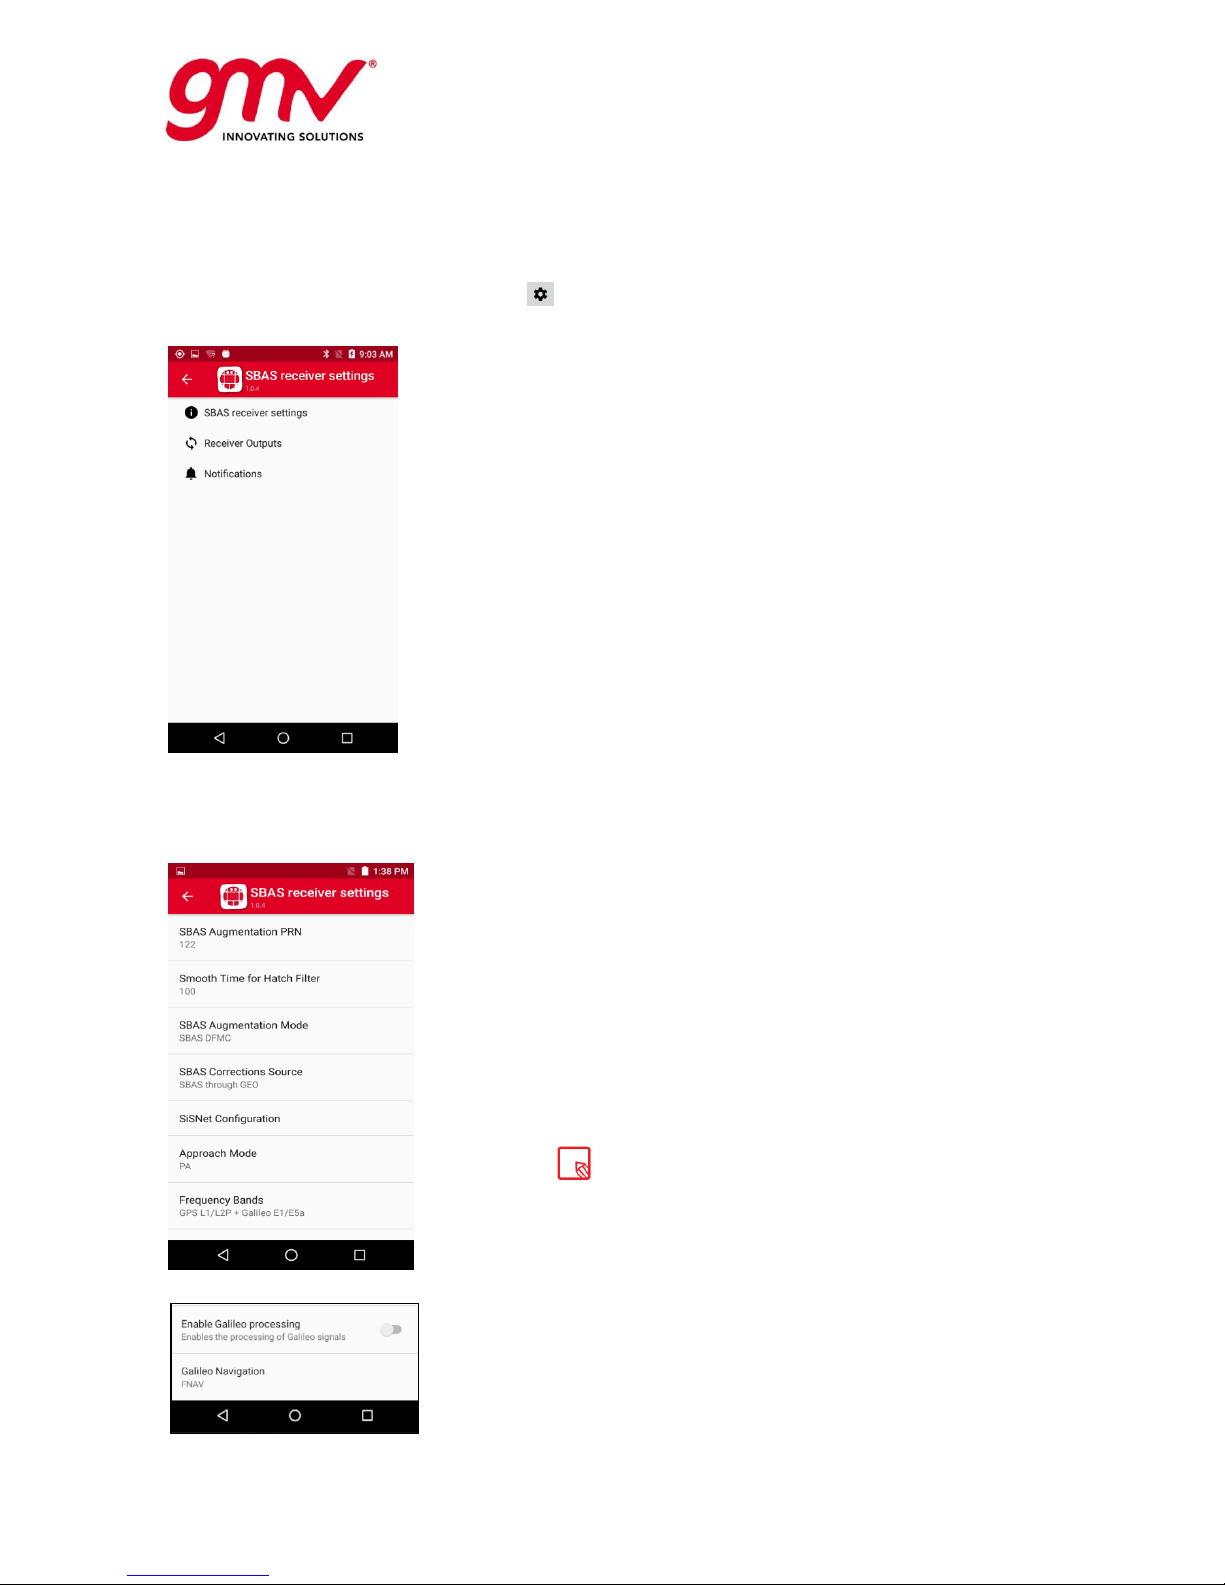
UNCLASSIFIED
Code:
Date:
Issue:
Revision:
Page:
GMV-magicGNSS-MAN-0002
05 July 2018
1
2
36 of 44
magicGNSSUT
GMV 2018; all rights reserved
UNCLASSIFIED
magicGNSS User Terminal Manual
4.3. THE MAGICSBAS UM SETTINGS
While the application is not computing the navigation solution, it is possible to access to the tool
configuration through the Settings button ( ).
This will open the main settings window that is arranged
into three sections:
SBAS receiver settings: Contains all
configuration parameters related with the
navigation solution computation.
Receiver Outputs: Allows configuring the
different outputs that the tool can produce.
Notifications: enables the configuration of the
notifications generated by the tool.
Each of these sections is detailed in the following
sections
4.3.1. SBAS RECEIVER SETTINGS
By entering to this menu, it is possible to configure several navigation solution related options.
SBAS augmentation PRN: Allows the selection of
the SBAS PRN to be used for augmentation. It will
depend on the location and SBAS service provided.
For instance, during Australia testbed, the PRN 122
will be used. However this PRN will not be usable in
other regions such as Europe.
Smooth Time for Hatch Filer: Allows the user to
configure the minimum time needed to smooth
pseudorange measurements using the phase
measurements. For aeronautical users this value
shall be set to 100.
However, this value can be very
restrictive for urban users which may
need to reduce it in order to increase the
availability of the position computation.
Page 37
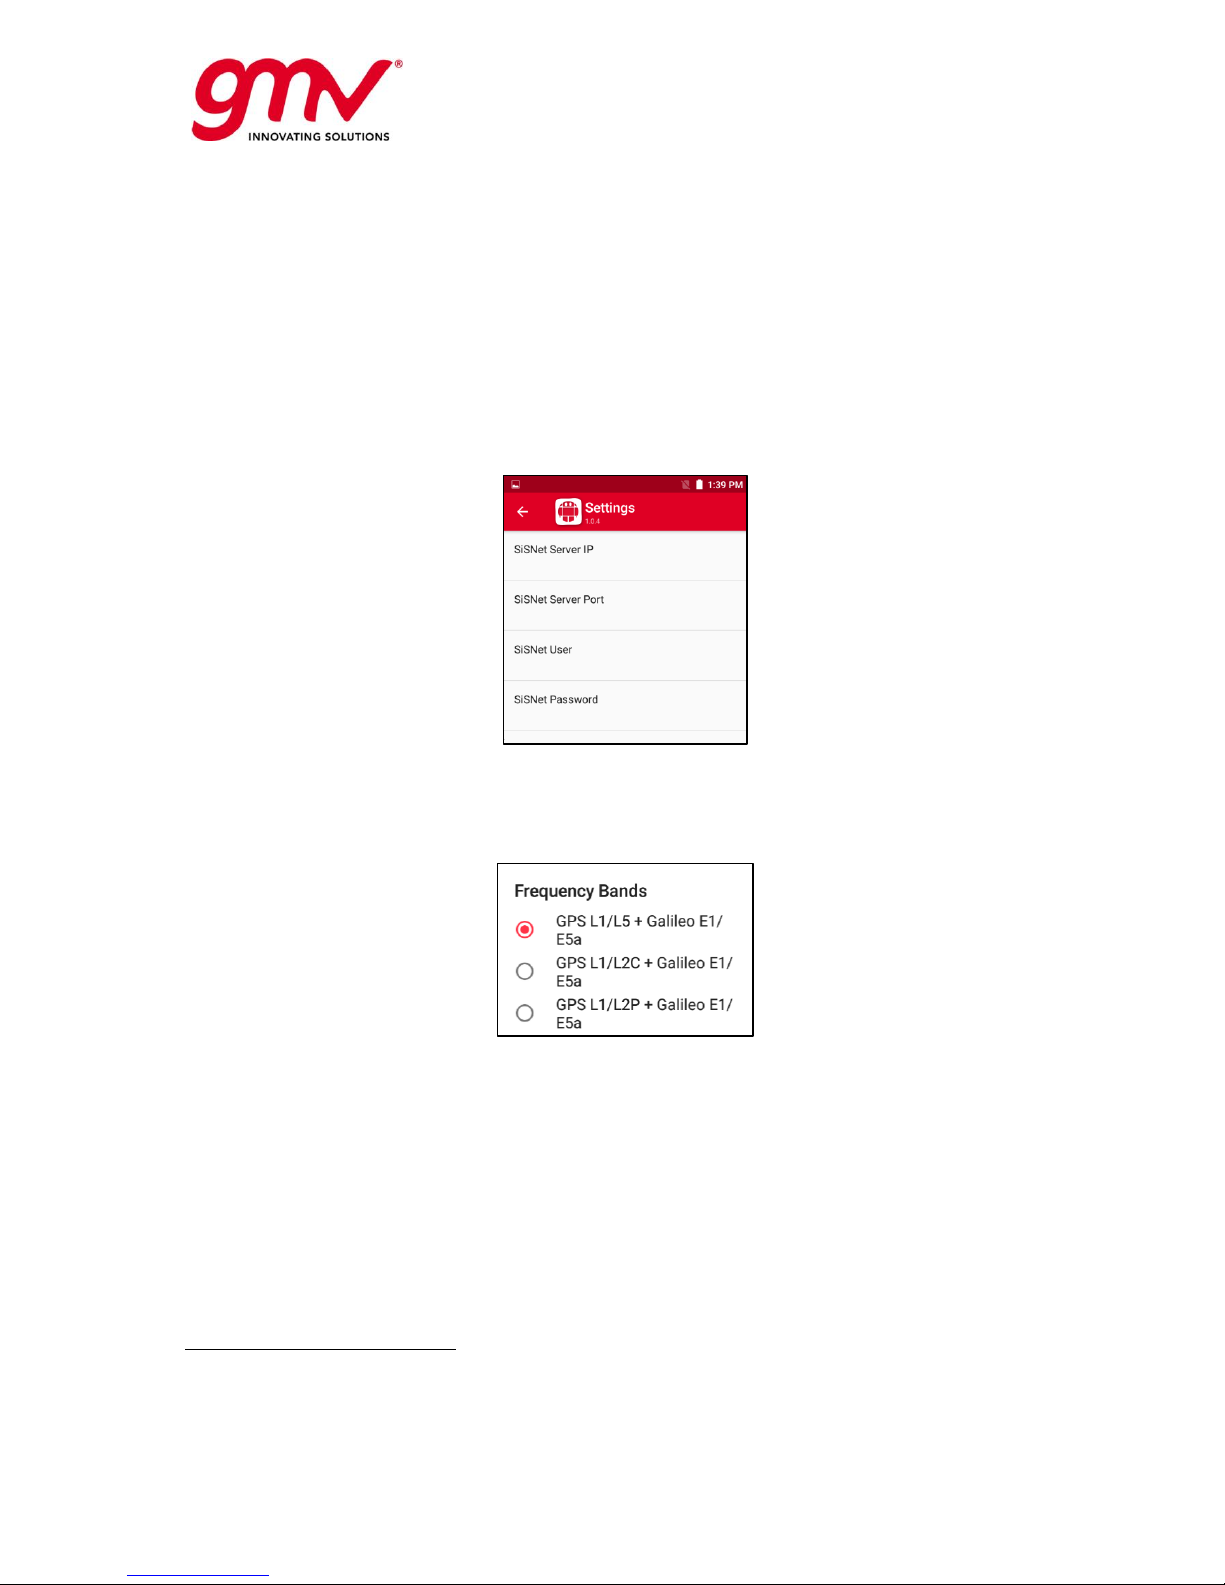
UNCLASSIFIED
Code:
Date:
Issue:
Revision:
Page:
GMV-magicGNSS-MAN-0002
05 July 2018
1
2
37 of 44
magicGNSSUT
GMV 2018; all rights reserved
UNCLASSIFIED
magicGNSS User Terminal Manual
SBAS augmentation mode: allows the selection of one of the supported augmentation modes:
o SBAS L1
o SBAS DFMC
o SBAS Enabled L11
o SBAS Enabled DFMC2
SBAS corrections source: allows the selection of the source of the augmentation between:
o SBAS through SiSNet: SBAS information is obtained through internet using SiSNet
protocol
o SBAS through GEO: SBAS information is obtained through the signal in space
broadcast by the GEO.
SiSNet configuration: in case SBAS through SiSNet is configured, this option allows the user
to configure the SiSNet server IP and port and the user log name and password.
Approach Mode: allows to select between PA and NPA types of approach
Frequency bands: selects the frequency bands that will be tracked by the receiver. It is
highlighted that this bands are used to configure the internal receiver but the final bands used
will depend on other configuration parameters such as the SBAS augmentation mode or the
enable/disable of the Galileo satellites processing.
Enable Galileo processing: enables/disables the processing of the Galileo signals.
Galileo Navigation: allows the selection of the Galileo navigation message (INAV/FNAV) to be
used in the navigation solution computation
1
SBAS Enabled L1 is a mixed solution which uses the SBAS L1 information for accuracy when it is available. This solution if focused on increasing
the availability and accuracy of the position computation in environments with degraded satellite visibility (urban environments for instance). No
integrity is computed in this solution.
2
SBAS Enabled DFMC is a mixed solution which uses the SBAS DFMC information for accuracy when it is available. This solution if focused on
increasing the availability and accuracy of the position computation in environments with degraded satellite visibility (urban environments for
instance). No integrity is computed in this solution.
Page 38
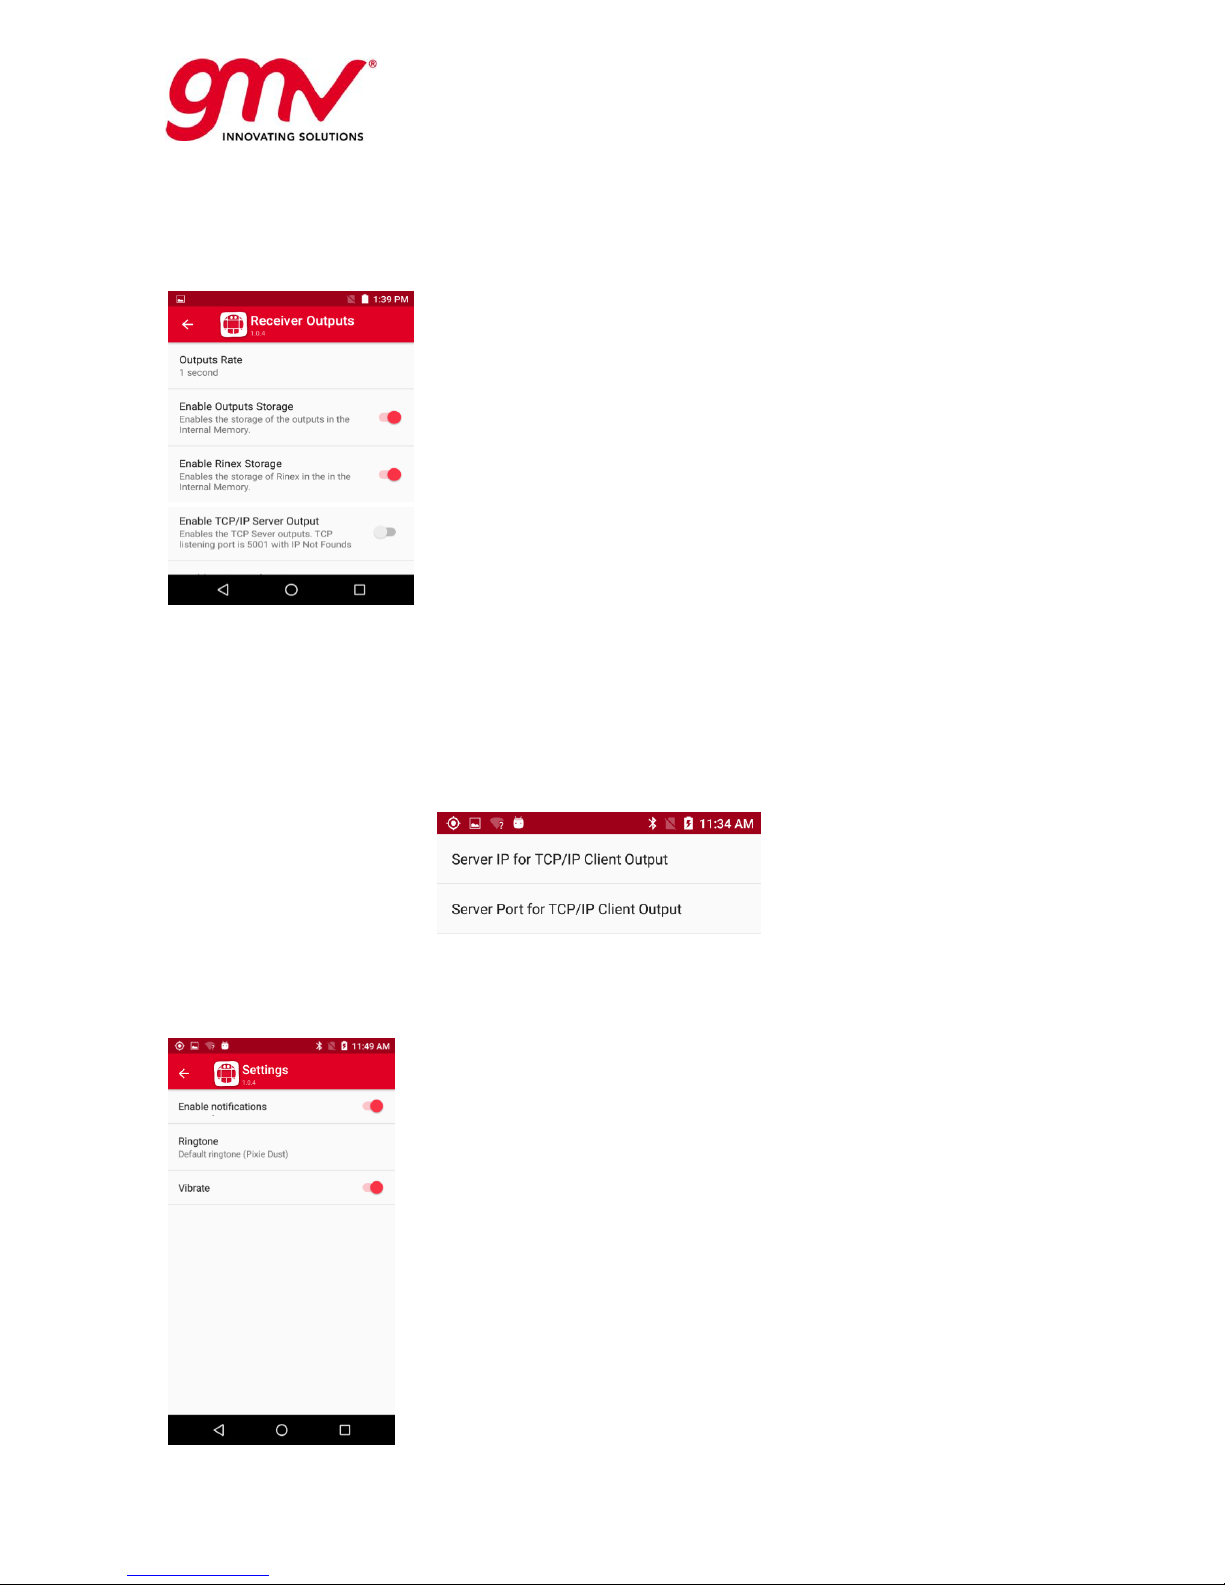
UNCLASSIFIED
Code:
Date:
Issue:
Revision:
Page:
GMV-magicGNSS-MAN-0002
05 July 2018
1
2
38 of 44
magicGNSSUT
GMV 2018; all rights reserved
UNCLASSIFIED
magicGNSS User Terminal Manual
4.3.2. RECEIVER OUTPUTS
This menu allows configuring which outputs will be produced by magicSBAS UM.
Output Rate: configures the rate at which
outputs are generated. It affects to all NMEA
outputs produced by the tool.
Enable Outputs Storage: It is a general flag to
allow the generation of output files in the internal
memory of the magicGNSS User Terminal. If it
is disable, no output files will be produced.
Enable RINEX Storage: enables/disabled the
recording of the navigation and observation
inputs into RINEX files and SBAS messages into
EMS files.
Enable the TCP/IP Server Output: enables/disables the output of the NMEA messages
through a TCP/IP server. Information to connect the clients to the server is provided below the
section title.
Enable the TCP/IP Client Output: enables/disables the output of the NMEA messages
acting the tool as a TCP/IP client.
TCP Client Configuration: If TCP client output is selected, this item allows the configuration
of the IP address and port to which the client should establish the connection.
4.3.3. NOTIFICATIONS
This menu allows the configuration of the notifications raised by the tool.
Enable notifications: enables/disables the
generation of notifications.
Ringtone: allows the selection of a ringtone
associated with the generation of magicSBAS UM
notifications
Vibrate: enables/disabled the vibration of the devices
when magicSBAS UM notifications are produced
Page 39
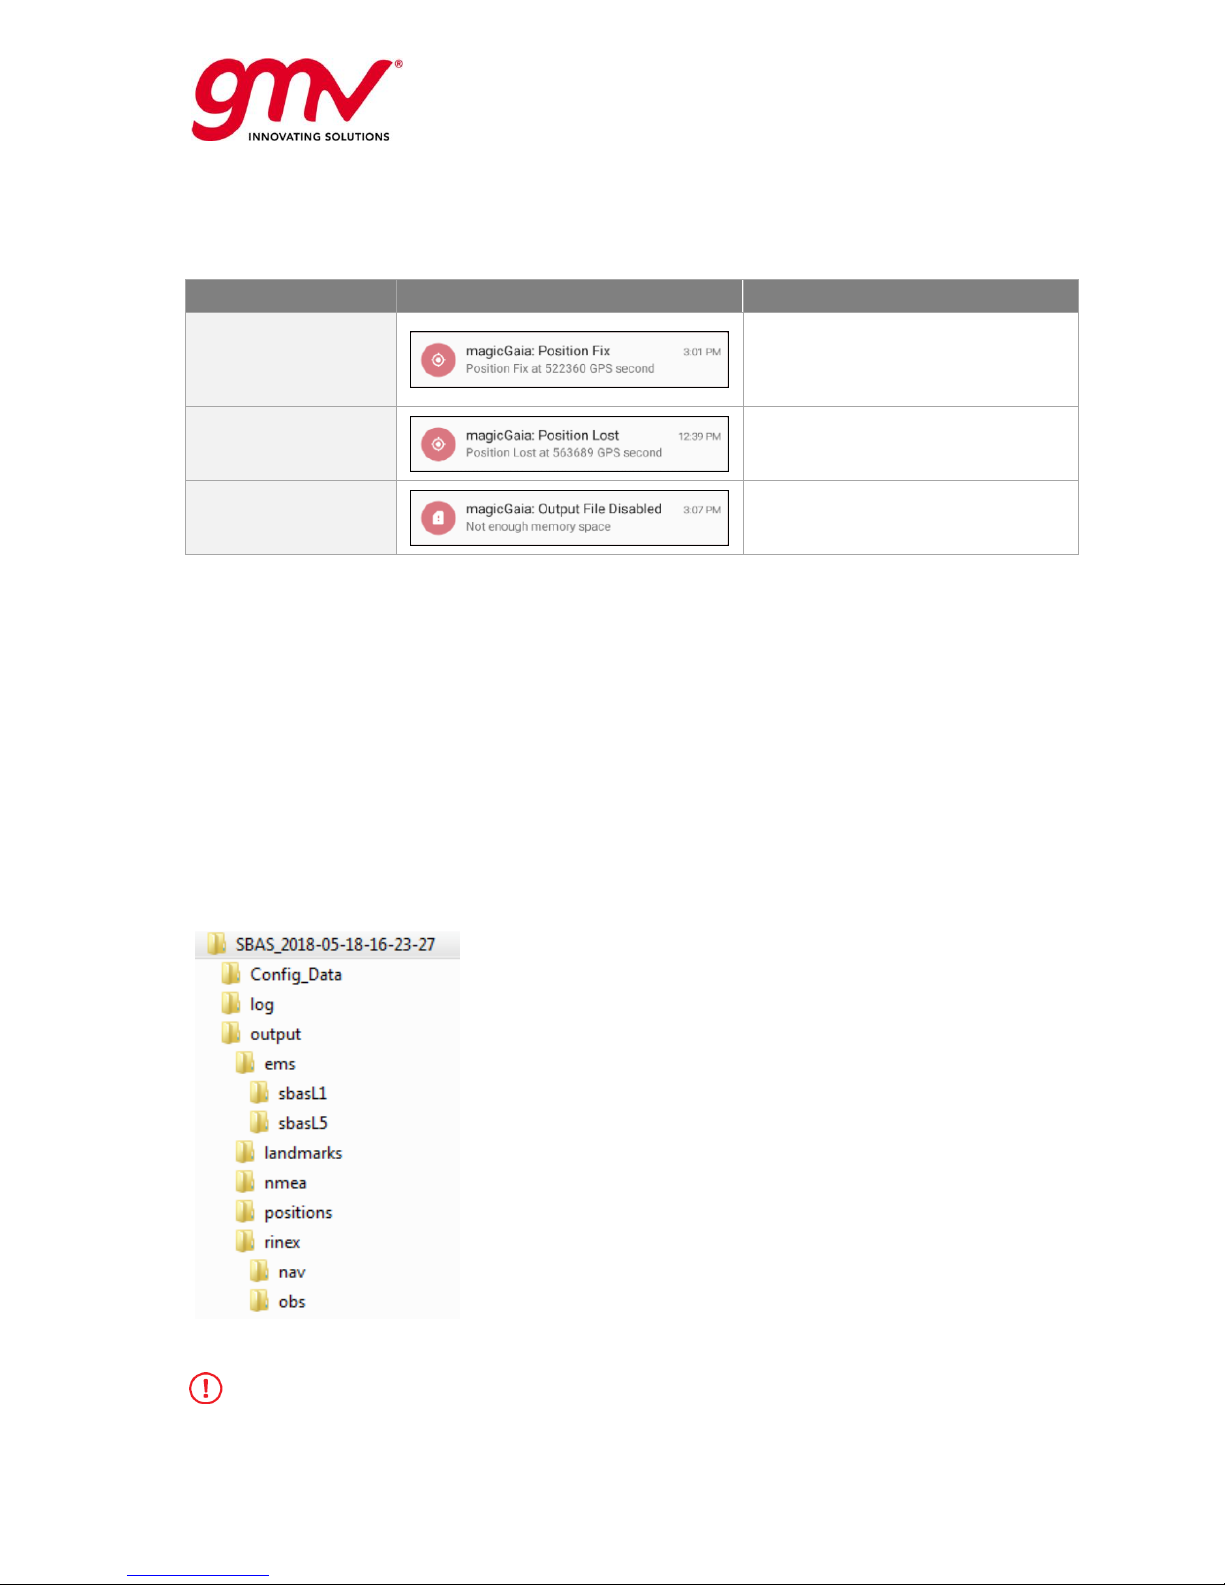
UNCLASSIFIED
Code:
Date:
Issue:
Revision:
Page:
GMV-magicGNSS-MAN-0002
05 July 2018
1
2
39 of 44
magicGNSSUT
GMV 2018; all rights reserved
UNCLASSIFIED
magicGNSS User Terminal Manual
magicSBAS UM generates three types of notifications:
Notification type
Example
Description
Position Fix
It is generated when position can be
computed for the first time or when
it is computed again after a period
when it was not computed
Position Lost
It is generated when position cannot
be computed after an epoch at which
it was computed.
Output Files Disabled
It is generated when output files
were enabled but they shall be
disabled due to free space shortage.
4.4. THE MAGICSBAS UM OUTPUTS
magicSBAS UM stores its outputs in the internal memory. Each time the play button is touched, a
session folder is created using the following nomenclature:
Internal Memory:/data/media/0/Android/data/gmv.magicgaia/files/magicGaia/SBAS_YYYY-MM-DD-hhmm-ss
Where:
YYYY: is the year corresponding to the phone local time in which the execution is started.
MM: is the month corresponding to the phone local time in which the execution is started.
DD: is the day of the month corresponding to the phone local time in which the execution is
started.
hh: is the hour corresponding to the phone local time in which the execution is started.
mm: is the minute corresponding to the phone local time in which the execution is started.
ss: is the second corresponding to the phone local time in which the execution is started.
Within this session folder the following folder structure is created:
log: contains the magicSBAS UM log for
troubleshooting
outputs: contains all outputs generated by
magicSBAS UM:
o ems: Contains the SBAS EMS files
o landmarks: contains the landmark file
o positions: contains the KML file
o nmea: contains the NMEA file with all NMEA
messages generated by the tool
o rinex: contains the RINEX files recorded by
the tool
Config_Data: contains a magicSBAS UM
configuration for the scenario that is compatible with
magicGemini tool.
magicSBAS UM will only generate its output files if enough space is available on the magicGNSS
User Terminal internal memory. If that is not the case, output data will only be generated through
the real time interface (Wi-Fi, etc.).
Page 40
UNCLASSIFIED
Code:
Date:
Issue:
Revision:
Page:
GMV-magicGNSS-MAN-0002
05 July 2018
1
2
40 of 44
magicGNSSUT
GMV 2018; all rights reserved
UNCLASSIFIED
magicGNSS User Terminal Manual
4.4.1. OUTPUT FILES
The following table shows the outputs that are generated by magicSBAS UM:
File type
File characteristics
Description
Relative Path
Rinex Files
Rinex Observation Format
Rinex version 3.03
\output\rinex\obs
Rinex Navigation Format
Rinex version 3.03
\output\rinex\nav
Ems files
SBAS NOF L1 Format
EMS 2.0
\output\ems
SBAS NOF L5 Format
EMS 2.03
NMEA Files
NMEA Version
NMEA-0183
\output\nmea
NMEA Standard Messages
GPGGA, GPGST
NMEA Proprietary Messages
PGMVA, PGMVS
NMEA Files Name
YYYYMMDD_HHMMSS.dat
(from device date)
Landmarks files
Landmark File Name
landmarks.dat
\output\landmarks
KML file
KML File Name
positions.kml
\output\positions
Content
KML file with the positions
computed and landmark
added.
Configuration file
Configuration File Name
config.dat
\Config_Data
Content
magicGemini configuration
file
Log files
Log File name
kernel_000
\log
4.4.2. REAL TIME OUTPUTS
magicSBAS UM is able to output the NMEA messages (GPGGA, PGMVA and PGMVS) in real time through
a TCP interface (Wi-Fi, 3G).
4.4.3. OUTPUT FORMATS
Main magicSBAS UM output formats are well known standards as it can be check in the tables of the
previous sections.
The landmark file is a simple ASCII file containing the time and position information of those epochs in
which the landmark button ( ) was touched.
#GPS_week GPS_sec Lat(deg) Lon(deg) alt(m) Number Description
1163 523972 52.21848328 4.41929491 56.669 001 Test 1
1163 524452 52.21848574 4.41929781 57.315 002 End
magicSBAS UM also generates four types of NMEA messages, two standard message (GPGGA and
GPGST) and two proprietary messages (PGMVA and PGMVS) that report some information not covered
by the NMEA standard. The contents of these messages are described hereafter:
3
EMS format is defined for SBAS L1. magicSBAS UM uses this format also for DFMC.
Page 41
UNCLASSIFIED
Code:
Date:
Issue:
Revision:
Page:
GMV-magicGNSS-MAN-0002
05 July 2018
1
2
41 of 44
magicGNSSUT
GMV 2018; all rights reserved
UNCLASSIFIED
magicGNSS User Terminal Manual
Fields
NMEA Standard Message ($GPGGA)
UtcTime
UTC time of position fix
Latitude
Latitude (degrees)
LatInd
Direction of latitude (N: North, S: South)
Longitude
Longitude (degrees)
LonInd
Direction of longitude (E: East, W: West)
GPS_QI
GPS Quality indicator (Always 2)
usedSats
Number of satellites in use
HDOP
Horizontal dilution of precision
altitude
Orthometric Height (EGM2008)
M
M: Altitude measured in meters
Geoid_gap
Geoid separation (EGM2008)
M
M: Geoid separation measured in meters
StaId
Station ID (always 0000)
CRC
Cyclic Redundancy Check
Fields
NMEA Standard Message ($GPGST)
UtcTime
UTC time of position fix
N/A
N/A
error_ellipse_major
Semi-major axis of the estimated error ellipse (1 sigma, in meters)
error_ellipse_minor
Semi-minor axis of the estimated error ellipse (1 sigma, in meters)
error_ellipse_orientation
Error ellipse orientation from true north (degrees)
latitude_1sig
Latitude error estimation (1 sigma, in meters)
longitude_1sig
Longitude error estimation (1 sigma, in meters)
altitude_1sig
Altitude error estimation (1 sigma, in meters)
CRC
Cyclic Redundancy Check
NMEA proprietary message PGMVA contains the same parameters as $GPGGA, with the exception that
GPS quality Indicator is set to 10 instead of 2, and there are two additional fields: HPL and VPL.
Fields
NMEA Proprietary Message ($PGMVA)
UtcTime
Time in UTC
UtcTime
UTC time of position fix
Latitude
Latitude (degrees)
LatInd
Direction of latitude (N: North, S: South)
longitude
Longitude (degrees)
lonInd
Direction of longitude (E: East, W: West)
GPS_QI
GPS Quality indicator (Always 10)
usedSats
Number of satellites in use
HDOP
Horizontal dilution of precision
altitude
Orthometric Height (EGM2008)
M
M: Altitude measured in meters
Geoid_gap
Geoid separation (EGM2008)
M
M: Geoid separation measured in meters
Page 42
UNCLASSIFIED
Code:
Date:
Issue:
Revision:
Page:
GMV-magicGNSS-MAN-0002
05 July 2018
1
2
42 of 44
magicGNSSUT
GMV 2018; all rights reserved
UNCLASSIFIED
magicGNSS User Terminal Manual
Fields
NMEA Proprietary Message ($PGMVA)
StaId
Station ID (always 0000)
HPL
Horizontal Protection Level (meters)
VPL
Vertical Protection Level (meters)
CRC
Cyclic Redundancy Check
NMEA proprietary message PGMVS is a simplified message that contains the position and the Protection
Levels:
Fields
NMEA Proprietary Message ($PGMVS)
gpsWeek
GPS Week Number
gpsSec
GPS Seconds
GnssComb
GNSS Combination: 0: GPS, 1: GLONASS, 2: Galileo, 3:
GPS+GLONASS, 4: GPS+Galileo
solType
Navigation Solution Type: 0: Least Squares, 1: SBAS L1 augmented,
2: SBAS L5 augmented, 3: RAIM, 4: ARAIM, 5: DGPS, 6: Kalman
Filter
Latitude
Latitude WGS84 (degrees)
Longitude
Longitude WGS84 (degrees)
Altitude
Height WGS84 (meters)
HPL
Horizontal Protection Level (meters)
VPL
Vertical Protection Level (meters)
CRC
Cyclic Redundancy Check
4.5. F.A.Q.
Q1: Which RINEX observables record magicSBAS UM?
magicSBAS UM records 3 types of observables: pseudorange measurements (C), carrier-phase
measurements (L) and signal strength measurements (S).
In the case of GPS satellites, the tool is prepared to record the signals in L1, L2 and L5 bands. Thus,
the GPS observables included in the recorded RINEX are: C1C, L1C, D1C, S1C, C2C, L2C, D2C, S2C,
C2W, L2W, D2W, S2W, C5Q, L5Q, D5Q and S5Q.
In the case of Galileo satellites, the tool is prepared to record the signals in E1 and E5A bands. Thus,
the Galileo observables included in the recorded RINEX are: C1C, L1C, D1C, S1C, C5Q, L5Q, D5Q and
S5Q.
Q2: Does magicSBAS UM record RINEX and EMS of all signals or only of those being
configured?
magicSBAS UM is prepared to track and record simultaneously the 3 GPS bands, the 2 Galileo bands
and the 2 SBAS bands. It is noted that the availability of each signal will depend on the capability of the
internal receiver to track them. Therefore, it is possible than some bands appear earlier in the RINEX
than other.
Q3: What happens when magicSBAS UM runs out of battery?
magicSBAS UM stores its outputs each second. Therefore, it will continue computing and storing data
until the device runs out of battery without losing data. However the tracking capabilities of the internal
receiver can be affected when battery goes low (<10%). Then, it is recommended to keep the device
connected to a power outlet or a power bank for long tests.
Q4: Does magicSBAS UM seem to track enough satellites but position is not being computed?
There are many reasons why this can happen. In SBAS navigation solutions you need to recover almost
the full SBAS message sequence in order to apply them and this can take several minutes. Other
parameter that may affect the availability of the position computing is the smoothing time. The receiver
will need continuous measurements of a satellite for 3.6 times the configured smoothing time to use it
Page 43

UNCLASSIFIED
Code:
Date:
Issue:
Revision:
Page:
GMV-magicGNSS-MAN-0002
05 July 2018
1
2
43 of 44
magicGNSSUT
GMV 2018; all rights reserved
UNCLASSIFIED
magicGNSS User Terminal Manual
in the position computation. Therefore, reducing this value will increase the number of usable satellites
(notice in any case that the lower this value is, the noisier the measurements will be).
Q5: Does magicSBAS UM seem to track only one frequency of some constellation?
The antenna connected to magicSBAS UM is a key element in order to allow the tracking of the signals.
Most of the GNSS antennas are designed to cover one or two frequency bands. Antenna specifications
shall be verified in order to ensure that bands needed by the tool are covered.
Q6: magicSBAS UM TCP/IP outputs use 3G or Wi-Fi?
If Wi-Fi is available, magicSBAS UM will use this interface for the transmission of the NMEA outputs.
If 3G is enabled and the device is not connected to a Wi-Fi network, then magicSBAS UM will use the
3G interface to send its data.
Q7: Can I use magicSBAS UM for Safety of Life applications?
NO. This device is a non-certified development, designed for conducting tests in research
establishments, in the frame of the Satellite-Based Augmentation System (SBAS) Test-bed. Thus, it
shall NOT be used for Safety of Life applications.
Q8: The magicSBAS application, after showing nominal behaviour for a long time period,
starts providing non expected results.
It could be the case the device temperature exceeds some thresholds, above which the
microprocessor is forced to slow down the processing velocity. Please check that the device is not
running under direct sunlight or near some heat source.
Q9: Can I post-process the data recorded with magicGemini?
Yes. magicSBAS UM generates the needed configuration files to run the scenario recorded in postprocessing with magicGemini. The session folder can be directly copied into magicGemini Scenario
folder and the tool will automatically recognize the configuration.
magicSBAS UM application support
Page 44

UNCLASSIFIED
Code:
Date:
Issue:
Revision:
Page:
GMV-magicGNSS-MAN-0002
05 July 2018
1
2
44 of 44
magicGNSSUT
GMV 2018; all rights reserved
UNCLASSIFIED
magicGNSS User Terminal Manual
END OF DOCUMENT
 Loading...