

GME Electrophone TX7000 SERIES Instruction Manual
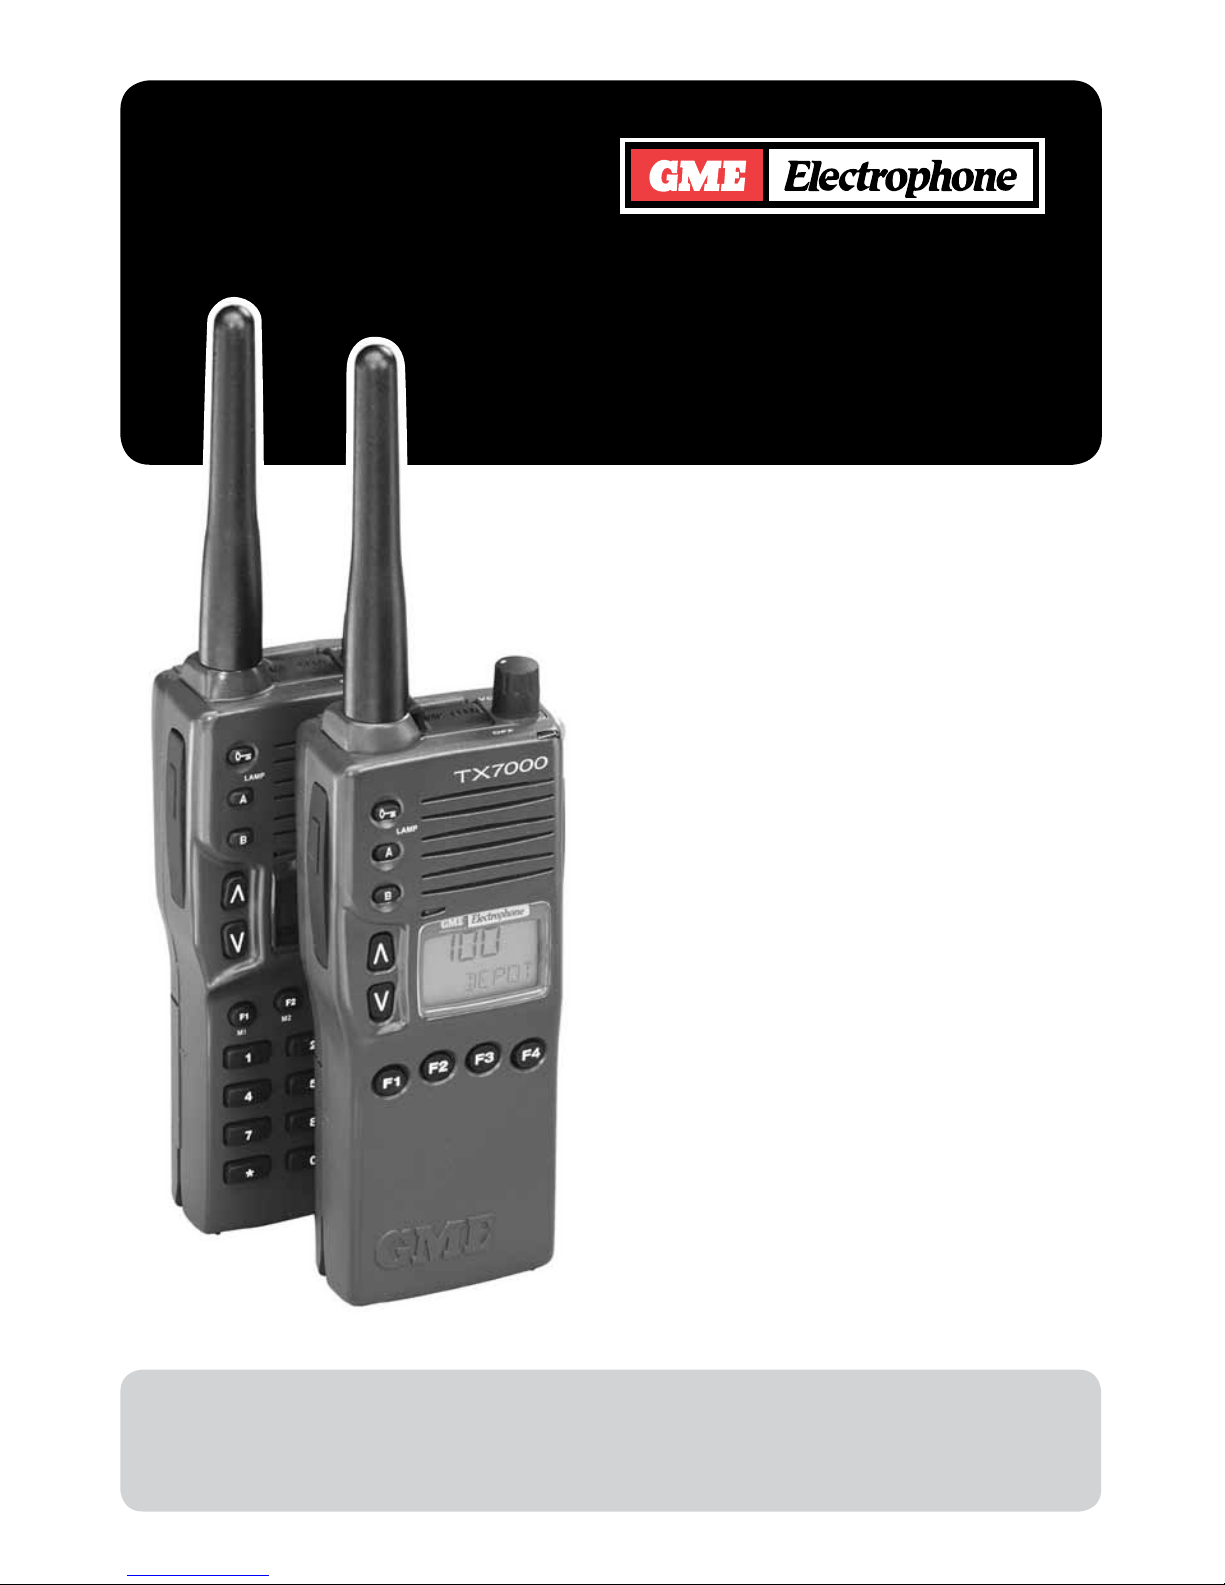
TX7000
SERIES
PORTABLE UHF
TRANSCEIVER
INSTRUCTION
MANUAL
STANDARD COMMUNICATIONS
PTY. LTD.

2
CONTENTS
Introduction . . . . . . . . . . . . . . . . . . . . . . . . . . . . . . . . . . . . . . . . 3
Getting Started . . . . . . . . . . . . . . . . . . . . . . . . . . . . . . . . . . . . 4
Standard Controls & Functions
. . . . . . . . . . . . . . 5
Standard LCD Indicators . . . . . . . . . . . . . . . . . . . . . . . 6
Operation of Standard Functions
. . . . . . . . . . . . 6
Turning the TX7000 On or Off . . . . . . . . . . . . . . . . 6
Adjusting the Receiver Volume . . . . . . . . . . . . . . 6
Selecting Channels . . . . . . . . . . . . . . . . . . . . . . . . . . . . . 6
Selecting Channels using the
Optional
Keypad . . . . . . . . . . . . . . . . . . . . . . . . . . . . . . . . 6
Alphanumeric Labels . . . . . . . . . . . . . . . . . . . . . . . . . . . 7
Activating the Backlighting . . . . . . . . . . . . . . . . . . . 7
Locking the Keys . . . . . . . . . . . . . . . . . . . . . . . . . . . . . . . 7
Transmitting
. . . . . . . . . . . . . . . . . . . . . . . . . . . . . . . . . . . . . . 7
Receiving . . . . . . . . . . . . . . . . . . . . . . . . . . . . . . . . . . . . . . . . . 8
Normal Reception . . . . . . . . . . . . . . . . . . . . . . . . . . . . . . 8
The Busy Indicator . . . . . . . . . . . . . . . . . . . . . . . . . . . . . 8
Programmable Functions
. . . . . . . . . . . . . . . . . . . . . . 8
The Squelch Key . . . . . . . . . . . . . . . . . . . . . . . . . . . . . . . . 8
Programmed Key Allocations
for your Radio
. . . . . . . . . . . . . . . . . . . . . . . . . . . . . . . . . . . 9
Advanced LCD Indicators . . . . . . . . . . . . . . . . . . . . . 10
The Low Power Key . . . . . . . . . . . . . . . . . . . . . . . . . . . . . 10
Repeaters and Talk Around
. . . . . . . . . . . . . . . . . . . . 10
Repeaters . . . . . . . . . . . . . . . . . . . . . . . . . . . . . . . . . . . . . . . . . 10
Talk Around . . . . . . . . . . . . . . . . . . . . . . . . . . . . . . . . . . . . . . 10
CTCSS (Continuous Tone
Coded Squelch System)
. . . . . . . . . . . . . . . . . . . . . . . 11
The Monitor Key . . . . . . . . . . . . . . . . . . . . . . . . . . . . . . . . . . 11
Programming Recall Channels
. . . . . . . . . . . . . . . 11
Scanning . . . . . . . . . . . . . . . . . . . . . . . . . . . . . . . . . . . . . . . . . . . . 11
Overview
. . . . . . . . . . . . . . . . . . . . . . . . . . . . . . . . . . . . . . . . . . 11
Scan Groups . . . . . . . . . . . . . . . . . . . . . . . . . . . . . . . . . . . . . 12
Open Scan . . . . . . . . . . . . . . . . . . . . . . . . . . . . . . . . . . . . . . . 12
Group Scan . . . . . . . . . . . . . . . . . . . . . . . . . . . . . . . . . . . . . . 12
Dual Watch
. . . . . . . . . . . . . . . . . . . . . . . . . . . . . . . . . . . . . . . 12
Selecting a Scan Group . . . . . . . . . . . . . . . . . . . . . . . 12
Selecting Dual Watch
. . . . . . . . . . . . . . . . . . . . . . . . . . 12
Programming Your Working Channel . . . . . . 12
Programming Scan Channels . . . . . . . . . . . . . . . . 13
Selecting Scan . . . . . . . . . . . . . . . . . . . . . . . . . . . . . . . . . . 13
Scanning in Open Scan mode
. . . . . . . . . . . . . . . 13
Scanning in Group Scan Mode . . . . . . . . . . . . . . 14
Scanning in Dual Watch Mode . . . . . . . . . . . . . . . 14
Selective Calling (Selcall)
. . . . . . . . . . . . . . . . . . . . . . 15
Overview . . . . . . . . . . . . . . . . . . . . . . . . . . . . . . . . . . . . . . . . . . 15
Receiver Quiet Mode . . . . . . . . . . . . . . . . . . . . . . . . . . . 15
The Quiet Key . . . . . . . . . . . . . . . . . . . . . . . . . . . . . . . . . . . . 15
Sending a Selcall
. . . . . . . . . . . . . . . . . . . . . . . . . . . . . . . 16
Sending a Selcall Using the
Speed Dial Memories . . . . . . . . . . . . . . . . . . . . . . . . . . . 16
Programming the 'Call To' Selcall Codes . . 16
Sending Group Calls
. . . . . . . . . . . . . . . . . . . . . . . . . . . 17
Without keypad . . . . . . . . . . . . . . . . . . . . . . . . . . . 17
With the Optional keypad . . . . . . . . . . . . . . 18
Sending DTMF Signals
. . . . . . . . . . . . . . . . . . . . . . . . . . 19
Using the DTMF Speed Dial Memories . . . . 19
Using the Optional Keypad . . . . . . . . . . . . . . . . . . . 19
Side Panel Sockets
. . . . . . . . . . . . . . . . . . . . . . . . . . . . . . 20
Maintaining you Battery Pack . . . . . . . . . . . . . . . . . 20
Low Battery Indicators . . . . . . . . . . . . . . . . . . . . . . . . . 20
Battery Charging
. . . . . . . . . . . . . . . . . . . . . . . . . . . . . . . . 21
Cycling the battery . . . . . . . . . . . . . . . . . . . . . . . . . . . . . 21
Battery Usage . . . . . . . . . . . . . . . . . . . . . . . . . . . . . . . . . . . 21
Conserving battery Power . . . . . . . . . . . . . . . . . . . . 21
Headset and Speaker Microphone
. . . . . . . . . . 22
Accessories . . . . . . . . . . . . . . . . . . . . . . . . . . . . . . . . . . . . . . . . 23
Care and Maintenance
. . . . . . . . . . . . . . . . . . . . . . . . . . 25
Specifications . . . . . . . . . . . . . . . . . . . . . . . . . . . . . . . . . . . . . 26
Warranty
. . . . . . . . . . . . . . . . . . . . . . . . . . . . . . . . . . . . . . . . . . . . 28

3
INTRODUCTION
The GME Electrophone TX7000 UHF portable
transceiver has been wholly designed and
man ufac ture d in Aus tral ia b y St a nda r d
Com muni cati ons Pt y. L td. to me e t t h e
requirements of commercial hand held users.
The TX700 0 co mbine s th e v e r y l a t est in
electronic hardware with co m p u t e r a i d ed
design a nd m anuf a c turin g te chniq u e s t o
produce a compact hand held commercial radio
with outstanding features, specifications and
performance.
FEATURES
• Light weight tough polycarbonate and die
cast metal construction.
• Tested to MIL-STD 810C/D/E standards for
shock, vibration, humidity, dust and rain.
• Simple-to-use Controls - rotating on/off
volume control and pushbutton function
keys. An optional keypad is also available.
• Up t o 1 00 si mp lex a nd semi -d uple x
channels with independent CTCSS encode/
decode. In addition, all 40 UHF CB channels
may be programmed if required.
• Large illuminated alpha-numeric Liquid
Crystal Display (LCD) provides a visual
indication of all selected functions at a
glance.
• Alpha-numeric labelling of selected channels
and users simplifies channel selection and
identification of incoming callers.
• Bui lt -in Sel ca ll ( up to 8 ton e s) w it h
alphanumeric ANI.
• Five scanning modes available including
Dual Watch, “Multi-trunk” (busy channel
voting) and Signal Strength voting.
• Transmitter output power of 5 Watts or 1
Watt selectable on individual channels.
• Automatic receiver “sleep” mode coupled
with high quality 1000 mAh rechargeable
Ni-Cad battery pack ensures long battery
life.
• Audible and visual low ba t t e r y alarms
provide advanced warning that the battery
pack is becoming discharged.
• Features built-in DTMF signalling using
preprogrammed “Speed Dial” keys or with
direct entry via the optional keypad.
• Programmable “Kill” code allows the radio to
be remotely disabled if it is lost or stolen.
• Keylock feature prevents accidental key
presses from altering your settings.
The following items are included with your TX7000
• 1000mAHBatteryPack
• Antenna
• BeltClip
• InstructionManual
• QuickReferenceCard
If any items are missing or damaged, please contact your dealer or place of purchase.
4
Your T X 7 000 i s su p p lied wit h a 9. 6 Volt
1 0 0 0 m A h N i c k e l C a d m i u m ( N i C a d )
rechargeable battery pack.
When the battery pack is new, it must be
fully charged before being used for the first
time.
If left unused, your TX7000’s battery pack will
discharge itself within a few months. If you have
not used your TX7000 for some time, you will
need to recharge the battery pack before use.
The battery pack is a sealed unit. There are no
user serviceable parts inside.
WARNING. Use only GME Electrophone
approved battery packs and chargers. The
use of any other types may be dangerous
and will void any warranty.
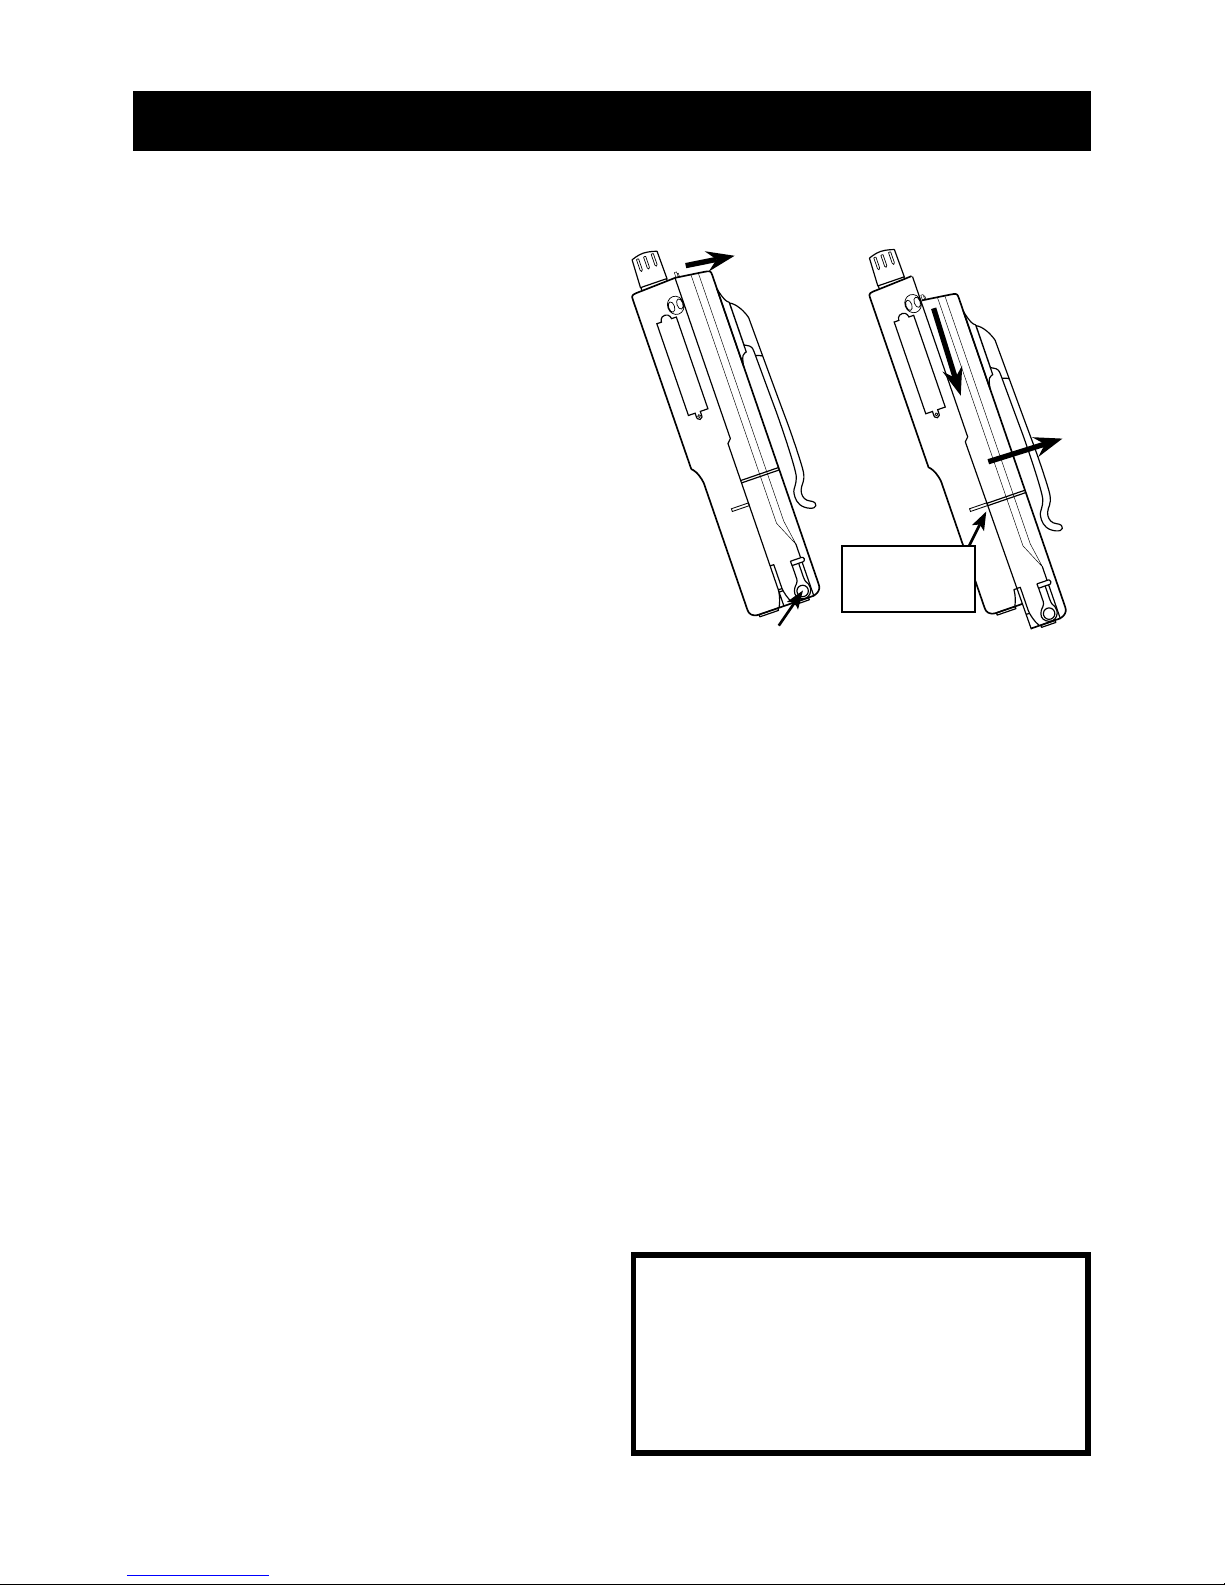
REMOVING THE BATTERY PACK
The battery pack is a self contained unit which
can be removed from the radio as follows:
1. Hold the radio face down in one hand.
2. With the index finger of the other hand, pull
the locking tab away from the radio while
pressing down on the top of the battery. The
battery pack will slide downwards.
3. Now gently lift the battery away from the
radio.
RE-FITTING THE BATTERY PACK
1. Carefully position the battery pack onto the
back of the radio so that the groove around
the battery pack lines up with the raised
mark on the side of the radio.
2. Ensure the battery pack is pressed flat
against the radio’s metal plate.
3. Slide the battery pack upwards, until the
locking tab at the top clicks into place.
CHARGING THE BATTERY PACK
Your TX7000’s battery pack can be recharged
using the BCD6000 drop-in fast charger. The
BCD6000 will fast charge a fully discharged
battery pack in around 4.5 hours. The charging
time will be less if there is still some charge
remaining in the battery.
To charge the battery, insert the battery pack
(with or without the radio attached) into the
charging compartment. The boost charge cycle
will begin automatically. When the battery is
fully charged, the trickle charge cycle will take
over to keep the battery “topped up” until
required.
For more information on charging and cycling
your battery and tips on conserving battery
power, see section on ‘Maintaining your Battery
Pack’ later in this manual.
GETTING STARTED
1. Pull tab
BACK
2. Slide battery
pack DOWN
3. Lift battery pack
OFF radio
2
3
1
Removing the Battery Pack
Charging Socket
DO NOT CONNECT YOUR VEHICLE’S
BATTERY (13.8 VOLTS) TO THE
CHARGING SOCKET AS DAMAGE TO
THE RADIO AND BATTERY PACK
WILL RESULT WHICH WILL VOID
THE WARRANTY.
Line these marks
up when re-fitting
the battery.

5
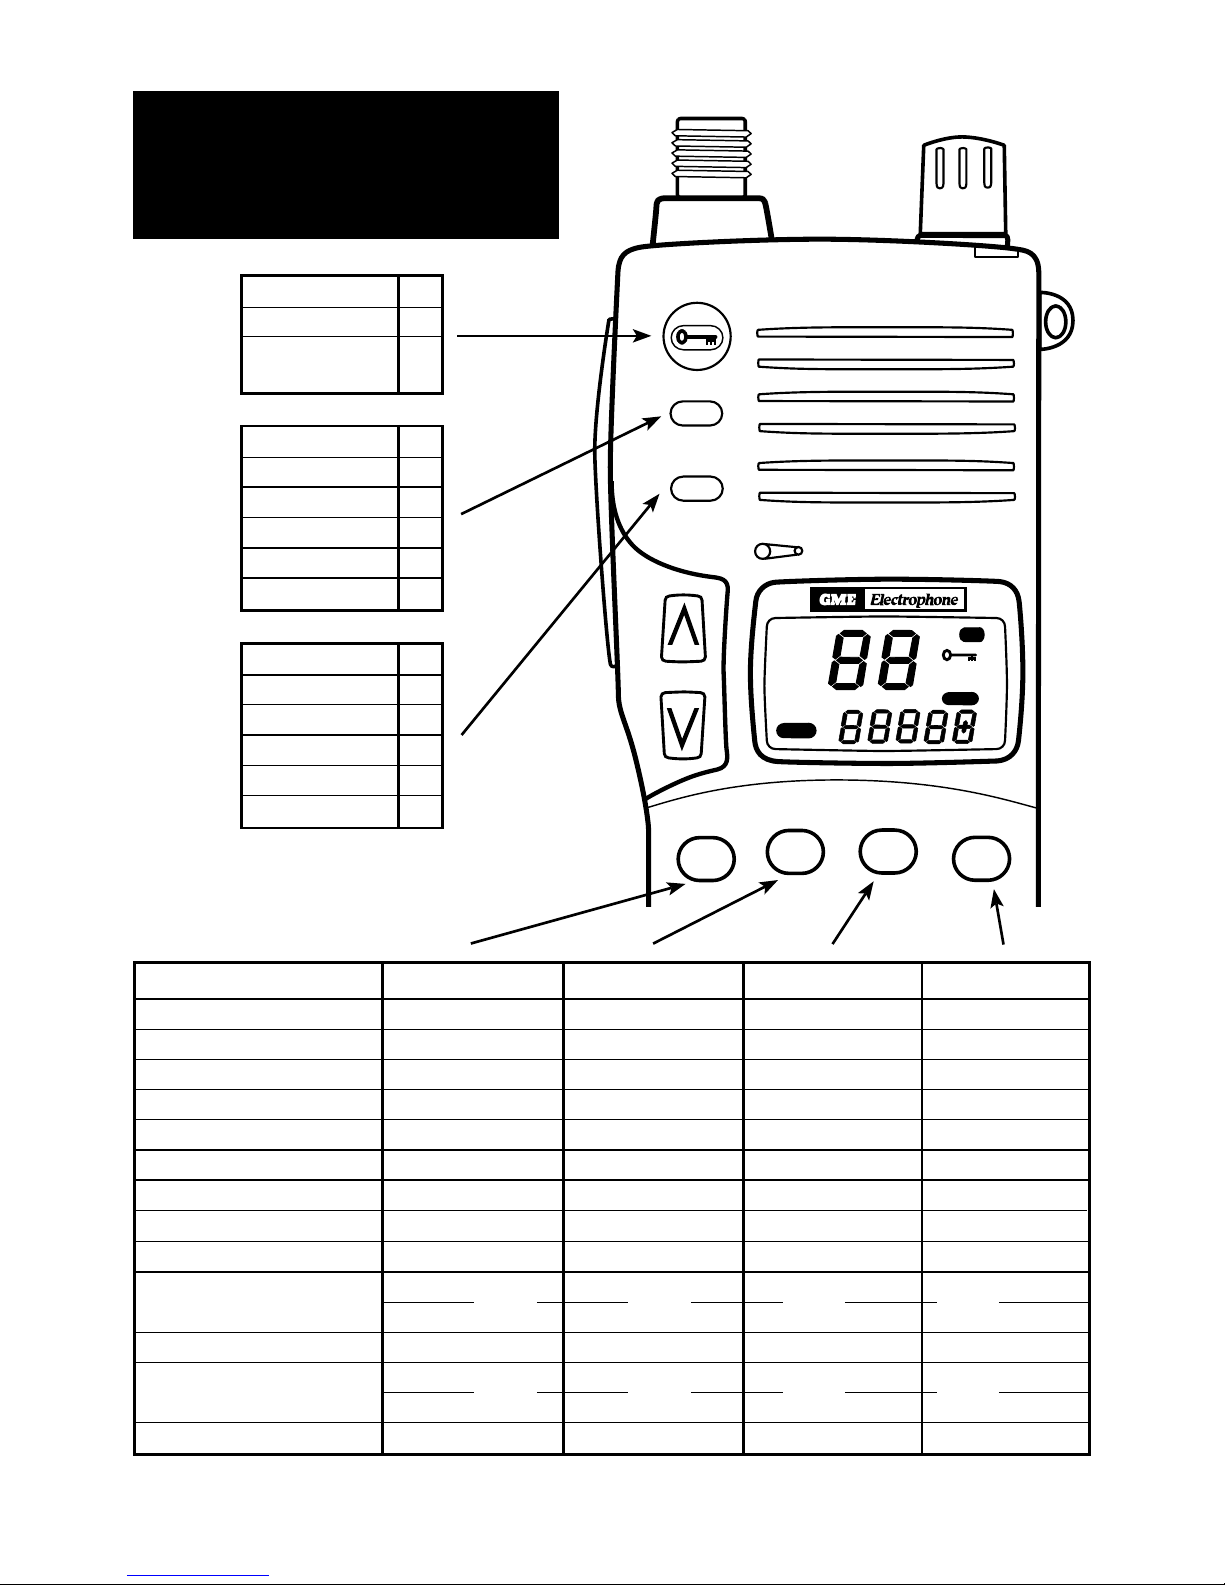
STANDARD CONTROLS AND FUNCTIONS
A
LAMP
BATT
BUSY
T/A
LO
M Q
CALL TO FROM
TX
PRIV
QUIET
F1
F2
F3
F4
1 2 3
4 5 6
7 8 9
0
*
#
SCAN
B
TX7000
Antenna socket.
Front Panel Controls
For PROGRAMMABLE Controls, refer to page 9.
•PressONCEtoactivatebacklight.
•PressandHOLDtotoggle
Keyboard Lockout function.
•PressONCEtostepUPone
channel.
•PressandHOLDtostepUP
channels continuously.
•PresstoTransmit.
•ReleasetoReceive.
•PressONCEtostepDOWNone
channel.
•PressandHOLDtostepDOWN
channels continuously.
Volume ON/OFF
Control.
Busy/Transmit/
Battery Low LED.
Microphone.
Liquid Crystal
Display.
Speaker.
Carry Strap
anchor point.
Optional keypad.
6
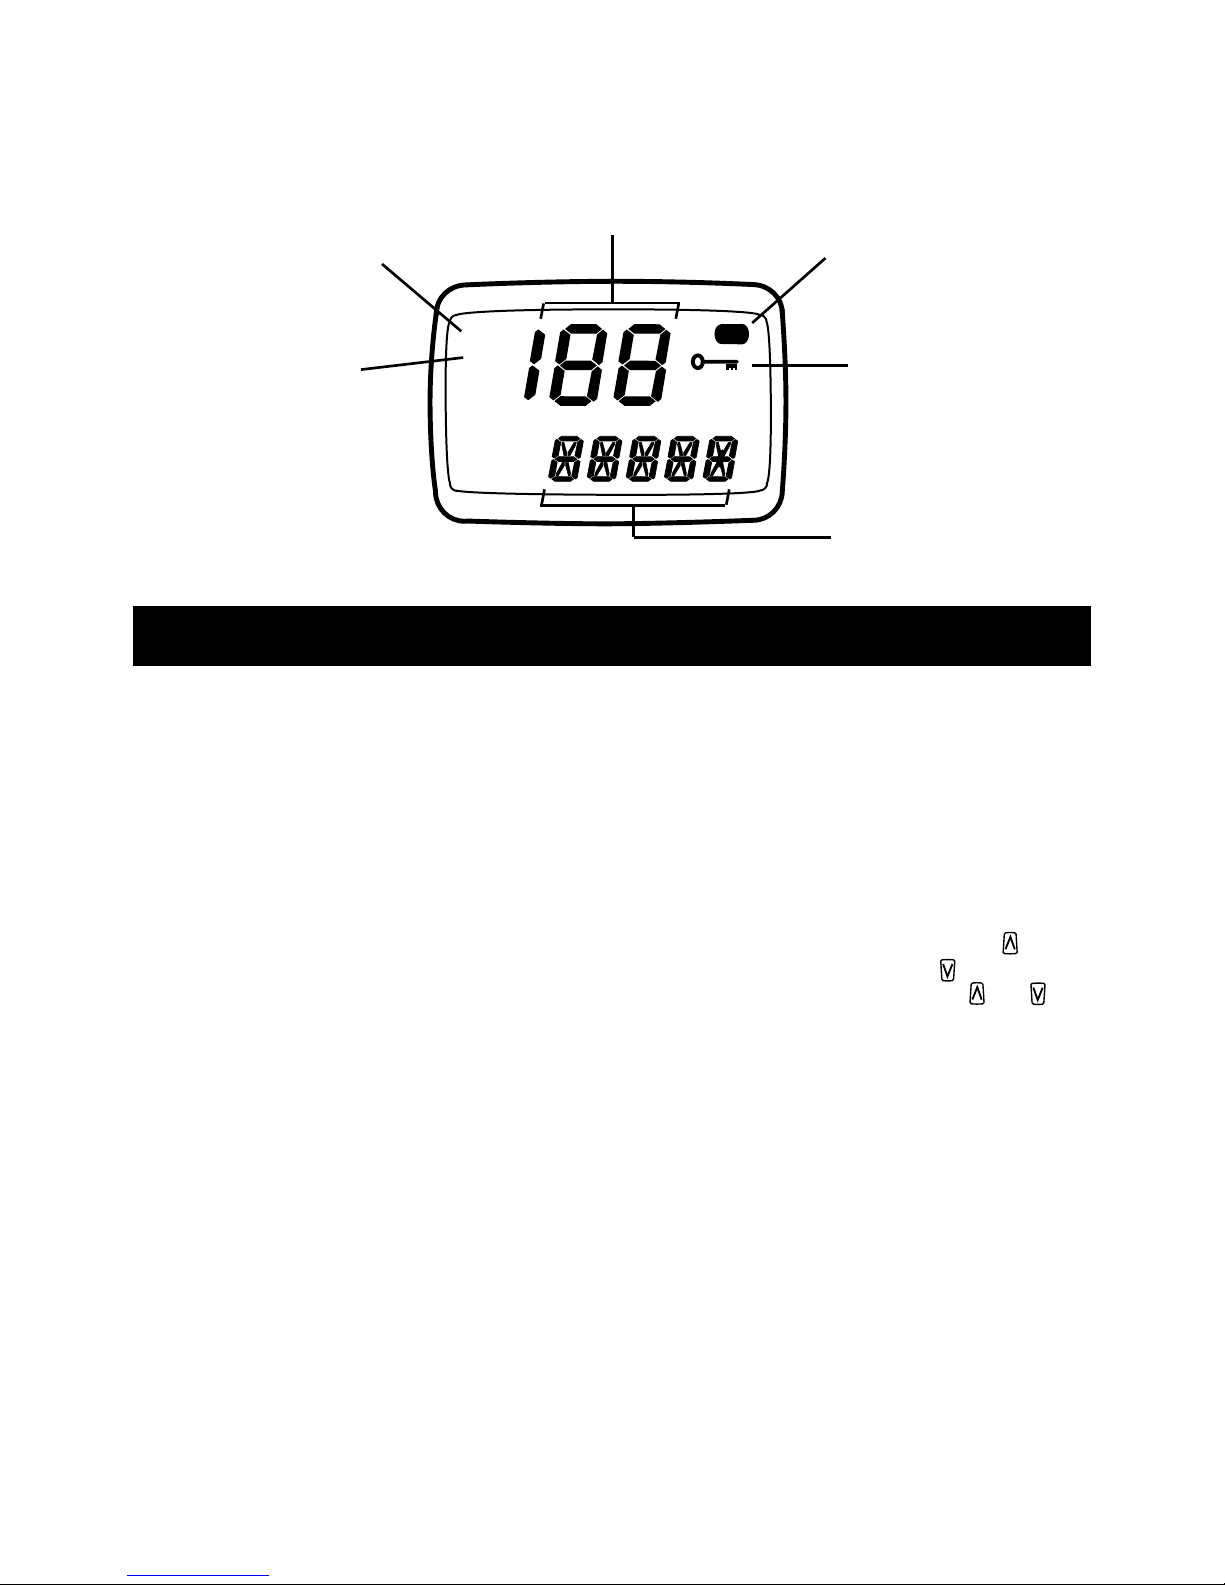
OPERATION AND STANDARD FUNCTIONS
Low battery
Indicator
Channel Busy
Indicator
Channel Indicator
KeyLock Indicator
Transmit Indicator
BATT
BUSY
TX
Standard LCD Indicators
(For ADVANCED LCD indicators, refer to page 10).
Alphanumeric Labels
TURNING THE TX7000 ON OR OFF
Rotate the volume control clockwise past the
'click' to turn the TX7000 on. Rotate the control
fully counter clockwise past the click to turn the
radio off.
ADJUSTING THE RECEIVER VOLUME
While receiving a signal, rotate the volume
control to achieve a comfortable listening level.
If there are no signals present and your radio
has a squelch key, press it briefly to open the
squelch, then adjust the volume while listening
to the receiver's background noise. When
finished, briefly press the squelch key again to
return the receiver to the quiet state.
If your radio does not have a squelch key and
there are no signals present, set the volume
control to the 11 o'clock position as a starting
point.
Note: The minimum setting of the volume
control has been factory preset so that, even
with the volume turned right down, you can still
safely listen to an incoming signal with your ear
against the speaker (telephone style).
SELECTING CHANNELS
The channels in your radio are preprogrammed
by your dealer and are identified by numbers. In
ad di t i o n , e ac h ch an n e l m ay a ls o b e
programmed with an identifying name or
'alphanumeric label'. The label appears in the
bottom right of the display.
To change channels, briefly press the key to
step up one channel or the key to step
down one channel. Holding either or will
cause the radio to step through the channels
automatically at a rate of around 4 channels per
second. Continuing to hold these keys will step
through the channels at a faster rate.
Selecting channels using the optional
keypad
If your radio is fitted with a numeric keypad, you
may be able to use it to enter channel numbers
directly. If you press one of the numeric keys
and your radio does not beep and display the
number you pressed, the keypad is not enabled
for channel entry.
To select channels using the keypad, simply
enter the required channel number.
M
M
CALL TO
LO
M Q
PRIV
TX
M
M
CALL TO
LO
M Q
PRIV
TX
M
M
CALL TO
LO
M Q
PRIV
TX
M
M
CALL TO
LO
M Q
PRIV
TX
7
E.g. to select channel 20 press on the
keypad.
To select single digit channel numbers (e.g.
channel 5) either press or simply press
and wait a moment. The channel display
will flash for a few seconds then lock onto
channel 5.
Note: Channel numbers greater than 100 cannot
be entered via the keypad. Select channel
numbers g reat e r th a n 10 0 (e . g . U H F CB
installed as channels 101 to 140) by pressing
the or key.
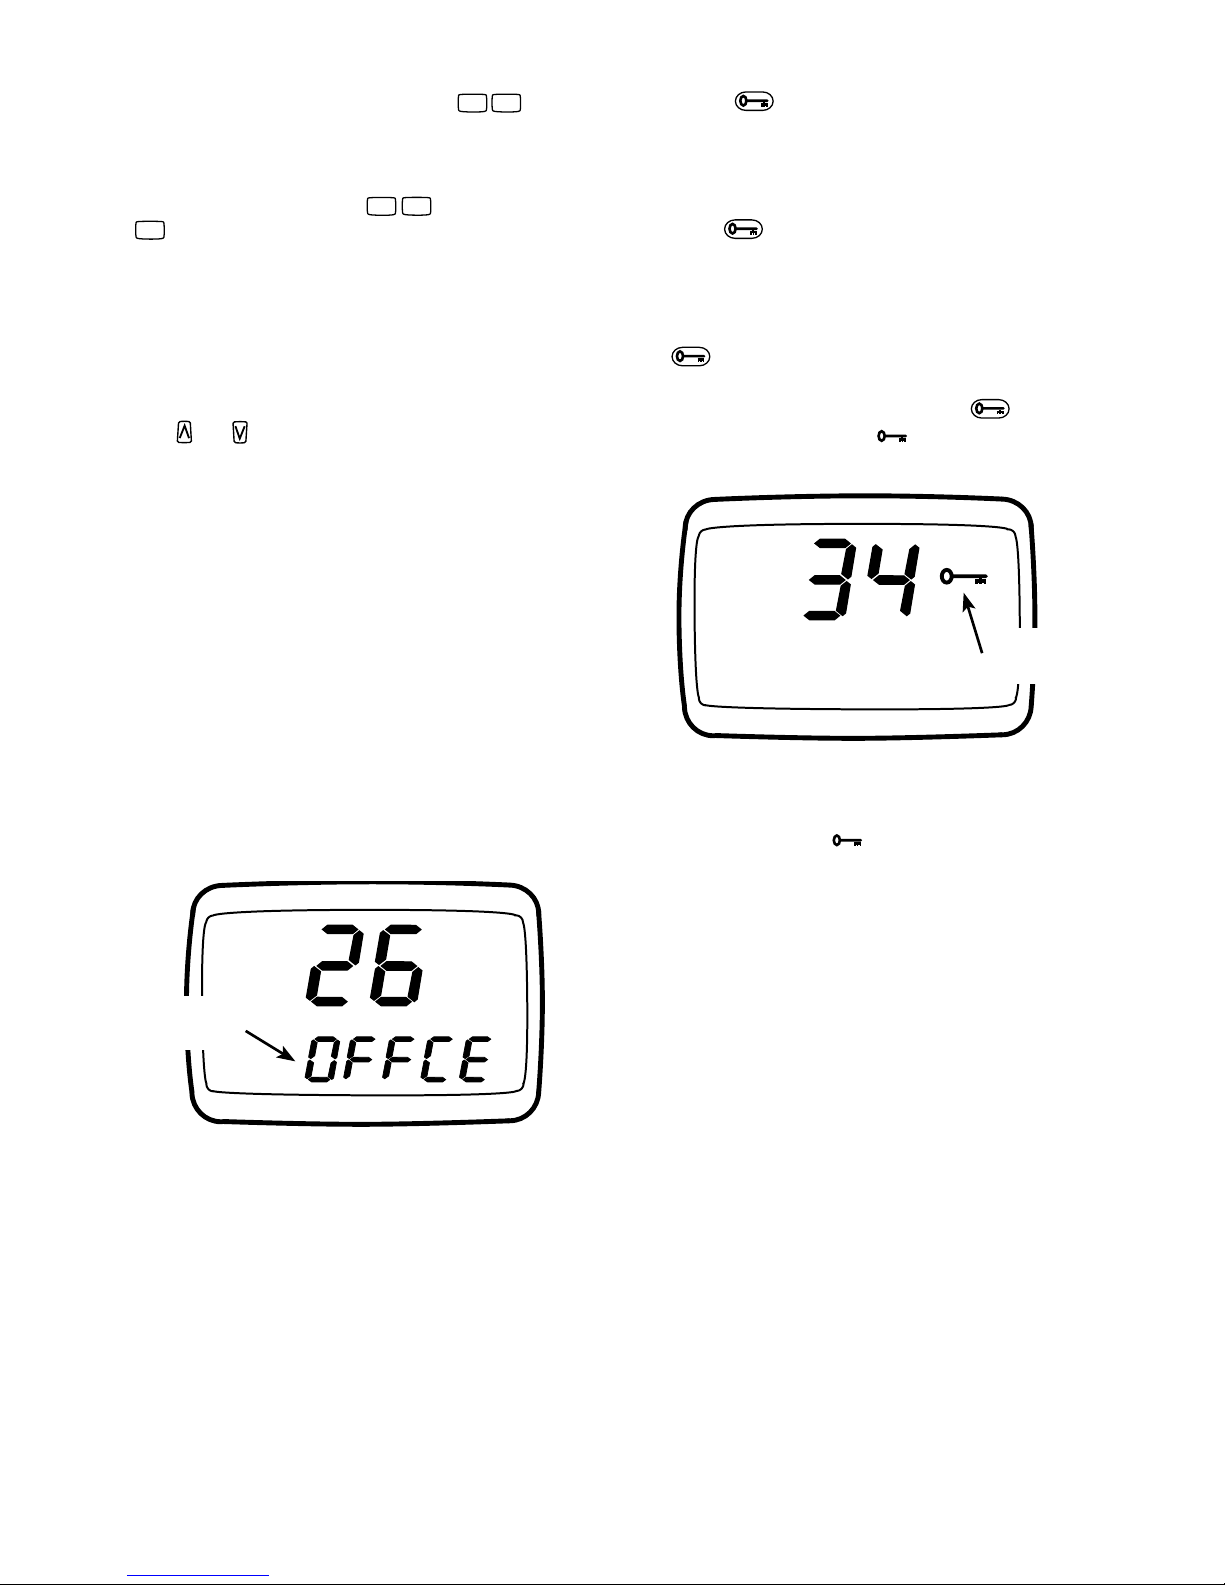
Alphanumeric Labels
As well as identifying channels by their channel
numbers, channels may be programmed with a
5 character alphanumeric label. Using labels
with meaningful names makes it much easier to
identify channels.
e.g. The channel you normally contact your
office on might be labelled OFFCE while a
construction site channel might be labelled
SITE1. In this way you no longer need to
remember which channel numbers to select,
you simply select the required channel by its
label.
Alphanumeric labels are preprogrammed into
your radio by your dealer.
ACTIVATING THE BACKLIGHTING
Your TX7000's Liquid Crystal Display (LCD)
features built-in backlighting. The backlighting
is normally switched off to conserve battery
power, but will switch on automatically when
any key is pressed. To switch the backlighting
on without activating any other functions, briefly
press the key. The backlighting will turn
off automatically after 5 seconds.
LOCKING THE KEYS
Use the key to disable the keys on the
front of the radio. This will prevent unintentional
key presses from making accidental calls or
altering your settings. While the keys are
disabled, only the Push-to-talk switch and
the and lamp functions will be available.
To lock the keys, press and hold the key until
a high beep is heard. The symbol will appear
on the display.
To unlock the keys and restore them to normal
operation, press and hold the key until a low
beep is heard. The symbol will disappear
from the display.
TRANSMITTING
Before transmitting, check to see if the channel
is already in use (i.e. BUSY will be displayed
and the LED on the top of the radio will be
green). If the channel is busy, you should wait
until it is clear before transmitting.
To transmit, press the Push-To-Talk (PTT) switch
on the left-hand side of the radio and speak into
the built-in microphone located just below the
speaker. Hold the radio about 2 - 6 cms
from your mouth and slightly to one side so that
you are speaking across the microphone, not
directly into it. When talking, speak at a normal
voice level. The microphone is quite sensitive
so it is not necessary to raise your voice or
shout.
Note: Your radio may have been programmed to
prevent you from transmitting when the channel
M
Alphanumeric
Label
Keylock
Symbol
M
M
CALL TO
LO
M Q
PRIV
TX
M
LO
M Q
PRIV
TX
M
LO
M Q
PRIV
TX
M
LO
M Q
PRIV
TX
M
LO
M Q
PRIV
TX
M
LO
M Q
PRIV
TX
M
LO
M Q
PRIV
TX
M
9
0
M
CALL TO
M
CALL TO
M
9
0
5
6
2
1
M
CALL TO
M
CALL TO
M
9
5
M
CALL TO
M
CALL TO
M
9
5
M
CALL TO
M
CALL TO
M
9
0
M
CALL TO
M
CALL TO
M
M
CALL TO
LO
M Q
PRIV
TX

8
is already in use. If this is the case, pressing the
PTT switch while the channel is busy will result
in a low beep and the transmitter will not
function.
RECEIVING
Note: Your radio may be programmed with
options that could affect the way your radio
behaves when it receives a call from another
radio.
Normal Reception
Your radio will normally be muted (squelched)
so that it is quiet when there are no signals.
When a transmission is received, the radio will
automatically unmute itself to allow you to hear
the call.
The BUSY Indicator
Whenever the channel is active, the BUSY
indicator will appear on the display and the
green LED on the top of the radio will light.
However, depending on the muting options
programmed into your radio, you may not
always hear any sound from the speaker. This
ca n happen when others are sharing the
channel but their calls are not meant for you.
For this reason it is important that you visually
check that the channel is not busy before
making a call to ensure you do not accidentally
talk over someone else. In some cases your
radio may be programmed with 'Busy Channel
Lockout' to prevent you from transmitting while
the channel is busy.
The TX7000 can be programmed to suit specific
customer requirements by enabling only those
features that are useful to the customer's
operation.
The f o ll ow in g s ec ti o n d es cr ib es a l l t he
additional features available in the TX7000. In
most cases only a few of these features will be
enabled in a TX7000 at any one time. Many of
the front panel keys are able to perform multiple
fu nct ion s d ep en di ng o n ho w th ey a r e
programmed. In addition many of the functions
can be programmed into more than one key
which means that no specific key can be
addressed as performing a particular function. It
is therefore a matter for your dealer to inform
you of the keys that are enabled and what their
functions are. You can then refer to this manual
to learn how to use the specific functions with
which you have been provided.
THE SQUELCH KEY
The Squelch (or mute) is used to eliminate any
annoying background noise when there are no
signals present. The TX7000 features a pre-set
squelch system. The squelch level has been
fa c t ory set internally to provide op timum
performance. The squelch function can be
switched ON or OFF using the Squelch key.
When the s q u elch i s OFF, the rece i v er's
background noise will be heard (unless Quiet is
enabled), the BUSY indicator will appear on the
display and the LED above the speaker will be
green. When the squelch is ON, the receiver will
remain quiet when there are no signals present,
but an incoming signal will overcome the
squelch action and be heard in the speaker.
To disable the squelch, briefly press the
Squelch key. A low beep will be heard. If there
are no signa l s present, you will hear the
receiver's background noise.
To re-enable the squelch, briefly press the
Squelch key again. A high beep will be heard.
Note: Disabling the squelch will allow you to
listen to all other callers on the channel, unless
Selcall is in use and the Quiet key has been
pressed as indicated by the icon on the
display.
PROGRAMMABLE FUNCTIONS
QUIET
9
PROGRAMMED KEY
ALLOCATIONS FOR
YOUR RADIO
Ch:
Id:
Id:
Ch:
No:
No:
Ch:
Ch:
Id:
Id:
Ch:
No:
No:
Ch:
Ch:
Id:
Id:
Ch:
No:
No:
Ch:
Ch:
Id:
Id:
Ch:
No:
No:
Ch:
Key Lock
Lamp
Selcall
Programming
✔
✔
No Operation
Quiet
Scan / Mem
Low power
Squelch
Talk Around
No Operation
Call
Scan / Mem
Low power
Squelch
Talk Around
Function F1 F2 F3 F4
No Operation
Quiet
Scan / Mem
OS / GS
Low Power
Squelch
Talk Around
Channel Recall
Selcall Speed Dial
Selcall Speed Dial with
Channel Recall
DTMF Speed dial
Monitor
DTMF Speed Dial
with Channel Recall
A
LAMP
BATT
BUSY
T/A
LO
M Q
CALL TO FROM
TX
PRIV
QUIET
F1
F2
F3
F4
SCAN
B
TX7000
 Loading...