

GME Electrophone TX4200 Series Instruction Manual
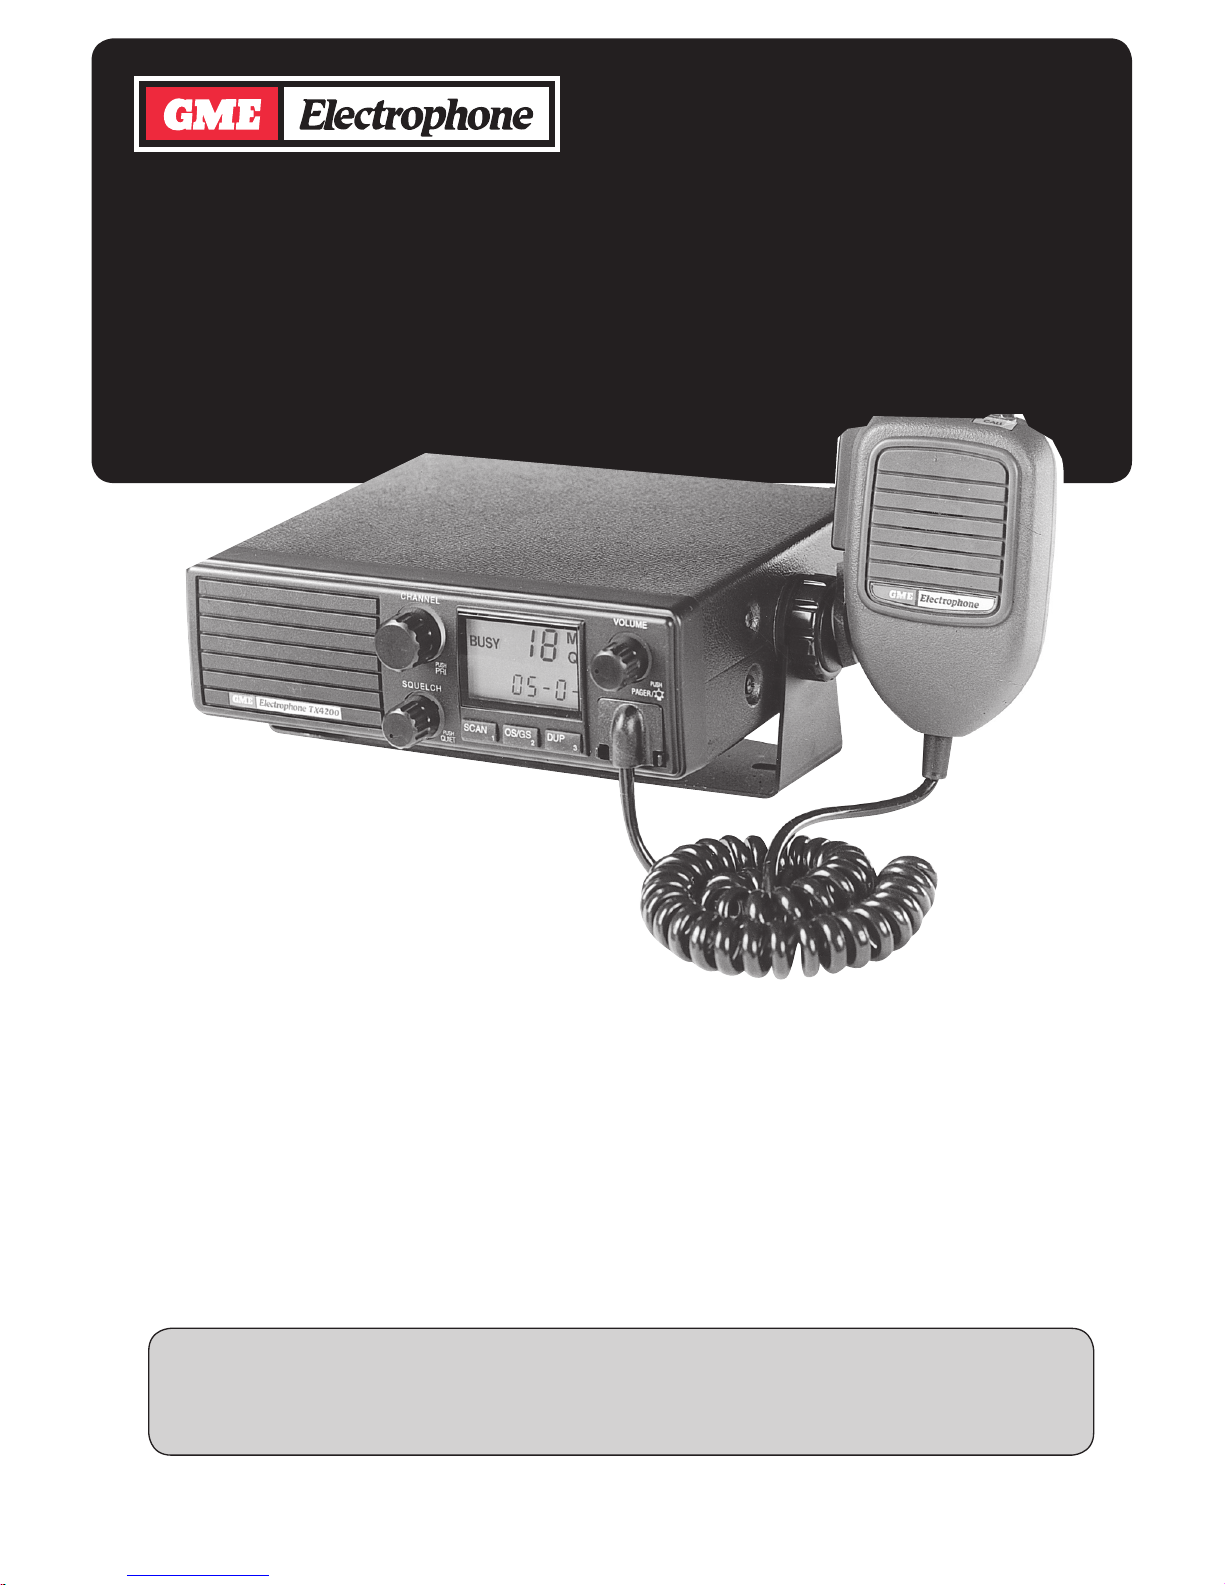
TX4200
SERIES
UHF TRANSCEIVER
Complies with SMAS 250
STANDARD COMMUNICATIONS
PTY. LTD.
INSTRUCTION MANUAL

Specifications . . . . . . . . . . . . . . . . . . . . . . .
Introduction . . . . . . . . . . . . . . . . . . . . . . . . . .
General Description . . . . . . . . . . . . . . . . . .
Features . . . . . . . . . . . . . . . . . . . . . . . .
Basic Operation . . . . . . . . . . . . . . . . . . . . .
Basic Controls . . . . . . . . . . . . . . . . . . . . .
Volume . . . . . . . . . . . . . . . . . . . . . . . . . .
Backlighting . . . . . . . . . . . . . . . . . . . . . . .
Squelch . . . . . . . . . . . . . . . . . . . . . . . . . .
Channel . . . . . . . . . . . . . . . . . . . . . . . . . .
Signal Strength Meter . . . . . . . . . . . . . . .
Duplex . . . . . . . . . . . . . . . . . . . . . . . . . . .
Priority Channel . . . . . . . . . . . . . . . . . . . .
Scanning . . . . . . . . . . . . . . . . . . . . . . . . .
Programming the Scan Memories . . . . . .
Open Scan (OS) mode . . . . . . . . . . . . . .
Scanning in the OS mode . . . . . . . . . . . .
Group Scan (GS) mode . . . . . . . . . . . . . .
Scanning in the GS mode . . . . . . . . . . . .
Checking which channels are in memory
Transmitting . . . . . . . . . . . . . . . . . . . .
Advanced Features . . . . . . . . . . . . . . . . . .
Features . . . . . . . . . . . . . . . . . . . . . . . . .
Selective Calling (general) . . . . . . . . . . . .
TX4200 Selcall Identification Number . . .
Receiver Quiet mode (Q) . . . . . . . . . . . . .
Selective Channel Quieting . . . . . . . . . . .
Call Modes . . . . . . . . . . . . . . . . . . . . . . . .
‘Call To’ Mode . . . . . . . . . . . . . . . . . . . . .
‘Call To’ Memory . . . . . . . . . . . . . . . . . . .
‘Call From’ Mode . . . . . . . . . . . . . . . . . . .
‘Call From’ Alarm . . . . . . . . . . . . . . . . . . .
‘Call From’ Acknowledge . . . . . . . . . . . . .
Advanced Operation . . . . . . . . . . . . . . . . .
Advanced Controls . . . . . . . . . . . . . . . . .
Selcall Ident . . . . . . . . . . . . . . . . . . . . . . .
Transmitting a Selcall Ident . . . . . . . . . . .
Selecting the Selcall ‘Call To’ Mode . . . .
Programming the ‘Call to’ Ident . . . . . . . .
Transmitting the Selcall Ident . . . . . . . . .
Answering an Incoming Selcall . . . . . . . .
Storing Selcall Idents in Memory . . . . . . .
Recalling Idents from the Memory . . . . . .
Selcall Quiet Mode . . . . . . . . . . . . . . . . . .
Marking Channels for Quiet Operation . . .
Unmarking Channels set for Quiet
Operation . . . . . . . . . . . . . . . . . . . . . . . . .
Operating in the Quiet Mode . . . . . . . . . .
Deactivating the Quiet Mode . . . . . . . . . .
Receiving a Signal in the Quiet Mode . . .
Return the Call . . . . . . . . . . . . . . . . . . . . .
Scanning in the Quiet Mode . . . . . . . . . . .
Important Tips on Scanning in the Quiet
Mode . . . . . . . . . . . . . . . . . . . . . . . . . . . .
Group Calls . . . . . . . . . . . . . . . . . . . . . . .
Programming and Sending a Group Call .
Receiving a Group Call . . . . . . . . . . . . . .
Paging Function . . . . . . . . . . . . . . . . . . .
Page Channel . . . . . . . . . . . . . . . . . . . . . .
Programming the Page Ident . . . . . . . . . .
Viewing the Page Ident Memory . . . . . . .
Selecting the Page Mode . . . . . . . . . . . . .
Scanning in the Page Mode . . . . . . . . . . .
Alarm Features . . . . . . . . . . . . . . . . . . . . . .
Selcall Alarm Output . . . . . . . . . . . . . . . . .
Operation . . . . . . . . . . . . . . . . . . . . . . . . .
Connection . . . . . . . . . . . . . . . . . . . . . . . .
External Trigger Input . . . . . . . . . . . . . . . .
Input Alarm Priority . . . . . . . . . . . . . . . . . .
Input Alarm Operation . . . . . . . . . . . . . . .
Connecting to an External Device . . . . . .
Dealer Programmable Options . . . . . . . . .
Using the Dealer Programmable Options .
Group Scan Mode Options . . . . . . . . . . . .
Appending 4 or 5 Digits to
your Selcall Signal . . . . . . . . . . . .
Sending and Receiving Group
Calls to 100 radios . . . . . . . . . . . .
Setting the way your radio responds to a
Selcall when in the Quiet mode . . .
Installation . . . . . . . . . . . . . . . . . . . . . . . . . . . .
Repeaters . . . . . . . . . . . . . . . . . . . . . . . . . . . .
Trouble Shooting Guide . . . . . . . . . . . . . . . . .
Warranty . . . . . . . . . . . . . . . . . . . . . . . . . . . . .
2
CONTENTS
3
4
5
5
6
6
7
7
7
7
7
7
8
8
9
9
9
10
10
11
11
12
12
12
12
13
13
13
13
13
13
14
14
14
14
15
15
15
16
16
16
16
17
17
17
17
17
18
18
18
18
19
19
20
20
20
21
21
21
21
22
23
23
23
23
24
24
24
24
25
26
26
26
27
28
29
30
31
32

GENERAL
Frequency Range:
Frequency Control:
No. of Channels:
Channel Spacing:
Antenna Impedance:
Antenna Connector:
Voltage Range:
Nominal Voltage:
Polarity:
Temperature Range:
Dimensions:
Current Protection:
Reverse Polarity &
Overvoltage
Protection:
Speaker:
Scan Rate:
Alarm Input:
Alarm Output
Current:
Selcall - Tone Set:
- Tone Period:
Options:
TRANSMITTER
RF Output Power:
Frequency Stability:
Modulation Mode:
Frequency Response:
Modulation Deviation:
476.425 - 477.400 MHz
Microprocessor
controlled synthesiser
40
25 kHz
50 Ohms
SO239 Cable socket
10.5 - 15.2 Volts DC
13.8 Volts DC
Negative earth
-10° C to +60° C
171mm(W) x
52mm(H) x
148mm(D)
2 Amp in-line fuse
Series diode/regulator
3 Watt 4 Ohm high
efficiency front
mounted
0.1 seconds (10
channels per second)
Active Low
1 Amp max.
CCIR compatible
40 ms
Scrambler
5 Watts max. legal
power @ 11.5-15.2V
Better that ±5 PPM
FM
300 Hz - 3 kHz 6dB
per octave preemphasis +
microphone preemphasis
Within ±5 kHz (+20dB
limiting @ 300 Hz 3 kHz)
Hum and Noise:
Modulation
Distortion:
Microphone:
Microphone Input
Sensitivity:
Spurious Emissions:
Current
Consumption:
RECEIVER
Circuit System:
I.F. Frequencies:
Frequency Stability:
Sensitivity:
Selectivity:
Image Rejection:
Spurious Rejection:
Blocking:
Intermodulation:
Hum and Noise:
Frequency Response:
Squelch Range:
Audio Output:
Current
Consumption:
-40 dB
3% @ ±3 kHz
deviation
Electret
1 Pascal @ 1 kHz for
±1.5 kHz deviation
Better than -70 dBc
1.9 Amps
Double conversion
Superheterodyne
1st 21.4 MHz
2nd 455 kHz
Better than ±5 PPM
0.25 uV for 12 dB
SINAD
0.35 uV for 20 dB
noise quieting
-6 dB @ ±7.5 kHz
-72 dB @ ±25 kHz
1st IF: -66 dB
2nd IF: -75 dB
Better than -70 dB
Better than -90 dB @
±200 kHz
Better than -70 dB
-40 dB
300 Hz - 3 kHz with 6
dB per octave
de-emphasis
Threshold = 0.15 uV
Tight = 2 uV
3 Watts undistorted
@ 4 Ohms
Squelched = 200 mA
Full volume = 680 mA
3
SPECIFICATIONS
Specifications are typical unless
otherwise indicated and may be subject
to change without notice or obligation.

The UHF Citizens Band Radio Service (CBRS)
was set up to provide a simple yet reliable form
of radio communication for business, farming or
private use. A CB radio license is not required.
Your TX4200 operates in the UHF (Ultra High
Frequency) 477 MHz band and offers a much
higher quality service than 26/27 MHz systems.
In addition, by using FM (frequency modulation),
vo ice quality is improved while electrical
interference is virtually eliminated.
The range of a UHF FM signal is usually
considered ‘line-of-sight’, but this can be greatly
increased by the liberal use of repeaters.
Repeaters are special transceivers (transmitter/
receivers) installed in high locations. Their job
is to automatically re-transmit any signals they
receive, thereby extending the range of the
original signal. Generally, the range of your
UHF radio will vary according to your location
and the height of your antenna. UHF signals
are easily blocked by hills or large buildings, so
you wont get as much range in a valley or builtup city area as you will from a hill or in open
country. If you are having trouble contacting
someone, try moving to an open space or a
higher location. Typical vehicle to vehicle range
is around 3 to 10 km depending on the terrain.
A base station, because of it’s higher antenna
installation, could extend it’s range to 30 km or
more depending on it’s location. Once again,
the use of repeaters can increase these ranges
considerably (up to 100 km or so).
The following functions are standard on most
UHF CB radios. Here is what they do.
Volume : Used to adjust the level of sound
output from the speaker.
Squelch (sometimes called ‘Mute’) : The
squelch control is used to eliminate any
annoying background noise when there are no
signals present. When the control is fully
cou nter-cl ockwise , t he squelch is set to
minimum and everything can be heard in the
speaker. As the control is slowly advanced
clockwise, the squelch level increases until it
reaches a point where the background noise
suddenly disappears. This is known as the
threshold. At this point, the radio is quiet when
there are no signals being received, but any
incoming signals will overcome the squelch and
be heard in the speaker. As the squelch control
is advanced further clockwise, the squelch level
is progress i v ely incr e a sed a n d stronge r
incoming signals are needed to overcome it.
The usual procedure for setting the squelch is
to temporarily select an unused channel, adjust
the squelch control fully counter-clockwise, then
slowly advance it clockwise just past the point
where the background noise disappears.
Channels : There are 40 frequencies available
in the UHF CB band. To make it easier to
identify each frequency, they are allocated
channel numbers (channels 1 to 40). The
channels are selected by rotating the channel
knob. The selected channel number appears on
the display.
Duplex : UHF radios have a simplex/duplex
function. The Simplex mode is used when you
wish to talk directly to another radio. It allows
the radio to transmit on the same channel as it
receives. The Duplex mode is used when
communicating through repeaters. It causes the
radio to transmit and receive on two different
channels. Put simply, if you wish to talk directly
to another radio select ‘Simplex’. To talk to
another radio via a repeater, select ‘Duplex’.
Push To Talk (PTT) Switch : This is the large
button on the side of the microphone. It is used
to make the radio transmit. To transmit, hold the
microphone close to your mouth, press the PTT
switch, then talk into the microphone in a normal
voice. When you have finished talking, release
the PTT switch and the radio will return to the
receive mode.
Scan : The scan function allows you to listen for
signals on a number of channels in quick
succession. The radio monitors each channel
for just long enough to check for signals. If no
signals are present, it switches to the next
channel in sequence. If a signal is heard, the
radio pauses on that channel so the signal can
be heard. After the signal disappears, the radio
resumes scanning. The TX4200 scans at up to
10 channels per second and allows you to
select which channels you wish to scan.
4
INTRODUCTION

Th e GM E El e c t ro p h o ne T X 42 0 0 U H F
transceiver has been wholly designed and
manufactu r e d in Austr a l i a by Stan d a r d
Communications Pty. Ltd to exceed all the
requirements of the UHF CB service, while
withstanding the forces of the harsh Australian
and New Zealand environments.
The TX4200 incorporates the very latest in
CAD/CAM (computer aided design, computer
aided manufacturing) techniques to produce a
UH F C B t r a ns c ei v er wi t h out s ta n d in g
specifications and performance.
The new TX4200 incorporates amongst other
thi ngs, a liquid crys tal displa y a nd fully
programmable scanning . In addition, the
TX4200 has a number of innovative signalling
features including fully user programmable
Selcall system with full 5 digit received Ident
display, separate priority channel programming
and a group call feature.
Remarkably, with all these features the TX4200
remains a very compact unit.
FEATURES
• Microprocessor Controlled Frequency
Synthesiser: Allows user programmable
control of scanning and channel memory
storage.
• Non volatile EEPROM memory: All dealer
and user settings are stored inside an
EEPROM.
• User Programmable multi-tone Selcall
Function: CCIR tone compatible and built-in
to the TX4200 microprocessor.
• SELCALL 'QUIET' mode programmable on
individual channels: Allows mixed monitoring
and scanning of QUIET and OPEN channel
combinations with audible alarm when
called.
• Three SELCALL memories: U s e r
programmable storage of three frequently
called SELCALL Idents.
• Open Scan and Group Scan modes: The
original GME scan functions are now even
better, fully programmable and faster than
ever.
• Liquid Crystal Display: Fully detailed LCD
provides a visual indication of all selected
functions at a glance.
• High Contrast Backlighting: Not just the LCD
but all rotary controls are fully backlit for
hassle free operation at night.
• Individually Programmable Duplex Function:
User selectable for only those individual
channels in your area that have repeaters,
leaving the others free for use as extra
simplex channels.
• Di g i t al Si g n a l S t re n g t h M e t e r: An
improvement on the old 5 segment bar type
meter, the digital signal strength meter
provi d e s a n umeri c si gnal st r ength
indication in numbers from 0 to 9.
• Low Profile Microphone Plug: The 'new
generation' low profile microphone plug
provides a stronger attachment and a more
compact appearance.
• Surface Mount Microchip Technology: Only
the very latest techniques in surface mount
component selection, assembly and quality
assurance are used to ensure the highest
quality and reliability is achieve d and
maintained.
• Designed and Manufactured in Australia:
The TX4200 is totally designed a nd
manufactured in our factory at Gladesville,
NSW to meet the demanding needs of the
Australian and New Zealand communities.
5
GENERAL DESCRIPTION
6
BASIC OPERATION
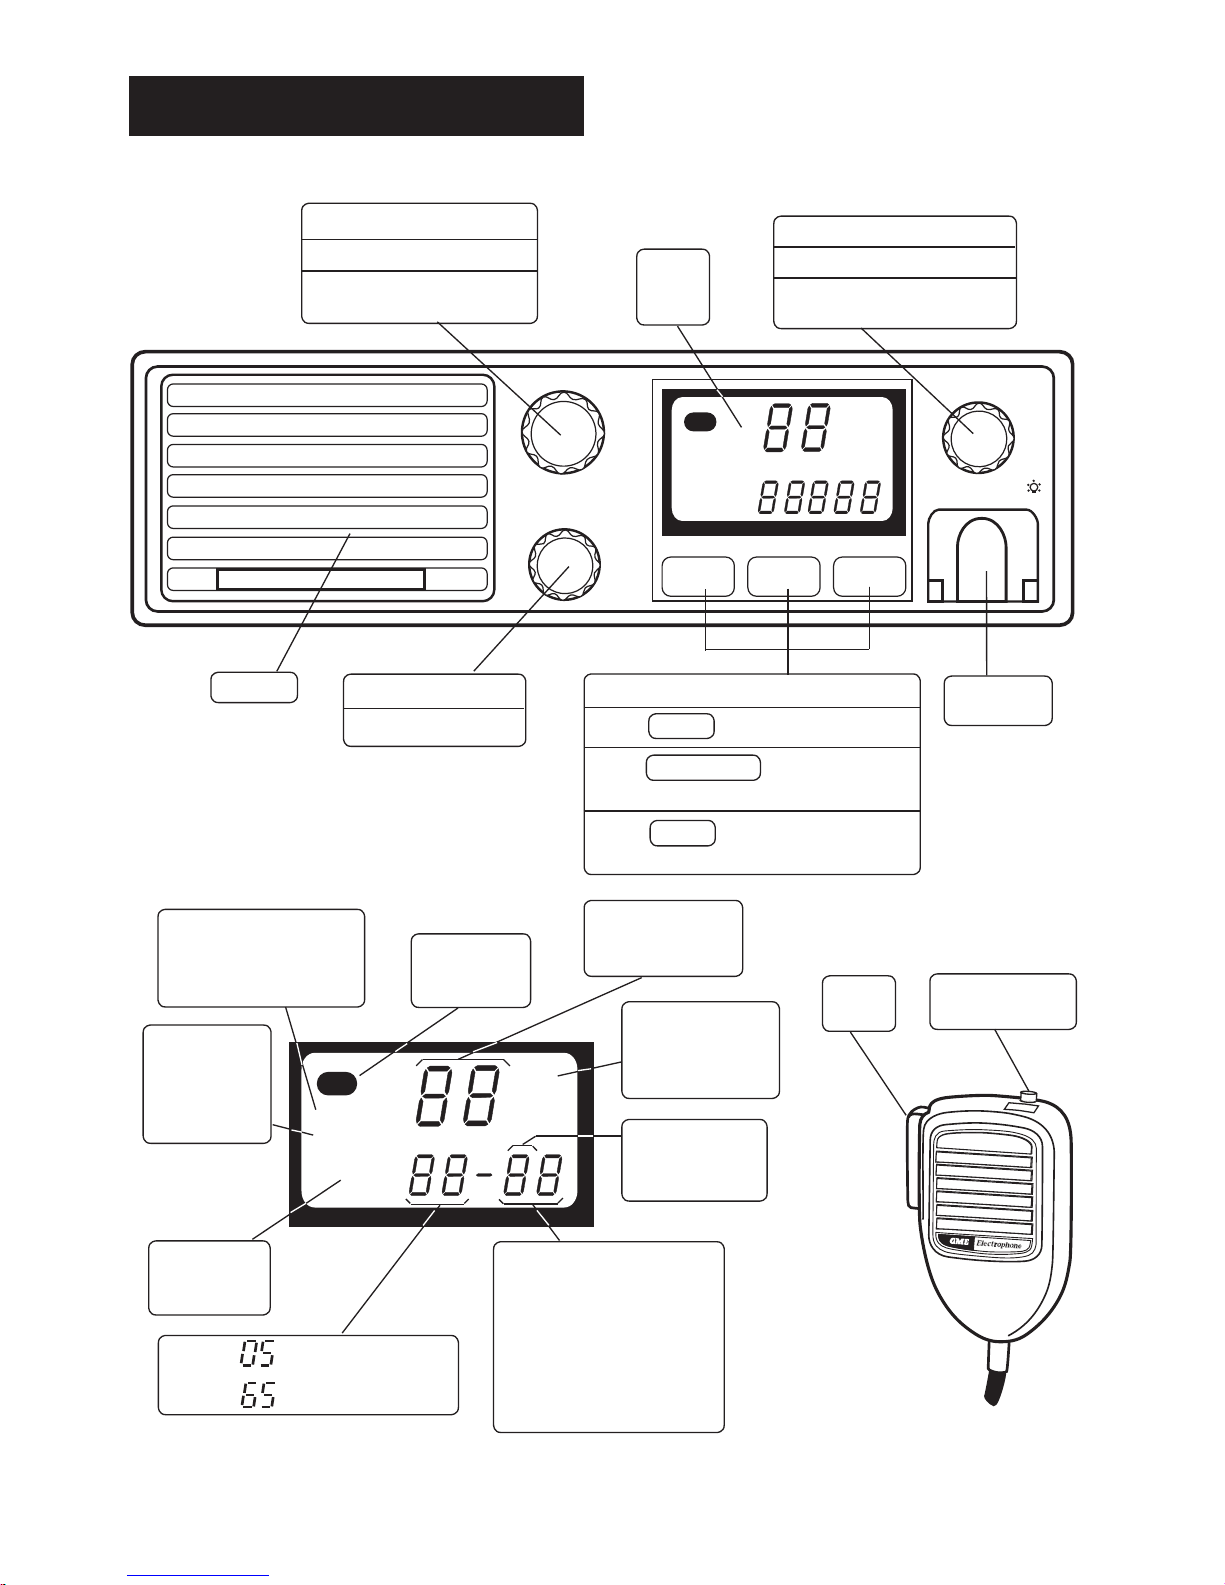
CHANNEL
VOLUME
PUSH
QUIET
SQUELCH
PUSH
PAGER/
OFF
PUSH
PRI
SCAN
MEM
DUPOS/GS
2 31
SCAN
DUP
BUSY
M
TX
SCAN
DUP
BUSY
M
TX
CALL
Appears when a signal
is being received or the
Squelch is open (fully
counter-clockwise)
Indicates the
selected
channel is set
for DUPLEX
operation
Indicates the
receiver is
Scanning
Displays in Open Scan mode
Displays in Group Scan mode
Displays the
incoming signal
strength
Indicates the
selected channel
is in the Scan
memory
Displays the
selected channel
number
Indicates the
TX4200 is
transmitting
OS mode: Displays the
last selected
channel.
GS mode: Displays the
PRIORITY
channel
number.
Speaker
BASIC FUNCTION
Rotate for Squelch
BASIC FUNCTION
Press to toggle Scan mode
Press
to toggle OPEN SCAN or GROUP SCAN modes
Press
to toggle DUPLEX mode on channels 1 - 8
Microphone
Socket
Liquid
Crystal
Display
BASIC FUNCTION
Rotate to select channels
Press to jump to the
PRIORITY channel
BASIC FUNCTION
Rotate for Volume ON/OFF
Press for Backlighting Bright or Dim
PTT
Switch
Skip channels
when scanning.
SCAN
OS/GS
DUP
CONTROLS
LIQUID CRYSTAL DISPLAY
MICROPHONE
VOLUME
Rotate the Volume control clockwise past the
"click" to turn the TX4200 on. Adjust the Volume
control for a comfortable listening level.
(If no sound is heard, adjust the Squelch control
fully counter-clockwise, then readjust the
Volume control).
BACKLIGHTING
The TX4200 features built-in backlighting of the
Liquid Crystal Display (LCD) and all controls.
The backlighting can be toggled bright or dim
by momentarily pressing the Volume knob.
When the radio is turned off, the backlighting
setting is retained and will be restored when the
radio is turned on again.
SQUELCH
The Squelch control is used to eliminate any
annoying background noise when there are no
signals present. To adjust the Squelch, first
rotate the Squelch fully counter-clockwise until
the background noise is heard and the BUSY
indicat or on the LCD i s disp layed . The n
advance the Squelch control clockwise until the
noise just disappears and the BUSY indicator is
extinguished. At this point the receiver will
remain quiet under "no signal" conditions, but
an incoming signal will overcome the Squelch
action and be heard in the speaker. As the
control is further advanced clockwise, the
squelch action is progressively increased and
stronger incoming signals are neede d to
overcome it. To receive extremely weak signals
or to disable the squelch, simply turn the
Squelch control fully counter-clockwise.
CHANNEL
Select the required channel by rotating the
Channel selector switch clockwise or counterclockwise. Rotating clockwise selects higher
channels and counter-clockwise selects lower
channels. The selected channel is displayed on
the LCD.
SIGNAL STRENGTH METER
The TX4200 has a digital signal strength meter
built into the LCD. When in the normal receive
mode (scan not selected), the received signal
strength is displayed as numbers from 0 to 9
(with 9 being the strongest) on the bottom right
of the LCD.
DUPLEX
Duplex operation allows the TX4200 to transmit
on a different channel to that which it receives.
This allows operation through any repeater
stations in your area. Repeaters automatically
re- transmi t y our signal pro viding grea tly
increased range. (See section on repeaters on
page 30).
The Duplex function operates only on channels
1-8. When Duplex is selected on one of these
channels, the TX4200 receives on the selected
channel but actually transmits 30 channels
higher.
e.g.
Channel Selected 1 2 3 4 5 6 7 8
Receive Channel 1 2 3 4 5 6 7 8
Transmit Channel 31 32 33 34 35 36 37 38
The TX4200 allows you to programme Duplex
7
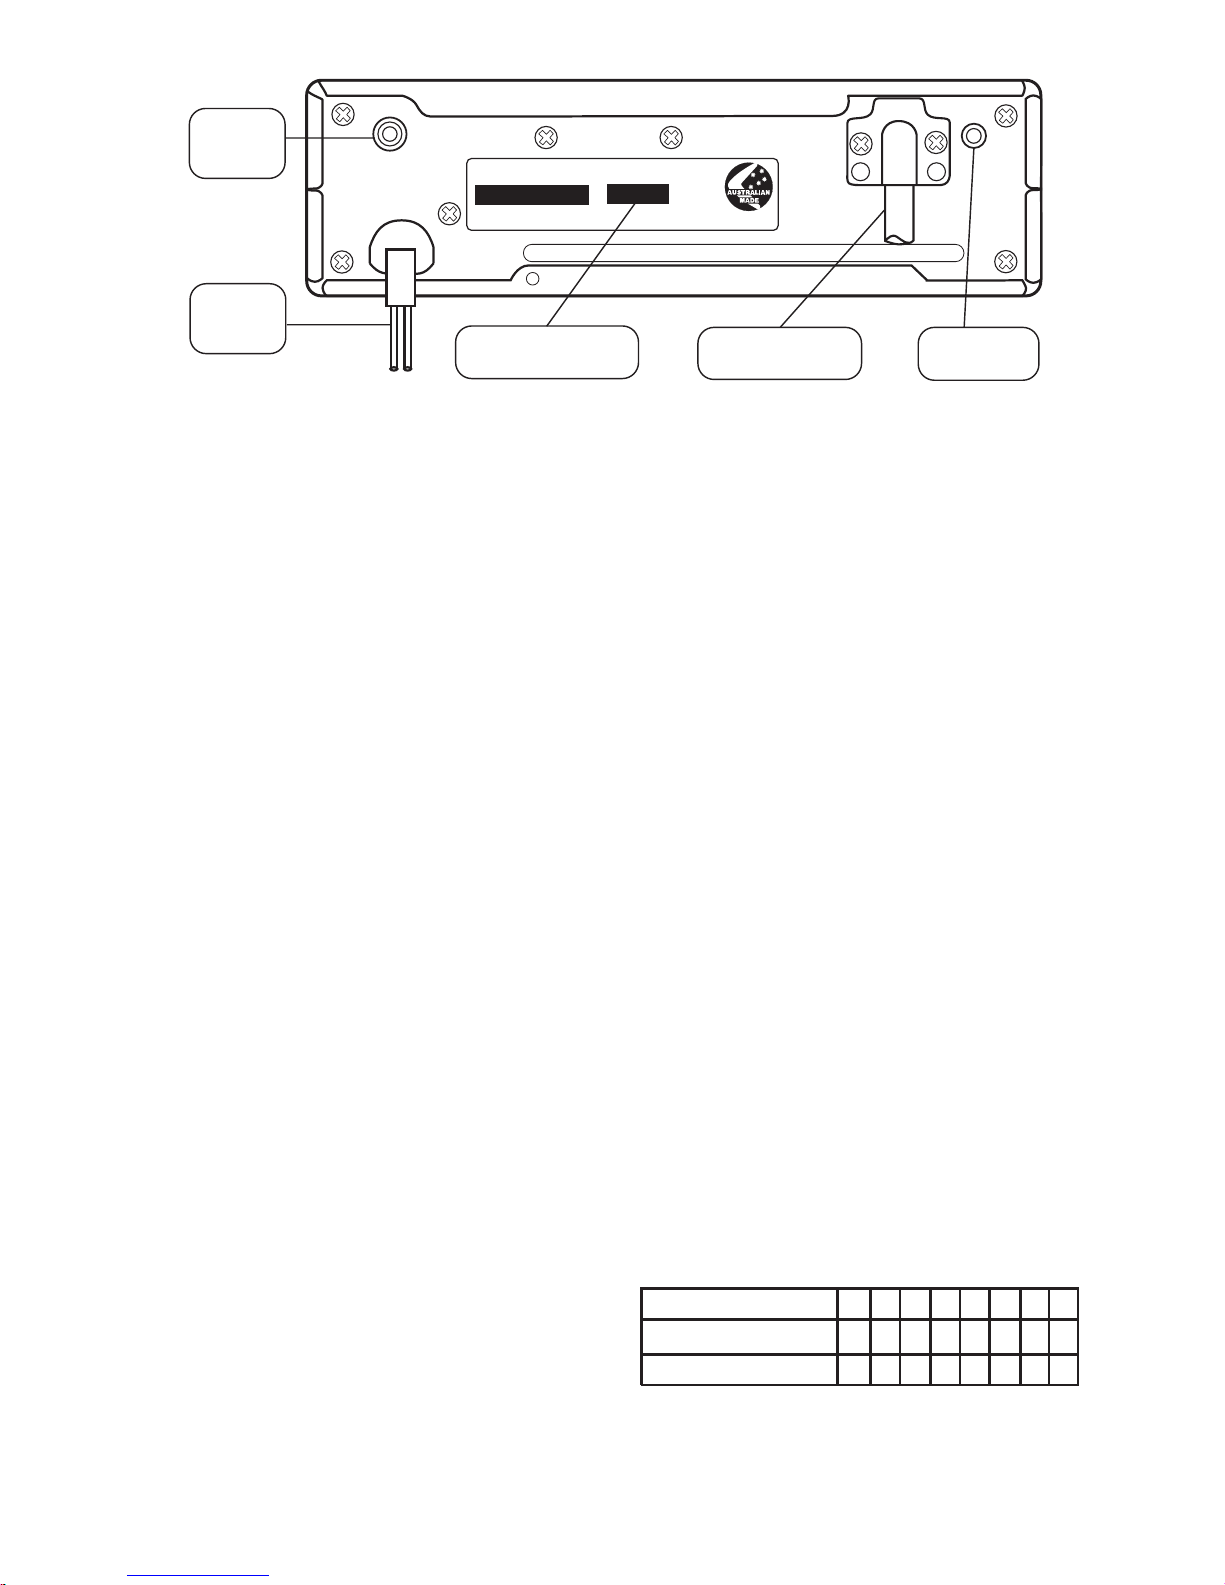
13.8 V DC
GME ELECTROPHONE MODEL TX4200
SERIAL No.
MANUFACTURED BY:
STANDARD COMMUNICATIONS Pty. Ltd.
6 Frank St., GLADESVILLE N.S.W.
COMPLIES WITH SMAS 250
APP
R. No. 2503017
SELCALL IDENT
ANTENNA
ALARM
EXT SPKR
Extension
Speaker
Socket
External
Power
Lead
Your TX4200
Selcall Ident Code
External Antenna
flying lead
Alarm
Input/Output
operation on individual channels rather than the
usual method of programming either all 8
channels or none. This is particularly useful in
country areas where there may only be one or
two repeaters. These repeater channels can be
programmed as Duplex and the rest can be left
as normal (simplex) channels for use as normal
direct radio to radio communications.
To programme an individual channel for Duplex
operation:
1. Select the required channel (1 - 8)
2. Press DUP
A high beep will be heard and 'DUP' will be
displayed. Now whenever that channel is
selected, it can be used as a Duplex (repeater)
channel.
To cancel Duplex on the selected channel,
press DUP again. A low beep will be heard and
'DUP' will disappear from the display on that
channel.
Note: The TX4200 will not allow Duplex to be
selected on any channels other that channels 1
to 8. If DUP is pressed on any other channels, a
low beep is heard and the command is ignored.
PRIORITY CHANNEL
The TX4200 allows you to store a priority
channel which can be instantly recalled at the
press of a button. This could be your normal
working channel or your local repeater channel.
To STORE a channel in the Priority channel
memory:
1. Select the required channel using the
channel selector switch.
2. Press and hold the channel selector knob.
The channel display will flash for a few seconds
then a high beep will be heard. The selected
channel is now stored in memory.
To Recall the Priority Channel:
Press the Channel selector knob at any time.
The radio will immediately jump to the Priority
channel. If the radio was scanning, the scan
function will be cancelled.
To Change the Priority Channel:
Simply select a new channel, then press and
hold the channel selector knob again. The new
priority channel will overwrite the old one.
NOTE: If at any time you feel you have lost
control of your TX4200, simply press th e
channel selector knob. The radio will switch to
the priority channel and all functions will reset.
SCANNING
The TX4200 is provided with a scan function to
allow groups of user programmable channels to
be scanned for activity. Channels are scanned
at a rate of 10 channels per second. If a busy
channel is found, scanning will pause to allow
the signal to be heard. Scanning will then
resume 5 seconds after the channel becomes
clear again.
Two scanning modes are available - Open Scan
(OS) and Group Scan (GS). Each scan mode
has it's own separate user programmable scan
memory. Once programmed, the channels
stored in these memories can be scanned using
the SCAN button.
NOTE: If you do not need to use the SCAN
function or are confused by it's operation,
simply ignore the SCAN button on the front
panel. The TX4200 will continue to operate in
it's basic mode as a stand a rd UHF C B
transceiver.
If at any time you feel you have lost control of
your TX4200, simply press the channel selector
knob. The radio will switch to the priority
channel and all functions will reset.
If in doubt, turn to the trouble shooting
section at the back of this manual.
8
SCAN
MEM
DUPOS/GS
2 31
DUP
PROGRAMMING SCAN MEMORIES
The Open Scan and Group Scan modes have
their own s e p arate user p r ogrammable
scanning memories. This means that you can
freely add or remove channels from one scan
group without fear of affecting those channels
programmed into the other group. In both scan
modes, any channel in the range of 1 to 40 (up
to a m a x i m u m of 40 channels) can be
programmed into or removed from the scanning
memories.
The sequence for adding or removing channels
in the scanning memory is identical for both OS
and GS modes.
1. Check that the TX4200 is not presently
scanning. If it is, press SCAN to cancel the scan
function.
2. Press OS/GS to select the Open Scan (OS)
or Group Scan (GS) mode. 'OS' or 'GS' will be
displayed.
3. Rotate the channel selector switch until the
required channel is displayed.
• If 'M' is displayed, then the selected channel
is already in the scan memory.
To remove it, press and hold MEM until a
low beep is heard. 'M' will disappear from
the display indicating the channel is no
longer in memory.
• If 'M' is not displayed, then the selected
channel is not presently in the selected scan
memory.
To add it, press and hold MEM until a high
beep is heard. 'M' will appear in the display
indicating the selected channel is now in the
memory.
OPEN SCAN (OS) MODE
Open Scan mode allows up to 40 channels to
be scanned in an ascending sequence.
Scanning is performed at a rate of 10 channels
per second.
The TX4200 is supplied with all 40 UHF CB
channels pre-programmed into the OS memory.
Any channels not required can be removed as
necessary.
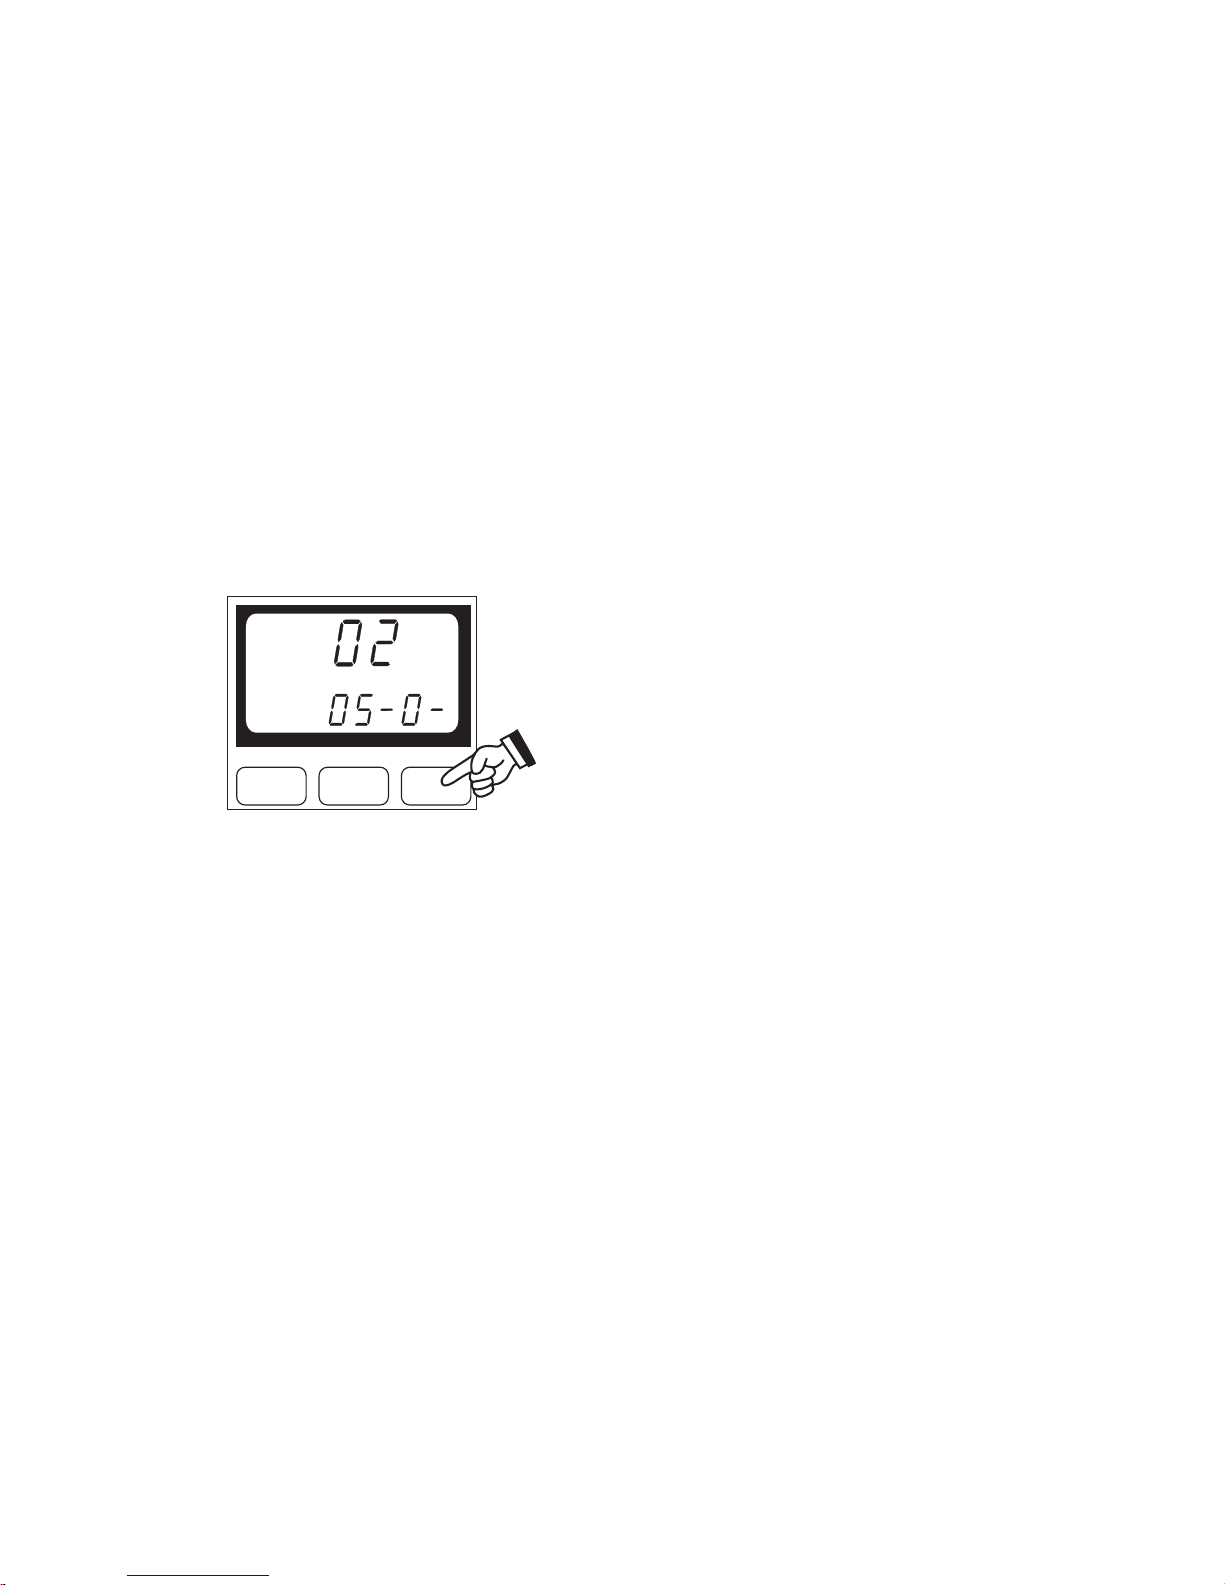
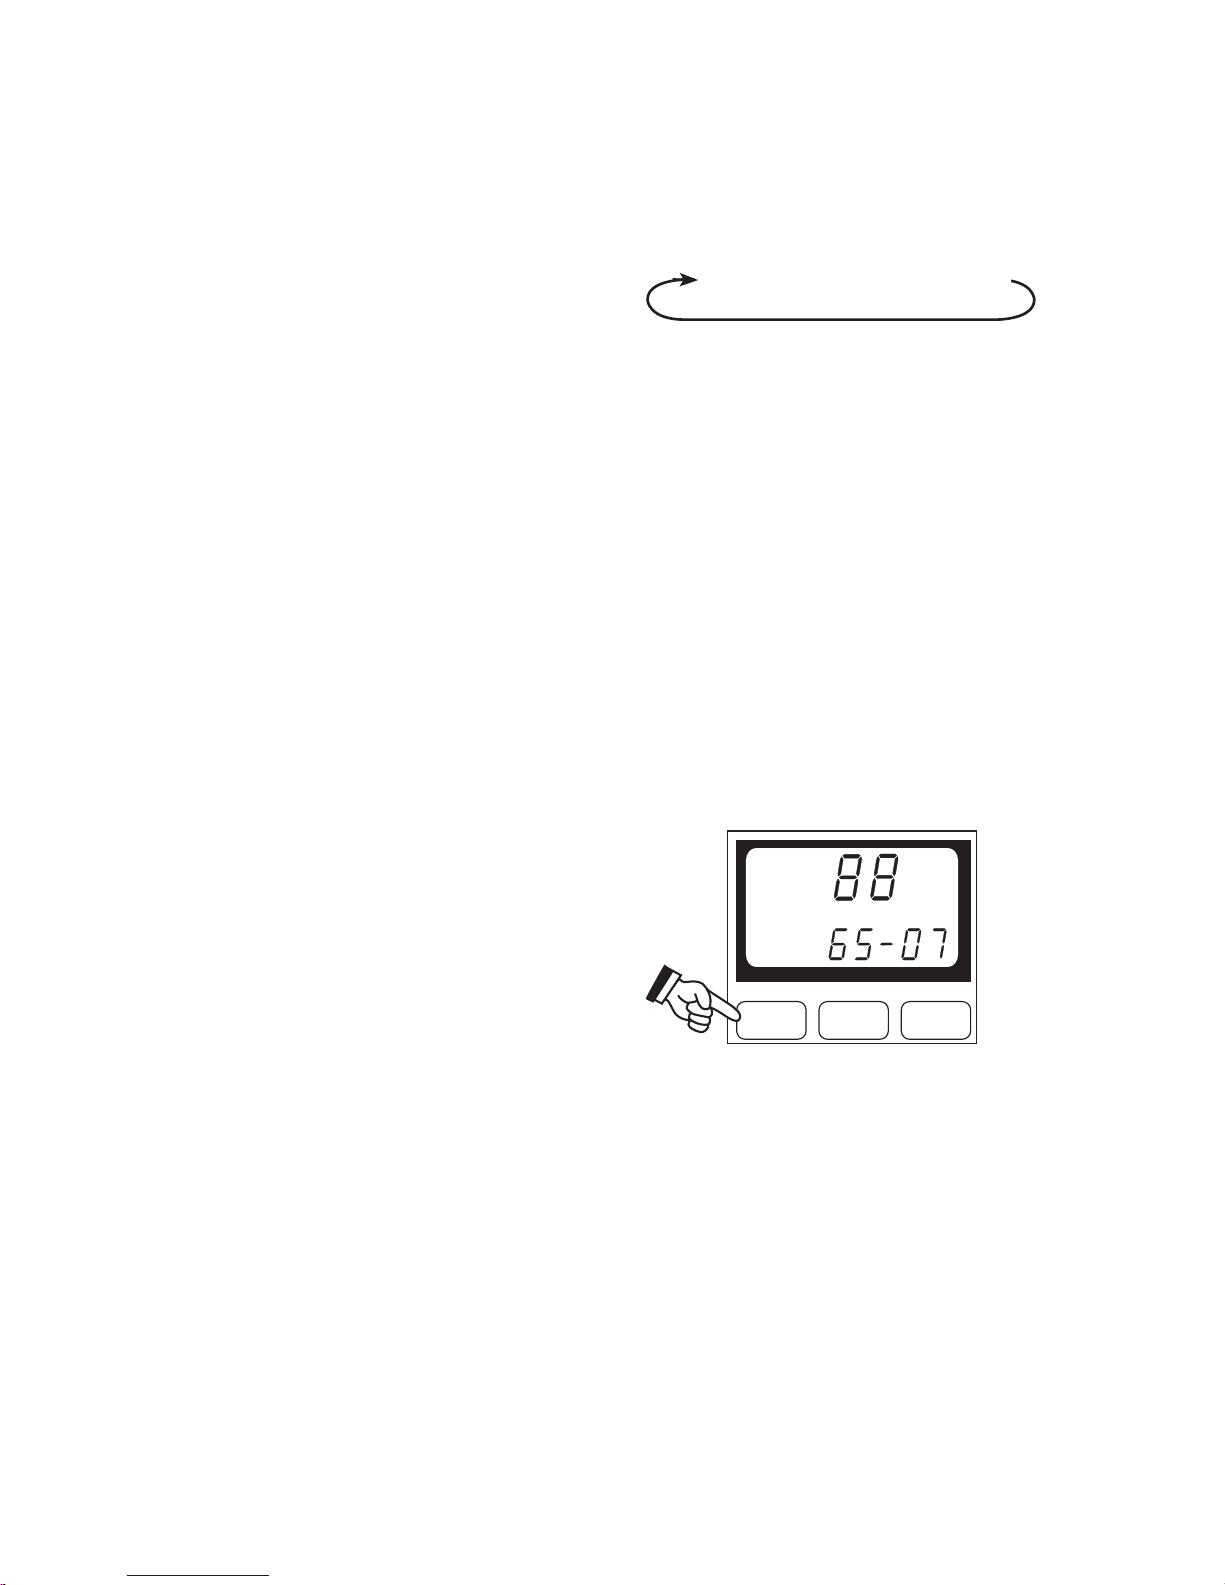
SCANNING IN THE OPEN SCAN MODE
To scan in the Open Scan (OS) mode:
1. Press OS/GS so that 'OS' is displayed.
2. Adjust the squelch control so that the
background noise disappears.
3. Press SCAN. 'SCAN' will be displayed.
When scanning in the OS mode, the TX4200
will display rapidly changing channel numbers
indicating each channel as it is being scanned.
In addition, it will display 'OS' to indicate that it
is in the Open Scan mode, along with the last
channel you selected before pressing SCAN.
(It is to this channel that the TX4200 will return
when you exit the Scan mode).
If a busy channel is found, the receiver will 'lock'
onto it and will remain there for as long as the
channel remains busy, and for 5 seconds after
th e transmission ceas es. This allows the
TX4200 to hold the channel during short breaks
in the conversation. Once the channel has
remained clear for 5 seconds, the radio will
9
SCAN
MEM
DUPOS/GS
2 31
M
SCAN
MEM
DUPOS/GS
2 31
SCAN
M
1 - 2 - 3 - 4 - . . . . . . . 39 - 40
resume scanning.
If you don't wish to listen to a busy channel, you
can skip over it with a quick press of the CALL
button (on the microphone). The receiver will
immediately resume scanning.
• To manually hold a busy channel, briefly
press the PTT switch on the microphone. 'M'
will be displayed and the scan function will
pause, causing the radio to stay on the
channel indefinitely. You can now transmit
and receive on that channel in the usual
way.
NOTE: 'SCAN' is still displayed to remind
you that the radio is still in the Scan mode
and that the Scan function is only inhibited
temporarily.
• To resume scanning, briefly press the CALL
button. 'M' will disappear and the receiver
will begin scanning again.
• To cancel the Scan function, press SCAN.
If the radio was scanning, it will exit Scan
and return to the last selected channel.
If the radio was stopped on a busy channel,
it will exit Scan and remain on that channel.
NOTES:
1. At any time while scanning, you can
immediately cancel scanning and jump to
the priority channel by briefly pressing the
channel selector knob.
2. While the receiver is scanning (i.e. not
stopped on a busy channel) the transmitter
is disabled. Pressing the PTT switch will
result in a low beep.
GROUP SCAN (GS) MODE
Group Scan mode allows you to transmit and
receive normally on your Priority channel, but
between breaks in the conversation, the radio
can scan and listen to several other channels.
The receiver will continue to scan the other
channels stored in the GS memory ONLY
WHILE THERE ARE NO SIGNALS ON THE
PRIORITY CHANNEL.
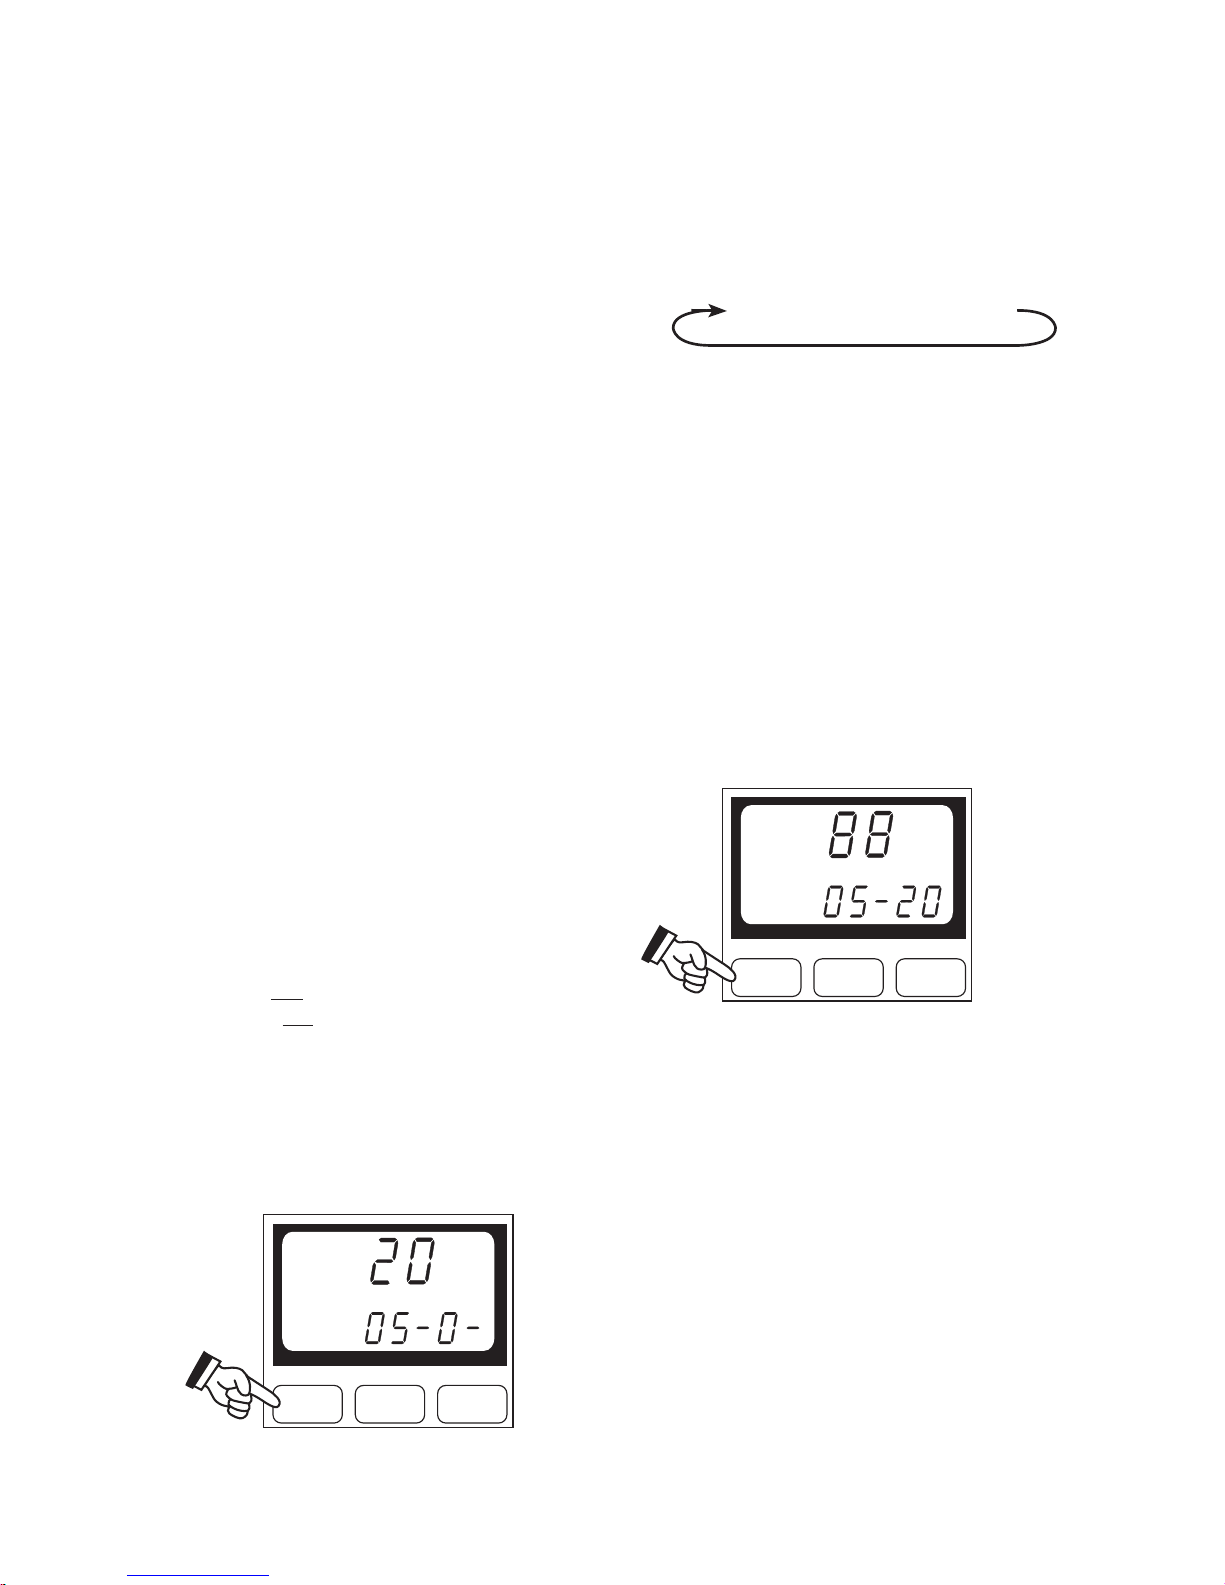
The Priority channel is scanned after every 2
group scan channels.
e.g. Using priority channel 20 with GS channels
1, 2, 3, 4, 5 and 6.
The TX4200 is supplied with a blank group scan
memory, allowing you to programme your own
channel group as required. Programming the
Group Sca n channels is described under
“Programming Scan Memories” on page 9.
SCANNING IN THE
GROUP SCAN MODE
To scan in the Group Scan (GS) mode:
1. Press OS/GS so that 'GS' is displayed.
2. Adjust the squelch control so that the
background noise disappears.
3. Press SCAN. 'SCAN' will be displayed.
When scanning in the GS mode the TX4200 will
display rapidly changing channel numbers
indicating each channel as it is being scanned.
In addition, it will display 'GS' to indicate that it
is in the Group Scan mode, along with the
Priority channel number. (It is this channel that
is being monitored with the GS channels and it
is to this channel that the TX4200 will return
when you exit the Scan mode).
The Priority channel is scanned after every 2
Group S c a n (G S ) chann e l s have been
scanned.
10
SCAN
MEM
DUPOS/GS
2 31
SCAN
M
1 - 2 - 20 - 3 - 4 - 20 - 5 - 6 - 20
 Loading...