

Page 1

GX620
VHF MARINE HANDHELD RADIO
INSTRUCTION MANUAL
Page 2

CONTENTS
INTRODUCTION ..............................3
........................................3
CAUTION
.......................................4
FEATURES
STANDARD PACKAGE INCLUDES
OPTIONAL ACCESSORIES
.....4
.................4
RADIO CONTROLS...........................5
FITTING THE BATTERY PACK
............6
Fitting ......................................6
Removal ...................................6
BATTERY CHARGING
FUNCTIONS
LCD DISPLAY
BASIC RADIO OPERATIONS
RADIO FEATURES EXPLAINED
.......................7
....................................8
.................................10
...........11
.......11
Volume Level ..........................11
Function (Menu) Mode ............11
Channels ................................11
Power High/Low .....................12
Squelch Level Adjustment .......12
Monitor ..................................12
Keypad Lock ...........................12
Channel 16 ............................12
Last Channel Memory (LCM) ...13
Dual Watch/Triple Watch Mode 13
Channel Scan .........................14
Priority Scan ...........................14
Key Beep ................................14
Display & Keypad Backlight ....15
Battery Level ..........................15
Power Save ............................15
INTERNATIONAL/ USA & CANADIAN
.........................................15
MODES
SAFETY REQUIREMENTS
TROUBLESHOOTING
INTERNATIONAL FREQUENCY
............................................17
PLAN
FREQUENCY PLAN – CANADA
...............16
......................16
......18
FREQUENCY PLAN – USA..............19
TECHNICAL SPECIFICATIONS
SC CONTRACT WARRANTY
AGAINST DEFECTS
.........20
......................... 22
PAGE 2 INSTRUCTION MANUAL GX620
Page 3

INTRODUCTION
Congratulations on purchasing this GME fully featured VHF Marine radio.
Your GX620 has been built to offer excellent value by combining advanced features,
great design and manufacturing quality.
To ensure you are familiar with the operation and features of your radio, and in order
to obtain the best performance, please read this manual thoroughly before operation.
CAUTION
IMPORTANT: READ ALL INSTRUCTIONS carefully and completely before operating
your radio and retain this manual for future reference.
NEVER: connect the radio to a power source other than the supplied battery.
This may damage your product.
NEVER: operate your radio with the antenna less than 5 cm from exposed
parts of the body.
NEVER: use the radio in or near a mining facility or other area which uses
remotely triggered explosives or an area labelled ‘Blasting Area’.
NEVER: use or charge your radio in a potentially explosive atmosphere.
DO NOT: place your radio in front of a vehicle air bag.
DO NOT: operate your radio on board an aircraft.
DO NOT: use your radio with a damaged antenna.
DO NOT: attempt to modify your radio in any way.
ALWAYS : charge your radio at normal room temperature.
ALWAYS : switch off your radio where notices restrict the use of two-way radio
or mobile telephones.
ALWAYS : replace the accessory jack cover when the jack is not in use.
AVOID: submerging your radio into water. It is not submersible.
AVOID: storing or charging your radio in direct sunlight.
AVOID: storing or using your radio where temperatures are below -20º C or
above +60º C.
GX620 INSTRUCTION MANUAL PAGE 3
Page 4

FEATURES
Complete International/USA and Canadian channel plans
•
Easy to read large backlit LCD
•
Simple 5/1 watt switchable power
•
Priority Scan
•
Water resistant to IP54
•
Drop in style semi-quick charger
•
Flexible antenna and carry case
•
STANDARD PACKAGE INCLUDES
GX620 Radio
•
Replaceable Flexible Antenna
•
Li-Ion Battery Pack (1000 mAh)
•
Charging Cradle
•
Belt Clip
•
Instruction Manual
•
12 V DC In-Dash Adapter (BCV005)
•
OPTIONAL ACCESSORIES
BCT005 – Power Adaptor
•
MC005 – Speaker Microphone
•
BP1700 – Li Ion Battery Pack (1700 mAh)
•
LC003 – Leather Carry Case
•
PAGE 4 INSTRUCTION MANUAL GX620
Page 5
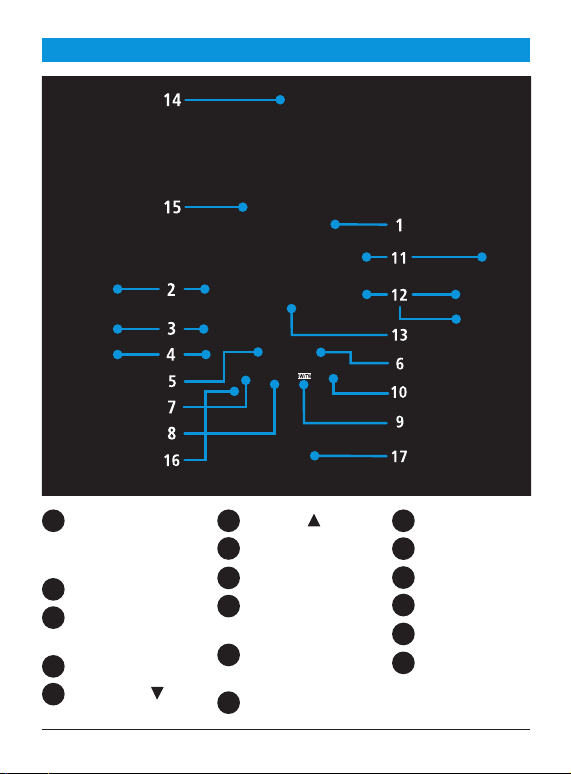
RADIO CONTROLS
1 Power On/Off and
Volume Control
knob.
2 PTT Button
3 Squelch/Monitor
Button.
4 Keypad Lock Button
5 Down Button
GX620 INSTRUCTION MANUAL PAGE 5
6 Up Button
7 Channel 16 Button
8 Menu Button
9 Dual Watch/Triple
Watch Button.
10 Scan/Priority Scan
Button.
11 Jack Cover
12 Accessory Jack
13 LCD Display
14 Lanyard fix point
15 Antenna
16 Microphone
17 Speaker
Page 6
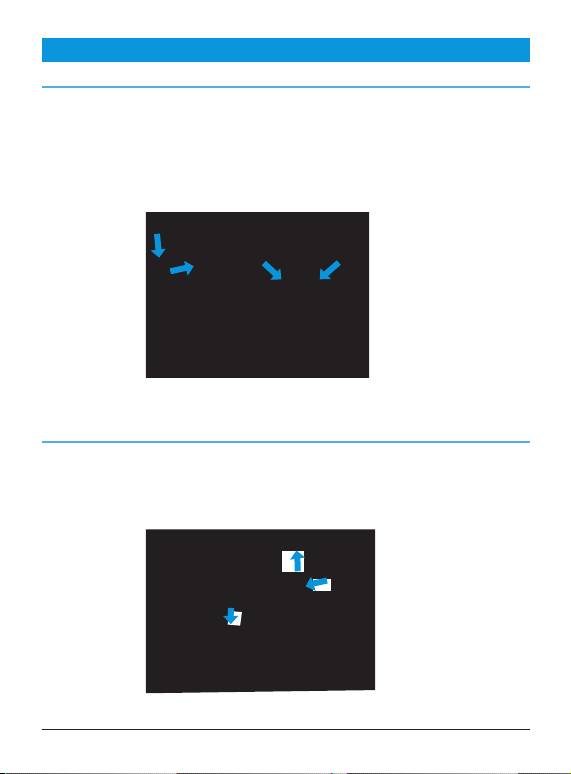
FITTING THE BATTERY PACK
FITTING
1. Ensure that your radio is switched OFF.
2. Align the bottom of the battery pack with the securing slots at the back of
the radio.
3. Press the top of the battery into the back of the radio until it ‘clicks’ home.
REMOVAL
1. Ensure that your radio is switched OFF.
2. Press down on the battery release catch and separate the battery pack from
the radio.
PAGE 6 INSTRUCTION MANUAL GX620
Page 7
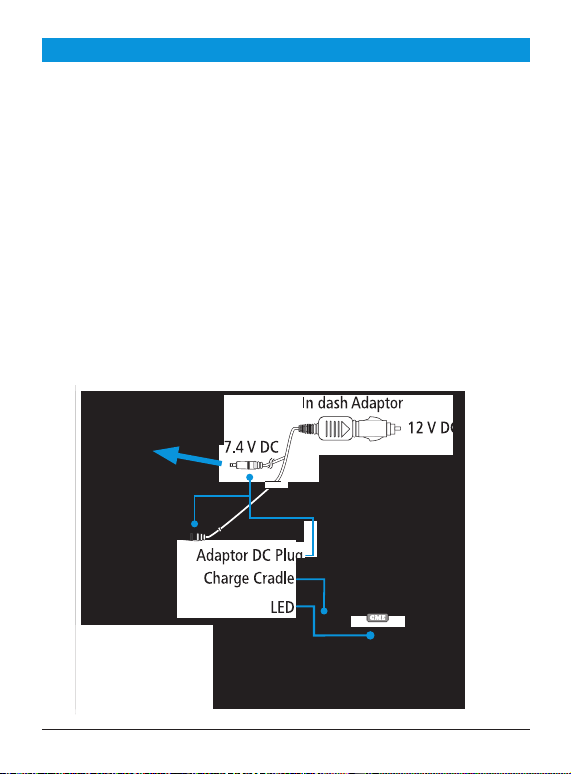
BATTERY CHARGING
To charge your radio, there are 2 options. Prior to charging, disconnect any radio
accessories and ensure the radio is switched OFF. Then carefully follow one of the
following options:
1. Connect the 12 V in-dash adaptor to a 12 V socket:
a. Connect the female adaptor power plug to the charging cradle.
b. Insert the radio into the charging cradle until it ‘clicks’ home. The charger LED
will glow red and charging will start. If the charger LED blinks red and green
or the charger LED does not light, re-insert the radio into the charging cradle.
When the battery is fully charged the charger LED will turn green.
c. The battery charging time is typically 4 to 5 hours.
2. Connect the 12 V in-dash adaptor to a 12 V socket:
a. Remove the jack cover on the side of the radio and connect the male adaptor
into the top accessory jack. The charging cradle is not required for this option.
b. The battery charging time is typically 8 to 10 hours via the accessory jack.
(or optional Power Adaptor)
OR
GX620 INSTRUCTION MANUAL PAGE 7
Page 8
FUNCTIONS
1. Power On/Off/Volume Control
Turn the knob clockwise to switch the radio ON and increase the volume, turn
counter-clockwise to decrease the volume and switch the radio OFF. The radio will
emit a confirmation tone when it switches ON.
2. Push-To-Talk (PTT) Button
Press and hold this button to speak (transmit) and release the button to hear
(receive) messages. You can only communicate with other VHF Marine Band radios
when the channel is the same as yours.
3. Squelch Control/Monitor Button
Press this button briefly to change the Squelch level in combination with and buttons.
Press and hold this button to activate or deactivate the MONITOR function.
4. KEYPAD LOCK Button
Press this button briefly to activate or deactivate the keypad lock function.
5. DOWN Button
Pressing this button will decrease the channel number. In some modes this button
is used to adjust the function setting.
PAGE 8 INSTRUCTION MANUAL GX620
Page 9

6. UP Button
Pressing this button will increase the channel number. In some modes this button is
used to adjust the function setting.
7. Channel 16 Button
Press this button briefly to enter the channel 16. To return to the normal channel
operation, press this button briefly again.
8. MENU Button
Press this button briefly to activate the function MENU. Press the button again
(repeatedly) to step through the function MENU. Press and hold this button to
return to the previously used channel.
9. DUAL WATCH/TRIPLE WATCH Button (DW/TW)
Press this button briefly to activate and deactivate the Dual Watch. Press and hold
to activate or deactivate the Triple Watch. Pressing this button briefly again during
execution Triple Watch will change the mode to Dual Watch.
10. SCAN/PRIORITY SCAN Button
Press this button briefly to activate or deactivate the scan mode. For Priority scan press
and hold the SCAN button. The radio will alternatively scan the
Priority channel and
the entire VHF Marine Band. Briefly press the scan button to stop the scan.
GX620 INSTRUCTION MANUAL PAGE 9
Page 10

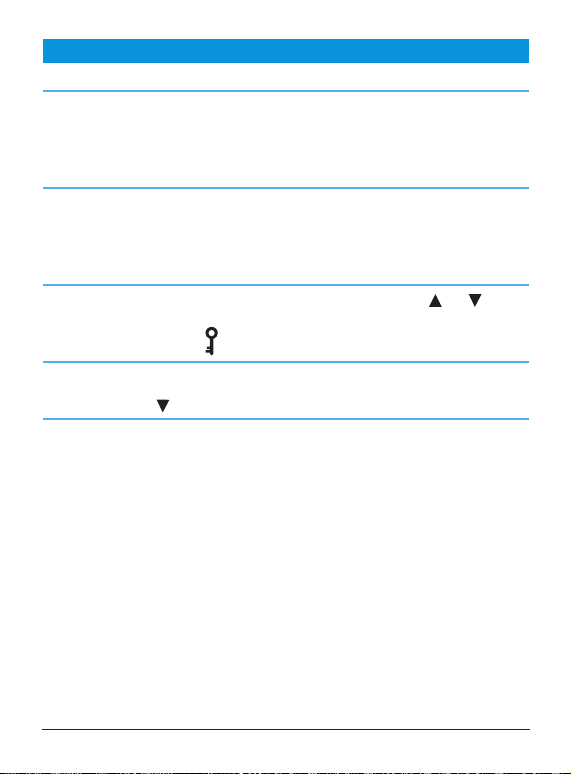
LCD DISPLAY
1. Transmit Icon 7. Keypad Lock Icon 13. Duplex Icon
2. Receiver Busy Icon 8. Scan Icon 14. Channel Plan Icons
3. Monitor Icon 9. Key Beep Icon 15. Weather channels
4. Dual Watch Icon 10. Priority Channel Icon
5. Triple Watch Icon 11. High Power Icon
6. Battery Icon 12. Channel Indicator
(US only).
1 2 3 4 5 6
15
13
7
12
8
9
10
11
PAGE 10 INSTRUCTION MANUAL GX620
14
Page 11

BASIC RADIO OPERATIONS
The VHF Marine radio service shares channels on a ‘take turns’ basis. This means
that other users and groups may be using any channel. To communicate with other
Marine radios, all units must be switched to the same channel.
1. Switch your radio on.
2. Ensure you are on the same channel as the other party (see function Mode).
3. To speak, hold the radio upright, about 10 cm from your mouth and press the
PTT button, the ‘TX’ icon will appear in the radio display. Speak normally and
clearly towards the radio. Release the PTT button when you finish speaking. You
will hear messages from other radios that are within range on the same channel.
The Busy icon will appear in the radio display when you receive a message.
RADIO FEATURES EXPLAINED
VOLUME LEVEL
To adjust the volume level, use the power ON/OFF/VOLUME control
the volume turn this control clockwise, to decrease the volume turn this control
counter-clockwise.
FUNCTION (MENU) MODE
The MENU mode allows you to set-up and edit the basic functions. To access the
MENU mode, press the MENU button briefly. Each press of the MENU button
steps the radio sequentially through the different functions. The radio display
indicates the current function, the present setting and associated icon flash. Use the
or button to change the setting. Press the PTT or MENU button or wait for
5 seconds to store your choice. If you do not press any key for 5 seconds your radio
will return to stand-by mode automatically.
CHANNELS
This radio operates on any one of the VHF Marine Band radio channels. To
communicate with other VHF Marine radios, all units must be switched to the same
channel. To change the radio channel, press the
stand-by mode.
or button when the radio is in
. To increase
GX620 INSTRUCTION MANUAL PAGE 11
Page 12

POWER HIGH/LOW
This feature permits selection of the transmit power level to HIGH (5 watts) or LOW
(1 watt). The LCD indicator will display ‘HI’ when it is in the high power mode.
Using low power, the radio will have a lower transmit range but the battery life will
be increased.
Press both the PTT button and the button to select LOW power. The LCD indicator,
‘HI’ will disappear. To return to high power, press again the PTT and button.
SQUELCH LEVEL ADJUSTMENT
This function allows you to adjust the Squelch level of your radio. To change the
Squelch level, press the Squelch/Monitor button briefly. The current Squelch
setting will appear. Use the
or button to change the setting. Press the PTT
button or wait for 5 seconds to store your choice. There are 8 Squelch levels. Level
91 is the most sensitive (open) and level 98 is the least sensitive (closed). Auto (Ao)
is the optimum factory setting and ‘Off’ is fully open, with constant static noise.
MONITOR
The Monitor function is used to briefly check for activity on the current channel.
It is
the same as setting the Squelch level to level 91 or fully open.
To activate or deactivate the Monitor press the Squelch/Monitor button for
about 2 seconds. The Monitor icon ‘ ‘ will appear and you will hear background
static noise.
KEYPAD LOCK
To toggle the Keypad Lock, briefly press Keypad Lock
button. The Keypad Lock
icon ‘ ‘ appears when the lock is on.
CHANNEL 16
The channel 16 (Distress channel) is used to initially contact another radio station for
emergency communications. This channel is automatically monitored during Dual Watch and
Triple Watch. Upon stand-by, you must monitor channel 16.
PAGE 12 INSTRUCTION MANUAL GX620
Page 13

LAST CHANNEL MEMORY (LCM)
The previously used channel is memorised every time you press the PTT button.
To re-visit this channel press and hold the MENU button
.
DUAL WATCH AND TRIPLE WATCH MODE
Dual Watch mode allows you to monitor two channels; a Working channel and
Dual Watch channel. The Dual Watch channel must be channel 16, this is preset
by factory default. When a signal is received on either channel the unit will pause
before resuming Dual Watch.
To activate Dual Watch mode, first select a radio channel (see ‘Channels’) as the
Working channel. This is done by simply selecting a channel using the
or keys.
Once you have selected the Working channel, a brief press of the DW/TW key will
activate the Dual Watch.
The radio display will alternate between the Working channel and channel 16.
‘DW‘
The Dual Watch icon
will appear in the radio display.
To deactivate Dual Watch press the DW/TW button briefly again.
Triple Watch mode allows you to monitor three channels; a Working channel,
the Dual Watch channel (channel 16) and a Priority channel that you can select. A
selected Priority channel is working as the third channel. If the third channel (one
Priority channel) has not been selected, the Triple Watch will not start and there will
be an error beep.
When a signal is received on one channel among the three, the unit will pause
before resuming the Triple Watch.
To activate Triple Watch mode first select a Working channel, this is done by
simply selecting a channel using the
or keys. Then select a Priority channel,
this is done by pressing the MENU button once then selecting a channel by using
the or keys. Once a Priority channel has been selected, press the PTT button
or wait for 5 seconds to store your choice. Press and hold the DW/TW button. The
radio display will alternate among the Working channel, channel 16 and the Priority
channel. The Triple Watch icon ‘TW‘
will appear.
GX620 INSTRUCTION MANUAL PAGE 13
Page 14

To deactivate Triple Watch press and hold the DW/TW button again. Pressing the
DW/TW button briefly will select Dual Watch mode.
If you press the PTT button whilst receiving a signal in Dual Watch or Triple Watch
mode the radio will transmit on the currently displayed channel. If you press the
PTT button when no signal is present the radio will transmit on the Working
channel. Dual Watch and Triple Watch will resume approximately 5 seconds after
the transmission.
CHANNEL SCAN
The Channel Scan can be used to find or detect users on other radio channels. To
activate/deactivate the Channel Scan, press the Scan button briefly. The Scan icon
‘SCAN’ will appear when the Channel Scan is active. Scanning will only stop when
you deactivate the Scan function. The radio will scan through the whole VHF Marine
Band channels. If your radio detects a valid signal the Scan will pause for about 5
seconds. If you press the PTT button when your radio detects a signal, the radio
will transmit on the same channel. Press the
or button to resume scanning
immediately. If you press the PTT button during scanning, an error beep will be
heard and your radio will continue to scan.
PRIORITY SCAN
Priority Scan allows the user to scan all channels whilst monitoring the Priority
channel. In between each channel being scanned, the radio scans the Priority
channel. Select a Priority channel, this is done by pressing the MENU button once
then selecting a channel by using the
or keys. Press the PTT button or wait for
5 seconds to store your choice. Then press and hold the Scan button for 2 seconds,
the radio will commence Priority Scan.
The Priority channel icon ‘PRI’ will appear when one Priority channel has
been selected.
KEY BEEP
If the Key Beep is activated, your radio will emit a confirmation tone whenever you
use the keypad. You can activate or deactivate the Key Beep as required
.
PAGE 14 INSTRUCTION MANUAL GX620
Page 15

To change the Key Beep setting, press the MENU button until the Key Beep icon ‘
’ appears. Use the or button to change the setting. Press the PTT or MENU
button or wait for 5 seconds to store your choice.
The Key Beep icon ‘
’ will appear when Key Beep is active.
DISPLAY & KEYPAD BACKLIGHT
The display and keypad backlight will illuminate for 5 seconds whenever any button
(except for the PTT button) is pressed.
BATTERY LEVEL
The Battery icon ’ ‘ indicates when the battery level is low and the battery
needs recharging.
POWER SAVE
To conserve battery power the radio will automatically enter Power Save mode
after a short period of inactivity. There is no user setting for Power Save.
INTERNATIONAL/USA AND CANADIAN MODES
The GX620 comes with the International Channel Plan (INTL) as the default
setting. Canada or the USA Channel Plans can be accessed (this includes the
relevant weather channels) as follows:
1. Press and hold MENU and LOCK KEYS together, turn the radio ON.
2. Use up or keys to change the mode: International 1 (No Display),
International 2 (INTL), Canada (CAN) and USA (US). International 1 and
International 2 Channel Plans are equivalent to each other.
3. Press the MENU key to confirm.
4. Turn the radio OFF.
5. Turn the radio ON.
GX620 INSTRUCTION MANUAL PAGE 15
Page 16

SAFETY REQUIREMENTS
For recharging the battery, use the specifically supplied GME in-dash adaptor or the
optional GME AC power adapter.
TROUBLESHOOTING
If you experience problems with your GX620 VHF Marine Handheld Radio. First
check the battery power level as low battery can cause problems such as poor
transmission, weak reception and reduced sound quality. Then check the manual
and radio display to ensure that a function (such as ‘Lock’) has not been activated
by accident.
If these steps do not solve the problem reset your unit as follows:
1. Switch the radio OFF.
2. Press and hold the MENU button, button and PTT button together.
3. Switch the radio ON and press the MENU button.
4. Turn the radio OFF and turn it ON again.
This will reset the radio to the factory settings and should resolve most problems.
PAGE 16 INSTRUCTION MANUAL GX620
Page 17

INTERNATIONAL FREQUENCY PLAN
CH Frequency (MHz) CH Frequency (MHz)
Transmit Receive Transmit Receive
1 156.050 160.650 61 156.075 160.675
2 156.100 160.700 62 156.125 160.725
3 156.150 160.750 63 156.175 160.775
4 156.200 160.800 64 156.225 160.825
5 156.250 160.850 65 156.275 160.875
6 156.300 156.300 66 156.325 160.925
7 156.350 160.950 67 156.375 156.375
8 156.400 156.400 68 156.425 156.425
9 156.450 156.450 69 156.475 156.475
10 156.500 156.500 70 RX Only 156.525
11 156.550 156.550 71 156.575 156.575
12 156.600 156.600 72 156.625 156.625
13 156.650 156.650 73 156.675 156.675
14 156.700 156.700 74 156.725 156.725
15 156.750 156.750 75 156.775 156.775
16 156.800 156.800 76 156.825 156.825
17 156.850 156.850 77 156.875 156.875
18 156.900 161.500 78 156.925 161.525
19 156.950 161.550 79 156.975 161.575
20 157.000 161.600 80 157.025 161.625
21 157.050 161.650 81 157.075
22 157.100 161.700 82 157.125 161.725
23 157.150 161.750 83 157.175 161.775
24 157.200 161.800 84 157.225 161.825
25 157.250 161.850 85 157.275 161.875
26 157.300 161.900 86 157.325 161.925
27 157.350 161.950 87 157.375 157.375
28 157.400 162.000 88 157.425 157.425
60 156.025 160.625
161.675
GX620 INSTRUCTION MANUAL PAGE 17
Page 18

FREQUENCY PLAN – CANADA
CH Frequency (MHz) CH Frequency (MHz)
Transmit Receive Transmit Receive
WX01 Weather Channel 163.275 23 157.150 161.750
WX02 Weather Channel 162.550 24 157.200 161.800
WX03 Weather Channel 162.400 25 157.250 161.850
WX04 Weather Channel 162.475 26 157.300 161.900
WX05 Weather Channel 162.425 27 157.350 161.950
WX06 Weather Channel 162.450 28 157.400 162.000
WX07 Weather Channel 162.500 60 156.025 160.625
WX08 Weather Channel 162.525 61 156.075 156.075
WX09 Weather Channel 161.65 0 62 156.125 156.125
WX10 Weather Channel 161.775 64 156.225 156.225
1 156.050 160.650 65 156.275 156.275
2 156.100 160.700 66 156.325 156.325
3 156.150 160.750 67 156.375 156.375
4 156.200 156.200 68 156.425 156.425
5 156.250 156.250 69 156.475 156.475
6 156.300 156.300 70 RX Only 156.525
7 156.350 156.350 71 156.575 156.575
8 156.400 156.400 72 156.625 156.625
9 156.450 156.450 73 156.675 156.675
10 156.500 156.500 74 156.725 156.725
11 156.550 156.550 77 156.875
12 156.600 156.600 78 156.925 156.925
13 156.650 156.650 79 156.975 156.975
14 156.700 156.700 80 157.025 157.025
15 156.750 156.750 81 157.075 157.075
16 156.800 156.800 82 157.125 157.125
17 156.850 156.850 83 157.175 157.175
18 156.900 161.500 84 157.225 161.825
19 156.950 161.550 85 157.275 161.875
20 157.000 161.600 86 157.325 161.925
21 157.050 157.050 87 157.375 161.975
22 157.100 157.100 88 157.425 162.025
156.875
Page 19

FREQUENCY PLAN – USA
CH Frequency (MHz) CH Frequency (MHz)
Transmit Receive Transmit Receive
WX01 Weather Channel 163.275 24 157.200 161.800
WX02 Weather Channel 162.550 25 157.250 161.850
WX03 Weather Channel 162.400 26 157.300 161.900
WX04 Weather Channel 162.475 27 157.350 161.950
WX05 Weather Channel 162.425 28 157.400 162.000
WX06 Weather Channel 162.450 61 156.075 156.075
WX07 Weather Channel 162.500 63 156.175 156.175
WX08 Weather Channel 162.525 64 156.225 156.225
WX09 Weather Channel 161.65 0 65 156.275 156.275
WX10 Weather Channel 161.775 66 156.325 156.325
1 156.050 156.050 67 156.375 156.375
3 156.150 156.150 68 156.425 156.425
5 156.250 156.250 69 156.475 156.475
6 156.300 156.300 70 RX Only 156.525
7 156.350 156.350 71 156.575 156.575
8 156.400 156.400 72 156.625 156.625
9 156.450 156.450 73 156.675 156.675
10 156.500 156.500 74 156.725 156.725
11 156.550 156.550 77 156.875 156.875
12 156.600 156.600 78 156.925 156.925
13 156.650 156.650 79 156.975
14 156.700 156.700 80 157.025 157.025
15 RX Only 156.750 81 RX Only 157.075
16 156.800 156.800 82 157.125 161.725
17 156.850 156.850 83 RX Only 157.175
18 156.900 156.900 84 157.225 161.825
19 156.950 156.950 85 157.275 161.875
20 157.000 157.000 86 157.325 161.925
21 157.050 157.050 87 157.375 161.975
22 157.100 157.100 88 157.425 157.425
23 157.150 157.150
156.975
GX620 INSTRUCTION MANUAL PAGE 19
Page 20

TECHNICAL SPECIFICATIONS*
GENERAL
Complies with
Frequency Range: 156.025 to 162.025 MHz
Channel Set: International Channels, USA, Canada, USA weather channels.
Modulation: FM
Frequency Stability: ± 5.0 ppm
Dual Watch: Monitor time - 180 ms/over 2 sec.
Scan Speed: 10 ch/sec.
Channel Spacing:
Supply Voltage Range: Int. battery 7.4 V DC nom.
Battery Life Stand-by: 9 hours
Current Drain: Stand-by: 40 mA
Receive: 150 mA
Transmit: 1.4 A @ Hi 550 mA @ Lo
: AS/NZS 4415.2:2003
25 kHz
TRANSMITTER
Output Power: Low 1 watt, High 4.8 watts
Frequency Deviation: ± 5 kHz max + 20 dB limiting @ 1 kHz.
Frequency Response: + 6 dB per octave, 300 kHz Max.
Demodulated S/N: > 40 dB weighted
Modulation: ± 5 kHz Max.
Current Consumption: High: 1.4 Amp Low: 550 mA
PAGE 20 INSTRUCTION MANUAL GX620
Page 21

RECEIVER
Receiver Type: Double Conversion Super Heterodyne
Sensitivity: 12 dB SINAD: -120 dBm
IF Frequencies
2nd: 450 kHz
ModulationFrequency Response: -6 dB per octave 300 Hz–3 kHz, +1–3 dB
Intermodulation Rejection: > 65 dB
Blocking Rejection: > 90 dB
Spurious Rejection: > 65 dB
Audio Output Power: 500 mW @ 8 Ohms
Audio S/N: > 40 dB
Conducted Spurious Emission: > -57 dBm
: 1st: 21.4 MHz
MECHANICAL
Unit Dimensions:
Unit Weight: 180 g approx
98 H x 62 W x 30 D mm
ENVIRONMENTAL
Water/Dust Resistance:
Temperature Range: -10°C to +60°C
Compass Safe Distance: 200 mm
IP54
EXTERNAL CONNECTIONS
Microphone:
3 pin speaker mic
INTERNATIONAL FREQUENCY
PLAN
*All specifications are typical and subject to change without notice
or obligation.
GX620 INSTRUCTION MANUAL PAGE 21
Page 22

STANDARD COMMUNICATIONS
WARRANTY AGAINST DEFECTS
This warranty against defects is given by
Standard Communications Pty Ltd ACN 000
346 814 (We, us, our or GME). Our contact
details are set out in clause 2.7.
1. Consumer guarantees
1.1 Our goods come with guarantees
that cannot be excluded under the
Australian Consumer Law. You are
entitled to a replacement or refund for
a major failure and for compensation
for any other reasonably foreseeable
loss or damage. You are also entitled
to have the goods repaired or replaced
if the goods fail to be of acceptable
quality and the failure does not amount
to a major failure.
1.2 To the extent we are able, we exclude
all other conditions, warranties and
obligations which would otherwise be
implied.
2. Warranty against defects
2.1 This warranty is in addition to and does
not limit, exclude or restrict your rights
under the Competition and Consumer Act
2010 (Australia) or any other mandatory
protection laws that may apply.
2.2 We warrant our goods to be free from
defects in materials and workmanship
for the warranty period (see warranty
table) from the date of original sale (or
another period we agree to in writing).
Subject to our obligations under clause
1.2, we will at our option, either
repair or replace goods which we are
satisfied are defective. We warrant any
replacement parts for the remainder of
the period of warranty for the goods
into which they are incorporated.
2.3 To the extent permitted by law, our
sole liability for breach of a condition,
warranty or other obligation implied by
law is limited
(a) in the case of goods we supply,
to any one of the following as we
decide -
(i) the replacement of the goods or
the supply of equivalent goods;
(ii) the repair of the goods;
(iii) the cost of repairing the goods
or of acquiring equivalent
goods;
(b) in the case of services we supply,
to any one of the following as we
decide –
(i) the supplying of the services
again;
(ii) the cost of having the services
supplied again.
2.4 For repairs outside the warranty period,
we warrant our repairs to be free from
defects in materials and workmanship
for three months from the date of the
original repair. We agree to re-repair or
replace (at our option) any materials or
workmanship which we are satisfied
are defective.
PAGE 22 INSTRUCTION MANUAL GX620
Page 23

2.5
We warrant that we will perform
services with reasonable care and skill
and agree to investigate any complaint
regarding our services made in good
faith. If we are satisfied that the
complaint is justified, and as our sole
liability to you under this warranty (to
the extent permitted at law), we agree
to supply those services again at no
extra charge to you.
2.6 To make a warranty claim you must
before the end of the applicable
warranty period (see warranty table),
at your own cost, return the goods you
allege are defective, provide written
details of the defect, and give us an
original or copy of the sales invoice or
some other evidence showing details of
the transaction.
2.7 Send your claim to:
Standard Communications Pty Ltd.
Unit B, 22-24 College Street,
Gladesville, NSW 2111, Australia.
Tel: (02) 9879 8888
Fax: (02) 9816 4722
Email: servadmin@gme.net.au
2.8 If we determine that your goods are
defective, we will pay for the cost of
returning the repaired or replaced
goods to you, and reimburse you for
your reasonable expenses of sending
your warranty claim to us.
3. What this warranty does not cover
3.1 This warranty will not apply in relation
to:
(a) goods modified or altered in any
way;
(b) defects and damage caused by use
with non Standard Communications
products;
(c) repairs performed other than by
our authorised representative;
(d) defects or damage resulting
from misuse, accident, impact or
neglect;
(e) goods improperly installed or
used in a manner contrary to the
relevant instruction manual; or
(f) goods where the serial number
has been removed or made illegal.
4. Warranty period
4.1 We provide the following warranty on
GME and Kingray products. No repair or
replacement during the warranty period
will renew or extend the warranty
period past the period from original
date of purchase.
PRODUCT TYPE WARRANTY PERIOD
Marine VHF transceivers 1 year
GX620 INSTRUCTION MANUAL PAGE 23
Page 24

Part Number: 310392 Drawing Number: 43752-5
GX620
 Loading...