

Page 1

ACIES
GT9600
DIVERSITY DIGITAL
TV RECEIVER
™
I N S T R U C T I O N M A N U A L
Page 2

PA GE 2 I N S TRUCTI O N MANUA L G T 9 600
CO NTE NTS
FEATURES . . . . . . . . . . . . . . . . . . . . . . . . . . . . . . . 2
ACCESSORIES SUPPLIED . . . . . . . . . . . . . . . . . . . . 2
PTIONAL ACCESSORIES . . . . . . . . . . . . . . . . . . . . 2
O
DUCTION . . . . . . . . . . . . . . . . . . . . . . . . . . 3
INTRO
EMOTE CONTROL BUTTONS . . . . . . . . . . . . . . . . 3
R
CONNECTIONS & FEATURES . . . . . . . . . . . . . 3
UNIT
EMOTE CONTROL FUNCTIONS . . . . . . . . . . . . . . 4
R
SIC OPERATIONS . . . . . . . . . . . . . . . . . . . . . . . 4
BA
Gener
M
al Functions . . . . . . . . . . . . . . . . . . . . . . 4
ENU GUIDE . . . . . . . . . . . . . . . . . . . . . . . . . . . . 4
Main Menu . . . . . . . . . . . . . . . . . . . . . . . . . . . 4
GME STRONGLY RECOMMENDS THAT YOU KEEP THIS MANUAL
IN A SAFE PL ACE FOR FUTURE REFERENCE
Automatic
Progr
Settings . . . . . . . . . . . . . . . . . . . . . . . . . . . . . 6
Teletext Guide . . . . . . . . . . . . . . . . . . . . . . . . 6
Games . . . . . . . . . . . . . . . . . . . . . . . . . . . . . . 6
Radio Channels . . . . . . . . . . . . . . . . . . . . . . . 6
LLATION . . . . . . . . . . . . . . . . . . . . . . . . . . . 7
INSTA
BLESHOOTING . . . . . . . . . . . . . . . . . . . . . . . 7
TROU
PECIFICATIONS . . . . . . . . . . . . . . . . . . . . . . . . . . 7
S
ARRANTY . . . . . . . . . . . . . . . . . . . . . . Back Page
W
Channel Search . . . . . . . . . . . . . . . 4
am Guide . . . . . . . . . . . . . . . . . . . . . . . . 6
FE AT U RE S
Fully MPEG-2 and DVB-T compliant
•
Specifically designed for mobile digital
•
terrestial reception.
Twin diversity tuners capable of receiving signal
•
at speeds up to 150 Km/per hour.
Conformally coated PCB
•
Infrared remote control
•
Extension infrared eye for concealed installations
•
Tough exterior construction with an easy wall
•
mounting option.
Simple plug and play installation
•
Supports 4:3 and 16:9 formats
•
S-Video as well as Composite outputs
•
Slimline design 250 (w) x 150 (d) x 35 (h) mm
•
Electronic program guide
•
The GME ACIES™ Digital TV Receiver is supplied with the
following accessories in the standard package:
• Digital Receiver
• Infrared Remote Control Handset
• Remote Control Receiver Extension Eye
• Receiver to Monitor Interconnection Cable
• DC Power Cable
• Mounting hardware (4 brackets)
• Owner’s Manual
Please contact your point of purchase immediately if any
of these components are missing.
•
windscreen installations.
•
•
•
grade installations.
•
suit
•
AC CE SS ORi ES S Upp li Ed
Op T iO N Al ACC ES SO RiE S
AE960
– Powered diversity antennas for on
AE961
– Stainless steel diversity antenna for
mobile applications.
AE961B
– Black diversity antenna for
mobile applications.
AE341T
– Diversity antennas for all Marine
MDA20H
– Low noise masthead amplifier to
AE341T
.
PIK960
– Power Injectors to suit MDA
Page 3
G T 9 600 I N S TRUCTI O N MANUA L PA GE 3
•
INFO
ENTER
PSK18KR
– 240 V AC to 15 V DC power adaptor
for mains powering.
•
VC4S
– 24 V DC to 13.8 V DC power converter
iNT RO dU C Ti ON
Congratulations on the purchase of your GME ACIES™
Diversity DVB-T digital receiver.
™
The ACIES
of TV reception for mobile installations. By drawing on over
45 years experience in television signal engineering and the
latest digital reception techniques, GME’s ACIES™ compact
digital receiver, provides as the name suggests, clear,
focussed pictures whether parked, moored or underway*.
GME’s ACIES
tuners both set to the same frequency. A Digital Signal
Processor (DSP) constantly monitors information from both
tuners to generate the best signal and consequently the
best possible picture at all times.
When first installing the GME ACIES
moving to a new location, it will be necessary to undertake
an auto Channel search. See page 5 for details.
The GME ACIES
vessel’s standard 12 Volt system and is supplied complete
with mounting hardware, all interconnection cables and
remote control. For optimum performance, GME strongly
recommends that a matching pair of AE341T custom
external aerials be used for marine installations, AE960 for
automotive use.
Particular care should be taken to follow the installation
diagram on page 7 of this manual.
tuning process is relatively straight forward, however, for
digital receiver overcomes the age old problem
™
diversity receiver contains two integrated
™
receiver or when
™
receiver package operates from the
The installation and
larger vessels where multiple receivers may be required,
ME strongly recommends installation be undertaken by
G
an appropriately qualified electronics technician.
GME offers a full range of accessories, including splitters
and signal amplifiers to facilitate such installations.
*Within the digital television transmission footprint
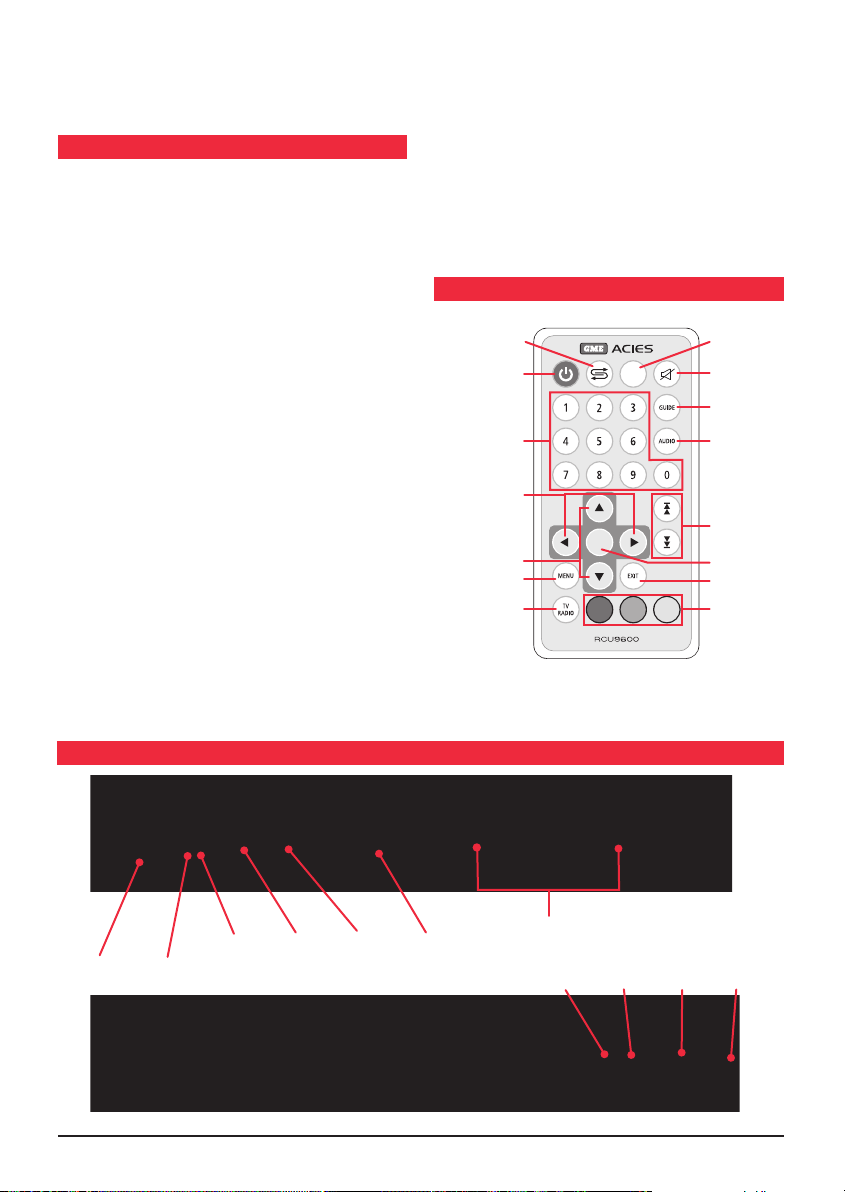
RE M OT E CO NT ROl b UT T ON S
Recall
Standby (Power)
Numeric Buttons
Arrow Left/Right
Arrow Up/Down
Menu
TV/Radio
Remove the plastic battery insulator
on the remote control prior to first use.
Info
Mute
Guide
Audio
Pg Up/Down
Enter
Exit
Red/Green/
Yellow
Function
Se
lect
UNi T CO NNE CT i ON S & FE AT URE S
power
DC
Main power
switch
DC power
input
for active
antenna
output
Extension
infrared
eye input
Video
S-
output
Video/Audio
output
terminals
Antenna inputs
Power off
indicator
Power on
indicator
mote
Re
sensor
Bracket
(x4)
Page 4

RE M OT E CO NT ROl F UN C Ti ONS
STANDBY (POWER)
Switches receiver on from standby or off from standby.
NUMERIC BUTTONS
Selects channels or enters programming parameters.
ARROWS LEFT/RIGHT
In normal operating mode – increases or decreases volume.
In menu mode – moves highlighted cursor left or right.
ARROWS UP/DOWN
In normal operating mode – channel up/down selection.
n menu mode – moves highlighted cursor up or down.
I
MENU
Displays main menu on the screen.
T
V/RADIO
Switches receiver between TV and Radio mode.
RED/GREEN/YELLOW
Function selection via menu.
XIT
E
Cancels menu selection and returns to the normal
viewing mode.
ENTER
n normal operating mode – displays channel list.
I
n menu mode – confirms selected menu function.
I
PAGE UP/DOWN
Moves the cursor to the next or previous page in the
Channel Manager and Favourites Manager menu.
AUDIO
Permits selection of left/right channels and stereo.
GUIDE
Displays
TV or Radio program guide (if available).
MUTE
Disables or enables audio.
INFO
Displays current channel status/information.
RECALL
I
n normal operating mode – returns to last viewed channel.
bA S iC O pE R ATiO N
GENERAL FUNCTIONS
PO
WER ON/OFF
Slide the Main Power Switch located on the rear of the
receiver to the ON position. Initially both the RED and
GREEN LED indicators will illuminate. Once the receiver
has locked in a signal, the RED indicator will turn off and a
picture will be displayed on the monitor.
STANDBY ON/OFF
To turn the receiver OFF, momentarily press the red POWER
button on the remote control handset. The GREEN LED indicator
will turn off and the RED LED indicator will illuminate.
To turn the receiver ON, momentarily press the red POWER
b
utton on the remote control handset. The RED LED indicator
will turn off and the GREEN LED indicator will illuminate.
MEMORY
The GME ACIES™ receiver has a non-volatile memory;
consequently all programmed data is retained even when
the power to the receiver has been completely switched off.
VOLUME
Press and hold the button to increase the audio level.
Press and hold the
button to decrease the audio level.
MUTE
Momentarily press the MUTE button to turn the audio off
(the screen will display ‘MUTE’)
To restore the audio momentarily press the
the sound will be returned at the previous level.
MUTE button,
CHANNEL SELECTION
Press the or buttons to sequentially select channels.
INPUT & OUTPUT CONNECTIONS
The GME ACIES™ receiver has a number of rear panel
inputs and outputs (see page 7 for illustration).
ME N U GU i dE
MAIN MENU
Press the MENU button to display the main menu.
• To select the desired sub-menu use the
buttons.
• Press ENTER to confirm the selection.
•
Press the MENU button to exit this menu,
EXIT button to return to the normal viewing mode.
or press the
AUTOMATIC CHANNEL SEARCH
Selecting the Channel Search mode will scan all available
channels and load them into the receiver’s
non-volatile memory.
To commence an auto channel search:
• Press the
Move the cursor to ‘CHANNEL SEARCH’.
•
• Press
Press the
•
confirm selection by pressing ENTER.
MENU button.
ENTER to confirm.
or buttons to select country area,
PA GE 4 I N S TRUCTI O N MANUA L G T 9 600
Page 5

Note: This process may take several minutes, a bar graph
indicator and percentage completed is displayed on the screen.
Note: When you travel long distances between different
destinations, it is recommended that you complete a new
‘Automatic Channel Search’, to ensure you receive the
maximum number of channels available.
Once the ‘Automatic Channel Search’ has been
completed, there are 3 options available for the
user to view these channels:
OPTION 1 - STANDARD
The channels can be viewed as they are by using the or
buttons. As the channel is changed from one to another,
content information can be viewed briefly at the bottom of
the screen.
OPTION 2 - CHANNEL MANAGER
Once the ‘Automatic Channel Search’ has been completed,
the ‘Channel Manager’ permits simple manipulation or
modification of the channel data.
• Press the MENU button on the remote control.
•
Press the
cursor, selecting ‘Channel’.
• Press the
cursor to ‘Channel Manager’.
• Press ENTER to select.
•
Press the
skip, or delete a channel.
• Once you have selected the relevant symbol, the
and buttons are then used to select the channel
to which you wish to apply the symbol.
For example, if you wish to ‘Delete’ unwanted channels
from the list:
Highlight the ‘Delete’ symbol use the
1.
to select the channel you wish to delete.
2. When you have the channel highlighted, press the
ENTER
button an ‘X’ will appear, the channel will go blank.
3. Repeat this process until you have the ‘X’ against all
the channels you wish to delete from the list. Press the
EXIT button once, the data is saved.
4. The new channel manager will then only contain the
channels you have not deleted.
5. By accessing the ‘Channel Manager’ again and utilising
the other symbols you can rename, move the order
or skip the channels that are left in the ‘Channel
Manager’ list.
6. If you wish to view the deleted channels again, you will
need to perform another ‘Automatic Channel Search’.
G T 9 600 I N STRUCT I O N MANUA L PA GE 5
buttons to move the highlighted
or
or buttons to move the highlighted
buttons to rename, move,
or
or buttons
If channels have been selected in the ‘Channel Manager’
list from an ‘Automatic Channel Search’ (And you are still
within the same digital transmission footprint) and another
‘Automatic Channel Search’ is performed, the channels
that were previously in the ‘Channel Managers’ list will
be retained at the top of the list followed by the newly
scanned channels.
I
f an ‘Automatic Channel Search’ is performed and there
is no digital signal present, the last ‘Channel Manager’ list
will be retained in the memory.
OPTION 3 - FAVOURITE’S MANAGER
Once the ‘Automatic Channel Search’ has been completed,
the ‘Favourites Manager’ permits the storage of channels
into 16 specific categories, enabling the operator swift and
simple access to favourite channels.
•
Press the MENU button.
Move the highlighted cursor to select ‘Channel’.
•
• Use the
cursor to ‘Favourites Manager’.
• Press ENTER to select.
•
Press the
‘Favourites’ lists with corresponding symbols that is
relevant for the favourite channels.
• For example, select ‘Leisure’ (Coffee Cup symbol).
1. Use the
relevant channel, press the
symbol (Coffee Cup) will appear on the left hand side of
the channel. If you wish to add more than one channel
to this group, repeat this process again.
2. To access the favourite groups, press the
on the remote control, then select ‘Fav List’ which is
done by pressing the
3. The ‘Fav Type List’ menu will then appear, (Including
‘All Channel List’ which is the standard list received
from completing the original ‘Automatic Channel Search’
and can be selected to view the channels as per option 1),
using the
the relevant ‘Favourites’ list and select or press
4. Press the E
Use the
access to only the channels in that particular ‘Favourites’ list.
5. To access a new ‘Favourites’ list or return to the ‘All
Channel List’, simply repeat steps 2, 3 and 4.
Note: Accessing and making changes in the ‘Channel
Manager’ will override anything previously preset in the
‘Favourites Manager’.
or buttons to move the highlighted
buttons to select 1 of the 16
or
or buttons on the remote to select the
or buttons on the remote control select
XIT button once to remove the menu page.
or button on the remote control to provide
ENTER button once.
GREEN button on the remote control.
The
GUIDE button
ENTER.
Page 6

PROGRAM GUIDE
The integrated electronic program guide (EPG) provides
information such as program listings, starting and
ending times.
Press the GUIDE button to access the program guide
display sub menu:
Navigate
– Using the or buttons, programmed guides
can be viewed for up to 4 days.
Channel Change
viewing channel may be changed.
Favourite List
channels selected for the favourites list will be displayed.
Reserve
pre-selected programs may be viewed.
Note:
only be available when it is included in the transmission.
– Using the or buttons, the
– Using the GREEN function button,
– Using the YELLOW function button,
This service is not offered by all TV stations, Data will
SETTINGS
To access the receiver’s operational set up, press MENU,
then use the or buttons to select ‘SETTING’.
Follow the on screen prompts to adjust settings as required.
Timer
– sets various program timing options within receiver.
Time Setting
Factory Default
factory values.
TV Setting
Accessory
use only).
OSD Setting
duration of message display.
Language
information language.
– sets either GMT or local times.
– returns all settings to original
– sets TV operating mode and aspect ratio.
– password protected, non user setting (factory
– sets contrast level of on screen display and
– sets audio and on screen
TELETEXT GUIDE
Teletext is an information retrieval service provided by
television broadcast companies. Teletext offers a range of
text-based information, including national, international
and sporting news, weather and TV schedules. Subtitle (or
closed caption) information is also transmitted within the
teletext signal.
The GME ACIES™ Receiver features an integrated Teletext
decoder, to access the Teletext service, press the YELLOW
function button on the remote control handset, then press
ENTER to confirm selection. To exit the Teletext mode,
press EXIT.
To access specific Teletext pages, use the numeric or
or buttons.
Teletext is transmitted on Channel 7 (and network
Note:
affiliates) in Australia. This service may not be available in
all areas.
Some Teletext pages may have been deleted by the provider,
others maybe extremely slow in downloading due to poor
quality transmissions.
GAMES
The GME ACIES™ offers 3 computer style games for
entertainment. These are Tetris, Snake and Sokoban.
To access the games menu:
• Press the
cursor to GAMES.
• Press ENTER to confirm choice.
•
Follow the on screen instructions and use the
MENU button,
buttons to operate and play the game.
then move the highlighted
RADIO CHANNELS
Depending on your location, GME ACIES™ may receive a
number of radio channels that are transmitted over on certain
TV channels. (Currently the ABC and SBS Networks only).
You can access these radio channels by pressing the
V/RADIO button on the remote, then select the wanted
T
radio channel using the or
the TV/RADIO button on the remote will toggle you back
to the TV channels.
buttons. A quick press of
PA GE 6 I N S TRUCTI O N MANUA L G T 9 600
Page 7

iNS TAll AT iO N
INFO
ENTER
Extension Infrared
Master
ON/OFF Switch
option for Antennas
Eye Input
12 V DC
Input
Remote Power
S-Video Output
2 x Audio/Video
Outputs
TR OUb lE S HO OT iNG
pR Obl EM CHE CK i TE M
Does not display any
message at front panel
No video and no audio
Poor picture quality and
blocking error are displayed
R
emote control does
not operate
Check the main power is plugged into a suitable power outlet.
Check the main power is on.
Check antenna.
Based on signal level indicator in channel search menu adjust antenna position.
Check if the cable/receiver and receiver/monitor are connected correctly.
Change the antenna position. If antenna output is weak, connect to signal amplifier.
If antenna is small, change it to the bigger.
C
heck battery.
Make sure the remote sensor window is not under strong fluorescent lighting.
Sp ECi FiC AT iO NS
GENERAL
C supply input: 11 – 16 Volts Negative Ground
D
Power consumption: Approximately 10 W
Transport stream: ISO/IEC 13818
Profile & level: MPEG-2 MP @ ML
Input frequency: VHF, UHF, 174 - 862 MHz
Input impedance: 75 Ω unbalanced
COFDM spectrum: 2k and 8k mode
Guard interval: 1/32, 1/16, 1/8 and 1/4
Demodulation method: QPSK, 16QAM, 64QAM
Video resolution: 720 x 576 (PAL),
7
20 x 480 (NTSC)
Aspect ratio: 4:3, 16:9
AUDIO
Audio decoding:
Audio type: Single channel, dual channel,
joint stereo, stereo.
Audio sampling rate:
OUTPUTS
Composite video output: 2 x RCA
Audio:
S-Video output: 1 x S-Video connector
PHYSICAL
Dimensions:
235 mm (D)
Weight: Approximately 1.6 Kg
Remote Control
Antenna
Input 1
MPEG-1 layers 1 and 11
32, 44.1 and 48 kHz
4 x RCA
370 mm (W) x 100 mm (H) x
Antenna
Input 2
*All specifications are typical and subject to change without notice or obligation
G T 9 600 I N S TRUCTI O N MANUA L PA GE 7
Page 8

WA RRA NTY
GME limit this warranty to the original purchaser of
the equipment.
GME warrant this product to be free from defects in material
and workmanship for a period of twelve (12) months from the
date of purchase from their authorised retailer.
Should the product require servicing during this period, all
labour and parts used to effect repairs will be supplied free
of charge. GME reserve the right to determine whether
damage has been occasioned by accident, misuse or
improper installation whereby the warranty would be
void, including:
Equipment which has been damaged due to:
(a) Incorrect or reverse polarity connection to a battery or
power supply;
(b) Connection to incorrect supply voltage.
(c) Effects of water or moisture penetration.
(d) Non-factory modifications.
(e) Use of incorrect replacement fuse.
Procedure to be followed by claimant: In the event of a
defect occurring during the twelve (12) month warranty
period, the original purchaser may return the defective unit
along with suitable proof of purchase date (i.e. receipt,
docket, credit card slip etc.) and a full description of the
defect to any authorised retailer.
All freight charges incurred for transportation by the retailer
or GME are the purchaser’s responsibility.
The retailer will forward the unit to the closest authorised
GME Service Depot in your particular area.
GME A FT E R SA LE S SE R VI CE
Your GME GT9600 is especially designed for the
environment encountered in mobile or portable installations.
The use of all solid state circuitry, careful design and
rigorous testing, result in high reliability. Should failure
occur however, GME maintain a fully equipped service
facility and spare parts stock to meet the customer’s
requirements long after expiry of the warranty period.
PR ECA UT IONS
Never attempt to remove the receiver covers or undertake
repairs. Should any maintenance be required it should only
be performed by a GME approved service centre.
Do not connect or disconnect any cables without first
turning off the receiver’s DC supply.
Do not expose the receiver to areas of extreme
temperature, high humidity, dust, steam, water, petroleum
products, smoke or direct sunlight.
Use only GME specified adaptors, power sources, amplifiers
or aerials.
Never use thinners or other chemical reagents to clean the
receiver, should cleaning be necessary use only a soft cloth.
Turn main power off and disconnect DC supply when the
receiver is not being used for extended periods of time.
Part Number: 310394 Drawing Number: 437 58- 3
 Loading...