

Page 1
Getting to Know Your
2016 Yukon Denali/
Yukon XL Denali
Review this Quick Reference Guide for an overview of some
important features in your GMC Yukon Denali or Yukon XL Denali.
More detailed information can be found in your Owner Manual.
Some optional equipment described in this guide may not be
www.gmc.com
included in your vehicle. For easy reference, keep this guide with
your Owner Manual in your glove box.
1
Page 2
Instrument Panel
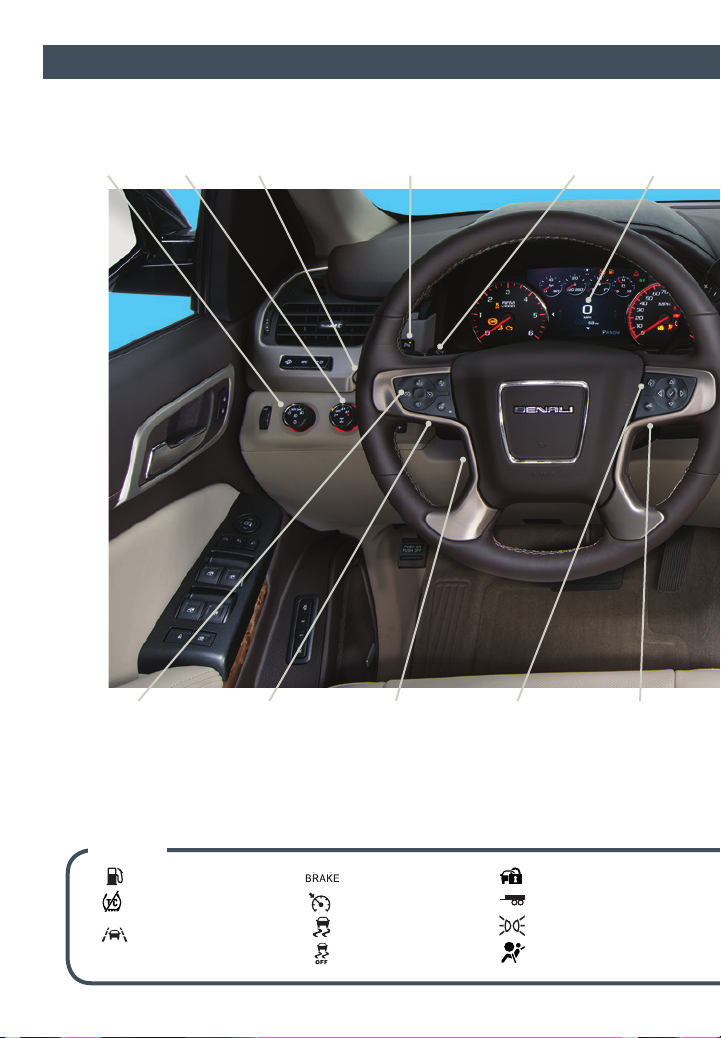
Instrument Panel
Illumination
Control/Exterior
Lamp Control
4WD
Control
Integrated
Trailer Brake
F
Control
Traction Control and StabiliTrak/
Front and Rear Parking Assist/Lane
Keep Assist/Adjustable Pedals/
Power Assist StepF Buttons
Turn Signal/
Windshield
Wipers Lever
Driver
Information
Center
Cruise Control/
Collision Alert/
Heated Steering
Wheel Buttons
Symbols
2
Low Fuel
Traction Control Off
Lane Keep Assist
Warning
Audio Next/
Previous Favorite
Station Controls
(behind steering
wheel)
Tilt/Telescopic
Steering Wheel
Control
Brake System
Cruise Control Set
StabiliTrak Active
StabiliTrak Off
Voice Recognition
Buttons/Driver
Information Center
Control Pad
Security
Tow/Haul Mode
Lights On Reminder
Airbag Readiness
Audio Volume
Controls (behind
steering wheel)
Page 3
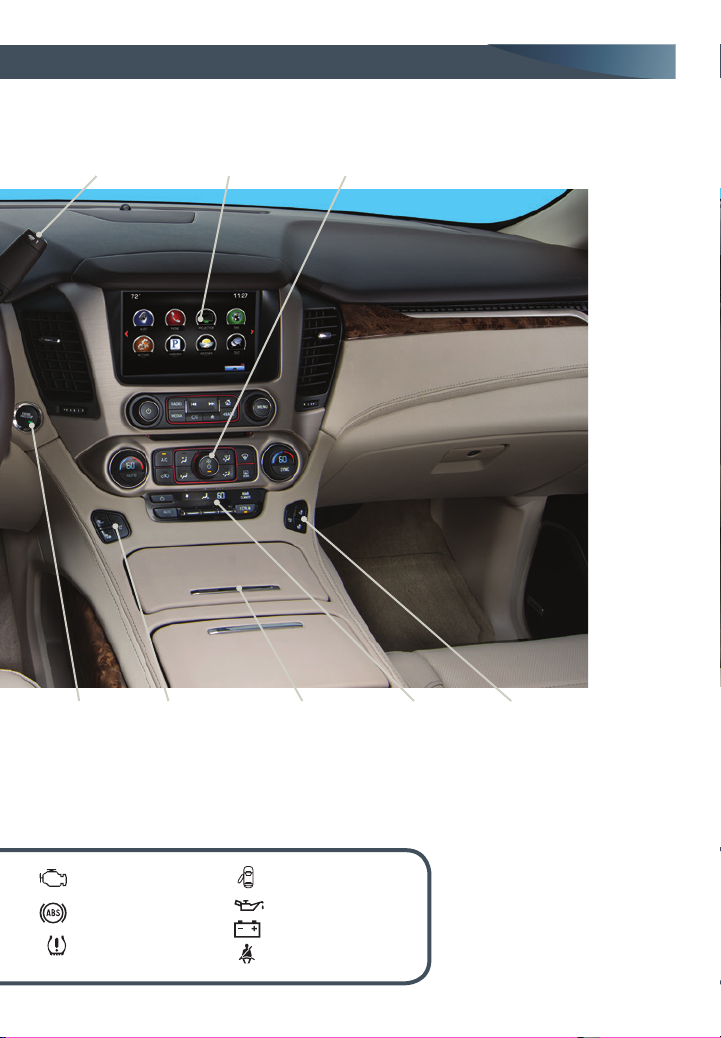
Tow/Haul
Button
GMC
IntelliLink
Radio
Climate
Controls
Engine
Start/Stop
Button
Check Engine
Antilock Brake
System
Low Tire Pressure
F
Optional equipment
Driver’s Heated/
Cooled Seat
Buttons
Storage
Compartment with
Accessory Power
Outlet/USB Ports
Door Ajar
Oil Pressure
Charging System
Safety Belt Reminder
Rear
Climate
Controls
Passenger’s
Heated/Cooled
Seat Buttons
Refer to your Owner Manual
to learn about the information
being relayed by the lights,
gauges and indicators on the
instrument cluster.
See In Brief in your Owner Manual.
3
Page 4
Remote Keyless Entry Transmitter (Key Fob)
Unlock
Press to unlock the driver’s door.
Press again to unlock all doors.
Lock
Press to lock all doors.
Note: Press and hold the Lock/Unlock buttons
to automatically fold/unfold the power mirrors.
To change the Auto Mirror Folding setting, go to
Comfort and Convenience in the Vehicle Settings
menu.
Liftglass
Press twice to open the liftglass.
Power Liftgate
Press twice to open or close the
power liftgate.
Vehicle Locator/Panic Alarm
Press and release to locate your vehicle.
The turn signal lamps will ash and the
horn will sound.
Press and hold to activate the alarm. The turn
signal lamps will ash and the horn will sound
until the button is pressed again or the ignition
is turned on.
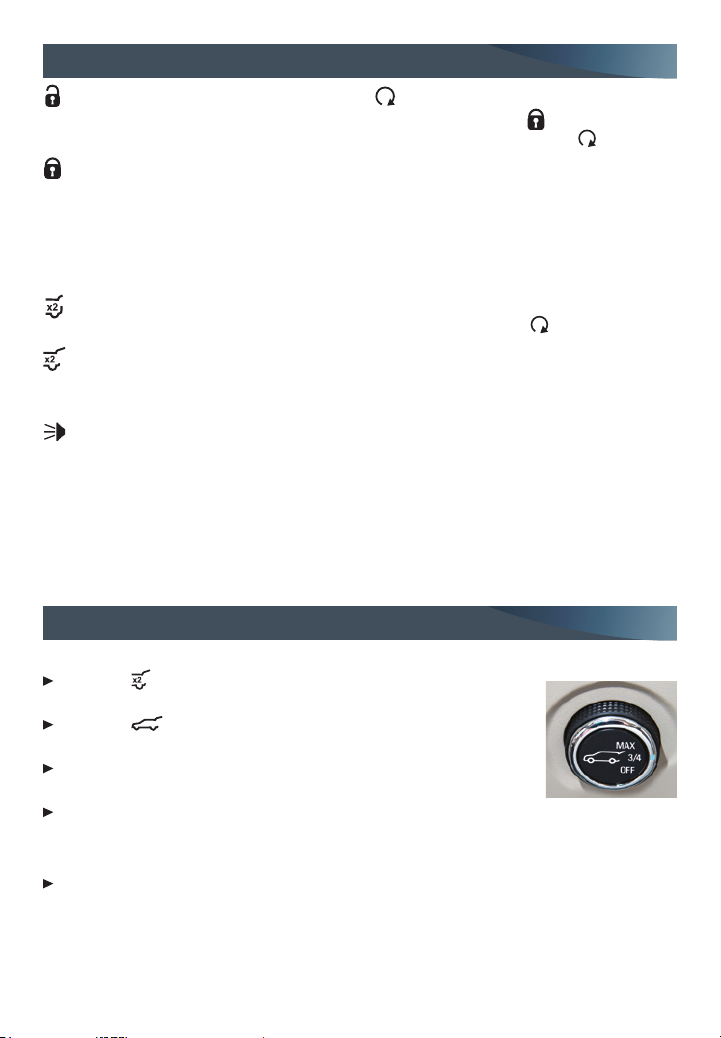
Power Liftgate
Open/Close the Power Liftgate
Press the Power Liftgate button on
the RKE transmitter twice.
Press the Power Liftgate knob on
the overhead console.
Press the touchpad on the liftgate han-
dle to open the liftgate.
Press the button next to the liftgate
latch to close the liftgate.
Hands-Free Operation
To open or close the liftgate hands-free,
kick your foot straight in and out under
the center of the rear bumper. Do not
swing your foot side-to-side. The RKE
transmitter must be within 3 feet of
the liftgate.
4
F
Optional equipment
Remote Vehicle Start
Press and release the Lock button
and then press and hold the button
until the turn signal lamps ash (about
4 seconds) to start the engine from outside the vehicle. After entering the vehicle,
turn on the ignition.
• During a remote start, the engine will
run for 10 minutes.
• Remote Start can be extended once by
repeating the remote start procedure.
• Press and hold the button until
the parking lamps turn off to cancel a
remote start.
• The heated/cooled seats will turn on
during a remote start (if selected in the
Vehicle Settings menu) when outside
temperatures warrant.
Note: To program the remote lock, unlock, and
remote start settings, go to Remote Lock, Unlock,
Start in the Vehicle Settings menu.
See Keys, Doors and Windows in your Owner Manual.
Programming the Liftgate Height
1. Turn the Power
Liftgate knob to the
3/4 mode position.
2. Open the liftgate.
3. Adjust the liftgate
manually to the
desired height.
4. To save the setting, press and hold the
button next to the liftgate latch for
3 seconds. The turn signals will ash
when the setting is saved.
See Keys, Doors and Windows in your Owner Manual.
Page 5
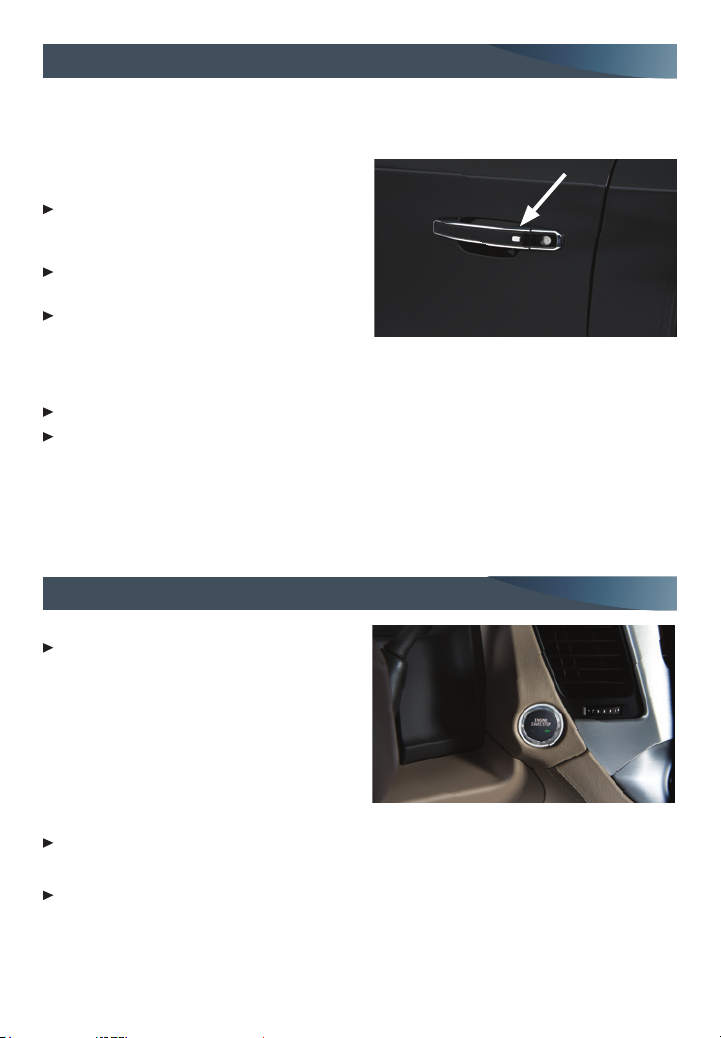
Keyless Entry System
The Keyless Entry System enables operation of the doors and ignition without removing
the Remote Keyless Entry transmitter from a pocket or purse. The transmitter must be
within 3 feet of the door being unlocked or the liftgate.
Keyless Unlocking
With the transmitter within range:
Press the lock button on the driver’s door
handle to unlock the driver’s door; press it
again within 5 seconds to unlock all doors.
Press the lock button on a passenger door
handle to unlock all doors.
Press the touchpad on the liftgate handle
to open the liftgate.
Keyless Locking
With the ignition off, the transmitter out of the vehicle, and all doors closed:
Press the lock button on any door handle to lock all doors immediately.
If Passive Locking is turned on, all doors will lock automatically after a short delay once
all doors are closed.
Note: To program the door lock and unlock settings, go to Remote Lock, Unlock, Start in the Vehicle
Settings menu.
See Keys, Doors and Windows in your Owner Manual.
Pushbutton Start
Starting the Engine
With the vehicle in Park or Neutral, press
the brake pedal and then press and hold
the ENGINE START/STOP button to start
the engine.
Note: The transmitter must be in the vehicle to turn
on the ignition. If the transmitter battery is weak,
place the transmitter in the pocket in the center
console to enable the engine to start. Replace the
transmitter battery as soon as possible.
Stopping the Engine
Shift to Park and press the ENGINE START/STOP button to turn off the engine.
Accessory
With the engine off and the brake pedal NOT depressed, press the ENGINE START/
STOP button to place the ignition system in the accessory position.
See Driving and Operating in your Owner Manual.
F
Optional equipment
5
Page 6
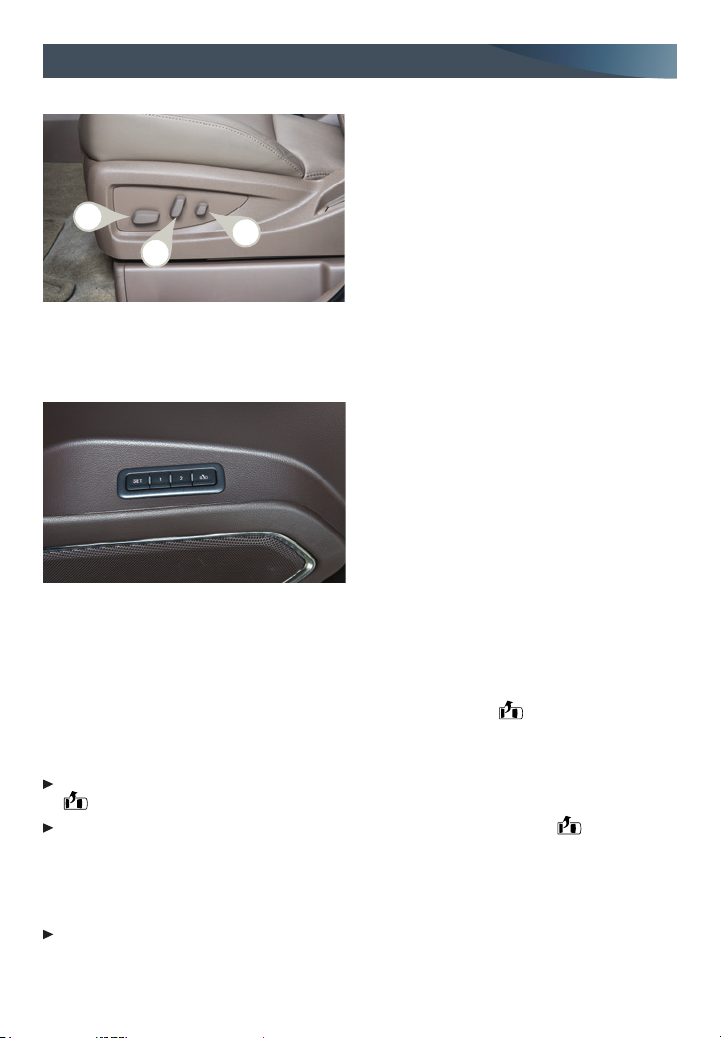
Power Front Seats
Seat Adjustments
A
C
B
Set Memory Positions
Set Exit Position
1. With the vehicle in Park and the ignition on, adjust the power driver’s seat, power
adjustable pedals power, and power tilt/telescopic steering column to the desired
positions.
2. Press and release the SET button and then press and hold the Exit button on the
driver’s door until two beeps sound.
Recall Positions
With the ignition on and the vehicle in Park, press and release button 1 or 2 or the
Exit button to recall the stored position.
With the vehicle off or not in Park, press and hold button 1 or 2 or the Exit button
until the stored position is reached. Releasing the button before the stored position is
reached cancels the recall.
The memory/exit positions can be programmed to be recalled automatically when the
ignition is turned on/off (for exit recall, the driver’s door must be opened).
To set the Auto Memory Recall or Easy Exit Options, go to Settings > Vehicle > Comfort
and Convenience > Auto Memory Recall or Easy Exit Options.
6
F
Optional equipment
A. Seat Cushion Adjustment
Move the front horizontal control to
move the seat forward or rearward, or
to tilt, raise or lower the seat.
B. Seatback Adjustment
Move the vertical control to recline or
raise the seatback.
C. Lumbar Adjustment
Move the rear control fore/aft to
increase/decrease lumbar support or
up/down to raise/lower the lumbar
location.
1. With the vehicle in Park and the ignition on, adjust the power driver’s seat,
power adjustable pedals, power outside
mirrors, and power tilt/telescopic steering column to the desired positions.
2. Press and release the SET button and
then press and hold button 1 on the
driver’s door until two beeps sound.
3. Repeat the steps using button 2 for a
second driver.
See Seats and Restraints in your Owner Manual.
Page 7
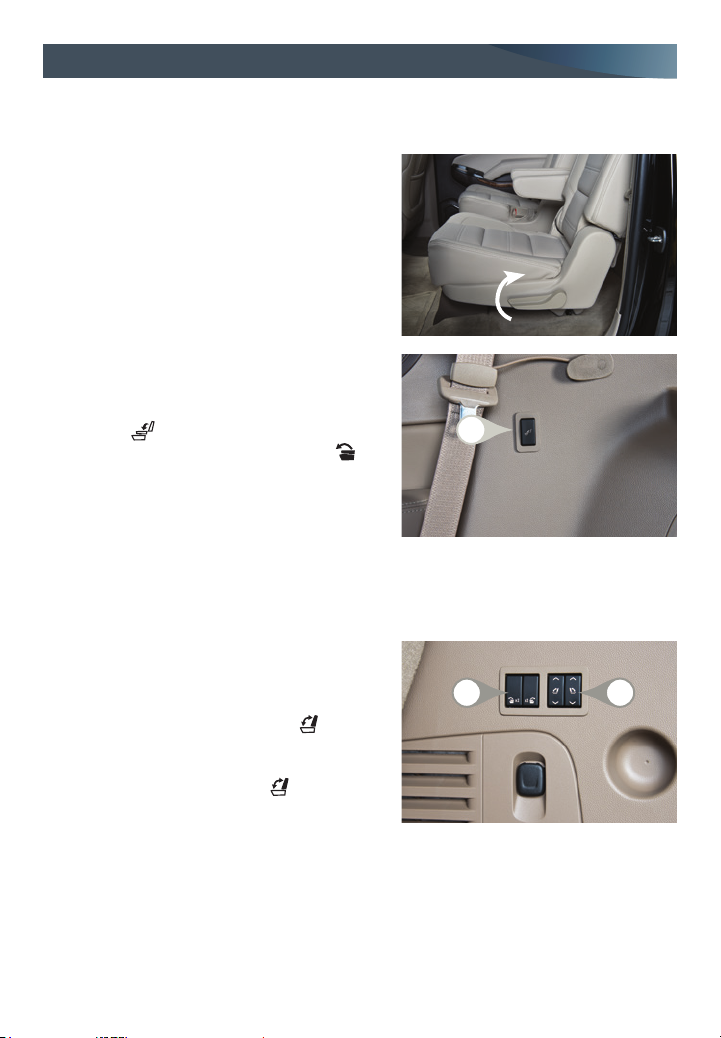
Rear Seats
Folding 2nd-Row Seats
The 2nd-row seats fold and tumble to provide more cargo space and access to the
3rd-row seats.
1. Lower the head restraint, unbuckle the safety
belt, make sure nothing is under or in front
of the seat, and move the front seat forward
enough to allow room for the folded seat.
2. Lift the lever on the lower outboard side of the
2nd-row seat. The seatback will fold forward.
3. Lift the lever again to tumble the seat forward.
Power Folding 2nd-Row Seats
1. Lower the head restraint, unbuckle the safety
belt, make sure nothing is under or in front
of the seat, and move the front seat forward
enough to allow room for the folded seat.
2. Press the Seat Release button (A) on
the panel behind the rear doors or the x2
button (B) in the rear cargo area to fold the
seat forward. Press either button again to
tumble the seat forward.
Unfolding 2nd-Row Seats
1. Pull down the seat until it latches to the oor.
2. Lift up the seatback until it locks in place.
A
Power Folding/Unfolding 3rd-Row Seats
1. With the vehicle in Park, lower the head
restraint, unbuckle the safety belt, and make
sure nothing is on the seat.
2. Press and hold the bottom of the Seat
Release button (C) in the rear cargo area to
fold the seat at.
3. Press and hold the top of the button to
raise the seatback.
F
Optional equipment
B
See Seats and Restraints in your Owner Manual.
C
7
Page 8
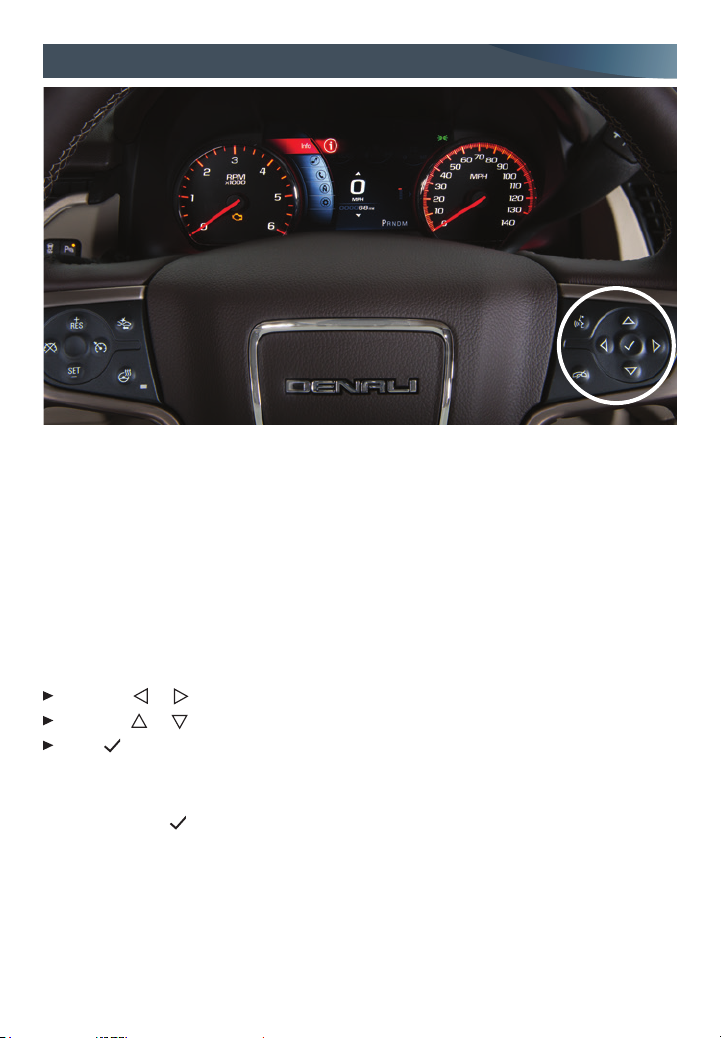
Customizable Driver Display
The Customizable Driver Display on the instrument cluster displays a variety of vehicle
system information and warning messages.
Menu Items
Use the control pad on the right side of the steering wheel to view the following menus:
Info – display trip and fuel information
Audio – browse music or change the audio source
Phone – view active call or recent calls and scroll through contacts
Navigation – view active route or change voice prompts
Settings – display units, info pages settings and set a speed warning
Display/Select Menu Items
Press the or button to move between the display zones.
Press the or button to move through the menus.
Press to open a menu or select/deselect a setting.
Reset an Item
1. Use the control pad to display the item.
2. Press and hold to reset or clear the item.
Changing Display Themes
The Customizable Driver Display features three display themes: Standard, Technology,
and Media. The style of the display will change depending on the selected theme.
1. Use the control pad to display the Settings menu.
2. Select Display Theme.
3. Select the desired theme.
8
See Instruments and Controls in your Owner Manual.
Page 9
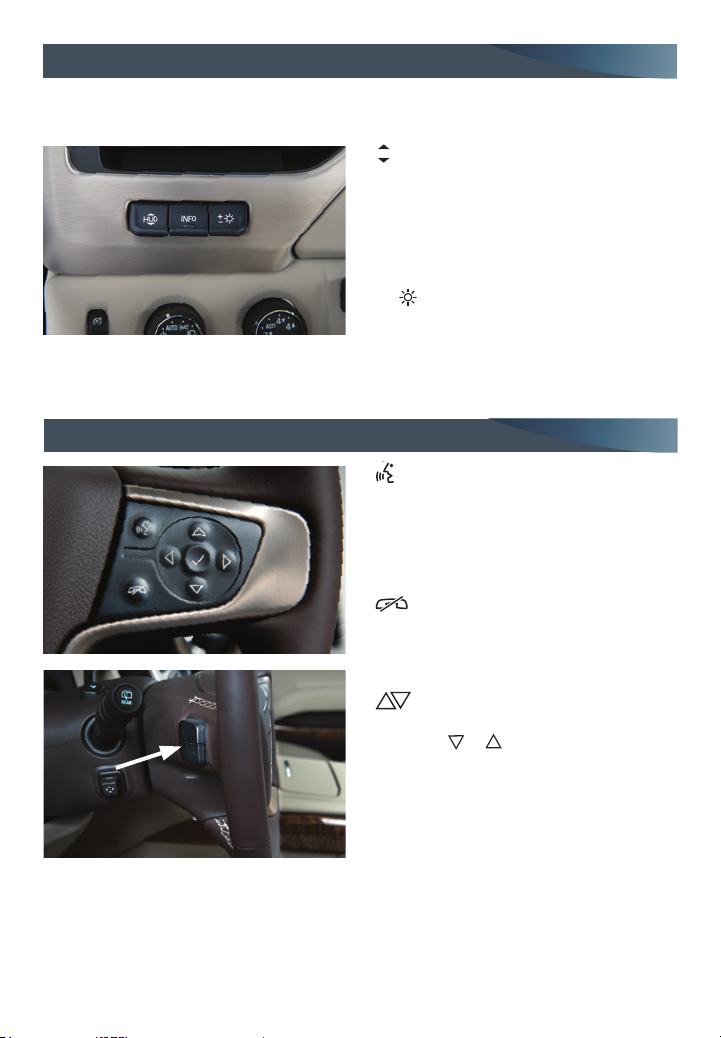
Head-Up Display
HUD
F
The Head-Up Display (HUD) projects some operating information onto the windshield.
The HUD controls are located on the left side of the instrument panel.
HUD
Lift up or press down to adjust the position of the image on the windshield. It
cannot be adjusted side-to-side.
INFO
Press to select a display view.
+ –
Lift up or press down to brighten or dim
the display. Hold down to turn off the
display.
See Instruments and Controls in your Owner Manual.
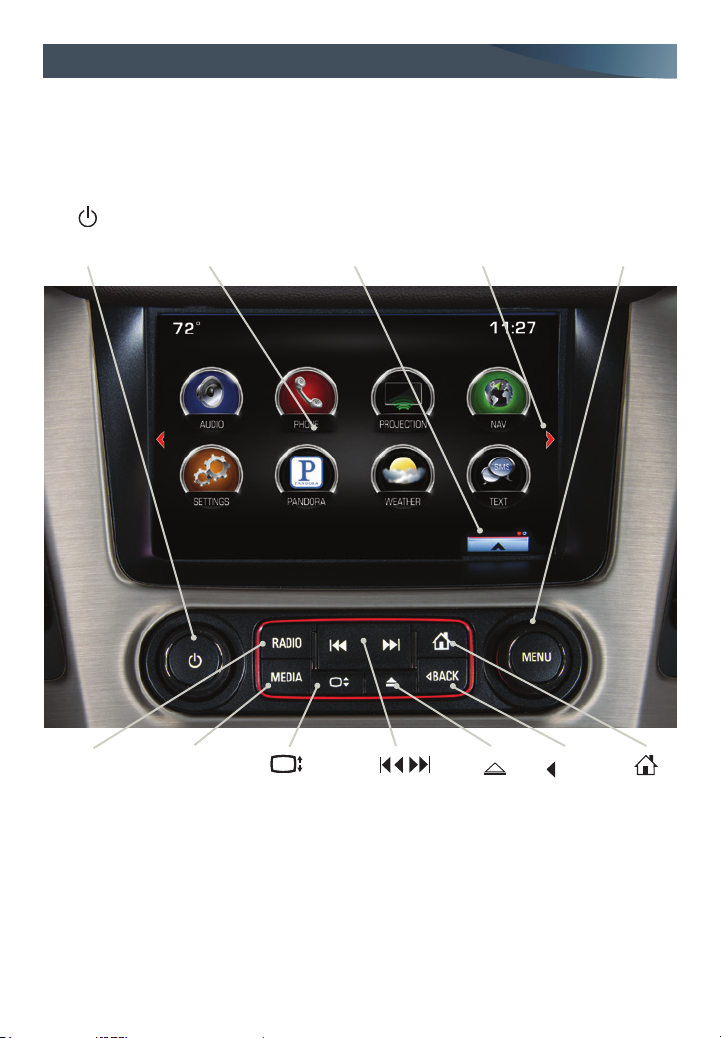
Audio Steering Wheel Controls
Push to Talk
Press to answer an incoming call or to use
natural voice recognition with the audio,
Bluetooth or navigation system.
Press and hold to activate voice pass-thru
or Siri® Eyes Free.
End Call/Mute
Press to end or reject a call.
Press to mute/unmute the vehicle
speakers.
Next/Previous
With the Audio screen displayed on the
DIC, press or to seek the previous
or next radio station or track.
Volume
(behind right side of steering wheel)
Press the top or bottom button to adjust
the volume.
Next/Previous Favorite Station button shown. Volume
button is located behind the right side of the steering
wheel.
F
Optional equipment
Next/Previous Favorite Station
(behind left side of steering wheel)
Press the top or bottom button to display
the current station or track. Press the top
or bottom button again to go to the next
or previous favorite radio station or track.
See your Infotainment System Owner Manual.
9
Page 10
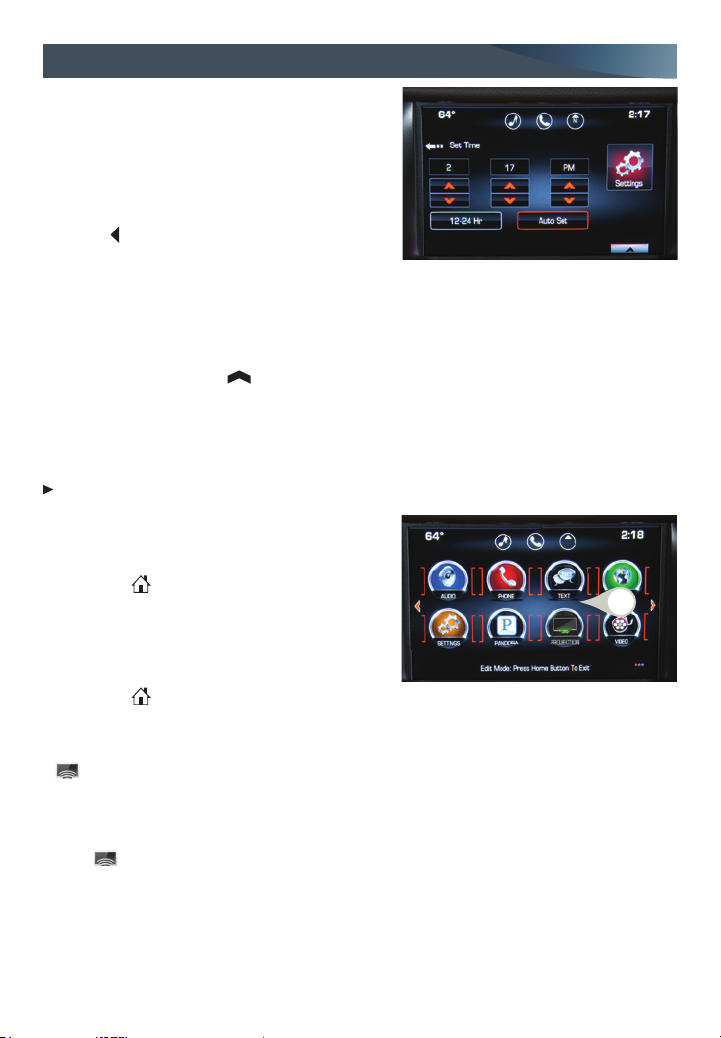
GMC IntelliLink Radio with 8-Inch* Color Touch Screen
Refer to your Owner Manual for important safety information about using the infotainment
system while driving.
The GMC IntelliLink radio is controlled by using the audio system buttons and touch
screen.
Additional Pages:
Touch to view
additional pages
of applications
(if available)
TUNE/MENU:
Tune radio
stations/Open and
select menus
Power/
Volume
Applications:
Touch the screen
icon to access the
application
Interaction
Selector:
Touch to display
the favorites list
RADIO:
Select AM,
F
FM, XM
MEDIA:
Select the
media source
Open/Close
the storage
compartment
Previous/Next radio
station or track
SEEK:
Eject
disc
BACK:
Move back one
level in the
menus
Home
screen
GMC IntelliLink uses a Bluetooth or USB connection to link to a compatible device, such
as a smartphone, cell phone, USB ash drive or portable audio player/iPod®. IntelliLink
enables streaming audio through a smartphone and hands-free voice control. For assistance with the IntelliLink system, contact Customer Assistance at 1-855-4-SUPPORT
(1-855-478-7767) or visit www.gmc.com and click the For Owners tab.
F
Optional equipment *Screen measured diagonally
10
See your Infotainment System Owner Manual.
Page 11
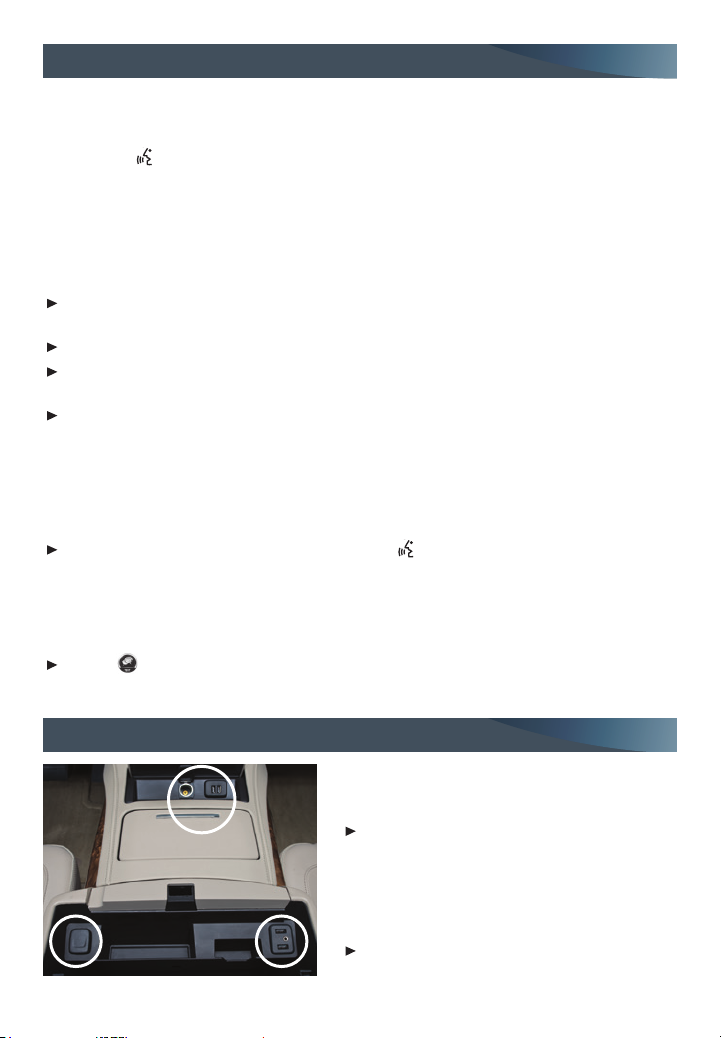
GMC IntelliLink Radio with 8-Inch* Color Touch Screen
Setting the Time
1. Touch Settings on the home page.
2. Touch Time and Date.
3. Touch Set Time.
4. Touch the arrows to adjust the hours, minutes
and AM or PM.
5. Touch BACK to exit the menu.
Storing Favorites
Up to 60 radio stations from all bands (AM, FM or XMF), media (song, artist, album, and
genre with device connected to a USB port), phone contacts and navigation destinations
can be stored in any order.
1. Select the desired radio station, media favorite, navigation destination or contact.
2. Touch and drag up the Interaction Selector at the bottom of the screen to display
the favorite screen buttons.
3. Touch and hold one of the favorite screen buttons until a beep is heard, indicating it
is stored.
4. Repeat the steps to store another favorite item.
To change the number of favorites displayed, go to Radio in the Settings menu.
Managing Home Page Icons
The home page icons (A) can be arranged in
any order.
1. Press the Home button.
2. To enter edit mode, touch and hold the home
page icon to move.
3. Continue holding the icon and drag it to the
desired position, and then release.
4. Press the Home button to exit edit mode.
Apple CarPlay™
F
Apple CarPlay capability may be available through a compatible smartphone. If available,
a Projection icon will appear on the home page of the infotainment display.
1. Connect your compatible Apple iPhone to a USB data port in the console front storage
bin or inside the console. Use your device’s factory-provided USB cable. Aftermarket
cables may not work.
2. The Projection icon will change to Apple CarPlay, depending on the phone. Apple
CarPlay may launch automatically upon USB connection. If not, touch the Apple
CarPlay icon on the home page.
For more information on using Apple CarPlay, call 1-855-4-SUPPORT (1-855-478-7767) or
visit my.gmc.com/learn.
See your Infotainment System Owner Manual.
A
F
Optional equipment *Screen measured diagonally
11
Page 12
GMC IntelliLink
Natural Voice Recognition
Control the music source and make phone calls hands-free (after pairing your Bluetoothenabled phone) using the natural voice recognition system.
1. Press the Push to Talk button on the steering wheel.
2. The radio will say “Command please,” followed by a beep.
3. After the beep, say what you want it to do using natural speech.
(Example: “Call Amanda” or “Tune FM 104.3.” Say “Help” for assistance.)
PANDORA® Internet Radio
Listen to personalized radio stations based on favorite artists or genres.
Download the Pandora app to your smartphone. Restart the smartphone and sign in
to Pandora.
Create a station on your phone to listen to a customized song list in the vehicle.
Connect your smartphone/device to the system by Bluetooth or, for Apple devices,
by a USB cable.
Touch the Pandora icon on the touch screen to access Pandora. A slight delay may
occur when loading a song or changing a station.
Voice Pass-Thru and Siri® Eyes Free
Voice pass-thru allows access to the voice recognition commands on a paired cell phone;
i.e. Siri or Voice Command. For more information, visit www.gmc.com and click the
For Owners tab.
To activate voice pass-thru, press and hold the Push to Talk steering wheel button.
Text Message Alerts
Text message alerts play a text message over the audio system and allow a response
with a preset message. The text messaging feature must be set up when the cell phone is
paired. Messages can be viewed on the touch screen only when the vehicle is not moving.
Touch Text to view the text message inbox.
See your Infotainment System Owner Manual.
Portable Audio Devices
12
Accessory power outlets and USB ports are
located in several locations in the vehicle to
connect portable audio devices.
An iPod®, iPhone®, MP3 Player, a USB ash
drive or a USB mass storage device can be
connected to the USB port. GMC IntelliLink
will read the device and build a list of
songs. Search for music on-screen or by
voice commands.
Press the MEDIA button to select a portable
device as the audio source.
See your Infotainment System Owner Manual.
Page 13

Bluetooth® System
Refer to your Owner Manual for important safety information about using the Bluetooth system
while driving.
Before using a Bluetooth-enabled device in the vehicle, it must be paired with the invehicle Bluetooth system. The pairing process is disabled when the vehicle is moving.
Not all devices will support all functions. Visit my.gmc.com/learn for more information.
Pair a Phone
1. To use voice recognition, press the Push to Talk button; after the beep, say
“Pair phone,” or use the MENU knob or the touch screen to select the Phone icon >
Phones > Pair Device.
2. Start the pairing process on the phone. Locate GMC IntelliLink on the phone.
3. Enter the four-digit code that appears on the touch screen into the phone or, if a six-
digit code appears on the phone, conrm it on the touch screen.
4. If your phone prompts you to accept the connection or phone book download, select
Always Accept and Allow.
Streaming Audio
With a paired device connected via Bluetooth, press the MEDIA button until Bluetooth is
displayed on the touch screen to stream audio from the device. Control audio operation
using the device controls. For full control of the device, connect it to a USB port.
See your Infotainment System Owner Manual.
Wireless Charging
F
The Wireless Charging system is located on the storage tray on top of the center console.
To check mobile device compatibility, visit my.gmc.com/learn. See your phone retailer for
details on required phone accessories.
1. The vehicle must be on or Retained Accessory Power must be active.
2. Remove all objects from the charging pad.
3. Place the device, face up, on the symbol on the pad, aligned with the rear rib.
4. Move the device slowly until the battery charging symbol displays on the infotainment
screen. If not charging, remove the device for 3 seconds, and rotate it 180 degrees.
See your Infotainment System Owner Manual.
OnStar® with 4G LTE
With OnStar 4G LTE and a Wi-Fi® hotspot, up to seven devices (smartphones, tablets and
laptops) can be connected to a reliable, built-in Internet connection.
To retrieve the SSID and password for the hotspot, press the OnStar Voice
Command button on the rearview mirror, wait for the prompt, and then say “Wi-Fi
settings.” The information will be displayed on the screen.
For assistance or to change the SSID and password, press the blue OnStar button or call
1-888-4ONSTAR (1-888-466-7827).
Note: See onstar.com for a detailed instruction guide, vehicle availability and system limitations.
F
Optional equipment
See your Infotainment System Owner Manual.
13
Page 14
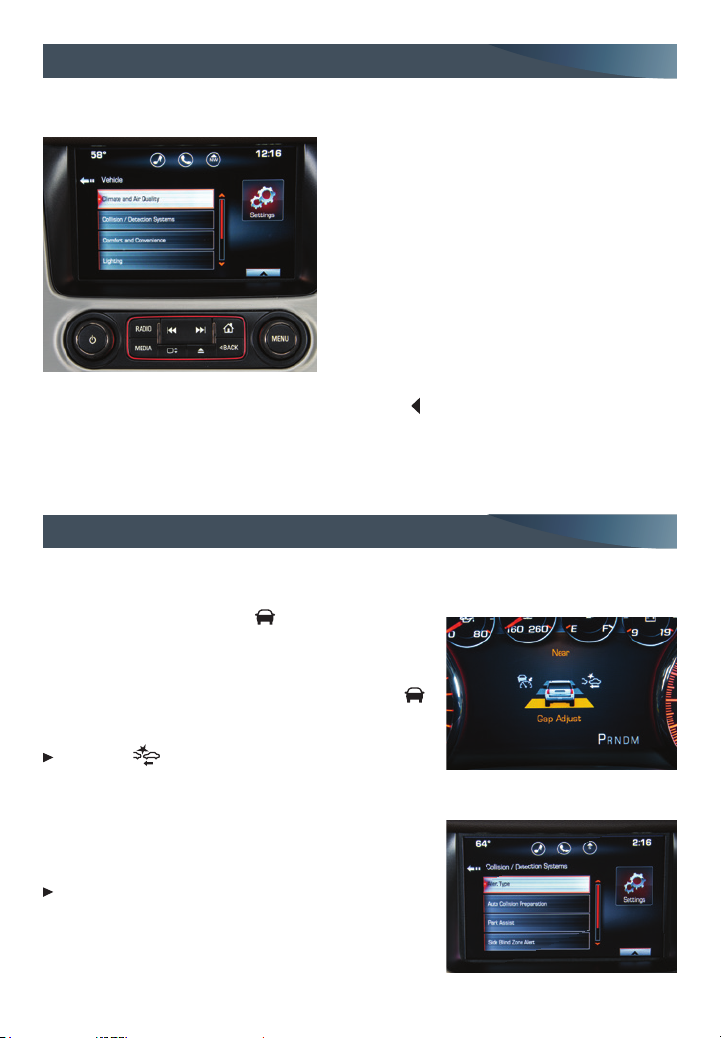
Vehicle Personalization
Some vehicle features can be customized using the audio controls and menus or the
touch screen buttons.
Changing Vehicle Settings
The Vehicle Settings menu may include
Climate and Air Quality, Collision/Detection
Systems, Comfort and Convenience,
Lighting, Power Door Locks, or Remote
Lock/Unlock/Start.
Use the MENU knob or the touch screen to:
1. Select Settings on the home page.
2. Select Vehicle.
3. Select the desired menu item.
4. Select the desired feature and setting.
Settings are saved automatically.
5. Select BACK to exit each menu.
See Instruments and Controls in your Owner Manual.
Driver Assistance Systems
The driver assistance systems use advanced technologies to help avoid collisions by
providing visual and audible alerts under some imminent collision conditions.
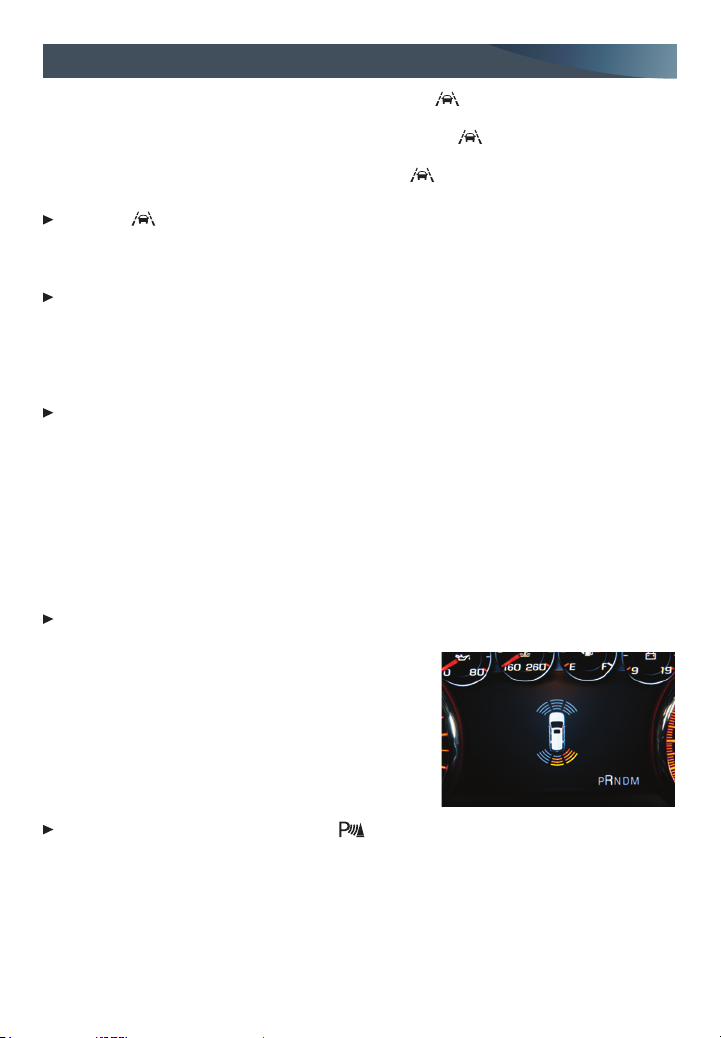
Forward Collision Alert – The Vehicle Ahead indica-
tor will illuminate in green on the instrument cluster
when a vehicle is detected and will illuminate in amber
when following a vehicle ahead too closely. If your
vehicle approaches another vehicle too rapidly, the
will ash, a visual alert will ash on the windshield and
the Safety Alert Seat will pulse. See Safety Alert Seat.
Press the Collision Alert button on the left side
of the steering wheel to set the alert sensitivity to
Far, Medium, Near, or Off. The setting is displayed in the Driver Information Center.
Safety Alert Seat – The driver’s seat pulses, left side,
right side, or simultaneously, to alert the driver of
potential hazards.
Audible notication may be selected instead of
Safety Alert Seat pulsing notication. To change the
alert setting, go to Settings > Vehicle > Collision/
Detection Systems > Alert Type.
14
See Driving and Operating in your Owner Manual.
Page 15
Driver Assistance Systems
Lane Keep Assist with Lane Departure WarningF – The Lane Keep Assist indicator is
green on the instrument cluster when a lane marking is detected. The system may assist
by gently turning the steering wheel and display an amber if the vehicle approaches a
detected lane marking without using a turn signal in that direction. It may also provide a
Lane Departure Warning alert by ashing an amber and pulsing the left or right side
of the Safety Alert Seat as the lane marking is crossed. See Safety Alert Seat.
Press the Lane Keep Assist button on the left side of the instrument panel to turn
the system on or off.
Rear Vision Camera – Provides a view directly behind the vehicle when backing up.
To turn the Rear Vision Camera Guidelines or Rear Park Assist Symbols on or off, go to
Settings > Rear Camera.
Rear Cross Trafc Alert – Warns of trafc coming in either direction behind the vehicle by
displaying a visual alert on the Rear Vision Camera display and pulses the left or right side
of the Safety Alert Seat. See Safety Alert Seat.
To turn the system on or off, go to Settings > Vehicle > Collision/Detection Systems >
Rear Cross Trafc Alert.
Front Automatic BrakingF – Prepares the brakes or applies the brakes and slows the
vehicle if an emergency collision appears imminent or the driver does not react to previous alerts.
Side Blind Zone Alert/Lane Change Alert – While driving, the Side Blind Zone Alert/Lane
Change Alert displays a warning symbol on the left or right side mirror when a vehicle is
detected in that side blind zone area or rapidly approaching that side blind zone area. The
warning symbol ashes if a turn signal is activated when a vehicle has been detected.
To turn the system on or off, go to Settings > Vehicle > Collision/Detection Systems >
Lane Change Alert.
Front and/or Rear Parking Assist – During low-speed
parking maneuvers, the system provides “distance to
closest object” information in the Driver Information
Center and a caution symbol on the Rear Vision
Camera display. When the vehicle should be stopped
immediately to avoid a collision, a continuous audible
tone sounds or the Safety Alert Seat pulses. See Safety
Alert Seat.
To turn the system on or off, press the Parking Assist button on the left side of
the instrument panel.
See Driving and Operating in your Owner Manual.
F
Optional equipment
15
Page 16
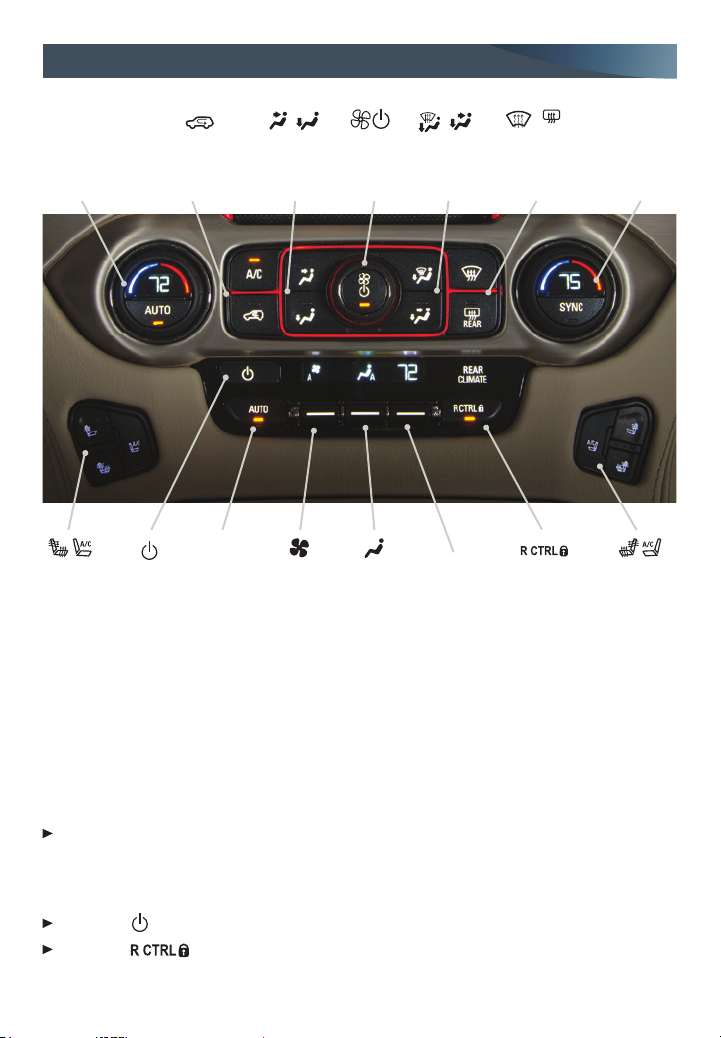
Automatic Climate Controls
REAR
AUTO:
Driver’s Temp.
Control/
Automatic
Operation
Driver’s
Heated/
Cooled Seat
Buttons
A/C/
Air Conditioning
Control/
Recirculation
Mode
Rear Power
Control
AUTO:
Rear
Automatic
Operation
/
Vent
Mode/
Floor
Mode
Rear Fan
Speed
Fan
Speed
Control/
On/Off
Rear Air
Delivery
Mode/
Bi-level
Temperature
/
Defog
Mode
Rear
/
Defrost Mode/
Rear Window/
Outside Mirror
Defogger
Rear Control
Lock-out
Automatic Operation
1. Press AUTO.
2. Set the temperature. The system automatically controls the fan speed, air delivery, air
conditioning and recirculation to reach the set temperature. Allow time for the system
to reach the desired temperature.
If the air delivery mode or fan speed is manually adjusted, automatic operation is
turned off.
Sync Temperature Settings
Press SYNC to link the passenger’s and rear climate temperature settings to the
driver’s setting. When the passenger’s or rear climate setting is adjusted, the different
temperature setting is displayed.
Rear Climate Controls
Press the Power button to turn the rear climate controls on/off.
Press the
button to lock out the rear controls. Rear climate control operation is
controlled using the front controls.
16
See Climate Controls in your Owner Manual.
SYNC:
Passenger’s
Temp. Control/
Link setting to
driver’s setting
Passenger’s
Heated/
Cooled Seat
Buttons
Page 17
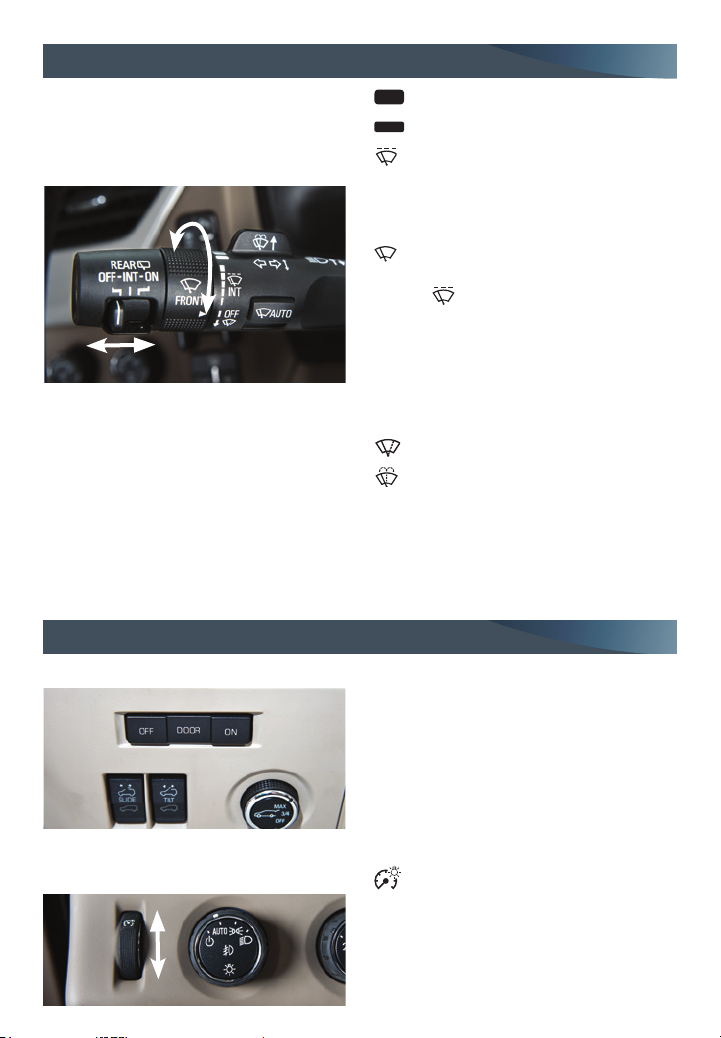
Wipers and Washers
Windshield Wipers
Rotate the band on the lever to activate
the wipers.
Fast Wipes
Slow Wipes
INT Intermittent
Rotate the band to adjust the delay
between wipes. The wipers activate more
often as the band is rotated upward.
AUTO – Rainsense™ On/Off
Press to turn the Rainsense wipers on/off.
Use the INT band to adjust the wiper
cycling based on the amount of moisture on the windshield. Rotate the band
upward to increase the moisture sensitivity setting and the wipers will cycle more
frequently.
OFF
Single Wipe
Washer Fluid
Push the paddle forward to spray washer
uid on the windshield.
Rear Wiper
Slide the switch to activate the rear wipers.
Lighting
Dome Lamps
Instrument Panel Lighting
OFF – INT Intermittent – ON
See Instruments and Controls in your Owner Manual.
OFF
Press to turn off the lamps at all times,
even when a door is open.
DOOR
Press to have the lamps turn on
automatically when a door is open.
ON
Press to turn on all dome lamps.
Instrument Panel Brightness
Rotate the thumbwheel on the left side
of the instrument panel to adjust the
instrument panel lighting.
See Lighting in your Owner Manual.
17
Page 18
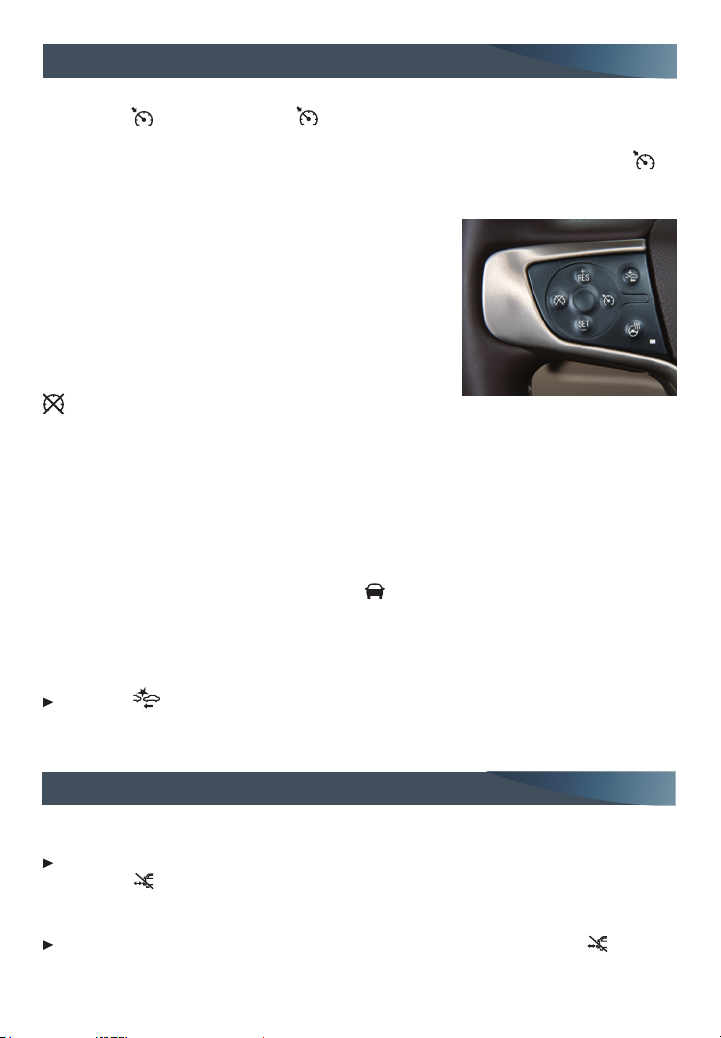
Cruise Control
Setting Cruise Control
1. Press the On/Off button. The Cruise Control symbol will illuminate in white on
the instrument cluster.
2. When traveling at the desired speed, press the SET– button to set the speed. The
symbol will illuminate in green on the instrument cluster.
Adjusting Cruise Control
RES+ Resume/Accelerate
Press to resume a set speed.
When the system is active, press once to increase speed
1 mph; press and hold to continue increasing speed.
SET– Set/Coast
When the system is active, press once to decrease speed
1 mph; press and hold to continue decreasing speed.
Cancel
Press to cancel the cruise control without erasing the set speed from memory.
Pressing the brake pedal also will cancel the cruise control.
The set speed is erased when cruise control or the vehicle ignition is turned off.
Adaptive Cruise Control
Adaptive Cruise Control enhances traditional cruise control by maintaining a driver-selected following gap between your vehicle and a vehicle detected directly ahead. Once a speed
is set, the vehicle will maintain the selected gap distance by braking or accelerating.
When a slower vehicle is detected ahead, the
the vehicle brakes moderately to maintain the selected following gap. If driver action
is required to apply sufcient braking, a visual alert ashes on the windshield and the
Safety Alert Seat pulses.
Selecting the Following Gap
Press the Collision Alert button on the left side of the steering wheel to set a
following gap of Far, Medium or Near.
F
Vehicle Ahead symbol is displayed and
See Driving and Operating in your Owner Manual.
Power Assist StepsF
The power assist steps lower automatically when a door is opened and retract after the
doors are closed.
With the ignition on and the vehicle in Park or with the vehicle running and in Neutral,
press the Power Assist Steps button on the left side of the instrument panel
to deploy the steps for cleaning and car washes. Press the button again to retract
the steps.
With the ignition on and the vehicle in Park or Neutral, press and hold the button
for 4 seconds to lock/disable the steps or to unlock/enable the steps.
18
F
Optional equipment
See Keys, Doors and Windows in your Owner Manual.
Page 19
Traction Control and StabiliTrak Systems
The traction control system limits wheelspin and the StabiliTrak® stability control system
assists with directional control of the vehicle in difcult driving conditions. Both systems
turn on automatically every time the vehicle is started.
Turn off traction control if the vehicle is stuck and rocking the vehicle is required.
Press the Traction Control/StabiliTrak Off button on the left side of the instrument
panel to turn traction control off or back on. The Traction Control Off light will illuminate on the instrument cluster when the system is off.
See Driving and Operating in your Owner Manual.
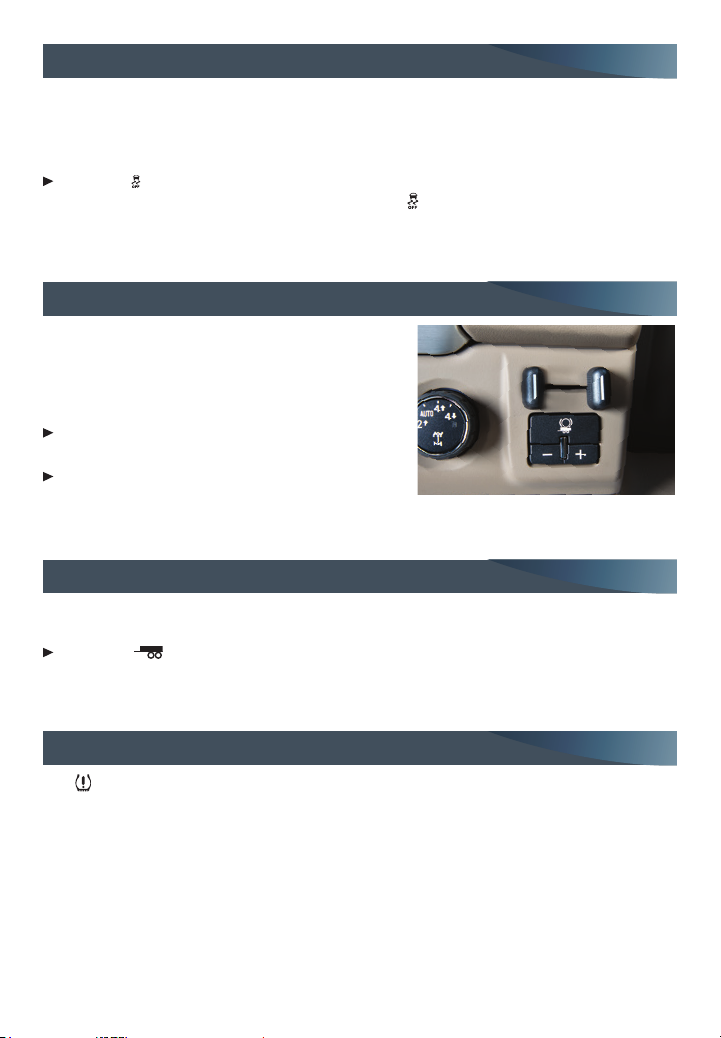
Integrated Trailer Brake Control (ITBC)
The ITBC system can be used to adjust the amount
of power output, or Trailer Gain, available to the
trailer brakes. The control panel is located on the
left side of the instrument panel. ITBC information
is displayed on the Driver Information Center.
Adjust the Trailer Gain by pressing the +/–
adjustment buttons on the control panel.
Squeeze the levers together (left lever does not
move) on the control panel to manually apply
the trailer brakes.
See Driving and Operating in your Owner Manual.
Tow/Haul Mode
The Tow/Haul Mode adjusts the transmission shifts to reduce shift cycling, such as when
towing or hauling heavy loads or driving on steep grades.
Press the Tow/Haul Mode button on the end of the shift lever to turn the system
on or off.
See Driving and Operating in your Owner Manual.
Tire Pressure Monitor
The Low Tire Pressure warning light on the instrument cluster illuminates when one
or more of the vehicle’s tires is signicantly underinated. Fill the tires to the proper tire
pressures. The proper tire pressures for the vehicle are listed on the Tire and Loading
Information label, located below the driver’s door latch. Current tire pressures can be
viewed in the Driver Information Center.
Tire pressure is affected by cold weather and distance driven. If the low tire pressure
warning light illuminates when the vehicle is rst started in cooler temperatures and
then turns off as the vehicle is driven, check for the proper tire pressures.
Refer to your Owner Manual for additional information about normal monthly tire maintenance.
See Vehicle Care in your Owner Manual.
19
Page 20
Roadside Assistance
1-800-GMC-8782 TTY Users: 1-888-889-2438
(1-800-462-8782)
As the owner of a new GMC, you are automatically enrolled in the GMC Roadside
Assistance program for up to 5 years/60,000 miles, whichever occurs rst, at no expense
to you. GMC’s Roadside Assistance toll-free number is staffed by a team of trained advisors who are available 24 hours a day, 365 days a year, to contact a service provider for
light services (fuel delivery, jump-starts, at tire and lock-outs) or make arrangements to
tow your vehicle to the nearest GMC dealer for any repairs.
Roadside Assistance and OnStar
If you require roadside service and have a current OnStar subscription, press the OnStar
button and the vehicle will send your current GPS location to an OnStar Advisor who
will speak to you, assess your problem, contact Roadside Assistance and relay your exact
location so you will get the help you need.
®
Mobile Apps
The myGMC mobile app connects owners to a variety of vehicle info rmation
and services, such as a searchable Owner Manual, real-time fuel information
and Roadside Assistance.
Download the OnStar RemoteLink mobile app and enjoy select features for ve
subscribers can access many services, including remotely starting/stopping the vehicle,
locking/unlocking doors, and locating the vehicle on a map (on properly equipped
vehicles). To learn more about OnStar services, press the blue OnStar button, call
1-888-4ONSTAR (1-888-466-7827), visit onstar.com or refer to your owner manual.
Download the mobile apps from your compatible mobile device’s app store.
years from date of vehicle delivery. With a compatible mobile device, OnStar
GMC Owner Center
Get to know your vehicle inside and out with the GMC Owner Center. Check out personalized information, including an online owner manual and helpful how-to videos, track your
service history and warranty status, review your current OnStar Vehicle Diagnostics report
(active OnStar account required) and more. Create an account today at my.gmc.com.
We recommend always using ACDelco or genuine GM service parts.
Certain restrictions, precautions and safety procedures apply to your vehicle. Please read your Owner Manual
for complete instructions. All information contained herein is based on the latest information available at the
time of printing and is subject to change without notice. Copyright 2015 General Motors. All rights reserved.
23133501 A
!23133501=A!
20
 Loading...