

Page 1

LS620SR
020919 LS620LSR ED9
• London • Melbourne • Perth • Taipei • Verona
• Hong Kong • New York • Auckland • Paris
INSTRUCTION MANUAL
620W
Variable Speed Jigsaw
with LightSabre
Page 2

Contents
Introduction 3
Environmental protection 3
Symbols 3
Specifications 3
Safety rules for laser lights 3
General safety instructions 4
Additional safety rules for jigsaws 5
Unpacking 6
Know your product 7
Adjusting the shoe for angular cutting 8
Dust extraction 8
Switching on and off 8
Adjusting the cutting speed 8
Making a cut 9
Pocket and round cutting 9
Pocket cutting 9
Cutting metal 9
Fitting the straight guide 9
Changing a blade 9
Using the LightSabre system 10
Changing the batteries 10
General inspection 10
Maintenance 10
Full 2 Years Warranty
Whilst every effort is made to ensure your complete
satisfaction with this tool, occasionally, due to the mass
manufacturing techniques, a tool may not live up to our
required level of performance and you may need the
assistance of our service department.
This product is warranted for a 2-year period from the
date of the original purchase. If found to be defective in
materials or workmanship, the tool or the offending
faulty component will be replaced free of charge with
another of the same item. A small freight charge may
apply.
The warranty replacement unit is only made available by
returning the tool to the place of purchase with a
confirmed register receipt. Proof of purchase is essential.
We reserve the right to reject any claim where the
purchase cannot be verified.
This warranty does not include damage or defects to the
tool caused by or resulting from abuse, accidents or
alterations.
It also does not cover any bonus accessories unless the
tool is a GMC Platinum Professional model.
Please ensure that you store your receipt in a safe place.
Conditions apply to the above warranty.
If you need direction of what constitutes a free of
charge warranty claim, please review the guide given on
the rear of the Receipt Holder. An indication is given as
to the types of claim that are permissible, and those
that are not.
Page 3

Dear Customer
If you require any help with your product, whether it is a
Warranty claim, spare part or user information:
please phone our Help Line for an immediate response.
The appropriate number is given on the rear page of this
manual.
Introduction
Your new GMC power tool will more than satisfy your
expectations. It has been manufactured under stringent
GMC Quality Standards to meet superior performance
criteria.
You will find your new tool easy and safe to operate, and,
with proper care, it will give you many years of
dependable service.
Caution. Carefully read through this entire Instruction
Manual before using your new GMC Power Tool. Take
special care to heed the Cautions and Warnings.
Your GMC power tool has many features that will make
you job faster and easier. Safety performance and
dependability have been given top priority to the
development of this tool, making it easy to maintain and
operate.
Environmental protection
Recycle unwanted materials instead of
disposing of them as waste. All tools, hoses
and packaging should be sorted, taken to the
local recycling centre and disposed of in an
environmentally safe way.
Symbols
The rating plate on your tool may show symbols. These
represent important information about the product or
instructions on its use.
Wear hearing protection.
Wear eye protection.
Wear breathing protection.
Double insulated
for additional protection.
Conforms to relevant
safety standards.
Specifications
Voltage: 230–240V ~ 50 Hz
Power rating: 620W
No load speed: 800–3000/min
Stroke length: 18mm
Cutting angle range: 0–45°
Cutting depth in:
Wood 60mm
Steel 6mm
This jigsaw is double insulated. There are two independent
barriers of insulation to protect you from the possibility of
electric shock.
The sound intensity level for the operator may exceed 85
dB(A) and sound protection measures are necessary.
Safety rules for laser lights
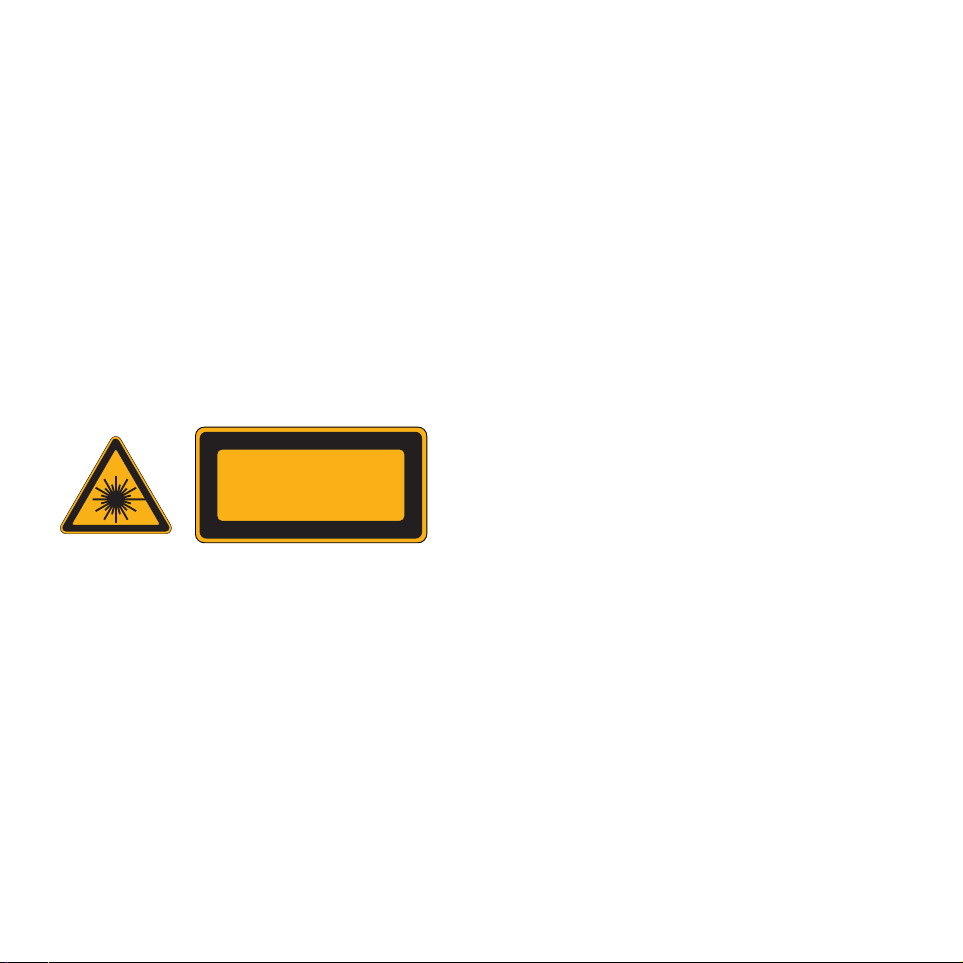
The laser light/laser radiation used in the GMC LightSabre
system is Class 2 with maximum 1mW and 400nm–
700nm wavelengths. These lasers do not normally present
an optical hazard, although staring at the beam may
cause flash blindness.
Warning. Do not stare directly at the laser beam.
A hazard may exist if you deliberately stare into the
beam, please observe all safety rules as follows;
3
Page 4
• The laser shall be used and maintained in accordance
with the manufacturer’s instructions.
• Never aim the beam at any person or an object other
than the work piece.
• The laser beam shall not be deliberately aimed at
personnel and shall be prevented from being directed
towards the eye of a person for longer than 0.25s.
• Always ensure the laser beam is aimed at a sturdy work
piece without reflective surfaces. I.e. wood or rough
coated surfaces are acceptable. Bright shiny reflective
sheet steel or the like is not suitable for laser use as the
reflective surface could direct the beam back at the
operator.
• Do not change the laser light assembly with a different
type. Repairs must be carried out by the laser
manufacturer or an authorized agent.
Caution. Use of controls or adjustments or performance of
procedures other than those specified herein may result in
hazardous radiation exposure.
Please refer to the relevant Australian standards, AS 2397
and AS/NZS2211 for more information on Lasers.
General safety instructions
To use this tool properly, you must observe the safety
regulations, the assembly instructions and the operating
instructions to be found in this Manual. All persons who
use and service the machine have to be acquainted with
this Manual and must be informed about its potential
hazards. Children and infirm people must not use this
tool. Children should be supervised at all times if they are
in the area in which the tool is being used. It is also
imperative that you observe the accident prevention
regulations in force in your area. The same applies for
general rules of occupational health and safety.
Warning. When using power tools, basic safety
precautions should always be taken to reduce the risk of
fire, electric shock and personal injury. Also, please read
and heed the advice given in the additional important
safety instructions.
1. Keep the work area clean and tidy. Cluttered work
areas and benches invite accidents and injury.
2. Consider the environment in which you are working.
Do not use power tools in damp or wet locations. Keep
the work area well lit. Do not expose power tools to
rain. Do not use power tools in the presence of
flammable liquids or gases.
3. Keep visitors away from the work area. All visitors
and onlookers, especially children and infirm persons,
should be kept well away from where you are working.
Do not let others in the vicinity make contact with the
tool or extension cord.
4. Store tools safely. When not in use, tools should be
locked up out of reach.
5. Do not force the tool. The tool will do the job better
and safer working at the rate for which it was
designed.
6. Use the correct tool for the job. Do not force small
tools or attachments to do the job best handled by a
heavier duty tool. Never use a tool for a purpose for
which it was not intended.
7. Dress correctly. Do not wear loose clothing or jewelry.
They can be caught in moving parts. Rubber gloves and
non-slip footwear are recommended when working
outdoors. If you have long hair, wear a protective hair
covering.
8. Use safety accessories. Safety glasses and earmuffs
should always be worn. A face or dust mask is also
required if the cutting operation creates dust.
9. Do not abuse the power cord. Never pull the cord to
disconnect the tool from the power point. Keep the
4
LASER LIGHT. LASER RADIATION
Do not stare into beam.
Only turn laser beam on when tool
is on work piece. Class 2 laser product
Page 5

cord away from heat, oil and sharp edges.
10. Secure the work piece. Use clamps or a vice to hold
the work piece. It is safer than using your hand and
frees both hands to operate the tool.
11. Do not overreach. Keep your footing secure and
balanced at all times.
12. Look after your tools. Keep tools sharp and clean for
better and safer performance. Follow the instructions
regarding lubrication and accessory changes. Inspect
tool cords periodically and, if damaged, have them
repaired by an authorised service facility. Inspect
extension cords periodically and replace them if
damaged. Keep tool handles dry, clean and free from
oil and grease.
13. Disconnect idle tools. Switch off the power and
disconnect the plug from the power point before
servicing, when changing accessories and when the
tool is not in use.
14. Remove adjusting keys and wrenches. Check to see
that keys and adjusting wrenches are removed from
the tool before switching on.
15. Avoid unintentional starting. Always check that the
switch is in the OFF position before plugging in the
tool to the power supply. Do not carry a plugged in
tool with your finger on the switch.
16. Use outdoor rated extension cords. When a tool is
used outdoors, use only extension cords that are
intended for outdoor use and are so marked.
17. Stay alert. Watch what you are doing. Use common
sense. Do not operate a power tool when you are
tired.
18. Check for damaged parts. Before using a tool, check
that there are no damaged parts. If a part is slightly
damaged, carefully determine if it will operate
properly and perform its intended function. Check for
alignment of moving parts, binding of moving parts,
breakage of parts, proper mounting and any other
conditions that may affect the operation of the tool.
A part that is damaged should be properly repaired or
replaced by an authorised service facility, unless
otherwise indicated in this Instruction Manual.
Defective switches must be replaced by an authorised
service facility. Do not use a tool if the switch does
not turn the tool on and off correctly.
19. Guard against electric shock. Prevent body contact
with grounded objects such as water pipes, radiators,
cookers and refrigerator enclosures.
20. Use only approved parts. When servicing, use only
identical replacement parts. Use an authorised service
facility to fit replacement parts.
Additional safety rules for jigsaws
Warnings. Before connecting a tool to a power source
(mains switch power point receptacle, outlet, etc.) be sure
that the voltage supply is the same as that specified on
the nameplate of the tool. A power source with a voltage
greater than that specified for the tool can result in
serious injury to the user, as well as damage to the tool.
If in doubt, do not plug in the tool. Using a power source
with a voltage less than the nameplate rating is harmful
to the motor.
Always remove the plug from the mains socket before
making any adjustments or maintenance, including
changing the blade.
• Ensure that the lighting is adequate.
• Do not use the saw unless the guards are in place
• Keep the shoe flat on the work piece.
• Do not put pressure on the saw, such that it slows the
motor down. Allow the saw blade to cut without
pressure. You will get better results and you will be
taking better care of your tool.
• Keep the area free of tripping hazards.
• Do not let anyone under 18 years operate this jigsaw.
• Only use blades in good condition.
5
Page 6

• Before cutting, check that there is sufficient clearance
for the blade under the work piece.
• Do not touch the blade after operation. It will be very
hot.
• Keep your hands away from under the work piece.
• Never use your hands to remove sawdust, chips or waste
close by the blade.
• Rags, cloths, cord, string and the like should never be
left around the work area.
• Avoid cutting nails. Inspect the work piece and remove
all nails and other foreign objects before beginning
sawing.
• Support the work properly.
• Never reach over the blade to remove waste or off cuts.
• Do not attempt to free a jammed blade before first
switching off the machine.
• If you are interrupted when operating the saw,
complete the process and switch off before looking up.
• Periodically check that all nuts, bolts and other fixings
are properly tightened.
• Do not store materials or equipment above a machine
in such a way that they could fall into it.
• Always hold the saw on parts that are insulated. If you
accidentally cut into hidden wiring or the saw’s own
cable, the metal parts of the saw will become ‘live’.
• Check the voltage on mains matches that of rating plate
before plugging in the tool.
• Do not secure the jigsaw upside down in a vice or work
bench and use it as a saw bench. This can lead to
serious injury.
• When using the jigsaw, use safety equipment including
safety goggles or shield, ear defenders, dust mask and
protective clothing including safety gloves.
Wear goggles
Wear ear defenders
Wear a breathing mask
Unpacking
Due to modern mass production techniques, it is unlikely
that your power tool is faulty or that a part is missing. If
you find anything wrong, do not operate the tool until
the parts have been replaced or the fault has been
rectified. Failure to do so could result in serious personal
injury.
6
Page 7
3
1
4
15
11
12
2
6
7
9
10
8
7
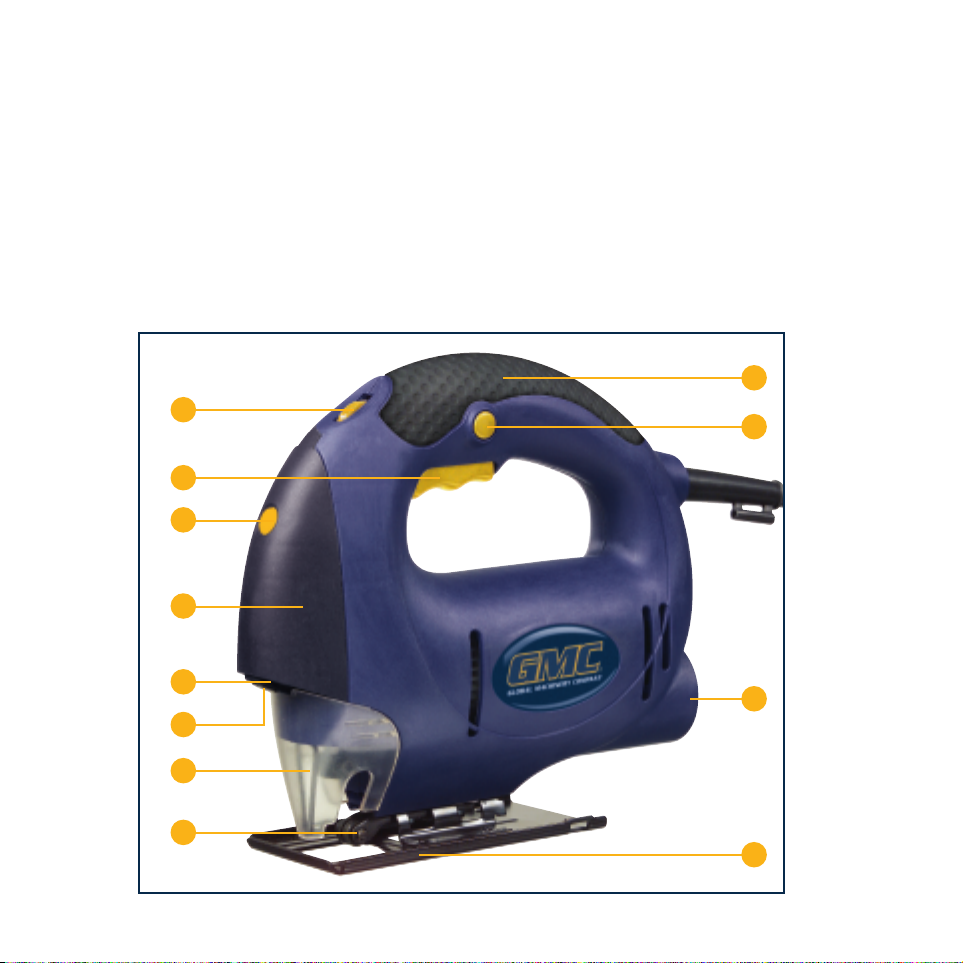
Know your product
Before using the jigsaw, familiarise yourself with all the
operating features and safety requirements.
Use the tool and accessories only for the applications
intended. All other applications are expressly ruled out.
1. Laser light assembly
2. Laser light on/off switch
3. Laser light battery cover
4. Laser aperture
5. Laser warning label
(not shown)
6. On/off switch
7. Lock on button
8. Soft grip handle
9. Dust extraction outlet
10. Shoe plate
11. Blade guard
12. Blade roller guide
13. Cutting angle scale
(not shown)
14. Straight guide
(not shown)
15. Variable speed dial
Page 8
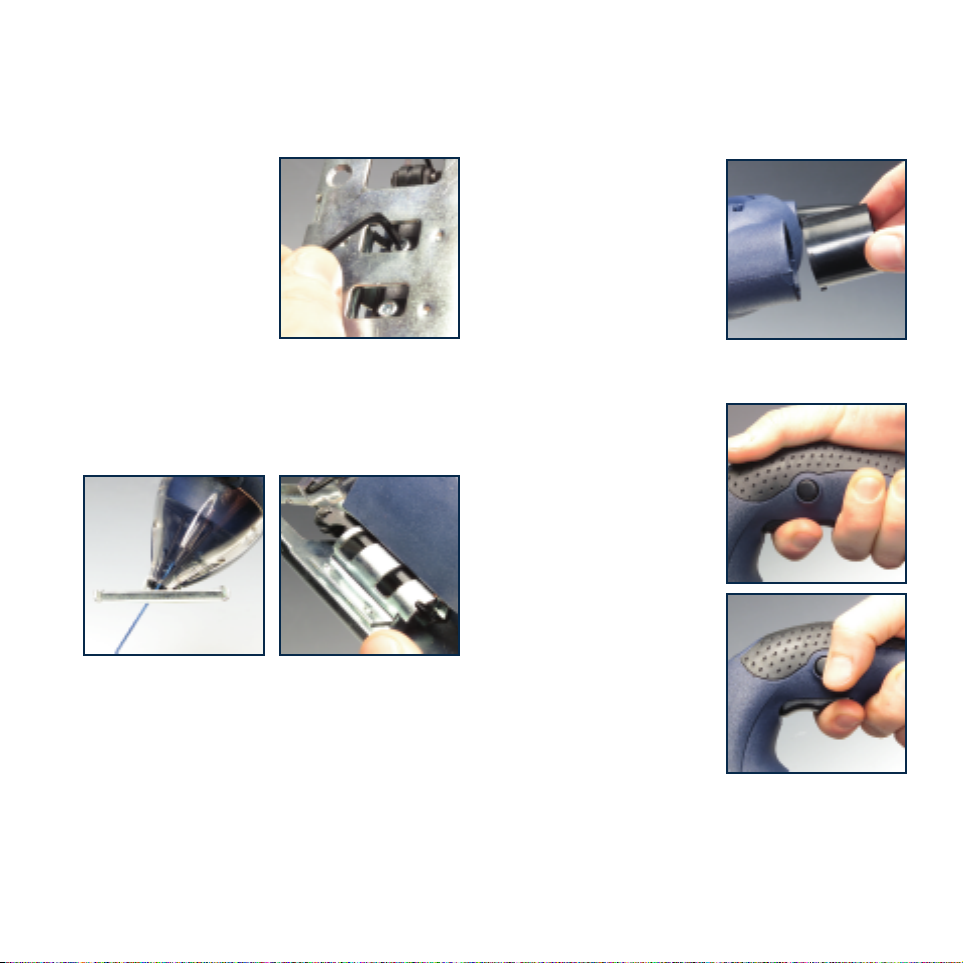
Adjusting the shoe for angular cutting
Caution. Always ensure that the jigsaw is switched off
and plug is removed from the power point before making
any adjustments.
1. Loosen the 2 hex screws
located on the underside
of the tool using the hex
key provided.
2. Move the shoe plate (10)
backwards and tilt it to
the required angle between
0 and 45° using the scale
marked on the base. For
accurate work it is
necessary to make a trial cut, measure the work and
reset the angle until the correct setting is achieved.
3. Slide the shoe plate (10) until the guide roller (12)
rests against the back edge of the blade.
4. Retighten the 2 hex screws.
Caution. The blade roller guide supports the blade when
cutting and must at all times rest against the back edge
of the blade. It should rotate freely.
Dust extraction
1. To improve dust extraction from the working area,
connect dust extraction equipment to the dust
extraction outlet (9) at the rear of the tool.
2. The vacuum adapter
supplied can be used to
connect an ordinary
household vacuum cleaner
to the tool.
3. The vacuum extraction
system works most
effectively when the safety
guard (11) is in the down
position.
Switching on and off
1. Connect the plug to the
power point.
2. Start the tool by squeezing
the on/off trigger switch
(6).
3. Release the trigger to stop
the tool.
4. If you press the lock on
button (7) while the trigger
switch is depressed, the
switch is kept in the
operating position.
5. To release the lock on
button, press and release
the trigger switch.
Caution. Allow the blade to
come to a complete standstill
before setting the jigsaw down.
Adjusting the cutting speed
The variable speed feature of this jigsaw enhances the
cutting performance and saves the blade from undue
wear.
8
Page 9
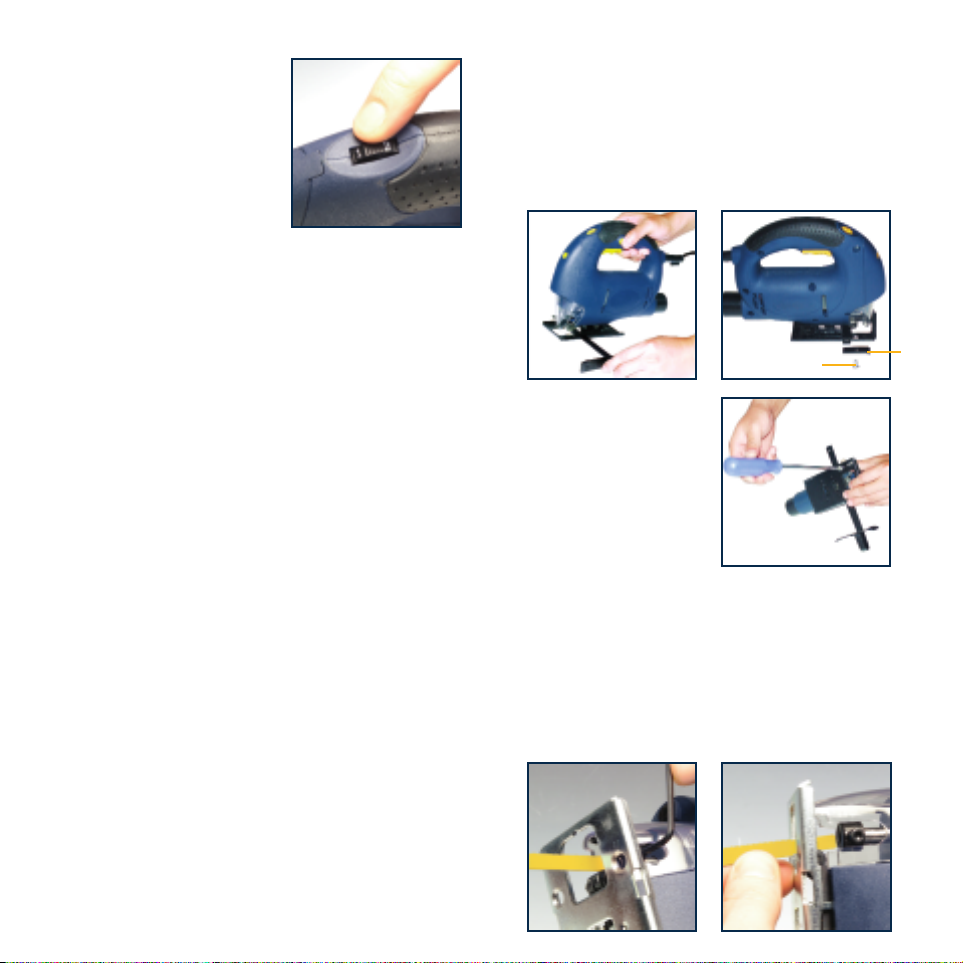
1. The electronic speed control
dial (15) is used to
programme the speed of the
blade.
2. The speed should be
adapted to the material
being cut.
3. Use your thumb to turn the
dial forward to increase the
speed and backward to decrease it.
4. Position “1” denotes the lowest speed. Position “6”
denotes the highest speed.
Making a cut
1. Switch on the jigsaw and allow the blade to reach
maximum speed.
2. Slowly guide the jigsaw forward using both hands,
keeping the shoe plate flat against the work piece.
3. Do not force the jigsaw.
Note. Use only enough pressure to keep the blade cutting.
Do not force the cutting, allow the blade and the saw to
do the work.
Pocket & round cutting
1. When starting a cut from the centre of a work piece,
drill a 12mm diameter hole to ensure that there is
clearance for the blade.
2. When cutting tight curves, reduce the speed of the saw.
Warning. Do not move the saw forward along its cut until
the blade has completely entered the material and the
shoe comes to rest on its surface.
Cutting metal
1. When cutting metals, a suitable cooling/cutting oil
must be used.
2. Squirt the lubricant onto the blade or work piece at
regular intervals during cutting in order to reduce wear
on the blade.
Fitting the straight guide
1. Push the guide (14) into the slot in the shoe plate
(10) to the approximate required position.
2. Place the short locking bar (a) on the guide and secure
it finger-tight with screw (b). The screw fits point first
through the hole in the shoe plate.
3. Position the guide precisely
where required and tighten
the screw.
Changing a blade
Warning. Always ensure that the saw is switched off and
plug is removed from the power point before making any
adjustments.
1. Insert the hex key through the guard at the front of
the tool and loosen the 2 hex screws.
2. Slide the blade into the locating groove with the teeth
pointing forward.
9
a
b
Page 10

3. Tighten the 2 hex screws.
4. Replace the plug and run the saw under no load to
check that it runs smoothly before using it to cut any
materials.
Using the LightSabre system
Warnings. Do not stare directly at the laser beam.
Never aim the beam at any person or an object other
than the work piece.
Do not deliberately aim the beam at personnel and ensure
that it is not directed towards the eye of a person for
longer than 0.25s.
Always ensure the laser beam is aimed at a sturdy work
piece without reflective surfaces i.e. wood or rough coated
surfaces are acceptable. Bright shiny reflective sheet steel
or the like is not suitable for laser use as the reflective
surface could direct the beam back at the operator.
Only turn laser beam on when tool is on work piece.
1. Mark the line of the cut on the work piece.
2. Adjust the angle of cut as required.
3. Plug in the machine and start the motor.
4. When the blade is at its maximum speed
(approximately 2 seconds), place the saw on the work
piece.
5. Switch on the laser beam using the switch (2).
6. Align the beam with the mark on the work piece and
slowly push the saw forward using both hands, keeping
the red light beam on the mark.
7. Switch off the laser beam on completion of the cut.
Changing the batteries
1. Hold the jigsaw with both hands and use your thumbs
to push the base of the laser light battery cover (3)
upwards. Steady it with your index fingers to prevent it
getting away from you.
2. Replace both AAA batteries, taking care to insert the
new batteries with the correct polarity
3. To replace the battery cover (3), locate the lugs on the
cover below those on the case and slide the cover
down until it snaps into position.
Caution. Remove the laser light batteries when the tool is
to be stored without use for a few days or more. If left in
position, the batteries might leak and damage the laser
light assembly. Damage due to leaking batteries is not
covered under warranty.
General inspection
Regularly check that all the fixing screws are tight. They
may vibrate loose over time.
Maintenance
1. Store the tool, instruction manual and accessories in a
secure place. In this way you will always have all the
information and parts ready to hand.
2. Keep the tool’s air vents unclogged and clean at all
times.
3. Remove dust and dirt regularly. Cleaning is best done
with compressed air or a rag.
4. Never use caustic agents to clean plastic parts.
5. Lubricate the guide roller from time to time with a
drop of oil. It will extend the life of the roller.
Caution. Do not use cleaning agents to clean the plastic
parts of the tool. A mild detergent on a damp cloth is
recommended. Water must never come into contact with
the tool.
10
Page 11

Carefully read the entire Instruction Manual
before using this product.
Before returning this product for a
Warranty Claim or any other reason
Please Call 1300 880 001 (Australia)
or 0800 445 721 (New Zealand)
When you make your call, please have
the following information at hand:
• GMC Product Type • GMC Product Code
A GMC Service Engineer will take your call and, in
most cases, will be able to solve your problem over
the phone.
You are welcome to use this phone-in service to
make suggestions or give comments about any
GMC product.
With continuing product development changes may
have occurred which render the product received
slightly different to that shown in this instruction
manual. The manufacturer reserves the right to
change specifications without notice. Note:
Specifications may differ from country to country.
The GMC 777 Helpline operates from 7am to
7pm, 7 days a week (EST). This allows you
to contact GMC directly with any queries and
technical questions you have regarding
our products.
45–55 South Centre Road
Melbourne Airport
Victoria, Australia 3045
Tel: (03) 8346 1100 Fax: (03) 8346 1200
Save this Manual for future reference.
 Loading...