

Page 1

Congratulations on your purchase of a GMC Envoy. Please read this information and your Owner
Manual to ensure an outstanding ownership experience. Note that your vehicle may not include
all the features described in this booklet. Place this booklet in your Owner Manual portfolio for
easy reference.
Instrument Panel . . . . . . . . . . . . . . . . . . . . . . . . .2
Instrument Panel Cluster . . . . . . . . . . . . . . . . . .3
Malfunction Indicator Lamp . . . . . . . . . . . . . . . .4
Heated Front Seats . . . . . . . . . . . . . . . . . . . . . . .4
Interior Lamps . . . . . . . . . . . . . . . . . . . . . . . . . . .4
Dual Manual Climate Control . . . . . . . . . . . . . . .5
Dual Automatic Climate Control . . . . . . . . . . . . .6
Rear Seat Climate Controls . . . . . . . . . . . . . . . .7
Content Theft-Deterrent System . . . . . . . . . . . . .8
Lockout Protection . . . . . . . . . . . . . . . . . . . . . . .8
Headlamp Controls . . . . . . . . . . . . . . . . . . . . . . .8
Heated, Power Outside Mirrors . . . . . . . . . . . . .9
Outside Mirrors with Curb View Assist . . . . . . .9
Memory Seats . . . . . . . . . . . . . . . . . . . . . . . . . .10
Electric Adjustable Pedals . . . . . . . . . . . . . . . .10
Entertainment Systems . . . . . . . . . . . . . . . . . .10
Rainsense Wipers . . . . . . . . . . . . . . . . . . . . . . .12
Headlamp Washers . . . . . . . . . . . . . . . . . . . . . .12
HomeLink®Universal Transmitter . . . . . . . . . .13
Travel Note Recorder . . . . . . . . . . . . . . . . . . . .14
Driver Information Center . . . . . . . . . . . . . . . . .14
Sun Visors . . . . . . . . . . . . . . . . . . . . . . . . . . . . .16
Electronically Controlled Air Suspension . . . .16
Air Inflator System . . . . . . . . . . . . . . . . . . . . . .16
Four-Wheel Drive . . . . . . . . . . . . . . . . . . . . . . .17
Traction Assist System . . . . . . . . . . . . . . . . . . .17
Luggage Carrier . . . . . . . . . . . . . . . . . . . . . . . .18
Roadside Assistance Program . . . . . . . . . . . . .20
My GMLink . . . . . . . . . . . . . . . . . . . . . . . . . . . .20
Page 2
2
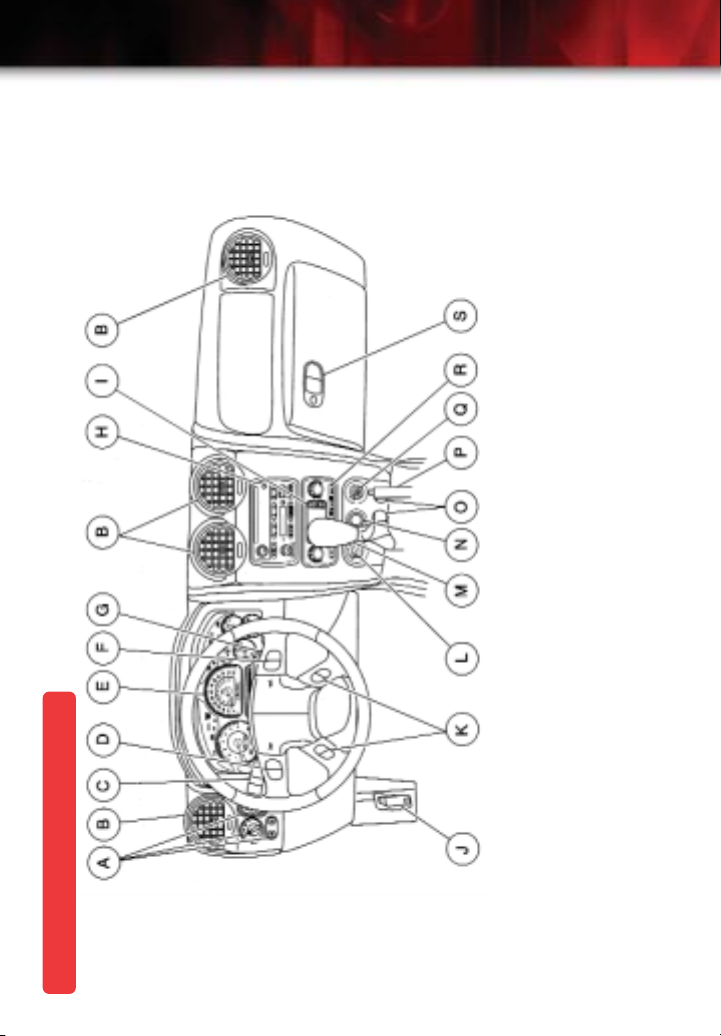
Getting to Know Your Envoy
M.Shift Lever
N. Lighter
O. Accessory Power Outlets
P. Parking Brake
Q. Rear Window Washer/Wiper
R. Rear Window Defogger
Instrument Panel
Steering Wheel Controls
G. Ignition Switch
H. Audio System
I. Climate Controls
J. Hood Release
K. Driver Information Center (DIC)
A. Exterior Lamp Controls
B. Air Outlets
C. Turn Signal/Multifunction Lever
D. Audio Steering Wheel Controls
E. Instrument Panel Cluster
F. Audio Steering Wheel Controls
See Section 3 of your Owner Manual.
L. Transfer Case Controls
Page 3

3
F
E
D
IMPORTANT: The instrument panel
cluster is designed to let you know
about many important aspects of
your vehicle’s operation. It is impor-
tant to read your Owner Manual and
become familiar with the information
being relayed to you by the lights,
gauges and indicators, and what
action can be taken to ensure safety
C
B
and to prevent damage.
A
Instrument Panel Cluster
Gauge
C. Oil Pressure Gauge
D. Fuel Gauge
E. Voltmeter
F. Engine Coolant Temperature
Your vehicle’s instrument panel is
equipped with this cluster or one very
similar to it. The instrument panel
cluster includes these key features:
A. Tachometer
B. Speedometer and Odometer
See Section 3 of your Owner Manual.
Page 4

4
Getting to Know Your Envoy
Malfunction Indicator Lamp
(Service Engine Soon Lamp)
This instrument panel lamp illuminates
under a variety of conditions when the
On-Board Diagnostics II (OBD II) system
detects a malfunction in the vehicle’s
emission controls.
If the Malfunction Indicator Lamp
is lit steadily, check the gas cap to
ensure it is present and securely
fastened
•Turn the cap clockwise until a “ratcheting” sound is heard, signaling that it
is secure.
• If this is the cause of the condition, a
few driving trips with the cap installed
properly should turn the light off.
See Section 3 of your Owner Manual.
Heated Front Seats (if equipped)
Select a heat setting for the seatback
only
• Press and release the button labeled
BACK ONLY until the switch indicates
the desired setting: three for High,
two for Medium, one for Low and
none for Off.
The engine must be running to operate
this feature.
See Section 1 of your Owner Manual.
Interior Lamps
Your vehicle is equipped with illuminated
entry and exit lighting as well as reading
lamps and dome lamps.
Activate illuminated entry feature
• Open a door or press the UNLOCK
button on your Remote Keyless Entry
System transmitter.
• With all doors closed, the dome
lamps stay illuminated briefly and turn
off automatically.
Select a heat setting for both the
seatback and seat cushion
• Press and release the button labeled
with the heated seat ( ) icon
located on the front door armrest
until the indicator lights designate
your setting: three for High, two for
Medium, one for Low and none
for Off.
A
Disable entry and exit lighting
• Push in the Dome Override button
located below the exterior lamps
switch (see “A” above). This will override the illuminated entry feature
unless the Remote Keyless Entry
System transmitter is used to unlock
Page 5

5
the vehicle. The Dome Override feature is useful when the vehicle doors
need to be open for a long period of
time.
Turn the reading lamps on or off
• Press the lens on the lamp above the
door.
Dual Manual Climate Control
(if equipped)
Select airflow source
•Turn the MODE knob on the right of
the heat and A/C control panel to the
desired setting:
() Instrument panel vents
() Instrument panel vents and
floor vents
( ) Floor vents
() Floor, windshield and side
window vents
() Windshield and side window
vents
Raise or lower fan speed
•Turn the fan control knob ( ).
Adjust the dual temperature controls
• Use the lever on the left-hand side of
the climate control panel to adjust the
temperature on the left side of the
vehicle.
• Use the right-hand lever to adjust the
temperature on the right side of the
vehicle and the temperature for the
second row.
Cool the vehicle interior more quickly
on very hot days
• Choose the coolest temperature
setting.
• Activate the RECIRCULATE ( )
and A/C ( ) buttons.
• Place the A/C mode knob in the
VENT mode.
• Open the windows just long enough
to let the hot air escape.
Turn on the rear window defogger
• Press the rear window defogger
( REAR) button.
• An indicator light on the button will
come on to let you know the rear
window defogger is active.
See Section 3 of your Owner Manual.
Page 6

6
Getting to Know Your Envoy
Dual Automatic Climate Control
(if equipped)
Manually select desired airflow
source
• Press and release the MODE button
until the desired source is indicated
on the display. Mode selections
include VENT, BI-LEVEL, FLOOR
and DEFOG/DEFROST.
Manually raise or lower fan speed
• Press the upper or lower portion of
the FAN control button.
Manually adjust the dual temperature
controls
• Use the knob on the left-hand side of
the climate control panel to adjust the
temperature on the driver side of the
vehicle. Use the right-hand knob to
adjust the temperature on the passenger side of the vehicle as well as
the second row.
•To match and link the passenger-side
temperature to the driver’s, press and
hold the AUTO button for three seconds.
Recirculate interior air and prevent
outside air from entering your vehicle
• Press the RECIRCULATE button.
This feature can be activated while in
the VENT or BI-LEVEL mode, but not in
DEFOG, DEFROST or FLOOR mode.
Clear the windshield and front side
windows of fog or frost more quickly
• Press the FRONT button.
Clear the rear glass of fog or frost
more quickly, and activate the heated
outside rearview mirrors (if equipped)
• Press the REAR button.
Adjust and Memorize the preferred
automatic settings for two drivers
• Press the button with the unlock
symbol on the remote keyless entry
transmitter, or press one of the
memory buttons on the driver’s door.
• Push the AUTO button and adjust
the temperature knob to the desired
temperature to set automatic air delivery mode, fan speed, A/C and recirculation functions for the driver.
• Press AUTO again within five
seconds and settings for the front
passenger are displayed and can
be adjusted.
• The new settings are automatically
memorized for the driver as identified
by the Remote Keyless Entry transmitter or by memory button.
See Section 3 of your Owner Manual.
Page 7

7
Rear Seat Climate Controls
(5-Passenger Vehicle System shown)
Turn the rear controls on and off
(5-passenger vehicle)
• Press the PWR ( ) button.
(Note: The rear controls do not
function when the front climate
control is in DEFROST mode.)
Turn the rear controls on
(7-passenger vehicle)
• Set the rear HVAC knob (located on
the front floor console) to R.
Change the direction of airflow
• Use the mode knob on SLE (or the
button on SLT models) to select
upper, bi-level or floor.
Set the temperature of air through the
rear outlets (5-passenger vehicle)
•Temperature of air from the rear
outlets is determined by the front
passenger temperature setting.
Set the temperature of air through
the rear outlets from the rear control
(7-passenger vehicle)
• Set the rear HVAC knob (located on
the front floor console) to R.
• Turn the center knob on the control
panel to choose a temperature (on
SLE models) or use the temperature
button with the arrows on SLT.
Adjust rear fan speed (7-passenger
vehicle)
• Use the Fan button with the arrows
(on SLT) or the fan control knob on
SLE models.
See Section 3 of your Owner Manual.
Page 8

8
Getting to Know Your Envoy
Content Theft-Deterrent System
Arm the Content-Theft Deterrent
System
• Lock the doors using the power door
lock switch or by pressing the LOCK
button on the Remote Keyless Entry
System transmitter.
• After closing all doors, the security
lamp on the instrument panel stops
flashing and remains lit. After a delay
of about 30 seconds, the lamp darkens and the system arms itself.
• When arming with the power door
lock switch, at least one door must be
open and the key must be removed
from the ignition. (Note: A door does
not have to be open to arm the system with the Remote Keyless Entry
System transmitter.)
• The system will not arm if the door is
locked with a key or the manual door
lock button is pressed.
• If the alarm is tripped, the horn
sounds and the headlamps/taillamps
flash for about two minutes. The
alarm sounds whenever a locked
door is opened without the key or
Remote Keyless Entry System transmitter, or someone attempts to turn
on the ignition without the correct key.
Turn off the alarm if set by accident
• Unlock a door with the key or press
UNLOCK on the Remote Keyless
Entry transmitter.
• Starting the engine with the correct
key will also turn off the alarm.
See Section 2 of your Owner Manual.
Lockout Protection
Prevent your ignition key from being
locked in your vehicle
• When the key is in the ignition and
a door is open, pressing any power
door lock switch unlocks the driver
door and locks all other doors.
See Section 2 of your Owner Manual.
Headlamp Controls
The exterior lamps knob is located on
the instrument panel, to the left of the
steering wheel.
Turn off the Daytime Running Lamps
(DRL) and automatic headlamp
system
• Move the knob to the OFF ( )
position.
The automatic headlamp system automatically reactivates at the next key-on.
Page 9

9
Activate the Daytime Running Lamps
(DRL) and automatic headlamp system
• Move the knob to the AUTO ( )
position.
• All exterior lamps and the instrument
panel/radio lights will illuminate when
they are needed.
Manually activate the parking lamps,
sidemarker lamps, taillamps, instrument panel/radio lights and license
plate lamps
• Move the knob to the parking lamp
() position.
Manually activate the headlamps, all
exterior tail/marker lamps and the
instrument panel/radio lights
• Move the knob to the ON ( )
position.
Activate the fog lamps
• Press the button (See “A” below)
located on the instrument panel to the
right of the exterior lamps switch
once.
A
• An indicator lamp will illuminate.
•To turn them off, press the button
again.
See Section 3 of your Owner Manual.
Heated, Power Outside Mirrors
(if equipped)
Activate heat feature on the power
outside mirrors
• Press the rear window defogger button on the climate control panel.
See Section 2 of your Owner Manual.
Outside Mirrors with Curb View
Assist (if equipped)
Save curb view assist position
memory settings
• Press the Personalization button,
located on your steering wheel, until
“Tilt Mirror in REVERSE (R)” appears
on the DIC display.
• Press the Select button once to
choose the passenger’s side mirror,
press it twice for the driver’s side
mirror and three times for both
mirrors.
• Press the Personalization button
repeatedly until the display is blank.
• Using your driver’s door-mounted
electric controls, adjust the mirrors
downward to allow you to see curbs
when backing up while the vehicle is
in REVERSE (R) and the brake pedal
is pressed.
• When the vehicle is shifted out of
REVERSE (R), the mirrors return to
their original positions, and the
REVERSE (R) positions are saved
for the current driver.
See Sections 2 and 3 of your Owner Manual.
Page 10

10
Getting to Know Your Envoy
Memory Seats (if equipped)
Save driver seat preference memory
setting
• Adjust the driver seat (including seatback recliner and lumbar) to a comfortable position.
• Press and hold either the driver 1 or
driver 2 memory button located on
the driver’s door. A double chime will
sound to confirm your settings.
To program settings for a second driver,
repeat the same procedure using the
other numbered memory button.
See Section 2 of your Owner Manual.
Electric Adjustable Pedals
• Press the switch located on the steering column toward you to move the
pedals closer to you.
• Press the switch away from you to
move the pedals away from you.
Note: The pedals cannot be positioned farther away from the driver
than they are in their standard position. This feature can be programmed
to work with the memory function
(if equipped) on your vehicle.
Adjustment of the powered pedals
requires that the vehicle be in Park.
See Section 2 of your Owner Manual.
Entertainment Systems
Set the time on radios without using
the Radio Data System (RDS)
• Press the H or HR (down) arrow until
the correct hour appears on the
display.
• Press and hold the M or MIN (up)
arrow until the correct minute appears
on the display.
The time may be set with the ignition on
or off.
Adjust the brake and accelerator
pedals to comfortable positions
Page 11

11
Set the time to an FM station’s Radio
Data System (RDS) setting
(if equipped)
• Press and hold both HR and MN for
two seconds until UPDATED and the
clock symbol appear on the display.
• Press and hold both HR and MN for
another two seconds to accept and
set the time.
• If the time is not available from the
station, NO UPDAT appears in the
display.
Program radio station presets
•Turn the radio on.
• Press AM-FM to select the band
(AM, FM1/FM2/XM1/XM2).
• Use the seek or tune knob to tune in
the desired station.
• Press AUTO TONE to select the
equalization that best suits the type
of station selected.
• Press and hold one of the six numbered buttons until a beep sounds;
release the button.
• Repeat these steps for each station
preset, using a different numbered
button for each station.
Activate the Radio Data System
(RDS) traffic announcement feature
(if equipped)
• Press TRAF. <TRAF> will appear on
the display if the tuned station broadcasts traffic announcements.
• If the tuned station does not broadcast traffic announcements, the radio
will seek a station that does.
• If no station is found, NO TRAF
appears on the display.
Display a station’s INFO message
when INFO appears on the display
• Press INFO to see the message.
Once the complete message has
been displayed, INFO disappears
from the display.
Tune to an RDS broadcast of a
selected program type
•Turn the P-TYPE knob to select the
Program Type you want to listen to.
• Press the SEEK or SEEK TYPE
button (as applies to your radio).
Access one of the two available XM
Satellite Radio bands (if equipped)
• Press the BAND button until XM1 or
XM2 appears on the display.
Load one CD into the Six-Disc CD
player (if equipped)
• With the ignition on, press and
release the LOAD side of the LOAD
CD button.
•Wait for the green indicator light at
the right side of the slot to turn green.
• Insert the disc partway into the slot,
label side up; the player will pull the
disc in.
Page 12

12
Getting to Know Your Envoy
Load multiple CDs
• With the ignition on, press and hold
the LOAD button for two seconds.
The unit beeps and the light to the
right of the slot begins to flash.
• When the light stops flashing and
turns green, insert a disc partway,
label side up.
• The indicator light will begin blinking
and turn steadily green. Load another
disc at this time.
• When loading more than one but
fewer than six CDs, press the LOAD
button again to signal that loading is
complete.
• When more than one disc is loaded,
a number for each disc is displayed.
•To play a specific CD, press the CD
AUX button and then the number of
the CD you want to hear.
•Asmall bar appears under the CD
number that is playing, and the track
number appears.
See Section 3 of your Owner Manual.
Activate the Rainsense feature
• Set the wipers to one of five moisture
sensitivity settings on the multifunction lever.
• The closer the setting is to the OFF
position, the less sensitive it will be to
moisture.
Note: Turn this feature off before entering an automatic car wash.
See Section 3 of your Owner Manual.
Headlamp Washers
(if equipped)
Rainsense Wipers (if equipped)
Rainsense Wipers automatically control
the frequency of the wipers from OFF to
HIGH speed according to the amount of
moisture on the windshield.
A
Spray the headlamps with washer
fluid
• Press the headlamp washer button
(see “A” above) located on the
instrument panel to the left of the
steering wheel.
See Section 3 of your Owner Manual.
Page 13

13
HomeLink®Universal
Transmitter (if equipped)
The controls for this feature are located
on your overhead console.
Program the transmitter
•Turn the ignition OFF.
• Press and hold down the two outside
buttons until the indicator light flashes, then release the buttons (about
20 seconds — do not hold for more
than 30 seconds); do not repeat this
step for the second or third devices
that you plan to add to the
HomeLink
®
system.
• Hold the end of your hand-held transmitter up to three inches away from
the surface of the universal transmitter and hold its button and the button
you wish to assign it to on the
HomeLink®system.
• Continue holding both buttons (up to
90 seconds may pass as the universal transmitter is being programmed);
the indicator light will begin blinking
slowly, then more quickly. Programming is complete when the light on
the HomeLink®transmitter flashes
rapidly.
• Release both buttons.
• Press and release the HomeLink
®
button again. If the indicator light
stays lit constantly, programming is
complete.
• Continue programming additional
devices using the transmitters, but do
not press the two outside buttons on
the HomeLink®transmitter again.
If the HomeLink®indicator light blinks
rapidly for two seconds and remains on,
it indicates that your device (usually a
garage door opener) has a “rolling
code.” Continue with the following steps:
• Press the training button (sometimes
marked “LEARN” or “SMART”) on the
garage door opener motor head unit,
making sure that the indicator light
flashes to confirm training mode.
• Within 30 seconds, press and hold
the HomeLink®transmitter button programmed in the previous steps for
two seconds.
• Press and release this button three
times, holding it for two-second intervals to ensure that the HomeLink
®
transmitter has been trained.
See Section 2 of your Owner Manual.
Page 14

14
Getting to Know Your Envoy
Travel Note Recorder
(if equipped)
The Travel Note Recorder includes three
buttons located in the overhead console.
Record a message
• Press the button marked with a circle
and begin speaking.
• Press the button again to stop recording, or press and hold the button
while recording and release it to stop
recording.
Play a message
• Press the button with a right arrow
designation. If multiple messages are
stored, the system plays one message and stops.
• Press the button again until reaching
the desired message.
Play all messages
• Press and hold the button with the
right arrow for more than one second.
Delete a message
• Press the button with the square
while the message is playing.
Delete all messages
• Press and hold the right arrow button
and the circle button simultaneously
for a half-second.
See Section 2 of your Owner Manual.
Driver Information Center
(if equipped)
Your vehicle’s Driver Information Center
(DIC) is located in the instrument panel
cluster.
Access DIC modes
• Press one of the following DIC buttons located on the steering wheel.
–Trip Information ( )
– Fuel Information ( )
– Personalization ( )
– Select settings ( )
Trip Information Button
• Press to scroll through the odometer,
TRIP A, TRIP B, and TIMER. When
either TRIP A or TRIP B is displayed,
you can press the SELECT button to
reset the displayed odometer.
•You can also reset a trip odometer
to zero by pressing and holding the
reset stem for four seconds. When
TIMER is displayed, you can press
the Select button to start or stop the
timer. To reset it to zero, push and
hold the select button while TIMER is
displayed.
Page 15

15
Note: If your vehicle is not equipped
with DIC steering wheel buttons, press
the trip odometer reset stem located in
the instrument panel cluster to select
the information. Hold the stem for four
seconds to reset trip odometers.
Fuel Information Button
• Press to scroll through the range,
average fuel economy, instant fuel
economy and the GM Oil Life
SystemTM.
• RANGE estimates the remaining distance you can drive without refueling.
Range is based on recent fuel economy and the fuel remaining in the tank.
•AVG. ECON calculates how many
miles per gallon you are getting
based on overall driving conditions.
Press and hold the Select button
while AVG. ECON is displayed and
the DIC will begin calculating the
average fuel economy from that point
in time.
• INST. ECON calculates how many
miles per gallon you are getting at a
particular moment.
• ENGINE OIL LIFE calculates an estimate (percentage) of the engine oil’s
remaining useful life. It also will alert
you when it is time to change your oil
by illuminating the CHANGE ENG
OIL light on your instrument panel.
Please remember to always reset the
oil life system after an oil change. To
reset the Engine Oil Life monitor,
press and hold the Select button for
four seconds while ENGINE OIL LIFE
is displayed. When successful, the
DIC will display ENGINE OIL LIFE:
100%.
Personalization Button
• Press the Personalization button
once and the current driver will be
displayed. Any changes made will
affect only the displayed driver.
Press this button again to scroll
through and set the personalization
features.
Select Button
• Press to scroll through the menu
choices for each personalization
feature. Finalize your choice by
pressing the button while it is
displayed on the DIC and move on
to the next feature.
• The personalization features can be
reset to their default mode by holding
the Trip Information button and the
Personalization button down for four
seconds.
Language Options
• If you find that the unit displays a language other than the one you prefer
and you are unable to change it, hold
the Trip and Personalization buttons
down until the display begins cycling
through the three available languages. Release the buttons when
you see the preferred language.
Note that this will reset this driver’s
personalization settings to the factory
default setting.
Displaying Driver Preferences
• The driver preferences are recalled
by pressing any button on the
Remote Keyless Entry System
transmitter or by pressing the
appropriate memory button (1 or 2)
located on the driver’s door. The last
value displayed for each preference
is saved automatically.
See Section 3 of your Owner Manual.
Page 16

16
Getting to Know Your Envoy
Sun Visors
Block glare
•To help block the sun’s glare, rotate
the sun visor down.
• Block the driver or passenger frontside window glare by turning the sun
visor to the side window.
• The sun visor can also slide along the
attachment bar for additional window
coverage.
See Section 2 of your Owner Manual.
Electronically Controlled Air
Suspension (if equipped)
Occasional “whirring” and/or “hissing” sound under the rear of the vehicle under heavier rear loads.
• This sound indicates that the system’s air compressor is operating to
provide a level ride height, and is
normal.
See Section 4 of your Owner Manual.
Air Inflator System (if equipped)
Locate the air
inflator unit and kit
• The inflator unit
is in the rear
compartment on
the passenger
side of the vehicle, behind an
access cover.
• An inflator kit,
with a 22-foot hose and three nozzle
adapters, is located in the glove box.
Use the air inflator
• Open the access cover.
• Attach the appropriate nozzle adapter
to the end of the hose (if required).
• Attach that end of the hose to the
object you are inflating. Attach the
other end of the hose to the inflator
outlet.
• Press and release the on/off switch to
turn the air inflator on. An indicator
light verifies that the inflator is
running.
• When inflation is complete, press and
release the on/off switch again.
• Remove the hose from the outlet
(load leveling will not operate when
the hose is attached to the outlet).
See Section 5 of your Owner Manual.
Page 17

17
Four-Wheel Drive (if equipped)
Envoy’s four-wheel drive system rotary
controls are located on the instrument
panel.
Shift into 4HI or A4WD
•Turn the knob to 4HI or A4WD. This
can be done at any speed except
when shifting from 4LO.
Shift into 2HI
•Turn the knob to 2HI. This can be
done at any speed except when shifting from 4LO.
Shift into or out of 4LO
• With the ignition in RUN and the vehicle stopped or moving less than 3
mph (4.8 km/h), shift the transmission
into neutral.
•Turn the knob to the 4LO or the 2HI,
4HI or A4WD, preferably with the
vehicle moving 1 to 2 mph (1.6 to 3.2
km/h).
•Wait for the indicator lamp to stop
flashing and remain illuminated, then
shift your transmission into gear.
Shift into NEUTRAL (N)
Place the transfer case in neutral only
when towing your vehicle. See
Section 4 of your Owner Manual for
towing information.
See Sections 2, 4 and 5 of your Owner Manual.
Traction Assist System
(if equipped)
The Traction Assist System (TAS) limits
wheelspin and only operates if it senses
that one or both rear wheels begin to
lose traction. When this happens,
engine power is reduced to limit wheelspin. You may hear or feel the system
working.
The system is automatically enabled
whenever the engine is started.
Turn the system OFF or ON
• Press the TAS on/off button located
near the shift lever.
• With the system off, the TRAC
ON/OFF button indicator light comes
on until TAS is turned back on or the
vehicle is turned off and restarted.
See Section 4 of your Owner Manual.
Page 18

18
Getting to Know Your Envoy
Luggage Carrier (if equipped)
Slide the crossrails to desired
position
• Pull up the lever on each side of the
crossrail. This will release the crossrail and allow you to slide it.
• When the crossrail is where you want
it, press down on the levers to lock it
in place.
Reduce wind noise when the roof
luggage carrier is not in use
• Position the rear crossrail at the
rearmost position and the front
crossrail above the rearmost portion
of the rear door opening (above the
“C”-pillar).
See Section 2 of your Owner Manual.
Page 19

Notes
19
Page 20

20
Getting to Know Your Envoy
Roadside Assistance Program
1-800-GMC-8782 (1-800-462-8782)
TTY: 1-888-889-2438
As the proud owner of a new GMC
vehicle, you are automatically enrolled
in the GMC Roadside Assistance
Program.
The toll-free number is staffed by a team
of technically trained advisors, who are
available 24 hours a day, 365 days a
year.
The Roadside Assistance Program
provides stranded owners with over-thephone roadside repairs, location of the
nearest GMC dealer or the following
special services:
• Flat Tire Change
• Fuel Delivery
• Lockout Service
• Emergency Towing Service
• Jump Start
For prompt and efficient assistance
when calling, please provide the following information to the advisor:
• Location of the vehicle
•Telephone number or your location
•Vehicle model, year and color
•Vehicle mileage
•Vehicle Identification Number (VIN)
•Vehicle license plate number
GMC reserves the right to limit services
or reimbursement to an owner or driver
when, in GMC’s judgment, the claims
become excessive in frequency or type
of occurrence.
My GMLink
The GMC Owner Center at My GMLink
is a complimentary service for GMC
Owners, a one-stop resource to
enhance your GMC ownership experience. Exclusive member benefits
include online service reminders, vehicle
maintenance tips, online owner manual,
special privileges and more. Sign up
today at www.mygmlink.com
Certain restrictions, precautions and safety procedures apply to your vehicle. Please read your Owner
Manual for complete instructions. All information contained herein is based on information available at
the time of printing and is subject to change without notice. Copyright 2003 by GM Corp.
All rights reserved.
04ENVYQRG
 Loading...