

Page 1

Black plate (1,1)
GMC Canyon Owner Manual - 2012
2012 GMC Canyon Owner Manual M
In Brief . . . . . . . . . .. . . . . . . . . . .. . . 1-1
Instrument Panel . . . . . . . . . . . . . . 1-2
Initial Drive Information . . . . . . . .1-3
Vehicle Features. . . . . . . . . . . . .1-14
Performance and
Maintenance . . . . . . . . . . . . . . . . 1-17
Keys, Doors, and
Windows . . . . . . . . . . . . . . . . . . . . 2-1
Keys and Locks . . . . . . . . . . . . . . .2-2
Doors . . . . . . . . . . . . . .. . . . . . . . . . . . 2-7
Vehicle Security. . . . . . . . . ..... . .2-9
Exterior Mirrors . . . . . . . . . . . . . . . 2-12
Interior Mirrors . . . . . . . . . . . . ... .2-13
Windows . . . . . . . . . . . . . . . . . . . . . 2-14
Seats and Restraints . . . . . . . . . 3-1
Head Restraints . . . . . . . . . . . . . . . 3-2
Front Seats . . . . . . . .. . . . . . . . .. . . 3-3
Rear Seats . . . . . . . . . . . . . . . . . . . . 3-8
Safety Belts . . . . . . . . . . . . . . . . . .3-10
Airbag System . . . . . . . . . . . . . . ..3-19
Child Restraints . . . . . . . . . . . . . . 3-33
Storage . . . . . . . . . . . . . .. . . . . . . . . 4-1
Storage Compartments . . . . . . . . 4-1
Instruments and Controls . . . . 5-1
Controls . . . . . . . . . . . . . . . . . . . . . . . 5-2
Warning Lights, Gauges, and
Indicators . . . . . . . . . . . . . . . . . . . . 5-6
Information Displays . . . . . . . .. . 5-19
Vehicle Messages.. . . . . . . . . . . 5-22
Lighting . . . . . . . . . . . .. . . . . . . . . . . 6-1
Exterior Lighting . . . . . . . . . . . . . . . 6-1
Interior Lighting . . . . . . .. . . . . . .. . 6-6
Lighting Features . . . . . . . . . . . . . . 6-7
Infotainment System . . . . . . . . . 7-1
Introduction . . . . . . . . . .. . . . . . . . . . 7-1
Radio . . . . . . . . . . ... . . . . . . . . . . . ..7-6
Audio Players . . . . . . . . . . . . . . . . 7-13
Phone . . . . . . . . . .. . . . . . . . . .. . . . 7-19
Climate Controls . . . . . . . . . . . . . 8-1
Climate Control Systems . . . . . . 8-1
Air Vents.. . . . . . . . . . . . . . . . . . . . . . 8-3
Driving and Operating . . . . . . . . 9-1
Driving Information . . . . . . . . . . . . . 9-2
Starting and Operating . . . . . . . 9-22
Engine Exhaust . . . . . . . . . . . . . . 9-30
Automatic Transmission . . . . . .9-31
Manual Transmission . . . . . . . . . 9-34
Drive Systems . . . . . . . . . . .. . . . . 9-35
Brakes . . . . . . . . . . . . . . . . . . . . . . . 9-40
Ride Control Systems . . . . . . . .9-43
Cruise Control . . . . . . . .. . . . . . . . 9-46
Fuel . . . . . . . . . . . . . . . . . . . . . . . . . . 9-48
Towing . . . . . . . . . . . . . . . . . . . . . . . 9-53
Conversions and Add-Ons . . . 9-64
Vehicle Care . . . . . .. . . . . . . . .. . 10-1
General Information . . . . . . . . . .10-2
Vehicle Checks.. . . . . . . . . . . . . . 10-4
Headlamp Aiming . . . . . . . . . . . 10-34
Bulb Replacement . . . . . . . . . . 10-35
Electrical System . . . . . . . . . . . . 10-38
Wheels and Tires . . . . . . . . . . . 10-45
Jump Starting . . . . . . . . . . . . . . . 10-81
Towing . . . . . . . .. . . . . . . . . . . . . . 10-85
Appearance Care . . . . . . . . . . .10-91
Page 2

Black plate (2,1)
GMC Canyon Owner Manual - 2012
2012 GMC Canyon Owner Manual M
Service and Maintenance . . . 11-1
General Information . . . . . . . . . . 11-1
Maintenance Schedule . . . . . . .11-3
Special Application
Services . . . . . . . . . . . . . . . . . . . . 11-8
Additional Maintenance
and Care . . . . . . . . .. . . . . . . . . . . 11-8
Recommended Fluids,
Lubricants, and Parts . . . . . . 11-11
Maintenance Records . . . . . . . 11-15
Technical Data . . . . . . ......... 12-1
Vehicle Identification.. . . . . . . . 12-1
Vehicle Data. . . . . . . . . . . . . . . . . . 12-2
Customer Information . . . . . . . 13-1
Customer Information . . . . . . . . 13-1
Reporting Safety Defects . . . . 13-17
Vehicle Data Recording and
Privacy . . .. . . . . . . . . . . . . . . . . 13-19
Index . . . . . . . . . . . . . . . . . . . . . i-1
Page 3
Black plate (3,1)
GMC Canyon Owner Manual - 2012
Introduction iii
The names, logos, emblems,
slogans, vehicle model names, and
vehicle body designs appearing in
this manual including, but not limited
to, GM, the GM logo, GMC, the
GMC Truck Emblem, and CANYON
are trademarks and/or service
marks of General Motors LLC, its
subsidiaries, affiliates, or licensors.
Litho in U.S.A.
Part No. 20901232 A First Printing
This manual describes features that
may or may not be on your specific
vehicle either because they are
options that you did not purchase or
due to changes subsequent to the
printing of this owner manual.
Please refer to the purchase
documentation relating to your
specific vehicle to confirm each of
the features found on your vehicle.
For vehicles first sold in Canada,
substitute the name “General
Motors of Canada Limited” for GMC
wherever it appears in this manual.
Keep this manual in the vehicle for
quick reference.
©
2011 General Motors LLC. All Rights Reserved.
Canadian Vehicle Owners
Propriétaires Canadiens
A French language copy of this
manual can be obtained from your
dealer or from:
On peut obtenir un exemplaire de
ce guide en français auprès du
concessionnaire ou à l'adresse
suivante:
Helm, Incorporated
P.O. Box 07130
Detroit, MI 48207
1-800-551-4123
Numéro de poste 6438 de langue
française
www.helminc.com
Page 4
Black plate (4,1)
GMC Canyon Owner Manual - 2012
iv Introduction
Using this Manual
To quickly locate information about
the vehicle, use the Index in the
back of the manual. It is an
alphabetical list of what is in the
manual and the page number
where it can be found.
Danger, Warnings, and Cautions
Warning messages found on vehicle
labels and in this manual describe
hazards and what to do to avoid or
reduce them.
Danger indicates a hazard with a
high level of risk which will result in
serious injury or death.
Warning or Caution indicates a
hazard that could result in injury or
death.
WARNING
{
These mean there is something
that could hurt you or other
people.
Notice: This means there is
something that could result in
property or vehicle damage. This
would not be covered by the
vehicle's warranty.
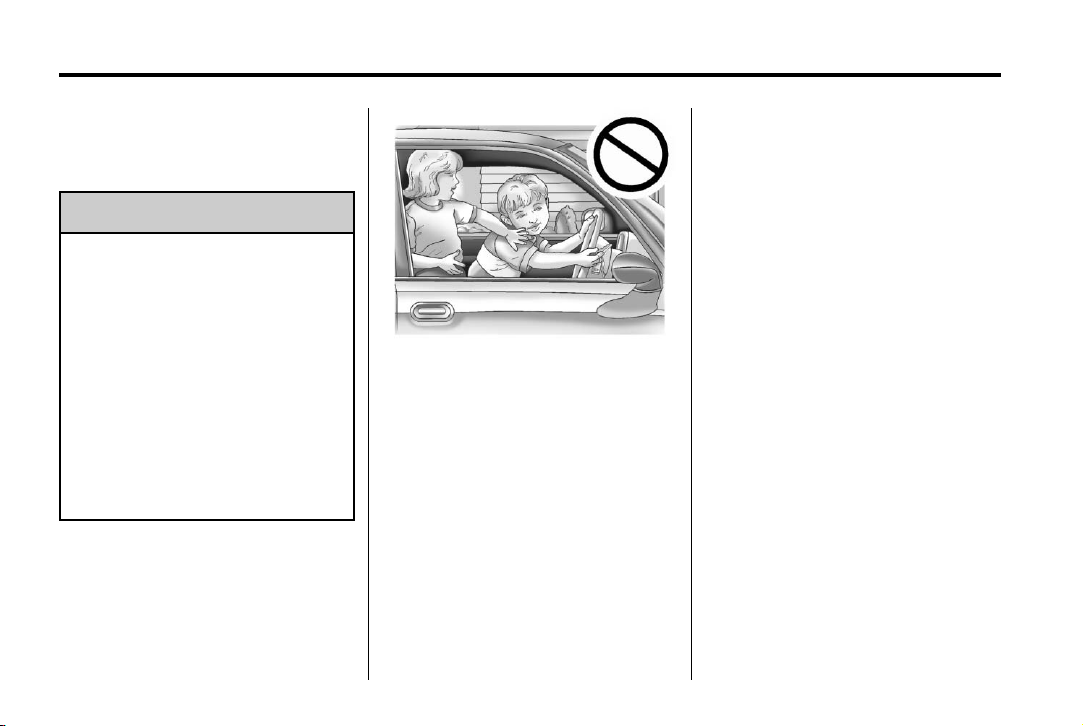
A circle with a slash through it is a
safety symbol which means “Do
Not,” “Do not do this,” or “Do not let
this happen.”
Symbols
The vehicle has components and
labels that use symbols instead of
text. Symbols are shown along with
the text describing the operation or
information relating to a specific
component, control, message,
gauge, or indicator.
M : This symbol is shown when
you need to see your owner manual
for additional instructions or
information.
* : This symbol is shown when
you need to see a service manual
for additional instructions or
information.
Page 5

Black plate (5,1)
GMC Canyon Owner Manual - 2012
Introduction v
Vehicle Symbol Chart
Here are some additional symbols
that may be found on the vehicle
and what they mean. For more
information on the symbol, refer to
the Index.
9 : Airbag Readiness Light
# : Air Conditioning
! : Antilock Brake System (ABS)
J : OnStar
®
Hands-Free Phone
J : Brake System Warning
Light
" : Charging System
I : Cruise Control
B : Engine Coolant Temperature
O : Exterior Lamps
# : Fog Lamps
. : Fuel Gauge
+ : Fuses
3 : Headlamp High/Low-Beam
Changer
j : LATCH System Child
Restraints
* : Malfunction Indicator Lamp
: : Oil Pressure
} : Power
> : Safety Belt Reminders
7 : Tire Pressure Monitor
d : Traction Control/Stabilitrak
M : Windshield Washer Fluid
®
Page 6

Black plate (6,1)
GMC Canyon Owner Manual - 2012
vi Introduction
2 NOTES
Page 7

Black plate (1,1)
GMC Canyon Owner Manual - 2012
In Brief 1-1
In Brief
Instrument Panel
Instrument Panel . . . . . . .. . . . . . . 1-2
Initial Drive Information
Initial Drive Information . . . . . . . . 1-3
Remote Keyless Entry (RKE)
System . . . . . . .. . . . . . . . . . . . . . . 1-3
Door Locks . . . . . . . . . . . . . . . . . . . 1-4
Tailgate . . . . . . . . . . . . . . . . . . . . .. . 1-5
Windows . . . . . . . . . . . . . . . . . . . . .. 1-5
Seat Adjustment . . . . . . . . . . . . . . 1-6
Heated Seats . . . . . . . . . . . . . . . . . 1-7
Head Restraint Adjustment . . . . 1-8
Safety Belts . . . . . . .. . . . . . . . . . . . 1-8
Passenger Sensing System . . . 1-8
Mirror Adjustment . . . . . . . . . . . . . 1-9
Steering Wheel
Adjustment . . . . . . . . . . . . . . . . . 1-10
Interior Lighting . . . . . . . . . . . . . . 1-10
Exterior Lighting . . . . . . . . . . . . . 1-11
Windshield Wiper/Washer .... 1-12
Climate Controls . . . . . .. . . . . . . 1-13
Four-Wheel Drive . . . . . . . . . . . . 1-13
Vehicle Features
Radio(s) . . . . . .. . . . . . . . . . . . . . . 1-14
Satellite Radio . . . . . . . . . . . . . . . 1-15
Cruise Control . . . . . . . . . . . . . . . 1-16
Driver Information
Center (DIC) . . . . . . . . . . . . . . . 1-16
Power Outlets . . . . . . . . . . . . . . . 1-16
Performance and Maintenance
Traction Control
System (TCS) . . . . . . . . . . . . . . 1-17
StabiliTrak
Tire Pressure Monitor . . . . . . . . 1-17
Engine Oil Life System . . . . . . 1-18
Driving for Better Fuel
Economy .... . . . . . . . . . . . . . . . 1-18
Roadside Assistance
Program . . . . . . . . . . .... . . . . . . 1-18
OnStar
®
System . . . . . . . . . 1-17
®
. . . . . . . . . . . . . . . . . . . . . 1-19
Page 8
Black plate (2,1)
GMC Canyon Owner Manual - 2012
1-2 In Brief
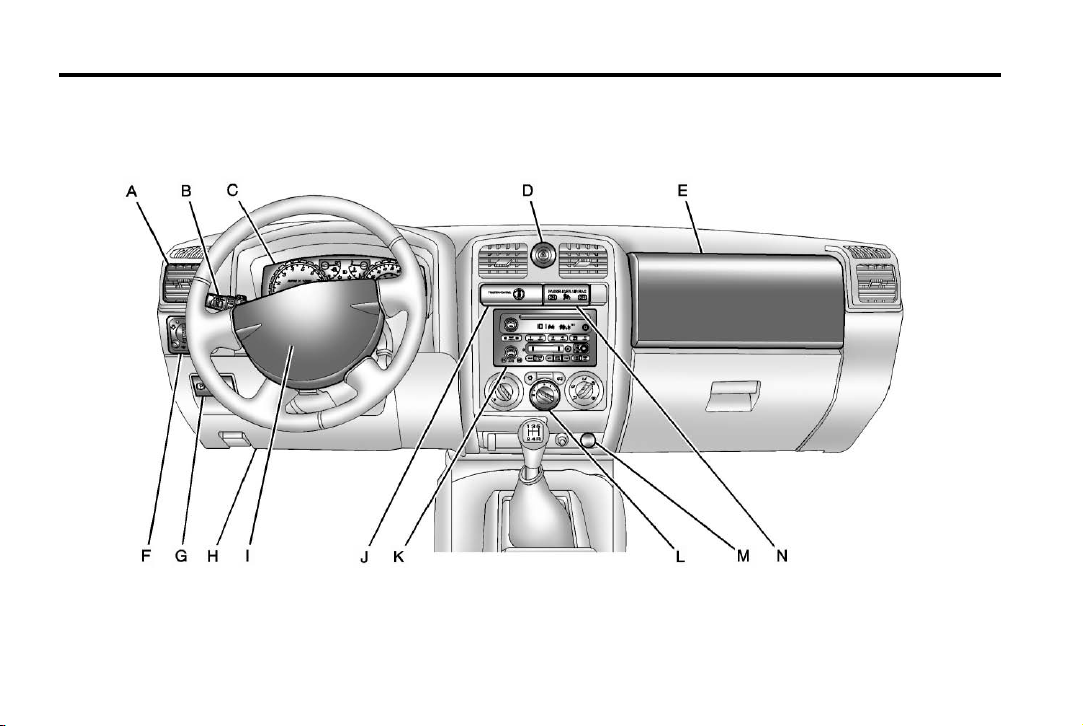
Instrument Panel
Manual Transmission shown, Automatic Transmission similar
Page 9

Black plate (3,1)
GMC Canyon Owner Manual - 2012
In Brief 1-3
A. Air Vents on page 8‑3.
B. Turn and Lane‐Change Lever.
See Turn and Lane-Change
Signals on page 6‑4.
Windshield Wiper/Washer on
page 5‑2.
C. Instrument Cluster on page 5‑7.
D. Hazard Warning Flashers on
page 6‑4.
E. Passenger Side Airbag. See
Airbag System on page 3‑19.
F. Exterior Lamp Controls on
page 6‑1.
Fog Lamps on page 6‑5
(If Equipped).
Exterior Cargo Lamps on
page 6‑5.
G. Parking Brake on page 9‑41.
H. Data Link Connector (DLC)
(Out of View). See Malfunction
Indicator Lamp on page 5‑12.
I. Horn on page 5‑2.
J. StabiliTrak
page 9‑44.
Four-Wheel Drive on
page 10‑30.
K. Infotainment on page 7‑1.
L. Climate Control Systems on
page 8‑1.
M. Power Outlets on page 5‑5.
N. Passenger Airbag Status
Indicator on page 5‑11.
®
System on
Initial Drive Information
This section provides a brief
overview about some of the
important features that may or may
not be on your specific vehicle.
For more detailed information, refer
to each of the features which can be
found later in this owner manual.
Remote Keyless Entry (RKE) System
The RKE transmitter is used to lock
and unlock the doors from up to 9 m
(30 ft) away from the vehicle.
Page 10
Black plate (4,1)
GMC Canyon Owner Manual - 2012
1-4 In Brief
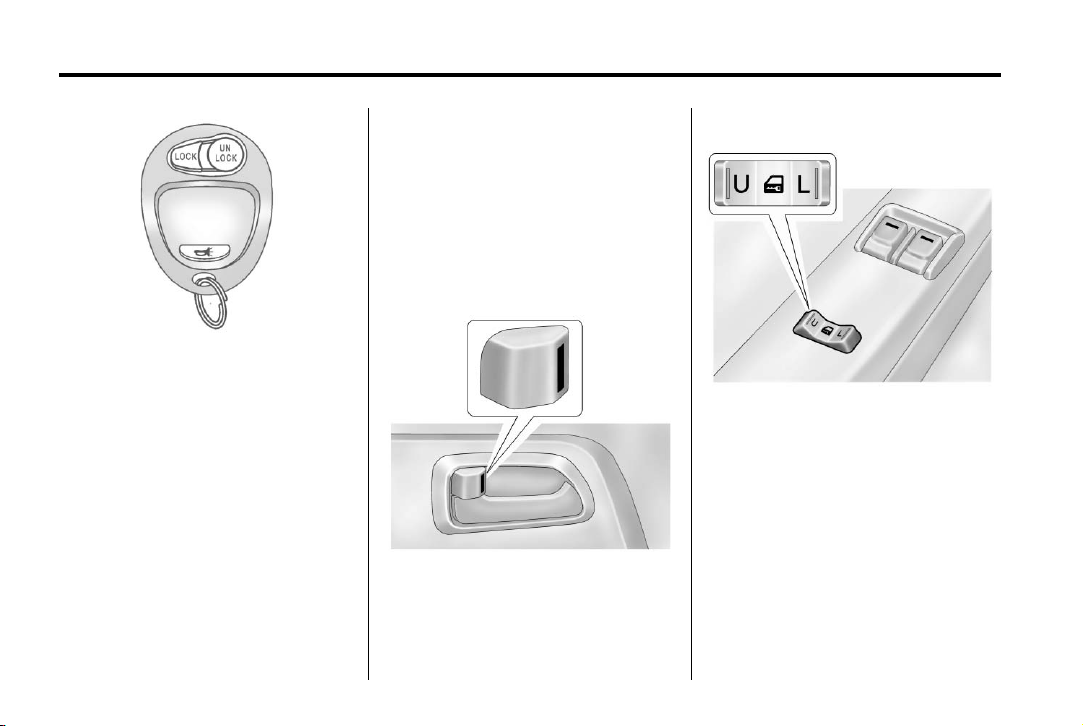
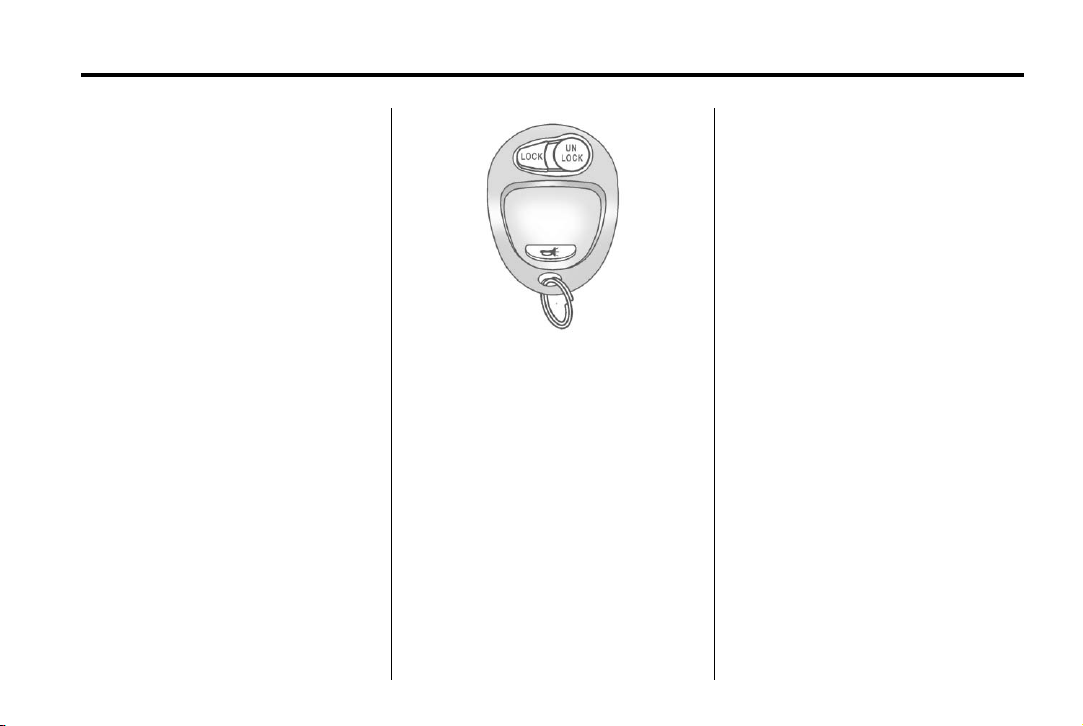
Press UNLOCK to unlock the doors
and press LOCK to lock them.
L to sound the horn and
Press
to flash the exterior lamps for
30 seconds.
Lock and unlock feedback can be
personalized. See Driver
Information Center (DIC) on
page 5‑19.
See Keys on page 2‑2 and Remote
Keyless Entry (RKE) System
Operation on page 2‑3.
Door Locks
Manual Door Locks
Lock or unlock the doors from the
outside with the key in the driver or
front passenger door or press the
LOCK or UNLOCK button on the
Remote Keyless Entry
(RKE) transmitter.
From inside the vehicle, move the
lever on the door forward or
rearward to lock or unlock the door.
Seeing the red line on the lever
indicates the door is unlock.
Power Door Locks
Vehicles with power door locks, the
switches are located on the front
door armrests.
Press L to lock the doors.
Press U to unlock the doors.
For more information see:
.
Door Locks on page 2‑4.
.
Power Door Locks on page 2‑5.
Page 11
Black plate (5,1)
GMC Canyon Owner Manual - 2012
In Brief 1-5
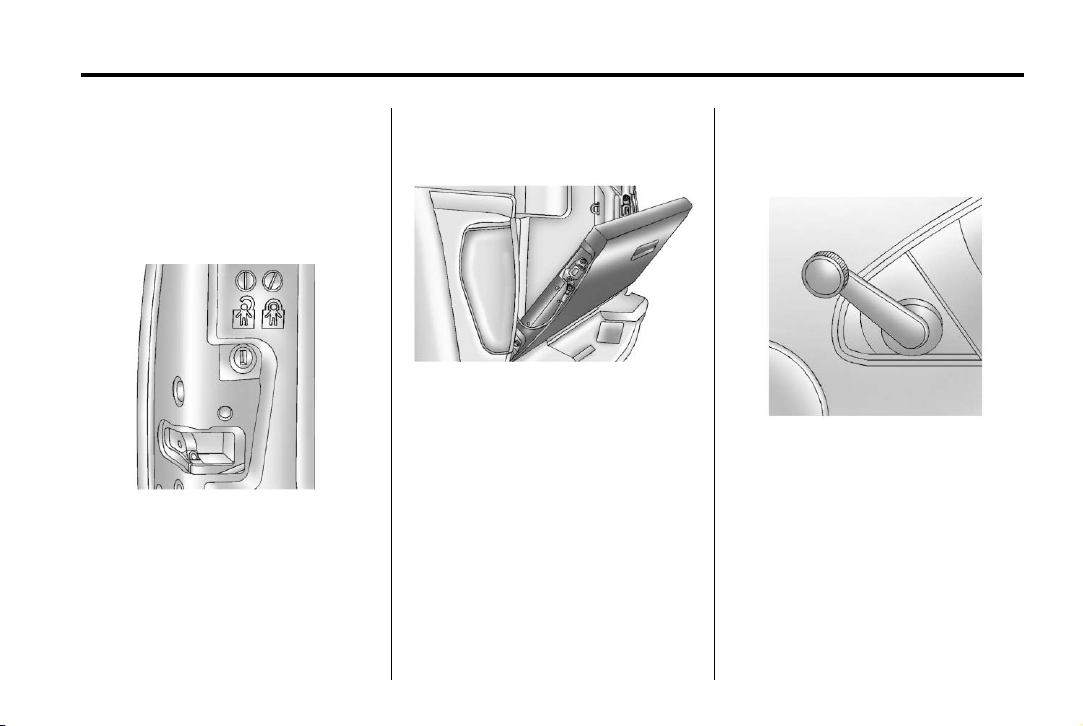
Safety Locks (Crew Cab)
If the vehicle is a crew cab model, it
may have rear door safety locks on
the rear doors. With this feature,
the rear doors are locked so they
cannot be opened from the inside.
The rear door safety locks are
located on the inside edge of each
rear door below the safety lock
label.
For more information, see Safety
Locks (Crew Cab) on page 2‑6.
Tailgate
Open the tailgate by pulling up on
the outside handle while pulling the
tailgate down.
On vehicles with a locking tailgate,
use the ignition key to unlock it.
For more information see Tailgate
on page 2‑7.
Windows
Manual Windows
Use the window crank to open and
close each window.
Page 12
Black plate (6,1)
GMC Canyon Owner Manual - 2012
1-6 In Brief
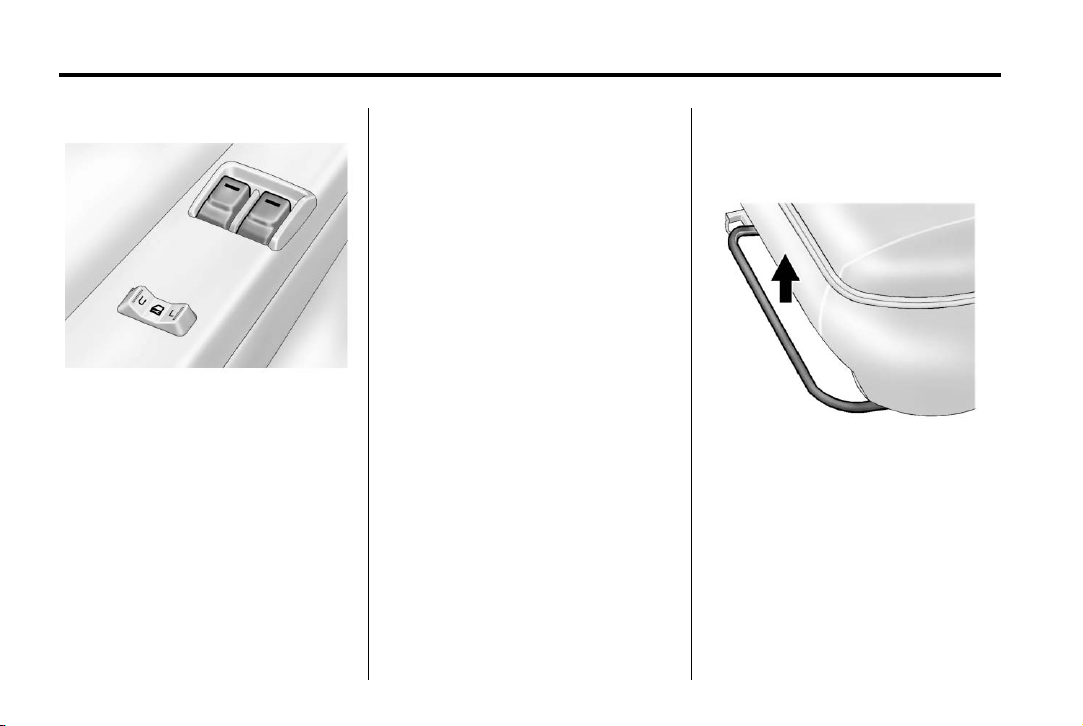
Power Windows
Regular Cab Shown, Crew Cab
Similar
Push the switch down to open the
window. Pull the front of the switch
up to close it.
See Manual Windows on page 2‑15
or Power Windows on page 2‑15.
Express-Down Window
Windows with an express-down
feature allow the window to be
lowered fully without pressing and
holding the switch. Press the front of
the switch to the first position, and
the window opens a small amount.
Press the switch down fully and the
window goes all the way down.
To stop the window while it is
lowering, pull up the front of the
switch.
Seat Adjustment
Manual Seats
To adjust a manual seat:
1. Lift the bar under the front of the
seat cushion to unlock the seat.
2. Slide the seat to the desired
position and release the bar.
3. Try to move the seat back and
forth to make sure it is locked in
place.
See Seat Adjustment on page 3‑3
for more information.
Page 13
Black plate (7,1)
GMC Canyon Owner Manual - 2012
In Brief 1-7
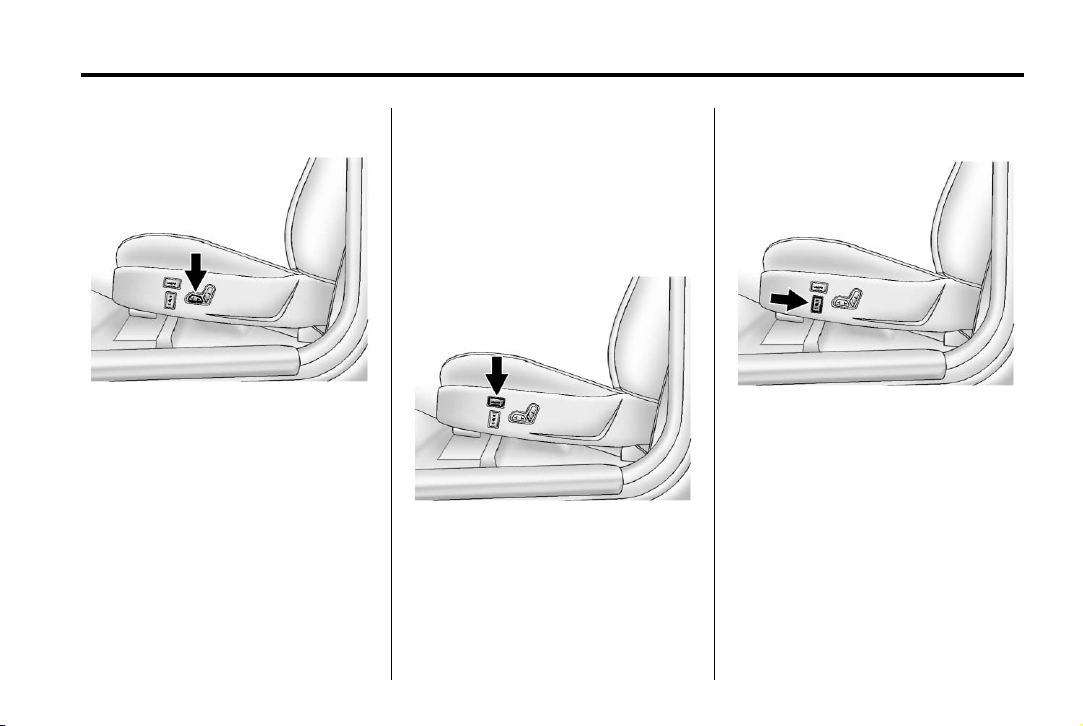
Power Seats
To adjust a power seat, if available:
.
Move the seat forward or
rearward by sliding the control
forward or rearward.
.
Raise or lower the front or rear
part of the seat cushion by
moving the front or rear of the
control up or down.
.
Raise or lower the entire seat by
moving the entire control up
or down.
Use the vertical control to adjust the
seatback.
See Power Seat Adjustment on
page 3‑3 and Reclining Seatbacks
on page 3‑4 for more information.
Power Lumbar
If available, press and hold the front
or rear of the control to increase or
decrease lumbar support. Release
the control when the level of support
is reached.
See Lumbar Adjustment on
page 3‑4 for more information.
Heated Seats
If available, the switches are on the
outboard sides of the front seats. To
operate, the ignition must be on.
.
Press the top of the switch for
the high setting.
.
Press the bottom of the switch
for the low setting.
.
Put the switch in the center
position to turn this feature off.
See Heated Front Seats on
page 3‑7 for more information.
Page 14
Black plate (8,1)
GMC Canyon Owner Manual - 2012
1-8 In Brief
Head Restraint Adjustment
Do not drive until the head restraints
for all occupants are installed and
adjusted properly.
To achieve a comfortable seating
position, change the seatback
recline angle as little as necessary
while keeping the seat and the
head restraint height in the proper
position.
For more information see Head
Restraints on page 3‑2 and Seat
Adjustment on page 3‑3.
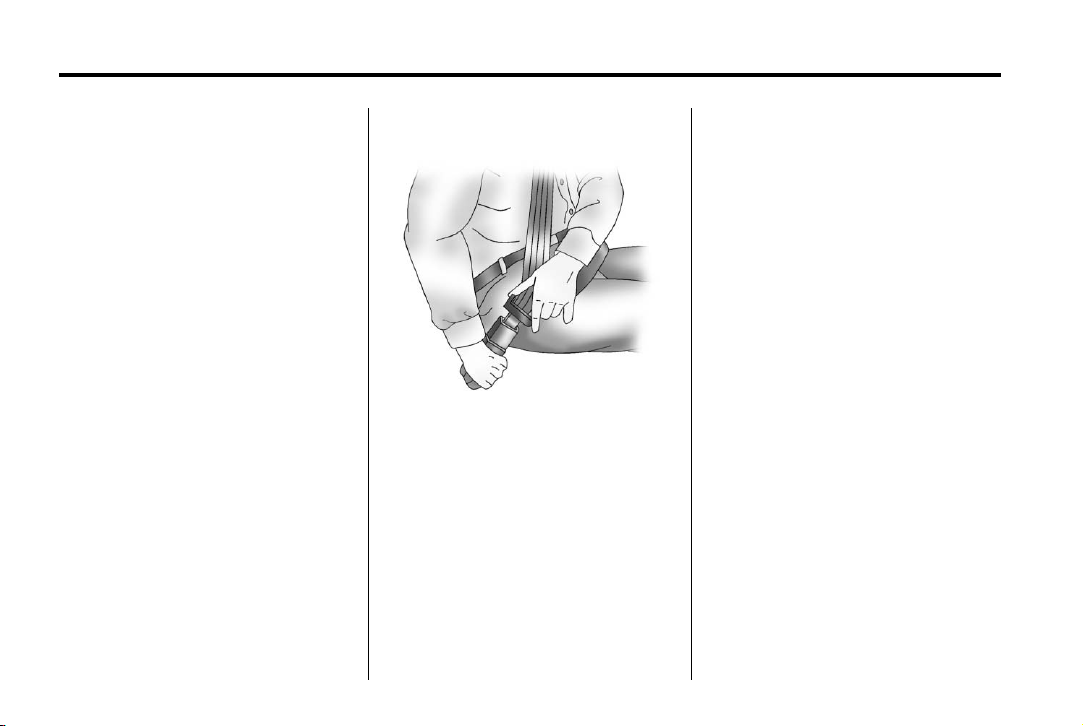
Safety Belts
Refer to the following sections for
important information on how to use
safety belts properly.
.
Safety Belts on page 3‑10.
.
How to Wear Safety Belts
Properly on page 3‑11.
.
Lap-Shoulder Belt on page 3‑12.
.
Lower Anchors and Tethers for
Children (LATCH System) on
page 3‑41.
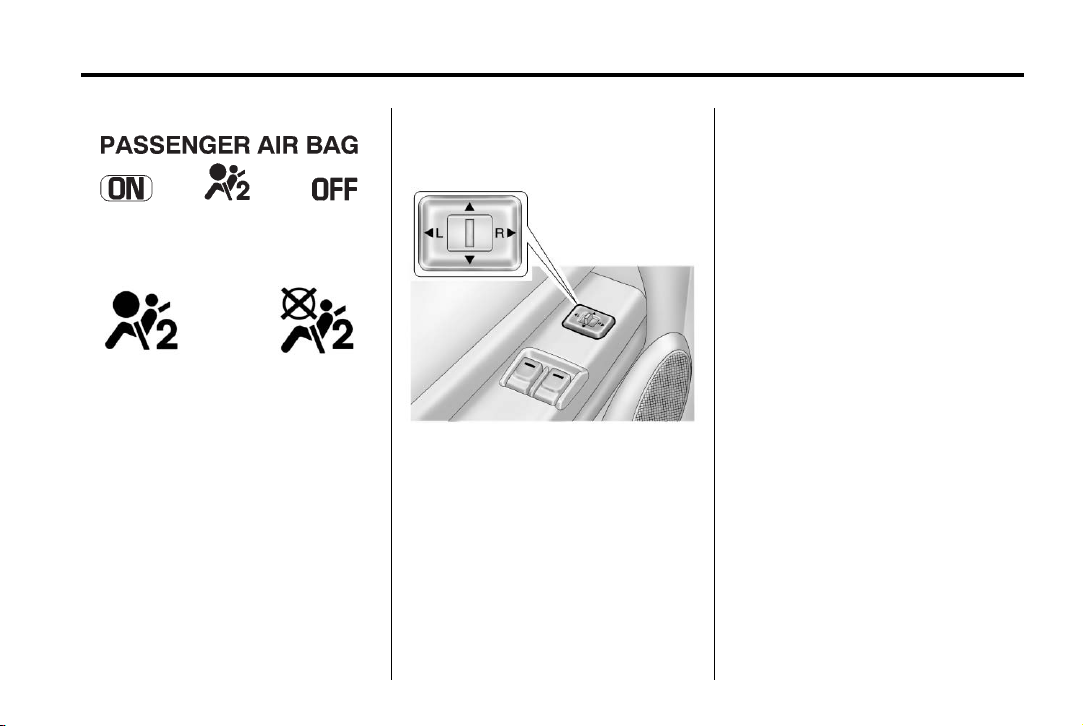
Passenger Sensing System
The passenger sensing system,
if equipped, will turn off the right
front passenger frontal airbag under
certain conditions. The driver
airbags are not affected by this.
If the vehicle has one of the
passenger airbag status indicators
pictured in the following illustrations,
then the vehicle has a passenger
sensing system.
The passenger airbag status
indicator will be visible on the
instrument panel when the vehicle
is started.
Page 15
Black plate (9,1)
GMC Canyon Owner Manual - 2012
In Brief 1-9
United States
Canada and Mexico
See Passenger Sensing System on
page 3‑26 for important information.
Mirror Adjustment
Exterior Mirrors
Vehicles with outside power mirrors
have controls on the driver door
armrest.
To adjust the power mirrors:
1. Move the selector switch to the
L (left) or R (right) to choose the
driver or passenger mirror.
2. Press one of the four arrows
located on the control pad to
move the mirror to the desired
direction.
3. Return the selector switch to the
center position once the mirrors
are adjusted.
See Power Mirrors on page 2‑13.
Vehicles with manual outside
mirrors can be adjusted by pressing
the mirror up and down and left and
right so that you can see a clear
view behind you.
Manually fold the mirrors inward
to prevent damage when going
through an automatic car wash.
To fold, push the mirror toward the
vehicle. Push the mirror outward, to
return to its original position.
See Manual Mirrors on page 2‑12.
Page 16
Black plate (10,1)
GMC Canyon Owner Manual - 2012
1-10 In Brief
Interior Mirror
On vehicles with a manual inside
rearview mirror, the mirror can be
adjusted by holding it in the center
to move it for a clear view behind
you. To avoid glare from the
headlamps behind you, push the
tab forward for daytime use and
pull it for nighttime use.
See Manual Rearview Mirror on
page 2‑13.
The automatic dimming inside
rearview mirror will automatically
reduce the glare of lights from
behind the vehicle.
See Automatic Dimming Rearview
Mirror on page 2‑13.
Steering Wheel Adjustment
The steering wheel adjustment lever
is located on the left side of the
steering wheel.
To adjust:
1. Hold the steering wheel and pull
the lever toward you.
2. Move the steering wheel up
or down.
3. Release the lever to lock the
wheel in place.
Do not adjust the steering wheel
while driving.
Interior Lighting
Dome Lamps
The dome lamps come on when any
door is opened.
To manually turn on the dome
lamps, turn the thumbwheel, located
next to the exterior lamps control, all
the way up. The cargo lamps may
come on, if the vehicle is equipped
with Bluetooth. In this position, the
lamps remain on whether a door is
opened or closed.
Page 17
Black plate (11,1)
GMC Canyon Owner Manual - 2012
In Brief 1-11
Reading Lamps
Press the lens on the lamps to turn
each reading lamp on or off.
These lamps will not come on with
the dome lamps.
For more information see:
.
“Dome Lamp Override” under
Dome Lamps on page 6‑6.
.
Instrument Panel Illumination
Control on page 6‑6.
.
Exit Lighting on page 6‑7.
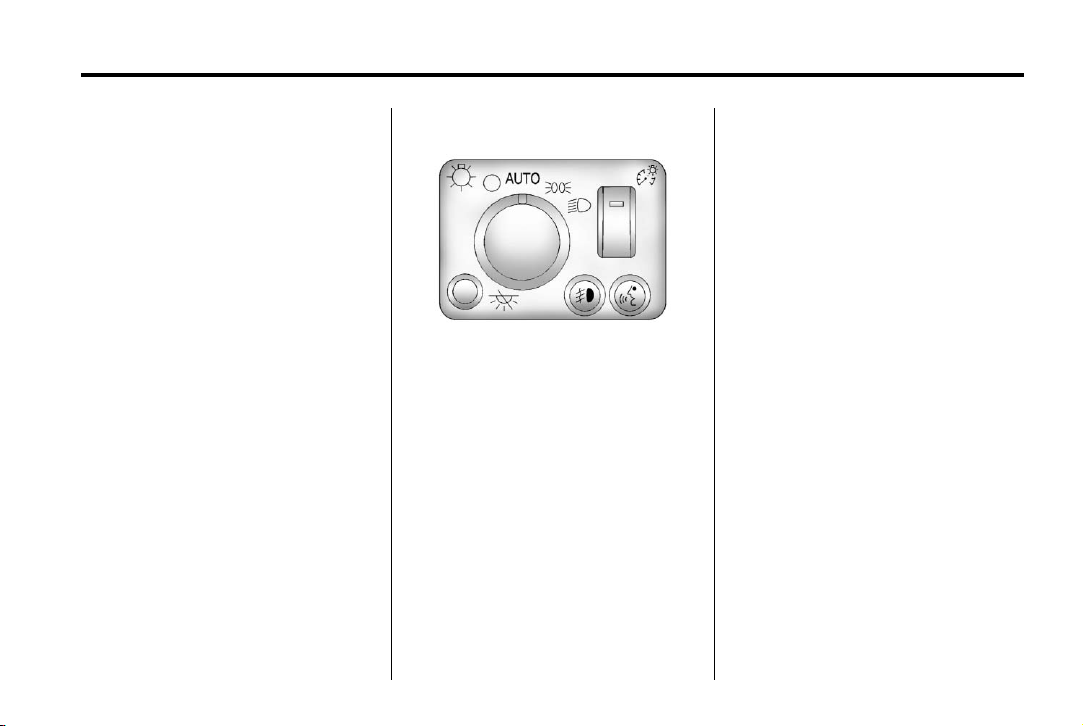
Exterior Lighting
O : Turns off all exterior lamps
including the Daytime Running
Lamps (DRL).
AUTO: Automatic operation of the
headlamps and other exterior lamps
at normal brightness.
; : Manual operation of the
parking lamps and other exterior
lamps.
5 : Manual operation of the
headlamps and other exterior
lamps.
For more information, see:
.
Exterior Lamp Controls on
page 6‑1.
.
Daytime Running Lamps (DRL)
on page 6‑3.
.
Automatic Headlamp System on
page 6‑3.
.
Fog Lamps on page 6‑5.
.
Exterior Cargo Lamps on
page 6‑5.
Page 18
Black plate (12,1)
GMC Canyon Owner Manual - 2012
1-12 In Brief
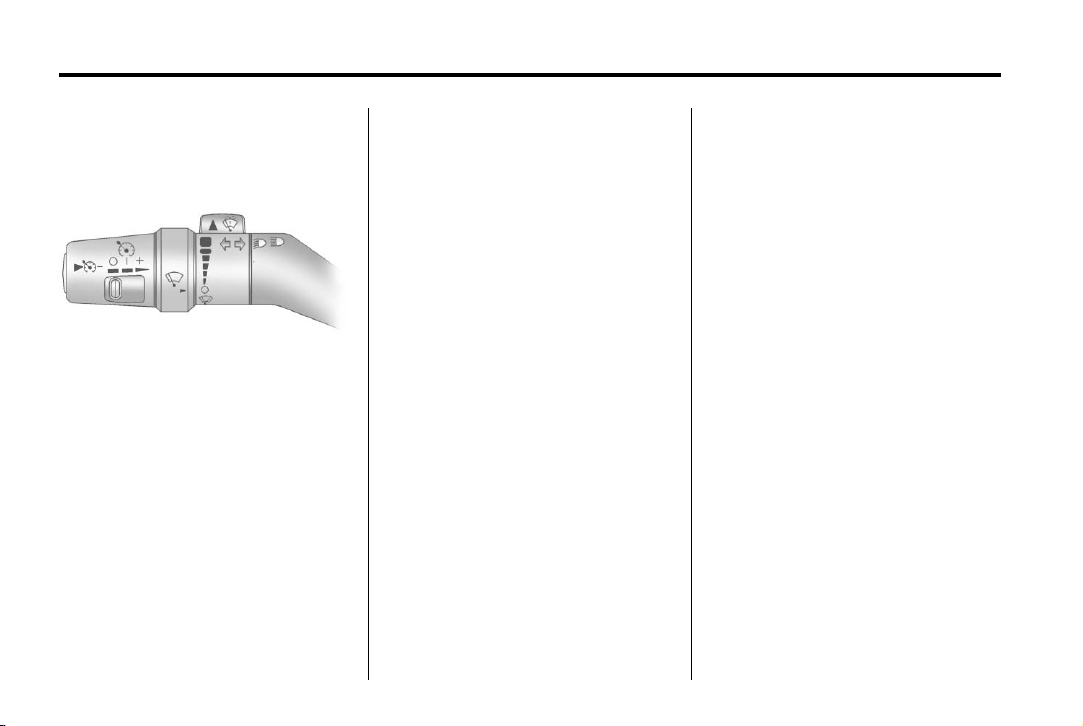
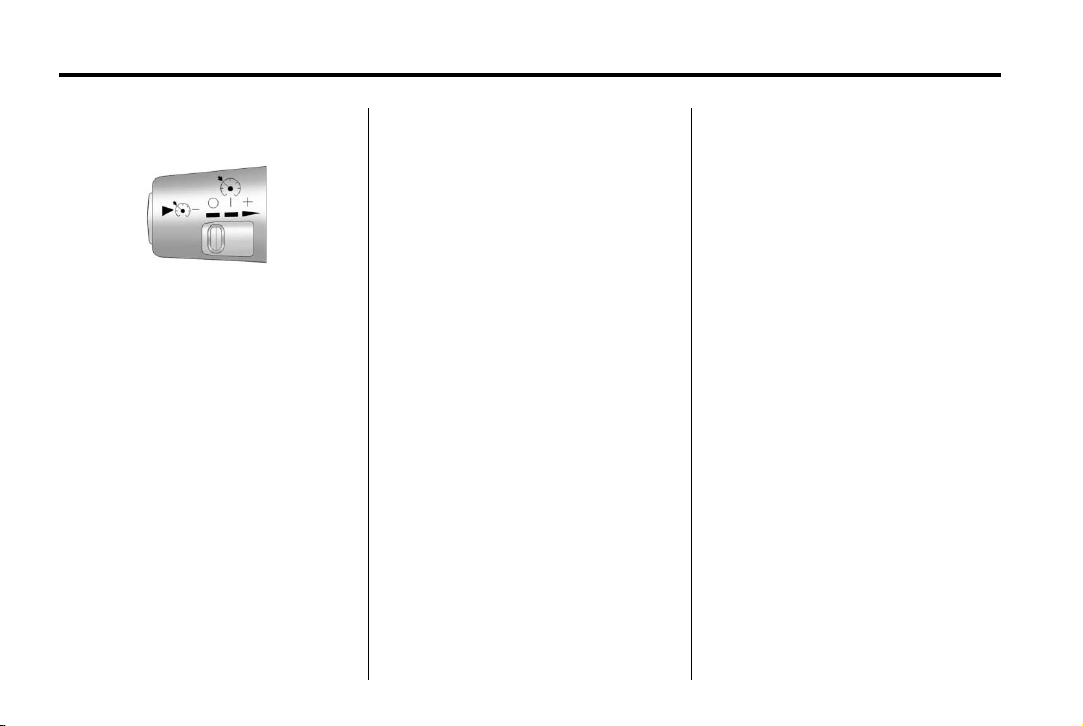
Windshield Wiper/Washer
8: For a single wipe, move the
band to
For several wipes, hold the band on
8 and then release it.
8 longer.
N: For adjustable interval wipes,
turn the band up for more frequent
wipes or down for less frequent
wipes.
6 : For slow wipes, turn the
band to the first solid position past
the delay settings.
1 : For fast wipes, turn the band
to the second solid position past the
delay settings.
9: Use to turn the wipers off.
Windshield Washer: Push the
paddle on top of the turn signal/lane
change lever to spray washer fluid
on the windshield.
See Windshield Wiper/Washer on
page 5‑2.
Page 19
Black plate (13,1)
GMC Canyon Owner Manual - 2012
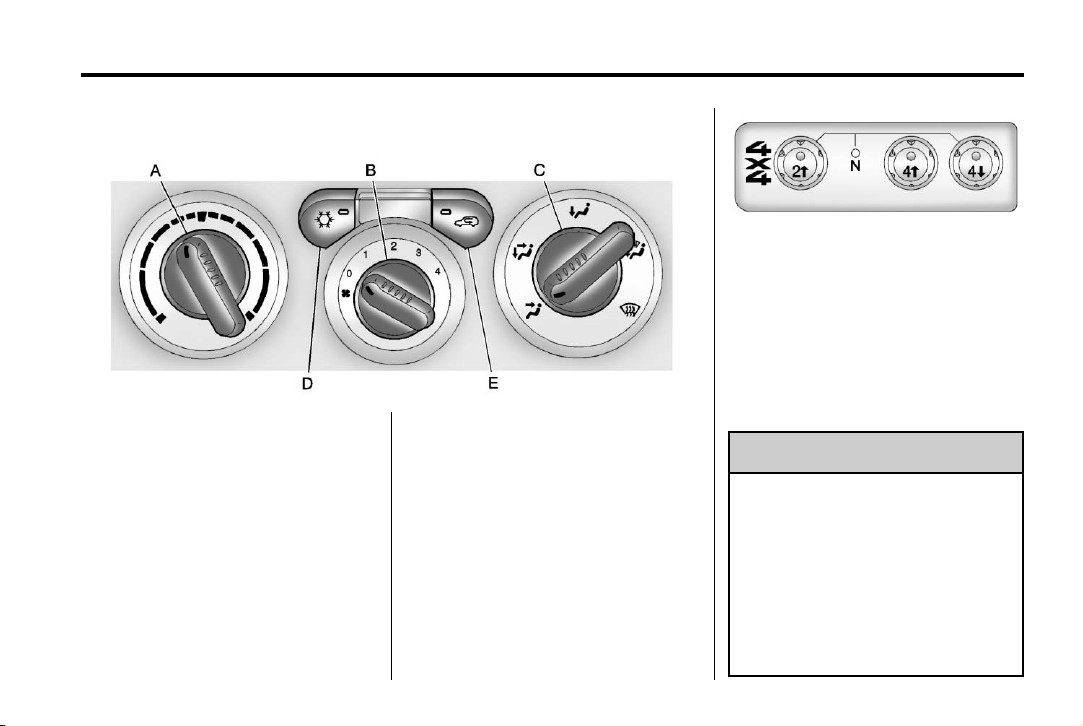
Climate Controls
A. Temperature Control
B. Fan Control
C. Air Delivery Mode Control
D. Air Conditioning
E. Air Recirculation
See Climate Control Systems on
page 8‑1.
Four-Wheel Drive
Four-wheel drive sends engine
power to all four wheels for extra
traction.
In Brief 1-13
The transfer case buttons are
located to the right of the steering
wheel on the instrument panel.
Use these buttons to shift into and
out of four-wheel drive.
m (Two-Wheel High): Use for
2
driving in most street and highway
situations.
WARNING
{
Shifting the transfer case to
N (Neutral) can cause the vehicle
to roll even if the transmission is
in P (Park). You or someone else
could be seriously injured. Be
sure to set the parking brake
before placing the transfer case in
N (Neutral). See Parking Brake on
page 9‑41.
Page 20

Black plate (14,1)
GMC Canyon Owner Manual - 2012
1-14 In Brief
N (Neutral): Use the N (Neutral)
position only when towing the
vehicle. See Recreational Vehicle
Towing on page 10‑85.
m (Four-Wheel High): Use when
4
extra traction is needed in most
off-road situations.
n (Four-Wheel Low): Use this
4
position to deliver extra torque to
all four wheels. Used for extreme
off‐road conditions. See Four-Wheel
Drive on page 9‑35.
Vehicle Features
Radio(s)
Radio with CD (MP3/WMA)
PWR: Press to turn the system on
and off.
q VOL r : Turn to increase or
decrease the volume.
BAND: Press to switch between
FM1, FM2, AM, or XM1, or XM2 (if
equipped). The selection displays.
Page 21

Black plate (15,1)
GMC Canyon Owner Manual - 2012
In Brief 1-15
q TUNE r : Turn to select radio
stations.
q SEEK r : Press to go to the
previous or to the next station and
stay there.
For more information about these
and other radio features, see
Infotainment on page 7‑1.
Setting Preset Stations
Radio stations are stored as
presets.
For vehicles with an XM radio, a
maximum of 30 stations can be
stored as presets using the six
numbered pushbuttons.
If the radio does not have XM, up to
18 stations (six FM1, six FM2, and
six AM), can be programmed on the
six numbered buttons.
See “Setting Preset Stations” under
Operation on page 7‑2.
Setting the Clock
To set the time and date for the
radio with CD (MP3/WMA):
Press and hold the HR button until
the correct hour displays. Press and
hold the MN button until the correct
minute displays. The time can be
set with the ignition on or off.
To synchronize the time with an
FM station broadcasting Radio Data
System (RDS) information, press
and hold the HR and MN buttons
at the same time until RDS TIME
displays. To accept this time, press
and hold the HR and MN buttons,
at the same time, for another
two seconds. If the time is not
available from the station, NO
UPDAT (update) displays.
RDS time is broadcast once a
minute. After tuning to an RDS
broadcast station, it could take a
few minutes for the time to update.
For detailed instructions on setting
the clock for your specific audio
system, see Clock on page 5‑4.
Satellite Radio
XM is a satellite radio service based
in the 48 contiguous United States
and 10 Canadian provinces.
XM satellite radio has a wide
variety of programming and
commercial-free music, coast to
coast, and in digital-quality sound.
A fee is required to receive the
XM service.
For more information, refer to:
.
www.xmradio.com or call
1-800-929-2100 (U.S.)
.
www.xmradio.ca or call
1-877-438-9677 (Canada)
See Satellite Radio on page 7‑10.
Page 22
Black plate (16,1)
GMC Canyon Owner Manual - 2012
1-16 In Brief
Cruise Control
The cruise controls are located at
the end of the multifunction lever.
9 : Turns the system off.
R : Turns the system on.
+ (Resume/Accelerate): Use to
make the vehicle accelerate or
resume a previously set speed.
r T (Set): Press the button at
the end of the lever to set the
speed.
For more information, see Cruise
Control on page 9‑46.
Driver Information Center (DIC)
The DIC is located on the
instrument panel cluster. It displays
the status of many vehicle systems
and enables some features to be
personalized.
Use the trip reset stem located on
the instrument panel cluster to scroll
through the available functions. For
more information, see Driver
Information Center (DIC) on
page 5‑19.
Vehicle Personalization
Some vehicle features can be
personalized through the DIC.
These features include:
.
Language: English, Spanish,
or French
.
Automatic Door Locks
.
RKE Feedback
For more information, see Driver
Information Center (DIC) on
page 5‑19.
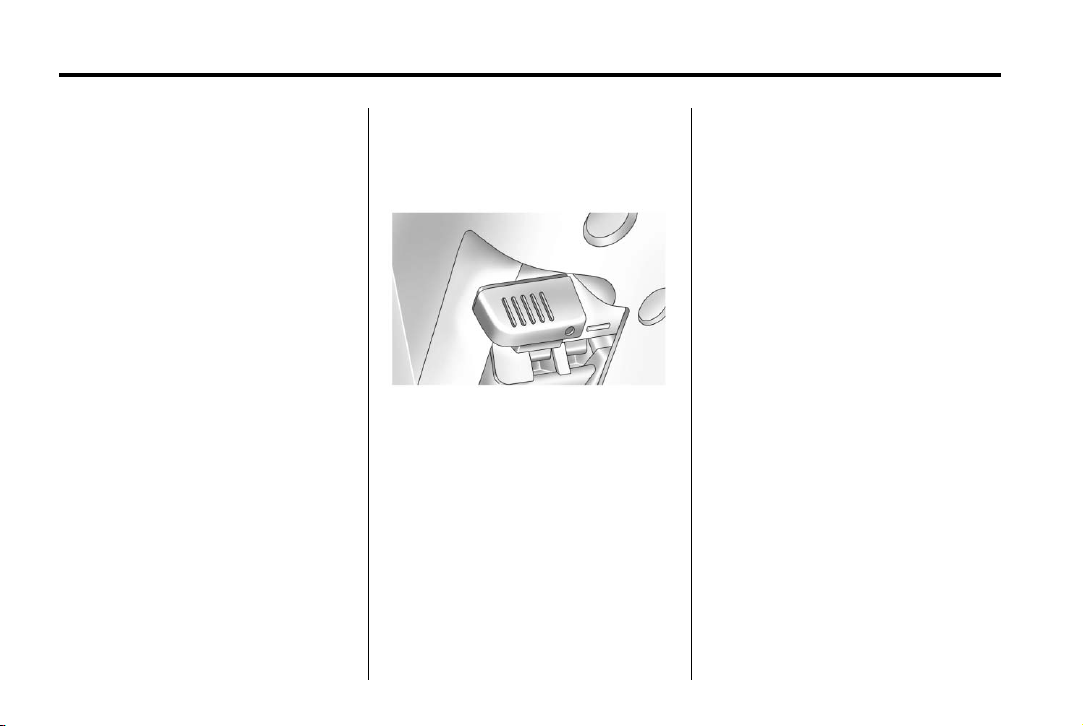
Power Outlets
The accessory power outlets can be
used to plug in electrical equipment,
such as a cell phone or MP3 player.
The vehicle may have an accessory
power outlet located below the
climate control system and on the
rear of the center console.
See Power Outlets on page 5‑5.
Page 23
Black plate (17,1)
GMC Canyon Owner Manual - 2012
In Brief 1-17
Performance and Maintenance
Traction Control System (TCS)
The traction control system limits
wheel spin. The system turns on
automatically every time the vehicle
is started.
.
To turn off traction control, press
and release the TCS/StabiliTrak
button on the instrument panel.
g illuminates and the appropriate
DIC message is displayed. See
Ride Control System Messages
on page 5‑24.
.
Press and release the TCS/
StabiliTrak button again to turn
on traction control.
For more information, see Traction
Control System (TCS) on
page 9‑43.
StabiliTrak®System
The StabiliTrak system assists with
directional control of the vehicle in
difficult driving conditions. The
system turns on automatically every
time the vehicle is started.
.
To turn off both traction control
and StabiliTrak, press and hold
the TCS/StabiliTrak button until
g illuminates and the appropriate
DIC message is displayed. See
Ride Control System Messages
on page 5‑24.
.
Press and release the TCS/
StabiliTrak button again to turn
on both systems.
For more information, see
StabiliTrak
®
System on page 9‑44.
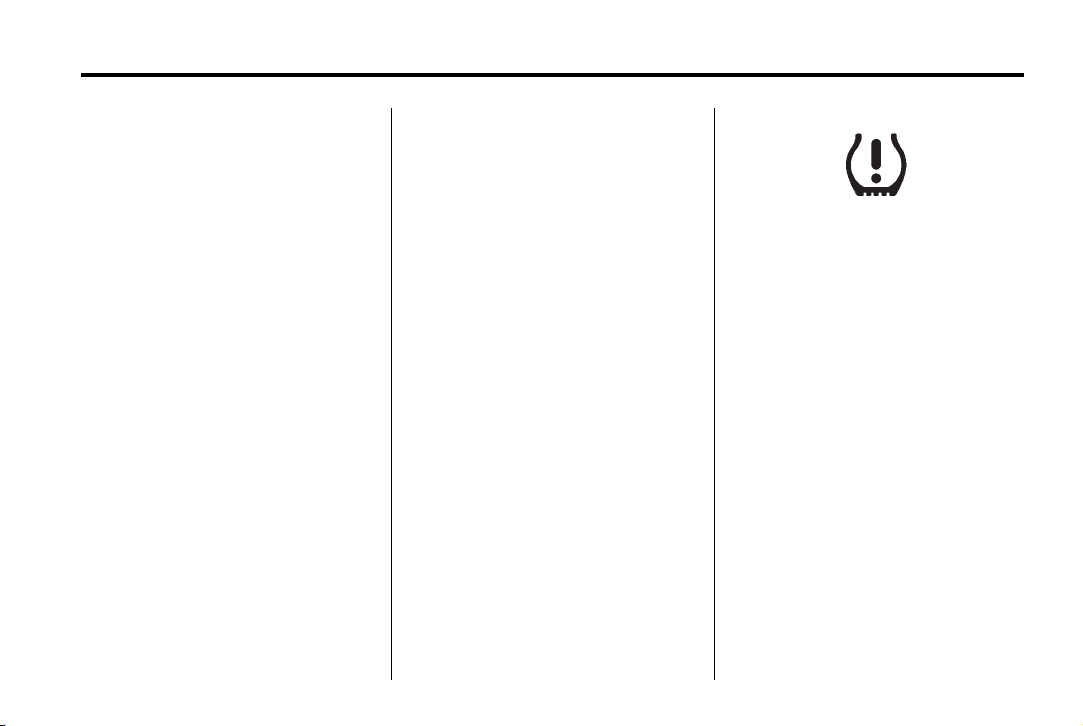
Tire Pressure Monitor
This vehicle may have a Tire
Pressure Monitor System (TPMS).
The TPMS warning light alerts you
to a significant loss in pressure of
one of the vehicle's tires. If the
warning light comes on, stop as
soon as possible and inflate the
tires to the recommended pressure
shown on the Tire and Loading
Information label. See Vehicle Load
Limits on page 9‑16. The warning
light will remain on until the tire
pressure is corrected.
During cooler conditions, the low tire
pressure warning light may appear
when the vehicle is first started and
then turn off. This may be an early
indicator that the tire pressures are
getting low and the tires need to be
inflated to the proper pressure.
Page 24

Black plate (18,1)
GMC Canyon Owner Manual - 2012
1-18 In Brief
The TPMS does not replace normal
monthly tire maintenance. It is the
driver’s responsibility to maintain
correct tire pressures.
See Tire Pressure Monitor System
on page 10‑53.
Engine Oil Life System
The engine oil life system calculates
engine oil life based on vehicle use
and displays a DIC message when
it is necessary to change the engine
oil and filter.
Resetting the Oil Life System
1. Turn the ignition to ON/RUN,
with the engine off.
2. Press and release the stem in
the lower center of the
instrument cluster until the OIL
LIFE message is displayed.
3. Once the alternating OIL LIFE
and RESET messages appear,
press and hold the stem until
several beeps sound. This
confirms that the oil life system
has been reset.
4. Turn the key to LOCK/OFF.
See Engine Oil Life System on
page 10‑12.
Driving for Better Fuel Economy
Driving habits can affect fuel
mileage. Here are some driving tips
to get the best fuel economy
possible.
.
Avoid fast starts and accelerate
smoothly.
.
Brake gradually and avoid
abrupt stops.
.
Avoid idling the engine for long
periods of time.
.
When road and weather
conditions are appropriate, use
cruise control.
.
Always follow posted speed
limits or drive more slowly when
conditions require.
.
Keep vehicle tires properly
inflated.
.
Combine several trips into a
single trip.
.
Replace the vehicle's tires with
the same TPC Spec number
molded into the tire's sidewall
near the size.
.
Follow recommended scheduled
maintenance.
Roadside Assistance Program
U.S.: 1-888-881-3302
TTY Users (U.S.): 1-888-889-2438
Canada: 1-800-268-6800
Mexico: 01-800-466-0801
As the owner of a new GMC, you
are automatically enrolled in the
Roadside Assistance program.
See Roadside Assistance Program
(U.S. and Canada) on page 13‑7 or
Roadside Assistance Program
(Mexico) on page 13‑9 for more
information.
Page 25
Black plate (19,1)
GMC Canyon Owner Manual - 2012
In Brief 1-19
Roadside Assistance and OnStar
(U.S. and Canada)
If you have an active OnStar
subscription, press the
and the current GPS location will be
sent to an OnStar advisor who will
assess your problem, contact
Roadside Assistance, and relay
your exact location to get the help
you need.
Online Owner Center (U.S. and
Canada)
The Online Owner Center is a
complimentary service that includes
online service reminders, vehicle
maintenance tips, online owner
manual, special privileges,
and more.
Sign up today at:
www.gmcownercenter.com (U.S.)
or www.gm.ca (Canada).
Q button
OnStar
For vehicles with an active OnStar
subscription, OnStar uses several
innovative technologies and live
Advisors to provide a wide range of
safety, security, navigation,
diagnostics, and calling services.
Automatic Crash Response
In a crash, built‐in sensors
automatically alert an OnStar
Advisor who is immediately
connected to the vehicle to see
if you need help.
®
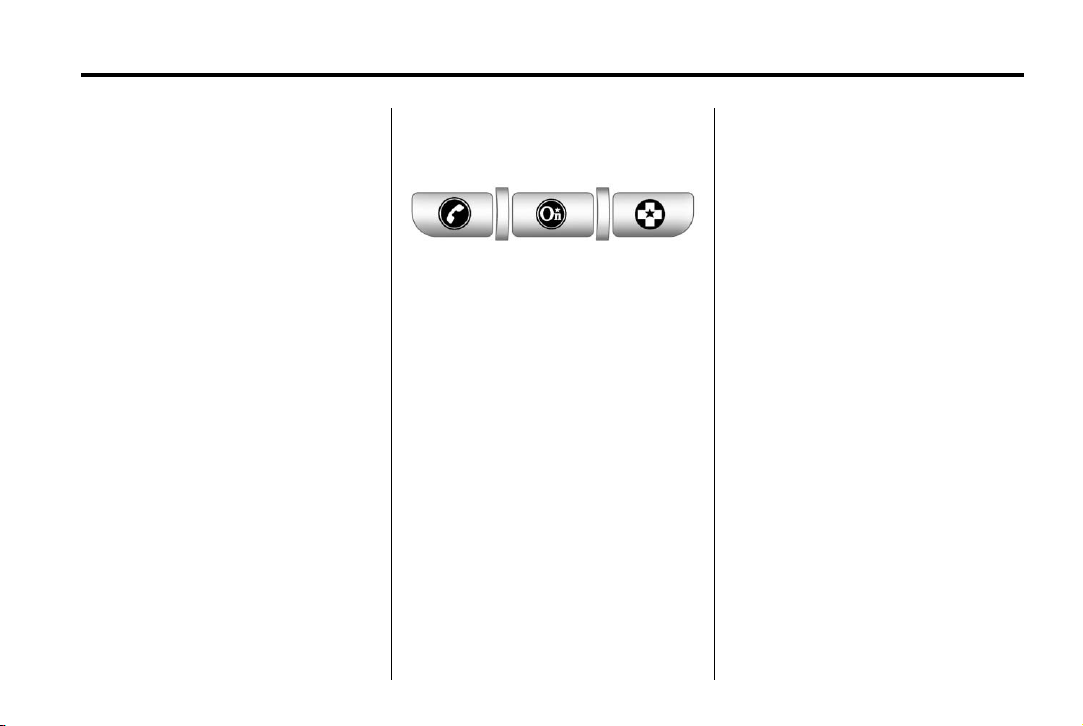
How OnStar Service Works
Q : Push this blue button to
connect to a specially trained
OnStar Advisor to verify your
account information and to answer
questions.
] : Push this red emergency
button to get priority help from
specially trained OnStar Emergency
Advisors.
X : Push this button for hands‐free,
voice‐activated calling and to give
voice commands for Hands‐Free
Calling and Turn‐by‐Turn
Navigation.
Automatic Crash Response,
Emergency Services, Crisis Assist,
Stolen Vehicle Assistance, Vehicle
Diagnostics, Remote Door Unlock,
Roadside Assistance, Turn‐by‐Turn
Navigation, and Hands‐Free Calling
are available on most vehicles. Not
all OnStar services are available on
all vehicles. For more information,
see the OnStar Owner's Guide;
visit www.onstar.com (U.S.) or
www.onstar.ca (Canada); contact
OnStar at 1-888-4-ONSTAR
(1‐888‐466‐7827) or TTY
1‐877‐248‐2080; or push
speak with an OnStar Advisor
24 hours a day, seven days a week.
Q to
Page 26

Black plate (20,1)
GMC Canyon Owner Manual - 2012
1-20 In Brief
For a full description of OnStar
services and system limitations, see
the OnStar Owner's Guide in the
glove box.
OnStar service is subject to the
OnStar Terms and Conditions
included in the OnStar Glove
Box Kit.
OnStar service requires wireless
communication networks and the
Global Positioning System (GPS)
satellite network. Not all OnStar
services are available everywhere
or on all vehicles at all times.
OnStar service cannot work unless
your vehicle is in a place where
OnStar has an agreement with a
wireless service provider for service
in that area, and the wireless
service provider has coverage,
network capacity, reception, and
technology compatible with OnStar's
service. Service involving location
information about your vehicle
cannot work unless GPS signals
are available, unobstructed, and
compatible with the OnStar
hardware. The vehicle must have a
working electrical system and
adequate battery power for the
OnStar equipment to operate.
OnStar service may not work if the
OnStar equipment is not properly
installed or you have not maintained
it even if your vehicle is in good
working order and in compliance
with all government regulations.
If you try to add, connect, or modify
any equipment or software in your
vehicle, OnStar service may not
work. Other problems beyond
OnStar's control may prevent
service to you, such as hills, tall
buildings, tunnels, weather,
electrical system design and
architecture of your vehicle, damage
to important parts of your vehicle in
a crash, or wireless phone network
congestion or jamming.
See Radio Frequency Statement on
page 13‑20 for information
regarding Part 15 of the Federal
Communications Commission
(FCC) rules and Industry Canada
Standards RSS-GEN/210/220/310.
Your Responsibility
Increase the volume of the radio
if the OnStar Advisor cannot be
heard.
If the light next to the OnStar
buttons is red, the system may
not be functioning properly.
Push
Q and request a vehicle
diagnostic. If the light appears clear
(no light appears), your OnStar
subscription has expired and all
services have been deactivated.
Push
Q to confirm that the OnStar
equipment is active.
Page 27

Black plate (1,1)
GMC Canyon Owner Manual - 2012
Keys, Doors, and Windows 2-1
Keys, Doors, and Windows
Keys and Locks
Keys . . . . . . .. . . . . . . . . . .. . . . . . . . 2-2
Remote Keyless Entry (RKE)
System . . . . . . .. . . . . . . . . . . . . . . 2-2
Remote Keyless Entry (RKE)
System Operation . . . . . . . . . . . 2-3
Door Locks . . . . . . . . . . . . . . . . . . . 2-4
Power Door Locks . . . . . . . . . . . . 2-5
Automatic Door Locks . . . . . . . . . 2-5
Lockout Protection . . . . . . . . . . . . 2-6
Safety Locks (Crew Cab) . . . . . 2-6
Doors
Rear Doors . . . . . . . . . . . . . . . . . . . 2-7
Tailgate . . . . . . . . . . . . . . . . . . . . .. . 2-7
Vehicle Security
Vehicle Security . . . . . . . . . . . . . .. 2-9
Anti-theft Alarm System . . . . . . . 2-9
Immobilizer . . . . . . . . . . . . . . . . . . 2-10
Immobilizer Operation
(PASS-Key III+
Canada Only) . . . . . . . . . . . . . . 2-10
Immobilizer Operation
(Passlock U.S. Only) . . . . . . . 2-12
Exterior Mirrors
Convex Mirrors . . . . . . . . . . . . . . 2-12
Manual Mirrors . . . . . . . . . . . . . .. 2-12
Power Mirrors . . . . . . . . . . . ..... 2-13
Interior Mirrors
Manual Rearview Mirror . . . . . . 2-13
Automatic Dimming Rearview
Mirror . . . . . . . . . . . . . . . . . . . . . . . 2-13
Windows
Windows . . . . . . . . . . . . . . . ...... 2-14
Manual Windows . . . . . . . . . . . . 2-15
Power Windows . . . . . . . . . . . . . 2-15
Rear Windows . . . . . .. . . . . . . . . 2-17
Sun Visors . . . . . . . . . ... . . . . . . . 2-17
Page 28
Black plate (2,1)
GMC Canyon Owner Manual - 2012
2-2 Keys, Doors, and Windows
Keys and Locks
Keys
WARNING
{
Leaving children in a vehicle with
the ignition key is dangerous for
many reasons. Children or others
could be badly injured or even
killed. They could operate the
power windows or other controls
or even make the vehicle move.
The windows will function with the
keys in the ignition and children
could be seriously injured or killed
if caught in the path of a closing
window. Do not leave the keys in
a vehicle with children.
The key can be used for the ignition,
all door locks, and the tailgate.
The key has a bar-coded key tag
that the dealer or qualified locksmith
can use to make new keys. Store
this information in a safe place, not
in your vehicle.
Notice: If the keys get locked in
the vehicle, it may have to be
damaged to get them out. Always
carry a spare key.
If locked out of your vehicle, call the
Roadside Assistance Center. See
Roadside Assistance Program (U.S.
and Canada) on page 13‑7 or
Roadside Assistance Program
(Mexico) on page 13‑9.
With an active OnStar subscription,
an OnStar Advisor may remotely
unlock the vehicle. See OnStar
page 1‑19.
®
on
Remote Keyless Entry (RKE) System
See Radio Frequency Statement on
page 13‑20 for information
regarding Part 15 of the Federal
Communications Commission (FCC)
rules and Industry Canada
Standards RSS-GEN/210/220/310.
If there is a decrease in the RKE
operating range:
.
Check the distance. The
transmitter may be too far from
the vehicle.
Page 29
Black plate (3,1)
GMC Canyon Owner Manual - 2012
.
Check the location. Other
vehicles or objects may be
blocking the signal.
.
Check the transmitter's battery.
See “Battery Replacement” later
in this section.
.
If the transmitter is still not
working correctly, see your
dealer or a qualified technician
for service.
Remote Keyless Entry (RKE) System Operation
Vehicles with Remote Keyless
Entry (RKE), transmitter functions
work up to 9 m (30 ft) away from the
vehicle.
There are other conditions which
can affect the performance of the
transmitter. See Remote Keyless
Entry (RKE) System on page 2‑2.
Keys, Doors, and Windows 2-3
UNLOCK: Press to unlock the
driver door and turn on the interior
lamps. The parking lamps may flash
and the horn may sound.
Press UNLOCK again within
three seconds and all of the doors
unlock.
LOCK: Press to lock all the doors.
The parking lamps may flash and
the horn may sound.
If a door is open or ajar when
LOCK is pressed, the horn sounds
several times to let you know the
doors did not lock and the content
theft‐deterrent system is not armed.
Pressing LOCK again while the horn
is sounding or within three seconds
after the horn stops sounding,
the doors lock but the content
theft‐deterrent system does not arm
until the opened door is closed.
Different feedback modes can be
programmed through the Driver
Information Center (DIC). See
“Remote Keyless Entry Feedback”
under Driver Information Center
(DIC) on page 5‑19.
L (Panic): Press to make the
horn sound and the headlamps and
taillamps flash for up to 30 seconds.
To turn them off wait for 30 seconds,
or press
vehicle.
L again, or start the
Page 30
Black plate (4,1)
GMC Canyon Owner Manual - 2012
2-4 Keys, Doors, and Windows
Programming Transmitters to
the Vehicle
Only RKE transmitters programmed
to the vehicle will work. If a
transmitter is lost or stolen, a
replacement can be purchased and
programmed through your dealer.
When the replacement transmitter is
programmed to the vehicle, all
remaining transmitters must also be
programmed. Any lost or stolen
transmitters no longer work once the
new transmitter is programmed.
Each vehicle can have up to four
transmitters programmed to it.
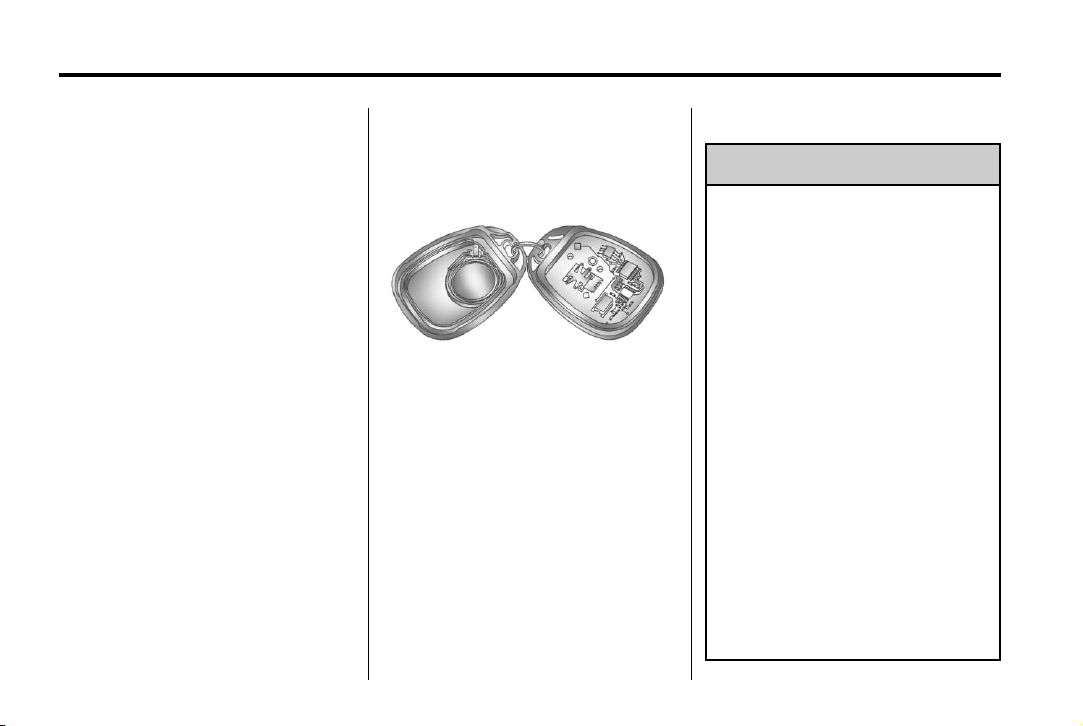
Battery Replacement
Notice: When replacing the
battery, do not touch any of the
circuitry on the transmitter. Static
from your body could damage the
transmitter.
To replace the battery:
1. Separate the transmitter with a
flat, thin object inserted in the
slot between the covers of the
transmitter housing.
2. Remove the old battery. Do not
use a metal object.
3. Insert the new battery. Replace
with a CR2032 or equivalent
battery.
4. Put the transmitter back
together.
Door Locks
WARNING
{
Unlocked doors can be
dangerous.
.
Passengers, especially
children, can easily open the
doors and fall out of a moving
vehicle. When a door is
locked, the handle will not
open it. The chance of being
thrown out of the vehicle in a
crash is increased if the
doors are not locked. So, all
passengers should wear
safety belts properly and the
doors should be locked
whenever the vehicle is
driven.
.
Young children who get into
unlocked vehicles may be
unable to get out. A child can
be overcome by extreme heat
and can suffer permanent
(Continued)
Page 31

Black plate (5,1)
GMC Canyon Owner Manual - 2012
Keys, Doors, and Windows 2-5
WARNING (Continued)
injuries or even death from
heat stroke. Always lock the
vehicle whenever leaving it.
.
Outsiders can easily enter
through an unlocked door
when you slow down or stop
the vehicle. Locking the doors
can help prevent this from
happening.
To lock or unlock the door from the
outside, use the key in the driver or
front passenger door or press the
LOCK or UNLOCK button on the
Remote Keyless Entry (RKE)
transmitter.
To lock a door from the inside, move
the manual lever on the door
forward. To unlock a door from the
inside, move the lever on the door
rearward.
You will see a colored area on the
lever when the door is unlocked.
Power Door Locks
Vehicles with power door locks, the
switches are located on the front
door armrests.
Press L to lock the doors.
Press U to unlock the doors.
Automatic Door Locks
If the vehicle has power door locks
and the remote keyless entry
system, it has an automatic
lock/unlock feature.
If the vehicle has an automatic
transmission, it is programmed
from the factory to lock all doors
automatically when the shift lever is
moved out of P (Park). All the doors
will unlock when the shift lever is
moved back into P (Park).
If the vehicle has a manual
transmission, it is programmed
from the factory to lock all the doors
when the vehicle speed is greater
than 24 km/h (15 mph). The doors
will unlock when the key is removed
from the ignition.
To change the automatic door lock
and unlock settings, see “Automatic
Door Locks” under Driver
Information Center (DIC) on
page 5‑19.
Page 32

Black plate (6,1)
GMC Canyon Owner Manual - 2012
2-6 Keys, Doors, and Windows
Lockout Protection
If the vehicle has power door locks,
this feature protects you from
locking the key in the vehicle when
the key is in the ignition and a door
is open.
If the power door lock switch is
pressed when a door is open and
the key is in the ignition, all of the
doors will lock and then the driver
door will unlock.
Safety Locks (Crew Cab)
If the vehicle is a crew cab model, it
may have rear door safety locks.
With this feature, the rear doors are
locked so they cannot be opened
from the inside.
The rear door safety lock is located
on the inside edge of each rear door
below the safety lock label.
To engage the safety locks:
1. Open one of the rear doors.
2. Using the ignition key, turn the
safety lock to the horizontal
position.
3. Close the door.
4. Repeat these steps on the other
rear door.
To open a rear door when the safety
lock is on, unlock the door and open
the door from the outside.
To disengage the safety locks:
1. Open one of the rear doors.
2. Using the ignition key, turn the
safety lock to the vertical
position.
3. Close the door.
4. Repeat these steps on the other
rear door.
Page 33

Black plate (7,1)
GMC Canyon Owner Manual - 2012
Keys, Doors, and Windows 2-7
Doors
Rear Doors
To open the door, open the front
door. Then, use the handle to open
the rear door. The rear door must be
closed before closing the front door.
Tailgate
WARNING
{
It is extremely dangerous to ride
on the tailgate, even when the
vehicle is operated at low speeds.
People riding on the tailgate can
easily lose their balance and
fall in response to vehicle
maneuvers. Falling from a moving
vehicle may result in serious
injuries or death. Do not allow
people to ride on the tailgate. Be
sure everyone in your vehicle is in
a seat and using a safety belt
properly.
Open the tailgate by pulling up on
the outside handle while pulling the
tailgate down.
When the tailgate is shut, be sure it
is latched securely.
On vehicles with a locking tailgate,
use the ignition key. Turn the key
counterclockwise to lock the
tailgate. Turn the key clockwise to
unlock the tailgate.
Page 34

Black plate (8,1)
GMC Canyon Owner Manual - 2012
2-8 Keys, Doors, and Windows
Tailgate Removal
To remove the tailgate:
1. With the tailgate fully open, lift
up slightly on the entire tailgate
assembly.
2. Remove the retaining cables
from both sides of the tailgate by
pulling the clips away from the
bolt heads while pushing the
cable bracket forward.
When the larger part of the hole
on the bracket is over the bolt,
slide the bracket off of the bolt.
3. With the tailgate partially down,
lift up on the passenger side and
pull the tailgate toward you, then
move the tailgate to the right to
release the driver side. You can
then remove the entire tailgate
assembly.
Reverse the procedure to reinstall
the tailgate. Make sure it is secure.
To partially lower the tailgate:
1. With the tailgate fully open, lift
up slightly on the entire tailgate
assembly.
Tailgate Partially Down
2. Remove the retaining cable
from the passenger side of the
tailgate by pulling the clip away
from the bolt head while pushing
the cable bracket forward.
Page 35

Black plate (9,1)
GMC Canyon Owner Manual - 2012
Keys, Doors, and Windows 2-9
When the larger part of the hole
on the bracket is over the bolt,
slide the bracket off the bolt.
3. Slide the lower end fitting onto
the top bolt. The tailgate will now
stay in the partially opened
position.
4. Repeat Steps 2 and 3 for the
driver side.
If you would like to close the
tailgate, the bracket cannot be in the
partially opened position. Use the
top position on the bracket to
anchor it on the bottom bolt.
Vehicle Security
This vehicle has theft-deterrent
features; however, they do not make
it impossible to steal.
Anti-theft Alarm System
If your vehicle has the Remote
Keyless Entry (RKE) system, the
vehicle has a content theft-deterrent
alarm system.
To activate the content
theft-deterrent system:
1. Close all the doors.
2. Lock the doors with the RKE
transmitter. The security light,
located on the instrument panel
cluster, will flash.
If the LOCK button on the RKE
transmitter is pressed, but a door is
open, the horn will chirp six times.
Press the LOCK button again, within
three seconds, and the doors will
lock. Close the open door and the
system will be activated.
If a locked door is not opened using
the RKE transmitter, or by OnStar
the pre-alarm will go off. If the
engine is not started or UNLOCK
not pressed within 10 seconds, the
front turn signal lamps will flash for
two minutes, and the horn will sound
for two minutes, then will turn off to
save the battery power.
Remember, the theft-deterrent
system will not activate if you lock
the doors with a key, the manual
door lock, or power door lock
switch. The system can only be
activated using the RKE transmitter,
or by OnStar
Owner's Guide for additional
information. You should also
remember that you can start your
vehicle with the correct ignition key
if the alarm has been set off.
®
. See the OnStar
®
,
Page 36

Black plate (10,1)
GMC Canyon Owner Manual - 2012
2-10 Keys, Doors, and Windows
Here is how to avoid setting off the
alarm by accident:
.
If you do not want to activate
the theft-deterrent system, the
vehicle should be locked with
the door key after the doors are
closed.
.
Always unlock a door with the
RKE transmitter. Unlocking a
door any other way will set off
the alarm.
If you set off the alarm by accident,
you can turn off the alarm by
pressing UNLOCK on the RKE
transmitter. The alarm will not stop if
you try to unlock a door any
other way.
Testing the Alarm
To test the alarm:
1. From inside the vehicle, activate
the system by locking the doors
with the RKE transmitter.
2. Unlock the door with the manual
door lock and open the door.
This should set off the alarm.
3. To turn the alarm off, press the
UNLOCK button on the RKE
transmitter or start the engine.
If the alarm does not sound when it
should but the lights flash, check to
see if the horn works. The horn fuse
may be blown. To replace the fuse,
see Fuses and Circuit Breakers on
page 10‑38.
If the alarm does not sound or the
front turn signal lamps do not flash,
see your dealer for service.
Immobilizer
See Radio Frequency Statement on
page 13‑20 for information
regarding Part 15 of the Federal
Communications Commission (FCC)
rules and Industry Canada
Standards RSS-GEN/210/220/310.
Immobilizer Operation (PASS-Key III+ Canada Only)
This vehicle has a passive
theft-deterrent system.
The system is automatically armed
when the key is removed from the
ignition.
The system is automatically
disarmed when the key is turned to
ON/RUN.
You do not have to manually arm or
disarm the system.
The security light comes on if
there is a problem with arming or
disarming the theft-deterrent
system.
The key uses a transponder that
matches an immobilizer control unit
in the vehicle. Only the correct key
starts the vehicle. If the key is ever
damaged, the vehicle may not start.
Page 37

Black plate (11,1)
GMC Canyon Owner Manual - 2012
Keys, Doors, and Windows 2-11
When trying to start the vehicle,
if the engine does not start and the
security light comes on, there may
be a problem with the theft-deterrent
system. Turn the ignition off and try
again.
If the engine still does not start, and
the key appears to be undamaged,
try another ignition key. Check the
fuse. See Fuses and Circuit
Breakers on page 10‑38. If the
engine still does not start with the
other key, the vehicle needs service.
If the vehicle does start, the first key
may be faulty. See your dealer who
can service the theft-deterrent
system and have a new key made.
It is possible for the theft-deterrent
system decoder to learn the
transponder value of a new or
replacement key. Up to 10 keys
can be programmed for the vehicle.
The following procedure is for
programming additional keys only.
Canadian Owners: If the keys are
lost or damaged, only a dealer can
service the theft-deterrent system to
have new ones made. Two current
driver's keys are required to
program additional keys.
To program a new key:
1. Verify that the new key has
PK3+ stamped on it.
2. Insert the current driver's key in
the ignition and start the engine.
If the engine does not start see
your dealer for service.
3. After the engine has started, turn
the key to LOCK/OFF, and
remove the key.
4. Insert the second current driver's
key in the ignition and start the
engine within ten seconds of
removing the previous key. If the
engine does not start see your
dealer for service.
5. After the engine has started, turn
the key to LOCK/OFF, and
remove the key. Insert the key to
be programmed and turn it to
ON/RUN within ten seconds of
removing the previous key.
The security light turns off once
the key has been programmed.
6. Repeat Steps 1 through 5 if
additional keys are to be
programmed.
If the security light comes on and
stays on while driving, the engine
will restart if you turn it off. However,
the theft-deterrent system is not
working properly and must be
serviced by your dealer. The
vehicle is not protected by the
theft-deterrent system at this time.
In an emergency, contact Roadside
Assistance. See Roadside
Assistance Program (U.S. and
Canada) on page 13‑7 or Roadside
Assistance Program (Mexico) on
page 13‑9.
Do not leave the key or device that
disarms or deactivates the theft
deterrent system in the vehicle.
Page 38

Black plate (12,1)
GMC Canyon Owner Manual - 2012
2-12 Keys, Doors, and Windows
Immobilizer Operation (Passlock U.S. Only)
Passlock®is a passive
theft-deterrent system that enables
fuel if the vehicle is started with
a valid key. If an incorrect key is
used or the ignition lock cylinder is
tampered with, the fuel system is
disabled and the vehicle does not
start.
The security light turns off
approximately five seconds after
the engine is started. See Security
Light on page 5‑18.
If the engine stalls and the security
light flashes, wait about 10 minutes
until the light stops flashing before
trying to restart the engine. Release
the key from START as soon as the
engine starts.
If the engine does not start after
three tries, the vehicle needs
service.
If the engine is running and the
security light comes on, the engine
restarts if you turn the engine off.
However, the Passlock
not working properly and must be
serviced by your dealer. The vehicle
is not protected by Passlock
time. See your dealer for service.
In an emergency, call the Roadside
Assistance Center. See Roadside
Assistance Program (U.S. and
Canada) on page 13‑7 or Roadside
Assistance Program (Mexico) on
page 13‑9.
Do not leave the key or device that
disarms or deactivates the theft
deterrent system in the vehicle.
®
system is
®
at this
Exterior Mirrors
Convex Mirrors
WARNING
{
A convex mirror can make things,
like other vehicles, look farther
away than they really are. If you
cut too sharply into the right lane,
you could hit a vehicle on the
right. Check the inside mirror or
glance over your shoulder before
changing lanes.
The passenger side mirror is convex
shaped. A convex mirror's surface is
curved so more can be seen from
the driver seat.
Manual Mirrors
Adjust the mirrors by pressing the
mirror up and down and left and
right so you can see a clear view
behind you.
Page 39

Black plate (13,1)
GMC Canyon Owner Manual - 2012
Keys, Doors, and Windows 2-13
Manually fold the mirrors inward to
prevent damage when going
through an automatic car wash. To
fold, push the mirrors toward the
vehicle. Push outward, to return the
mirrors to their original position.
Power Mirrors
Vehicles with outside power mirrors
have controls on the driver door
armrest.
To adjust the power mirrors:
1. Move the selector switch to the
L (left) or R (right) to choose the
driver or passenger mirror.
2. Press one of the four buttons
located on the control pad to
move the mirror to the desired
direction.
3. Return the selector switch to the
center position once the mirrors
are adjusted.
If the mirror begins making a
ratcheting sound, the mirror has
reached the end of its travel and
can go no farther in that direction.
To stop the sound, reverse the
mirror direction using the
control pad.
Manually fold the mirrors inward to
prevent damage when going
through an automatic car wash. To
fold, push the mirror toward the
vehicle. Push outward, to return the
mirror to its original position.
Interior Mirrors
Manual Rearview Mirror
Adjust this mirror for a clear view of
the area behind the vehicle. Hold
the mirror in the center to move it
up, down, or side-to-side. To reduce
headlamp glare, push the tab
forward for daytime use and pull it
for nighttime use.
®
Vehicles with OnStar
additional control buttons located at
the bottom of the mirror. See your
dealer for more information on the
system and how to subscribe to
OnStar. See the OnStar Owner's
Guide for more information about
the services OnStar provides.
Automatic Dimming Rearview Mirror
The vehicle may have an automatic
dimming inside rearview mirror.
Automatic dimming reduces the
glare of lights from behind the
vehicle.
have three
Page 40

Black plate (14,1)
GMC Canyon Owner Manual - 2012
2-14 Keys, Doors, and Windows
The mirror may also have OnStar
and/or a compass and outside
temperature display.
Control buttons for the OnStar
system are at the bottom of the
mirror. See the OnStar Owners
Guide for more information about
the services OnStar provides. See
Compass on page 5‑3 for more
information about the compass
display. See “Temperature Display”
after, for more information about the
outside temperature display.
AUTO/
and hold AUTO/
three seconds or depending on the
mirror, press
dimming on or off. The automatic
dimming feature comes on and the
indicator light illuminates each time
the vehicle is started.
( / O (On/Off): Press
( for about
O to turn automatic
®
Temperature Display
Y b / O (On/Off) : Press Y b or
depending on the mirror, press
turn the display on or off.
To adjust between Fahrenheit and
Celsius:
1. Press and hold
few seconds. The current unit of
measure (C or F) flashes.
2. Press
It is normal under certain conditions
for the temperature update to be
delayed. If an incorrect temperature
displays for an extended period, see
your dealer.
Y b / O again and
release to change the unit of
measure. Wait several seconds
and the compass/temperature
display returns with the selected
unit of measure.
Y b / O for a
Cleaning the Mirror
Do not spray glass cleaner directly
on the mirror. Use a soft towel
dampened with water.
O to
Windows
WARNING
{
Leaving children, helpless adults,
or pets in a vehicle with the
windows closed is dangerous.
They can be overcome by
the extreme heat and suffer
permanent injuries or even death
from heat stroke. Never leave a
child, a helpless adult, or a pet
alone in a vehicle, especially with
the windows closed in warm or
hot weather.
Page 41

Black plate (15,1)
GMC Canyon Owner Manual - 2012
Keys, Doors, and Windows 2-15
The vehicle aerodynamics are
designed to improve fuel economy
performance. This may result in a
pulsing sound when either rear
window is down and the front
windows are up. To reduce the
sound, open either a front window
or the sunroof (if equipped).
Manual Windows
On vehicles with manual windows,
use the window crank to open and
close each window.
Power Windows
WARNING
{
Leaving children in a vehicle with
the keys is dangerous for many
reasons. Children or others could
be badly injured or even killed.
They could operate the power
windows or other controls or even
make the vehicle move. The
windows will function and they
could be seriously injured or killed
if caught in the path of a closing
window. Do not leave keys in a
vehicle with children.
When there are children in the
rear seat use the window lockout
button to prevent unintentional
operation of the windows.
Page 42

Black plate (16,1)
GMC Canyon Owner Manual - 2012
2-16 Keys, Doors, and Windows
Regular Cab Shown, Crew Cab
Similar
Push the switch down to open the
window. Pull the front of the switch
up to close it.
The switches work when the ignition
is in ON/RUN, ACC/ACCESSORY,
or in Retained Accessory Power
(RAP). See Retained Accessory
Power (RAP) on page 9‑26.
Express-Down Window
Windows with an express-down
feature allow the window to be
lowered fully without pressing and
holding the switch. Press the front of
the switch to the first position, and
the window opens a small amount.
Press the switch down fully and the
window goes all the way down.
To stop the window while it is
lowering, pull up the front of the
switch.
Window Lockout (Crew Cab)
This feature prevents the rear
passenger windows from operating,
except from the driver position.
Press
o to activate the rear
window lockout switch. The red
line (A) will not be visible when
activated.
o again to deactivate the
Press
lockout switch. The red line (A) is
visible when deactivated.
Page 43

Black plate (17,1)
GMC Canyon Owner Manual - 2012
Keys, Doors, and Windows 2-17
Rear Windows
Sliding Rear Window
If the vehicle has this feature,
squeeze the latch in the center of
the window and slide the glass to
open it.
Be sure the latch is engaged when
the window is closed.
Sun Visors
Pull the sun visor down to block
glare. Detach the sun visor from the
center mount to pivot to the side
window, or to extend along the rod,
if available.
Page 44

Black plate (18,1)
GMC Canyon Owner Manual - 2012
2-18 Keys, Doors, and Windows
2 NOTES
Page 45

Black plate (1,1)
GMC Canyon Owner Manual - 2012
Seats and Restraints 3-1
Seats and Restraints
Head Restraints
Head Restraints . . . . . . . . . .... . . 3-2
Front Seats
Seat Adjustment . . . . . . . . . . . . . . 3-3
Power Seat Adjustment . . . . . . . 3-3
Lumbar Adjustment . . . . . . . . . . . 3-4
Reclining Seatbacks . . . . . . . . . . 3-4
Seatback Latches . . . . . . . . . . . . . 3-6
Heated Front Seats . . . . . . . . . . . 3-7
Rear Seats
Rear Seats (Extended Cab) . . . 3-8
Rear Seats (Crew Cab) . . . . . . . 3-8
Safety Belts
Safety Belts . . . . . . . . . . . . . . . ... 3-10
How to Wear Safety Belts
Properly .... . . . . . . . . . . . . . . . . 3-11
Lap-Shoulder Belt . . . . . . . . . . . 3-12
Safety Belt Use During
Pregnancy .... . . . . . . . . . . . . . . 3-16
Lap Belt . . . . . . . . . . . . . . . .. . . . . 3-17
Safety Belt Extender . . . . . . . . . 3-18
Safety System Check . . . . . . . . 3-18
Safety Belt Care . . . . . . . . . . . . . 3-18
Replacing Safety Belt System
Parts after a Crash . . . . . . . . . 3-18
Airbag System
Airbag System . . . . . .. . . . . . . .. 3-19
Where Are the Airbags? . . . . . 3-21
When Should an Airbag
Inflate? . . . . . . . . . . . . . . . . . .. . . 3-22
What Makes an Airbag
Inflate? . . . . . . . . . . . . . . . . . .. . . 3-24
How Does an Airbag
Restrain? . . . . . . . . . . . . ..... . . 3-24
What Will You See after an
Airbag Inflates? . . . . . . . . . . . . 3-24
Passenger Sensing
System . . . . . . . . .. . . . . . . . . . . . 3-26
Servicing the Airbag-Equipped
Vehicle . . . . . . . . . . . . . . . . . . . . . 3-30
Adding Equipment to the
Airbag-Equipped Vehicle . . . 3-30
Airbag System Check . . . . . . . . 3-32
Replacing Airbag System
Parts after a Crash . . . . . . . . . 3-32
Child Restraints
Older Children . . . . . . . . . . . . . . . 3-33
Infants and Young
Children . . . . . . . . . . . . . . . . . .. . 3-35
Child Restraint Systems . . . . . 3-37
Where to Put the Restraint . . . 3-39
Lower Anchors and Tethers
for Children (LATCH
System) . . . . . . .. . . . . . . .. . . . . 3-41
Replacing LATCH System
Parts After a Crash . . . . . . . . . 3-52
Securing Child Restraints
(Rear Seat Position) . . . . . .. . 3-52
Securing Child Restraints
(Center Front Seat
Position) . . . . . . . . . . . . . . . . . . . 3-54
Securing Child Restraints
(Right Front Seat
Position) . . . . . . . . . . . . . . . . . . . 3-57
Page 46

Black plate (2,1)
GMC Canyon Owner Manual - 2012
3-2 Seats and Restraints
Head Restraints
On some crew cab models, the
vehicle's front seats have adjustable
head restraints in the outboard
seating positions.
WARNING
{
With head restraints that are not
installed and adjusted properly,
there is a greater chance that
occupants will suffer a neck/
spinal injury in a crash. Do not
drive until the head restraints for
all occupants are installed and
adjusted properly.
Adjust the head restraint so that the
top of the restraint is at the same
height as the top of the occupant's
head. This position reduces the
chance of a neck injury in a crash.
The height of the head restraint can
be adjusted. Pull the head restraint
up to raise it. Try to move the head
restraint to make sure that it is
locked in place.
To lower the head restraint, press
the button, located on the top of the
seatback, and push the restraint
down. Try to move the head
restraint after the button is released
to make sure that it is locked in
place.
The front seat outboard head
restraints are not designed to be
removed.
Page 47

Black plate (3,1)
GMC Canyon Owner Manual - 2012
Seats and Restraints 3-3
Front Seats
Seat Adjustment
WARNING
{
You can lose control of the
vehicle if you try to adjust a
manual driver seat while the
vehicle is moving. The sudden
movement could startle and
confuse you, or make you push a
pedal when you do not want to.
Adjust the driver seat only when
the vehicle is not moving.
To adjust the seat:
1. Lift the bar under the front edge
of the seat cushion to unlock
the seat.
2. Slide the seat to the desired
position and release the bar.
3. Try to move the seat back and
forth to be sure the seat is
locked in place.
Power Seat Adjustment
To adjust the seat, if available:
.
Move the seat forward or
rearward by sliding the control
forward or rearward.
.
Raise or lower the front or rear
part of the seat cushion by
moving the front or rear of the
control up or down.
.
Raise or lower the entire seat by
moving the entire control up
or down.
Page 48

Black plate (4,1)
GMC Canyon Owner Manual - 2012
3-4 Seats and Restraints
To adjust the seatback, see “Power
Reclining Seatbacks” under
Reclining Seatbacks on page 3‑4.
Lumbar Adjustment
Manual Lumbar
If available, the manual lumbar knob
is on the outboard side of the
driver seat.
Turn the knob to increase or
decrease lumbar support.
Power Lumbar
If available, press and hold the front
or rear of the control to increase or
decrease lumbar support. Release
the control when the seatback
reaches the desired level of lumbar
support.
Reclining Seatbacks
WARNING
{
Sitting in a reclined position when
the vehicle is in motion can be
dangerous. Even when buckled
up, the safety belts cannot do
their job when reclined like this.
The shoulder belt cannot do its
job because it will not be against
your body. Instead, it will be in
front of you. In a crash, you could
go into it, receiving neck or other
injuries.
The lap belt cannot do its job
either. In a crash, the belt could
go up over your abdomen. The
belt forces would be there, not at
your pelvic bones. This could
cause serious internal injuries.
(Continued)
Page 49

Black plate (5,1)
GMC Canyon Owner Manual - 2012
Seats and Restraints 3-5
WARNING (Continued)
For proper protection when the
vehicle is in motion, have the
seatback upright. Then sit well
back in the seat and wear the
safety belt properly.
Do not have a seatback reclined if
the vehicle is moving.
Manual Reclining Seatbacks
WARNING
{
You can lose control of the
vehicle if you try to adjust a
manual driver seat while the
vehicle is moving. The sudden
movement could startle and
confuse you, or make you push a
pedal when you do not want to.
Adjust the driver seat only when
the vehicle is not moving.
WARNING
{
If either seatback is not locked, it
could move forward in a sudden
stop or crash. That could cause
injury to the person sitting there.
Always push and pull on the
seatbacks to be sure they are
locked.
To recline a manual seatback:
1. Lift the lever.
2. Move the seatback to the
desired position, and then
release the lever to lock the
seatback in place.
3. Push and pull on the seatback to
make sure it is locked.
To return the seatback to the upright
position:
1. Lift the lever fully without
applying pressure to the
seatback, and the seatback will
return to the upright position.
Page 50

Black plate (6,1)
GMC Canyon Owner Manual - 2012
3-6 Seats and Restraints
2. Push and pull on the seatback to
make sure it is locked.
Power Reclining Seatbacks
To recline a power seatback,
if available:
.
Tilt the top of the control
rearward to recline.
.
Tilt the top of the control forward
to raise.
Seatback Latches
The vehicle may have front
seatbacks that fold forward for easy
access to the rear seats or the
storage area behind the seats.
To fold the seatback forward, push
the lever on the side of the seat
rearward and pull the seatback
forward.
WARNING
{
If either seatback is not locked, it
could move forward in a sudden
stop or crash. That could cause
injury to the person sitting there.
Always push and pull on the
seatbacks to be sure they are
locked.
To return the seatback to the upright
position, push the seatback all the
way back until it latches.
If the seatback was reclined before
being folded forward, it will return to
the reclined position.
Page 51

Black plate (7,1)
GMC Canyon Owner Manual - 2012
Seats and Restraints 3-7
Heated Front Seats
WARNING
{
If you cannot feel temperature
change or pain to the skin, the
seat heater may cause burns
even at low temperatures. To
reduce the risk of burns, people
with such a condition should use
care when using the seat heater,
especially for long periods of
time. Do not place anything on
the seat that insulates against
heat, such as a blanket, cushion,
cover, or similar item. This may
cause the seat heater to
overheat. An overheated seat
heater may cause a burn or may
damage the seat.
If available, the switches are on the
outboard sides of the front seats. To
operate, the ignition must be on.
This feature will heat the cushion
and back of the seats.
.
Press the top of the switch for
the high setting.
.
Press the bottom of the switch
for the low setting.
.
Put the switch in the center
position to turn this feature off.
The heated seat will turn on at the
last setting if the ignition is turned
off and then back on.
The passenger safety belt must be
fastened for the heated seat feature
to work on the passenger seat.
Page 52

Black plate (8,1)
GMC Canyon Owner Manual - 2012
3-8 Seats and Restraints
Rear Seats
Rear Seats (Extended Cab)
On extended cab models, there may
be forward folding seats in the
rear area.
To fold a rear seat cushion from
the stored position to the sitting
position, pull the front of the seat
cushion down completely.
The rear seat storage compartments
must be closed before folding the
seat down. See Rear Storage on
page 4‑2.
Notice: Folding a rear seat with
the safety belts still fastened may
cause damage to the seat or the
safety belts. Always unbuckle the
safety belts and return them to
their normal stowed position
before folding a rear seat.
A. Hook and Loop Fastener
To store the seat:
1. Secure the safety belt buckle to
the inboard side of the seat with
the hook and loop fastener (A),
so that it does not move when
not in use.
2. Push the entire seat up until it is
flush with the trim panel.
Rear Seats (Crew Cab)
On crew cab models, the rear
seatbacks can be folded forward.
Notice: Folding a rear seat with
the safety belts still fastened may
cause damage to the seat or the
safety belts. Always unbuckle the
safety belts and return them to
their normal stowed position
before folding a rear seat.
Page 53

Black plate (9,1)
GMC Canyon Owner Manual - 2012
Seats and Restraints 3-9
To fold a rear seatback:
1. Disconnect the rear center
safety belt latch from the
mini-buckle by inserting the tip of
the safety belt tongue into the
slot on the buckle. Let the belt
retract.
2. Pull the loop on the outboard
side of the seatback forward
until you hear a click.
3. Fold the seatback forward.
To return a seatback to the upright
position:
1. Lift the seatback up and push it
rearward.
WARNING
{
If either seatback is not locked, it
could move forward in a sudden
stop or crash. That could cause
injury to the person sitting there.
Always push and pull on the
seatbacks to be sure they are
locked.
Page 54

Black plate (10,1)
GMC Canyon Owner Manual - 2012
3-10 Seats and Restraints
2. Push and pull on the seatback to
make sure it is locked in place.
WARNING
{
A safety belt that is improperly
routed, not properly attached,
or twisted will not provide the
protection needed in a crash. The
person wearing the belt could be
seriously injured. After raising the
rear seatback, always check to be
sure that the safety belts are
properly routed and attached, and
are not twisted.
3. Reconnect the center safety belt
latch plate to the mini-buckle.
Make sure the safety belt is not
twisted.
4. Push and pull on the latch plate
to be sure it is secure.
When the seatback is not in use, it
should be kept in the upright, locked
position.
Safety Belts
This section of the manual
describes how to use safety belts
properly. It also describes some
things not to do with safety belts.
WARNING
{
Do not let anyone ride where a
safety belt cannot be worn
properly. In a crash, if you or your
passenger(s) are not wearing
safety belts, injuries can be much
worse than if you are wearing
safety belts. You can be seriously
injured or killed by hitting things
inside the vehicle harder or by
being ejected from the vehicle.
In addition, anyone who is not
buckled up can strike other
passengers in the vehicle.
(Continued)
WARNING (Continued)
It is extremely dangerous to ride
in a cargo area, inside or outside
of a vehicle. In a collision,
passengers riding in these areas
are more likely to be seriously
injured or killed. Do not allow
passengers to ride in any area of
the vehicle that is not equipped
with seats and safety belts.
Always wear a safety belt, and
check that all passenger(s) are
restrained properly too.
This vehicle has indicators as a
reminder to buckle the safety belts.
See Safety Belt Reminders on
page 5‑9 for additional information.
Page 55

Black plate (11,1)
GMC Canyon Owner Manual - 2012
Seats and Restraints 3-11
Why Safety Belts Work
When riding in a vehicle, you travel
as fast as the vehicle does. If the
vehicle stops suddenly, you keep
going until something stops you.
It could be the windshield, the
instrument panel, or the safety belts!
When you wear a safety belt, you
and the vehicle slow down together.
There is more time to stop because
you stop over a longer distance and,
when worn properly, your strongest
bones take the forces from the
safety belts. That is why wearing
safety belts makes such good
sense.
Questions and Answers About
Safety Belts
Q: Will I be trapped in the vehicle
after a crash if I am wearing a
safety belt?
A: You could be — whether you are
wearing a safety belt or not.
Your chance of being conscious
during and after a crash, so you
can unbuckle and get out, is
much greater if you are belted.
Q: If my vehicle has airbags, why
should I have to wear safety
belts?
A: Airbags are supplemental
systems only; so they work with
safety belts — not instead of
them. Whether or not an airbag
is provided, all occupants still
have to buckle up to get the
most protection.
Also, in nearly all states and in
all Canadian provinces, the law
requires wearing safety belts.
How to Wear Safety Belts Properly
This section is only for people of
adult size.
There are special things to know
about safety belts and children. And
there are different rules for smaller
children and infants. If a child will be
riding in the vehicle, see Older
Children on page 3‑33 or Infants
and Young Children on page 3‑35.
Follow those rules for everyone's
protection.
It is very important for all occupants
to buckle up. Statistics show that
unbelted people are hurt more often
in crashes than those who are
wearing safety belts.
There are important things to know
about wearing a safety belt properly.
Page 56

Black plate (12,1)
GMC Canyon Owner Manual - 2012
3-12 Seats and Restraints
.
Sit up straight and always keep
your feet on the floor in front
of you.
.
Always use the correct buckle
for your seating position.
.
Wear the lap part of the belt low
and snug on the hips, just
touching the thighs. In a crash,
this applies force to the strong
pelvic bones and you would be
less likely to slide under the lap
belt. If you slid under it, the belt
would apply force on your
abdomen. This could cause
serious or even fatal injuries.
.
Wear the shoulder belt over the
shoulder and across the chest.
These parts of the body are best
able to take belt restraining
forces. The shoulder belt locks if
there is a sudden stop or crash.
WARNING
{
You can be seriously injured,
or even killed, by not wearing
your safety belt properly.
.
Never allow the lap or
shoulder belt to become
loose or twisted.
.
Never wear the shoulder belt
under both arms or behind
your back.
.
Never route the lap or
shoulder belt over an
armrest.
Lap-Shoulder Belt
All seating positions in the vehicle
have a lap-shoulder belt except for
the center front passenger position,
if equipped, which has a lap belt.
See Lap Belt on page 3‑17 for more
information.
The following instructions explain
how to wear a lap-shoulder belt
properly.
1. Adjust the seat, if the seat is
adjustable, so you can sit up
straight. To see how, see “Seats”
in the Index.
2. Pick up the latch plate and pull
the belt across you. Do not let it
get twisted.
The lap-shoulder belt may lock if
you pull the belt across you very
quickly. If this happens, let the
belt go back slightly to unlock it.
Then pull the belt across you
more slowly.
If you ever pull the shoulder
portion of a passenger belt out
all the way, the child restraint
locking feature may be engaged.
If this happens, just let the belt
go back all the way and start
again.
Page 57

Black plate (13,1)
GMC Canyon Owner Manual - 2012
Seats and Restraints 3-13
Engaging the child restraint
locking feature in the right front
seating position may affect the
passenger sensing system,
if equipped. See Passenger
Sensing System on page 3‑26
for more information.
3. Push the latch plate into the
buckle until it clicks.
Pull up on the latch plate to
make sure it is secure. If the belt
is not long enough, see Safety
Belt Extender on page 3‑18.
Position the release button on
the buckle so that the safety belt
could be quickly unbuckled if
necessary.
4. If equipped with a shoulder belt
height adjuster, move it to the
height that is right for you. See
“Shoulder Belt Height Adjuster”
later in this section for
instructions on use and
important safety information.
5. To make the lap part tight, pull
up on the shoulder belt.
It may be necessary to pull
stitching on the safety belt
through the latch plate to fully
tighten the lap belt on smaller
occupants.
To unlatch the belt, push the button
on the buckle. The belt should
return to its stowed position. Slide
the latch plate up the safety belt
webbing when the safety belt is not
in use. The latch plate should rest
on the stitching on the safety belt,
near the guide loop on the side wall.
Page 58

Black plate (14,1)
GMC Canyon Owner Manual - 2012
3-14 Seats and Restraints
Before a door is closed, be sure the
belt is out of the way. If a door is
slammed against a safety belt,
damage can occur to both the belt
and the vehicle.
Shoulder Belt Height Adjuster
The vehicle has a shoulder belt
height adjuster for the driver and
right front passenger seating
position.
Adjust the height so the shoulder
portion of the belt is on the shoulder
and not falling off of it. The belt
should be close to, but not
contacting, the neck. Improper
shoulder belt height adjustment
could reduce the effectiveness of
the safety belt in a crash. See How
to Wear Safety Belts Properly on
page 3‑11.
To move it up or down, squeeze the
release buttons (A) together and
move the height adjuster to the
desired position.
After the adjuster is set to the
desired position, try to move it down
without squeezing the release
buttons to make sure it has locked
into position.
Safety Belt Pretensioners
This vehicle has safety belt
pretensioners for front outboard
occupants. Although the safety belt
pretensioners cannot be seen, they
are part of the safety belt assembly.
They can help tighten the safety
belts during the early stages of a
moderate to severe frontal or near
frontal crash if the threshold
conditions for pretensioner
activation are met.
Pretensioners work only once. If the
pretensioners activate in a crash,
they will need to be replaced, and
probably other new parts for the
vehicle's safety belt system. See
Replacing Safety Belt System Parts
after a Crash on page 3‑18.
Page 59

Black plate (15,1)
GMC Canyon Owner Manual - 2012
Rear Safety Belt Comfort
Guides
This vehicle may have rear shoulder
belt comfort guides for the rear
outside positions. If not, they are
available through your dealer.
Rear shoulder belt comfort guides
may provide added safety belt
comfort for older children who have
outgrown booster seats and for
some adults. When installed and
properly adjusted, the comfort guide
positions the belt away from the
neck and head.
Here is how to install a comfort
guide to the shoulder belt:
1. Slide the guide off of its storage
clip located between the interior
body and the seatback.
Seats and Restraints 3-15
2. Place the guide over the belt
and insert the two edges of the
belt into the slots of the guide.
Page 60

Black plate (16,1)
GMC Canyon Owner Manual - 2012
3-16 Seats and Restraints
3. Be sure that the belt is not
twisted and it lies flat. The
elastic cord must be under the
belt and the guide on top.
WARNING
{
A safety belt that is not properly
worn may not provide the
protection needed in a crash. The
person wearing the belt could be
seriously injured. The shoulder
belt should go over the shoulder
and across the chest. These parts
of the body are best able to take
belt restraining forces.
4. Buckle, position, and release the
safety belt as described
previously in this section. Make
sure the shoulder portion of the
belt is on the shoulder and not
falling off of it. The belt should
be close to, but not contacting,
the neck.
To remove and store the comfort
guide, squeeze the belt edges
together so that the safety belt can
be removed from the guide. Slide
the guide back on its storage clip
located between the interior body
and the seatback.
Safety Belt Use During Pregnancy
Safety belts work for everyone,
including pregnant women. Like all
occupants, they are more likely to
be seriously injured if they do not
wear safety belts.
Page 61

Black plate (17,1)
GMC Canyon Owner Manual - 2012
Seats and Restraints 3-17
A pregnant woman should wear a
lap-shoulder belt, and the lap
portion should be worn as low as
possible, below the rounding,
throughout the pregnancy.
The best way to protect the fetus is
to protect the mother. When a safety
belt is worn properly, it is more likely
that the fetus will not be hurt in a
crash. For pregnant women, as for
anyone, the key to making safety
belts effective is wearing them
properly.
Lap Belt
This section is only for the lap belt.
To learn how to wear a lap-shoulder
belt, see Lap-Shoulder Belt on
page 3‑12.
The vehicle may have a center
seating position. When you sit in the
center front seating position, you
have a lap safety belt, which has no
retractor.
To make the belt longer, tilt the latch
plate and pull it along the belt.
Buckle, position, and release it the
same way as the lap part of a
lap-shoulder belt.
To make the belt shorter, pull its free
end as shown until the belt is snug.
If the belt is not long enough, see
Safety Belt Extender on page 3‑18.
Make sure the release button on the
buckle is positioned so you would
be able to unbuckle the safety belt
quickly if necessary.
Page 62

Black plate (18,1)
GMC Canyon Owner Manual - 2012
3-18 Seats and Restraints
Safety Belt Extender
If the vehicle's safety belt will fasten
around you, you should use it.
But if a safety belt is not long
enough, your dealer will order you
an extender. When you go in to
order it, take the heaviest coat you
will wear, so the extender will be
long enough for you. To help avoid
personal injury, do not let someone
else use it, and use it only for the
seat it is made to fit. The extender
has been designed for adults. Never
use it for securing child seats. To
wear it, attach it to the regular safety
belt. For more information, see the
instruction sheet that comes with
the extender.
Safety System Check
Now and then, check that the safety
belt reminder light, safety belts,
buckles, latch plates, retractors, and
anchorages are all working properly.
Look for any other loose or
damaged safety belt system parts
that might keep a safety belt system
from doing its job. See your dealer
to have it repaired. Torn or frayed
safety belts may not protect you in a
crash. They can rip apart under
impact forces. If a belt is torn or
frayed, get a new one right away.
Make sure the safety belt reminder
light is working. See Safety Belt
Reminders on page 5‑9 for more
information.
Keep safety belts clean and dry.
See Safety Belt Care on page 3‑18.
Safety Belt Care
Keep belts clean and dry.
WARNING
{
Do not bleach or dye safety belts.
It may severely weaken them. In
a crash, they might not be able to
(Continued)
WARNING (Continued)
provide adequate protection.
Clean safety belts only with mild
soap and lukewarm water.
Replacing Safety Belt System Parts after a Crash
WARNING
{
A crash can damage the safety
belt system in the vehicle.
A damaged safety belt system
may not properly protect the
person using it, resulting in
serious injury or even death in a
crash. To help make sure the
safety belt systems are working
properly after a crash, have them
inspected and any necessary
replacements made as soon as
possible.
Page 63

Black plate (19,1)
GMC Canyon Owner Manual - 2012
Seats and Restraints 3-19
After a minor crash, replacement of
safety belts may not be necessary.
But the safety belt assemblies that
were used during any crash may
have been stressed or damaged.
See your dealer to have the safety
belt assemblies inspected or
replaced.
New parts and repairs may be
necessary even if the safety belt
system was not being used at the
time of the crash.
Have the safety belt pretensioners
checked if the vehicle has been in a
crash, or if the airbag readiness light
stays on after you start the vehicle
or while you are driving. See Airbag
Readiness Light on page 5‑10.
Airbag System
The vehicle has the following
airbags:
.
A frontal airbag for the driver.
.
A frontal airbag for the right front
passenger.
Your vehicle may also have the
following airbags:
.
A roof-rail airbag for the driver
and the passenger seated
directly behind the driver.
.
A roof-rail airbag for the right
front passenger and the
passenger seated directly
behind the right front passenger.
All of the airbags in your vehicle will
have the word AIRBAG embossed
in the trim or on an attached label
near the deployment opening.
For frontal airbags, the word
AIRBAG will appear on the middle
part of the steering wheel for the
driver and on the instrument panel
for the right front passenger.
With roof-rail airbags, the word
AIRBAG will appear along the
headliner or trim.
Airbags are designed to supplement
the protection provided by safety
belts. Even though today's airbags
are also designed to help reduce
the risk of injury from the force of an
inflating bag, all airbags must inflate
very quickly to do their job.
Page 64

Black plate (20,1)
GMC Canyon Owner Manual - 2012
3-20 Seats and Restraints
Here are the most important things
to know about the airbag system:
WARNING
{
You can be severely injured or
killed in a crash if you are not
wearing your safety belt — even if
you have airbags. Airbags are
designed to work with safety
belts, but do not replace them.
Also, airbags are not designed to
deploy in every crash. In some
crashes safety belts are your only
restraint. See When Should an
Airbag Inflate? on page 3‑22.
Wearing your safety belt during a
crash helps reduce your chance
of hitting things inside the vehicle
or being ejected from it. Airbags
are “supplemental restraints” to
the safety belts. Everyone in your
vehicle should wear a safety belt
properly — whether or not there is
an airbag for that person.
WARNING
{
Airbags inflate with great force,
faster than the blink of an eye.
Anyone who is up against, or very
close to, any airbag when it
inflates can be seriously injured
or killed. Do not sit unnecessarily
close to the airbag, as you would
be if you were sitting on the edge
of your seat or leaning forward.
Safety belts help keep you in
position before and during a
crash. Always wear your safety
belt, even with airbags. The driver
should sit as far back as possible
while still maintaining control of
the vehicle.
Occupants should not lean on or
sleep against the door or side
windows in seating positions with
roof-rail airbags.
WARNING
{
Children who are up against,
or very close to, any airbag when
it inflates can be seriously
injured or killed. Airbags plus
lap-shoulder belts offer protection
for adults and older children, but
not for young children and infants.
Neither the vehicle safety belt
system nor its airbag system is
designed for them. Young
children and infants need the
protection that a child restraint
system can provide. Always
secure children properly in the
vehicle. To read how, see Older
Children on page 3‑33 or Infants
and Young Children on
page 3‑35.
Page 65

Black plate (21,1)
GMC Canyon Owner Manual - 2012
There is an airbag readiness light
on the instrument panel, which
shows the airbag symbol.
The system checks the airbag
electrical system for malfunctions.
The light tells you if there is an
electrical problem. See Airbag
Readiness Light on page 5‑10 for
more information.
Where Are the Airbags?
The driver's airbag is in the middle
of the steering wheel.
Seats and Restraints 3-21
The right front passenger's airbag is
in the instrument panel on the
passenger's side.
Page 66

Black plate (22,1)
GMC Canyon Owner Manual - 2012
3-22 Seats and Restraints
Driver Side Shown, Passenger
Side Similar
If your vehicle has roof-rail airbags
for the driver, right front passenger,
and second row outboard
passengers, they are in the
ceiling above the side windows.
WARNING
{
If something is between an
occupant and an airbag, the
airbag might not inflate properly
or it might force the object into
that person causing severe injury
or even death. The path of an
inflating airbag must be kept
clear. Do not put anything
between an occupant and an
airbag, and do not attach or put
anything on the steering wheel
hub or on or near any other
airbag covering.
Never secure anything to the roof
of a vehicle with roof-rail airbags
by routing a rope or tie down
through any door or window
opening. If you do, the path of an
inflating roof-rail airbag will be
blocked.
When Should an Airbag Inflate?
Frontal airbags are designed to
inflate in moderate to severe frontal
or near-frontal crashes to help
reduce the potential for severe
injuries mainly to the driver's or right
front passenger's head and chest.
However, they are only designed to
inflate if the impact exceeds a
predetermined deployment
threshold. Deployment thresholds
are used to predict how severe a
crash is likely to be in time for the
airbags to inflate and help restrain
the occupants.
Whether your frontal airbags will or
should deploy is not based on how
fast your vehicle is traveling.
It depends largely on what you hit,
the direction of the impact, and how
quickly your vehicle slows down.
Page 67

Black plate (23,1)
GMC Canyon Owner Manual - 2012
Seats and Restraints 3-23
Frontal airbags may inflate at
different crash speeds. For
example:
.
If the vehicle hits a stationary
object, the airbags could inflate
at a different crash speed than if
the vehicle hits a moving object.
.
If the vehicle hits an object that
deforms, the airbags could
inflate at a different crash speed
than if the vehicle hits an object
that does not deform.
.
If the vehicle hits a narrow object
(like a pole), the airbags could
inflate at a different crash speed
than if the vehicle hits a wide
object (like a wall).
.
If the vehicle goes into an object
at an angle, the airbags could
inflate at a different crash speed
than if the vehicle goes straight
into the object.
Thresholds can also vary with
specific vehicle design.
Frontal airbags are not intended to
inflate during vehicle rollovers, rear
impacts, or in many side impacts.
Your vehicle has seat position
sensors which enables the sensing
system to monitor the position of the
driver's seat and the right front
passenger's seat. Seat position
sensors provide information that is
used to determine if the airbags
should deploy at a reduced level or
at full deployment.
In addition, your vehicle has
dual-stage frontal airbags.
Dual-stage airbags adjust the
restraint according to crash severity.
Your vehicle has electronic frontal
sensors, which help the sensing
system distinguish between a
moderate frontal impact and a more
severe frontal impact. For moderate
frontal impacts, dual-stage airbags
inflate at a level less than full
deployment. For more severe frontal
impacts, full deployment occurs.
Your vehicle may or may not have
roof-rail airbags. See Airbag System
on page 3‑19. Roof-rail airbags are
intended to inflate in moderate to
severe side crashes. Roof-rail
airbags will inflate if the crash
severity is above the system's
designed threshold level. The
threshold level can vary with
specific vehicle design.
Roof-rail airbags are not intended to
inflate in frontal impacts, near-frontal
impacts, rollovers, or rear impacts.
Both roof-rail airbags will deploy
when either side of the vehicle is
struck.
In any particular crash, no one can
say whether an airbag should have
inflated simply because of the
damage to a vehicle or because of
what the repair costs were. For
frontal airbags, inflation is
determined by what the vehicle hits,
the angle of the impact, and how
quickly the vehicle slows down. For
roof-rail airbags, deployment is
determined by the location and
severity of the side impact.
Page 68

Black plate (24,1)
GMC Canyon Owner Manual - 2012
3-24 Seats and Restraints
What Makes an Airbag Inflate?
In a deployment event, the sensing
system sends an electrical signal
triggering a release of gas from the
inflator. Gas from the inflator fills the
airbag causing the bag to break out
of the cover and deploy. The inflator,
the airbag, and related hardware are
all part of the airbag module.
Frontal airbag modules are located
inside the steering wheel and
instrument panel. For vehicles with
seat‐mounted side impact airbags,
there are airbags modules in the
side of the front seatbacks closest
to the door. For vehicles with
roof-rail airbags, there are airbag
modules in the ceiling of the vehicle,
near the side windows that have
occupant seating positions.
How Does an Airbag Restrain?
In moderate to severe frontal or
near frontal collisions, even belted
occupants can contact the steering
wheel or the instrument panel. In
moderate to severe side collisions,
even belted occupants can contact
the inside of the vehicle.
Airbags supplement the protection
provided by safety belts. Frontal
airbags distribute the force of the
impact more evenly over the
occupant's upper body, stopping the
occupant more gradually. Roof-rail
airbags distribute the force of the
impact more evenly over the
occupant's upper body.
But airbags would not help in many
types of collisions, primarily
because the occupant's motion is
not toward those airbags. See When
Should an Airbag Inflate? on
page 3‑22 for more information.
Airbags should never be regarded
as anything more than a supplement
to safety belts.
What Will You See after an Airbag Inflates?
After the frontal airbags inflate, they
quickly deflate, so quickly that some
people may not even realize the
airbags inflated. Roof-rail airbags
may still be at least partially inflated
for some time after they deploy.
Some components of the airbag
module may be hot for several
minutes. For location of the airbag
modules, see What Makes an
Airbag Inflate? on page 3‑24.
The parts of the airbag that come
into contact with you may be warm,
but not too hot to touch. There may
be some smoke and dust coming
from the vents in the deflated
airbags. Airbag inflation does not
prevent the driver from seeing out of
the windshield or being able to steer
the vehicle, nor does it prevent
people from leaving the vehicle.
Page 69

Black plate (25,1)
GMC Canyon Owner Manual - 2012
Seats and Restraints 3-25
WARNING
{
When an airbag inflates, there
may be dust in the air. This dust
could cause breathing problems
for people with a history of
asthma or other breathing trouble.
To avoid this, everyone in the
vehicle should get out as soon as
it is safe to do so. If you have
breathing problems but cannot
get out of the vehicle after an
airbag inflates, then get fresh air
by opening a window or a door.
If you experience breathing
problems following an airbag
deployment, you should seek
medical attention.
The vehicle has a feature that may
automatically unlock the doors
(if equipped with power door locks),
turn the interior lamps on, flash the
hazard warning flashers, turn off the
radio, and shut off the fuel system
after the airbag inflates. You can
lock the doors again by using the
door lock. The interior lamps and
hazard warning flashers will
deactivate after approximately
15 minutes.
WARNING
{
A crash severe enough to inflate
the airbags may have also
damaged important functions in
the vehicle, such as the fuel
system, brake and steering
systems, etc. Even if the vehicle
appears to be drivable after a
moderate crash, there may be
concealed damage that could
make it difficult to safely operate
the vehicle.
Use caution if you should attempt
to restart the engine after a crash
has occurred.
In many crashes severe enough to
inflate the airbag, windshields are
broken by vehicle deformation.
Additional windshield breakage may
also occur from the right front
passenger airbag.
.
Airbags are designed to inflate
only once. After an airbag
inflates, you will need some new
parts for the airbag system.
If you do not get them, the
airbag system will not be there
to help protect you in another
crash. A new system will include
airbag modules and possibly
other parts. The service manual
for your vehicle covers the need
to replace other parts.
.
Your vehicle has a crash
sensing and diagnostic module
which records information after a
crash. See Vehicle Data
Recording and Privacy on
page 13‑19 and Event Data
Recorders on page 13‑19.
Page 70

Black plate (26,1)
GMC Canyon Owner Manual - 2012
3-26 Seats and Restraints
.
Let only qualified technicians
work on the airbag system.
Improper service can mean that
the airbag system will not work
properly. See your dealer for
service.
Passenger Sensing System
If the vehicle has one of the
passenger airbag status indicators
pictured in the following illustrations,
then the vehicle has a passenger
sensing system for the right front
passenger position. The passenger
airbag status indicator, if equipped,
is visible on the instrument panel
when the vehicle is started.
In addition, if the vehicle has a
passenger sensing system for the
right front passenger position, the
label on the vehicle's sun visors
refer to “ADVANCED AIRBAGS”.
United States
Canada and Mexico
The words ON and OFF, or the
symbol for on and off, will be visible
during the system check. When the
system check is complete, either the
word ON or OFF, or the symbol for
on or off will be visible. See
Passenger Airbag Status Indicator
on page 5‑11.
The passenger sensing system will
turn off the right front passenger
frontal airbag under certain
conditions. The driver airbag is not
affected by the passenger sensing
system.
The passenger sensing system
works with sensors that are part of
the right front passenger seat. The
sensors are designed to detect the
presence of a properly-seated
occupant and determine if the right
front passenger frontal airbag
should be enabled (may inflate)
or not.
According to accident statistics,
children and infants are safer when
properly restrained in a child
restraint system or infant restraint
system secured in a rear seating
position.
We recommend that children be
secured in a rear seat, including:
an infant or a child riding in a
rear-facing child restraint; a child
riding in a forward-facing child seat;
an older child riding in a booster
seat; and children, who are large
enough, using safety belts.
Page 71

Black plate (27,1)
GMC Canyon Owner Manual - 2012
Seats and Restraints 3-27
We recommend that rear‐facing
child restraints not be transported in
the vehicle, even if the airbag is off.
A label on your sun visor says,
“Never put a rear-facing child seat in
the front.” This is because the risk to
the rear-facing child is so great,
if the airbag deploys.
WARNING
{
A child in a rear-facing child
restraint can be seriously
injured or killed if the right front
passenger airbag inflates. This
is because the back of the
rear-facing child restraint would
be very close to the inflating
airbag. A child in a forward-facing
child restraint can be seriously
injured or killed if the right front
passenger airbag inflates and the
passenger seat is in a forward
position.
(Continued)
WARNING (Continued)
Even if the passenger sensing
system has turned off the right
front passenger frontal airbag, no
system is fail-safe. No one can
guarantee that an airbag will not
deploy under some unusual
circumstance, even though the
airbag is turned off.
Secure rear-facing child
restraints in a rear seat, even if
the airbag is off. If you secure a
forward-facing child restraint in
the right front seat, always move
the front passenger seat as far
back as it will go. It is better to
secure the child restraint in a
rear seat.
If your vehicle does not have a
rear seat that will accommodate a
rear-facing child restraint, a
rear-facing child restraint should
not be installed in the vehicle, even
if the airbag is off.
The passenger sensing system is
designed to turn off the right front
passenger airbag if:
.
The right front passenger seat is
unoccupied.
.
The system determines that an
infant is present in a rear-facing
infant seat.
.
The system determines that a
small child is present in a child
restraint.
.
The system determines that a
small child is present in a
booster seat.
.
A right front passenger takes
his/her weight off of the seat for
a period of time.
.
The right front passenger seat is
occupied by a smaller person,
such as a child who has
outgrown child restraints.
.
Or, if there is a critical problem
with the airbag system or the
passenger sensing system.
Page 72

Black plate (28,1)
GMC Canyon Owner Manual - 2012
3-28 Seats and Restraints
When the passenger sensing
system has turned off the right front
passenger frontal airbag, the off
indicator will light and stay lit to
remind you that the airbag is off.
See Passenger Airbag Status
Indicator on page 5‑11.
The passenger sensing system is
designed to turn on (may inflate) the
right front passenger frontal airbag
anytime the system senses that a
person of adult size is sitting
properly in the right front passenger
seat. When the passenger sensing
system has allowed the airbag to be
enabled, the on indicator will light
and stay lit to remind you that the
airbag is active.
For some children who have
outgrown child restraints and for
very small adults, the passenger
sensing system may or may not
turn off the right front passenger's
frontal airbag, depending upon the
person's seating posture and body
build. Everyone in your vehicle
who has outgrown child restraints
should wear a safety belt
properly — whether or not there
is an airbag for that person.
WARNING
{
If the airbag readiness light ever
comes on and stays on, it means
that something may be wrong
with the airbag system. To help
avoid injury to yourself or others,
have the vehicle serviced right
away. See Airbag Readiness
Light on page 5‑10 for more
information, including important
safety information.
If the On Indicator is Lit for a
Child Restraint
If a child restraint has been installed
and the on indicator is lit:
1. Turn the vehicle off.
2. Remove the child restraint from
the vehicle.
3. Remove any additional items
from the seat such as blankets,
cushions, seat covers, seat
heaters, or seat massagers.
4. Reinstall the child restraint
following the directions
provided by the child restraint
manufacturer and refer to
Securing Child Restraints (Rear
Seat Position) on page 3‑52 or
Securing Child Restraints
(Center Front Seat Position) on
page 3‑54 or Securing Child
Restraints (Right Front Seat
Position) on page 3‑57.
Page 73

Black plate (29,1)
GMC Canyon Owner Manual - 2012
Seats and Restraints 3-29
5. If, after reinstalling the child
restraint and restarting the
vehicle, the on indicator is still lit,
turn the vehicle off. Then slightly
recline the vehicle seatback
and adjust the seat cushion,
if adjustable, to make sure that
the vehicle seatback is not
pushing the child restraint into
the seat cushion.
Also make sure the child
restraint is not trapped under the
vehicle head restraint. If this
happens, adjust the head
restraint. See Head Restraints
on page 3‑2.
6. Restart the vehicle.
If the on indicator is still lit,
secure the child in the child
restraint in a rear seat position in
the vehicle and check with your
dealer.
If no rear seat is available, do
not install a child restraint in this
vehicle and check with your
dealer.
If the Off Indicator is Lit for an
Adult‐Size Occupant
If a person of adult-size is sitting in
the right front passenger seat, but
the off indicator is lit, it could be
because that person is not sitting
properly in the seat. If this happens,
use the following steps to allow the
system to detect that person and
enable the right front passenger
frontal airbag:
1. Turn the vehicle off.
2. Remove any additional material
from the seat, such as blankets,
cushions, seat covers, seat
heaters, or seat massagers.
3. Place the seatback in the fully
upright position.
4. Have the person sit upright in
the seat, centered on the seat
cushion, with legs comfortably
extended.
5. Restart the vehicle and have the
person remain in this position for
two to three minutes after the on
indicator is lit.
Additional Factors Affecting
System Operation
Safety belts help keep the
passenger in position on the seat
during vehicle maneuvers and
braking, which helps the passenger
sensing system maintain the
passenger airbag status. See
“Safety Belts” and “Child Restraints”
in the Index for additional
information about the importance
of proper restraint use.
Page 74

Black plate (30,1)
GMC Canyon Owner Manual - 2012
3-30 Seats and Restraints
If the shoulder portion of the belt is
pulled out all the way, the child
restraint locking feature will be
engaged. This may unintentionally
cause the passenger sensing
system to turn the airbag off for
some adult size occupants. If this
happens, let the belt go back all the
way and start again.
A thick layer of additional material,
such as a blanket or cushion,
or aftermarket equipment such as
seat covers, seat heaters, and seat
massagers can affect how well the
passenger sensing system
operates. We recommend that you
not use seat covers or other
aftermarket equipment except when
approved by GM for your specific
vehicle. See Adding Equipment to
the Airbag-Equipped Vehicle on
page 3‑30 for more information
about modifications that can affect
how the system operates.
WARNING
{
Stowing of articles under the
passenger seat or between the
passenger seat cushion and
seatback may interfere with the
proper operation of the passenger
sensing system.
Servicing the Airbag-Equipped Vehicle
Airbags affect how the vehicle
should be serviced. There are parts
of the airbag system in several
places around the vehicle. Your
dealer and the service manual have
information about servicing the
vehicle and the airbag system. To
purchase a service manual, see
Service Publications Ordering
Information on page 13‑16.
WARNING
{
For up to 10 seconds after the
vehicle is turned off and the
battery is disconnected, an airbag
can still inflate during improper
service. You can be injured if you
are close to an airbag when it
inflates. Avoid yellow connectors.
They are probably part of the
airbag system. Be sure to follow
proper service procedures, and
make sure the person performing
work for you is qualified to do so.
Adding Equipment to the Airbag-Equipped Vehicle
Q: Is there anything I might add
to or change about the vehicle
that could keep the airbags
from working properly?
A: Yes. If you add things that
change the vehicle's frame,
bumper system, height, front end
or side sheet metal, they may
Page 75

Black plate (31,1)
GMC Canyon Owner Manual - 2012
Seats and Restraints 3-31
keep the airbag system from
working properly. Changing or
moving any parts of the front
seats, safety belts, the airbag
sensing and diagnostic module,
steering wheel, instrument
panel, roof-rail airbag modules,
ceiling headliner or pillar garnish
trim, front sensors, or airbag
wiring can affect the operation of
the airbag system.
In addition, the vehicle may have
a passenger sensing system for
the right front passenger
position, which includes sensors
that are part of the passenger
seat. The passenger sensing
system may not operate properly
if the original seat trim is
replaced with non-GM covers,
upholstery or trim, or with
GM covers, upholstery or trim
designed for a different vehicle.
Any object, such as an
aftermarket seat heater or a
comfort enhancing pad or
device, installed under or on top
of the seat fabric, could also
interfere with the operation of
the passenger sensing system.
This could either prevent proper
deployment of the passenger
airbag(s) or prevent the
passenger sensing system from
properly turning off the
passenger airbag(s). See
Passenger Sensing System on
page 3‑26.
If you have any questions, call
Customer Assistance. The
phone numbers and addresses
for Customer Assistance are in
Step Two of the Customer
Satisfaction Procedure in this
manual. See Customer
Satisfaction Procedure (U.S. and
Canada) on page 13‑1 or
Customer Satisfaction
Procedure (Mexico) on
page 13‑3.
Q: Because I have a disability,
I have to get my vehicle
modified. How can I find out
whether this will affect my
airbag system?
A: If you have questions, call
Customer Assistance. The
phone numbers and addresses
for Customer Assistance are in
Step Two of the Customer
Satisfaction Procedure in this
manual. See Customer
Satisfaction Procedure (U.S. and
Canada) on page 13‑1 or
Customer Satisfaction
Procedure (Mexico) on
page 13‑3.
In addition, your dealer and the
service manual have information
about the location of the airbag
sensors, sensing and diagnostic
module and airbag wiring.
Page 76

Black plate (32,1)
GMC Canyon Owner Manual - 2012
3-32 Seats and Restraints
Airbag System Check
The airbag system does not need
regularly scheduled maintenance or
replacement. Make sure the airbag
readiness light is working. See
Airbag Readiness Light on
page 5‑10 for more information.
Notice: If an airbag covering is
damaged, opened, or broken, the
airbag may not work properly. Do
not open or break the airbag
coverings. If there are any
opened or broken airbag covers,
have the airbag covering and/or
airbag module replaced. For the
location of the airbags, see
Where Are the Airbags? on
page 3‑21. See your dealer for
service.
Replacing Airbag System Parts after a Crash
WARNING
{
A crash can damage the
airbag systems in the vehicle.
A damaged airbag system may
not work properly and may
not protect you and your
passenger(s) in a crash, resulting
in serious injury or even death.
To help make sure the airbag
systems are working properly
after a crash, have them
inspected and any necessary
replacements made as soon as
possible.
If an airbag inflates, you will need to
replace airbag system parts. See
your dealer for service.
If the airbag readiness light stays on
after the vehicle is started or comes
on when you are driving, the airbag
system may not work properly.
Have the vehicle serviced right
away. See Airbag Readiness Light
on page 5‑10 for more information.
Page 77

Black plate (33,1)
GMC Canyon Owner Manual - 2012
Seats and Restraints 3-33
Child Restraints
Older Children
Older children who have outgrown
booster seats should wear the
vehicle safety belts.
The manufacturer's instructions that
come with the booster seat state the
weight and height limitations for that
booster. Use a booster seat with a
lap-shoulder belt until the child
passes the fit test below:
.
Sit all the way back on the seat.
Do the knees bend at the seat
edge? If yes, continue. If no,
return to the booster seat.
.
Buckle the lap-shoulder belt.
Does the shoulder belt rest on
the shoulder? If yes, continue.
If no, try using the rear safety
belt comfort guide. See “Rear
Safety Belt Comfort Guides”
under Lap-Shoulder Belt on
page 3‑12 for more information.
If the shoulder belt still does not
rest on the shoulder, then return
to the booster seat.
.
Does the lap belt fit low and
snug on the hips, touching the
thighs? If yes, continue. If no,
return to the booster seat.
.
Can proper safety belt fit be
maintained for the length of the
trip? If yes, continue. If no,
return to the booster seat.
Q: What is the proper way to
wear safety belts?
A: An older child should wear a
lap-shoulder belt and get the
additional restraint a shoulder
belt can provide. The shoulder
belt should not cross the face or
neck. The lap belt should fit
snugly below the hips, just
touching the top of the thighs.
This applies belt force to the
child's pelvic bones in a crash.
It should never be worn over the
abdomen, which could cause
severe or even fatal internal
injuries in a crash.
Also see “Rear Safety Belt Comfort
Guides” under Lap-Shoulder Belt on
page 3‑12.
Page 78

Black plate (34,1)
GMC Canyon Owner Manual - 2012
3-34 Seats and Restraints
According to accident statistics,
children and infants are safer when
properly restrained in a child
restraint system or infant restraint
system secured in a rear seating
position.
In a crash, children who are not
buckled up can strike other people
who are buckled up, or can be
thrown out of the vehicle. Older
children need to use safety belts
properly.
WARNING
{
Never do this.
Never allow two children to wear
the same safety belt. The safety
belt cannot properly spread the
impact forces. In a crash, the two
children can be crushed together
and seriously injured. A safety
belt must be used by only one
person at a time.
WARNING
{
Never do this.
Never allow a child to wear the
safety belt with the shoulder belt
behind their back. A child can be
seriously injured by not wearing
the lap-shoulder belt properly. In a
crash, the child would not be
restrained by the shoulder belt.
(Continued)
WARNING (Continued)
The child could move too far
forward increasing the chance of
head and neck injury. The child
might also slide under the lap
belt. The belt force would then be
applied right on the abdomen.
That could cause serious or fatal
injuries. The shoulder belt should
go over the shoulder and across
the chest.
Page 79

Black plate (35,1)
GMC Canyon Owner Manual - 2012
Seats and Restraints 3-35
Infants and Young Children
Everyone in a vehicle needs
protection! This includes infants
and all other children. Neither the
distance traveled nor the age and
size of the traveler changes the
need, for everyone, to use safety
restraints. In fact, the law in every
state in the United States and in
every Canadian province says
children up to some age must be
restrained while in a vehicle.
WARNING
{
Children can be seriously injured
or strangled if a shoulder belt is
wrapped around their neck and
the safety belt continues to
tighten. Never leave children
unattended in a vehicle and never
allow children to play with the
safety belts.
Airbags plus lap‐shoulder belts
offer protection for adults and older
children, but not for young children
and infants. Neither the vehicle's
safety belt system nor its airbag
system is designed for them. Every
time infants and young children ride
in vehicles, they should have the
protection provided by appropriate
child restraints.
Children who are not restrained
properly can strike other people,
or can be thrown out of the vehicle.
WARNING
{
Never do this.
Never hold an infant or a child
while riding in a vehicle. Due to
crash forces, an infant or a child
will become so heavy it is not
possible to hold it during a crash.
(Continued)
WARNING (Continued)
For example, in a crash at only
40 km/h (25 mph), a 5.5 kg (12 lb)
infant will suddenly become a
110 kg (240 lb) force on a person's
arms. An infant should be
secured in an appropriate
restraint.
Page 80

Black plate (36,1)
GMC Canyon Owner Manual - 2012
3-36 Seats and Restraints
WARNING
{
Never do this.
Children who are up against,
or very close to, any airbag when
it inflates can be seriously injured
or killed. Never put a rear-facing
child restraint in the right front
seat. Secure a rear-facing child
restraint in a rear seat. It is also
better to secure a forward-facing
child restraint in a rear seat. If you
must secure a forward-facing
child restraint in the right front
seat, always move the front
passenger seat as far back as
it will go.
Q: What are the different types of
add-on child restraints?
A: Add-on child restraints, which
are purchased by the vehicle
owner, are available in four basic
types. Selection of a particular
restraint should take into
consideration not only the child's
weight, height, and age but also
whether or not the restraint will
be compatible with the motor
vehicle in which it will be used.
For most basic types of child
restraints, there are many
different models available. When
purchasing a child restraint, be
sure it is designed to be used
in a motor vehicle. If it is, the
restraint will have a label saying
that it meets federal motor
vehicle safety standards.
The restraint manufacturer's
instructions that come with the
restraint state the weight and
height limitations for a particular
child restraint. In addition, there
are many kinds of restraints
available for children with
special needs.
WARNING
{
To reduce the risk of neck and
head injury during a crash, infants
need complete support. This is
because an infant's neck is not
fully developed and its head
weighs so much compared with
(Continued)
Page 81

Black plate (37,1)
GMC Canyon Owner Manual - 2012
Seats and Restraints 3-37
WARNING (Continued)
the rest of its body. In a crash,
an infant in a rear-facing child
restraint settles into the restraint,
so the crash forces can be
distributed across the strongest
part of an infant's body, the back
and shoulders. Infants should
always be secured in rear-facing
child restraints.
WARNING
{
A young child's hip bones are still
so small that the vehicle's regular
safety belt may not remain low
on the hip bones, as it should.
Instead, it may settle up around
the child's abdomen. In a crash,
the belt would apply force on a
body area that is unprotected by
any bony structure. This alone
could cause serious or fatal
(Continued)
WARNING (Continued)
injuries. To reduce the risk of
serious or fatal injuries during a
crash, young children should
always be secured in appropriate
child restraints.
Child Restraint Systems
(A) Rear‐Facing Infant Seat
A rear-facing infant seat (A)
provides restraint with the seating
surface against the back of the
infant.
The harness system holds the infant
in place and, in a crash, acts to
keep the infant positioned in the
restraint.
(B) Forward-Facing Child Seat
A forward-facing child seat (B)
provides restraint for the child's
body with the harness.
Page 82

Black plate (38,1)
GMC Canyon Owner Manual - 2012
3-38 Seats and Restraints
(C) Booster Seats
A booster seat (C) is a child restraint
designed to improve the fit of the
vehicle's safety belt system.
A booster seat can also help a
child to see out the window.
Securing an Add-On Child
Restraint in the Vehicle
WARNING
{
A child can be seriously injured
or killed in a crash if the child
restraint is not properly secured in
the vehicle. Secure the child
restraint properly in the vehicle
using the vehicle safety belt or
LATCH system, following the
instructions that came with that
child restraint and the instructions
in this manual.
To help reduce the chance of injury,
the child restraint must be secured
in the vehicle. Child restraint
systems must be secured in vehicle
seats by lap belts or the lap belt
portion of a lap-shoulder belt, or by
the LATCH system. See Lower
Anchors and Tethers for Children
(LATCH System) on page 3‑41 for
more information. Children can be
endangered in a crash if the child
restraint is not properly secured in
the vehicle.
When securing an add-on child
restraint, refer to the instructions
that come with the restraint which
may be on the restraint itself or in a
booklet, or both, and to this manual.
The child restraint instructions are
important, so if they are not
available, obtain a replacement
copy from the manufacturer.
Keep in mind that an unsecured
child restraint can move around in a
collision or sudden stop and injure
people in the vehicle. Be sure to
properly secure any child restraint in
the vehicle — even when no child
is in it.
Page 83

Black plate (39,1)
GMC Canyon Owner Manual - 2012
Seats and Restraints 3-39
In some areas of the United States
and Canada, Certified Child
Passenger Safety Technicians
(CPSTs) are available to inspect
and demonstrate how to correctly
use and install child restraints. In
the U.S., refer to the National
Highway Traffic Safety
Administration (NHTSA) website to
locate the nearest child safety seat
inspection station. For CPST
availability in Canada, check with
Transport Canada or the Provincial
Ministry of Transportation office.
Securing the Child Within the
Child Restraint
WARNING
{
A child can be seriously injured
or killed in a crash if the child is
not properly secured in the
child restraint. Secure the child
properly following the instructions
that came with that child restraint.
Where to Put the Restraint
According to accident statistics,
children and infants are safer when
properly restrained in a child
restraint system or infant restraint
system secured in a rear seating
position.
We recommend that children and
child restraints be secured in a rear
seat, including: an infant or a child
riding in a rear-facing child restraint;
a child riding in a forward-facing
child seat; an older child riding in a
booster seat; and children, who are
large enough, using safety belts.
Never put a rear-facing child seat in
the front. This is because the risk to
the rear-facing child is so great,
if the airbag deploys.
Page 84

Black plate (40,1)
GMC Canyon Owner Manual - 2012
3-40 Seats and Restraints
WARNING
{
A child in a rear-facing child
restraint can be seriously
injured or killed if the right front
passenger airbag inflates. This
is because the back of the
rear-facing child restraint would
be very close to the inflating
airbag. A child in a forward-facing
child restraint can be seriously
injured or killed if the right front
passenger airbag inflates and the
passenger seat is in a forward
position.
The vehicle may have a
passenger sensing system which
is designed to turn off the right
front passenger frontal airbag
under certain conditions.
Even if the passenger sensing
system, if equipped, has turned
off the right front passenger
frontal airbag, no system is
(Continued)
WARNING (Continued)
fail-safe. No one can guarantee
that an airbag will not
deploy under some unusual
circumstance, even though
it is turned off.
Secure rear-facing child restraints
in a rear seat, even if the
airbag is off. If you secure a
forward-facing child restraint in
the right front seat, always move
the front passenger seat as far
back as it will go. It is better to
secure the child restraint in a
rear seat.
See Passenger Sensing System
on page 3‑26 for additional
information.
WARNING
{
A child in a child restraint in the
center front seat can be badly
injured or killed by the frontal
airbags if they inflate. Never
secure a child restraint in the
center front seat. It is always
better to secure a child restraint in
a rear seat.
Do not use child restraints in the
center front seat position.
If the vehicle does not have rear
seats, rear-facing child restraints
should not be installed in the
vehicle, even if the passenger
airbag is off.
If a child in a forward-facing child
restraint must be transported in a
vehicle that does not have rear
seats, the child restraint should be
secured in the right front seat
position. See “Securing Child
Restraints (Right Front Seat
Position)” later in this section, for
Page 85

Black plate (41,1)
GMC Canyon Owner Manual - 2012
Seats and Restraints 3-41
instructions on how to install a child
restraint in the right front seat
position.
When securing a child restraint in a
rear seating position, study the
instructions that came with the child
restraint to make sure it is
compatible with this vehicle.
Child restraints and booster seats
vary considerable in size, and some
may fit in certain seating positions
better than others. Always make
sure the child restraint is properly
secured.
Depending on where you place the
child restraint and the size of the
child restraint, you may not be able
to access adjacent safety belt
assemblies or LATCH anchors for
additional passengers or child
restraints. Adjacent seating
positions should not be used if the
child restraint prevents access to or
interferes with the routing of the
safety belt.
Wherever you install a child
restraint, be sure to secure the child
restraint properly.
Keep in mind that an unsecured
child restraint can move around in a
collision or sudden stop and injure
people in the vehicle. Be sure to
properly secure any child restraint in
the vehicle, even when no child is
in it.
Lower Anchors and Tethers for Children (LATCH System)
The LATCH system holds a child
restraint during driving or in a crash.
This system is designed to make
installation of a child restraint easier.
The LATCH system uses anchors in
the vehicle and attachments on the
child restraint that are made for use
with the LATCH system.
Make sure that a LATCH-compatible
child restraint is properly installed
using the anchors, or use the
vehicle's safety belts to secure the
restraint, following the instructions
that came with that restraint, and
also the instructions in this manual.
When installing a child restraint with
a top tether, you must also use
either the lower anchors or the
safety belts to properly secure the
child restraint. A child restraint must
never be installed using only the top
tether and anchor.
In order to use the LATCH system in
your vehicle, you need a child
restraint that has LATCH
attachments. The child restraint
manufacturer will provide you with
instructions on how to use the child
restraint and its attachments. The
following explains how to attach a
child restraint with these
attachments in your vehicle.
Not all vehicle seating positions or
child restraints have lower anchors
and attachments or top tether
anchors and attachments.
Page 86

Black plate (42,1)
GMC Canyon Owner Manual - 2012
3-42 Seats and Restraints
Lower Anchors
Lower anchors (A) are metal bars
built into the vehicle. There are two
lower anchors for each LATCH
seating position that will
accommodate a child restraint with
lower attachments (B).
Top Tether Anchor
A top tether (A, C) anchors the top
of the child restraint to the vehicle.
A top tether anchor is built into
the vehicle. The top tether
attachment (B) on the child restraint
connects to the top tether anchor in
the vehicle in order to reduce the
forward movement and rotation of
the child restraint during driving or in
a crash.
Your child restraint may have a
single tether (A) or a dual tether (C).
Either will have a single
attachment (B) to secure the
top tether to the anchor.
Some child restraints that have a
top tether are designed for use with
or without the top tether being
attached. Others require the top
tether always to be attached. In
Canada, the law requires that
forward-facing child restraints have
a top tether, and that the tether be
attached. Be sure to read and follow
the instructions for your child
restraint.
Page 87

Black plate (43,1)
GMC Canyon Owner Manual - 2012
Seats and Restraints 3-43
Lower Anchor and Top Tether
Anchor Locations
Crew Cab — Rear Seat
i (Top Tether Anchor): Seating
positions with top tether anchors.
j (Lower Anchor): Seating
positions with two lower anchors.
For crew cab models, there are
exposed metal lower anchors for
each rear outboard seating position,
where the seatback meets the back
of the seat cushion.
To assist in locating the lower
anchors, place your hand in a
palm-up position and reach up
between the seat cushion and the
seatback.
Extended Cab — Rear Seat
i (Top Tether Anchor): Seating
positions with top tether anchors.
j (Lower Anchor): Seating
positions with two lower anchors.
For extended cab models with rear
seats, there are exposed metal
lower anchors for each rear seating
position, attached to the back wall,
near the seat cushion.
To assist in locating the lower
anchors, place your hand in a
palm-up position and reach up
between the seat cushion and the
seatback.
Front Bucket Seats — Regular
and Extended Cab without Rear
Seats
i (Top Tether Anchor): Seating
positions with top tether anchors.
Page 88

Black plate (44,1)
GMC Canyon Owner Manual - 2012
3-44 Seats and Restraints
Front Bench Seat — Regular
and Extended Cab without Rear
Seats
i (Top Tether Anchor): Seating
positions with top tether anchors.
Some top tether anchors have
covers. To assist in locating the
covered top tether anchors, the top
tether anchor symbol is on the
cover.
Crew Cab
The top tether anchors in a crew
cab model are on the back wall
behind each rear seating position.
Be sure to use an anchor on the
same side of the vehicle as the
seating position where the child
restraint will be placed.
Extended Cab — Rear Seat
The top tether anchors in an
extended cab model are on the
center of the back wall behind a
removable cover for the rear seating
positions. Be sure to use an anchor
nearest to the seating position
where the child restraint will be
placed.
Page 89

Black plate (45,1)
GMC Canyon Owner Manual - 2012
Regular and Extended Cab
without Rear Seats (Front Bucket
Seats)
For regular and extended cab
models without rear seats that have
front bucket seats, there is a top
tether anchor behind a removable
cover on the back wall behind the
right front passenger seat. You may
have to pull the seatback forward to
access the anchor.
Regular and Extended Cab
without Rear Seats (Front
Bench Seat)
For regular and extended cab
models without rear seats that have
a front bench seat, there are top
tether anchors behind removable
covers on the back wall behind the
right front passenger seat and the
center front passenger seat. The
seatback may have to be pulled
forward to access the anchors.
Seats and Restraints 3-45
Do not secure a child restraint in a
position without a top tether anchor
if a national or local law requires
that the top tether be attached, or if
the instructions that come with the
child restraint say that the top tether
must be attached.
According to accident statistics,
children and infants are safer
when properly restrained in a child
restraint system or infant restraint
system secured in a rear seating
position. See Where to Put the
Restraint on page 3‑39 for
additional information.
Page 90

Black plate (46,1)
GMC Canyon Owner Manual - 2012
3-46 Seats and Restraints
Securing a Child Restraint
Designed for the LATCH
System
WARNING
{
If a LATCH-type child restraint is
not attached to anchors, the child
restraint will not be able to protect
the child correctly. In a crash, the
child could be seriously injured
or killed. Install a LATCH-type
child restraint properly using the
anchors, or use the vehicle safety
belts to secure the restraint,
following the instructions that
came with the child restraint and
the instructions in this manual.
WARNING
{
Do not attach more than one child
restraint to a single anchor.
Attaching more than one child
restraint to a single anchor could
cause the anchor or attachment
to come loose or even break
during a crash. A child or others
could be injured. To reduce the
risk of serious or fatal injuries
during a crash, attach only one
child restraint per anchor.
WARNING
{
Children can be seriously injured
or strangled if a shoulder belt is
wrapped around their neck and
the safety belt continues to
tighten. Buckle any unused safety
belts behind the child restraint so
(Continued)
WARNING (Continued)
children cannot reach them. Pull
the shoulder belt all the way out
of the retractor to set the lock,
if the vehicle has one, after the
child restraint has been installed.
Notice: Do not let the LATCH
attachments rub against the
vehicle’s safety belts. This may
damage these parts. If necessary,
move buckled safety belts to
avoid rubbing the LATCH
attachments.
Do not fold the empty rear seat
with a safety belt buckled. This
could damage the safety belt or
the seat. Unbuckle and return the
safety belt to its stowed position,
before folding the seat.
Page 91

Black plate (47,1)
GMC Canyon Owner Manual - 2012
Seats and Restraints 3-47
Crew Cab — Rear Seat
1. Put the child restraint on
the seat.
2. If the child restraint
manufacturer's instructions
recommend that the top tether
be attached, attach the top
tether to the top tether
anchor (A). Refer to the child
restraint instructions and the
following steps:
2.1. Pull the seatback forward to
access the top tether
anchors (A). See Rear
Seats (Extended Cab) on
page 3‑8 or Rear Seats
(Crew Cab) on page 3‑8.
2.2. Route the top tether
according to your child
restraint instructions and
the following instructions:
If the child restraint has a
single tether, route the
tether over the seatback.
Page 92

Black plate (48,1)
GMC Canyon Owner Manual - 2012
3-48 Seats and Restraints
If the child restraint has a
dual tether, route the tether
over the seatback.
2.3. Attach the top tether to the
anchor (A). Make sure that
you secure the top tether to
the top tether anchor and
not to the seatback
latch (B).
2.4. Push rearward on the
seatback until it locks into
its upright position. Push
and pull on the seatback to
make sure it is secured
properly.
3. Attach and tighten the lower
attachments to the lower
anchors. If the child restraint
does not have lower
attachments or the desired
seating position does not have
lower anchors, secure the child
restraint with the top tether and
the safety belts. Refer to your
child restraint manufacturer
instructions and the instructions
in this manual.
3.1. Find the lower anchors for
the desired seating
position.
3.2. Attach and tighten the lower
attachments on the child
restraint to the lower
anchors.
4. Tighten the top tether.
5. Before placing a child in the
child restraint, make sure it is
securely held in place.
To check, grasp the child
restraint at the LATCH path and
attempt to move it side to side
and back and forth. There
should be no more than
2.5 cm (1 in) of movement for
proper installation.
Extended Cab — Rear Seat
1. Attach and tighten the lower
attachments to the lower
anchors. If the child restraint
does not have lower
Page 93

Black plate (49,1)
GMC Canyon Owner Manual - 2012
Seats and Restraints 3-49
attachments or the desired
seating position does not have
lower anchors, secure the child
restraint with the top tether and
the safety belts. Refer to your
child restraint manufacturer
instructions and the instructions
in this manual.
1.1. Find the lower anchors (D)
for the desired seating
position.
1.2. Put the child restraint on
the seat.
1.3. Attach the lower
attachments on the child
restraint to the lower
anchors (D) in the vehicle.
The child restraint
instructions will show
you how.
2. If the child restraint manufacturer
recommends that the top tether
be attached, attach and tighten
the top tether to the top tether
anchor (C). Refer to the child
restraint instructions and the
following steps:
2.1. Pull on the finger access
tab to remove the cover to
access the top tether
anchors (C).
2.2. Route the top tether (A)
through the loop (B) at the
top of the seatback to
attach the top tether to the
nearest top tether
anchor (C).
3. Tighten the lower anchor
attachments and the top tether.
The child restraint instructions
will show you how.
4. Before placing a child in the
child restraint, make sure it is
securely held in place. To check,
grasp the child restraint at the
LATCH path and attempt to
move it side to side and back
and forth. There should be no
more than 2.5 cm (1 in) of
movement for proper installation.
Page 94

Black plate (50,1)
GMC Canyon Owner Manual - 2012
3-50 Seats and Restraints
Right Front Seat — Regular/
Extended Cab without Rear
Seats
The vehicle has a right front
passenger airbag and may also
have a passenger sensing system.
If the vehicle has a passenger
sensing system it is designed to turn
off the right front passenger frontal
airbag when an infant in a
rear-facing infant seat or a small
child in a forward-facing child
restraint or booster seat is detected.
See “Securing Child Restraints
(Right Front Seat Position)” later in
this section and Passenger Sensing
System on page 3‑26 for important
safety information and additional
information on installing a child
restraint in the right front seat
position.
1. See “Securing Child Restraints
(Right Front Seat Position)” later
in this section for instructions on
installing the child restraint using
the safety belts.
2. If the child restraint
manufacturer's instructions
recommend that the top tether
be attached, attach and tighten
the top tether to the top tether
anchor. Refer to the child
restraint instructions and the
following steps:
2.1. Pull the seatback forward to
access the top tether
anchor. See Seatback
Latches on page 3‑6.
2.2. Pull on the finger access
tab to remove the cover to
access the top tether
anchor.
2.3. Route the top tether
according to your child
restraint instructions and
the following instructions:
If the position you are using
has a fixed headrest or
head restraint and you are
using a single tether, route
the tether over the headrest
or head restraint.
Page 95

Black plate (51,1)
GMC Canyon Owner Manual - 2012
If the position you are using
has an adjustable headrest
or head restraint and you
are using a single tether,
raise the headrest or head
restraint and route the
tether under the headrest or
head restraint and in
between the headrest or
head restraint posts.
If the position you are using
has a fixed or adjustable
headrest or head restraint
and you are using a dual
tether, route the tether
around the headrest or
head restraint.
3. Attach and tighten the top tether
according to your child restraint
instructions.
4. Before placing a child in the
child restraint, make sure it is
securely held in place. To check,
grasp the child restraint at the
LATCH path and attempt to
move it side to side and back
and forth. There should be no
more than 2.5 cm (1 in) of
movement for proper installation.
Seats and Restraints 3-51
Center Front Seat — Regular/
Extended Cab without Rear
Seats
For vehicles without rear seats,
manufacturers are required to
provide top tether anchors for all
non-driver seating positions and
instructions for using those anchors.
Even if a top tether anchor is
available, you should not install a
child restraint in the center front
seat position. See Where to Put the
Restraint on page 3‑39 for important
safety information and additional
information on installing a child
restraint in the center front seat
position. See “Securing Child
Restraints (Center Front Seat
Position)” later in this section for
instructions on installing the child
restraint using the safety belts and
top tether anchor.
Page 96

Black plate (52,1)
GMC Canyon Owner Manual - 2012
3-52 Seats and Restraints
Replacing LATCH System Parts After a Crash
WARNING
{
A crash can damage the LATCH
system in the vehicle. A damaged
LATCH system may not properly
secure the child restraint,
resulting in serious injury or even
death in a crash. To help make
sure the LATCH system is
working properly after a crash,
see your dealer to have the
system inspected and any
necessary replacements made
as soon as possible.
If the vehicle has the LATCH system
and it was being used during a
crash, new LATCH system parts
may be needed.
New parts and repairs may be
necessary even if the LATCH
system was not being used at the
time of the crash.
Securing Child Restraints (Rear Seat Position)
When securing a child restraint in a
rear seating position, study the
instructions that came with your
child restraint to make sure it is
compatible with this vehicle.
If your child restraint has the LATCH
system, see Lower Anchors and
Tethers for Children (LATCH
System) on page 3‑41 for how to
install your child restraint using
LATCH. If you secure a child
restraint using a safety belt and it
uses a top tether, see Lower
Anchors and Tethers for Children
(LATCH System) on page 3‑41 for
top tether anchor locations.
Do not secure a child restraint in a
position without a top tether anchor
if a national or local law requires
that the top tether be anchored, or if
the instructions that come with the
child restraint say that the top strap
must be anchored.
In Canada, the law requires that
forward-facing child restraints have
a top tether, and that the tether be
attached.
If your child restraint does not have
the LATCH system, you will be
using the safety belt to secure the
child restraint in this position.
Be sure to follow the instructions
that came with the child restraint.
Secure the child in the child restraint
when and as the instructions say.
If you need to install more than one
child restraint in the rear seat, be
sure to read Where to Put the
Restraint on page 3‑39.
1. Put the child restraint on
the seat.
2. Pick up the latch plate, and run
the lap and shoulder portions of
the vehicle's safety belt through
or around the restraint. The child
restraint instructions will show
you how.
Page 97

Black plate (53,1)
GMC Canyon Owner Manual - 2012
Seats and Restraints 3-53
3. Push the latch plate into the
buckle until it clicks.
Make sure the release button is
positioned so you would be able
to unbuckle the safety belt
quickly if necessary.
4. Pull the shoulder belt all the way
out of the retractor to set the
lock. When the retractor lock is
set, the belt can be tightened but
not pulled out of the retractor.
5. If your child restraint has a top
tether, attach the top tether to
the top tether anchor. See Lower
Anchors and Tethers for
Children (LATCH System) on
page 3‑41.
6. To tighten the belt, push down
on the child restraint, pull the
shoulder portion of the belt to
tighten the lap portion of the belt,
and feed the shoulder belt back
into the retractor. When installing
a forward-facing child restraint, it
may be helpful to use your knee
to push down on the child
restraint as you tighten the belt.
Try to pull the belt out of the
retractor to make sure the
retractor is locked. If the
retractor is not locked, repeat
Steps 4 and 6.
Page 98

Black plate (54,1)
GMC Canyon Owner Manual - 2012
3-54 Seats and Restraints
7. Tighten the top tether. See
Lower Anchors and Tethers for
Children (LATCH System) on
page 3‑41.
8. Before placing a child in the
child restraint, make sure it is
securely held in place. To check,
grasp the child restraint at the
safety belt path and attempt to
move it side‐to‐side and
back‐and‐forth. When the child
restraint is properly installed,
there should be no more than
2.5 cm (1 in) of movement.
To remove the child restraint,
unbuckle the vehicle’s safety belt
and let it go back all the way. If the
top tether is attached to a top tether
anchor, disconnect it.
Securing Child Restraints (Center Front Seat Position)
For vehicles without rear seats,
manufacturers are required to
provide top tether anchors for all
non-driver seating positions and
instructions for using those anchors.
Even if a top tether anchor is
available, you should not install a
child restraint in the center front
seating position.
WARNING
{
A child in a child restraint in the
center front seat can be badly
injured or killed by the frontal
airbags if they inflate. Never
secure a child restraint in the
center front seat. It is always
better to secure a child restraint in
a rear seat.
In addition, some larger child
restraints, if installed in the center
front seating position, may interfere
with access to the driver and right
front passenger safety belt buckles.
See Safety Belts on page 3‑10 for
information, including warnings,
about the importance of safety
belt use.
If the vehicle does not have rear
seats, rear-facing child restraints
should not be installed in the
vehicle, even if the passenger
airbag is off.
If a child in a forward-facing child
restraint must be transported in a
vehicle that does not have rear
seats, the child restraint should be
secured in the right front seat
position. See “Securing Child
Restraints (Right Front Seat
Position)” later in this section, for
instructions on how to install a child
restraint in the right front seat
position.
Page 99

Black plate (55,1)
GMC Canyon Owner Manual - 2012
Seats and Restraints 3-55
Do not secure a child seat in a
position without a top tether anchor
if a national or local law requires
that the top tether be anchored.
In Canada, the law requires that
forward‐facing child restraints have
a top tether, and that the tether be
attached.
The lap belt would be used to
secure a child restraint in this
position, following the instructions
that came with the child restraint.
1. Adjust the driver seat to the
desired position. Fold the
armrest up, if equipped.
2. Move the passenger seat so that
the seat and seatback are
aligned with the driver seat and
seatback positions. See Seat
Adjustment on page 3‑3 or
Power Seat Adjustment on
page 3‑3 and Reclining
Seatbacks on page 3‑4 for more
information.
3. Make the center position lap belt
as long as possible by tilting the
latch plate and pulling it along
the belt.
4. Place the child restraint on
the seat.
5. If the child restraint manufacturer
recommends using a top tether
anchor, attach the top tether on
the child restraint to the top
tether anchor on the vehicle.
Route the top tether according to
the child restraint instructions
and the following instructions:
5.1. Pull on the finger access
tab to remove the cover to
access the top tether
anchor.
Page 100

Black plate (56,1)
GMC Canyon Owner Manual - 2012
3-56 Seats and Restraints
5.2. Route the top tether over
the center seatback or
folding armrest, if equipped.
5.3. Attach the top tether to the
slots in the back panel as
shown.
Do not tighten the top
tether at this time.
6. Pick up the latch plate on the
center position lap safety belt,
and run the lap safety belt
through the restraint. The child
restraint instructions will show
you how.
7. Push the latch plate into the
buckle until it clicks. Position the
release button on the buckle so
that the safety belt can be
unbuckled.
8. Tighten the center position lap
belt by pulling on the loose end
of the belt. It may be helpful to
use your knee to push down on
the child restraint as you tighten
the belt.
9. Tighten the top tether. Follow the
child restraint manufacturer's
instructions.
10. Before placing a child in the
child restraint, make sure it is
securely held in place. To
check, grasp the child restraint
at the safety belt path and
attempt to move it side to side
and back and forth. When the
child restraint is properly
installed, there should be no
more than 2.5 cm (1 in) of
movement.
To remove the child restraint,
unbuckle the vehicle safety belt.
If the top tether is attached to the
top tether anchor, disconnect it and
reinstall the top tether anchor cover.
 Loading...