

Page 1

1
360W
MAGNESIUM
ALLNAILER®
ACALN
INSTRUCTION MANUAL
Black
Cyan
Magenta
Yellow
Code: ACALN IM
Date: 070910 Edition: 03 Op: DCR
Page 2

2
Contents
Warranty Power Tools
Whilst every effort is made to ensure your complete
satisfaction with this tool, occasionally, due to the mass
manufacturing techniques, a tool may not live up to our
required level of performance and you may need the
assistance of our service department.
This product is warranted for a 2-year period for home
domestic use from the date of the original purchase.
If found to be defective in materials or workmanship,
the tool or the offending faulty component will be repaired
or replaced free of charge with another of the same item.
A
small freight charge may apply. Proof of purchase is
essential. We reserve the right to reject any claim where
the purchase cannot be verified.
This warranty does not include damage or defects to the
tool caused by or resulting from abuse, accidents,
alterations or commercial or business use. It also does not
cover any bonus items or included accessories. Only the
power tool is covered under this warranty.
With continuing product development, changes may have
occurred which render the product received slightly
different to that shown in this instruction manual.
Please ensure that you store your receipt in a safe place.
Conditions apply to the above warranty. For full details of
the warranty terms and conditions please refer to our
website – www.gmcompany.com
For prompt service we suggest you log your service
request online - www.gmcservice.com.au, should you
not have access to the internet, please contact our
service department on 1300 880 001 (Australia)
or 0800 445 721 (New Zealand).
Warranty 2
Introduction 3
Environmental protection 3
Description of symbols 3
Specifications 4
General safety rules 4
Additional safety rules for nailers 6
Know your product 7
Accessories 8
Unpacking 8
Assembly 8
Adjusting the depth of nail penetration 8
Installing the non marking jaw protector 8
Operation 9
Safety switch 9
Loading a nail 9
Driving a nail 9
Variable speed 10
Maintenance and repair 10
Page 3

3
Description of symbols
The rating plate on your tool may show symbols.
These represent important information about the
product or instructions on its use.
Wear hearing protection.
Wear eye protection.
Wear breathing protection.
Double insulated for additional protection.
Conforms to relevant standards
for electromagnetic compatibility.
For safe operation read instruction manual.
Introduction
Your new GMC power tool will more than satisfy
your expectations. It has been manufactured under
stringent GMC Quality Standards to meet superior
performance criteria.
You will find your new tool easy and safe to operate,
and, with proper care, it will give you many years
of dependable service.
CAUTION. Carefully read through this entire Instruction
Manual before using your new GMC Power Tool. Take
special care to heed the Cautions and Warnings.
Your GMC power tool has many features that will make
your job faster and easier. Safety, performance, and
dependability have been given top priority in the
development of this tool, making it easy to maintain
and operate.
Environmental protection
Recycle unwanted materials instead
of disposing of them as waste. All tools,
hoses and packaging should be sorted,
taken to the local recycling centre and
disposed of in an environmentally safe way
.
Page 4

4
Specifications
Voltage: 230 –240V ~ 50Hz
Input power: 360W
Hammer rate: 0 – 4200 min
-1
Nail length: 40mm (1-5/8") to 150mm (6")
Nail type: Accepts all commonly
available nail types including
oval brad nails, round shank
nails and serrated nails
Nail head size: Maximum of 10mm
Depth of nail (The value
given is approximate only
as the depth will depend
on the hardness of the
wood into which the nail
is driven):
Position 1: Nail head underflush by 1mm
Position 2: Nail head level with surface
Position 3: Nail head 5mm proud
from surface
Position 4: Nail head 10mm proud
from surface
Sound pressure value: 91.9dB(A)
Net weight: 2.7kg
General safety rules
WARNING. Read all instructions. Failure to follow all
instructions listed below may result in electric shock,
fire and/or serious injury. The term “power tool” in all of the
warnings listed below refers to your mains operated (corded)
power tool or battery operated (cordless) power tool.
Save these instructions
1. Work area
a. Keep work area clean and well lit.
Cluttered and dark areas invite accidents.
b. Do not operate power tools in explosive atmospheres,
such as in the presence of flammable liquids, gases
or dust. Power tools create sparks which may ignite
the dust or fumes.
c. Keep children and bystanders away while operating
a power tool. Distractions can cause you to lose control.
2. Electrical safety
a. Power tool plugs must match the outlet.
Never modify the plug in any way. Do not use any
adapter plugs with earthed (grounded) power tools.
Unmodified plugs and matching outlets will reduce risk
of electric shock.
b. Avoid body contact with earthed or grounded surfaces
such as pipes, radiators, ranges and refrigerators.
There is an increased risk of electric shock if your body
is earthed or grounded.
c. Do not expose power tools to rain or wet conditions.
Water entering a power tool will increase the risk of
electric shock.
d. Do not abuse the cord. Never use the cord for
carrying, pulling or unplugging the power tool.
Keep cord away from heat, oil, sharp edges or moving
parts. Damaged or entangled cords increase the risk of
electric shock.
e. When operating a power tool outdoors, use an
extension cord suitable for outdoor use. Use of a cord
suitable for outdoor use reduces the risk of electric shock.
Page 5

5
3. Personal safety
a. Stay alert, watch what you are doing and use
common sense when operating a power tool.
Do not use a power tool while you are tired or under
the influence of drugs, alcohol or medication. A moment
of inattention while operating power tools may result in
serious personal injury.
b. Use safety equipment. Always wear eye protection.
Safety equipment such as dust mask, non-skid
safety shoes, hard hat, or hearing protection used for
appropriate conditions will reduce personal injuries.
c. Avoid accidental starting. Ensure the switch is in the
off position before plugging in. Carrying power tools with
your finger on the switch or plugging in power tools that
have the switch on invites accidents.
d. Remove any adjusting key or wrench before
turning the power tool on. A wrench or a key left
attached to a rotating part of the power tool may result
in personal injury.
e. Do not overreach. Keep proper footing and balance at
all times. This enables better control of the power tool in
unexpected situations.
f. Dress properly. Do not wear loose clothing or
jewellery. Keep your hair, clothing and gloves away from
moving parts. Loose clothes, jewellery or long hair can be
caught in moving parts.
g. If devices are provided for the connection of dust
extraction and collection facilities, ensure these are
connected and properly used. Use of these devices
can reduce dust related hazards.
4. Power tool use and care
a. Do not force the power tool. Use the correct power tool
for your application. The correct power tool will do the job
better and safer at the rate for which it was designed.
b. Do not use the power tool if the switch does not turn
it on and off. Any power tool that cannot be controlled
with the switch is dangerous and must be repaired.
c. Disconnect the plug from the power source before
making any adjustments, changing accessories, or
storing power tools. Such preventive safety measures
reduce the risk of starting the power tool accidentally.
d. Store idle power tools out of the reach of children
and do not allow persons unfamiliar with the power
tool or these instructions to operate the power tool.
Power tools are dangerous in the hands of
untrained users.
e. Maintain power tools. Check for misalignment or
binding of moving parts, breakage of parts and
any other condition that may affect the power tools
operation. If damaged, have the power tool repaired
before use. Many accidents are caused by poorly
maintained power tools.
f. Keep cutting tools sharp and clean. Properly
maintained cutting tools with sharp cutting edges are
less likely to bind and are easier to control.
g. Use the power tool, accessories and tool bits etc.,
in accordance with these instructions and in the
manner intended for the particular type of power
tool, taking into account the working conditions and
the work to be performed. Use of the power tool for
operations different from those intended could result in
a hazardous situation.
Page 6

6
Additional safety rules for nailers
1. Use only the nail types indicated in this manual.
Use of accessories that are not designed for this tool
could result in personal injury and / or damage to the tool.
2. Do not touch metal parts of tool during operation.
Hold only the handle or housing of the tool.
3. Do not activate the trigger switch unless the nail is in
contact with the workpiece. Serious injury can result
from improper operation.
4. The tool should only be used for the purpose it was
designed as outlined in this manual. Do not use it on
hard surfaces like rock or concrete. Personal injury or
damage to the tool could result.
5. Take care when nailing thin material. Special caution
must be taken for possible penetration of nails through
thin material. This could cause harm to anyone behind
the workpiece or in the immediate area.
6. Do not overheat the tool. During operation, the nailer
may feel warm to the touch. This is normal. However, if
the nailer starts to feel hot, discontinue use until the unit
cools down.
The tool must be used only for its prescribed purpose.
Any use other than those mentioned in this manual will
be considered a case of misuse. The user and not the
manufacturer shall be liable for any damage or injury
resulting from such cases of misuse.
To use this tool properly, you must observe the safety
regulations, the assembly instructions and the operating
instructions to be found in this manual. All persons who use
and service the machine have to be acquainted with this
manual and must be informed about its potential hazards.
Children and infirm people must not use this tool. Children
should be supervised at all times if they are in the area in
which the tool is being used. It is also imperative that you
observe the accident prevention regulations in force in your
area. The same applies for general rules of occupational
health and safety.
The manufacturer shall not be liable for any changes made
to the tool nor for any damage resulting from such changes.
Even when the tool is used as prescribed it is not possible to
eliminate all residual risk factors. The following hazards may
arise in connection with the tool’s construction and design:
1. Damage to hearing if ear protection is not worn.
2. Injury from nails if the safety instructions are
not followed.
Page 7
7
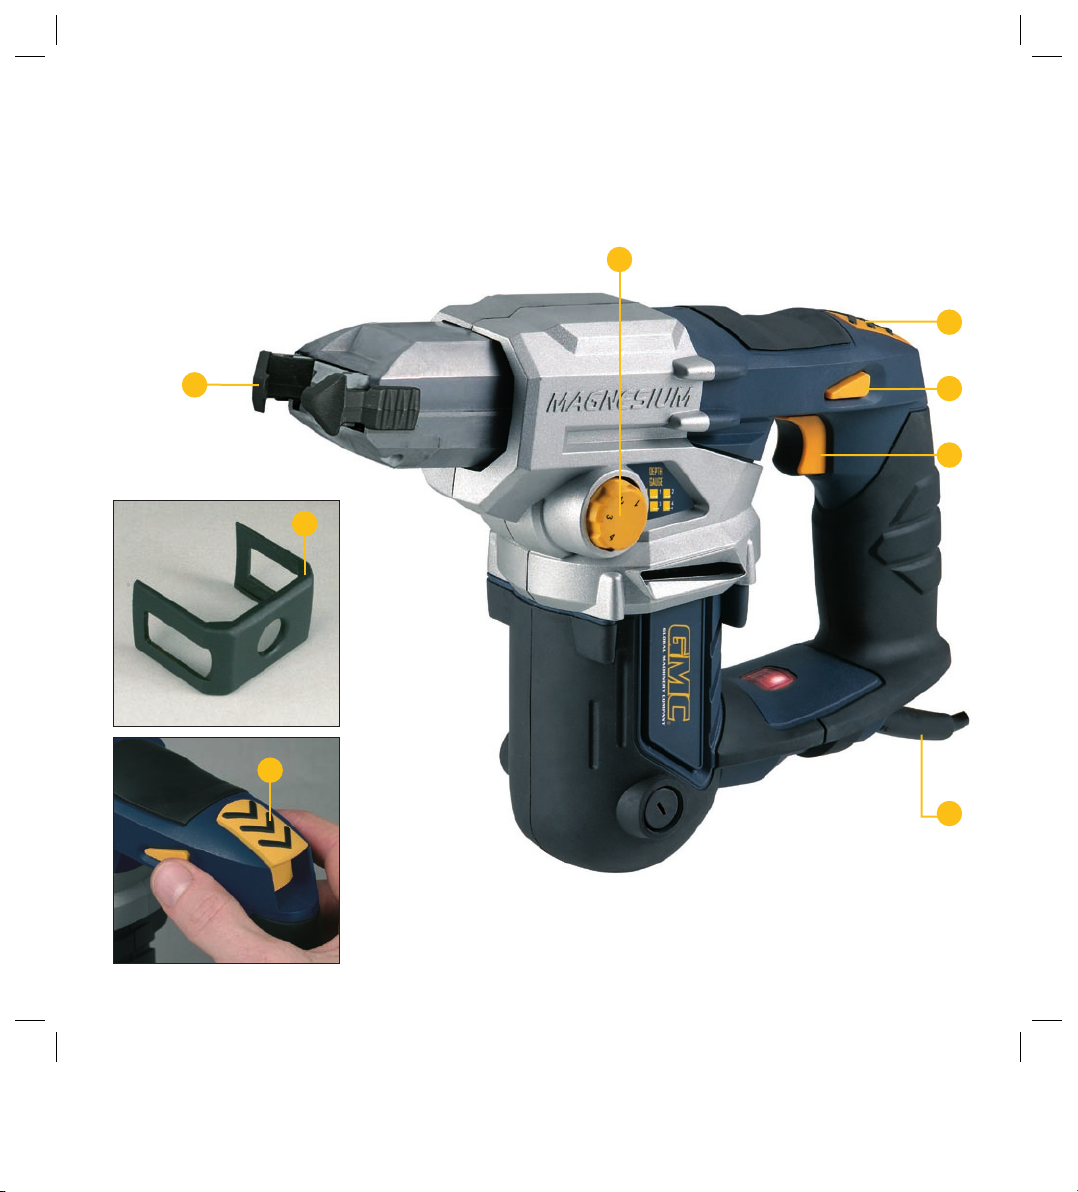
Know your product
1. On/off trigger switch with
variable speed control
2. Power cord
3. Nail gripping jaws
4. Jaw release button
5. Depth adjustment dial
6. Safety switch
7. Non marking
jaw protector
3
2
5
4
6
4
1
7
Page 8

8
A
Accessories
We recommend that you buy
all your accessories such as
nails from the store where you
bought the tool. Use good quality
accessories with a well-known
brand name. Store personnel
can help and advise (Fig. A).
Unpacking
Due to modern mass production techniques, it is unlikely
that your power tool is faulty or that a part is missing. If you
find anything wrong, do not operate the tool until the parts
have been replaced or the fault has been rectified. Failure
to do so could result in serious personal injury.
Assembly
The ACALN Allnailer® is packed fully assembled.
Adjusting the depth of nail penetration
1. The depth adjustment dial can be set to 4 different positions
in order to vary the depth of nail penetration as follows:
Depth setting values (approximate only)
Position Depth
1 Nail head underflush by 1mm
2 Nail head level with the surface
3
Nail head 5mm proud from surface and suitable for
hanging heavy objects (ensure that the mounting surface
is capable of taking the weight loading)
4
Nail head 10mm proud from surface and suitable for
hanging lighter objects (ensure that the mounting surface
is capable of taking the weight loading)
2. Press in then turn the depth
adjustment dial (5) to the
appropriate level (Fig. B).
Installing the nonmarking jaw protector
The Allnailer® comes supplied
with a non marking jaw protector (7) designed to protect the
workpiece surface from the jaw hammer impacts. This is
the ideal accessory when using the Allnailer® as a finisher
nailer (i.e. on decking, when building furniture, fitting skirting
boards or architraves). Installing the non marking jaw
protector (7) is easy, just follow
the following steps;
1. Slide the non marking jaw
protector (7) directly over the
nail gripping jaws (3). Make
sure that the gripping jaws (3)
line up with the non marking
jaw protector (7) (Fig. C).
2. Secure the non marking jaw
protector (7) by pressing
and positively engaging the
cover and locking it over the
side ribbed section of the nail
gripping jaws (3) (Fig. D).
Note. When using the non
marking jaw protector (7) the
nail will not finish flush.
Note. The nail depth adjustment gauge (5) has been set in
accordance with the nail gripping jaws and not with the non
marking jaw protector (7). Hence the depth adjustment dial
gauge and pre set driving capacity does not apply when
using the non marking jaw protector (7). We recommended
that when using the non marking jaw protector (7) that you
trial the depth adjustment gauge (5) settings on a test piece
of timber prior to applying it to the workpiece, then set the
depth adjustment gauge (5) accordingly.
B
C
D
Page 9
9
Operation
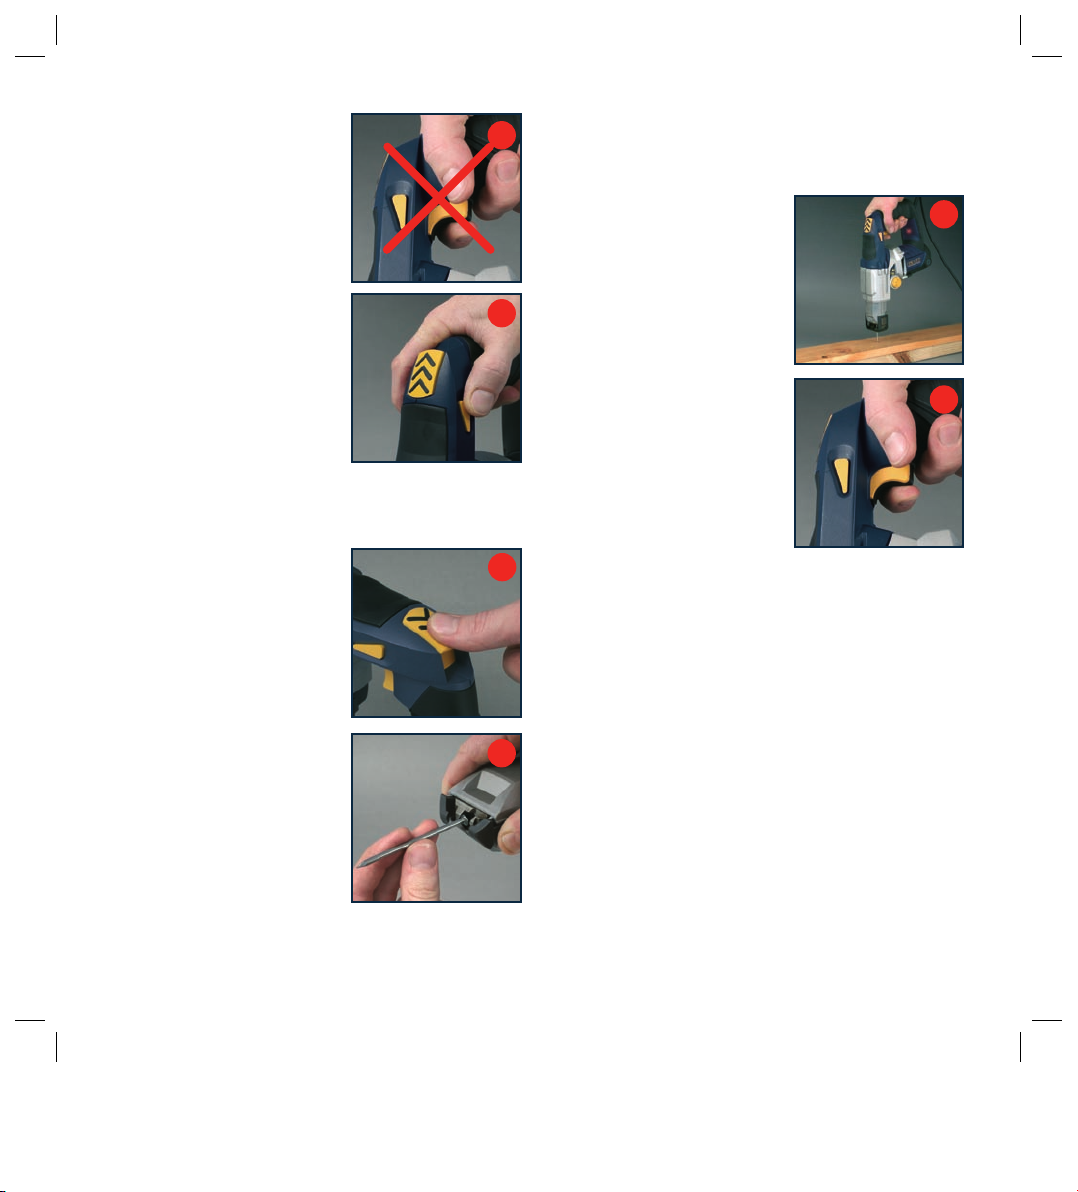
WARNING. Make sure your
finger is not on the trigger
switch (1) when loading
nails into the tool (Fig. E).
Safety switch
1. The nailer is protected
against accidental
operation by the safety switch
(6). When this switch is in its
mid position the trigger switch
(1) is inoperable (Fig. F).
DANGER. Always set the
safety switch (6) to the mid
position when not actually
using the nailer.
Ensure that the safety switch (6) is pressed in.
You can press this switch from either side.
Loading a nail
1. Hold the nailer in the operating
position and use your thumb
to press the jaw release button
(4) (Fig. G).
2. Insert the nail, head first,
between the jaws (3) as far
as it will go and then release
the jaws by taking your thumb
off the jaw release button (4)
(Fig. H).
Note. The nailer accepts nails
from 40mm (1 5/8”) to 150mm
(6”) long. The shank can be oval,
round or serrated. The head
must not be more than 10mm
(3/8”) in diameter.
You are now ready to use the nailer
.
Note.
This product is designed for intermittent use. The
recommended operational duration is 10 seconds on and
10 seconds off. Please operate accordingly.
Driving a nail
1. Once the nail is inserted in
the jaws and button (4) is
released, the nail can be
driven into the workpiece.
2. Hold the tool such that the nail
is guided into the workpiece
by the automatic hammering
process (Fig. I).
3. Squeeze the trigger switch
(1) (Fig. J).
4. When the nail has been driven
to the required depth, release
trigger switch (1) and either
return the safety switch (6)
to its mid position or use the
release button (4) to open the
jaws and insert another nail.
Note. It is best to trial the depth adjustment setting using
the same type of nail on a scrap piece of wood of the same
type as the workpiece. It may be necessary to change the
depth setting to suit the circumstances.
Note. The nail can be driven between the perpendicular
and 45°.
WARNING. To avoid personal injury, keep your fingers away
from the trigger switch (1) until you are ready to drive a nail.
Do not point the nailer at anyone when a nail is loaded into
the nailer.
G
H
I
J
F
E
Page 10

10
Variable speed
The variable speed feature
enables you to select the best
speed for a particular application.
The farther you squeeze the
trigger, the faster the tool will
operate.
Use lower speeds for starting
and when hammering large nails into hard wood.
Increase the speed to suit the application (Fig. K).
Note. It is recommended to use the variable speed feature
for short periods at a time. Do not continuously operate the
tool at different speeds. It may damage the switch.
Maintenance and repair
General Inspection
Regularly check that all the
fixing screws are tight. They may
vibrate loose over time (Fig. L).
Maintenance
WARNING. Always ensure that
the tool is switched off and that
the power cord is removed from the power supply before
making any adjustments or maintenance procedures.
Store the tool instruction manual and accessories in a
secure place. In this way you will always have all the parts
ready to hand.
Re-lubricate all moving parts at regular intervals.
CAUTION. Do not use cleaning agents to clean the plastic
parts of the nailer. A mild detergent on a damp cloth is
recommended. Water must never come into contact with
the tool.
Cleaning
1. Keep your machine and its
cord clean. The outside of the
machine can be cleaned using
a soft brush or damp soft
cloth with a mild detergent if
required (Fig. M).
2. Some maintenance products
and solvents may damage the
plastic parts; these include
products containing benzene,
trichloroethylene, chloride and ammonia.
3. Excessive sparking generally indicates the presence of
dirt in the motor or abnormal wear on the carbon brushes.
4. Take special care to keep the ventilation inlets/outlets free
from obstruction; cleaning with a soft brush followed by
a compressed air jet will usually be sufficient to ensure
acceptable internal cleanliness.
5. Wear eye protection when carrying out cleaning.
CAUTION. Do not use cleaning agents to clean the plastic
parts of the drill.
Power cord maintenance
If the supply cord needs replacing, the task must be carried
out by the manufacturer, the manufacturer’s agent, or an
authorised service centre in order to avoid a safety hazard.
M
L
K
Page 11

11
Page 12

GMC customer assist
If your product needs repairing, replacing,
technical service or you simply need help or advice,
please contact us on our Customer Assist Line
1300 880 001 (Australia) or 0800 445 721 (New Zealand).
For prompt service we suggest you log your service request
online at www.gmcservice.com.au. Should you not have
access to the Internet, please contact our service department
on 1300 880 001 (Australia) or 0800 445 721 (New Zealand).
7am –7pm, 7days a week (AEST).
Please note that if repair or replacement is required,
you must provide a valid original purchase receipt.
You will need the following details at hand to log your service request;
Personal details: First & Last name, address, pick up address,
contact phone numbers, email address
Product details: Product number, date of purchase, retailer bought from,
State & postcode, receipt number,
reason for the request,
c
opy of official purchase receipt
Attach your purchase receipt and save with this Manual for future reference
.
Please refer to our website www.gmcompany.com for full GMC warranty Terms and Conditions.
 Loading...