

Page 1
Getting to Know Your
2017 Acadia Limited
www.gmc.com
Review this Quick Reference Guide for an overview of some important features in your
GMC Acadia Limited. More detailed information can be found in your Owner Manual.
Some optional equipment described in this guide may not be included in your vehicle.
For easy reference, keep this guide with your Owner Manual in your glove box.
Page 2
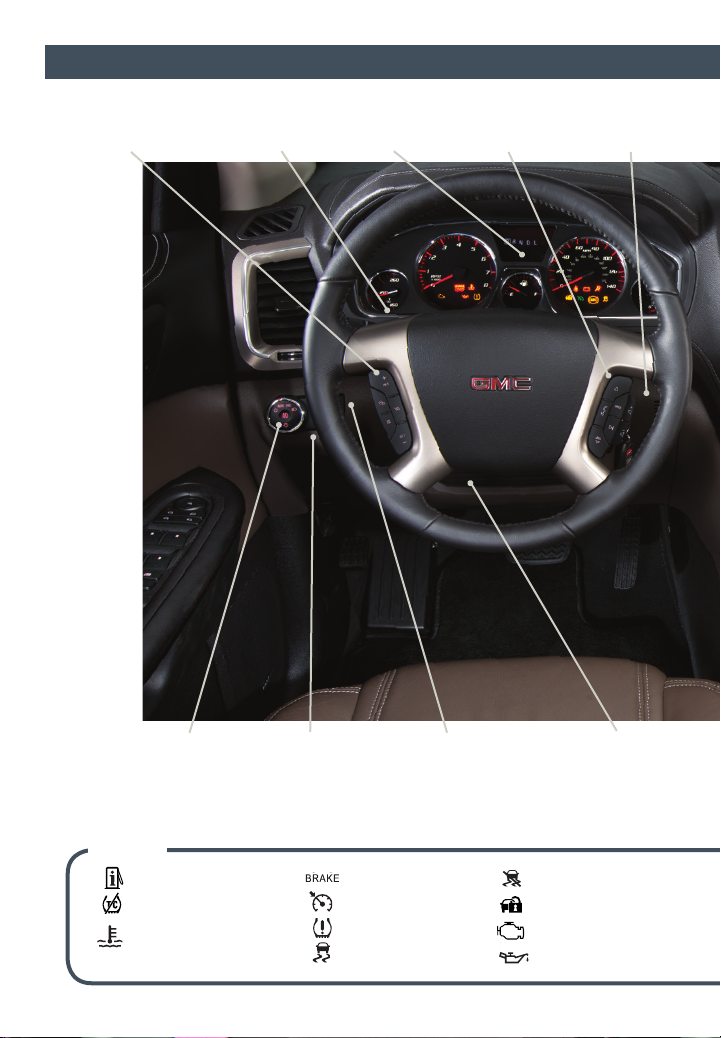
Instrument Panel
Cruise Control
Buttons/Heated
Steering Wheel Button
Turn Signal Lever/
Windshield
Wipers Lever
Driver
Information
Center
Audio Steering
Wheel
Controls
Head-Up
Display
Controls
F
2
Exterior Lamps
Symbols
Low Fuel
Traction Control Off
Engine Coolant
Temperature
Control
Ambient Light
Control
Brake System
Instrument Panel
Illumination Control/
Dome Lamp Off Button
Cruise Control Set
Low Tire Pressure
StabiliTrak Active
Tilt/Telescopic
Steering Wheel
StabiliTrak Off
Security
Check Engine
Oil Pressure
Lever
Page 3
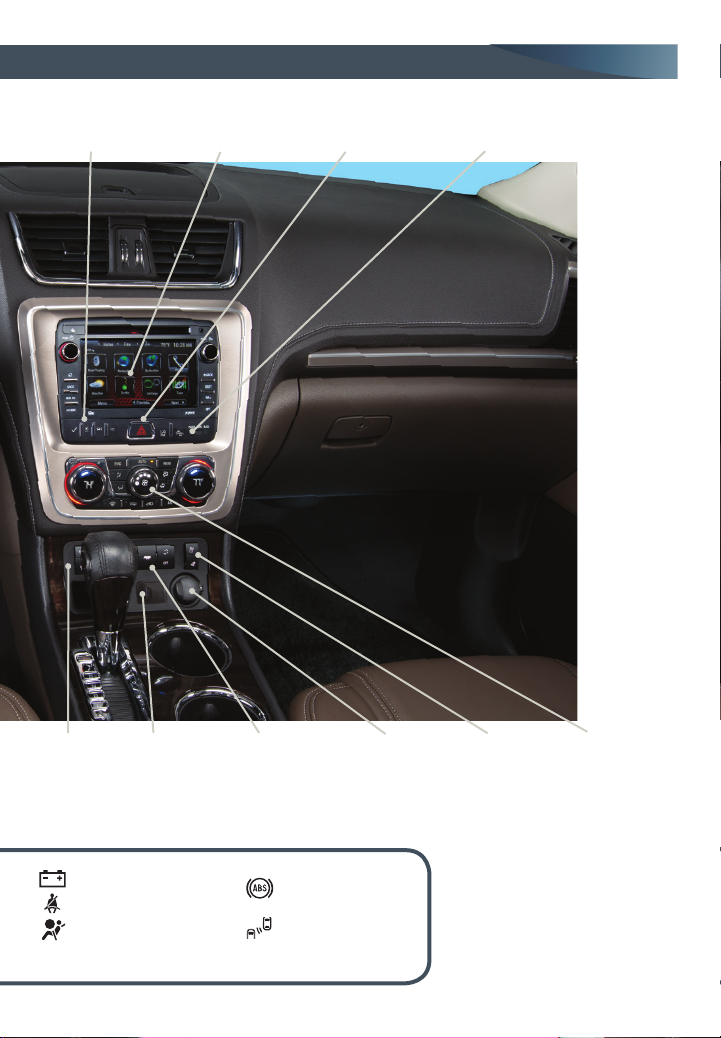
Driver
Information Center
Buttons
Audio System/
Navigation
System
Hazard Warning
Flashers Button
Lane Departure
Warning Button/
Forward Collision
Alert Button
Driver’s
Heated/Cooled
Seat Buttons
F
Charging System
Safety Belt Reminder
Airbag Readiness
F
Optional equipment
USB
Port
Rear Wiper Switch/
Traction Control
Off Button/Tow/
Haul Mode ButtonF/
Power Liftgate Switch
Antilock Brake
System
Side Blind
Zone Alert
Accessory
Power
Outlet
Passenger’s
Heated/Cooled
Seat Buttons
Climate
Controls
F
Refer to your Owner Manual
to learn about the information
being relayed by the lights,
gauges and indicators on the
instrument cluster.
See In Brief in your Owner Manual.
3
Page 4
Front Seats
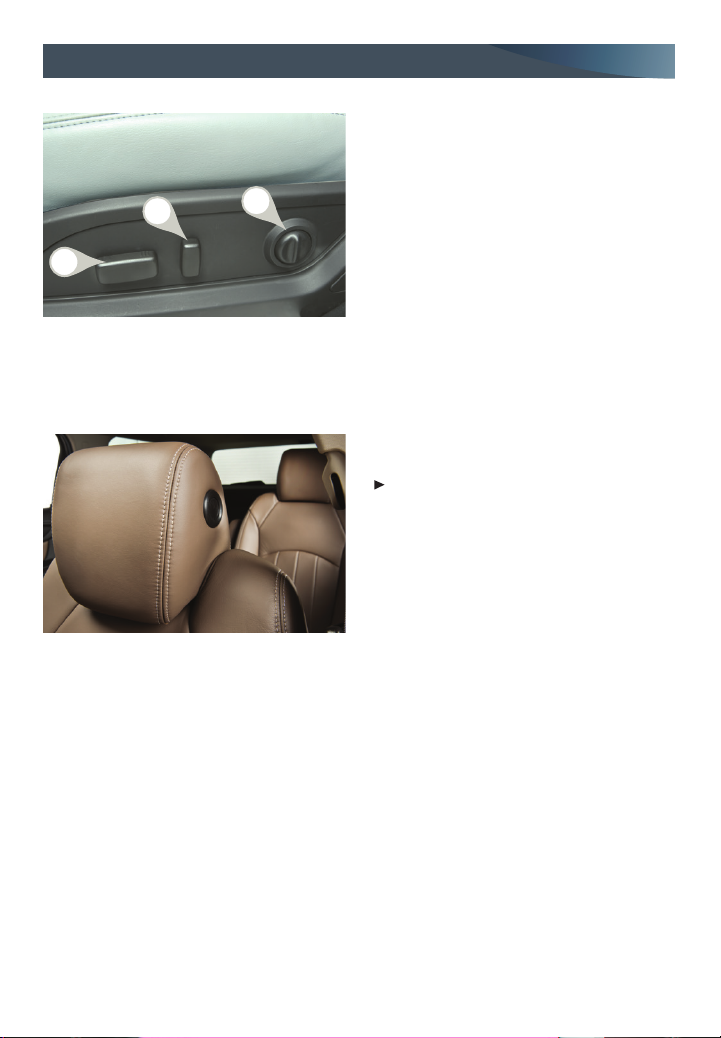
Power Seats
A
Head Restraints
A. Seat Adjustment
Move the horizontal control to move
the seat forward or rearward and to
B
C
raise, lower or tilt the seat.
B. Seatback Recline Adjustment
Move the vertical control to recline or
raise the seatback.
C. Lumbar Adjustment
Press the switch to adjust the amount
of lumbar support.
The driver and front passenger head
restraints are adjustable.
Press the button on the left side of the
head restraint to raise or lower the
head restraint, or move it rearward.
Move the head restraint forward by
pulling it forward.
See Seats and Restraints in your Owner Manual.
(Driver’s Seat Only)
4
Page 5
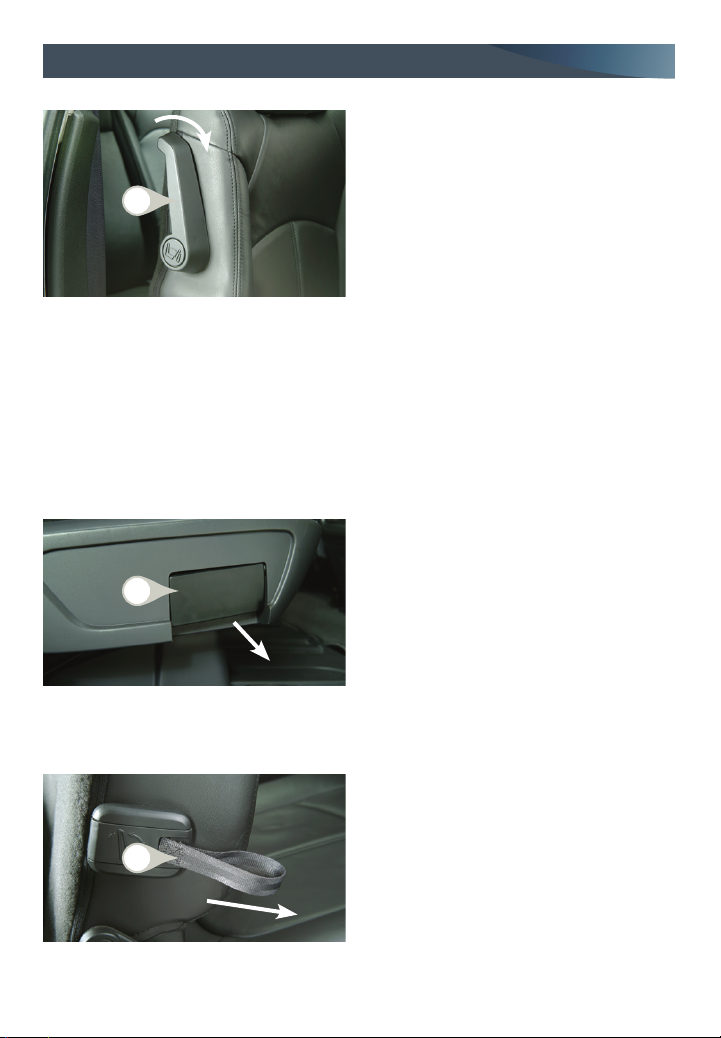
2nd-Row Seats
Enter or Exit the 3rd-Row Seats
A
Slide the Seat
B
1. Make sure nothing is on the 2nd-row
seat or the oor in front of or behind
the seat.
2. Fold up the armrest(s) and make sure
the safety belt is unfastened and in the
stowed position.
3. Rotate the release lever (A) on the
upper-outboard side of the seatback
forward.
4. Push the top of the seatback forward.
The seat cushion will fold and the
entire seat will slide forward.
5. After entering/exiting, push the top of
the seatback rearward until the seat
back and oor tracks lock.
6. Push down at the rear of the seat
cushion to lock it in place.
1. Make sure nothing is on the oor in
front of or behind the 2nd-row seat.
2. Pull outward on the handle (B) on the
outboard side of the seat cushion and
slide the seat forward or rearward.
3. Release the handle.
-
Fold/Recline the Seatback
C
1. Make sure the seat is all the way
rearward (when folding the seat), the
armrest(s) are upright and the safety
belt is unfastened.
2. Pull forward on the strap (C) on the
outboard side of the seatback.
3. Fold down or recline the seatback.
See Seats and Restraints in your Owner Manual.
5
Page 6
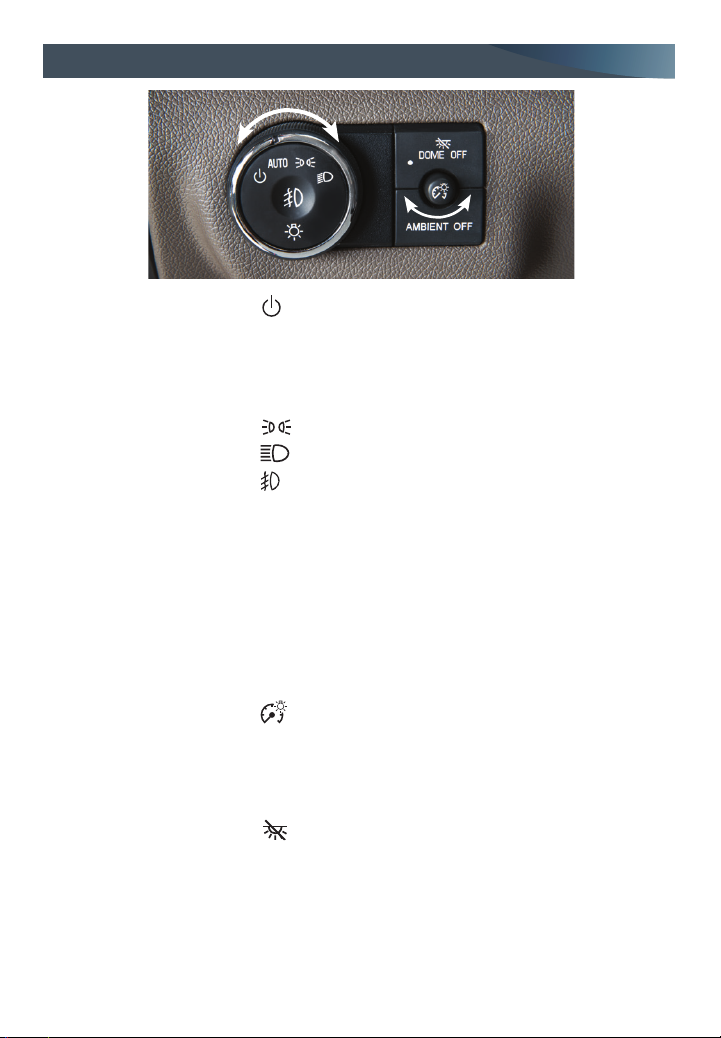
Lighting
Exterior Lamps
Rotate the knob to
operate the exterior
lamps.
Ambient Lighting
Interior Lighting
Dome Lamps
6
Off/On
AUTO Automatic Headlamp System
Activates the Daytime Running Lamps (DRLs) in the
daytime and the headlamps and other exterior lamps
at night or when necessary.
Parking Lamps
Headlamps
Fog Lamps
Press the knob to turn the fog lamps on or off.
Ambient Off
The ambient lighting illuminates across the instru
ment panel. Press the button to turn the ambient
lighting on or off. Turn the instrument panel bright
ness knob to adjust the lighting. The headlamps must
be on for the ambient lighting to operate.
Instrument Panel Brightness
Press the small knob to extend it. Turn the knob to
adjust the instrument panel lighting. Turn the knob
fully to turn on the dome lamps when all doors are
closed.
Dome Off
Press the button to turn off the dome lamps. The
button indicator will illuminate when the dome lamps
are turned off. With the button depressed, the dome
lamps will not turn on when a door is open.
Press the button again to have the dome lamps turn
on when a door is open.
See Lighting in your Owner Manual.
-
-
Page 7
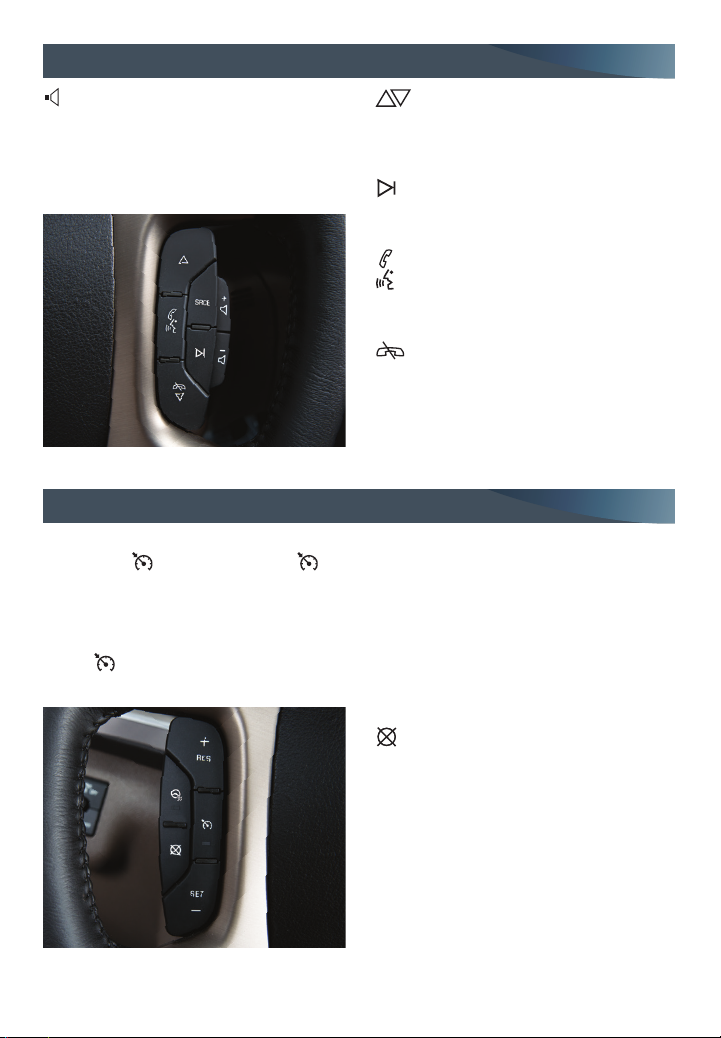
Audio Steering Wheel Controls
F
Volume
Pull up the + or – button to adjust the
volume.
SRCE Source
Press to select an audio source.
Cruise Control
Setting Cruise Control
1. Press the
Cruise Control symbol will illuminate in
white on the instrument cluster.
2. When traveling at the desired speed,
press the SET/– button to set the speed.
The
on the instrument cluster.
On/Off button. The
symbol will illuminate in green
Next/Previous
Press the up or down arrow to go to the
next or previous favorite radio station,
track, or le.
Seek
Press to go to the next radio station on the
same band or CD track.
Push to Talk
Press to start voice recognition to
interact with the audio, OnStar
®
, Bluetooth
or navigation system.
End Call
Press to end or reject an OnStar or a
Bluetooth call.
See Instruments and Controls in your Owner Manual.
Adjusting Cruise Control
RES/+ Resume/Accelerate
Press to resume a set speed.
When the system is active, press to
increase speed.
SET/– Set/Coast
When the system is active, press to
decrease speed.
Cancel
Press to cancel the cruise control
but retain the set speed in memory.
Pressing the brake pedal also will cancel
the cruise control.
The cruise control set speed is erased
when cruise control or the vehicle ignition
is turned off.
F
Optional equipment
See Driving and Operating in your Owner Manual.
7
Page 8
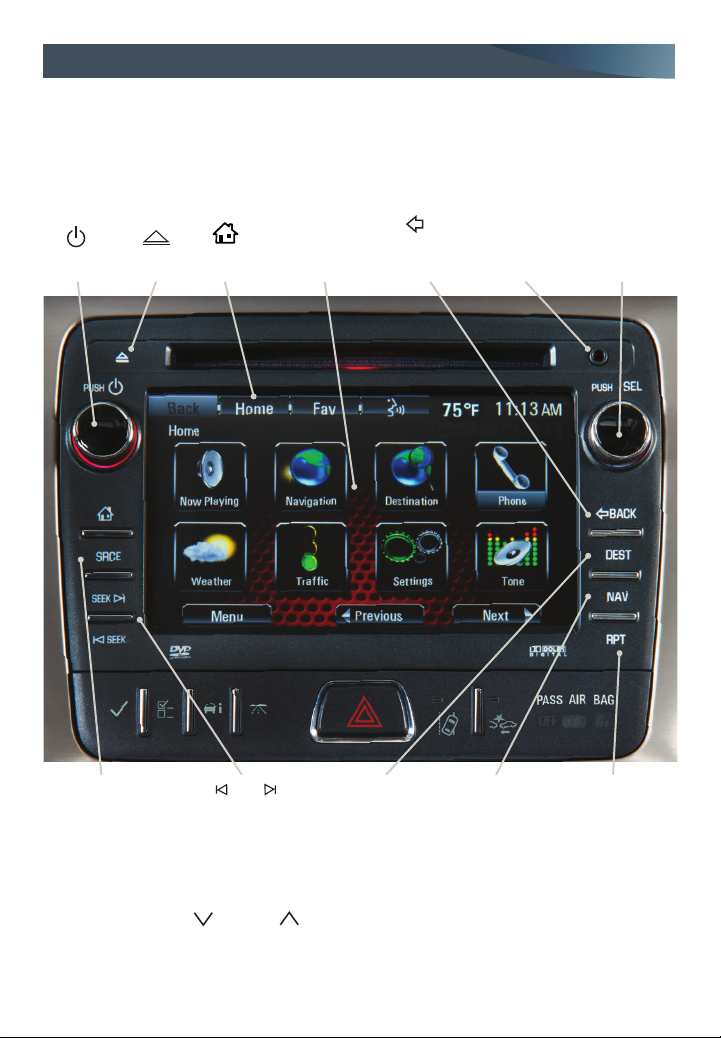
Infotainment System
Refer to your Owner Manual for important safety information about using the infotainment system
while driving.
The infotainment system is controlled using the faceplate buttons, touch screen, voice
recognition and audio steering wheel controls.
Volume/
Power
SRCE
Select the audio
source
Eject
disc
Previous/Next radio
station, track or le
Home
page
SEEK
Applications:
Touch the
screen icon
to access the
application
Move back one
level in the
menus
DEST
Open the
Destination
menu
BACK
Auxiliary
input jack
NAV
Map
screen
Tune/Menu:
Tune radio
stations/Open
and select
menus
Repeat voice
guidance
RPT
Setting the Time
1. Touch the Time Display on the touch screen.
2. Touch the desired
down or up screen button to adjust the time.
3. Touch the OK screen button to conrm the setting.
8
See Infotainment System in your Owner Manual.
Page 9
Infotainment System
Storing Favorite Stations
Radio stations from all bands (AM, FM or Sirius XM
on up to six pages of favorites.
1. Tune in the desired radio station.
2. Press and hold one of the six preset screen buttons until a beep is heard.
3. Repeat the steps for each desired station.
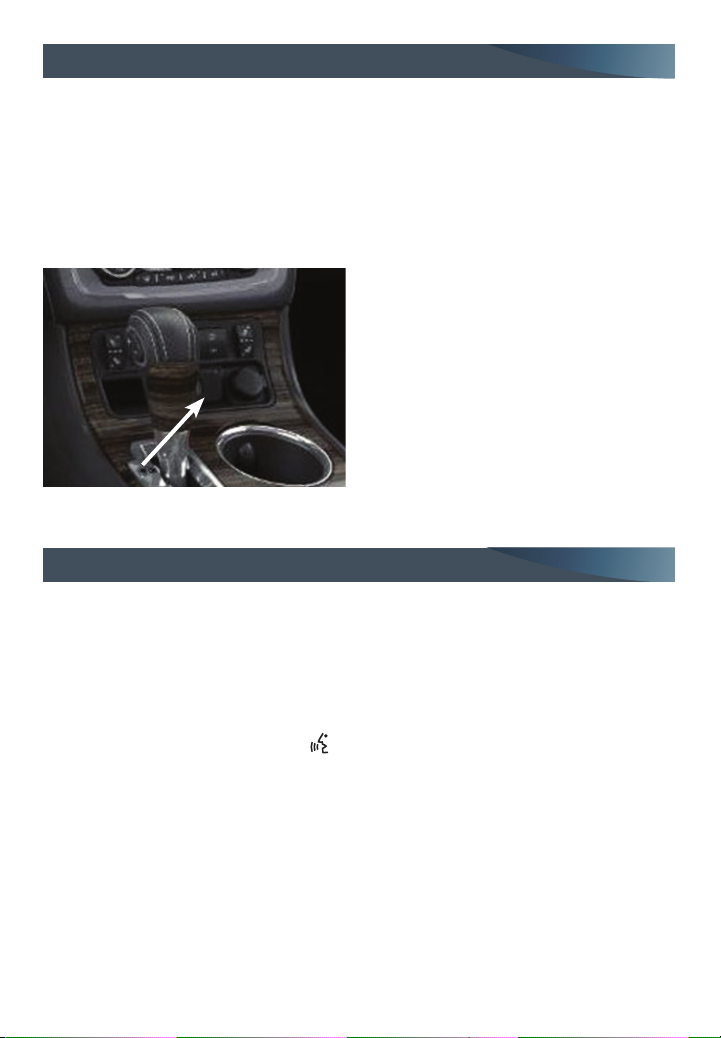
Portable Audio Devices
F
) can be stored, in any order,
A USB port is located at the front of the
center console.
®
, iPhone®, MP3 Player, a USB ash
An iPod
drive or a USB mass storage device can be
connected to the USB port. Compatible
devices connected to the USB port can be
controlled by the audio system. Not all
devices may be supported. Use the audio
controls and audio steering wheel controls
to access various functions.
See Infotainment System in your Owner Manual.
Bluetooth® System
Refer to your Owner Manual for important safety information about using the Bluetooth system
while driving.
Before using a Bluetooth-enabled device in the vehicle, it must be paired with the
in-vehicle Bluetooth system. The pairing process is disabled when the vehicle is moving.
Not all devices will support all functions. Bluetooth streaming audio is available with the
IntelliLink system. For more information, visit my.gmc.com/learn.
Pair a Phone
1. To use voice recognition, press the
To use the screen buttons (IntelliLink system only), press the Settings screen button
and then touch Bluetooth Device List > New Device.
2. Start the pairing process on the phone. Locate your vehicle name or IntelliLink on
the phone.
3. Enter the four-digit code that appears on the touch screen into the phone or conrm
the six-digit code on the phone.
4. If your phone prompts you to accept the connection or phone book download, select
Always Accept and Allow.
Push to Talk button; after the beep, say “Pair.”
See Infotainment System in your Owner Manual.
F
Optional equipment
9
Page 10

GMC IntelliLink
IntelliLink uses a Bluetooth or USB connection to link to a compatible device, such as a
smartphone, cell phone, USB ash drive or portable audio player/iPod
streaming audio through a smartphone and hands-free voice control. Music also can be
played from a USB ash drive.
For assistance with the IntelliLink system, contact Customer Assistance at
1-855-4-SUPPORT (1-855-478-7767) or go to www.gmc.com and click the More GMC link.
Voice Recognition
Control the music source and make phone calls hands-free (after pairing your Bluetoothenabled phone) using the enhanced voice recognition system.
1. Press the
Push to Talk button on the steering wheel.
2. The radio will say “Command please,” followed by a beep.
3. After the beep, say what you want it to do.
Phone (using your paired phone):
Example command: “Call Amanda” or “Dial 555-1212”
Media Music Device Search (when connected to USB only):
Example command: “Play artist [name]” or “Play song [name]”
Radio Control:
Example command: “Tune FM 104.3” or “Tune XM Classic Vinyl”
PANDORA
®
Internet Radio
Listen to personalized radio stations based on favorite artists or genres.
Download the Pandora app to your smartphone. Restart the smartphone and sign in
to Pandora.
Create a station on your phone to listen to a customized song list in the vehicle.
Connect your smartphone/device to the system by Bluetooth or, for Apple devices,
by a USB cable.
Touch the Pandora icon on the touch screen to access Pandora. A slight delay may
occur when loading a song or changing a station.
See Infotainment System in your Owner Manual.
®
. IntelliLink enables
OnStar® with 4G LTE and Wi-Fi®
With OnStar 4G LTE and Wi-Fi, up to seven devices (smartphones, tablets and laptops)
can be connected to high-speed Internet through the vehicle’s built-in Wi-Fi hotspot.
To retrieve the SSID and password for the hotspot, press the OnStar Voice Command
button on the overhead console or rearview mirror, wait for the prompt, and then say
“Wi-Fi settings.” The information will be displayed on the screen.
For assistance, press the blue OnStar button or call 1-888-4-ONSTAR (1-888-466-7827).
Note: See onstar.com for a detailed instruction guide, vehicle availability, details, and system
limitations.
See OnStar in your Owner Manual.
10
Page 11
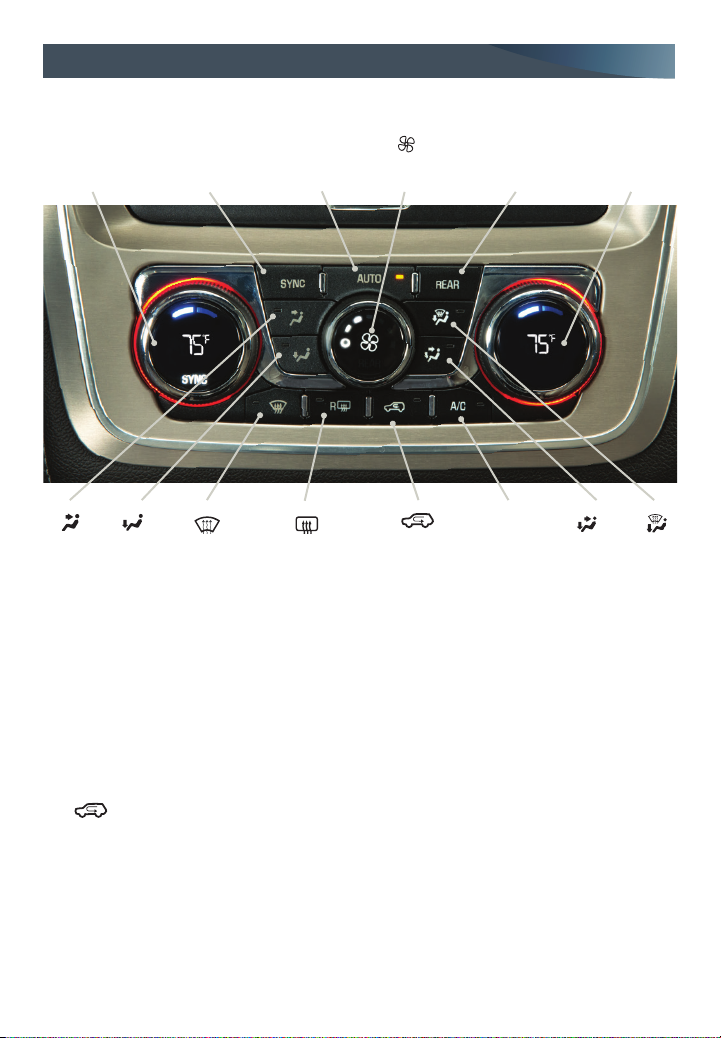
Climate Controls
Driver’s
Temperature
Control
Vent Mode
Floor
Mode
SYNC
Link all settings
to driver’s
setting
Defrost
Mode
AUTO
Automatic
operation
R
Rear Window/
Outside Mirror
Defogger
Fan Speed
Control/Off
Recirculation
Mode
REAR
Activate Rear
Climate Control
operation
A/C
Air
Conditioning
Control
Passenger’s
Temperature
Control
Bi-level
Mode
Defog
Mode
Automatic Operation
1. Press AUTO.
2. Set the temperature for the driver and front passenger. If desired, press SYNC to link all
temperature settings to the driver’s setting. Allow time for the system to automatically
reach the desired temperature.
If the air delivery mode or fan speed is adjusted manually, automatic operation is
canceled.
Recirculation Mode
The
vent outside odors from entering the vehicle. It is not available while the Floor, Defog or
Recirculation Mode can help to quickly cool the air inside the vehicle or pre
-
Defrost Mode is selected. When the Recirculation Mode is used without air conditioning,
the air humidity increases and the windows may fog.
See Climate Controls in your Owner Manual.
11
Page 12
Rear Seat Climate Controls
Front Controls
A
B
C
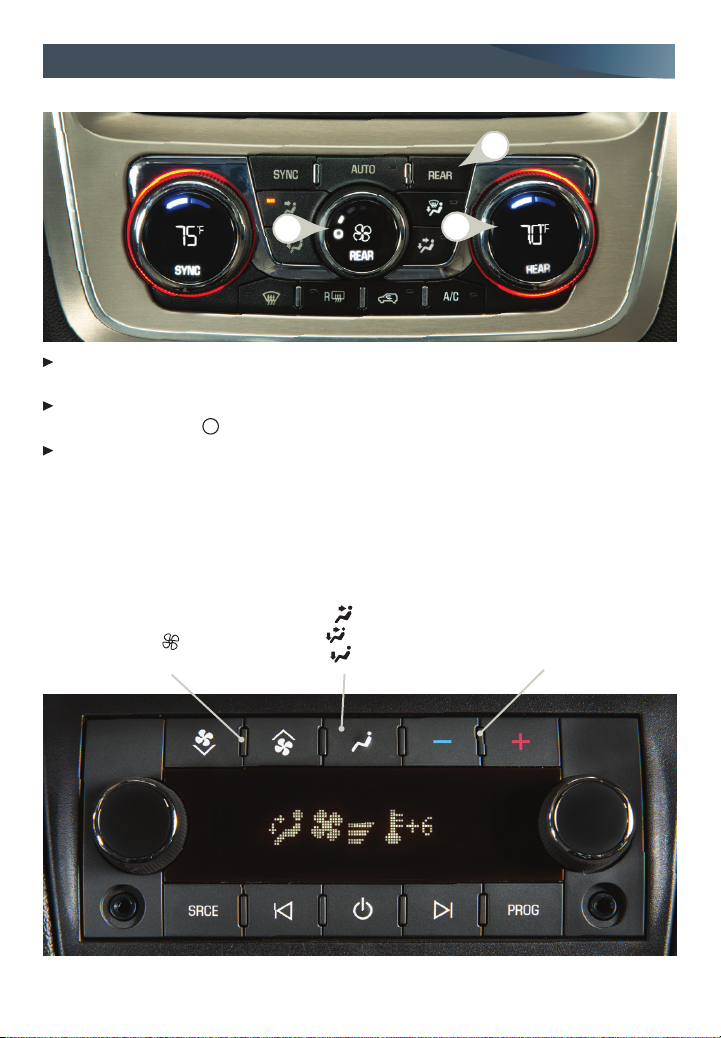
Press the REAR button (A) to activate rear climate control operation. REAR will illumi-
nate on the fan control knob and temperature control knob.
Use the fan control knob (B) to adjust the rear climate control fan speed. Turning the
fan control knob to
Off turns off the climate control system.
Use the temperature control knob (C) to adjust the rear climate control temperature.
Note: Maximum system operation is achieved by turning on the rear system even if the rear seats are
unoccupied.
Rear Seat Controls
Rear seat occupants can adjust the rear settings at any time by using the rear controls,
regardless of the front control panel REAR setting.
Fan Controls
Air Delivery Modes:
Vent
Bi-level
Floor
Temperature
Controls
Rear climate controls with rear seat audio shown
12
See Climate Controls in your Owner Manual.
Page 13
Driver Assistance Systems
The driver assistance systems use advanced technologies to help avoid collisions by
providing visual and audible alerts under some imminent collision conditions.
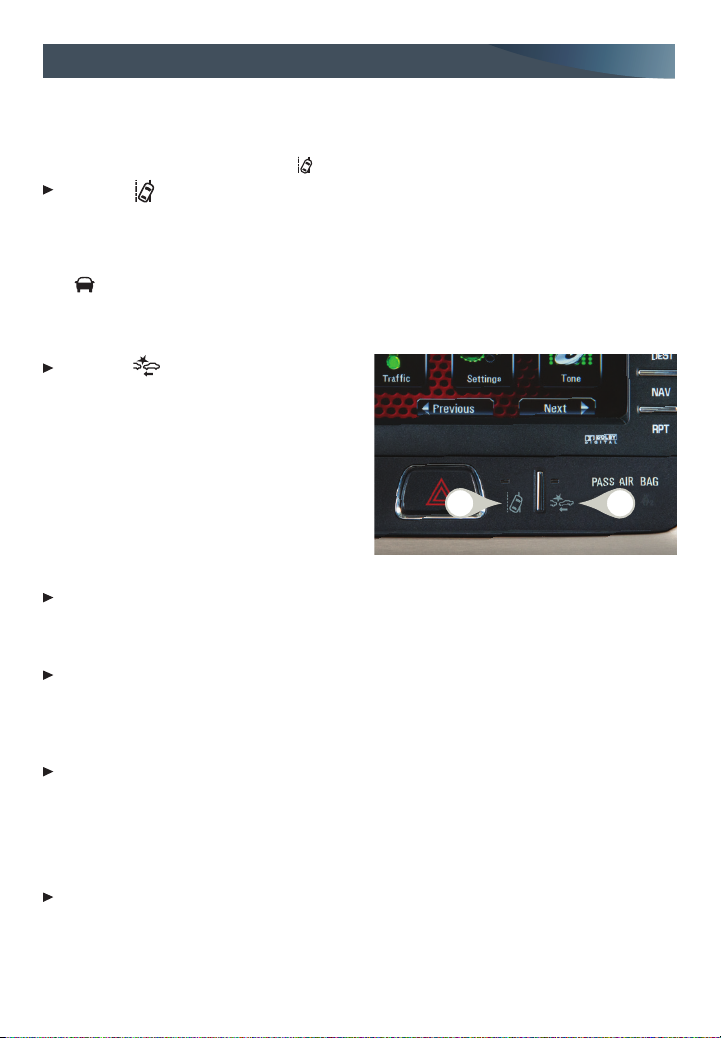
Lane Departure Warning – When crossing a detected lane marking without using a turn
signal, the system ashes an amber
Press the Lane Departure Warning button (A) on the center of the instrument
panel to turn the system on or off.
Forward Collision Alert – When approaching a vehicle directly ahead too quickly, the
system ashes a visual alert.
The
Vehicle Ahead indicator will illuminate in green on the instrument cluster when
a vehicle is detected and will illuminate in amber when following a vehicle ahead too
closely. If your vehicle approaches another vehicle much too rapidly, the collision alert will
ash on the windshield and beep rapidly.
Press the Collision Alert button (B)
on the center of the instrument panel to
set the alert sensitivity to Far, Medium,
Near, or Off. The setting is displayed in
the Driver Information Center.
Side Blind Zone Alert – While driving, the
Side Blind Zone Alert displays a warning
symbol on the left or right side mirror when
a vehicle is detected in that side blind zone
area. The warning symbol ashes if a turn
signal is activated when a vehicle has been detected.
To turn the system on or off, go to the Vehicle Information menu in the Driver
Information Center.
Rear Vision Camera – Provides a view directly behind the vehicle when backing up.
To turn the Rear Vision Camera Guidelines or Rear Park Assist Symbols on or off, go to
Settings > Rear Camera.
Rear Cross Trafc Alert – Warns of trafc coming in either direction behind the vehicle by
displaying a visual alert on the Rear Vision Camera display.
To turn the system on or off, go to the Vehicle Information menu in the Driver
Information Center.
Rear Parking Assist – When the vehicle is in Reverse, detected objects are indicated by
audible beeps. The interval between beeps becomes shorter as the vehicle gets closer to
an object. When the distance is less than 12 in. (30 cm), the beeps are continuous. The
system operates only at speeds less than 5 mph.
To turn the system on or off, go to the Vehicle Information menu in the Driver
Information Center.
visual alert on the instrument cluster.
A
See Driving and Operating in your Owner Manual.
B
13
Page 14
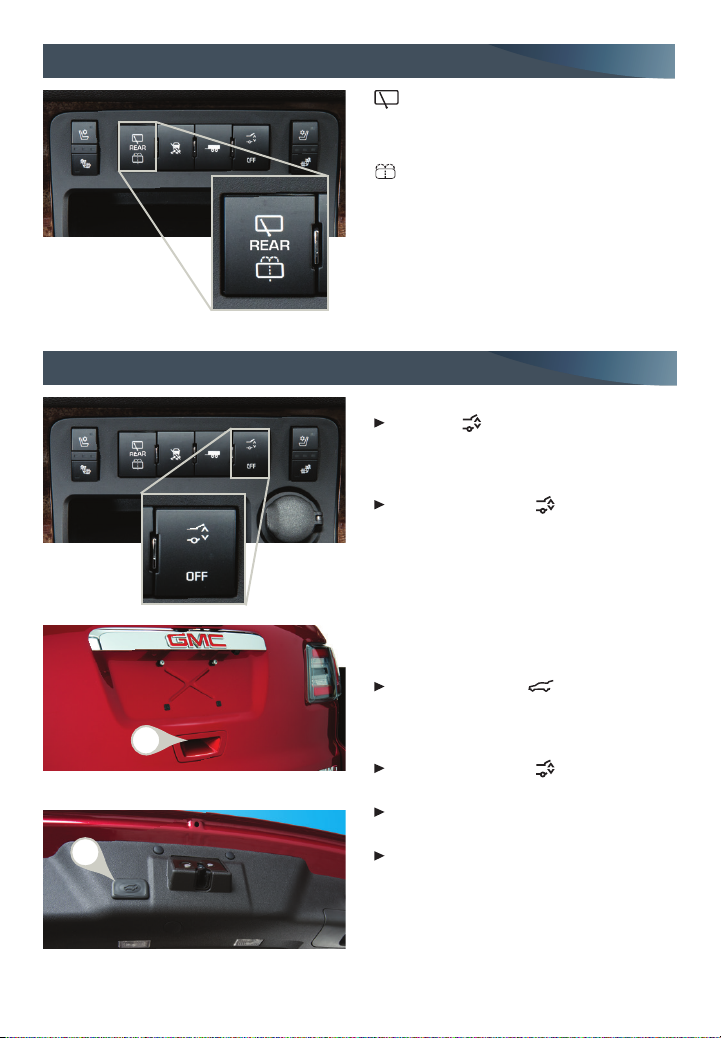
Rear Wiper/Washer
Power Liftgate
Rear Wiper
Press the top of the switch to turn the rear
wiper on or off.
Washer Fluid
Press the bottom of the switch to spray
washer uid on the rear window.
See Instruments and Controls in your Owner Manual.
Power Liftgate Switch
Press the
to turn off the power liftgate. The lift
Power Liftgate OFF switch
gate can only be operated manually
when the switch is in the Off position.
Press the top of the
Power Liftgate
switch to turn on the power liftgate.
Note: If the power liftgate does not open or close,
make sure the power liftgate switch is not in
the Off position. The Driver Information Center
will display POWER LIFTGATE OFF if the power
liftgate is disabled.
14
Open/Close the Power Liftgate
Press and hold the
button on the Remote Keyless Entry
A
transmitter until the liftgate starts
moving.
Press the top of the
Power Liftgate
Power Liftgate
switch on the center console.
Press the touchpad (A) in the liftgate
handle to open.
B
Press the touchpad (B) next to the lift-
gate latch to close.
See Keys, Doors and Windows in your Owner Manual.
Page 15

Wind Noise
If a rear window is open, there may be a buffeting wind noise inside the vehicle.
Opening a front window slightly when a rear window is open will prevent this noise
from occurring.
See Keys, Doors and Windows in your Owner Manual.
Towing
The Acadia base towing capacity is 2,000 lbs. Vehicles equipped with the Trailer Towing
Package have a towing capacity of 5,200 lbs.
F
Use the Tow/Haul mode
mission shifts and improve the control of vehicle speed.
To turn the Tow/Haul mode on or off, press the Tow/Haul button on the
center console.
when pulling a heavy trailer to reduce the frequency of trans-
See Driving and Operating in your Owner Manual.
Battery Location
The battery is located beneath the oor behind the front passenger seat. Jump-start positive and negative posts are located under the hood on the passenger’s side of the vehicle.
See Vehicle Care in your Owner Manual.
Tire Pressure Monitor
Low Tire Pressure warning light on the instrument cluster illuminates when one
The
or more of the vehicle’s tires is signicantly underinated. Fill the tires to the proper tire
pressures. The proper tire pressures for the vehicle are listed on the Tire and Loading
Information label, located below the driver’s door latch. Current tire pressures can be
viewed in the Driver Information Center.
Tire pressure is affected by cold weather and distance driven. If the low tire pressure
warning light illuminates when the vehicle is rst started in cooler temperatures and
then turns off as the vehicle is driven, check for the proper tire pressures.
Refer to your Owner Manual for additional information about normal monthly tire maintenance.
See Vehicle Care in your Owner Manual.
F
Optional equipment
15
Page 16
Roadside Assistance
1-888-881-3302 TTY Users: 1-888-889-2438
As the owner of a new GMC, you are automatically enrolled in the GMC Roadside
Assistance program for up to 5 years/60,000 miles, whichever occurs rst, at no expense
to you. GMC’s Roadside Assistance toll-free number is staffed by a team of trained advi
sors who are available 24 hours a day, 365 days a year, to contact a service provider for
light services (fuel delivery, jump-starts, at tire and lock-outs) or make arrangements to
tow your vehicle to the nearest GMC dealer for any repairs.
Roadside Assistance and OnStar®
If you require roadside service and have a current OnStar subscription, press the OnStar
button and the vehicle will send your current GPS location to an OnStar Advisor who
will speak to you, assess your problem, contact Roadside Assistance and relay your exact
location so you will get the help you need.
-
myGMC and OnStar® Mobile Apps
The myGMC mobile app connects owners to a variety of vehicle information and services, such as a searchable Owner Manual, real-time
fuel information and Roadside Assistance.
Download the OnStar RemoteLink mobile app and enjoy select features
device, owners can access many services, including remotely starting/stopping the vehicle,
locking/unlocking the doors, and locating the vehicle on a map (on properly equipped
vehicles). To learn more about OnStar services, press the blue OnStar button, call
1-888-466-7827, visit onstar.com or refer to your Owner Manual
Download the mobile apps from your compatible mobile device’s app store.
for 5 years from date of vehicle delivery. With a compatible mobile
.
GMC Owner Center
Get to know your vehicle inside and out with the GMC Owner Center. Check out personalized information, including an online Owner Manual and helpful how-to videos, track your
service history and warranty status, review your current OnStar Vehicle Diagnostics report
(active OnStar account required) and more. Create an account today at my.gmc.com.
We recommend always using ACDelco or genuine GM service parts.
Certain restrictions, precautions and safety procedures apply to your vehicle. Please read your Owner Manual
for complete instructions. All information contained herein is based on the latest information available at the
time of printing and is subject to change without notice. Copyright 2016 General Motors. All rights reserved.
84016872 A
!84016872=A!
16
 Loading...