

Page 1
Firewire CDR
Quickstart Guide
Page 2

About This Manual
This is not a technical manual. Technical manuals usually include
information about the drive mechanism (like drive specs, wiring
schematics, pin outs ... stuff like that). Since opening your Glyph
enclosure voids your warranty, our documentation covers the setup
& use of the product, not the drive inside it.
If you have questions or comments of a technical nature, we urge
you to contact the Glyph Technical Support Department at
(607)275-0154 or check out our web site for technical resources at
www.glyphtech.com.
2
Page 3

3
Unpacking, Inspection & General Info
Your Glyph WildFire CDR and accessories are packaged in a sturdy
shipping container. Please inspect the container for evidence of
shipping damage and mishandling. If such evidence is found, file a
report with the carrier or dealer immediately and do not attempt
to unpack and operate the WildFire CDR until the carrier or dealer
confirms the damage. All Glyph products are factory sealed and you
should not accept a box which has been previously opened.
Now, proceed with unpacking the WildFire CDR and verify that all
of the following items are present:
1 - The WildFire CDR itself
2 - One (1) FireWire Cable
3 - One (1) Power Cable
4 - Warranty Card
5 - CD Burning Software (Like Toast)
If any of the items are missing, contact the party from whom the
drive was purchased to arrange for replacement.
• It is a good idea to keep the shipping container and packing
materials if you plan to store or ship your WildFire CDR at some
future date.
Page 4
4
Parts Identification
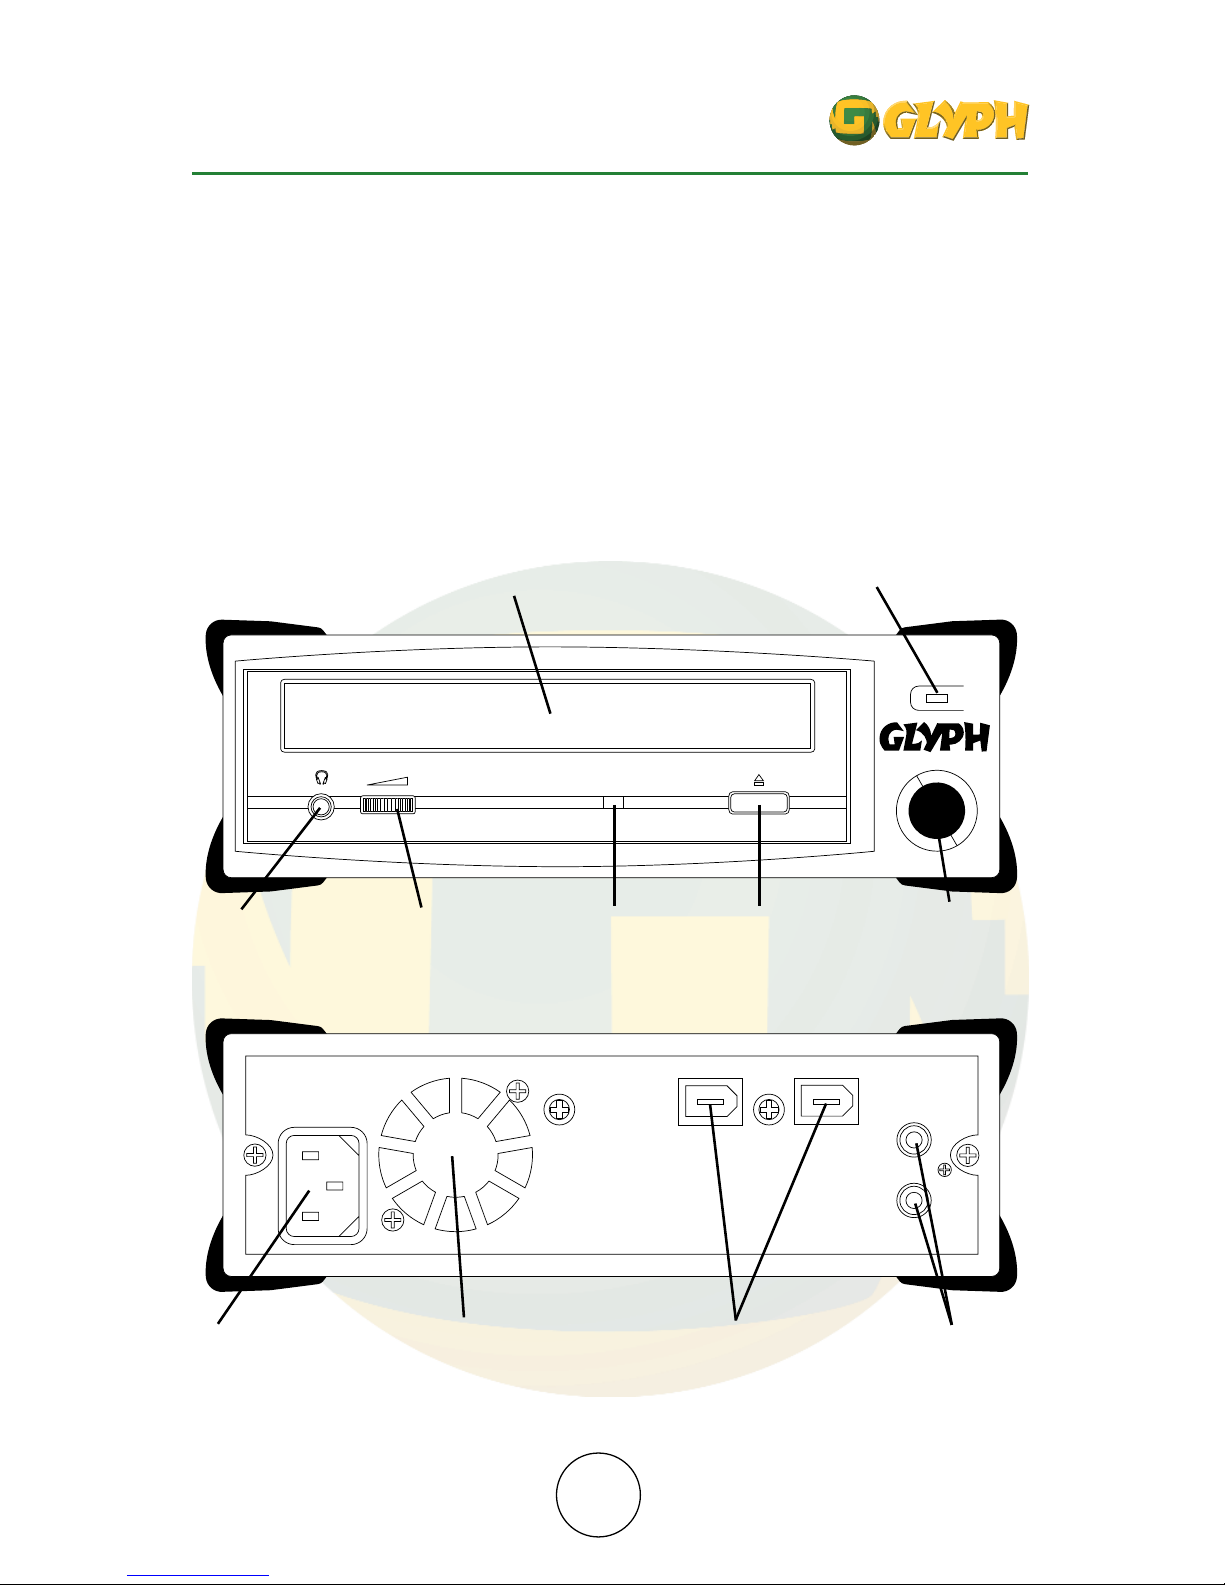
To familiarize yourself with the WildFire CDR, take a moment to
study the diagrams below. You will be connecting cables on the
drive shortly, so it will be helpful to know the layout of the
physical connections.
CD Tray
Power Indicator
Light
Power
Button
Headphone
Jack
Volume
Control
Eject
Button
Access
Light
Power Fan FireWire
Ports
Audio RCA
Outs
Page 5

5
Configuring the WildFire CDR for Install
The WildFire CDR drive will interface with your computer through
the FireWire cable which is supplied with your drive. Your WildFire
CDR package includes everything you need to get started.
FireWire is a transfer protocol that uses a serial data bus.This bus is
capable of transferring data at 100, 200 and 400 Mbps (Megabits per
second). FireWire, unlike SCSI, requires no ID numbers or termination.
In almost all Glyph scenarios it is a plug and play solution.
Connecting the Glyph WildFire CDR
To connect your WildFire CDR drive, locate the following items
from your WildFire CDR package:
• The WildFire CDR itself
• Power cable
• FireWire cable
Page 6
6
Installing Glyph WildFire CDR Hardware
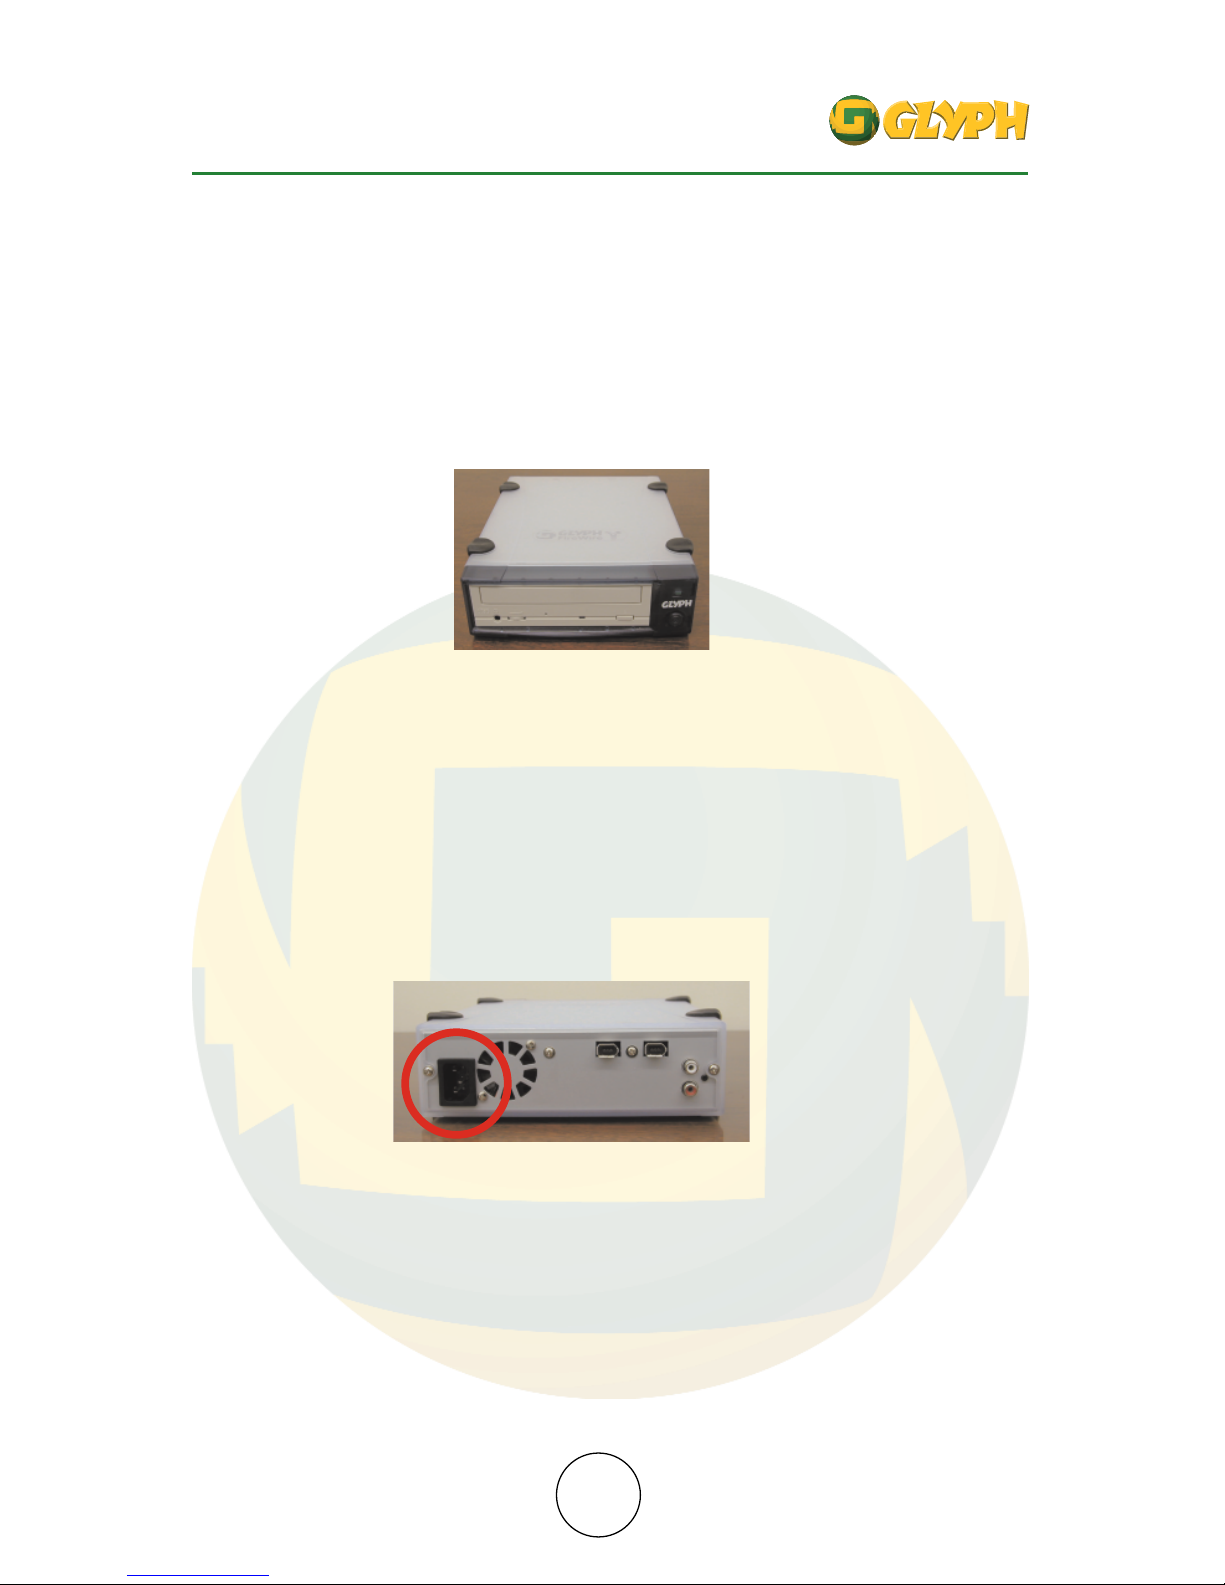
Step 1 - Position the Drive
Find a level, solid surface on which to place the unit.
Here’s one on Larry’s desk.
Step 2 - Connect Power Cable (Power Off)
Make sure that the power is off on all of your computer
equipment and the WildFire CDR. Connect the power cable to the
back of the WildFire CDR drive. Plug the three prong power plug
into an appropriate power receptacle, preferably with surge and
spike protection.
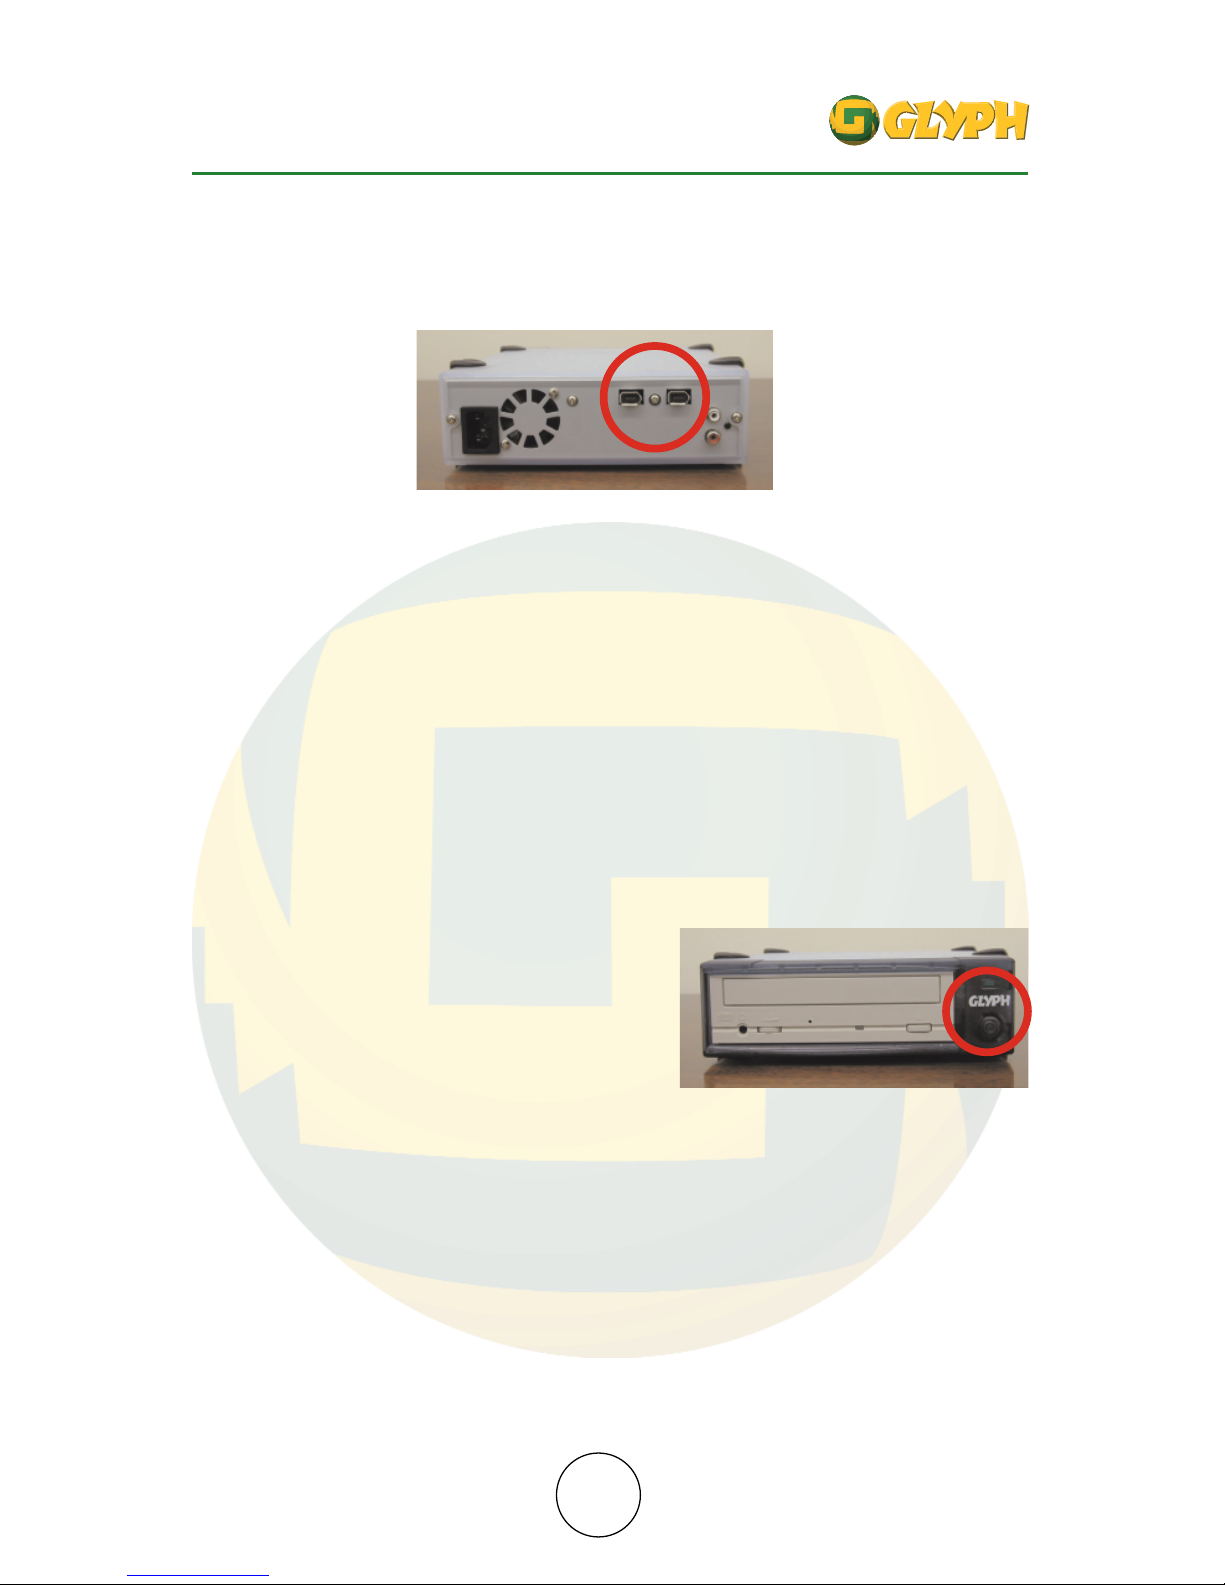
Step 3 - Connect FireWire Cable
Plug one end of the firewire cable into your computer’s firewire
port, and the other into the back of the WildFire CDR. The firewire
cables have an obvious shape and should plug in easily (like any
computer connection, don’t ever force the plug).
Page 7
7
The two ports are functionally the same and it does not matter
which one you plug into. A terminator is not necessary – this is
FireWire.
Step 4 - Power Up the Glyph WildFire
Check that you have:
• A good location for the drive
• The drive off and the power cord plugged into the drive
• The firewire cable connected to the WildFire CDR.
Power up your WildFire CDR. WildFire CDR drives have power switches
on the right side of the front panel.
Make sure that the power light is on.
Step 5 - Power Up Your
Computer
Now that the drive is on, power up your computer.
Step 6 - Using & Inserting the CDR Discs
Now that you have completed unpacking, connecting your drive
correctly, and powering up both your CDR and computer you are
ready to learn how to use the CD tray and CDR disc. Additional
discs are available from your dealer or from Glyph. See page 10 to
prepare your Mac.
Page 8
8
Disc Handling
Always store your CDR Discs in the jewel case when not in use.
Some important guidelines include:
• Store in a cool dry location.
• Do not transport the disc in your WildFire drive when
moving the drive.
• Always keep the disc free of dust and debris before
inserting into your WildFire drive.
• Do not touch the bottom side of the blank CDR disc as
fingerprints will cause problems during the recording
process.
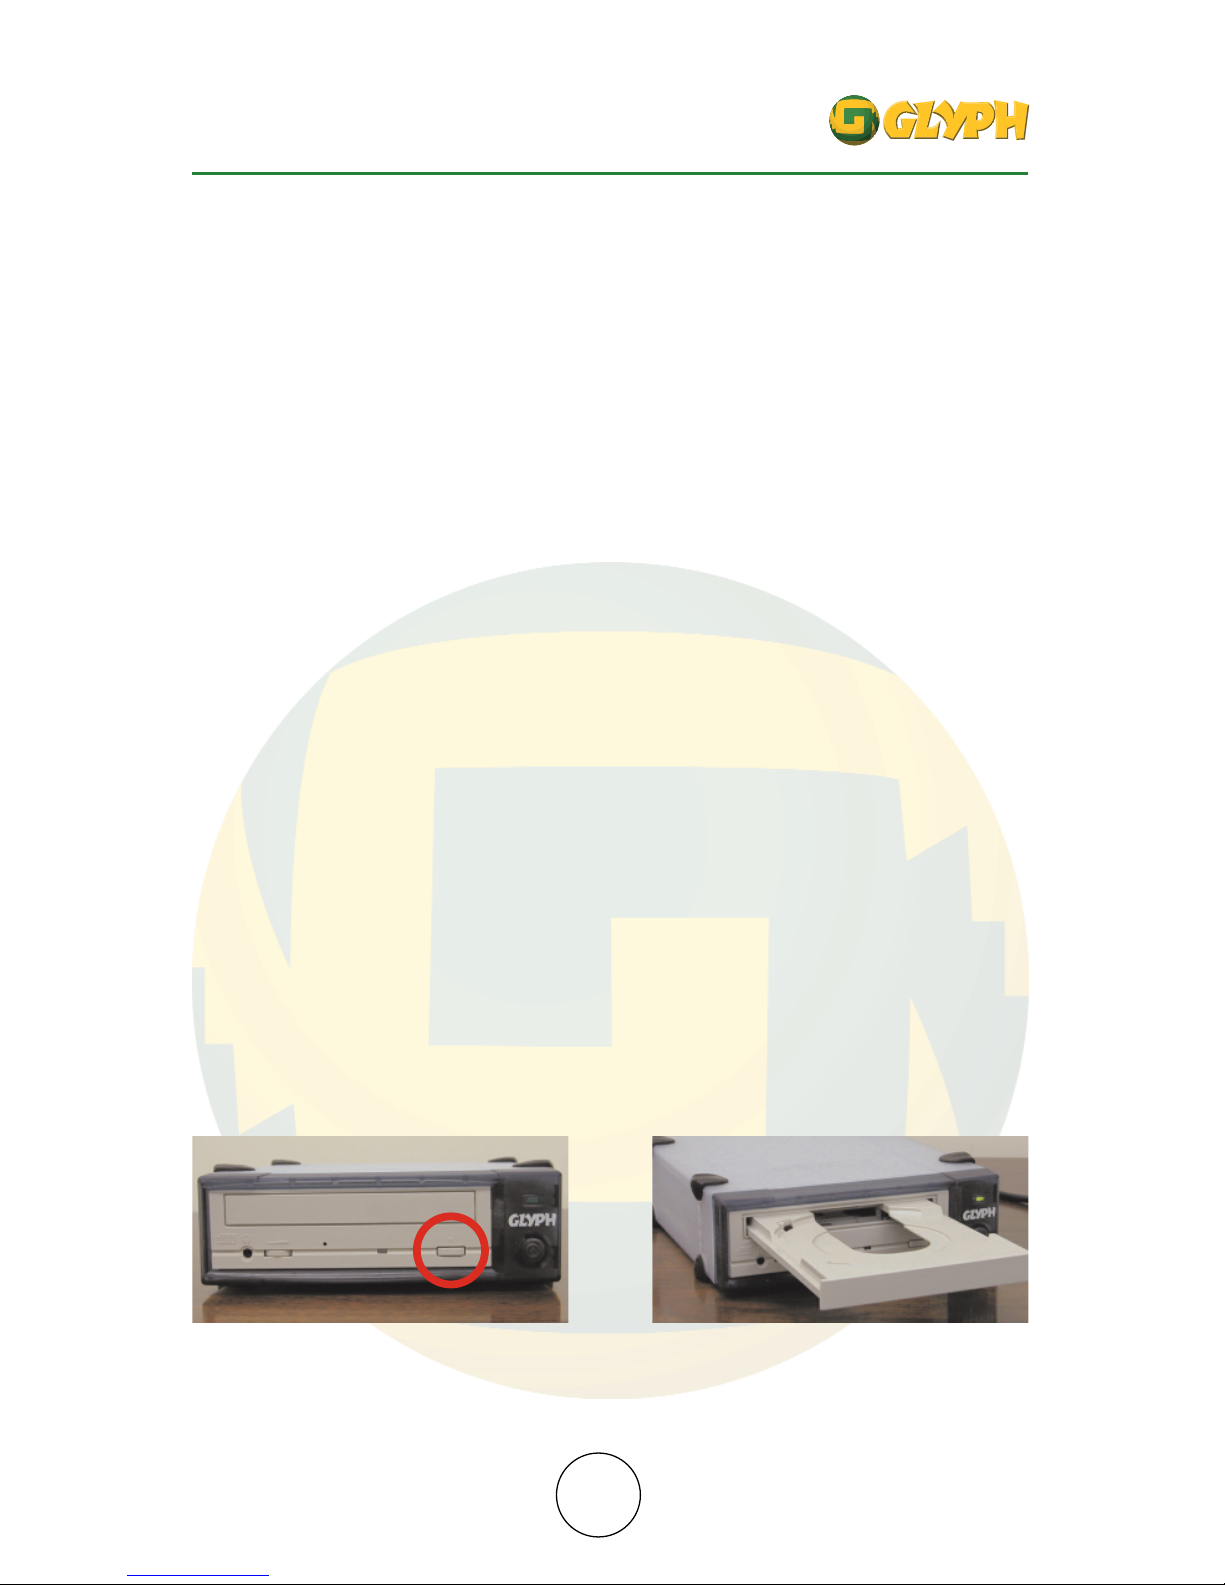
To use the CD tray:
Press the EJECT button and the tray will slide out of the drive.
When the tray is opened fully, it’s ready to accept a CD-ROM or a
blank piece of CDR media.
Page 9
9
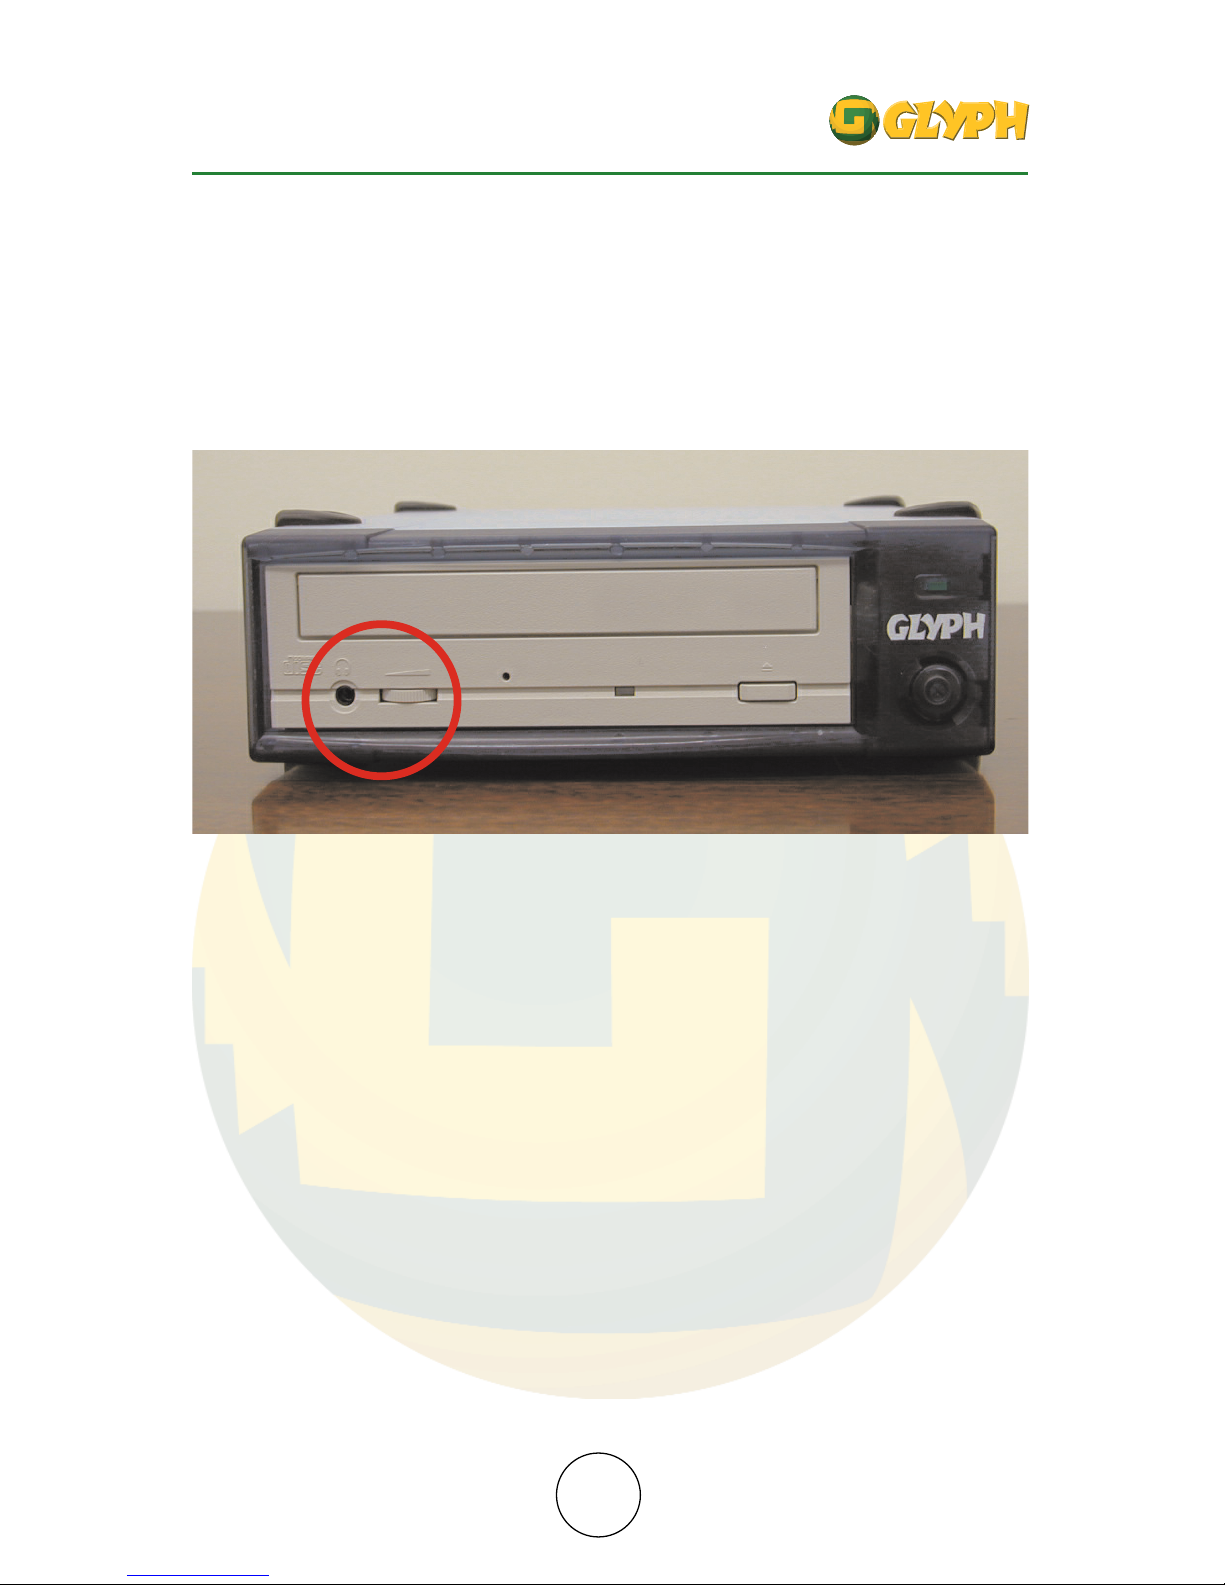
The Audio Jacks
The headphone jack and headphone volume control are located on
the front panel of the drive. Plug your stereo headphones into the
headphone jack for private listening.
To play an Audio CD, you must first mount the Audio CD using an
applicaion like Toast, then play the Audio CD with Apple’s CD Audio
Player application.
Any properly installed WildFire drive in the Windows, Windows 9x,
or NT environment can be controlled by specific, third party audio
software supplied with your system or with the Media Player that
is supplied with Windows.
Page 10
10
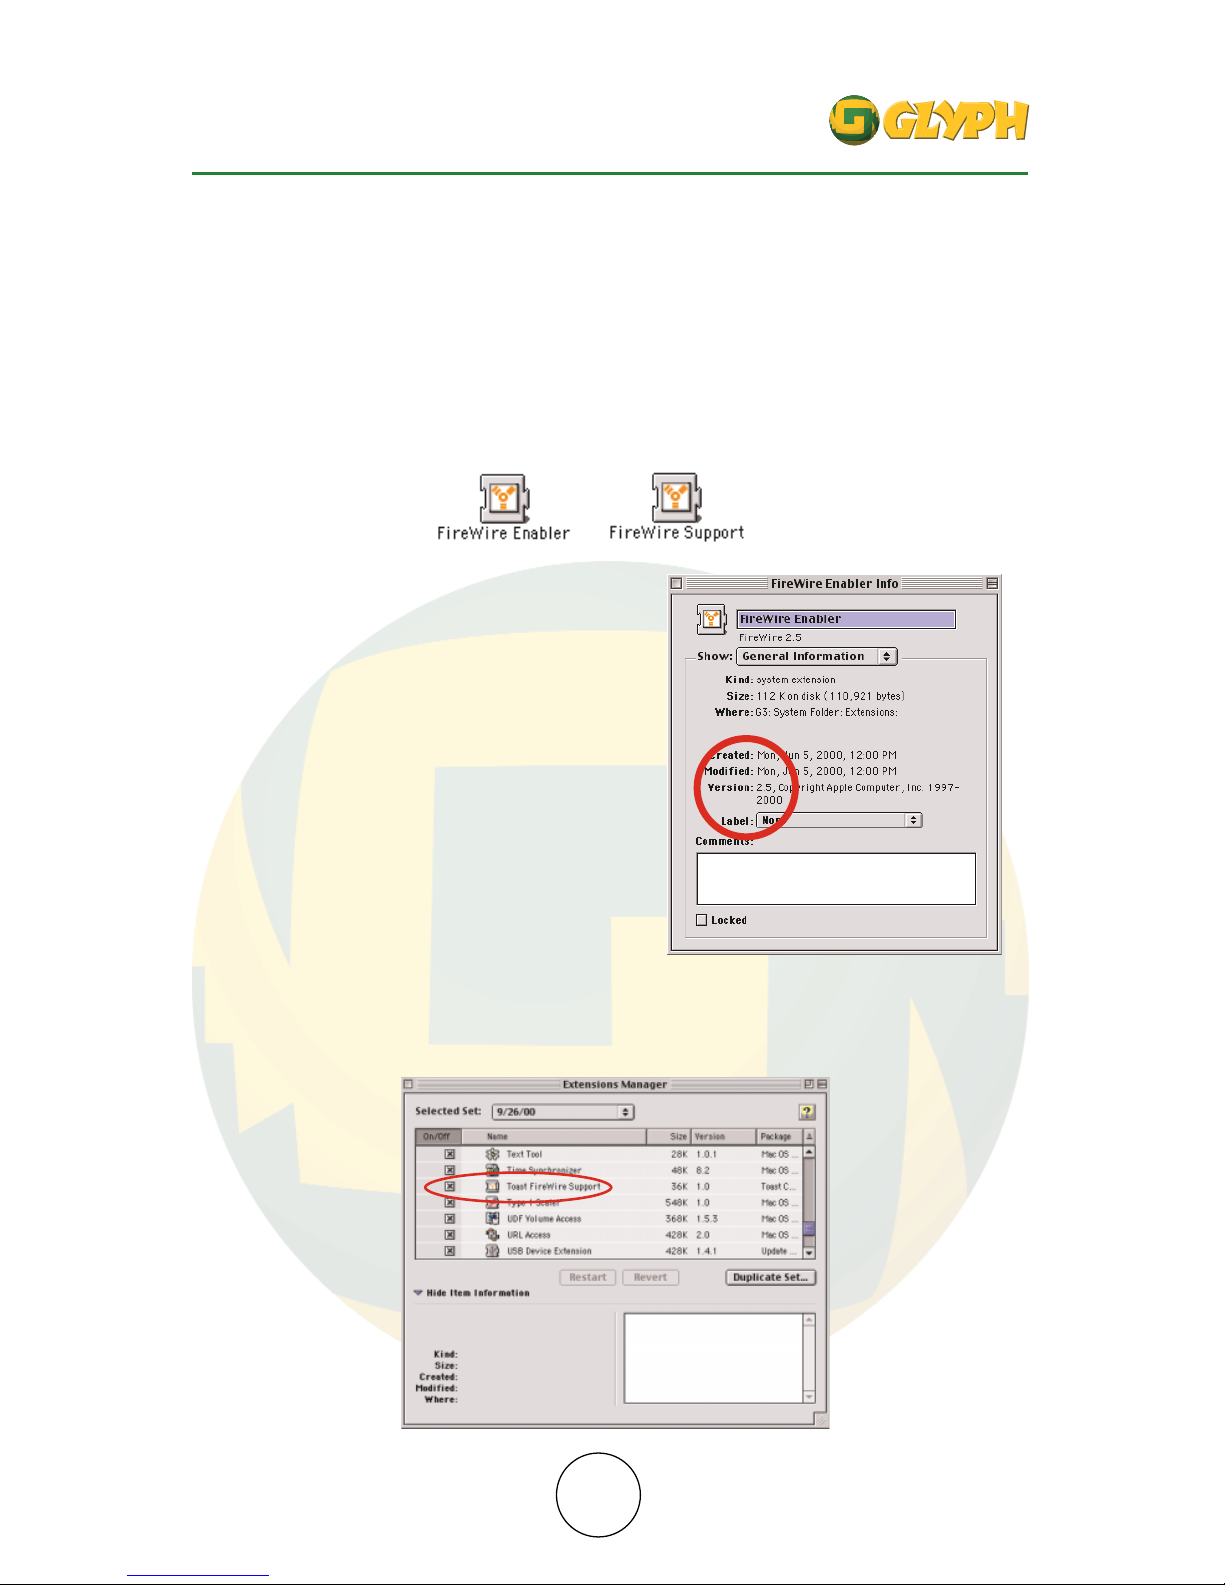
While your new WildFire CDR is incredibly simple to install and
use, there are a couple of things that have to be true in order for
things to go smoothly for you.
You must have at least version 2.4 of Apple’s FireWire Enabler, and
FireWire Support Extensions. Look in your extensions folder for these:
Then “Get Info” and verify that
they are version 2.4 or above.
Also check Extensions Manager to verify that “Toast FireWire
Support” is enabled. You should then be ready to go.
Page 11

11
Your Mission ...
should you choose to accept it ...
Your Glyph WildFire CDR should now be ready for you to go forth
and make the art you were destined to create. Again, the technical
support staff is here to help you if you run into problems along
the way.
Technical Support and Service
If you are having difficulties or need assistance getting started,
Glyph will be glad to assist you.
Our support email address is: [email protected]
Help can also be found on our website at:
http://www.glyphtech.com/
You may also call to speak to a Technical Support Engineer at
(607) 275-0154. We offer support from Monday through Friday,
between 9:00 AM and 6:00 PM, Eastern Time.
Please send all correspondence to:
Glyph Technologies, Inc.
Attn: Tech Support
735 West Clinton Street
Ithaca, New York 14850
Page 12

12
735 West Clinton Street
Ithaca, New York 14850
Phone. . (607) 275-0345
Fax. . . . (607) 275-9464
Technical Support (607)275-0154
www.glyphtech.com
[email protected]
in UK/Europe:The Global Distribution Group
PO Box 39,Ashdon, Saffron Waldon, Essex CB10 2FT, England
Tel. 44-0-1799-584-925 / Fax 44-0-1799-584-094
[email protected]
 Loading...