

Glunz & Jensen PlateWriter 2000 Operating Manual

Operating Manual
PlateWriter 4200
PlateWriter
TM
2000

Operating Manual
PlateWriterTM 2000

© 2007 Glunz & Jensen A/S. All rights reserved.
PlateWriterTM 2000 Operating Manual
Part no. 51588, rev. AA - December 2007
The information in this manual is furnished for informational use only, is subject to
change without notice, and should not be construed as a commitment by Glunz &
Jensen A/S.
Glunz & Jensen A/S assumes no responsibility or liability for any errors or
inaccuracies that may appear in this manual.
Glunz & Jensen A/S assumes no responsibility or liability for loss or damage incurred
during or as a result of using Glunz & Jensen software or products.
PlateWriter and iCtP are trademarks of Glunz & Jensen A/S.
Printed in Denmark.
0749 Operating Manual - PlateWriterTM 2000
0-2

Table of Contents
Operating Manual - PlateWriterTM 2000 0749
Table of Contents
0-3
Part 1: Introduction ...............................................1-1
About this Manual ...............................................1-1
Intended Use of this Manual .......................................1-1
Reservations ..................................................1-1
Notes, Cautions, and Warnings .....................................1-1
Important ......................................................1-2
Safety and Use ................................................1-2
The PlateWriter 2000 System ......................................1-3
The PlateWriter System consists of: ..................................1-3
PlateWriter Overview .............................................1-4
Part 2: Daily Use .................................................2-1
Overview ......................................................2-1
Daily Start-Up ..................................................2-1
Making a Proof..................................................2-3
Creating Files for Proofs ..........................................2-3
Printing a Proof ................................................2-3
Making Plates ..................................................2-4
Creating Files for Plates ..........................................2-4
Loading Plates on the PlateWriter ...................................2-4
Imaging the Plate ...............................................2-5
Finishing .....................................................2-7
Daily Shut-Down ................................................2-8
Important notes about switching the Power On and Off.....................2-8
Part 3: Cleaning & Maintenance ....................................3-1
Overview ......................................................3-1
Inks and Fluids..................................................3-2
Liquid DotTM (1) ................................................3-2
Maintenance Fluid (2) ...........................................3-2
Replacing the Ink Cartridges........................................3-3
Care and Handling of Ink Cartridges ..................................3-3
Other Printer Cleaning Tasks .......................................3-4
General ......................................................3-4
Cleaning the Printer Body .........................................3-4
Finishing Unit...................................................3-5
Running the Gum Rinse Program ....................................3-5
Cleaning of Gum/Finisher Rollers ....................................3-7
Cleaning the Finishing Unit Body ....................................3-7
Gum/water Replenishing System ....................................3-8

Table of Contents
0749 Operating Manual - PlateWriterTM 2000
Table of Contents
0-4
Part 4: Using the RIP .............................................4-1
Overview of the Navigator RIP ......................................4-1
Input formats..................................................4-1
Basic Concepts and Definitions .....................................4-2
Setting Up Devices ...............................................4-4
Creating Separation and Progressive Styles.............................4-4
Separation Styles ...............................................4-4
Creating Page Setups for Plate-making ................................4-8
About Page Setups ..............................................4-8
Predefined Page Setups ..........................................4-8
Creating Page Setups ............................................4-9
Setting the Plate Size ...........................................4-14
Setting the Gripper and Job Position on the Plate........................4-15
Duplicating and Editing existing Page Setups ...........................4-22
Printing a Job Using the RIP ......................................4-27
Using the Print File Command .....................................4-27
Printing several files ............................................4-28
Automating Job Input to the RIP ...................................4-29
Printing using Managed Input Plug-ins or 'Input Queues' ...................4-29
Managing Input Plugins .........................................4-31
Turning on the input system ......................................4-32
Adding a new input source to the list ................................4-32
Copying an input plugin .........................................4-33
Editing the details for an input source................................4-33
Configuring an input plugin .......................................4-34
Deleting an input source .........................................4-34
Enabling and disabling input sources ................................4-34
Using the Spool Folder Input folder .................................4-35
Creating and Configuring a Spool Folder Input Source ....................4-36
Using the AppleTalk Input Plugin ...................................4-41
Configuring an AppleTalk input source ...............................4-41
Using the NT Print input .........................................4-43
Installing the plugin ............................................4-43
Creating an NT Print Input .......................................4-44
Creating a Printer under Windows XP ................................4-46
Using the Printer from Windows 2000/XP.............................4-51
Using More than One Method .....................................4-51
Enhanced File Management and Printing for Mac Users ...................4-51
Calibrating ....................................................4-52
Why Calibrate ................................................4-52
Using Calibration to Linearize Output on Your Plates .....................4-52

Table of Contents
Operating Manual - PlateWriterTM 2000 0749
Table of Contents
0-5
Including the Linear Calibration in Page Setups .........................4-56
Calibrating your Press ...........................................4-57
Including the Press Calibration in Page Setups..........................4-62
Why Use Intended Press or Tone Curves?.............................4-63
Including the Intended Press Curves in Page Setups ......................4-63
Backup & Restore your NavigatorRIP Configuration for Windows ...........4-64
Configuration Backup ...........................................4-64
How to Restore your Configuration ..................................4-64
Part 5: Troubleshooting............................................5-1
General .......................................................5-1
Problems with the Finishing Unit ....................................5-2
Indicator Status and Error Codes ....................................5-2
Problems with Printed Material .....................................5-3

0749 Operating Manual - PlateWriterTM 2000
0-6

Part 1: Introduction
About this Manual
Intended Use of this Manual
• This man ual de scribes the com mon use pro ce dures of the PlateWriter 2000 Sys tem.
It is in tended for the daily user and should be kept with the equip ment for ref er ence
at all times.
"
Printer-specific information relating to operation, maintenance and service can
be found in the manuals supplied on the CD with your printer.
Reservations
• This man ual was writ ten and il lus trated us ing the best pos si ble in for ma tion avail -
able at the time of pub li ca tion.
• Any dif fer ences be tween this man ual and the equip ment re flect im prove ments in tro -
duced af ter the pub li ca tion of the manual.
• Changes, tech ni cal in ac cu ra cies and ty po graph i cal er rors will be cor rected in sub se -
quent edi tions.
• As a part of our pol icy of con tin u ous im prove ment, we re serve the right to al ter de -
sign and spec i fi ca tions with out fur ther notice.
Notes, Cautions, and Warnings
Through out the man ual notes, cau tions, and warn ings are writ ten in bold like the
ex am ple be low:
$
Al ways re place a fuse with one of the same size and rat ing as the old one.
Symbol Meaning Explanation
"
Note
The operator should observe and/or act according to the
information in order to obtain the best possible function of
the equipment.
$
Caution
The operator must observe and/or act according to the
information in order to avoid any mechanical or electrical
damage to the equipment.
#
Warning
The operator must observe and/or act according to the
information in order to avoid any personal injury.
Operating Manual - PlateWriterTM 2000 0749
Introduction
1-1
About this Manual
Important
Safety and Use
• Be fore us ing the equip ment it is as sumed that it has been prop erly in stalled and con -
fig ured as de scribed in the in stal la tion man u als de liv ered with the system.
• The man u fac turer can not be held re spon si ble for any dam age caused by in cor rect
use of this equip ment.
0749 Operating Manual - PlateWriterTM 2000
Introduction
1-2
Important
1
2
3

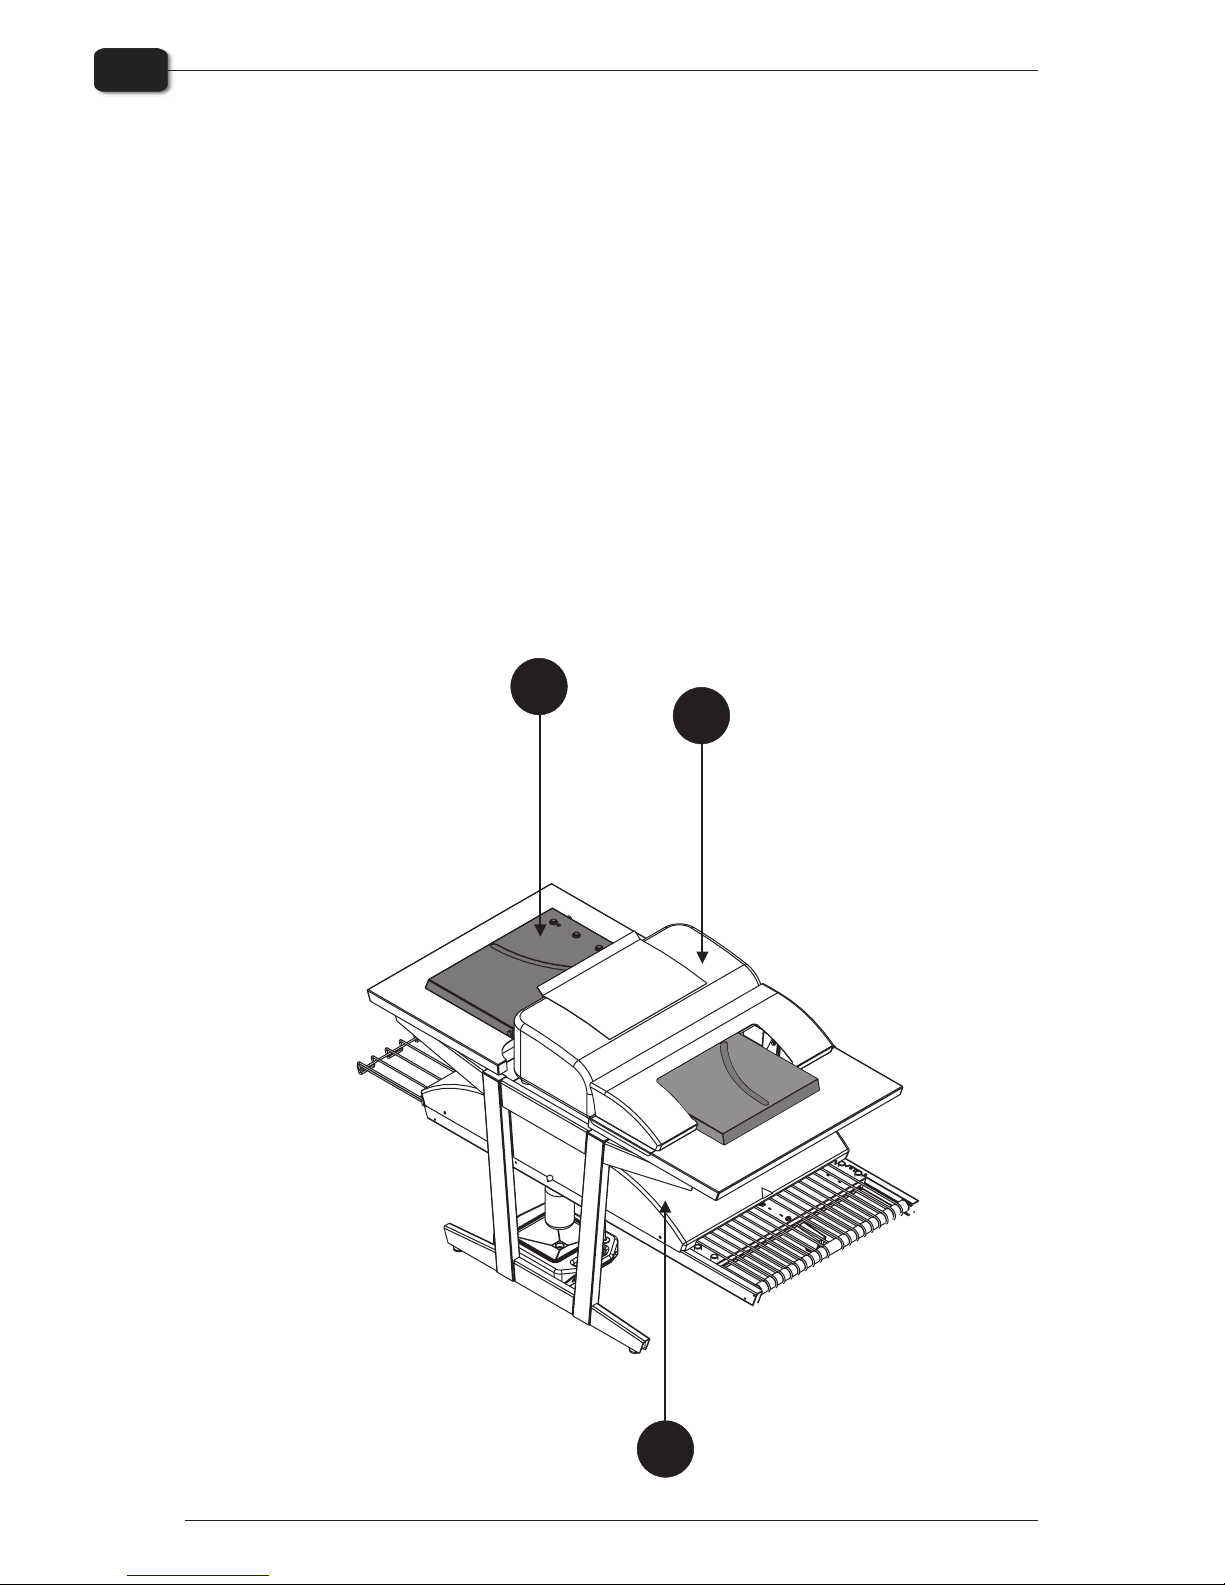
The PlateWriter 2000 System
The PlateWriter 2000 System is an innovative and patented inkjet Computer-to-Plate
(iCtP) device.
The PlateWriter System consists of:
• PlateWriter En gine (1)
A spe cially mod i fied Epson Sty lus Pro 4880 inkjet printer that uses Glunz & Jensen's
Liq uid Dot fluid to im age the iPlates print ing plates.
• Plate In put Ta ble (2)
A ta ble for align ing plates prior to en ter ing into the PlateWriter 2000 En gine.
• Proofer
An un mod i fied Epson Sty lus Color 4800, 4880 or 7800, 7880 printer used for proof ing. Plug-ins to drive these print ers are sup plied with the Har le quin RIP
• Har le quin RIP Plat form
A cus tom ized work sta tion ac ces si ble by both Mac and PC com put ers, loaded with
the lat est ver sion of the Global Graphics Har le quin RIP.
The Har le quin RIP pro vided is cus tom ized by Xitron and it ac cepts Post Script, PDF,
EPS, TIF & JPEG files pro duced by stan dard pre-press ap pli ca tions.
It RIPs the data and sends out put to the PlateWriter Engine or to the Proofer
• PlateWriter Fin ish ing Unit (3)
An in te grated plate fin isher that ex e cutes all of the steps nec es sary to pro duce
press-ready plates, i.e: cur ing, gum ming and dry ing of the plates af ter they are im aged in the PlateWriter Engine.
Operating Manual - PlateWriterTM 2000 0749
Introduction
1-3
The PlateWriter 2000 System
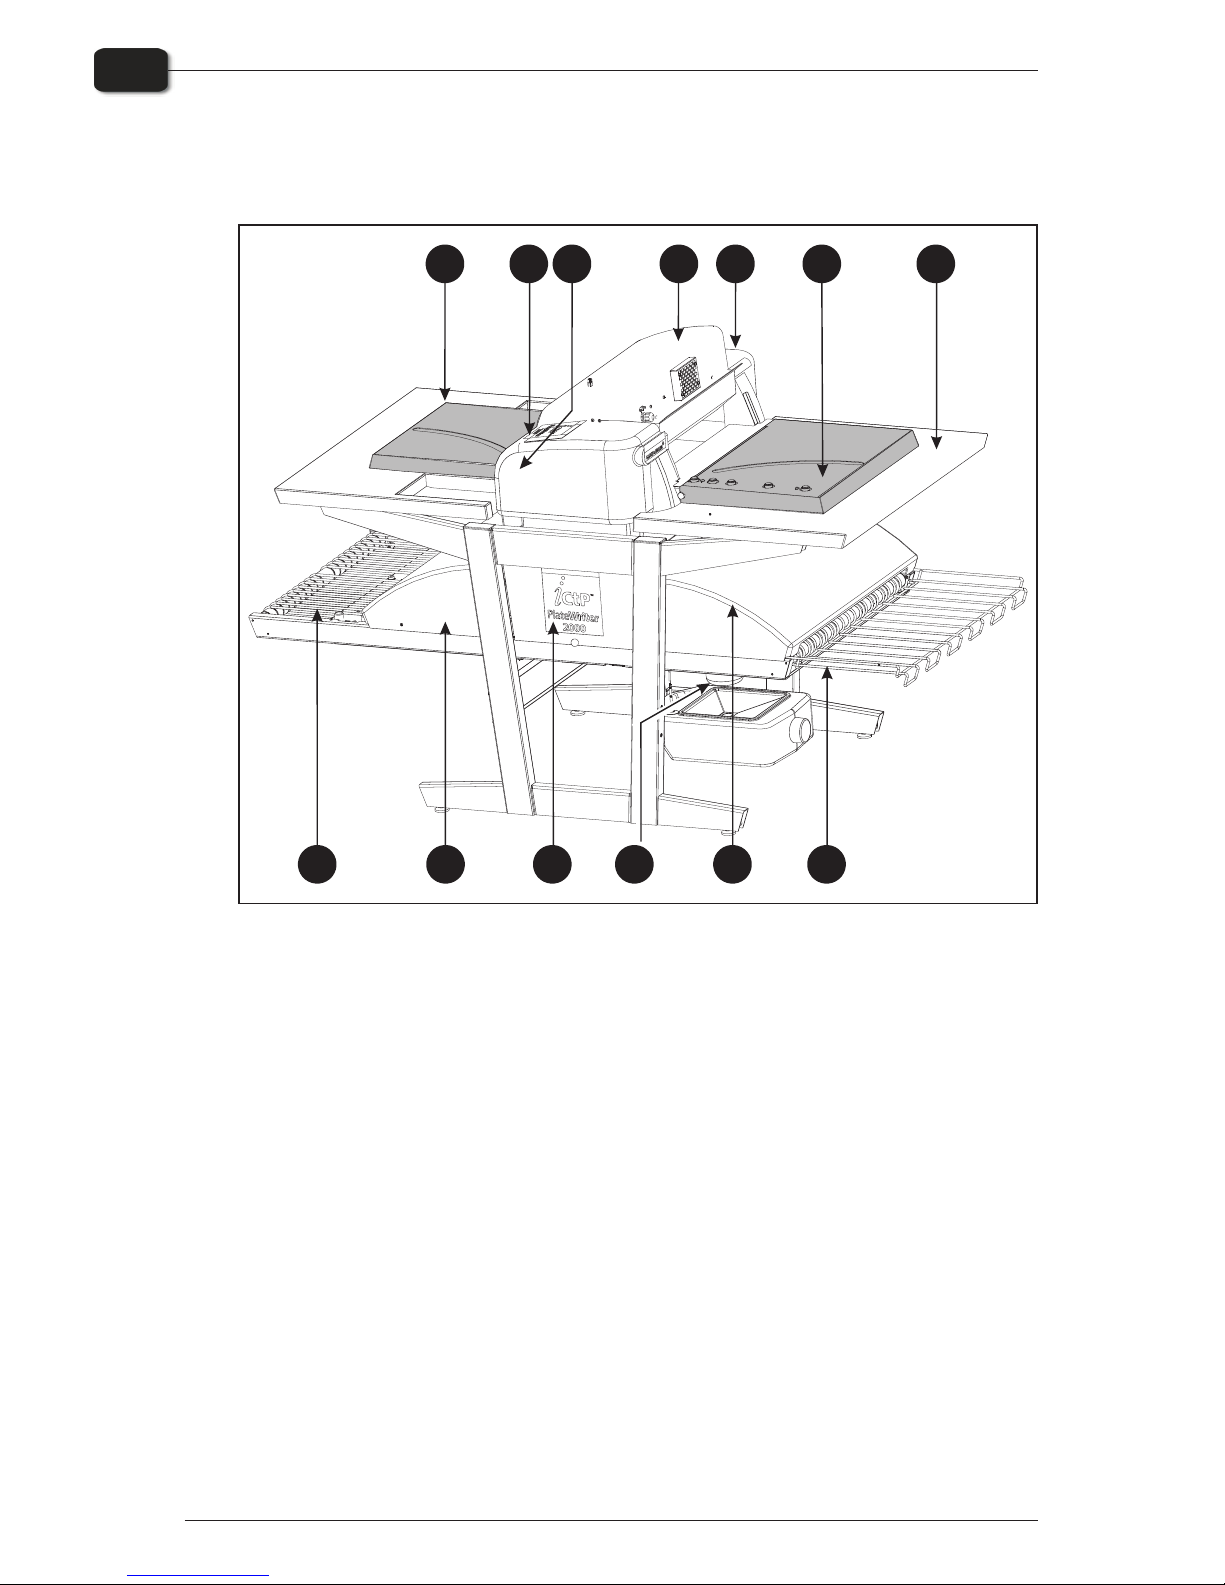
PlateWriter Overview
1 Front Plate Table: place plates here before printing.
2 Control Panel: from here you control the Imaging Unit (see details on page 1-6).
3 Input table: Ensures that plates are aligned correctly prior to entering the Imaging Unit.
4 Ink Dryer: improves the drying of the Liquid Dot ink on the plate.
5 Rear Plate Table: when a plate has been loaded it will be transported to here before
printing starts.
6 Curing Conveyor: leads the printed plate through the curing sections.
7 Curing Oven: dries the ink on the plate and cross-links it to the aluminum base.
8 Gum/Finishing Bottle: contains the finishing solution applied to the plate in the finishing
section. Solution not accepted by the plate returns into the bottle.
9 Finishing Section: cools the plate and applies a combined gum- and plate enhancer to the
plate to protect it from oxidation and to improve its press characteristics and hydrophilic
properties when on press.
10 Gum Dryer: dries the plate to provide a finished, dry plate.
11 Plate Exit Tray: holds the finished plates.
12 Ink Cartridges: There are two compartments on each side of the printer. Each compartment
can contain up to 4 ink cartridges.
0749 Operating Manual - PlateWriterTM 2000
Introduction
1-4
PlateWriter Overview
6
7
89
10
11
12 4 3
12
5
12
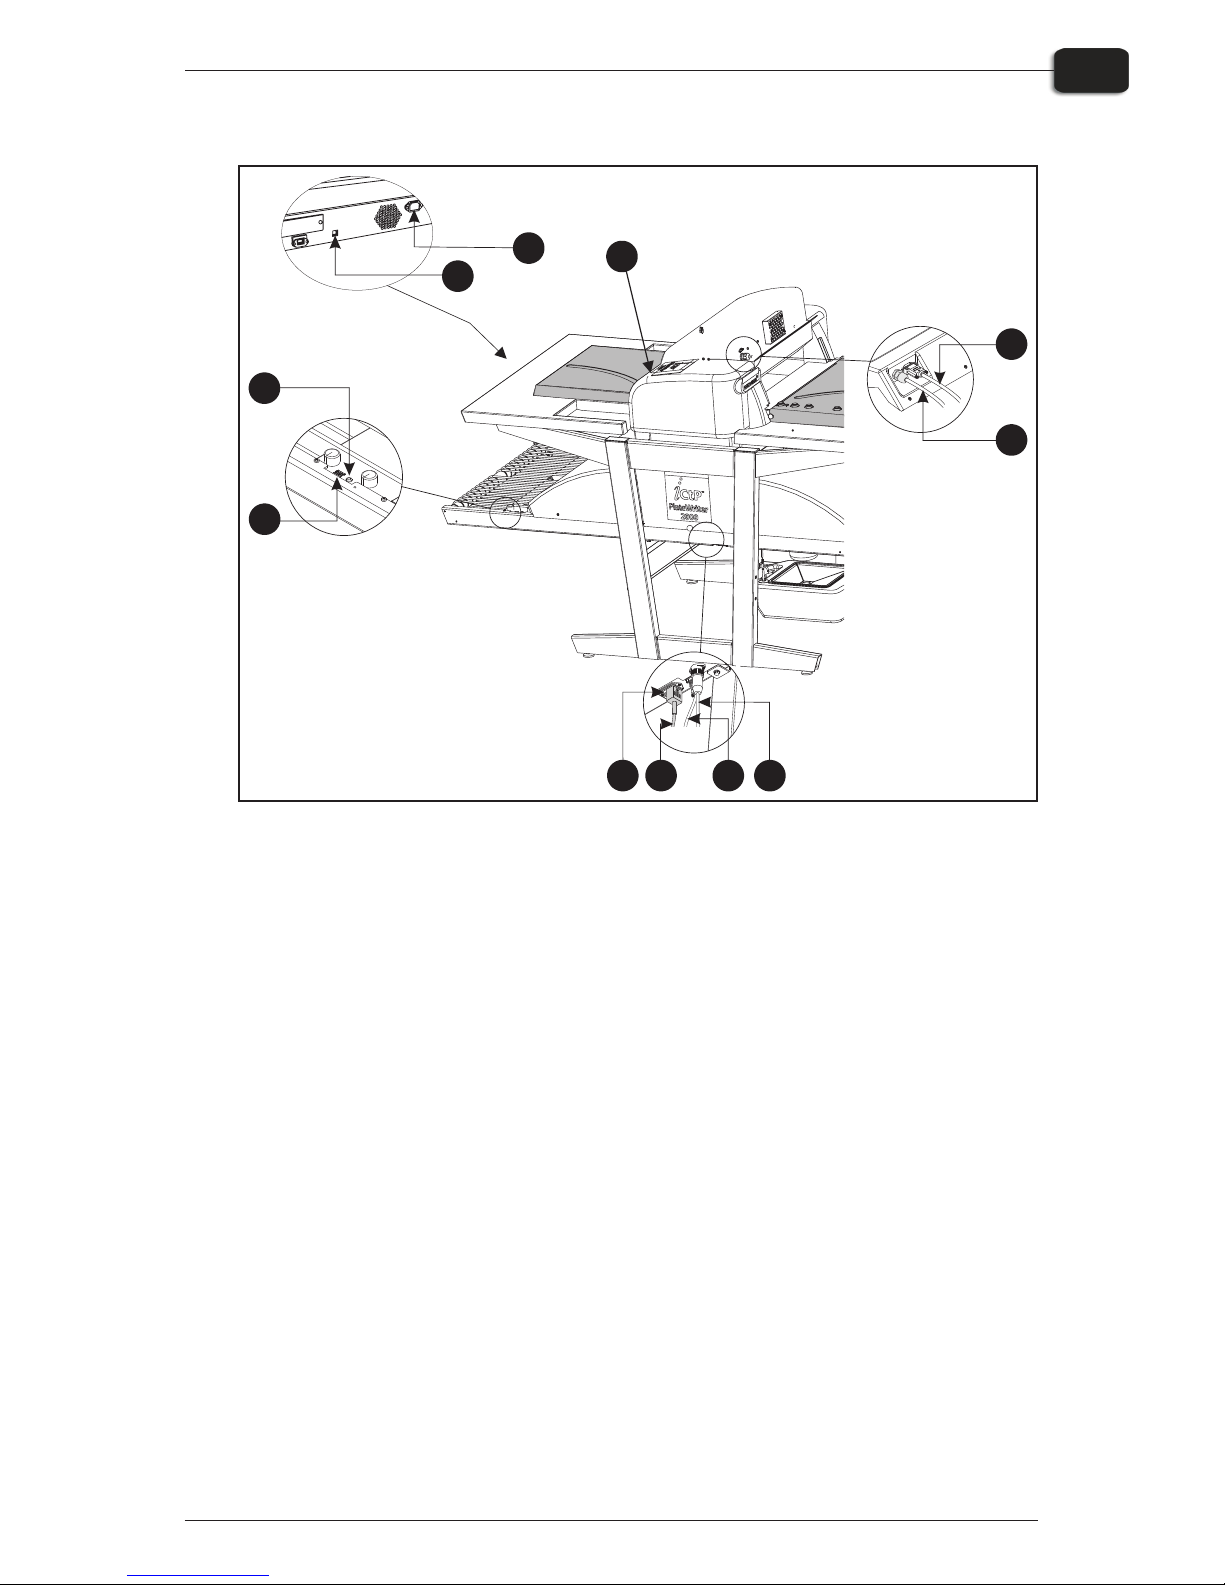
13 Status Indicator LED: indicates the current status of the Finishing Unit.
14 Program Selector: for selection of the Curing Oven program.
15 USB-cable: connects the Imaging Unit with the RIP Workstation.
16 Power Cable: supply voltage for the Imaging Unit.
17 Power Switch: press here to switch the Imaging Unit On/Off.
18 Power Switch: press here to switch the Finishing Unit On/Off.
19 Power Cable: supply voltage for the Finishing Unit.
20 Control Cable: connects the Ink Dryer with the Finishing Unit.
21 Power Cable: supply voltage from Finishing Unit to the Ink Dryer.
Operating Manual - PlateWriterTM 2000 0749
Introduction
1-5
PlateWriter Overview
1918
20
21
13
14
2120
15
16
17

0749 Operating Manual - PlateWriterTM 2000
Introduction
1-6
PlateWriter Overview
Part 2: Daily Use
Overview
The daily use procedures described in this chapter cover the following issues:
• Daily Start-Up pro ce dure
• Load ing of plates into the PlateWriter for print ing
• Print ing of plates
• Fin ish ing
• Daily Shut-Down pro ce dure
Daily Start-Up
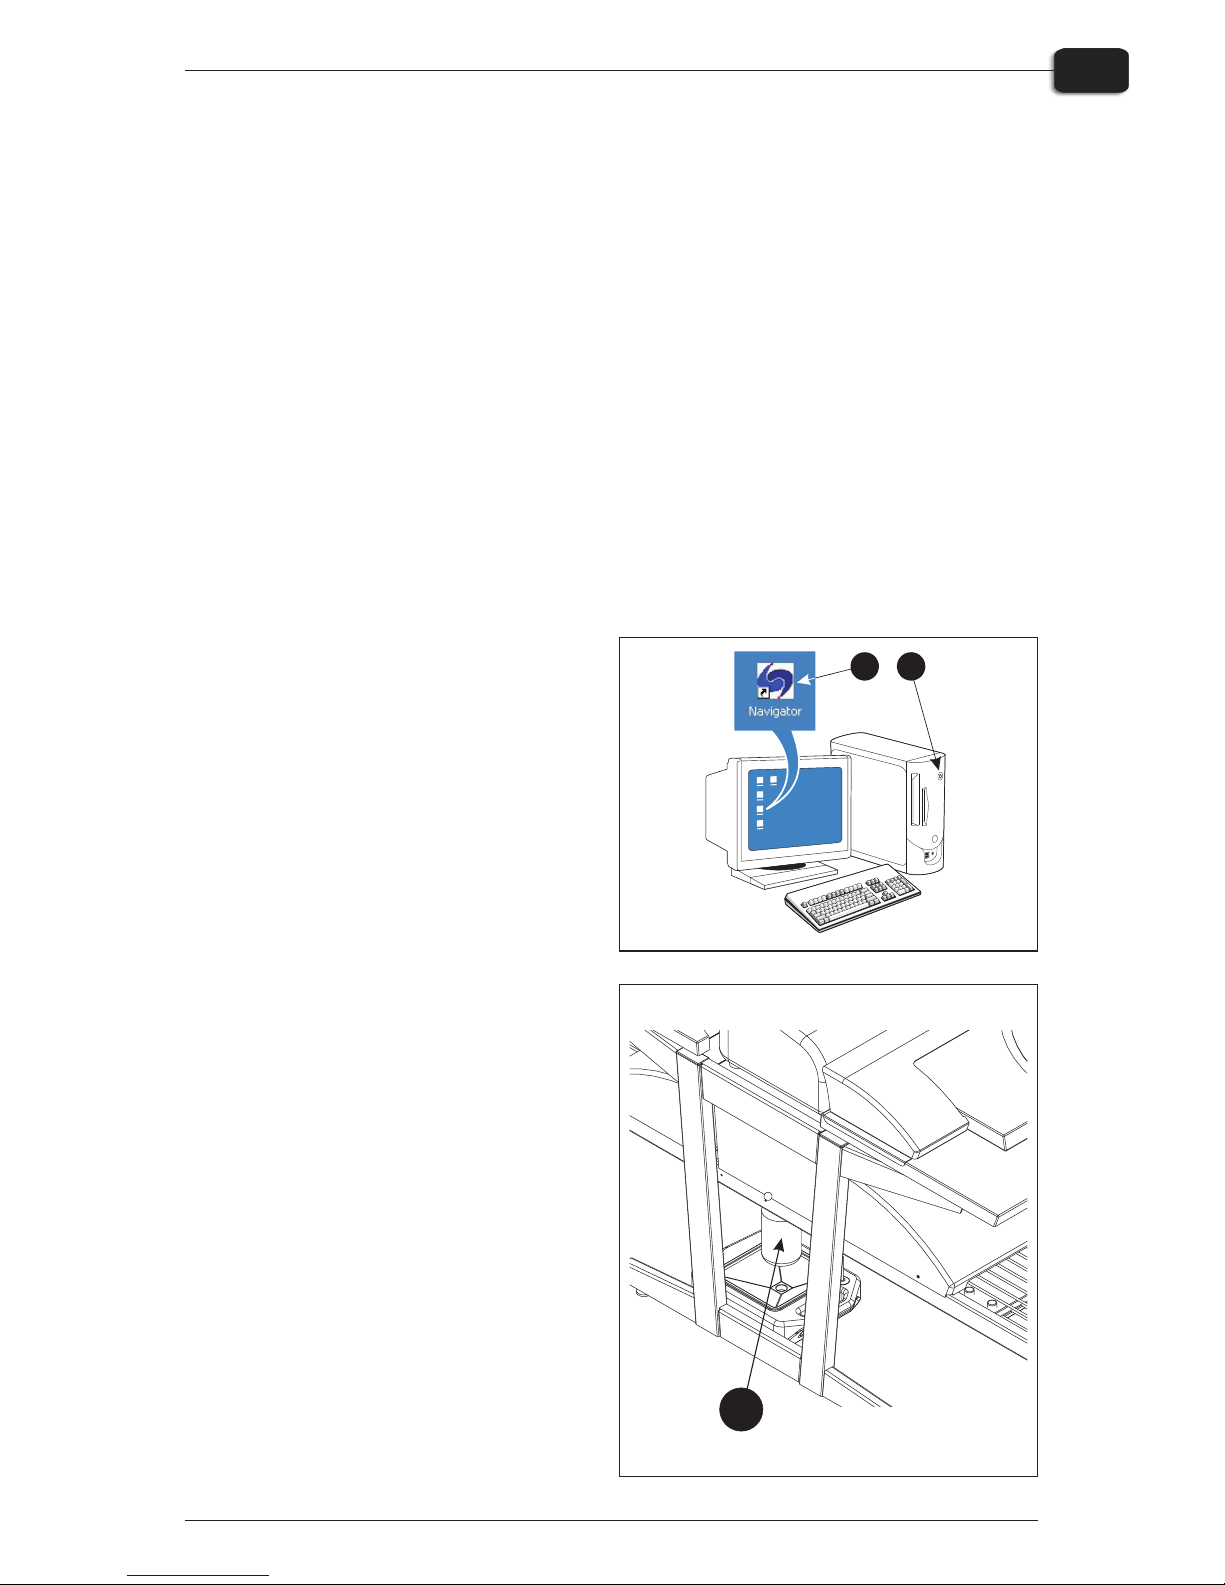
• Start the RIP Work sta tion (1).
• Launch the RIP Ap pli ca tion (2).
• Re place the fin isher so lu tion in the fin -
ish ing bot tle (3) with fresh fin isher so lu tion.
"
Half a bot tle is suf fi cient.
Operating Manual - PlateWriterTM 2000 0749
Daily Use
2-1
Overview
12
3

• If you see the mes sage MNT TNK
FULL on the LCD dis play, you need
to re place the main te nance tank.
Place the used tank in the plas tic
tank sup plied with the new tank. In sert the new tank.
• Switch on the Fin ish ing Unit on the
main switch (5) underneath and
make sure that the in di ca tor (6) lights
steady green.
• The unit will run gum fluid through
the sys tem for ap prox i mately three
min utes to en sure an even gum ming
of the plates.
"
This will also switch on the Ink
Dryer.
• Switch on the PlateWriter by press -
ing the [POWER] but ton.
• The PlateWriter initializes and when
fin ished, the dis play (8) shows
”READY”.
0748 Service Manual - PlateWriterTM 2000
Daily Use
2-2
Daily Start-Up
5
6

Making a Proof
Creating Files for Proofs
• Use your DTP ap pli ca tion to pre pare a com pos ite out put file - please re fer to your
ap pli ca tion man ual for help.
Se lect an out put page size suf fi ciently large to ac com mo date your con tent and any
reg is tra tion marks or colour bars.
• Save the file to a folder, ei ther on the com puter run ning Nav i ga tor RIP or on a
server.
Printing a Proof
• In the Nav i ga tor RIP open the Out put Con trol ler / Mon i tor win dow by ei ther
press ing Ctrl+O or choos ing Out put -> Out put Con trol ler from the RIP menu.
• Be sure that Dis able Out put is checked.
• Se lect File -> Print file from the RIP menu.
Choose an ap pro pri ate Proof ing Page Setup and a file type (.ps, .pdf, .eps, .jpg or .tif)
from the di a logue.
Nav i gate to the folder con tain ing your com pos ite files, choose one file, and click on
Print.
• The file will be ripped and will ap pear in the Ac tive Queue of the Out put Mon i -
tor/Con trol ler win dow.
• Uncheck Dis able Out put in the Out put Con trol ler/Mon i tor win dow. The proof will
be printed.
Operating Manual - PlateWriterTM 2000 0749
Daily Use
2-3
Making a Proof
Making Plates
Creating Files for Plates
• Use your DTP ap pli ca tion to pre pare sep a ra tion out put files - please re fer to your
ap pli ca tion man ual for help.
• Se lect an out put page size suf fi ciently large to ac com mo date your con tent and any
reg is tra tion marks or col our bars - it should not be the same size as your plate. The
RIP will po si tion a smaller page cor rectly on your plate for you.
• Save the file to a folder, ei ther on the com puter run ning Nav i ga tor RIP or on a
server.
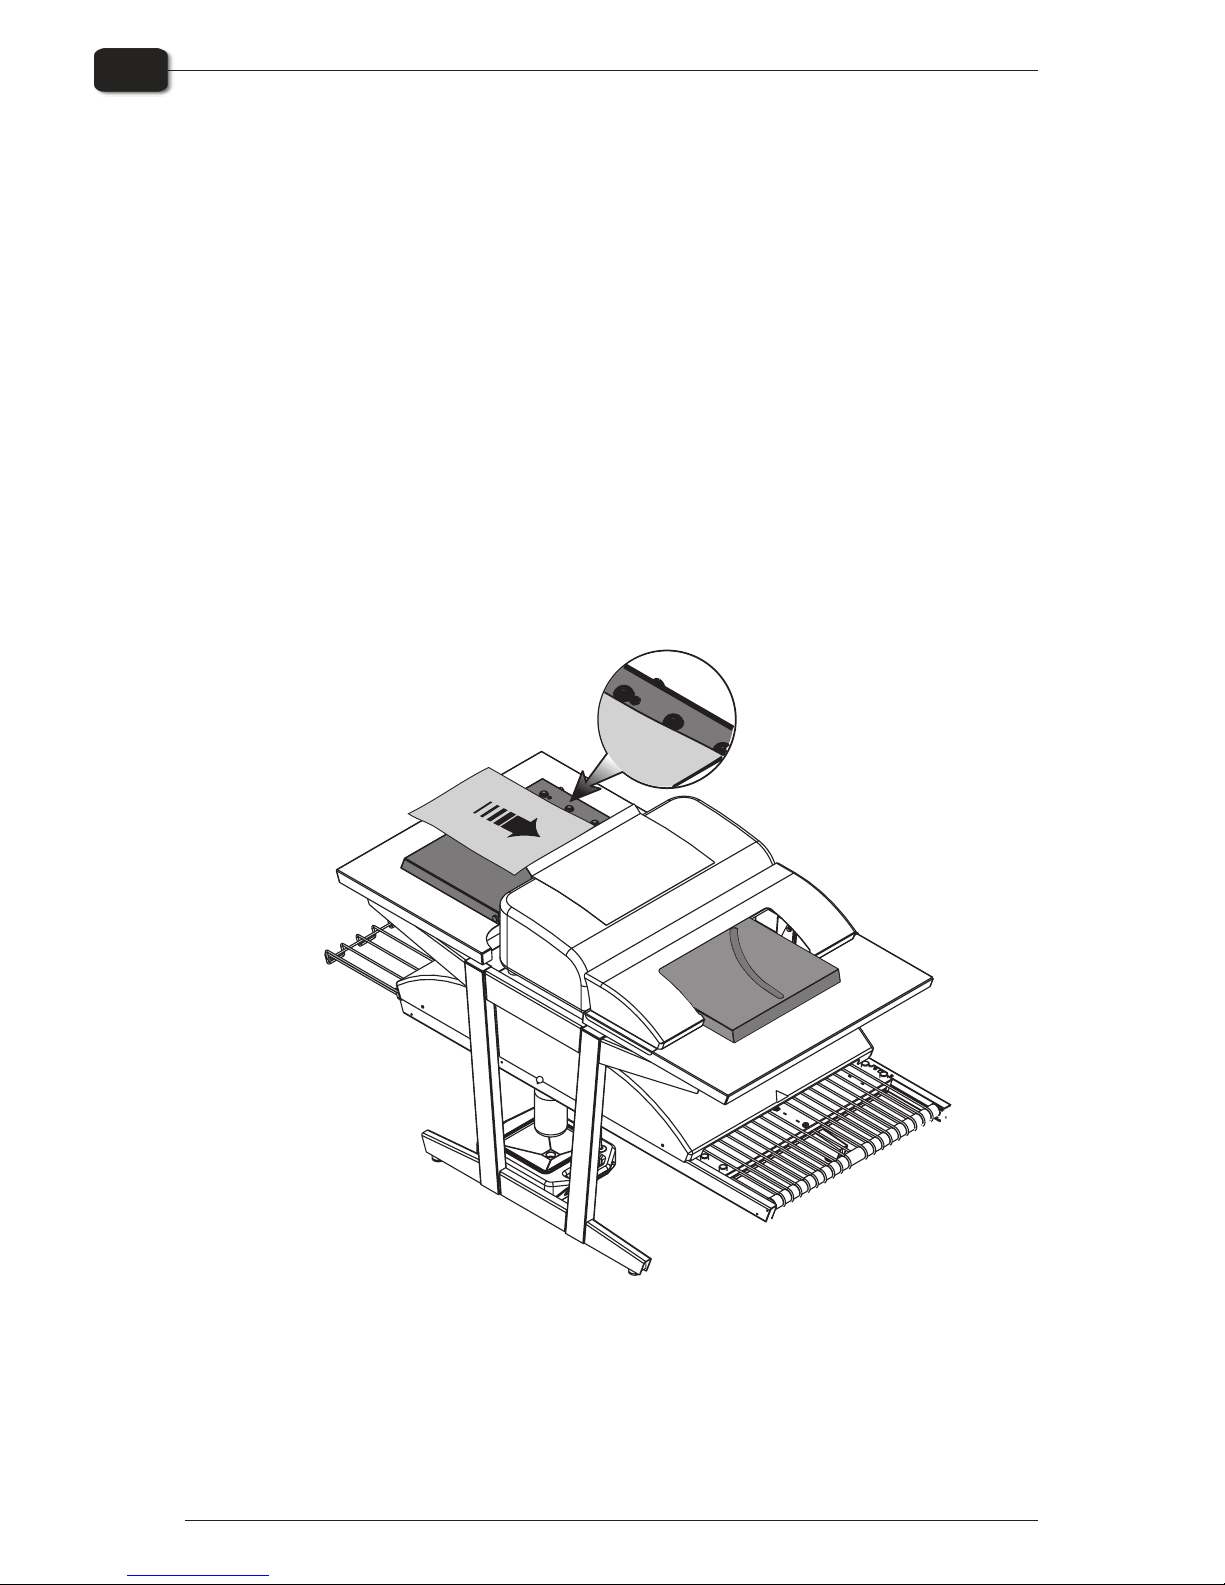
Loading Plates on the PlateWriter
The input table ensures that plates are fed into the printer correctly. The side register
rollers (see below) enable correct and easy alignment prior to entering the printer.
• Place the plate on the in put ta ble against the reg is ter wheels on the left side and slide
the plate into the printer.
• If the plate is fed in cor rectly into the printer, the LCD dis play will show the mes sage
“NOT STRAIGHT - RELOAD”.
0749 Operating Manual - PlateWriterTM 2000
Daily Use
2-4
Making Plates

Imaging the Plate
• In the Nav i ga tor RIP open the Out put Con trol ler / Mon i tor win dow by ei ther
press ing Ctrl+O or choos ing Out put -> Out put Con trol ler from the RIP menu.
• Be sure that Dis able Out put is checked.
• Se lect File -> Print file from the RIP menu.
Choose an ap pro pri ate PlateWriter 2000 Page Setup that matches your print job and
the ori en ta tion of the loaded plate, then choose a file type (.ps, .pdf, .eps, .jpg or .tif).
Nav i gate to the folder con tain ing your sep a ra tion files, choose the files, and click on
Print.
• The files will be ripped and will ap pear in the Ac tive Queue of the Out put Mon i -
tor/Con trol ler win dow.
• The ink (col our) of each sep a ra tion will be dis played in brack ets af ter the job name,
and if there are mul ti ple pages, then each page will be des ig nated with a nu meric
value.
• Se lect your file and click on Info.
• The Through Put Info win dow ap pears.
Operating Manual - PlateWriterTM 2000 0749
Daily Use
2-5
Imaging the Plate
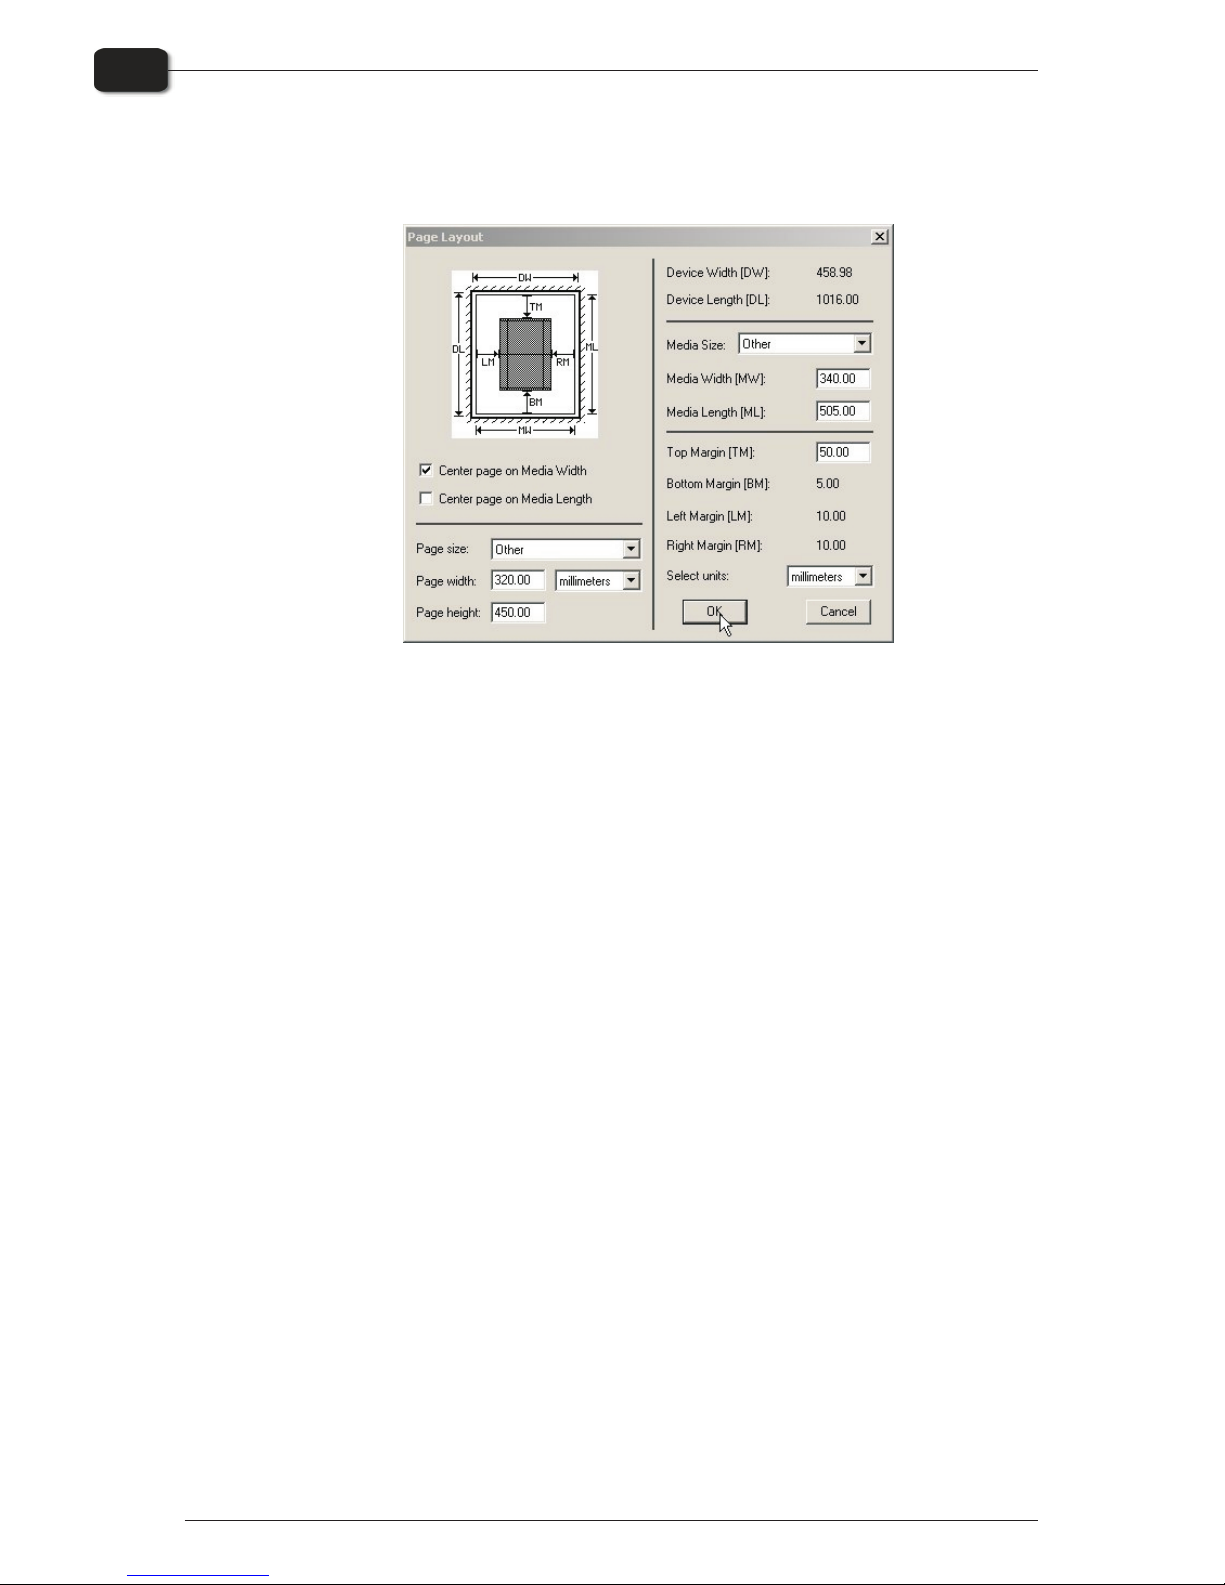
• Be sure that Change all pages in job is checked.
• Click on Page lay out... to open the Page Lay out win dow.
• Check that the size of your plate is cor rectly en tered in the Me dia Width [MW] and
Me dia Length [ML] boxes. Most plates will be im aged por trait in the PlateWriter
2000. De pend ing on whether you are load ing the plates in por trait or land scape and
whether you have a por trait or land scape press, dif fer ent se lec tions have to be made.
If you load the plate in por trait and have a land scape press, be sure to se lect the
Cen ter page on Me dia Length and set the Left Mar gin [LM] to ac com mo date the
nor mal un print able area on your press. (also known as the Grip).
• If you have a por trait press, and have loaded the plate por trait, then make sure to se -
lect the Cen ter page on Me dia Width and set the Top Mar gin [TM] to ac com mo -
date the nor mal un print able area on your press.
• Click OK in the Page Lay out win dow and in the Through Put Info win dow.
• Drag all but the first sep a ra tion of your job to the Held Queue.
• Uncheck Dis able Out put in the Out put Con trol ler/Mon i tor win dow. The first plate
will be printed.
• Re move the plate from the PlateWriter and place it on the front of the Plate Writer
fin ish ing unit, see fin ish ing pro ce dure in the fol low ing sec tion.
• For sub se quent plates, make sure that Dis able Out put is checked, load a plate into
the PlateWriter 2000, drag one sep a ra tion from the Held Queue to the Ac tive
Queue, and then uncheck Dis able Out put.
0749 Operating Manual - PlateWriterTM 2000
Daily Use
2-6
Imaging the Plate
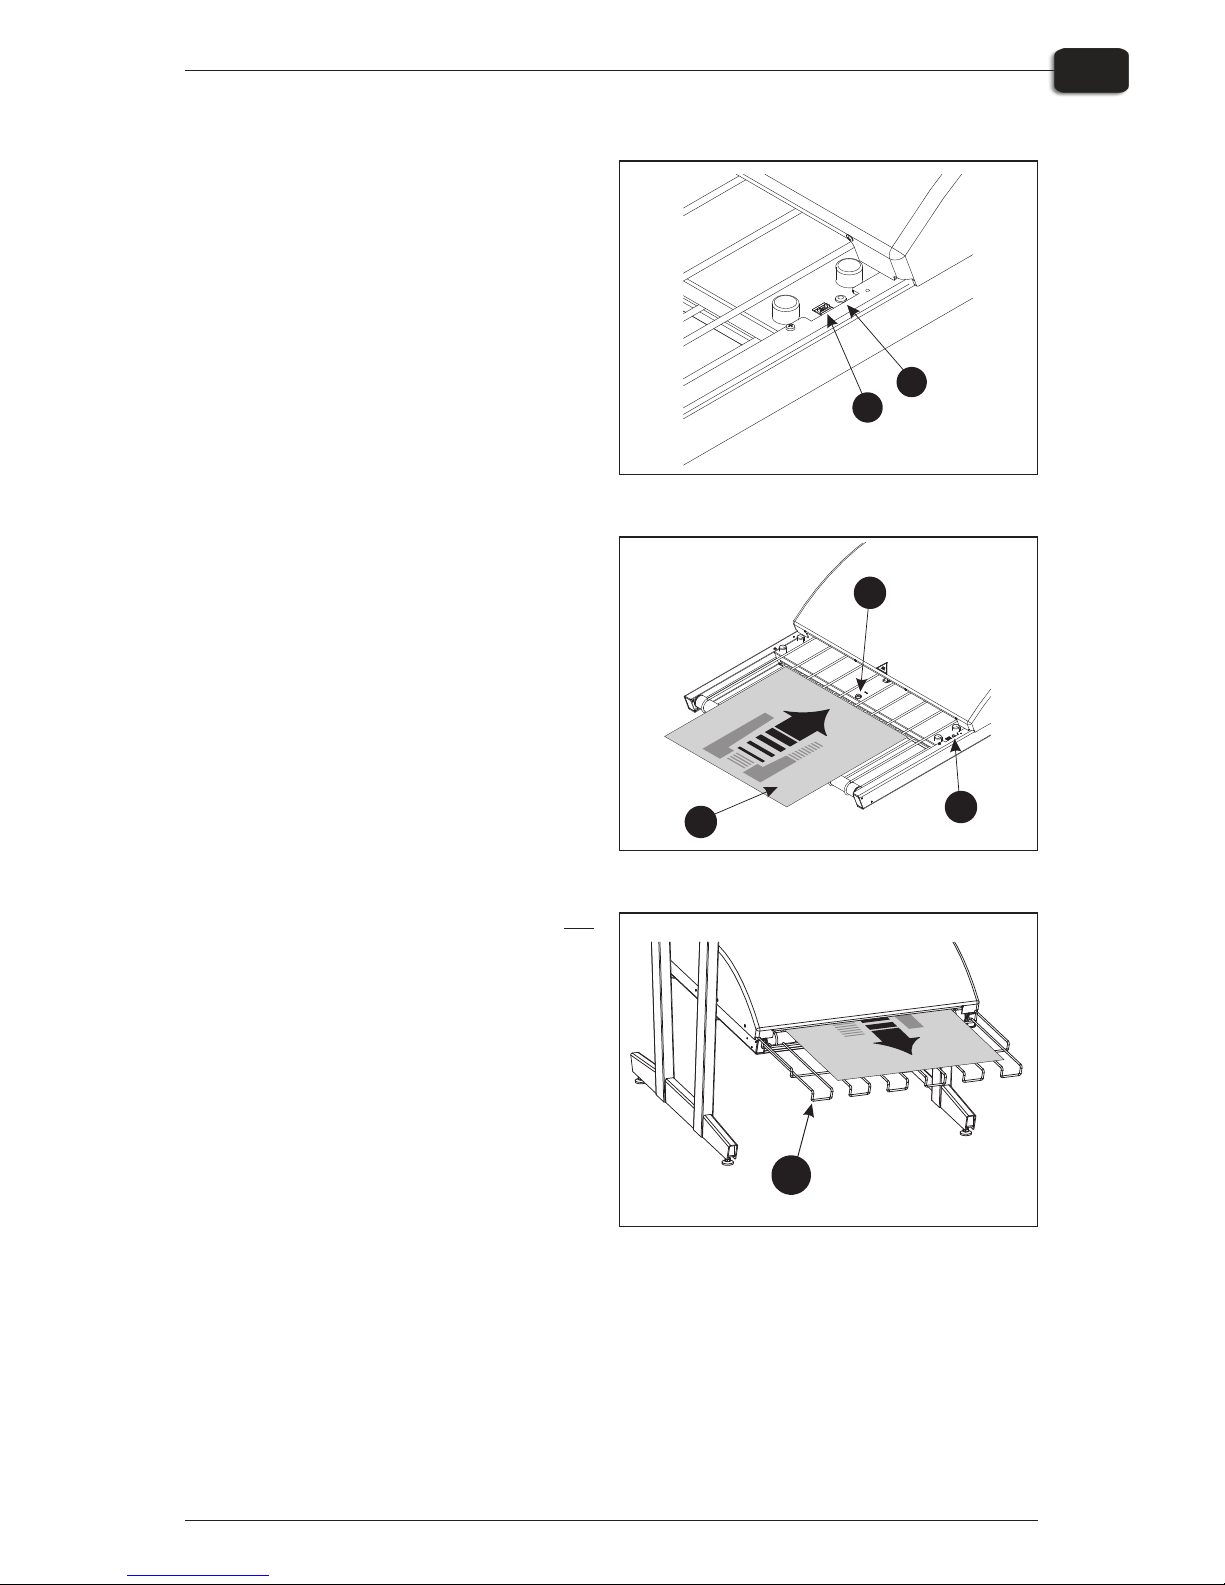
Finishing
• Use +/- but tons on the Pro gram Se -
lec tor (1) to se lect pro gram:
1 = 0.15 mm plates
2 = 0.20 mm plates
3 = 0.30 mm plates
4 = Gum ming only/Gum Rinse
"
Pro gram 0 is for tech ni cians
only!
• Make sure that the in di ca tor (2)
lights steady green.
"
For the var i ous in di ca tor sta tus
and er ror codes please see chap ter 5 “Troubleshooting”.
• Place the printed plate (3) on the con -
veyor mak ing sure that the front
edge is placed over the plate sen sor
(4).
• If the cur ing oven has al ready
reached the cor rect work ing tem per a ture, the con veyor will take the
plate through the oven, oth er wise it
moves the plate slightly for ward and
then it stops un til the oven is ready.
• The in di ca tor (5) will start to flash in -
di cat ing that the unit is busy. Do not
in sert an other plate while in di ca tor is
flash ing.
• When fin ished the plate is placed on
the exit tray (6).
Service Manual - PlateWriterTM 2000 0748
Daily Use
2-7
Imaging the Plate
1
2
3
5
4
6

Daily Shut-Down
• Switch the unit into OFF-mode by press ing and hold -
ing the [POWER] key (1) for 2 secs. All lights turn off
and the dis play will go blank.
• When in OFF-mode the unit will still “wake up” at
in ter vals and per form the main te nance cy cle and
then au to mat i cally re turn to OFF-mode.
Important notes about switching the Power On and Off
Never switch off the main power while the sub power is switched on. The printing
heads may be left uncapped (the printing carriage may remain over the Plate
Alignment Mat). If the machine is left unused with the printing heads uncapped for a
prolonged period, the printing heads may become irreversibly clogged.
Before switching off the main power, be sure to hold down the [POWER] key for one
second or longer to switch off the sub power.
If the printing carriage stops while over the platen, press the [POWER] key to reset the
power. The printing carriage moves and the printing heads are capped.
0749 Operating Manual - PlateWriterTM 2000
Daily Use
2-8
Daily Shut-Down
1

Part 3: Cleaning & Maintenance
Overview
This section describes the various procedures for care and maintenance such as:
Printer
Please refer to the Printer Guide
Finishing Unit
• Re plac ing the Gum/Fin isher So lu tion (Daily)
• Run ning the Gum Rinse Pro gram (Weekly)
• Clean ing of the Gum/Fin isher Roll ers (Monthly)
Operating Manual - PlateWriterTM 2000 0749
Cleaning & Maintenance
3-1
Overview

Inks and Fluids
The PlateWriter requires the use of various inks and fluids for processing, cleaning and
maintenance purposes:
Liquid DotTM (1)
The Liquid DotTM ink is supplied in special cartridges and used in the imaging channels
to create a hydrophobic image on the printing plate.
Maintenance Fluid (2)
The Maintenance Fluid is a general purpose fluid supplied in special cartridges, and is
used to keep the unused print heads available for use as backups. It can also be used as
a light cleaning fluid.
0749 Operating Manual - PlateWriterTM 2000
Cleaning & Maintenance
3-2
Inks and Fluids
Ma
i
n
t
e
n
a
n
c
e
F
l
u
i
d
f
or
2
2
0
m
l
Maintenance Fluid
for
W
i
t
h
t
h
i
s
s
i
d
e
u
p,
i
n
s
e
r
t
i
n
t
h
e
d
i
r
e
c
t
i
o
n
o
f
t
h
e
ar
r
ow
.
W
A
R
N
I
N
G
!
C
O
N
TA
I
N
S
1
M
e
t
h
o
x
y
2
P
r
o
p
a
n
o
l
1
0
7
9
8
2
F
I
R
S
T
A
I
D
•
I
f
i
n
h
a
l
e
d
,
r
•
F
L
A
M
M
A
B
L
E
L
I
Q
U
I
D
A
N
D
V
A
P
O
U
R
.
•
H
A
R
M
F
U
L
I
F
I
N
H
A
L
E
D
.
•
M
A
Y
B
E
H
A
R
M
F
U
L
I
F
S
W
A
L
L
O
W
E
D
O
R
A
B
S
O
R
B
E
D
T
H
R
O
U
G
H
S
K
I
N
.
•
MA
Y
C
A
U
S
E
I
R
R
I
T
AT
I
O
N
T
O
S
K
I
N,
EY
E
S
,
A
N
D
R
E
S
P
I
R
A
T
O
R
Y
T
R
A
C
T
.
A
m
m
o
n
i
a
1
3
3
6
2
1
6
F
o
r
a
d
d
i
t
i
o
n
a
l
i
n
f
o
r
m
a
t
i
o
n
,
p
l
e
a
s
e
s
e
e
M
a
t
e
ri
a
l
S
a
f
e
t
y
D
at
a
S
h
e
e
t
(
MS
D
S
)
.
e
m
o
v
e
t
o
f
r
e
s
h
a
i
r
.
I
f
n
o
t
b
r
e
a
t
h
i
n
g
,
g
i
v
e
a
r
t
i
fi
c
i
a
l
r
e
s
p
i
r
a
t
i
o
n
.
I
f
b
r
e
a
t
h
i
n
g
i
s
d
i
f
f
i
c
u
l
t
,
g
i
v
e
o
x
yg
e
n
.
G
e
t
m
e
di
ca
l
a
t
t
e
n
t
i
o
n
.
•
I
n
c
a
s
e
o
f
c
o
n
t
a
ct
,
i
m
m
e
d
i
a
t
e
l
y
f
l
u
s
h
s
k
i
n
w
i
t
h
p
l
e
n
t
y
o
f
w
a
t
e
r
f
o
r
a
t
l
e
a
s
t
1
5
m
i
n
u
t
e
s
w
h
i
l
e
r
e
m
o
v
i
n
g
c
o
n
ta
m
i
n
a
t
e
d
c
l
o
t
h
i
n
g
a
n
d
sh
o
e
s
.
W
a
s
h
c
l
o
t
h
i
n
g
b
e
f
o
r
e
r
e
u
s
e
.
T
h
o
r
o
u
gh
l
y
c
l
e
a
n
s
h
o
e
s
b
e
f
o
r
e
r
e
us
e
.
G
e
t
m
e
d
i
c
a
l
a
t
t
e
n
t
i
o
n
i
f
s
y
m
pt
o
m
s
o
c
c
u
r
.
M
A
N
U
F
A
CT
U
R
E
R
I
N
FO
RM
A
T
I
O
N
S
e
e
bo
t
t
o
m
o
f
c
a
r
t
ri
dg
e
Part no:
Batch no:
Prod. date:
20043576
54321/9876
09-12-2005
1 2
L
i
q
u
i
d
D
o
t
2
20
m
l
Maintenance Fluid
for
W
i
t
h
t
h
i
s
s
i
d
e
u
p
,
i
n
s
e
rt
i
n
t
h
e
d
i
r
e
c
t
i
o
n
o
f
t
h
e
ar
r
o
w
.
W
A
RN
I
N
G
!
C
O
N
T
A
I
N
S
1
M
e
t
h
o
x
y
2
P
r
o
p
a
n
o
l
1
07
9
8
2
FI
R
S
T
A
I
D
•
I
f
i
n
h
a
l
e
d,
r
•
F
L
A
MM
A
B
L
E
L
I
Q
U
I
D
A
N
D
V
A
P
O
U
R
.
•
H
A
R
M
F
U
L
I
F
I
N
H
A
L
E
D
.
•
M
A
Y
B
E
H
A
R
M
F
U
L
I
F
S
W
A
L
L
O
W
E
D
O
R
A
B
S
O
RB
E
D
TH
RO
U
G
H
S
K
I
N
.
•
MA
Y
C
A
U
S
E
I
RR
I
T
A
T
I
O
N
T
O
S
K
I
N
,
E
Y
E
S
,
A
N
D
R
E
S
P
I
R
A
T
O
R
Y
T
R
A
C
T
.
A
m
m
o
n
i
a
13
36
2
1
6
F
o
r
a
d
d
i
t
i
o
n
a
l
i
n
f
o
rm
at
i
o
n
,
pl
e
a
s
e
s
e
e
M
a
t
e
r
i
a
l
S
a
fe
t
y
D
a
t
a
S
h
e
e
t
(
M
S
D
S
)
.
e
m
o
v
e
t
o
f
r
e
s
h
a
i
r
.
I
f
n
o
t
b
r
e
a
t
h
i
n
g,
g
i
v
e
a
r
t
i
fi
c
i
a
l
r
e
sp
i
r
a
t
i
o
n
.
I
f
b
r
e
a
t
h
i
n
g
i
s
d
i
f
f
i
c
u
l
t
,
g
i
v
e
o
x
y
g
e
n
.
G
e
t
m
e
d
i
c
a
l
a
t
t
e
nt
i
o
n
.
•
I
n
ca
s
e
o
f
c
o
nt
a
c
t
,
i
m
m
e
d
i
a
t
e
l
y
f
l
u
sh
s
k
i
n
w
i
th
p
l
e
n
t
y
o
f
w
a
t
e
r
f
o
r
a
t
l
e
a
s
t
1
5
m
i
n
u
t
e
s
w
h
i
l
e
r
e
m
o
v
i
n
g
c
o
n
t
a
m
i
n
a
t
e
d
c
l
o
t
h
i
n
g
a
n
d
s
h
o
e
s
.
Wa
s
h
c
l
o
t
h
i
n
g
b
e
f
o
r
e
r
e
us
e
.
T
h
o
r
o
u
gh
l
y
c
l
e
a
n
s
h
o
e
s
b
e
f
o
r
e
r
e
us
e
.
G
e
t
m
e
d
i
c
a
l
a
tt
e
n
t
i
o
n
i
f
s
y
m
p
t
o
m
s
o
c
c
u
r
.
M
A
N
U
F
A
CT
U
R
E
R
I
N
FO
R
MA
T
I
O
N
S
e
e
bo
t
t
o
m
o
f
c
a
r
t
r
i
d
g
e
Part no:
Batch no:
Prod. date:
20043576
54321/9876
09-12-2005

Replacing the Ink Cartridges
If ink runs out, replace the cartridges as described in the following.
$
Never use any ink other than genuine Liquid Dot ink from Glunz & Jensen.
Doing so may result in malfunction or faulty operation.
Care and Handling of Ink Cartridges
Give attention to the following points when handling ink cartridges.
• Never at tempt to in stall any ink other than a Liq uid Dot car tridge.
• Never at tempt to dis as sem ble.
• Never drop or al low to fall. The im pact from a fall may cause dam age, mak ing the
car tridge un us able.
• Store un opened in a well-ven ti lated lo ca tion where the tem per a ture is from -20ºC
(-40ºF) to 40ºC (104ºF).
• Once an ink car tridge has been in stalled, never re move it un til the ink has been used
up, ex cept when mov ing the ma chine.
Fre quent in ser tion and re moval may cause air to en ter the ink tube, re sult ing in dot
drop-out or other prob lems in print ing quality.
• Al ways be sure to gently shake the ink car tridge be fore you in stall it.
• Re mov ing or in sert ing an ink car tridge while op er a tion is in prog ress may cause air
to get in side the car tridge, re sult ing in poor im age quality.
• Af ter re mov ing an ink car tridge, never al low the ma chine to stand with the ink-car -
tridge port re main ing empty — in stall a new ink car tridge im me di ately. Fail ure to
do so may re sult in clog ging of the heads.
Operating Manual - PlateWriterTM 2000 0749
Cleaning & Maintenance
3-3
Replacing the Ink Cartridges
Other Printer Cleaning Tasks
General
Exposed areas of the machine may become soiled with ink during printing.
The cleaning methods described below let you continue printing without affecting the
printed media or the machine.
"
When carrying out any cleaning other than cleaning using cleaning sticks,
switch off the main power (before turning off the main power, press the
[POWER] key to switch off the sub power.)
Never lubricate the mechanisms.
Never clean with solvents (such as benzine or thinners).
Never touch the printing heads or allow the printing heads to come in contact
with anything except ink.
Cleaning the Printer Body
Use a cloth moistened with water then wrung well, and wipe gently to clean all
surfaces.
Wipe the operation panel and LCD display gently with a clean, soft cloth.
#
Do NOT put wet plates back in the printer. This will cause the image to
transfer to the rollers and on every subsequent plate!
0749 Operating Manual - PlateWriterTM 2000
Cleaning & Maintenance
3-4
Other Printer Cleaning Tasks

Finishing Unit
Running the Gum Rinse Program
"
It is recommended to run the Gum Rinse Program at the end of each working
period (preferably once a week).
• Re place the so lu tion in the Gum/Fin isher bot tle with warm wa ter.
• Se lect Pro gram 4 on the Pro gram Se lec tor to start the Gum Rinse Pro gram.
• The unit will run for approximately 10 minutes re cir cu lat ing the wa ter through the
gum ming sys tem and then it switches to stand-by mode.
• Leave the unit with wa ter un til the start of the next work ing pe riod, then re place the
wa ter with fresh Gum/Fin isher So lu tion.
#
Danger of crushed fingers when working inside the Finisher section, proceed
with caution. Always replace the side plate after completing cleaning and
maintenance tasks in the Finisher section.
$
Always replace the side plate after cleaning and maintenance of the Finisher
section. Failure to do this will result in inferior processing quality.
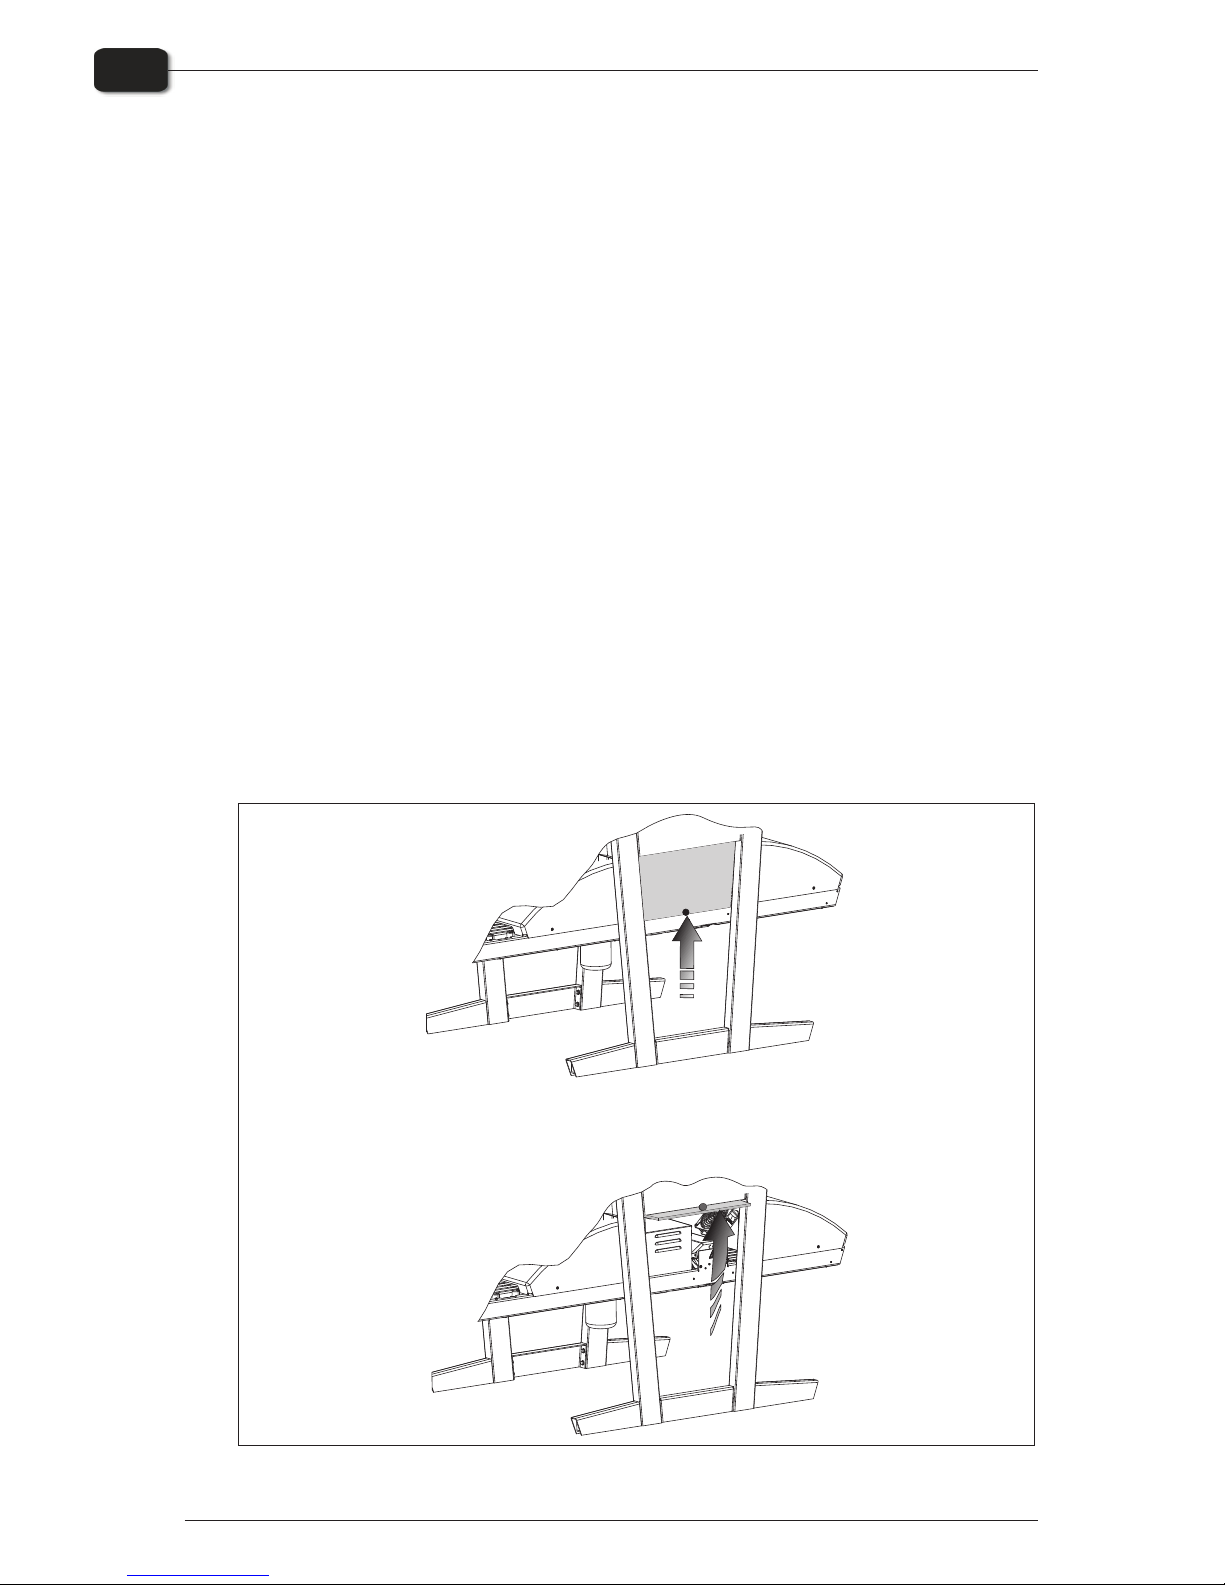
Procedure for accessing the Gum/Finisher section
See figure opposite
• Turn off the power sup ply to the ma chine.
• Re move the plug from the socket.
• Lift the side plate by its knob and push it into the re cess where it can be stored while
work ing in the sec tion.
You can also remove the covers of the curing oven and gum dryer for easier access.
Operating Manual - PlateWriterTM 2000 0749
Cleaning & Maintenance
3-5
Finishing Unit
0749 Operating Manual - PlateWriterTM 2000
Cleaning & Maintenance
3-6
Finishing Unit
PULL
PRE
S
S
1
4
6
5
3
2

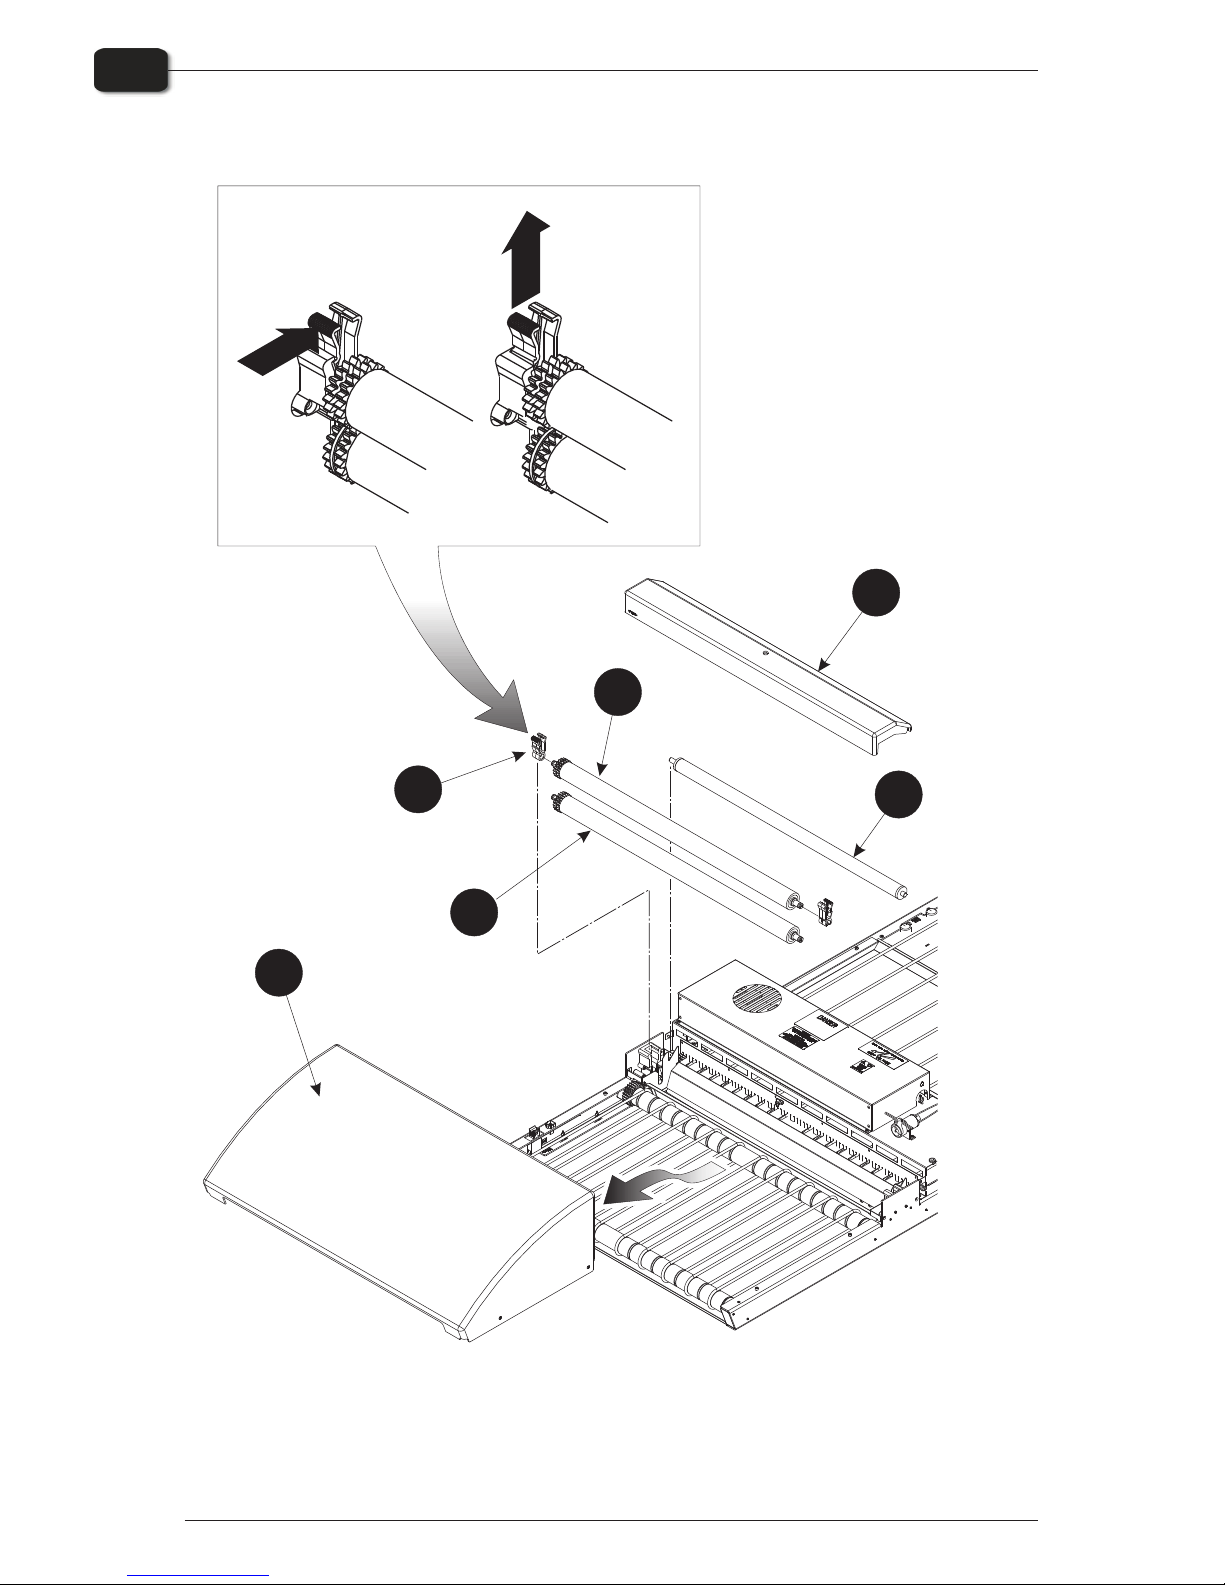
Cleaning of Gum/Finisher Rollers
"
It is recommended to perform this cleaning procedure once a month.
(See illustration opposite)
• Switch off and un plug the Fin ishing Unit.
• Re move the Gum Dryer (1).
• Re move the Gum Sec tion Cover (2).
• Take out the roller (3).
• Re lease the roller bear ings (4) and take out the roll ers (5) and (6).
To re lease the roller bear ings, press the lock ing arm as il lus trated, and then pull up wards.
• Clean the roll ers and bear ings in hot wa ter us ing a soft brush.
• Re in stall all parts in re verse or der, mak ing sure that the bear ings (4) click prop erly
into place.
Cleaning the Finishing Unit Body
Use a cloth moistened with water then wrung well, and wipe gently to clean all
surfaces and conveyor belts.
Operating Manual - PlateWriterTM 2000 0749
Cleaning & Maintenance
3-7
Finishing Unit
Gum/water Replenishing System
Use
• De pend ing on the size of the plate, the fin ish ing unit sets aside a lit tle wa ter pump
run time (ap prox i mately 1 s for ev ery 60 sec onds that the fin ish ing unit is run ning).
Once the plate has passed through the ma chine, the wa ter pump re plen ishes the re served amount of wa ter and dis trib utes it to clean the rollers.
• If plates are con tin u ously run ning through the fin ish ing unit, it will con tinue re serv -
ing wa ter re plen ish un til it has ac cu mu lated 30 sec onds. The fin ish ing unit lights
green (ready) as soon as wa ter re plen ish is added.
"
Do not turn off the finishing unit before it is ready (green). This ensures that
water replenish is added and will stop the rollers from sticking together the
next day.
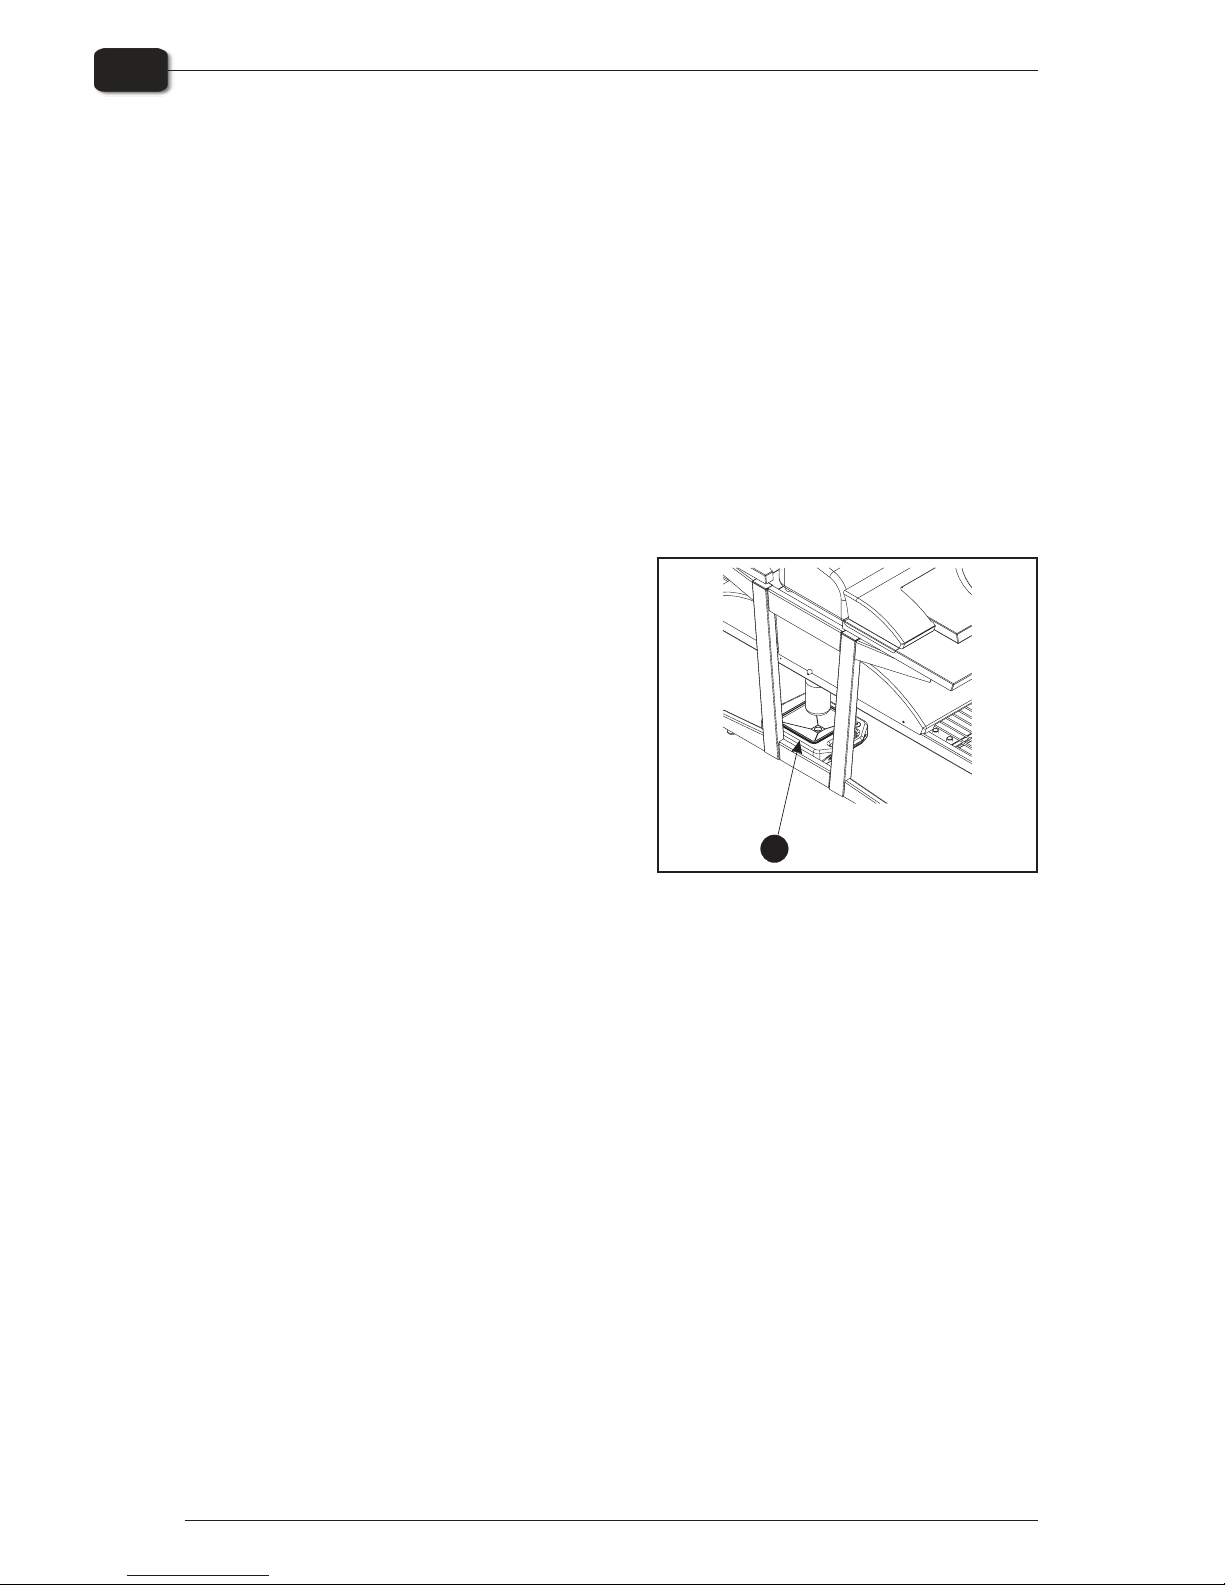
• If the fin ish ing unit is turned off be fore re -
plen ish has been added, any saved re plen ish will be de leted.
• The wa ter tank (1) must be placed be low
the gum bot tle with the cap in the tray dis mounted. The wa ter tank func tions as a
drip tray for the gum bot tle.
Cleaning
• The wa ter tank must be emp tied and
cleaned once a week, for in stance when
chang ing gum.
• Re fill with de min er al ised wa ter only to
avoid con tam i na tion of gum/plates.
• With the gum/wa ter re plen ish sys tem in stalled, gum should only be changed/re -
filled and cleaned once a week.
Gum con sump tion will be ap prox i mately 20 g/m².
Water consumption will be approximately 40 g/m².
"
Depending on the throughput in the finishing unit, you should calculate how
much gum and water to put in the gum bottle and water tank to make the gum
last one week. If there is less than 25% gum remaining in the bottle when
commencing work with the printer in the morning, it is a good idea to top up.
0749 Operating Manual - PlateWriterTM 2000
Cleaning & Maintenance
3-8
Finishing Unit
1
 Loading...