

311-4283300-007
機器說明書/GlucoRx Go/英文
L297*W420mm/4折/銅版紙100P/雙黑
K90
Sam
K80
Color
Designer
Part no.
Product name
Spec
IMPORTANT SAFETY INSTRUCTIONS
Read Before Use
Dear owner of GlucoRx GO TD-4283 Integrated Blood Glucose Monitoring System,
The system consists of three main products: the meter, test strips and control
solution. These products have been designed, tested, and proven to work
together as a system to provide accurate blood glucose test results. Only use
Nexus test strips and control solution with the GlucoRx GO TD-4283 Integrated
Blood Glucose Monitoring System.
Intended Use
This system is intended for external use (in vitro diagnostic use) only. It is used for
the quantitative measurement of glucose in samples of fresh capillary whole
blood taken from the nger, palm, forearm and upper arm. It is not intended to
diagnose or screen for diabetes mellitus, or to be used on neonates.
It allows blood glucose levels to be measured by people with diabetes at home,
and by healthcare professionals in clinical settings as an aid to monitoring the
eectiveness of diabetes control.
Professionals may test with capillary or venous blood samples: home use is limited
OPERATION
INSTRUCTION
Version 1.0
2015-11
Integrated Blood
Glucose Monitoring System
TD-4283
to capillary whole blood testing.
This system provides you with plasma equivalent results and is displayed in
millimoles of glucose per liter of blood (mmol/L).
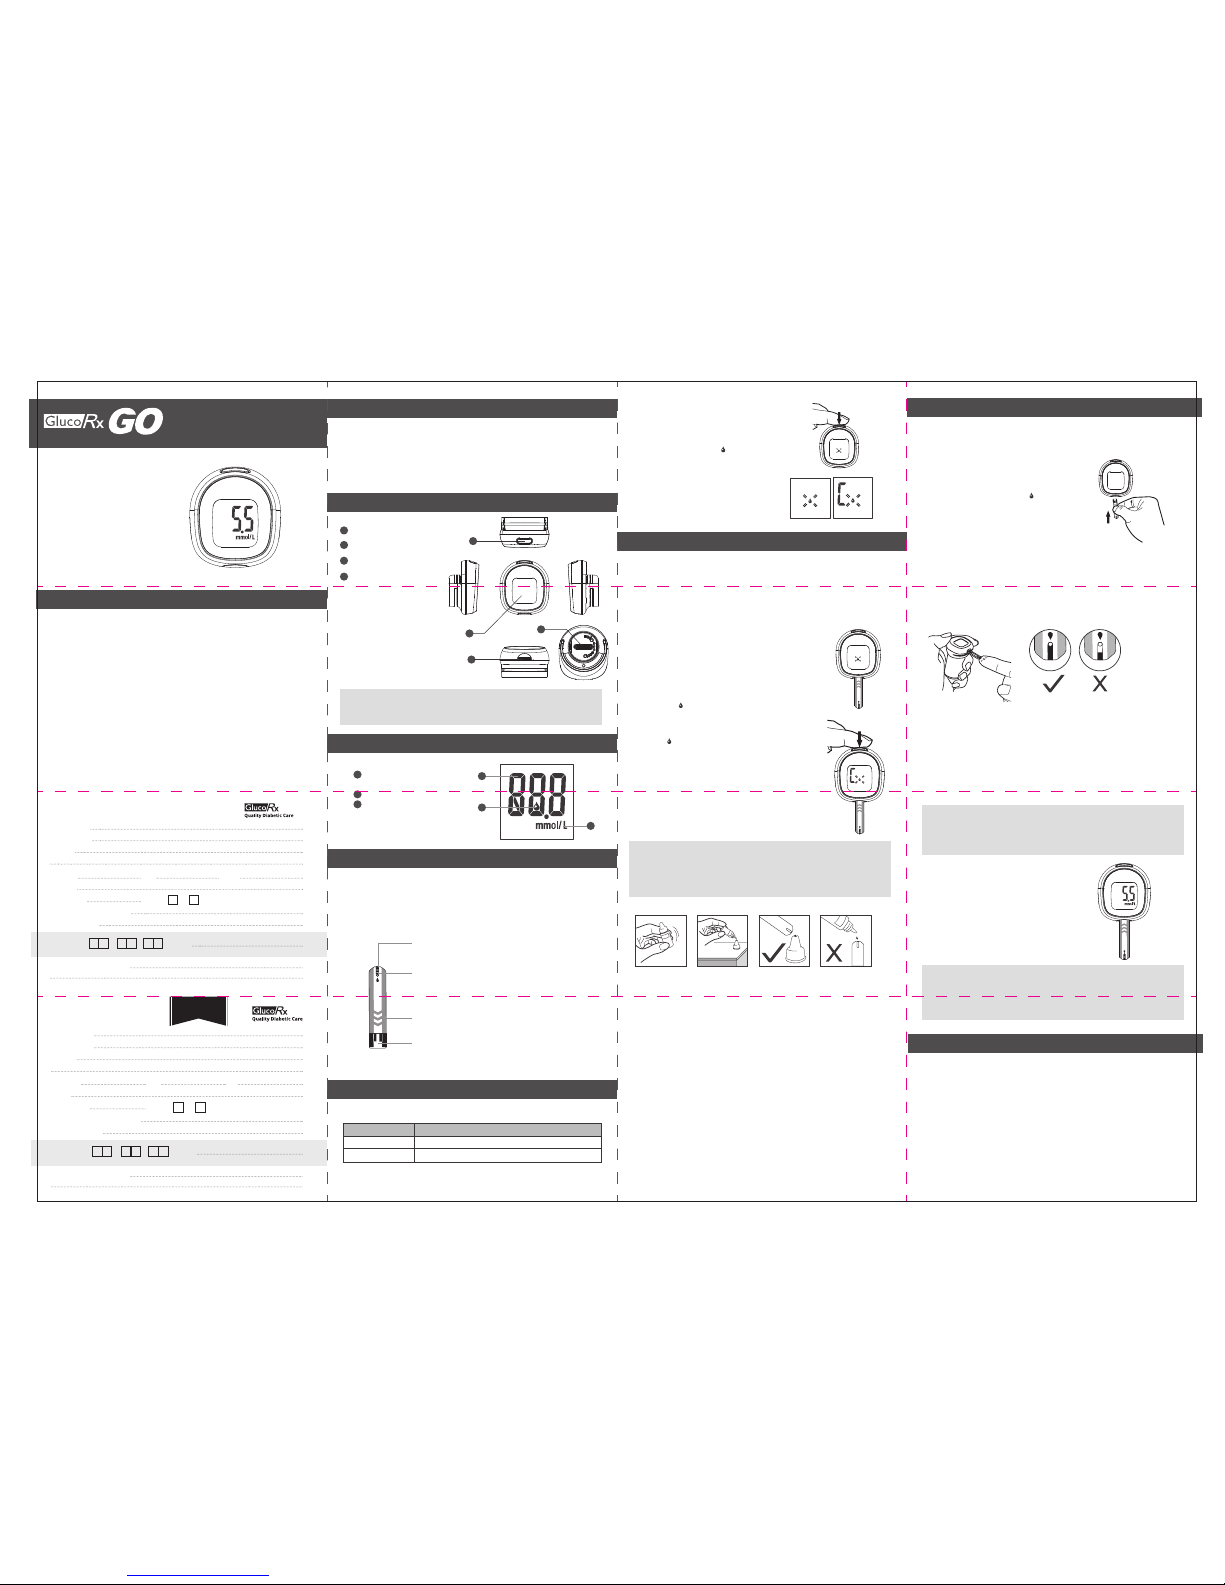
Main Button (M)
Display Screen
Test Strip Slot
Battery Compartment
CAUTION
Every time you perform a control solution test, you have to mark it so that
the test result will NOT be stored in the memory. Failure to do so will mix up
the blood glucose test results with the control solution test results in
memory.
IMPORTANT SAFETY PRECAUTIONS
CHECKING THE SYSTEM WITH CONTROL SOLUTION
APPEARANCE AND KEY FUNCTIONS OF THE METER
METER DISPLAY
GlucoRx Nexus TEST STRIPS
1
2
3
4
Test Result / Measuring Mode
C- control solution test
Blood Drop Symbol
Measurement Unit
1
2
3
Your system measures the amount of sugar (glucose) in whole blood. Blood is
applied to the absorbent hole on the test strip and is automatically drawn into the
reaction cell where the reaction takes place.
The test strip consists of the following parts:
Our Control Solution contains a known amount of glucose that reacts with test
strips. By comparing the result of your control solution test with the expected
range printed on the test strip vial label, you can check that the meter and the
test strips are working together as a system and you are performing the test
correctly. It is very important that you perform this simple check routinely to
make sure you get accurate results.
Insert a Nexus test strip into the test slot with the contact
bars end first and facing up.
(Contact bars must be inserted all the way into the meter
or you may get an inaccurate test result.) The meter turns
on automatically and displays the following in sequence:
CH, and then “ “
Absorbent Hole
Apply a drop of blood here. The blood will be
automatically absorbed.
Conrmation Window
This is where you confirm if enough blood has been
applied to the absorbent hole in the strip.
Test Strip Handle
Hold this part to insert the test strip into the slot
Contact Bars
Insert this end of the test strip into the meter. Push it
in firmly until it will go no further.
HOW TO PERFORM A CONTROL SOLUTION TEST
STEP1. Insert test strip
NOTE
The meter will turn o automatically after 180 seconds without any action, or you
can press and hold the M button for 3 seconds to turn o the meter.
311-4283300-007
1
2
3
4
1
2
3
THE TWO MEASURING MODES
The meter provides you with TWO modes for measuring, General and QC.
MODES
General (no symbol)
QC (shows C)
USE WHEN
any time of day, regardless of time since last meal
testing with the control solution
When the “ “ symbol appears on the display, press
M and “C” will appear on the display. When the “C” sign
is displayed, the meter will not store your test result in
memory under “QC”. If you decide not to perform a
control solution test, press M again and the “C” sign
will disappear.
You can switch between each mode by:
1. Start with the meter switched off. Insert a
test strip to turn on the meter. The screen
will display: CH and then “ ” .
2. Press M to switch between General and QC
mode.
WARNING:
1. Please do not change your treatment based on the result without first
consulting your healthcare professional.
2. Turn your meter off by removing the test strip. Discard the used test strip
and lancet carefully according to your local environmental regulations.
Food, medication, illness, stress and exercise can affect blood glucose levels.
Capillary blood at the fingertip reflects these changes faster than capillary blood
at other sites. Thus, when testing blood glucose during or immediately after a
meal, physical exercise, or any other event, take a blood sample from your finger
only.
You can test on a variety of locations on your body.
Important: There are limitations with AST (Alternative Site Testing).
Please consult your healthcare professional before you perform AST.
When to use AST?
ALTERNATIVE SITE TESTING
STEP 2. Apply Control Solution
STEP 4. Get result
Your blood glucose result will be stored
in the memory automatically.
Shake the control solution vial thoroughly before use. Squeeze out the first drop
and wipe it off, then squeeze out another drop and place it on the tip of the vial
cap. Hold the meter to move the absorbent hole of the test strip to touch the
drop. Once the confirmation window fills completely, the meter will begin
counting down. To avoid contaminating the control solution, do not directly
apply control solution onto a strip.
STEP 3. Read and compare the results
After the meter counts to 0, the result of the control solution test will appear.
Compare the result with the range printed on the test strip vial. The result should
fall within this range.
Out-of-range results
If you continue to have test results fall outside the range printed on the test strip
vial, your meter and strips may not be working properly. Do NOT test your blood.
Contact GlucoRx Customer care on 01483 755133 for help.
STEP 2. Select the appropriate measuring mode by pressing M
For selecting the measurement mode, please refer to the “TWO MEASURING
MODES”
STEP 3. Apply blood sample
Obtain a drop of blood of at least 0.5 μL using the lancing device. Use the clear
cap for alternative sites other than fingers, and refer to the strip package insert
for further details.
Preparing the Lancing Device for Blood Sampling
Please follow the instructions in the lancing device insert for collecting a blood
sample. Never share a lancet of the lancing device. GlucoRx Lancing device is for
self-use only.
STEP 1. Insert the test strip to turn on the meter
Wait for the meter to display the .
Gently apply a drop of blood to the absorbent hole of the test strip at a tilted
angle. The confirmation window should be completely filled if enough blood
sample has been applied. Do NOT remove your finger until you hear a beep sound.
If the confirmation window is not filled completely before your meter begins to
count down, do not add more blood to the test strip. Discard the test strip and
start again. If you have trouble filling the test strip, please call GlucoRx Customer
care on 01483 755133 for assistance.
NOTE:
If you do not apply a blood sample to the test strip within 3 minutes, the
meter will turn itself off. You must remove the strip and insert it back into the
meter to restart the test.
TESTING YOUR BLOOD GLUCOSE
Date obtained: / / Serial No:
Date obtained: / / Serial No:
WARRANTY REGISTRATION CARD
WARRANTY CERTIFICATE
[ Dealer’s Portion ]
[ Owner’s Portion ]
Product Name:
Owner’s Name:
Address:
Tel No: (M)
(H)
(W)
Email:
Date of Birth:
Gender:
M F
Blood glucose testing frequency:
Insulin dependent?
GP Surgery name and Address:
GP Surgery name and Address:
Day
Day
Month
Month
Year
Year
*IMPORTANT: To qualify for the warranty, please fill in this card and mail to us within 6 months from date product obtained.
*NOTE: Please produce this card for warranty service.
Product Name:
Owner’s Name:
Address:
Tel No: (M) (H) (W)
Email:
Date of Birth: Gender:
M F
Blood glucose testing frequency:
Insulin dependent?
YEAR WARRANTY

The following is a summary of display messages. If your meter displays an
error message, please follow the actions for the error message as described
in the following table. If the problem persists, please contact GlucoRx
Customer care on 01483 755133.
DISPLAY MESSAGES AND PROBLEM-SOLVING GUIDE
NOTE
●
If you wish to exit memory mode before the last result being displayed, press
the M button for 3 seconds.
●
When the memory is full, the oldest test result will be replaced by the newest
test result.
●
The control solution results are NOT stored in the memory. Only blood glucose
results will be stored.
Viewing Results
Your Meter stores the 999 most recent blood glucose test results in its
memory. You can review the test results with these easy steps.
STEP 1. Enter the memory mode
With the meter turned off, press M twice. The first
test result will appear, indicating you are in
memory mode.
STEP 2.
When using the meter for the first time “---” will
appear, indicating that there are no test results in
the memory.
STEP 3. Recall test results
If you continue to press M, you can then review
the last 999 tests in the memory.
STEP 4. Exit the memory mode
After displaying the last test result in memory,
press the M again. The meter displays "End" and
then turns off.
VIEWING THE METER MEMORY
Strip Vial Embedding and Replacement
1. When you use your meter first time, the meter
is designed to embed into the strip vial cap at
an upward angle. If the meter is embedded
well, you will hear a “click” afterwards.
2. Open the strip vial cap to take out a new strip
for blood testing.
3. After all the strips have been used up, detach
the meter from the strip vial a downward
angle; dispose the empty strip vial. Replace
with a new strip vial.
MESSAGE WHAT IT MEANS
< 1.1 mmol/L
> 33.3 mmol/L
SYMBOL INFORMATION
Symbol Referent
In vitro diagnostic medical device
Consult instructions for use
Temperature limitation
Use by
Batch code
Manufacturer
Serial number
Authorised representative in the European Community
Caution, consult accompanying documents
CE mark
Humidity limitation
Collection for electrical and electronic equipment
MESSAGE WHAT IT MEANS WHAT TO DO
Appears when the
battery is too low.
Replace the batteries
immediately.
Repeat with a new test strip.
System operation range is
10°C to 40°C (50°F to 104°F).
Repeat the test after the
meter and test strip are in the
above temperature range.
Repeat the test with a new
test strip. If the meter still
does not work, please
contact GlucoRx Customer
care on 01483 755133
for assistance.
Appears when a used
test strip is inserted.
Appears when ambient
temperature is above or
below system operation
range.
Problems with the meter.
Appears when test strip is
removed while counting
volume.
Review the instructions and
repeat test with a new strip.
If the problem persists,
please contact GlucoRx
Customer care
on 01483 755133 for help.
Model No.: TD-4283
Dimension & Weight: 43.5 (L) x 39.3 (W) x 24.2 (H) mm
Weight: 18 g (including battery)
Power Source: one 3V CR2032 lithium battery (for at least 500 measurements)
Display: LCD
Memory: 999 memory sets
Automatic detection of electrode insertion
Auto sample loading detection
Automatic reaction time count-down
Auto switch-o after 3 minutes without action
Temperature warning
Operating Condition:
10°C to 40°C (50°F to 104°F), below 85% R.H.
Meter Storage/ Transportation Conditions:
-20°C to 60°C (-4°F to 140°F), below 95% R.H.
Strip Storage/ Transportation conditions:
2°C to 32°C (35.6°F to 89.6°F), below 85% R.H.
Measurement Units: xed mmol/L
Measurement Range: 1.1–33.3 mmol/L
Expected service life: 5 years
This device has been tested to meet the electrical and safety requirements of:
IEC/EN 61010-1, IEC/EN 61010-2-101, EN 61326-1, IEC/EN 61326-2-6.
SPECIFICATIONS
TaiDoc Technology Corporation
B1-7F., No. 127, Wugong 2nd Rd.,
Distributed by GlucoRx Ltd.
4 Wintonlea, Monument Way West, Woking, Surrey, GU21 5EN, UK
Website: www.glucorx.co.uk
Customer careline: 01483 755133
Wugu Dist., New Taipei City 248, Taiwan (R.O.C.)
www.taidoc.com
MedNet GmbH
Borkstraβe 10, 48163 Mϋnster, Germany
For self-testing
NOTE
●
Replacing the battery does not aect the test results stored in the memory.
●
As with all small batteries, these batteries should be kept away from children. If
swallowed, promptly seek medical assistance.
●
Battery might leak chemicals if unused for a long time. Remove the battery if
you are not going to use the device for an extended period ( i.e. 3 months or
more).
●
Properly dispose of the battery according to your local environmental
regulations.
Your meter comes with one 3V CR2032 lithium battery. If the low battery
symbol ” ” appears on the screen, this indicates that the battery is low
and it is time to change the battery.
E-b error appears:
The power is not enough to do a test. Please change the battery
immediately.
Caring for Your Meter
Cleaning
●
To clean your meter exterior, wipe it with a disinfecting wipe
(Example:Micro-Kill Plus™) to clean exposed surfaces thoroughly and
remove any visible dirt, blood or any other body fluid with the wipe. Then
dry the device with a soft, dry and clean cloth. Do NOT rinse your meter with
water.
●
Do NOT use organic solvents to clean your meter.
Meter Storage
●
Storage conditions: -20°C to 60°C (-4°F to 140°F), below 95% relative
humidity.
●
Always store or transport your meter in its original storage case.
●
Avoid dropping and heavy impact.
●
Avoid direct sunlight and high humidity.
Meter Disposal
Your used meter should be treated as contaminated that may carry a risk of
infection during measurement. The batteries in your used meter should be
removed and the meter disposed in accordance with local environmental
regulations.
Your meter falls outside the scope of the European Directive
2002/96/EC-Directive on waste electrical and electronic equipment (WEEE).
Replacing the Battery
To replace the battery, make sure that your meter is turned o.
1. Open the battery cover in an anti-clockwise direction and lift it up to remove.
2. Remove the old battery and replace with one new 3V CR2032 lithium battery.
3. Close the battery cover. If the battery is inserted correctly, you will hear a
"beep" afterwards.
BATTERY
MAINTENANCE
We strongly recommend that you perform AST ONLY at the following times:
●
In a pre-meal or fasting state (more than 2 hours since the last meal).
●
Two hours or more after taking insulin.
●
Two hours or more after exercise.
Do NOT use AST if:
●
You think your blood glucose is low.
●
You are unaware of hypoglycaemia.
●
You are testing for hyperglycaemia.
●
Your AST results do not match the way you feel.
●
Your routine glucose results often uctuate.
PLEASE
AFFIX
STAMP
GlucoRx Ltd
4 Wintonlea
Monument Way West
Woking
Surrey
GU21 5EN
United Kingdom
TERMS & CONDITIONS OF WARRANTY
1. GlucoRx warrants this product to be free of defects in workmanship and materials within the said warranty period
on the Warranty Certificate.
2. During the warranty period if this product is found to be defective, you may send it with the Warranty Certificate to
our office for warranty service. GlucoRx will then repair or replace defective parts, or exchange the whole product as
GlucoRx may choose, with no additional charge to the original owner. After such repair, replacement or exchange,
the product will be warranted for the remaining time of the warranty period.
3. This warranty is valid only if the Warranty Certificate and Warranty Registration Card are duly completed with date
of obtaining product, serial number and if the Warranty Registration Card is sent to our office (or you register on
our website www.glucorx.co.uk) no later than 6 months from the date obtained.
4. This warranty is void if this product has been repaired or serviced by an unauthorised person. This warranty does
not cover defects caused by misuse, abuse, accident, tampering, lack of reasonable care, fire or any other acts
beyond human control.
5. Except as stated in the above paragraphs, GlucoRx disclaim all other warranties, including those of merchantability
of fitness for a particular purpose with respect to the use of this product. GlucoRx shall not be liable for any direct,
consequential or incidental damages arising out of the use or inability to use this product.
 Loading...