

GlucoRx Nexus mini ultra TD-4141 Owner's Booklet
311-4141100-008
機器說明書/ GlucoRx Nexus mini ultra /英(DIME)
L297*W420mm/3折/銅版紙100P/雙面/黑
JF
K100 K75
Part no.
Product name
Spec
Color
Designer
311-4141100-008
Version 2.0
2017/03
BLOOD GLUCOSE
MONITORING SYSTEM
OWNER’S BOOKLET
(TD-4141)
Dear owner of GlucoRx Nexus mini ultra Blood Glucose Monitoring System,
The system consists of three main products: the meter, test strips and control solution.
These products have been designed, tested, and proven to work together as a system to
produce accurate blood glucose test results. Only use GlucoRx Nexus test strips and control
solutions with the GlucoRx Nexus mini ultra Blood Glucose Monitoring System.
Intended Use
This system is intended for external use (in vitro diagnostic use) only. It is used for the
quantitative measurement of glucose in samples of fresh capillary whole blood taken from
the palm, forearm, or fingers. It is not intended to diagnose or screen for diabetes mellitus,
or to be used on newborn babies.
Professionals may test with capillary and venous blood sample; home use is limited to
capillary whole blood testing.
This system provides you with plasma equivalent results.
Read Before Use
The meter will turn off automatically after 120 seconds without any action, or you can
press and hold ▲ and ▼ to turn off the meter.
NOTE
IMPORTANT SAFETY INSTRUCTIONS
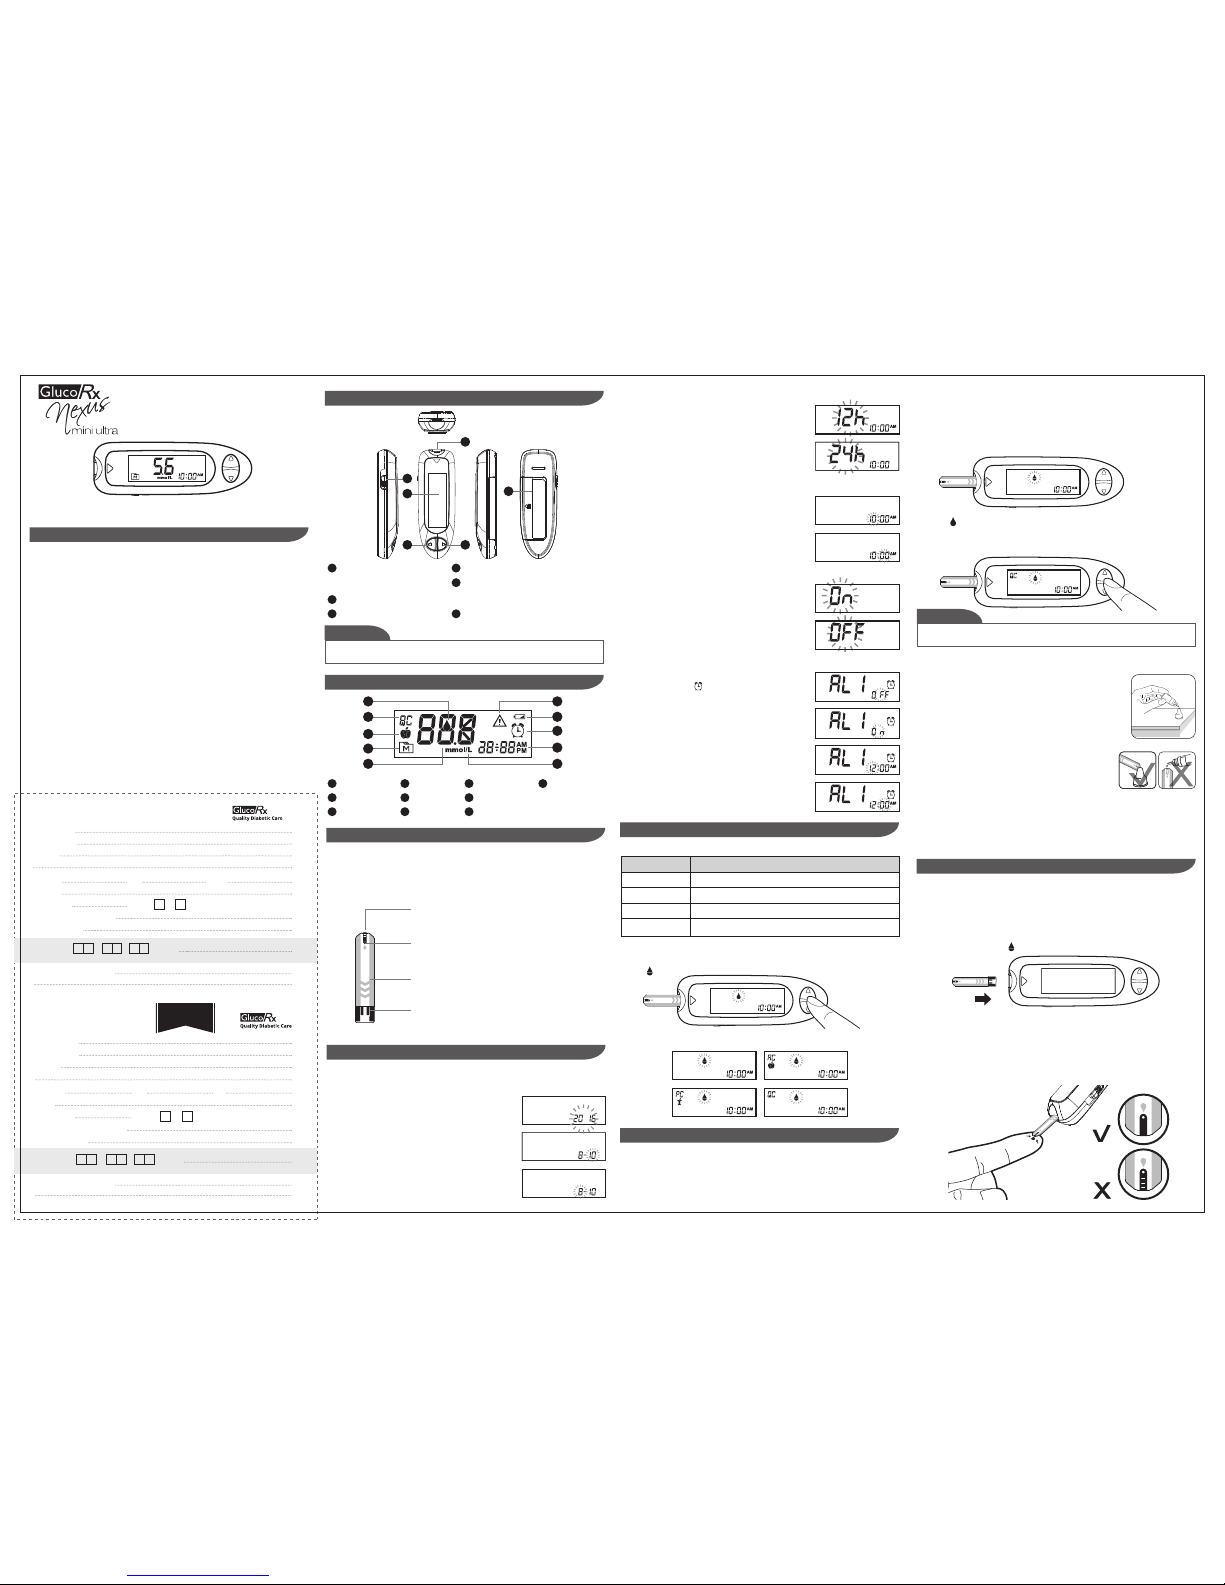
APPEARANCE AND KEY FUNCTIONS OF THE METER
With the hour flashing, press ▲ until the correct hour
appears. Press ▼.
With the minute flashing, press ▲ until the correct
minute appears. Press ▼.
STEP 3. Set the hour and minute
Blood Drop Symbol
1
Measuring Mode
2
AC/PC Indicator
3
Error Message
6
Test Result
5
4
Memory Symbol
Low Battery Symbol
7
Alarm Symbol
8
Time Display
9
Measurement Unit
10
METER DISPLAY
2
1
3
4
5 10
7
6
8
9
STEP 2. Setting the time format.
Press ▲ to select the desired time format -- 12h or 24h.
Press ▼.
STEP 2. Apply control solution
STEP 3. Read and compare the results
Shake the control solution vial thoroughly before use. Squeeze
out a drop and wipe it off, then squeeze out another drop and
place it on the tip of the vial cap. Hold the meter to move the
absorbent hole of the test strip to touch the drop. Once the
confirmation window fills completely, the meter will begin
counting down. To avoid contaminating the control solution,
do not directly apply control solution onto a strip.
After the meter counts to 0, the result of the control solution
test will appear. Compare the result with the range printed on
your test strip vial. The result should fall within this range.
Out-of-range results
If you continue to have test results falling outside the range printed on the test strip vial,
your meter and/or strips may not be working properly. Do NOT test your blood. Contact
GlucoRx Customer Services on 01483-755133.
Every time you perform a control solution test you must enter “QC” test mode so that
the test result will not be stored in the meter memory.
CAUTION
STEP 3. Apply blood sample
Wipe the first drop off and obtain a drop of blood of at least 0.5 µL using the GlucoRx
lancing device. Use the clear cap for sites other than fingers and refer to the strip package
insert for more details.
Preparing the Lancing Device for Blood Testing
Please follow the instructions in the lancing device insert for collecting a blood sample.
Never share a lancet of the lancing device. GlucoRx Lancing device is for self-use only.
STEP 1. Insert the test strip to turn on the meter
Wait for the meter to display “ ”.
STEP 2. Select the appropriate measuring mode by pressing ▲
For selecting the measurement mode, please refer to the “FOUR MEASURING MODES”.
TESTING YOUR BLOOD
STEP1. Insert test strip
Insert a test strip into the test slot with the contact bars end first and facing up. (Contact
bars must be inserted all the way into the meter or you may get an inaccurate test result.)
The meter turns on automatically and displays the following in sequence:
When the “ “ symbol appears on the display, press ▲ and “QC” will appear on the display.
When the “QC” sign is displayed, the meter will not store your test result in the memory. If
you decide not to perform a control solution test, press ▲ again and the “QC” sign will
disappear.
Display Screen with White Backlight
2
Down Button (▼)
3
Battery Compartment
6
Up Button (▲)
4
Test Strip Slot / Strip Cable Slot
5
Insert test strip here to turn the
meter on for testing.
Test Strip Ejector
1
Eject the used strip by pushing
up this button.
6
1
2
3 4
5
Your system measures the amount of sugar (glucose) in whole blood. Blood is applied to
the absorbent hole on the test strip and is automatically drawn into the reaction cell where
the reaction takes place.
The test strip consists of the following parts:
Contact Bars
Insert this end of the test strip into the meter.
Push it in firmly until it will go no further.
Test Strip Handle
Hold this part to insert the test strip into the slot.
Absorbent Hole
Apply a drop of blood here.
The blood will be automatically absorbed.
Confirmation Window
This is where you confirm if enough blood has been
applied to the absorbent hole in the strip.
GlucoRx Nexus TEST STRIPS
STEP 1. Set the date
Start with the meter off (no test strip inserted). Press and hold ▲ and ▼ at the same time.
With the year flashing, press ▲ until the correct year
appears. Press ▼.
With the month flashing, press ▲ until the correct month
appears. Press ▼.
With the day flashing, press ▲ until the correct day appears.
Press ▼.
SETTING THE METER
Date obtained: / / Serial No:
Date obtained: / / Serial No:
WARRANTY REGISTRATION CARD
WARRANTY CERTIFICATE
[ Dealer’s Portion ]
[ Owner’s Portion ]
Product Name:
Owner’s Name:
Address:
Tel No: (M)
(H)
(W)
Email:
Date of Birth:
Gender:
M F
Blood glucose testing frequency:
Insulin dependent?
GP Surgery name and Address:
GP Surgery name and Address:
Day
Day
Month
Month
Year
Year
*IMPORTANT: To qualify for the warranty, please fill in this card and mail to us within 6 months from date product obtained.
*NOTE: Please produce this card for warranty service.
Product Name:
Owner’s Name:
Address:
Tel No: (M) (H) (W)
Email:
Date of Birth: Gender:
M F
Blood glucose testing frequency:
Insulin dependent?
YEAR WARRANTY
STEP 4. Setting the buzzer beep
Press ▲ to switch between buzzer beep on or off.
Press ▼.
STEP 5. Setting the reminder alarm
Your meter has four reminder alarms. The meter will
display “OFF”, “AL1” and “ ”. If you don’t want to set
an alarm, press ▲ to select “OFF”, and then press ▼ to
skip this step. Or select “On” and press ▼ to proceed.
With the hour/minute flashing in sequence, press ▲
to select the correct hour/minute. Press ▼ and go to
the next alarm setting.
Our control solution contains a known amount of glucose that reacts with test strips. By
comparing the result of your control solution test with the expected range printed on the
test strip vial label, you can check that the meter and test strips are working together as a
system and that you are performing the test correctly. It is very important that you perform
this simple check routinely to make sure you get accurate results.
HOW TO PERFORM A CONTROL SOLUTION TEST
CHECKING THE SYSTEM WITH CONTROL SOLUTION
1. Start with the meter switched off. Insert a test strip to turn on the meter. The screen will
display “ ”.
The meter provides you with four modes for measuring: General, AC, PC and QC.
You can switch between each mode by:
MODES
USE WHEN
General
AC
PC
QC
any time of day, regardless of time since last meal
no food intake for at least 8 hours
2 hours after a meal
testing with the control solution
THE FOUR MEASURING MODES
2. Press ▲ to switch between General, AC, PC and QC mode.
 Loading...