

GlucoRx Nexus mini TD-4287 Owner's Booklet
311-4287200-006
Version 4.0
2014/12
BLOOD GLUCOSE
MONITORING SYSTEM
OWNER’S BOOKLET
TD-4287
Dear owner of GlucoRx Nexus mini Blood Glucose Monitoring System,
The system consists of three main products: the meter, test strips and control solution. These
products have been designed, tested, and proven to work together as a system to produce
accurate blood glucose test results. Only use GlucoRx Nexus test strips and control solutions
with the GlucoRx Nexus mini TD-4287 Blood Glucose Monitoring System.
Intended Use
This system is intended for external use (in vitro diagnostic use) only. It is used for the
quantitative measurement of glucose in samples of fresh capillary whole blood taken from
the palm, forearm, or fingers. It is not intended to diagnose or screen for diabetes mellitus, or
to be used on newborn babies.
Professionals may test with capillary and venous blood sample; home use is limited to
capillary whole blood testing.
This system provides you with plasma equivalent results.
The measurement unit used for indicating the concentration of blood or plasma glucose can
either have a weight dimension (mg/dL) or a molarity (mmol/L). The approximate calculation
rule for conversion of mg/dL in mmol/L is:
For example;
1) 120 mg/dL ÷ 18 = 6.6 mmol/L
2) 7.2 mmol/L x 18 = 129 mg/dL approximately.
Read Before Use
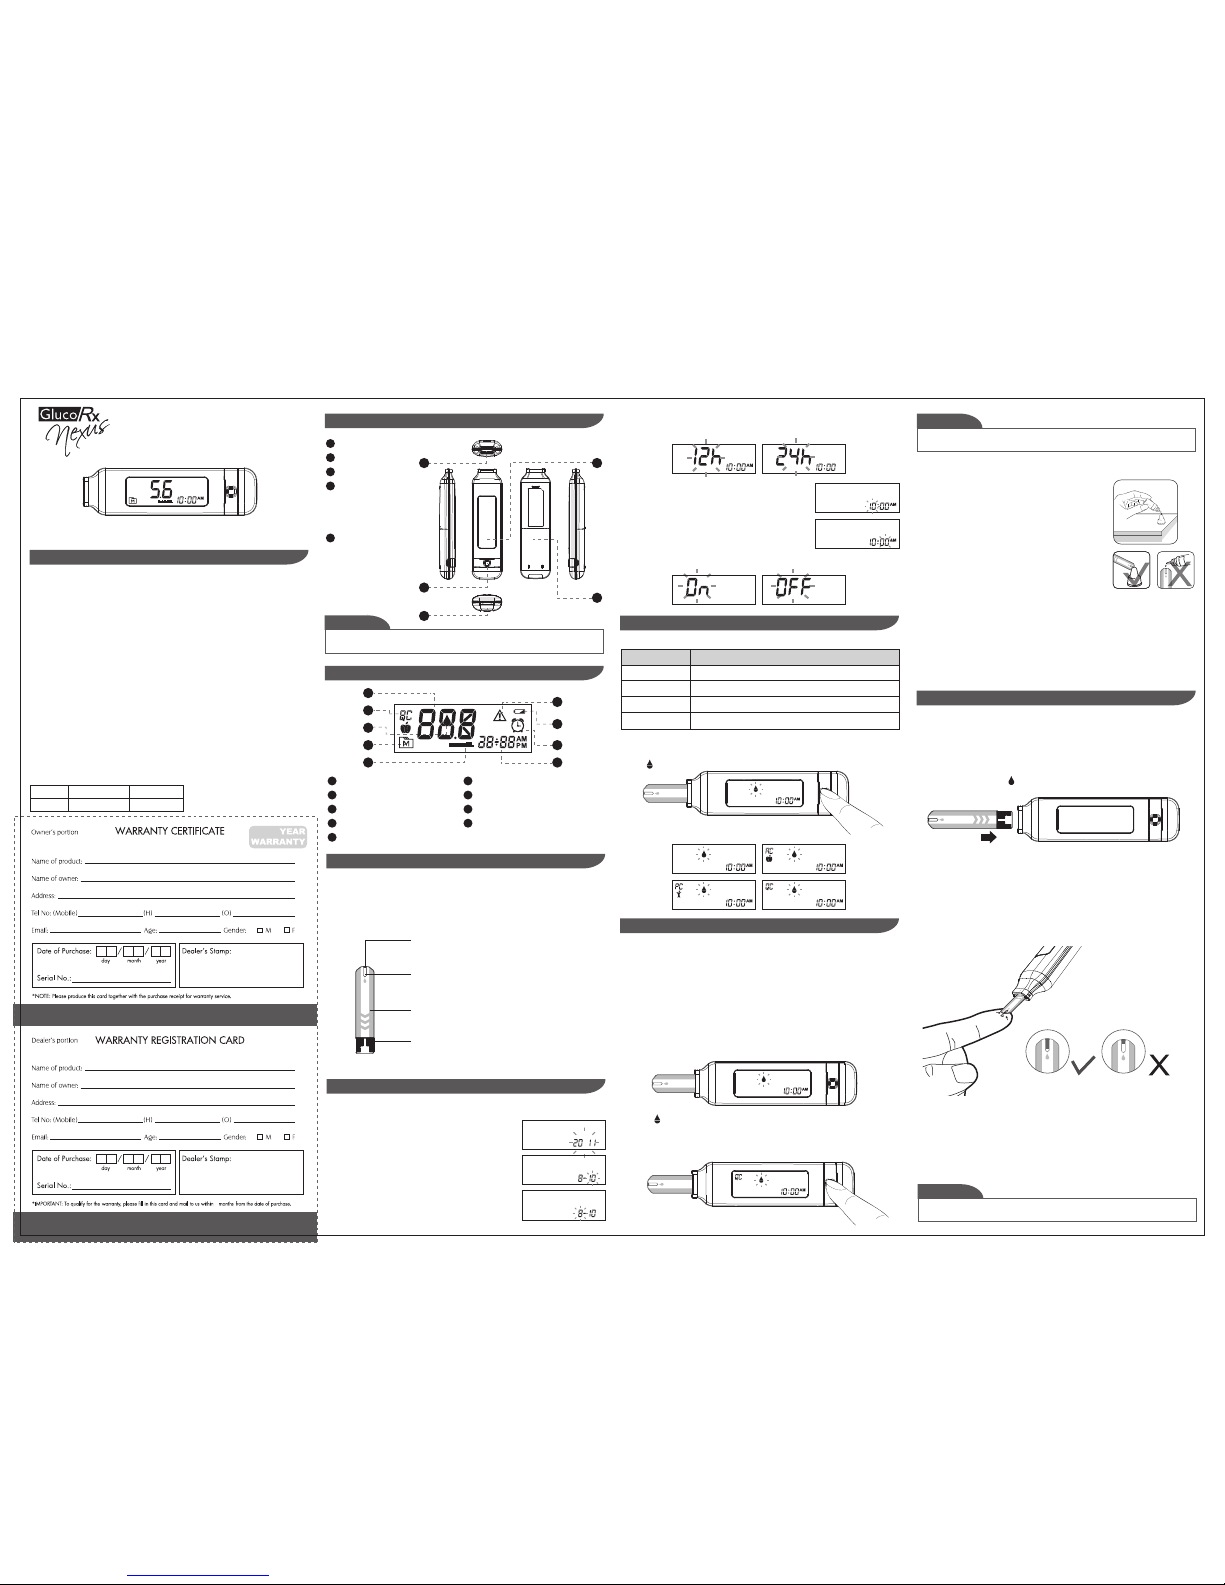
Test Slot
1.
Display Screen
2.
Main Button
3.
SET button and battery
4.
Data Port
5.
The meter will turn off automatically after 120 seconds without any action, or you can
press and hold the main button for 3 seconds to turn off the meter.
NOTE
1. 2.
4.
3.
5.
Test Result1.
Measuring Mode2.
Blood Drop Symbol3.
4.
Measurement Unit5.
Error Message6.
Low Battery Symbol7.
Memory Symbol
Alarm Symbol 8.
Time Display9.
1.
2.
3.
4.
5.
6.
7.
8.
9.
Our control solutions contain a known amount of glucose that reacts with test strips. By
comparing the result of your control solution test with the expected range printed on the
test strip vial label, you can check that the meter and the test strips are working together as
a system and that you are performing the test correctly. It is very important that you perform
this simple check routinely to make sure you get accurate results.
HOW TO PERFORM A CONTROL SOLUTION TEST
STEP1. Insert test strip
Insert a test strip into the test slot with the contact bars end first and facing up. (Contact bars
must be inserted all the way into the meter or you may get an inaccurate test result.) The
meter turns on automatically and displays the following in sequence:
When the “ “ symbol appears on the display, press Main button and “QC” will appear on the
display. When the “QC” sign is displayed, the meter will not store your test result in the
memory. If you decide not to perform a control solution test, press Main button again and
the “QC” sign will disappear.
If the confirmation window is not filled completely before the meter begins to count down,
do not add more blood to the test strip. Discard the test strip and start again. If you have
trouble filling the test strip, please call GlucoRx Customer Services on 01483-755133 for
assistance.
Gently apply the drop of blood to the absorbent hole of the test strip at a titled angle.
Confirmation window should be completely filled if enough blood sample has been
applied. Do NOT remove your finger until you hear a beep sound or a count down starts.
If you do not apply a blood sample within 2 minutes, the meter will turn itself off. You
must remove the test strip and insert it back into the meter to restart the test.
NOTE
STEP 2. Setting the time format.
Press Main button to select the desired time format -- 12h or 24h. Press SET.
With the hour flashing, press Main button until the correct
hour appears. Press SET.
With the minute flashing, press Main button until the correct
minute appears. Press SET.
STEP 3. Set the hour and minute
STEP 4. Setting the buzzer beep
1. Start with the meter switched off. Insert a test strip to turn on the meter. The screen will
display “ ”.
The meter provides you with four modes for measuring, General, AC, PC and QC.
You can switch between each mode by:
MODES
USE WHEN
General
AC
PC
QC
any time of day regardless of time since last meal
no food intake for at least 8 hours
2 hours after a meal
testing with the control solution
IMPORTANT SAFETY INSTRUCTIONS
CHECKING THE SYSTEM WITH CONTROL SOLUTIONS
THE FOUR MEASURING MODES
APPEARANCE AND KEY FUNCTIONS OF THE METER
METER DISPLAY
Press Main button to switch between buzzer beep on or off. Press SET.
2. Press Main button to switch between General, AC, PC and QC mode.
Your system measures the amount of sugar (glucose) in whole blood. Blood is applied to the
absorbent hole on the test strip and is automatically drawn into the reaction cell where the
reaction takes place.
The test strip consists of the following parts:
Contact Bars
Insert this end of the test strip into the meter.
Push it in firmly until it will go no further.
Test Strip Handle
Hold this part to insert the test strip into the slot.
Absorbent Hole
Apply a drop of blood here.
The blood will be automatically absorbed.
Confirmation Window
This is where you confirm if enough blood has been
applied to the absorbent hole in the strip.
GlucoRx Nexus TEST STRIPS
STEP 1. Set the date
Start with the meter off (no test strip inserted). Press SET.
With the year flashing, press Main button until the correct
year appears. Press SET.
With the month flashing, press Main button until the correct
month appears. Press SET.
With the day flashing, press Main button until the correct
day appears. Press SET.
SETTING THE METER
STEP 2. Apply control solution
STEP 3. Read and compare the results
Shake the control solution vial thoroughly before use.
Squeeze out a drop and wipe it off, then squeeze out another
drop and place it on the tip of the vial cap. Hold the meter to
move the absorbent hole of the test strip to touch the drop.
Once the confirmation window fills completely, the meter
will begin counting down. To avoid contaminating the
control solution, do not directly apply control solution onto a
strip.
After the meter counts to 0, the result of the control solution
test will appear. Compare the result with range printed on the
test strip vial. The result should fall within this range.
Out-of-range results
If you continue to have test results falling outside the range printed on the test strip vial,
the meter and strips may not be working properly. Do NOT test your blood. Contact
GlucoRx Customer Services on 01483-755133.
Every time you perform a control solution test you must enter “QC” test mode so that the
test result will not be stored in the meter memory.
CAUTION
STEP 3. Apply blood sample
Wipe the first drop off and obtain a drop of blood of at least 0.5 µL using the GlucoRx lancing
device. Use the clear cap for sites other than fingers and refer to the strip package insert for
more details.
Preparing the Lancing Device for Blood Testing
Please follow the instructions in the lancing device insert for collecting a blood sample.
Never share a lancet of the lancing device. GlucoRx Lancing device is for self-use only.
STEP 1. Insert the test strip to turn on the meter
Wait for the meter to display “ ”.
STEP 2. Select the appropriate measuring mode by pressing Main button
For selecting the measurement mode, please refer to the “FOUR MEASURING MODES”.
TESTING YOUR BLOOD
mg/dL
mmol/L
Divided by 18
Times 18
= mmol/L
= mg/dL
mini
6
both accessed after lifting the
blank black panel on the back
of the meter via the two
arrowed grooves either side
• Replacing the battery does not affect the test results stored in the memory.
• As with all small batteries, these batteries should be kept away from small children. If
swallowed, promptly seek medical assistance.
• Battery might leak chemicals if unused for a long time. Remove the battery if you are
not going to use the device for an extended period (i.e., 3 months or more).
• Properly dispose of the battery according to your local environmental regulations.
NOTE
• Any time you wish to exit the memory, keep pressing Main button for 5
seconds or leave it without any action for 3 minutes. The meter will switch off
automatically.
• Control solution results are NOT included in the day average.
• If using the meter for the first time, “---“ displays when you recall the test
results or review the average result. It indicates that there is no test result in the
memory.
NOTE
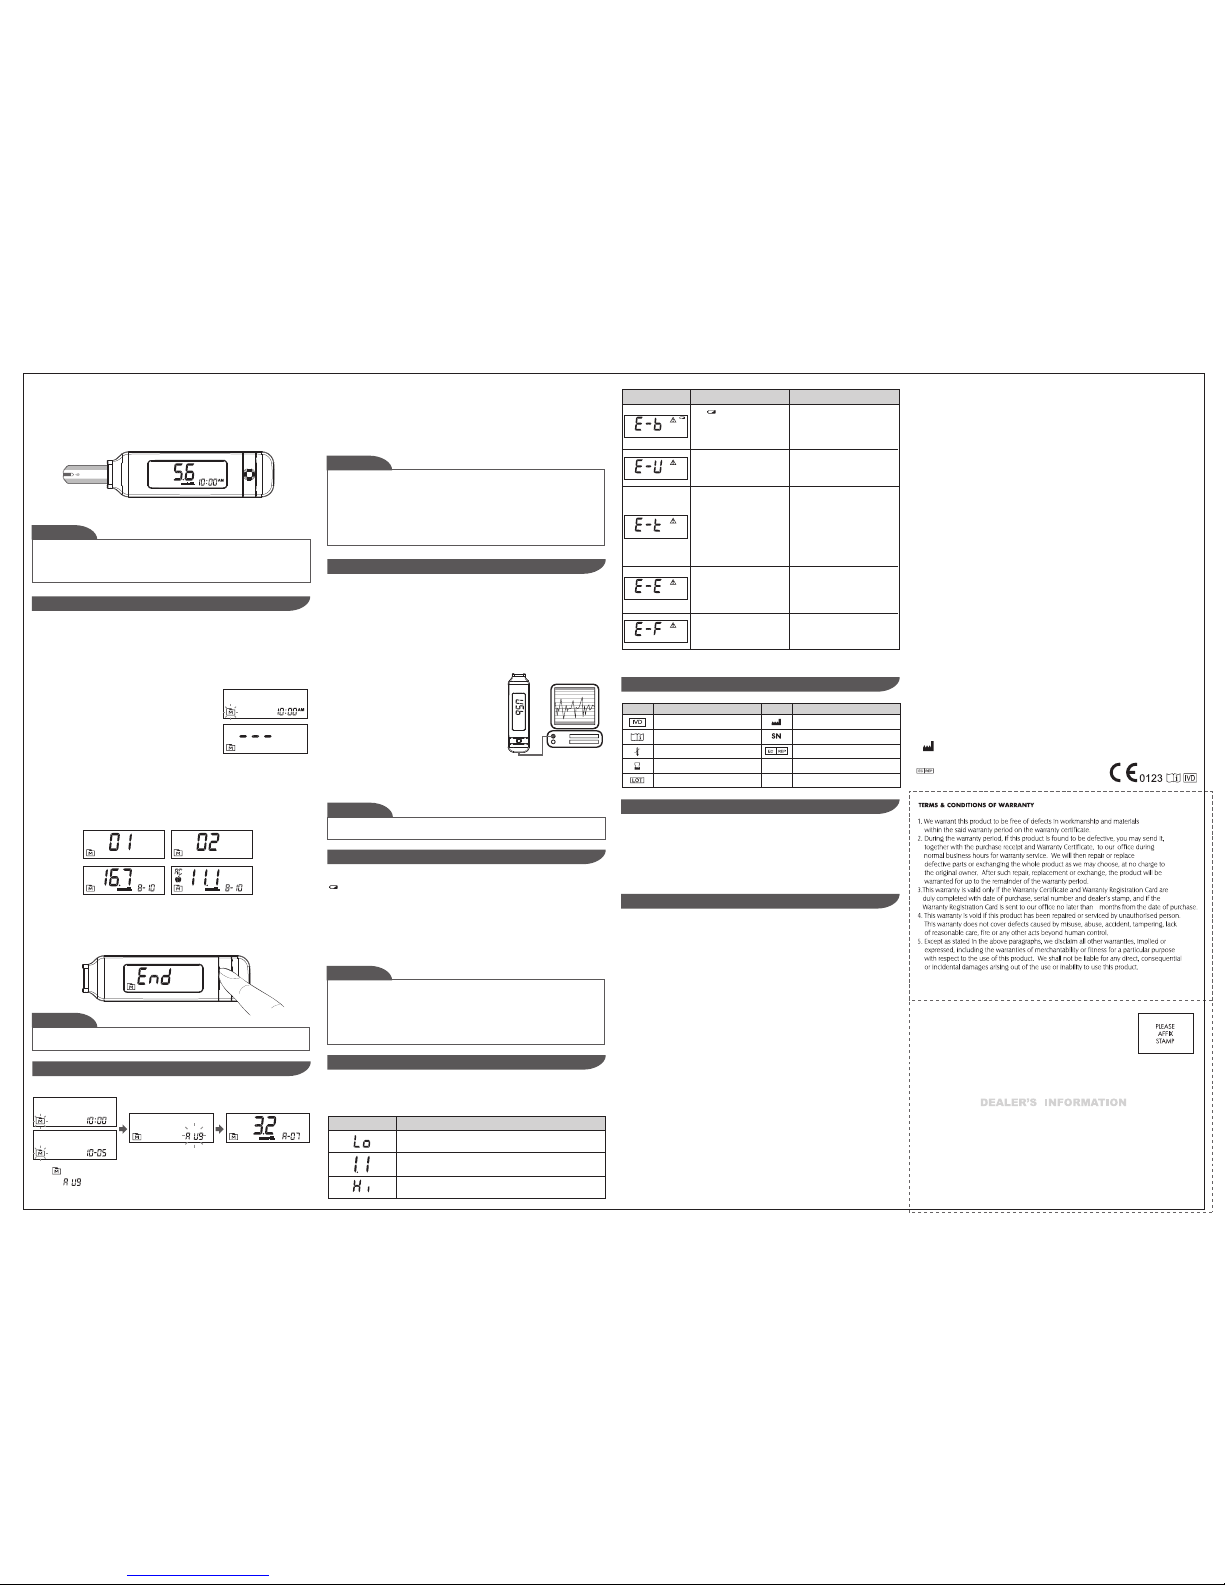
2. Connecting to a personal computer
Connect the cable to a USB port on your computer.
With the meter switched off, connect the other end of
the USB cable to the meter data port. "USb" will appear
on the meter display, indicating that the meter is in
communication mode.
3. Data transmission
To transmit data, follow the instructions provided with the software. Results will be
transmitted with date and time. Remove the cable and the meter will automatically
switch off.
Your meter comes with one 3V CR2032 lithium battery. If the low battery symbol
“ ”appears on the screen this indicates that the battery is low and it is time to replace the
battery.
Cleaning
1. To clean the meter exterior, wipe it with one disinfecting wipe (Example:Micro-Kill Plus™)
to clean exposed surfaces thoroughly and remove any visible dirt, blood or any other body
fluid with the wipe. Then dry the device with a soft, dry and clean cloth.
2. Do NOT rinse the meter with water.
1. Press the edge of the battery cover and lift it up to remove.
2. Remove the old battery and replace with one 3V CR2032 lithium battery.
3. Close the battery cover. If the battery is inserted correctly, you will hear a “beep” afterwards.
While the meter is connecting to the PC, it will be unable to perform a blood glucose
test.
Warning:
BATTERY RECHARGE
You can use the meter with an USB cable and the GlucoRx Healthcare Software System to
view your test results on your personal computer. To learn more about the GlucoRx
Healthcare Software System or to obtain a USB cable separately, please contact GlucoRx
customer services or the place of purchase for assistance.
1. Obtaining the required cable and installing the software
To download the GlucoRx Healthcare Software System, please visit GlucoRx website at
www.glucorx.co.uk.
DOWNLOADING RESULTS ONTO A COMPUTER
Distributed by GlucoRx Ltd
4 Wintonlea, Monument Way West
Woking, Surrey, GU21 5EN, UK
Website: www.glucorx.co.uk
Customer care number: 01483 755133
For self-testing.
The following is a summary of display messages. If your meter displays an error message,
please follow the actions for the error message as described in the table below. If the
problem persists, please contact GlucoRx for help.
DISPLAY MESSAGES AND PROBLEM-SOLVING GUIDE
MESSAGE
WHAT IT MEANS
<1.1 mmol/L (20 mg/dL)
1.1 - 33.3 mmol/L (20 - 600 mg/dL)
>33.3 mmol/L (600 mg/dL)
STEP 4. Get result
The blood glucose result will be stored in the memory automatically.
1. Please do not change your treatment based on the result without first consulting
your healthcare professional.
2. Turn the meter off by removing the test strip. Discard the used test strip and lancet
carefully according to your local regulations.
Warning:
STEP 1. Enter the memory mode
With the meter turned off, press Main button twice. The
first test result will appear, indicating that you are in the
memory mode. If you continue to press Main button, you
can then review the last 1000 tests in the memory.
When using the meter for the first time “---” will appear,
indicating that there are no test results in the memory.
Viewing Results
Your Meter stores the 1000 most recent blood glucose test results with date and time in its
memory. You can review the test results with these easy steps.
STEP 2. Recall test results
After the last test result, the most recent test result appears with the date and time. Press Main
button to review your last 1000 test results in order. When the memory is full, the oldest
result will be deleted when the newest is added.
STEP 3. Exit the memory mode
Press the Main button button for three seconds to turn off the meter or after the last
result, the display will show “End” and it will turn off automatically.
The results of control solution tests are NOT stored in the memory. Stored results are
blood glucose results only.
NOTE
VIEWING THE METER MEMORY
For questionable results, please see test strip package insert for important information.
Model no.: TD-4287
Dimensions: 103.4 (L) x 28.1 (W) x 15.1 (H) mm
Weight: 31.8g
Power source: 3V CR2032 lithium battery
Display: LCD
Memory: 1000 memory sets with date and time
Automatic detection of electrode insertion
Automatic reaction time count-down
Automatic blood detection
Temperature warning
Operating conditions: 10°C to 40°C (50°F to 104°F), below 85% R.H.
Meter storage/transport conditions: -20°C to 60°C (-4°F to 140°F), below 95% R.H.
Strip storage/transport conditions: 2°C to 32°C (35.6°F to 89.6°F), below 85% R.H.
Measurement units: Fixed mmol/L
Measurement range: 1.1–33.3 mmol/L (20–600 mg/dL)
This device has been tested to meet the electrical and safety requirements of: IEC/EN
61010-1, IEC/EN 61010-2-101, EN 61326-1, EN 61326-2-6.
SPECIFICATIONS
CARING FOR YOUR METER
SYMBOL INFORMATION
Symbol Referent
In vitro diagnostic medical device
Consult instructions for use
Temperature limitation
Use by
Batch code
Manufacturer
Serial number
Authorised representative in the
European Community
Symbol Referent
MESSAGE
WHAT IT MEANS ACTION
The symbol appears with this
message. This means that the
battery does not have enough
power for a test.
Replace the battery immediately.
A used test strip is inserted, or
there is an electrical problem.
Repeat test with a new test strip. If
the error message re-appears,
please contact GlucoRx for help.
The temperature of the
environment, meter, or test strip
is outside the system’s operating
range. You cannot perform a test
until the meter and test strip are
within the operating range of
10°C to 40°C (50°F to 104°F).
Repeat the test after the meter and
test strip are within the operating
temperatures.
Problem with the meter.
Review the instructions and try
again with a new test strip. If the
problem persists, please contact
GlucoRx for help.
You may have removed the strip
after applying blood to the
absorbent hole.
Keep the test strip in the meter after
it has absorbed the blood until the
meter displays the test result.
6
2.Press Main button to review 14-, 21-, 28-, 60- and 90- day average results stored in each
measuring mode in the order of Gen, AC, then PC.
3. Exit the meter memory.
Keep pressing the Main button and the meter will turn off after displaying the last test
result.
When appears on the display, keep pressing Main button for 3 seconds until the
flashing “ ” appears. Release Main button and then your 7-day average result
measured in general mode will appear on the display.
1. Press and release Main button.
Reviewing Blood Glucose Day Average Results
TaiDoc Technology Corporation
MedNet GmbH
Borkstraβe 10, 48163 Mϋnster, Germany
B1-7F., No. 127, Wugong 2nd Rd., Wugu Dist.,
New Taipei City 248, Taiwan (R.O.C.)
www.taidoc.com
 Loading...