

Page 1

Quick Guide to GlucoMen LX
1. Start the meter.
Press for more than 3 seconds. For a moment,
the screen will show all symbols.
2. Set the time.
The digits for hour blink. Browse and select by
pressing or . Confi rm with .
Set the minutes in the same way.
3. Set the year, month and day.
Select the year by pressing or . Confi rm with .
Select the month in the same way. Confi rm with .
Select the day in the same way. Confi rm with .
4. Set the sound.
Press or to activate the sound (you can choose
whether the meter has sound or is silent).
Select ”on” or ”off”. Confi rm with .
5. Save by pressing down for longer than
3 seconds.
How to set the time, date and sound.
State the following Apoteket item
number when you order:
GlucoMen® LX Sensor, 50 Test Strips
Apoteket item no. 22 01 84
GlucoMen
®
Lancets Fine, 200 Lancets
Apoteket item no. 20 47 15
Glucoject
®
Dual Lancing Device, 1
Apoteket item no. 20 47 11
Error codes.
E-0
Software error. Call customer support 040-32 12 70.
E-1
System error with hardware. Call customer support 040-32 12 70.
E-2
Wrong usage temperature. Temperature is outside the limits
(5°C–45°C). Let the meter and the test strips warm up or
cool off.
E-3
Wrong or previously used test strip. Take a new test strip.
E-4
Blood test error. Incorrect test. Take a new test strip.
E-xx
Other fi gure than above. Call customer support 040-32 12 70.
0:00
The battery has been changed. Set the time and date.
Customer support 040-32 12 70 or [email protected]
Time
Date
Left button
On/off-button
Right button
How to get the meter results from the memory.
1. Start the meter with the -button and the latest
meter result is shown in the display.
2. Press to scroll back in time (max 400 values).
Press to go forward.
3. Average value; turn on the meter with the -button.
Press again and the meter shows the day’s
average. Continue to press to show the latest
7, 14 and 30-day averages.
4. Keep pressed down longer than 3 seconds in
order to turn off the meter.
Page 2

1. Unscrew the top of the device and push in a new
lancet as far as it will go.
2. Twist off the needle’s plastic protective cover and
screw the top back on again.
3. Set the desired penetration depth 0–6 (0 is the
shallowest and 6 is the deepest) and adjust the
force level (three settings) to adapt the penetration
to your skin type.
4. Grasp the back section of the lancing device and
pull it out until you hear a click. Now the device
is loaded.
5. Press the top against your fi nger and press
the trigger.
6. Remove the lancet after the test and throw it in
a container for sharp objects. Do not reuse
the lancet.
Tip! Before you pull out the lancet, put the needle
in the four-sided piece of plastic that previously pro tected the needle so you don’t risk hurting yourself.
Puncture
depth
Force adjustment
Painless testing.
Your new lancing device is equipped with the unique
and ingenious Comfort Zone-technology: eight small
points in a circle, which block the brain’s sensory
perception so that the testing is practically painless.
The fact that you, in addition, can adjust the force
means that you don’t have to penetrate so deeply
to get the right amount of blood.
A shallow penetration is felt considerably less than
a deep one. So try to get a shallow penetration depth
and increase the force instead.
Trigger
How to use the lancing device.
1.
2.
6.
4.
Quick Guide to GlucoMen LX
Customer support 040-32 12 70 or [email protected]
CLICK!
Page 3
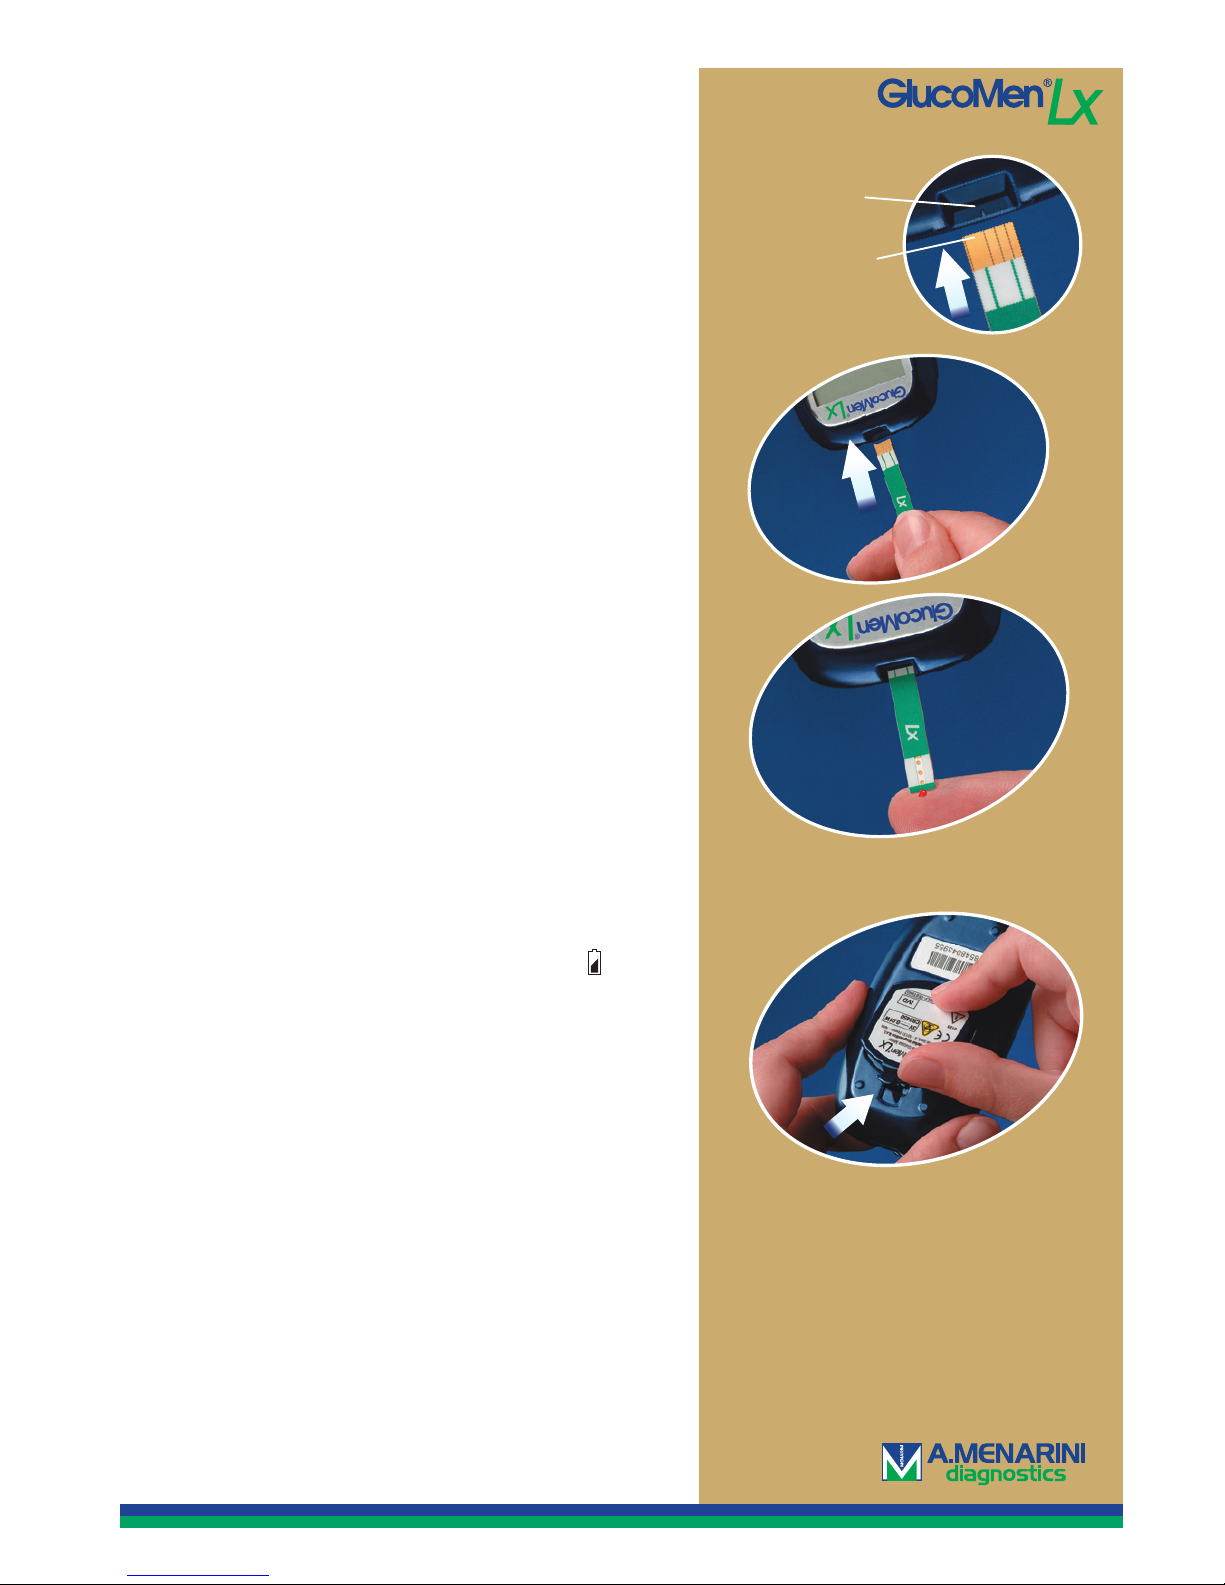
How to perform a test.
1. Wash your hands with soap and water.
2. Take a test strip from the vial and immediately
put the lid back on.
3. Put the gold-coloured contact area of the strip in
the test strip port of the meter.
No coding required!
4. The meter shows a blinking blood drop and is now
ready to perform a measurement.
5. Lance yourself in the fi nger, or at an alternative site
area with the lancing device (see the manual).
6. Set the blood drop against the short end of the test
strip, which automatically will draw up the right
amount of blood. The meter counts down and
the result is obtained in 4 seconds. If the test strip
does not get enough blood, the measuring will
not start.
7. When you have read your blood glucose value, take
out the test strip and discard it. The meter shuts off
automatically.
3.
6.
Test strip port
Contact area
Quick Guide to GlucoMen LX
Customer support 040-32 12 70 or [email protected]
Changing the battery.
GlucoMen® LX is powered by one CR2450 battery.
When battery strength is low, the meter shows in
the upper right-hand corner and a blood drop in the
lower left corner. You then have power for approximately 20 additional measurements. The battery symbol
will remain until you have changed the battery.
Contact our customer support at tel. 040-32 12 70, and
we will send you a new battery free of charge.
1. Open the battery cover on the back of the meter
by pressing down with your nail.
2. Pull the plastic strip so that the battery comes out
3. Put in a new battery with the ”+” symbol facing up
and put the cover back on.
4. Set the time and date. (See page 1.)
 Loading...