

GlucoMan Areo User Manual
1
ENGLISH
User manual
Thank you for choosing the GlucoMen® areo meter.
We have designed this compact blood glucose meter for faster and
easier testing of your blood glucose and we hope it will be of great
help in the management of your diabetes. This manual explains how to
use your new meter. Before testing, carefully read through this manual
and the package inserts that come with it: GlucoMen® areo Sensor and
GlucoMen® areo Control. Pay particular attention to listed warnings and
cautions. Please keep this manual handy for future reference. If you have
any questions, please contact A. Menarini Diagnostics for assistance
(references at the end of this manual).
1. Intended use
Your GlucoMen® areo meter and GlucoMen® areo Sensor are in vitro
diagnostic medical devices to quantitatively measure the glucose level in
fresh capillary whole blood. They are intended for self testing to monitor
and control blood glucose levels by people with diabetes mellitus; they
can also be used in a clinical setting by healthcare professionals. They
are not intended for diagnosis or screening of diabetes or for neonatal
use. Do not alter your treatment on the basis of test results of this meter
without previously consulting your doctor or healthcare professional.
● Blood glucose
monitoring system
2. System overview
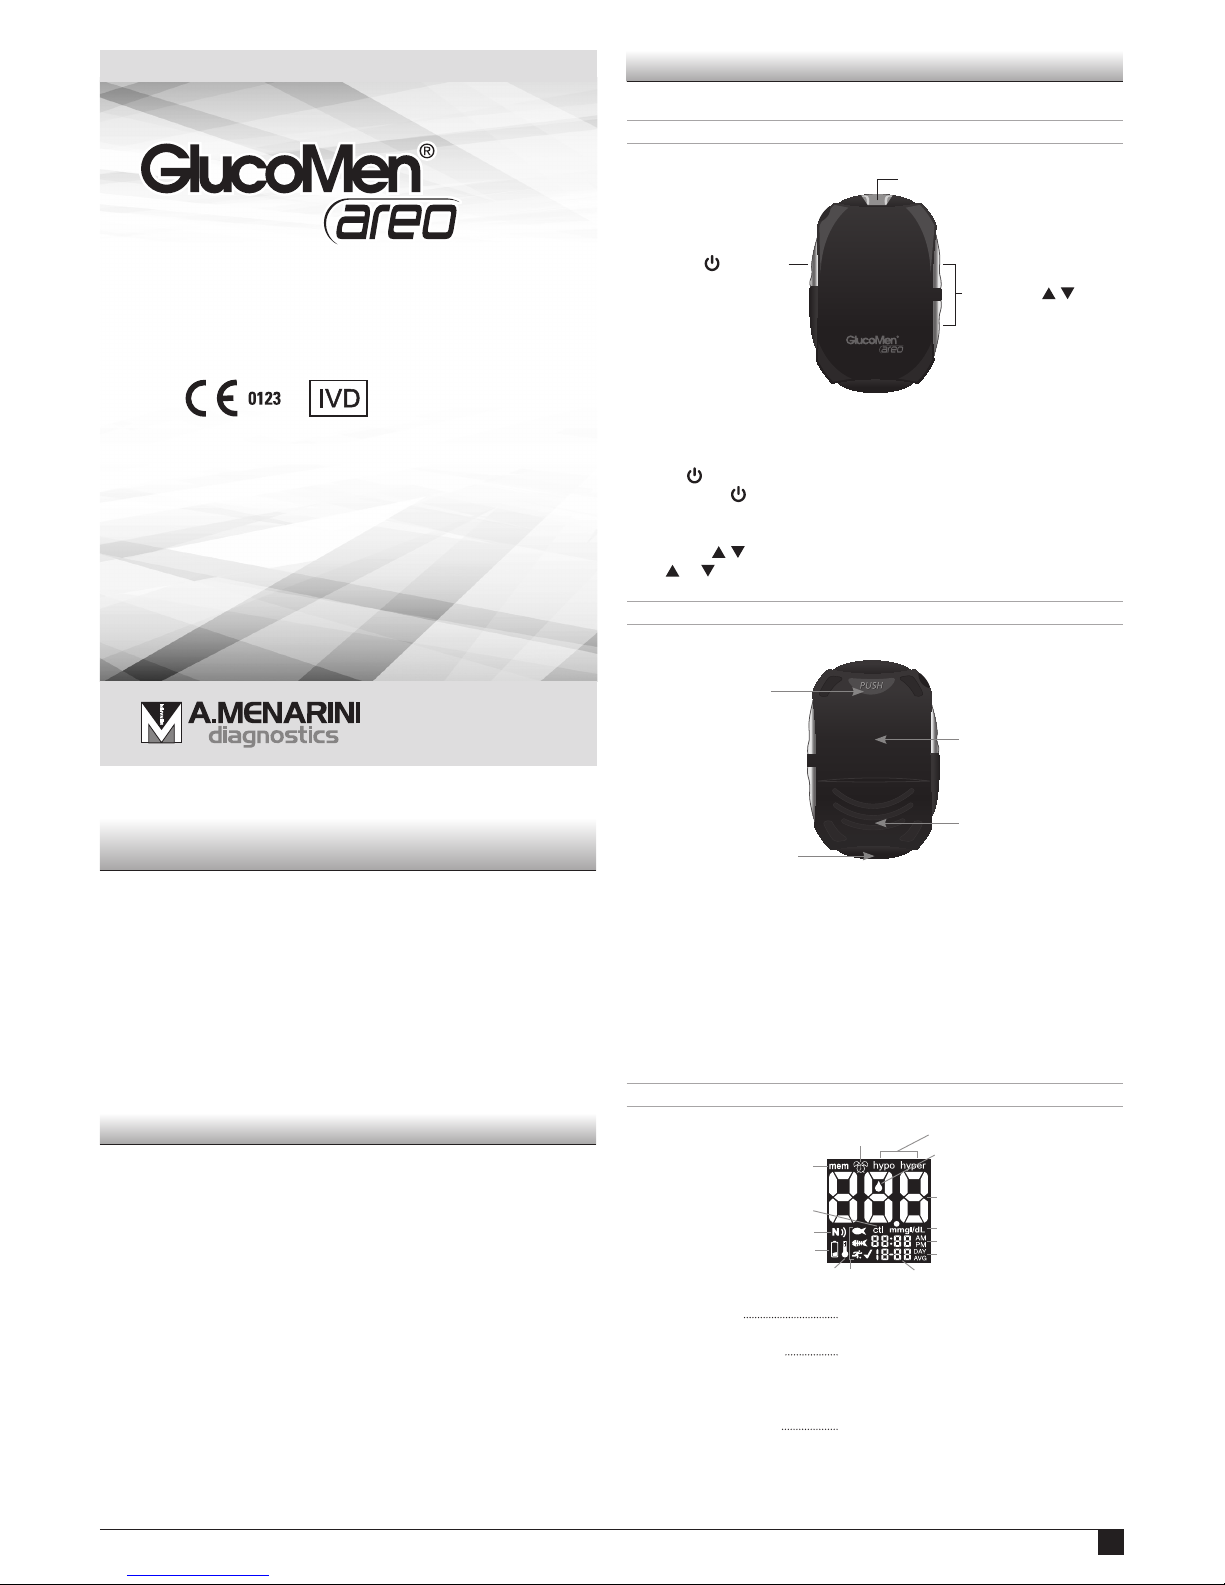
2.1 Meter
FRONT
TEST STRIP PORT
UP/DOWN (
/ )
BUTTONS
ENTER (
) BUTTON
TEST STRIP PORT
Test strip should be inserted here.
ENTER ( ) BUTTON
Press and hold for 2 seconds to access meter memory (§5.1) or longer
(4 seconds) to enter setup mode while not testing (§6).
UP/DOWN ( / ) BUTTONS
Press or to scroll through different options and/or values.
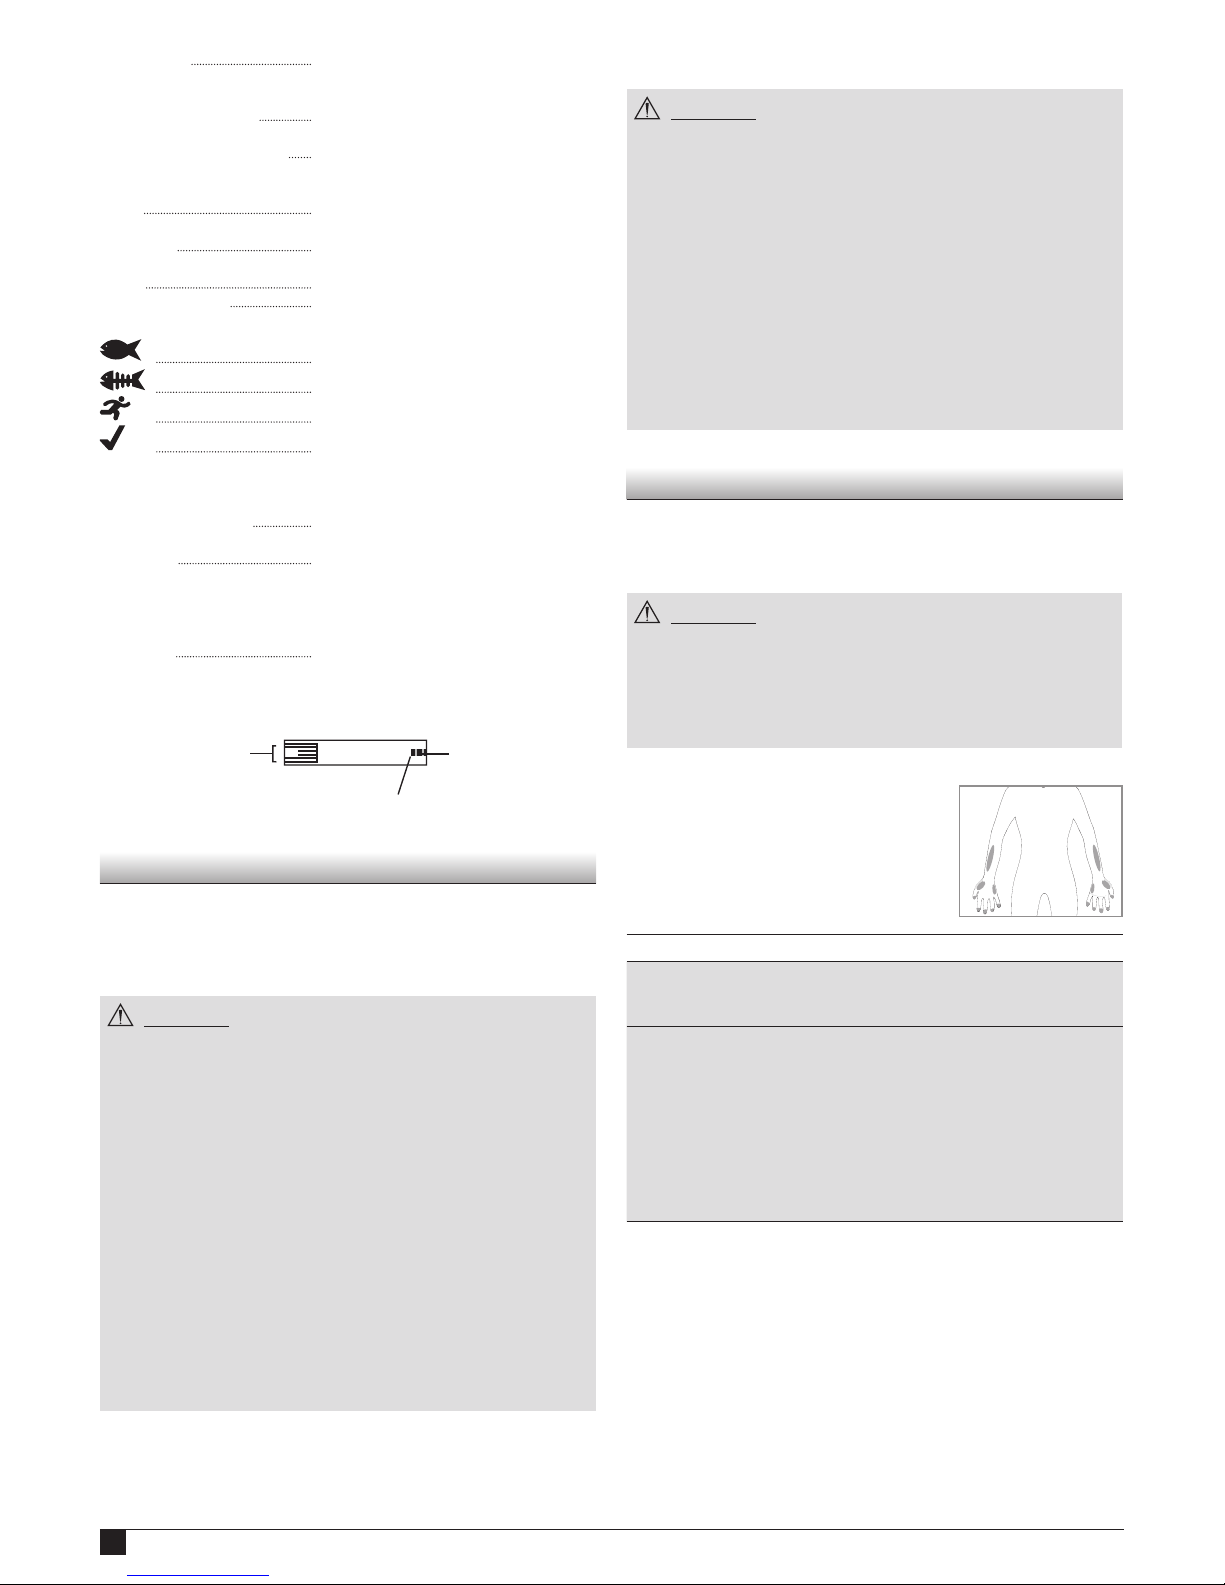
BACK
BATTERY HOLDER
NFC ANTENNA
DATA TRANSFER PORT
RELEASE BUTTON
RELEASE BUTTON
Press this button to remove used test strip.
BATTERY HOLDER
Houses two CR2032 3V lithium coin cell batteries.
DATA TRANSFER PORT
Connection port for PC data cable and Bluetooth device from A. Menarini
Diagnostics.
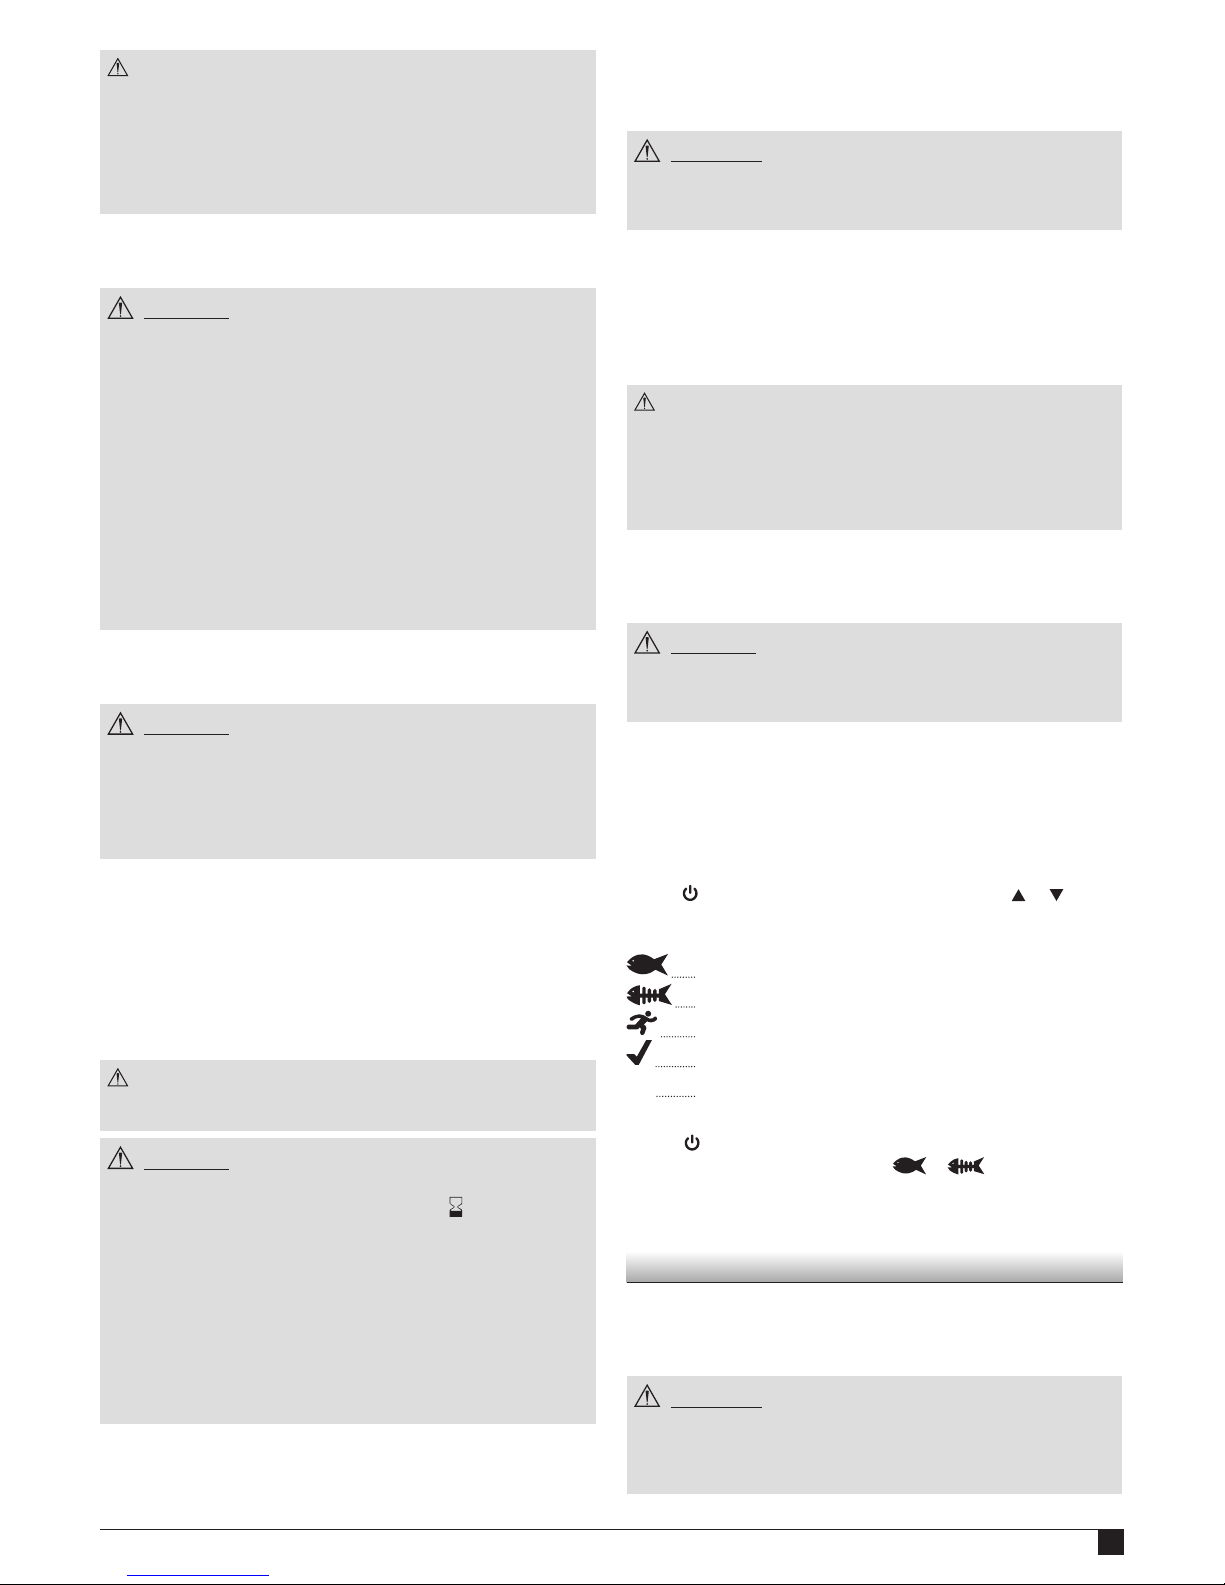
METER SCREEN
CLOCK/ALARM ICON
HYPO/HYPER ICONS
DROP ICON
MAIN DISPLAY AREA
UNIT OF MEASUREMENT
TIME
AVERAGE
DAT EMARKERS
ICONS
WRONG TEMPERATURE ICON
MEMORY ICON
CTL ICON
NFC ICON
LOW BATTERY ICON
MEMORY ICON: indicates that you are using the memory
(§5).
CLOCK/ALARM ICON: “clock” appears while setting the time
(§6.1); “alarm” appears while setting the
acoustic reminder(s), and will be displayed if any alarm is on (§6.2).
HYPO/HYPER ICONS: appear while setting the hypoglycaemic
and hyperglycaemic thresholds and if
your test results are below or above these
values (§6.4).
2
DROP ICON: blinks to indicate that the meter is ready
for blood or control solution testing (§4.2,
4.3).
MAIN DISPLAY AREA: displays test results, stored test values,
result averages and messages.
UNIT OF MEASUREMENT: shows the unit of measurement of your
blood glucose meter (mg/dL or mmol/L,
not changeable).
TIME: shows time (HH:MM 12H am/pm or 24H
format)
AVERAGE: shows the period related to the displayed
average (1, 7, 14, 30, 60 or 90 days – §5.2)
DAT E: shows the date (DD-MM format)
MARKERS ICONS: displayed while marking a test result
(§4.4) or reviewing a marked result.
Before meal marker
After meal marker
Exercise marker
Check marker
WRONG TEMPERATURE ICON:
appears while testing outside the allowed
temperature range.
LOW BATTERY ICON: appears when the battery needs to be
replaced (§7.3).
NFC ICON: displayed while setting the NFC (Near
Field Communication) function (§6.5)
and when this function is enabled;
blinks while data are transmitted via NFC
(§5.3.1)
CTL ICON: indicates a control solution test (§4.3).
2.2 TEST STRIP
APPLY BLOOD/CTRL
SOLUTION DROP HERE
CHECK WINDOW
INSERT THIS END INTO
THE METER
3. Before Testing
3.1 Caution when using the Meter
Time and date are pre-set in the meter. Please make sure that time and
date settings are correct before first use, and adjust them if needed.
Always check the settings after changing the battery (§7.3).
CAUTION
● For accurate test results, allow the meter to adjust to its surroundings
for 15 to 20 minutes before testing your blood glucose levels:
- temperature: 5 to 45°C (41 to 113°F);
- humidity: 20 to 90% RH (Relative Humidity).
● Do not store or use the meter where:
- there are sharp temperature fluctuations;
- humidity is high and causes condensation (bathrooms, drying
rooms, kitchen, etc.);
- there is a strong electromagnetic field (close to a microwave oven,
cell phone, etc.).
● Do not use the meter after if it has been dropped in a liquid or
liquids have entered inside, even if dried afterwards.
● Avoid hand contact with test strip port on the meter. A thermo
sensor is housed inside the meter to minimize any errors.
● Do not connect the data cable to the data transfer port during
testing. The meter may be damaged, leading to inaccurate test
results.
● Do not apply blood directly to the test strip port on the meter.
● Do not share your meter with anyone else to avoid the risk of
infection.
3.2 Caution when using the Test Strips
CAUTION
● For testing with GlucoMen® areo meter use GlucoMen® areo Sensor
only. Do not use other test strips, it causes inaccurate test results.
● Do not use test strips after their expiry date. The expiry date is
written on the test strip vial next to symbol.
For accurate test results, allow the test strips to adjust to the their
surroundings for at least 30 minutes before testing your blood
glucose levels:
- temperature: 5 to 45°C (41 to 113°F);
- humidity: 20 to 90% RH.
● Do not use the test strips if 6 months or more have passed since first
opening the vial.
● The test strips are for single-use only. Do not use test strips that
have already absorbed blood or control solution.
● Keep all unused test strips in the original vial and after having
removed one, immediately close the cap tightly to preserve their
quality. Do not transfer them into any other container.
4. Measuring your blood glucose levels
4.1 Blood sampling
For information on how to use the lancing device, read the relevant
instructions for use.
CAUTION
● Wash the puncture site with soap and water and dry the site
thoroughly before sampling blood.
● Do not share the same lancet or lancing device with anyone else to
avoid the risk of infection.
● Always use a new lancet. Lancets are for single-use only. Do not
reuse a lancet that has already been used.
4.1.1 Alternative site testing (AST)
This meter can test the glucose levels of
blood from your fingertip, palm and forearm.
However, test results from sites other than
the fingertip may differ from fingertip
measurements. Consult your doctor or
healthcare professional before testing blood
from the palm or forearm.
Use blood from: If you are going to test:
Fingertip, palm,
forearm
• Before meals
• Two hours or more after meals
• Two hours or more after exercise
Fingertip • When there is the possibility of your blood glu-
cose levels changing rapidly (e.g. after meals or
exercise)
• When experiencing symptoms of hypoglycaemia such as perspiration, cold sweats, a floating
sensation or trembling
• When immediate testing is needed for suspected hypoglycaemia
• When in poor physical condition, such as with a
head cold, etc.
4.2 Testing your Blood Glucose
1. Insert a new test strip into the test strip port. The drop icon starts
blinking on the screen. If nothing appears on the screen, remove the
test strip, insert it into the test strip port again and wait for the drop
icon to start blinking.
2. Apply the blood of drop to the tip of the test strip until the check
window is full. A beeper sounds (if enabled) and a countdown timer
starts on the screen.
3
NOTE
● For accurate test results, apply the drop of blood to the tip of the
test strip within 20 seconds after puncturing.
● Do not test blood that runs or spreads out from the puncture site.
● Do not smear blood onto the test strip.
● Do not forcefully press the test strip into your puncture site.
● Do not touch the test strip once the meter has started the
countdown.
3. Read your test result. You will hear a beep when the test result
appears on the screen.
CAUTION
● If “LO” or “HI” appears on the screen:
Repeat the test. If “LO” or “HI” still appears, contact your doctor or
healthcare professional. “LO” appears if your test result is less than
1.1 mmol/L “HI” appears if your test result is more than 33.3 mmol/L.
● The “hypo” or “hyper” icons may appear depending on the threshold
limit you have set (§6.4).
● If test results do not match how you feel:
Make sure you have performed the test correctly as explained
in §4.2. Then, conduct a control test to check that the system is
working properly (§4.3). Repeat the test using a blood sample taken
from a fingertip (do not use an alternative site). If the test result still
does not match how you feel, contact your doctor or healthcare
professional.
● Do not ignore test results. Do not alter your blood glucose
management or treatment without first consulting your doctor or
healthcare professional.
4. Press the release button to remove the test strip. The meter will
switch off.
CAUTION
● When ejecting the used test strip, point your meter downwards and
away from others.
● Disposal of Biohazardous Waste
Used test strips and lancets are biohazardous waste. They
must therefore be disposed according to local regulations on
biohazardous waste.
4.3 Control Test
Conduct a control test if:
● you suspect the meter or test strips are not working properly;
● the meter has been dropped;
● the meter is damaged;
● your test results do not match how you feel;
● you want to check the performance of the meter and test strips when
you first get them or any time you want to check their performance
before a blood glucose test.
NOTE
To test your meter and test strips only ever use the GlucoMen® areo
Control (provided separately).
CAUTION
● Do not use control solutions after their expiry date. The expiry date
is indicated on the control solution vial next to symbol.
● For accurate test results, allow the control solution to adjust to its
surroundings for at least 30 minutes before running the control
test:
- temperature: 5 to 45°C (41 to 113°F);
- humidity: 20 to 90% RH.
● Do not use the control solutions if 3 months or more have passed
since first opening the vial.
● Do not drink the control solution. It is not intended for human
consumption.
● Avoid contact of the solution with the skin and the eyes as this
could cause inflammation.
To perform a control solution test, proceed as follows:
1. Insert a new test strip into the test strip port. The drop icon starts
blinking on the screen. If nothing appears on the screen, remove the
test strip, insert it into the test strip port again and wait for the drop
icon to start blinking.
2. Select the ctl test icon (§2.1).
WARNING
● If the ctl icon has not been selected before performing the
control solution test, the result will be stored as a blood test
and used for calculating averages.
3. Gently shake the control solution vial before testing. Discard a drop
before use. Squeeze a drop of control solution onto a clean, hard, dry
surface.
4. Touch the control solution drop with the tip of the test strip until
the check window is full. A beeper will sound (if enabled) as the
countdown timer starts on the screen.
NOTE
● The test will not start if you apply your control solution directly
to the check window. The test starts when the meter detects the
control solution. During the test the meter counts down from 5 to 1.
● Tightly close the control solution vial.
● Do not touch the test strip once the meter has started the
countdown.
5. Check that your test result is within the acceptable range indicated
on the label of the test strip vial. If out of range, repeat the control
solution test.
CAUTION
● If you still have test results that fall outside the acceptable range,
stop using the system, and contact the A. Menarini Diagnostics
customer service.
6. Press the release button to remove the test strip. The meter will
switch off.
4.4 Marking Test Results
After a blood (not control) glucose test is performed with a valid result,
you can mark the result as follows:
1. Start from point 3 of the glucose testing procedure (result displayed
on the screen, §4.2)
Press until the markers icons start blinking. Press or to scroll
through the icons (backwards or forwards) according to the following
sequence:
Before meal marker
After meal marker
Exercise marker
Check marker (General Purpose marker).
Void (Once confirmed it deselects any previously selected
marker).
2. Press to confirm the marker you selected. You can select more
markers (but only one when setting or ) by repeating steps
1 & 2.
3. Return to point 4 of the glucose testing procedure (§4.2).
5. Managing your Test Results
5.1. Reviewing past results
You can review past results stored in the memory. Your meter stores up
to 730 test results with dates, times and markers.
WARNING
Please make sure that the time and date are correct before the first
use, and adjust them if needed (§6.1). If the time and date settings
are not correct the meter will memorize the test results in the wrong
order.
 Loading...