

gluco-comfort BGM 105, BGM 205 Operating Manual

gluco-comfort
Blood glucose measuring systems
BGM 105 / BGM 205
Operating manual
Issued in 11/2006 REF: 590107

3
Contents:
1 Introduction 7
2 How to start up your gluco-comfort
blood glucose meter 11
2.1 Inserting/exchanging batteries 11
2.2 Switching on 13
2.3 Configuring the device 13
2.4 Setting the date and time 15
2.5 Setting the unit of measurement 17
2.6 Configuring the measured value
memory 18
2.7 Resetting the wireless connection 21
2.8 Clearing the measured value memory 23
3 Carrying out the blood glucose
measurement 24
3.1 Coding your meter 24
3.2 Preparing the measurement 25
3.3 Getting a drop of blood for the blood
glucose measurement 28
3.4 Carrying out the blood glucose
measurement 31
3.5 Use by multiple persons 35
4 Measured value memory 36
4.1 Storing the measured values 36
4.2 Calling the stored measured values 36
5 Function checks and caring for the
gluco-comfort blood glucose meter 39
5.1 Function control of the display 39
5.2 Reasons for a function check with
control solution 39
5.3
Carrying out the control measurement
39
5.4 Evaluating the control measurement 41
5.5 Maintaining and cleaning the device 42
5.6 Storage 42
5.7 Disposing of the meter 42
6 Error messages/causes of error
and measures to take 43
7 Technical dat a
49
8
Manufacturer warranty and guarantee
51
9 Symbols and abbreviations 52
4 5
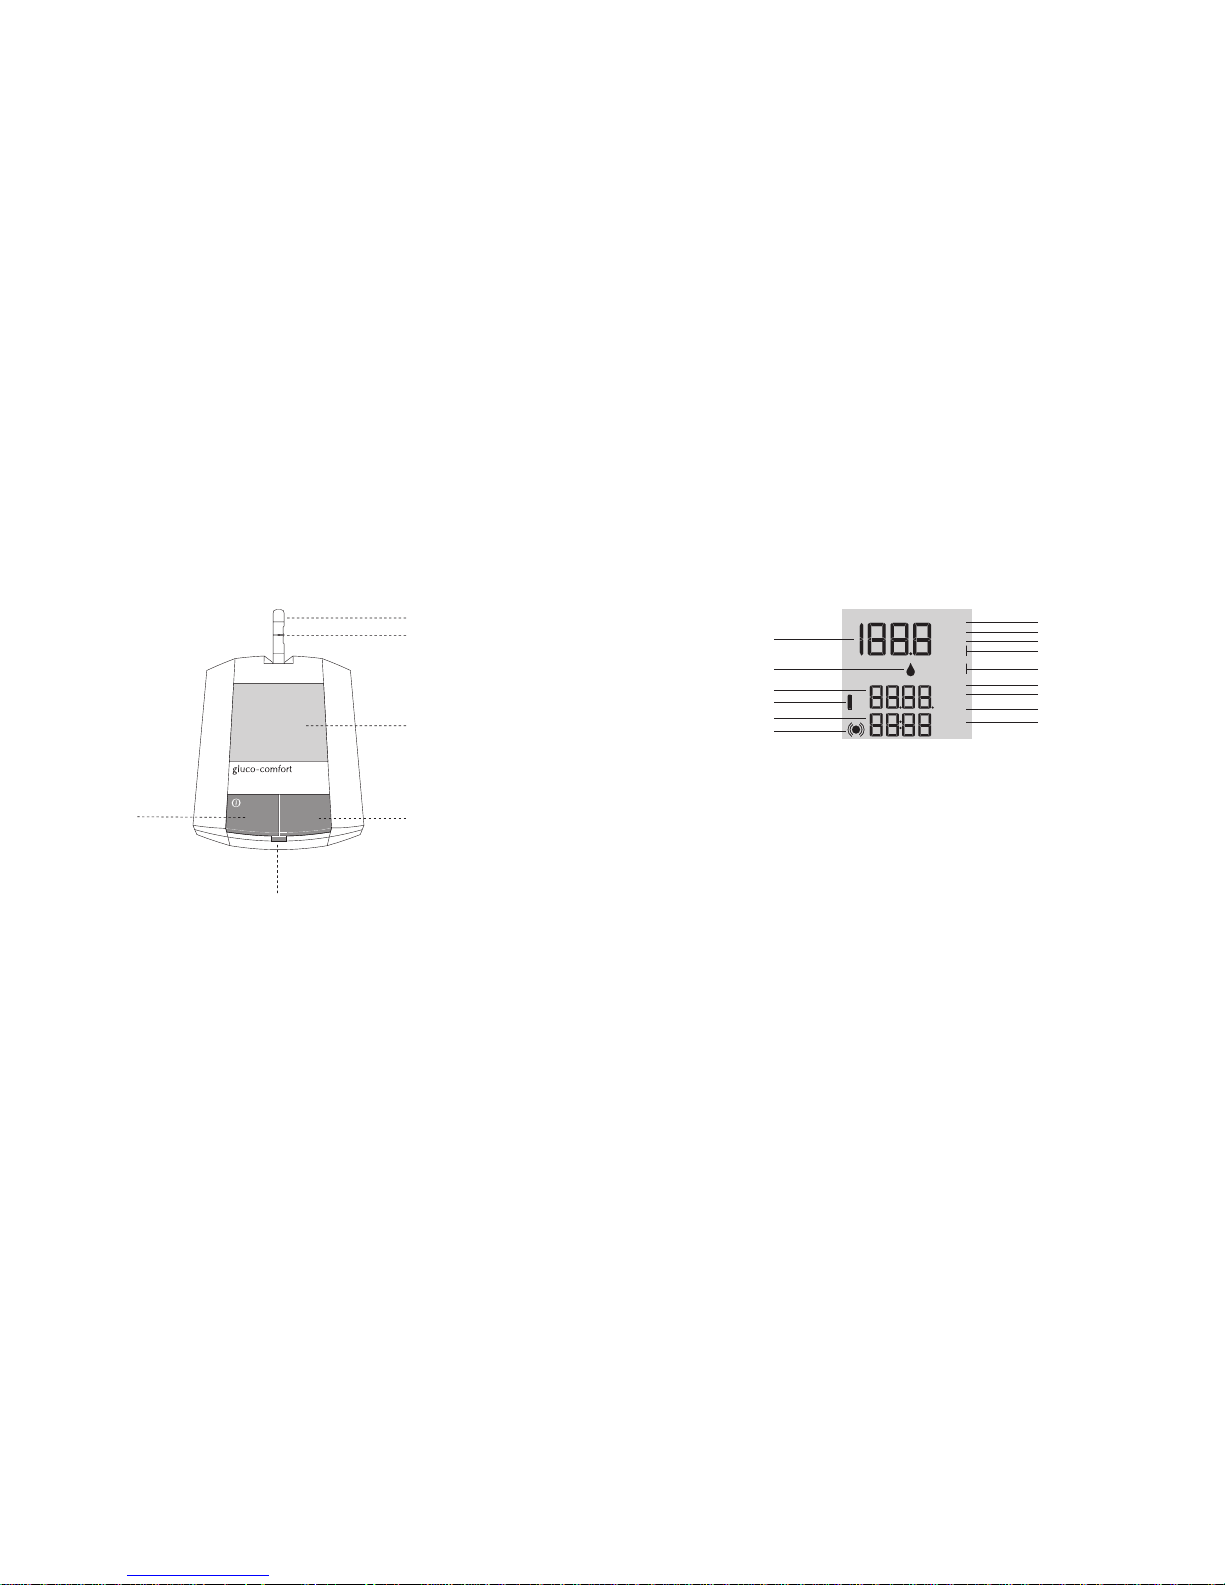
Test strip
Display
Memory button:
1. Switch on device
(memory mode)
2. Selection button
(lower to higher value)
3. Select user
Set button
1. Switch on device (setting mode)
2. Selection button (next field)
3. Switch off device after the last
field has been set
On/Off button
1. Switch on device
(measuring mode)
2. Switch off device
3. Confirm user selection
Control elements
Sample capillary
1 Number field for: blood glucose mea surement,
user no., year and code no.
2 “Blood drop” symbol: Pro mpt to apply blood to
the measuring field of the test s trip
3 Number field for date
4 Battery symbol
− constant: weak batter y
− blinking: dead battery
5 Number field for
− Year
− Time
− User activated / not activated
− Wireless connection activate d / not activated
6 Symbol for active wireless connection (BGM 105)
7 Code no. indication when code chip inserted
day
av
g
ctl
mem�
low
hig
h
mg/dL
mmol/
L
user
error
code
8 Error indication = error code
9 User no. indication
10 Indication of the set unit of measure ment
(to be set in set mode)
11 Indication whether measure d value too “high”
or too “low”
12 Indication of stored measure ment
(= ”memory function”)
13 Indication of control solution measurement
(is not stored)
14 Days, e.g. 7, 14, 21, 28, from which the average
blood glucose values are to be calculated
15 Indication of average measurements
for 7, 14, 21, 28 days
1
2
3
4
5
6
7
8
9
10
11
12
13
14
15
Display elements
mem
biocomfort

6 7
1 Introduction
Dear User,
We are pleased that you have decided in
favour of the Biocomfort blood glucose
measuring system. It will be a reliable aid
for you in checking your blood glucose
values. The meter is easy to operate.
You can transfer the results to your PC
for further evaluation (model variant
BGM 105).
The Biocomfort blood glucose measuring
system is an in-vitro diagnostic device for the
quantitative blood glucose measurement in
capillary blood. It is meant for your personal
use at home, and therefore support you with
your diabetes therapy.
Safety information:
This operating manual contains important
information for you.
It is mandatory that the safety measures
mentioned in this operating manual be
taken.
The Biocomfor t blood glucose measure
-
ment system may only be used in the man
-
ner described in this operating manual.
Please read the operating manual carefully
before using the device for the first time.
It is recommended that you take a practice
measurement. Keep your meter ready next
to you. Carry out ever y step immediately
after you have read it in the instructions.
All control elements and displays are
exactly explained. Keep the operating
manual in a safe place for future reference.
We recommend that you also instruct
other people in how to operate the
measuring system, in case you should
some day require help.
Introduction
1

8 9
and GCS305 are available separately as accessories.
Due to the wireless module in the gluco-com
-
fort blood glucose meter BGM105, the use
of this device in certain secure areas, such as
intensive care stations or in airplanes, is not
allowed.
The original packaging of the gluco-comfort
blood glucose system with the wireless mod
-
ule contains the following main components:
1. gluco-comfort meter BGM 105
2. gluco-comfort test strips BGS105
3. gluco-comfort control solution GCS105
4. gluco-comfort lancing device LDV105
5. gluco-comfort lancets LCE105
The original packaging of the gluco-comfort
blood glucose system without the wireless
module contains the following main compo
-
nents:
1. gluco-comfort meter BGM 205
2. gluco-comfort test strips BGS105
3. gluco-comfort control solution GCS105
4. gluco-comfort lancing device LDV205
5. gluco-comfort lancets LCE105
In addition, further components are included:
– Battery
– Meter operating manual
– Package insert for test strips
– Package insert for control solution
– User instructions for the lancing device
– Meter short instructions
– Bag
Additional important information concern
-
ing the test strips:
Please observe the separate user instructions
for the test strips.
– The test strips could be damaged by effects
of temperature and light. For this reason,
they should be used immediately after
being removed from the test strip con
-
tainer.
– The test strips may not be used past the
expiration date. The test strips can be used
four months after the container has been
opened. When you open the container for
the first time, write down the date on the
container.
– Close the container carefully after remov
-
ing the test strip. Always leave the contain
-
er closed and keep it in a cool, dry place.
You can check your momentary blood
glucose level with high precision with the
Biocomfort blood glucose measuring system.
Only your doctor can determine whether
your blood glucose levels are an indication
of a diabetic illness requiring treatment,
however.
The Biocomfort blood glucose measuring
system includes many components, such as
test strips, the test strip container, batteries,
etc., which can be misplaced or can be
dangerous for children. For this reason, keep
your blood glucose measuring system out of
the reach of children. Also, make sure the
meter can’t be misused while in use.
If there are signs of damage or malfunctions,
the Biocomfort meter cannot be used.
Please use only the gluco-comfort test strips
BGS105 and gluco-comfort control solutions
GCS105, GCS205 or GCS305.
The gluco-comfort control solutions GCS205
Introduction
1
10 11
2.1 Inserting/exchanging batteries
The Biocomfort blood glucose meter is de
livered with a 3V lithium cell [type CR2032],
which must be inserted before taking the first
measurement.
If the battery symbol appears on the display,
this is an indication that the battery is already
weak and has to be exchanged soon. If the
battery symbol is blinking on the display, this
indicates that the battery must be exchanged.
A weak battery is to be exchanged so that er
ror-free measuring results can be guaranteed.
When the battery is exchanged, all settings
which have been made on the device are
retained, as well as the stored measurements.
Insert batter y
Important information regarding the
control solution:
Please observe the separate user instructions
for the control solution.
– Always shake the control solution well
before use.
– The control solution can be damaged if
exposed to heat. For this reason, you
should immediately seal the vial immedi
-
ately after use and keep it in a cool place.
– The control solution may not be used
past the expiration date. Once the vial
is opened, it can be used for 3 months.
When you open it for the first time,
write down the date on the vial.
Getting started
2
2 How to start up your
gluco-comfort blood glucose
meter
+
CR�2032
gluco-comfort
Modell:�BGM10
5
REF:�590020��SN:�0526002A
�
�IVD�zur�Eigenanwendung
zur�ausschließlichen�Verwendung�mit�
Teststreifen�REF�BGS105�
�
������������r.
F.:20%�-�85%�Batt.:�CR-2032�3V
Biocomfort�Diagnostics�GmbH�&�Co.�K
G
Bernhäuser�Straße�17
D�73765�Neuhausen�a.�d.�Fildern
biocomfort
0197
10
ºC
40
ºC
+
CR�2032

12 13
Attention:
For the sake of the environment: Used batter
-
ies belong in the hazardous waste!
2.2 Switching on
Switch on your blood glucose meter by press
ing the On/Off button.
Every time you turn it on, all display elements
appear for about two seconds as a function
test. Please make sure that the display
elements can really be seen completely, as
shown in the figure on page 5. A defective
display can show false values in later meas
-
urements.
Note:
– If no test strip is inserted into the meter or
if no button is pushed within 2 minutes,
the blood glucose meter switches off auto
-
matically.
– If a test strip is inserted without any blood
or control solution on the application field,
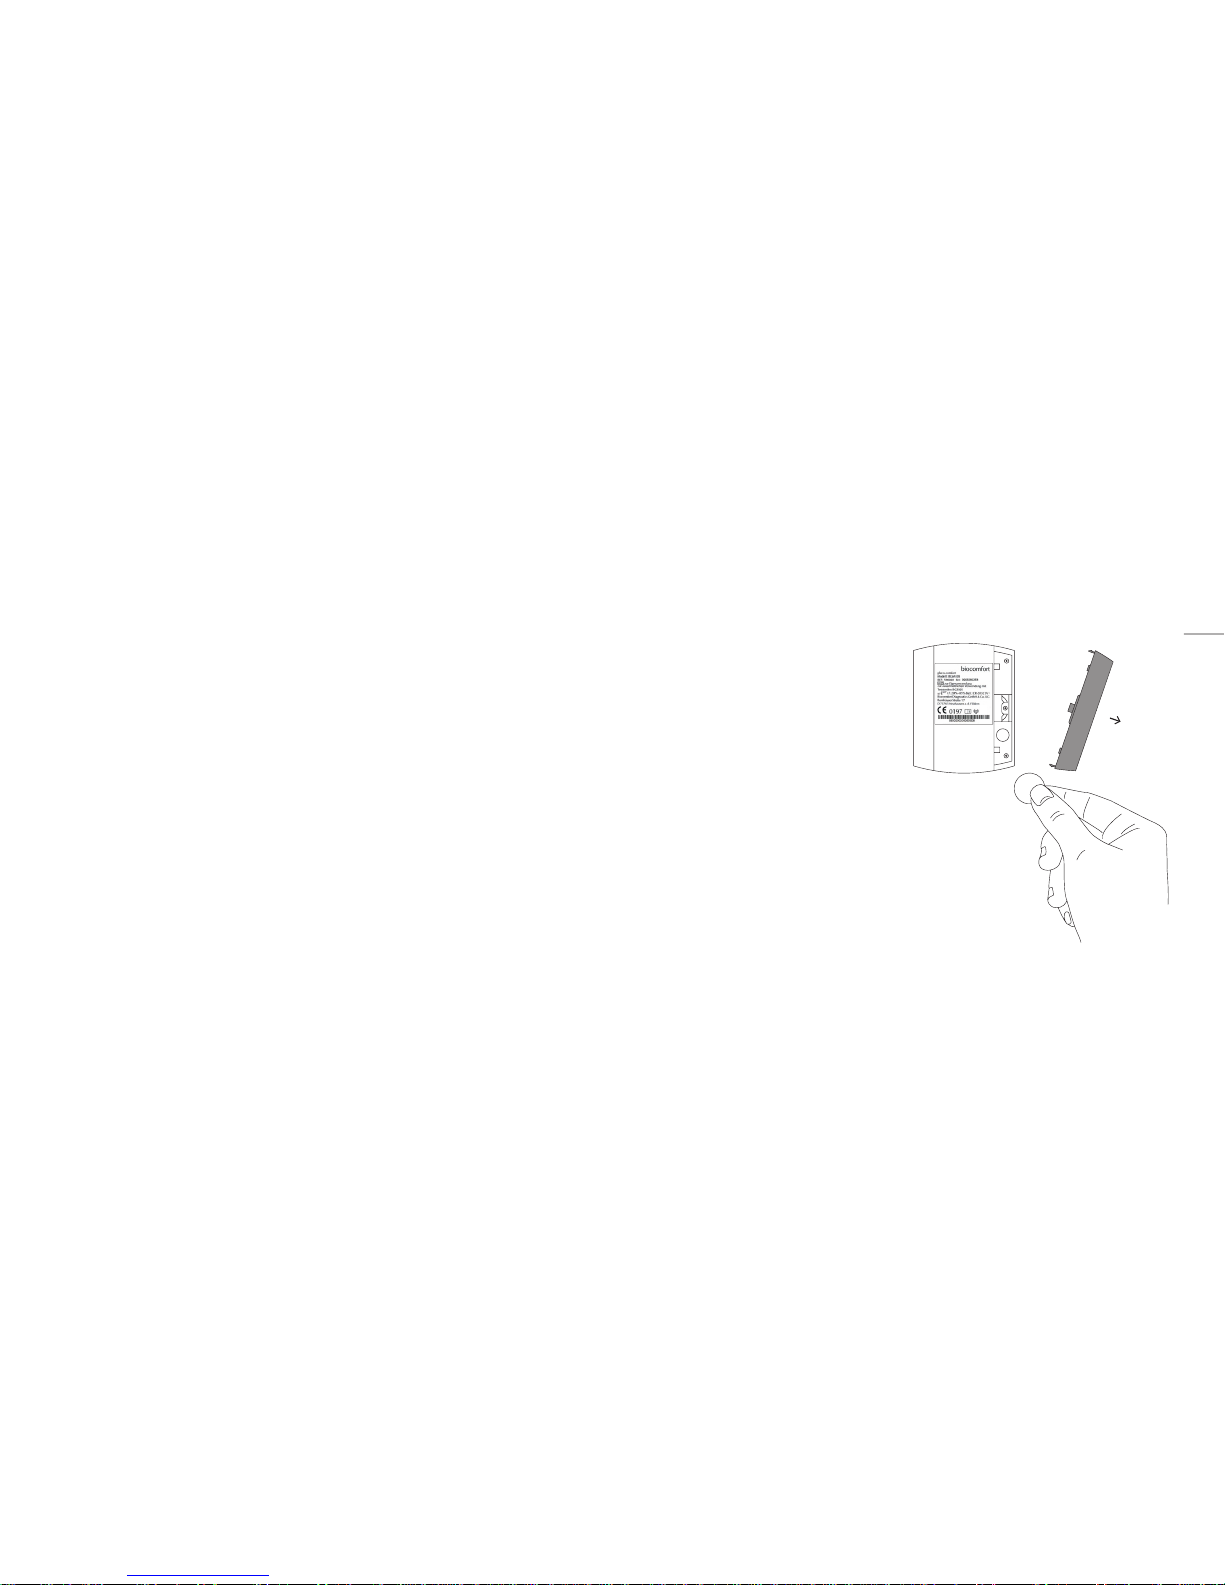
Please follow the following steps for
inserting/exchanging the battery:
Step 1:
Please always switch off the device before
exchanging the battery.
Step 2:
Pull the battery compartment cover (on the
back side of the device) in the direction of
the arrow and remove.
Step 3:
Remove any used battery.
Step 4:
Insert the 3V lithium cell with the writing
facing up.
Step 5:
Replace the battery compartment cover and
push it over the compartment until you hear
the cover click into place.
Step 6:
Afterwards, check whether the battery has been
correctly inserted by briefly pressing the On/Off
button. In this case, all elements of the display ap
-
pear for about two seconds as a function check.
Note:
– Please make sure that you always have a
replacement battery on hand.
– A new battery (3V lithium cell) has a life
time of about three months (BGM105) or
for around 800 measurements (BGM205).
– When the batteries are exchanged and
when the meter is stored without batter
ies, the contents of the measured value
memory are retained.
– When battery is removed, the internal
clock of the measuring device doesn’t
continue to run, so when the device is
used again after exchanging the batteries
or after storing the device without batter
ies, the date and time may have to be reset
(see Section 2.4).
the meter switches off automatically after
about six minutes.
2.3 Configuring the device
Before the blood glucose meter is used for
the first time or when adapting the meter to
your needs, you must make a few settings
in the settings menu. To do this, you will
press the SET, MEM and On/Off but tons,
as described in the following sections.
The SET button can be found underneath
the On/Off and MEM buttons. It is covered
by these two buttons to avoid pressing it by
mistake. It’s easiest to press the SET button
with a small, flat object (e.g. paperclip)
(see figure on page 14).
Getting started
2
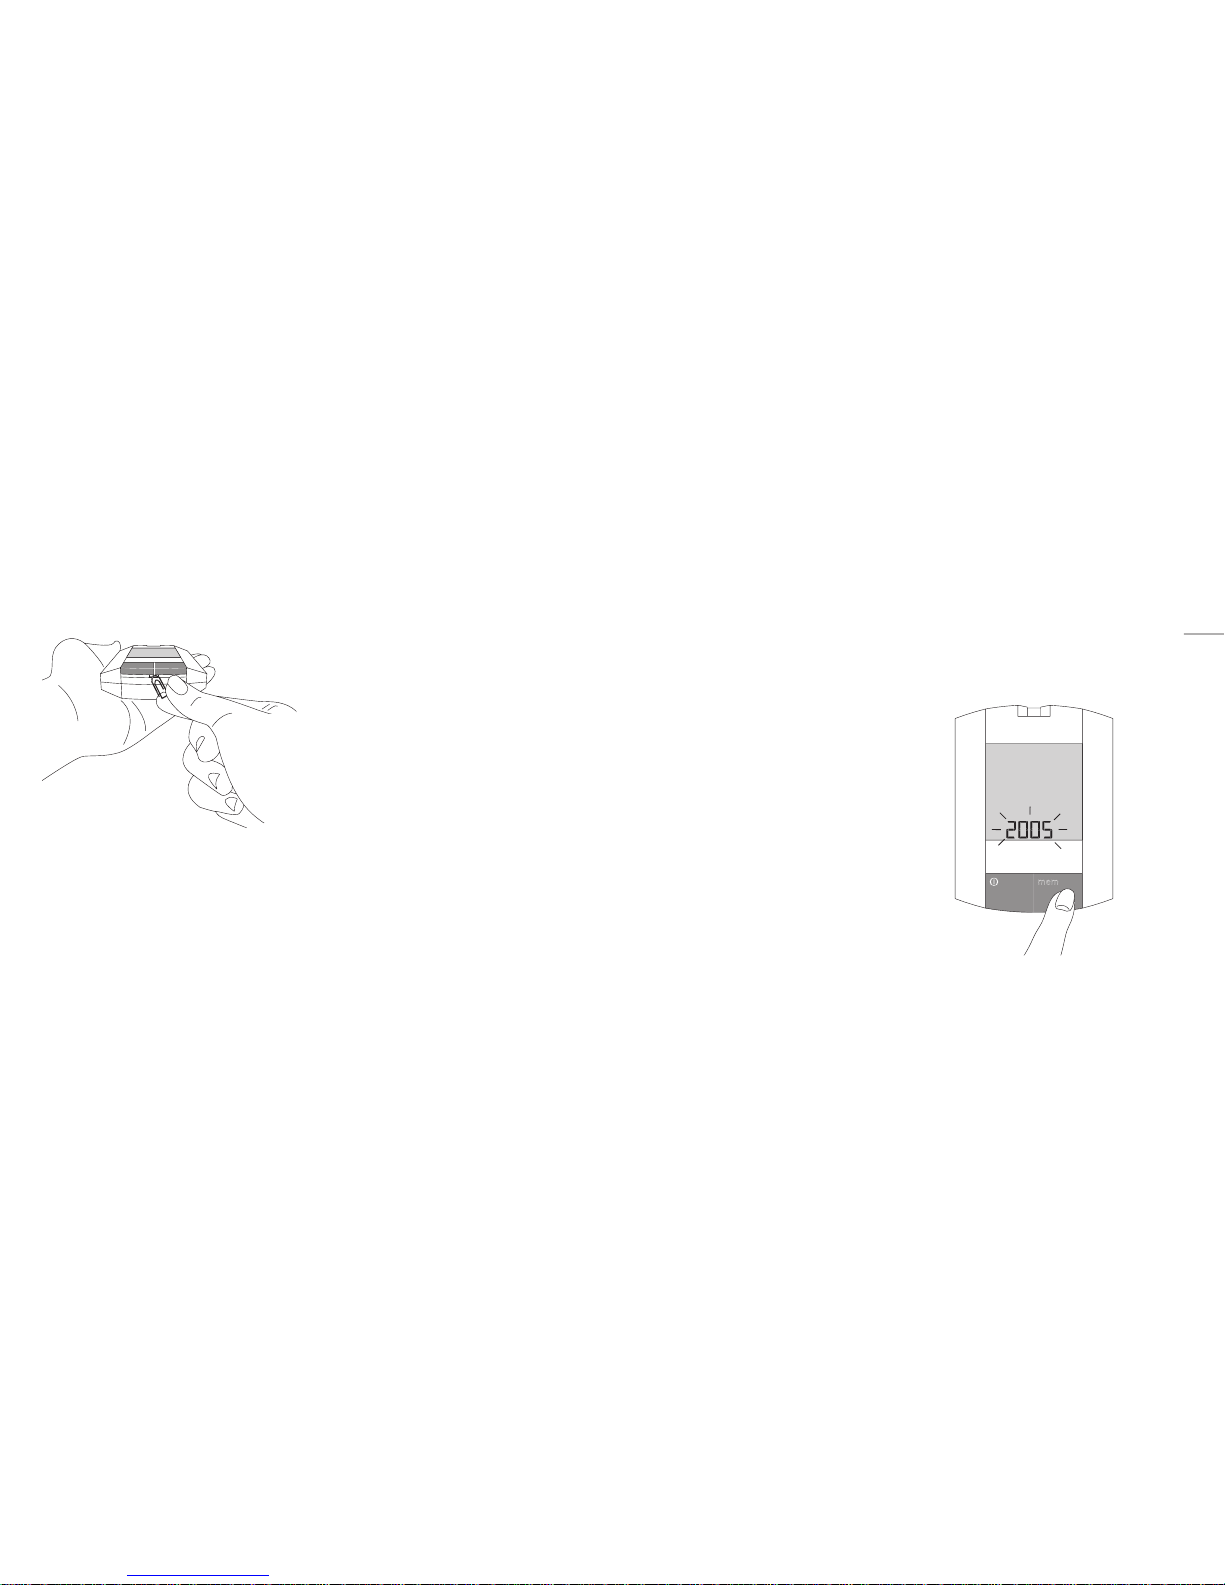
14 15
Step 2:
As soon as the year starts blinking on the
display, keep pressing the MEM button until
the correct year appears.
While you are in the settings menu, the
buttons have the following functions:
SET button:
If you press the SET button with the meter
switched off, you will get into the settings
menu. The year of the date is the first setting
which can be made. You can tell which
parameter can be set at any given time by its
blinking. If you press SET again, you proceed
to the next settable parameter.
MEM button:
By pressing the MEM button, you can change
the currently blinking parameter until it takes
on a value you desire. Now you can go to the
next parameter by pressing the SET button,
or you can exit the settings menu by pressing
the On/Off button.
Note:
If you keep the MEM button pressed, you can
change the active parameter faster.
Pressing the SET button
On/Off button:
By pressing the On/Off button, you exit the
settings menu and the set parameters are
saved.
2.4 Setting the date and time
Note:
The measured blood glucose values are
stored with the date and time. The correct
setting of the date and time makes it easier
for you to make a correct time allocation of
your measurements.
In order to set the correct date and time on
your measuring device, proceed as follows:
Step 1:
With the device switched off, first press
the SET button with a small, flat object
(e.g. paper clip).
gluco-comfort
biocomfort
mem
Getting started
2
16 17
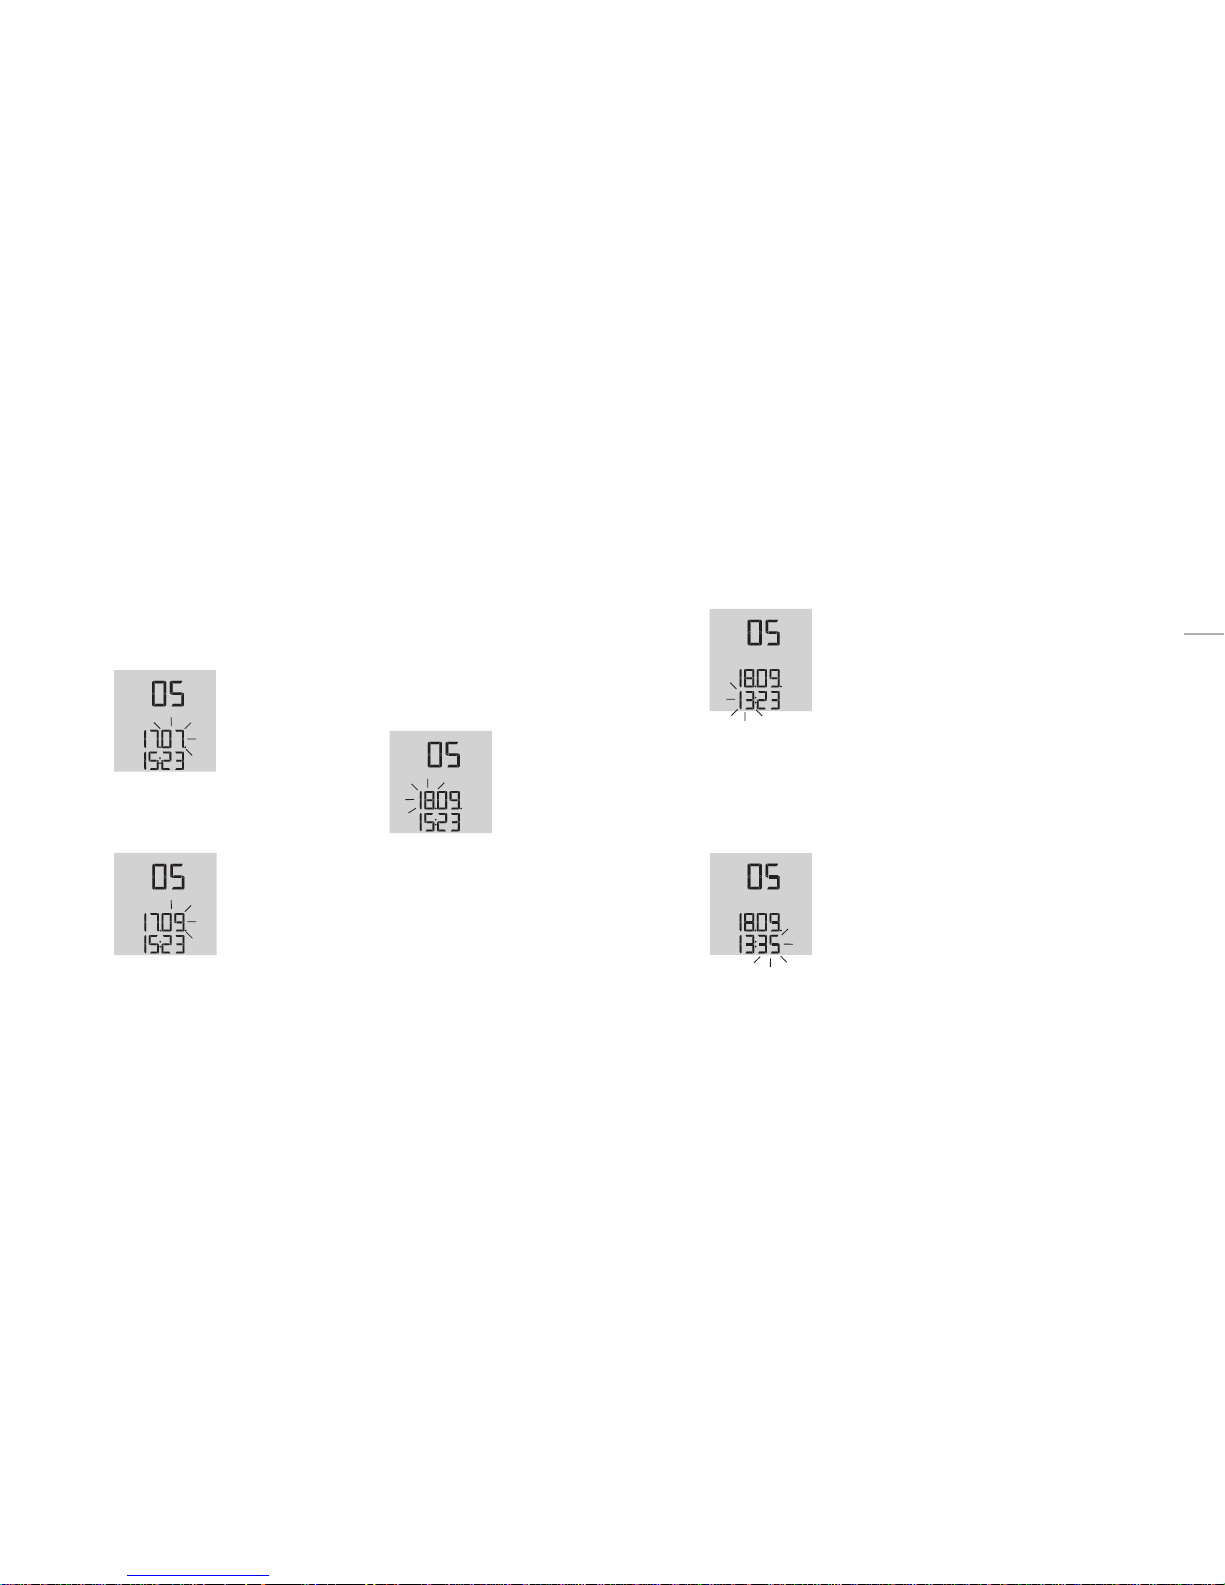
Step 3:
When you press the SET button again, you
activate the month display.
Step 4:
Keep pressing the MEM button until the cor
-
rect month is displayed.
Step 5:
By pressing the SET button again, you acti
-
vate the day display.
Step 6:
Keep pressing the MEM button until the cor
-
rect day is displayed.
Step 7:
By pressing the SET button again, you acti
-
vate the hour display.
Step 8:
Keep pressing the MEM button until the cor
-
rect hour is displayed.
Step 9:
By pressing the SET button again, you acti
-
vate the minute display.
Step 10:
Keep pressing the MEM button until the cor
-
rect minute is displayed.
Step 11:
If you are finished making settings, you can
exit the settings menu by pressing the On/Off
button. Otherwise, continue making settings
by pressing the SET button.
2.5 Setting the unit of measurement
Note:
The blood glucose values can either be
displayed in mg/dl or in mmol/l. The setting
of the unit of measurement can be found in
the settings menu sequence after the date
and time.
Step 1:
To change the unit of measurement, press the
SET button until the set unit of measurement
starts blinking on the display (see figure on
page 18, blinking unit of measurement).
Getting started
2
 Loading...