

Page 1
Page 2
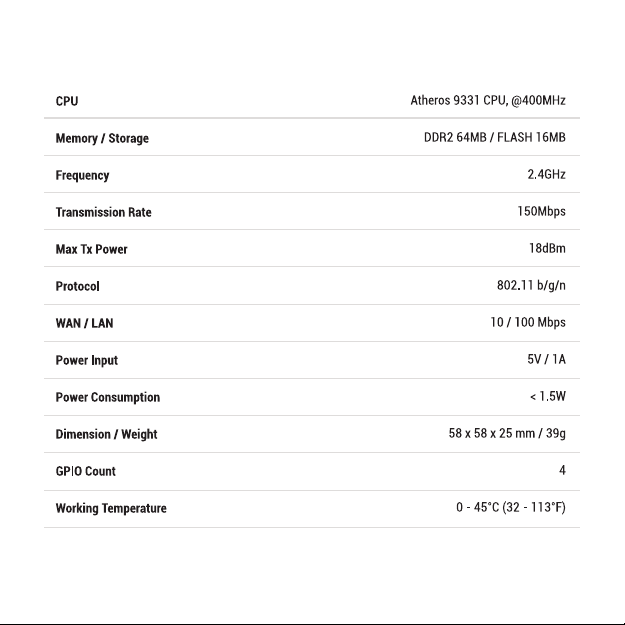
Versions & Specifications
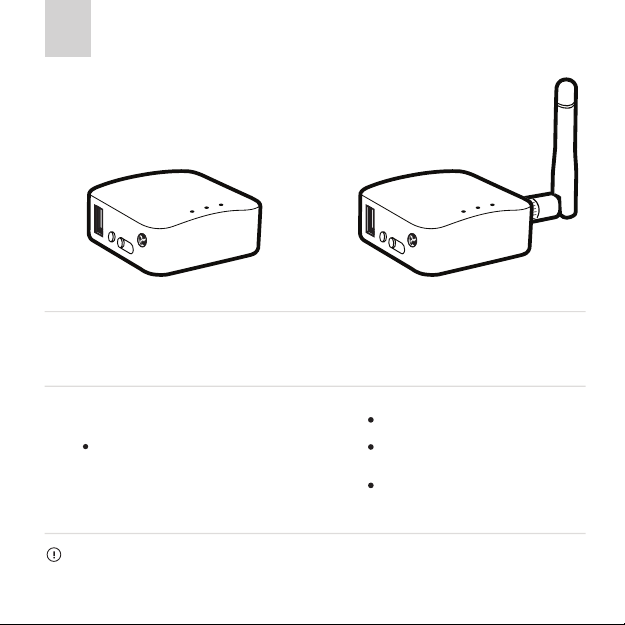
GL-AR150
(Internal Antenna Version)
Do NOT use any external antennas.
Failure to follow above instructions may damage the internal radio of your router.
GL-AR150-Ext
(External Antenna Version)
Do NOT use without the antenna.
Attach the antenna before connecting to
power supply.
Always keep the antenna connected.
Page 3
Page 4

Press and hold for 10 seconds then release, the router will be restored
to factory settings. All user data will be cleared.
Package Contents
Page 5
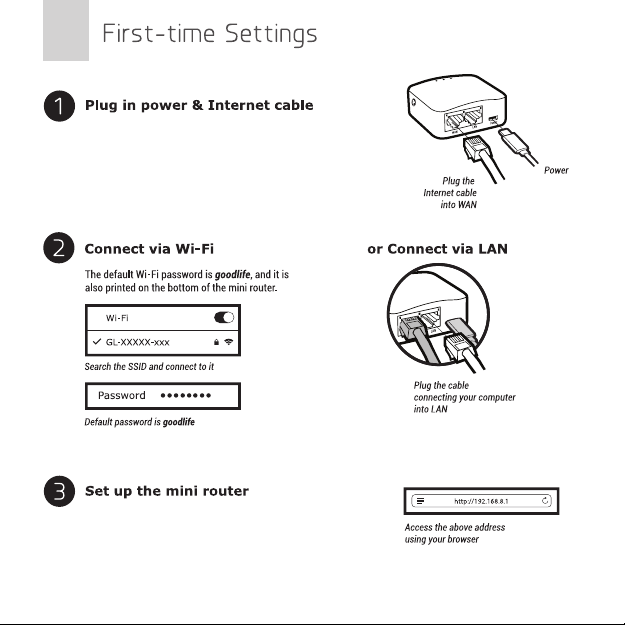
When powered up, your mini router will broadcast
Wi-Fi signal with the SSID: GL-XXXXX-xxx.
Visit http://192.168.8.1 in your browser to set up your
router; start by choosing your preferred language.
Page 6

After you have set up your mini router, you will see the main web interface.
Find the Internet Settings icon, then click the New Connection button. The
Internet Settings window will pop up showing four types of connection
methods: Cable, Repeater, 3G modem and Tethering.
The default protocol is DHCP. If your network needs a static
setting, you can change it to Static.
Page 7

Using Repeater means connecting your mini router to another existing wireless
network, e.g. when you are using Wi-Fi in hotels or other public locations.
Choose Repeater mode in your Internet Settings and the mini router will
automatically search for SSIDs. Choose a SSID and input the Wi-Fi password.
Make sure your exiting Wi-Fi network supports WDS. Using WDS only
if you are knoweledgeable about this mode.
The repeater manager will work once you set up a repeater and it
will automatically connect to your available networks. To disable
repeater manager, uncheck the box Auto scan & reconnect on the
Internet status page.
You can manage your saved networks by clicking Saved Stations.
Delete or choose one from the list to connect.
Page 8

After choosing your Region and Service Provider, your carrier
settings should be filled automatically. If you find the setting
information is incorrect, you will need to input it manually.
Generally, most modems work in TTY serial mode. You need to
find out the correct device, e.g. using /dev/ttyUSB2.
Some modems work in Tethering (hostless) mode. Please see below:
Using the USB cable to share network from your smartphone or hostless
modem to the mini router is called Tethering.
Plug your phone into the mini router and click Trust to continue when the
message pops up in your smartphone. Then turn on your phone’s Personal
Hotspot. Choose your phone from the device list and submit your choice.
A newly-added phone will be named beginning with eth.
Page 9

This router supports OpenVPN client. Using OpenVPN will slow down your Internet
speed because of data encryption.
Click the OpenVPN icon and go to the VPN setting page. The first time it will ask
you to upload your OpenVPN client configuration (ovpn files). Usually, you can
download it from your OpenVPN service provider’s website or console. Consult your
service provider for more details.
Click here to select files or drag and drop them here: .ovpn .zip .tar .gz
Some of your ovpn files need a username, a passowrd and a
passphrase. Please submit yours to authenticate these files.
After uploading the ovpn files, the router will check them. If
you are prompted for a username and password, or a private
key passphrase, or both, a window for VPN Authentication
will pop up so that you can Submit these information for all
files you upload.
This may not be necessary for some service providers.
Page 10

ver. 20170628.1
To protect against DNS leaks, you must customize your DNS servers. You can enable Force all clients to override the
DNS server settings for your client devices. To customize your DNS server, go to Internet Settings > Custom DNS
To get more detailed instructions or information about compatible VPN service providers, please visit http://gl-inet.com/docs/
Page 11

GL-AR150 has an official DDWRT firmware which you can download from DDWRT website. DDWRT firmware is not
available for other GL models. For further information, please visit https://www.dd-wrt.com
Using above DIY features might have a risk of bricking your router. We have no obligation to provide support, maintenance,
upgrades, modifications, or new releases on DIY features. We reserve the rights of interpretation on above DIY contents
without further announcement.
Page 12

By default, the switch button has no function.
You need to enable above functions manually on the web interface (Available in our firmware v2.26 +).
Deactivate VPN client
Page 13

深圳市广联智通科技有限公司
深圳市宝安区石岩街道松白路创维数码大厦305-306室 ( +86-0755-86606126 )
ver. 20170628.1
Page 14

ver. 20170628.1
 Loading...