

GLP YPOC CMY 700 Instruction Manual
Instruction Manual
from software version 1.53
(instruction version 1.33)
e-mail: service@glp.de
Internet: http://www.glp.de

GLP German Light Products GmbH (instruction version 1.33 / from software version 1.53) 2
Notes:

GLP German Light Products GmbH (instruction version 1.33 / from software version 1.53) 3
Table of content
1 Description of Device..............................................................................................5
1.1 Safety Instructions ............................................................................................6
2 Preparation and Installation ...................................................................................7
2.1 Mounting ...........................................................................................................7
2.1.1 Clamps ..................................................................................................7
2.2 Secure the YYPPOOCC 770000 CCMMYY .............................................................................8
2.3 Connections......................................................................................................8
2.3.1 Power supply.........................................................................................8
2.3.2 DMX ......................................................................................................8
2.4 Fuses................................................................................................................9
3 The Menu Field ........................................................................................................9
3.1 Adjust the DMX- Address (D001) ...................................................................10
3.2 The Test Program (TEST)...............................................................................11
3.3 The Audio Program (AUDI).............................................................................11
3.4 Lamp On/Off (LAMP) .......................................................................................11
3.5 Reset (RESE) ..................................................................................................12
3.6 Running time of lamp and unit (TIME) ............................................................12
3.7 Invert Pan Movement (RPAN)..........................................................................12
3.8 Invert Tilt Movement (RTLT) ...........................................................................12
3.9 Special Functions (SPEC) ...............................................................................12
3.9.1 Manual Drive (MANU) ...........................................................................13
3.9.2 Lamp On automatically (LAAU)............................................................13
3.9.3 Lamp Off via DMX (DLOF) ...................................................................14
3.9.4 DMX Input (DMXI) ...............................................................................14
3.9.5 Display (DISP) ....................................................................................14
3.9.6 Fixture Temperature (TEMP)................................................................15
3.9.7 Fan Control (FANS) .............................................................................15
3.9.8 Adjustments and Calibrations (ADJU)..................................................16
3.9.9 Default Settings (DFSE) ....................................................................... 16
3.9.10 Automatic position control / Feedback (FEED) ...................................17
3.9.11 Correction of faults (EFLG).................................................................17
3.10 Error and Information Messages.....................................................................17
4 DMX Channel Selection (DMX Protocol) .............................................................18
5 Changing the Lamp............................................................................................... 27
5.1 Safety Regulations..........................................................................................27

GLP German Light Products GmbH (instruction version 1.33 / from software version 1.53) 4
5.2 Realize the Lamp Change ..............................................................................27
5.3 Adjusting the lamp position (Hotspot) .............................................................28
6 Optical plug-in module (inside the fixture) .........................................................29
6.1 Safety regulations ...........................................................................................29
6.2 Taking out and opening optical plug-in ...........................................................29
6.3 Changing Gobos and Color filters...................................................................31
6.3.1 General remarks for changing Gobos and Colors ...............................31
6.3.2 Changing rotating Gobos ....................................................................32
6.3.3 Changing Color filters..........................................................................33
6.3.4 Changing the Effect wheel ..................................................................34
7 Maintaining and Cleaning the YYPPOOCC 770000 CCMMYY ...................................................37
7.1 Safety Regulations..........................................................................................37
7.2 Circumference and Interval (rule-of-thumb) ....................................................37
7.3 Cleaning the Optical System...........................................................................38
8 Technical Specification ........................................................................................38
9 Index.......................................................................................................................40
GLP German Light Products GmbH (instruction version 1.33 / from software version 1.53) 5
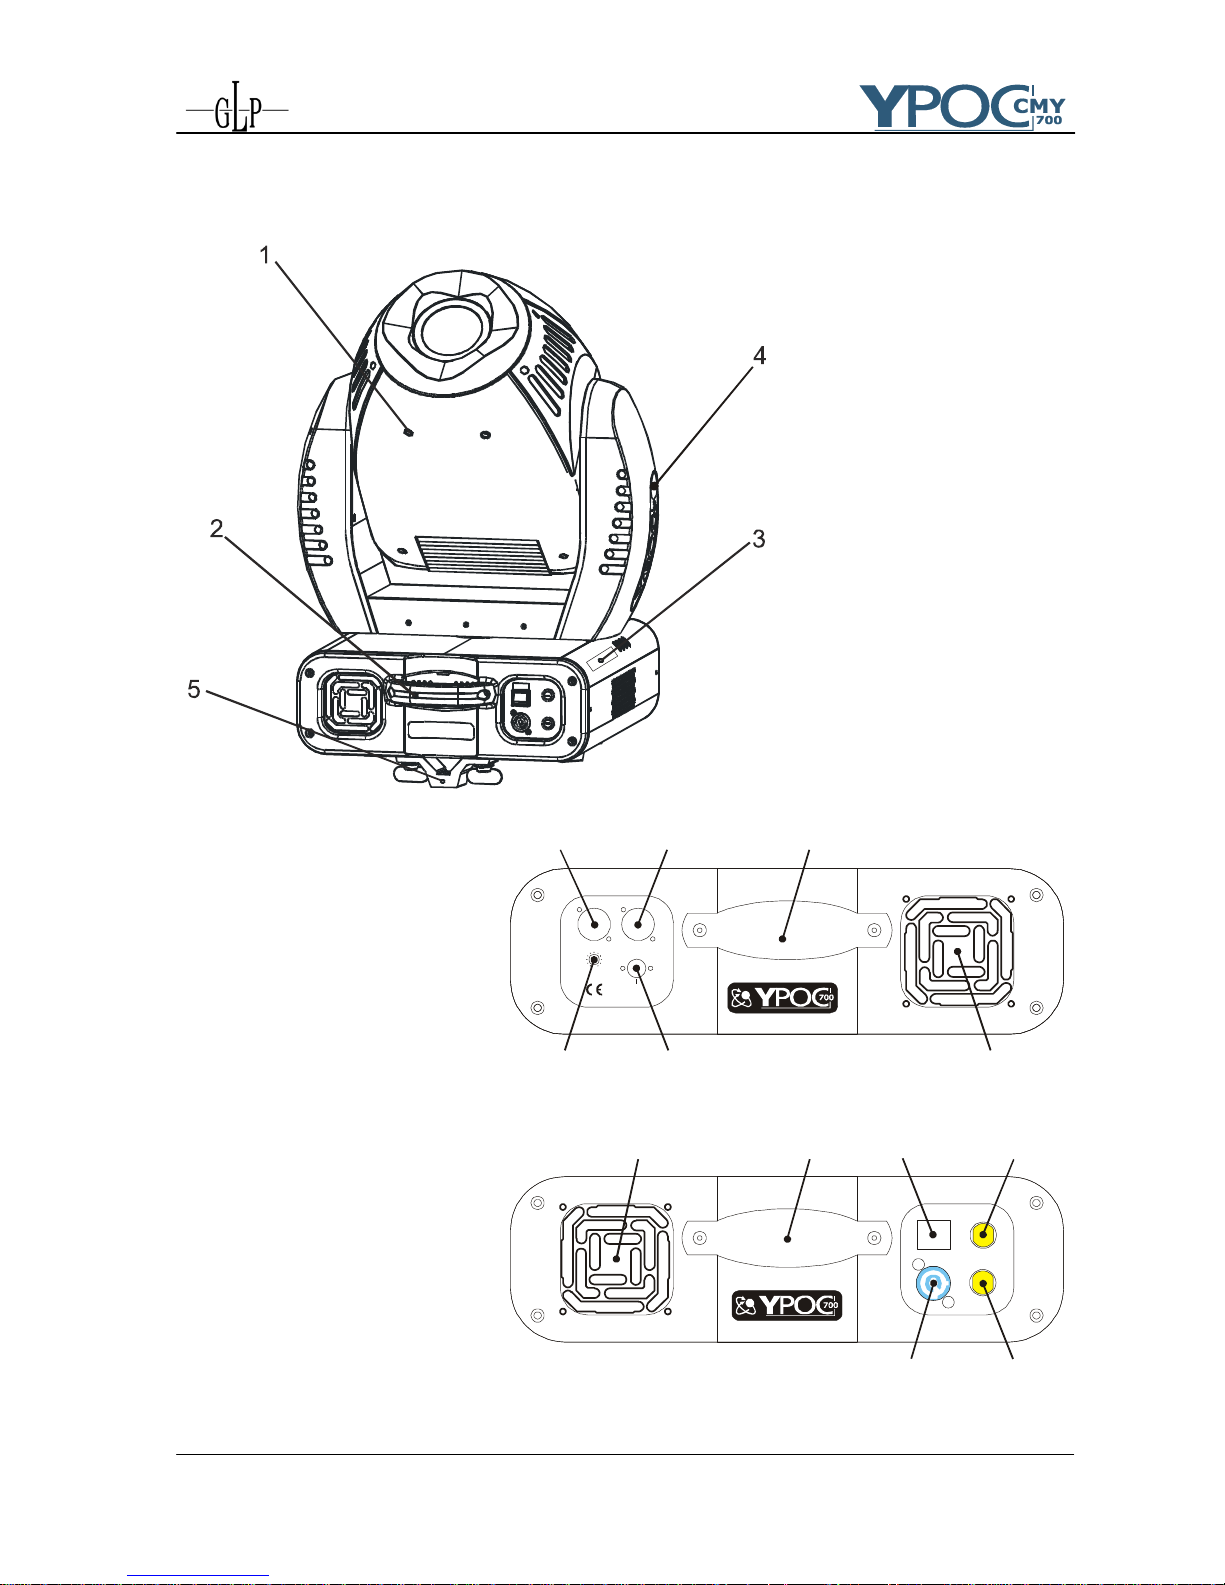
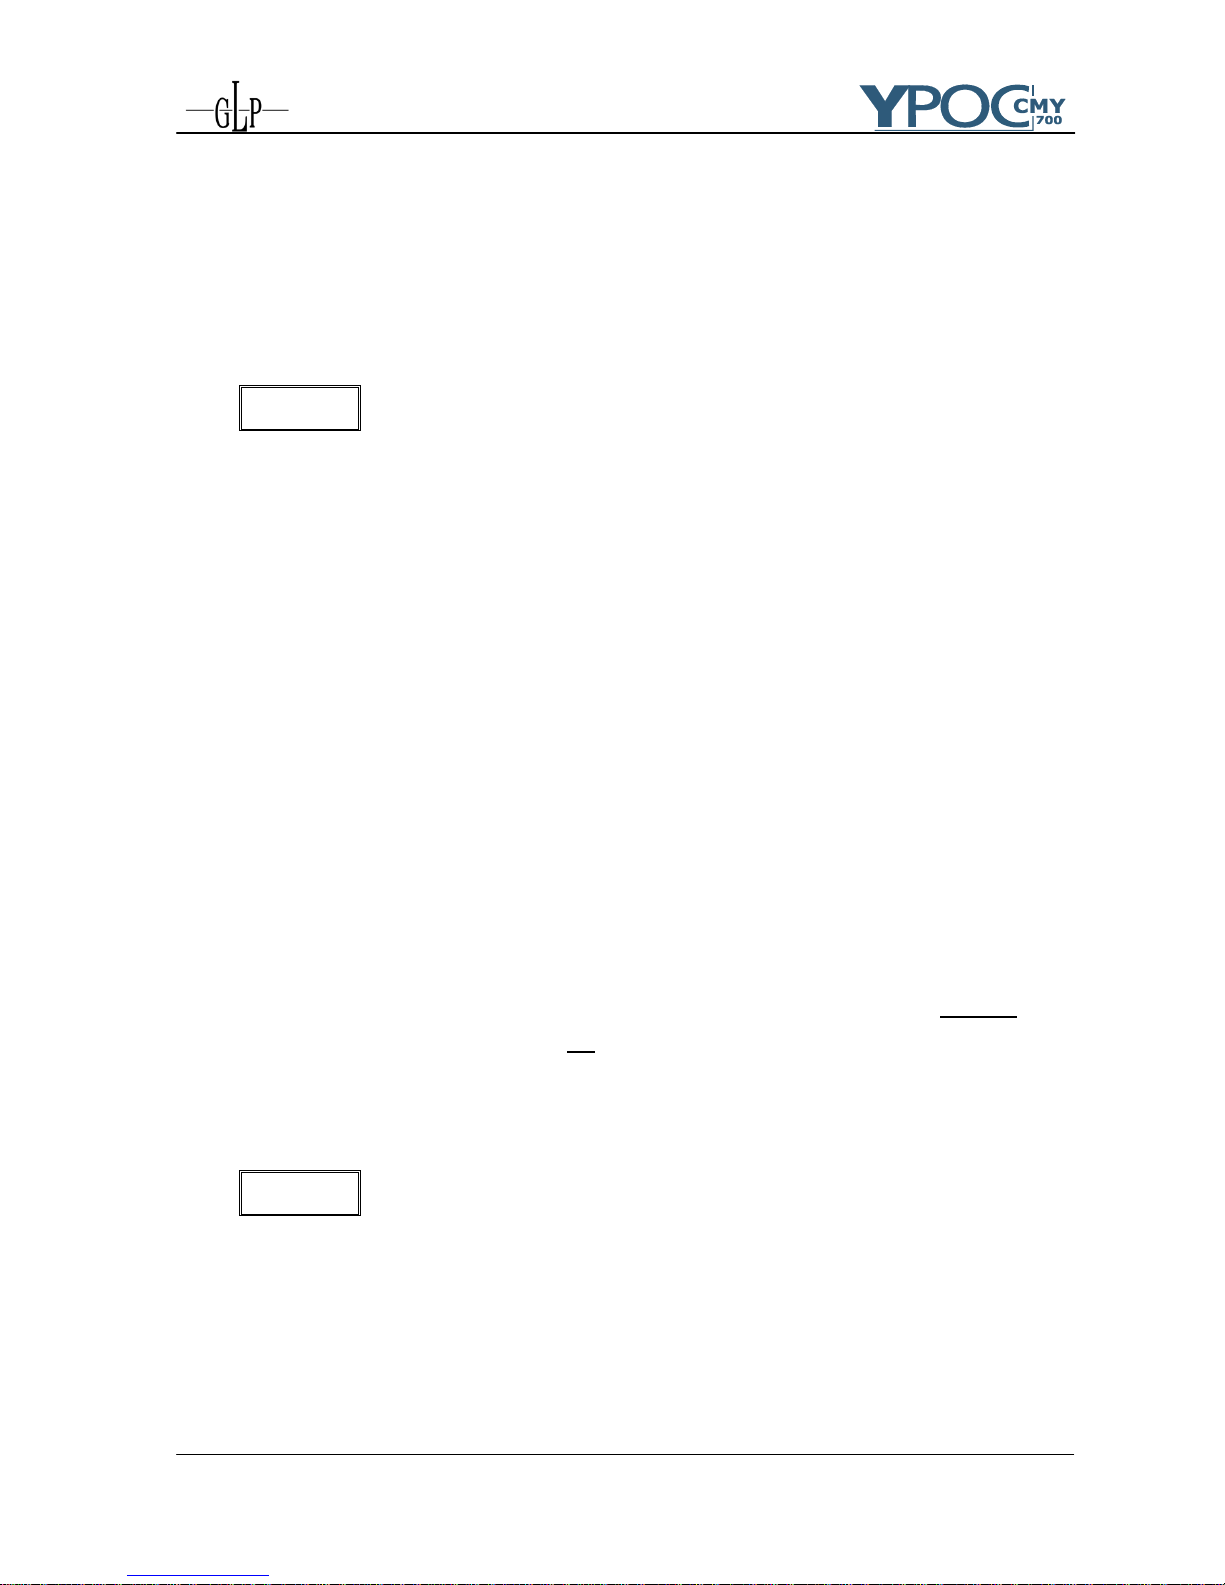
1 Description of Device
1. Moving Head
2. Carrying handles
3. LED- Display (Data
entry)
4. Head locking system
(single-side n 45°
steps)
5. Camlock mounting
system
6. Software-Update
connector
7. Microphone- Intensity
8. DMX- Input
9. DMX- Output
10. Fan (air inlet/outlet)
11. Fuse electronics
12. Mains supply
(Powercon)
13. Power On/Off
14. Fuse lamp
15. Carrying handles
MaxMin
DMX IN DMX OUT
Software Update
1.Ground
2.Data -
3.Data +
Mic Sensitivity
6
7
8 9
10
15
POWER
Power Input: 90 - 260 VAC, 50/60 Hz
Lamp
Fuse
Electroni c
Fuse
10
11
12
13 14
15
T 2A @ 115 V~
T 1A @ 230 V~
T 10A @ 115 V~
T 5A @ 230 V~
0
1

GLP German Light Products GmbH (instruction version 1.33 / from software version 1.53) 6
1.1 Safety Instructions
The YYPPOOCC 770000 CCMMYY is a High-Tech Product. To guarantee a
smooth operation, it is necessary to respect the following rules.
The manufacturer of this device will not take responsibility of
damages through disregard of the information in this manual.
Warranty claims will be cancelled.
1. Make sure before putting into operation, that the fan and the air inlets are
clean and not blocked by anything.
2. Attention: Don’t touch the device during the operation. This can cause injuries
or damages.
3. Unplug the YYPPOOCC 770000 CCMMYY from the AC outlet before any service.
4. It is necessary to wait at least 30 minutes after disconnecting the AC before
you open the YYPPOOCC 770000 CCMMYY. Please do not touch the bulb of the lamp if you
are not absolutely sure it is cold. -- Danger of BURNING --
5. Never look directly into the beam of the lamp. You risk injury of your retina and
blindness.
6. Pay attention of the maximum lamp operation time. You have to change it if
the lamp shows any deformations or damages. The same is with all glass
components, color filters, lenses and mirrors.
7. To allow a secure operation, follow also the Installation guide described in
chapter 2. Operating the YYPPOOCC 770000 CCMMYY without suited safety aids like Safety
cables or clamps/hooks can increase the risk of an accident.
8. The installation should be done by qualified staff only. You need to pay
attention to the common rules of technology that are not explicit mentioned in
this manual.
9. Use only original spare parts. Any structural modification will cancel all
warranty claims.
10. This device is equipped with a Head locking system. Make sure that before
switching on the system is unlocked. Check also that the device can rotate
and operate in its entire movement area.
GLP German Light Products GmbH (instruction version 1.33 / from software version 1.53) 7
2 Preparation and Installation
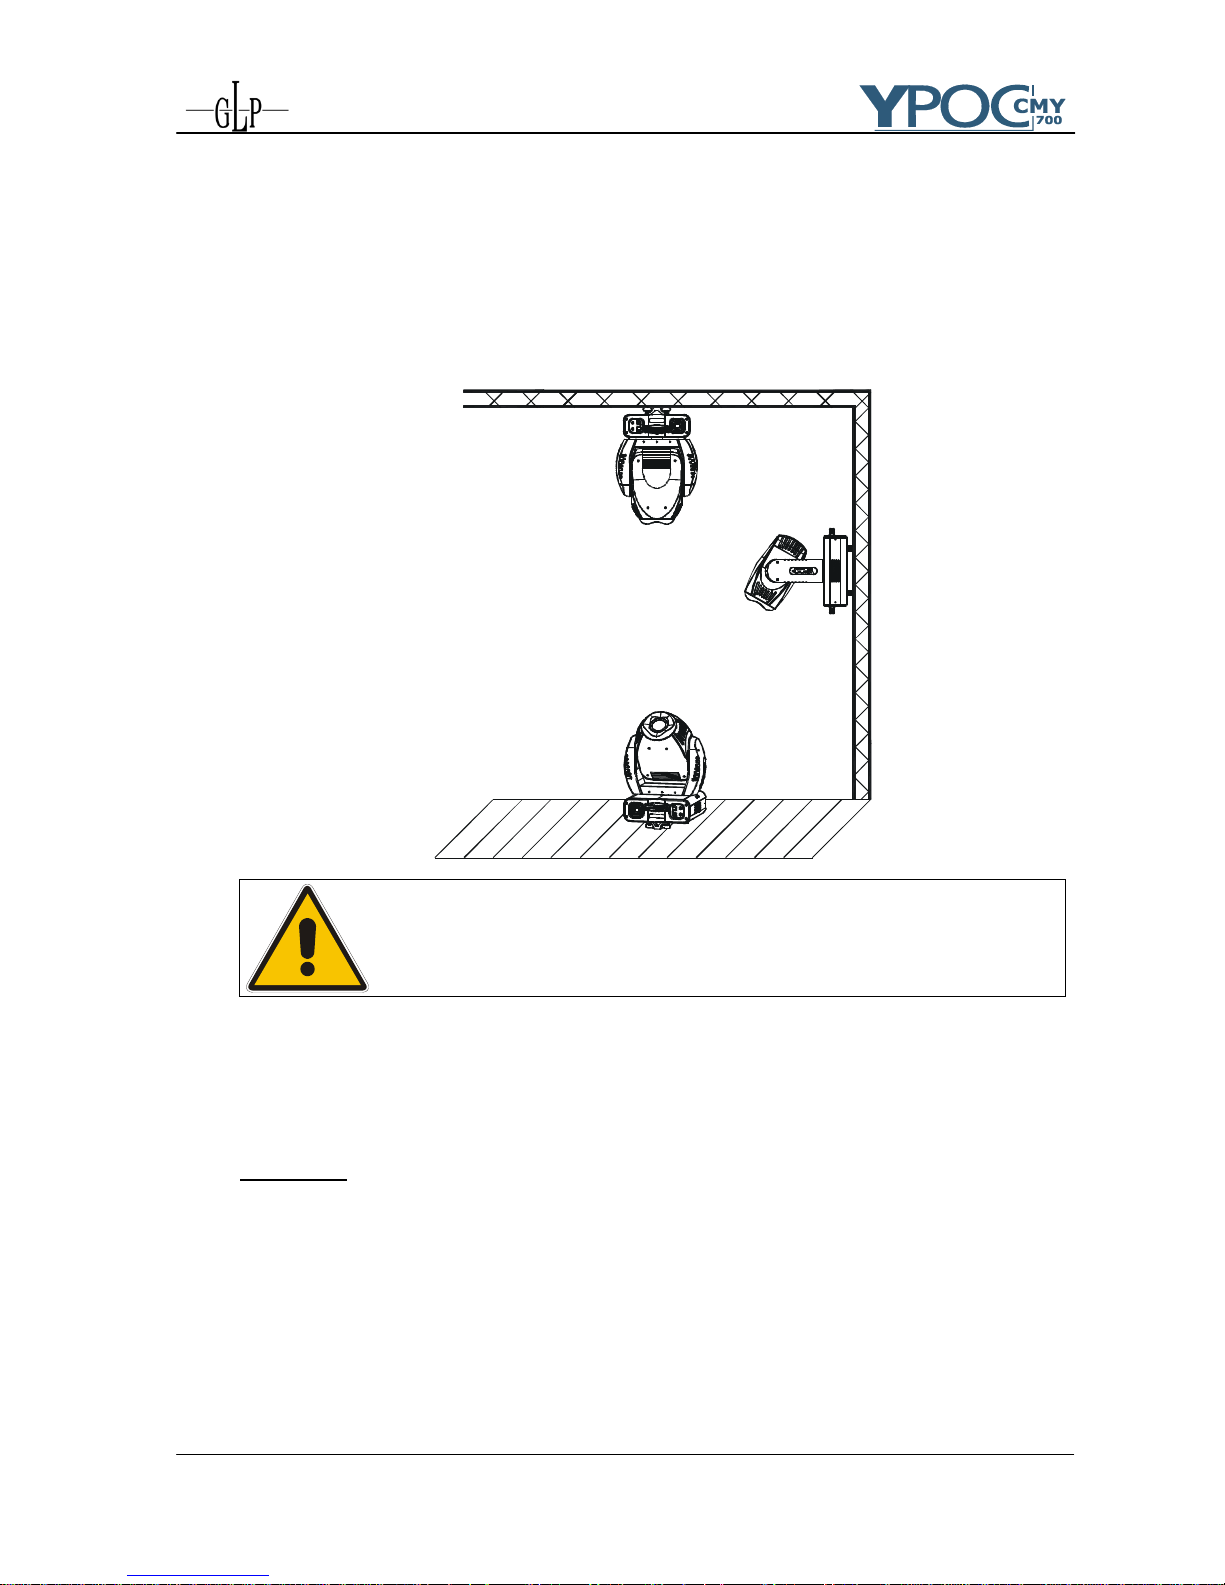
2.1 Mounting
The YYPPOOCC 770000 CCMMYY is fully operational whether it hangs or is mounted to the wall.
It can also be operated while standing on the floor. Keep a safety distance of 0.5
m towards any easily inflammable materials (decoration etc.).
Pay attention to the regulations of: BGV C1 (former VBG 70)
and DIN VDE 0711-217.
The installation should be done by qualified staff only.
For mounting and service purposes this device is equipped with a Head locking
system which allows you to lock the head in 45° steps. Push the lock button on the
side of the arm to lock and unlock the system.
Attention:
Make sure that before switching on the system is unlocked. Check also
that the device can rotate and operate in his entire movement area.
2.1.1 Clamps
There are two major possibilities to mount the YYPPOOCC 770000 CCMMYY together
with clamps. Camlock system or direct mounting of clamps. In both cases
you have to regard a sufficient stability of the system. For installation
instructions please see also printing on the bottom side of the case.

GLP German Light Products GmbH (instruction version 1.33 / from software version 1.53) 8
a) Camlock system: This system allows you a fast and efficient setup of
clamps. Attach the two camlocks to designated position (C1 and C2) on
the bottom side of the case and close the locks by turning them 90°.
Verify the secure fit of the camlock system. The clamps themselves are
directly attached permanently on the camlocks.
90°
b) Use two clamps direct on the bottom side of the YYPPOOCC 770000 CCMMYY to
mount the unit on a truss (each two opposite threads A1 -A4 or A2 - A3,
use screws M10 max. length 50 mm). Distances, diameters and
positions can also been seen on the printing on the bottom plate of the
system.
2.2 Secure the YYPPOOCC 770000 CCMMYY
Regardless of the rigging of the YYPPOOCC 770000 CCMMYY you have to use a stipulated
safety wire. Therefore you have to pull the safety wire through to two provided
holes on the bottom side of the fixture and connect it with the truss-support. Pay
attention to a safe and proper fastening. Install a safety wire that can hold at least
10 times the weight of the fixture. Never use the carrying handles for this purpose.
2.3 Connections
2.3.1 Power supply
Electronic ballast with:
~90 - 260 Volt, 50 - 60 Hz, earth contact type plug - Powercon
Connected load 1000W <=> 4.5 A (blind current compensation).
Please see printing on the case for the right electronic supply!
2.3.2 DMX
USITT DMX 512 Standard input/output, 3 pole connectors.
[+] = Pin 3 / [-] = Pin 2 / [Ground] = Pin 1

GLP German Light Products GmbH (instruction version 1.33 / from software version 1.53) 9
The DMX- Addressing starts at the DMX- Address [001].
See also printing on the case for the right pin assignment.
2.4 Fuses
The YYPPOOCC 770000 CCMMYY electronic system is protected by two 5x20 mm fine-wire
fuses.
Lamp: 230V / T 5A Lamp: 115V / T 10A
Electronic: 230V / T 1A Electronic: 115V / T 2A
Attention:
• Disconnect AC outlet before changing a fuse!
• Use only the original declared fuse type!
3
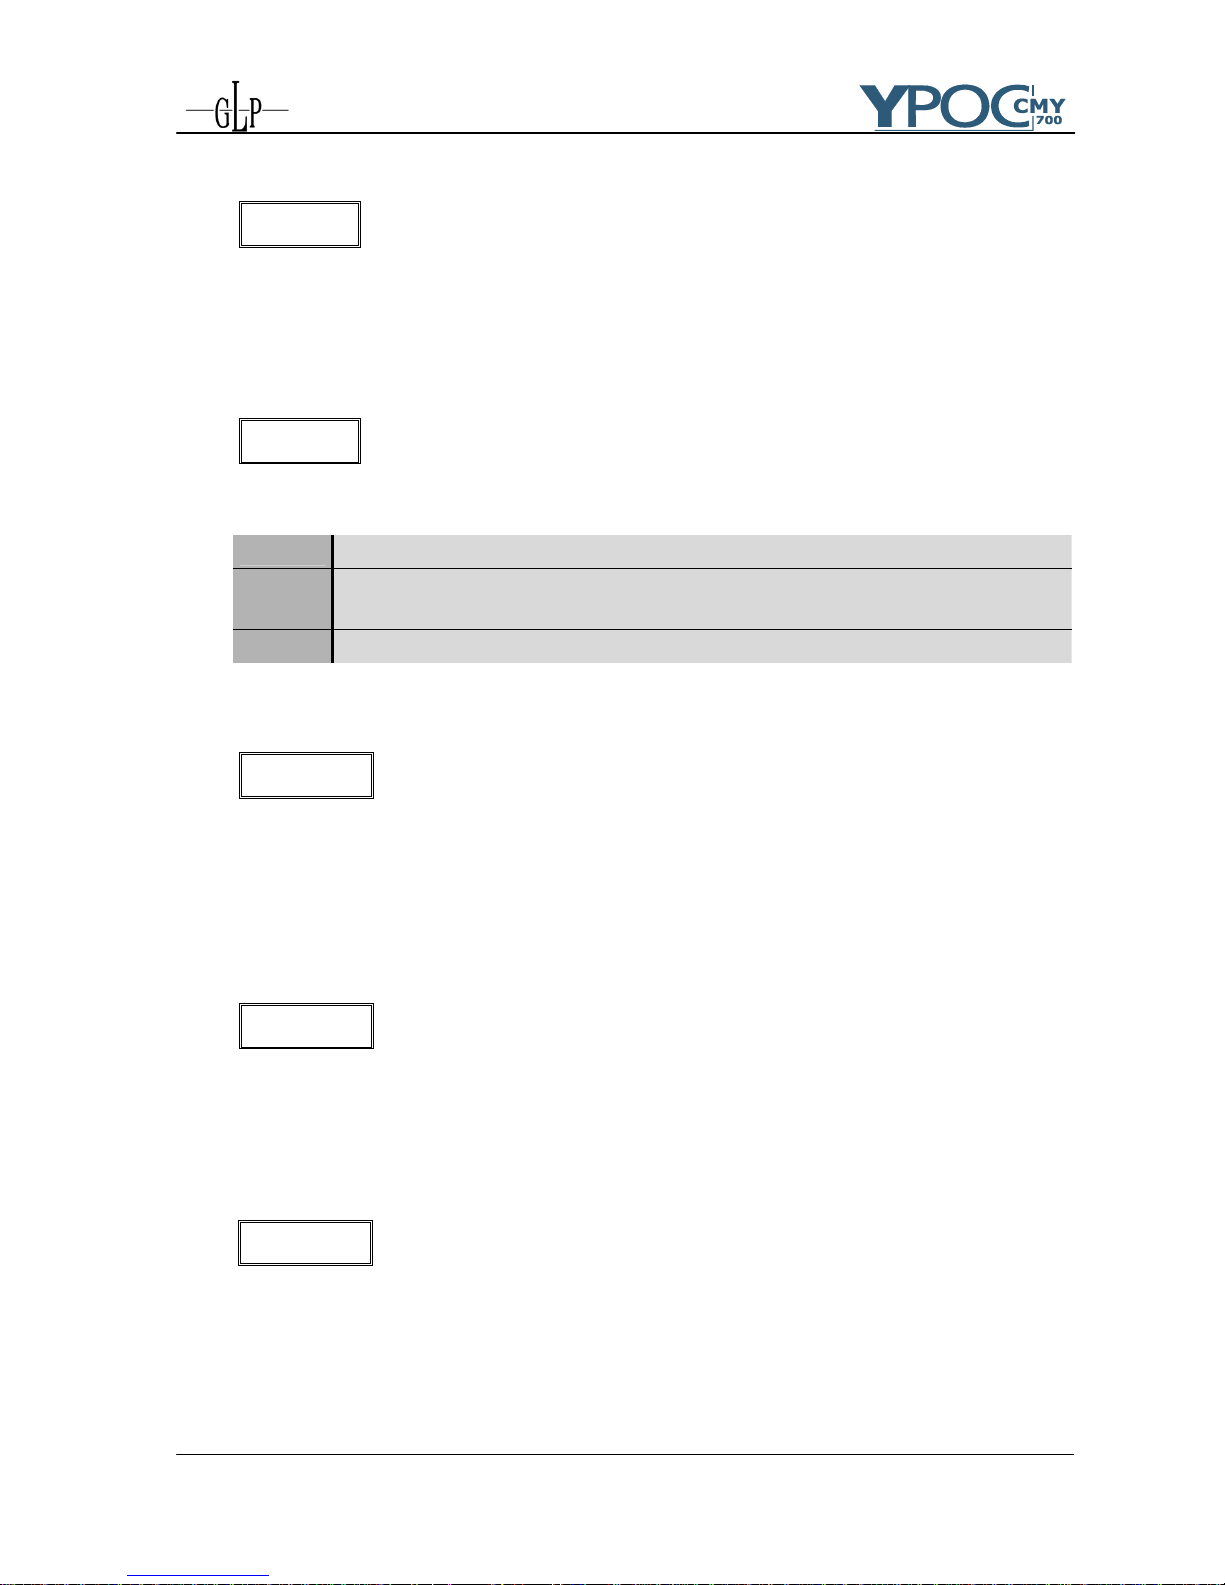
The Menu Field
You’ll find the control board on the side part of the base. It allows you to make
all necessary adjustments of the YYPPOOCC 770000 CCMMYY.. With the Mode-key you get
into the main menu. Afterwards you can navigate through the menu with the
Up/Down-keys. Push the Enter-key to get in the next menu level or to confirm
your settings. Make them and set functions ON/OFF with the Up/Down-keys.
Confirm and save it with the Enter-key (the display shows OK). Push the Mode-
key to cancel the entry and go back to the main menu.
MODE ENTER
UP
DOWN
MODE ENTER UP DOWN
UPMODE ENTER DOWN
Display
Å MODE - ENTER Æ
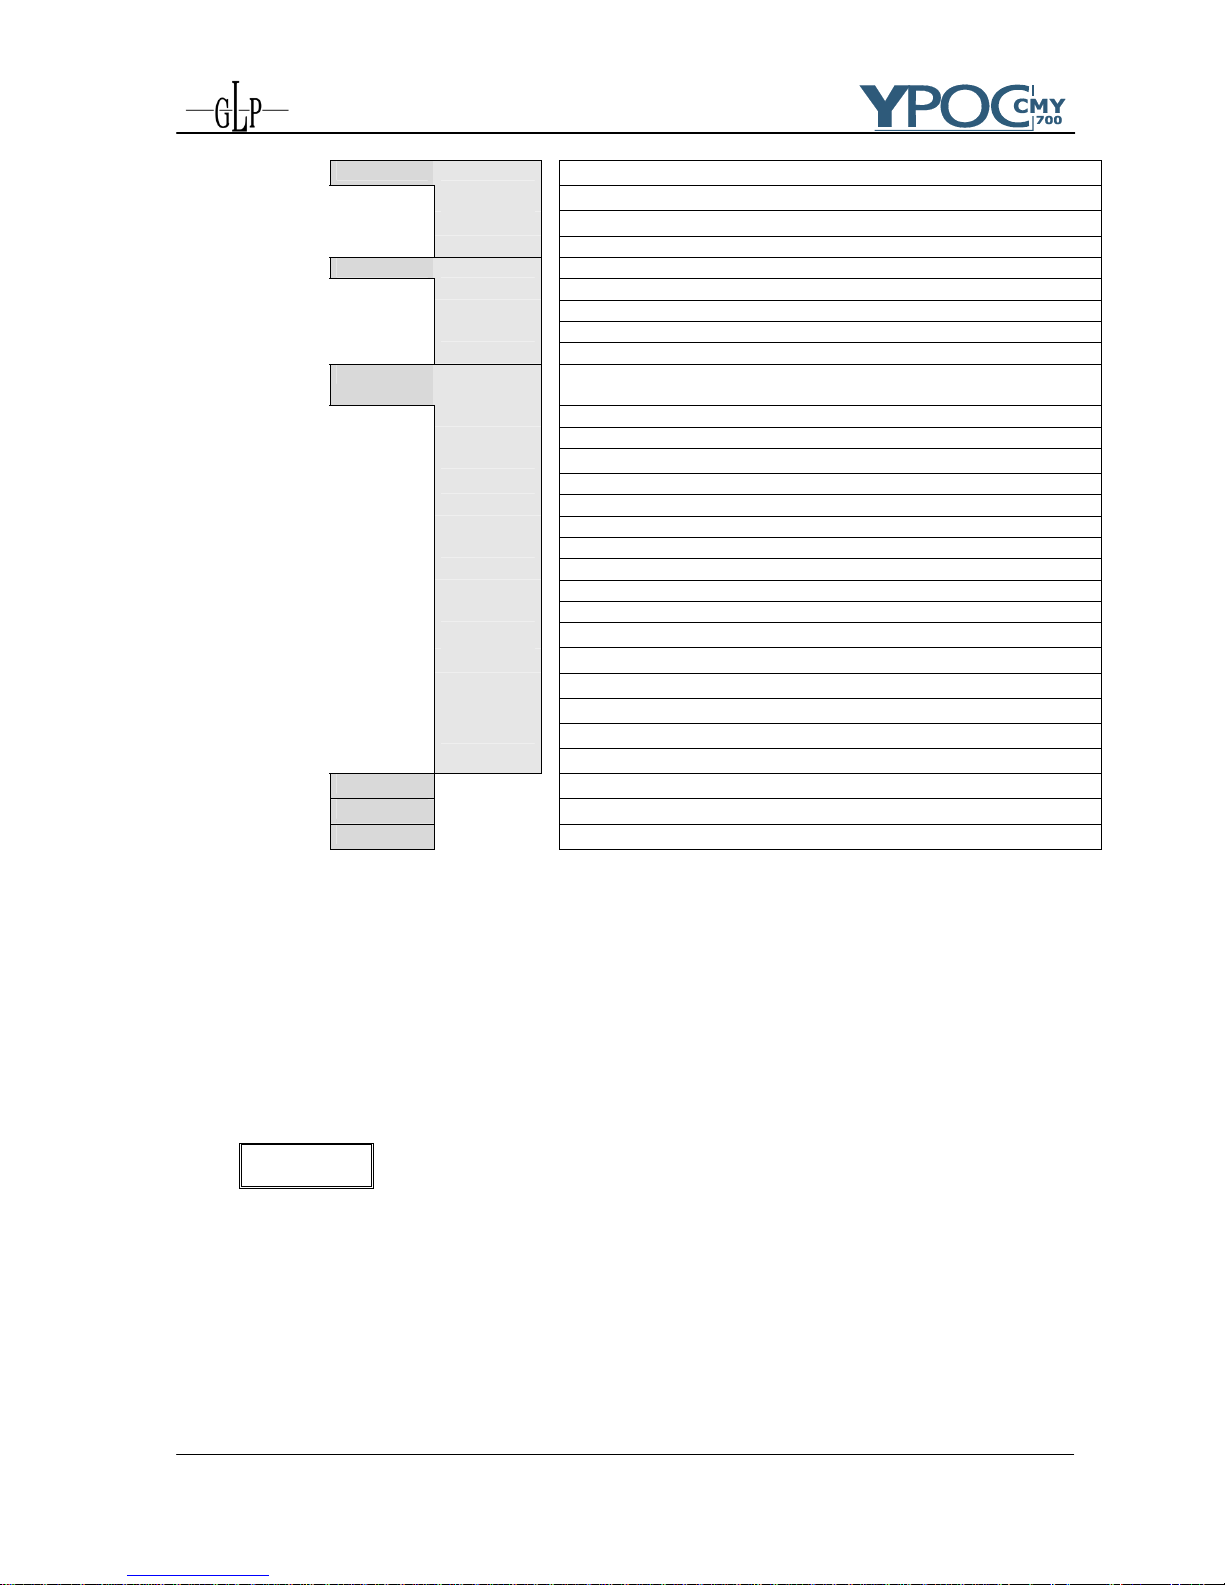
Level 1 Level 2 Level 3
Remark
D001
Define the DMX start address
TEST
Test program of all functions
AUDI ASLW
Self-running audio program (slow)
AFST
Self-running audio program (fast)
MSTR
Master for the audio program
SVPT
Basic position for the audio program
SIZE
Size for the audio program (NORM-BIG-MIDL-SMAL)
LAMP
Switch on/of the lamp direct at the YYPPOOCC 770000 CCMMYY
RESE
Reset
TIME POWR
Running time of the fixture (no destructible)
LA1
Running time of the lamp (erasable)
LA2
Running time of the lamp (no destructible)
RPAN
Reverse Pan-direction
RTLT
Reverse Tilt-direction
DMOD NORM
DMX Mode: Defines the number of DMX channels
EXT
DMX Mode NORM has to be selected at the moment.
SPEC MANU
Manual drive of all device functions
LAAU
Automatic lamp start at switching on the unit
Å DOWN - UP Æ
DLOF
Switch off lamp via DMX
DMXI
Read out actual DMX-values
DISP D ON
Display On/Off
REV
Twist the display (also pushing Up/Down keys at the same time)
TEMP
Read out internal temperature
GLP German Light Products GmbH (instruction version 1.33 / from software version 1.53) 10
FANS HIGH
Maximum cooling fan velocity
REG
Automatic cooling fan control
LOOF
Low cooling fan speed Æ lamp off
LOHI
Low cooling fan speed Æ Automatic
VERS VTIL
Software version Tilt-board
VTR1
Software version driver board 1
VTR2
Software version driver board 2
VTR3
Software version driver board 3
DBUG
Function not yet in use
ADJU CODE xxxx
Use the code for entering the calibration menu (for authorized
persons only)
CL1c
Coarse calibration of color wheel 1
CL1f
Fine calibration of color wheel 1
GOB1
Calibration of gobo wheel 1
GOB2
Calibration of gobo wheel 2
SHSH
Shutter moves pair wise parallel left and right (Shift)
SHOC
Shutter moves pair wise open and close
FR T
Calibration of frost filter A (top)
FR B
Calibration of frost filter b (bottom)
PRIS
Calibration of prism wheel
Å DOWN - UP Æ
IRIS
Calibration of iris
FOCU
Calibration of focus
POFS
Calibration of Pan-Offsets
TOFS
Calibration of Tilt-Offsets
CLRE
Settings in the internal memory (super-user only)
SPFS
Speed fast - limit the max. Pan velocity to 70%
ARES
Adjust Reset (all wheels stand still after a reset)
DFSE
Call on the default function values
FEED
Pan/Tilt feedback (error correction) On/Off
EFLG
Correction of faults
3.1 Adjust the DMX- Address (D001)
A rest will be performed right after switching on the YYPPOOCC 770000 CCMMYY (the display
shows the following information: GLP - Y700 - software version of the unit - YSTD
for standard module/Spot setup or YCMY for CMY module/CMY setup). The reset
can last up to 30 seconds. Afterwards the current DMX- Address is shown. If there
is no DMX- Signal the display flashes.
D001
For setting the address please follow this procedure:
1. Switch On the YYPPOOCC 770000 CCMMYY and wait until the fixture reset has finished
('RESE' is flashing in the display).
2. Press the Mode-key in order to access the main menu. Browse through the
menu by pressing the Up/Down-keys until the display shows D001. Confirm by
pressing the Enter-key (the decimal point is flashing)
GLP German Light Products GmbH (instruction version 1.33 / from software version 1.53) 11
3. Use the Up/Down-keys to select the desired address. Confirm the setting by
pressing the Enter-key (the display shows OK) or press the Mode-key to
cancel.
The DMX- Address is stored also while switching off the YYPPOOCC 770000 CCMMYY!
3.2 The Test Program (TEST)
Test
The Test-Program allows you to run a complete self test procedure of all
functions. Press Enter to confirm or Mode to cancel.
(* not runnig with old firmware)
3.3 The Audio Program (AUDI)
The Audio-menu allows you to run a stand alone audio program. This chaser can
run either fast or slow. AFST: Every sound impulse one step of the chaser. Aslw:
Every second sound impulse one step of the chaser.
Additionally you can choose a basic position for this audio chaser. Use either the
internal manual mode or an external controller to set the desired Pan/Tilt position.
Confirm this setting in the SVPT menu by pressing the Enter-key.
You can also define the size of the audio chaser in the SIZE menu. You have the
choice between: NORM (no basic position has to bee chosen), BIG, MIDL and SMAL).
If you want to run the systems simultaneously, one of the YYPPOOCCss must be
switched as the master. All others must be "Slave" Master = OFF. Notice: The
Audio function is only working if no DMX signal is connected. This Audio program
can work on small events or as an emergency program.
3.4 Lamp On/Off (LAMP)
LAMP
Use the Up/Down-keys to select lamp On or lamp Off Press Enter to confirm or
Mode to cancel and return to the main menu. (The lamp OFF command is only
functioning if the shutter is closed at the same time. Use an external controller or
the manual drive mode, see 3.9.1).
GLP German Light Products GmbH (instruction version 1.33 / from software version 1.53) 12
3.5 Reset (RESE)
RESE
Press the Enter-key to run a reset of all fixture functions (RST is shown in the
display). Performing a Reset will last approximately 30 seconds.
3.6 Running time of lamp and unit (TIME)
TIME
With this function you can read out three different running times of the fixture.
POWR
Complete running time of the fixture (non-erasable).
LA 1
Running time of the lamp (erasable). Push the Up/Down-keys at one
time to delete this running time.
LA 2
Running time of the unit with lamp on (non-erasable).
3.7 Invert Pan Movement (RPAN)
RPAN
This function allows you to invert the Pan movement. Use the Up/Down-keys to
select invert On or Off. Press Enter to confirm or Mode to cancel and return to the
main menu.
3.8 Invert Tilt Movement (RTLT)
RTLT
This function allows you to invert the Tilt movement. Use the Up/Down-keys to
select invert On or Off. Press Enter to confirm or Mode to cancel.
3.9 Special Functions (SPEC)
SPEC
This menu allows you to reach further special functions of the YYPPOOCC 770000 CCMMYY..
In detail they are:
GLP German Light Products GmbH (instruction version 1.33 / from software version 1.53) 13
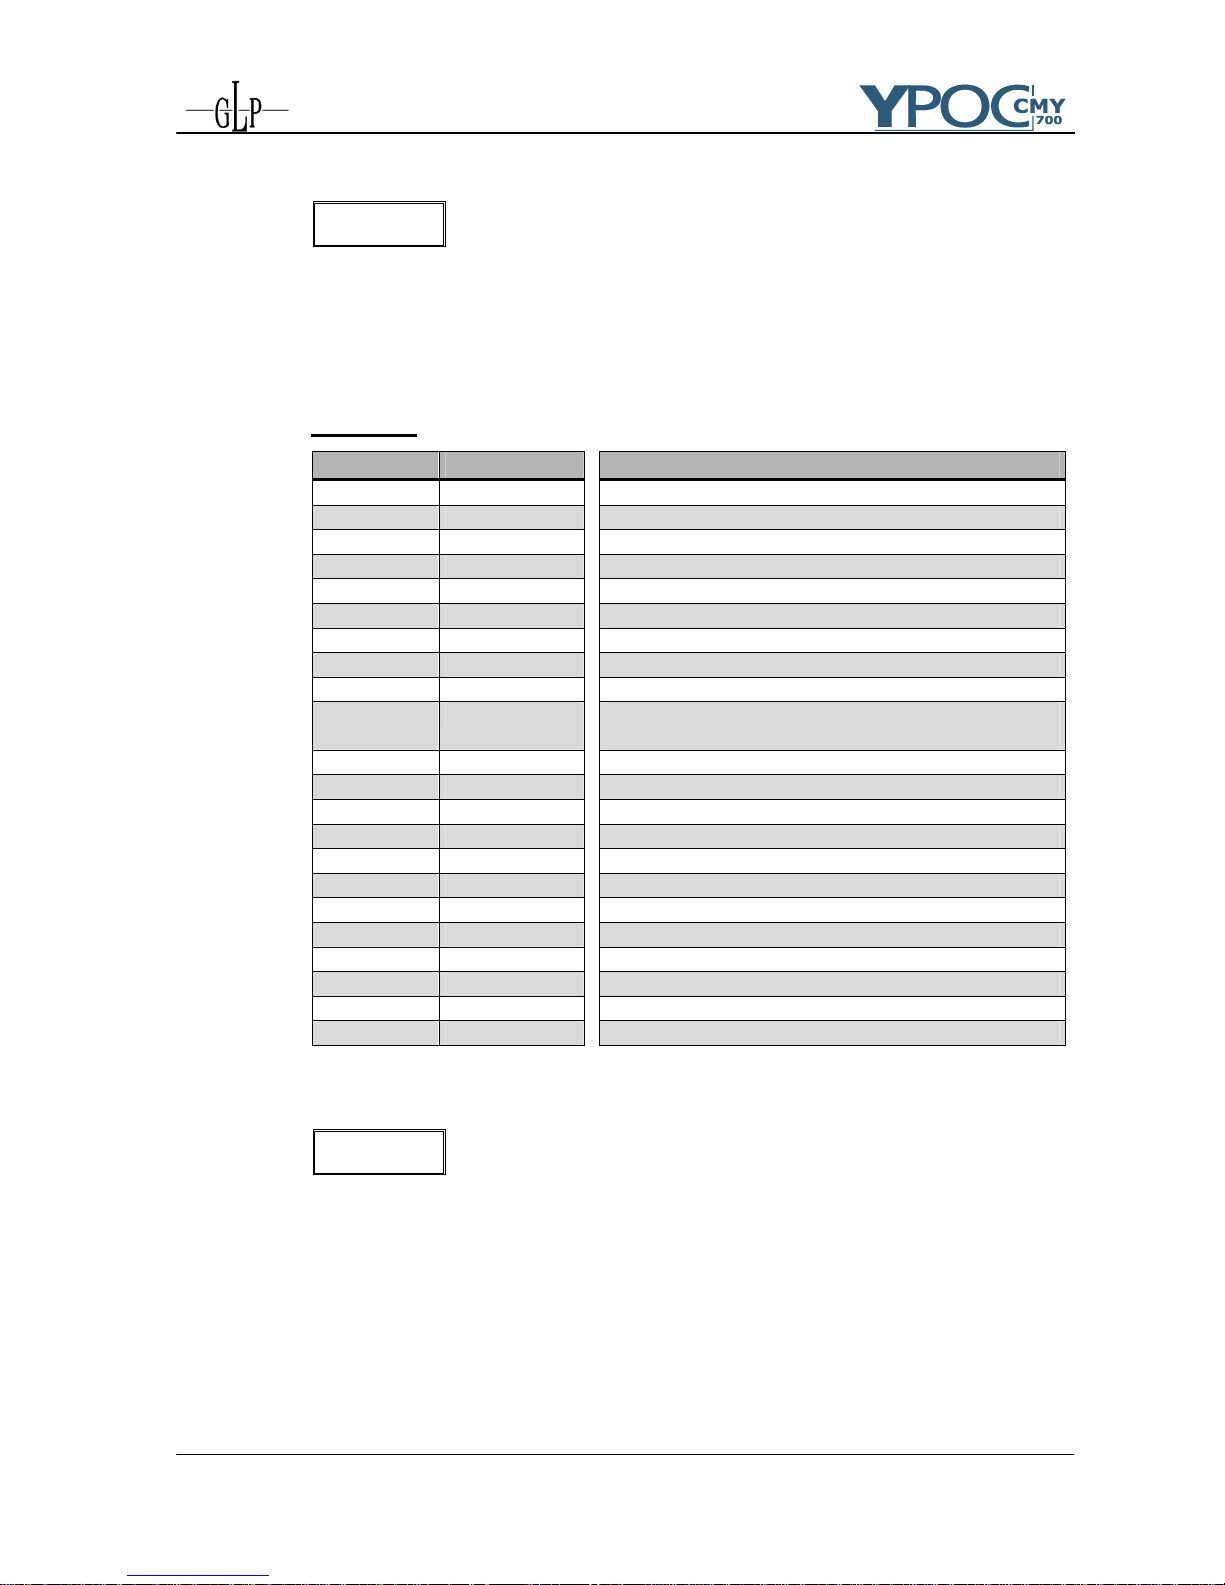
3.9.1 Manual Drive (MANU)
MANU
This function allows you to drive all fixture functions manually. Select the
desired function with the Up/Down-keys and confirm with Enter. Now
choose the desired value with the Up/Down-keys and confirm again with
Enter or cancel and return to the menu with the Mode-key.
Attention: The DMX cable must be disconnected during this operation.
Function Value Remark
PAN 000 - 255
Pan Position
TILT 000 - 255
Tilt Position
COL1 000 - 255
Color wheel 1 (fixed colors)
CYAN 000 - 255
Color wheel - Cyan
MAGE 000 - 255
Color wheel - Magenta
YELL 000 - 255
Color wheel - Gelb (Yellow)
GOB1 000 - 255
Gobo wheel 1
GRT1 000 - 255
Gobo wheel 1 rotation
GOB2 000 - 255
Gobo wheel 2
SHUT 000 - 255
Shutter / Strobe function (the lamp strikes at
DMX 255 if dimmer is "open" = DMX 255)
DIMR 000 - 255
Dimmer
FOCU 000 - 255
Focus
ZOOM 000 - 255
Zoom
FRST 000 - 255
Frost
PRIS 000 - 255
Prism (000 – 127) / Stop / Prism- rotation
IRIS 000 - 255
Iris
CTO 000 - 255
CTO correction wheel
EFFB 000 - 255
Effect wheel
EFFR 000 - 255
Effect wheel, rotation
SPEC 000 - 255
Lamp Off, Reset, ...
MOVE 000 - 255
Movements
SPED 000 - 255
Speed for Pan/Tilt
3.9.2 Lamp On automatically (LAAU)
LAAU
This function enables to strike the lamp automatically after switching on the
fixture. Use the Up/Down-keys to select ON if you want to strike the lamp
automatically after switching on the fixture or Off if you don't want this
function. Press Enter to confirm or Mode to cancel and return to the menu.
If you have chosen off you have the possibility to strike the lamp either via
DMX or direct at the YYPPOOCC 770000 CCMMYY in the Lamp menu.
 Loading...