

Page 1
Instruction Manual
from software version 1.5
(instruction version 1.6)
e-mail: service@glp.de
Internet: http://www.GLP.de
Page 2

This side is intentionally unlabelled.
GLP German Light Production (V1.6) 2
Page 3

Table of contents
1 Description of Device.............................................................................................5
1.1 Safety Instructions............................................................................................ 6
2 Preparation and Installation .................................................................................. 7
2.1 Mounting ..........................................................................................................7
2.1.1 Clamps...................................................................................................7
2.1.2 Mounting plate.......................................................................................7
2.2 Secure the YYPPOOCC 225500......................................................................................8
2.3 Connections.....................................................................................................9
2.3.1 Power supply.........................................................................................9
2.3.2 DMX ....................................................................................................... 9
2.4 Fuse.................................................................................................................9
3 The Menu Field......................................................................................................10
3.1 Adjust the DMX- Address (D001).....................................................................11
3.2 The Test Program (TEST)................................................................................11
3.3 The Audio Program (AUDI)..............................................................................11
3.4 Lamp On/Off (LAMP) ........................................................................................12
3.5 Reset (RESE) ...................................................................................................12
3.6 Running time of lamp and unit (TIME) .............................................................12
3.7 Invert Pan Movement (RPAN)...........................................................................12
3.8 Invert Tilt Movement (RTLT) ............................................................................13
3.9 DMX Mode (MODE)...........................................................................................13
3.10 Special Functions (SPEC).................................................................................13
3.10.1 Manual Drive (MANU) .............................................................................14
3.10.2 Lamp On automatically (LAAU)..............................................................14
3.10.3 Lamp Off via DMX (DLOF) ..................................................................... 14
3.10.4 DMX Input (DMXI) .................................................................................15
3.10.5 Display (DISP).......................................................................................15
3.10.6 Fixture Temperature (TEMP)..................................................................15
3.10.7 Fan Control (FANS)................................................................................16
3.10.8 Adjustments and Calibrations (ADJU).................................................... 16
3.10.9 Default Settings (DFSE).........................................................................17
3.10.10 Feedback (FEED).............................................................................. 17
3.10.11 Correction of faults (EFLG) ...............................................................17
3.11 Error and Information Messages....................................................................17
GLP German Light Production (V1.6) 3
Page 4

4 DMX Channel Selection (DMX Protocol).............................................................18
5 Change the Lamp..................................................................................................21
5.1 Safety Regulations .........................................................................................21
5.2 Realize the Lamp Change..............................................................................21
5.3 Lamp adjustment............................................................................................22
6 Change a Gobo .....................................................................................................23
6.1 Safety Regulations .........................................................................................23
6.2 Realize the Gobo Change..............................................................................23
7 Maintenance and Cleaning the YYPPOOCC 225500 ..........................................................24
7.1 Safety Regulations .........................................................................................24
7.2 Circumference and Interval (rule-of-thumb)....................................................25
7.3 Cleaning the Optical System..........................................................................25
8 Technical Specification........................................................................................26
9 Index ......................................................................................................................28
GLP German Light Production (V1.6) 4
Page 5
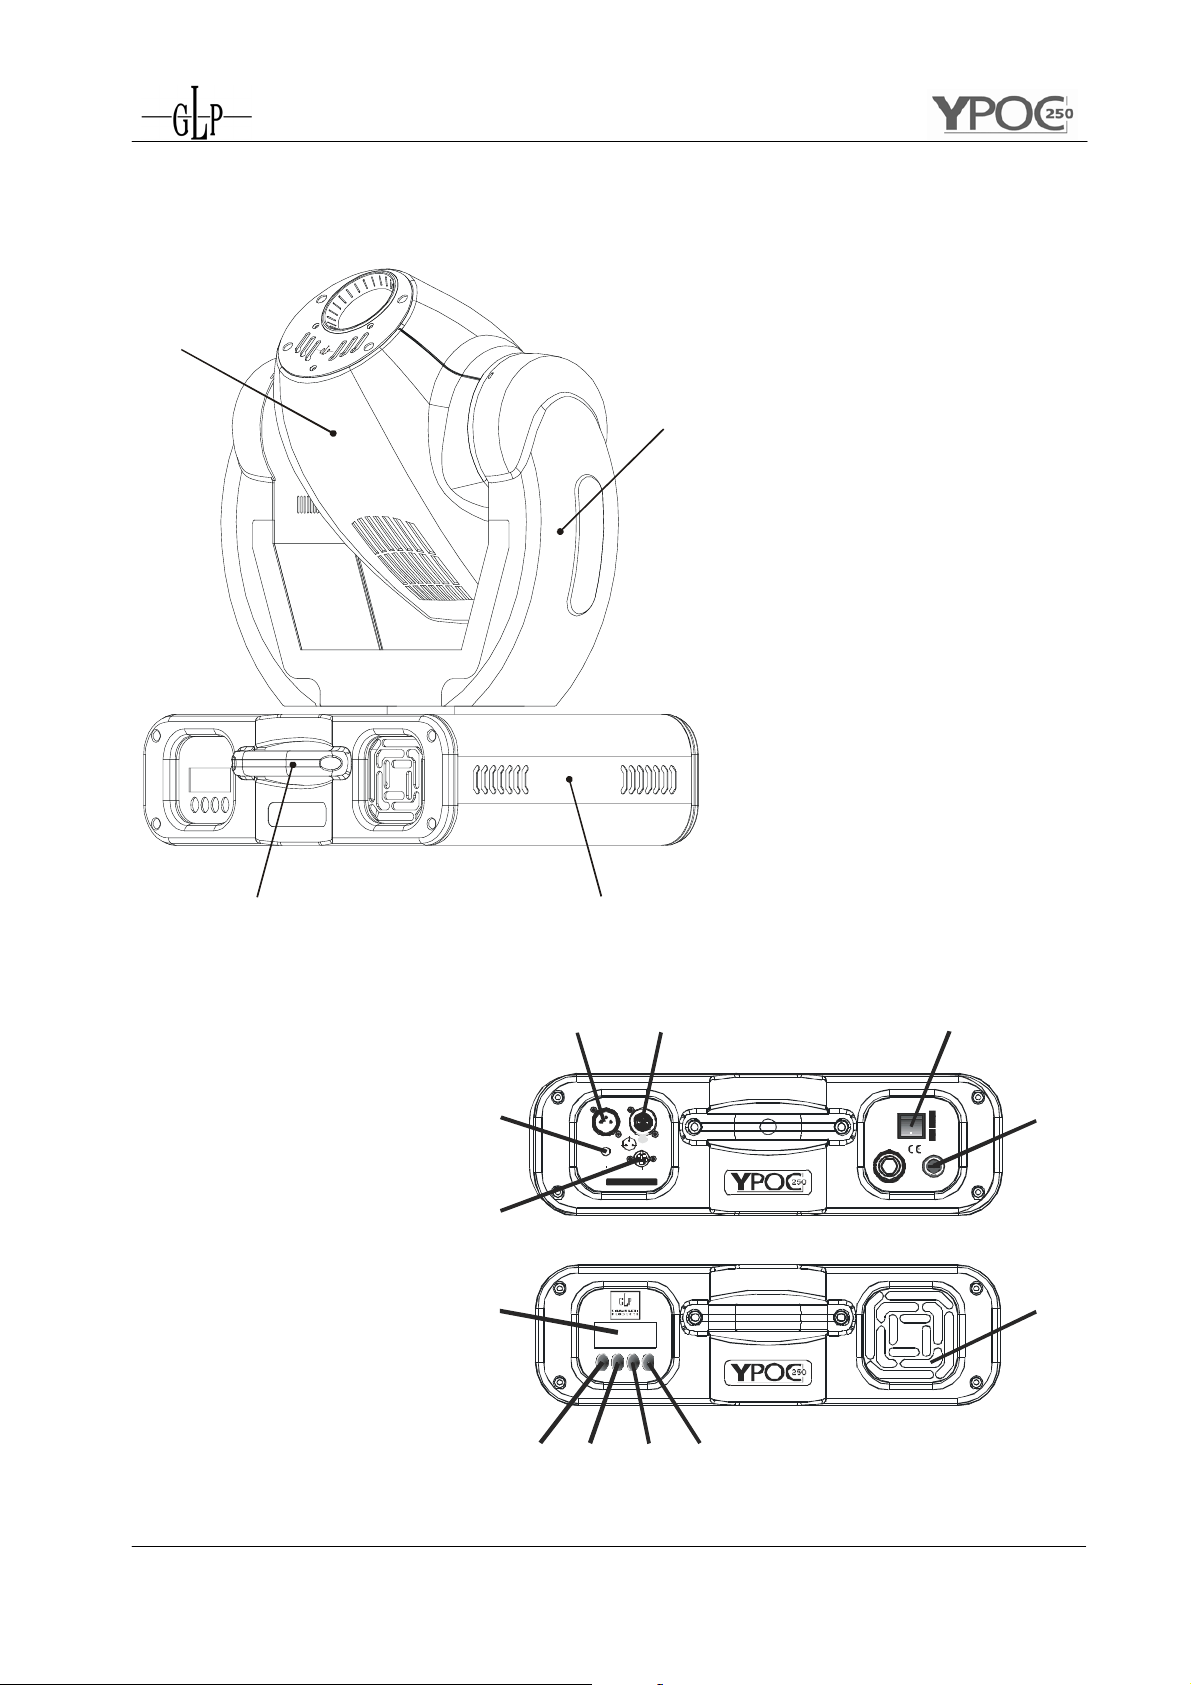
1 Description of Device
1
2
1. Moving Head
2. Arm
3. Base
4. Carrying handles
5. Up- button
6. Down- button
7. Enter- button
8. Mode- button
9. LED- Display
10. Software-Update
connector
11. Microphone- Intensity
12. DMX- Input
13. DMX- Output
14. Power On/Off
15. Fuse F3,15 A
16. Fan (air inlet)
34
12
11
10
9
87 65
DMX IN DMX OUT
MaxMin
Mic Sensitive
Serial
number:
MODE EN TER UP DOWN
O
M
D
E
E
R
3
H
S
12
Software Upda te
D
O
W
N
E
N
T
13
FUSE:
T3.1 5A @250 V
LAMP:
U
P
1.Ground
2.Data-
3.Data+
U
P
MSD 250W
Power input
14
POWER
210V~
230V~
250V~
50Hz
60Hz
Fuse
FUSE
15
16
GLP German Light Production (V1.6) 5
Page 6
1.1 Safety Instructions
The YYPPOOCC 225500 is a High-Tech Product. To guarantee a smooth
operation, it is necessary to keep following rules.
The manufacturer of this device will not take responsibility of
damages through disregard of the information in this manual.
Warranty adjustments will be canceled.
1. Make sure before putting into operation, that the fan and the air inlets are
clean and not blocked by anything.
2. Attention: Don’t touch the device during the operation. This can cause
injuries or damages.
3. Unplug the YYPPOOCC 225500 from the AC outlet before any service.
4. It is necessary to wait at least 30 minutes after disconnecting the AC before
you open the YYPPOOCC 225500. Please do not touch the bulb of the lamp if you are
not absolutely sure it is cold. -Danger of BURNING-
5. Never look directly into the beam of the lamp. You risk injury of your retina and
blindness.
6. Pay attention of the maximum lamp operation time. You have to change it if
the lamp shows any deformations or damages. The same is with all glass
components, color filters, lenses and mirrors.
7. To allow a secure operation, follow also the Installation guide described in
chapter 2. Operating the YYPPOOCC 225500 without suited safety aids like Safety
cables or clamps/hooks can increase the risk of an accident.
8. The installation should be done by qualified staff only. You need to pay
attention to the common rules of technology that are not explicit mentioned in
this manual.
9. Use only original spare parts. Any structural modification will cancel all
warranty adjustments.
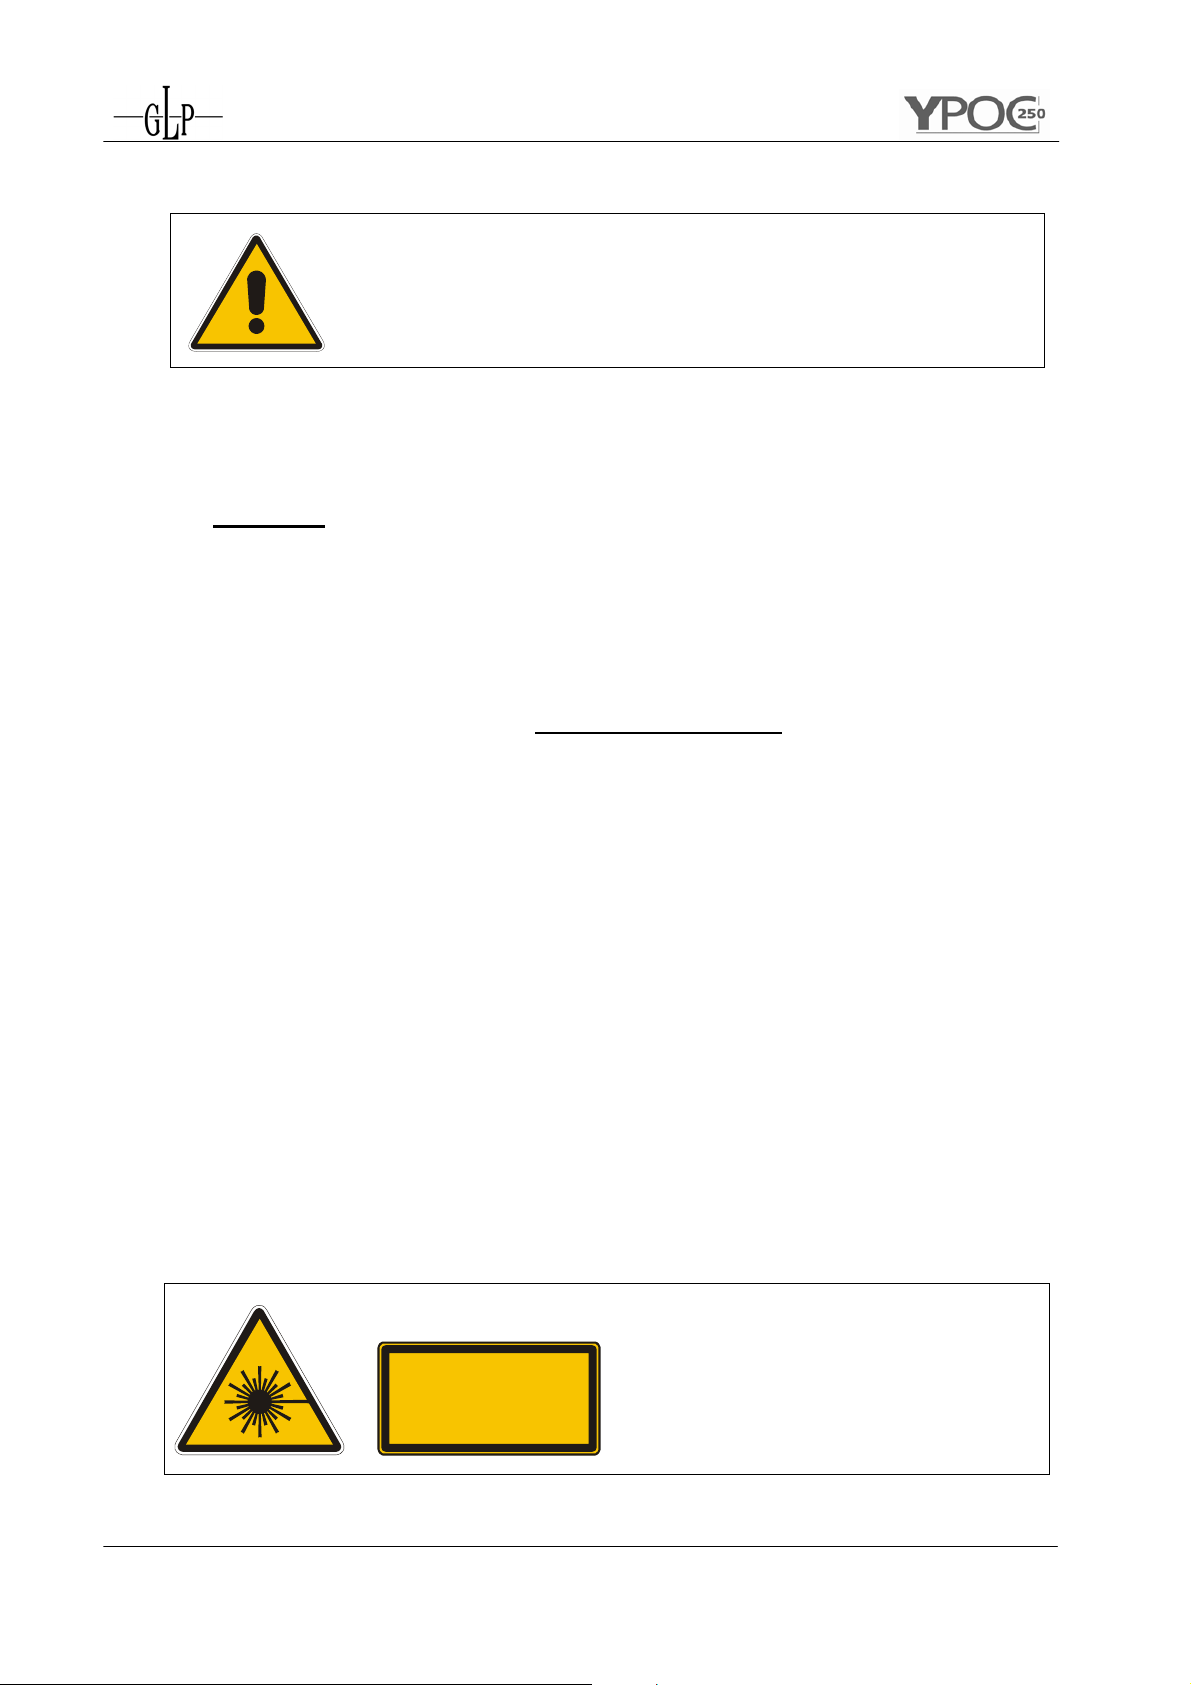
Attention: Laser of class 3R may
injure your retina after a short resi-
LASE RSTRAHLUNG
NICHT IN DEN STRAHL BLICKEN
LASER KLASSE 3R
NACH DIN-EN 60825-1/11:2001
λ
P 5mW; = 635-650 nm
0
dence time even without any optical
instrument. Avoid any direct ex-
posure of your eyes!
GLP German Light Production (V1.6) 6
Page 7
2 Preparation and Installation
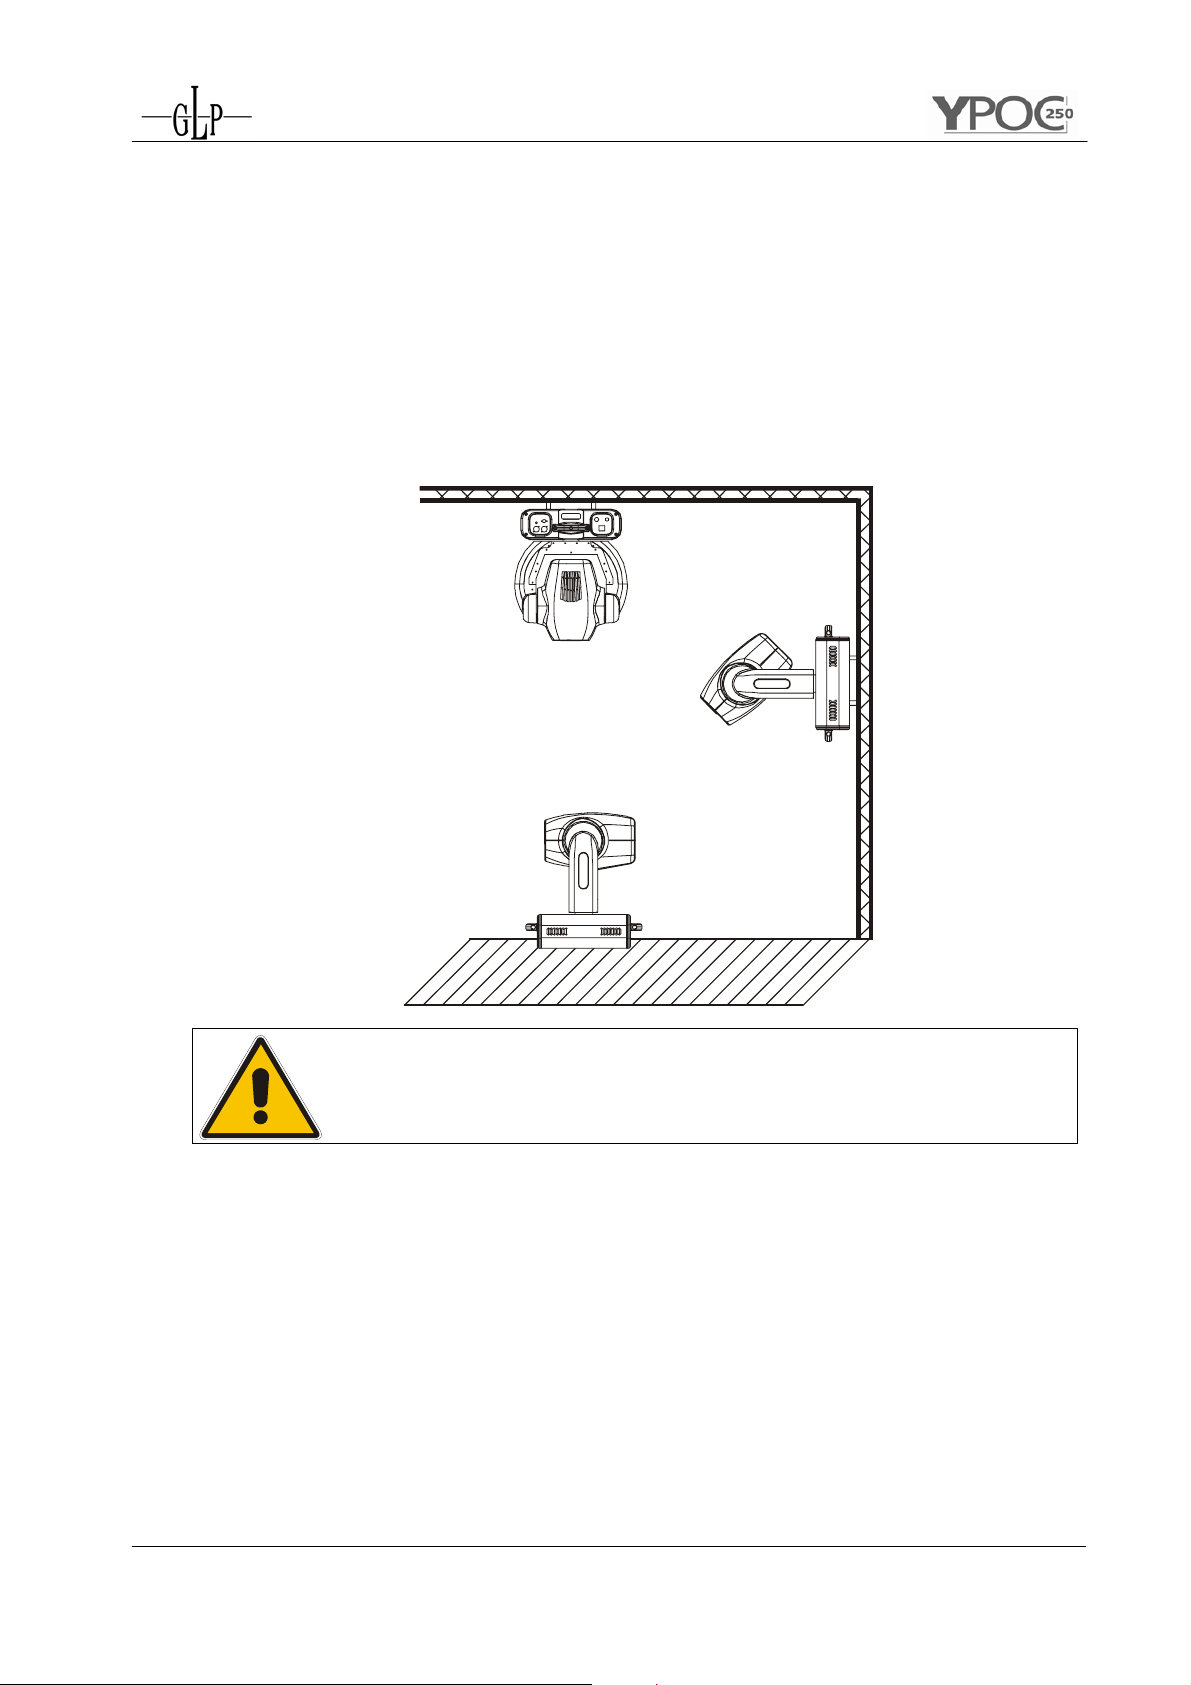
2.1 Mounting
The YYPPOOCC 225500 is fully operational whether it hangs or is mounted to the wall. It
can also be operated while standing on the floor. Keep a safety distance of 0.5 m
towards any easy inflammable materials (decoration etc.). Install a safety wire that
can hold at least 10 times the weight of the fixture. Never use the carrying handles
for secondary attachment.
Pay attention to the regulations of: BGV C1 (former VBG 70)
and DIN VDE 0711-217. Regulations of show laser BGV B2
(11.2001), E DIN 56912 part 6, DIN-EN 60825 part 1+2.
2.1.1 Clamps
Use two clamps on the backside of the YYPPOOCC 225500 to mount the unit on a
truss (each two opposite threads max. M10x20). See also printing on the
backside of the case.
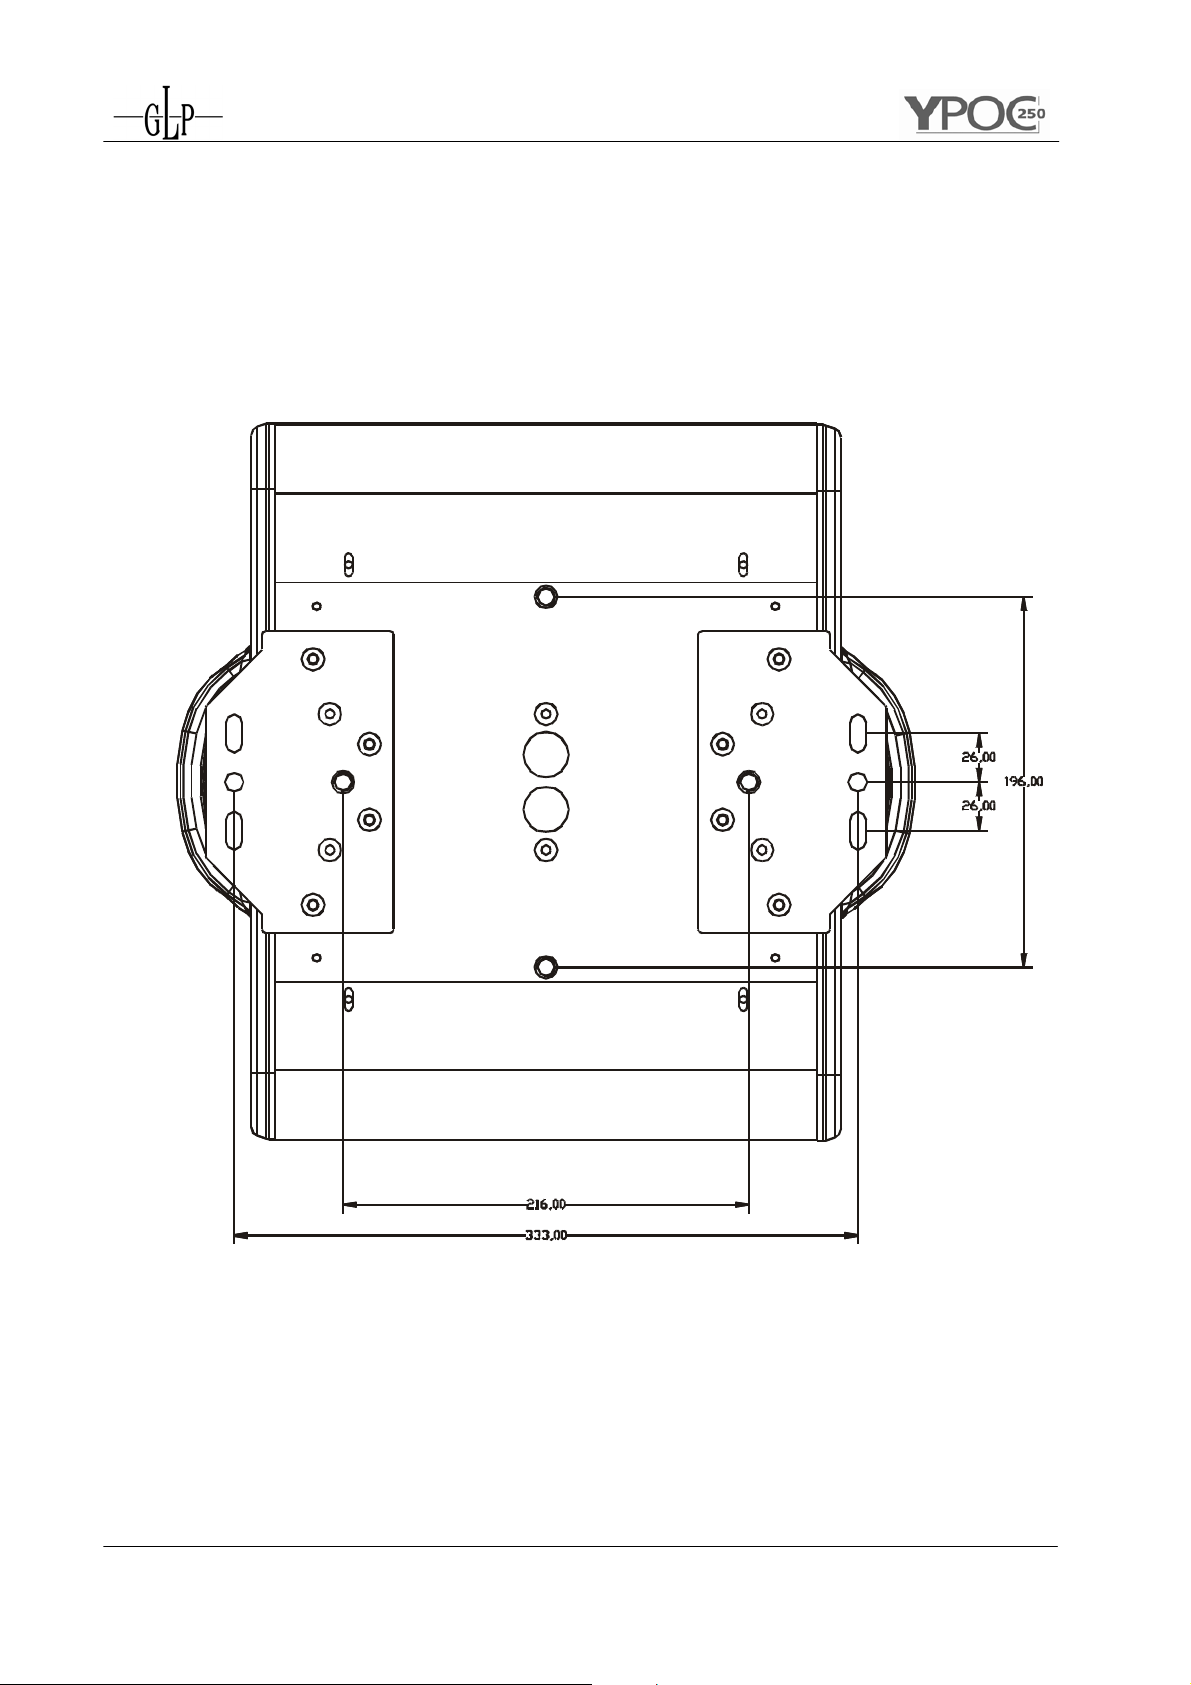
2.1.2 Mounting plate
For a permanent installation of the YYPPOOCC 225500 you can use a optional
mounting plate to fix the unit on a wall. The plate uses 4x screws M6x20.
GLP German Light Production (V1.6) 7
The installation should be done by qualified staff only.
Page 8
2.2 Secure the YYPPOOCC 225500
Regardless of the rigging of the YYPPOOCC 225500 you have to use a stipulated safety
wire. Therefore you have to thread to safety wire through to two provided holes on
the backside of the fixture and connect it with the truss-support. Pay attention to a
safe and proper fastening.
GLP German Light Production (V1.6) 8
Page 9

2.3 Connections
2.3.1 Power supply
230 Volt, 50 Hz,
Connected load 500W <=> 2,2 A (blind current compensation).
or 115V, 60 Hz
Connected load 500W <=> 4,4 A (blind current compensation).
Please see printing on the case for the right Power supply !
2.3.2 DMX
DMX 512 Standard input/output. See also printing on the case for the right
pin assignment.
[+] = Pin 3 / [-] = Pin 2 / [Ground] = Pin 1
The DMX- Addressing starts at the DMX- Address [001].
2.4 Fuse
The YYPPOOCC 225500 electronic system is protected by a 5x20 mm fuse.
230V / T 3,15A (EU model) or 115V / T 6,3A (US model)
Please see the printing on the YYPPOOCC 225500 for more de tails.
Attention:
• Disconnect AC outlet before changing a fuse!
• Use only the original declared fuse type!
GLP German Light Production (V1.6) 9
Page 10

y
y
y
3 The Menu Field
You find the control board on the side part of the base. It allows
you to make all necessary adjustments of t he YYPPOOCC 225500.. With the
Mode-key you get into the main menu. Afterwards you can navigate through the menu with the Up/Down-keys. Push the Enter-
key to get in the next menu level or to confirm your settings. Make
them and set functions ON/OFF with the Up/Down-keys. Confirm
and save it with the Enter-key (the display shows
Mode-key to cancel the entry and go back t o t he m ain menu.
OK). Push the
Level 1 Level 2 Level 3 Remark
D001
TEST MOD1
AUDI ASLW
AFST
MSTR
SVPT
SIZE
LAMP
RESE
TIME POWR
LA1
LA2
RPAN
RTLT
MODE GDMX
MDMX
HDMX
SPEC MANU
LAAU
DLOF
DMXI
DISP D ON
Å DOWN - UP Æ
REV
TEMP
FANS HIGH
REG
LOOF
LOHI
ADJU CODE xxxx
Define the DMX start address
Test program of all functions
Self-running audio program (slow)
Self-running audio program (fast)
Master for the audio program
Basic position for the audio program
Size for the audio program (NORM-BIG-MIDL-SMAL)
Switch on/of the lamp direct at the YYPPOOCC 225500
Reset
Running time of the fixture (no destructible)
Running time of the lamp (erasable)
Running time of the lamp (no destructible)
Reverse Pan-direction
Reverse Tilt-direction
DMX Mode, Standard GLP
DMX Mode 'M'
DMX Mode 'H'
Manual drive of all device functions
Automatic lamp start
Switch off lamp via DMX
Reed out actual DMX-values
Display On/Off
Twist the display
Reed out internal temperature
Maximum cooling fan velocity
Automatic cooling fan control
Low cooling fan speed Æ lamp off
Low cooling fan speed Æ automatic
Use the code for entering the calibration menu (for
authorized person only)
COLO
GOBO
PRIS
SHT1
SHT2
clre
facc
DFSE
FEED
EFLG
Calibration of the color wheel
Calibration of the gobo wheel
Calibration of the prism wheel
Calibration of the shutter 1
Calibration of the shutter 2
Settings in the internal memory (superuser only)
Must read on. Protected with a code.
Call on the default function values
Pan/Tilt feedback (error correction) On/Off
Correction of faults
Mode-ke
LED-Displa
MODE ENTER UP DOWN
M O D E E N T E R U P D O W N
Enter-key Down-key
Up-ke
GLP German Light Production (V1.6) 10
Page 11

3.1 Adjust the DMX- Address (D001)
Right after turning on the YYPPOOCC 225500 you can see the current DMX- Address. If
there is no DMX- Signal the display flashes.
D001
For the address setting please follow this procedure:
1. Switch On the YYPPOOCC 225500 and wait until the fixture reset has finished ('RESE' is
flashing in the display).
2. Press the Mode-key in order to access the main menu. Browse through the
menu by pressing the Up/Down-keys until the display shows D001. Confirm by
pressing the Enter-key (the decimal point is flashing)
3. Use the Up/Down-keys to select the desired address. Confirm the setting by
pressing the Enter-key (the display shows OK) or press the Mode-key to
cancel.
The DMX- Address is stored also while switching off the YYPPOOCC 225500!
3.2 The Test Program (TEST)
test
The Test-Program allows you to run a complete self test procedure of all
functions. Press Enter to confirm or Mode to cancel.
3.3 The Audio Program (AUDI)
Audi
The Audio-menu allows you to run a stand alone audio program. This chaser can
run either fast or slow. AFST: Every soundimpulse on step of the chaser. Aslw:
Every second soundimpulse one step of the chaser.
Additional you can choose a basic position for this audio chaser. Use therefore
either the internal manual mode or an external controller to set the desired
Pan/Tilt position. Confirm this setting in the SVPT menu by pressing the Enter-key.
You can also set the size of the audio chaser in the SIZE menu. You have the
choice between: NORM (no basic position has to bee chosen), 'BIG', 'MIDL' and
'SMAL').
GLP German Light Production (V1.6) 11
Page 12

If you want to run the systems simultaneously, one of the YYPPOOCCss must be
switched as the master. All others must be "Slave" Master = OFF. Notice:
Audio function is only working if no DMX is connected. This function can work e.g.
on small events or as an emergency program.
3.4 Lamp On/Off (LAMP)
LAMP
Use the Up/Down-keys to select lamp On or lamp Off Press Enter to confirm or
Mode to cancel and return to the main menu. (The lamp OFF command is only
working if the shutter is closed at the same time. Use an external controller or the
manual drive mode, see 3.10.1)
3.5 Reset (RESE)
RESE
Press the Enter-key to run a reset of all fixture functions (RST is shown in the
The
display).
3.6 Running time of lamp and unit (TIME)
TIME
By this option can read out three different running times of the fixture.
POWR
LA 1
Running time of the fixture (no destructible).
Running time of the lamp (erasable). Push the Up/Down-keys at one
time to delete this running time.
LA 2
Running time of the lamp (no destructible).
3.7 Invert Pan Movement (RPAN)
RPAN
This function allows you to invert the Pan movement. Use the Up/Down-keys to
select invert On or Off. Press Enter to confirm or Mode to cancel and return to the
main menu.
GLP German Light Production (V1.6) 12
Page 13

3.8 Invert Tilt Movement (RTLT)
RTLT
This function allows you to invert the Tilt movement. Use the Up/Down-keys to
select invert On or Off. Press Enter to confirm or Mode to cancel.
3.9 DMX Mode (MODE)
mode
This function allows you to choose between three different DMX modes. The three
modes are different in order of the DMX channels. Use this function for example
to adapt the YYPPOOCC 225500 to an older setup of other fixtures or if you use a fader
DMX desk. The standard mode is the GLP mode GDMX.
DMX
1 Pan (coarse) Shutter Pan (coarse)
2 Pan (fine) Dimmer Pan (fine)
3 Tilt (coarse) Color Tilt (coarse)
4 Tilt (f ine) Gobo Tilt (fine)
5 Color Gobo wheel rotation --6 Gobo Focus Color
7 Gobo positioning/rotation Prism, Prism rotation --8 Prism, Prism rotation Pan (coarse) Gobo
9 Shutter Pan (fine) Gobo, positioning/rotat ion
10 Dimmer Tilt (coarse) --11 Focus Tilt (fine) Prism
12 Special Speed Pan/Tilt Focus
13 Movement Special --14 Speed Pan/Tilt --- Shutter
15 Laser --- Dimmer
16 --- --- Speed Pan/Tilt
17 --- --- --18 --- --- Special
GLP- Mode (GDMX) M- Mode (MDMX) H- Mode (HDMX)
3.10 Special Functions (SPEC)
SPEC
This menu allows you to enter further special functions of the YYppoocc 225500..
In detail they are:
GLP German Light Production (V1.6) 13
Page 14

3.10.1 Manual Drive (MANU)
MANU
This function allows you to drive all the fixture functions manually. Select
the desired function with the Up/Down-keys and confirm with Enter. Now
choose the desired value with the Up/Down-keys and confirm again with
Enter or cancel and return to the menu with the Mode-key.
Function Value Remark
PAN 000 - 255
TILT 000 - 255
COLO 000 - 255
GOBO 000 - 255
GROT 000 - 255
PRIS 000 - 255
SHUT 000 - 255
DIMR 000 - 255
FOCU 000 - 255
SPEC 000 - 255
LASR 000 - 255
Pan Position
Tilt Position
Color wheel
Gobo wheel
Gobo rotation
Prism rotation
Shutter / Strobe funct ion (the lamp str ikes at
DMX 255 if dimmer is "open" = DMX 255)
Dimmer
Focus
Lamp Off, Reset, ...
Laser
3.10.2 Lamp On automatically (LAAU)
LAAU
This function enables to switch On the lamp automatically after switching
On the fixture. Use the Up/Down-keys to select ON if you want to switch on
the lamp automatically after switching on the fixture or Off if you don't want
this function. Press Enter to confirm or Mode to cancel and return to the
menu.
If you have chosen off you have the possibility to start the lamp either via
DMX or direct at the YYppoocc 225500 in the Lamp menu.
3.10.3 Lamp Off via DMX (DLOF)
DLOF
This function enables to switch off the lamp via DMX or not. Use the
Up/Down-keys to select ON if you want to switch off the lamp via DMX or
Off if you don't want this function. Press Enter to confirm or Mode to
cancel and return to the menu.
GLP German Light Production (V1.6) 14
Page 15

If you have chosen off you have the possibility to switch off the lamp either
direct at the YYppoocc 225500 in the Lamp menu or switch off the main switch.
3.10.4 DMX Input (DMXI)
DMXI
Readout DMX values of each channel received by the fixture. Use the
Up/Down-keys to select desired channel and press Enter to read its value.
Function Value Remark
PAN 000 - 255
TILT 000 - 255
COLO 000 - 255
GOBO 000 - 255
GROT 000 - 255
PRIS 000 - 255
SHUT 000 - 255
DIMR 000 - 255
FOCU 000 - 255
SPEC 000 - 255
MOVE 000 - 255
SPED 000 - 255
LasR 000 - 255
Pan Position
Tilt Position
Color wheel
Gobo wheel
Gobo rotation
Prism wheel
Shutter / Strobe funct ion
Dimmer
Focus
Lamp Off, Reset, ...
Movement
Speed Pan/Tilt
Laser
3.10.5 Display (DISP)
DISP
Use this function to choose between different display indications. Use the
Up/Down-keys to select desired function and press Enter to confirm or
Mode to cancel and return to the menu.
D ON Display On/Off (If you've chosen off, the display will go out within
15 seconds after the last input. The next key touch will reactivate
the display).
REV
3.10.6 Fixture Temperature (TEMP)
Turn around the display
TEMP
This function allows you to read out the actual temperature of the YYppoocc
0. Press Enter to confirm or Mode to cancel. Inside temperatures below
22550
GLP German Light Production (V1.6) 15
Page 16

80°C are not critical. 80°C and more lead the lamp being switched off at a
critical point. Please note for a save operation that the outside temperature
should not exceed 45°C.
3.10.7 Fan Control
(FANS)
FANS
By using this function you can choose between 4 types of fan speed
operations. Use the Up/Down-keys to select desired function and press
Enter to confirm or Mode to cancel and return to the menu.
HIGH
REG
LOOF
LOHI
3.10.8 Adjustments and Calibrations (ADJU)
The cooling fan works continuously at max. speed.
The fan automatically raises its speed in order to control inside
temperature of the fixture.
The fan keeps the adjusted low speed until the temperature
exceeds max. inside temperature, then the YYppoocc 225500 automatically switch off the lamp.
The fan keeps the adjusted low speed until the temperature
exceeds max. inside temperature, then the YYppoocc 225500 automatically switch from low to high fan speed.
ADJU
By this function you can adjust and calibrate the positions of the different
wheels and other motors. This can be necessary after a service or repair
work.
For this function you have to entry the fixture code. This work should be
done only by authorized persons.
Use the Up/Down-keys to select desired function and press Enter to
confirm or Mode to cancel and return to the menu. Use now the Up/Down-
keys to set the adjustment values and confirm once more with the Enter-
key or cancel with the Mode-key.
Function Value Remark
COLO - 99 - + 99
GOBO - 99 - + 99
PRIS - 99 - + 99
SHT1 - 99 - + 99
SHT2 - 99 - + 99
clre
Adjustments in the internal circuit .
Color wheel
Gobo wheel
Prism wheel
Shutter 1
Shutter 2
GLP German Light Production (V1.6) 16
Page 17

3.10.9 Default Settings (DFSE)
DFSE
Press Enter to reset all fixture personalities (not the adjusted functions) to
the default values. On the display will appear ok to indicate that the de-
faults are set.
Function Display Default Settings
DMX Address
Pan reverse
Tilt reverse
Automatic lamp on
Lamp on via DMX
Display
Cooling fan
Feedback
D001 D001
RPAN ON OFF 9
RTLT ON OFF 9
LAAU ON OFF 9
DLOF ON 9 OFF
DISP D ON 9
FANS
HIGH
REG 9
LOOF LOHI
FEED ON 9 OFF
3.10.10 Feedback (FEED)
FEED
The YYPPOOCC 225500 is provided with a automatic position correction (feedback)
for the Pan and Tilt movement. Use the Up/Down-keys to select ON if you
want to enable the feedback function or Off if you don't want this function.
Press Enter to confirm or Mode to cancel and return to the menu.
3.10.11 Correction of faults (EFLG)
EFLG
(Function available for authorized persons only)
3.11 Error and Information Messages
HEAt
This message appears if you try to switch on the lamp within 5 minutes
after having switched off (lamp too hot). The message will appear on
the display if the lamp doesn’t ignite within 20 seconds. The fixture will
store this command and automatically ignite the lamp after 5 minutes.
LaeR
After the ignition of the lamp was two times not successful the display
will show LAER. That means the lamp could be damaged or even
missed, the fixture is overheating or there could be a failure on the
GLP German Light Production (V1.6) 17
Page 18

igniter or ballast. Switch off the power supply and solve the possible
problem.
OTMP
This error message informs you that the fixture was overheating and
that the relay switches off the lamp. Pleas look for possible reasons
(fan faulty, air in/outlets blocked or very dirty, lamp broken or very old,
too high ambient temperature. Switch off the power supply and solve
the possible problem.
RsER
This message informs you that one of the fixture function wasn’t able to
do its reset correct (magnetic sensor, stepping motor, driver on the
PCB, cables, etc.). Repair the defect and start the fixture again.
4 DMX Channel Selection (DM X Pr otocol)
Channel Function Time and Value DMX HEX %
1) PAN coarse
2) PAN-fine
3) Tilt coarse
4) Tilt-fine
5) Color
open / color 1 (fast) 2..3 02..03 1,0
color 1, Brilliant Blue (fast)
color 1 / color 2 (fast) 6..7 06..07 2,5
color 2, Blue (fast) 8..9 08..09 3,3
color 2 / color 3 (fast) 10..11 0A..0B 4,1
color 3, Blue Purple (fast) 12..13 0C..0D 4,9
color 3 / color 4 (fast) 14..15 0E..0F 5,7
color 4, Magenta (fast) 16..17 10..11 6,5
color 4 / color 5 (fast) 18..19 12..13 7,3
color 5, Pink (fast) 20..21 14..15 8,0
color 5 / color 6 (fast) 22..23 16..17 8,8
color 6, Orange (fast) 24..25 18..19 9,6
color 6 / color 7 (fast) 26..27 1A..1B 10,4
color 7, Canary (fast) 28..29 1C..1D 11,2
color 7 / color 8 (fast) 30..31 1E..1F 12,0
color 8, Italian Blue (fast) 32..33 20..21 12,7
color 8 / color 9 (fast) 34..35 22..23 13,5
color 9, Turquoise (fast) 36..37 24..25 14,3
color 9 / color 10 (fast) 38..39 26..27 15,1
color 10, Jade (fast) 40..41 28..29 15,9
color 10 / color 11 (fast) 42..43 2A..2B 16,7
color 11, Red (fast) 44..45 2C..2D 17,5
color 11 / open (fast) 46..47 2E..2F 18,2
open (fast) 48..63 30..3F 19,0
open (slow) Chaser from color to 64..65 40..41 25,3
0 .. 530° min. 2,65 s 0..255 00..FF 0..100
High- Pos ... High- Pos + 2,1° (16 Bit) 0..255 00..FF 0..100
0 .. 285° min. 1,8 s 0..255 00..FF 0..100
High- Pos … High- Pos + 1,1° (16 Bit) 0..255 00..FF 0..100
open (fast) 0..1 00..01 0,2
Chaser from color to
color max. 140 BPM
=> 0,43 s
4..5 04..05 1,8
GLP German Light Production (V1.6) 18
Page 19

Channel Function Time and Value DMX HEX %
open / color 1 (slow) 66..67 42..43 26,1
color 1, Brilliant Blue (slow)
color max. 70 BPM
=> 0,86 s
68..69 44..45 26,9
color 1 / color 2 (slow) 70..71 46..47 27,6
color 2, Blue (slow) 72..73 48..49 28,4
color 2 / color 3 (slow) 74..75 4A..4B 29,2
color 3, Blue Purple (slow) 76..77 4C..4D 30,0
color 3 / color 4 (slow) 78..79 4E..4F 30,8
color 4, Magenta (slow) 80..81 50..51 31,6
color 4 / color 5 (slow) 82..83 52..53 32,4
color 5, Pink (slow) 84..85 54..55 33,1
color 5 / color 6 (slow) 86..87 56..57 33,9
color 6, Orange (slow) 88..89 58..59 34,7
color 6 / color 7 (slow) 90..91 5A..5B 35,5
color 7, Canary (slow) 92..93 5C..5D 36,3
color 7 / color 8 (slow) 94..95 5E..5F 37,1
color 8, Italian Blue (slow) 96..97 60..61 37,8
color 8 / color 9 (slow) 98..99 62..63 38,6
color 9, Turquoise (slow) 100..101 64..65 39,4
color 9 / color 10 (slow) 102..103 66..67 40,2
color 10, Jade (slow) 104..105 68..69 41,0
color 10 / color 11 (slow) 106..107 6A..6B 41,8
color 11, Red (slow) 108..109 6C..6D 42,5
color 11 / open (slow) 110..111 6E..6F 43,3
open (slow) 112.127 70..7F 44,1
color rotation, slow-fast, CW min. 1,4 turns/h 128..191 80..BF 50..75
color rotation, fast-slow, CCW max. 2,9 turns/sec. 192..253 C0..FD 76..98
Audio color chaser slow each 4th sound impulse
254 FE 99
Æ new color
Audio color chaser fast each sound impulse Æ
255 FF 100
new color
6) Gobo
Gobo 1 (open, fast) 0..7 0..7 0..2,9
Gobo 2 (fast) 8..15 8..F 3..5,9
Gobo 3 (fast)
Gobo 4 (fast) 24..31 18..1F 9..11,9
Gobo 5 (fast) 32..39 20..27 12..14,9
Gobo 6 (fast) 40..47 28..2F 15..17,9
Gobo 7 (fast) 48..55 30..37 18..20,9
Gobo 1 (open, fast) 56..63 38..3F 21..23
Gobo 1 (open, slow) 64..71 40..47 24..26,9
Gobo 2 (slow) 72..79 48..4F 27..29,9
Gobo 3 (slow)
Gobo 4 (slow) 88..95 58..5F 34..36,9
Gobo 5 (slow) 96..103 60..67 37..39,9
Gobo 6 (slow) 104..111 68..6F 40..42,9
Gobo 7 (slow) 112..119 70..77 43..45,9
Gobo 1 (open, slow) 120..127 78..7F 46..49
Gobo rotation, slow-fast, CW min. 1,4 turns/h 128..191 80..BF 50..75
Gobo rotation, fast-slow, CCW max. 1.0 turns/sec. 192..253 C0..FD 76..98
Audio gobo chase, slow each 4
Chaser from gobo to
gobo max. 100 BPM
=> 0,6 s
Chaser from gobo to
gobo max. 40 BPM
=> 1,51 s
th
sound impulse
16..23 10..17 6..8,9
80..87 50..57 30..33,9
254 FE 99
Æ new gobo
Audio gobo chase, fast each sound impulse Æ
255 FF 100
new gobo
7) Gobo
Posi./Rot
Gobo position 0 ... 540° 0..131 00..7F 0..50
Gobo rotation, slow-fast, CW min. 2,0 turns/h 132..191 80..BF 51..75
GLP German Light Production (V1.6) 19
Page 20

Channel Function Time and Value DMX HEX %
8) Prism
9) Shutter
10) Dimmer
11) Focus
12) Special
Gobo rotation, fast-slow, CCW max. 3,8 turns/sec. 192..253 C0..FD 76..100
Audio gobo rotation, slow each 4
Audio gobo rotation, fast each sound impulse Æ
Prism swing out 0..5 00..02 0..2
Prism position 0 ... 540° 6..129 00..7F 0..50
Prism rotation, slow-fast, CW min. 1,6 turns/h 130..191 80..BF 51..75
Prism rotation, fast-slow, CCW max. 4,4 turns/sec. 192..253 C0..FD 76..100
Audio prism rotation, slow each 4
Audio prism rotation, fast each sound impulse Æ
Shutter closed 0..15 00..0F 0..6
Random Strobe (different pattern) 16..31 10..1F 7..11,9
Strobe Pulse effect , slow - fast min. frequent 0,7 Hz 32..47 20..2F 12..12,9
Strobe effect , slow - fast max. frequent 10 Hz 48..239 30..EF 13..93
Shutter open (lamp start) 240..255 F0..FF 94..100
Dimmer closed (0%) 0..3 0..3 0..1
Dimmer 1%...99% movement time 0,3 sec. 4..251 4..FB 2..98
Dimmer open (100%) 252..255 FC..FF 99..100
in - out full distance 1,5 sec. 0..255 0..FF 0..100
no function 0..15 00..0F 0..6
Gobo-seesaw+/- 10°
slow – fast
Gobo-seesaw +/- 20°
slow – fast
Gobo-seesaw +/- 30°
slow – fast
Color-chaser C / C+1
slow – fast
Color-chaser C / C+2
slow – fast
13) Move-
Audio Pan / Tilt slow each 4
Audio Pan / Tilt fast each sound impulse Æ
no function 128..249 80..E5 50..97
Lamp OFF (3 sec.) 230..249 E6..F9 92..97
Reset 250..255 FA..FF 98..100
no movement 0 00 0
ment Movement Size Phase
PAN 1 0° 01..01 01..01 0,5
1 90° 02..03 02..03 1,0
1 180° 04..05 04..05 1,7
1 270° 06..07 06..07 2,5
PAN 2 0° 08..09 08..09 3,3
2 90° 10..11 0A..0B 4,1
2 180° 12..13 0C..0D 4,9
2 270° 14..15 0E..0F 5,7
PAN 3 0° 16..17 11..11 6,5
3 90° 18..19 12..13 7,3
3 180° 20..21 14..15 8,0
3 270° 22..23 16..17 8,8
th
sound impulse
254 FE 99
Æ new position
255 FF 100
new position
th
sound impulse
254 FE 99
Æ new prism
255 FF 100
new prism
3,5 moves / min. up to
16..31 10..1F 7..12
60 moves / max.
3,5 moves / min. up to
32..47 20..2F 13..18
60 moves / max.
3,5 moves / min. up to
48..63 30..3F 19..24
60 moves / max.
0,7 BPS ... 2,3 BPS
64..79 40..4F 25..31
=> 1,43 s ... 0,43 s
0,7 BPS ... 2,0 BPS
=> 1,43 s ... 0,5 s
th
sound impulse
80..95 50..5F 32..37
96..111 60..6F 38..43
Æ new position
112..127 70..7F 44..50
new position
GLP German Light Production (V1.6) 20
Page 21

Channel Function Time and Value DMX HEX %
14) Speed
Pan/Tilt
15) Laser
Lamp ON
Lamp OFF
PAN 4 0° 24..25 18..19 9,6
4 90° 26..27 1A..1B 10,4
4 180° 28..29 1C..1D 11,2
4 270° 30..31 1E..1F 12
TILT size / phase see also PAN 32..63 20..3F 13..25
PAN / TILT size / phase see also PAN 64..95 40..5F 26..37
PAN / TILT (inverse) size / phase see also PAN 96..127 60..7F 38..50
Circle size / phase see also PAN 128..159 80..9F 51..62
Circle (inverse) size / phase see also PAN 160..191 A0..BF 63..75
lying eight size / phase see also PAN 192..223 C0..DF 76..87
random movement size see also PAN 224..255 E0..FF 88..100
Pan/Tilt relative movement 0..15 00..0F 0..6
Pan/Tilt slow – fast
Use this channel 14) also for the speed
of the movements (channel 13).
Laser OFF 0..15 00..0F 0..6
Laser flashing random 16..31 10..1F 7..12
Audio Laser 32..47 20..2F 13..18
Blinking slow - fast 48..127 30..7F 19..50
Flashing slow - fast 128..239 80..EF 51..93
Laser ON 240..255 FO..FF 94..100
Shutter open 240..255 F0..FF 94..100
Channel 12 ( min. 3 sec. ) (only if
shutter is closed, channel 9 = 0 ..15)
Pan min. 530° = 200 s
Pan max. 530° = 2,65 s
Tilt min. 285° = 110 s
Tilt max. 285° = 1,8 s
230..249 6E..9F 92..97
16..255 10..FF 7..100
5 Change the Lamp
For a frictionless operation pleas read this chapter carefully and follow all instructions.
5.1 Safety Regulations
• Pull out the main plug!
• Wait min. 20 minutes after the last operation to cool down the fixture.
• Don’t touch the bulb of the lamp with bare fingers (this can cause damages).
• Before you put the YYPPOOCC 225500 into operation close the casing, otherwise your
retina can be hurt!
5.2 Realize the Lamp Change
1. Pull out the main plug!
2. Open the upper shell of the head casing by loosening the 4 Phillips screws.
GLP German Light Production (V1.6) 21
Page 22

A
Two on the front side and 2 on the back side of the head.
3. Open the 3 screws at the lamp sheet and remove it.
4. Remove the old or broken lamp out of the socket. Attention:
The glass bulb of
the lamp can splinter. For that reason remove the lamp with safety gloves or
some cloth.
5. Put in the new lamp securely into the socket.
fastening screw
Attention: Use only the original lamp type!
6. Adjust the optimum distance between the lamp
bulb and the lens (1.0-1.5 mm) with the adjusting
screw [A]. This can be necessary through
lamp
cover plate
different manufacturer.
7. Close the YYPPOOCC 225500 in reverse order.
8. The running time of the lamp LA1 can be reseed
in the Time Menu.
Attention:
Pay attention on a firm fit of the lamp and on the optimum distance
between the lamp and the lens (1.0 - 1.5 mm)!
lamp
5.3 Lamp adjustment
The optimum distance between the lamp and the lens must be controlled after
every lamp change. The lower deviation amount is min. 1.0mm. Running the
fixture within a lower deviation can cause damages of lamp and/or lens.
min. distance 1mm
WARNING:
Disconnect the fixtur e from AC power
before re-lam ping.
Lamp is hot! R isk of fire! Protect ha nds and eyes.
Wait at least 15min. Before opening the covers
and removing l amp from the fixture.
Maximum room temp erature t=45 C
Minimum dist ance from flam mable materia l d=0.5m.
Exterior surf ace temperat ure T=80 C
Not for domes tic use.
Be sure that the lamp
Adjust lamp position by tur ning screws and
Screws "A"
Screws "B"
bulb never touch the lens
AB
B
The YYppoocc 225500 lamp holder is aligned at the factory. Due to differences between
lamps, fine adjustments may improve light performance.
Pease follow this procedure:
GLP German Light Production (V1.6) 22
Page 23

1. Strike the lamp (for example in the LAMP menu) and wait a while until full
intensity of the lamp.
2. Direct the beam straight on a flat and bright surface/wall (beam open, white, no
gobo, no effects).
Remark: As the optimum distance of the lamp from lens was adjusted during
the installation or changing the lamp (by turning the screw A), it is necessary to
adjust only the second position by turning the screw B, in order to center the
so-called 'Hot-Spot' (the brightest part of the beam).
3. If the Hot-Spot is not in the middle, you can adjust this by turning the screw B.
4. If the Hot-Spot is too bright and the beam not even, you can adjust this again
by turning the screw A. clockwise (get nearer towards the reflector). Remark:
A complete even beam can't be reached because of the design of the lamp.
5. Appears the beam more bright at the edge, you can adjust this by turning the
screw A counter-clockwise (get nearer towards the lens).
Attention: Never remain the minimum distance between lamp and lens
(1.0mm). Is there any doubt, open the fixture and control the distance!
6 Change a Gobo
The YYPPOOCC 225500 is fitted with standard gobos (outside diameter 27 mm, image size 23
mm). You can use ether steel or glass gobos.
6.1 Safety Regulations
• Pull out the main plug!
• Wait min. 20 minutes after the last operation to cool down the fixture.
• Before you put the YYPPOOCC 225500 into operation close the casing, otherwise your
retina can be hurt!
6.2 Realize the Gobo Change
1. Pull out the main plug!
2. Open the upper shell of the head casing by loosening the 4 Phillips screws.
Two on the front side and 2 on the back side of the head.
GLP German Light Production (V1.6) 23
Page 24

3. Remove the gobo springs with a small screwdriver.
4. Change the gobo and fix it with the gobo spring. Pay attention on a safe fit.
5. Close the YYPPOOCC 225500 in reverse order.
Attention:
If you use glass gobos, the non-vaporized side must be fitted towards the
lamp direction.
Maintenance and Cleaning the YYPPOOCC 225500
77
It is absolutely essential that the fixture is kept clean and that dust, dirt and smoke-fluid
residues must not built up on or within the fixture. Otherwise the fixture's light-output will
be significantly reduced. Regular cleaning will not only ensure the maximum lightoutput, but will also allow the fixture to function reliable throughout its life.
A soft lint-free cloth moistened with any good glass cleaning fluid is recommended, under no circumstances should alcohol or solvents be used!
The inside optical system should be maintained only by authorized persons. Please
contact your local dealer.
7.1 Safety Regulations
• Pull out the main plug!
• Wait min. 20 minutes after the last operation to cool down the fixture.
• Before you put the YYPPOOCC 225500 into operation close the casing, otherwise your
retina can be hurt!
GLP German Light Production (V1.6) 24
Page 25

7.2 Circumference and Interval (rule-of-thumb)
The contamination of the fixture depends on the environment details. Therefore
no general guidelines can be given. From this it follows that the intervals are only
suggestions from our practice experience.
Position Interval In this way
Outside optic weekly soft cloth and glass cleaning fluid
Color filter monthly soft clot h and glass cleaning fluid
Gobos yearly vacuum cleaner, airbrush, etc.
Glass gobos monthly soft cloth and glass cleaning fluid
Prism monthly soft cloth and glass cleaning fluid
Dimmer/Shutter yearly vacuum cleaner, airbrush, etc.
Inside lens monthly
Fan and air channel monthly vacuum cleaner, airbrush, etc.
Reflector
Lamp
Moveable parts yearly suitable fatty oil
never
never
soft cloth no glass cleaning fluid
Attention:
1. Never let optical parts come into contact with oil or fat.
2. Before running the fixture wait until all parts are dried up.
3. Never clean the aspheric lens with water or other cleaners. Change the
lens if it looks milky (about 1-2 years). For that please contact your local
dealer.
7.3 Cleaning the Optical System
1. Pull out the main plug!
2. Wait min. 20 minutes after the last operation to cool down the fixture.
3. Open the upper shell of the head casing by loosening the 4 Phillips screws.
Two on the front side and 2 on the back side of the head.
4. Do the work as explained in the list above.
5. Before you put the YYPPOOCC 225500 into operation close the casing, otherwise your
retina can be hurt!
GLP German Light Production (V1.6) 25
Page 26

8 Technical Specification
Power supply
Power consumption
EU-model
Fuse protection
US-model
Fuse protection
Lamp
Type 1
Type 2
Optical system
Parabolic reflector
Doubles condenser lens
15° standard objective (optional 12° or 18°)
Lens anti-reflex
Color
11 dichroic filter plus white
Gobos
6 exchangeable standard gobos plus open
Gobo outside diameter 27 mm, image size 23 mm
All gobos rotating and positioning
Shutter / Strobe / Dimmer
Strobe- effect with variable speed 1 - 10 f lashes per second
Continuously mechanical dimmer 0 - 100%
Prism
Rotating 3-face prism, rotating and variable in speed
Focus
Motor driven focus from near to far away
Drive
Standard DMX-512, 3 pole XLR; [+] = Pin 3 [- ] = Pin 2 [Ground] = Pin 1.
The DMX- addressing starts at t he DMX- address [001].
Pan / Tilt
Pan- movement 530° in max. 2,65 seconds, 16 bit resolution
Tilt- movement 280° in max. 1,68 seconds, 16 bit resolution
Weights and measures
Width of the base 380 mm
Length of the base 380 mm
height (head vertical) 500 mm
Weight (net) 22,2 kg
Weight (gross) 24, 6 kg
500 Watt (blind current compensated)
AC 230V / 50 Hz~
T3,15A, 250V, 5x20 mm (fine- wire fuse)
AC 115V / 60 Hz~
T6,3A, 115V, 5x20 mm (f ine- wire fuse)
MSD 230V/250W, socket G Y- 9,5
MSD 230V/200W, socket G Y- 9,5
GLP German Light Production (V1.6) 26
Page 27

Brilliant
Blue
Blue
Purple
Magenta
Blue
Pink
Red
Jade
Turquoise
Italian
Blue
Orange Canary
GLP German Light Production (V1.6) 27
Page 28

9 Index
A
Adjustments....................................................16
aspheric lens....................................................25
Audio................................................................11
B
BGV C1..............................................................7
C
Calibrations ....................................................16
Change a Gobo................................................23
Circumference..................................................24
Clamps...............................................................7
Cleaning...........................................................25
Connected load..................................................9
D
Description of Device .........................................5
DIN VDE 0711-217 ............................................7
Display..............................................................15
DMX ...................................................................9
DMX- Address.................................................11
DMX Input ........................................................15
DMX Mode .......................................................13
DMX Protocol...................................................18
E
Error Messages ..............................................17
EU model ...........................................................9
F
Fan...................................................................16
Feedback .........................................................17
Fixture Temperature ........................................15
Fuse...................................................................9
G
Glass Gobos ....................................................24
I
Injury of the retina..............................................6
Invert................................................................12
L
Lamp adjustment .............................................22
M
Maintenance...................................................24
Measures.........................................................26
Menu Field.......................................................10
Mounting............................................................7
Mounting plate .................................................7
P
Pan- movement ...............................................26
Permanent installation .......................................7
Power supply......................................................9
R
Reset................................................................12
Running time....................................................12
S
Safety Instructions .............................................6
Secure the YYPPOOCC 225500 .......................................8
Special Functions.............................................13
T
Technical Specification....................................26
Test Program...................................................11
Tilt- movement.................................................26
U
US model...........................................................9
V
VBG 70 ..............................................................7
W
Weights............................................................26
GLP German Light Production (V1.6) 28
Page 29

GLP German Light Production (V1.6) 29
 Loading...