

Page 1
Instruction version 1.1
e-mail: service@glp.de
Internet: http://www.glp.de
Page 2

R
R
R
-
-
-
G
G
G
-
-
-
B
B
B
GLP German Light Products GmbH
Instruction version 1.1
2
Notes:
Page 3

R
R
R
-
-
-
G
G
G
-
-
-
B
B
B
GLP German Light Products GmbH
Instruction version 1.1
3
Table of contents
1 Description of Device.............................................................................................. 4
1.1 Safety Instructions ............................................................................................ 4
1.2 Protection rating ................................................................................................ 5
2 Preparation and Installation ................................................................................... 6
2.1 Mounting ........................................................................................................... 6
2.2 Securing the fixture ........................................................................................... 6
2.3 Connections ...................................................................................................... 6
2.3.1 Power Supply....................................................................................... 6
2.3.2 DMX ..................................................................................................... 6
3 The Menu ................................................................................................................. 7
4 DMX Channel Selection (DMX Protocol) ............................................................... 7
5
5 Maintaining and Cleaning the Ion Spot ................................................................. 9
5.1 Safety regulations ............................................................................................. 9
5.2 Maintenance Intervals (rule-of-thumb) .............................................................. 9
6 Technical Specifications ...................................................................................... 10
7 Index ....................................................................................................................... 11
Page 4
R
R
R
-
-
-
G
G
G
-
-
-
B
B
B
GLP German Light Products GmbH
Instruction version 1.1
4
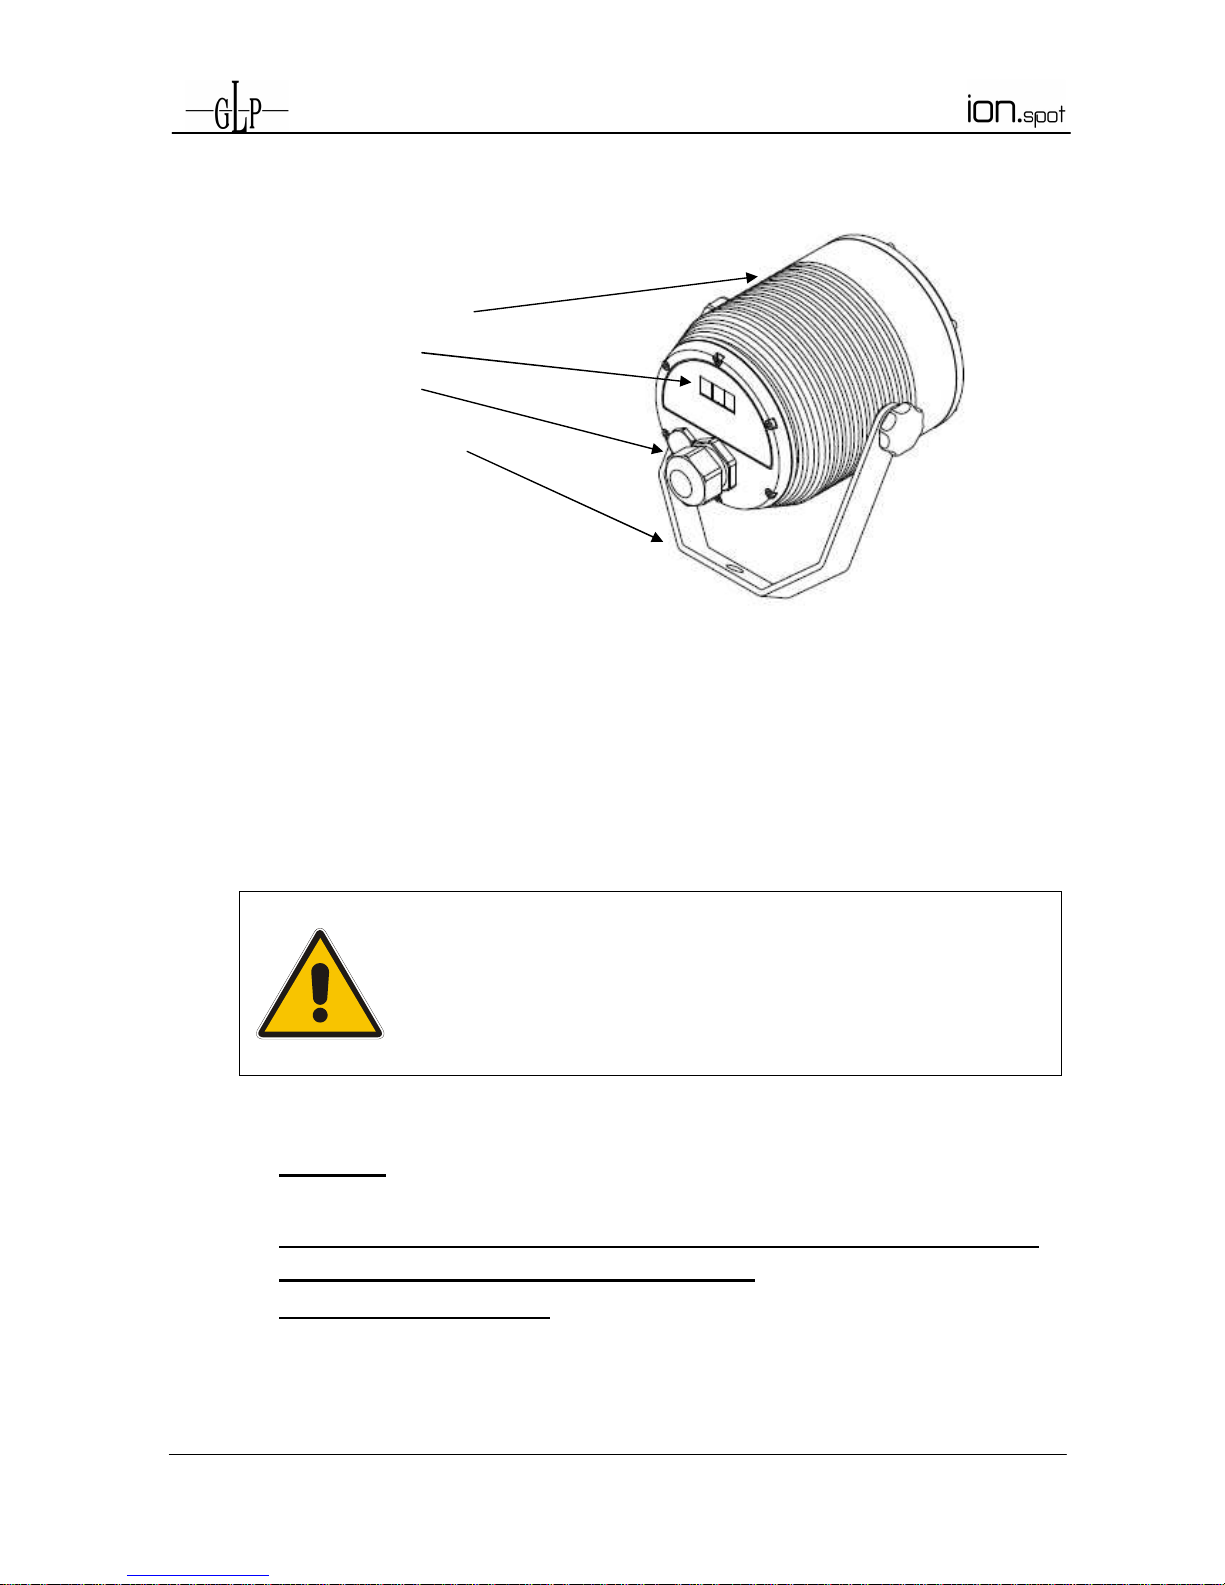
1 Description of Device
1. Head (passively cooled)
2. LED Display/Menu
3. Connector (IP 65)
4. Arm with adjustment screws
1.1 Safety Instructions
The IIoonn SSppoott is an advanced technology product. To guarantee
smooth operation, it is necessary to follow the following rules.
The manufacturer of this device will not take responsibility of
damages through any disregard of the information in this user
manual. Warranty claims will also be cancelled in event of the
system casing being opened.
1. A safety distance of at least 0.5 m to any easily inflammable material (e.g.
decoration material) must be adhered to.
2. Attention! The IIoonn SSppoott ccaann bbeeccoommee hhoott dduurriinngg ooppeerraattiioonn.. Don’t touch the
device during the operation. This can cause injuries or damages.
3. The system doesn’t contain any user serviceable parts. Open the
fixture will void the manufacturers warranty!
4. -- Danger of BURNING -- Wait at least 15 minutes after disconnecting the
AC power before changing the optical carrier in the fixture. Pay attention to
possible hot parts of the system.
Page 5

R
R
R
-
-
-
G
G
G
-
-
-
B
B
B
GLP German Light Products GmbH
Instruction version 1.1
5
5. Never look directly into the beam of light or one of the LEDs. Never use
optical apertures with a distance less than 0.5 m to observe the beam of
light. LED Class 2M. Not following these precautions can result in serious
injury to your eyes and in particular your retina.
Attention:
LED Class 2M can cause injuries of your eyes even
without optical instruments in front of them or within a distance
of less than 0.5m and short exposure time.
Avoid direct radiation to your eyes!
6. To ensure proper operation, you must also follow the installation guide in
chapter 2 of this manual. Operating the IIoonn SSppoott without suitable mounting
devices can increase the risk of an accident.
7. Repair-, maintenance- and installation work should only perfomred by
qualified or GLP certified staff. You need to pay attention to the common
rules of technology that are not explicit mentioned in this manual.
8. Use only original spare parts. Any structural modification on the system will
terminate all warranty claims.
9. Please keep this instruction manual for future reference.
1.2 Protection rating
The fixture should only be used with its classified IP rating. Failure to do so will
void the warranty.
IP 65 is classified for:
Dust Ingress:
No- dust entry, up to a pressure of 20mbar, will enter the fixture housing.
Protected against water-jet:
Water that is aimed from any direction will not result in any damage to the
fixture. Note: This equates roughly to a 12.5 litre per/min. Test for a duration
of 5 minutes although these criteria can´t be specifically guaranteed for every
installation.
Page 6

R
R
R
-
-
-
G
G
G
-
-
-
B
B
B
GLP German Light Products GmbH
Instruction version 1.1
6
2 Preparation and Installation
2.1 Mounting
The IIoonn SSppoott is fully operational whether it hangs or is mounted at the wall. It
can also be operated while standing on the floor. Keep a safety distance of
0.5 m from any easily inflammable materials (decoration etc.).
Pay attention to the regulations of: BGV C1 (former VBG 70)
and DIN VDE 0711-217.
The installation shall be done by qualified personal only.
2.2 Securing the fixture
Regardless of the mounting method of the IIoonn SSppoott you'll have to use a
secondary safety wire. This safety wire can be attached to the fixture by
threading it through the arm of the fixture housing. Ensure that the safety is
securely fastened through the fixture and the fixture´s mounting surface. Install
a safety wire that can hold at least 10 times the weight of the fixture.
2.3 Connections
2.3.1 Power Supply
~100-240 Volt AC, 50-60 Hz, without plug.
Connected load 45 VA (W) <=> T1A (micro-fuse 5x20mm)
Disconnect from the mains supply before changing the fuse and
use only the above described micro-fuse type.
2.3.2 DMX
USITT DMX-512 Standard input/output without connectors.
The DMX- Addressing starts at the DMX- Address [001].
Page 7

R
R
R
-
-
-
G
G
G
-
-
-
B
B
B
GLP German Light Products GmbH
Instruction version 1.1
7
3 The Menu
Mode adjust and DMX address setting
The Mode will change with the button 100. The Mode button needs to be pushed
several times until dn1, dn2 or dn3 shows in the display.
The DMX address will be adjusted with the buttons 1, 10 and 100. Every button press
will incremently the digit above. At maximum value the Digit goes back to the
minimum value.
The DMX address and the mode adjustment will save automatically, 5 seconds after
the last button press.
4 DMX Channel Selection (DMX Protocol)
1. DMX Mode 1, RGB Mode, 4 DMX Channels (dn1)
Channel
Function
Times and Values
DMX
HEX %
1) Red
Color mixing - Red 0 - 100% 0..255 00..FF 0..100
2) Green
Color mixing - Green 0 - 100% 0..255 00..FF 0..100
3) Blue
Color mixing - Blue 0 - 100% 0..255 00..FF 0..100
4) Dimmer
Dimmer 0 - 100% 0..255 00..FF 0..100
2. DMX Mode 2, Color-Mode, 1 DMX Channel (dn2)
Channel
Function
Times and Values
DMX
HEX %
1) Color
Off 0..7 00..07 0..2,5
(fixed)
Color 01 - Red 1) 8..15 08..0F 3..5,5
Color 02 - Amber 1) 16..23 10..17 6..8,5
Color 03 - Yellow (warm) 1) 24..31 18..1F 9..12,5
Color 04 - Yellow 1) 32..39 20..27 13..15,5
Color 05 - Green 1) 40..47 28..2F 16..18,5
Color 06 - Turquise 1) 48..55 30..37 19..21,5
Color 07 - Cyan 1) 56..63 38..3F 22..24,5
Color 08 - Blue 1) 64..71 40..47 25..27,5
Color 09 - Lavender 1) 72..79 48..4F 28..30,5
Color 10 - Mauve 1) 80..87 50..57 31..34,5
Color 11 - Magenta 1) 88..95 58..5F 35..37,5
Color 12 - Pink 1) 96..103 60..67 38..40,5
White - CTO Color Temp. 3200K 104..111 68..6F 41..43,5
White Color Temp. 5600K 112..119 70..77 44..46,5
White - CTB Color Temp. 7200K 120..127 78..7F 47..49,5
Rainbow Effect Stop 2) 128 80 50
Rainbow Effect 3) slow - fast 129..223 81..DF 51,,88
Rainbow Effect, Random Col. slow - fast 224..255 E0..FF 89..100
Page 8

R
R
R
-
-
-
G
G
G
-
-
-
B
B
B
GLP German Light Products GmbH
Instruction version 1.1
8
3. DM Mode, Color-Mode, 2 DMX Channels (dn3)
Channel
Function
Times and Values
DMX
HEX %
1) Color
Off 0..7 00..07 0..2,5
(fixed)
Color 01 - Red 1) 8..15 08..0F 3..5,5
Color 02 - Amber 1) 16..23 10..17 6..8,5
Color 03 - Yellow (warm) 1) 24..31 18..1F 9..12,5
Color 04 - Yellow 1) 32..39 20..27 13..15,5
Color 05 - Green 1) 40..47 28..2F 16..18,5
Color 06 - Turquise 1) 48..55 30..37 19..21,5
Color 07 - Cyan 1) 56..63 38..3F 22..24,5
Color 08 - Blue 1) 64..71 40..47 25..27,5
Color 09 - Lavender 1) 72..79 48..4F 28..30,5
Color 10 - Mauve 1) 80..87 50..57 31..34,5
Color 11 - Magenta 1) 88..95 58..5F 35..37,5
Color 12 - Pink 1) 96..103 60..67 38..40,5
White - CTO Color Temp. 3200K 104..111 68..6F 41..43,5
White Color Temp. 5600K 112..119 70..77 44..46,5
White - CTB Color Temp. 7200K 120..127 78..7F 47..49,5
Rainbow Effect Stopp 2) 128 80 50
Rainbow Effect 3) slow - fast 129..223 81..DF 51,,88
Rainbow Effect, Random Col. slow - fast 224..255 E0..FF 89..100
2) Dimmer
Dimmer (0% - 100%) 0..255 0..FF 0..100
1)
The predefined colors can be used as start-colors for the Rainbow effect. Please select your desired
start-color first, and then activate the rainbow effect. All
IIoonn SSppoot
t
fixture will then afterwards start
from that color and execute the rainbow effect synchronously. Different
IIoonn SSppoot
t
fixture can be set
to have different start-colors but will still execute the rainbow effect synchronously. If you choose a
color different from the ones marked with 1) in the tables above the rainbow start-color will be red.
2)
Rainbow-effect Stop will pause this function. After resuming the rainbow-effect will continue from the
current color.
3)
The Rainbow-effect will run synchronously only if it is started from one of the predefined colors (see
also 1) before).
Page 9

R
R
R
-
-
-
G
G
G
-
-
-
B
B
B
GLP German Light Products GmbH
Instruction version 1.1
9
55
Maintaining and Cleaning the Ion Spot
The IIoonn SSppoott is a low maintenance fixture. It is only necessary to clean the optical
LED lenses from time to time. For safe operation it is absolutely essential that the
fixture is kept clean and that dust, dirt and smoke-fluid residues must not build up on,
or within the fixture. If they do, the fixture's light-output will be significantly reduced,
and damages to the fixture may occur. Regular cleaning will not only ensure the
maximum light-output, but will also allow the fixture to operate reliably throughout its
entire life.
A soft lint-free cloth moistened with any good glass cleaning fluid is recommended. Under no circumstances should alcohol or solvents be used to clean
the fixture or its lenses!
5.1 Safety regulations
• Disconnect the fixture from mains power before commencing any
maintenance work!
• Wait minimum 15 minutes after removing the power to allow the fixture to
cool down.
5.2 Maintenance Intervals (rule-of-thumb)
The maintenance schedule of any given fixture depends on the installation
environment. Hence no specific guidelines can be given. The cleaning intervals
given below are suggestions, based on practical experience. We suggest that
you start with these and develop your maintenance schedule as you see the
fixtures performance your specific environment.
Maintenance Interval How
LED reflector and optical system weekly soft brush /lint-free cloth
Attention:
• Never let optical parts come into contact with oil or fat.
• Before running the fixture wait until all parts are touch dry.
• Never touch lenses with bare fingers.
Page 10

R
R
R
-
-
-
G
G
G
-
-
-
B
B
B
GLP German Light Products GmbH
Instruction version 1.1
10
6 Technical Specifications
Power supply
Power consumption
45 VA (Watt)
Power input
~100-240 V AC, 50-60 Hz (auto sensing input)
Fuse protection
Micro-fuse 5x20 mm, T1A
Protection rating
IP65
Operational Parameters
Ambient Temperature
0° - 45°C / 32° - 113°F
Lighting System - Additive Color mixing
LED Type
Lamina Titan® High Power LED-Module
Lifetime
50,000 hours
Optical System
High efficiency collimator cluster
Interchangeable optics for a lighting angle of 20°/30°/45°
Dimmer (8 Bit)
Continuous Dimmer 0 - 100%
DMX Control
Standard USITT DMX-512, 5 pole XLR; [+] = Pin 3 [-] = Pin 2 [Ground] = Pin 1.
Die DMX- Addressing starts at the DMX channel [001].
Weights and Measures
Width
165 mm / 6.5 inches
Length
200 mm / 7.9 inches
H
eight
130 mm / 5.1 inches
Weight (net)
1,9 kg / 4.2 lbs.
Page 11

R
R
R
-
-
-
G
G
G
-
-
-
B
B
B
GLP German Light Products GmbH
Instruction version 1.1
11
7 Index
B
BGV C1............................................................ 6
C
Circumference ................................................. 9
Cleaning........................................................... 9
D
Danger of BURNING ...................................... 4
Description of Device ....................................... 4
DIN VDE 0711-217 .......................................... 6
DMX ................................................................. 6
E
e-mail ............................................................... 1
I
Instruction Version ........................................... 1
Internet............................................................. 1
L
LED Class 2M ................................................. 5
M
Maintenance .................................................... 9
Menu Field ....................................................... 7
Micro-fuse ........................................................ 6
Mounting......................................................... 6
N
Normal-Mode ............................................. 7, 8
O
Optical parts .................................................. 9
P
Power Supply ................................................ 6
R
Rebel High-power- LEDs .............................. 10
S
Safety distance ............................................... 6
Safety Instructions ...................................... 4, 5
Secure the Device ......................................... 6
T
Technical Specifications ............................ 10
V
VBG 70 ........................................................... 6
W
Warranty claims .............................................. 5
Weights and Measures ................................. 10
Page 12

R
R
R
-
-
-
G
G
G
-
-
-
B
B
B
GLP German Light Products GmbH
Instruction version 1.1
12
 Loading...