

Page 1
PRELIMINARY
User Manual
Fixture software version 26
Page 2

GLP® Highlander Wash User Manual – Revision A (this revision is preliminary)
PRELIMINARY
This document covers fixture software version 26
© 2019 German Light Products GmbH. All rights reserved.
The marks ‘GLP’ and ‘German Light Products’ are trademarks registered as the property of
German Light Products GmbH in Germany, in the United States of America and in other
countries.
The information contained in this document is subject to change without notice. German Light
Products GmbH and all affiliated companies disclaim liability for any injury, damage, direct or
indirect loss, consequential or economic loss or any other loss occasioned by the use of, inability
to use or reliance on the information contained in this document.
Manufacturer’s head office:
German Light Products GmbH (GLP), Industriestrasse 2, 76307 Karlsbad, Germany
Tel (Germany): +49 7248 92719 - 0
Service & Support EMEA:
GLP, Industriestrasse 2, 76307 Karlsbad, Germany
Tel. (Germany): +49 7248 9271955
Email: support@glp.de
www.glp.de
Service & Support USA:
GLP USA, 1145 Arroyo St., Ste. A, 91340 San Fernando, California
Tel (USA): +1 818 767 8899
Support (US): info@germanlightproducts.com
www.germanlightproducts.com
Page 3

Table of Contents
PRELIMINARY
Safety ....................................................................................................................... 4
Key to symbols ................................................................................................... 4
GLP Service and Support ................................................................................. 5
Avoiding damage to the fixture ..................................................................... 5
Powering the fixture off .................................................................................... 5
Features ................................................................................................................... 6
Intended use ...................................................................................................... 6
Lamp ................................................................................................................... 6
Control options .................................................................................................. 6
Pan and tilt ......................................................................................................... 7
Shutter ................................................................................................................. 7
Dimming ............................................................................................................. 7
CMY color mixing .............................................................................................. 7
Color temperature control .............................................................................. 7
Color wheels ...................................................................................................... 8
Effect shortcuts .................................................................................................. 8
Framing ............................................................................................................... 8
Iris effect ............................................................................................................. 9
Zoom ................................................................................................................... 9
Focus and focus tracking ................................................................................ 9
Behavior when the fixture is not receiving a DMX signal .......................... 10
Stand-Alone operation .................................................................................. 10
Performance settings ...................................................................................... 10
Fan modes ....................................................................................................... 11
Offsets ............................................................................................................... 11
Changing settings by DMX ............................................................................ 11
Control panel ........................................................................................................ 12
Default screen ................................................................................................. 12
Using the control panel .................................................................................. 13
Fixture overview ............................................................................................... 13
Error codes ....................................................................................................... 13
Loss of DMX signal ........................................................................................... 14
Display orientation .......................................................................................... 14
Control menus ....................................................................................................... 15
Quick menu ..................................................................................................... 15
Main menu ....................................................................................................... 16
DMX control layout .............................................................................................. 20
Normal Mode (26 DMX channels) ................................................................ 20
Status and error codes ........................................................................................ 24
Page 4
www.glp.de
PRELIMINARY
Safety
Key to symbols
The following symbols are used in the product’s user documentation:
Warning! Safety hazard.
Risk of severe injury or
death.
Warning! See user
manual for important
safety information.
Warning! Risk of eye
injury.
Warning! Read the Quick Start and Safety Manual supplied with the
Highlander Wash lighting fixture and available for download from www.glp.de
before installing, operating or servicing the fixture. The Quick Start and Safety
Manual contains important information for the safe use of Highlander Wash
fixtures. If you fail to read that information you may create a safety hazard
with a risk of injury, death or damage.
Warning! Fire hazard.
Warning! Hazardous voltage.
Risk of lethal or severe
electric shock.
Warning! Hot surface. Risk of
burn injury.
If you have any doubts or questions about how to use the product safely please
contact your GLP® supplier, who will be happy to help.
The user documentation for GLP Highlander Wash lighting fixtures consists of:
● The Highlander Wash Quick Start and Safety Manual, supplied with Highlander Wash
fixtures and available for download from www.glp.de. The Quick Start and Safety
Manual contains important safety information and installation instructions that the
installer and user must read. It also contains a detailed product overview, dimensions
drawings and technical specifications for the product.
● The Highlander Wash User Manual, available for download from www.glp.de. The
User Manual explains features and control of Highlander Wash fixtures.
● The Highlander Wash DMX Channel Index, containing the DMX control channel
layout and DMX commands available in the fixture. This information is also included
in the User Manual.
The Highlander Wash is intended for use by experienced professionals with the
knowledge and skills to set up, operate, and maintain high-powered, remotely
controlled lighting equipment safely and efficiently. These operations require expertise
that may not be provided in this manual.
● Respect all warnings and directions given in the product’s user documentation and
on the product. Read the user documentation and familiarize yourself with the safety
precautions it contains before installing, using or servicing the product. GLP and
4 Highlander Wash
User Manual
Page 5

German Light Products
PRELIMINARY
affiliated companies will take no responsibility for damage or injury resulting from
disregard for the information in the user documentation.
● Check the GLP website at www.glp.de and make sure that you have the latest
versions of the product’s user documentation.
● Check the fixture software version indicated on page 2 of this User Manual and then
use the fixture’s control panel to check the version installed in the fixture. If the
versions are not the same, the user manual may still cover the fixture, because
software updates do not always affect the use of the fixture. However, it is possible
that this User Manual does not match the fixture perfectly. Software release notes
can help clarify this question. You can consult software release notes and download
the correct version of this manual on the GLP website if necessary.
● Make both the Quick Start and Safety Manual and this User Manual available to all
persons who will install, operate or service the product. Save both documents for
future reference.
● If you have any questions about the safe operation of the product, please contact
an authorized GLP distributor (see list of distributors at www.glp.de).
● Use the product only as directed in this manual. Observe all markings in this manual
and on the product.
®
GLP Service and Support
Contact information for the nearest GLP Service and Support is available online at
www.glp.de/en/service, by email at info@glp.de, or by telephone at the following
numbers:
● GLP Germany: +49 (7248) 927 19-55
● GLP N. America: +1 818 767-8899
● GLP UK: +44 1392 690140
● GLP Asia: +852 (3151) 7730
● GLP Nordic: +46 737 57 11 40
Avoiding damage to the fixture
The Quick Start and Safety Manual contains important information that is intended to
help you avoid possible damage to the fixture from other light sources, during
transportation, etc. Read that information before storing, transporting or using the
fixture.
Powering the fixture off
When you power the fixture off, douse the lamp but leave power applied to the fixture
for 30 minutes before shutting down. This will allow cooling fans to cool down the fixture
evenly, avoiding hotspots that can weaken or damage the lamp.
If you douse the lamp, leave power applied and wait 5 minutes or until the HOT
message disappears from the display until you restrike it.
Hilghlander Wash User Manual
5
Page 6
www.glp.de
PRELIMINARY
Features
Intended use
The Highlander Wash is for permanent or temporary indoor use in venues where the
distance to illuminated surfaces is at least 8 m / 26.3 ft.). It may be used outdoors if it is
protected from moisture and precautions are taken to prevent damage from direct
sunlight. It may be placed upright on a level surface or suspended from a suitable
structure as described in this manual.
The Highlander Wash is not suitable for household use, wherever unattended children
have access to it, for permanent outdoor installation, or in areas where the distance
from the fixture to illuminated surfaces is less than the minimum specified.
The Highlander Wash must be installed, operated, and maintained only by persons with
the training, knowledge and skills to do so safely.
Lamp
The Highlander Wash has an OSRAM Lok-It! 1400/PS Brilliant 1400 watt short-arc
discharge lamp with a CRI of 95. This lamp gives true-to-life color and very attractive skin
tones, making it ideal for theatre settings. The lamp’s average rated life is 750 hours. To
minimize the risk of lamp explosion and obtain the best light output, replace the lamp
before it reaches its rated lifetime following the directions in the fixture’s Quick Start and
Safety Manual supplied with the fixture and available for download from www.glp.de.
The fixture will not allow a lamp restrike if it senses that the lamp is too hot. If hot restrike
protection is active, the message HOT appears in the fixture display.
If you have had lamp power applied and then powered the lamp off, allow the lamp to
cool with the fixture powered on until the HOT message disappears from the display
before restriking it. Allow the fixture to cool with power applied for 30 minutes before
opening the lamp door or any other part of the housing.
Lamp power
The lamp can be operated at two power levels:
● At the NORMAL power setting, the lamp runs at 1400 W
● At the ECO power setting, the lamp runs at 1000 W.
You can toggle between these two settings under Lamp Power in the Fixture Settings
control menu.
See the Highlander Wash Quick Start and Safety Manual for details of the lamp power
available when the fixture is connected to AC mains power below 200 V.
Control options
The Highlander Wash is compatible with DMX 512, RDM, Art-Net and sACN control
protocols. See the Highlander Wash Quick Start and Safety Manual for more details.
You can also control the Highlander Wash via wireless DMX if you install an optional
CRMX module. Contact your GLP supplier for details.
6 Highlander Wash
User Manual
Page 7
German Light Products
PRELIMINARY
Pan and tilt
The Highlander Wash pans through 640° and tilts through 262° with coarse and fine
control channels and self-correcting position feedback. Position feedback can be
disabled and control of pan and tilt can be reversed using the control panel or via DMX
on the Special/Control channel.
Pan and tilt are automatically disabled while you are using the fixture’s control panel.
Shutter
The Highlander Wash features a high-speed mechanical shutter with a choice of pulse
and strobe effects. It provides a full blackout with no visible light when intensity is set to
0%
Dimming
The mechanical dimming system provides
smooth full-range dimming.
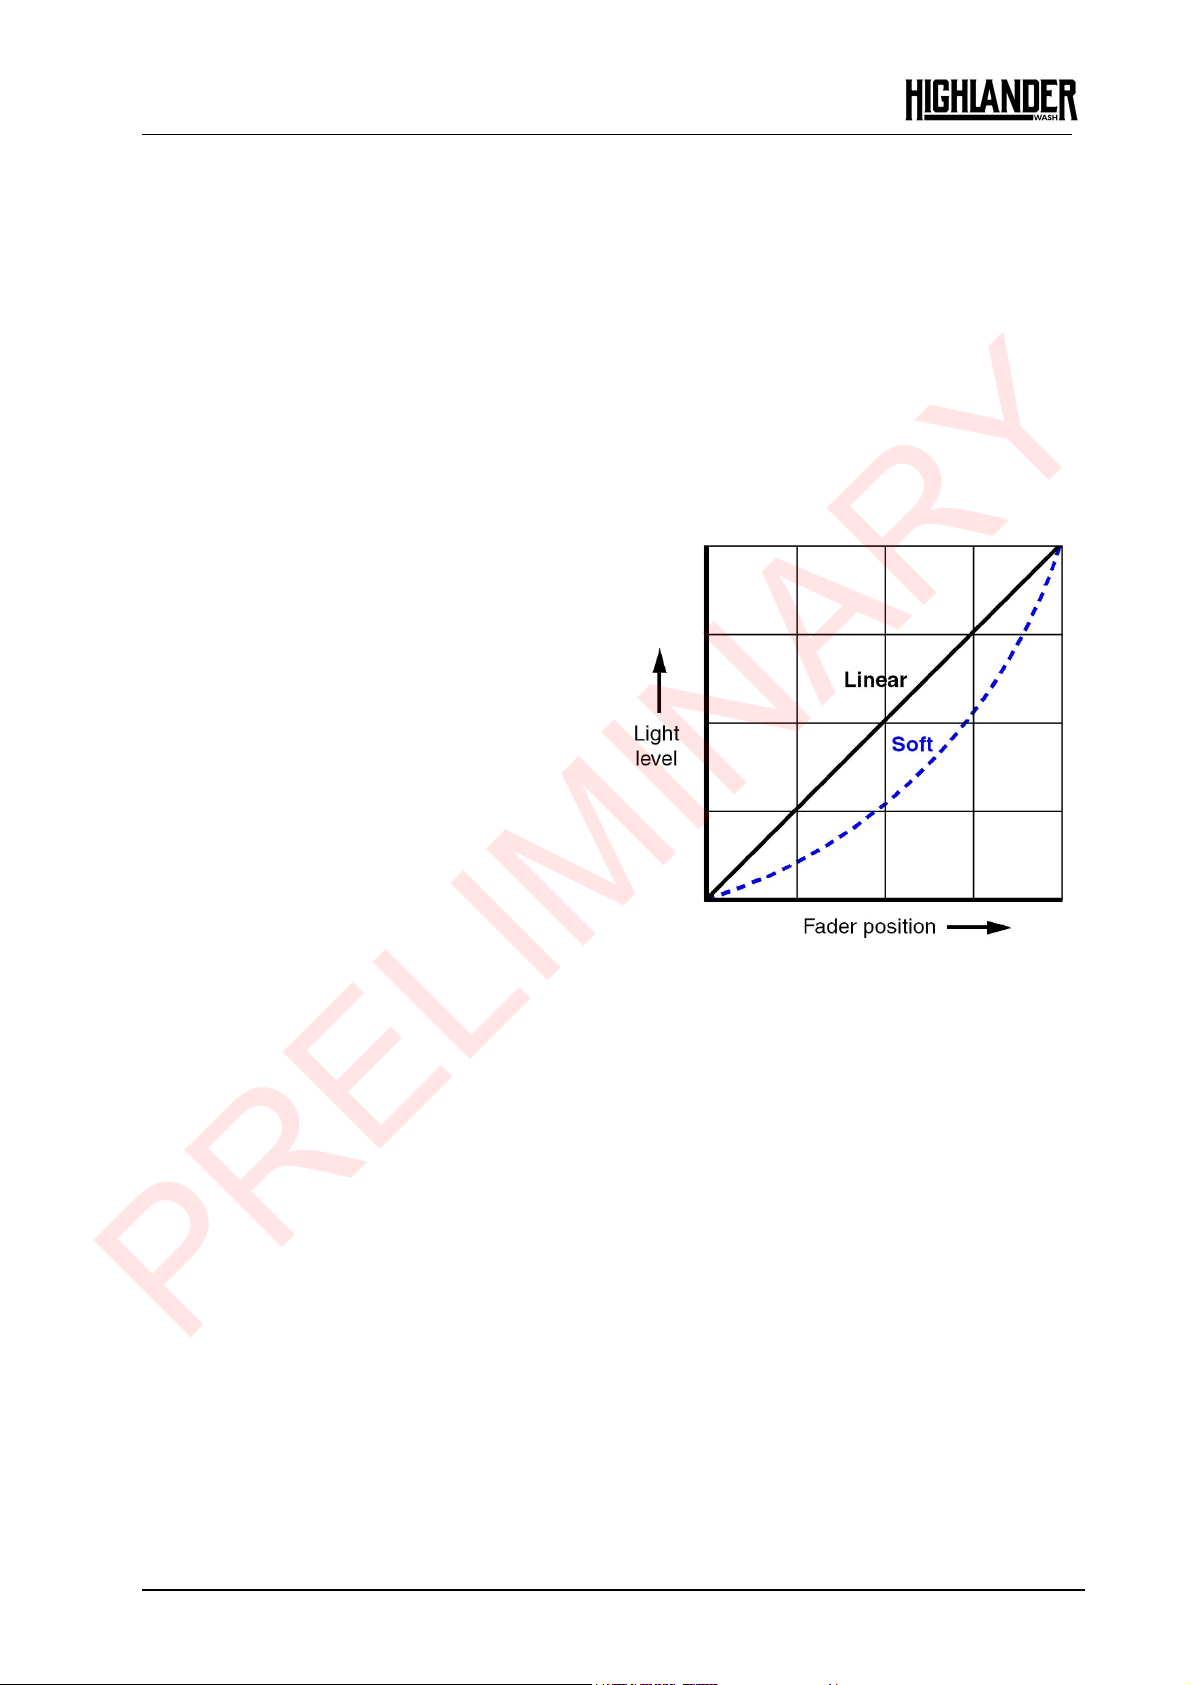
Dimming curves
®
See Figure 1. Two dimming curve options
are available: Linear and Soft.
● The Linear setting gives a dimming
curve that the eye perceives as linear.
● The Soft setting gives finer control at
lower light levels, where the eye is most
sensitive to changes in light intensity,
and coarser control at higher light
levels.
You can select the dimming curve using
the control panel or via DMX on the
Special/Control channel.
CMY color mixing
The Highlander Wash features CMY color mixing with progressively saturated Cyan,
Magenta and Yellow for full-range color and efficient output.
Color temperature control
A separate progressive CTO filter lets you vary the color temperature from 6700 K at the
open position to 2700 K warm white when fully applied.
Figure 1. Dimming curves
You can use color mixing on its own to achieve a custom color, or you can select a
color on one of the fixture’s color wheels and then fine-tune it using CMY and CTO in
combination.
Hilghlander Wash User Manual
7
Page 8
www.glp.de
PRELIMINARY
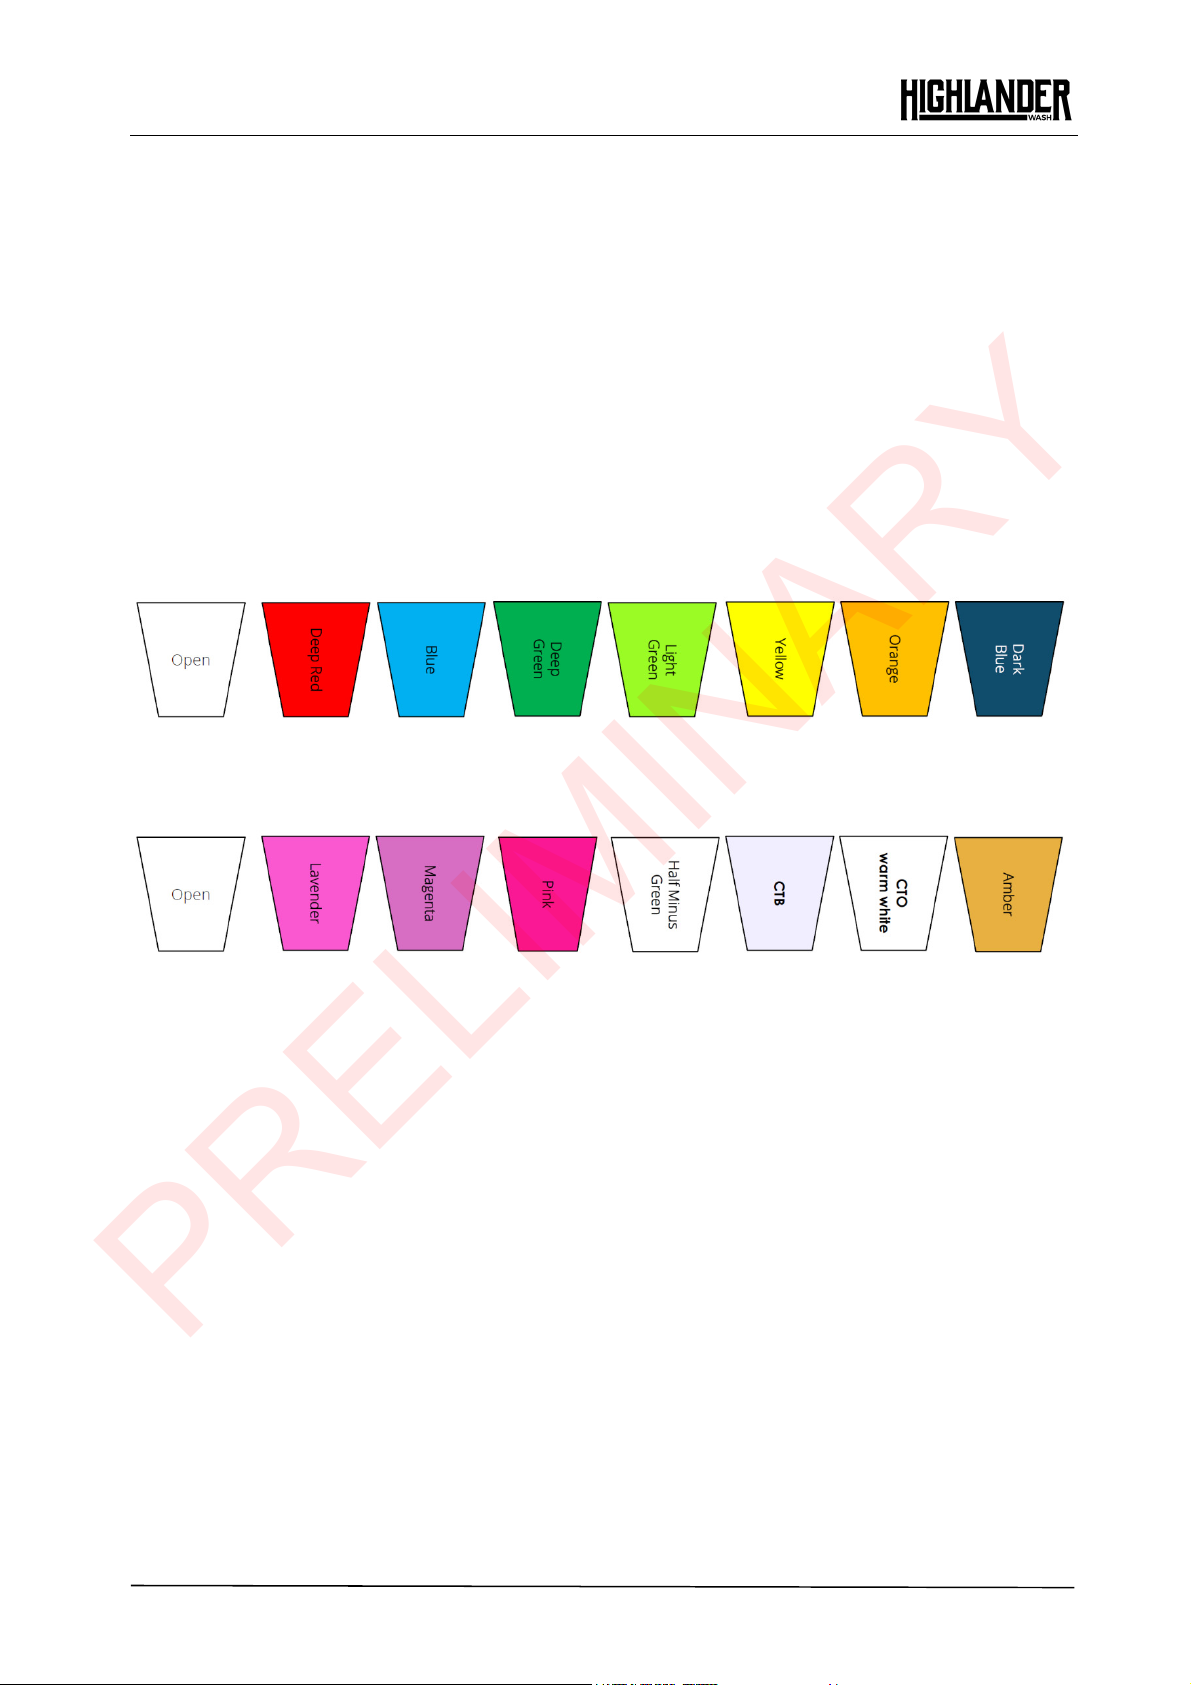
Color wheels
See Figure 2. The Highlander Wash features two separate color wheels with dichroic
color filters:
● Color wheel 1 offers seven saturated colors plus open.
● Color wheel 2 offers four pastel colors, half minus green and two color correction
filters plus open.
The color wheel control options let you:
● Select full colors or the open position,
● Scroll the color wheels for split color effects, or
● Rotate the color wheels continuously with variable direction and speed.
Color wheel 1
Color wheel 2
Figure 2. Color wheels
Effect shortcuts
By default, the color wheels take the shortest, fastest route from one slot to the next,
even if this means that they may pass through the open position. To avoid the wheels
passing through the open position when they change from one slot to the next you can
set Effect shortcuts to OFF on the Special/Control DMX channel or in the control panel.
Framing
The four-blade framing module offers individual control of each blade, and the entire
module can be indexed continuously from -45° to +45°. Blades can be continuously
angled by +/- 30° and inserted by up to 100%, giving flexibility in choice of frame shape
and size right down to dead blackout.
Two framing control modes are available:
● Position/Indexing (PI) mode lets you insert each blade into the beam from 0% to 100%
on one channel and tilt each blade from -30° to + 30° on the next channel. Inserting
8 Highlander Wash
User Manual
Page 9

German Light Products
PRELIMINARY
all four blades 100% into the beam will result in dead blackout. The fixture is set to PI
mode by default.
● Left/Right (LR) mode gives you individual control of the left-hand and the right-hand
sides of each of the four blades. In this mode, for example, DMX channel 25 gives
control of the left-hand side of blade 1 and channel 26 gives control of the right-hand
side of blade 1.
To use framing, select either Position/Index mode (this mode is selected by default) or
Left/Right mode using either the fixture’s control panel or the Special/Control DMX
channel. Then use DMX channels 17 – 24 to control the four framing blades and use
DMX channel 16 to set the indexed angle of the entire framing module.
®
Iris effect
The fixture uses the four framing blades to create an iris effect that can close the beam
down from 100% to blackout.
If you use framing and the iris effect at the same time, the iris effect is overlaid on top of
the framing function: in other words, you can use framing effects within the area
defined by the iris.
Zoom
The Highlander Wash has a 1:7 zoom range. You can vary the beam angle from 5° to
44° (half-peak) / vary the field angle from 11° to 63° (one-tenth peak).
Control on the Zoom DMX channel is normally from spot to flood as the DMX value
increases. You can invert this using the control panel and the Special/Control DMX
channel so that control becomes flood to spot as you increase the DMX value.
Focus and focus tracking
You can adjust focus on DMX channel 15.
You can also set the fixture to use focus tracking, in which focus automatically adjusts to
match different zoom positions. Focus tracking is enabled by default, letting you
change zoom angles without any need to make adjustments on the focus channel.
It is possible to disable focus tracking completely or to optimize focus tracking for three
different projection distance ranges using the Special/Control DMX channel. Four focus
tracking settings are available:
● Focus tracking OFF sets the zoom and focus DMX channels to control zoom and focus
completely independently of each other.
● Focus tracking NEAR sets focus to automatically adjust for optimum sharpness at
projection distances of around 8 meters or less when the zoom angle is changed.
● Focus tracking MEDIUM sets focus to automatically adjust for optimum sharpness at
projection distances of around 15 meters when the zoom angle is changed. Focus
tracking is set to MEDIUM by default.
● Focus tracking FAR sets focus to automatically adjust for optimum sharpness at
projection distances of over 20 meters when the zoom angle is changed.
If you have enabled Focus tracking NEAR, MEDIUM or FAR you can still override the
automatic focus setting: any manual adjustment that you make on the Focus DMX
channel will take priority over the automatic setting. However, if you change the zoom
Hilghlander Wash User Manual
9
Page 10

www.glp.de
PRELIMINARY
angle again, the fixture will forget any manual focus setting and return to automatically
adjusting focus to match the fixture’s zoom angle.
Behavior when the fixture is not receiving a DMX signal
You can set the fixture to react in four different ways if no DMX signal is present (if the
fixture is being controlled by DMX but the DMX signal stops, or if you apply power to the
fixture when no DMX signal is present):
● Hold DMX sets the fixture to continue obeying the last DMX values it received. This is
the default setting.
● Blackout sets the fixture to black out whenever it is not receiving a DMX signal.
● Replay DMX Scene sets the fixture to play its stored stand-alone scene (see Capture
DMX Values below) when the fixture is not receiving a DMX signal. If no stand-alone
scene is stored in memory, the fixture will black out.
● Capture DMX Values takes a snapshot of the DMX values that are currently being
received and stores them in the fixture’s memory as its Captured scene. The fixture
will display this scene if it is set to Replay DMX Scene (see above) and is not receiving
a DMX signal.
You can select one of the four settings above using either the control panel or the
Special/Control DMX channel.
In the control panel, the commands for capturing and playing a stand-alone scene are
available in two places: Fixture Settings No Signal and Manual Control Manual
DMX. The commands are the same in both places.
Stand-Alone operation
If the fixture is set to Replay DMX Scene and if a stand-alone scene has been captured
and stored in its memory using the Capture DMX Values command, it will display its
stand-alone scene at all times when it is powered on but not receiving a DMX signal.
You can therefore use this setting if you want fixtures to automatically start stand-alone
operation when you apply power to them.
Performance settings
You can select between three different settings for the movement speed of all the
fixture’s mechanical effects (pan/tilt, color wheel, zoom, focus, etc.):
● In Normal mode, mechanical effects movement is set to give an optimum balance
between speed, quietness and smoothness. Normal is the default setting.
● In Fast mode, movement is set to maximum speed. This setting gives super-fast effects
but can result in higher noise levels.
● In Smooth mode, movement is set to optimize smoothness and give lowest-noise
performance. This setting gives extremely low noise and smooth performance but
effect movement will be slower than in Normal mode.
You can select Movement Performance using either the control panel or the
Special/Control DMX channel.
10 Highlander Wash
User Manual
Page 11

German Light Products
PRELIMINARY
Fan modes
Two cooling fan modes let you give priority to lowest fan noise or most powerful cooling:
● Regulated sets fans to operate only at the speed that is necessary to cool the fixture
and the lamp. As fixture temperature increases, temperature regulation increases fan
speed to the level that is necessary.
● High speed mode suits operation in high ambient temperatures. Fans are set to
constant operation at high speed. You can use High speed mode to cool down a
fixture quickly after dousing the lamp or to help remove dust from cooling fans.
You can set the cooling fan mode using the control panel or the Special/Control DMX
channel.
In both fan modes, if fixture temperature reaches a dangerous level the fixture will
protect itself from damage by carrying out an emergency lamp shutdown. The
message HEAT will appear in the display and it will be impossible to restrike the lamp until
the temperature has fallen to a safe level.
Offsets
®
You can customize the Highlander Wash by creating offsets in the fixture’s effects,
including pan and tilt. Custom offsets let you adjust fixtures in multiple installations to
compensate for the different positions of the fixtures in the rig, for example.
Custom offsets are for temporary adjustment of individual effects. They are not
permanent fixture calibration values. Custom offset values are reset to zero if you apply
a Service Advanced Factory Backup command in the control panel. If you need
to adjust fixture calibration values, please contact GLP Service.
Changing settings by DMX
The Special/Control DMX channel lets you change fixture settings, power the lamp
on/off and perform a fixture reset from the control desk. To apply a command on this
channel you must hold the command for the time indicated in the DMX channel index
section at the end of this manual.
Hilghlander Wash User Manual
11
Page 12

www.glp.de
PRELIMINARY
Control panel
Warning! DMX control is disabled when the control menus are active. Be
prepared for the head to move as soon as you exit the control menus.
The control panel and backlit graphic LCD display with self-charging battery allow you
to change fixture settings, view readouts and use utilities quickly and intuitively, even
when the fixture is disconnected from power.
To allow comfortable use of the control panel, pan and tilt are automatically disabled
for a few seconds if you turn the yoke manually. Pressing any button on the control
panel also disables pan and tilt for a few seconds. Pan and tilt remain disabled for as
long you are working in the control panel. If no button is pressed for a few seconds,
head movement is re-enabled with pan and tilt correction applied.
Default screen
When power is applied, the fixture resets. After the reset has completed, the default
screen appears in the display. The fixture asks you to press any key to unlock the control
panel and display. When you unlock the display you will see this screen:
V:26/NS ECO
DMX
101
Shortcut Menu
See Figure 3. From left to right, the top line of the default screen displays:
● Main CPU software version
12 Highlander Wash
Figure 3. Control panel
User Manual
Page 13

German Light Products
PRELIMINARY
● Pan, tilt, and zoom modes: N (Normal) or I (inverse)
● Dimming curve: L (Linear) or S (Soft)
● Lamp power mode: ECO will be displayed if the ECO (1000 W) mode is enabled.
There is no lamp power indication if the lamp is in Normal (1400 W) mode.
● Fixture’s DMX address
● Protocol type: DMX, Art-Net, sACN or CRMX (if an optional CRMX module is installed)
In the example shown in Figure 3:
● The fixture is running CPU software version 26
● Pan, Tilt and Zoom are set to Normal
● The dimmer is set to Soft dimming curve
● Lamp power is set to 1000 W (ECO)
● The fixture is set to receive data via DMX protocol
● The fixture’s DMX start address is 101.
®
Using the control panel
From the default screen you have three options:
● Pressing the ENTER button under Menu on the right opens the main menu for
configuration, service and information.
● Pressing the BACK/ESC button on the left under Shortcut opens the quick menu with
the most frequently used settings.
● Pressing both buttons quickly at the same time flips the display.
Once you have opened the main menu or the quick menu, navigate and apply
commands as follows:
● Use the jog wheel to scroll up and down through menu items
● Use the ENTER button on the right to enter a submenu or confirm a selection.
● Use the BACK/ESC button on the left to exit a menu. If you have not confirmed a
selection with the ENTER button, no command will be applied.
Fixture overview
If you rotate the jog wheel a half-turn while the default screen is being displayed, the
display will change to a general fixture overview which gives you quick information
about software version, lamp hours, fixture settings etc. This feature is very helpful for
maintenance or service tasks.
Error codes
If the fixture detects an error it will display an error code in place of the DMX address. All
error codes except the HOT message (lamp hot, restrike impossible until lamp has
cooled down) are sticky: they will remain in the display until the next power cycle or
motor reset.
‘Status and error codes’ on page 24 gives a key to all the codes in the Highlander Wash.
Hilghlander Wash User Manual
13
Page 14

www.glp.de
PRELIMINARY
Loss of DMX signal
The display flashes if the DMX signal is lost.
Display orientation
If the display orientation is set to Normal or Upside-down pressing both keys will invert the
display orientation.
If the display orientation is set to Auto, pressing both keys inverts the display temporarily
regardless of its current orientation. After you exit the menus, or after a short period with
no key presses, the display will return to its Auto orientation.
14 Highlander Wash
User Manual
Page 15

German Light Products
PRELIMINARY
®
Control menus
Quick menu
The control panel’s Quick Menu gives you quick access to the most frequently used
commands. You can open the Quick Menu when you press the left-hand control button
(marked Shortcut) when the display is showing the default screen.
The Quick Menu contains the following items:
Menus Notes
Lamp ON/OFF Toggle Power lamp on / off
Lamp Power
Reset All
Information Scroll through fixture information
Load Settings
Factory Backup (!)
Normal Set lamp power to 1400 W
Eco Set lamp power to 1000 W
Carry out a reset of all effects
(takes a few seconds)
Preset 1
Preset 2
Preset 3
Default
Configure all fixture settings to a
user preset – hold Enter for 3
seconds to activate.
Return fixture to default settings
(not including DMX address,
protocol type, Ethernet / CRMX
configuration, user offsets, user
presets and counters) – hold
Enter for 3 seconds to activate.
Restore all factory default
settings (including DMX address,
protocol type, Ethernet / CRMX
configuration, user offsets and
user presets) – hold Enter for 5
seconds to activate.
Hilghlander Wash User Manual
15
Page 16

www.glp.de
PRELIMINARY
Main menu
The following menus and commands are available in the Highlander Wash control
panel.
Menus Notes
DMX Start Address
1-490 Set fixture’s DMX address
Protocol Setup
Select
Control
Protocol
Ethernet
Config
Protocol Type
CRMX Unilink Confirm
Fixture Settings
Pan Invert
Tilt Invert
Position
feedback
Zoom Invert
No Signal
DMX Control via DMX protocol
Art-Net
sACN Control via sACN protocol
Auto 2.X.X.X
Addressing Mode
Custom IP Address xxx.xxx.xxx.xxx Enter custom IP address
Custom IP Subnet xxx.xxx.xxx.xxx Enter custom subnet
Art-Net Port 0 - 32767 Enter Art-Net port
sACN Universe 1 - 63999 Enter sACN universe
DMX
sACN
OFF
ON
OFF
ON
OFF
ON
OFF Zoom wide to narrow
ON Zoom narrow to wide
Hold DMX
Blackout
Replay DMX scene
Capture DMX Values
Auto 10.X.X.X
DHCP Get IP address by DHCP
Custom IP Use custom IP address
Control via Art-Net
protocol (default)
Auto addressing in the
range 2.X.X.X
Auto addressing in the
range 10.X.X.X
Select control protocol ArtNet
Select CRMX protocol
(only possible if CRMX
module is installed)
Reverse direction of pan
movement
Reverse direction of tilt
movement
Enable/disable pan/tilt
position correction
Fixture continues to display
current effect if no DMX
signal received
Fixture blacks out if no
DMX signal received
Plays the stored Captured
Scene (see next menu
item) if no DMX signal
received
Captures current scene
and stores it for use in No
Signal
Capture Scene
16 Highlander Wash
User Manual
Page 17

German Light Products
PRELIMINARY
®
Dimmer
Curve
Display Mode
Display
Orientation
Performance
Fan Mode
Framing
Control
Shortway
Auto Lamp
On
Lamp Power
Soft (Square)
Linear Linear dimming curve
Auto
On Display constantly on
Off
Auto
Normal
Upside-down
Smooth
Normal
Fast
Regulated
High
Position/Index
Left/Right
On
Off Color wheel avoids open
Off
On
Normal Lamp at 1400 W power
Eco Lamp at 1000 W power
Soft (square law) dimming
curve
Display dims after a short
period of inactivity if no
errors and valid DMX
signal
Display dims even if there
are errors / no DMX signal
Display automatically
inverts to match
installation position
Display normal (for use
when fixture is standing)
Display inverted (for use
when fixture is flown headdown)
Optimize pan, tilt and
effects movement for
smoothness
Normal pan, tilt and
effects movement
Optimize pan, tilt and
effects movement for
speed
Fan speed temperatureregulated (optimized for
lowest noise)
Fan speed constant high
(optimized for coolest
operation)
Framing control Position /
Indexing mode
Framing control Left /
Right mode
Color wheel takes shortest
route from one slot to
next, even if it passes
through open
No automatic lamp power
on when fixture is
powered on
Lamp is automatically
powered on when fixture
is powered on
Hilghlander Wash User Manual
17
Page 18

www.glp.de
PRELIMINARY
Load Settings
No
Default
Settings
Yes
Information
System Version
Temperatures
Errors
Counters
DMX Monitor
Network
CRMX
Main AC
Manual Control
Lamp On/Off
Reset All
Reset Pan &
Tilt
Reset Head
No
Yes
No
Yes
No
Yes
No
Yes
Preset 1
Preset 2
Preset 3
Default
Lamp Counters
Fixture Counters
Misc
Configure all fixture
settings to a user preset –
hold for 3 secs.
Return fixture to default
settings (not including
DMX address, protocol
type, Ethernet / CRMX
configuration, user offsets,
user presets and counters)
– hold for 3 secs.
Return fixture to default
settings (not including
DMX address, DMX mode,
user offsets, user presets,
counters and temperature
units)
Shows current fixture
software version
Shows current sensor
temperatures
Shows most recent and
current errors, if any
Resettable and total
counters for lamp strikes
and hours that lamp has
been powered on
Counter for total number
of power cycles;
resettable and total
counters for hours fixture
has been powered on
Number of times fixture
has carried out automatic
emergency shutdown
Shows DMX values
currently being received
on each channel
Shows network status
information
Shows CRMX status
information (if optional
CRMX module is fitted)
Shows AC power voltage
information
Power lamp on/off
Reset all effects
Reset pan and tilt
Reset all effects except
pan and tilt
18 Highlander Wash
User Manual
Page 19

German Light Products
PRELIMINARY
Pan < 001..128..255 >
Pan Fine < 001..128..255 >
Tilt < 001..128..255 >
Tilt fine < 001..128..255 >
… scroll through effects
Manual DMX
Warning!
Fixture will
start moving!
Press Enter
Service
Test
Sequences
Reset
Counters
Service
Mode
Advanced
(Press and
hold for 3
secs.)
…
Load No-Signal Scene Confirm (press Enter)
Save as No-Signal Scene Confirm (press Enter)
Capture DMX Values Confirm (press Enter)
Reset Manual Values Confirm (press Enter)
Test All
Test Pan / Tilt Only
Test Head Only
Device Hours
Lamp Counters
On/Off
Offsets
Clear FW Image Yes/No
Reprogram Slaves Yes/No
Save Settings
Factory Backup (!) Yes/No
Enter Factory Mode Yes/No
®
Manually control all
effects (Framing always in
P/I mode)
Display the scene that is
stored as Captured Scene
Capture current scene
and store it as Captured
Scene for use in No Signal
menu
Sets all manual DMX
values to the values
currently being received
via DMX
Reset all manually entered
DMX values to zero
Run test sequence of all
effects including pan and
tilt
Run test sequence of pan
and tilt only
Run test sequence of all
effects except pan and tilt
Zero the resettable fixture
on-time hours counter
Zero the resettable lamp
strikes and lamp-on hours
counters
Enable/disable pan and
tilt
Pan
…
…
Preset 1
Preset 2
Preset 3
Create custom offsets in
home positions of all
effects. Default offset = 0
Clear firmware file from
memory
Install firmware from
image file in all slaves
Saves current fixture
settings as custom presets
for use in Fixture Settings
Load Settings
Restore all factory default
settings (including DMX
address, protocol type,
Ethernet / CRMX
configuration, user offsets
and user presets) – hold
for 5 secs.
Contact GLP Service
before entering this menu
– changes can cause
damage to the fixture that
is not covered by the
product warranty
Default settings are written in BOLD type
Hilghlander Wash User Manual
19
Page 20

www.glp.de
PRELIMINARY
DMX control layout
Normal Mode (26 DMX channels)
Channel Function Description
1
2
3
4
5
6
Pan coarse
Pan fine
Tilt coarse
Tilt fine
Color wheel 1 Open
Color wheel 2 Open
-320° – +320° (16-bit) 0 – 65535 32767 0 – 100% Fade
-131° – +131° (16-bit) 0 – 65535 32767 0 – 100% Fade
Color 1 – Deep red
Color 2 – Blue
Color 3 – Deep green
Color 4 – Light green
Color 5 – Yellow
Color 6 – Orange
Color 7 – Deep blue
Open
Color wheel indexing 0 – 360°
(continuous)
olor wheel rotation CW
C
fast – slow
Color wheel rotation stop
Color wheel rotation CCW
slow – fast
Color 1 – Lavender
Color 2 – Magenta
Color 3 – Pink
Color 4 – Half minus green
Color 5 – CTB
Color 6 – CTO
Color 7 – Amber
Open
Color wheel indexing 0 – 360°
(continuous)
olor wheel rotation CW
C
fast – slow
Color wheel rotation stop
Color wheel rotation CCW
slow – fast
DMX
range
0 – 5
6 – 10
11 – 15
16 – 20
21 – 25
26 – 30
31 – 35
36 – 40
41 – 43
44 – 167
168 – 211
212
213 – 255
0 – 5
6 – 10
11 – 15
16 – 20
21 – 25
26 – 30
31 – 35
36 – 40
41 – 43
44 – 167
168 – 211
212
213 – 255
Default
DMX
0 0 – 2.0%
0 0 – 2.0%
% Range Fade
2.4 – 3.9%
4.3 – 5.9%
6.3 – 7.8%
8.2 – 9.8%
10.2 – 11.8%
12.2 – 13.7%
14.1 – 15.7%
16.1 – 16.9%
17.3 – 65.5%
65.9 – 82.7%
83.5 – 100%
2.4 – 3.9%
4.3 – 5.9%
6.3 – 7.8%
8.2 – 9.8%
10.2 – 11.8%
12.2 – 13.7%
14.1 – 15.7%
16.1 – 16.9%
17.3 – 65.5%
65.9 – 82.7%
83.5 – 100%
83.1%
83.1%
Snap
Snap
Snap
Snap
Snap
Snap
Snap
Snap
Snap
Fade
Fade
Snap
Fade
Snap
Snap
Snap
Snap
Snap
Snap
Snap
Snap
Snap
Fade
Fade
Snap
Fade
7
8
9
10
11
20 Highlander Wash
Cyan Cyan 0 – 100% 0 – 255 0 0 – 100% Fade
Magenta Magenta 0 – 100% 0 – 255 0 0 – 100% Fade
Yellow Yellow 0 – 100% 0 – 255 0 0 – 100% Fade
CTO CTO 0 – 100% 0 – 255 0 0 – 100% Fade
Shutter Shutter closed 0 – 15 255 0 – 5.9% Snap
Pulse, random, slow – fast 16 – 47 6.3 – 18.4% Fade
Pulse, slow – fast 48 – 79 18.8 – 31%
Pulse open, slow – fast 80 – 111 31.4 – 43.5%
Pulse close, slow – fast 112 – 143 43.9 – 56.1%
Strobe, random, slow – fast 144 – 199 56.5 – 78.0%
Strobe, 1 – 10 Hz 200 – 239 78.4 – 93.7%
Shutter open 240 – 255 94.1 – 100% Snap
User Manual
Page 21

German Light Products
PRELIMINARY
®
12
13
14
15
16
17
18
19
20
21
22
23
24
25
Dimmer coarse
Dimmer fine
Zoom
Focus
Framing module
indexing
Framing blade 1
position / left
Framing blade 1
index / right
Framing blade 2
position / left
Framing blade 2
index / right
Framing blade 3
position / left
Framing blade 3
index / right
Framing blade 4
position / left
Framing blade 4
index / right
Iris effect
Intensity 0 – 100% 0 – 65535 32768 0 – 100% Fade
Narrow (spot) – wide(flood)
Near – far
CW indexing from 0° to -45°
Center: 0°
CCW indexing from 0° to +45°
PI mode: In – out
LR mode: Blade left side
PI mode: Tilt -30° – +30°
LR mode: Blade right side
PI mode: In – out
LR mode: Blade left side
PI mode: Tilt -30° – +30°
LR mode: Blade right side
PI mode: In – out
LR mode: Blade left side
PI mode: Tilt -30° – +30°
LR mode: Blade right side
PI mode: In – out
LR mode: Blade left side
PI mode: Tilt -30° – +30°
LR mode: Blade right side
Open – closed
0 – 255 128 0 – 100% Fade
0 – 255 128
0 – 128
128
129 – 255
0 – 255
0 – 255
0 – 255
0 – 255
0 – 255
0 – 255
0 – 255
0 – 255
0 – 255
0 – 255
0 – 255
0 – 255
0 – 255
0 – 255
0 – 255
0 – 255
0 – 255 128 0 – 100% Fade
128 0 – 50.2%
0
0
128
0
0
0
128
0
0
0
128
0
0
0
128
0
0 – 100% Fade
Fade
50.2%
50.6 – 100%
0 – 100%
0 – 100%
0 – 100%
0 – 100%
0 – 100%
0 – 100%
0 – 100%
0 – 100%
0 – 100%
0 – 100%
0 – 100%
0 – 100%
0 – 100%
0 – 100%
0 – 100%
0 – 100%
Snap
Fade
Fade
Fade
Fade
Fade
Fade
Fade
Fade
Fade
Fade
Fade
Fade
Fade
Fade
Fade
Fade
Fade
Hilghlander Wash User Manual
21
Page 22

www.glp.de
PRELIMINARY
26
Special/Control No function
Performance fast*
Performance normal*
Performance smooth*
No function
Dimmer curve soft*
Dimmer curve linear*
No function
Display off*
Display auto*
Display on*
Display orientation normal*
Display orientation invert*
Display orientation auto*
No signal = blackout*
No signal = hold*
No signal = play stand-alone*
Capture stand-alone
scene (DMX snapshot)*
No function
Fan regulated*
Fan high speed*
No function
Position feedback off*
Position feedback on*
Effect shortcuts off*
Effect shortcuts on*
Tilt invert off*
Tilt invert on*
Pan invert off*
Pan invert on*
Zoom invert off*
Zoom invert on*
No function
Focus tracking off*
Focus tracking near*
Focus tracking medium*
Focus tracking far*
No function
Framing Control = PI Mode,
(position/Index)*
Framing Control = LR Mode,
(left/right)*
No function
Lamp power Eco*
Lamp power Normal*
No function
Auto lamp on enabled*
Auto lamp on disabled*
No function
Lamp on*
Lamp off*
No function
Reset pan/tilt only *
Reset head only*
Reset all*
0 – 26
27 – 29
30 – 32
33 – 35
36 – 38
39 – 41
42 – 44
45 – 53
54 – 56
57 – 59
60 – 62
63 – 65
66 – 68
69 – 71
72 – 74
75 – 77
78 – 80
81 – 83
84 – 86
87 – 89
90 – 92
93 – 104
105 – 107
108 – 110
111 – 113
114 – 116
117 – 119
120 – 122
123 – 125
126 – 128
129 – 131
132 – 134
135 – 140
141 – 143
144 – 146
147 – 149
150 – 152
153 – 158
159 – 161
162 – 164
165 – 191
192 – 194
195 – 197
198 – 200
201 – 203
204 – 206
207 – 209
210 – 212
213 – 215
216 – 245
246 – 248
249 – 251
252 – 255
0 0 – 10.2%
10.6 – 11.4%
11.8 – 12.5%
12.9 – 13.7%
14.1 – 14.9%
15.3 – 16.1%
16.5 – 17.3%
17.6 – 20.8%
21.2 – 22%
22.4 – 23.1%
23.5 – 24.3%
24.7 – 25.5%
25.9 – 26.7%
27.1 – 27.8%
28.2 – 29.0%
29.4 – 30.2%
30.6 – 31.4%
31.8 – 32.5%
32.9 – 33.7%
34.1 – 34.9%
35.3 – 36.1%
36.5 – 40.8%
41.2 – 42.0%
42.4 – 43.1%
43.5 – 44.3%
44.7 – 45.5%
45.9 – 46.7%
47.1 – 47.8%
48.2 – 49.0%
49.4 – 50.2%
50.6 – 51.4%
51.8 – 52.5%
52.9 – 54.9%
55.3 – 56.1%
56.5 – 57.3%
57.6 – 58.4%
58.8 – 59.6%
60.0 – 62.0%
62.4 – 63.1%
63.5 – 64.3%
64.7 – 74.9%
75.3 – 76.1%
76.5 – 77.3%
77.6 – 78.4%
78.8 – 79.6%
80.0 – 80.8%
81.2 – 82.0%
82.4 – 83.1%
83.5 – 84.3%
84.7 – 96.1%
96.5 – 97.3%
97.6 – 98.4%
98.8 – 100%
Snap
* Hold value for 3 seconds to apply
22 Highlander Wash
User Manual
Page 23

German Light Products
PRELIMINARY
Notes
Default settings are written in bold type.
To apply a command on the Special/Control channel, send the corresponding DMX
value for 3 seconds.
Percentage values are calculated by dividing DMX values by 2.56 and rounding to the
nearest 0.1%.
®
Hilghlander Wash User Manual
23
Page 24

www.glp.de
PRELIMINARY
Status and error codes
This section provides a key to the five-letter status and error codes used in the
Highlander Wash.
All states except HOT are sticky, meaning they are shown in the fixture’s control panel
display until the next power cycle or the next motor reset.
Motor errors are usually issued by a failed self-test (motor not connected, PCBA not
connected) or position feedback errors during a reset (motors with position feedback
only).
Code Notes
Overtemperature condition detected. Lamp housing temperature
* HEAT
* HOT
sensor exceeded threshold, or temperature switch tripped. Lamp will
be powered off and cooldown sequence will be initiated.
Lamp failed to strike. Possible causes: lamp was too hot, no lamp
installed, or ELD (Electronic Lamp Detector) connector is missing. In
addition, when you douse the lamp the fixture will display a HOT code
until it is cool enough to power down the fixture.
* FOCER
* ZOOER
* CW1ER
* CW2ER
* CMYER
* FRAER
* PANER
* TILER
* DIMER
* SHUER
* ELDER
* MEMER
Focus error
Zoom error
Color Wheel 1 error
Color Wheel 2 error
Cyan, Magenta, Yellow or CTO error
Error on one or more framing blades or on framing rotation
Pan error
Tilt error
Dimmer error
Shutter error
Issued if lamp is doused unexpectedly or if communication with the
ELD is lost / not possible
Communication with onboard flash memory is not possible, or written
data in flash memory cannot be read properly (inability to read flash
data can be due to end of flash memory lifetime)
* FANER
24 Highlander Wash
Fan error
User Manual
Page 25

PRELIMINARY
 Loading...