


User Guide

2

Loupé
V1.0 User Guide
3

Table of Contents
Overview 9
Connections ...............................................10
Switches ......................................................10
Encoders .....................................................10
Displays .......................................................11
Audio Path ..................................................12
Filters ...........................................................12
Dry/Loop .....................................................13
Decay ..........................................................13
Games 15
Game select ................................................16
Game Edit ...................................................16
Game Exit and Save ...................................17
Params .........................................................17
Functions Basics 19
LED Status ...................................................20
Toggle / Sustain .........................................20
Alternate Endings ......................................21
Bar Clock, Quant Clock, QuantDiv ...........21
Quantized Functions..................................22
First Loop ....................................................23
Record .........................................................23
Reset ............................................................23
Default Mode .............................................24
Sample ........................................................24
Tails ..............................................................24
Overdub ......................................................24
Replace .......................................................25
Substitute ....................................................25
4

Cycling Functions 27
Time Limit ...................................................28
Insert ...........................................................28
Instut............................................................28
Multiply .......................................................29
Stack ............................................................30
Record/BPM ...............................................30
Rounded Functions ....................................32
Unquantized Cycling Functions ................33
Mute and Trig 35
Mute ............................................................36
Pause ...........................................................36
Mutrig ..........................................................36
Trig, Trig/Q ..................................................37
Trig Point, Start, Start/Q .............................37
Undo 39
Undo Display ..............................................40
Alternate Ending ........................................41
Undo and Decay ........................................41
Overdub Trick .............................................41
Scroll 43
Operation ...................................................44
Scroll Exit and Undo ..................................45
Recording Scroll with Multiply ..................45
5

ReadFX 47
General Philosophy ...................................48
More in Depth ............................................48
Multiple ReadFX in a Game ......................49
ReadFX Display ..........................................49
Composing your ReadFX, Preview ...........50
Copying ReadFX ........................................50
Recording of ReadFX.................................50
ReadFX Parameters 51
Mix ...............................................................52
Feedback ....................................................52
Pitch .............................................................53
Reverse .......................................................53
Stutter ..........................................................54
Drift ..............................................................56
Auto-Follow ................................................57
Modulation .................................................60
Redux ..........................................................60
Special Modes 61
6
ForceDry .....................................................62
Expression Pedal (EXP) ..............................63
Feedback ....................................................63
Swell 1 .........................................................64
Swell 2 .........................................................64
Soft Replace ................................................65

Sync / OS Update 67
Synchronization ..........................................68
Audio Bootloader ......................................69
Endnotes 71
Factory Games 79
Acknowledgements 83
7

8

Overview
9

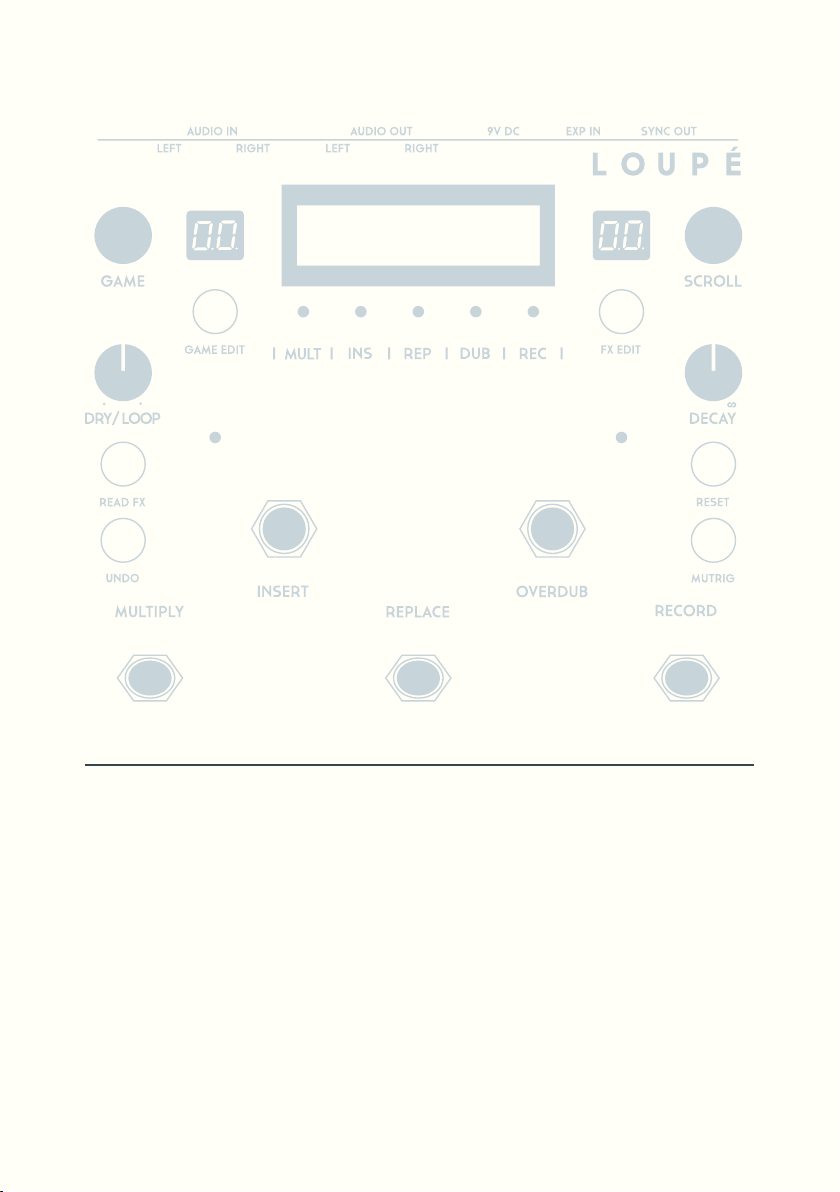
Connections
To power Loupé, use a center-negative 9V DC 400mA power supply (not
included) and plug it in the DC jack input (DC).
Loupé is a stereo device, with two mono inputs (JK1, JK2) and two mono
outputs (JK3, JK4).
If one input is connected (For example, the Left Audio In) then sound will
only come out of one output (the Left Audio Out, in this case).
Input can be either:
• Line: Suited for instrument level (guitar, bass) and line level (synth,
mixer aux) signals. This is the factory default. (To avoid distortion, adjust
the output volume of external equipment to match line level)
• Mic: Suited for a dynamic microphone. (With use of a XLR to TRS cable
or adapter) Line/Mic input selector is on the left side of Loupé. (1)
Exp In (JK5) is for connecting an expression pedal. (see Special Modes)
Sync Out (JK6) sends a pulse clock to synchronize external equipment. (see
Master Synchronization)
Switches
Loupé features 5 footswitches (FSW1-5) and 4 tactswitches (TSW1-4) that
you can assign Functions or ReadFX to.
Tactswitches 5 and 6 (TSW5-6) are for navigating Play mode and Game Edit
mode.
Encoders
ECD1 and ECD2 are digital encoders that serve different roles.
In Play mode, they change Game (ECD1) and activate Scroll (ECD2).
In Game Edit mode, they are used to navigate drop-down menus.
10
FSW5
FSW4
FSW3
FSW2
FSW1
TSW1
TSW2
TSW3
TSW4
ECD1 ECD2
POT1 POT2
TSW5 TSW6
7seg1 7seg2
LED5LED4LED3LED2LED1
LED6 LED7
JK1 JK2 JK3 JK4 JK5 JK6DC
LCD
Displays
Loupé has a variety of flashing lights that display information about playing
and programming.
• LED1-5 show the activity status of main functions
• LED7 flashes at the start of every bar
• LED6 flashes on subdivisions of that bar
• 7seg1 indicates the current Game
• 7seg2 counts cycle multiples or subdivisions
• LCD is the most flexible. In Play mode, it displays the current function or
ReadFX. In Game Edit mode, it displays drop-down menus.
11

Loupé’s core audio processor is an STM32 ARM CPU clocked at 180MHz,
paired with 32MB of SDRAM.
The analog input signal is converted to digital information by a 24-bit Cirrus
Logic stereo codec running at 48kHz. In the digital domain, all of the signal
processing operations are performed with 32-bit floating point resolution,
and loops are stored as such in the SDRAM before being sent back to the
24-bit D/A converter.
The internal audio buffer size is 32 samples, which corresponds to an
imperceptible 1.33ms of latency between input and output.
While there is no bypass switch for the internal circuitry, the input and
output impedance were selected to guarantee a high impedance bridging
connection to/from any typical low-power load/source.
Audio Path
The diagram opposite shows us the audio path including live input,
pre-memory filtering, memory, feedback path (Decay pot), ReadFX mixing,
Dry/Loop mixing and output.
Expert users: The four green circles [delin] for delay in, [feed] for feedback,
[dry] and [loop] are virtual switches that can be open (1) or closed (0) resulting
in a certain behaviour. The main Functions of Loupé correspond to different
configurations.
Filters
Before being written to memory, the mix of the live input and the feedback
loop goes through two filters and a limiter.
These filters are a high-pass with cutoff frequency ranging in steps from
20Hz to 500Hz and a low-pass with cutoff frequency ranging in steps from
24KHz to 0.5KHz. Filter settings are specific to each Game (see Game
Edit/Params). Filters have -12dB/octave slopes which gives a soft filtering,
however many rounds of a loop (e.g. long Overdub) will progressively
intensify filtering.
12
Live
input
Output
Dry
Decay
high-pass
filter
low-pass
filter
limiter
Loop
memory
write
Dry
Head
FX
Head
memory
read
ReadFX
Mix
ReadFX
Fbk
Dry/Loop
The Dry/Loop knob (POT1) controls the mix between the dry input and the
playing loop. At 12 o’clock, dry and loop are at the same level; fully counter
clockwise you will hear only the dry signal, and fully clockwise only the loop.
-
Decay
The Decay knob (POT2) controls how long the loop plays, from continuous
playback to a single repeat.
When using Loupé as a looper, keep the Decay pot fully clockwise for
infinite repeats. When the Decay pot is less than fully clockwise, it will
function like a highly interactive and customizable delay pedal.
13

14

Games
15

On the enclosure of Loupé, the printed labels associated with footswitches
(Record, Overdub, Replace, Insert, Multiply) and tactswitches (ReadFX,
Undo, Reset, Mutrig) are there to help new users find their way. In practice,
any function or ReadFX can be assigned to any footswitch or tactswitch.
A collection of these assignments can be saved in what we have decided to
call a Game.
There are 99 Games: 50 factory slots (1-50) that cannot be overwritten, and
49 user slots (51-99) to store your very own custom Games.
In addition to these switch assignments, each Game also saves a set of
parameters contained in the Params menu.
Game select
The current Game number is displayed by 7seg1.
To select a different Game, turn ECD1, 7seg1 will start flashing and you can
scroll through the saved Games.
Once you have chosen a Game, press ECD1, 7seg1 will stop flashing and
the new Game is active.
You can change Game on the fly without affecting audio, sync, or any
function that might be running. Only the current ReadFx will be ended.
Game Edit
When you enter the Game Edit menu, Loupé’s sound will still be running,
but FSW1-5 and TSW1-4 are no longer operational.
To enter Game Edit, press TSW5. The LCD will display [Press to Assign] and
[Exit / Params]. Here we can either press any switch and assign a function to
it, enter the Params menu, or Exit.
16

Let’s first look at how to assign functions to switches.
If we press FSW1, the LCD will display its current assignment and its
parameters in a list. The Switch’s name will be displayed as the first item in
the list and the second item is the function currently assigned to said switch.
To change the function, turn ECD1 one step clockwise to move the cursor
down to the line [Func] then turn ECD2 to scroll through the different
functions. Now choose the Switch Mode (Toggle/Sustain) by moving the
cursor down to the line [SwMode]. This changes whether the selected
switch will operate in a momentary or latching fashion.
Game Exit and Save
Press TSW5 to exit the Game Edit menu, the message [Overwrite ? Y/N] is
displayed and the Game number flashes.
There are 3 possible cases:
• You do not want to save any modifications, select [N] by pressing TSW6.
• You do want to save modifications made to the selected Game, select
[Y] by pressing TSW5.
• You do want to save your modifications, but in a different Game slot,
turn ECD1 to select another Game (7seg1 will start flashing), then select
[Y] by pressing TSW5.
Params
The Params menu contains parameters specific to each saved Game.
Once in the Game Edit menu, press TSW6 to enter the Params page.
You can navigate up and down the menu with ECD1 and change values
with ECD2.
These parameters relate to:
• Clocks: QuantDiv (see Clocks), SyncDiv (see Sync), ScrollDiv. (see Scroll)
• Filters Cutoff frequencies. (see Filters)
• Activation of Special Modes: ForceDry, EXP. (see Special Modes)
17

18

Functions Basics
19

There are two types of functions: One-Shot and Two-Step.
These names are self explanatory, as One-Shots require you to hit the switch
once, and Two-Step require you to hit the switch twice.
• One-Shot functions are: Undo, Trig, Start, Reset.
• Two-Step functions are: Record, Overdub, Replace, Substitute, Insert,
Instut, Multiply, Stack, Mute, Pause, Mutrig.
Two-Step functions can only be used one-at-a-time. In other words, starting
a new function will automatically end any current function you have not
stopped. (see Alternate Endings)
LED Status
Two-Step functions are associated with LED1-5:
• LED5: Record, Record/BPM
• LED4: Overdub
• LED3: Replace, Substitute
• LED2: Insert, Instut
• LED1: Multiply, Stack
• LED1-5: Mute, Pause, Mutrig
When a function is activated, the associated LED turns from green to red.
When a function is deactivated, the associated LED turns back from red to
green.
Toggle / Sustain
For all Two-Step functions, two switch behaviours are available and can be
set when assigning the function to a switch in Game Edit.
• Toggle: one short press to start a function, another short press to end.
This is often referred to as latching
• Sustain: press and hold to start a function, release to end. This is often
referred to as momentary.
20

Alternate Endings
There is an alternate way to end a Two-Step function. Instead of pressing the
same switch to end, you can start another function and this will automati
cally end the previous one.
This is convenient when using Toggle Switch behavior as you will save many
switch presses.
For example, let’s say you want to use Multiply just after Recording a loop,
and then begin to Overdub. With standard endings your presses would be:
Rec / Rec / Mult / Mult / Dub
With Alternate Endings your presses are:
Rec / Mult / Dub
By using Alternate Endings you save switch presses and keep the music
flowing.
-
Bar Clock, Quant Clock, QuantDiv
Before going further, we need to understand how the different Clocks work.
We have seen that LED7 flashes on the start of each bar, whereas LED6
flashes on each subdivision. In other words LED7 shows the Bar Clock and
LED6 the Quant Clock.
Besides giving us visual timing cues, both Clocks are also used to quantize
functions. (A third Clock with no visual feedback exists, this is the Sync Clock
allowing synchronization of slave machines)
These three Clocks start as soon as you finish your first recording.
Bar Clock (LED7) indicates the first beat of the bar. Quant Clock (LED6) is
derived from Bar Clock and runs 2, 4, 8 or 16 times faster.
QuantDiv (Game Edit/Params) sets the ratio between Bar Clock and
Quant Clock. Subdivisions can be half, quarter, eighth, or sixteenth notes.
(QuantDiv=2, 4, 8, 16)
21

Quantized Functions
Most functions are available in several versions.
The basic unquantized function (e.g. Replace), as well as two other
quantized versions. (e.g. Replace/B and Replace/Q)
Instead of being activated immediately, these quantized functions activate
and deactivate exactly at the start of a bar or a musical subdivision, which
has the effect of framing content and maintaining or creating rhythmic
coherence.
• Functions with /B modifiers are quantized to the Bar. (Mostly used with
Cycling functions). All these functions will start and end at the beginning
of a bar, ensuring tempo and structure are maintained. (Game 03+04)
• Functions with /Q modifiers are quantized to the subdivision, these
functions will start and end at the beginning of a subdivision (e.g.
an eighth note if QuantDiv=8). In practice, use of /Q functions leads
to composition in a sequencer/arpeggiator style with Non-Cycling
functions (Overdub, Replace, Substitute), or to complex odd time
signatures with Cycling functions. (Multiply, Insert) (Game 05+06)
• The /R modifier (Rounded) is a special kind of quantization, only
available for Multiply and Stack. In this case, starting the function is
immediate whereas the ending is quantized.
Concerning the LEDs associated to Functions (LED1-5): as well as inactive
status (green) or active (red), we also have a third status "waiting" (orange),
informing us that the start or end of a quantized function is about to
happen.
22

Let’s look at an example of a Replace/Q function using Toggle Switch Mode:
On the first press, LED3 turns from green to orange (function has not yet
started). On the next Quant Clock tick the function effectively starts and the
associated LED turns from orange to red.
Similarly on the second press, the associated LED turns from red to orange
(function still running). On the next Quant Clock tick the function effectively
ends and the associated LED turns from orange to green.
First Loop
When you turn on Loupé, you will be in Reset Mode. All clocks are stopped
and the LCD displays [Ready]. This is your blank canvas.
Your first loop can be recorded with the Record function, or a Cycling
function. (2)
Record
[delin=1] [feed=0] [loop=0]
With Record, create your first loop and abandon it at any time to create a
new one. During Record LED5 turns red, then once Record is ended, it turns
back to green and you will be in the Default Mode.
Successive Records can be undone.
Reset
[delin=0] [feed=0] [loop=0]
This function instantly returns us to Reset Mode regardless of any active
function, be it quantized or unquantized. (3)
The current loop is interrupted and definitively lost.
Undo is reset and Scroll is no longer available.
23

Default Mode
A Default Mode is the mode you return to after ending Record or any other
Two-Step function. (4)
The Default Mode can be either Sample, Tails or Overdub.
Sample
[delin=0] [feed=1] [loop=1]
Sample is the Default Mode if Decay is fully clockwise.
In this mode, the loop is read without being rewritten on each pass.
Tails
[delin=0] [feed=1] [loop=1]
Tails is the Default Mode if Decay is not fully clockwise.
In this mode the loop fades away like a delay, each repetition is processed
through the filters, and written to memory.
Overdub
[delin=1] [feed=1] [loop=1]
This is any looper’s basic function, allowing you to record layers and layers
of sound.
You can record an infinite number of layers, but if an overdub lasts over
43 seconds undo will not be possible anymore. (Scroll however remains
available)
If Overdub is activated, it becomes the Default Mode until it is deactivated
and ending any other Two-Step function will put you back in Overdub. (5)
24

In this case, while the other function is active, LED4 turns orange indicating
that Overdub is ready to take over at the end of that function.
Overdub takes into account the Decay pot, and if it is set to less than 100%,
the feedback amount is displayed on the LCD.
Replace
[delin=1] [feed=0] [loop=0]
This lets you replace all or part of an existing loop with completely new
material. While using Replace, loop playback is muted.
Let’s describe two typical uses:
• If the Replace duration is shorter than the loop length, you can replace
the loop bit by bit. This is ideal for click and cut style.
• If the Replace duration is longer than loop length, you are constantly
writing the incoming signal to memory. This is good for rehearsing a
pattern until you are satisfied, and ending Replace will keep your last
take.
Substitute
[delin=1] [feed=0] [loop=1]
This is a Replace variant in which loop playback is not muted.
While you will have the same result using either Replace or Substitute,
Substitute will give you a guide for your playing while you record.
25
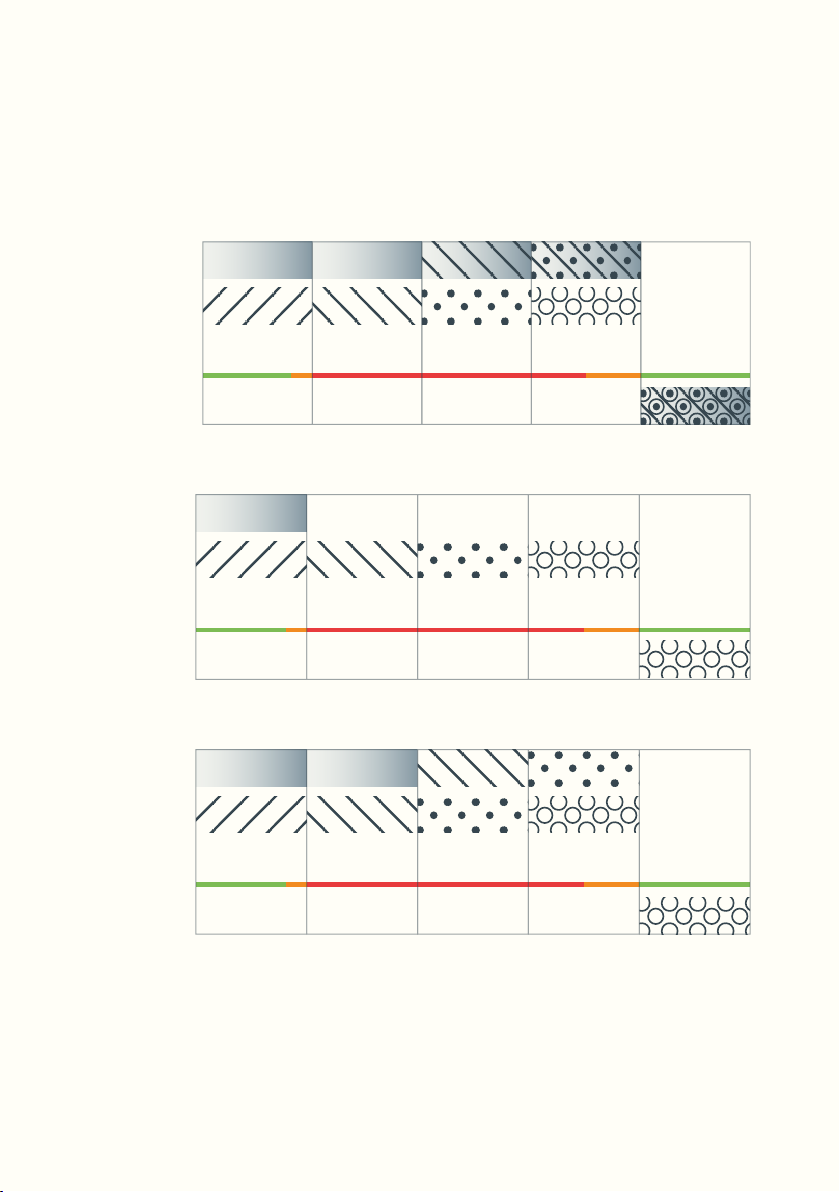
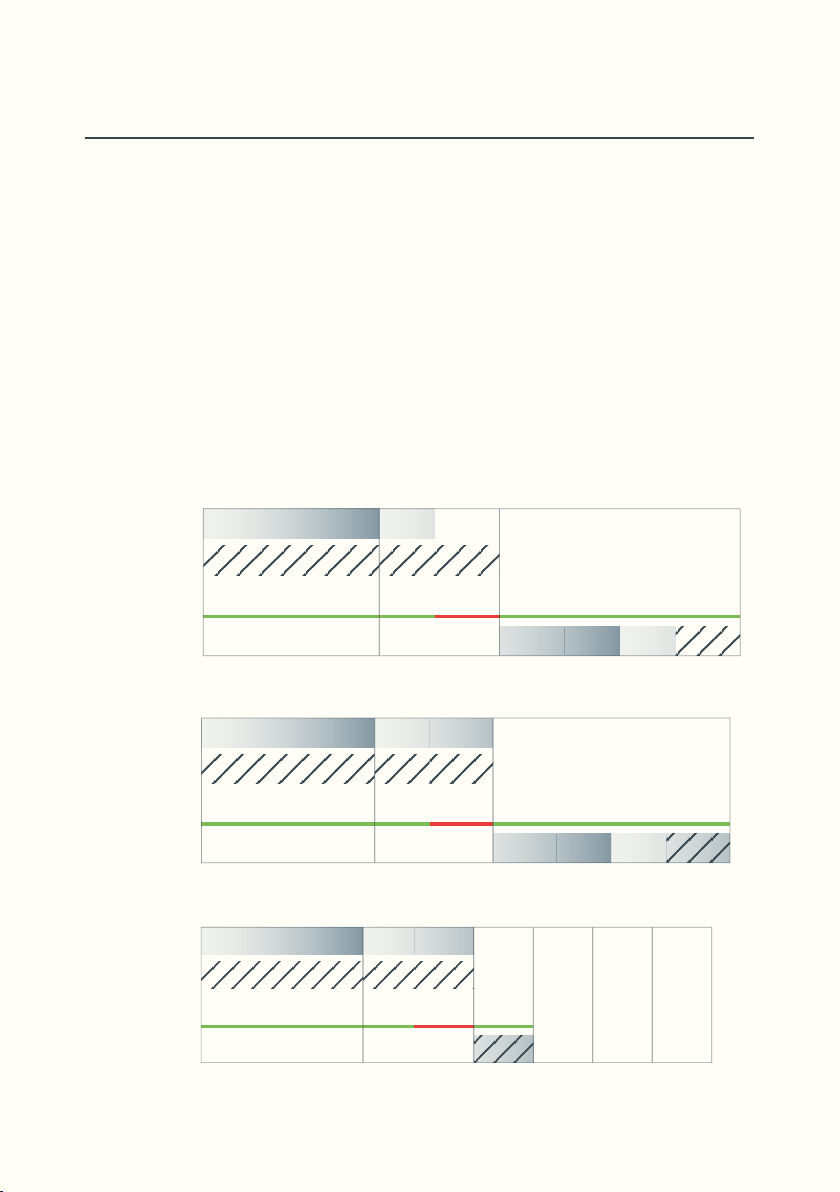
The following diagrams give us a good visual example of what makes these
Playing Loop
Live Input
Actions
New Loop
Replace/B (3 Cycles)
in out
vv
Playing Loop
Live Input
Actions
New Loop
Substitute/B (3 Cycles)
in out
vv
Playing Loop
Live Input
Actions
New Loop
functions unique. The thing they have in common is that they do not change
the loop length.
Overdub/B (3 Cycles)
in out
vv
26

Cycling Functions
27

As opposed to Overdub, Replace and Substitute (where loop length
remains unchanged) the Cycling Functions Insert, Instut, Multiply and
Stack do change loop length.
In their /B and /R versions, the resulting loop length is an exact multipli
cation of the original loop, these are Cycling functions.
We consider the length of this obtained loop as a multiple of X cycles and
7seg2 will count these cycles during and after the function.
-
Time Limit
Cycling functions (as well as Record) cannot last longer than 43 seconds.
Once this limit has been passed, the message [Memory Limit] will be
displayed on the LCD and the current function will automatically end
whether the function is quantized or not.
Insert
[delin=1] [feed=0] [loop=0]
As the name suggests, the Insert function lets you insert new content into
an existing loop. At the start of the function, loop playback stops and
recording begins. When you end the function, the inserted recording stops
and playback returns to where it was before you started the function. This
expands the loop length by however long Insert was engaged for.
Instut
[delin=1] [feed=1] [loop=1]
Instut is a variation of Insert. It is almost identical except that loop playback
does not stop during the new recording. When you start Instut, it begins
sampling a portion of the loop. When you end Instut, the section of the loop
between the start and end points is immediately copied and pasted to the
precise point where Instut ended. This expands the loop length by however
long Instut was engaged for. (6)
28
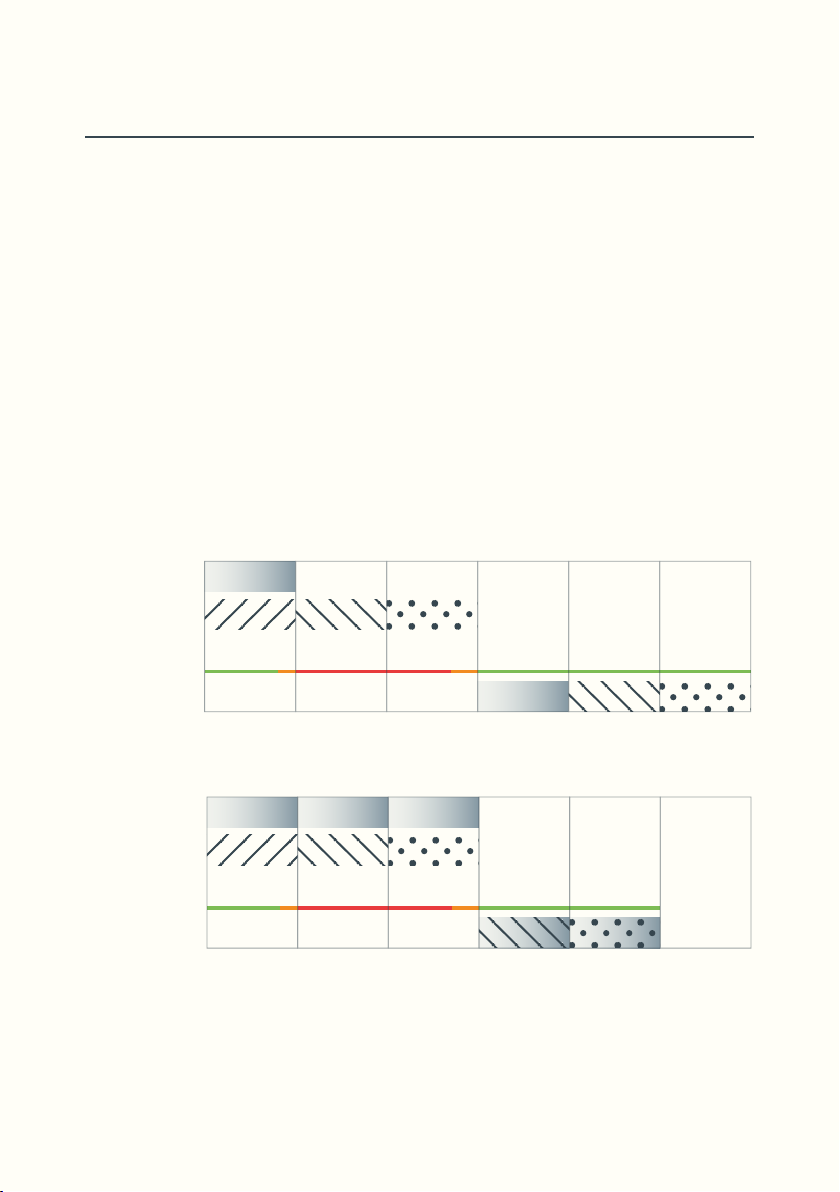
Multiply
Playing Loop
Live Input
Actions
New Loop
Insert/B (2 Cycles)
in out
vv
[delin=1] [feed=1] [loop=1]
Multiply lets us add new material on top of the original loop.
The Multiply function is part Record, part Overdub. Just like with Record we
define a new loop length, and just like in Overdub we are recording a mix
of the input and the original loop (repeatedly if Multiply lasts longer than
the original loop). (7) Multiply resamples whatever sounds are happening,
including trig patterns and even ReadFX with the right settings.
Let’s compare Insert and Multiply in their quantize to Bar versions (/B).
From each first loop, we apply the function for two cycles.
The result is a three cycle loop for Insert and a two cycle loop for Multiply.
Playing Loop
Live Input
Actions
New Loop
in out
Multiply/B (2 Cycles)
vv
29

Stack
[delin=1] [feed=1] [loop=1]
The Stack function lets you record layers over a single bar that is repeating,
and then during playback, it stacks each of those layers one bar at a time.
To refer to the other functions, when Stack is activated, it behaves like
Overdub, but when ending the function, the result is closer to Multiply.
Stack takes into account the Decay pot, and if it is set to less than 100% then
the feedback amount is displayed on the LCD.
Record/BPM
[delin=1] [feed=0] [loop=0]
The BPM version of the Record function allows you to record your first loop
at a tempo that you set.
In the Game Edit menu, turn ECD1 to the [BPM] line and use ECD2 to select
a tempo, from 30BPM to 250BPM.
When the recording starts, the Sync clock will automatically start.
This will give you a guide during the recording if a drum machine is synced
up. (Without one it will be hard to do a rhythmically accurate first recording)
The end of the recording will be quantized to Bar Clock, meaning the
recording will end at the next ending of a bar. The result will be a loop X
bars long.
30

The following diagrams show us how Stack/B is similar to Overdub/B and
Playing Loop
Live Input
Actions
New Loop
Overdub (3 Cycles)
in out
vv
Playing Loop
Live Input
Actions
New Loop
Multiply/B (3 Cycles)
in out
vv
Playing Loop
Live Input
Actions
New Loop
Stack/B (3 Cycles)
in out
vv
Playing Loop
Live Input
Actions
New Loop
Rec/BPM (3 Cycles)
in out
vv
Multiply/B, and how Rec/BPM resembles a Multiply/B but without loop
playback.
31

Rounded Functions
Playing Loop
Live Input
Actions
New Loop
Multiply/R (3 Cycles)
in out
vv
Playing Loop
Live Input
Actions
New Loop
Multiply/B (3 Cycles)
in out
vv
Rounded (/R) is a third quantization option only available for Multiply and
Stack functions.
Conversely to /B functions which start on the next Bar Clock tick, Rounded
functions (e.g. Multiply/R) start immediately. However, the end of the
function will be quantized so that you obtain a loop length that is equal to
an exact multiple of your original loop.
The final result will be equivalent to that obtained with a /B function: a new
loop of X cycles of the original loop.
The appeal of this option, particularly with longer loops, is to avoid waiting
for Multiply or Stack to begin, which is often more musical.
The following diagram lets us see the difference in behaviour between
Multiply/R and Multiply/B.
32
Unquantized Cycling Functions
Playing Loop
Live Input
Actions
New Loop
Insert (unquantized)
in out
vv
Playing Loop
Live Input
Actions
New Loop
Instut (unquantized)
in out
vv
Playing Loop
Live Input
Actions
New Loop
Multiply (unquantized)
in out
vv
When we use Cycling functions that are quantized to Bar (/B) or to subdi-
vision (/Q), all Clocks (Bar Clock, Quant Clock, Sync Clock) stay at the same
tempo.
If Cycling functions are not quantized, a new loop length is set with no
relation to the previous loop length.
All clocks (Bar Clock, Quant Clock and Sync Clock) are reset and their
frequency updated. A new tempo is established.
In the following case, Insert lengthens the loop and you get a lower tempo.
Multiply shortens the loop which increases the tempo.
33

34

Mute and Trig
35

Mute, Pause and Mutrig allow you to temporarily stop loop playback.
They each have subtle differences.
Mute
[delin=0] [feed=0] [loop=0]
Mute silences the sound of the loop without stopping playback.
When you end Mute the volume is restored as if it never stopped playing at
all. This function is available in /B and /Q variants.
Pause
[delin=0] [feed=0] [loop=0]
Pause silences the sound by temporarily stopping playback. It works just
like the pause button on a tape player. When starting the function, loop
playback is paused and so are all Clocks. When you end the function, loop
playback and clocks restart from where they were stopped.
Pause has no /B or /Q variant.
Mutrig
[delin=0] [feed=0] [loop=0]
Mutrig silences the sound by stopping playback, but when playback starts
again, it returns to the beginning of the loop.
When you end this function, volume is restored and the loop is triggered
from its beginning.
This function is available in /B and /Q variants.
36

Trig, Trig/Q
Trig is a One-Shot function that instantly plays your loop from the beginning
as soon as you hit it.
It is only available in Sample and Multiply modes and is indicated by LED1-5
quickly flashing red. In its unquantized version, every Trig resets all clocks
immediately, including the Sync Clock. (retriggering your slaved drum
machine)
Trig/Q is the quantized version of Trig. You need to hold the button down
(Sustain mode) and the function will be activated on the next tick of Quant
Clock and on every subsequent tick as long as you keep holding the button
down. In this case all clocks remain unchanged.
Trig Point, Start, Start/Q
The Trig Point is the point from which the loop is retriggered.
It is indicated by LED7 flashing red. LED7 also indicates the Bar Clock by
Flashing green. When starting a new recording, the Trig point and the Bar
Clock are both at the very start of the loop. LED7 will flash orange, since
both the green and red functions are happening at the same time. (8)
The Start function is only available in Sample mode. It lets you redefine the
Trig Point location. Listen to loop playback and press the switch when you
would like your loop to start from now on. (LED1-5 flash red)
When using the Trig function, your loop will now be triggered from this new
Trig Point. This is useful when trying to musically use Trig functions from
anywhere in the loop other than the original start.
Start/Q is the quantized version of Start. You need to hold the button down
(sustain mode) and the function will be activated on the next tick of the
Quant Clock and on every subsequent tick as long as you keep holding the
button down.
37

38

Undo
39

Undo is a very useful function, saving you from having to start all over again
because of a wrong button press or lackluster performance. Undo can be
used after the Record, Tails, Overdub, Replace, Substitute, Insert, Instut,
Multiply, and Stack functions.
At the end of every function, the loop coordinates are saved in a list.
Each time Undo is pressed, playback is instantly set to the position given by
the last line added to the list and this line is then removed from the list.
Undo therefore lets us not only cancel the last function applied, but also go
back through each step in a performance all the way up to the first Record
made.
127 levels of Undo are available, under certain conditions.
In practice, the number of levels of Undo available is often below this value,
as soon as functions are used in a prolonged manner.
This is due to Loupé’s memory structure being a circular buffer. The memory
size is limited, therefore, once full, previous material will be written over.
These samples are lost for good and the coordinates removed from the
list. The worst situation is prolonged use of Overdub, past 43 seconds of
continuous Overdub you will have zero levels of Undo.
Scroll however is still available to go back through the last 43 seconds.
Undo Display
When you press Undo, LED1-5 play a short animation, the LCD briefly
displays the function it has undone and the next function in the stack.
For example: [Undo:Multiply 26], [Next:Overdub 25] and finally [Nothing
To Undo] when you’ve run out of layers.
40

Alternate Ending
Undo can be used as an Alternate Ending.
For example, if you are in the middle of an Overdub and would like to Undo
it, you could either click out of Overdub, listen back to make sure that you
want to Undo it and then press Undo. Or if you are sure, no need to click out
of Overdub, pressing Undo will end Overdub and reposition playback on
the loop before Overdub started.
Undo and Decay
When you Undo a function with Decay<100% (Tails, Overdub, Stack) Undo
repositions the loop and automatically puts you back in Sample mode.
(Decay=100%).
However, we now have a state in which the Decay pot position does not
match the actual value. In this state the Decay pot value is no longer being
registered and for it to regain control you need to turn it. (a slight nudge
should suffice)
Overdub Trick
When you Overdub 20 layers in a single streak and then press Undo, all 20
layers will be erased in one fell swoop… a stunning effect, but this might be
frustrating if that was not what you were after.
If you want to be able to go back through the layers one by one, click in and
out of Overdub between layers (easy if you’re in Sustain mode!).
By doing so you will create as many Undo points as layers and be able to
remove them one by one.
41

42

Scroll
43

Scroll is a unique function in that it is permanently assigned to ECD2 and
available in every game. Scroll shifts the loop window back and forth in the
memory.
Operation
To start the Scroll function, turn ECD2 counterclockwise, the LCD displays
two numbers and a graphic representation that will help us navigate. The
first number is the step in the memory, the second number is the shift
amount.
LED2-5 turn off, meaning that all Two-Step functions except Multiply are
now unavailable.
Now that you are in Scroll, you can shift the loop window back and forth
through previously recorded material. Turning counterclockwise will shift
the window backwards and turning clockwise will shift it forwards.
This shifting amount is defined by the ScrollDiv parameter (Game Edit/
Params), its default value is 1, which gives us a shift of the same length as
the original loop. If ScrollDiv=8 then the shift will be 1/8th of the length of
the loop. Available values are 1, 2, 4, 8 and 16.
If you want to use the current Scroll window as your new loop then press
ECD2. Loupé then stays on that version of the loop and clears everything
that occurred after. The message [Applying Scroll] appears on the LCD, and
LED1-5 display progress of the operation. When this is over they turn back
to green, indicating that the associated functions are now available again.
If you avoid using Cycling Functions, Scroll works like a temporary Undo/
Redo. If however you change loop length with Cycling Functions before
entering Scroll, you will hear previous content with a different loop length
than originally. (9)
44

Scroll Exit and Undo
There are three possible ways to exit once you have entered Scroll:
• You explore the memory, but return to your current loop version (by
scrolling fully clockwise) and none of your Undo points will be lost.
LED2-5 will turn back on.
• You explore the memory and exit somewhere else by pressing ECD2, in
which case Undo is reset and all previous points lost.
• You use Multiply while in Scroll. Undo is not reset.
Recording Scroll with Multiply
You might be wondering why LED1 stays on during Scroll.
As we have just seen, one way of exiting Scroll is to use Multiply.
This lets you record a Scroll performance.
Multiply can be /B, /Q or unquantized. It is often handy to have it /B to keep
things in time.
When you are in Scroll, press Multiply (LED1 turns red) and shift the loop
around periodically to produce musical variation. (You can even spice it up
with some ReadFX!)
Once your performance is over, press Multiply again to end the function.
LED1 turns green and LED2-5 light back up. This recorded performance is
now your new loop.
45

46

ReadFX
47

General Philosophy
When you modify the playback of a recording, you can get new and familiar
sounds. Think of changing the speed on a record player or tape loop, it
affects how the sounds are read and therefore changes the sounds you
hear.
This can be done with Loupé as well, we call them ReadFX.
ReadFX are an alternative way of reading samples in the memory by
changing playback speed or applying skips to playback.
These effects range from the more classic Vibrato, Wow and Flutter,
Chorus, Flanger, to effects from the realm of samplers like Pitch-Shifting,
Time-Stretching, Reverse, and Redux.
On Loupé, a single ReadFX can hold any or all of these effects at once, and
should be considered as a multi-effect rack preset.
When you activate a ReadFX, it will stay on until it is turned off or until
another Game is selected.
Whether you are in Sample, Multiply, Overdub, or even Scroll, playback will
be affected by the parameters of any active ReadFX.
The ReadFX function, like Two-Step functions, is available in an unquantized
version as well as two quantized versions: ReadFX/B and ReadFX/Q. Choice
of switch mode (Toggle/Sustain) is also available. (10)
More in Depth
For a better understanding of ReadFX, let’s use vocabulary from the tape
machine world and talk about different heads.
If you are unfamiliar, the magnetic mechanism that the tape rubs against
is called the "head". The head is what picks up the sound saved on the
magnetic tape - this is true if it is a reel to reel, cassette player, or even VHS
tape.
48

Loupé always has at least one head - the Dry Head - that is always reading
the "tape" (in reality the digital memory) at a constant speed until the end of
the loop, at which point the loop restarts.
ReadFX use a second head - the FX Head - which will, in parallel with
the Dry Head, read samples from the same loop, but in a different way,
changing speed or place and returning periodically to the Dry Head
position (see Auto-Follow). Both heads coexist and you’ll be able to hear
and record a mix of both.
Multiple ReadFX in a Game
Multiple ReadFX can be assigned in a single Game, these multiple ReadFX
are just different settings and can not be stacked.
When you turn on an additional ReadFX, it will take the last one’s place. If
this secondary ReadFX is then turned off, Loupé will snap back to the first
ReadFX unless it was turned off.
A game can contain a mix of Toggle or Sustain, quantized or unquantized
ReadFX. (11)
ReadFX Display
Unlike Two-Step functions, ReadFX do not have a dedicated LED showing
their active status. Instead, we use the LCD screen. When a ReadFX is active,
the LCD displays the main active parameters as well as the associated
switch.
For example:
[TSW3 Stt:16]
[Dft:16 Rev:On]
If a Two-Step or One-Shot function is activated while a ReadFX is active, the
LCD briefly displays this function before returning to displaying the active
ReadFX.
49

Composing your ReadFX, Preview
In Game Edit, you can choose the switch you wish to assign ReadFX to. With
ECD1, go to the function line and then browse with ECD2 fully right through
all the functions to find ReadFX, ReadFX/B and ReadFX/Q. (12)
You can now browse through ReadFX parameters with ECD1 and change
values with ECD2.
All parameters can be activated simultaneously!
While you are setting up your ReadFX, pressing and holding TSW6 will let
you preview your effect without having to exit Game Edit.
The preview switch will be quantized if ReadFX/B or ReadFX/Q is selected.
When in play mode, TSW6 is also a shortcut to go directly to the last edited
ReadFX.
Copying ReadFX
You may want to create variations of a ReadFX, this is made easy with the FX
Copy function.
Here’s how it works: in the Game Edit menu, select the ReadFX you want to
copy by pressing the assigned switch. Press and hold this switch again, and
while holding it down press TSW6. The LCD will display [Press Switch to
Copy to] and you’re clear to release the switches. Now press the destination
switch. Copy is done.
Recording of ReadFX
It is possible and sometimes desirable to record the effects produced by
different ReadFX.
For this to happen their Feedback parameters must be >0. (See ReadFX
Parameters/Feedback)
Recording will take place when using functions Tails, Overdub, Instut,
Multiply and Stack.
50

ReadFX Parameters
51

Mix
[Mix: D/0 FX/10]
This parameter lets you blend between the Dry Head (D) and the FX Head
(FX).
By default this setting is [Mix: D/0 FX/10], which means that only the FX
Head will be heard.
At [Mix: D/5 FX/5] the Dry Head and the FX Head are at the same level.
(13)
(Games 22 to 25)
Feedback
[Fbk: D/10 FX/0]
This parameter lets you choose how much of the Dry Head and the FX Head
is being recorded while using the following functions: Tails (14), Overdub,
Multiply, Stack, Instut.
• When the feedback is set to [Fbk: D/10 FX/0] (default value) effects will
not be recorded during these functions. They will still behave as usual.
(Games 10 to 25)
• If Feedback is set to [Fbk: D/0 FX/10] then ReadFX will be recorded
during these functions.
• If you are between [Fbk: D/9 FX/1] and [Fbk: D/1 FX/9], for example
[Fbk: D/5 FX/5], a mix of Dry head and FX head will be recorded. In
this case, pay attention to the volume getting progressively louder
while using Tails, Overdub or Stack in a prolonged manner, especially
on shorter loops. You can always turn Decay down if things get out of
hand.
(Games 26 to 35)
52

Pitch
[Pitch:+0]
Pitch lets you change the playback speed of the FX Head, up to twice the
speed or down to half (like a record player or tape loop, speed changes
pitch).
Values are expressed in semitones, for example: +12=OctaveUp=Speedx2 ;
+7=FifthUp=Speedx1.5 ; -5=FourthDown=Speedx0.75 ;
-12=OctaveDown=Speedx0.5.
It’s usually a good idea to pick a /B or /Q ReadFX if you want to pitch-shift in
octaves or fifths and still keep things rhythmically coherent.
The behaviour of Pitch is affected by the Auto-Follow setting and high
Auto-Follow values will help retain the loop’s timing and length while
changing its pitch.
(Games 10+11)
(Games 26+27)
Reverse
[Reverse: Off]
Reverse lets you read samples backwards - the end of the loop becomes
the beginning and vice versa. Reverse behaves differently based on the
Auto-Follow setting. (22)
There are two available modes:
• Standard mode [Reverse: On] the FX Head moves backwards conti
nuously in a loop. (Game 12)
• Infinite mode [Reverse: Inf] the FX Head moves backwards with no
limits, allowing you to pass through previous stages of development. It
is not recommended to use Infinite mode in an always on manner. It is
better suited to momentary use.
(Games 28+39)
-
53

Stutter
[Stutter: Off]
Stutter lets you create micro-loops inside the main loop.
The length of these micro-loops is expressed as a fraction of the length of
the main loop.
In practice, the moment you activate a Stutter ReadFX sets the start of the
micro loop. The FX Head will read as usual, but when it reaches the end of
this micro-loop (as defined by the Stutter value setting) it will skip back to its
start and keep reading the same micro-loop until the ReadFX is deactivated.
Quantized Stutter favors sharp tight attacks whereas unquantized will sound
more organic.
For example if Stutter=8 then the Stutter loop length will last 1/8th of the
main loop. Available values are .5, 1, 2, 4, 8, 16, 32, 64 (with triplet, dotted,
quintuplet and septuplet modifiers). (15) If we consider the main loop to be
one bar of four beats, then this gives us double whole, whole, 1/2, 1/4, 1/16,
1/32 and 1/64 notes.
(Game 13)
Beyond 1/64, the available values are no longer calculated as a fraction
of the main loop length, but are given extremely short fixed values that
correspond to musical pitches.
This is because beyond a certain point, the Stutter loop length is so small
that the frequency (1/t) enters the audio domain. Pitches go from E1 to E4 in
semitones. This lets you use Loupé like a synthesizer.
Because of the static nature of Stutter, it is best suited to momentary use.
It is however possible to automatically shift the Stutter loop inside the main
loop. There are two ways to do so: either with the Drift parameter (exclu
sively linked to the Stutter parameter) or with the Auto-Follow parameter.
In both of these cases, always on use could be considered.
(Games 32+33).
54
-

The following diagram gives an overview of various stutter values and their
1
1s
1o
1t
1q
.5
.5s
.5o
.5t
.5q
2
2s
2o
2t
2q
4
8
16
32
64
4s
4o
4t
4q
x1
x7/8
x6/8
x2/3
x5/8
x2
x7/4
x6/4
x4/3
x5/4
x1/2
x7/16
x6/16
x1/3
x5/16
x1/4
x1/8
x1/16
x1/32
x1/64
x7/32
x3/16
x1/6
x5/32
Stutter and Auto-Follow values (% loop length)
multipliers that are applied to the length of the original loop.
55

Drift
1
2 3 4
Dry Head
ReadFX/B, Drift:2, Stutter:4
FX Head
1
2 3 4
[Drift: Off]
This parameter is linked to Stutter. If Stutter=Off then Drift will have no effect
on the ReadFX.
With Drift, a Stutter loop can be gradually shifted both forward and
backward.
We have here a kind of primitive timestretch, with the Stutter value being
our grain size and the Drift value indicating percent of timestretch (2=200%,
4=400%, 8=800%) and direction (no prefix=forward, B=backward). (16)
(Games 16 to 21)
Let’s look at an example considering our main loop as one bar of four beats.
(Game 17)
56
With a quarter note stutter and Drift:2 the Stutter loop start point shifts on
every restutter by one eighth note forward in the main loop. (1/4 x 1/Drift)
Another example with Drift=B is given in the Endnotes. (17)

Auto-Follow
1
2 3 4
Dry Head
ReadFX/B, Stutter:8, A-F:4
FX Head
[Auto-F: Off]
Auto-Follow is a parameter linked to the following parameters: Pitch,
Reverse and Stutter.
If none of these parameters are active then Auto-Follow will have no effect.
When Auto-Follow is activated, the FX Head will periodically realign with the
Dry Head position. How often the two heads realign is determined by the
Auto-Follow value. These values are, just like Stutter, calculated as a fraction
of the main loop.
Let’s take a look at how Auto-Follow affects Stutter.
What we will hear will be the first 8th note of beat 1 (A) repeated twice, then
the first 8th note of beat 2 (C) repeated twice and so on for beats 3 and 4.
This amounts to the same as manually restarting Stutter on each beat in the
bar.
More Auto-Follow/Stutter examples here: (18)
Typically you would use an Auto-Follow value that is longer than the Stutter
value, and if you use the same value for both the result will be no effect!
It can however be interesting to have a Stutter value longer than that of
Auto-Follow to obtain a different kind of effect.
(Game 14)
(Game 15) (19)
57

Let’s now look at how Auto-Follow affects Pitch. (Game 11)
1
2 3 4
Dry Head
ReadFX/B, Pitch:+12, A-F:2
FX Head
1
2 3 4
Dry Head
ReadFX/B, Pitch:-12, A-F:4
FX Head
While the Dry Head is reading beat 1, the FX Head is reading at half the
speed and will only read the first 8th note, it will then realign with the Dry
Head on beat 2 and will then read only the first 8th note of beat 2, and so
on for beats 3 and 4.
Another example with Pitch=+12.
The FX Head reads the loop twice as fast, and while the Dry Head reads 2
beats, the FX Head reads the whole loop. On beat 3, Auto-Follow aligns
the FX Head with the Dry Head and it continues to read twice as fast, now
reading the second half of the loop and continuing into the first half.
More Auto-Follow/Pitch examples here: (20)
(Game 10)
58

Auto-Follow also has an effect on Reverse. (Game 12)
1
2 3 4
Dry Head
ReadFX/B, Reverse:On, A-F:4
FX Head
While the dry head reads forward through beat 1, the FX head reads
backward through beat 4.
On the start of the second beat Auto-Follow will realign the FX Head on
beat 2, and it will now read backward through beat 1 while the Dry Head
reads forward through beat 2, and so on for beats 3 and 4.
More Auto-Follow/Reverse examples here: (21)
59

Modulation
[Mod Wave: Sin]
[Mod Spd: 0.02Hz]
[Mod Depth: 0]
Here we are dealing with pitch modulation.
The playback speed is modulated by an LFO with 3 accessible parameters.
The first line [Mod Wave] lets you choose the wave shape that will modulate
playback speed: Sine or Random.
• Sine gives you access to all sorts of vibrato effects if the Mix parameter
is [D/0 FX/10] or chorus/flanger effects if Mix is [D/5 /FX/5].
• Random lets you obtain tape delay style sounds, from sweet and subtle
to a broken/dying tape machine.
The second line [Mod Spd] lets you select a value for the LFO speed (rate),
from 0.05Hz to 100Hz.
The third line [Mod Depth] lets you set the LFO’s amplitude (amount of
modulation) from 0 to 30.
(Game 36)
(Game 40)
Redux
[Redux: Off]
Last but not least, the Redux parameter simulates sample frequency
reduction (downsampling).
Values range from 1 to 256. The higher the value the dirtier the sound.
60

Special Modes
61

The settings that activate Special Modes are found in the Params Menu.
(Game Edit/Params)
ForceDry
There is a style of looping (that we love) where you create and add new
material to your loop without hearing the input signal. Input could be a
radio, the TV or anything you like, as long as it is continuous.
This leads to a certain degree of randomness as you don’t know the result in
advance when using Record, Replace or Insert.
To activate this mode, go to the Game Parameters menu, scroll down to the
line ForceDry and set to On [ForceDry:On]. The LCD now displays [FD] in
play mode.
Let’s now turn the Dry/Loop knob fully clockwise so that we can’t hear the
dry signal (operation known as kill dry).
Without the ForceDry mode, we would hear silence when in Record, Insert
and Replace. What this option does is to force the dry signal during these
functions, regardless of the Dry/Loop pot setting.
It makes things more consistent.
(Games 43+44)
Additionally, this mode will change the operation of Overdub, Instut, Stack
and Multiply functions as the input signal won’t be recorded during these,
which is desirable in this kind of situation (stacking layers of a continuous
source can quickly sound messy). In ForceDry mode, these functions will
mainly be used for recording ReadFX.
Because Games in ForceDry mode revolve around blindly replacing
portions of your loop with the input signal, it can be useful to monitor your
input without having to turn the Dry/Loop pot. The Mute function does just
this, in addition to its normal behaviour (mute loop playback).
62

Expression Pedal (EXP)
Pedal Up Pedal Down
Loupé features a passive expression pedal input. (JK5)
Any TRS classic expression pedal will work, a CV input will work too under
certain conditions. (22)
To avoid any confusion, we will use the expression "pedal up" for heel
down/toe up and "pedal down" for heel up/toe down. Here’s a diagram just
to be sure!
Broadly speaking, pedal up is your base position, where you are listening to
your loop and where feedback is at its maximum level.
This playing style revolves around periodically pushing the pedal down
while playing then returning to pedal up.
If any of the Expression pedal modes is selected then [EXP] is displayed on
the LCD.
You can choose between three modes: Feedback, Swell 1 and Swell 2.
Feedback
Pedal controls feedback in conjunction with Decay. Value is 0% when the
pedal is down and equal to the Decay value when up. (100% if Decay is fully
clockwise)
63

Swell 1
In this mode, the pedal controls the live input signal fed into the loop.
When the pedal is up, no signal will pass into the loop during Overdub,
Multiply, Replace, Insert, etc.
When the pedal is down, the input signal is fed into the loop normally.
Intermediate positions of the pedal will add new elements into the loop at
varying volumes.
For instance: playing a note with the pedal up, and then moving the pedal
down while sustaining that note, causes that note to fade in (or "swell") into
the loop.
(Game 41)
Swell 2
Swell 2 behaves almost identically to Swell 1, with one crucial difference:
the dry signal is also affected by the pedal.
When the pedal is up, no live input sound is heard, regardless of the current
state of Loupé. With the pedal down, live input is heard, and fed into the
loop, normally.
(Game 42)
Swell 1 and Swell 2 can be thought of as two different ways of "listening" to
the live input signal.
• In Swell 1, live input is always heard at full volume. The pedal only
affects the amount of signal being fed into the loop.
• In Swell 2, the pedal affects live input [dry] and the amount of signal
being fed into the loop [delin]. Swell 2 can be thought of as "listening
to the live input from the loop’s point of view". The amount of live input
heard is identical to the amount being fed into the loop.
64

Soft Replace
Swell 1 and 2 have special functionality when Replace or Substitute are
active: the pedal will perform a "soft replace" operation.
Instead of the immediate on/off behavior of the regular Replace function,
using Swell 1 or 2 while Replace is active will gradually crossfade new layers
over old layers.
This is done by changing the feedback [feed] according to the expression
pedal. Pedal Up: [delin=0] [feed=1] / Pedal Down: [delin=1] [feed=0]
Older loop content is overwritten, but the transition time is regulated by the
speed of the pedal movement.
At intermediate pedal positions, old content is blended with new material.
The amount of "blending vs. overwriting" occurring is displayed as a
changing percentage as the pedal moves.
This effect is only possible while the Replace function is active.
If Replace is set to Sustain, then the Replace button must be held down
throughout the pedal’s movement for the "soft replace" effect to work.
65

66

Sync / OS Update
67

Synchronization
The Sync Clock is used to synchronize external equipment (sequencers,
drum machines…) to Loupé. This equipment must have a pulse sync input.
Plug an instrument cable from Loupé’s Sync Out (JK6) to the sync in of your
equipment. Sync Clock is derived from Bar Clock, and is configurable to suit
a variety of situations.
This setting, which is per Game, is accessed in the Params menu.
The division value of the Sync Clock is expressed in PPQ (Pulses Per Quarter
note), and Loupé will send out 1, 2, 4, 8, 16, 24 or 48 PPQ.
Some machines like the Korg Volca series need a resolution of 1, 2 or 4 PPQ
whereas some older drum machines need 24 or 48 PPQ. (23)
The Sync Clock starts as soon as you end your first Record, or in the case of
Record/BPM as soon as you start the function.
When the Sync Clock is active the LCD will display loop length in BPM
instead of seconds.
To avoid a slave machine running at an extreme BPM when recording very
small loops (<1s), the Sync Clock is automatically reduced.
If the loop is shorter than one second, the clock is divided by 2, shorter than
500ms divided by 4, shorter than 250ms divided by 8 etc. (24)
Pulse Sync can be converted to Midi Clock using external devices.
The Arturia Keystep for example can perform this conversion.
68

Audio Bootloader
It is possible to update Loupé’s software (Operating System or OS) by
yourself, and fairly easily.
Glou-Glou will make an audio file available. (e.g. LoupéOS1.10.wav)
• Download this file to your computer, phone or tablet.
• Connect the audio out to Loupé’s Audio Right Input (JK2) with a mono
jack.
• Disconnect Loupé’s audio output (you do not want to hear this audio
file).
• Turn Loupé on and wait until the end of the start sequence animation.
• Turn Loupé off, press and hold down ECD1 while you turn Loupé back
on. This time there is no animation, but instead [Waiting] displayed on
the LCD. You can now let go of ECD1.
• Make sure that the volume of your device (phone, computer…) is at
maximum and start playing the .wav file from the beginning. LED1-5
serve as a VU meter for the incoming signal. You should have LED1-3
always on and LED4 flashing.
• Bootloading will start and the LCD alternatively displays the messages
[receiving] and [writing].
Once the bootloading is finished, Loupé will restart and display the newly
installed OS version number (for example Loupé OS 1.10).
69

Troubleshooting:
For the operation to complete successfully, make sure Loupé was already
plugged in before restarting in audio bootloader mode.
Going straight to bootloader mode from a cold start, when the machine
has not been on for some time, might not work.
Make sure you are using the correct audio input. (Right Input JK2)
Pay attention to the volume level: the output of a phone or computer
at 100% should work, but if amplified more could cause distortion and
corrupt the file. Conversely, volume too low can also ruin transmission.
Try playing the audio file with different software (iTunes works, VLC does
not). If you are using a mobile device, put it in airplane mode to prevent
audio notifications from disrupting transmission.
70

Endnotes
71

(1) about Audio Input: Setting loupé’s inputs to line/mic level - There are
two small holes on the left side of Loupé. Inside
both is a pushbutton switch that latches in or out.
=line
=mic
There is a red cap that should be easily visible in
the out position. The out position corresponds
left
input
right
input
to line level input (factory setting) and the in
position corresponds to mic level input. Insert a
match or a paperclip to access the pushbutton.
(2) about Cycling function as first loop: After a Reset, the functions Multiply,
Insert and Instut, in their quantized or unquantized versions, can be used
as a substitute Record for your first loop. Once this first loop is created,
functions return to normal behaviour.
(3) about Record/Reset: Record can be used to "reset" your current loop
by recording a short loop of silence. There are two approaches, either use
Record to “reset”, and no need for Reset in the Game, or include Reset in
the Game and you could do without Record by using a Cycling function for
your first loop.
(4) about Default Mode: The Default Mode system makes using Loupé
as a delay much easier, as you don’t need to press a switch to re-engage
Overdub after using another function.
(5) about Overdub as Default Mode: Using Overdub/Q or Overdub/B as
Default Mode is a special case that requires explanation. With Overdub/Q
as Default Mode, all unquantized Two-Step functions in the Game will take
on /Q behaviour. With Overdub/B as Default Mode all Two-Step functions
(/Q or unquantized) in the Game take on /B behaviour.
(Game 9)
(6) about Instut: Since Instut duplicates smaller portions within a loop,
it can function as a manual, variable-length stutter. Very short, repeated
72

applications of Instut (particularly in Sustain mode) can produce granular
and quasi-timestretch effects.
(7) about Multiply: Typical use of Multiply is to first record a 1 bar rhythm
loop, then Multiplying an 8 Bar chord progression over it. The same
scenario would be more tedious with a "standard" looper (without Multiply).
(8) about Trig Point and LED7: Note that in the case of a loop containing
several cycles (e.g. after Multiply/B or Insert/B) LED7 flashes once orange
(Trig Point + Bar Clock) then green at beginning of every cycle (Bar Clock).
In the case of a loop counted in subdivisions (e.g. after Multiply/Q of odd
number length) LED7 flashes alternatively Bar Clock in green and Trig Point
in red, which is always shifting.
(9) about ScrollDiv: In the case where before entering Scroll, you have
done a Multiply/Q of a shorter length than the original loop (e.g. a quarter
note, QuantDiv=4) and that your ScrollDiv value is longer (e.g. a half note,
ScrollDiv=2) then each increment will have you jump in steps of two loops
by two loops and part of the contents of the memory will not be accessible.
In this kind of case, avoid having ScrollDiv<QuantDiv.
(10) about Quantized ReadFX: In some cases, you might want the ReadFX
to activate at the start of the loop, or in tempo, in order to maintain rhythmic
coherence. This is where you can use the quantized versions of ReadFX.
(11) about Multiple ReadFX in a Game: In the case where a ReadFX/B is
always on (e.g. a modulation effect) and where other ReadFX or ReadFX/Q
are temporarily activated (e.g. SwMode: Sustain) the return to ReadFX/B
will be quantized to Bar Clock and not to Quant Clock. In the same way,
if a ReadFX/Q is always on and other ReadFX are temporarily activated,
the return to ReadFX/Q will be quantized to Quant Clock.
28+29+32+34,
the ReadFX/B on TSW1 must stay On.)
(Games
73

(12) about Composing ReadFX: One of the consequences of changing a
ReadFX between unquantized, /B and /Q variants is that you will lose its
settings.
(13) about ReadFX Mix: With [Mix: D/5 FX/5] you may notice a small
decrease in volume compared to your loop without ReadFX, this is normal.
(14) about Tails and ReadFX: Tails applies ReadFX on every round, as if you
were in Overdub, which may come as a surprise.
(15) about Stutter value: The value 0.5 corresponds to twice the original
loop length which might seem strange. In fact the co-use of Stutter and
Auto-Follow make it desirable to have these long values available.
(16) about Drift: Complete list of Drift Values: 16=1600%, 8=800%,
6=600%, 4=400%, 3=300%, 2=200%, W=150% (3/2), X=133,33% (4/3)
Y=114,3% (8/7), Z=106,66% (16/15).
(17) about Drift
Dry Head
FX Head
Stutter:2
FX Head
Stutter:4
FX Head
Stutter:8
FX Head
Stutter:16
74
(Game 16)
1
ReadFX/B, Drift=B
2 3 4

(18) about Auto-Follow/Stutter (Game 14)
Auto-Follow=2
Stutter=1s
Auto-Follow=1
Stutter=1s
Auto-Follow=2
Stutter=1q
Auto-Follow=1
Stutter=1q
Original Loop
ReadFX/B, Stutter=8
1
Dry Head
FX Head
A-F:2
FX Head
A-F:4
FX Head
A-F:8
2 3 4
(19) about Game 15 "Keep the One Variations": In this Game, ReadFX are
Stutter+Auto-F where the Stutter value is greater than the Auto-F value. The
resulting effects are variations that may seem random, but where the first
downbeat is not scrambled. See the following illustration:
75

(20) about Auto-Follow/Pitch (Game 10+11)
FX Head
A-F:1
1
2 3 4
Dry Head
ReadFX/B, Pitch=-12
FX Head
A-F:2
FX Head
A-F:4
FX Head
A-F:8
ReadFX/B, Pitch=+12
Dry Head
FX Head
A-F:1
FX Head
A-F:2
FX Head
A-F:4
FX Head
A-F:8
1
2 3 4
76

(21) about Auto-Follow/Reverse (Game 12)
FX Head
A-F:1
1
2 3 4
Dry Head
ReadFX/B, Reverse=On
FX Head
A-F:2
FX Head
A-F:4
FX Head
(22) about EXP: In the case where you want to use a CV signal (coming from
a CV pedal or other machine), first make sure that the CV in question is 0/5V.
A higher voltage signal could damage the EXP input. Next, use a special
cable: take a stereo TRS jack and disconnect the central part (RING).
(23) about Sync: For Korg Volcas, make sure the Sync In polarity is set to
Rise.
(24) about Sync: At a given tempo, Record lengths of one bar, one half
note, one quarter note, or even just an eighth note will output the same
Sync Clock. However, this will still have an effect on Bar Clock and Quant
Clock (LED6-7) (multiplied by 2 in the case of half notes, 4 for quarter notes
and 8 for eighth notes).
77

78

Factory Games
79

01 to 09
Games 01 to 09 are composed of Loupé’s basic functions, FSW1-5 and
TSW1-4 functions correspond to the printed labels.
01 basic Toggle labelled functions
02 variations of 01 (Substitute/Instut/Stack/Pause)
03 same as 01 but /B
04 same as 02 but /B
05 same as 01 but /Q
06 same as 02 but /Q
07 basic Sustain labelled functions
08 same as 05 but Sustain
09 mix of Quantized/Unquantized, Sustain/Toggle functions
10 mix of Quantized/Unquantized, Sustain/Toggle functions
Games 10 to 42 are here to illustrate the workings of ReadFX,
consequently TSW1-4, as well as FSW2 and 4 are assigned to ReadFX.
FSW1, FSW3 and FSW5 take on main Two-Step functions.
10 to 21 Always On Effects
Games 10 to 21 are dedicated to "Always On" use of ReadFX.
We have [Mix: D/0 FX/10] and [Fbk: D/10 FX/0] therefore the Overdub,
Multiply and Instut functions don’t record ReadFX.
10 Pitch:+12 / Auto-F variations
11 Pitch:-12 / Auto-F variations
12 Reverse / Auto-F variations
13 Stutter / Quantized vs Unquantized
14 Stutter / Auto-F variations
15 Stutter / Auto-F "Keep the One"
16 Drift:B / Stutter variations
80

17 Drift:2 / Stutter variations
18 Drift:x or Bx / Stutter variations
19 Drift:y or By / Stutter variations
20 Various Stutter + Forward Drift
21 Various Stutter + Backward Drift
22 to 25 Always On Effects [Mix]
Games 22 to 25 are also dedicated to "Always On" ReadFX use, but with
[Mix: D/5 FX/5]. We will hear a mix of Dry Head and FX Head.
22 Pitch:+7 Drift:w / Stutter variations
23 Pitch:+7 Drift:Bw / Stutter variations
24 Pitch:+7 / Backward Drift variations
25 Pitch:-7 / Drift variations
26 to 35 Sustain ReadFX [Fbk]
In Games 26 to 35, ReadFX are set to Sustain switch mode with
[Fbk: D/0 FX/10] and [Mix: D/0 FX/10]. ReadFX will be recorded when
Overdubbing, Multiplying etc...
26 Various Pitch / Unquantized
27 Various Pitch / Quantized
28 Various Reverse Infinite + Pitch
29 Stutter + Pitch / Unquantized
30 Stutter + Pitch / Quantized
31 Various Quantized Stutter
32 Stutter Notes / Unquantized
33 Stutter Notes / Quantized
34 Various Effects / Unquantized
35 Various Effects / Unquantized
81

36 to 41 Delays
Games 36 to 41 are dedicated to Delay use (Decay<100%) + Overdub
always on. ReadFX are Toggle and are applied on each repetition. (Fbk>0)
36 Tape Delay
37 Shimmer
38 Drifting Delay
39 Reverse Infinite + Pitch
40 Flanger Delay
41 to 45 Special Modes
41 EXP: Swell 1
42 EXP: Swell 2
43 Force Dry
44 Force Dry
45 to 50 Guests
45 Aldo is Taken
46 Andre Lafosse
47 Andy Pitcher
48 Ben Shaw
49 Knobs
50 Andrew Dymond
82

Acknowledgements
83

In France we have an expression: "we are dwarfs sitting on the shoulders of
giants" and this is so true that I would like to thank here those whose work
has directly made this creation possible.
First of all Matthias Grob, inventor of the Echoplex Digital Pro. A good half
of Loupé is inspired by this fabulous machine. Matthias opened the doors
of live-looping the same way Georges Meliès invented, at turn of the 20th
century, all the cinematographic special effects. Loupé is a fruit of his work,
there will be others. On top of being a visionary, Matthias was kind enough
to steer me towards a looper called DLD (Digital Loop Delay).
The DLD comes in the shape of a modular synth module, commercialised
by the company 4MS and developed by Dan Green and Gary Hall.
Our first research was based on this open source project which helped
us save a lot of time on Loupé’s hardware design. Emilie Gillet (Mutable
Instruments) is our national pride of the modular synth community. We used
her open source code for the LCD and the bootloader.
Thanks to you all for sharing.
Now onto my partner in crime: Théo Zanellato. Théo is an electronics and
software engineer, he took charge of all of Loupé’s code and advised and
supervised during hardware development. Without our meeting, there
would be no Loupé. (And so a thanks goes out to the Dutrieux family)
Instead of listing his qualities, I would like to express my intense satisfaction
in finding a work partner. Co-creation is something rare and precious.
Maxence Michaux (aka Kevin Heartbeat) was a young student engineer
when he contacted me for an internship. He found himself in charge of the
early R&D of Loupé and I sometimes made his life difficult. Thanks for your
enthusiasm and youthful spirit which was a perfect match for those early
days.
84

A short word now for my fellow pedal makers.
Joel Korte (Chase Bliss Audio) gave me his unfailing support back when
Glou-Glou was started five years ago, and he is to me (and I think I speak in
the name of the whole boutique pedal community) an example of success
that pushes me forward. What’s more, he’s a wonderful human being.
I have also had rewarding interactions with CooperFX, Empress Effects,
Hologram Electronics, OBNE, Keeley Electronics, Collision Devices, Zorg
Effects, Thrilltone, Two Notes and Anasounds. Thanks to all of you. I am
proud to be part of this community.
A big thanks to my loyal customers for their essential contribution. Without
them Glou-Glou would not exist. Thanks for your trust, buying boutique
pedals is also supporting the work of someone you believe in.
To wrap things up, thanks to Andrew Dymond (aka André Duracell), my
neighbour, beta tester and translator. Thanks to him this instruction manual
has seen the light of day with the least amount of pain and the utmost
clarity. Thanks to André Lafosse and Andy Pitcher for their contribution
to this manual, improving it significantly. And finally, thanks to Jim Wylde
(sp3ct3rs demos) for proofreading.
Olivier Armbruster - May 2021
85

86

87

 Loading...