

Page 1

GRAPHICS CARDS
Precautions - Read this rst!
1) Before playing video games
Do not play when you are tired or short of sleep. Make sure that the room is well illuminated and
lighting is adjusted to the brightness of the monitor. Keep a suitable distance from the display monitor.
Take a break of 10 to 15 minutes every hour while playing.
Extremely pronounced lighting effects such as fast image changes, repetitions of simple geometric
shapes, ashes of light may induce epileptic ts or blackouts in some persons. Even persons with
no previous known tendency to epilepsy may be in danger. If you or member of your family has been
diagnosed as prone to epilepsy, please consult your physician before playing the video game. Parents
should monitor their children carefully when they play video games. Stop playing immediately if the
following symptoms are detected: nausea, vision disturbance, muscle tension or cramps, orientation
problems, involuntary movements or brief loss of consciousness.
2) Static electricity precautions
Do not take the graphics card out from the original static electricity protection package until you
are ready to install it. Before installing, wear a grounded wrist strap if possible, or discharge static
electricity by touching the bare metal surface of the system chassis. Carefully hold the graphics card
by its rear bracket, and avoid touching the “gold nger” PCB edge connector unless it is necessary.
3) Turn off system power before installing the graphics card
Turn off the AC main power to the system, by the AC main power switch or by detaching the AC
power cord. Damage to the graphics card or the system components, or injury to you may result
if power is turned on during the installation. Please consult a qualied technician if necessary. The
manufacturer assumes no liability for any damage, caused directly or indirectly, by improper installation
by unauthorized service personnel.
Products and corporate names appearing in this manual may or may not be registered trademarks or
copyrights of their respective companies, and are used only for identication or explanation and to the
owner’s benet, without intent to infringe.
NVIDIA is a trademark of NVIDIA Corporation
Windows is a trademark of Microsoft Corp.
Macrovision
This product incorporates copyright protection technology that is protected by method claims of
certain U.S. patents and other intellectual property rights owned by Macrovision Corporation and
other rights owners. Use of this copyright protection technology must be authorized by Macrovision
Corporation, and is intended for home and other limited viewing uses only unless otherwise authorized
by Macrovision Corporation. Reverse engineering or disassembly is prohibited.
1
Page 2

GRAPHICS CARDS
Table of Contents
1. System Requirements ---------------------------------------------------------------------------------------- 3
2. Installing the Graphics Card --------------------------------------------------------------------------------- 4
For systems without an existing graphics card -------------------------------------------------------- 4
For systems with an existing graphics card ------------------------------------------------------------ 5
Installing multiple graphics cards in SLI ----------------------------------------------------------------- 6
3. Connecting Display Devices -------------------------------------------------------------------------------- 7
VGA Port -------------------------------------------------------------------------------------------------------- 7
Composite / S-Video / HDTV Port ------------------------------------------------------------------------ 7
DVI Port -------------------------------------------------------------------------------------------------------- 8
HDMI Port ----------------------------------------------------------------------------------------------------- 8
4. Enabling S/PDIF audio input -------------------------------------------------------------------------------10
5. Graphics Card Driver Installation ------------------------------------------------------------------------ 11
Installing driver from CD ----------------------------------------------------------------------------------- 11
Installing and updating driver from downloaded le ------------------------------------------------ 14
Removing graphics card driver --------------------------------------------------------------------------- 15
Appendix - Basic Troubleshooting --------------------------------------------------------------------------- 17
Glossary ------------------------------------------------------------------------------------------------------------ 18
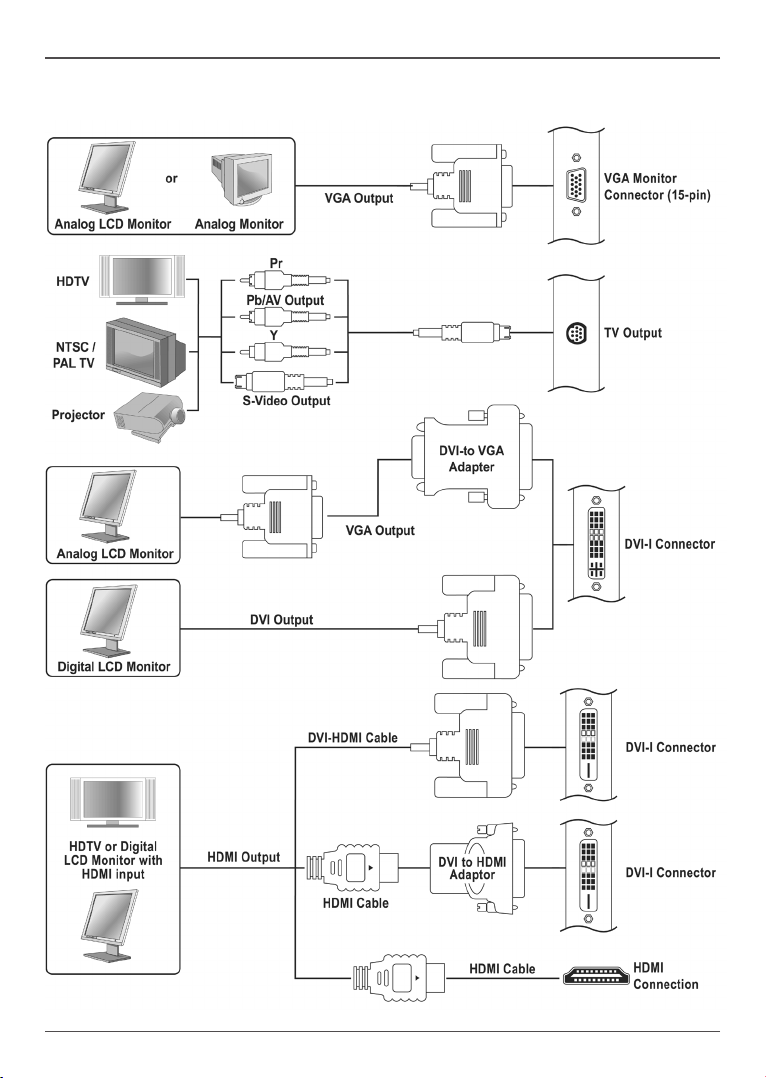
Connecting Your Monitor
---------------------------------------------------------------------------------------- 19
2 Table of Contents
Page 3

1. System Requirements
- 800MHz or higher speed processor
- At least 128MB system memory
- AGP or PCI-Express slot (depending on graphics card type)
- CD-ROM or DVD-ROM drive
- 200MB free hard disk space
- Microsoft® Windows 7 / Vista / XP
GRAPHICS CARDS
System Requirements 3
Page 4

GRAPHICS CARDS
2. Installing the Graphics Card
Important!
Read the precautions before starting the installation
For system without an existing graphics card
1. Shut down the system and unplug the power cable from the AC power source.
2. Open the system chassis to access the AGP or PCI Express slot. Refer to your system
manual for instructions.
3. Remove the metal bracket cover near the AGP or PCI Express slot. Save the screw for later
use.
4. Remove the graphics card from its anti-static packaging.
5. Hold the card rmly and insert its golden connectors into the AGP or PCI-Express slot.
6. Make sure that the card is properly seated in the slot, and then secure the card metal
bracket with a screw.
7. Connect the DC power plug from the system power supply unit if your card has an auxiliary
power connector (for specic cards only). Some models may come with a DC power cable,
which connects between the card and the system power supply unit.
8. Replace the system cover and re-connect all power cables.
Fig 2-1 Insert the graphic card to the slot
4
Installing the Graphics Card
Page 5
GRAPHICS CARDS
For system with an existing graphics card
1. Uninstall the current VGA driver by accessing the Windows® Control Panel / Add or
Remove Programs
2. Shut down the system and unplug the power cable from the AC power source.
3. Open the system chassis to locate the existing graphics card at the AGP or PCI Express
slot. Refer to your system manual for instructions.
4. Remove the graphics card from the AGP or PCI Express slot. Save the screw for later use.
5. Remove the graphics card from its anti-static packaging.
6. Hold the card rmly and insert its golden connectors into the AGP or PCI Express slot.
7. Make sure that the card is properly seated in the slot, and then secure the card the card
metal bracket with a screw.
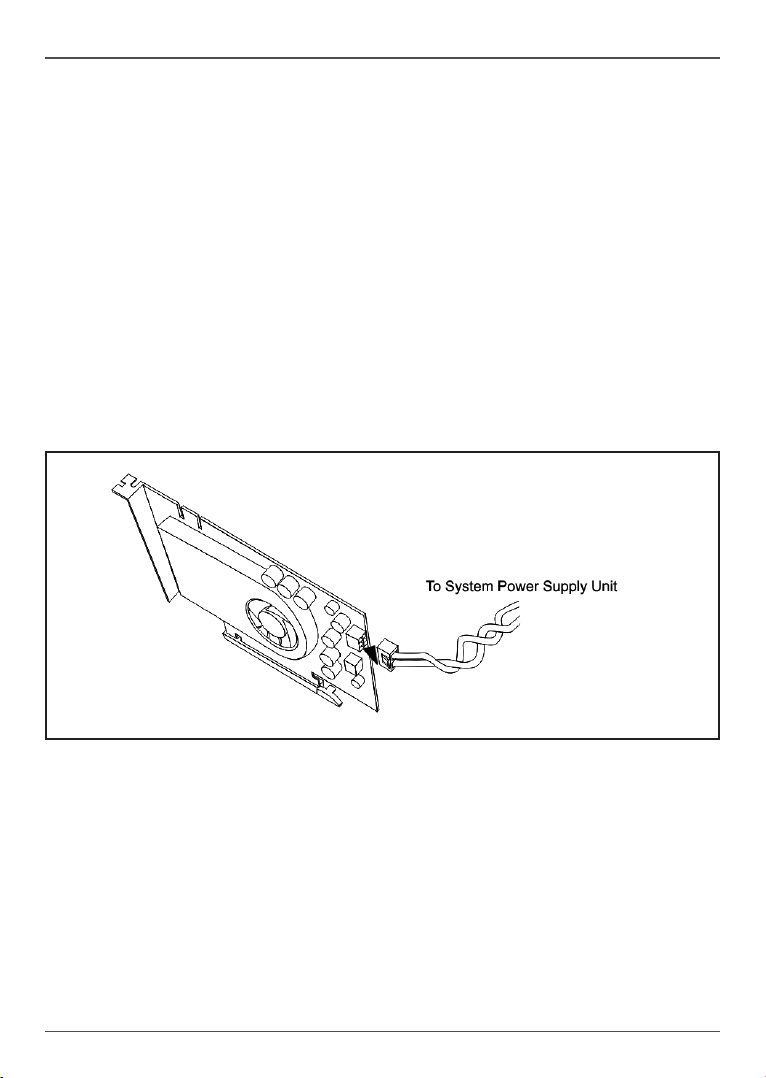
8. Connect the DC power plug from the system power supply unit if your card has an auxiliary
power connector (for specic cards only). Some models may come with a DC power cable,
which connects between the card and the system power supply unit.
9. Replace the system cover, and re-connect all power cables.
Fig 2-2 Connect the DC power plug to the card
Installing the Graphics Card
5
Page 6
Installing multiple graphics cards in SLI
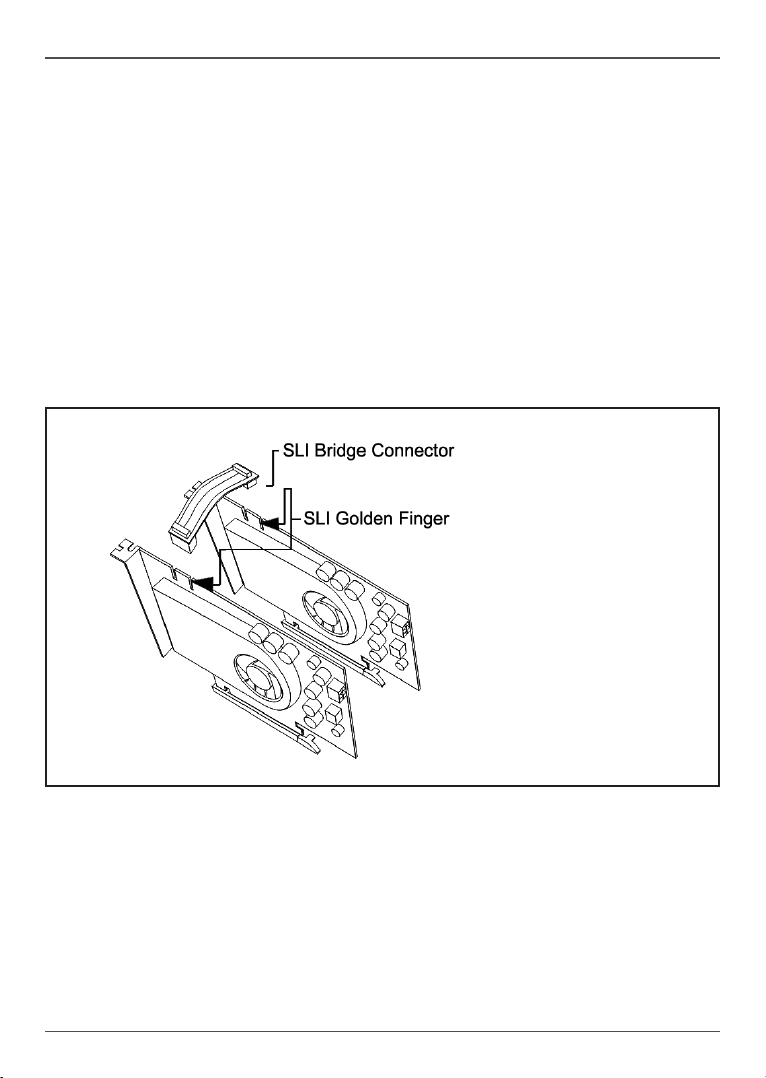
PCI Express graphics card models with SLI (Scalable Link Interface) feature are equipped with
a gold nger connector at the top edge of the PCB for multiple GPU operations. This feature
allows two graphics cards (with identical GPU types) to run simultaneously on an SLI enabled
motherboard for signicant performance improvements.
1. Follow the installation steps above to install two identical (SLI compatible) graphics cards in
the system.
2. Locate the SLI bridge (cable adaptor). This item is sold separately and typically included
with SLI compatible motherboards.
3. Hold the SLI bridge rmly and insert the connector on both ends of the graphics cards SLI gold nger
connectors, located at the top edge of the PCB.
4. Replace the system cover and re-connect all power cables.
Fig 2-3 Connect the SLI bridge between two graphic cards
6
Installing the Graphics Card
Page 7
GRAPHICS CARDS GRAPHICS CARDS
3. Connecting Display Devices
VGA Port
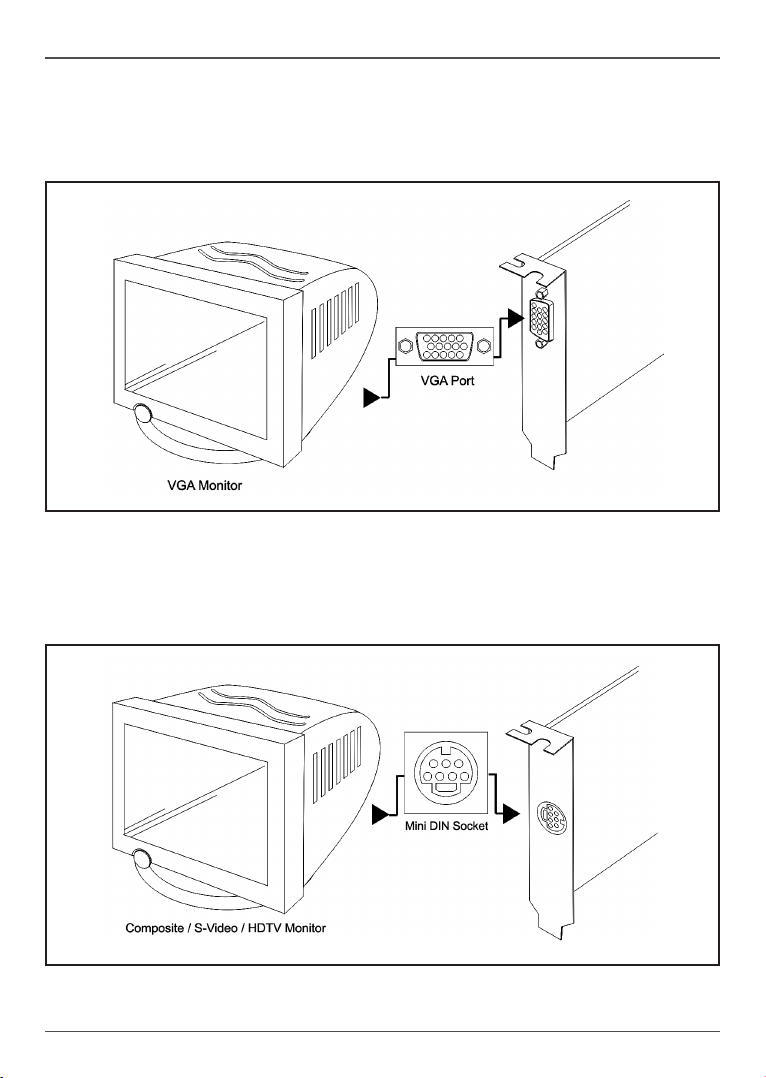
Connect the VGA Monitor Signal Cable to the VGA port on the graphics card.
Fig 3-1 Connect the VGA Monitor
Composite / S-Video / HDTV Port
Connect the Composite / S-Video Signal Cable to S-Video port on the graphic card.
Specic model of graphics cards may come with HDTV cable, which connects to HDTV.
Fig 3-2 Connect the Composite / S-Video / HDTV Monitor
Connecting Display Devices
7
Page 8
GRAPHICS CARDS
DVI Port
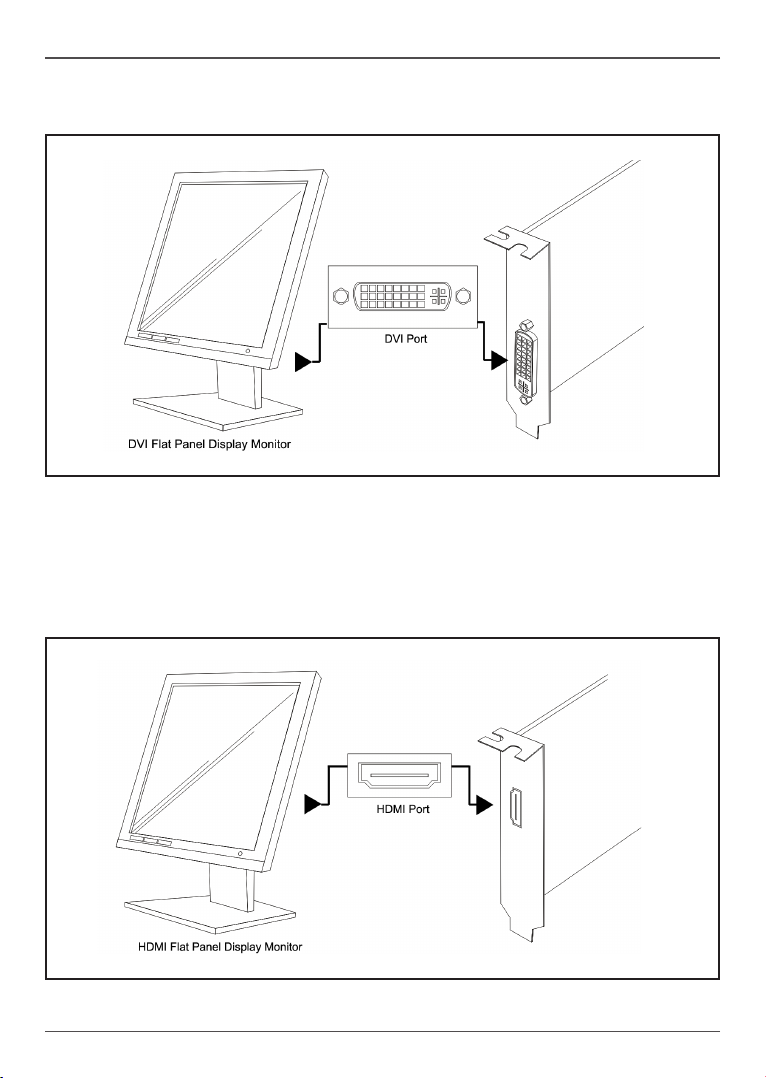
Connect the DVI Signal Cable from Flat Panel Display to DVI port on the graphics card.
Fig 3-3 Connect the DVI Flat Panel Display Monitor
HDMI Port
Specic models are equipped with HDMI port on the graphics card.
Connect the HDMI signal cable from Flat Panel Display or HDTV (with HDMI) to the HDMI port.
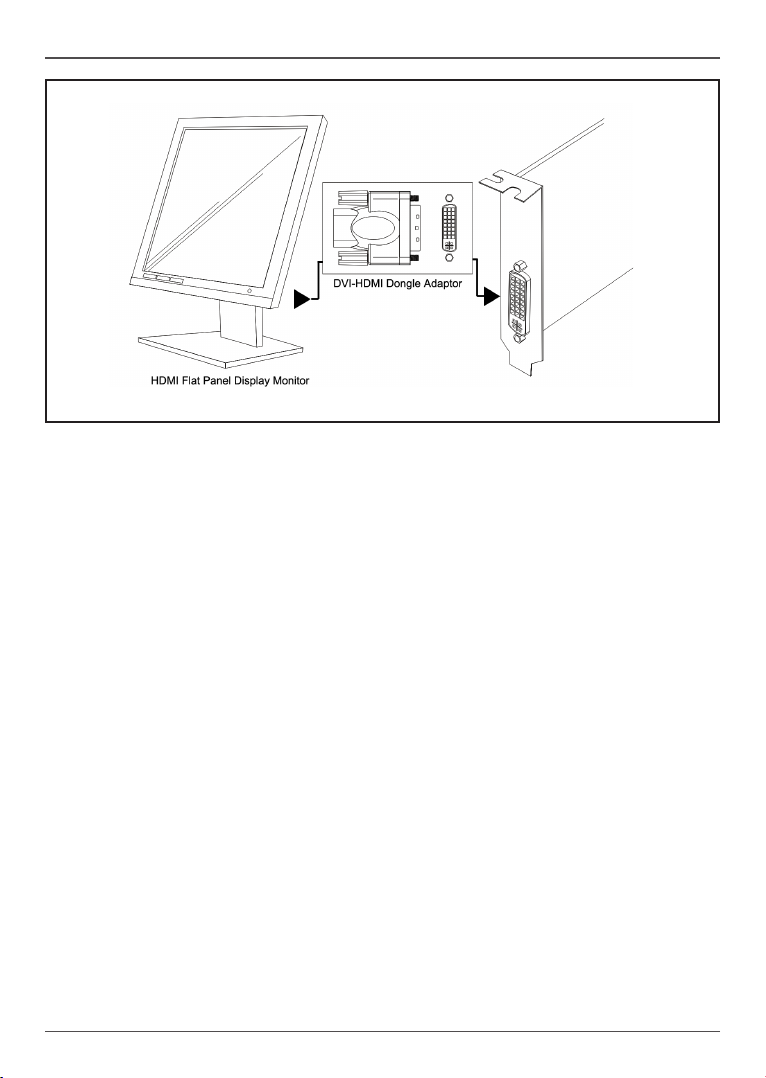
Some models without HDMI port may be connected via the DVI-HDMI Dongle Adaptor.
Fig 3-4 Connect the HDMI Flat Panel Display Monitor via HDMI port
8
Connecting Display Devices
Page 9
GRAPHICS CARDS
Fig 3-5 Connect the HDMI Flat Panel Display Monitor via DVI-HDMI Dongle Adaptor
Connecting Display Devices
9
Page 10
4. Enabling S/PDIF audio input
To enable audio output over HDMI or DVI with a GeForce 8 series or newer graphics card, follow
the steps below:
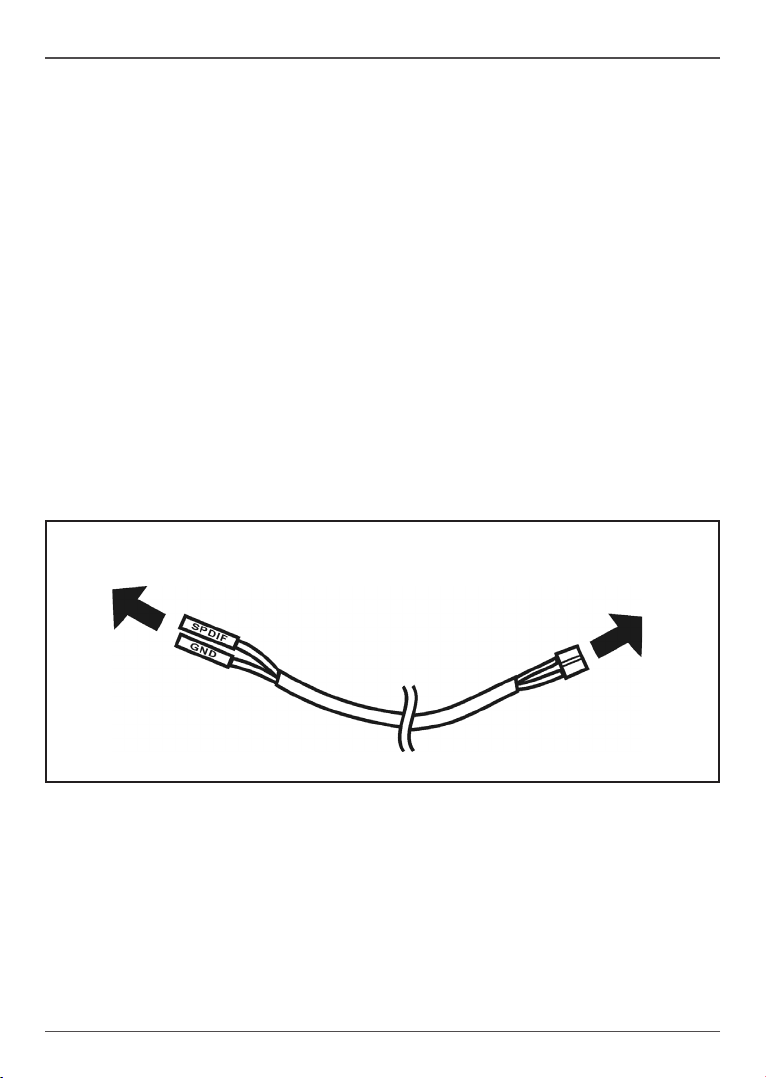
1. Find the S/PDIF audio cable bundled with the GeForce series graphics card
(GeForce 8 series and newer).
2. Locate end with white connector on S/PDIF audio input cable.
3. Connect white connector to S/PDIF input connector on the GeForce series graphics card
(GeForce 8 and newer). Ensure the connector matches up with the notch on the connector.
a. If there’s no visible connector on the GeForce series graphics card, the
connector may be hidden by a rubber cover (GeForce GTX 200 series). Remove the
cover and proceed to connect the cable.
4. Locate the S/PDIF audio header on your motherboard or sound card (consult user manual
for details).
5. Locate pins for SPDIF_OUT and GND (or GROUND) on motherboard or sound card
(consult user manual for details).
6. Connect connector labeled “SPDIF” (white) on cable to corresponding SPDIF_OUT pin on
motherboard or sound card.
7. Connect connector labeled “GND” (black) on cable to corresponding GND or GROUND pin
on motherboard or sound card.
Note: Connecting the S/PDIF audio input cable incorrectly can cause damage to your
GeForce series graphics card.
Connect to Motherboard
Fig 4-1 Connect the S/PDIF audio cable
10
Enabling S/PDIF audio input
Connect to VGA card
Page 11
GRAPHICS CARDS GRAPHICS CARDS
5. Graphics Card Driver Installation
Graphics card driver is the software program that makes the device work with your computer’s
Operating System. Each type of Operating System requires its own set of driver software for
each graphics card. The following types of Operating Systems are supported by the graphics
card driver:
- Windows® 7
- Windows® Vista
- Windows® XP
Please see the recommended methods in this section to install, update, or remove the graphics
card driver, after the graphics card is installed in the system.
Installing driver from CD
The procedure listed below are suitable for newly installed computer system, with no previous
graphics driver installed, or the graphics driver is already removed. The driver software is on the
CD bundled with the graphics card package.
1. Start the computer system and boot to Windows® 7/Vista/XP Operating System.
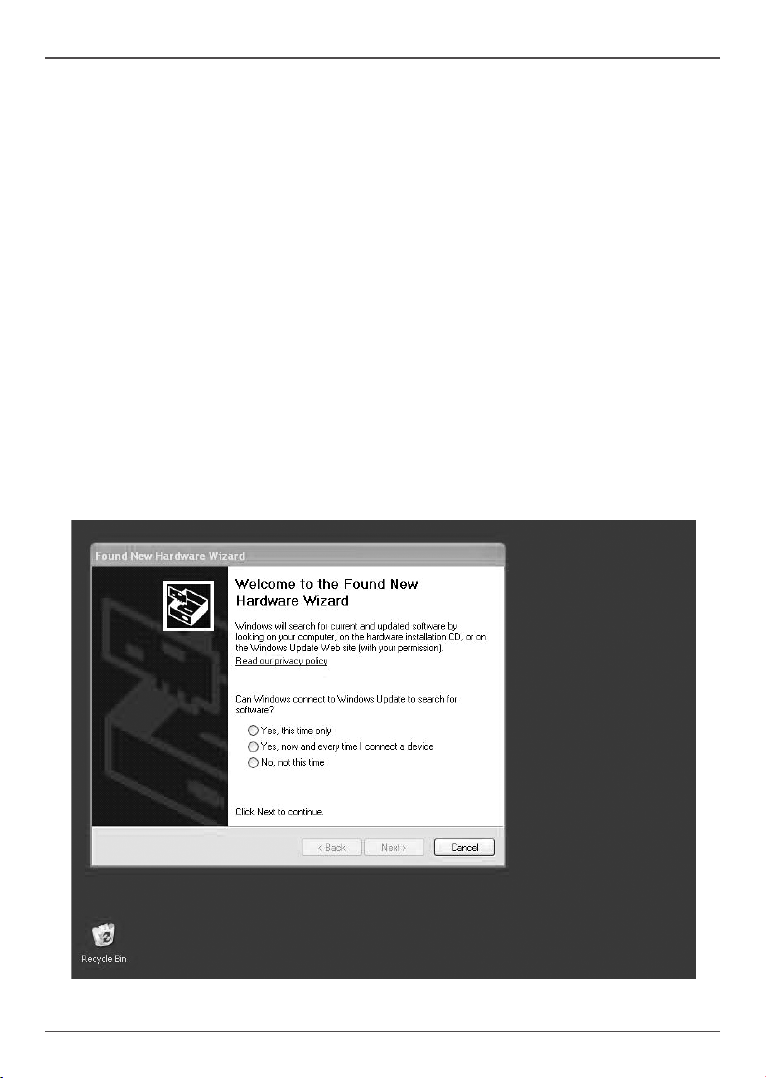
2. When the system shows the “Found New Hardware Wizard” dialog box, click “Cancel”.
Fig 5-1 Found New Hardware Wizard
Graphics Card Driver Installation
11
Page 12
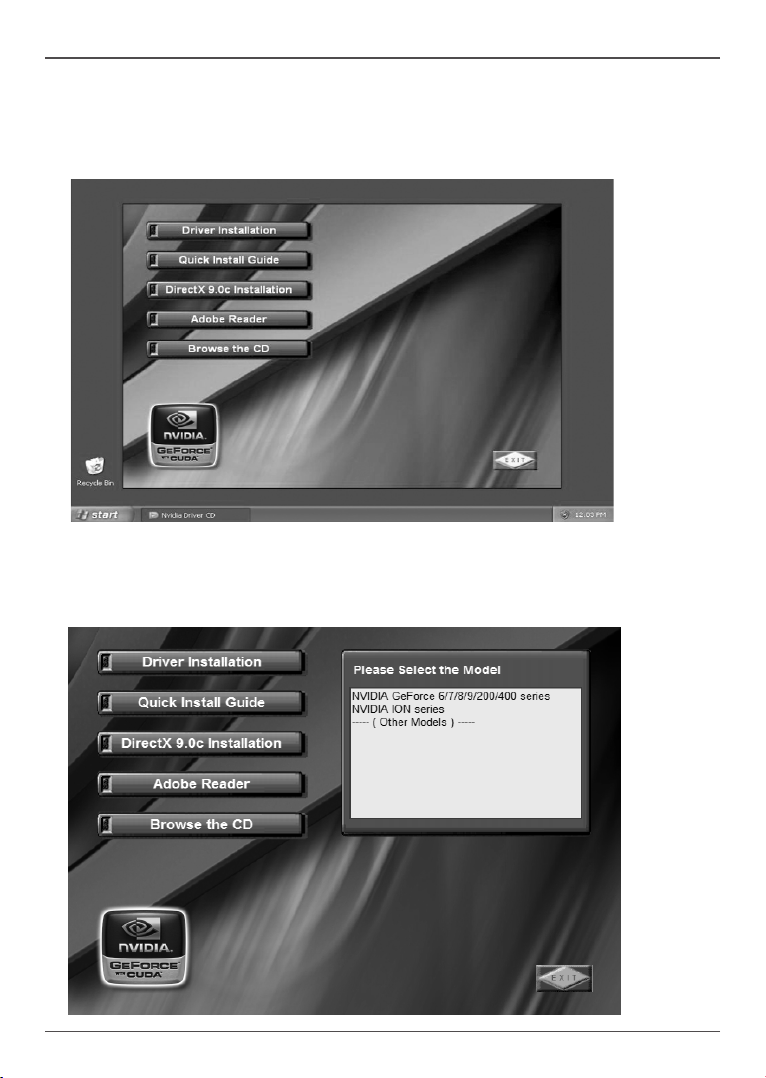
3. Insert the graphics card’s bundled CD in the CD-ROM / DVD-ROM drive. If autorun
is enabled, the Driver Installation Main Menu will show up automatically. If autorun is
disabled, you may click the le Launch.EXE to bring up the Driver Installation Main Menu.
Windows 7/Vista may ask for further conrmation, please click “Allow” or “OK” to proceed.
Fig 5-2 Driver Installation Main Menu
4. Click the box “Driver Installation”, then the GPU (Graphics Processing Unit) selection box
will show up.
Fig 5-3 GPU Selection Box
12
Graphics Card Driver Installation
Page 13
GRAPHICS CARDS GRAPHICS CARDS
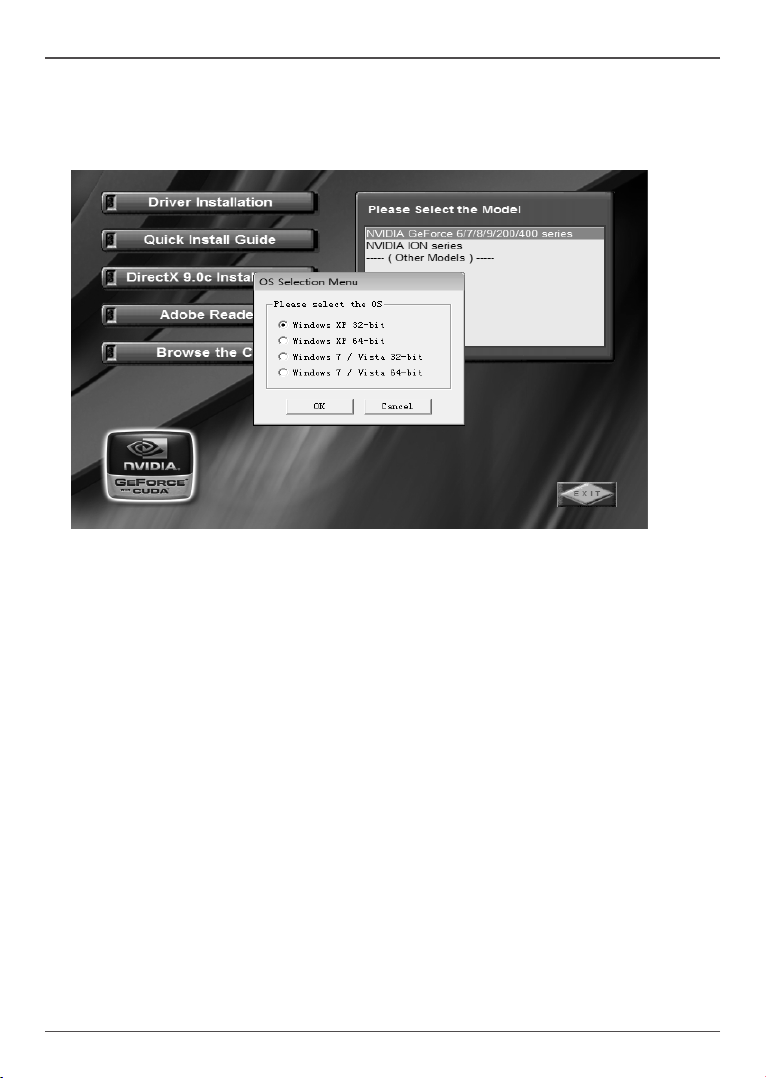
5. Click the Scroll Bar to locate the GPU type which is used on the graphic card and then click
to select the GPU.
6. The Operating System selection box will show up. Select the target Operating System and
then click OK to start the driver installation.
Fig 5-4 Operating System Selection Box
7. Follow the instructions on the screen to complete the installation of graphics card driver and
restart the system to let the driver take effect.
8. After the system restarts, bring up the Control Panel / Display Properties to select the
display resolutions and color depth that meets your application and monitor requirements.
Graphics Card Driver Installation
13
Page 14
Installing and updating driver from downloaded le
The procedure listed below is suitable for existing running computer systems, in which an older
graphic driver was installed, or when the driver CD is unavailable, or an updated version graphic
driver is necessary to x certain known issues.
1. Identify the exact GPU on the graphic card, the target system Operating System type and
download the graphic driver from the relevant web sites:
NVIDIA Web Site: http://www.nvidia.com
The downloaded driver le may be in ZIP or EXE le type. If it is a ZIP le type, please
expand the le using suitable software tools. Copy the EXE le or the expanded les to the
hard disk drive on the target system.
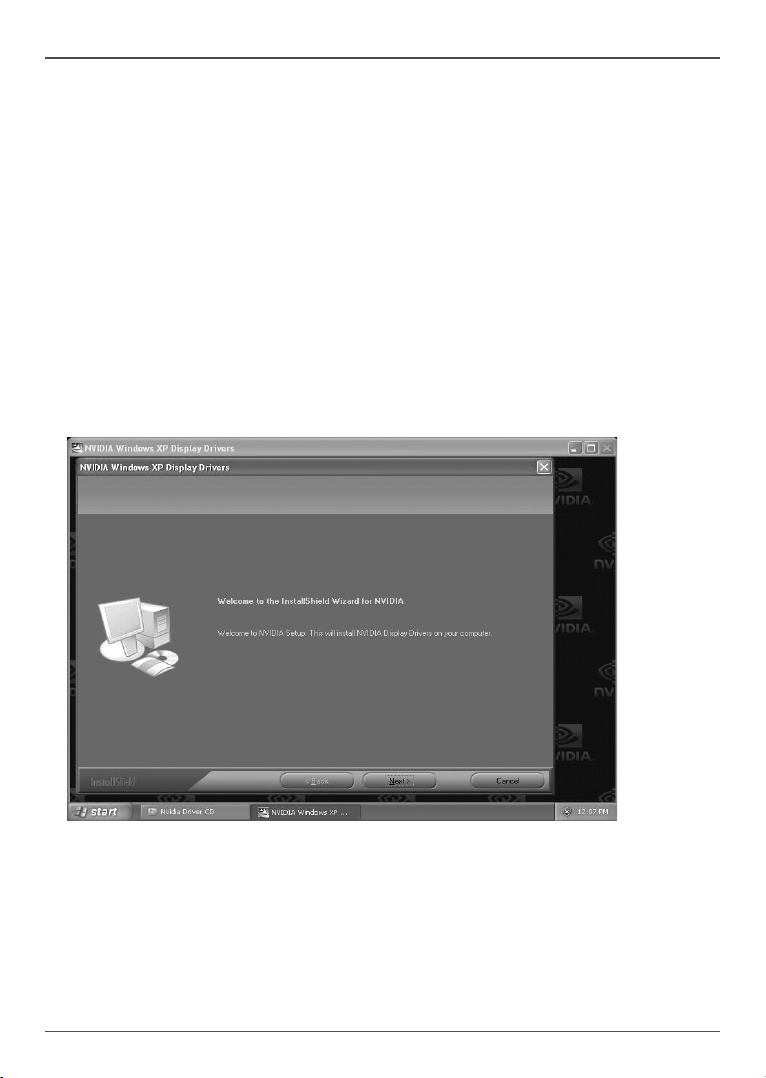
2. On the target system, click the EXE le, or the Setup.EXE to start the graphic driver
installation.
Fig 5-5 NVIDIA Graphic Driver installation wizard screen
3. Follow the instructions on the screen to complete the installation of graphic card driver and
restart the system to let the new driver take effect.
4. After the system restarts, bring up the Control Panel / Display Properties to select the
display resolutions and color depth which meets your application and monitor requirements.
14
Graphics Card Driver Installation
Page 15
GRAPHICS CARDS GRAPHICS CARDS
Removing graphics card driver
It may be necessary to remove an existing graphics card driver from the system, as for example,
when changing the graphics card to a brand new GPU type. Follow the procedures below to
remove the graphics card driver.
1. Start the computer system and boot to Windows® 7/Vista/XP Operating System.
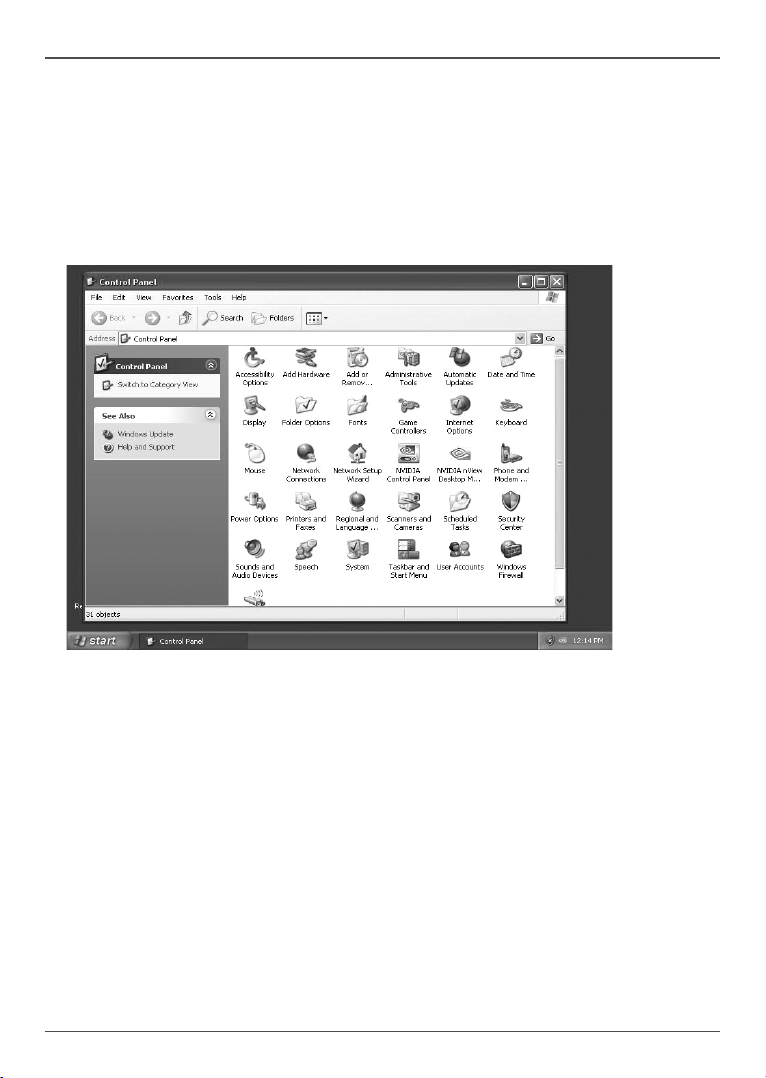
2. Click “Start”, then “Control Panel” to bring up the functions for Control Panel.
3. Double click the “Add or Remove Programs” icon.
Fig 5-6 Control Panel - Add or Remove Programs
4. From the list of “Currently installed programs”, locate the target item, eg. “NVIDIA Drivers”,
then click the “Change/Remove” box.
Graphics Card Driver Installation
15
Page 16
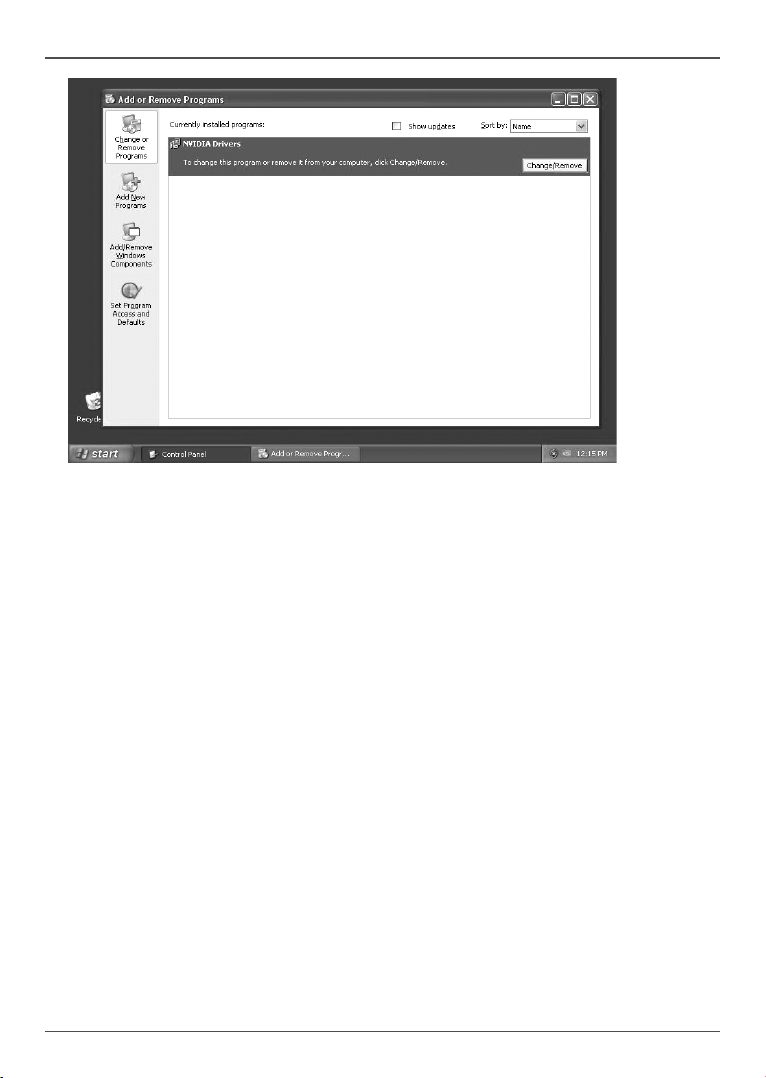
Fig 5-7 Add or Remove Programs - Currently installed programs
5. Follow the instructions on the screen to remove the graphics card driver.
Restart to complete the process.
6. Shut down the system, turn off the main power and proceed to install the new
graphics card.
16
Graphics Card Driver Installation
Page 17

Appendix - Basic Troubleshooting
Symptom Possible Cause Solution
1, No display after the
graphics card is
installed
2, Wrong display
screen, wrong color,
or distorted graphic
on the screen
3, Cannot switch to
higher resolution, or
higher color modes
4, Some LCD display
monitors go blank
during Windows®
booting
The graphics card is not properly
installed
The display monitor is not
properly connected
The auxiliary DC power connector
is not connected on the graphic
card
Insufcient power from the system
power supply unit
The graphics card is not
supported by the motherboard in
the system
The graphics card is not properly
installed
The display monitor is not
properly connected
The display monitor is unable to
support the current resolution or
refresh rate
Connectors for component
colors (HDTV) were not correctly
plugged
Another set of graphics card
driver was installed in the system,
which causes conict
The graphics card driver is
corrupted
The graphic card driver is not
installed or corrupted
The attached display device does
not support the high resolution
mode
The LCD display monitor needs
special driver software
Current setting of display
resolution is beyond the capability
of the LCD display
Check the card to make sure it is properly
secured into the slot.
Check the signal cable to ensure the
connectors are properly plugged into the
graphics card and display monitor
Check the auxiliary DC power socket on
the graphics card to make sure it is properly
plugged
Check the technical documentation of the
system to make sure the power supply unit
is capable
Check the technical documentation of the
system, eg. AGP voltage requirement, to
conrm that the card is supported on the
motherboard
Check the card to make sure it is properly
plugged into the slot
Check the signal cable to ensure the
connectors are secured and properly plugged
into the graphic card and display monitor
Check the technical documentation of the
display monitor to make sure the current
setting is supported
Check the connectors for component colors
(HDTV) to ensure proper connection
Remove the driver, for which the graphics
card is not present in the system
Remove and re-install the graphics card
driver
Remove and re-install the graphics driver
Check the technical documentation of the
display monitor and set to lower resolution if
necessary
Install the driver software for the LCD display
monitor
Enter Windows® Safe Mode and set a lower
resolution
GRAPHICS CARDS GRAPHICS CARDS
Appendix - Basic Troubleshooting
17
Page 18

Glossary
AGP (Accelerated Graphics Port)
An interface specication for graphics cards on older PCs. AGP was designed to offer the necessary bandwidth
and latency to perform texture mapping directly from system memory.
BIOS (Basic Input/Output System)
BIOS is a set of routines that control how the computer transfers data between computer components, such as
memory, disks and the display adapter. The BIOS instructions are built into the computer’s read-only memory. You
can update the BIOS using a suitable software tool.
CPU (Central Processing Unit)
The CPU, also called “Processor,” actually functions as the “brain” of the computer. It interprets and executes
program commands and processes data stored in the system memory.
Device Driver (software)
A software routine that links a peripheral device to the operating system. It acts as a translator between the device
and the applications that use it. Each device has its own set of specialized commands known only to its driver while
the applications access devices using high-level generic commands. The driver translates these commands into
the commands required by the devices.
DRAM (Dynamic Random Access Memory)
A type of RAM that requires refresh cycles to prevent the loss of the data stored in it.
OS (Operating System)
The software that controls the overall operation of a computer system. The OS tasks include memory allocation,
input and output distribution, interrupt processing, job scheduling, and various other duties.
PCIe (PCI Express)
The latest technology and interface specication for graphics cards, which enables high-performance 3D graphics
on current PCs. PCIe offers larger bandwidth for data transfer, as compared with AGP bus.
POST (Power On Self Test)
When you turn ON the computer, it will rst run through the POST, a series of software-controlled diagnostic tests.
The POST checks system memory, the motherboard circuitry, the display, the keyboard, the diskette drive, and
other I/O devices.
RAM (Random Access Memory)
The computer’s primary storage area used to write, store, and retrieve information and program instructions
which are passed to the CPU for processing. The information in RAM can be repeatedly re-written with new data.
Compared to other storage media like magnetic tape, oppy disk, and hard disk, RAM has an extraordinarily fast
access rate. RAM, however, is volatile, which means that the data stored in it are lost when the system power is
turned off, or if power glitches occur.
ROM (Read Only Memory)
An integrated circuit chip containing program and data that can be accessed and read but not modied.
SDRAM (Synchronous DRAM)
A type of DRAM with access signals that are synchronized with the CPU clock, eliminating the delay associated
with data transfers between the CPU and memory. SDRAM takes memory access away from the CPU control;
internal registers in the memory accept the request, and lets the CPU do something else while the data requested
is assembled for the next time the CPU talks to the memory.
18 Glossary
Page 19
Connecting Your Monitor
GRAPHICS CARDSGRAPHICS CARDS
Connecting Your Monitor 19
Page 20

GRAPHICS CARDS
20
 Loading...