

Page 1
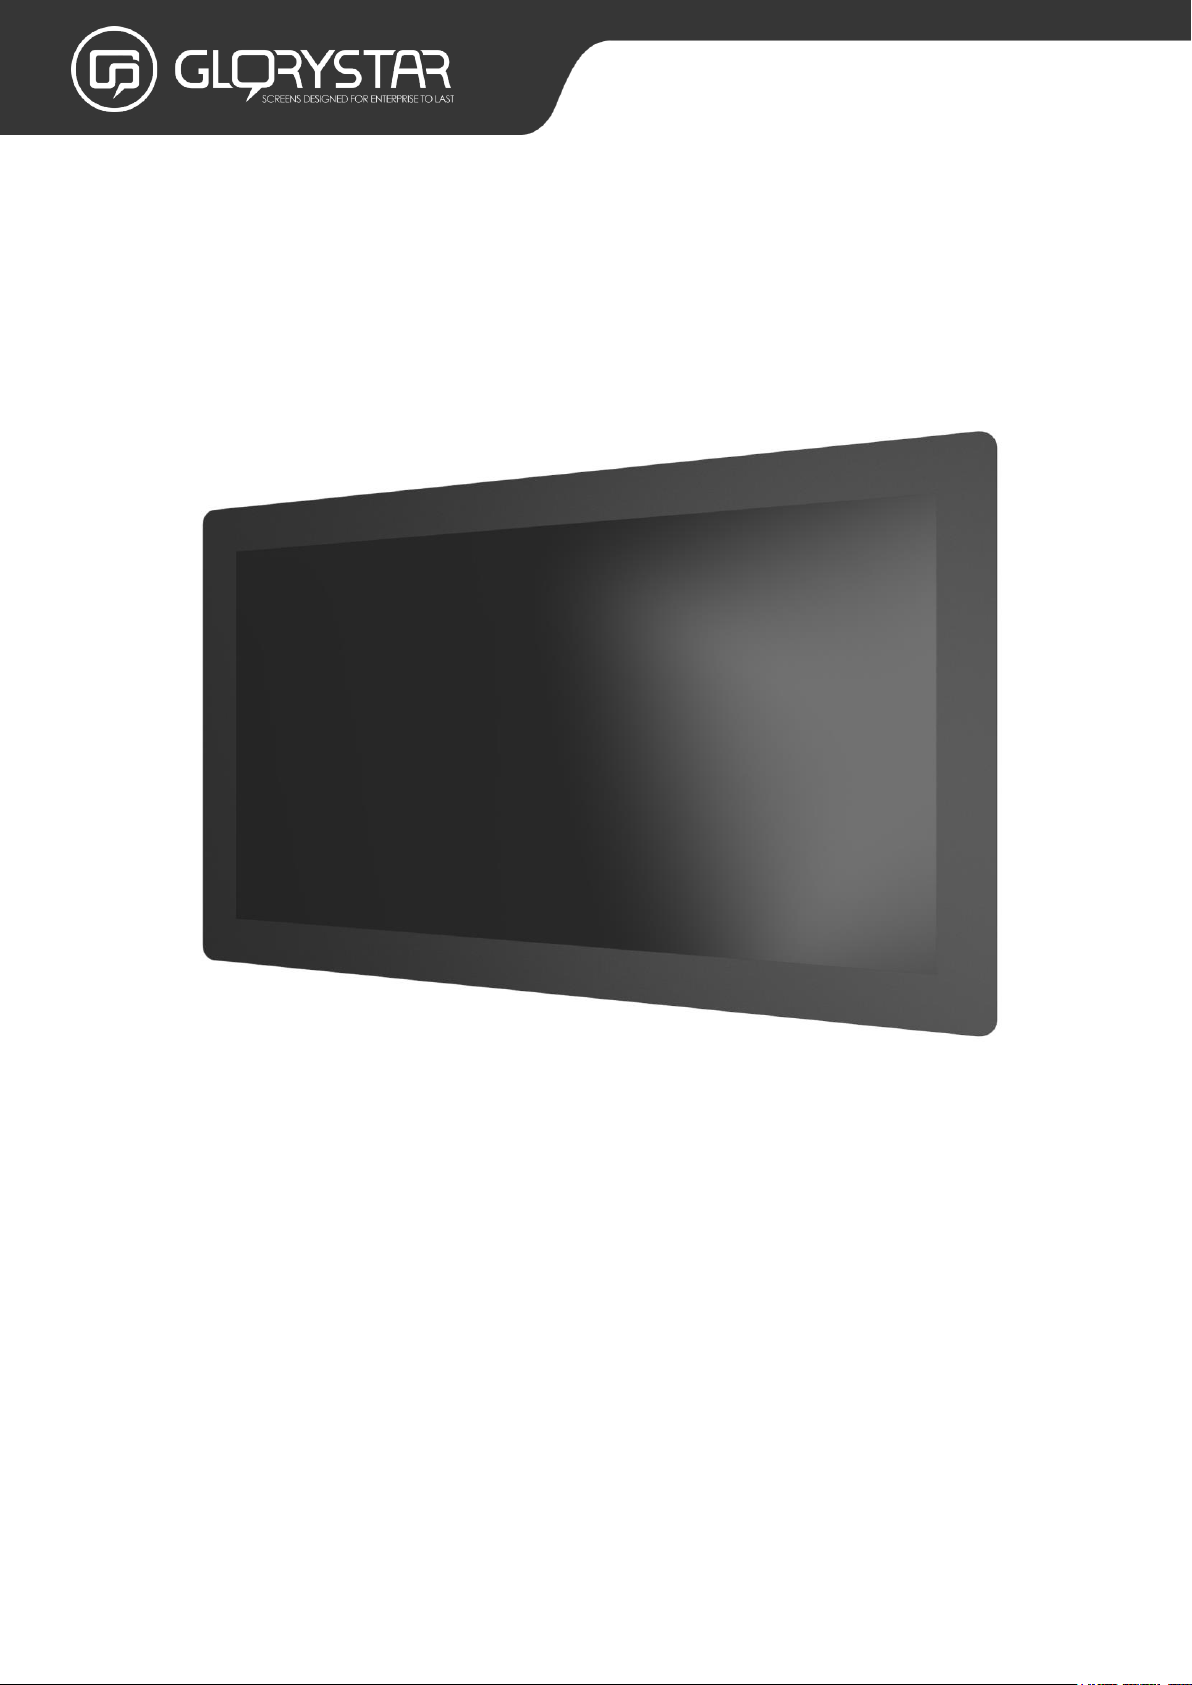
In-store POS Tablet | User manual
13.3/14, 15.6, 18.5, 21.5, 24 INCH
Page 2

Thank you for purchasing a Glory Star Group Limited product. We recommend reading this user
guide carefully in order to achieve optimal pleasure and performance and to maximize the
service life of this product. The technical data provided in this manual come with adjustment from
the actual product, it should be treat as reference only.
2 |
Page 3

Contents
Contents .................................................................................................................................................................... 3
Basic description...................................................................................................................................................... 4
Copyright information….………………………………………………………………………………………………………………………4
Safety and warning information………………………………………………………………………………………………………….5
Package contents…………………………………………………………………………………………………………………………………5
I/O description ......................................................................................................................................................... 6
Quick start user guide .......................................................................................................................................... 11
Android Operating System................................................................................................................................. 23
FAQ & Solution ...................................................................................................................................................... 24
3 |
Page 4

Basic description
The in-store POS tablet is an android multi-media player with special design and programming
where commonly used at commercial areas, for example: Super market and retail areas.
1. It is specially designed for multi advertising purpose compatible for movie
2. Built-in Internal Memory and via USB stick for update content
3. Mounting options: available for shelf mount and wall mount- for wall mount piece, please
request our sales
Copyright information
Copyright © 2017 Glory Star Group Limited. All rights reserved.
All intellectual property rights in this publication are owned by Glory Star Group Limited and
protected by applicable copyright laws and international treaty provisions. Glory Star Group
Limited retains all rights not expressly granted. No part of this publication may be reproduced in
any form whatsoever or used to make any derivative work without prior written approval by
Glory Star Group Limited.
Glory Star Group Limited reserves the right to revise this publication, and/or make improvements
or changes in the product(s) and/or the program(s) described in this documentation at any time
without prior notice. The information in this document is provided in good faith, but without any
representation or warranty whatsoever, whether it is accurate, or complete or otherwise, and on
express understanding that Glory Star Group Limited shall have no liability whatsoever to other
parties in any way arising from or relating to the information or its use.
All other trademarks are the property of their respective owners. Other company and brand
products and service names are trademarks or registered trademarks of their respective holders.
This device complies with CE and FCC regulations.
4 |
Page 5
Safety and warning information
1. Please read this manual carefully before using the device.
2. Please keep this manual for easy reference.
3. Please fix this product in a Safe and stable location to avoid falling harming others
4. Appropriate use of this product temperature at about 00C to 45 0C, relative humidity
20%~80%, please avoid placing it on hot or moist location.
5. Avoid Collision against harden objects, may cause Scratching on the surface and damaging
internal.
6. Should avoid liquidity flow inside of the device that cause internal damage to the machine.
7. Do not attempt to repair this product yourself, always use a qualified service agent to
perform adjustments or repairs.
8. Do not overload Electrical outlets, avoid electric shock or cause fire.
9. if you are not sure the voltage ,please consult with your local power company Before Plug-in
10. PS: Main power Supply: This equipment is designed to operate from a 100-240 Volt, 50/60
Hz AC main supply. The use of other power sources may damage this machine.
11. Check that the voltage marked on the rating plate located at the rear of the power adaptor
states 100-240v. The manufacturer will not accept responsibility for damage or injury caused
by connecting to the wrong voltage.
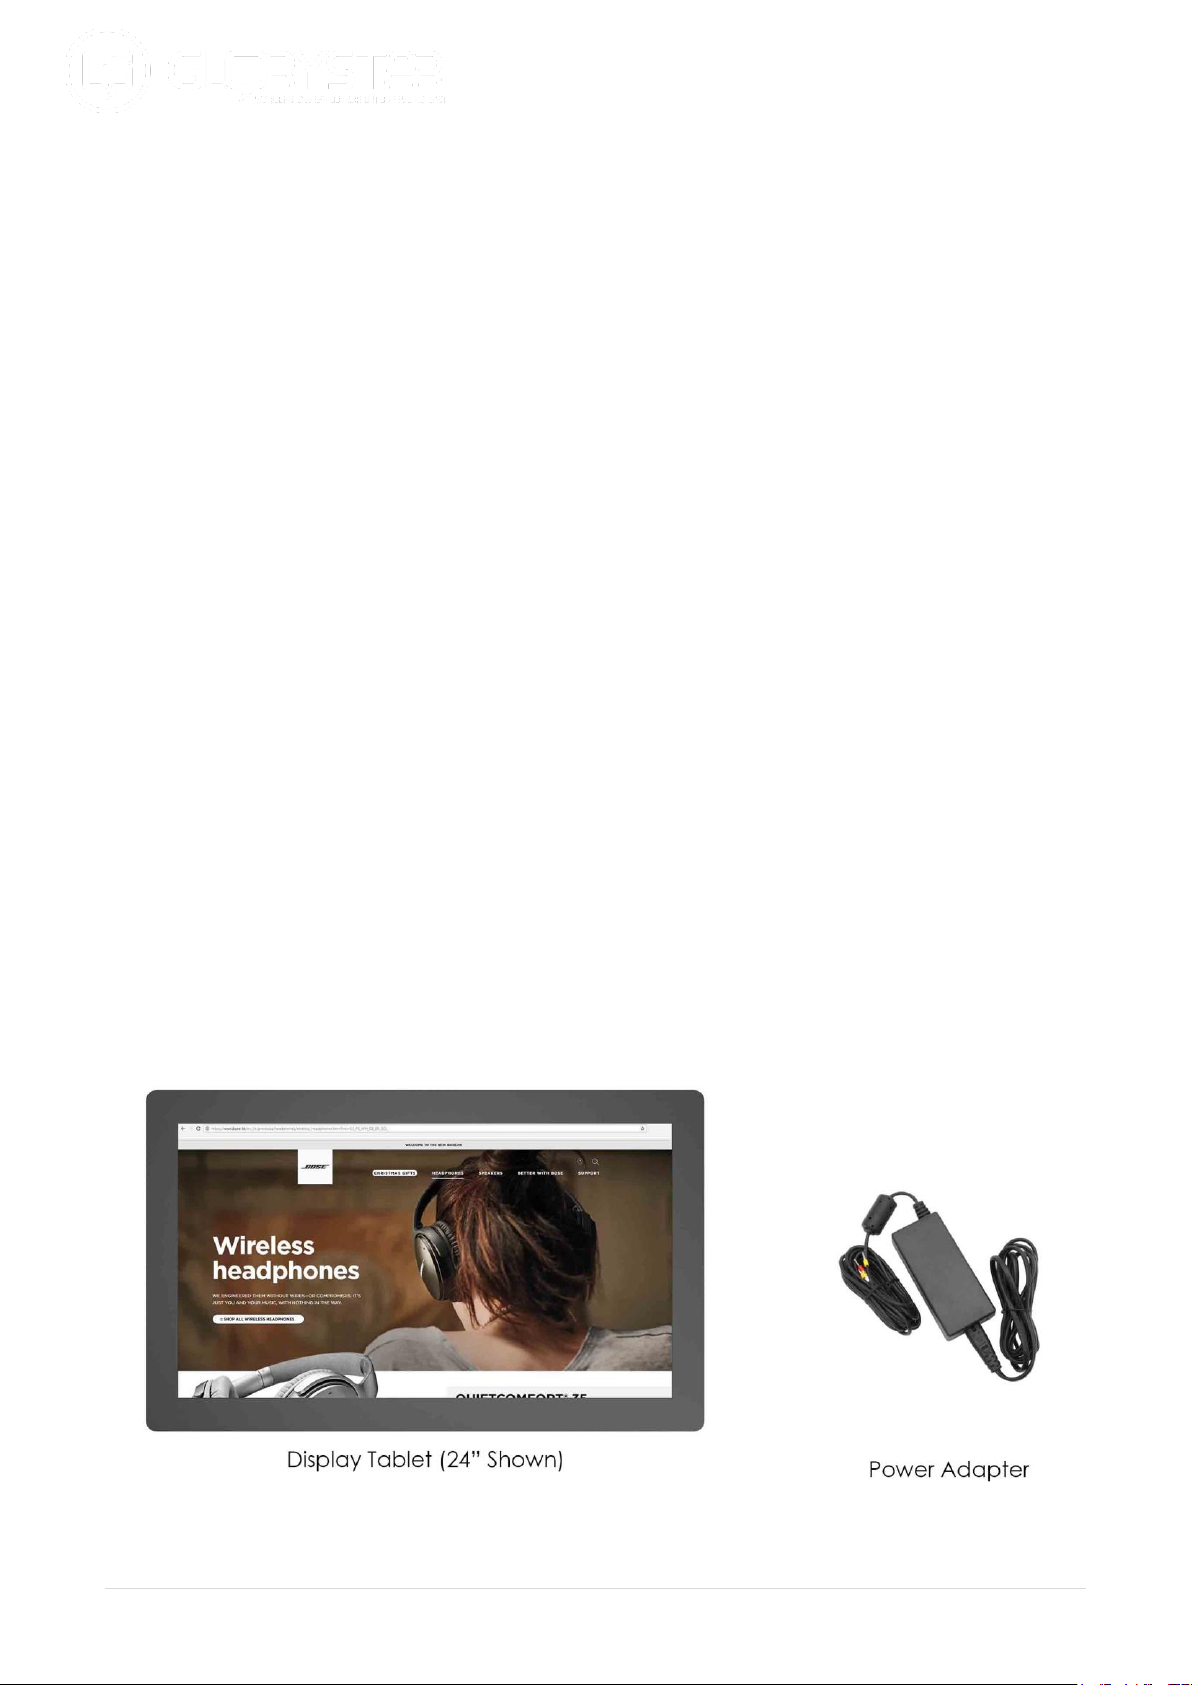
Package contents
The package contains the following items:
5 |
Page 6
No.
Description
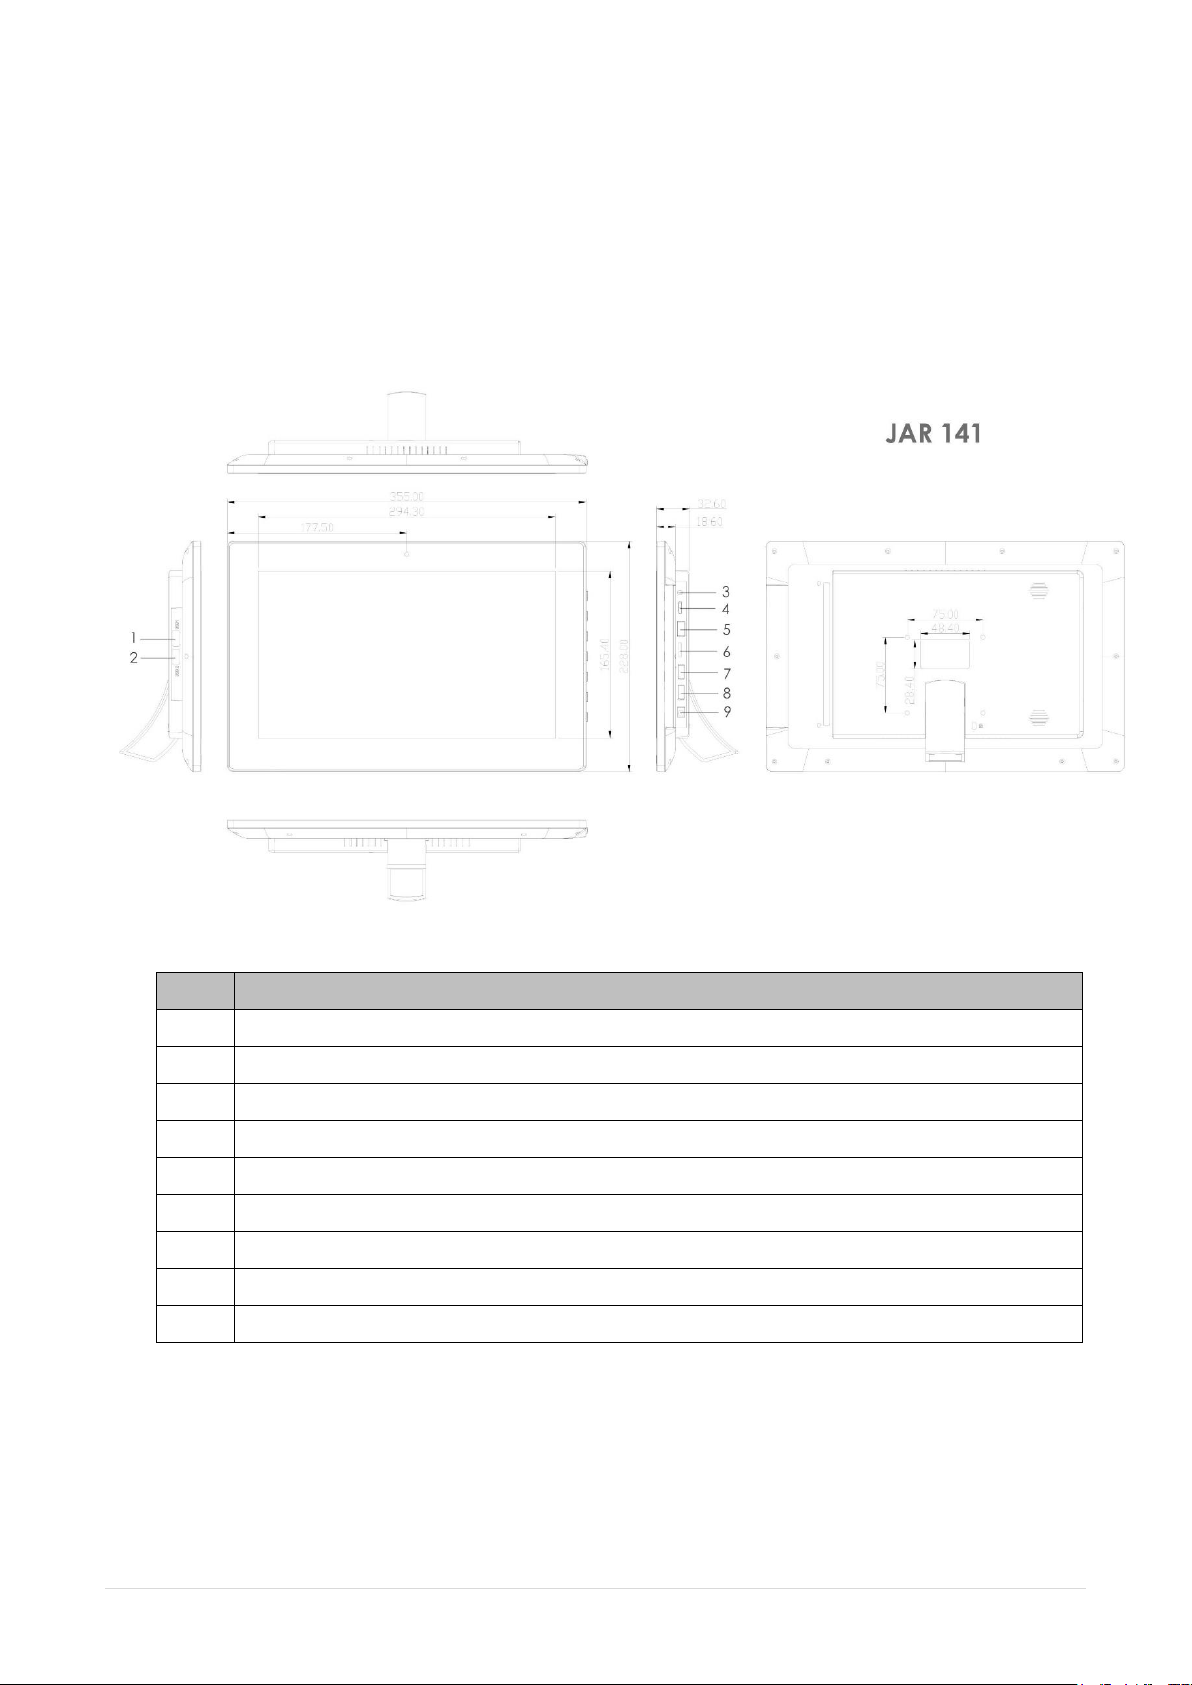
1
USB host port
2
USB host port
3
3.5mm audio jack
4
HDMI port
5
RJ45 Ethernet jack
6
TF card
7
USB host port
8
USB host port
9
DC in power supply port
I/O description
13.3/14” in-store POS tablet
6 |
Page 7
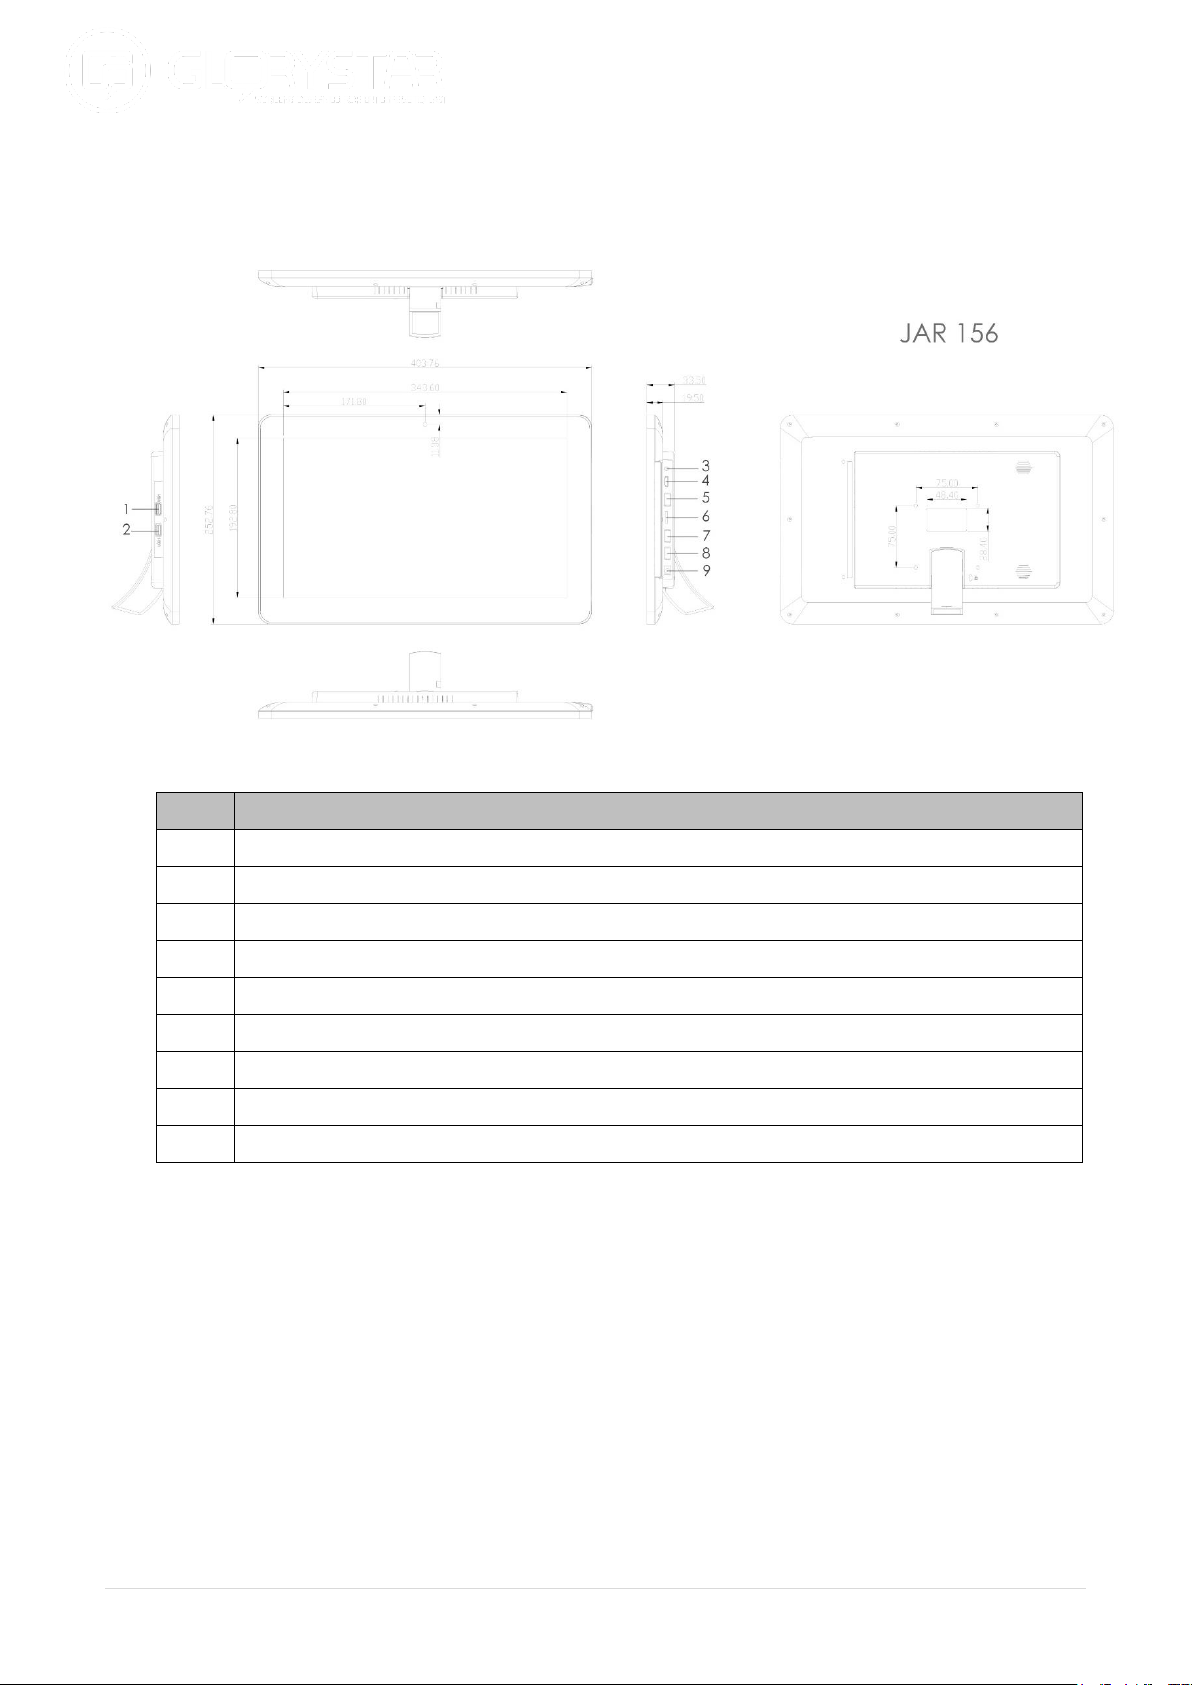
15.6” in-store POS tablet
No.
Description
1
USB host port
2
USB host port
3
3.5mm audio jack
4
HDMI port
5
RJ45 Ethernet jack
6
TF card
7
USB host port
8
USB host port
9
DC in power supply port
7 |
Page 8
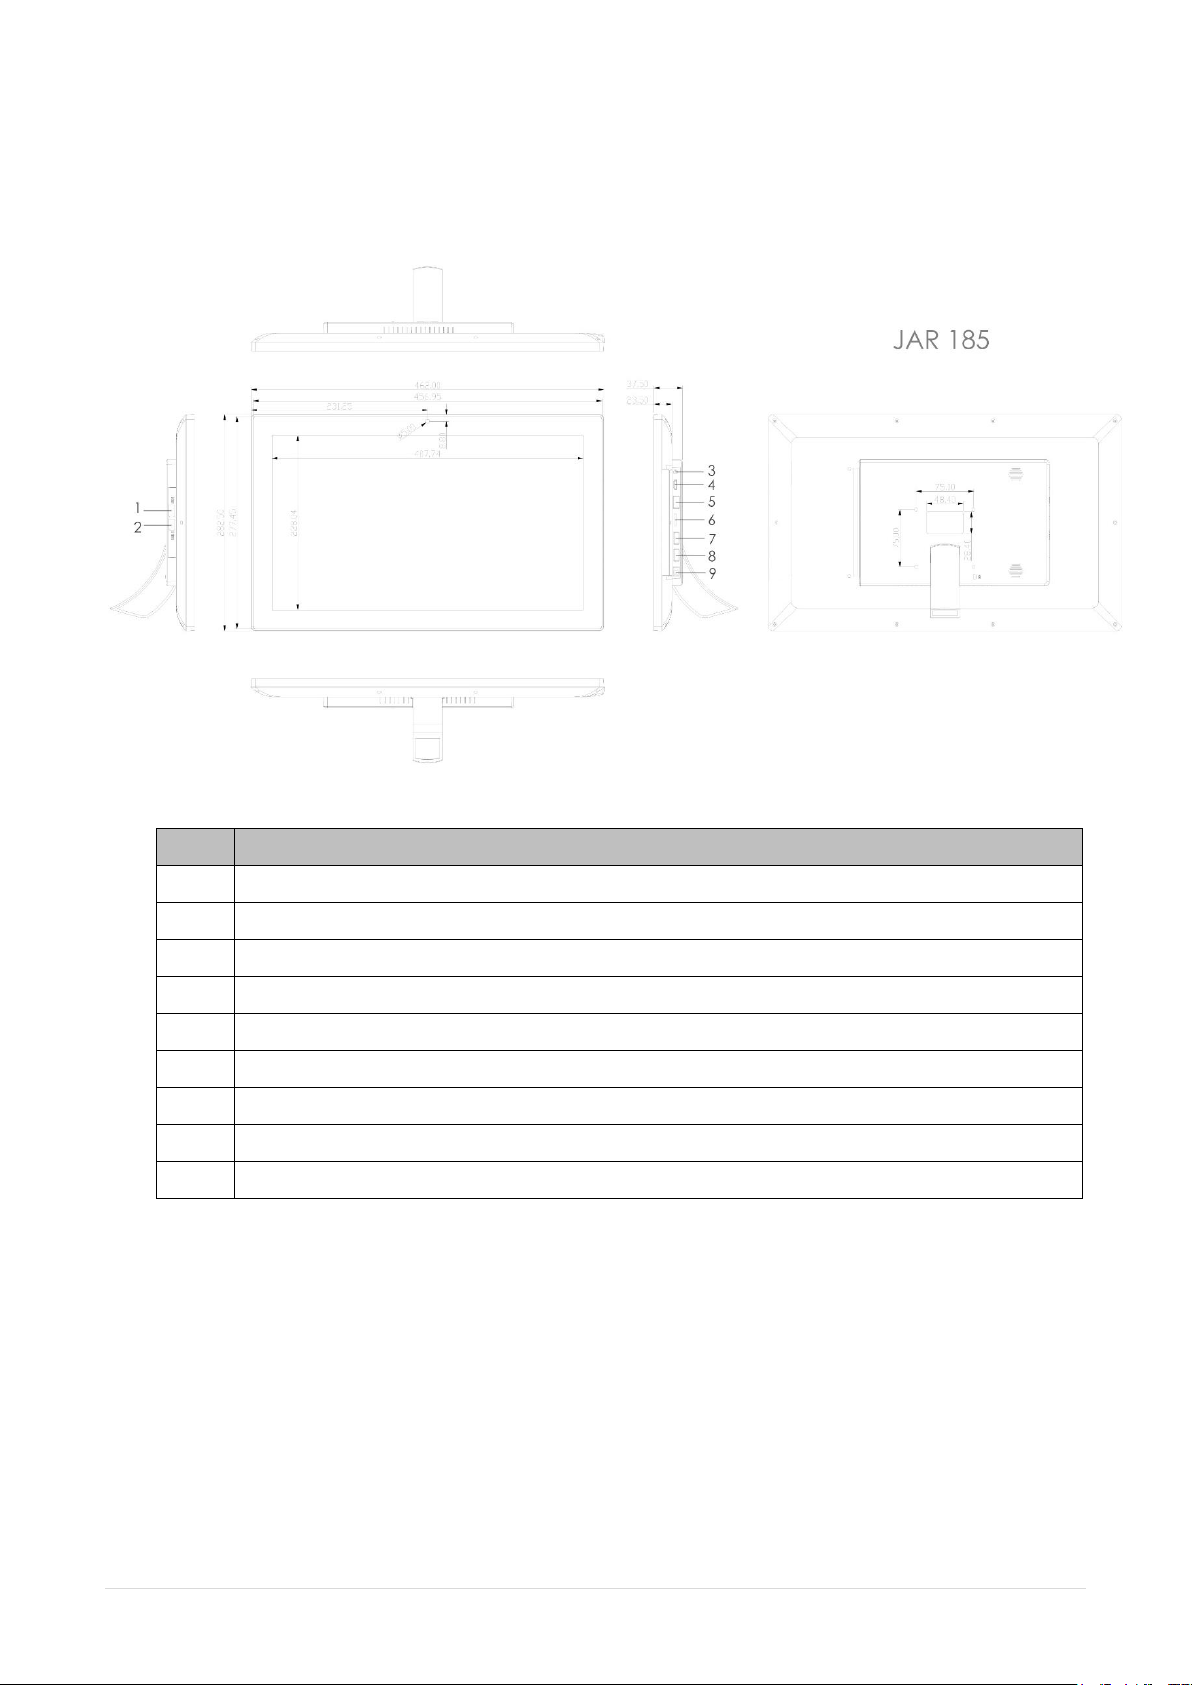
No.
Description
1
USB host port
2
USB host port
3
3.5mm audio jack
4
HDMI port
5
RJ45 Ethernet jack
6
TF card
7
USB host port
8
USB host port
9
DC in power supply port
18.5” in-store POS tablet
8 |
Page 9
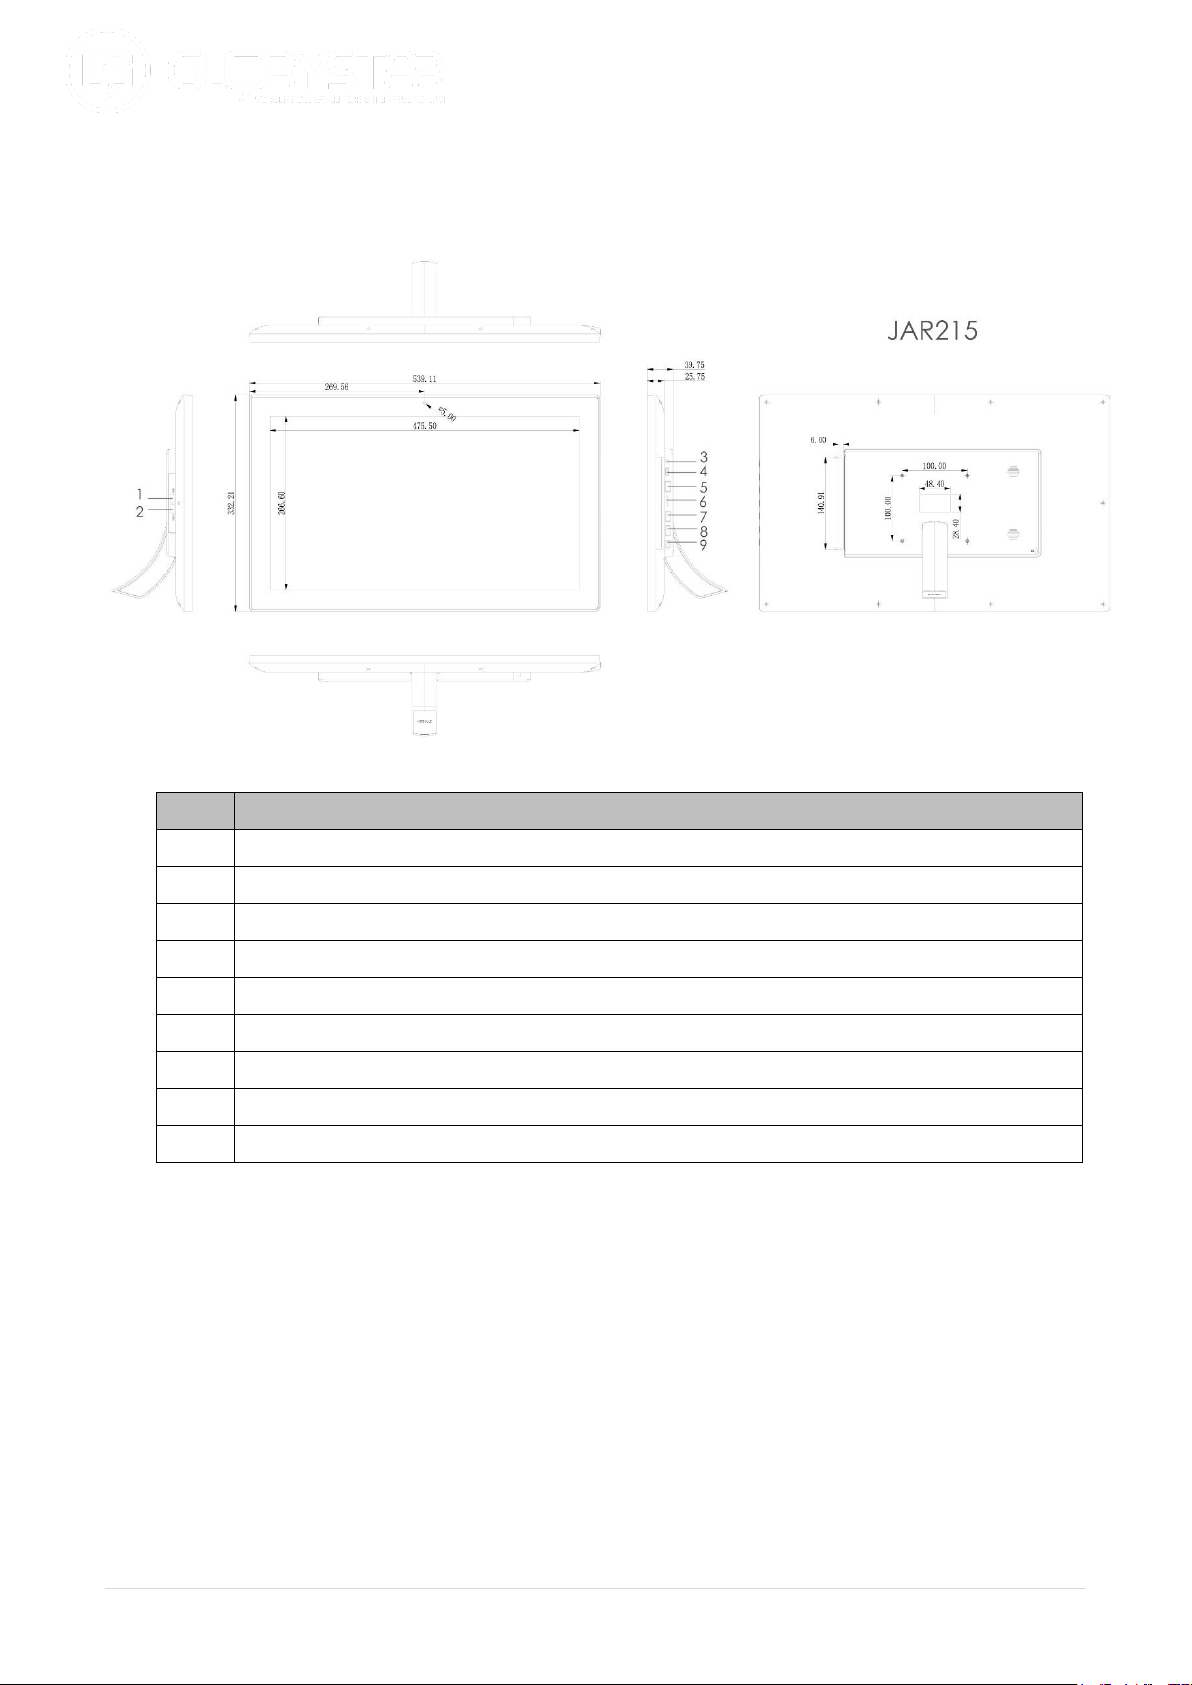
21.5” in-store POS tablet
No.
Description
1
USB host port
2
USB host port
3
3.5mm audio jack
4
HDMI port
5
RJ45 Ethernet jack
6
TF card
7
USB host port
8
USB host port
9
DC in power supply port
9 |
Page 10
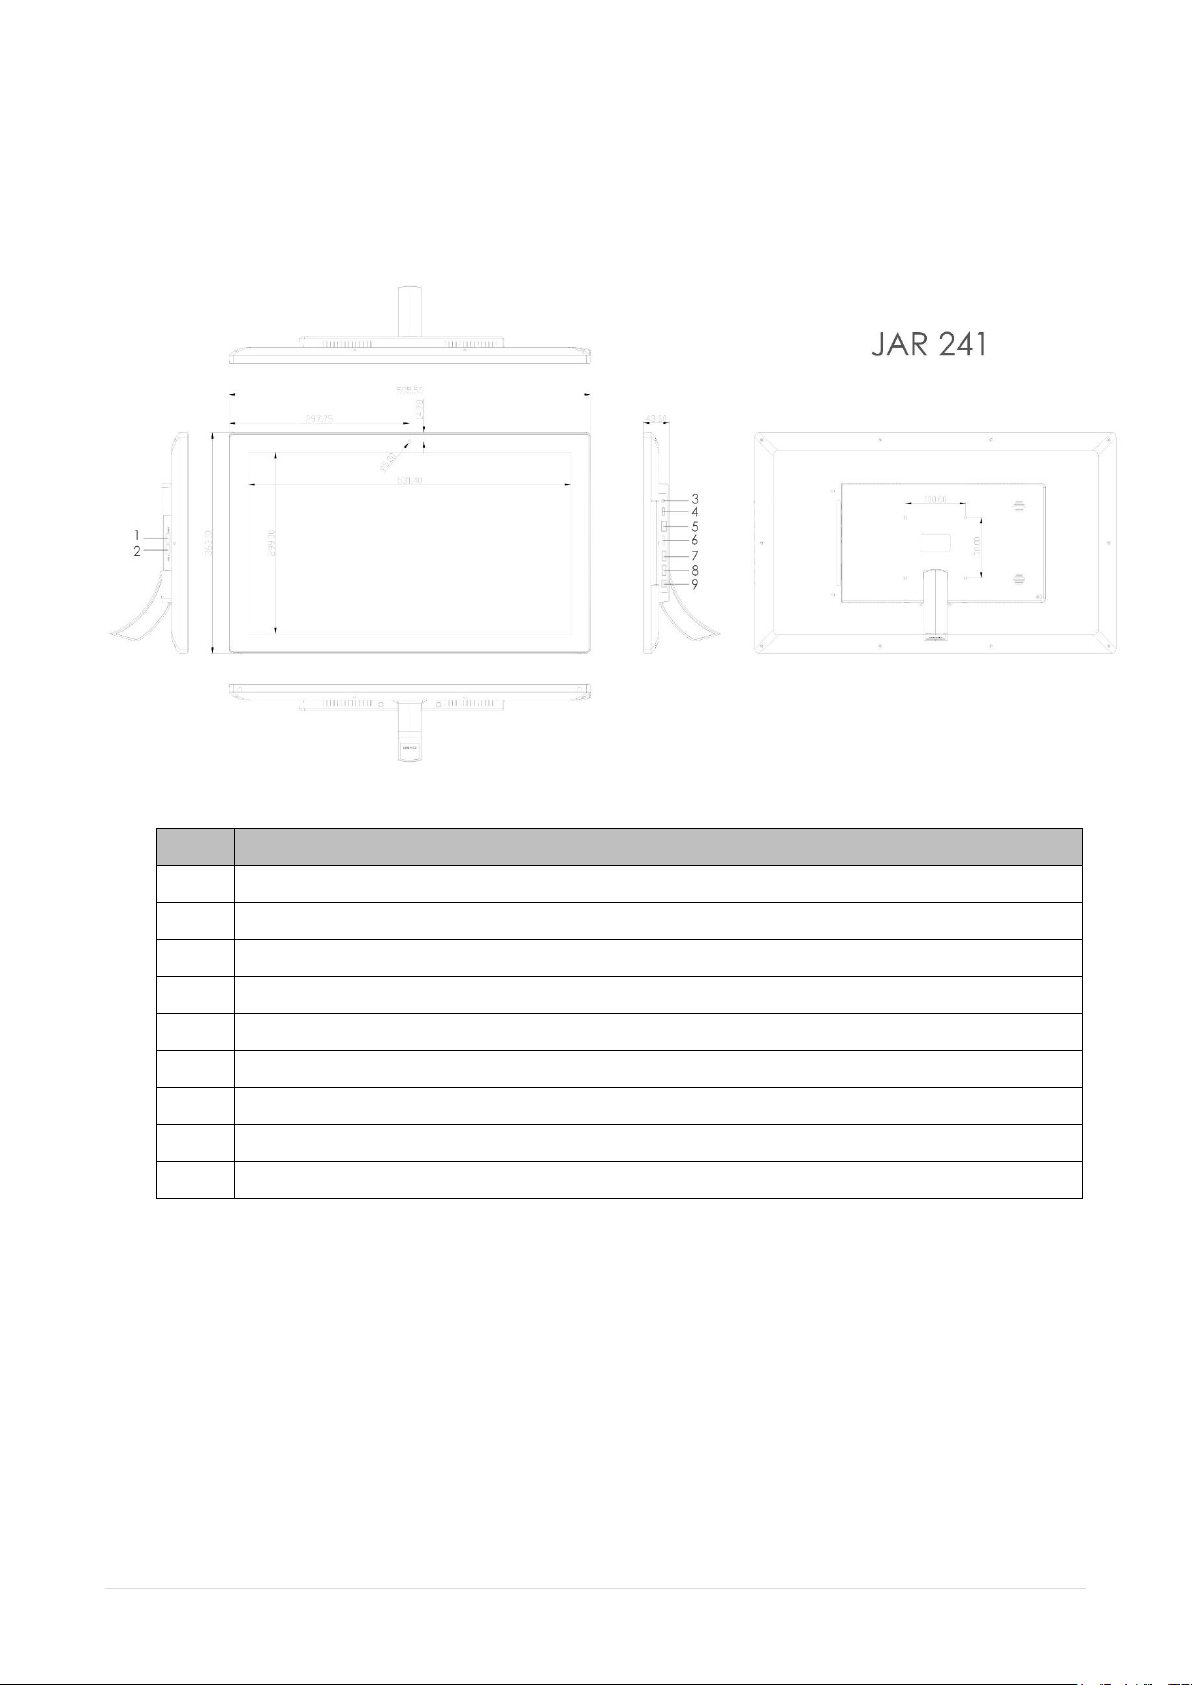
No.
Description
1
USB host port
2
USB host port
3
3.5mm audio jack
4
HDMI port
5
RJ45 Ethernet jack
6
TF card
7
USB host port
8
USB host port
9
DC in power supply port
24” in-store POS tablet
10 |
Page 11
Quick start user guide
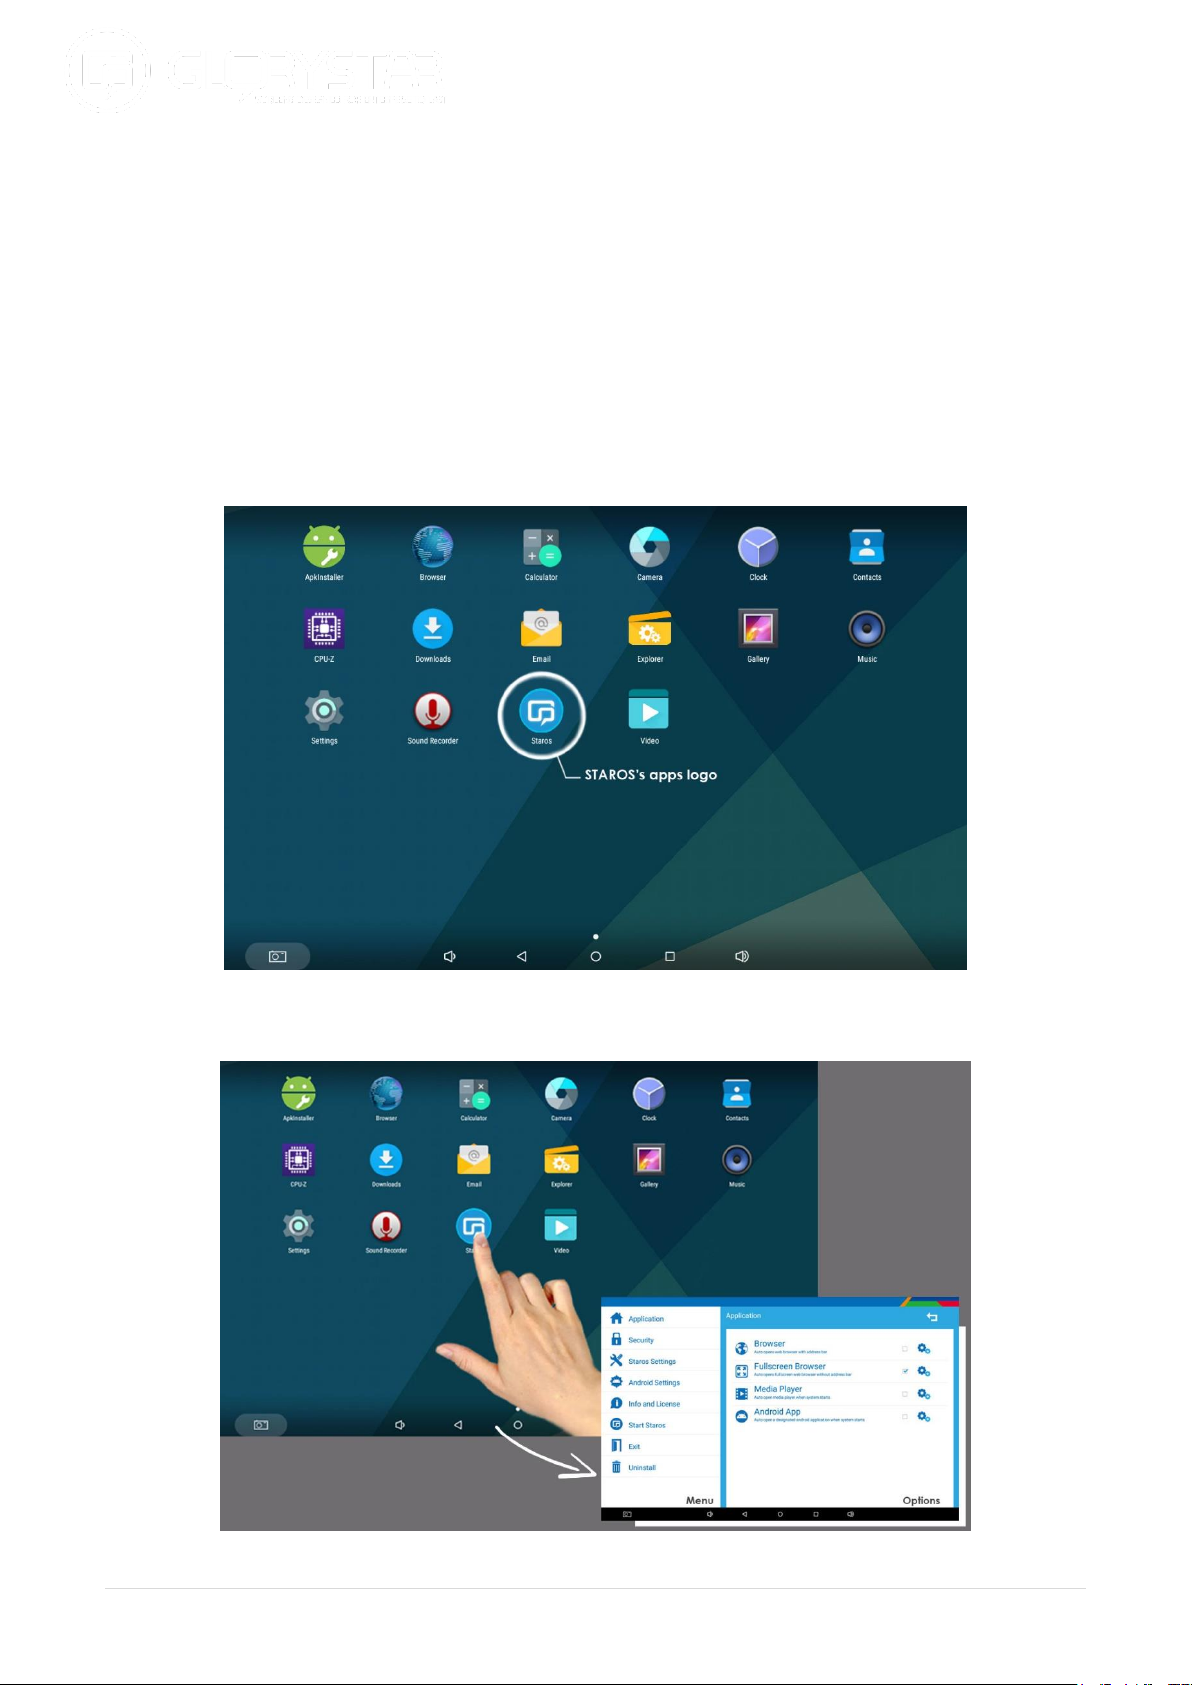
This section describes how to set up and use the in-store POS tablet for the first time. The tablet
runs Glory Star Group Limited’s STAROS software by default, which runs on an Android operating
system installed in the player to play the desired contact.
1.0. Start using STAROS
Step 1: Install STAROS
Install STAROS and you can find the STAROS’s apps logo on the desktop of your tablet.
Step 2: Start STAROS as below
Press the logo on the screen and open the app.
11 |
Page 12
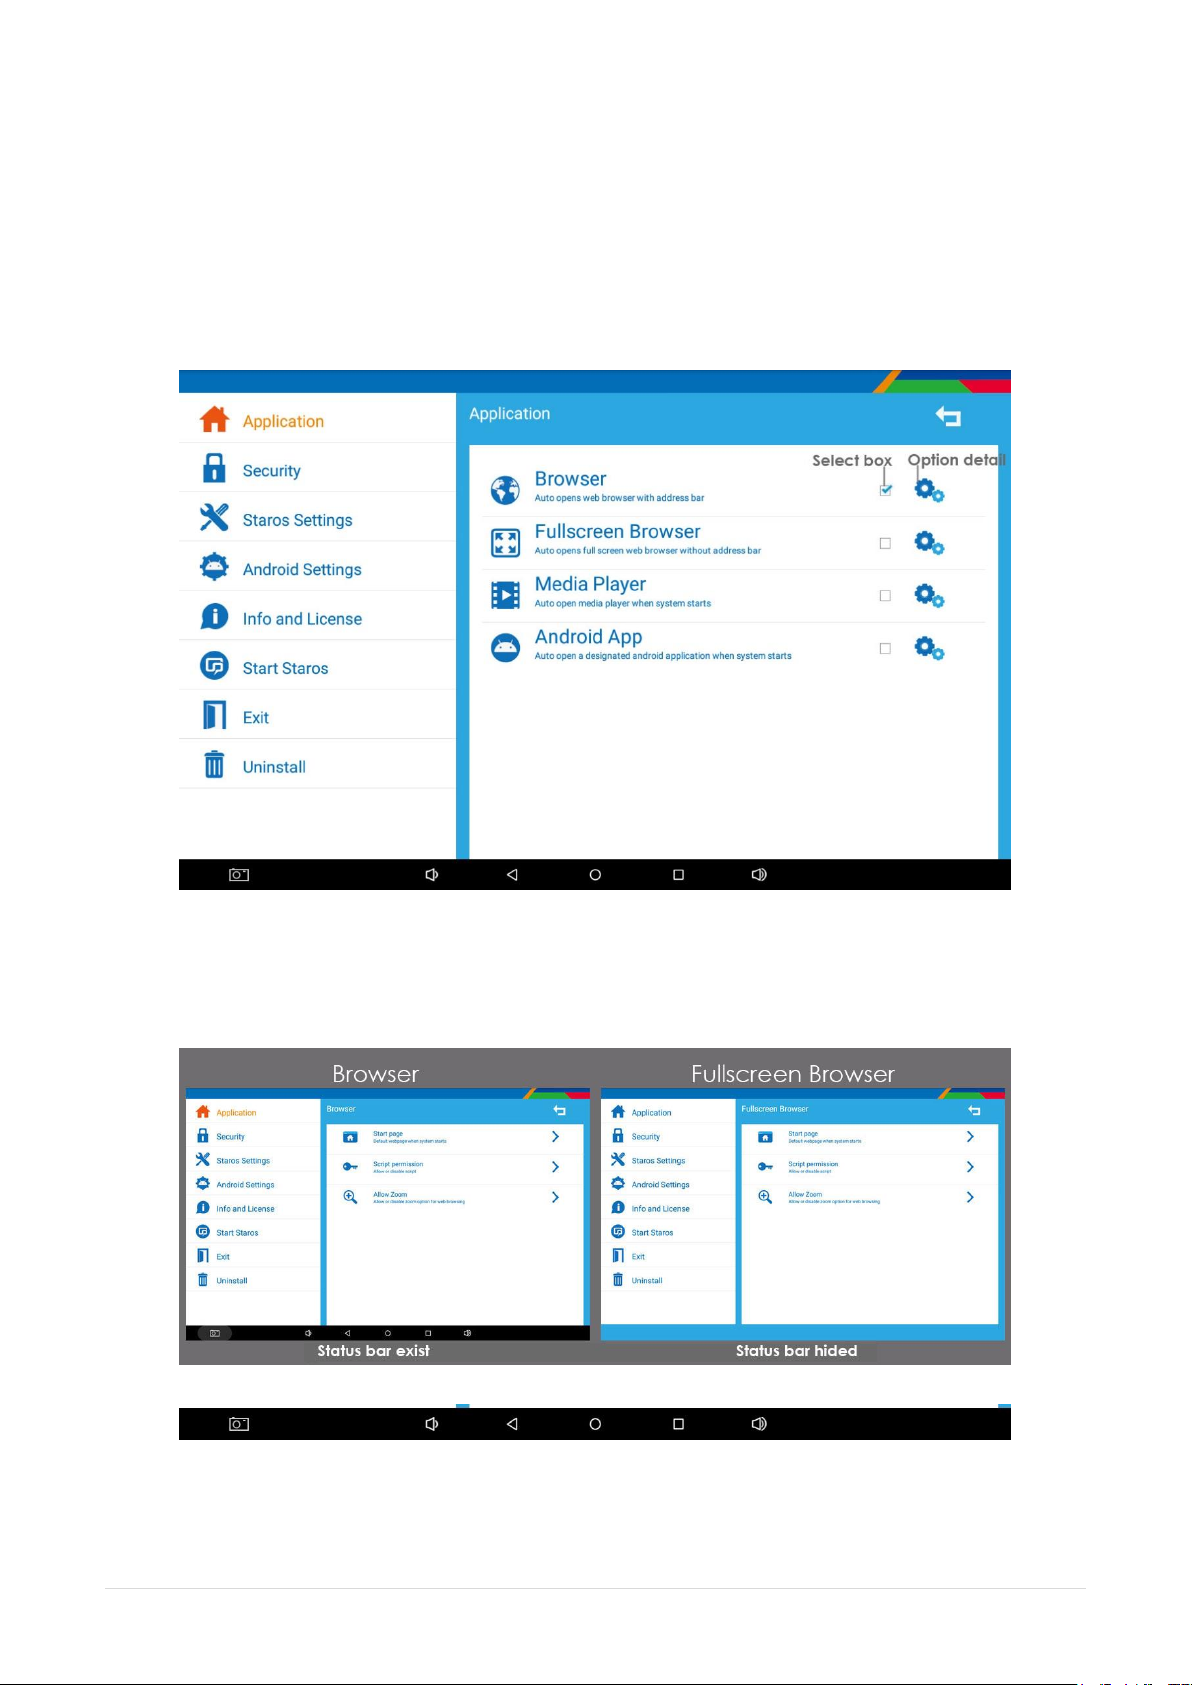
2.0. Application
1) Browser – auto opens web browser (online or offline) with status bar.
2) Full screen Browser – auto opens full screen web browser (online or offline) with status bar.
3) Media Player – auto start, auto play contents (including videos and JPEG) when device
turns on.
4) Android App – auto start, auto play the chosen android app when the device is turned on.
2.1. Browser/ Full screen Browser
Browser – auto start, auto play web browser BUT with status bar.
Full screen Browser - auto start, auto play web browser BUT without status bar.
Status bar: use to control the tablet more easily.
12 |
Page 13
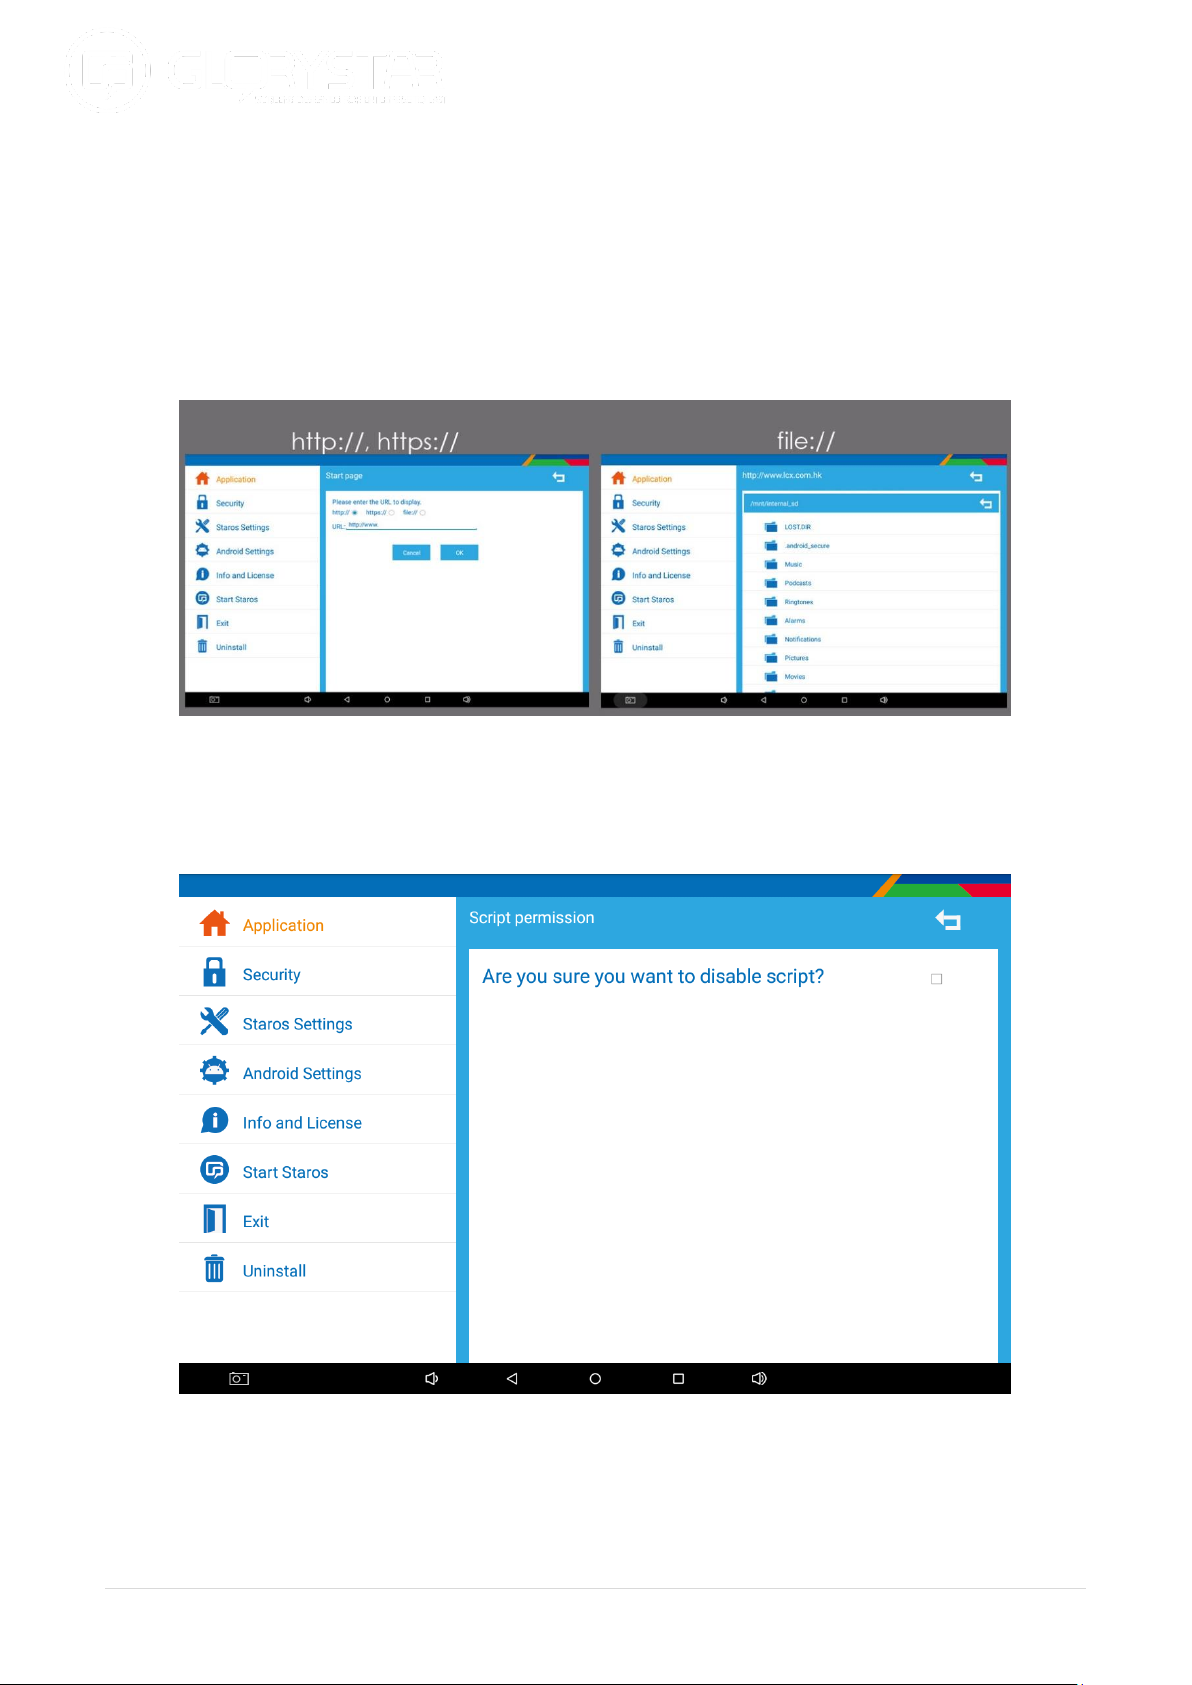
2.1.1. Start page
Select start page and you can set up the starting page of the apps. Here are three way to
set up:
http://, https:// - you can enter the URL page to auto start the web page (online website)
when the device turns on.
file:// - you can save the HTML page (offline website) into the internal memory and it would
auto start when the device is turned on.
2.1.2. Script permission
Select the script permission and you can disable the html script.
13 |
Page 14
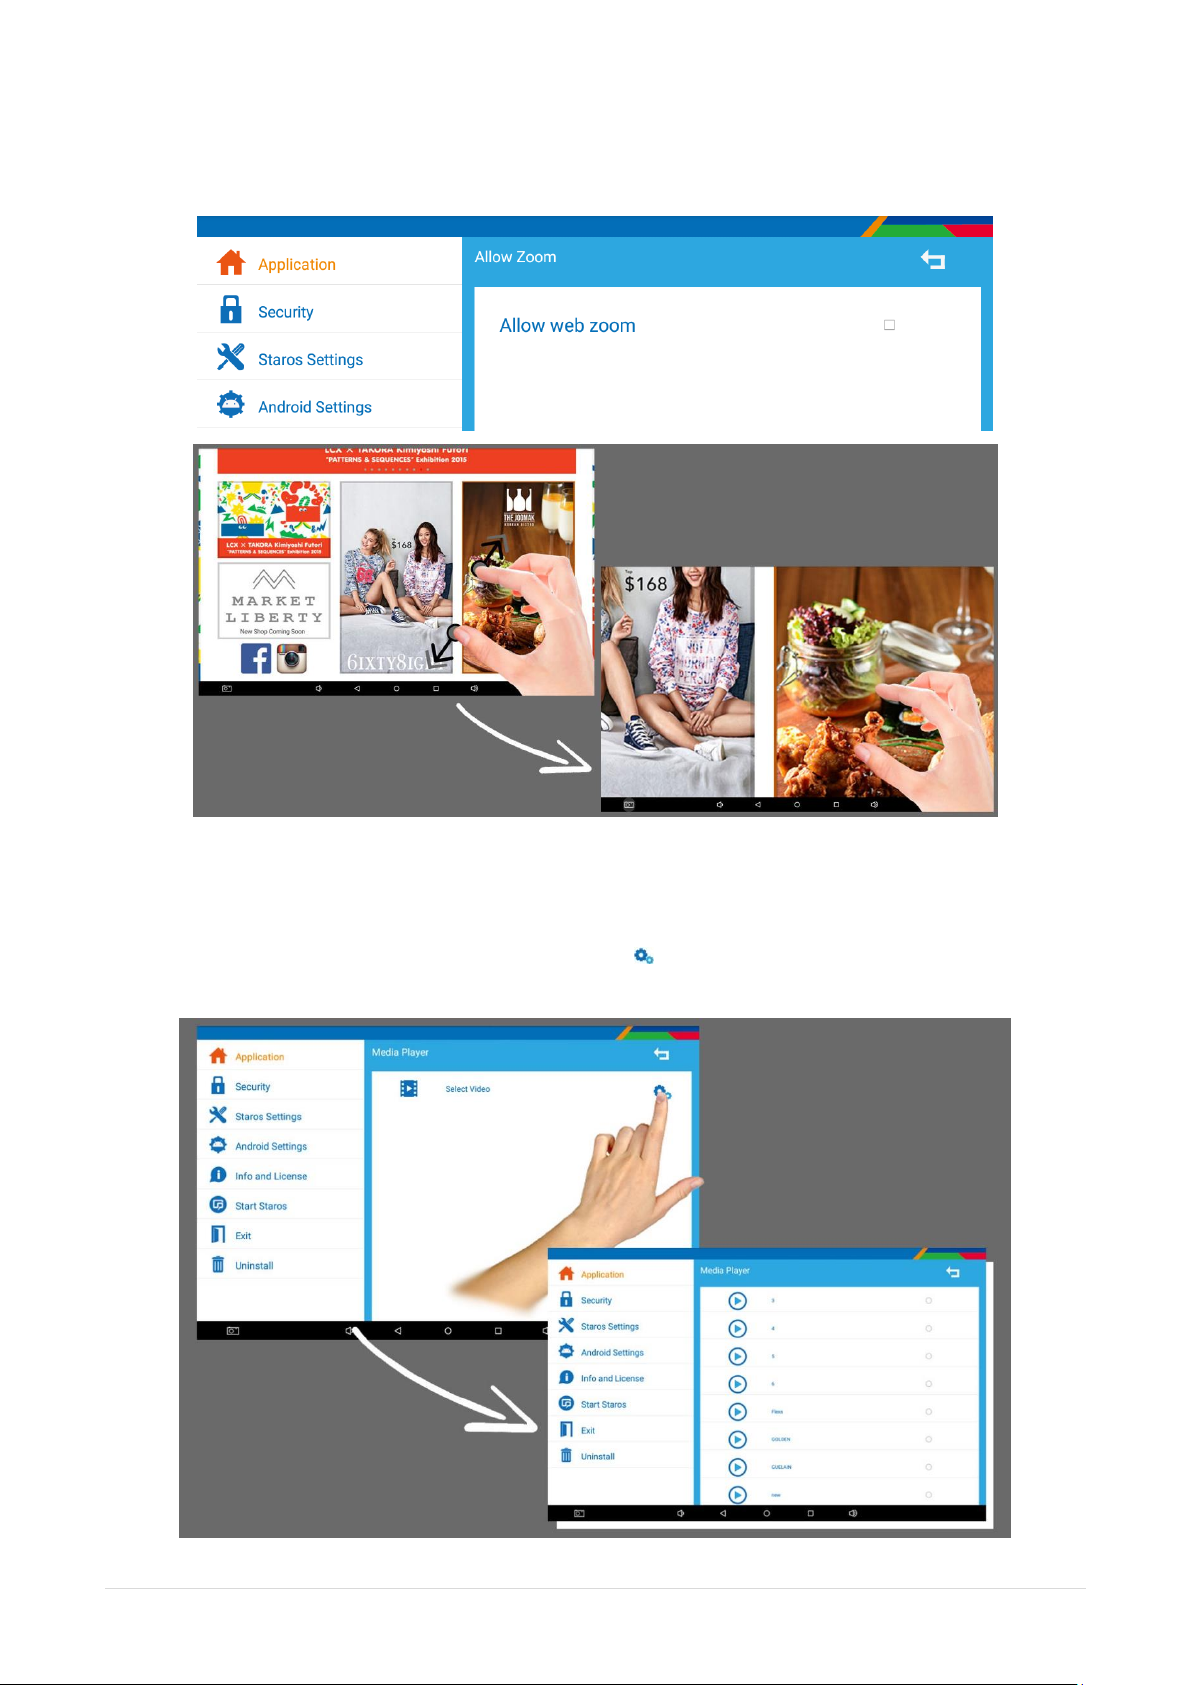
2.1.3. Allow Zoom
Check the box to allow zoom in or zoom out of content images / videos.
2.2. Media Player
Select media player to auto start, auto play selected videos. Insert videos into the internal
memory of the device. Select the settings logo ( ), check the videos you would like to auto
play.
14 |
Page 15
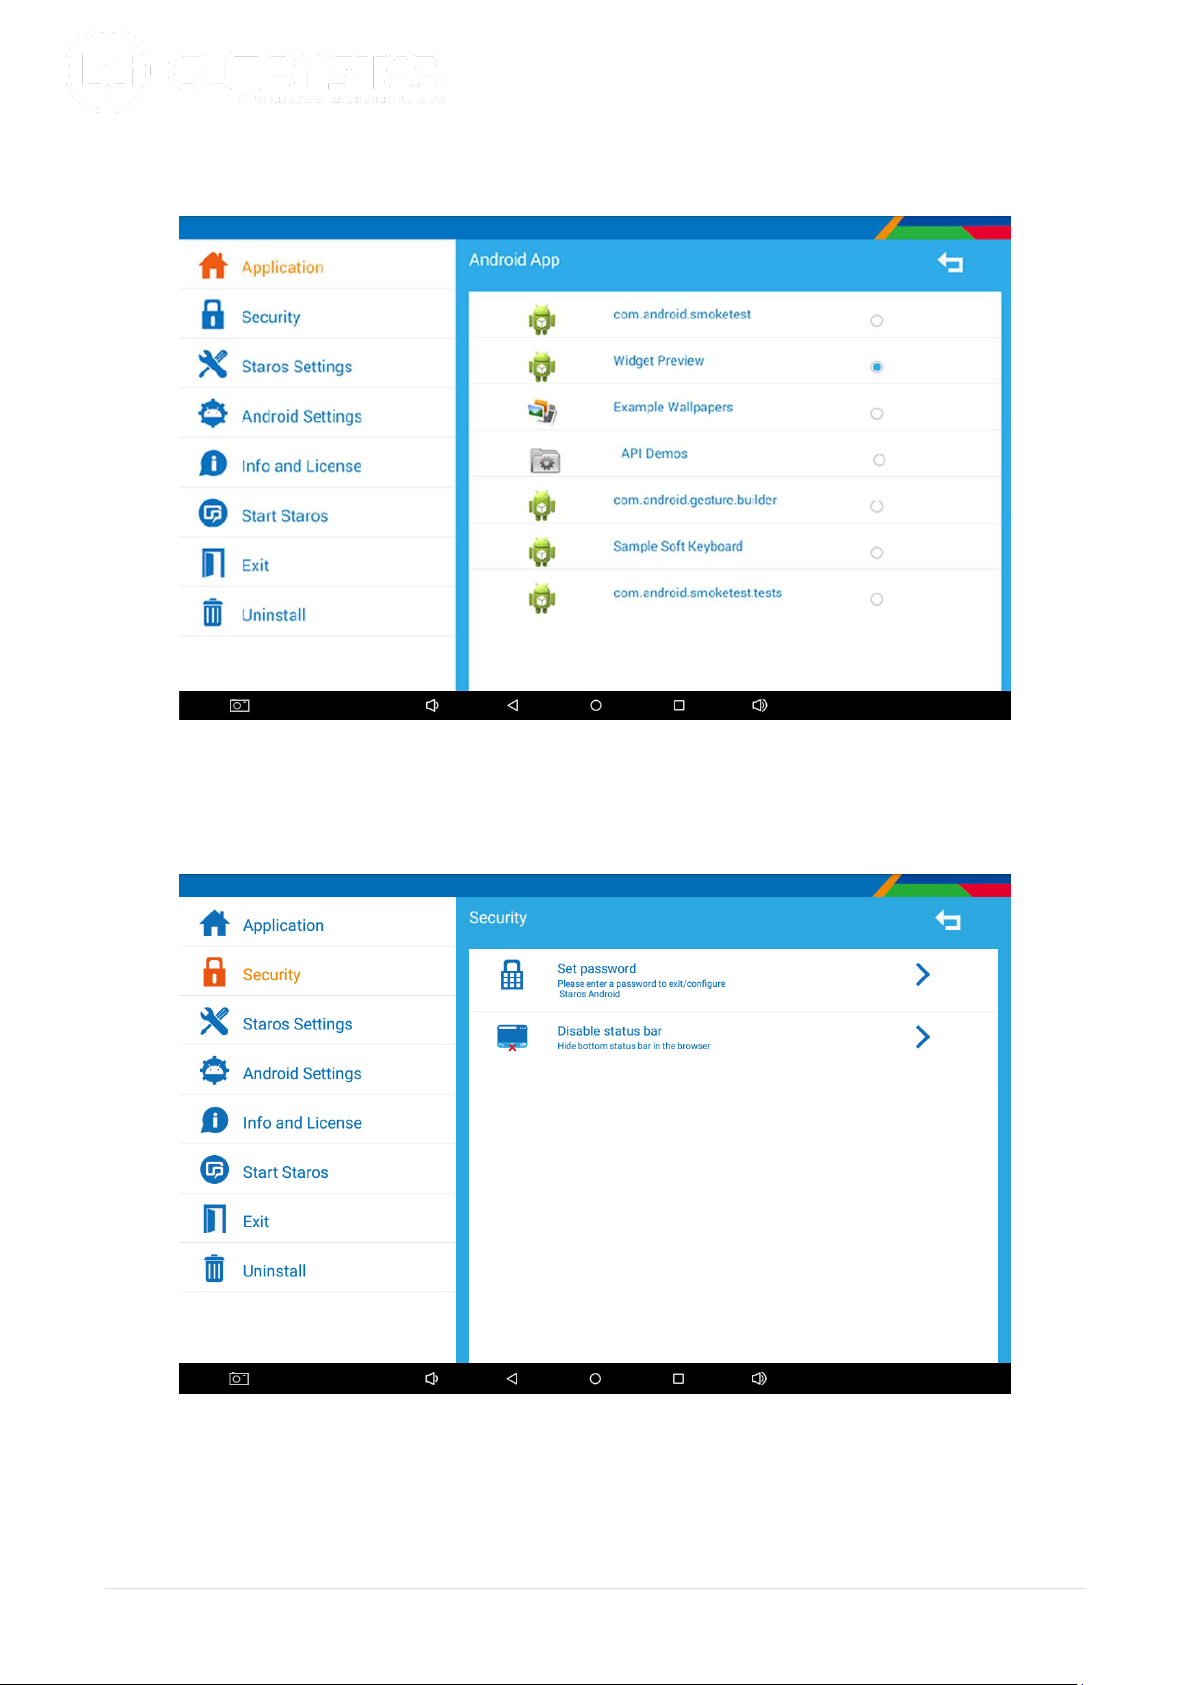
2.3. Android App
Select the android app you would like to auto start and auto play when device turns on.
3.0. Security
In the security section, you can set the password and status bar to upgrade the security level
of your tablet.
15 |
Page 16
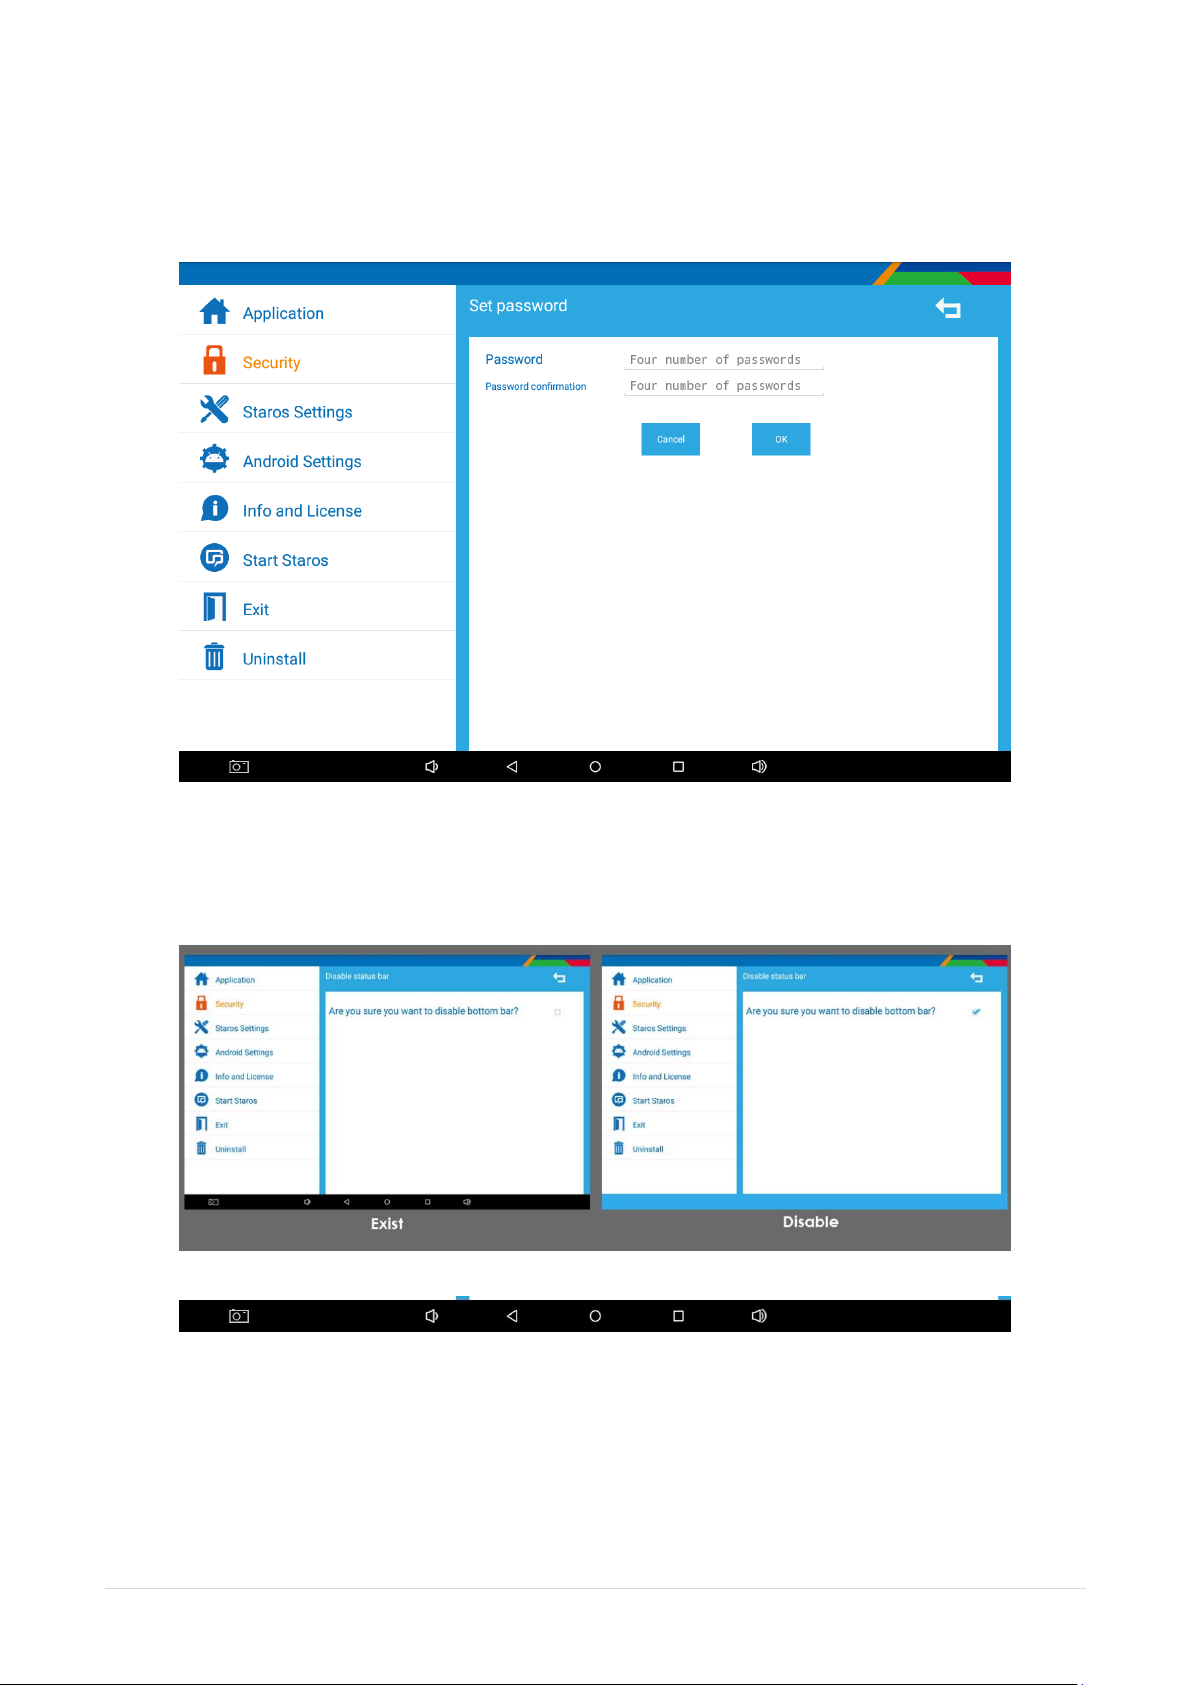
3.1. Set password
Select set password and you can set the new password to login the STAROS system (default
password is 0000).
3.2. Disable status bar
Check box - to disable status bar to allow full screen.
Uncheck box – to remain status bar
Status bar: use to control the tablet more easily.
16 |
Page 17
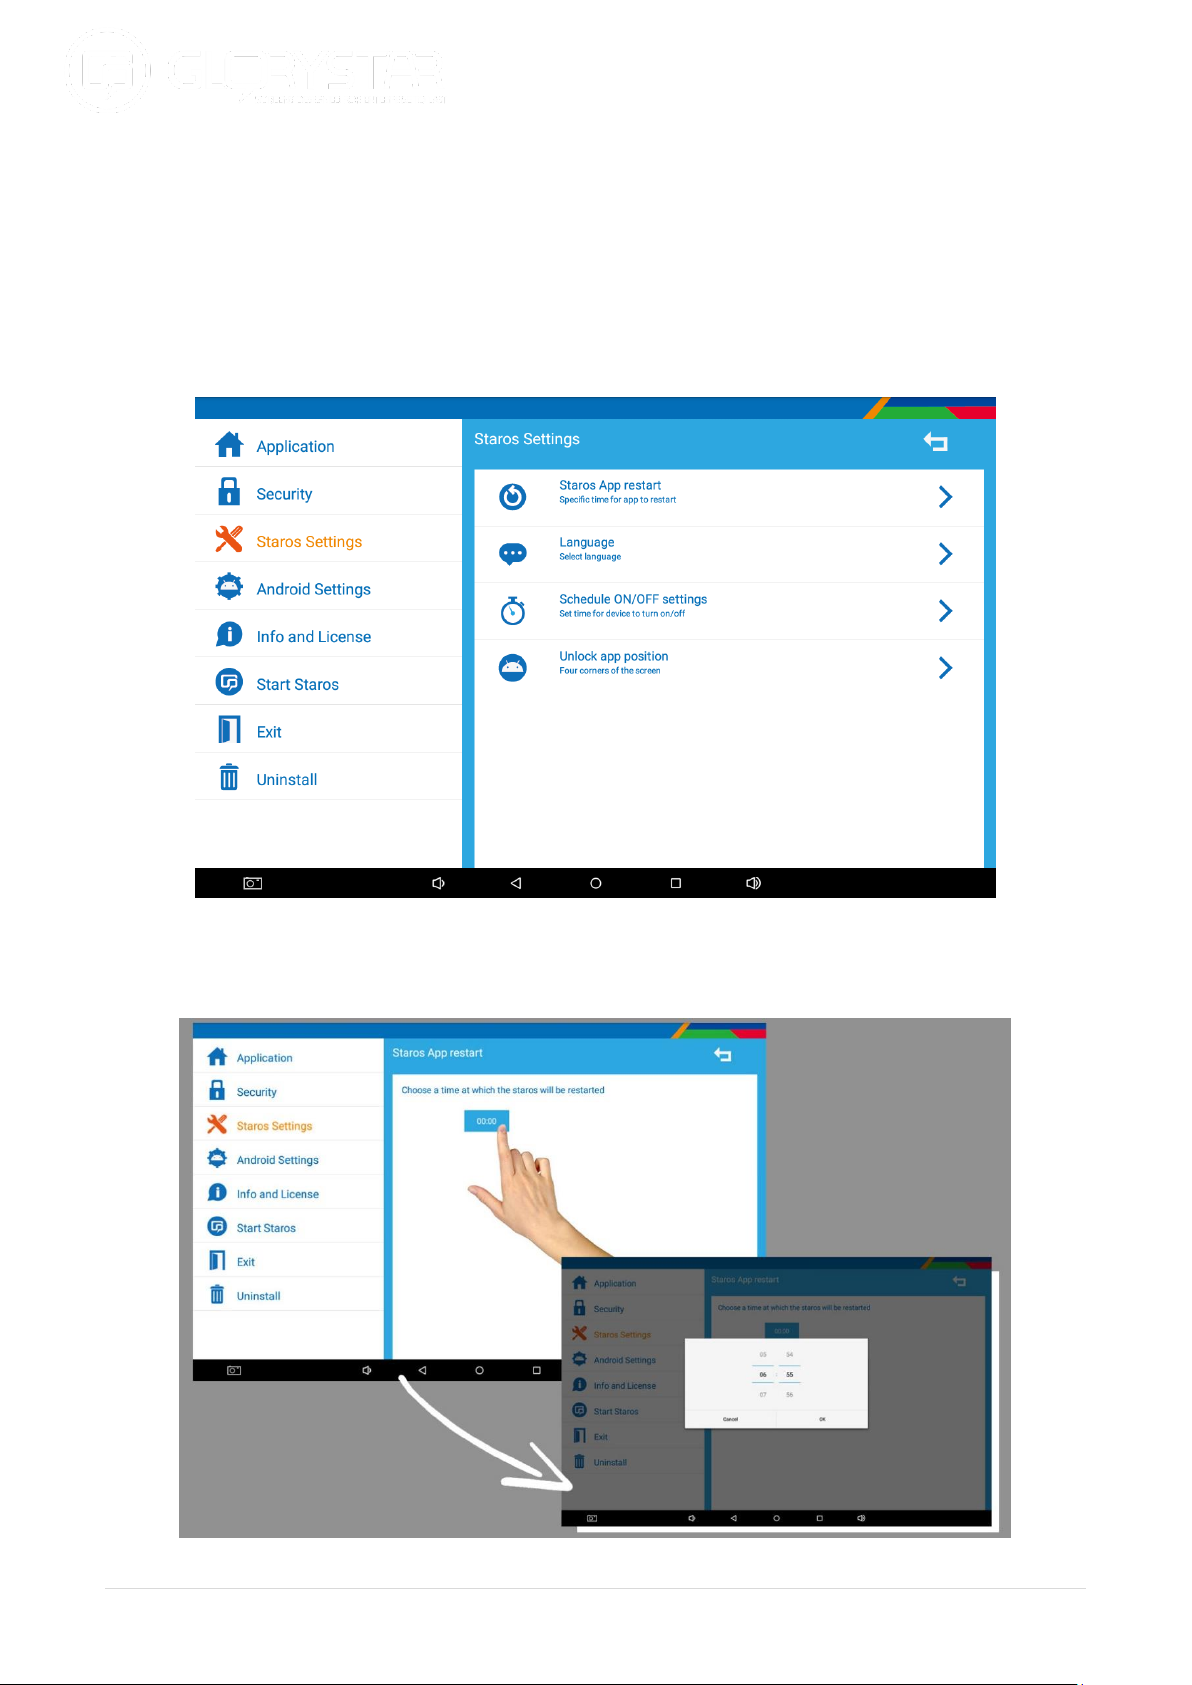
4.0. STAROS Settings
STAROS App restart – you can select a specific time each day for your selected app to
restart.
Language – select English or Chinese.
Schedule ON/OFF settings – you can select the complete shut down time of device daily or
weekly.
Unlock app position – you can select the position of tap on to unlock the device.
4.1. STAROS App restart
You can select a specific time each day for your selected app to restart.
17 |
Page 18
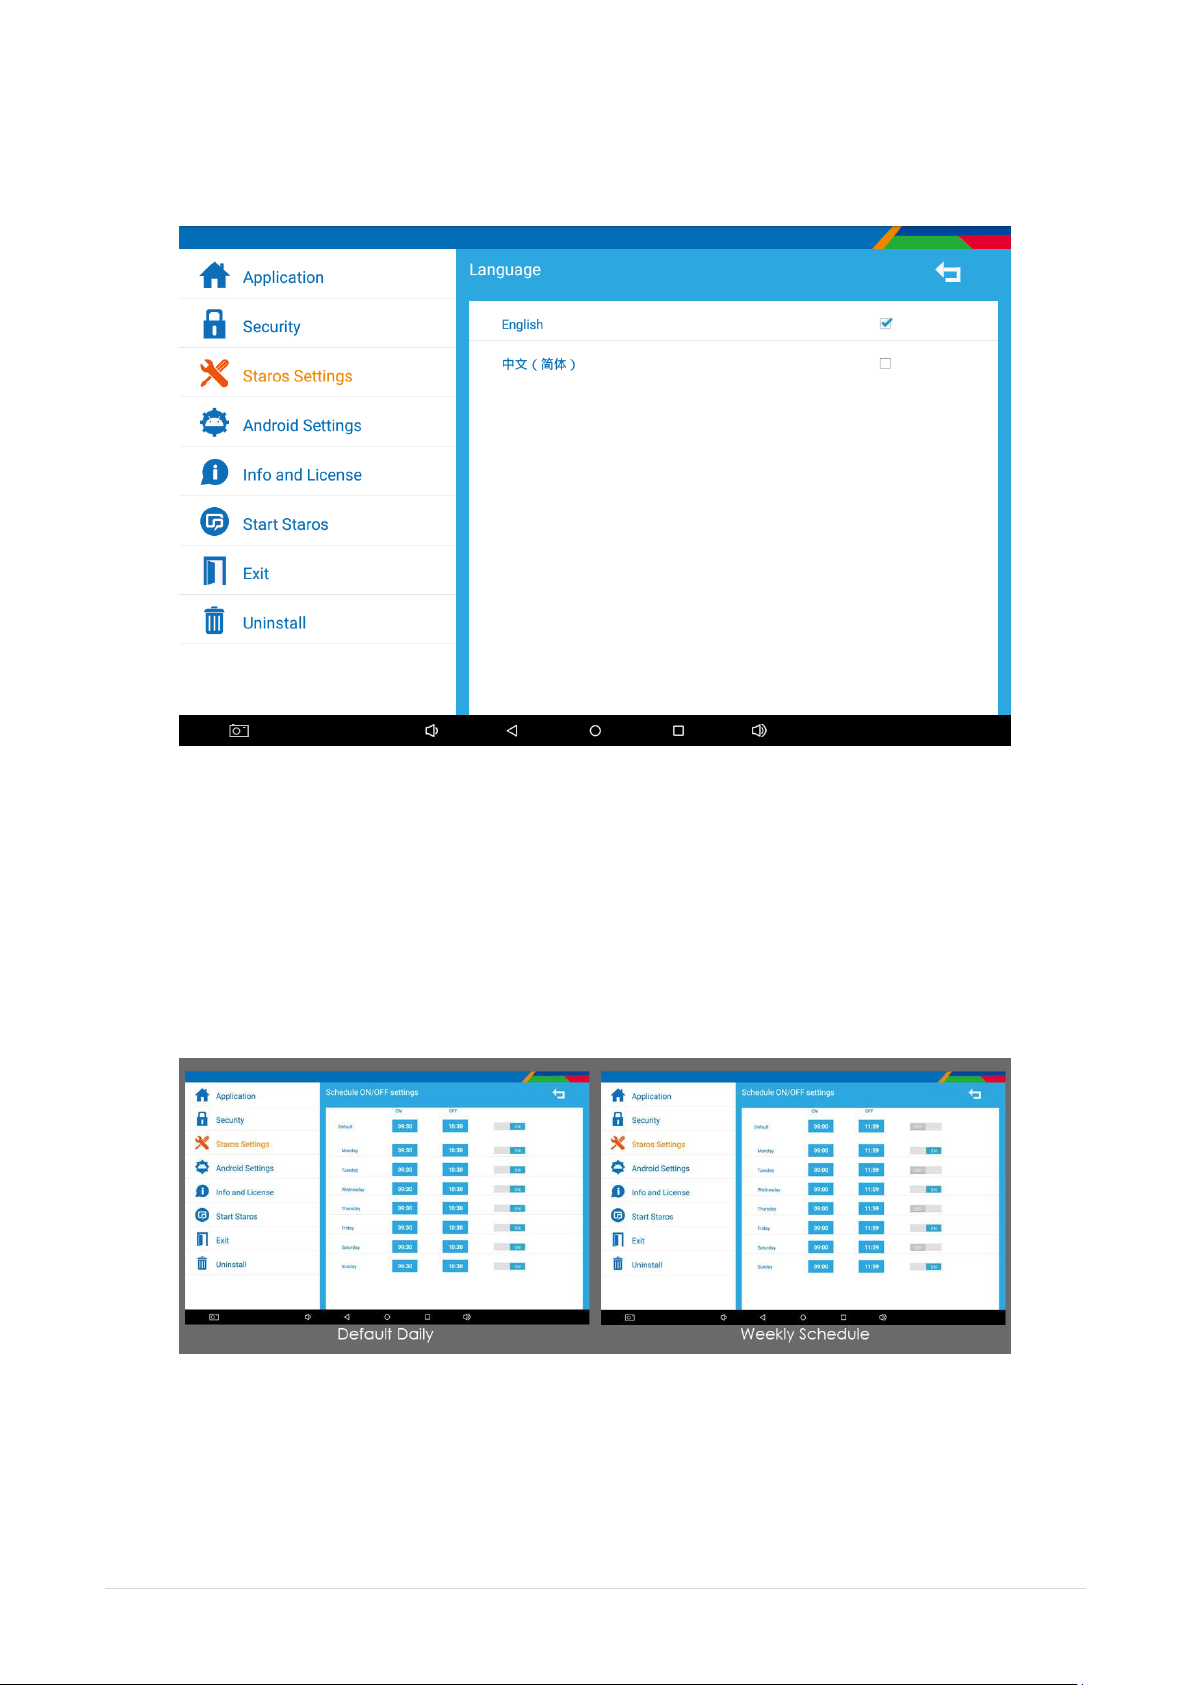
4.2. Language
Select language and you can set up the main language of your tablet.
4.3. Schedule ON/OFF settings
This function allows the device to completely shut down to save energy.
Default daily same ON/OFF time - set ON as the turn on device time
set OFF ae the turn off device time
Weekly schedule (Monday to Sunday) - select ON for the days you need the device to turn on
set the time ON for device to turn on
set the time OFF for device to turn off
18 |
Page 19
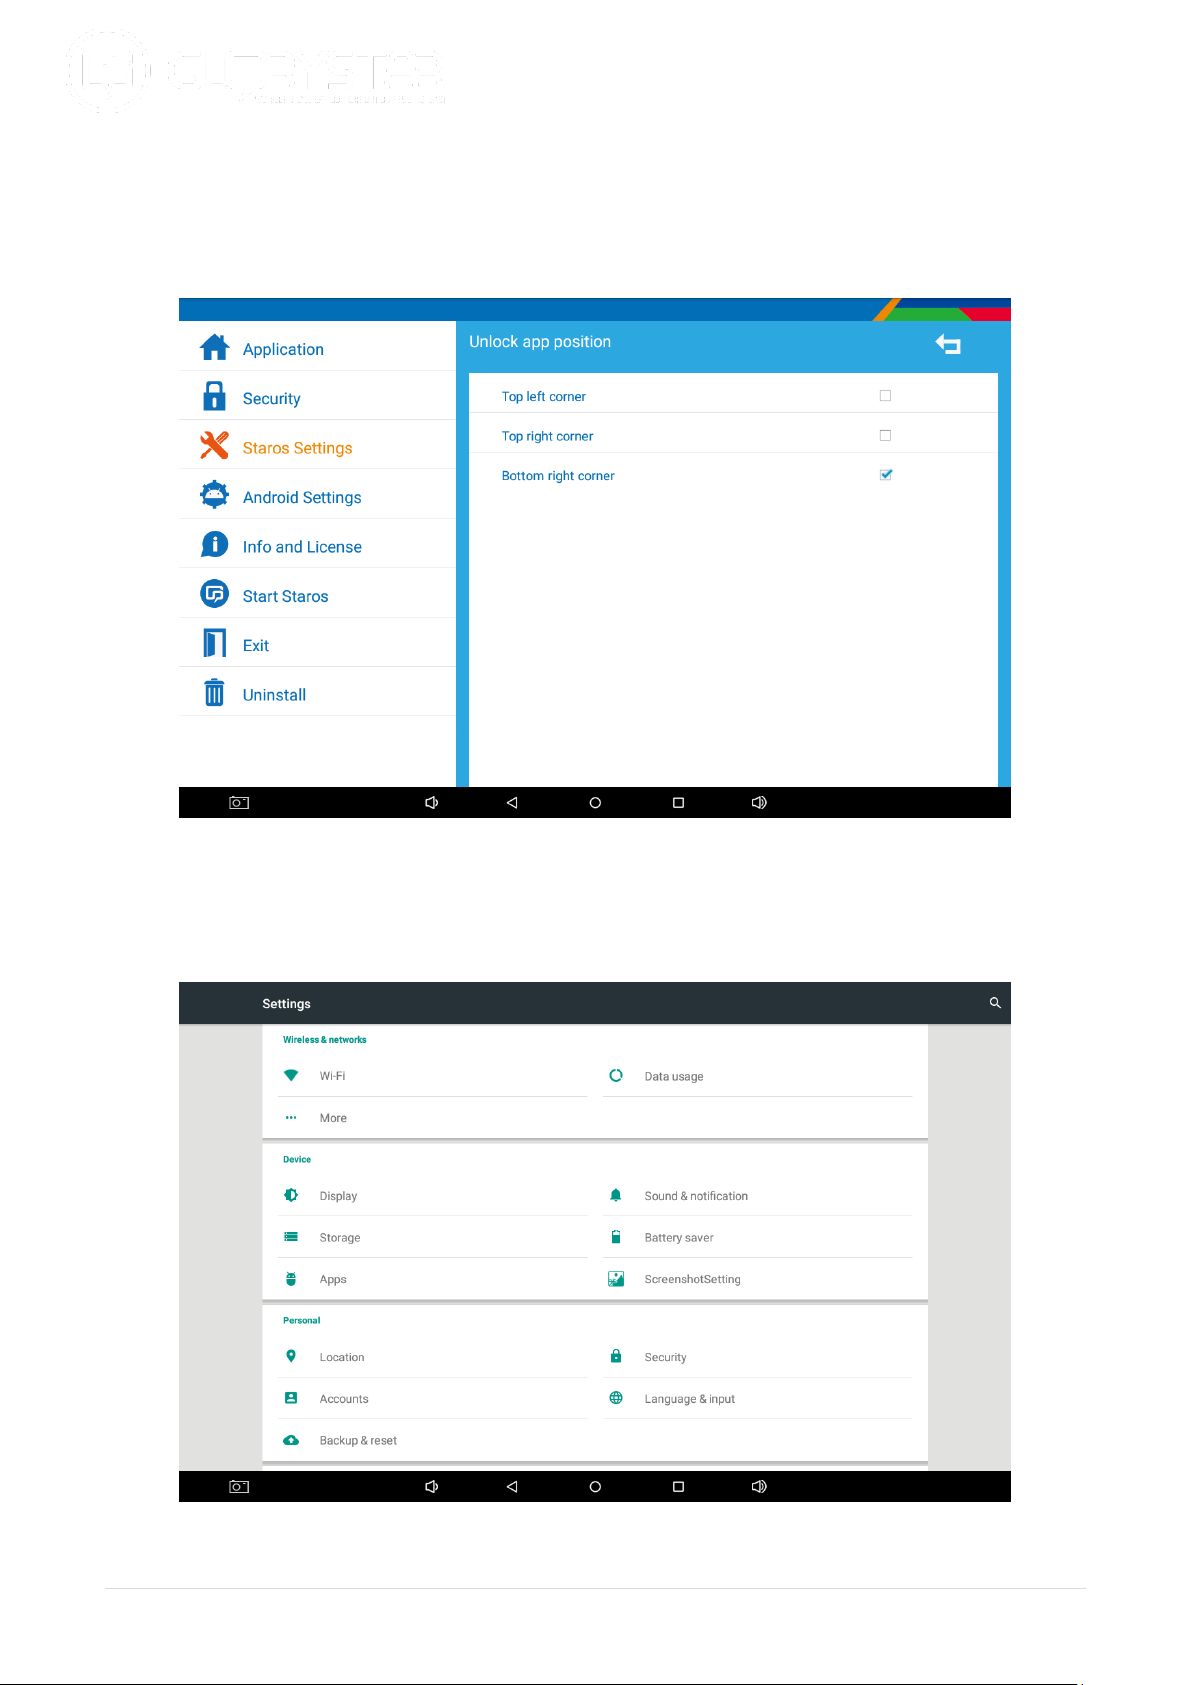
4.4. Unlock app position
Select unlock app position and you can choose which corner to tap and enter into the
settings page of STAROS. Tap 5-10 times on the selected corner to enter into the password
page.
5.0. Android Settings
Select Android settings and it allows you to directly access into the settings of the hardware
device e.g. Wi-Fi settings, display, sound, storage etc.
19 |
Page 20
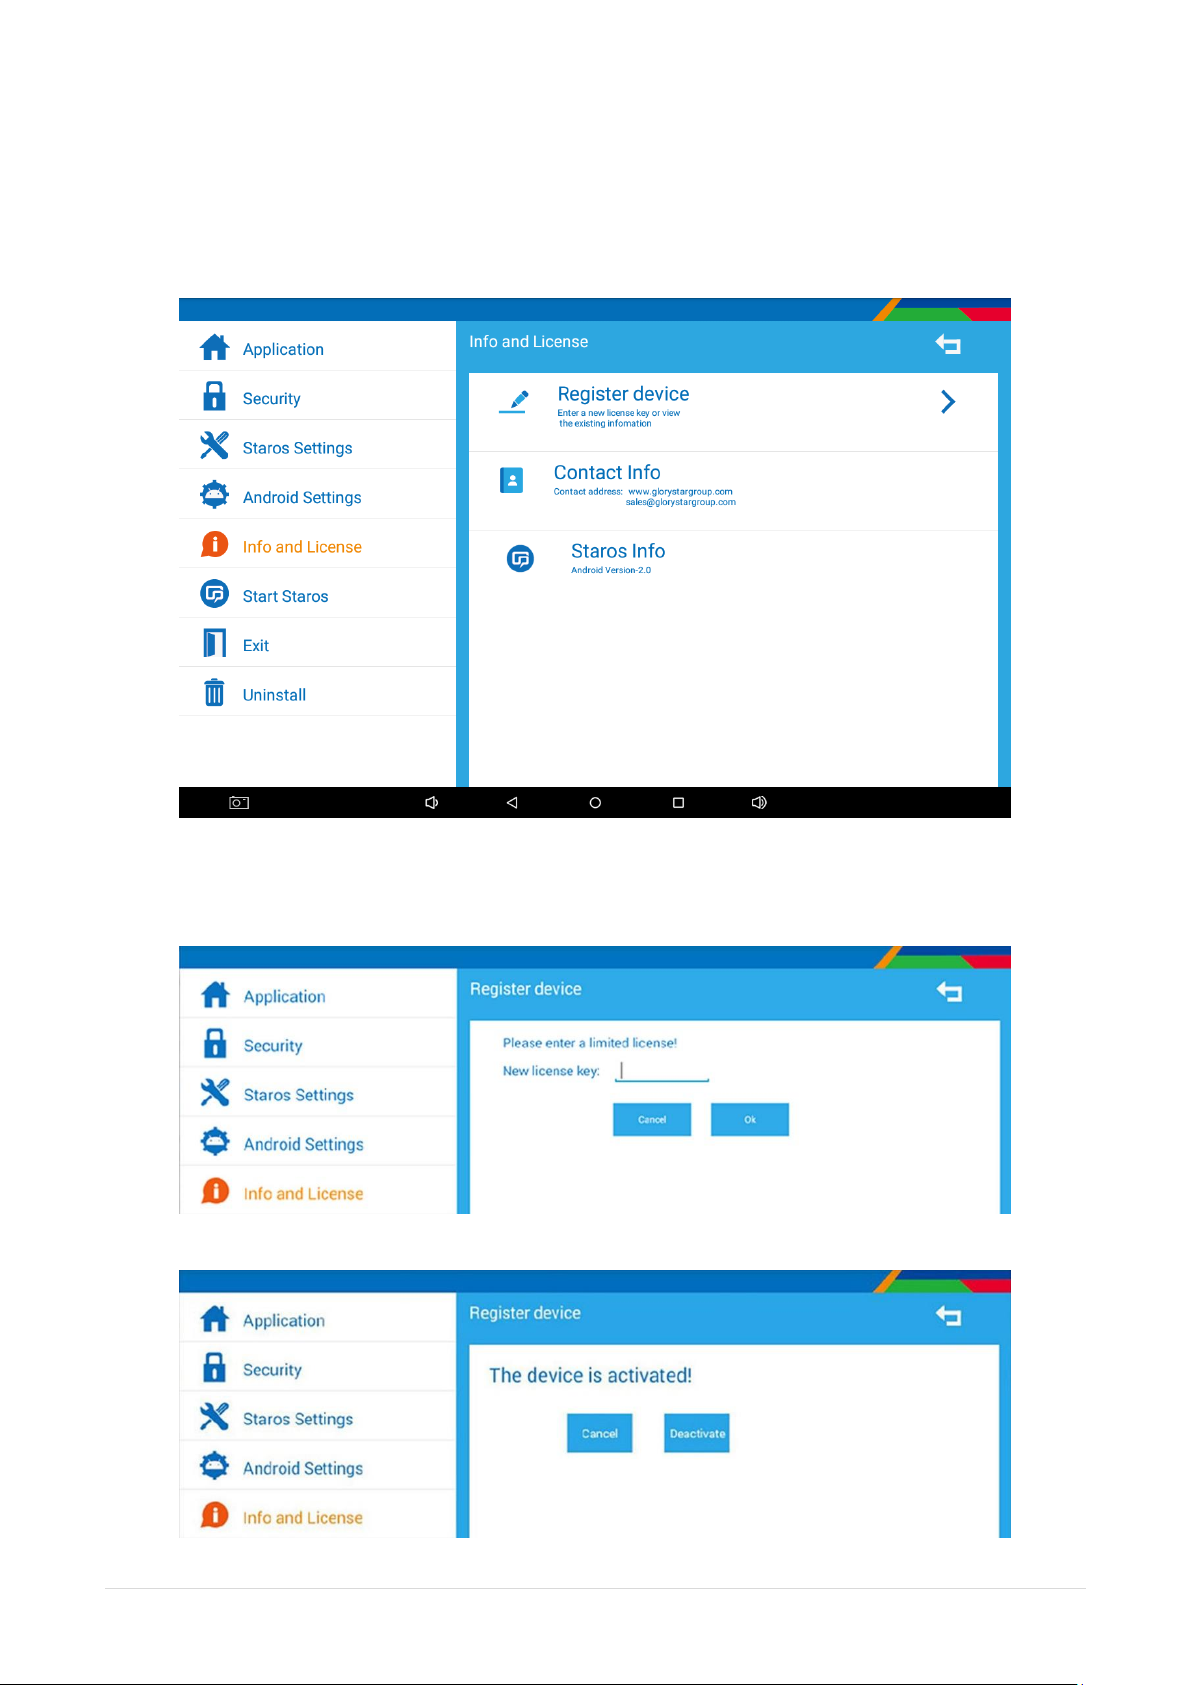
6.0. Info and License
Select info and license to register device.
If you do not have a license code, please e-mail to [email protected] to purchase
one.
6.1. Register device
Step 1: Select register device and you can enter your license key.
Step 2: You can deactivate if you have entered the wrong license.
20 |
Page 21
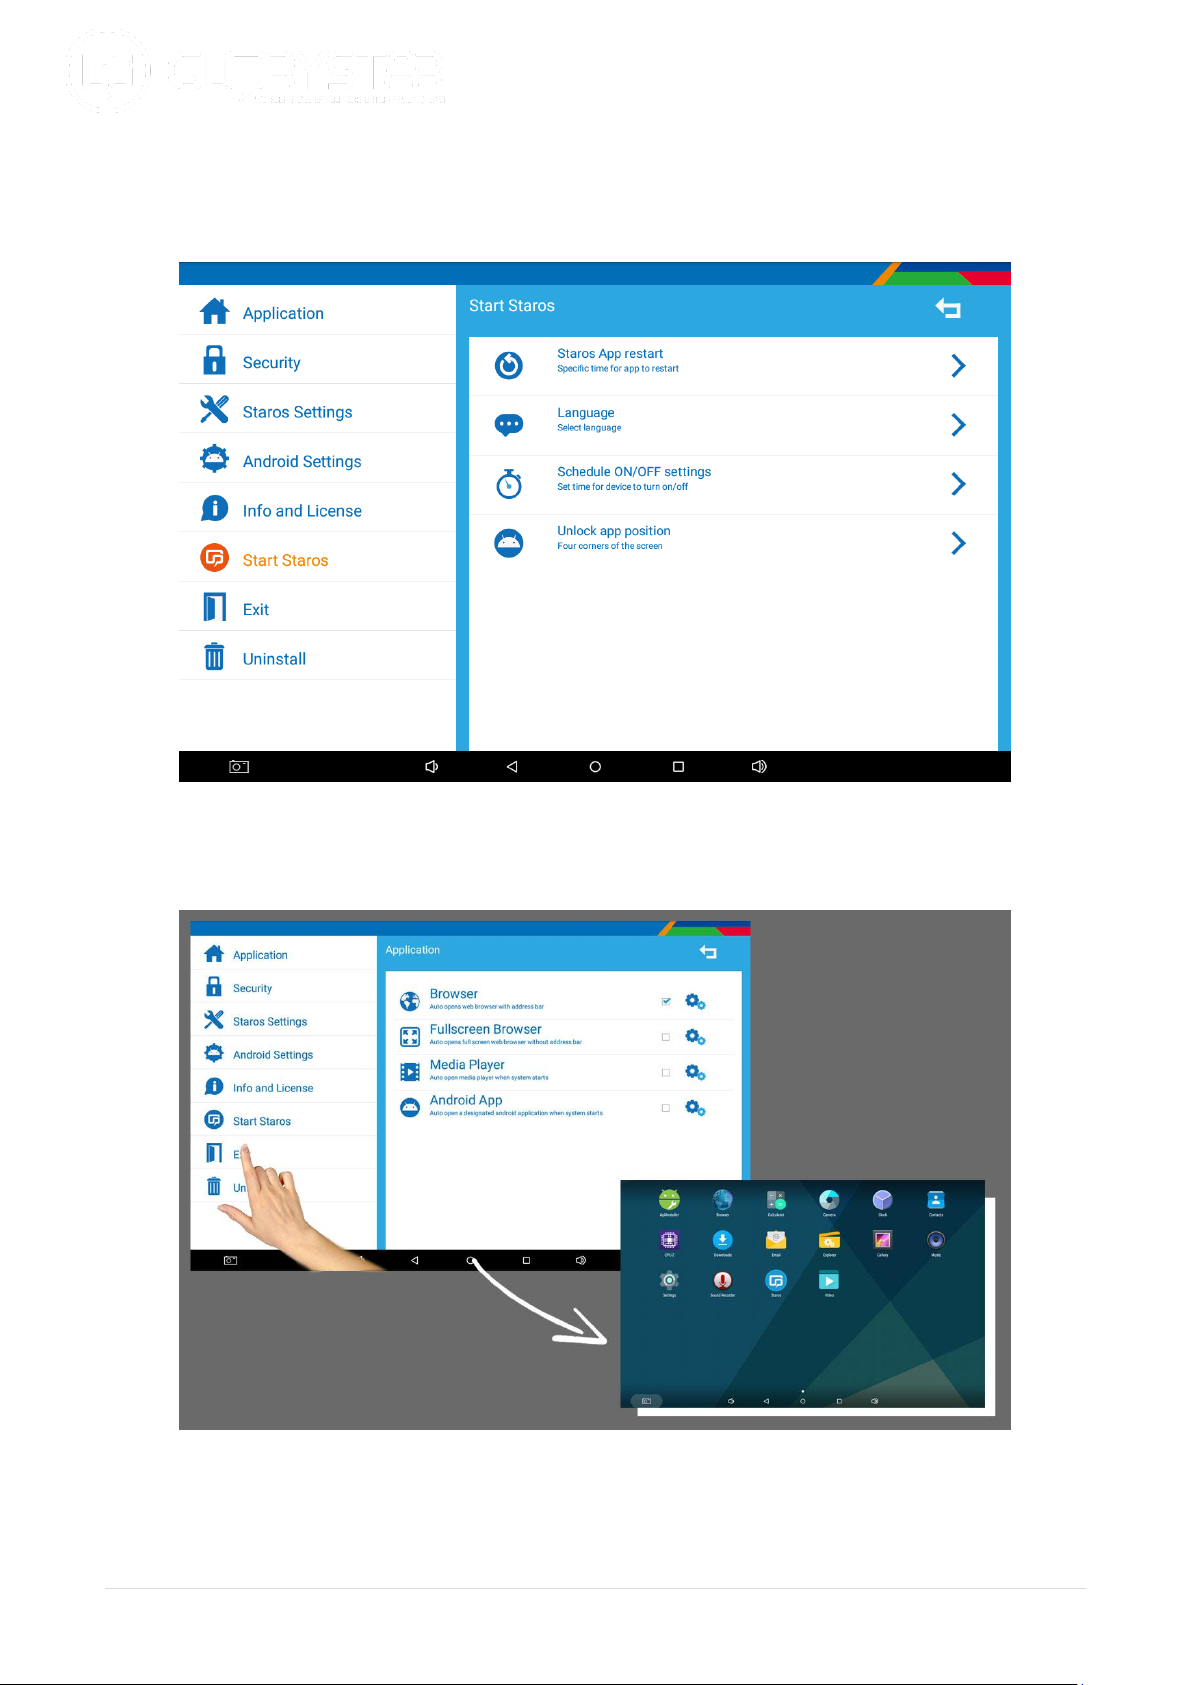
7.0. Start STAROS
Select start STAROS and it will go directly auto start your selected web browser, app or video
contents.
8.0. Exit
Select exit to go back to the desktop of your tablet.
21 |
Page 22
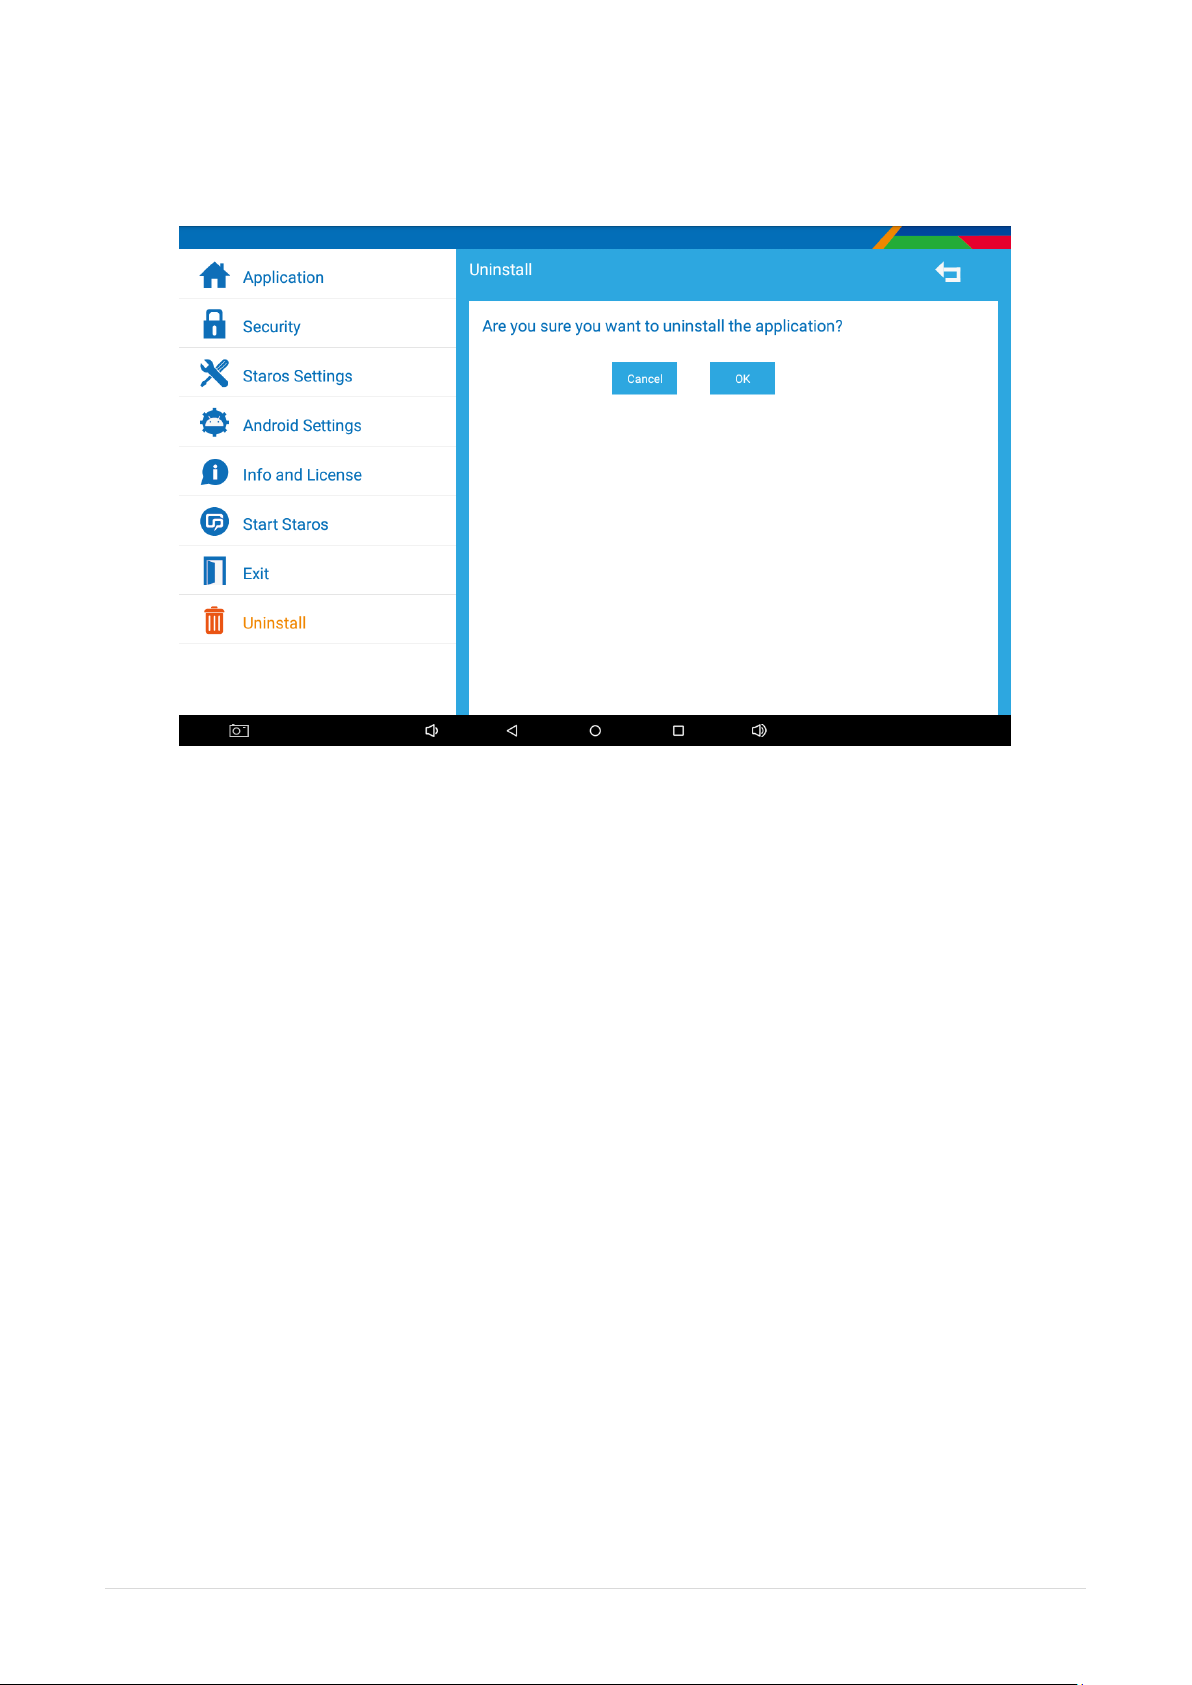
9.0. Uninstall
Select Uninstall and you can choose to uninstall STAROS.
22 |
Page 23
Android Operating System
Using the Android operating system
This section describes parts of the underlying Android operating system that are relevant to using
STAROS on Glory Star Group Limited devices. More important interface elements are described
below:
Applications Menu
On the bottom or the side of the Android home screen, which by default has a light blue
background with scattered lighter colored circles, the applications menu can be accessed by
tapping on the white circular icon with six white smaller squares. The applications menu contains
commonly used Android applications and tools.
The following three applications most relevant to using your in-store POS tablet device are
described below:
STAROS
Opens and runs the STAROS software to play interactive content.
Explorer
A file and folder system management application. Use Explorer to manually manage files to be
played by STAROS, as well as to access other system-specific files such as the STAROS log file.
Settings
Configure the Android operating system settings, such as to turn on and connect to a wireless
network. The following section describes these settings more in-depth.
Configuring the Android operating system settings
Tap on the “settings” icon to configure the following three relevant Android system settings:
Connecting to a wireless network
The preselected item on the left hand settings menu is “WIFI”. To enable wireless connections,
drag the “WIFI” menu item slider to the right to display “ON”. After a few seconds available
wireless networks appear on the right side of the screen. Select a network to configure.
Connecting to a wired network
A wired connection maybe made using a USB to Ethernet adapter. Select “More…” on the Android
23 |
Page 24

settings left hand menu. On the menu to the right, select “Ethernet” and ensure “Use Ethernet” is
checked. Immediately below the “Use Ethernet” option, open “Static IP Settings” to configure your
network’s wired connection settings.
Enable USB Debugging
This setting allows developers to debug their applications. Select “Developer options” on the left
hand menu and then ensure “USB debugging” on the right is checked. Under the “Device”
section on the left side menu, “USB” and then “Connect to PC” also needs to be enabled.
FAQ & Solution
What is the default STAROS password?
- 000000
Where is the license code?
- Please contact [email protected] with your serial number to retrieve your license
code
When STAROS forward to URL, option is enabled, why does the configured website not appear
when I tap the screen?
- Check the program is correct format;
- Make sure the file is not damage;
- Restart the machine;
Why when I have set to auto play the videos, it does not play?
- Is the program is correct format
If the problem cannot be solved, please contact our maintenance staff through
24 |
Page 25

Glory Star Group Limited © All Rights Reserved
25 |
 Loading...