

Page 1
Glooko Transmitter
– Quick guide for diasend® users
Page 2

Page 3

Contents
Find your device .........................................................................................................3-4
How to start using Glooko Transmitter ..................................................................... 5
Plug Glooko Transmitter into your power outlet .........................................................................................................................................5
Glooko Transmitter is ready to use when ......................................................................................................................................................5
Connect diabetes device to Glooko Transmitter .........................................................................................................................................6
Transfer data .......................................................................................................................................................................................................6
Log in to your diasend® Clinic account............................................................................................................................................................6
Viewing the data .................................................................................................................................................................................................7
Creating a patient prole and saving diabetes devices..............................................................................................................................7
Displaying the data from the diabetes devices ............................................................................................................................................8
Sharing the data .................................................................................................................................................................................................9
Invite patients to upload from home .............................................................................................................................................................9
Creating reports and printing as PDF .............................................................................................................................................................9
Explanation of Glooko Transmitter ..............................................................................................................................................................10
List of compatible devices .........................................................................................11
2
Page 4

Find your device
Glucose meter CGM Insulin pump Insulin pen
Abbott
FreeSt yle .......................................................................................................11
FreeStyle Flash .............................................................................................11
FreeStyle Freedom ..................................................................................... 11
FreeStyle Freedom Lite ............................................................................ 11
FreeSt yle InsuLinx ...................................................................................... 11
FreeStyle Lite ................................................................................................ 11
Freest yle Mini ...............................................................................................11
FreeSty le Optium ........................................................................................ 11
FreeSt yle Optium H .................................................................................... 11
FreeSt yle Optium Neo .............................................................................. 11
FreeStyle Papillon ....................................................................................... 11
FreeSt yle Papillon InsuLinx .................................................................... 11
FreeStyle Papillon L ite ..............................................................................11
FreeStyle Papillon Mini ............................................................................. 11
FreeSt yle Papillon Vision ......................................................................... 11
FreeStyle Precision ..................................................................................... 11
FreeStyle Precision H ................................................................................ 11
FreeStyle Xido .............................................................................................. 11
Optium Mini .................................................................................................. 11
Optium Xcee d ..............................................................................................11
Optium Xido .................................................................................................. 11
Precision Xceed ........................................................................................... 11
Precision Xtra ............................................................................................... 11
FreeSt yle Libre ............................................................................................. 11
FreeStyle Nav igator II ................................................................................ 11
Acon Laboratories
On Call® Advance d ..................................................................................... 12
On Call® Plus ................................................................................................. 12
On Call® Resolve .......................................................................................... 12
On Call® Vivid ................................................................................................ 12
AgaMatrix
Wave Sense Jaz z™ .......................................................................................12
WaveSens e Keynote ................................................................................. 12
Animas
IR1200 ............................................................................................................. 19
IR1250 ............................................................................................................. 19
2020 ..................................................................................................................19
OneTouch Ping............................................................................................. 19
OneTouch Vib e Plus ...................................................................................19
Vibe .................................................................................................................. 19
Apex Bio
GlucoSur e Extra........................................................................................... 12
GlucoSure Max ............................................................................................. 12
Arkray
GlucoC ard 01 ................................................................................................12
GlucoCard Expres sion ..............................................................................12
GlucoCard Shine ......................................................................................... 12
GlucoCard Vital ............................................................................................ 12
GlucoCard X- meter .....................................................................................12
GlucoCard X- mini plus ..............................................................................12
Relion Conrm ............................................................................................. 12
Relion Prime ................................................................................................. 12
Ascensia (Bayer)
Bre eze 2 ..........................................................................................................12
Contour...........................................................................................................12
Contour link................................................................................................... 12
Contour next ................................................................................................. 12
Contour nex t link .........................................................................................12
Contour nex t link 2.4 ..................................................................................12
Contour nex t one ........................................................................................12
Contour nex t USB .......................................................................................12
Contour plus one ........................................................................................ 12
Contour TS ....................................................................................................12
Contour XT ....................................................................................................12
Contour USB .................................................................................................12
Beurer
GL50 evo......................................................................................................... 13
B. Braun
Omnites t 5 .....................................................................................................13
Cambridge Sensors
Microdot+ ....................................................................................................... 13
Biosev en Linea D ORO ............................................................................. 13
Dexcom
G4 Pla tinum ..................................................................................................13
G5 rece iver .....................................................................................................13
Touchscreen receiver G5/G6 ..................................................................13
SEVEN PLUS .................................................................................................. 13
Diatesse
XPER .................................................................................................................13
ForaCare
FORA Diamond Prima ............................................................................... 13
GE
GE100 .............................................................................................................. 13
GlucoRx
HCT & Ke tone ...............................................................................................13
Nexus ............................................................................................................... 13
Nexus Mini ..................................................................................................... 13
Ne xus Mini Ultra ..................................................................................... 13
Nex us Voice ................................................................................................... 14
Q .................................................................................................................. 13
iCare
PalmDoc I....................................................................................................... 14
PalmDoc II ..................................................................................................... 14
Infopia
Element .......................................................................................................... 14
Finetest L ite...................................................................................................14
GlucoLab ........................................................................................................ 14
GluNEO ........................................................................................................... 14
Insulet
OmniPod ........................................................................................................ 19
OmniPod Dash.............................................................................................19
i-SENS
alphacheck professional NFC/ACURA PLUS .................................... 14
alphacheck professional .......................................................................... 14
COOL/Bravo ................................................................................................. 14
CareSens B GMS/TEE2 .............................................................................. 14
CareSen s N ....................................................................................................14
CareSen s N POP .......................................................................................... 14
CareSens N Voice ........................................................................................ 14
Inside Biometrics
KE YA Sma rt ................................................................................................... 14
3
Page 5

LifeScan
OneTouch Ping..............................................................................................14
OneTouch Select ......................................................................................... 15
OneTouch Select Plus ............................................................................... 14
OneTouch Sele ct Plus Flex ...................................................................... 14
OneTouch Ultra ...........................................................................................15
OneTouch Ultra2 .........................................................................................15
OneTouch UltraEasy ..................................................................................15
OneTouch UltraMini ................................................................................... 15
OneTouch UltraSmart ............................................................................... 15
OneTouch Verio .......................................................................................... 14
OneTouch Verio (old ) .................................................................................15
OneTouch Verio F lex .................................................................................. 14
OneTouch Verio I Q ......................................................................................14
OneTouch Verio Pr o ...................................................................................15
OneTouch Verio Sy nc .................................................................................15
OneTouch Vita ..............................................................................................15
Medcore
Care .................................................................................................................. 15
GlucoSure E xtra...........................................................................................15
GlucoSure Max ............................................................................................. 15
Menarini
GLUCO CARD MX .......................................................................................... 15
GLUCOCARD SM .......................................................................................... 16
GLUCOF IX iD .................................................................................................15
GLUCOFIX miò ..............................................................................................16
GLUCOFIX miò Plus .................................................................................... 16
GLUCOFIX Premium ................................................................................... 16
GLU COFIX TECH .......................................................................................... 15
GlucoMen areo ............................................................................................15
GlucoMen are o 2K ......................................................................................15
GlucoMen G+ ................................................................................................ 16
GlucoMen Gm ..............................................................................................15
GlucoMen LX ................................................................................................. 16
GlucoMen LX2 .............................................................................................. 16
GlucoMen L X Plus ....................................................................................... 16
GlucoMen READY ........................................................................................ 15
GlucoMen Visio ............................................................................................ 15
Mendor
Discreet ........................................................................................................... 16
Roche
Accu-Chek Active ........................................................................................ 16
Accu- Chek Aviva ......................................................................................... 18
Accu- Chek Aviva Combo.......................................................................... 18
Accu- Chek Aviva Connec t .......................................................................16
Accu- Chek Aviva Exp ert ........................................................................... 18
Accu-Chek Compac t ................................................................................. 18
Accu- Chek Compact Plus ........................................................................ 18
Accu-Chek Guide ........................................................................................ 16
Accu-Ch ek Instant ...................................................................................... 16
Accu- Chek Instant S ................................................................................... 16
Accu- Chek Mobile (IR) ............................................................................... 18
Accu- Chek Mobile (USB)........................................................................... 16
Accu-Chek Nano ......................................................................................... 18
Accu- Chek Performa Co nnect ............................................................... 16
Accu-Chek Insight ....................................................................................... 20
Accu-Chek Spirit ..........................................................................................20
Accu-Chek Spirit Combo..........................................................................20
Sano
BGStar ............................................................................................................. 17
MyStar Extra ................................................................................................. 17
Senseonics
Eversense CGM Transmitter .................................................................... 17
Smiths Medical
CoZ mo 17 00 .................................................................................................. 19
Tandem
t:ex ................................................................................................................. 19
t:slim ................................................................................................................ 19
t:slim X2 .......................................................................................................... 19
t:slim G 4 ..........................................................................................................19
Terumo
Finetouch ....................................................................................................... 17
Nipro
4SURE Smar t ............................................................................................... 16
4SURE Smar t Duo .......................................................................................16
TRUE METRI X ...............................................................................................16
TRUE METRIX AIR ........................................................................................ 16
TRUEresult ..................................................................................................... 16
TRUEyou ........................................................................................................ 16
TRUEyou mini ............................................................................................... 16
Nova
Max Link .......................................................................................................... 16
Max Plus .......................................................................................................... 16
NovoNordisk
NovoPen 6 ..................................................................................................... 21
NovoPen EchoPlus .....................................................................................21
Pendiq
pendiq ............................................................................................................. 21
Pic Solution
Pic Gluco Test ............................................................................................... 16
Prodigy
AutoCode ....................................................................................................... 16
ViCentra
Kaleido ............................................................................................................ 19
VivaChek
Fad .................................................................................................................... 17
Wellion
Calla Dialog ................................................................................................... 17
Calla Light ...................................................................................................... 17
Calla Mini ........................................................................................................ 17
Calla Premium ............................................................................................. 17
Galileo GLU/CHOL ...................................................................................... 17
Leonardo GLU/CHOL ..................................................................................17
Galileo GLU/KET .......................................................................................... 17
Leonardo GLU/KET .....................................................................................17
Linus ................................................................................................................ 17
Ypsomed
mylife Pur a ....................................................................................................17
mylife Unio .................................................................................................... 17
mylife OmniPod...........................................................................................19
4
Page 6
Glooko Transmitter
Quick guide for diasend® users
diasend® oers health care providers an online solution that collects and stores all their diabetes
patients’ data centrally, without worrying about any soware installation. No matter if the
device transmits using a cable, Bluetooth, infrared or a mobile app, all uploaded information will
immediately be shown online in a secure diasend.com account. All data from multiple devices will
be consolidated and presented in one report.
How to start using Glooko Transmitter
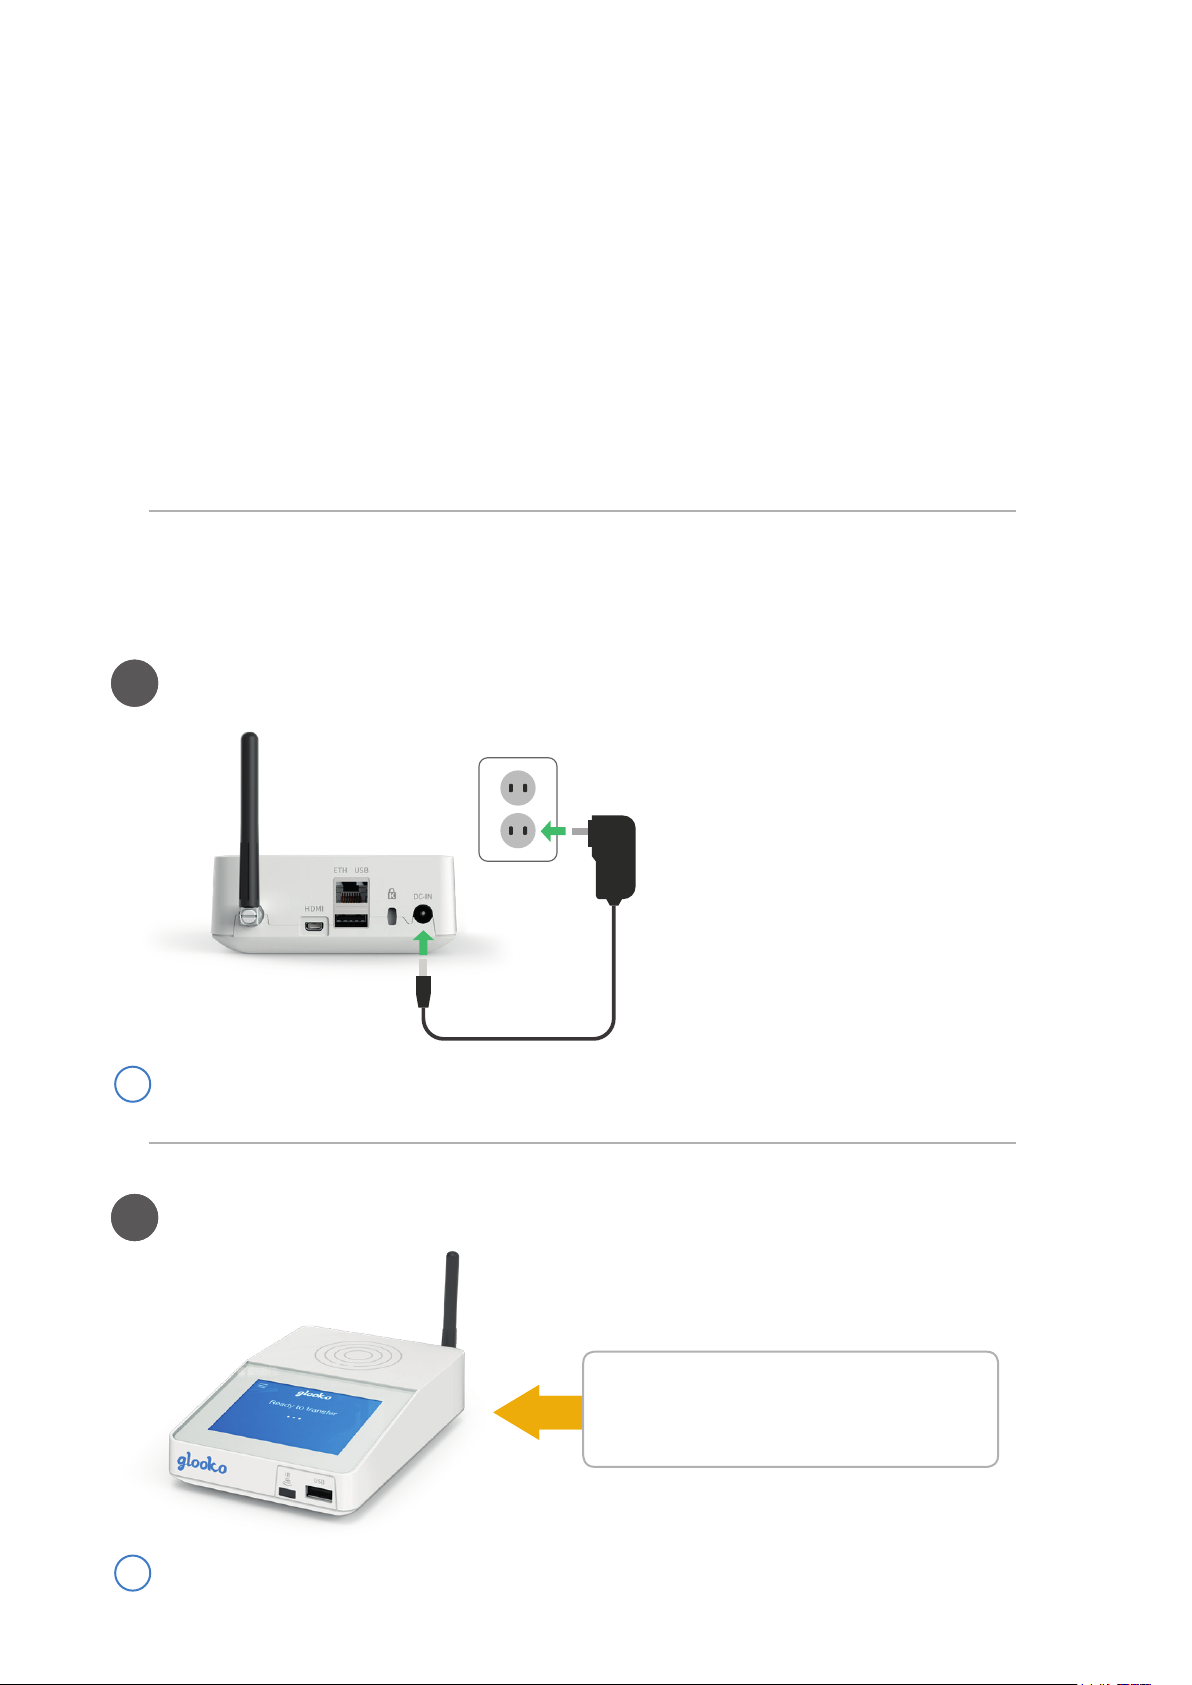
Plug Glooko Transmitter into your power outlet
1
1
Note: if you want to want to connect Glooko Transmitter to the Internet using Ether-
i
net (instead of the built-in cellular conne ction). Plug in the Ethernet cable and and
Glooko Transmitter will congure itself, for furthe r instructions see page 10.
Glooko Transmitter is ready to use when:
2
2
Note: If you have a USB hub connected to glooko® Transmitter,
i
the USB hub must be powered by its own power supply.
The display on Glooko Transmitter says:
”Ready to transfer”
5
Page 7
Connect a diabetes device to Glooko Transmitter
3
3
Upload data
4
4
IR
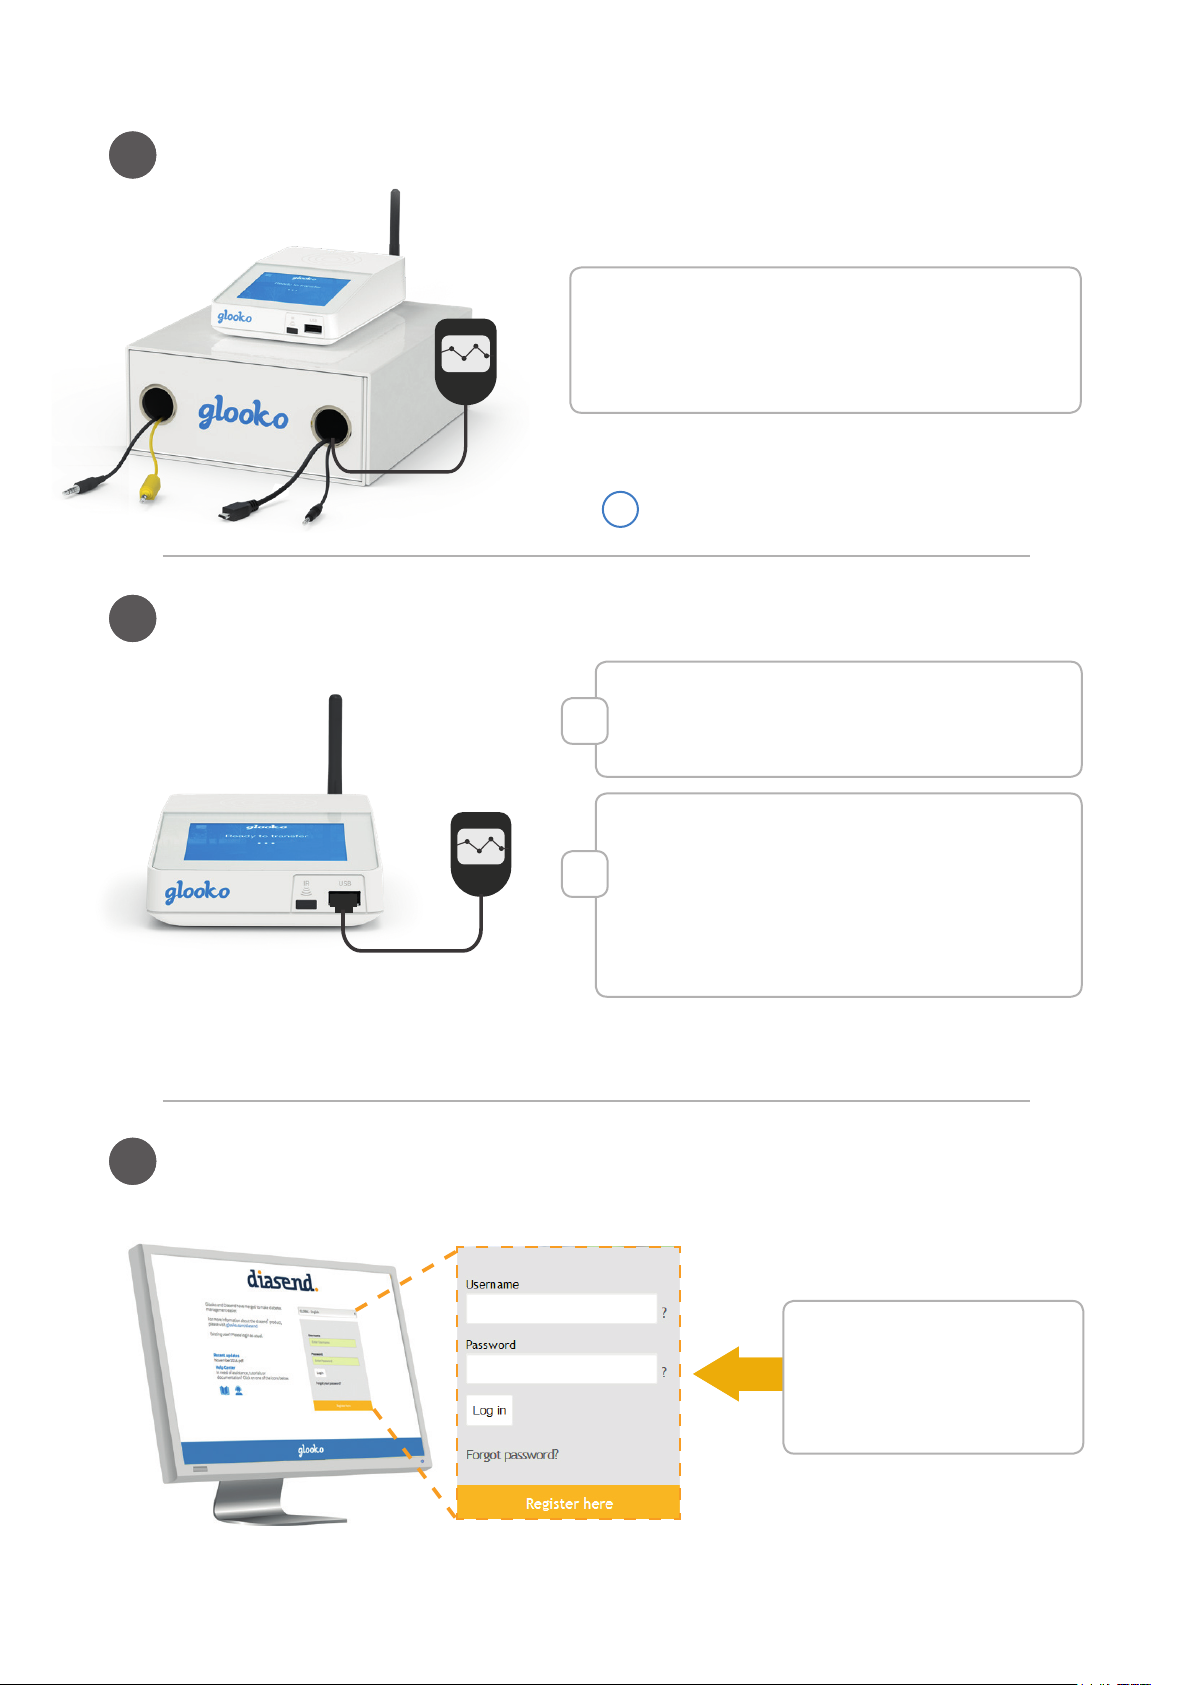
Each diabetes device connects in one of the following two manners:
• USB cable (USB port or USB hub)
• Infrared (built-in IR receiver or for some devices a SmartPix cable).
Please see page 11 of this guide for sp ecic instructions on how to
i
upload all compat ible diabetes devices.
Follow the instructions on the screen to upload data.
1
Once you have successfully uploaded a device, you can
log in and view the data at www.diasend.com or continue
uploading more diabetes devices.
2
Click Reload page if you were already logged in. Please
note that since diasend® is cloud-based, you can review
the uploaded data at any time.
5
5
Log in to your diasend® Clinic account
Go to www.diasend.com and
log in to your account. Once you
are logged in, you will be able to
retrieve the uploaded data.
6
Page 8
Viewing the data
6
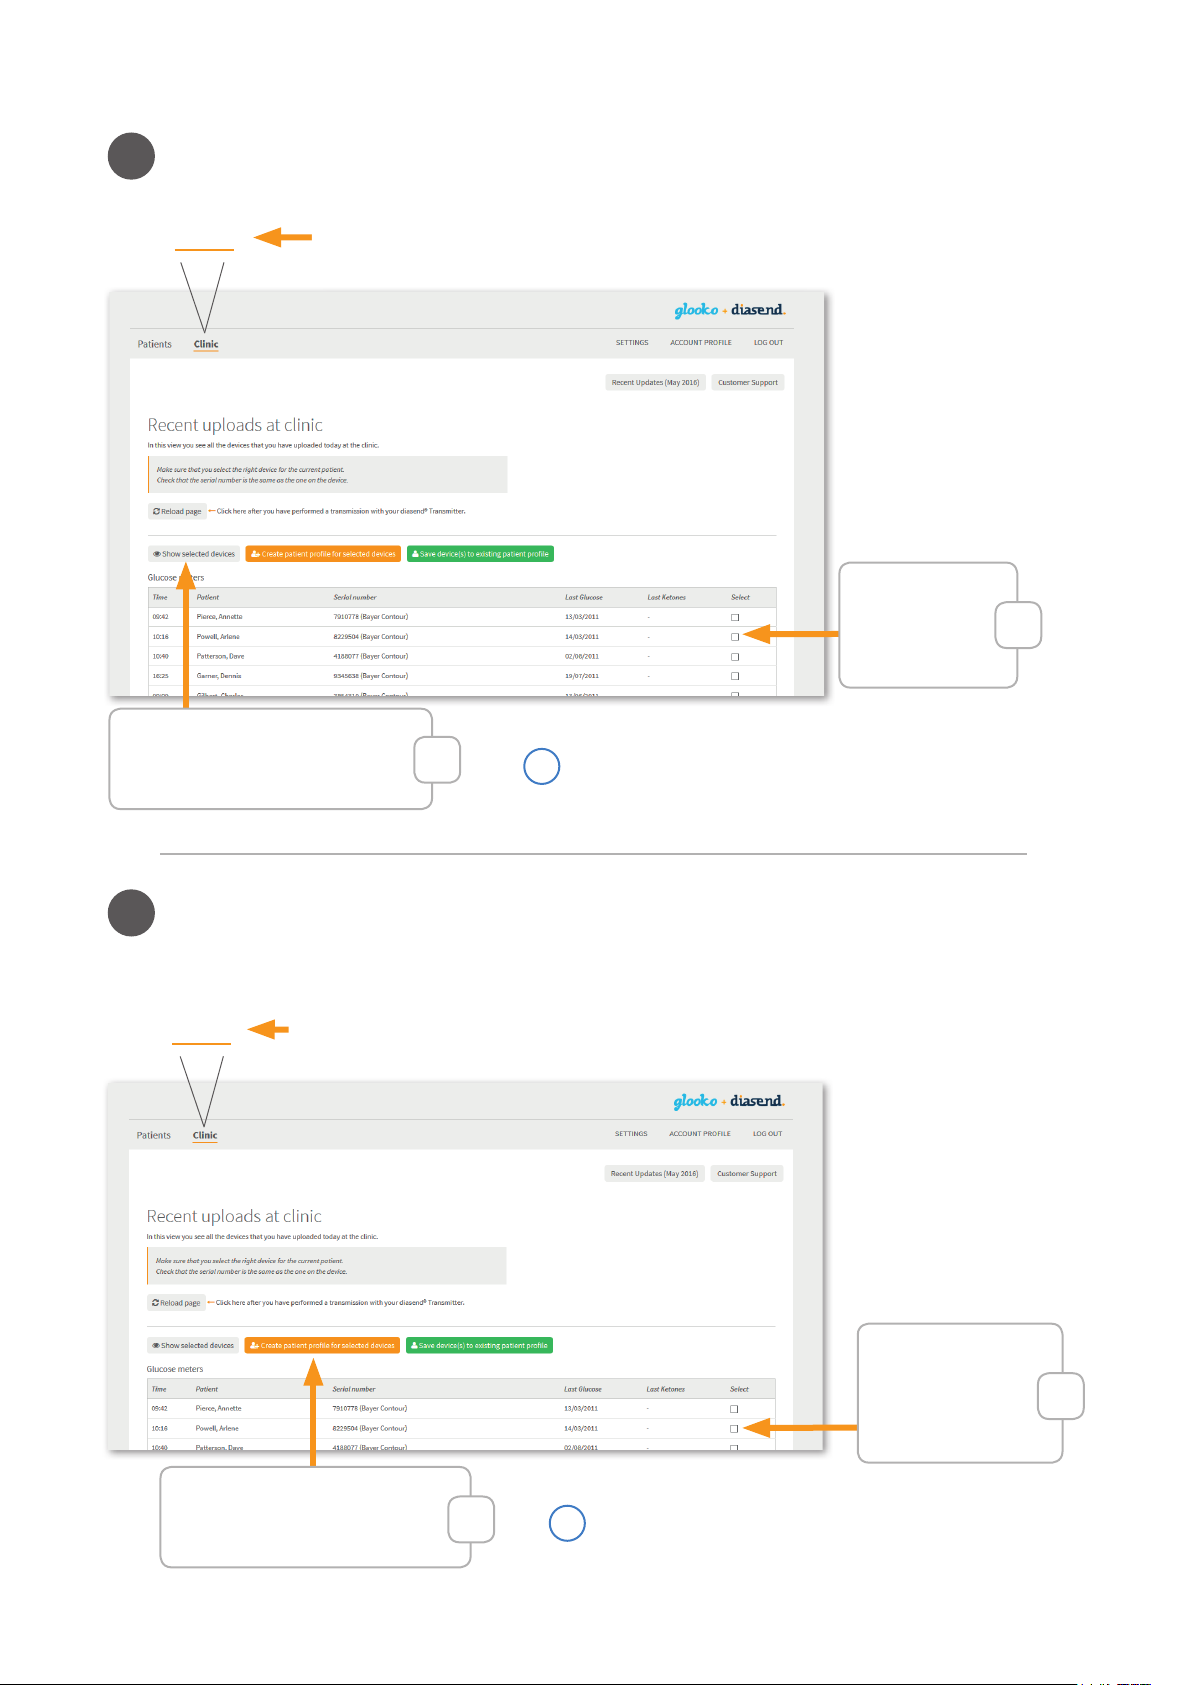
Clinic
Click on Show selected devices to
view the upload.
In the clinic tab it’s possible to view the data without
creating a patient prole.
Tick the box of
the upload you
wish to view.
2
Please note that all uploads are removed from the Clinic
i
view aer midnight the same day, but no data is erased.
1
Creating a patient prole and saving diabetes devices
7
There are two ways to create a patient prole. In the Clinic tab and in the patient tab.
Clinic
How to create a patient prole in the clinic tab:
Tick the box of the
upload you wish
to create a patient
prole for.
1
Click here to create a patient
prole for the selected device.
2
We recommend this method of registerering devices to a
patient, in order to avoid registering the diabetes device
i
manually in the patient tab.
7
Page 9
Continued from previous page
Patients
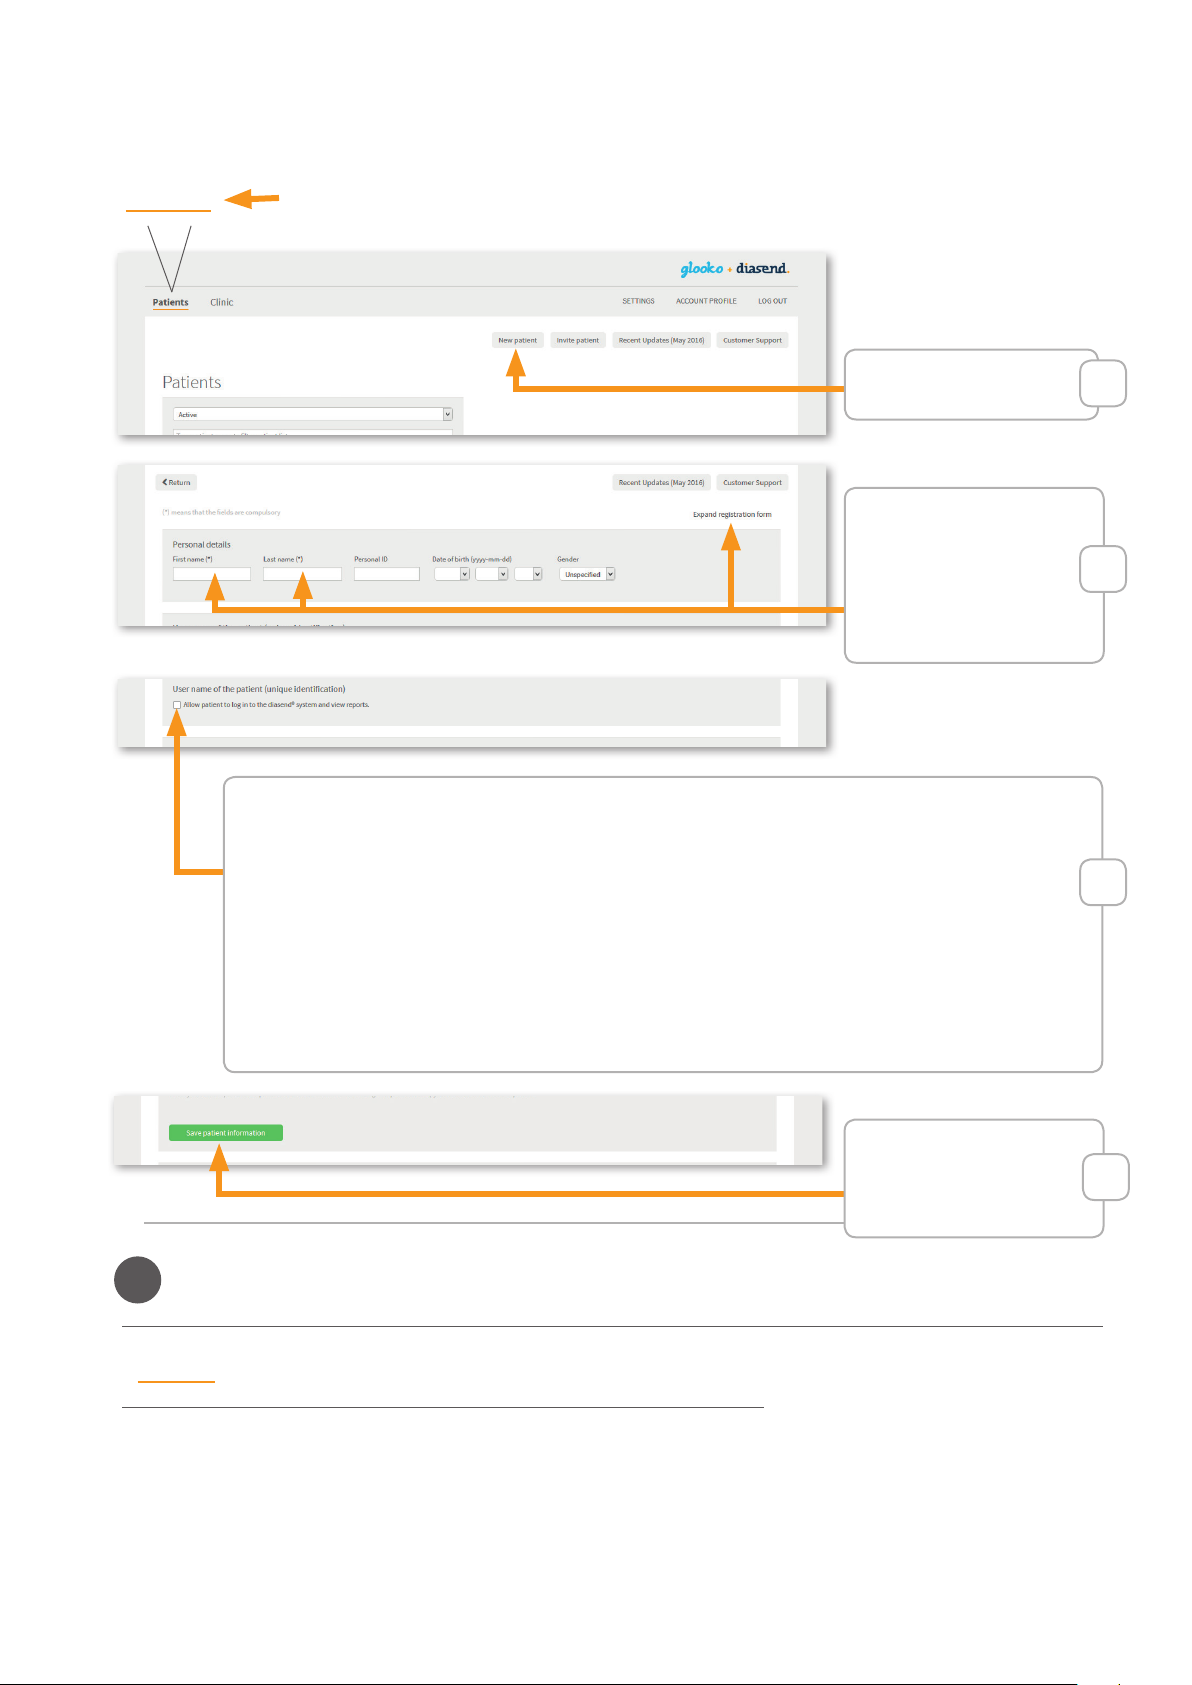
How to create a patient prole in the patient tab:
Click on New patient.
The mandatory elds
are rst and last names.
You will nd further
options under Expand
registration form.
1
2
To allow a patient to view their data from home, tick the box:
”Allow patient to log in to the diasend® system and view reports”
• If you do this in the registration process you will have to create a username and a password for the
patient.
• If you tick the box aer you have created a patient account, you will notice that diasend® has created a
username for you. In this case, you only need to create a password.
Please note that this only allows the patient to lo g in and view previously uploade d data. It does however not mean that a patient can
log in and upload data from home. If patients want to upload data from home they nee d to create their own diasend® Personal account
and share their data with the clinic .
Displaying the data from the diabetes devices
8
Glucose CGM Insulin Comparison Compilation
When you’re done click on:
”Save patient information”.
3
4
The data is displayed in the ve tabs above, where you can access the glucose, CGM and insulin data. Please refer
to the diasend® Report reference guide on our website for further details on our reports.
8
Page 10
Sharing the data
9
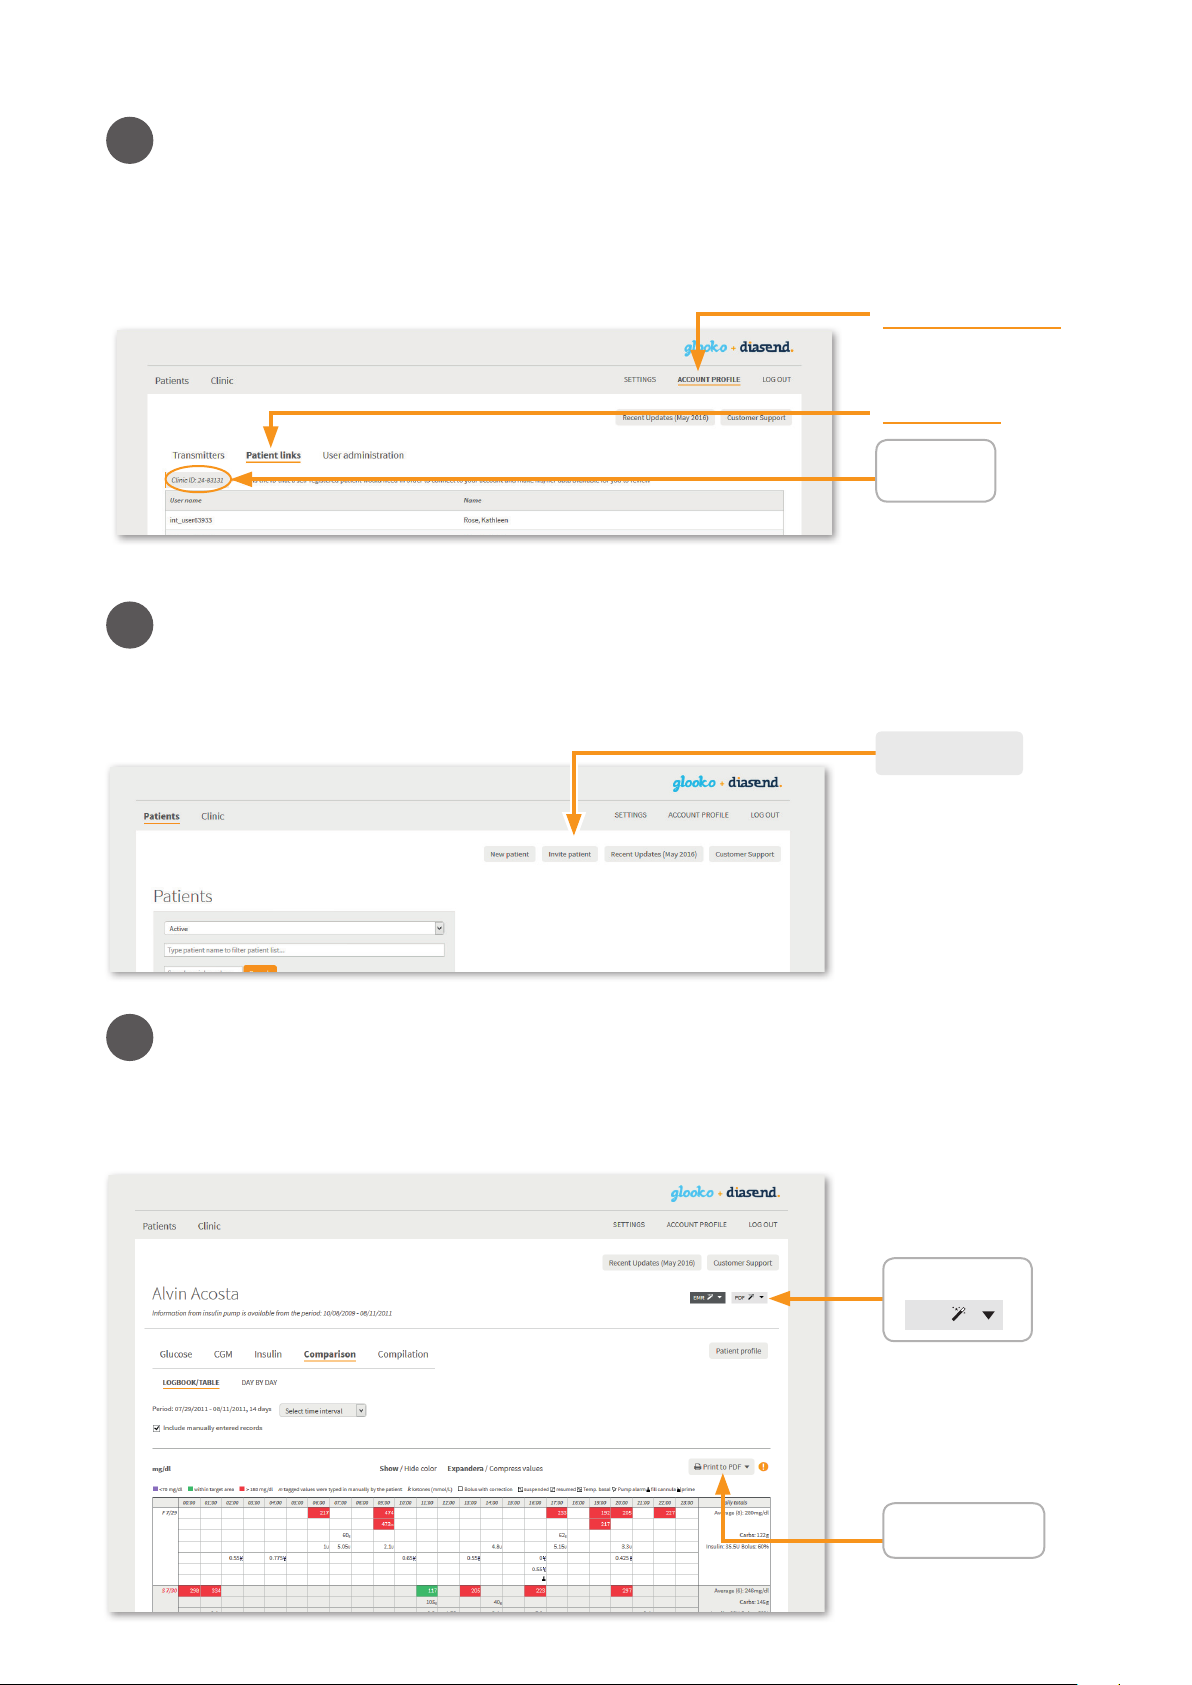
Patients with their own diasend® Personal account can upload their diabetes devices at home, and they can
share their uploaded data with up to two dierent healthcare facilities. To enable patients to share their data
with you, they will require your unique identier in diasend® called “Clinic ID”. You will nd it under “Account
prole” > “Patient links”.
ACCOUNT PROFILE
Patient links
Clinic ID
10
11
There are two ways to generate a report as a pdf. You can either click the “Print to PDF” icon to immediately generate a report of
the current view. Or you can click the PDF Wizard button to generate a report with preset variables. You can adjust this tool under
“Settings”.
Invite patients to upload from home
To make it easier for clinics and patients to share data we’ve added an invite button in the web application. This
means clinics can invite patients to upload data from home.
Invite patient
Creating reports and printing as PDF
PDF Wizard
PDF
Print to PDF
9
Page 11
Explanation of Glooko Transmitter:
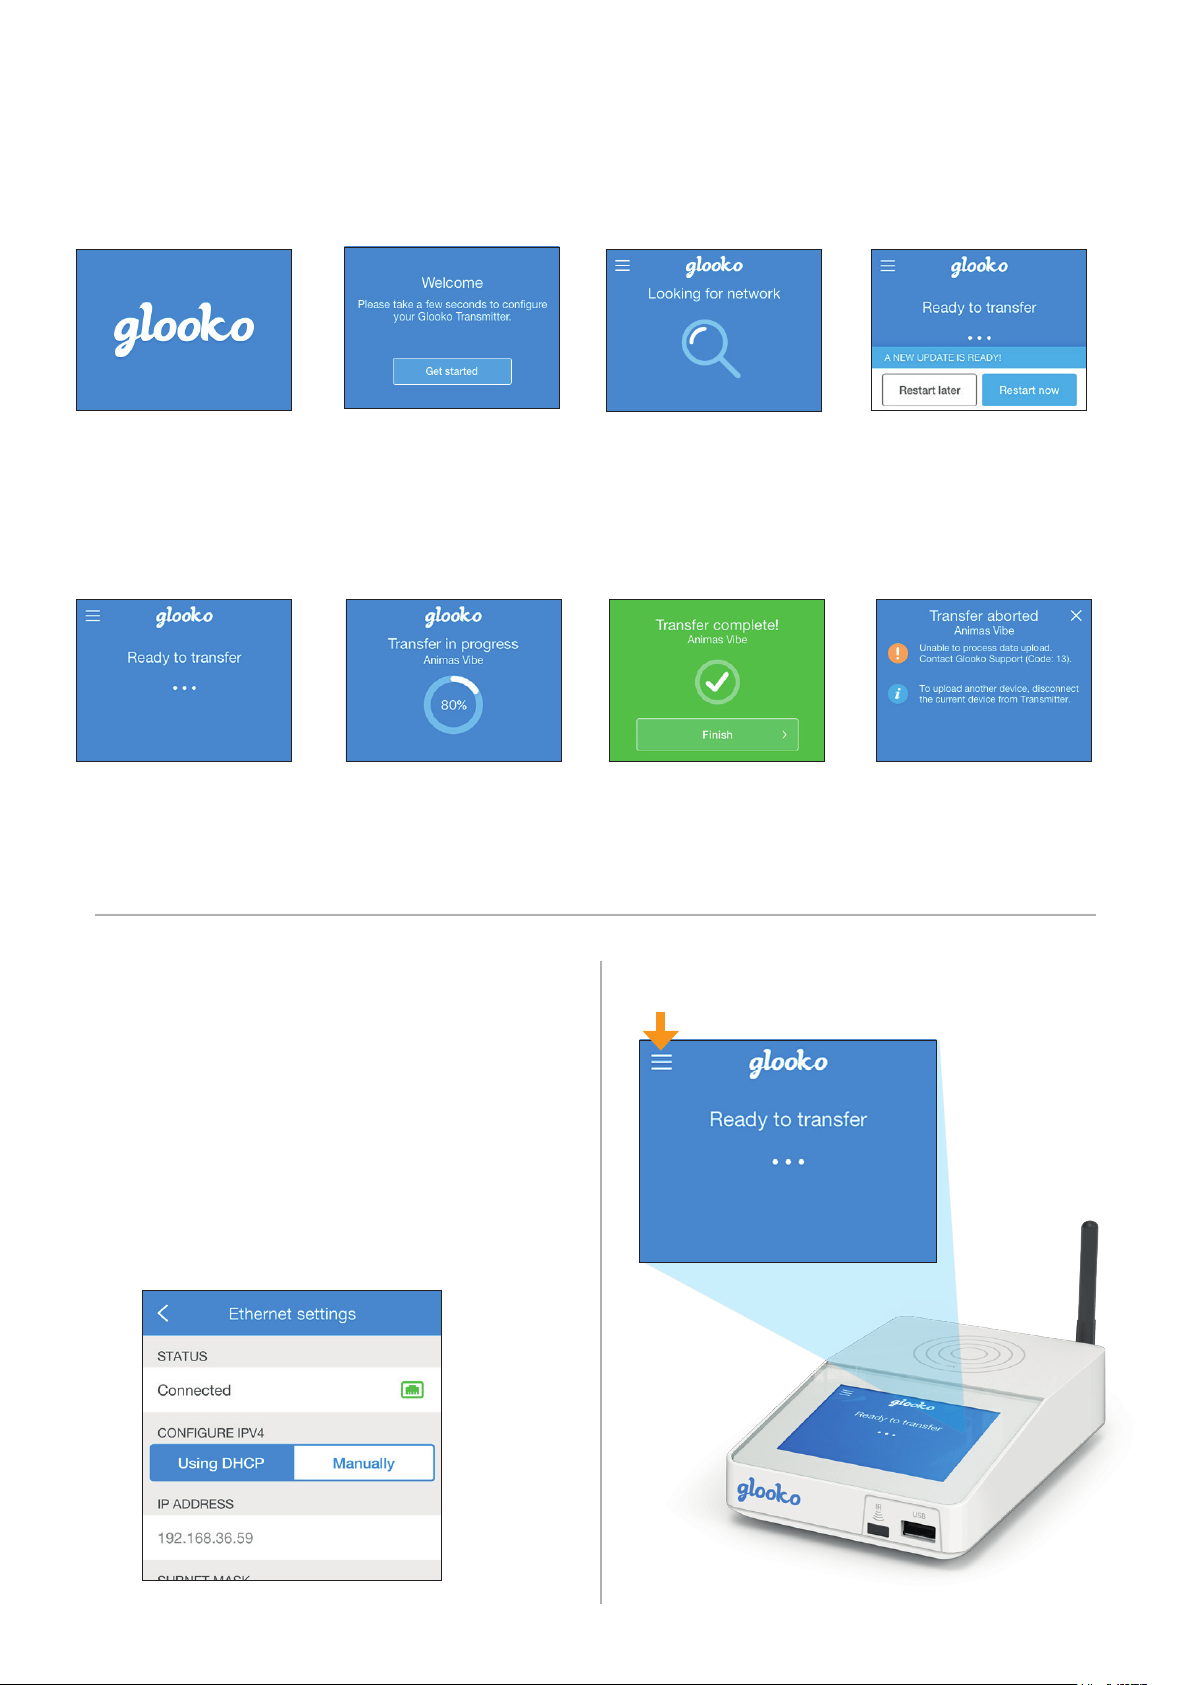
Starting up Glooko Transmitter
Glooko Transmitter is
powering up.
At startup Glooko Transmitter
might ask for additional
conguration. Please follow the
instructions on screen.
Uploading a device
The start up was successful. You
can now connect a device.
The upload process will begin
shortly aer a device has be en
connected.
Ethernet setup
When connecting an Ethernet cable, Glooko Transmitter
will automatically try to connect to the Internet via
Ethernet.
Please wait until a network
is found.
The upload process was sucessful.
Log into your diasend® account at
www.diasend.com to
view the data.
More functions are available
by tapping the menu icon.
If an update is ready, you can
choose to restart immediately.
Otherwise Glooko Transmitter
will update automatically aer 10
hours.
If the upload process was
unsuccessful you will be notied.
Please follow the instructions on
screen.
If you want to congure the Ethernet connection manually
or read the MAC address, please go to:
Menu > Settings > Network settings > Ethernet settings
If the congured Ethernet network is not available, Glooko
Transmitter will automatically revert to cellular connection.
10
Page 12
List of compatible devices
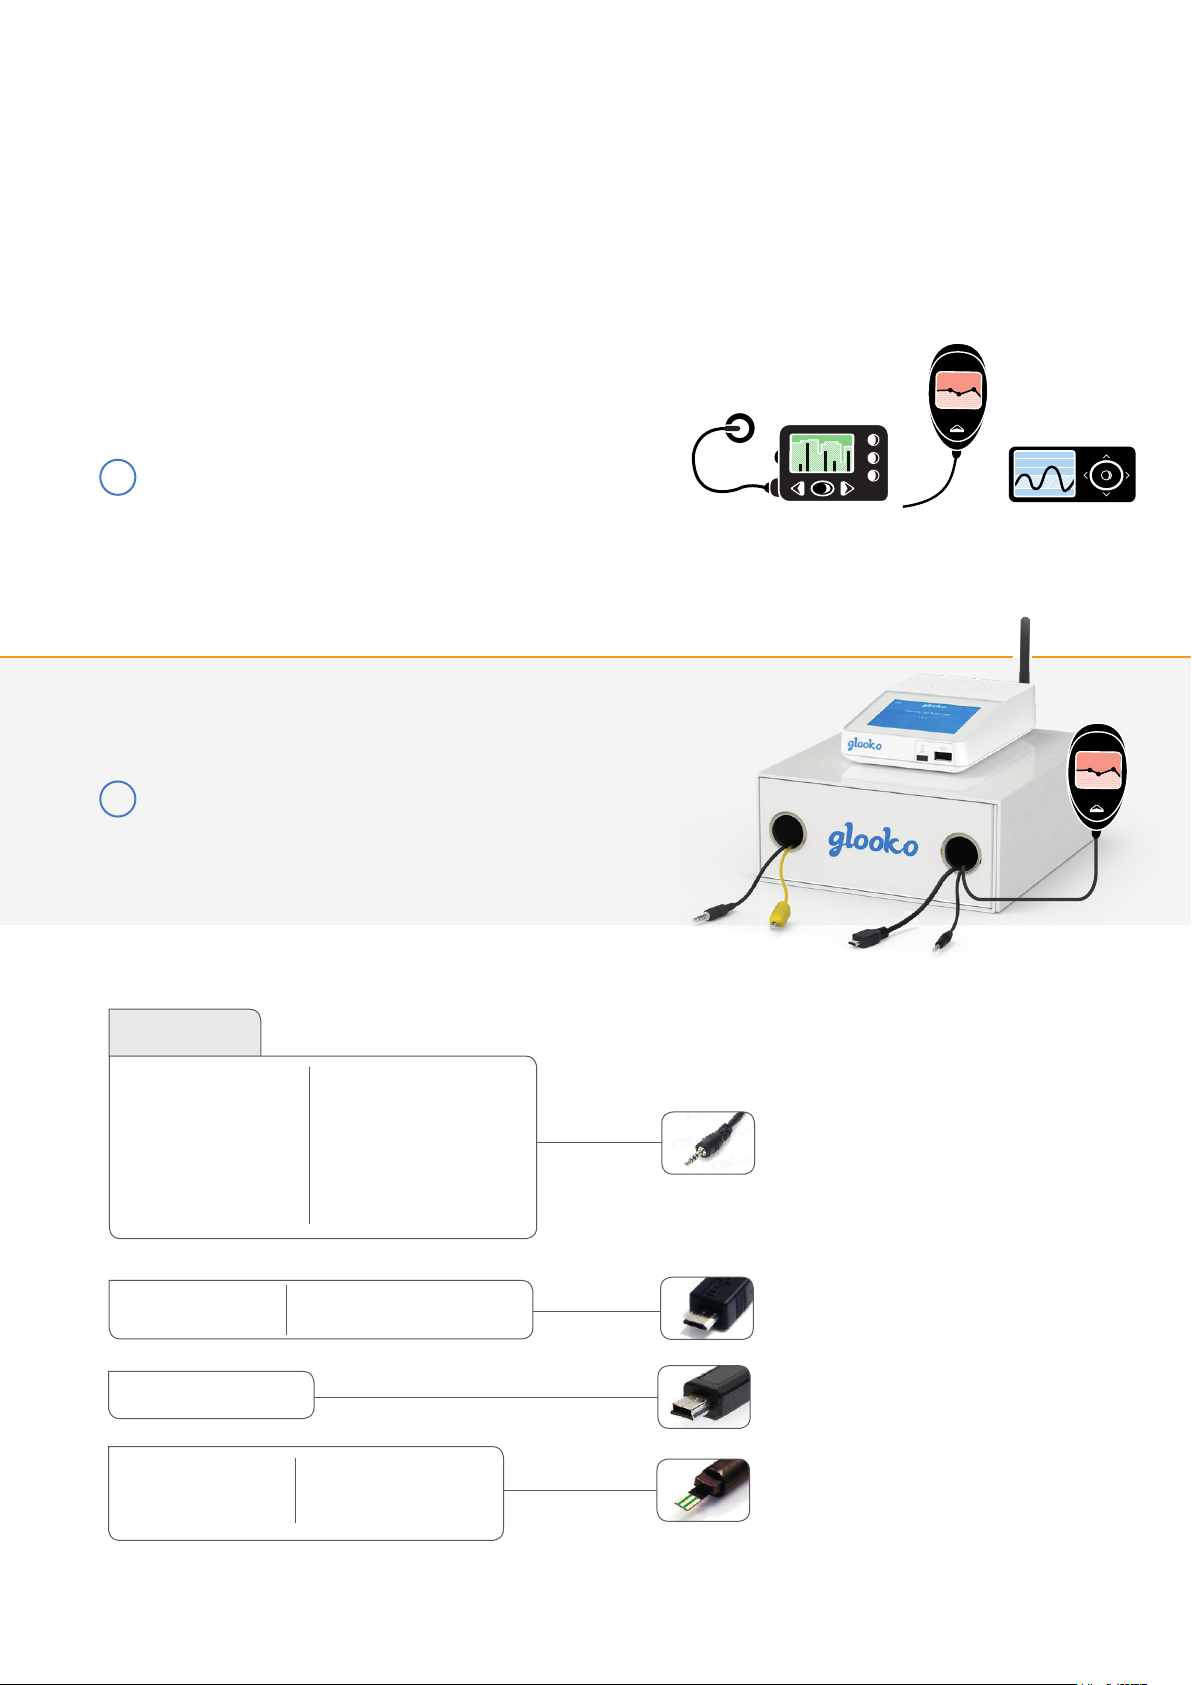
Below is a list of compatible devices with diasend®. Unless explicit
upload instructions are provided for the actual device, you simply
need to connect it to Glooko Transmitter or USB hub with its specic
USB cable or via IR and it will upload automatically. (Visit diasend.com
to see a current list of compatible devices and known limitations.)
Please note that some of the following diabetes devices
i
may not be available in your market.
Glucose meters and CGMs - connected with USB cable
Note: If you have a USB hub connected to glooko® Transmitter,
i
the USB hub must be powered by its own power supply.
Insulin pumps
Glucose meters
CGM devices
Abbott
FreeStyle
FreeSt yle Flash
FreeStyle Freedom
FreeStyle Freedom Lite
FreeStyle Lite
Freestyle Mini
FreeStyle Optium
FreeStyle InsuLinx
FreeStyle Libre
FreeStyle Navigator II
FreeStyle Precision
FreeStyle Precision H
Optium Xceed
FreeStyle Optium H
FreeStyle Papillon
FreeStyle Papillon Lite
FreeStyle Papillon Mini
FreeStyle Papillon Vision
FreeStyle Xido
Optium Mini
FreeStyle Optium Neo
FreeStyle Papillon InsuLinx
Optium Xido
Precision Xceed
Precision Xtra
Abbot t FreeSty le USB
cable
(2.5 mm)
Micro USB
Mini USB
Abbott Xce ed USB cable
11
Page 13
Continued from previous page
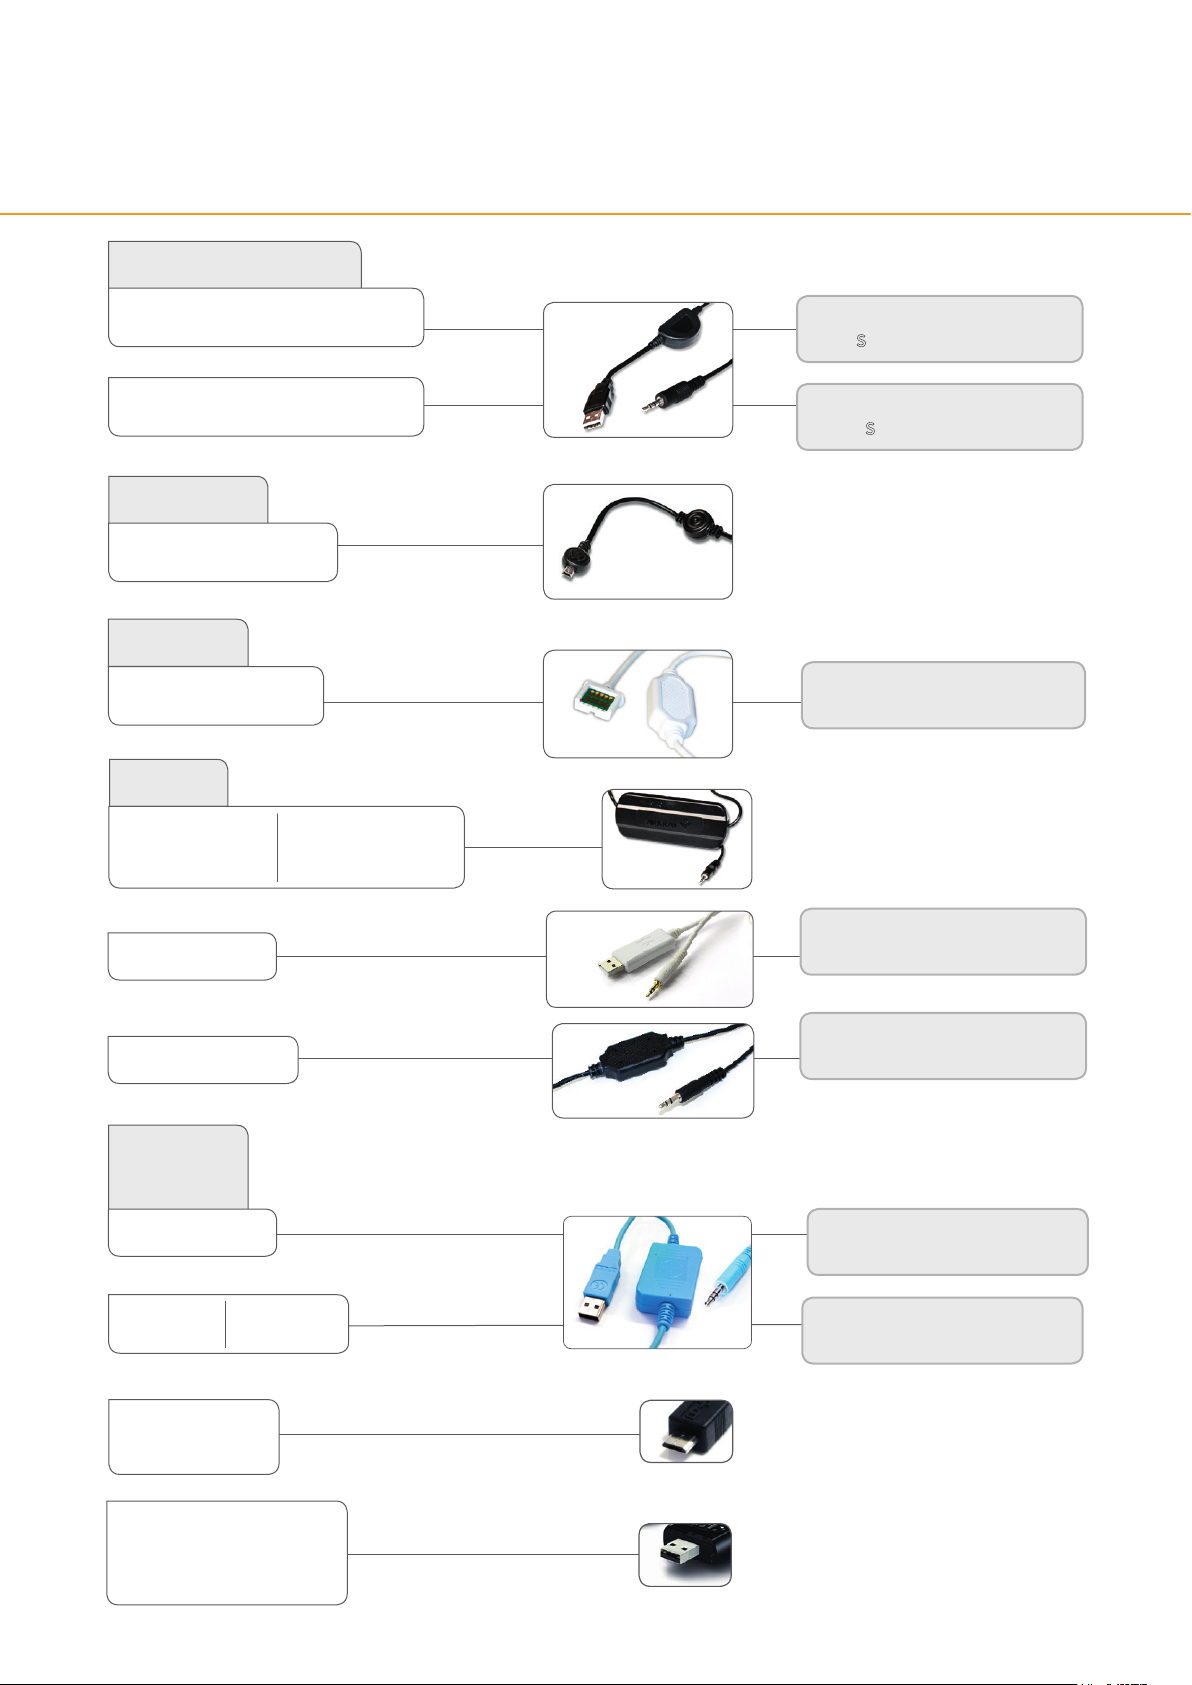
Glucose meters and CGMs - connected with USB cable
Acon Laboratories
On Call® Resolve
On Call® Advanced
On Call® Plus
On Call® Vivid
AgaMatrix
WaveSense Jazz™
WaveSense Keynote
Apex Bio
GlucoSure Extra
GlucoSure Max
Arkray
Glucocard 01
Glucocard Vital
Glucocard X-meter
Glucocard X-mini plus
Relion Conrm
Relion Prime
On Call USB cable
(2.5 mm)
On Call USB cable
(2.5 mm)
AgaMatrix USB cable
Apex Bio USB cable
Arkray
USB cable
(2.5 mm)
Connect and press the meter’s
M and S buttons.
Connect and press and hold the
meter’s S button.
portant l'inscription W
Connect and press the meter’s
power button.
Glucocard Shine
Glucocard Expression
Ascensia
(Bayer)
Breeze 2
Contour
Contour Link
Contour Next
Contour Next One
Contour Plus One
Contour Next Link
Contour Next Link 2.4
Contour USB
Contour Next USB
Contour TS
Contour XT
i-Sens USB cable
(2.5 mm)
Medcore Ca re + GlucoCard
Expre ssion USB cabl e (3.5 mm)
Bayer’s blue USB cable (3 .5 mm)
Bayer’s blue USB cable (3 .5 mm)
USB por t on meter
Connect and press any button.
Connect and select PC Link in the
main menu on the meter.
Connect and press the meter’s
M button.
Connect and press the meter’s
power button.
Micro USB
12
Page 14
Continued from previous page
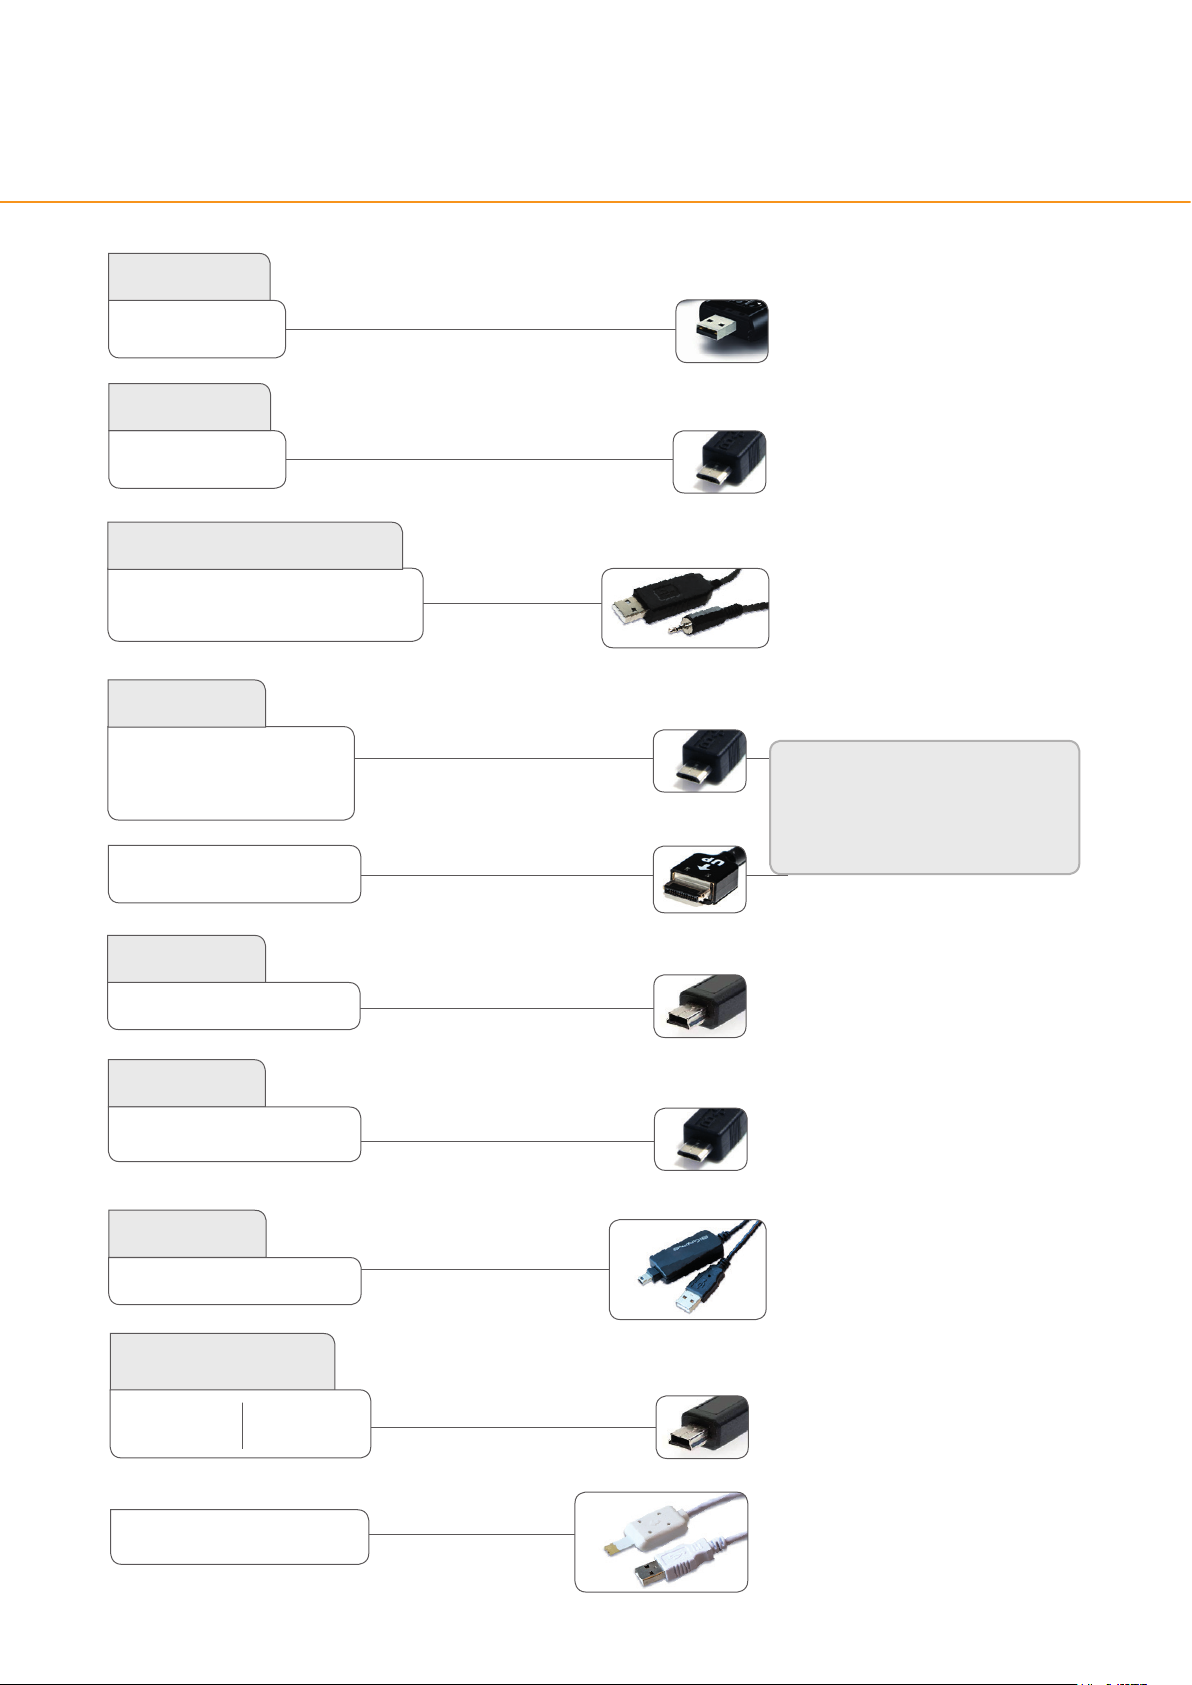
Glucose meters and CGMs - connected with USB cable
Beurer
GL50 evo
B. Braun
Omnitest 5
Cambridge Sensors
Microdot+
Bioseven LineaD ORO
Dexcom
G4 Platinum
G5 Mobile Receiver
Touchscreen Reciever G5/G6
SEVEN PLUS
USB por t on meter
Microdot+ USB cable
(2.5 mm)
Seven Plu s USB cable
Micro USB
Micro USB
If the upload doesn’t start, disconnect
the meter, select Shutdown in the menu
to turn the meter o. Turn the meter
on again and connect it to Glooko
Transmitter.
Diastesse
XPER
ForaCare
FORA Diamond Prima
GE
GE100
GlucoRx
HCT & Ketone
Nexus
Nexus Mini Ultra
Nexus Mini
Q
Bionime (P ura + Rightest) US B cable
(Mini USB)
Mini USB
GlucoR x Strip
Connector
USB cable
Mini USB
Micro USB
13
Page 15
Continued from previous page
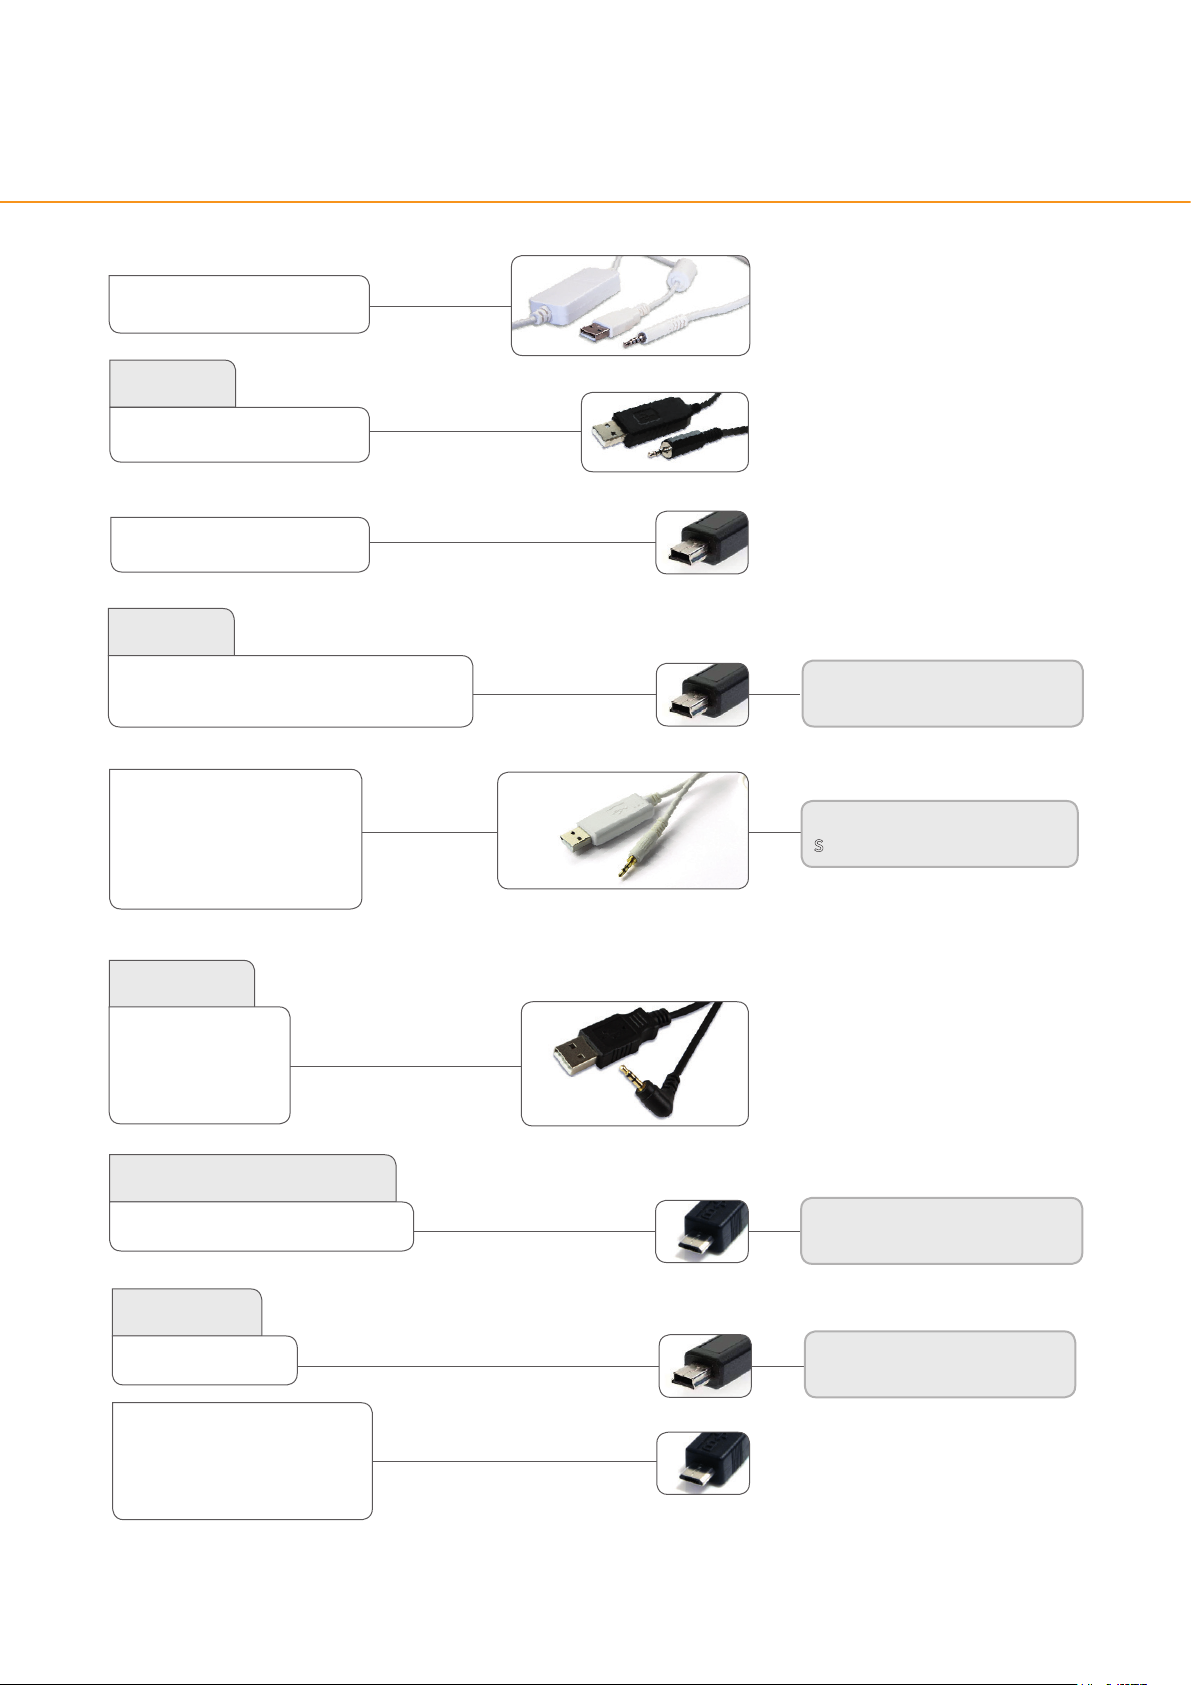
Glucose meters and CGMs - connected with USB cable
Nexus Voice
GlucoR x Nexus
Voice USB cable
iCare
PalmDoc I
PalmDoc II
i-SENS
alphacheck professional NFC/ACURA PLUS
alphacheck professional
CareSens BGMS/TEE2
CareSens COOL/Bravo
CareSens N
CareSens N POP
CareSens N Voice
i-Sens USB cable
(2.5 mm)
i-Care P almdoc I
USB cable
(2.5 mm)
(2,5 mm)
Mini USBMini USB
Mini USBMini USB
Connect and press the meter’s
power button.
Connect and press the meter’s
S button (C but ton).
Infopia
Element
Fintest Lite
GluNEO
GlucoLab
Inside Biometrics
KE YA Smar t
LifeScan
OneTouch Ping
OneTouch Select Plus
OneTouch Select Plus Flex
OneTouch Verio
OneTouch Verio Flex
Infopia USB cable
(2.5 mm)
Micro USB
Mini USB
Micro USB
Connect and select Data TX > USB in
the main menu on the meter.
Connect and press the meter’s
power button.
14
Page 16
Continued from previous page
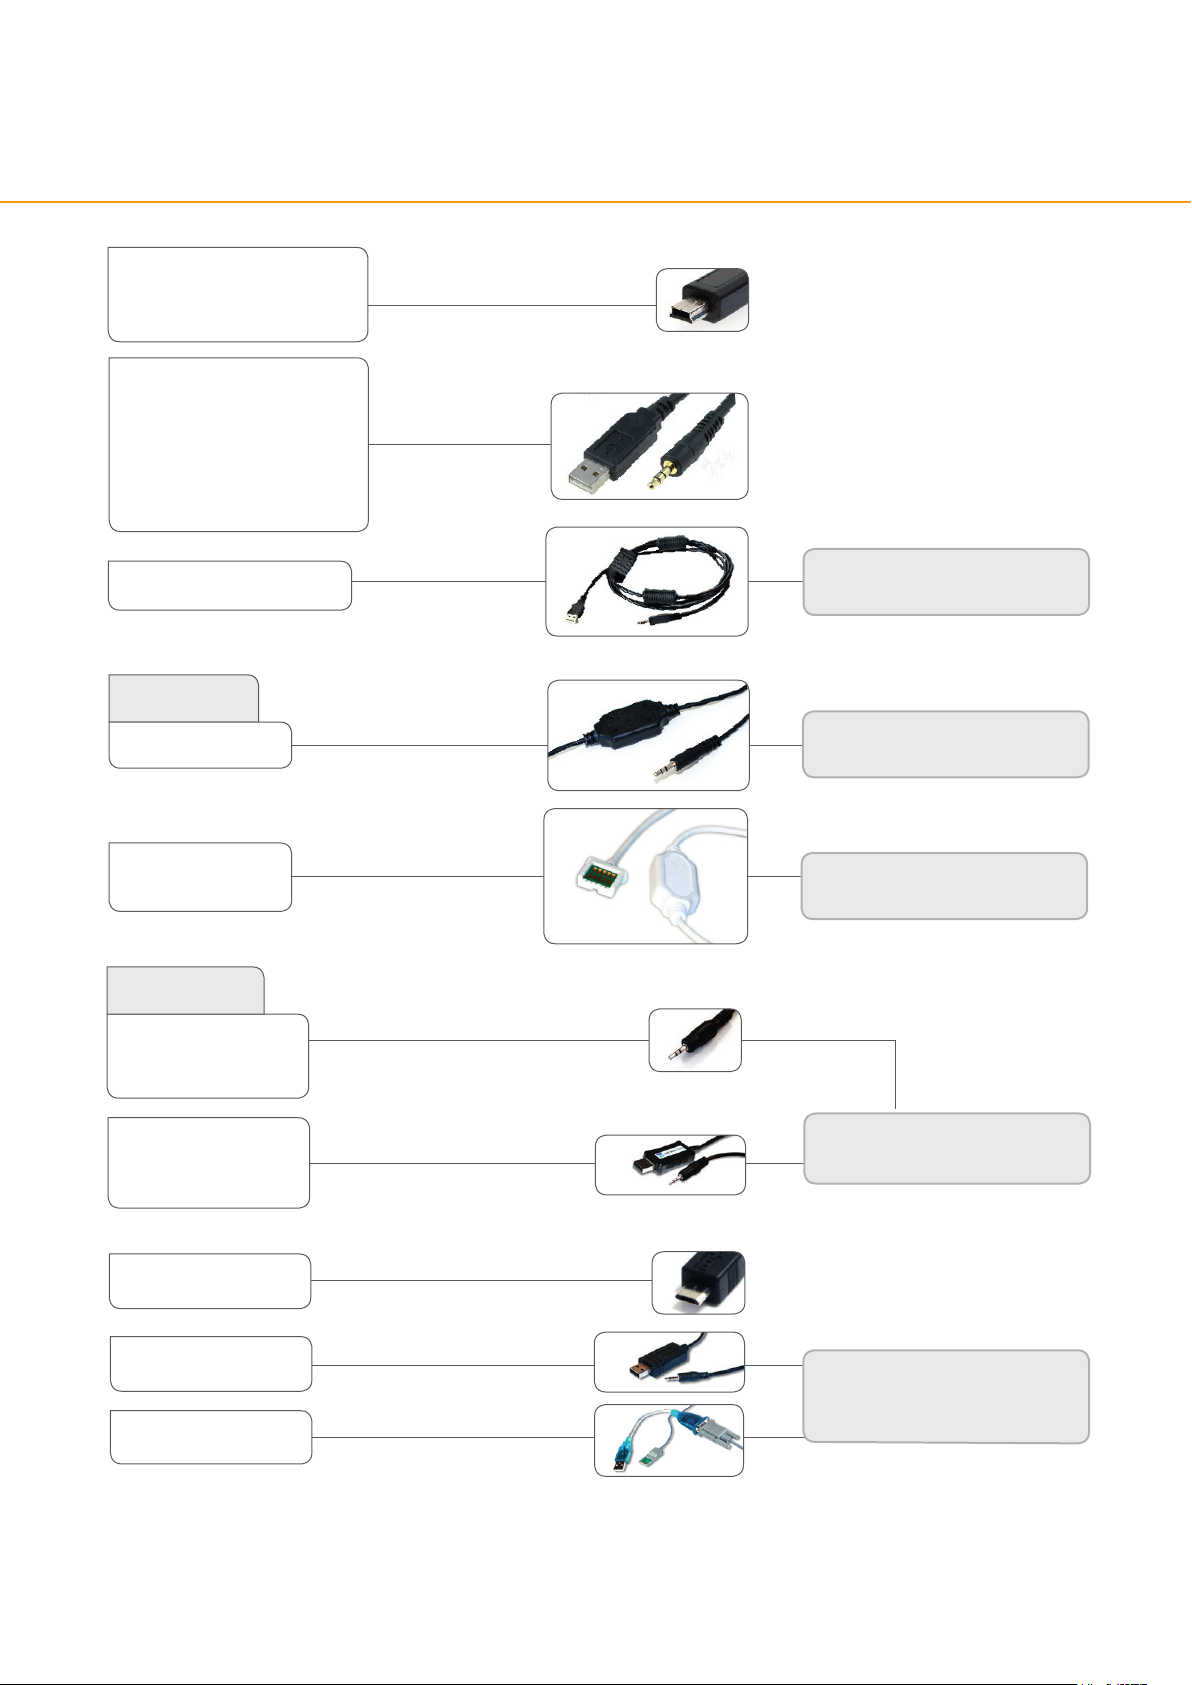
Glucose meters and CGMs - connected with USB cable
OneTouch Verio Pro
OneTouch Verio IQ
OneTouch Verio Sync
OneTouch Select
OneTouch Ultra
OneTouch Ultra2
OneTouch UltraMini
OneTouch UltraEasy
OneTouch Verio (old)
OneTouch Vita
LifeScan USB cable
(2.5 mm)
Mini USB
OneTouch UltraSmart
Medcore
Care
GlucoSure Extra
GlucoSure Max
Menarini
GlucoMen areo
GlucoMen areo 2K
GLUCOFIX TECH
GlucoMen Gm
Glucox iD
Glucocard MX
LifeScan USB cable
(2,5 mm)
Medcore care USB cable
(3,5 m m)
Medcore USB cable
Menarini GlucoMen areo USB cable (2, 5 mm)
Menarini white USB cab le (2,5 mm)
Connect and press any button.
Connect, then press and hold the
meter’s power button.
Connect and press the meter’s
power button.
If the meter displays: E-3, disconnect
it wait until the display is o, then
connect the meter again.
GLUCOCARD SM
GlucoMen READY
GlucoMen Visio
Mendor discreet USB cable (2, 5 mm)
Menarini GlucoMen Visio USB cable
Micro USB
Connect and press the meter’s
power button.
15
Page 17
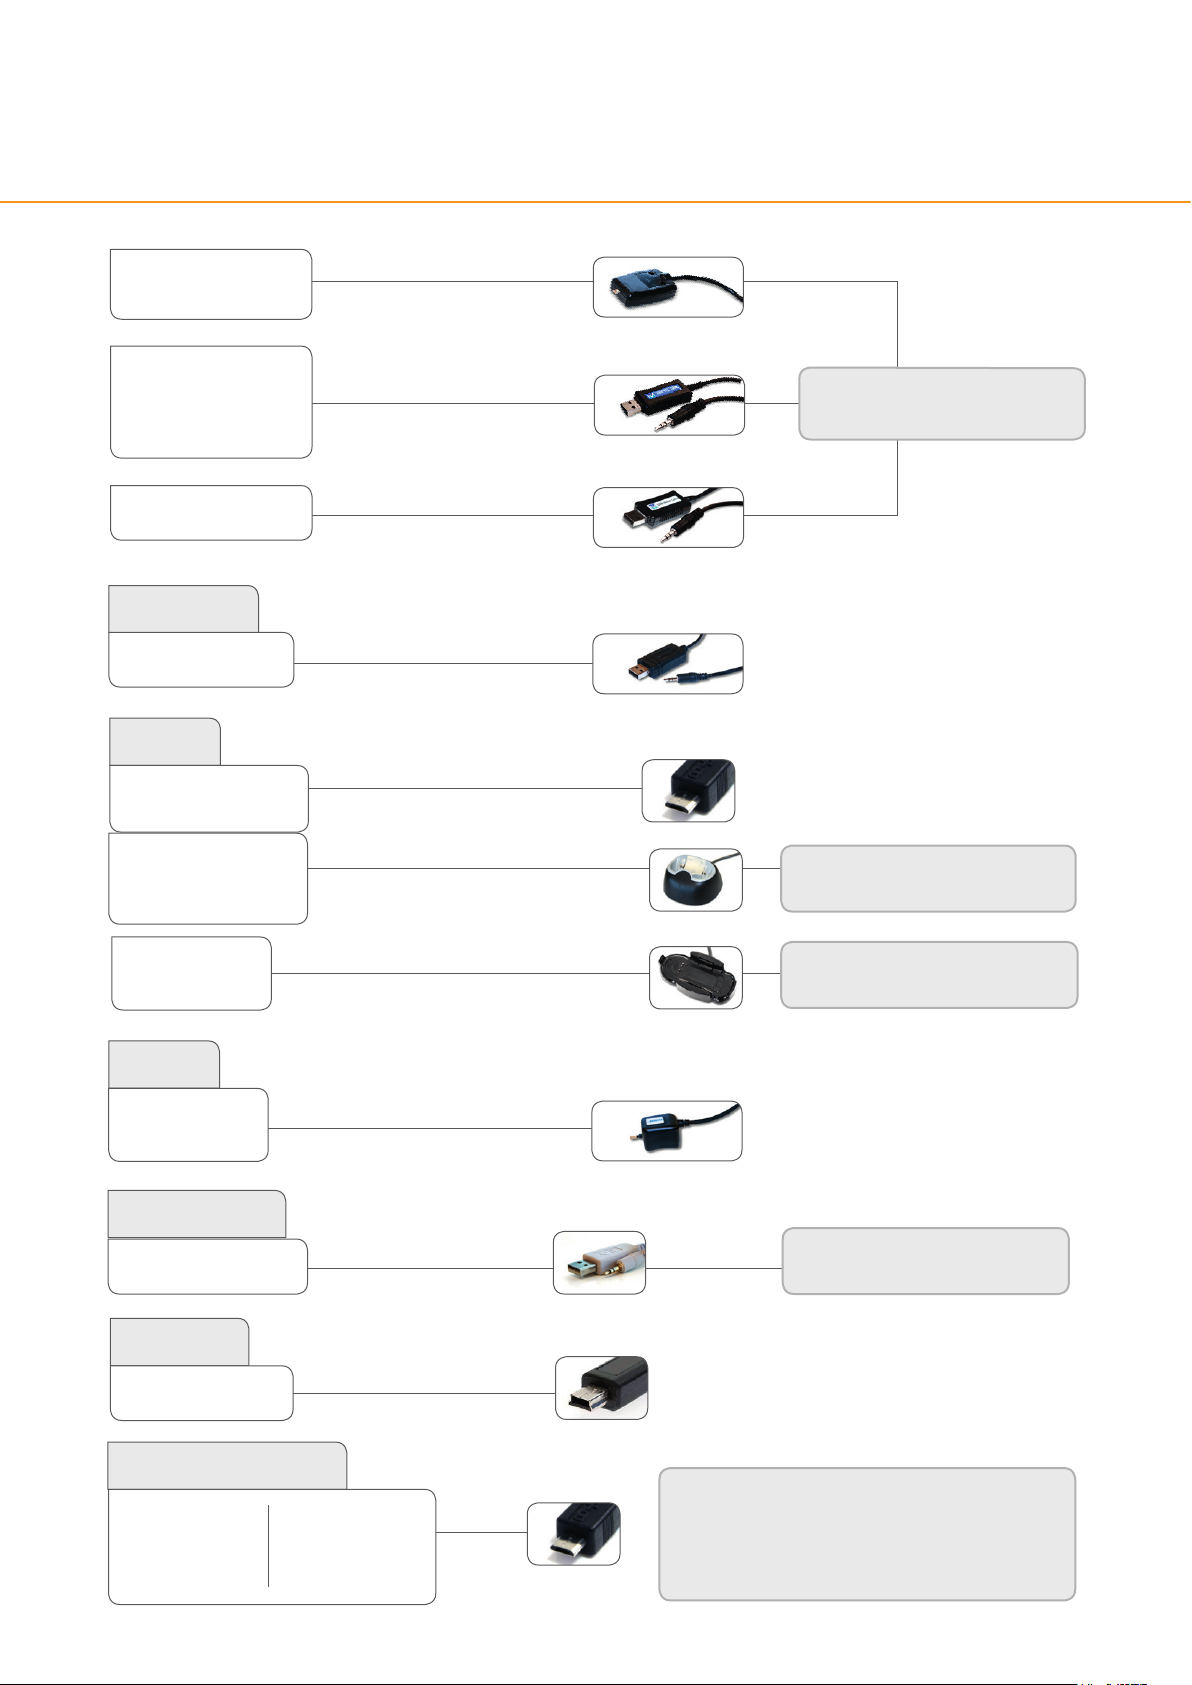
Continued from previous page
Glucose meters and CGMs - connected with USB cable
GlucoMen LX
Glucox miò
GlucoMen LX Plus
GlucoMen LX2
Glucox miò Plus
Glucox Premium
Glucocard G+
Mendor
Discreet
Nipro
4SURE Smart
4SURE Smart Duo
Menarini strip co nnector USB ca ble
Menarini blue USB cab le (3.5 mm)
Menarini white USB cab le (3,5 mm)
Mendor discreet USB cable (2, 5 mm)
If the meter displays: E-3, disconnect
it wait until the display is o, then
connect the meter again.
Micro USB
TRUEresult
TRUE METRIX
TRUE METRIX AIR
TRUEyou
TRUEyou mini
Nova
Max Link
Max Plus
Pic Solution
Pic Gluco Test
Prodigy
AutoCode
Nipro TRUEresult USB docking station
Nipro TRUEy ou mini USB docking station
Nova USB cable
Pic Solut ion USB cable
Mini USB
Connect and place the meter in the
docking station.
Connect and place the meter in the
docking station.
Connect and press the meter’s
power button.
Roche Accu-Chek
Active
Mobile (USB)
Aviva Connect
Performa Connect
Guide
Instant
Instant S
Micro USB
Once connected, upload should start within
20 seconds aer connecting the cable. If not,
go to the main menu on the meter. Go to
My data > Data Transfer > Reports, and connect
the meter to the USB cable again.
(Please do not hold d own the two arrow buttons .)
16
Page 18
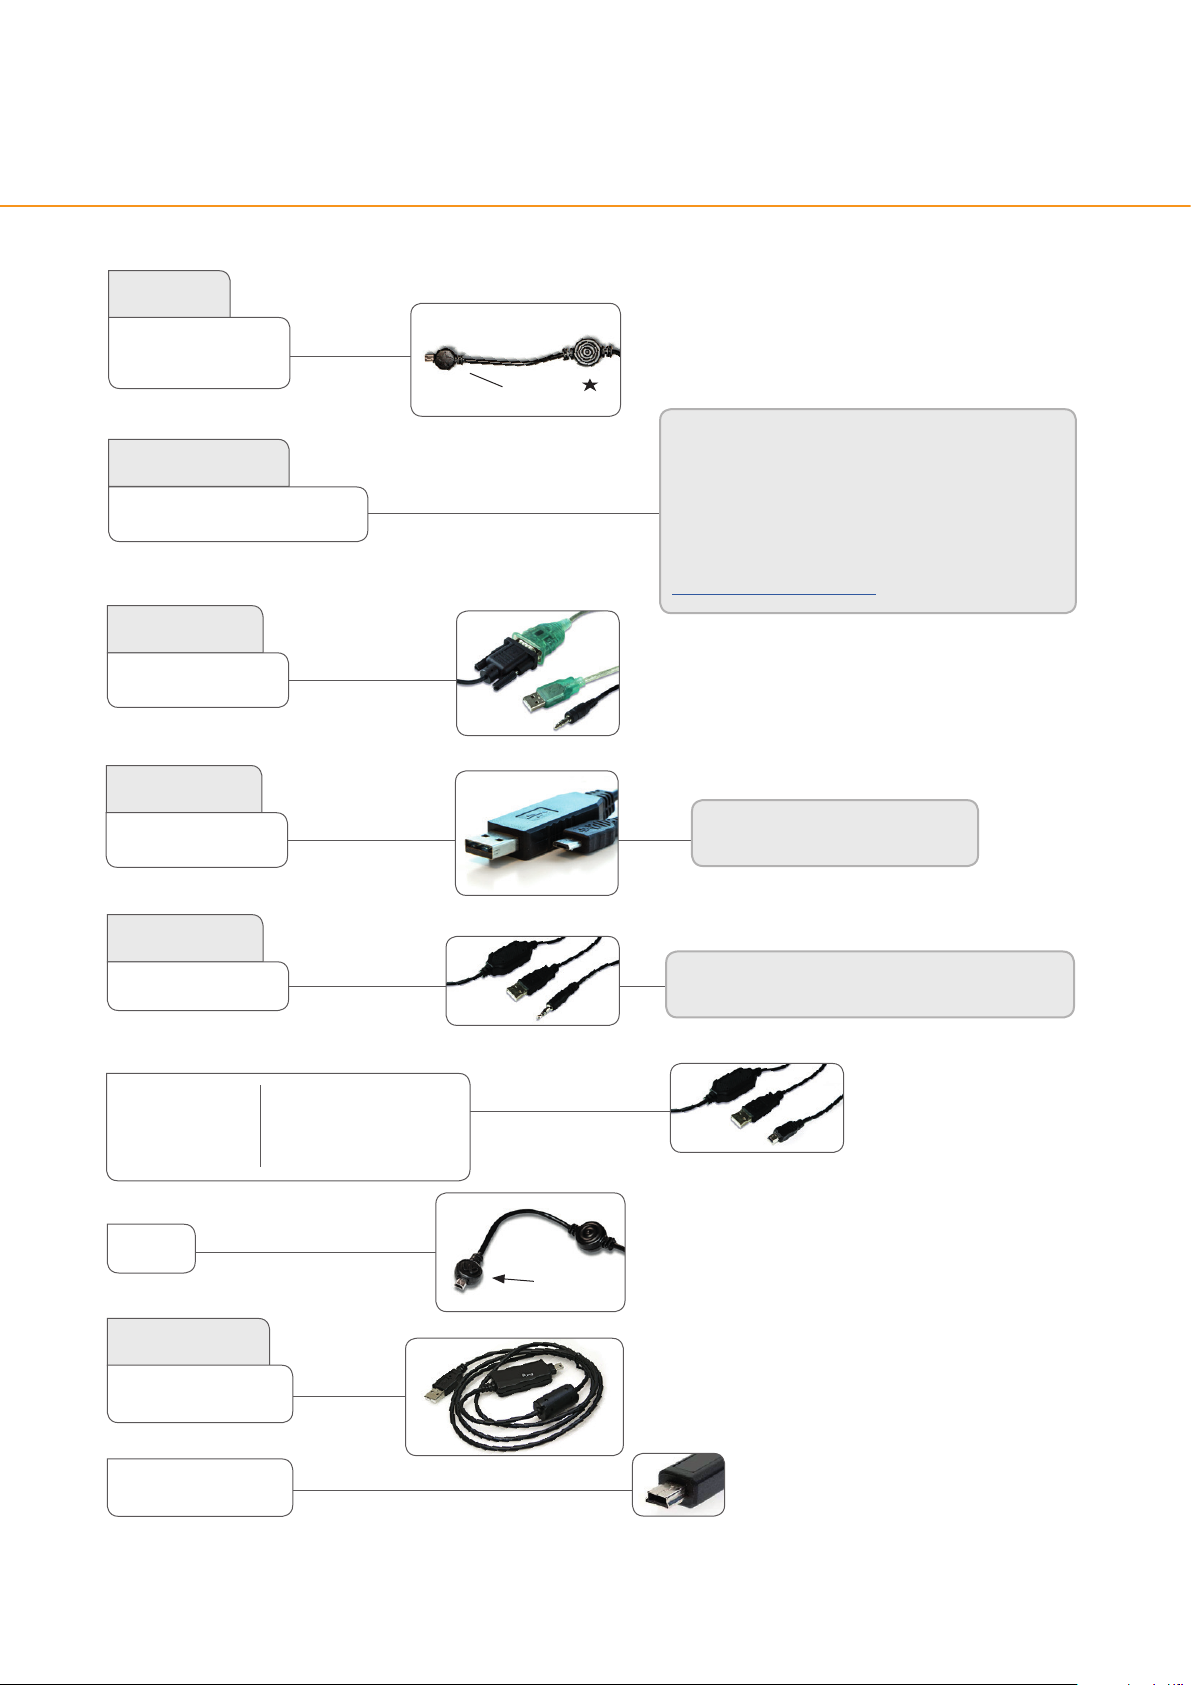
Continued from previous page
Glucose meters and CGMs - connected with USB cable
Sano
BGStar
MyStar E xtra
Senseonics
Eversense CGM Transmitter
Ter umo
Sano USB cable
marked wi th:
NOTE!
The Eversense CGM Transmitter (Gen. 2) can not be
uploaded via Glooko Transmitter.
The data from the Eversense CGM can only be uploaded
to diasend® via ”Connect app” in the patient’s diasend®
account. Please see further instructions at:
https://support.diasend.com
Finetouch
VivaCheck
Fad
Wellion
Calla Dialog
Calla Light
Calla Mini
Calla Premium
Galileo GLU/CHOL
Linus
Terumo USB cable
VivaChek USB cable
Wellion Calla USB cable
(3,5 m m)
Leonardo GLU/CHOL
Galileo GLU/KET
Leonardo GLU/KET
Wellion Linus USB cable
Connect and press the meter’s
power button.
Connect and select PC Link in the main menu
on the meter.
Wellion Calla mini USB cable
marked wi th a W
Ypsomed
mylife Pura
mylife Unio
mylife Pura
USB cable
Mini USB
17
Page 19
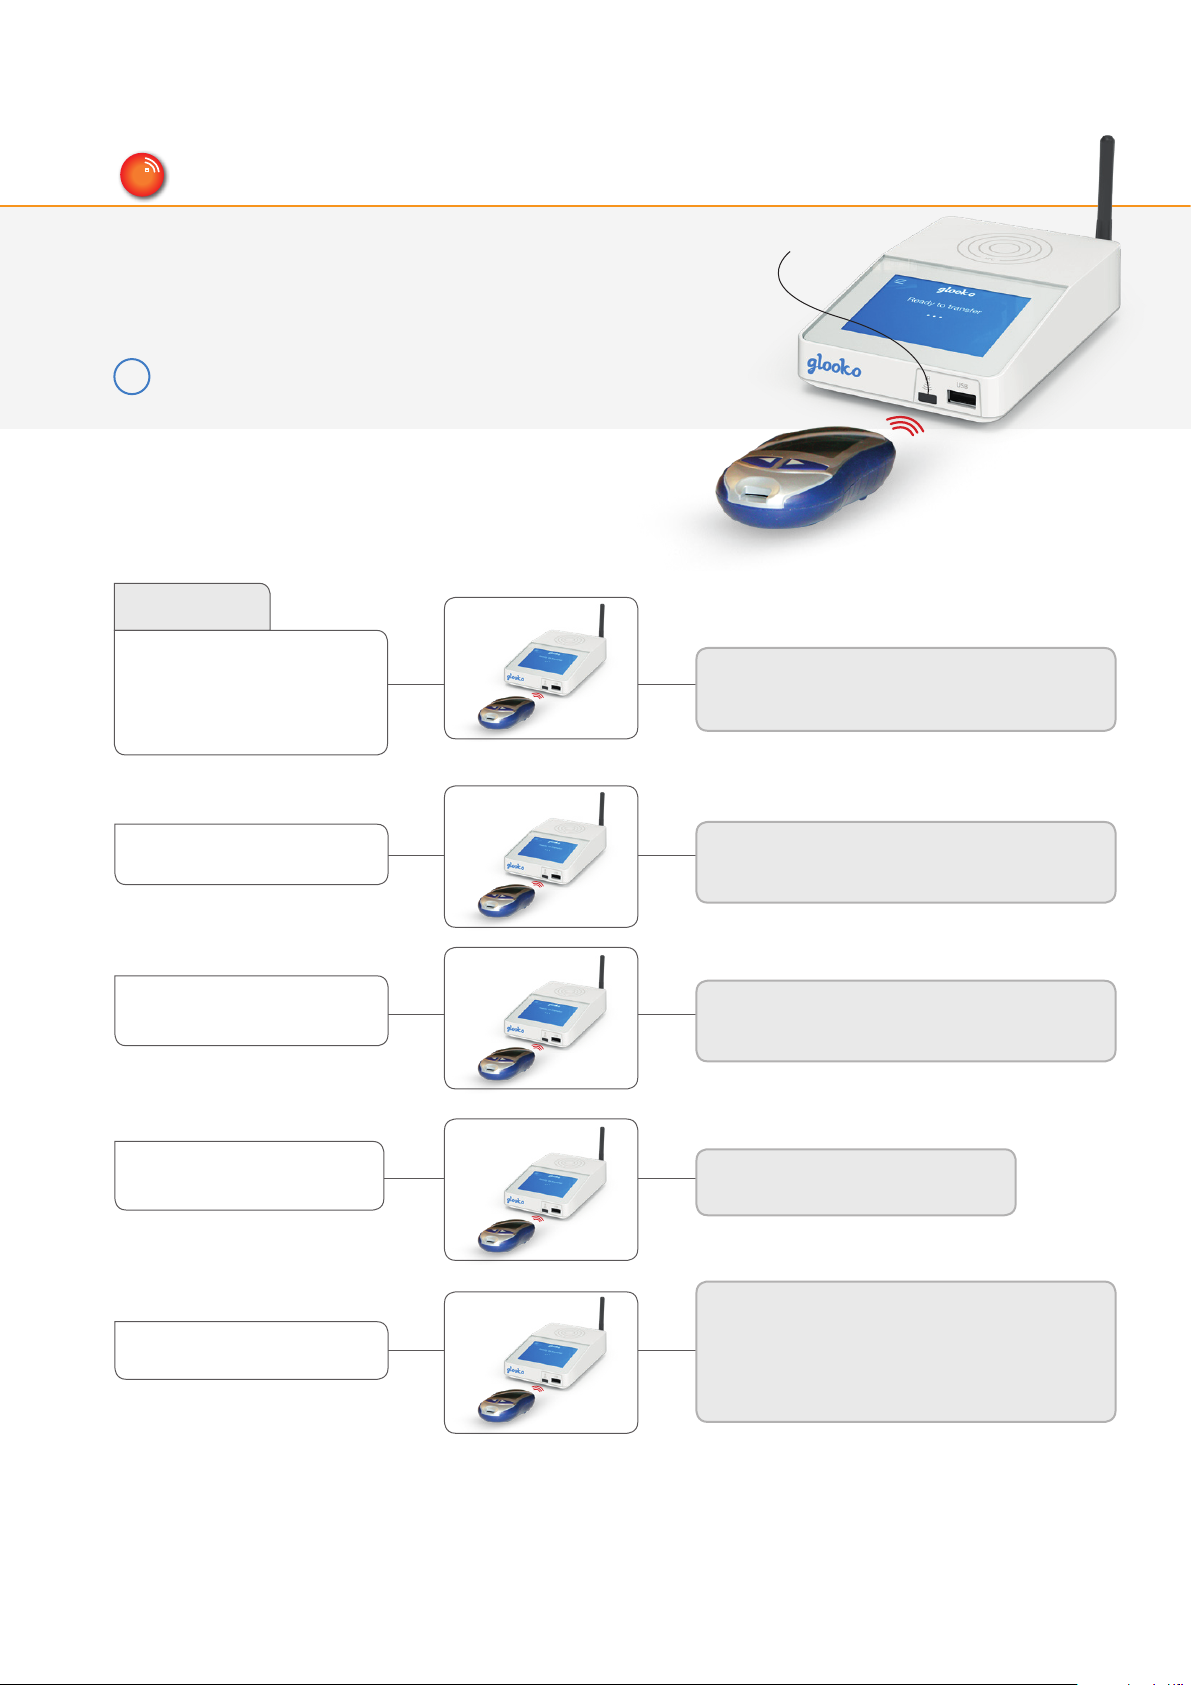
IR
Glucose meters - with infrared connection
Set the meter in upload mode by following the instructions below.
Place the glucose meter’s top end directed towards the IR window
on Glooko Transmitter.
Please make sure to keep the device completely still during the upload.
i
Do not remove the device until the screen displays: Transfer complete!
Roche
IR window on Glooko Transmitter
Accu-Chek Aviva
Accu-Chek Aviva Nano
Accu-Chek Nano
Accu-Chek Performa
Accu-Chek Compact
Accu-Chek Compact Plus
Accu-Chek Compact Plus GT
Accu-Chek Aviva Combo
Accu-Chek Aviva Expert
IR
Activate IR transmission by pressing and holding the two
arrow buttons until two arrows appear in the display.
Activate IR transmission by pressing and holding
the meter’s two topmost buttons until t wo arrows
appear in the display.
Activate IR transmission by pressing and holding
the buttons S and M below the display until two arrows
appear in the display.
In the main menu, go to My data and
select Data transfer.
Accu-Chek Mobile (IR)
1. Press and hold the two arrow buttons.
2. In the data transfer menu, select the rst
alternative (for analysis).
NOTE: If the meter’s serial number begins
with U1, please refer to the instruc tions for
Accu-Chek Mobile (USB) on page 16.
18
Page 20
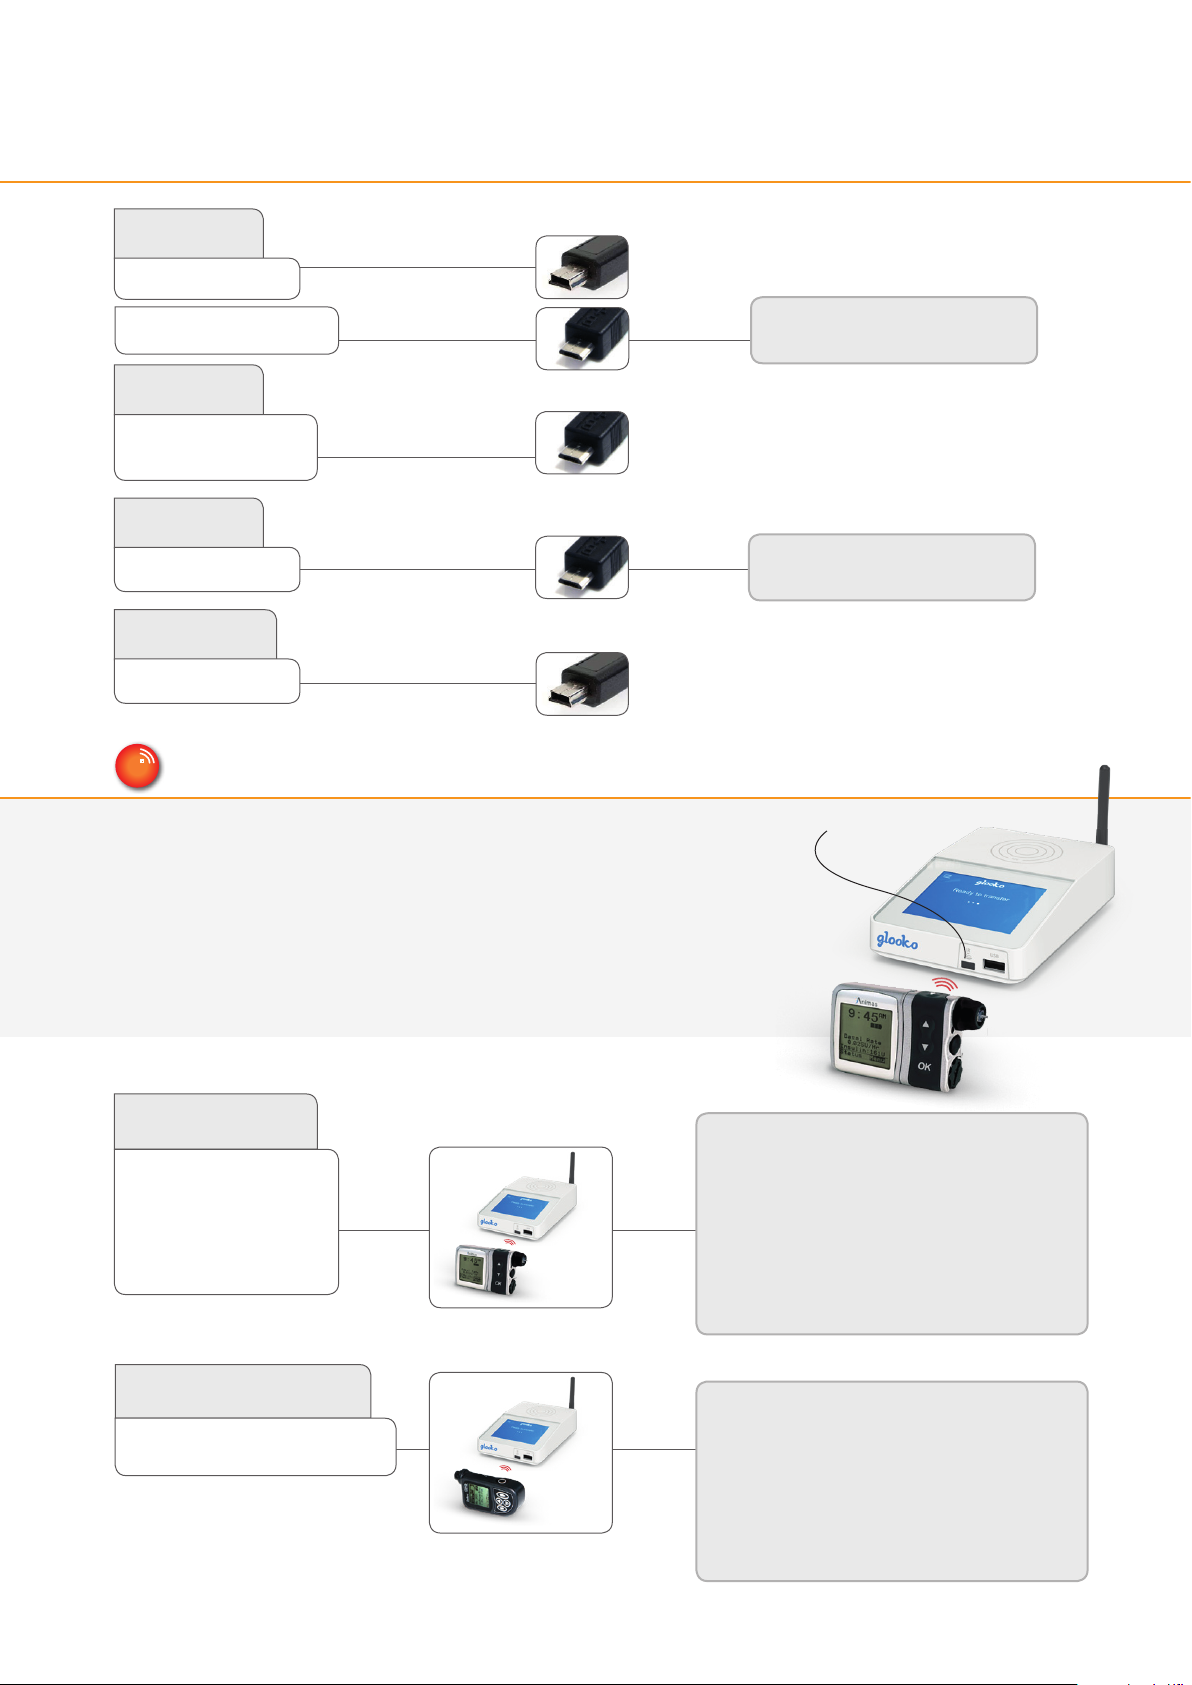
Insulin pumps - connected with standard USB cable
Insulet
Omnipod®
Omnipod®Omnipod Dash
Mini USB
Micro USB
Tandem
t:ex
t:slim
t:slim X 2
t:slim G4
Micro USB
ViCentra
Kaleido
Micro USB
Ypsomed
mylife Omnipod
IR
For the Animas pumps, please make sure the pump is
suspended and the screen is illuminated when transmission
begins. The screen does not need to remain illuminated
during the full transmission.
Insulin pumps - with infrared connection
Mini USB
Connect and press the PDM’s
power button.
Go to the yellow menu and choose
data upload.
IR window on Glooko Transmitter
Keep the pump completely still, and do not remove the
pump until the screen displays: Transfer Complete!
Animas
IR1200
IR1250
2020
OneTouch Ping
OneTouch Vibe Plus
Vibe
Smiths Medical
CoZm o 170 0
1. Suspend the pump. (MAIN MENU, scroll to
Suspnd/Resum and press OK;
Suspend is highlighted).
2. Press OK.
3. Place the pump with its back towards
the IR window on Glooko Transmitter.
4. When the transmission is nished:
Resume pump (MAIN MENU, scroll to
Suspnd/Resum and press OK;
Resume is highlighted). Press OK.
1. Press the down arrow button in order to
activate the pump.
2. Place the pump with its back towards the
centre of the front panel on the Glooko
Transmitter.
Note: The batter y in the CoZmo insulin
pump must be well-charged in order to
transmit successfully!
19
Page 21
IR
Insulin pumps - connected with infrared cables
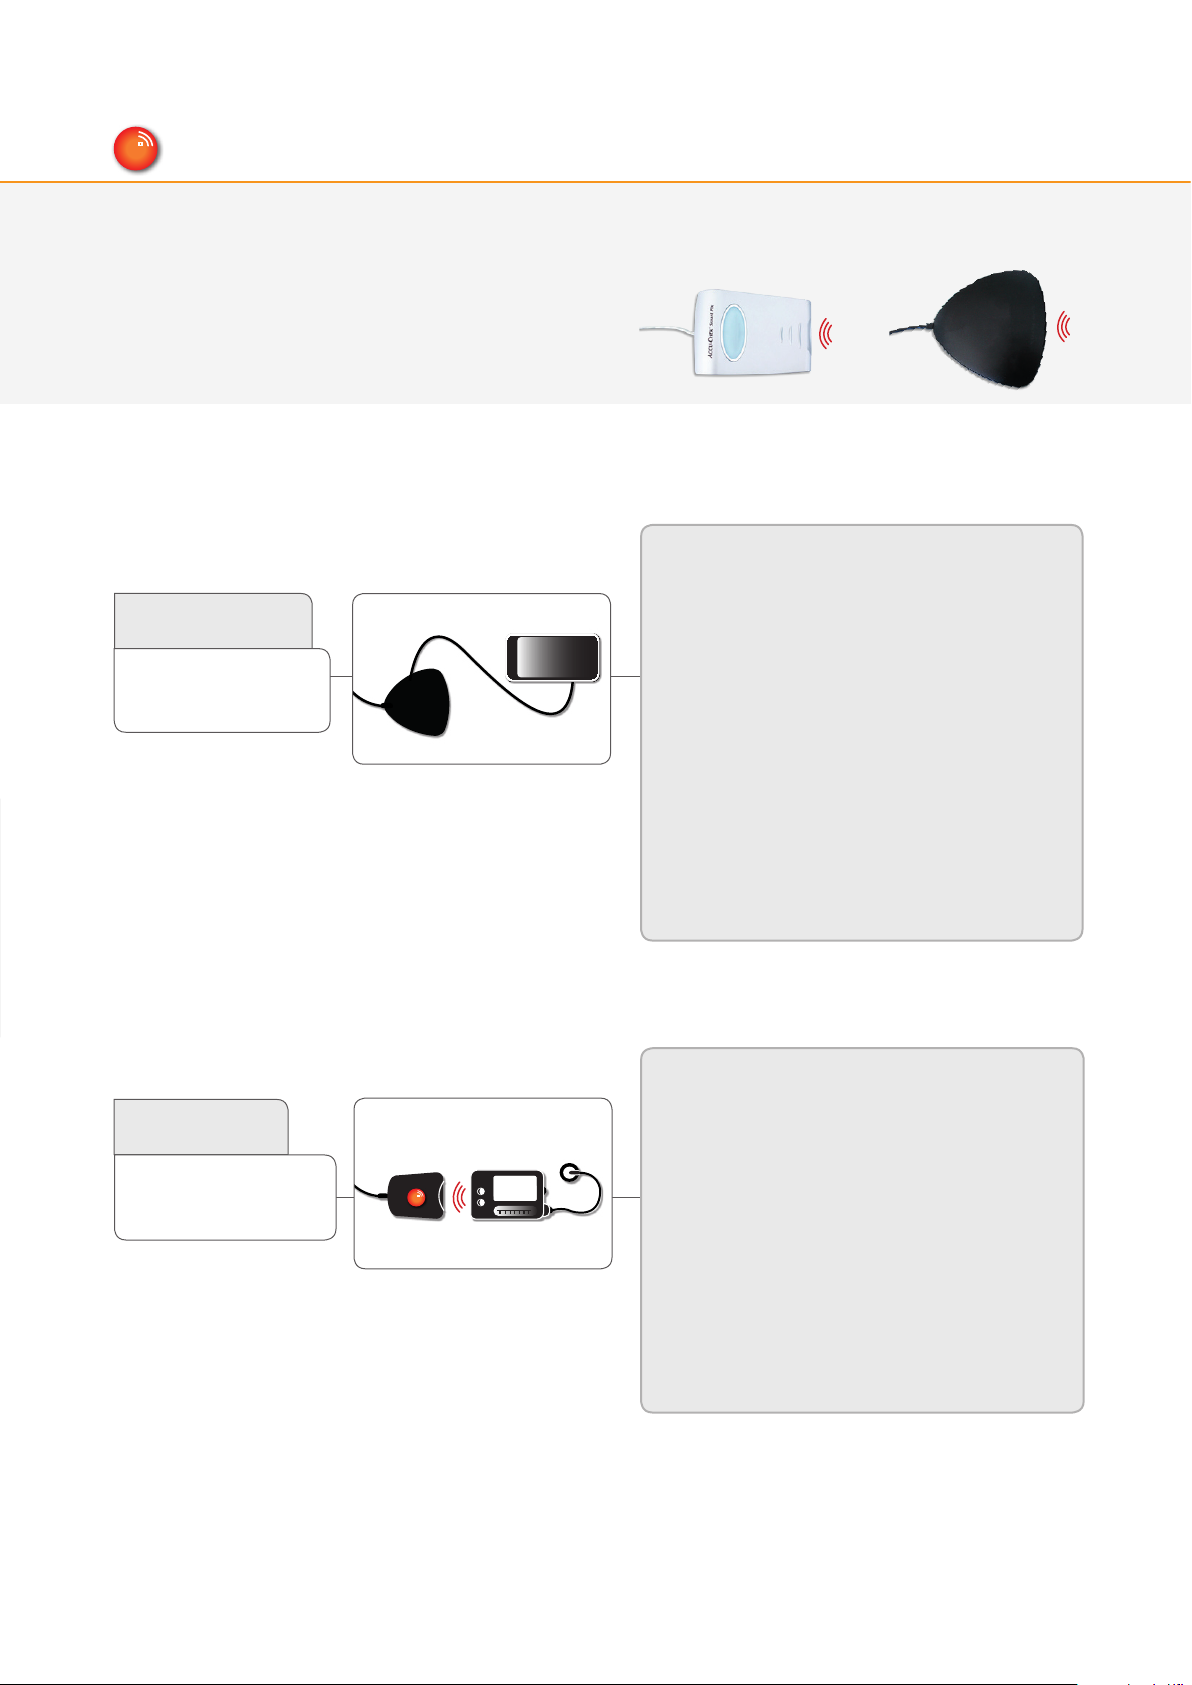
Compatible infrared cables
Roche
Accu-Chek Insight
Accu-Chek Aviva Solo
Smart P ix 2
Note! Conn ect the han dset of your pump
with a micro US B cable to the Sma rt Pix 2.
Roche Accu- Chek
Smart Pix ca ble
1. Connect the Smart Pix 2 cable to Glooko Transmitter
and wait for the blue indicator on the Smart Pix 2
to start ashing slowly.
2. Connect the handset to the Smar t Pix 2 with a
micro USB cable.
3. In the handset menu select Connect to PC and
press OK.
4. Ensure that the pump is within reach of the
handset.
5. The blue indicator on the Smar t Pix 2 is on while
the data is being transmitted from the device to
the Smart Pix 2.
6. The blue indicator turns itself o and both
Smart Pix 2 and device emit a sound to signal that
the data is being transmitted from the
Smart Pix 2 to Glooko Transmitter. Do not disconnect
the Smart Pix 2 yet!
7. Wait for Glooko Transmitter to conrm the upload was
successful.
Roche Accu- Chek
Smart Pix 2 ca ble
Roche
Accu-Chek Spirit
Accu-Chek Spirit Combo
IR
Smart P ix or Smart Pi x 2
Note! Smar t Pix soware vers ion 3.02 or higher is
require d when using Smar t Pix.
1. Connect the Smart Pix to Glooko Transmitter and
wait for the blue indicator on the Smart Pix to
start ashing slowly.
2. Put the pump in Data Transfer Mode (stop the pump
and enter the Data Transfer Menu).
3. Place the pump with its IR window towards the
Smart Pix. The blue indicator signals the data is
being transmitted to the Smart Pix.
4. Wait for the blue indicator to start ashing slowly
again or stop ashing altogether.
5. The data is now being transmitted from the
Smart Pix to Glooko Transmitter. Do not disconnect
the Smart Pix yet!
6. Wait for Glooko Transmitter to conrm the upload was
successful.
20
Page 22
Insulin pens - connected with standard USB cable
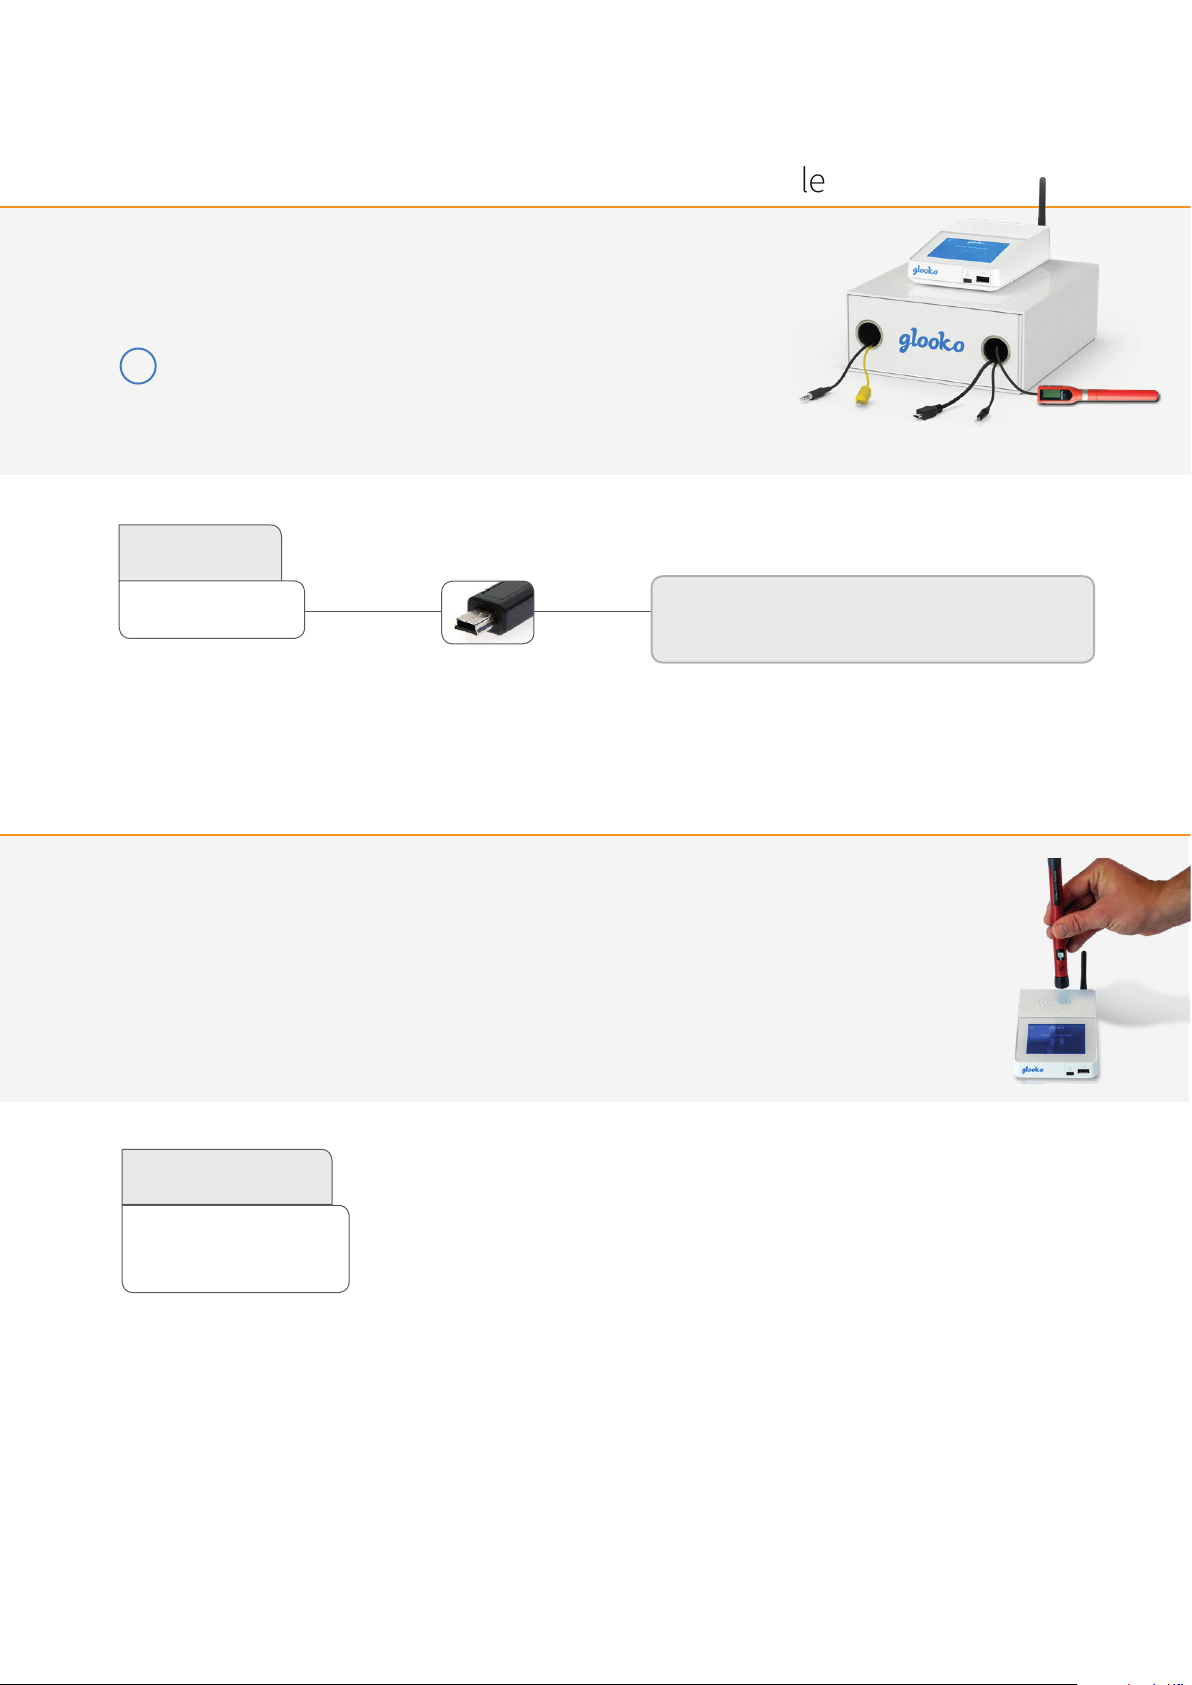
To be able to transmit data from an insulin pen, please follow the
instructions below.
Note: If you have a USB hub connected to glooko® Transmitter,
i
the USB hub must be powered by its own power supply.
Pendiq
pendiq
Mini USB
Make sure that the cable is properly inserted. The insulin
pen’s control lamp will start ashing, and the upload will be
initiated aer 10-15 seconds.
Insulin pens - connected with NFC-plate
Place the connected pen on the NFC pad on top of Glooko
Transmitter – and follow the on-screen instructions.
NovoNordisk
NovoPen 6
NovoPen EchoPlus
21
Page 23

222323
Page 24
WARNING!
All patient medical diagnoses and treatments are to be performed under supervision of qualied healthcare professionals!
diasend® is not intended to provide automated treatment decisions or to be used as a substitute for professional healthcare
judgment. diasend® is not intended for emergency calls or for transmission or indication of any real-time alarms or time- critical
data! diasend® is not intended as a substitute for direct medical supervision or emergency intervention.
Support
+44 (0)20 7795 8191
+46 (0)31-762 08 88
[email protected]
www.diasend.com
A2042v2F QG_GB_Gloo ko_Transmitter_for_diasend_users (2019-02-12)
diasend® is indicat ed for use by indi viduals or hea lth care profes sionals in th e home or healt h care faciliti es for transmis sion of data fr om home monito ring devices
such as gluco se meters and i nsulin pumps to a se rver datab ase to suppor t diabetes ma nagement. d iasend® is indicated for professional use and over-the-counter sales.
 Loading...