

Glomex ZigBoat ZB205 Owner's Manual
eng
Green dot: The sensor is working properly
Red dot: The sensor is not able to reach the
Gateway:
• Please check the battery status;
• Please check you have insert the correct serial
number
• In case of a weak or a bad signal, change
the location of the ZigBoat™ Porthole/Door
Sensor
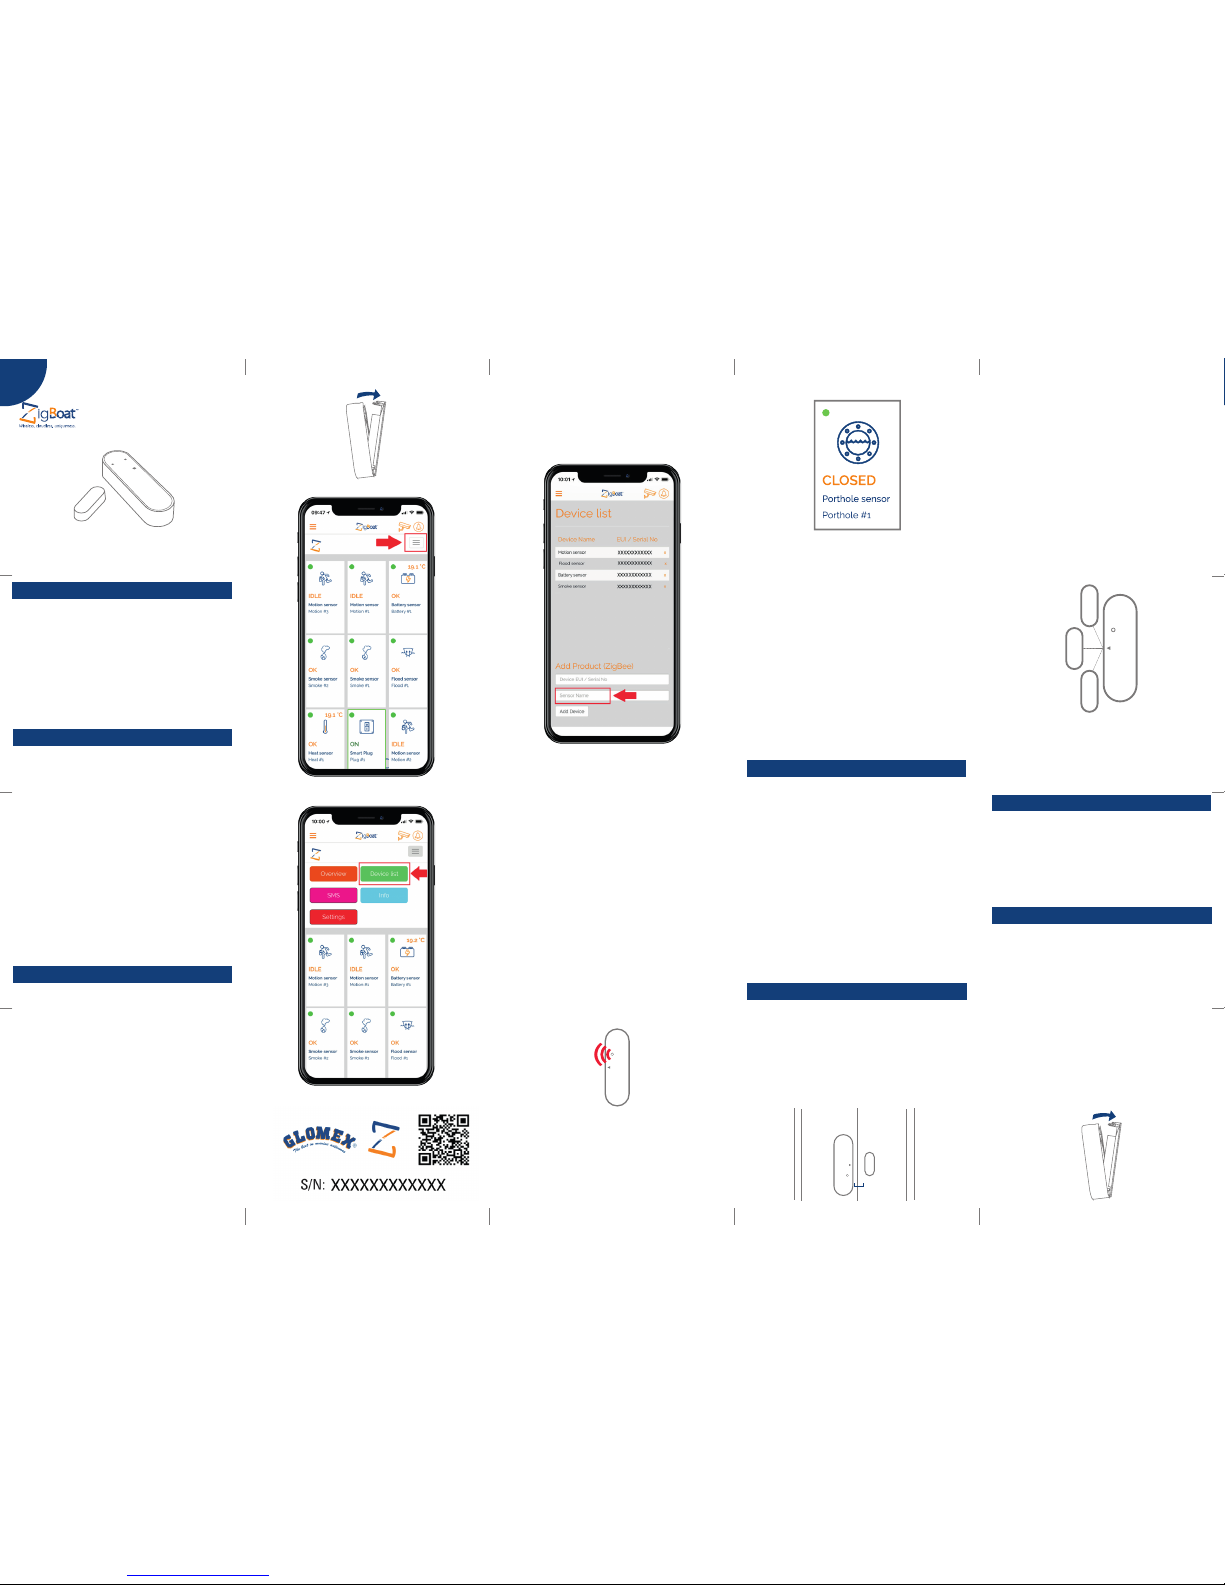
“CLOSED”: The door or porthole is closed
“OPEN”: The door or porthole is open
Resetting
Resetting is needed if you want to connect your
ZigBoat™ Porthole/Door Sensor to another
gateway or if you need to perform a factory
reset to eliminate abnormal behavior.
The reset button is marked with the small ring
on the front of the sensor.
STEPS FOR RESETTING
1. Open the casing of the device by pushing
the fastening on top of the device to remove
the front panel from the back cover.
Mounting
• Clean the surface before mounting.
• The ZigBoat™ Porthole/Door Sensor (a)
should be mounted to the frame using the
double stick tape, already applied on the
back of the sensor and magnet. Press rmly
to secure sensor.
Testing
You can test if the positioning of the sensor
and magnet are correct by checking whether
the green light on the ZigBoat™ Porthole/Door
Sensor is ashing when you open or close the
porthole/door.
Placement
• Place the sensor indoors at a temperature
between 0-50°C.
• The magnet has to be placed on that side
of the sensor which is marked with a small
triangle.
• The magnet and sensor also have to be
aligned/centered thickness-wise on as
similar level as possible.
• In case of a weak or a bad signal, change
the location of the ZigBoat™ Porthole/Door
Sensor .
• When removing cover for battery change,
electrostatic discharge can harm electronic
components inside.
• Always mount indoors.
• Do not place the sensor close to magnetic
or electromagnetic elds. This device
includes a magnet. The magnet creates
a magnetic eld that may cause damage
to computer hard drives, magnetic cards,
data storage devices, hearing aids and
speakers e.g. Therefore, we strongly advise
you to never position the magnet close to
electronic devices.
Adding the sensor to the Gateway
NOTE: Make sure Gateway is turned on
and congurated, for more details see the
Gateway owner’s manual.
1. Open the ZigBoat™ App, select the Gateway
in the ZB Gateways menu, wait a few
seconds, then select the menu button on
the top right (g. 1). Select “Device list” (g.
2). Add the sensor by entering the serial
number which is on the sensor’s label (g.
3). To locate the serial number of the sensor,
remove the front cover by pressing the tab
on top.
Product description
The ZigBoat™ Porthole/Door Sensor detects
and reports opening and closing of doors
and portholes. Easily installed on any door or
portholes, the sensor triggers a signal when
parted. This lets you know when a room is
entered, if a porthole or a door has been left
open, etc.
Porthole/Door Sensor
Version 1.0
OWNER’S MANUAL
Precautions
• The magnet (b) should be mounted on the
door or porthole no further than 5mm away
from the arrow on the sensor.
• There are many ways to mount the sensor
and magnet, as portholes and doors vary
greatly. The most important consideration is
for the magnet to be placed as near to the
point on the sensor indicated by the grey
arrow.
• The sensor and magnet may be placed on
separate three dimensional planes, though
code: ZB205
SEE PAGE 2 FOR PLACEMENT ILLUSTRATIONS
Fig. 1Fig. 2
Fig. 3
3. Insert the enclosed batteries (2xAAA) into the
device, respecting the polarities.
4. Close the casing.
5. The ZigBoat™ Porthole/Door Sensor
will now start searching for the ZigBoat™
network to join.
6. While the ZigBoat™ Porthole/Door Sensor is
searching for the ZigBoat™ network to join,
the red LED is ashing.
7. When the red LED stops ashing, the
ZigBoat™ Porthole/Door Sensor has
successfully joined the ZigBoat™ network.
To check the correct conguration, select the
overview tab of the ZigBoat™ App. (g. 5)
this does aect the maximum distance
allowed. The magnet may also be placed
either facing the side of the sensor or sitting
parallel to it.
2. You can change the devices name by
selecting “Name” (g. 4). Then, press the “Add
Device” button.
b
a
<5mm
Frame
Porthole/
Door
Fig. 4
Fig. 5
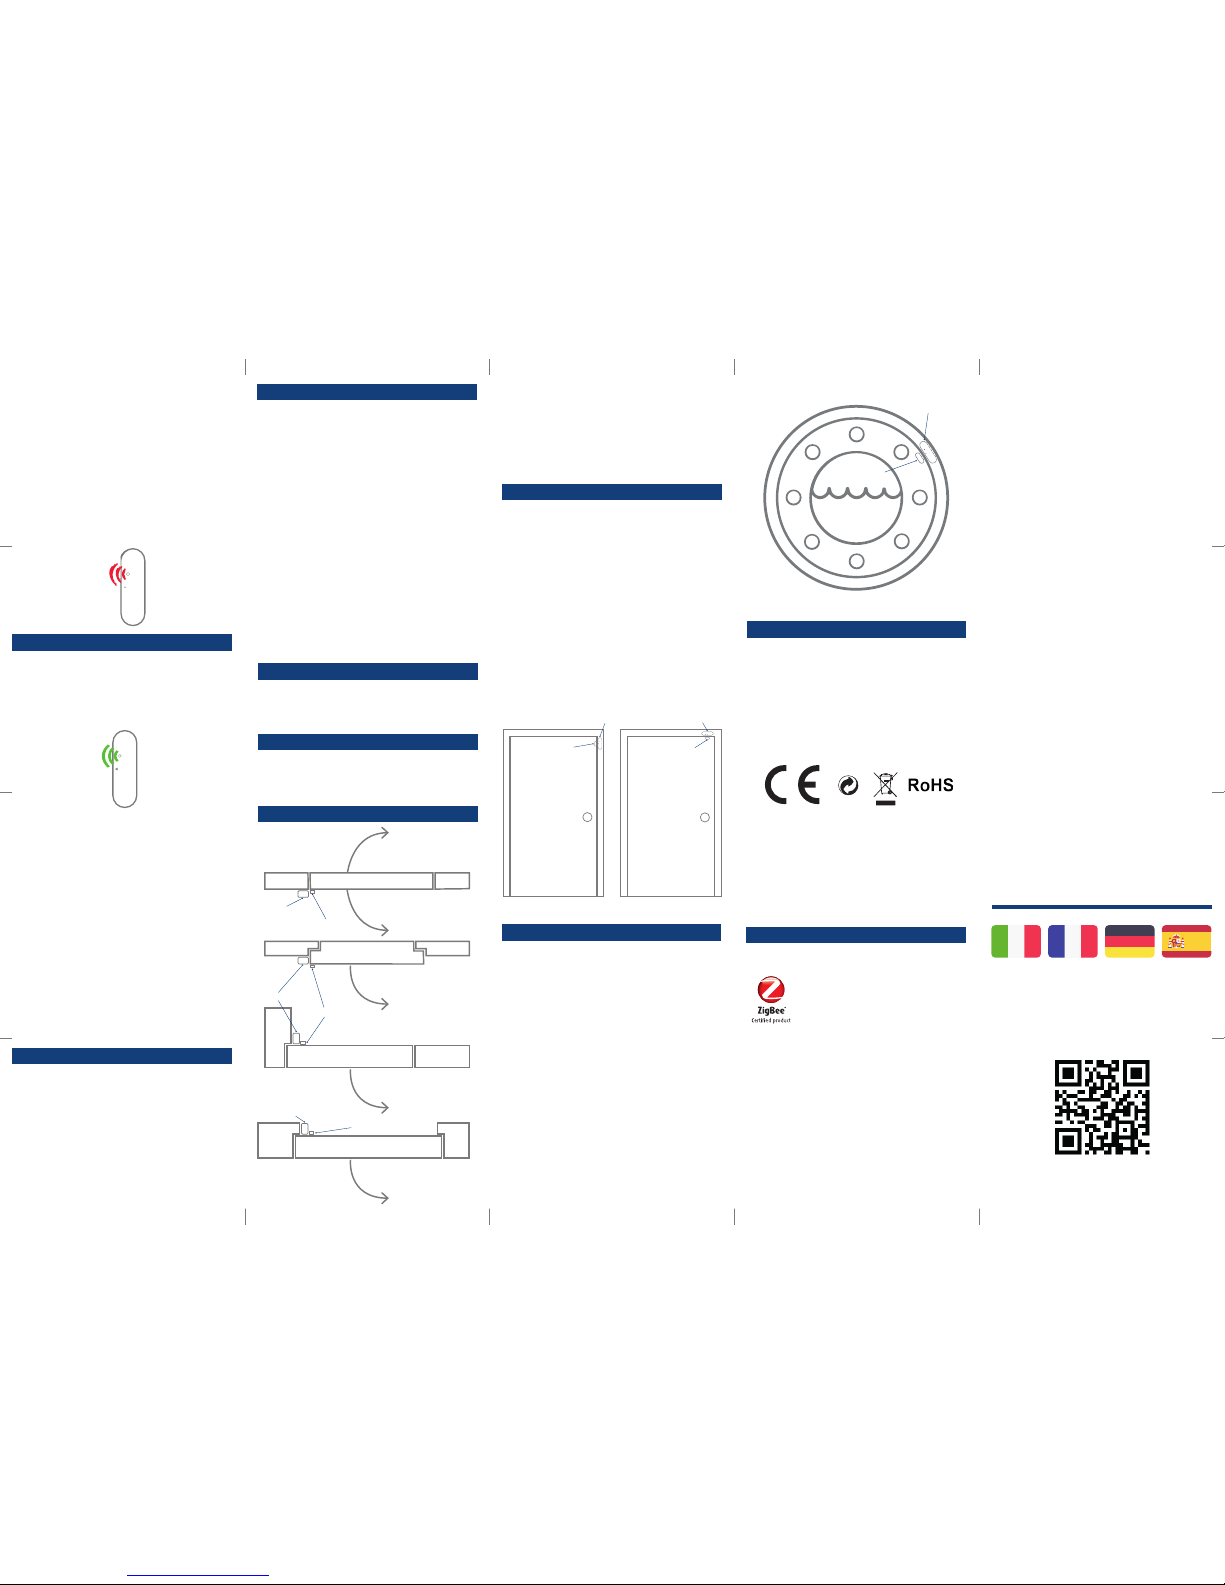
Placement Examples - Doors
• Be sure to mount the sensor on the frame,
to protect the electronics from heavy
vibrations.
• The sensor and magnet should be mounted
on the side opposite from the hinge/pivot
point.
• Pay careful attention to the arrow printed on
the sensor. This should be oriented to face
the magnet. The distance between the two
should not exceed 5mm.
Placement Example - Portholes
• Be sure to mount the sensor on the frame,
to protect the electronics from heavy
vibrations.
• The sensor and magnet should be mounted
on the side opposite from the hinge/pivot
point.
• Alternatively, if the porthole slides open,
the sensor and magnet may be mounted in
many positions, however the sensor should
always be placed on the frame.
• Pay careful attention to the arrow printed on
the sensor. This should be oriented to face
the magnet. The distance between the two
should not exceed 5mm.
Glomex assumes no responsibility for any
errors, which may appear in this manual.
Furthermore, Glomex reserves the right to alter
the hardware, software, and/or specications
All rights reserved.
Distributed by Glomex Srl
via Faentina 165/G
48124 Ravenna
Italy
Other certications
• ZigBee® certied.
IN ACCORDANCE WITH THE DIRECTIVES
• Radio Equipment Directive 2014/53/EU
• EMC Directive 2014/30/EU
• RoHS Directive 2011/65/EU
CE certication
The CE mark axed to this product conrms
its compliance with the European Directives
which apply to the product and, in particular,
its compliance with the harmonized standards
and specications.
Frame
Frame
Frame
Frame
Frame
Porthole
Frame
Frame
Frame
Door
Porthole
Sensor (a)
Sensor (a)
Sensor (a)
Magnet (b)
Magnet (b)
Magnet (b)
Door
Placement Examples - Top View
• The most benecial distance between the
sensor and the magnet is 0.2-0.5 cm.
• Be aware that on magnetic surface (e.g.
metal door), the distance between the
sensor and the magnet has to be 0.1-0.3 cm.
Other information
Dispose the product and battery properly at
the end of life. This is electronic waste which
should be recycled.
Disposal
Note local regulations about information to
your insurance company regarding installed
ZigBoat™ Porthole/Door Sensors.
Modes
ACTIVATION MODE
A single green ash means that the sensor
and the magnet are moving either away from
or towards each other.
Fault nding
• If the ZigBoat™ Porthole/Door Sensor
does not work when the porthole or door
is parted, the probable cause is a faulty
battery. Replace the batteries if they are
worn out.
• If the search for the ZigBoat™ Gateway has
timed out, a short press on the button will
restart it.
Battery replacement
CAUTION: RISK OF EXPLOSION IF BATTERIES
ARE REPLACED BY AN INCORRECT
TYPE. DISPOSE OF THE BATTERIES IN
ACCORDANCE WITH INSTRUCTIONS.
CAUTION: When removing cover for battery
change - Electrostatic Discharge (ESD) can
harm electronic components inside
1. Open the casing of the device by pushing
the fastening on top of the device to remove
the front panel from the back cover.
2. Replace the batteries respecting the
polarities. The ZigBoat™ Porthole/Door
Sensor uses 2xAAA batteries.
3. Close the casing.
4. Test the ZigBoat™ Porthole/Door Sensor.
2. Remove the batteries and reinsert the
batteries
3. Press and hold down the reset button for
approximately 8-10 seconds. The button
has to be pushed within one minute after
inserting the batteries.
4. When the red light starts ashing every
second, the reset process has been
successfully implemented.
SEARCHING GATEWAY MODE
Red ashes every second for a longer peri-
od, means that the device is searching for a
gateway.
LOST CONNECTION MODE
When the red LED ashes 3 times, it means
that the device has failed to connect to a
gateway.
LOW-BATTERY MODE
Two consecutive red LED ashes every 60
seconds, means that the battery should be
replaced.
Consulta il manuale utente in italiano su:
Consultez le manuel d’utilisation en français
sur:
Siehe das deutsche Benutzerhandbuch auf:
Consulte el manual de usuario en español en:
detailed herein at any time without notice, and
Glomex does not make any commitment to
update the information contained herein. All
the trademarks listed herein are owned by their
respective owners.
Warranty
Glomex guarantees the ZigBoat™ (ZB101) and
the Porthole/Door Sensor (ZB205) against
manufacturing defects for a period of 2 years
from date of purchase.
Warranty can be in the form of repair or
replacement of the unit if manufacturing
defects have been found and are conrmed
by Glomex or one of its aliates. In order to
validate warranty, either the original sales
receipt or a copy must be provided at the time
warranty is requested.
Before returning any items for warranty,
please contact the Glomex Customer Service
department to receive a RMA which should
be completed and sent with the unit to the
following address:
GLOMEX S.r.l.
Via Faentina 165/G
48124 Ravenna (Italy)
complete with all the accessories supplied at
the time of purchase for shipment.
The serial number must neither be erased nor
made illegible, otherwise the warranty will be
voided.
Sensor (a)
Magnet (b)
Sensor (a)
Sensor (a)
Magnet (b)
Magnet (b)
Every
second
 Loading...