

Page 1

DUAL SIM 4G/Wi-Fi INTEGRATED COASTAL
INTERNET SYSTEM
USER AND INSTALLATION MANUAL
This manual refers to the App weBBoat 4G Plus version 1.5 for iOS and Android
devices
Page 2
weBBoat 4G Plus
1
TECHNICAL SPECIFICATIONS
Antenna dimensions (diam.x H): 250 x 300 mm / 10x12"
Antenna weight: 1,2 kg / 2,65 lb
Automatic switch from Wi-FI registered networks to 4G.
DUAL SIM Management
Roaming Management
4G backup WAN function
LTE 4G up to 100 Mbps in download and 50 Mbps in upload
DC-HSPA+ up to 42 Mbps in download and 5.76 Mbps in upload
3 Ethernet ports
4 Diversity high performance antennas
SMS reboot function
Android and iOS App for an easy control
Easy installation requires only power supply connection 12/24V
UV waterproof resistant Dome
Automatic Firmware upgrade
General Feautures
LTE FDD bands: B1/B2/B3/B5/B7/B8/B20
DC- HSPA+/HASPA+/HSPA/UMTS: 850/900/1900/2100 MHz
GSM/GPRS/EDGE: 800/850/1800/1900 MHz
Power Class 3 (23 dBm) for LTE FDD
Power Class 3 (24 dBm) for UMTS
Power Class E2 (26 dBm) for EDGE 1800/1900 MHz
Power Class E2 (27 dBm) for EDGE 850/900 MHz
Power Class 1 (30 dBm) for GSM/GPRS 1900/1800 MHz
Power Class 4 (33 dBm) for GSM/GPRS 900/850 MHz
Data Rates
Mode LTE: DL 100 Mbps - 50 Mbps UL
DC-HSPA+: DL 43,2 Mbps - 5,76 Mbps UL
WCDMA PS: DL 384 Kbps - 384 Kbps UL
EDGE: DL 236,8 Kbps - 236,8 Kbps UL
GPRS: DL 85,6 Kbps - 85,6 Kbps UL
Complies with IEEE 802.11b/g/n wireless standard
Complies with IEEE 802.3 and IEEE 802.3u Ethernet standards
GL00159
LABEL
Page 3

weBBoat 4G Plus
2
General Features - weBBoat 4G Plus US Version
LTE (FDD) bands: B2/B4/B5/B17
DC-HSPA+/HSPA+/HSPA/UMTS bands: 850/1900 MHz
Data Rates - weBBoat 4G Plus US Version
LTE FDD: Downlink: 100 Mbps, Uplink: 50 Mbps
DC-HSPA+ :Downlink: 42 Mbps, Uplink: 5.76 Mbps
WCDMA: Downlink: 384 kbps, Uplink: 384 kbps
Complies with IEEE 802.11b/g/n wireless standard
Complies with IEEE 802.3 and IEEE 802.3u Ethernet standard
General Features - weBBoat 4G Plus AUS Version
LTE (FDD) B1/B2/B3/B5/B7/B8/B20/B28, all bands with diversity
DC-HSPA+/HSPA+/HSPA/WCDMA B1/B2/B5/B8, all bands with diversity
EDGE/GPRS/GSM 1900/1800/900/850 MHz
Data Rates - weBBoat 4G Plus AUS Version
LTE FDD: DL 150 Mbps/UL 50 Mbps @20M BW cat4
DC-HSPA+: DL 42Mbps/UL 5.76 Mbps
HSPA+: DL 21.6 Mbps/UL 5.76 Mbps
WCDMA PS: DL 384 kbps/UL 384 kbps
WCDMA CS: DL 64 kbps/UL 64 kbps
EDGE: DL 236.8 kbps/UL 236.8 kbps
GPRS: DL 85.6 kbps/UL 85.6 kbps
Complies with IEEE 802.11b/g/n wireless standard
Complies with IEEE 802.3 and IEEE 802.3u Ethernet standard
Federal Communication Commission Interference Statement
This FCC statement is related to weBBoat 4G Plus, for USA market.
This device contains FCC ID: 2AET4-RUT950
This equipment has been tested and found to comply with the limits for a Class B
digital device, pursuant to Part 15 of the FCC Rules.
These limits are designed to provide reasonable protection against harmful interference.
This equipment generates, uses and can radiate radio frequency energy and, if
not installed and used in accordance with the instructions, may cause harmful
interference to radio communications. However, there is no guarantee that interference will not occur in a particular installation.
FCC Caution: Any changes or modifications not expressly approved by the party
responsible for compliance could void the user’s authority to operate this equipment.
This device complies with Part 15 of the FCC Rules. Operation is subject to the
following two conditions: (1) This device may not cause harmful interference,
and (2) this device must accept any interference received, including interference
that may cause undesired operation.
This device and its antennas must not be co-located or operated in conjunction
with any other antenna or transmitter.
IMPORTANT: Exposure to Radio Frequency Radiation.
142 cm minimum distance to general public. Under such configuration, the FCC
radiation exposure limits set forth for a population/uncontrolled environment can
be satisfied.
Page 4

weBBoat 4G Plus
3
Page 5

weBBoat 4G Plus
50
INDEX
1. FOREWORD. . . . . . . . . . . . . . . . . . . . . . . . . . . . . . . . . . . . 51
1.1 INTRODUCTION . . . . . . . . . . . . . . . . . . . . . . . . . . . . . . . . . 51
1.2 IDENTIFICATION weBBoat 4G Plus . . . . . . . . . . . . . . . . . . . . 51
1.3 WARRANTY. . . . . . . . . . . . . . . . . . . . . . . . . . . . . . . . . . . . . 51
1.4 GENERAL SAFETY RULES . . . . . . . . . . . . . . . . . . . . . . . . . . . 53
1.5 ENVIRONMENT . . . . . . . . . . . . . . . . . . . . . . . . . . . . . . . . . . 53
2. PRODUCT DESCRIPTION . . . . . . . . . . . . . . . . . . . . . . . . 54
3. CONTENTS . . . . . . . . . . . . . . . . . . . . . . . . . . . . . . . . . 56
3.1 INSTALLATION . . . . . . . . . . . . . . . . . . . . . . . . . . . . . . . . 57
3.2 INSERTING THE SIM CARDS . . . . . . . . . . . . . . . . . . . . . . 61
4. HOW TO DOWNLOAD CONTROL APP
FOR weBBoat 4G Plus . . . . . . . . . . . . . . . . . . . . . . . . . . 62
5. FIRST TIME SETUP . . . . . . . . . . . . . . . . . . . . . . . . . . . . 64
5.1 SIM 1 CONFIGURATION . . . . . . . . . . . . . . . . . . . . . . . . . . . . 67
5.2 ALTERNATIVE APN CONFIGURATION . . . . . . . . . . . . . . . . . . . 67
5.3 SIM 2 CONFIGURATION . . . . . . . . . . . . . . . . . . . . . . . . . . . . 69
5.4 CONTROL UNIT . . . . . . . . . . . . . . . . . . . . . . . . . . . . . . . . . . 70
6. OPTIONS BUTTON. . . . . . . . . . . . . . . . . . . . . . . . . . . . . 78
6.1 Wi-Fi SETTING . . . . . . . . . . . . . . . . . . . . . . . . . . . . . . . . . . 79
6.2 CHANGE ADMINISTRATOR PASSWORD . . . . . . . . . . . . . . . . . 82
6.3 MANUAL IP CONFIGURATOR . . . . . . . . . . . . . . . . . . . . . . . . . 83
6.4 RESTART ROUTER . . . . . . . . . . . . . . . . . . . . . . . . . . . . . . . . 84
6.5 RESET ROUTER . . . . . . . . . . . . . . . . . . . . . . . . . . . . . . . . . . 84
6.6 FACTORY RESET . . . . . . . . . . . . . . . . . . . . . . . . . . . . . . . . . 84
7. UPDATING FIRMWARE AND SETTINGS BACKUP . . . . . . . . 86
Page 6

weBBoat 4G Plus
51
1. FOREWORD
1.1 INTRODUCTION
Thank you for purchasing the Glomex weBBoat 4G PLUS. We are sure that
you will enjoy the quality and reliability of this device for many years to
come.
This user manual should be read throughly before attempting to install the
device to ensure trouble-free operation. If you are unsure in any aspect of
this installation, please contact a qualified technician or Glomex Customer
Service.
1.2 IDENTIFICATION weBBoat 4G Plus
For any communication with Glomex or its service center, please have the
model and serial number of the weBBoat 4G PLUS handy which can be found
on the outside packaging, page one of this manual, or on the router inside
the weBBoat housing.
1.3 WARRANTY
Glomex guarantees the weBBoat 4G PLUS (IT1004PLUS) against
manufacturing defects for a period of 2 years from date of purchase.
Warranty can be in the form of repair or replacement of the unit if
manufacturing defects have been found and are confirmed by Glomex or one
of its affiliates. In order to validate warranty, either the original sales receipt
or a copy must be provided at the time warranty is requested.
Before returning any items for warranty, please contact the Glomex
Customer Service department to receive a RMA which should be completed
and sent with the unit to the following address:
GLOMEX S.r.l.
Via Faentina 165/G
48124 Ravenna (Italy)
complete with all the accessories supplied at the time of purchase for
shipment.
The serial number must neither be erased nor made illegible, otherwise the
warranty will be voided.
S
WARNING
Retain this user manual and installation guide which contains
you serial number for warranty purposes.
Page 7

weBBoat 4G Plus
52
The warranty does not apply in case of damage due to carelessness, use or
installation not compliant with the instructions given, tampering, product or
serial number modification, damage due to accidental causes or to the
buyer’s negligence.
Moreover, warranty does not apply in case of damage consequent to
connections of the equipment to different voltages than those indicated or to
sudden voltage variations of the network the equipment is connected to, as
well as in case of damage caused by leakage, fire, inductive/electrostatic
discharges or discharges due to lightning, use of cables different to those
provided, overvoltages or other phenomena not related to the equipment.
Finally, the warranty does not apply to problems caused by the telephone
operator and at a Wi-Fi hotspot.
The guarantee is not applicable in case passwords are lost. Keep them in a
safe place.
The parts subject to wear consequent to use such as connection cables,
connectors, external parts and plastic supports are covered by a one-year
period warranty.
The following are not covered by warranty: periodic monitoring, software
updates, settings of the product, maintenance.
After the expiration of the warranty period, the technical support activities
will be carried out charging the customer for the replaced parts, the labour
costs and freight charges, according to current rates.
The equipment will be replaced or repaired under warranty only and
exclusively on Glomex quality department’s approval.
Should any dispute rise, the place of jurisdiction will exclusively be Ravenna
(Italy).
The warranty is provided by:
GLOMEX S.r.l.
Via Faentina 165/G
48124 Ravenna (Italy)
Page 8
weBBoat 4G Plus
53
1.4 GENERAL SAFETY RULES
Carefully read the instructions and follow the recommended precautions to
avoid potential hazards and safeguard your
health and safety, before carrying out any installation and maintenance.
This manual contains the following indications:
S
WARNING
This symbol warns against potential damage to the equipment which could involve the operator’s safety.
Failure to comply with the instructions preceded by the above-mentioned
keywords (WARNING) can cause serious accidents or even the death of the
persons involved.
Moreover, in this Manual, some instructions are given with text in italics,
preceded by the word NOTE.
The information and specifications given in this manual are based upon the
information available at the moment it is written.
In case of doubts, do not hesitate to contact GLOMEX S.r.l. at the following
email:
service@glomex.it
1.5 ENVIRONMENT
Do not throw the appliance away with the normal household waste at the
end of its life, but instead, dispose of at a recycling station. By doing this,
you will help preserve the environment.
Fig. 1
Page 9

weBBoat 4G Plus
54
2. PRODUCT DESCRIPTION
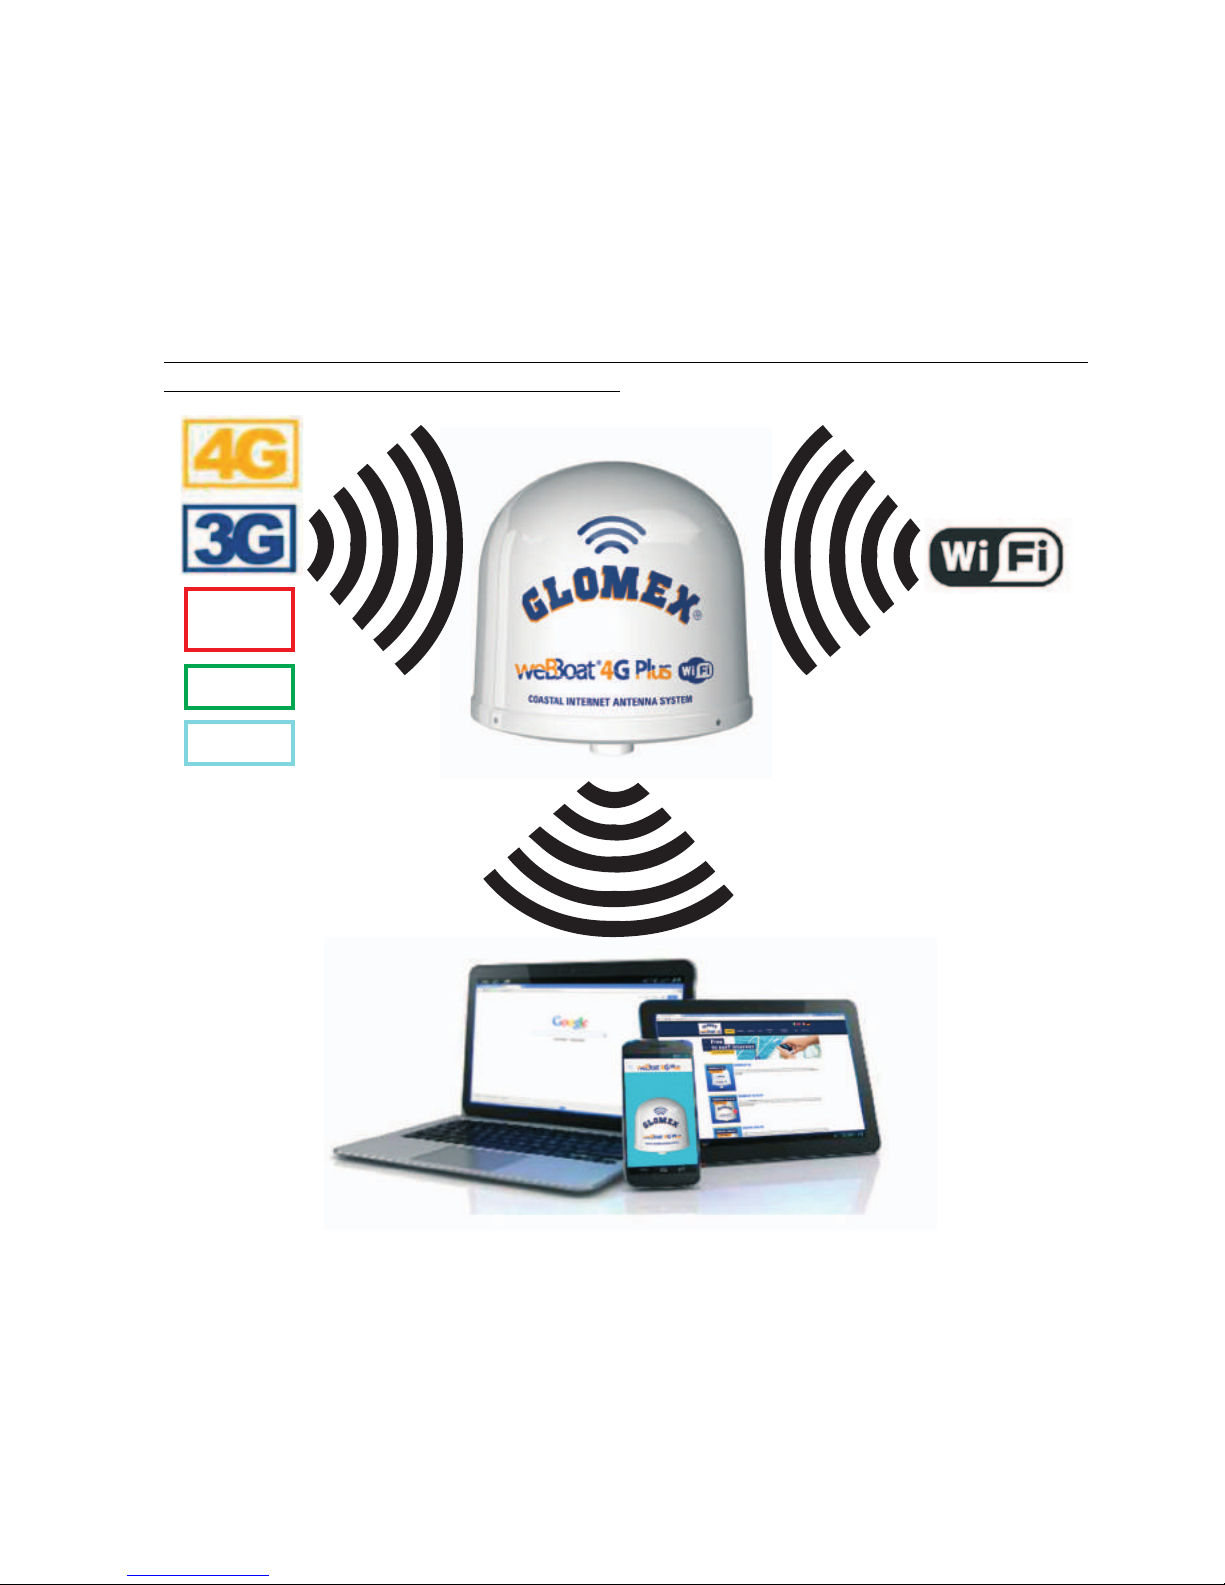
weBBoat 4G Plus is the first unique award-winning 3G/4G/Wi-Fi DUAL SIM
integrated system designed by Glomex to surf the Internet at high speed,
ensuring stable and fast connections up to 20 miles away from the coast.
weBBoat 4G Plus has 2 ea. 4G Diversity antennas and 2 ea. Wi-Fi antennas that
receive the Internet signal and redirect it inside the boat, thereby increasing the
signal strength, with a secure and protected Wi-Fi network that can be used
simultaneously by upto 32 different connected devices. Also, if a known Wi-Fi
network is present and available (such as the local marina's network), weBBoat
4G Plus will automatically connect to it to limit the cost of the Internet
connection.
weBBoat 4G PLUS is a PLUG & PLAY product as the 4G GSM module is
integrated within the radome and, for its operation, it only requires a 12 to
24 Volt power cable (12 VDC or 24 VDC) and one/two SIM cards from any
worldwide telephone operator* for surfing the Internet; all this makes the
system particularly easy to install. weBBoat 4G Plus is also easy to use, due
to the new weBBoat 4G Plus free app available for iOS and Android devices.
NOTE: The distance from the coast within which the weBBoat 4G Plus works
depends on the 3G/4G signal coverage from the transmitter of your cellular
carrier, the correct installation of the weBBoat, and on the height of the
weBBoat antenna.
New functions:
- Free and automatic firmware updates with the possibility to back up
system settings
- Periodic and free App updates
- Technical assistance via APP
weBBoat 4G Plus is provided with:
- 2 high-gain and wide bandwidth antennas to transmit and receive in 3G
and 4G in a Diversity configuration;
- 2 Wi-Fi antennas to receive the Wi-Fi signal of the local Wi-Fi network, thus
limiting the costs of surfing the Internet; The 2 antennas are able to receive
the Wi-Fi signal from twice the distance of the previous version;
- Automatic 4G/Wi-Fi switching with default to Wi-FI to save on connection
charges;
- Automatic SIM card switching to reduce roaming costs;
- 1 3G/UMTS, 4G/LTE, LAN and Wi-Fi router to redistribute the Internet
signal to a maximum of 32 devices (PCs, smartphones and tablets)
present on the boat through the protected and secure weBBoat 4G Plus
Wi-Fi network;
- External slot for 2 Micro-SIM cards with locking system.
Page 10
weBBoat 4G Plus
55
Simply insert one or two Micro-SIM cards (not supplied) into the convenient
external card slots and you can connect all of your Internet devices (smartphone, tablet, PC, etc) to a 3G/4G network or the local Wi-Fi hotspot.
The small internal router (250mm/10" x 300mm/12") will automatically
switch from 3G/4G to Wi-Fi and back to maintain internet connection.
weBBoat 4G Plus, in fact, can disable international roaming (if correctly set),
as described on page 74 (disable roaming).
To avoid excessive costs, we recommend using the Micro-SIM card of the
country in which you are navigating*.
* NOTE: For correct 4G operation, please verify that your service provider is
operating on the LTE network as listed on page 3 of this manual.
GL00222
UMTS
GPRS
2G
Fig. 2
Page 11
weBBoat 4G Plus
56
3. CONTENTS
The weBBoat 4G PLUS is packed and shipped in a sturdy cardboard box and
sealed with Glomex tape to eliminate damage or tampering.
Upon receipt, please check that:
- the packaging is not damaged and the Glomex packing tape is intact.
- the item matches that which was ordered.
- there is no internal damage to the antenna.
- the label with the serial number is present on the antenna. There is also a
label on page 1 of this manual.
In case of damage or missing parts, immediately inform the Retailer, if
possible with appropriate photos.
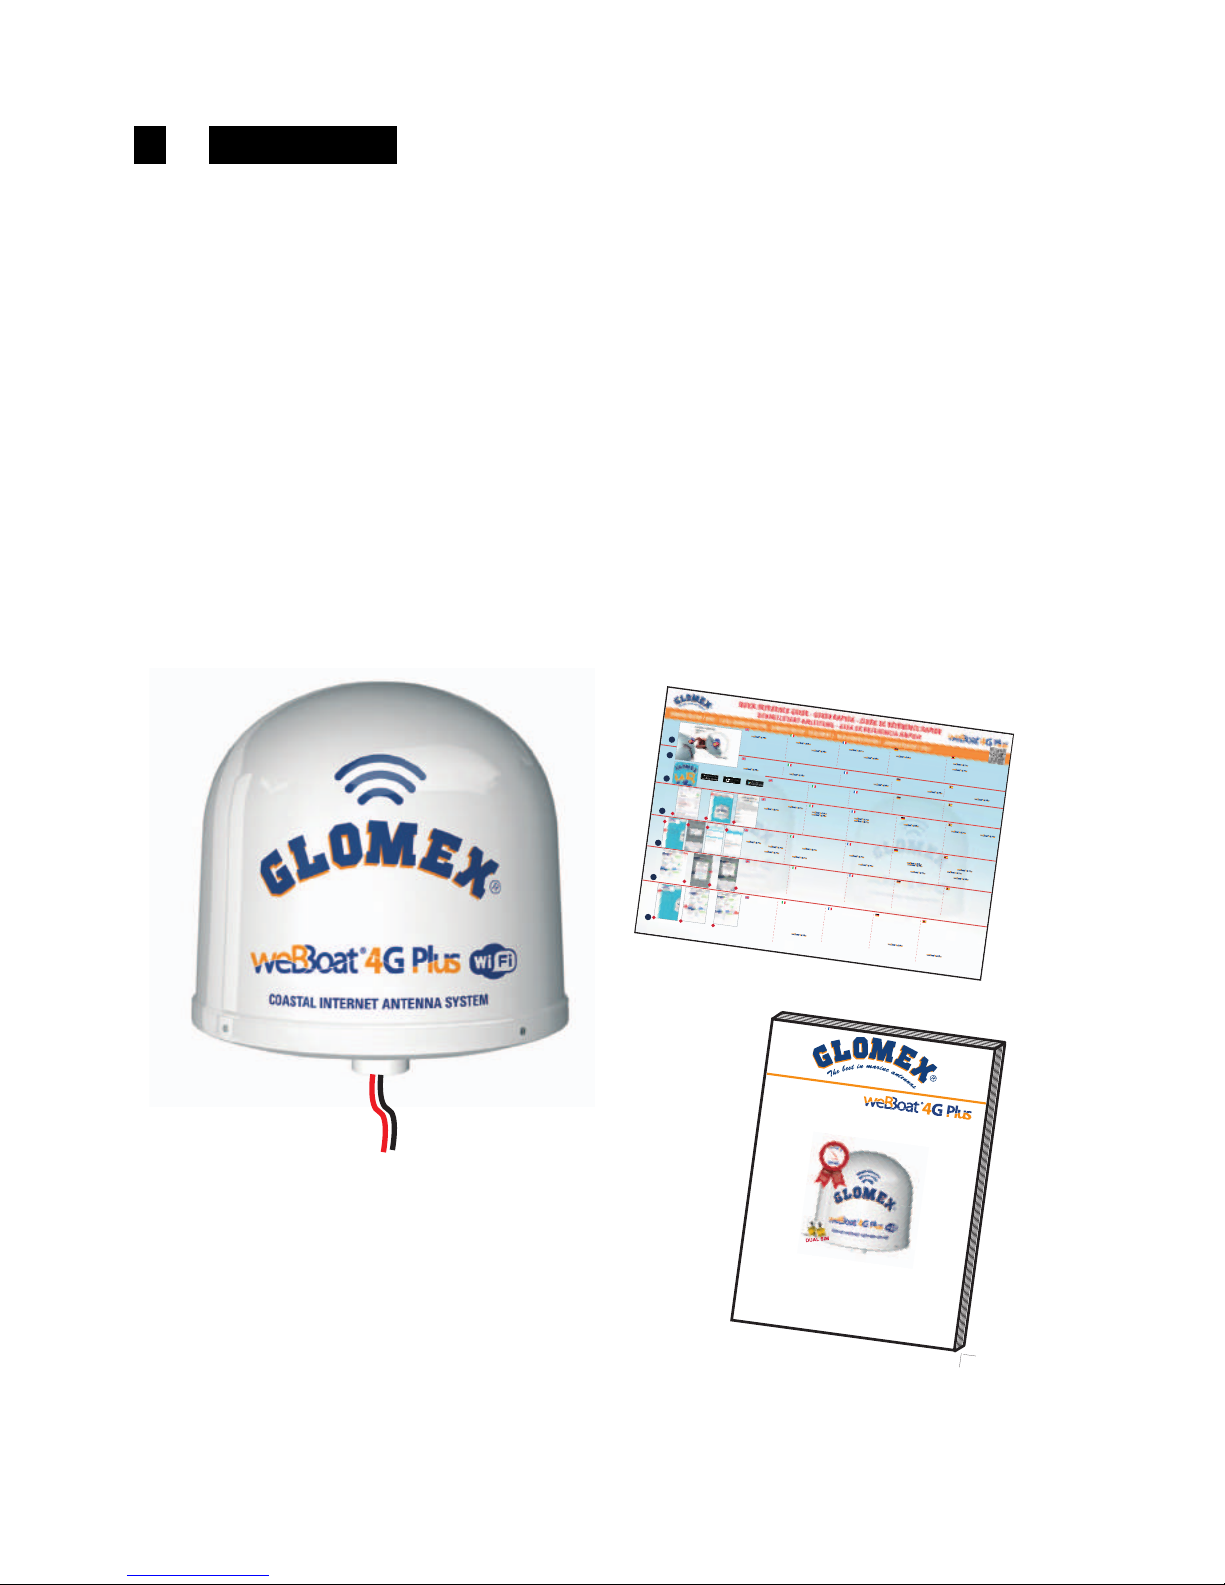
The components contained in the packaging are the following:
- Antenna unit (Fig. 3)
- Quick Reference Guide (Fig. 4)
- Installation and Operating Manual (Fig. 5) - If not present, the manual can
be downloaded from the website www.glomex.it/weBBoat, technical
support section
GL00223
Fig. 3
GL00230
2)
Inserire le due Micro-SIM nelle apposite slot esterne con
il bordo tagliato rivolto verso l’interno. N.B. Se utilizzate il
con una sola Micro-SIM, essa dovrà
essere inserita nella slot 1.
1) IMPORTANTE: Inserire le Micro-SIM
con spento.
Vi consigliamo di utilizzare le Micro-SIM senza
codice PIN, tuttavia il è in
grado di gestire le schede impostate con il PIN.
3)
Scaricare l’App weBBoat Plus nel
vostro dispositivo (solo uno) da App Store
(per i dispositivi Apple), da Google Play
(per i dispositivi Android) e da
Microsoft Store (per i dispositivi Windows).
4)
Collegare il dispositivo alla rete Wi-Fi del
(A). Aprire l’App
e selezionare il tasto
menù in alto a sinistra (B). Cliccare su
PANNELLO DI CONTROLLO e compilare il
modulo di registrazione (C). Nota: alla prima
accensione la rete wifi si chiama
“Glomex_weBBoat” e non ha pwd.
Si consiglia, dopo i settaggi iniziali,
di modificare dal menu il nome della rete
e la pwd (vedi punto 6).
4)
Connect your device to the
Wi-Fi network (A). Open the App
and select the menu button
(B). Click CONTROL PANEL and fill in the
registration form (C).
Note: when starting for the first time the WiFi
network is called "Glomex_WeBBoat" and have
no password. We advise you, after the initial
setup, to modify the name of the network and
to indicate a password. (See n°6).
5)
Cliccare su CONFIGURAZIONE INIZIALE (A), inserire la
password amministratore: admin01
(B), cliccare su OK e
Accetta e vai. Scegliere il Paese e l’APN della Micro-SIM 1
inserita nel (C) e cliccare su Procedere.
Se è stata inserita una seconda Micro-SIM ripetere
l’operazione altrimenti cliccare Saltare. A questo punto, se
disponibile, selezionare la rete Wi-Fi esterna a cui collegare
il . Se non disponibile cliccare Saltare.
Dopo aver effettuato i sopracitati passaggi avrete una
schermata riassuntiva (D). Se avete fatto le scelte corrette
selezionare Salva altrimenti cliccare Arresta.
7)
Cliccando
PANNELLO DI CONTROLLO
del menù
(A) si apre la schermata in cui sono riportate
tutte le informazioni relative al segnale, alle
schede SIM e all’APN in uso. Per cambiare la
scheda SIM in uso cliccare sul pulsante
corrispondente (B);
l’operazione può richiedere alcuni minuti.
Per attivare l’autoswitch 4G/WiFi selezionare
il relativo tasto sul Pannello di controllo (C). A
questo punto è possibile navigare in internet
con il vostro fino a circa
20 miglia dalla costa.
7)
Clicking
CONTROL PANEL
(A) you will
see all the information related to the
signal, the SIM cards and the APN
in use. To change the SIM card in
use click on the corresponding
button (B);
this may take several minutes. To
enable the 4G/WiFi Autoswitch,
select that Autoswitch button (C).
Now you can surf the internet with
your weBBoat 4G Plus up to,
approximately, 20 miles from the
coast and you can use up to
2 Micro-SIM Cards.
2
1
3
4
5
6
7
A
7)
En cliquant sur
TABLEAU
DE CONTRÔLE
(A), vous verrez toutes
les informations relatives au signal, les cartes
SIM et l'APN en cours d'utilisation. Pour
changer la carte SIM en cours d'utilisation,
cliquez sur le bouton correspondant (B); cela
peut prendre plusieurs minutes. Pour
activer l’Autoswitch 4G/WiFi, sélectionnez le
bouton AutoSwitch (C). Maintenant, vous
pouvez surfer sur Internet avec votre
weBBoat 4G Plus jusqu'à environ 20 miles
de la côte et vous pouvez utiliser jusqu'à
2 cartes Micro-SIM.
7)
Durch Klicken auf Schalttafel (A) sehen Sie alle
signalbezogenen Informationen, die SIM-Karten
und die APN, welche in Gebrauch ist. Um auf die
andere SIM-Karte zu wechseln, wählen Sie die
entsprechende Taste (B); das kann mehrere
Minuten dauern. Um die automatische
4G/WiFi-Umschaltung zu aktivieren, wählen Sie
die Auto-Switch-Taste (C). Jetzt können Sie in
einer Entfernung von bis zu etwa 20 Meilen zur
Küste mit Ihrer im Internet und
Sie können bis zu 2 Micro-SIM-Karten
verwenden.
7)
Al hacer clic en
PANEL DE
CONTROL
(A), verá toda la
información relacionada con
el señal, las tarjetas SIM y
de la APN en uso.
Para cambiar la tarjeta SIM
en uso, haga clic en el botón
correspondiente (B);
Esto puede tomar varios
minutos. Para permitir el
Auto-Conmutador 4G/WiFi,
seleccione el botón
Auto-Conmutador (C). Ahora
se puede navegar por
Internet
con su
hasta, aproximadamente, a
20 millas de la costa y se puede
utilizar hasta 2 tarjetas micro-SIM.
3)
Download the weBBoat Plus App to
your device (only one) from App Store (for
Apple devices), from Google Play (for
Android devices) and Microsoft Store
(for Windows devices).
3)
Télécharger l’App weBBoat Plus de
votre appareil (un seul) sur l’App Store
(pour les appareils Apple), Google Play
(pour les appareils Android) ou
Microsoft Store (pour les appareils Windows).
3)
Laden Sie die weBBoat Plus App auf Ihrem
Gerät (nur eine) aus dem App Store
(für Apple-Geräte), von Google Play
(für Android-Geräte) und Microsoft Store
(für Windows-Geräte).
3)
Descargar el weBBoat Plus App sobre el dispositivo
(sólo uno) desde App store (para los dispositivo Apple)
de Google Play (para los dispositivos Android) y de
Microsoft Store (para los dispositivos Windows).
1) IMPORTANT: Insert the Micro-SIM cards
with off. We recommend
using the Micro-SIM without PIN code,
however weBBoat 4G Plus is able to
works with Micro-SIM card with PIN.
2)
Insert the two Micro-SIM cards in the
external slot with the cut edge facing
inwards. IMPORTANT: If you use the
with a single Micro-SIM,
please insert it in slot 1.
D
1) IMPORTANT: Insérez les cartes Micro-SIM
avec Plus éteint. Nous vous
recommandons d'utiliser la micro-SIM sans
code PIN, cependant
fonctionne aussi avec les cartes Micro-SIM
avec un code PIN.
1) WICHTIG: Legen Sie die Micro-SIM-Karten mit
off. Wir empfehlen die
Verwendung des Micro-SIM ohne PIN-Code,
jedoch weBBoat 4G Plus arbeitet mit
Micro-SIM-Karte mit PIN-fähig ist.
1) IMPORTANTE: Inserte las tarjetas micro-SIM con
Plus apagado. Se recomienda utilizar
el micro-SIM sin código PIN, sin embargo
funciona tambien con la tarjeta
micro-SIM con el PIN.
2)
Insérez les deux cartes Micro-SIM dans la prise
externe avec le bord coupé vers l'intérieur.
IMPORTANT: Si vous utilisez le
avec une seule micro-SIM, insérez la dans
l'emplacement numéro 1.
2)
Setzen Sie die beiden Micro-SIM-Karten in den
äußeren Schlitz mit der Schnittkante nach innen
gerichtet. Wichtig: Wenn Sie die
mit einem einzigen Micro-SIM verwenden, bitte 1 in
Steckplatz ein.
2)
Introducir las dos tarjetas micro-SIM en la ranura
externa con el borde cortado hacia dentro.
IMPORTANTE: Si utiliza el con un solo
micro-SIM, por favor, insertarlo en la ranura 1.
4)
Connectez votre appareil au réseau Wi-Fi du
(A). Ouvrez l'App
et sélectionnez le bouton de
menu (B). Cliquez sur TABLEAU DE CONTRÔLE
et remplissez le formulaire d'inscription (C).
Note : au premier démarrage le réseau wifi
s’appelle “Glomex_WeBBoat”
et n’as pas de
mot de passe. Nous vous conseillons, après la
configuration initiale, de modifier le nom du
réseau et d’indiquer un mot de passe. (voir point n°6).
4)
Verbinden Sie Ihr Gerät mit dem
-Wi-Fi-Netzwerk (A). Öffnen
Sie die App weBBoat Plus und wählen Sie die
Menü-Taste (B). Klicken Sie auf
SCHALTTAFEL
und
füllen Sie das Anmeldeformular (C).
Bemerken : zum ersten Mal anfangend, wird
das WiFi-Netzwerk "Glomex_WeBBoat"
genannt und kein Kennwort haben. Wir beraten
uns Ihnen nach der anfänglichen Einrichtung,
den Namen des Netzwerks zu modifizieren und
ein Kennwort anzuzeigen. (Sieh N°6).
4)
Conectar el dispositivo a la red Wi-Fi de
(A). Abre la App
y seleccione el botón de menú (B). Haga clic en
PANEL DE CONTROL y rellenar el formulario de
inscripción (C). Nota: al primer arranque la red
wifi se llama "Glomex_WeBBoat"
y no tiene
contraseña. Le aconsejamos, después de la
configuración inicial, modificar el nombre de la
red e indicar una contraseña. (Ver punzado n°6).
5)
Click CONFIGURATION WIZARD (A), insert the
requested password: admin01 (B), click OK and
agree and proceed. Choose the country and the
correct APN of the Micro-SIM Card 1, inserted in
(C) and click Next. If there is a
second Micro-SIM Card on ,
repeat this instruction, otherwise click Skip.
Then, if available, select the external Wi-Fi
network to connect the .
If there is not an external WiFi network, click Skip.
After that, you will have a summary screen (D).
If you have made the correct choices select
Save, otherwise click Quit.
5)
Cliquez sur CONFIGURATION INITIALE (A), Entrez
le mot de passe: admin01 (B) et cliquez sur OK et
Accepter et continuer. Choisissez le pays et l'APN
correct de la carte Micro-SIM 1, inséré dans le
(C) et cliquez sur Suivant. S'il y a
une deuxième carte Micro-SIM sur répétez cette
opération, sinon cliquez sur Ignorer. Ensuite, si
présent, sélectionnez le réseau Wi-Fi externe pour
connecter le . S'il n'y a pas un
réseau WiFi externe, cliquez sur Ignorer. Après
cela, vous aurez un écran de résumé (D). Si vous
avez fait les bons choix, sélectionnez Enregistrer,
sinon cliquez sur Annuler.
5)
Klicken Sie auf die Schaltfläche Konfigurations-Assistent (A)
und geben Sie das Password ein: admin01 (B) und klicken Sie
auf OK und Zustimmen und fortfahren. Wählen Sie das Land
und die korrekte APN der Micro-SIM-Karte , welche im
Kartenslot 1 der steckt (C). Klicken Sie auf
Weiter. Wenn die mit einer zweiten
Micro-SIM-Karte betrieben werden soll, wiederholen Sie
diesen Vorgang, andernfalls klicken Sie auf Überspringen.
Dann, wenn verfügbar, wählen Sie das externe
Wi-Fi-Netzwerk um die damit zu verbinden.
Wenn kein externes WiFi-Netzwerk verfügbar ist, klicken Sie
auf Überspringen. Danach erhalten Sie einen
Übersichtsbildschirm (D). Wenn Sie die richtige Auswahl
vorgenommen haben, wählen Sie Speichern, andernfalls
klicken Sie auf Beenden.
5)
Haga clic en PRIMERA CONFIGURACIÓN (A) y
introduzca la contraseña solicidata: admin01 (B) y
haga clic en OK y Aceptar y continuar. Elija el país
y la correcta APN de la tarjeta micro-SIM 1,
insertada en el (C) y haga clic en
Siguiente. Si hay una segunda tarjeta micro-SIM en
el , repetir esta instrucción, de lo
contrario haga clic en Omitir. Entonces, si está
disponible, seleccione la red Wi-Fi externa para
conectar el . Si no hay una red
Wi-Fi externa, haga clic en Omitir. Después de eso,
tendrá una pantalla de resumen (D). Si ha tomado las
decisiones correctas selecciona Guardar, de lo contrario
haga clic en Interrumpe.
6)
Per modificare la password dell’ amministratore, andare su
PANNELLO DI CONTROLLO, cliccare sul tasto sull‘icona
impostazioni in alto a destra (A) e cliccare su Cambia
Password (B). A questo punto digitare la nuova password
in entrambi gli spazi (C).
Modifica SSID e PWD della rete generata dal weBBoat.
Si consiglia di cambiare l’SSID (ad esempio col nome della
barca) del weBBoat e la PWD associata per proteggere
la propria rete di bordo da un uso improprio.
Per cambiare SSID e PWD aprire il menu “modifica
impostazioni WIFI” e seguire le istruzioni. N.B: il fusibile di
protezione del weBBoat è del tipo 5x20 1A rapido.
N.B. Conservare la nuova password in un luogo sicuro.
6)
To change the password, go to CONTROL PANEL ,
click on settings icon on the top right (A)
and click Change Password (B). Now, insert the new
password in both spaces (C).
Modify SSID and Password of the network generated
by the WeBBoat. We advise you to change the SSID
of the WeBBoat (for example using the name of the
boat) and the password to protect your network. To
modify the SSID and the password, open the menu "
Modify WiFi setup " and to follow the instructions. We
advise you to keep the new password in a safe place.
Note: the fuse of protection of the WeBBoat is of
type 5x20 1A. IMPORTANT: Keep the new password
in a safe place and do not forget it.
6)
Pour changer le mot de passe, allez sur TABLEAU
DE CONTRÔLE, cliquez sur l’icône des paramètres en
haut à droite (A) et cliquez sur Change Password (B).
Maintenant, insérez le nouveau mot de passe dans les
deux espaces (C).
Modifier SSID et Mot de Passe du réseau générés
par le WeBBoat. Nous vous conseillons de changer
le SSID du WeBBoat (par exemple avec le nom
du bateau) et le mot de passe pour protéger votre réseau.
Pour modifier le SSID et le mot de passe, ouvrir le menu
« Modifier les paramètres wifi » et suivre les instructions.
Nous vous conseillons de conserver le nouveau mot de
passe en lieu sûr. Note : le fusible de protection du
WeBBoat est de type 5x20 1A.
IMPORTANT: Conservez le nouveau mot de passe dans
un endroit sûr et ne l'oubliez pas.
6)
Um das Passwort zu ändern, gehen Sie auf SCHALTTAFEL , klicken
Sie auf die Einstellungen Symbol auf der rechten
oberen (A) und klicken Sie auf Passwort ändern (B). Legen
Sie nun dasneue Kennwort in beiden Räumen (C).
Modifizieren Sie SSID und Kennwort des durch den WeBBoat
erzeugten Netzwerks. Wir empfehlen Ihnen, den SSID des
WeBBoat (zu ändern, zum Beispiel, den Namen des Bootes)
und des Kennwortes gebrauchend(benutzend), um Ihr
Netzwerk zu schützen. Um den SSID und das Kennwort zu
modifizieren, öffnen Sie sich das Menü " Modifiziert WiFi
Einrichtung " und den Anweisungen zu folgen. Wir empfehlen
Ihnen, das neue Kennwort in einem sicheren Platz zu behalten.
Bemerken Sie(Nehmen Sie zur Kenntnis): die Sicherung
(Zünder) des Schutzes des WeBBoat ist von Typ 5x20 1A.
WICHTIG: das neue Passwort an einem sicheren Ort
aufbewahren und es nicht zu vergessen.
6)
Para cambiar la contraseña, vaya a PANEL DE CONTROL,
haga clic en icono de configuración en la parte superior
derecha (A) y haga clic en Cambiar contraseña (B). Ahora,
introduzca la nueva contraseña en ambos espacios (C).
Modificar a SSID y Contraseña de la red generados por el
WeBBoat. Le aconsejamos cambiar el SSID del
WeBBoat (por ejemplo con nombre del barco) y la
contraseña para proteger su red. Para modificar el SSID
y la contraseña, abrir el menú " Modificar los parámetros
wifi " y seguir las instrucciones. Le aconsejamos
conservarla nueva contraseña en lugar seguro. Nota: el
fusible de protección del WeBBoat es de tipo 5x20 1A.
IMPORTANTE: Mantenga la nueva contraseña en un lugar
seguro y no se olvide de ella.
B
C
A
B
C
A
B
C
A
B
C
DOWNLOAD THE USERMANUAL
Fig. 4
Fig. 5
GL00224
S
IS
T
E
M
A
I
N
T
E
R
N
E
T
CO
S
T
IE
R
O
INT
E
G
R
A
T
O
4
G
/
WI-
F
I A D
O
P
P
IA MICR
O
-
S
IM
D
U
A
L
M
I
C
R
O
-
S
IM
4
G
/W
i-
F
i
IN
T
E
G
R
A
T
E
D C
O
A
S
T
A
L
INT
E
R
N
E
T
S
Y
S
T
E
M
S
Y
S
T
È
M
E
IN
T
E
R
N
E
T
CO
S
T
A
L
INT
É
G
R
É
4
G
/W
i-
F
i SO
U
B
L
E
MICR
O
-
S
IM
IN
T
E
G
R
IE
R
T
E
S
4
G
/W
i-
F
i-
C
O
A
S
T
A
L
-
INT
E
R
N
E
T
-
S
Y
S
T
E
M
MIT DU
A
L
MICR
O
-
S
IM
S
I
S
T
E
M
A
INT
E
G
R
A
D
O
D
U
A
L
MICR
O
-
S
IM 4
G
/W
i-
F
i P
A
R
A
RE
C
IBIR
IN
T
E
R
N
E
T
D
E
S
D
E
L
A
C
O
S
T
A
www.gl
om
e
x
.
i
t
–
www.gl
omex.us
M
AN
UA
LE
D’INS
TALLA
Z
I
ONE
E
D’US
O
US
E
R
A
ND
INS
T
A
L
LATION MAN
UAL
M
A
NU
E
L
D
’
I
N
S
TALLATIO
N
E
T UTILIS
ATIO
N
B
E
TR
I
E
BS
-
UN
D INS
TA
LLA
T
I
ONS
H
AND
BU
CH
M
A
NUA
L
DE
L
US
UAR
I
O
E
I
N
S
TAL
AC
I
ÓN
Th
is
m
a
n
u
a
l
r
e
f
e
r
s
t
o
t
h
e
A
p
p
we
B
B
o
a
t
4
G
P
l
u
s
ver
sio
n
1
.
5
f
o
r
i
O
S
a
n
d
A
n
d
r
o
i
d
d
e
vice
s
Page 12
weBBoat 4G Plus
57
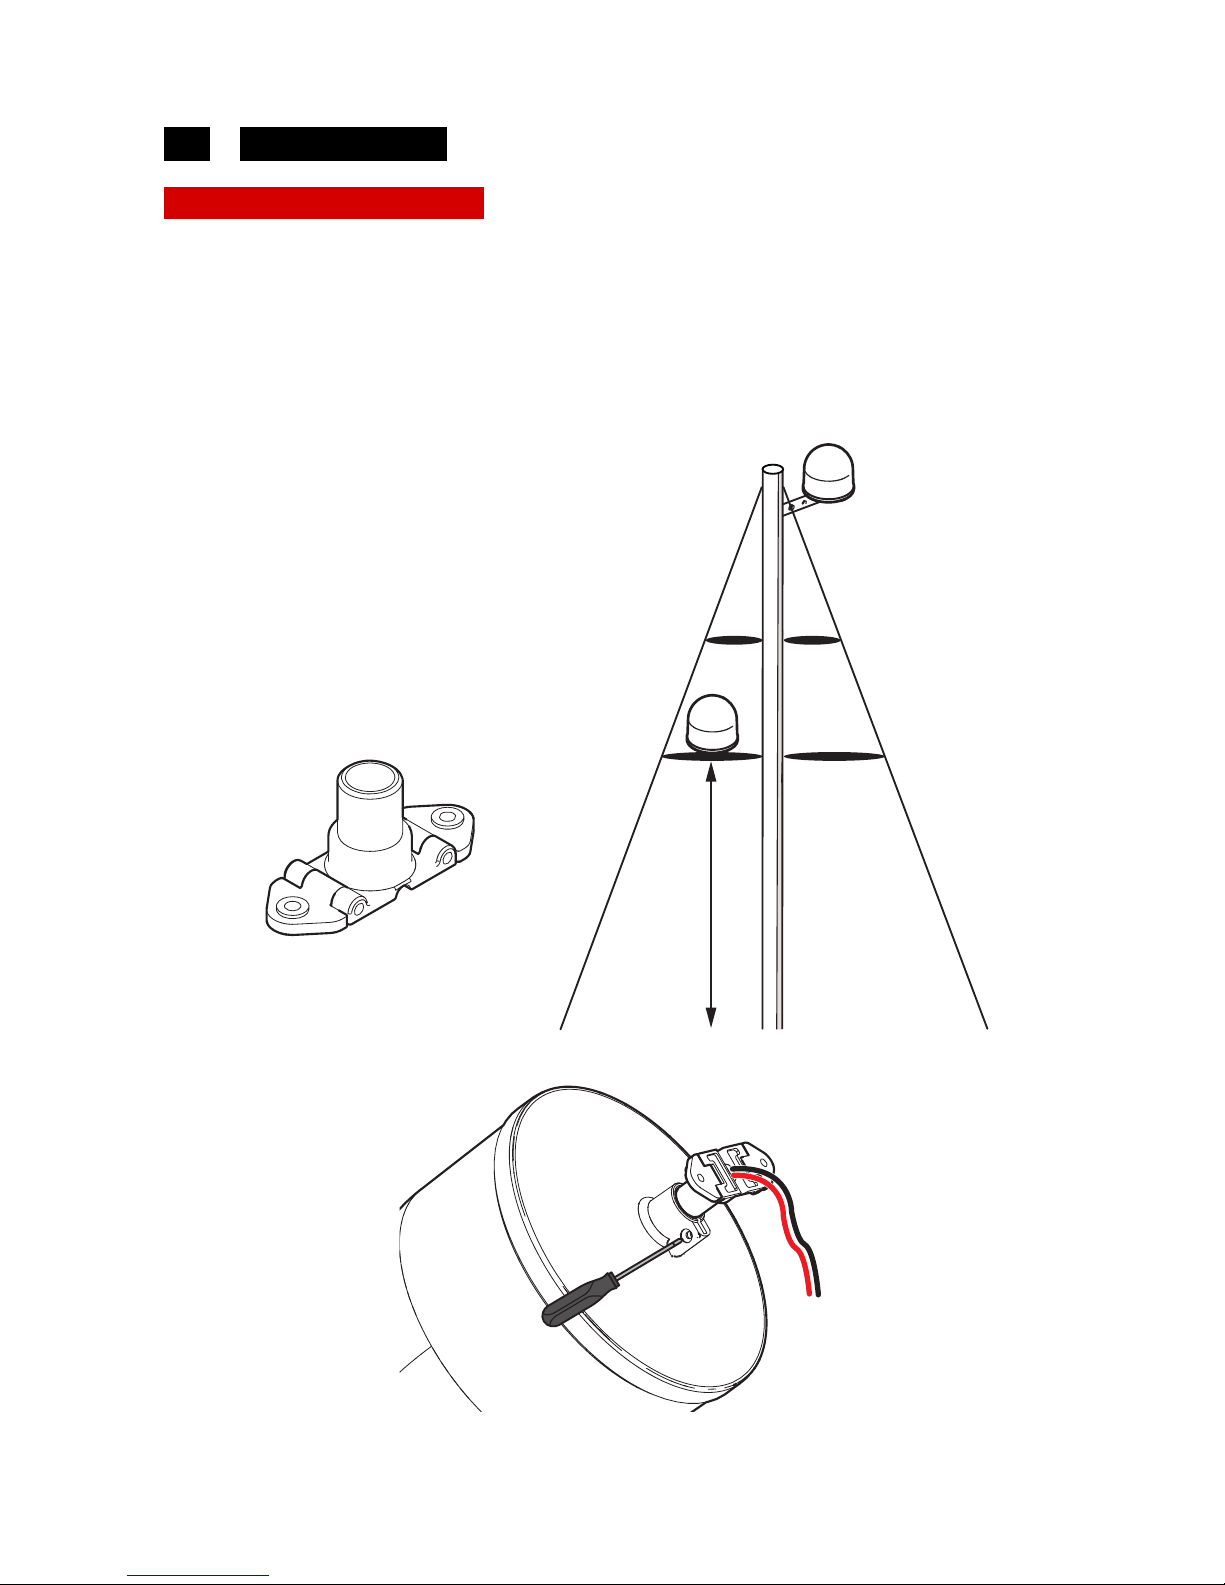
3.1 INSTALLATION
Installation on sailboats
It is advisable to place the weBBoat 4G Plus to a maximum height of 8/10
meters on the spreader with the support Glomex code ITM001 (not
supplied).
The weBBoat 4G Plus must be fixed to the support by tightening the screw
on the bottom of weBBoat 4G Plus with a screwdriver (Fig. 7).
IMPORTANT: Do not install the weBBoat 4G Plus at the masthead.
GL00153
NO
OK
8 - 10 m MAX
Fig. 6
WITH ITM001
(OPTIONAL)
WITH ITM001
(OPTIONAL)
GL00188
Fig. 7
Page 13
weBBoat 4G Plus
58
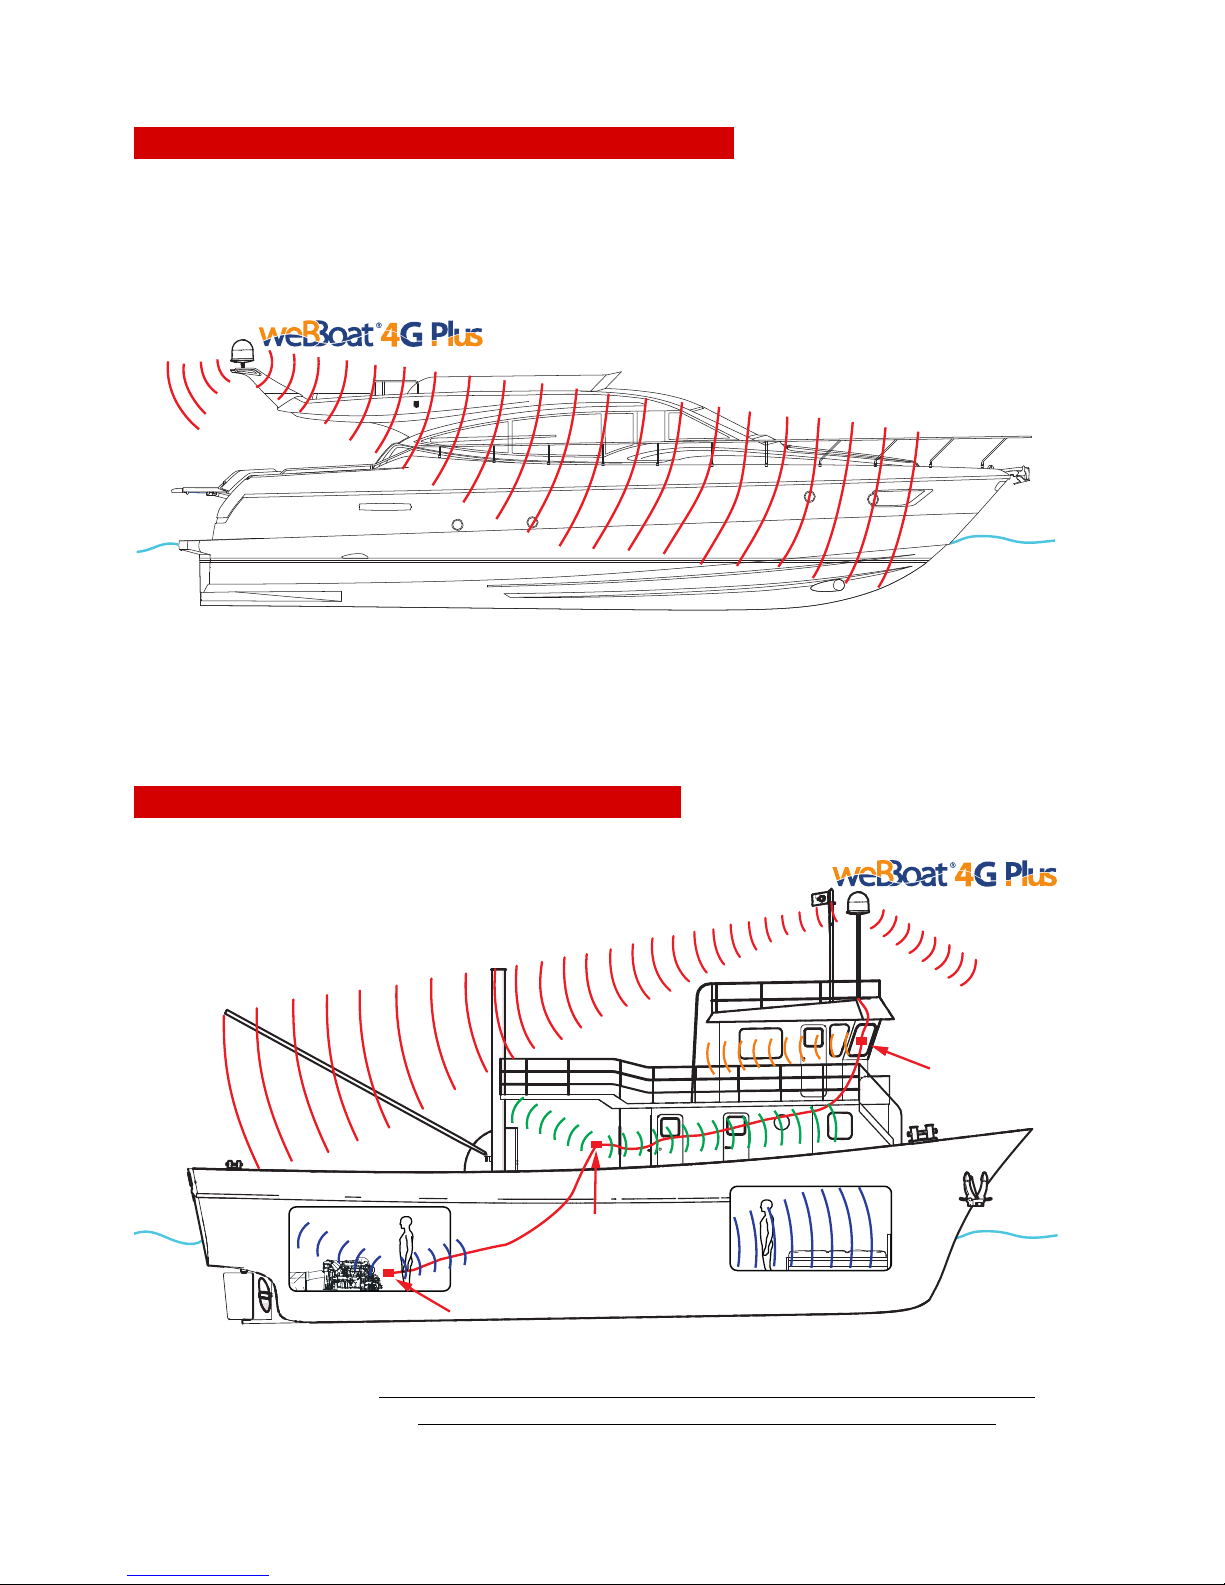
Typical installation on fiberglass power boats
Typical installation on metal power boats
GL00231
OK
Fig. 8
GL00225
Fig. 9
FIRST
ACCESS
POINT
SECOND
ACCESS
POINT
Note: Up to 4 access points can be connected to the weBBoat
4G PLUS for complete coverage inside a metal vessel.
THIRD
ACCESS
POINT
Page 14

weBBoat 4G Plus
59
Warning:
- The weBBoat 4G Plus must be fixed to a mount by tightening the screw in the
base of the weBBoat 4G Plus by means of a screwdriver (Fig. 7).
- The installation of the weBBoat 4G Plus near or above a flat metal surface
may result in significant reduction of the Wi-Fi and 3G/4G signal strength.
- Do not mount the weBBoat 4G Plus near metal obstructions that may
interfere with the Wi-Fi signal.
When using the weBBoat 4G PLUS on metal vessels, Wi-Fi signal can be very
weak. For this reason, it is necessary to use an access point (maximum of 4
APs can be used) inside the vessel. These can be connected to an external
network hub (optional) which then connects to the router inside the weBBoat
4G PLUS radome via an Ethernet cable (optional) (Fig. 10).
Electric connections
For proper functioning of weBBoat 4G Plus, simply connect the antenna
power cable to a 12/24 Vdc source following the guidelines below.
Connect the red (positive) and the black wire (negative) coming out from the
base of weBBoat 4G Plus to the battery through a twin lead power cable. The
connection can be made by soldering or with a crimp sleeve. It is advisable to
have this procedure carried out by a technician.
IMPORTANT
: Incorrect connection or reverse polarity on the power supply
will blow the internal fuse of the weBBoat 4G PLUS.
The power line (not supplied) which connects the two wires coming out from
the base of weBBoat 4G Plus must have cables with a cross section of 1.5
mm² by a length up to 10 m, and 2.5 mm² for longer lengths. Minimum
power supply voltage: 9Vdc.
NOTE: To prevent boat battery drain, we recommend attaching the weBBoat
power supply to a fuse panel that can be turned off when the unit is not in
use.
GL00236
Fig. 10
Page 15

weBBoat 4G Plus
60
NOTE: In order to receive the signal from the weBBoat inside metal vessels,
up to a maximum of four access points (according to your needs) must be
placed inside the boat, which must be linked with a switch to the router
inside the weBBoat 4G Plus via an Ethernet network cable.
GL00227
+
+
-
-
C
O
A
S
T
A
L
I
N
T
E
R
N
E
T
A
N
T
E
N
N
A
S
Y
S
T
E
M
12/24 Vdc
Fig. 11
CIRCUIT BREAKER
1st ACCESS
POINT
2nd ACCESS
POINT
3rd ACCESS
POINT
4th ACCESS
POINT
ROUTER
SWITCH
ETHERNET
CABLE
OPTIONAL
INSTALLATION
Page 16

weBBoat 4G Plus
61
3.2 INSERTING THE SIM CARDS
NOTE: Insert the micro-SIM card(s) with weBBoat 4G Plus off.
Insert the two Micro-SIM cards in the dedicated external slots with the
cut edge facing down and the contact facing outwards, as shown in
Fig.
12
.
NOTE: If you use weBBoat 4G Plus with a single Micro-SIM card, it must
be inserted in slot 1.
S
WARNING
SWITCH OFF weBBoat 4G Plus BEFORE INSERTING THE SIM
CARD.
IMPORTANT
: If the SIM card has a PIN, we recommend to remove the PIN
code request before inserting the SIM card into weBBoat 4G Plus. This can
be done via a mobile phone and varies according to the individual mobile
phones. Please check the steps in the instructions of your mobile phone, or
contact your carrier.
GL00228
Fig. 12
SLOT FOR Micro-SIM 2
CARD
CUT EDGE OF SIM
CARD
SLOT FOR MicroSIM 1 CARD
BOTTOM OF RADOME
Page 17

weBBoat 4G Plus
62
4. HOW TO DOWNLOAD CONTROL APP FOR weBBoat
4G Plus
To control your weBBoat 4G PLUS, you must download the weBBoat 4G PLUS
app from the App Store for Apple devices or from the Play Store for Android
devices.
NOTE: since we mention Apple and Android, we will need to put the usage
statement about them in here as well.
The weBBoat 4G Plus App is essential to setup weBBoat 4G Plus.
IMPORTANT: The app instructions should be used only by the weBBoat
4G Plus administrator (using only one device). After following all the
steps in the following instructions, all the other internet devices (up to
31) must simply select the Wi-Fi network of the webboat and enter the
password, if required.
GL00229
Fig. 13
Page 18

weBBoat 4G Plus
63
After the download, activate the Wi-Fi connection, then connect to the
weBBoat 4G Plus. The weBBoat 4G Plus network is called "Glomex_weBBoat"
(Fig. 14).
Please note YOU MUST CONNECT YOUR IOS OR ANDROID DEVICE TO
THE Wi-Fi NETWORK OF THE WEBBOAT AND NOT TO THE HARBOR,
OFFICE NETWORK OR OTHERS.
Fig. 14
iOS
Android
Page 19

weBBoat 4G Plus
64
5. FIRST TIME SETUP
Check that your device (Smartphone or Tablet) is connected to the
“Glomex_weBBoat” Wi-Fi network.
NOTE the weBBoat 4G Plus Wi-Fi network has no password. It is
recommended to change the network name and password after the initial
settings (see page 82 - point 6.2).
Open the weBBoat 4G Plus App and select the menu button on the top left
(Fig. 15).
GL00239
iOS Android
Page 20

weBBoat 4G Plus
65
Select CONTROL PANEL (Fig. 16), enter the administrator's password
admin01, then press OK in the iOS version or press Connect in the Android
version (Fig. 17).
iOS Android
Fig. 17
iOS
Android
Page 21

weBBoat 4G Plus
66
Read the informative note and press Agree and proceed in the iOS version or
press the arrow in the Android version (Fig. 18).
Fig. 18
iOS Android
Page 22

weBBoat 4G Plus
67
The SIM 1 configuration window will then appear.
5.1 SIM 1 CONFIGURATION
If the protection PIN is in the SIM card, enter it in the SIM Pincode 1 field.
Then select the country corresponding to the SIM card carrier, select the
telephone carrier and press Next or press the arrow in the Android version
(Fig. 19).
5.2 ALTERNATIVE APN CONFIGURATION
If your telephone operator is not on the list, select Custom APN in the iOS
version or CUSTOM APN in the Android version (Fig. 20).
Fill in the requested fields (Fig. 21):
- Provider: Name of the telephone carrier
- APN: Check the correct APN according to your data plan with your
telephone carrier
- Username: Fill in if required by the settings communicated by the
telephone carrier
- Password: Fill in if required by the settings communicated by the
telephone carrier
Press Save custom APN in the iOS version or Save setting in the Android
version.
Fig. 19
iOS Android
Page 23

weBBoat 4G Plus
68
Fig. 20
iOS Android
Fig. 21
iOS Android
Page 24

weBBoat 4G Plus
69
5.3 SIM 2 CONFIGURATION
Follow the same procedure as SIM 1 Configuration if you have a second SIM.
If a second SIM is not present, continue pressing SKIP.
At this point a screen summarizing the choices made will be displayed; now
press Save in the iOS and Android version (Fig. 22).
Wait about 1 minute and check the device settings to make sure it is
connected to the weBBoat 4G Plus Wi-Fi network. Launch the App again and
enter the control panel.
Fig. 22
iOS Android
Page 25

weBBoat 4G Plus
70
5.4 CONTROL UNIT
This screen display the system status which includes mobile connection, WiFi connection, and the following information:
Fig. 23
iOS Android
Page 26

weBBoat 4G Plus
71
GL00237
Fig. 24
Menu
Primary SIM
used selection
Wi-Fi network
connection status
AUTOSWITCH
mode or
mobile network
forcing
selection
Change APN
Refresh
Options
Mobile network
connection status
iOS
Page 27

weBBoat 4G Plus
72
GL00237B
Menu
Primary SIM
used selection
Wi-Fi network
connection status
AUTOSWITCH
mode or mobile
network forcing
selection
Change APN
Refresh
Options
Mobile
network
connection
status
Fig. 24a
Android
Page 28

weBBoat 4G Plus
73
Menu button (see page 65 - Fig. 16)
- Configuration wizard: guided weBBoat 4G Plus configuration procedure
- Control Panel: where you access the weBBoat 4G Plus status screen
- User registration: user registration form
- Technical assistance: send an email to ask Glomex for technical assistance.
To properly send the email to Glomex, weBBoat 4G Plus must be connected
to a data network. (If it is not connected to a data network, you can in any
case write the email that will be stored in the memory and will be sent as
soon as there is a connection)
- Glomex www: link to the Glomex website
- Glomex shop: link to the Glomex online shop
Refresh button: to update the status screen.
Options button: see page 78.
Internet via: displays the type of data network being used (3G/4G or Wi-Fi
will be displayed).
Connected via: displays the name of the network (SSID) you are connected
to (e.g. Glomex_weBBoat). You must be connected to the weBBoat 4G Plus
Wi-Fi network in order to properly view the data and system configuration.
XX dBm: signal level in dBm.
Mobile network connection status: displays the weBBoat 4G Plus status of
connection with your mobile carrier network.
Signal level: Signal level of the mobile network of the SIM being used (min.
1 / max. 5).
Provider Name of the telephone carrier connected.
Connection type: connection technology being used.
APN: APN being used.
Change APN: The APN has to be changed if the SIM is changed. See the SIM
1 CONFIGURATION section and the ALTERNATIVE APN CONFIGURATION
section (page 67).
IMEI: telephone module serial number.
Page 29

weBBoat 4G Plus
74
Disable roaming: enables and disables roaming based on your needs.
NOTE: Data roaming charges may be high so check the rate plan in use with
your carrier.
Use 4G network only: set 4G as the preferred connection; if only 2G/3G
networks are in the area, the system will not connect to the data network.
Primary SIM used selection: To select the SIM to use for navigating the web
through the mobile network.
Autoswitch mode or mobile network forcing selection: to select the
autoswitch mode (automatic switching between mobile network and Wi-Fi
network, if present and properly configured) or to force the mobile
connection only. If autoswitch is selected, the Wi-Fi networks available will
be scanned.
Wi-Fi network connection status: displays the status of the weBBoat 4G Plus
connection with the external Wi-Fi network.
Signal level: Signal level of the external Wi-Fi network being used (min. 1 / max.
5).
SSID: name of the external Wi-Fi network being used.
Signal quality: displays the quality of the external Wi-Fi signal being used.
Wi-Fi Scan: scanning of the Wi-Fi networks available.
NOTE: The Wi-Fi scan button appears only if Autoswitch mode has been
selected. To scan, the autoswitch mode has to be selected.
The Wi-Fi networks available will be displayed (Fig. 25).
A padlock if encrypted and the signal quality will be displayed for each Wi-Fi
network.
Select the Wi-Fi network you want. If encrypted, the password will be
requested. Enter it and press OK in the iOS version or Save in the Android
version (Fig. 26).
Page 30

weBBoat 4G Plus
75
iOS Android
Fig. 26
iOS Android
Page 31

weBBoat 4G Plus
76
At this point a screen summarizing the choices made will be displayed; now
press Save in the iOS version or SAVE in the Android version (Fig. 27).
Fig. 27
iOS Android
Page 32

weBBoat 4G Plus
77
The control panel with summarized information will then be displayed (Fig.
28).
Fig. 28
iOS
Android
Page 33

weBBoat 4G Plus
78
6. OPTIONS BUTTON
The menu of Fig. 29 will be displayed when the options button is pressed.
Fig. 29
iOS Android
Page 34

weBBoat 4G Plus
79
6.1 Wi-Fi SETTING
If you select this option, you can personalize the name of the Wi-Fi network
generated by weBBoat 4G Plus (SSID) and its password (we recommend
setting code psk2) (Fig. 30).
NOTE: do not use spaces or special characters in the name of the Wi-Fi
network and password.
Now press Save Wi-Fi settings in the iOS version or SAVE SETTING in the
Android version to save the new settings.
Press OK when prompted to restart the router.
iOS Android
Fig. 30
Page 35

weBBoat 4G Plus
80
You will have to wait about one minute and reconnect your device to the new
Wi-Fi network of weBBoat 4G Plus (Fig. 31 and Fig. 32).
Fig. 31
iOS Android
Page 36

weBBoat 4G Plus
81
Fig. 32
iOS Android
Page 37

weBBoat 4G Plus
82
6.2 CHANGE ADMINISTRATOR PASSWORD
NOTE: carefully read the warning and press OK.
By selecting this option, you can change the administrator password. Enter
the new password in the two text fields and press save (Fig. 33).
S
WARNING
If the administrator password should be lost, a factory reset
of weBBoat 4G Plus will be necessary (see point 6.6).
Fig. 33
iOS
Android
Page 38

weBBoat 4G Plus
83
6.3 MANUAL IP CONFIGURATOR
By selecting this option, you are able to change the IP address of the
weBBoat 4G Plus if there are conflicts with other networks.
The factory-set IP address is 192.168.80.1 (Fig. 34).
The options let you configure weBBoat 4G Plus as follows:
LAN 1 = 192.168.1.1
LAN 2 = 192.168.20.1
LAN 3 = 192.168.40.1
LAN 4 = 192.168.60.1
LAN 5 = 192.168.80.1 (not present because it is selected by default)
Select the configuration you want and press OK in the iOS version or CHANGE
IP in the Android version to save the new settings. Now wait about one
minute and reconnect the device to the Wi-Fi network of weBBoat 4G Plus.
Fig. 34
iOS Android
Page 39

weBBoat 4G Plus
84
6.4 RESTART ROUTER
weBBoat 4G Plus will be restarted when this option is selected.
6.5 RESET ROUTER
The factory settings of weBBoat 4G Plus will be restored when this option is
selected.
6.6 FACTORY RESET
To restore the factory system settings (FACTORY RESET) please follow this
procedure:
- Start the device and wait 2 minutes.
- Open the top radome of weBBoat 4G.
- Press the reset button on the router (button 4 - Fig. 35) for at least 10
seconds.
Key
1 LTE auxiliary antenna connector
2 LTE main antenna connector
3,5 Wi-Fi antenna connectors
4 Reset button
Fig. 35
Page 40

weBBoat 4G Plus
85
Key
1,2,3 LAN Ethernet ports
4 WAN Ethernet port
5,6,7 LAN LEDs
8 WAN LED
9 Power socket
10 Power LED
11 connection status LED (red= not connected / orange= 3G / green= 4G)
12 Signal strength indication LEDs
NOTES
To help the user determine how long the reset button has to be pressed, the
signal indicator (number 12 - Fig. 36) must be checked. Wait for all 5 LEDs
to turn on. Now the reset button can be released.
The beginning of the reset procedure is confirmed when all 4 LEDs of the
Ethernet ports (numbers 5, 6, 7 and 8 - Fig. 36) turn on at the same time.
The procedure completes in about 1 minute and is confirmed when the
Glomex_weBBoat Wi-Fi network is created.
Fig. 36
Page 41

weBBoat 4G Plus
86
7. UPDATING FIRMWARE AND SETTINGS BACKUP
When a firmware update becomes available, a notification symbol will appear
on the options button on the home page of the App (Fig. 37).
Fig. 37
iOS Android
Page 42

weBBoat 4G Plus
87
Click the Options symbol and select Firmware upgrade (Fig. 38).
Fig. 38
iOS Android
Page 43

weBBoat 4G Plus
88
Now you will be asked to choose one of the following options (Fig. 39):
Refresh button: to update the Firmware without backup.
Refresh with backup button: before the Firmware is updated, the App backs
up the settings and sends a summary via email.
Cancel button: cancels the Firmware update operation.
NOTE: If you update the firmware, the weBBoat 4G Plus will default to the
original settings. It is recommended to Update with backup so the settings
will be restored after completion of the update. Should you have any
difficulties, you may also contact technical support.
NOTE: Before starting the update procedure, connect weBBoat 4G Plus to a
Wi-Fi network.
Fig. 39
iOS Android
Page 44

weBBoat 4G Plus
89
When you press the Refresh with backup button (Fig. 39), you will have to
enter an email address to which the weBBoat 4G Plus configuration summary
will be sent before the Firmware is updated (Fig. 40).
Fig. 40
iOS Android
Page 45

weBBoat 4G Plus
90
Once the settings backup has completed, press Continue to download the
latest Firmware release available to weBBoat 4G Plus (Fig. 41).
Fig. 41
iOS Android
Page 46

weBBoat 4G Plus
91
The device will ask you to continue with the update after the Firmware
update has been downloaded (Fig. 42). The update is completed when the
Wi-Fi Glomex_weBBoat network appears.
S
WARNING
weBBoat 4G Plus must remain connected to the power supply during the Firmware update procedure in order to prevent irreparable damage to the device.
Fig. 42
Android iOS
 Loading...