

Glomar AG
l
Seestrasse 11 l CH-9326 Horn l T +41 71 841 70 70 l www.glomar.ch
EPG-ULTRA-ID
Bedienungsanleitung
Instruction manual
Mode d’emploi
Glomar AG
l
Seestrasse 11 l CH-9326 Horn l T +41 71 841 70 70 l www.glomar.ch
Bedienungsanleitung / Instruction manual / Mode d’emploi EPG-ULTRA-ID
EKM 60 ID-L
Bedienungsanleitung Presswerkzeug/Instruction Manual Crimping tool
14
10
23
9
8
7
6
5
BL1815 (RAL1)
optional:
NG2 BL1830 (RAL2)
Bild/pic./fi g. 1
HE.15333
2

Glomar AG
l
Seestrasse 11 l CH-9326 Horn l T +41 71 841 70 70 l www.glomar.ch
Bedienungsanleitung / Instruction manual / Mode d’emploi EPG-ULTRA-ID
EKM 60 ID-L
Bedienungsanleitung Presswerkzeug/Instruction Manual Crimping tool
1
HE.13432
2
5
304711 batch# e.g. 304711
GN datecode e.g. G = 2013; N = Jan.
142 consecutive# e.g. „142“ = tool # 142
3
EKM 60 ID-L
Crimping tool
Nennspannung (Voltage):
Preßkraft (Force): 60 kN
HE.13434
4
datecode
Year Code Month Code Month Code
2013 G Jan. N July V
2014 H Feb. P Aug. W
2015 J Mar. Q Sept. X
2016 K Apr. R Oct. Y
2017 L May S Nov. Z
2018 M June T Dec. 1
Bild/pic./fi g. 2
18V DC
HE.14821
Auf dem Knapp 46
D-42855
Remscheid
5
3

Glomar AG
l
Seestrasse 11 l CH-9326 Horn l T +41 71 841 70 70 l www.glomar.ch
Bedienungsanleitung / Instruction manual / Mode d’emploi EPG-ULTRA-ID
EKM 60 ID-L
Bedienungsanleitung Presswerkzeug/Instruction Manual Crimping tool
10 - 40°C
CLICK
(BL1815)
RAL1
(BL1830)
RAL2
Bild/pic./fi g. 3 Bild/pic./fi g. 4
Bild/pic./fi g. 5 Bild/pic./fi g. 6 Bild/pic./fi g. 7 Bild/pic./fi g. 8 Bild/pic./fi g. 9
15 min.
22 min.
Li-ion
Bild/pic./fi g. 10
®
#884676B996
#884598C990
Bild/pic./fi g. 11
4
Glomar AG
l
Seestrasse 11 l CH-9326 Horn l T +41 71 841 70 70 l www.glomar.ch
Bedienungsanleitung / Instruction manual / Mode d’emploi EPG-ULTRA-ID
EKM 60 ID-L
Bedienungsanleitung Presswerkzeug/Instruction Manual Crimping tool
1.
Bild/pic./fi g. 12 Bild/pic./fi g. 13
Bild/pic./fi g. 14 Bild/pic./fi g. 15
2.
90°
350°
5
Glomar AG
l
Seestrasse 11 l CH-9326 Horn l T +41 71 841 70 70 l www.glomar.ch
Bedienungsanleitung / Instruction manual / Mode d’emploi EPG-ULTRA-ID
EKM 60 ID-L
Bedienungsanleitung Presswerkzeug/Instruction Manual Crimping tool
CLICK
Bild/pic./fi g. 16 Bild/pic./fi g. 17
CLICK
PRESS
Bild/pic./fi g. 18 Bild/pic./fi g. 19
6
Glomar AG
l
Seestrasse 11 l CH-9326 Horn l T +41 71 841 70 70 l www.glomar.ch
Bedienungsanleitung / Instruction manual / Mode d’emploi EPG-ULTRA-ID
EKM 60 ID-L
Bedienungsanleitung Presswerkzeug/Instruction Manual Crimping tool
PRESS
Bild/pic./fi g. 20 Bild/pic./fi g. 21
1.
Bild/pic./fi g. 22 Bild/pic./fi g. 23
PRESS
2.
7

Glomar AG
l
Seestrasse 11 l CH-9326 Horn l T +41 71 841 70 70 l www.glomar.ch
Bedienungsanleitung / Instruction manual / Mode d’emploi EPG-ULTRA-ID
EKM 60 ID-L
Bedienungsanleitung Presswerkzeug/Instruction Manual Crimping tool
I. II. III. ....
t
r
t
r
PRESS
set reset
>t
r
<t
t
r
r
t
8
Glomar AG
l
Seestrasse 11 l CH-9326 Horn l T +41 71 841 70 70 l www.glomar.ch
Bedienungsanleitung / Instruction manual / Mode d’emploi EPG-ULTRA-ID
EKM 60 ID-L
Bedienungsanleitung Presswerkzeug/Instruction Manual Crimping tool
Bild/pic./fi g. 24 Bild/pic./fi g. 25
on / off
PRESS
PRESS
9

Glomar AG
l
Seestrasse 11 l CH-9326 Horn l T +41 71 841 70 70 l www.glomar.ch
Bedienungsanleitung / Instruction manual / Mode d’emploi EPG-ULTRA-ID
EKM 60 ID-L
Bedienungsanleitung Presswerkzeug/Instruction Manual Crimping tool
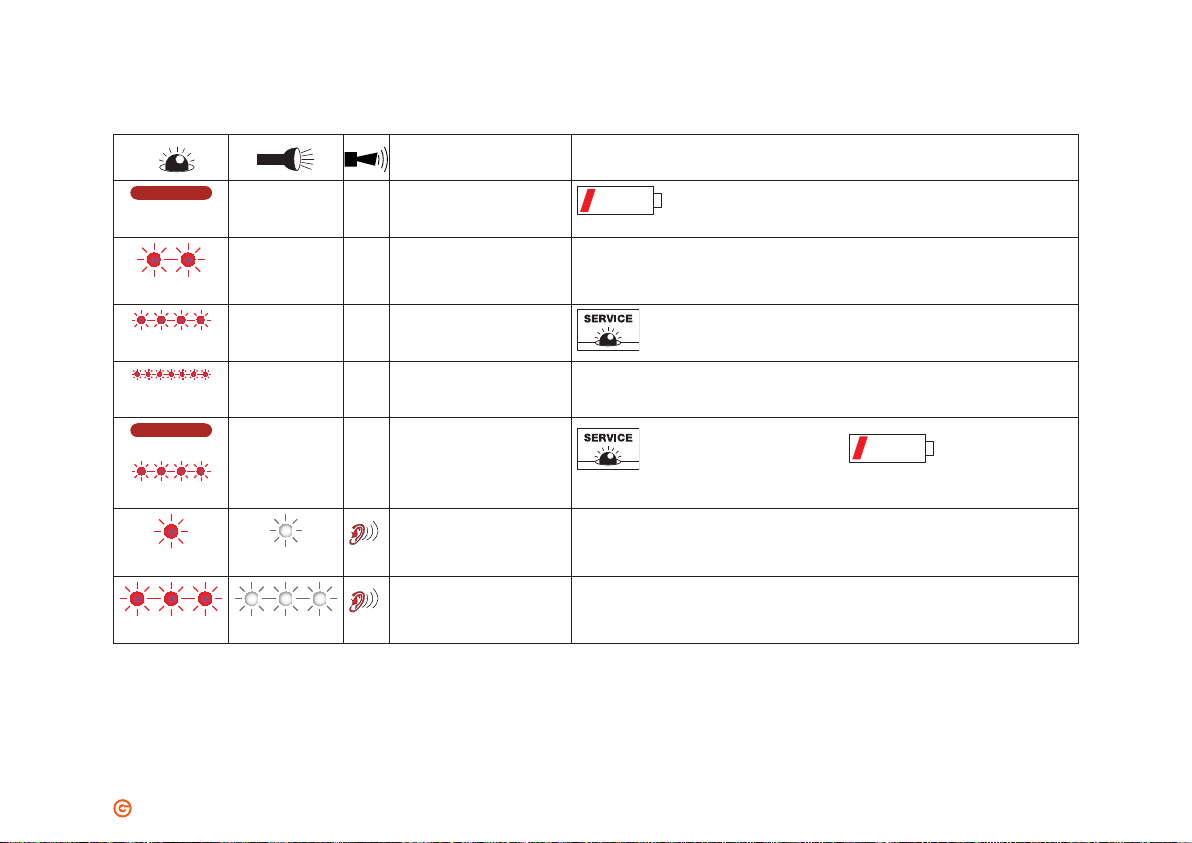
Tab. 1
20 sec
2 x
20 sec/2Hz
20 sec/5Hz
20 sec
20 sec/2Hz
1 x
3 x 3 x
1 x
Wann/When/Quand Warum/Why/Pourquoi
nach Arbeitsvorgang
after working cycle
après opération de travail
nach Einsetzen des Akkus
after inserting the battery
après mise en place de
l’accumulateur
nach Arbeitsvorgang
after working cycle
après opération de travail
während der Übertemperatur
while exceeding the temp. limit
pendant surchauffe
nach Arbeitsvorgang
after working cycle
après opération de travail
nach Arbeitsvorgang
after working cycle
après opération de travail
nach Arbeitsvorgang
after working cycle
après opération de travail
Selbsttest
Self check
autocontrôle
Werkzeug zu heiß
Unit too hot
outil surchauffé
+
Fehler: der notwendige Pressdruck wurde nicht erreicht. Es
handelt sich um eine manuelle Unterbrechung der Pressung bei
stehendem Motor.
Error: the required pressure has not been reached. The operator
has interrupted the pressing cycle manually while the motor was
not running.
ERREUR: Pression necessaire pas atteinte. Il s‘agît d‘une interruption manuelle de la sertissage au moteur arrêté.
Schwerwiegender Fehler: Pressdruck wurde bei laufendem Motor
nicht erreicht.
Serious Error: The pressure has not been reached while the motor
was running.
ERREUR GRAVE: Pression pas atteinte au moteur courant.
10

Glomar AG
l
Seestrasse 11 l CH-9326 Horn l T +41 71 841 70 70 l www.glomar.ch
Bedienungsanleitung / Instruction manual / Mode d’emploi EPG-ULTRA-ID
EKM 60 ID-L
Bedienungsanleitung Presswerkzeug/Instruction Manual Crimping tool
Tab. 1
20 sec
2 x
20 sec/2Hz
20 sec/5Hz
20 sec
20 sec/2Hz
1 x
3 x 3 x
1 x
Wanneer/Quando/
cuándo
na bedrijfscyclus
Después del proceso de trabajo
após o processo de trabalho
na het plaatsen van de accu
Después de insertar la batería
após inserir a bateria
na bedrijfscyclus
Después del proceso de trabajo
após o processo de trabalho
tijdens te hoge temperatuur
en caso de temperatura excesiva
durante a temperatura excessiva
na bedrijfscyclus
Después del proceso de trabajo
após o processo de trabalho
na bedrijfscyclus
Después del proceso de trabajo
após o processo de trabalho
na bedrijfscyclus
Después del proceso de trabajo
após o processo de trabalho
Waarom/Porquê/
¿por qué?
zelftest
Auto-test
Autoteste
gereedschap te heet
Herramienta demasiado caliente
ferramenta demasiado quente
+
Foutmelding: De benodigde persdruk wordt niet bereikt. De gebruiker
heeft de verkrimping handmatig stopgezet aangezien de motor niet
actief is.
Error: No se ha alcanzado la presión necesaria o el operador ha interrumpido el ciclo a mano mientras el motor ha parado.
Falha: a pressão de prensagem necessária não foi alcançada. Trata-
-se de uma interrupção manual da prensagem com o motor parado.
Urgente foutmelding: De persdruk werd bij een werkende motor niet
bereikt.
Error grave: No se ha alcanzado presión mientras el motor estaba
en marcha
Falha grave: a pressão de prensagem não foi alcançada com o motor
em funcionamento.
Service Center
11

Glomar AG
l
Seestrasse 11 l CH-9326 Horn l T +41 71 841 70 70 l www.glomar.ch
Bedienungsanleitung / Instruction manual / Mode d’emploi EPG-ULTRA-ID
EKM 60 ID-L
Bedienungsanleitung Presswerkzeug/Instruction Manual Crimping tool
Tab. 1
20 sec
2 x
20 sec/2Hz
20 sec/5Hz
20 sec
20 sec/2Hz
1 x
3 x 3 x
1 x
Когда это происходит/Når Причина/Hvorfor
после цикла опрессовки
Efter arbejdsgang
при установке аккумулятора
Efter batteriet er sat i
после цикла опрессовки
Efter arbejdsgang
при высокой температуре внутри корпуса
Når temperaturgrænsen overskrides
после цикла опрессовки
Efter arbejdsgang
после цикла опрессовки
Efter arbejdsgang
после цикла опрессовки
Efter arbejdsgang
Проверка инструмента
Kendi Kendine Test
Перегрев инструмента
Takm çok scak
+
Ошибка: не было достигнуто требуемое усилие
опрессовки или оператор прервал процесс опрессовки
вручную, когда двигатель остановился.
Fejl: utilstrækkeligt pressetryk. Operatøren har afbrudt presning manuelt, mens motoren ikke var i drift
Серьезная ошибка: не было достигнуто требуемое усилие
опрессовки во время работы двигателя
Alvorlig fejl: pressetrykket ikke opnået, mens motoren var i
drift
12
Glomar AG
l
Seestrasse 11 l CH-9326 Horn l T +41 71 841 70 70 l www.glomar.ch
Bedienungsanleitung / Instruction manual / Mode d’emploi EPG-ULTRA-ID
EKM 60 ID-L
Bedienungsanleitung Presswerkzeug/Instruction Manual Crimping tool
Tab. 1
20 sec
2 x
20 sec/2Hz
20 sec/5Hz
20 sec
20 sec/2Hz
1 x
3 x 3 x
1 x
Ne Zaman Neden
Çalşma işleminden sonra
Pilleri yerleştirdikten sonra Kendi Kendine Test
Çalşma işleminden sonra
Yüksek scaklk srasnda Takm çok scak
Çalşma işleminden sonra
+
Çalşma işleminden sonra Hata: Gerekli pres basncna ulaşlamad. Bu, motor durduğunda preslemenin
manüel bir kesintisidir.
Çalşma işleminden sonra Ağr hata: Motor çalşrken pres basncna ulaşlamad.
13

Glomar AG
l
Seestrasse 11 l CH-9326 Horn l T +41 71 841 70 70 l www.glomar.ch
Bedienungsanleitung / Instruction manual / Mode d’emploi EPG-ULTRA-ID
EKM 60 ID-L
Bedienungsanleitung Presswerkzeug/Instruction Manual Crimping tool
Tab. 2
Rohrkabelschuhe und Verbinder - Cu
Copper tubular cable lugs and connectors - Cu
Rohrkabelschuhe und Verbinder „Normalausführung“,
ohrkabelschuhe für Schaltgeräteanschlüsse
R
Tubular cable lugs and connectors, „standard type“,
tubular; cable lugs for switchgear connections
Rohrkabelschuhe und Verbinder für feindrähtige Leiter
Tubular cable lugs and connectors for fine stranded conductors
Quetschkabelschuhe, Verbinder und Stiftkabelschuhe nach DIN - Cu
Solderless terminals, connectors and pin terminals to DIN - Cu
Quetschkabelschuhe (DIN 46234), Verbinder (DIN 46341)
nd Stiftkabelschuhe (DIN 46230) - Cu
u
Solderless terminals (DIN 46234), connectors (DIN 46341)
pin terminals (DIN 46230) - Cu
Presskabelschuhe und Verbinder nach DIN - Al
Compression cable lugs and connectors to DIN - Al
Presskabelschuhe und Verbinder nach DIN - Al
Aluminium compression cable lugs and connectors to DIN - Al
Pressverbinder für zugfeste Verbindungen von Aldrey-Seilen nach
DIN EN 50182, Al-Leiter DIN EN 50182, 120-185 mm²
Compression joints for full-tension connections of Aldrey conductors
acc. to DIN EN 50182, Al-conductors DIN EN 50182, 120-185 mm²
Verb.
material
Connection
material
Pressbereich mm²
Crimping range mm²
16 - 240
10 - 240
10 - 240 K60ID
50 - 240
50 - 185
Press-
form
Crimping
mold
Kenn-
zeichnung
Marking
K60ID
K60ID
14

Glomar AG
l
Seestrasse 11 l CH-9326 Horn l T +41 71 841 70 70 l www.glomar.ch
Bedienungsanleitung / Instruction manual / Mode d’emploi EPG-ULTRA-ID
EKM 60 ID-L
Bedienungsanleitung Presswerkzeug/Instruction Manual Crimping tool
Presskabelschuhe und Verbinder nach DIN - Al
Compression cable lugs and connectors to DIN - Al
Pressverbinder nach DIN 48085, Teil 2 für Al-Seile DIN EN 50182
ompression joints to DIN 48085, part 2 for Al-cables DIN EN 50182
C
Presskabelschuhe und Verbinder - Al/Cu
Compression cable lugs and connectors - Al/Cu
Presskabelschuhe und Verbinder - Al/Cu
Compression cable lugs and connectors - Al/Cu
Verb.
material
Connection
material
Pressbereich mm²
Crimping range mm²
50 - 185 K60ID
50-240 K60ID
Press-
form
Crimping
mold
Kenn-
zeichnung
Marking
15

Glomar AG
l
Seestrasse 11 l CH-9326 Horn l T +41 71 841 70 70 l www.glomar.ch
Bedienungsanleitung / Instruction manual / Mode d’emploi EPG-ULTRA-ID
EKM 60 ID-L
Bedienungsanleitung Presswerkzeug/Instruction Manual Crimping tool
Klauke Q-series (Class 5 & 6)
Copper connector type Ring type Fork type Pin type Splices
Copper lugs Q-series 1652xx -1662xx 1652Cxx-1653Cxx ST1716 - ST1722
Klauke F-series (Class 5 & 6)
Copper connector type Ring type Angle type 90° Splices
Copper lugs F-series 702Fxx - 712Fxx 742Fxx - 752Fxx
Copper slices F-series 722F - 731F
Klauke R-series (Class 2 & 5)
Copper connector type Ring type Angle type 90° Angle type 45° Splices
Copper lugs R-series 3Rxx-12Rxx 43Rxx- 52Rxx 43Rxx45-52Rxx45
Copper slices R-series 23R-32R
T-splices R-series TV16-TV240
Cross-Splices KV16-KV240
Lugs for switch gear conn. 5SGxx-12SGxx
Klauke L-series (Class 2, 5 & 6)
Copper connector type Ring type Angle type 90° Angle type 45° Splices
Copper lugs L-series L16xxxx-L240xxxxx L16890xx-L240890xx L16845xx-L240845xx
Copper slices L-series LV16-LV240
Number of crimps 1* 1* 1* 1*
* EKM 60 ID-L, HK 60 ID, UA 60 ID
CLASSIFIED
23YE
HE.15590
16

Bedienungsanleitung EPG-ULTRA-ID
Glomar AG
l
Seestrasse 11 l CH-9326 Horn l T +41 71 841 70 70 l www.glomar.ch
EKM 60 ID-L
Bedienungsanleitung Presswerkzeug
Inhaltsangabe
1. Einleitung
2. Garantie
3. Beschreibung des elektro-hydraulischen Werkzeuges
3.1 Beschreibung der Komponenten
3.2 Kurzbeschreibung der wesentlichen Leistungsmerkmale des Werkzeuges
3.3 Beschreibung der Werkzeugindikation
4. Hinweise zum bestimmungsgemässen Gebrauch
4.1 Bedienung des Werkzeuges
4.2 Erläuterung des Anwendungsbereiches
4.3 Verarbeitungshinweise
4.4 Wartungshinweise
5. Verhalten bei Störungen am Werkzeug
6. Technische Daten
7. Außerbetriebnahme/Entsorgung
Symbole
Sicherheitstechnische Hinweise Bitte unbedingt beachten, um Personen- und Umweltschäden zu vermeiden.
Anwendungstechnische Hinweise Bitte unbedingt beachten, um Schäden am Werkzeug zu vermeiden.
1. Einleitung
Vor Inbetriebnahme Ihres Werkzeuges lesen Sie sich die Bedienungsanleitung sorgfältig durch.
Benutzen Sie dieses Werkzeug ausschließlich für den bestimmungsgemässen Gebrauch unter Berücksichtigung der
gültigen Sicherheits- und Unfallverhütungsvorschriften.
Einbau und Montage von Verbindungsmaterial mit Hilfe dieses Werkzeuges darf nur durch eine elektrotechnisch
unterwiesene Person erfolgen. Das Mindestalter beträgt 16 Jahre.
Diese Bedienungsanleitung ist während der gesamten Lebensdauer des Werkzeuges mitzuführen.
Der Betreiber muss • dem Bediener die Betriebsanleitung zugänglich machen und
• sich vergewissern, dass der Bediener sie gelesen und verstanden hat.
17

Bedienungsanleitung EPG-ULTRA-ID
Glomar AG
l
Seestrasse 11 l CH-9326 Horn l T +41 71 841 70 70 l www.glomar.ch
EKM 60 ID-L
Bedienungsanleitung Presswerkzeug
2. Garantie
Die Garantie beträgt 24 Monate ab Lieferdatum bei sachgemäßer Bedienung und unter Einhaltung der vorgeschriebenen Serviceintervalle. Ausgeschlossen von der Garantieerklärung sind Verschleißteile, die sich aus dem
bestimmungsgemäßen Gebrauch ergeben. Wir behalten uns ferner das Recht vor, das Produkt nachzuarbeiten.
3. Beschreibung des elektrohydraulischen Werkzeuges
3.1 Beschreibung der Komponenten
Das elektro-hydraulische Werkzeug ist handgeführt und besteht aus folgenden Komponenten:
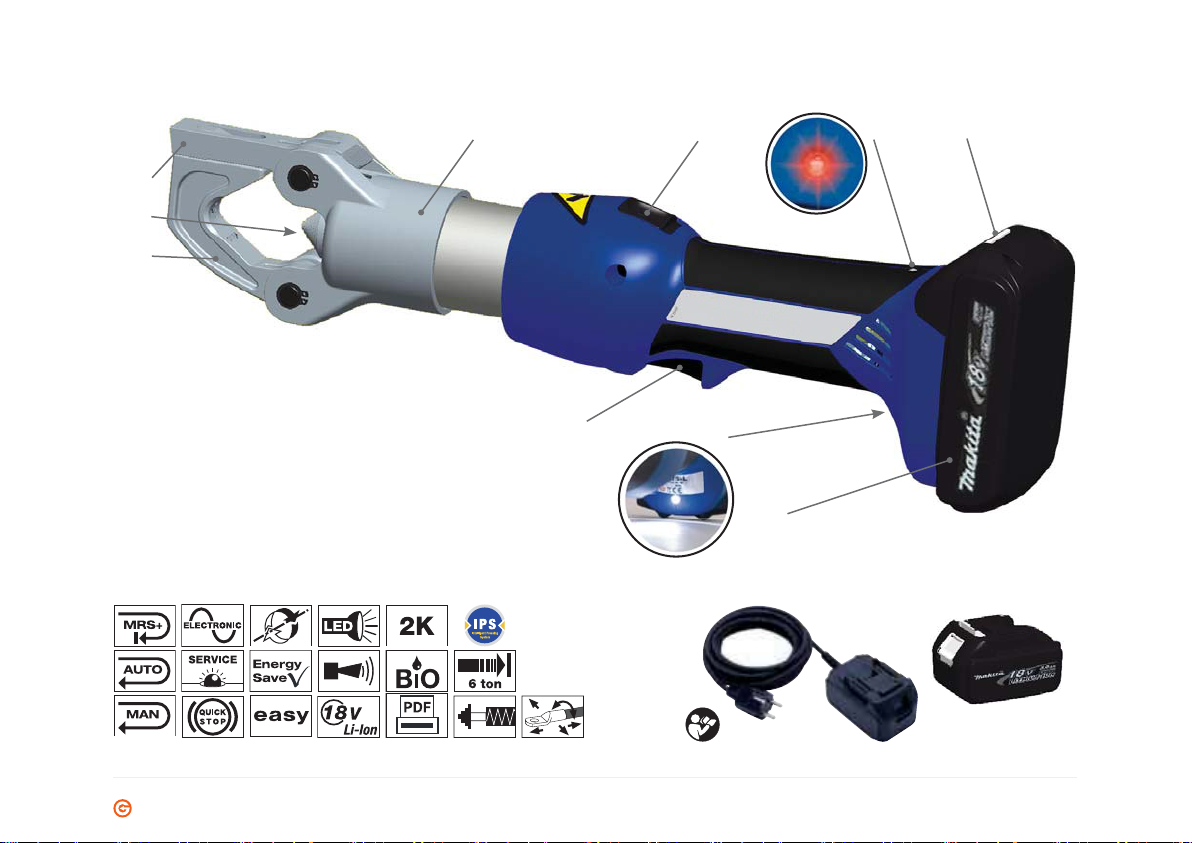
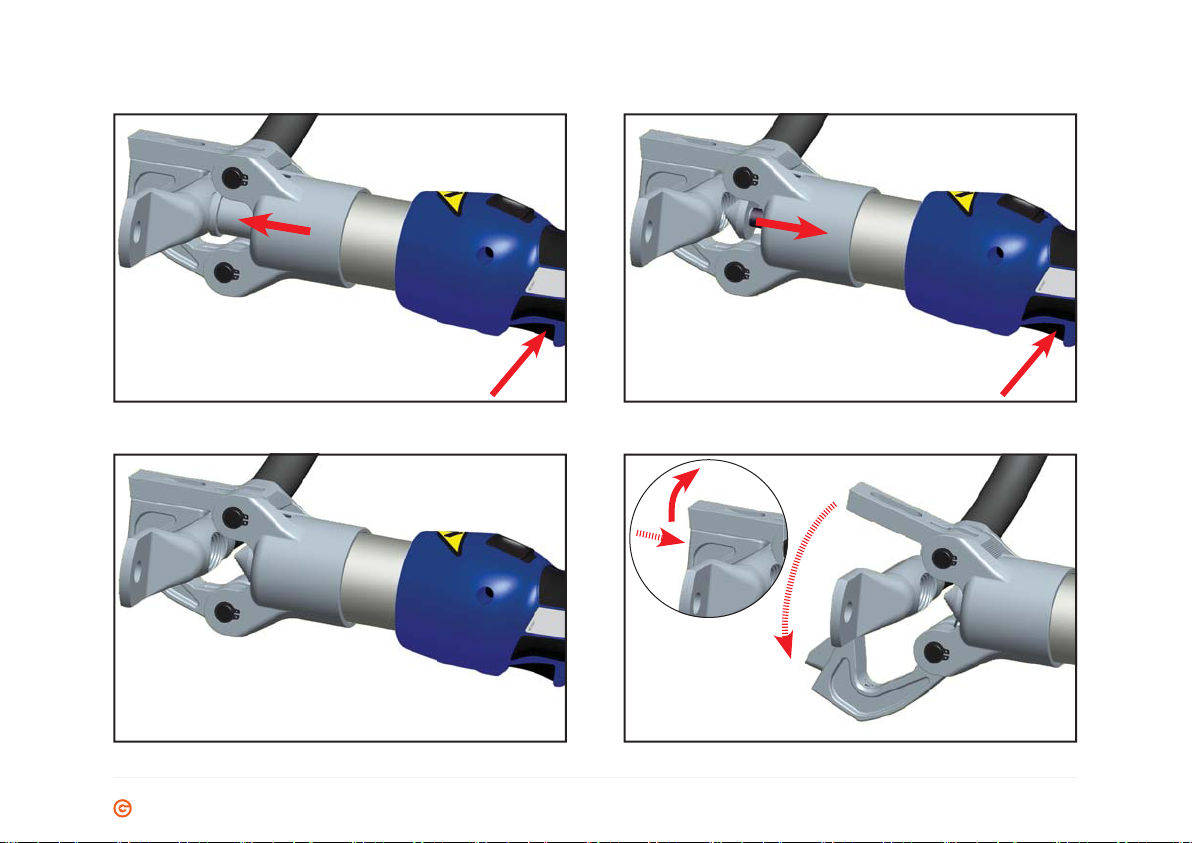
Tabelle 3 (siehe Bild 1)
Pos. Bezeichnung Funktion
1 Presskopf Arbeitseinheit zum Aufpressen des Verbindungsmaterials
2 Rückstellschieber Schieber zum Rückstellen des Kolbens im Fehler-, bzw. Notfall
3 LED (rot) Anzeige Akku-Kapazität, Wartungsanzeige und Fehler
4 Akkuentriegelung Entriegelungsschieber für den Akku
5 Akku (RAL1/BL1815)
6 LED (weiß) zur Ausleuchtung des Arbeitsumfeldes
7 Bedienungsschalter Auslösung des Pressvorgangs
8 Bügel Vorrichtung zum Öffnen des Kopfes
9 Pressdorn Stufenförmiger Preßdorn zum Pressen des Verbindungsmaterials
10 Lasche Vorrichtung zum Ver-, bzw. Entriegeln der Kopfes
wiederau adbarer 1,3 Ah Li-Ion Akku
Optional: 3Ah Li-Ion Akku (RAL2/BL1830) oder Netzgerät NG2
18

Bedienungsanleitung EPG-ULTRA-ID
Glomar AG
l
Seestrasse 11 l CH-9326 Horn l T +41 71 841 70 70 l www.glomar.ch
EKM 60 ID-L
Bedienungsanleitung Presswerkzeug
3.2 Kurzbeschreibung der wesentlichen Leistungsmerkmale des Werkzeugs
Das Werkzeug besitzt einen automatischen Rücklauf, der den Kolben nach Erreichen des max. Betriebsüberdruckes
automatisch in die Ausgangslage zurückfährt.
Die manuelle Rücklaufunterbrechung mit Teach-in ermöglicht die Einprogrammierung der Stoppposition im Rücklauf,
sodaß der Kolben bei der nächsten Verpressung an der gleichen Stelle stoppt, an der auch die vorhergehende Verpressung gestoppt wurde.
Ein manueller Rücklauf ermöglicht dem Bediener im Falle einer Fehlpressung den Kolben in die Ausgangslage zurückzufahren.
Das Presswerkzeug ist mit einem innovativen 2-stu gen Teleskopzylinder ausgestattet.
Bei diesem Werkzeug gibt es eine Vorspannvorrichtung, die das Verbindungsmaterial zuerst vor
verpreßt. Dadurch wird dem Installateur die Möglichkeit gegeben, die Position der Preßstelle nachträglich zu verändern, bzw. zu korrigieren (siehe Bild 19).
Das Gerät verfügt über einen integrierten Drucksensor, der bei jedem Arbeitsvorgang automatisch den erreichten
Pressdruck ermittelt und speichert. Bei Abweichungen vom festgelegten Arbeitsdruck ertönt ein akustisches Signal
und eine rote LED leuchtet auf (Tab. 1).
Das Werkzeug ist mit einem Nachlaufstopp ausgerüstet, der den Vorschub nach Loslassen des Bedienungsschalters
sofort stoppt.
Der Kopf ist stufenlos 350° um die Längsachse drehbar. Dieses ermöglicht Montagen auch an sehr schlecht zugänglichen Stellen.
Das Werkzeug ist mit einer Mikroprozessor-Steuerung ausgestattet, die z.B. den Motor nach vollendetem Pressvorgang abschaltet, Service-Intervalle anzeigt, den Ladezustand des Akkus angibt und eine Fehlerdiagnose durchführt,
bzw. unterschiedliche akustische und optische Warnsignale bei einer Fehlanwendung aussendet.
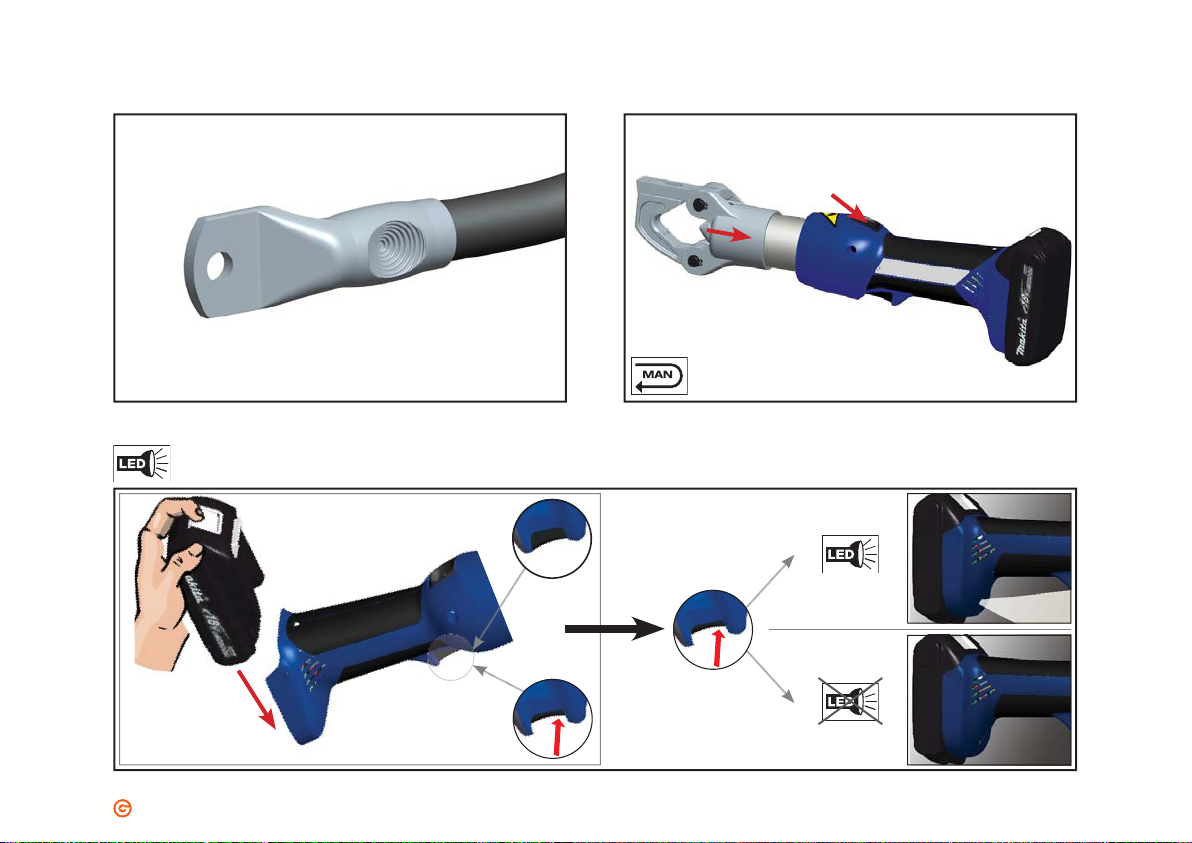
Eine eingebaute weiße LED beleuchtet den Arbeitsbereich nach Aktivierung des Bedienungsschalters und schaltet
sich nach 10 s wieder aus. Dieses Merkmal läßt sich auch ausschalten.
Es kann mittels eines USB Adapters (Zubehör) nach Arbeitsende ein Protokoll über die ordungsgemäße Funktion
des Werkzeugs über den PC ausgedruckt werden.
xiert und dann erst
19

Bedienungsanleitung EPG-ULTRA-ID
Glomar AG
l
Seestrasse 11 l CH-9326 Horn l T +41 71 841 70 70 l www.glomar.ch
EKM 60 ID-L
Bedienungsanleitung Presswerkzeug
Das kompakte ergonomische geformte Gehäuse besteht aus 2 Komponenten. Der Griffbereich ist durch seine Gum-
2K
mierung besonders rutschfest und zusammen mit dem schwerpunktoptimierten Gehäuse liegt das Werkzeug besonders gut in der Hand und unterstützt so ermüdungsfreies Arbeiten.
Alle Funktionen unserer Geräte können über einen Bedienknopf gesteuert werden. Dadurch bekommen wir eine
einfache Handhabung und besseren Halt als bei einer Zweiknopfbedienung.
Durch die Li-Ionen Batterien, die weder Memory Effekt noch Selbstentladung kennen, hat der Bediener auch nach
langen Arbeitspausen immer ein einsatzbereites Gerät. Dazu kommt noch ein geringeres Leistungsgewicht mit 50%
mehr Kapazität und kurzen Ladezeiten im Vergleich zu NiMH Akkus.
Das eingesetzte Öl ist ein biologisch schnell abbaubares und nicht wassergefährdendes Hochleistungshydrauliköl
und mit dem Blauen Engel ausgezeichnet. Das Öl ist für sehr niedrige Temperaturen geeignet und hat exzellente
Schmiereigenschaften.
Energiesparfunktion durch Motorabschaltung nach dem Pressvorgang.
20

Bedienungsanleitung EPG-ULTRA-ID
Glomar AG
l
Seestrasse 11 l CH-9326 Horn l T +41 71 841 70 70 l www.glomar.ch
EKM 60 ID-L
Bedienungsanleitung Presswerkzeug
3.3 Beschreibung der Werkzeugindikation
Siehe Tabelle 1.
Es sollte vor Arbeitsbeginn der Ladezustand des Akkus (Bild 1.2) überprüft worden sein. Ein niedriger Ladezustand
kann beispielsweise an der Leuchtdiode (Bild 1.1) durch ein 20 s’iges Au euchten am Ende einer Pressung erkannt
werden.
4. Hinweise zum bestimmungsgemäßen Gebrauch
Vor Arbeitsbeginn sind alle aktiven, d.h. stromführenden Teile im Arbeitsumfeld des Monteurs freizuschalten. Ist
dieses nicht möglich sind entsprechende Schutzvorkehrungen für das Arbeiten in der Nähe von unter Spannung
stehenden Teilen zu treffen (siehe z.B. DIN EN 50110).
Halten Sie Ihren Arbeitsbereich sauber und aufgeräumt. Verwenden Sie dieses Werkzeug nicht wenn Sie müde sind
oder unter Ein uß von Drogen, Alkohol oder Medikamenten stehen.
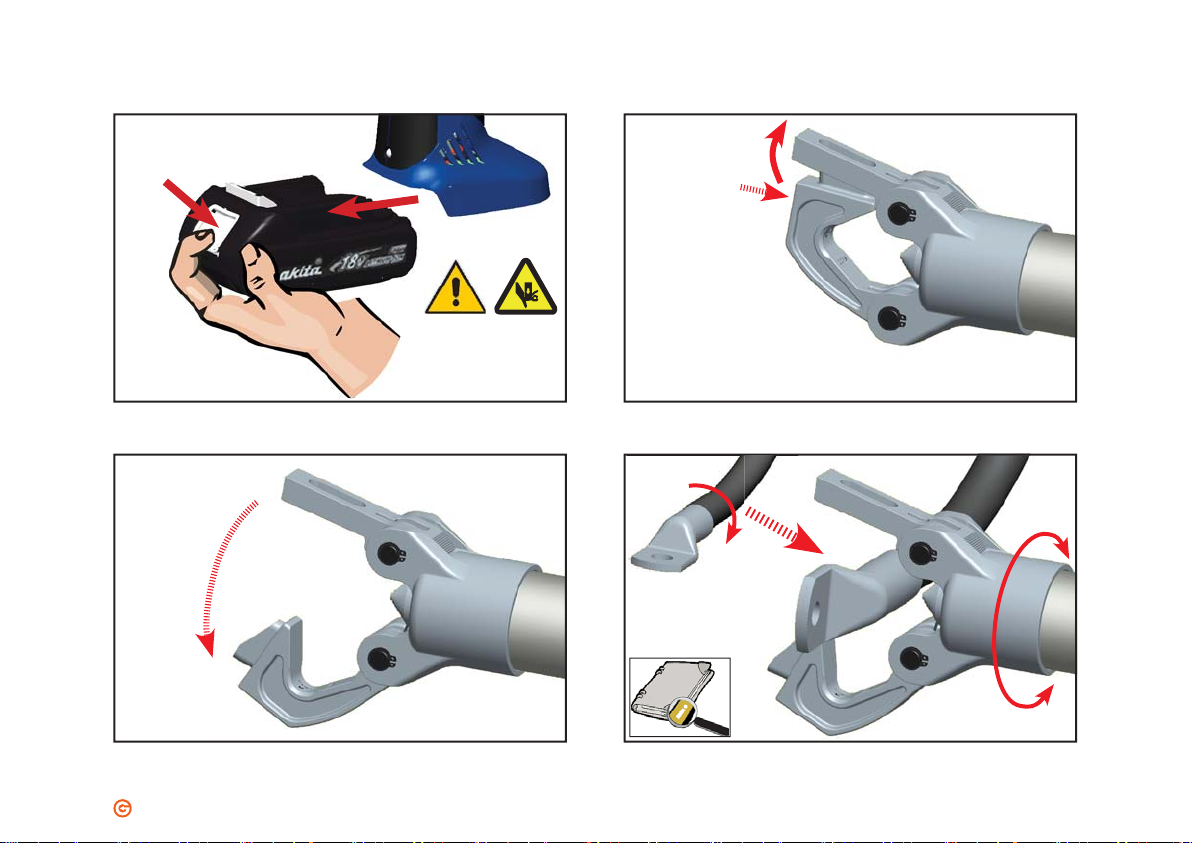
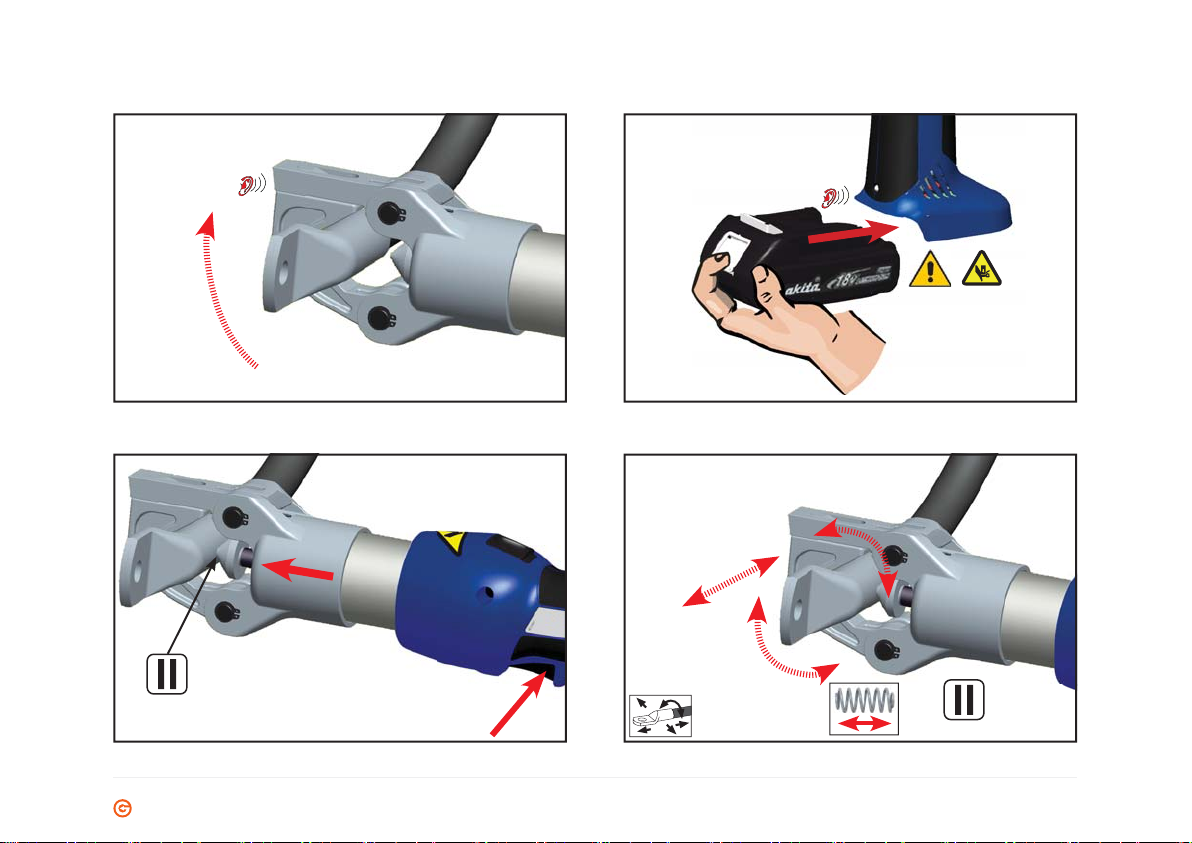
4.1 Bedienung des Werkzeugs
Ablauf: siehe Bilder vorne
Der Presskopf sollte möglichst vor Beginn des Pressvorganges in die gewünschte Position gedreht werden. Im
drucklosen Zustand lässt sich der Presskopf deutlich leichter drehen.
Achtung
Tragen Sie geeignete Kleidung. Tragen Sie keine weite Kleidung oder Schmuck.
Achtung
Sorgen Sie für einen sicheren Stand und halten Sie jederzeit das Gleichgewicht.
Achtung
Tragen Sie persönliche Schutzausrüstung und immer eine Schutzbrille.
Achtung
Der Pressvorgang kann jederzeit durch Loslassen des Betätigungsschalters (B. 1.7) unterbrochen werden.
21

Bedienungsanleitung EPG-ULTRA-ID
Glomar AG
l
Seestrasse 11 l CH-9326 Horn l T +41 71 841 70 70 l www.glomar.ch
EKM 60 ID-L
Bedienungsanleitung Presswerkzeug
4.2 Erläuterung des Anwendungsbereiches
Der Pressbereich ist bei Kupfer und Aluminium Kabelschuhen und Verbindern von Cu10/Al50 mm² bis 240 mm².
Sollten andere Verbindungsmaterialien verpresst werden müssen, ist eine Rücksprache mit dem Werk zwingend
erforderlich.
Achtung
Es dürfen keine unter Spannung stehenden T
isoliert.
Das handgeführte Werkzeug darf nicht eingespannt und nicht für den stationären Einsatz verwendet werden.
Das Werkzeug ist nicht für den Dauerbetrieb geeignet. Es muss nach ca. 30-40 Verpressungen hintereinander eine
Pause von ca. 15 min eingelegt werden um das Werkzeug abzukühlen.
Achtung
Bei zu intensivem Gebrauch kann es durch Erhitzung zu Schäden am Werkzeug kommen.
Achtung
Beim Betrieb von Elektromotoren kann es zur Funkenbildung kommen, durch die feuergefährliche oder explosive Stoffe in Brand gesetzt werden können.
Achtung
Das elektrohydraulische Presswerkzeug darf nicht bei starkem Regen oder unter Wasser eingesetzt werden.
eile verpresst werden. Das Werkzeug gilt nicht als
4.3 Verarbeitungshinweise
Bei der R- und L-Reihe einschließlich der feindrähtigen Reihe wird von 10 mm² bis 185 mm² 1 mal verpresst
und bei 240 mm² 2 mal. Bei Aluminium Kabelschuhen und Verbindern wird von 50 mm² bis 185 mm² 1-mal verpresst
und bei 240 mm² wird 2 mal verpresst.
Sollte die rote LED 3x blinken und gleichzeitig 3 akustische Signale ertönen liegt ein schwerer Fehler vor. Der betroffene Presszyklus muss wiederholt werden.
Bitte beachten Sie unbedingt die in unserem Katalog angeführten Montagehinweise.
22

Bedienungsanleitung EPG-ULTRA-ID
Glomar AG
l
Seestrasse 11 l CH-9326 Horn l T +41 71 841 70 70 l www.glomar.ch
EKM 60 ID-L
Bedienungsanleitung Presswerkzeug
4.4 Wartungshinweise
Das Gerät ist nach jedem Gebrauch zu reinigen und trocken zu lagern. Sowohl Akku als auch Ladegerät müssen vor
Feuchtigkeit und vor Fremdkörpern geschützt werden.
Das Gerät ist mit einem Mikroprozessor ausgestattet, der den Anwender durch 20 sekündiges Blinken nach dem
Arbeitsvorgang auf fällige Wartungen hinweist.
Das Gerät muss bei Erreichen von 10.000 Zyklen spätestens aber nach einem Jahr durch ein authorisiertes Service
Center gewartet werden.
Im Rahmen dieser Wartungen werden verschliessene Teile ersetzt und sicherheitsrelevante Komponenten geprüft
und ggf. vorbeugend ausgetauscht. Diese Maßnahme dient Ihrer Sicherheit und verhindert Ausfälle durch Materialermüdung.
Achtung
P
egen Sie Elektrowerkzeuge mit Sorgfalt. Kontrollieren Sie, ob bewegliche Geräteteile einwandfrei funktionieren und nicht klemmen, ob Teile gebrochen oder so beschädigt sind, daß die Funktion des Elektrowerkzeugs beeinträchtigt ist!
Achtung
Geräteversiegelung nicht beschädigen. Bei Beschädigung der Geräteversiegelung erlischt der Garantieanspruch!
Achtung
Lassen Sie beschädigte Teile vor dem Einsatz des elektrischen Gerätes von quali ziertem
oder durch unser Service Center reparieren!
Achtung
Geräteversiegelung nicht beschädigen. Bei Beschädigung der Geräteversiegelung erlischt der Garantieanspruch.
Fachpersonal
23

Bedienungsanleitung EPG-ULTRA-ID
Glomar AG
l
Seestrasse 11 l CH-9326 Horn l T +41 71 841 70 70 l www.glomar.ch
EKM 60 ID-L
Bedienungsanleitung Presswerkzeug
5. Verhalten bei Störungen am Presswerkzeug
a.) Regelmäßiges Blinken/Leuchten der roten LED (Bild 1.3) oder Ertönen eines akustischen Warnsignals.
siehe Tab. 1. Sollte sich die Störung nicht abstellen lassen, ist das Werkzeug an das nächst gelegene Service Center
(ASC) zu schicken.
b.) Das Presswerkzeug verliert Öl.
Das Werkzeug ist einzuschicken. Nicht öff nen und die Geräteversiegelung nicht entfernen.
c.) Die rote LED (Bild 1.3) blinkt 3x und gleichzeitig ertönen 3 Warnsignale (siehe Tab. 1).
Schwerer Fehler! Wenn dieser Fehler wiederholt auftritt ist das Werkzeug einzuschicken. Nicht öffnen und die Gerä-
teversiegelung nicht entfernen. Bei einmaligem Auftreten dieses Fehlers muß der betroffene Kabelschuh/Verbinder
nachgepresst werden.
6. Technische Daten
Gewicht (inklusive Akku): ca. 2,5 kg
Presskraft: ca. 30-60 kN (zweistu g)
Hub 35,5 mm max.
Antriebsmotor: Gleichstrom-Permanentfeldmotor
Akkuspannung: 18 V DC
Akkukapazität: 1,3 Ah (RAL1/BL1815) oder 3 Ah (RAL2/BL1830)
Akku-Ladezeit: 15 min. (RAL1/BL1815) oder 22 min. (RAL2/BL1830)
Presszeit: 2 s (bei ARS) bis 5 s (abhängig vom Verbinderquerschnitt)
Pressungen pro Akku: 100 - 300 Pressungen (abhängig vom Verbinderquerschnitt)
Hydrauliköl: Rivolta S.B.H. 11
Umgebungstemperatur: -10°C bis +40°C
Schalldruckpegel: < 70 dB (A) in 1m Abstand
Vibrationen: < 2,5 m/s² (gewichteter Effektivwert der Beschleunigung)
24

Bedienungsanleitung EPG-ULTRA-ID
Glomar AG
l
Seestrasse 11 l CH-9326 Horn l T +41 71 841 70 70 l www.glomar.ch
EKM 60 ID-L
Bedienungsanleitung Presswerkzeug
7. Außerbetriebnahme/Entsorgung
Dieses Werkzeug fällt in den Geltungsbereich der Europäischen WEEE (2012/19/EU) und RoHS Richtlinien (2011/65/
EU), die in Deutschland durch das Elektro- und Elektronikgerätegesetz (ElektroG) umgesetzt wurden.
Akkus müssen unter Berücksichtigung der Batterieverordung speziell entsorgt werden.
Achtung
Das Werkzeug darf nicht im Restmüll entsorgt werden.
Anmerkung
Diese Bedienungsanleitung können Sie jederzeit kostenlos unter der Bestellnummer HE.14820 bei uns bestellen.
25

Instruction manual EPG-ULTRA-ID
Glomar AG
l
Seestrasse 11 l CH-9326 Horn l T +41 71 841 70 70 l www.glomar.ch
EKM 60 ID-L
Index
1. Introduction
2. Warranty
3. Description of the electro-hydraulic tool
3.1 Description of the components
3.2 Brief description of the important features of the unit
3.3 Description of the tool indication
4. Remarks in respect of the determined use
4.1 Operation of the tools
4.2 Explanation of the application range
4.3 Mounting instructions
4.4 Service and Maintenance instructions
5. Troubleshooting
6. Technical data
7. Putting out of action/waste disposal
Symbols
Safety Warnings Please do not disregard to avoid injuries and environmental damage
Application Warnings Please do not disregard to avoid damaging the tool.
1. Introduction
Before starting to use the tool please read the instruction manual carefully.
Use this tool exclusively for its determined use and follow all applicable safety instructions.
Mounting and assembly of connecting material with the help of this tool must only be performed by specially trained
personnel. The minimum age is 16 years.
This instruction manual has to be carried along during the entire life span of that tool.
The operator has • to guarantee the availability of the instruction manual for the user and
• to make sure, that the user has read and understood the instruction manual.
26

Instruction manual EPG-ULTRA-ID
Glomar AG
l
Seestrasse 11 l CH-9326 Horn l T +41 71 841 70 70 l www.glomar.ch
EKM 60 ID-L
2. Warranty
If the tool is operated according to its intended use and the regular maintenance services are observed our warranty is 24 months from the time of delivery. Worn-out parts resulting from its intended use are excluded. We
reserve the right to rework the tool in case of a justi ed warranty claim.
3. Description of the battery operated electro-hydraulic tool
3.1 Description of the components
The hydraulic tool is a hand guided tool and consists of the following components:
Table 3 (see pic.1)
Pos. Description Function
1 Crimping head Working unit to crimp the connectors
2 Retract slide slide to retract the drive rolls in case of an error or emergency
3 LED (red) Indicator for Battery charge, Service Intervals and faults
4 battery lock Slide to unlock the battery
5 Battery
6 LED (white) to illuminate the working area
7Trigger Actuator to start the crimping cycle
8 J-Latch Device to open the head
9 Indentor Round piston with step design
10 Latch Device to open or close the crimping head
rechargeable 1,3 Ah Li-Ion battery
Optional:
3Ah Li-Ion battery (RAL2/BL1830) or mains adapter NG2
27

Instruction manual EPG-ULTRA-ID
Glomar AG
l
Seestrasse 11 l CH-9326 Horn l T +41 71 841 70 70 l www.glomar.ch
EKM 60 ID-L
3.2 Brief description of the important features of the unit
The hydraulic unit incorporates an automatic retraction which returns the piston into its starting position when the
maximum operating pressure is reached.
A manual retraction stop with Teach-in allows the user to programm the stop position during the retraction of the piston so that the piston stops at the very position where the previous crimping cycle had been stopped.
A manual retraction allows the user to return the piston into the starting position in case of an incorrect crimp.
The unit is equipped with an innovative two-stage telescopic cylinder.
The tool has a pre-crimping device which clamps the connectors
installer to interrupt the crimping cycle to re-position the connector, respectively make necessary corrections (see
pic. 19).
The unit is equipped with a special brake which stops the forward motion of the piston/dies when the trigger is released.
The crimping head can be smoothly turned by 350° around the longitudinal axis in order to gain better access to tight
corners and other dif cult working areas.
The tool is equipped with a microprocessor which shuts off the motor automatically after the crimp is completed,
indicates service intervals and low battery charges and performs internal checks sending out acoustical and optical
warning signals in case of a detected fault.
The new tools feature an integrated pressure sensor which automatically identi es the achieved crimping force du-
ring every crimping operation. If a deviation from the set operation pressure is identi ed, an acoustic signal sounds
and a red display ashes (tab. 1).
A white LED illuminates the working space after activating the trigger. It automatically switches off 10 sec. after releasing the trigger. This feature can be deactivated (see page V)
Through an optional USB adapter a report can be generated at the end of a working session at a PC documenting
the proper function of the tool.
rst before actually crimping it. This allows the
28

Instruction manual EPG-ULTRA-ID
Glomar AG
l
Seestrasse 11 l CH-9326 Horn l T +41 71 841 70 70 l www.glomar.ch
EKM 60 ID-L
The compact ergonomically formed design consists of 2 components. The grip area is rubber coated and therefore
2K
slip resistent. The housing design is optimized in respect of the center of gravity which improves the handling and
supports fatique-proof working.
All tool functions can be controlled by one trigger. This results in an easy handling and a better grip compared to a
two button operation.
Li-Ion batteries do neither have a memory effect nor self discharge. Even after long periods of non operation the tool
is always ready to operate. In addition we see a lower power weight ratio with 50% more capacity and shorter charging cycles compared to NiMH batteries.
The oil used in our tool is particularly environmentally friendly and and has been rewarded „The Blue Angel“. The oil
is also suitable for low temperatures and has excellent lubrication characteristics.
Power saving function through motor switch-off.
29

Instruction manual EPG-ULTRA-ID
Glomar AG
l
Seestrasse 11 l CH-9326 Horn l T +41 71 841 70 70 l www.glomar.ch
EKM 60 ID-L
3.3 Description of the tool indication
See Tab. 1.
Prior to operating the unit the charging level of the battery (pic. 1.2) should have been tested. A low charging level
can be detected by the ashing of the LED (pic. 1.1) for 20 s at the end of a crimping cycle.
4. Remarks in respect of the determined use
Before starting any work on electrical appliances it must be safeguarded that there are no live parts in the immediate
assembly area of the user. If this not possible special precaution measures (
must be provided.
Attention
Keep your working area clean and tidy. Do not use this tool when you are tired, on drugs, had alcohol or if
you are medicated.
4.1 Operation of the unit
Cycle: see pictures in front.
The crimping head should be turned into the desired position before starting the crimping cycle. It is signi cantly
easier to turn the crimping head in a pressure free state.
Attention
Dress properly. Do not wear loose clothing or jewellery. Keep your hair, clothing and gloves away from moving parts.
Attention
Keep proper footing and balance at all times.
Attention
Use safety gear and always wear eye protection.
Attention
The crimping process can be interrupted at any moment by releasing the trigger.
see EN 50110-1) for working near live parts
30

Instruction manual EPG-ULTRA-ID
Glomar AG
l
Seestrasse 11 l CH-9326 Horn l T +41 71 841 70 70 l www.glomar.ch
EKM 60 ID-L
4.2 Explanation of the application range
The crimping range is Cu10/Al50 mm² to 240 mm² for copper and aluminium cable lugs and connectors.
If different conducting materials have to be crimped, please contact the manufacturer.
Attention
Do not crimp on live cables or conductors.
The hand held tool is not supposed to be restrained in a vise. It is not allowed to use the tool in a stationary application.
The tool is not designed for continued crimping operations. After a sequence of approximately 30-40 completed
crimps you have to make a break of 15 min. to give the tool time to cool down.
Attention
Too intensive use can cause heat damages for the tool
Attention
During the operation of electric engines sparks can occur which might ignite highly in ammable or explosi-
ve liquids and materials.
Attention
Electric-hydraulic crimping tools should not be operated in pouring rain or under water.
4.3 Mounting instructions
Copper R- and L-series connectors as well as connectors for ne stranded cables in the range of 10 to 185
mm² are crimped once and 240 mm² are crimped twice. Also aluminium cable lugs and connectors in the range of 50
to 185 mm² are crimped once and 240 mm² twice.
A fault will be noti
3 times and simultaneously 3 accustic signals occure the crimp is faulty. In this case the crimp must be repeated.
Please read the assembly instructions in our general catalogue.
ed by optical (red LED) and accustical signals as indicated in table 1. If the red LED indicates
31

Instruction manual EPG-ULTRA-ID
Glomar AG
l
Seestrasse 11 l CH-9326 Horn l T +41 71 841 70 70 l www.glomar.ch
EKM 60 ID-L
4.4 Service and maintenance instruction
For every day service the unit has to be cleaned and dried after each use. The battery cartridge and the charging unit
have to be protected against humidity and dust.
The electric-hydraulic unit is equipped with a controller enabling the user to see when the next service is due by
ashing for 20 sec. at the end of a working cycle.
The unit must be sent to an authorized service center after reaching 10.000 cycles or at the latest after one
year. During this service worn out parts will be exchanged, safety relevant components checked and possibly replaced pre cautiously
Attention
Maintain power tools thoroughly
any other condition that may affect the power tools operation.
Attention
Do not damage the seals of the tool. If the seal is damaged the warranty claim is void.
Attention
Have damaged parts repaired by a quali
Attention
Do not damage the seals of the tool. If the seals are damaged the warranty is invalidated.
. This provision serves your safety and avoids failures through fatigue.
. Check for functionality or jamming of moving parts, breakage of parts and
ed expert or by our service center before use.
5. Troubleshooting
a.) Constant ashing/indicating of the red LED (pic 1.3) or the occurence of an acustical warning signal.
see tab. 1. If the failure can not be resolved through the action recommended in tab. 1 return the tool to the
nearest service center.
b.) The tool loses oil.
Return the unit to the manufacturer. Do not open it and damage the seal of the tool.
c.) The red LED
Serious fault! If this fault occures repeatedly return the unit to an Autorized Service Center. Do not open
it and damage the seal of the tool.
In case of a one time occurence the connector has to be pressed a second time.
ashes 3x and simultaneously 3 acoustic warning signals occure (see tab. 1).
32

Instruction manual EPG-ULTRA-ID
Glomar AG
l
Seestrasse 11 l CH-9326 Horn l T +41 71 841 70 70 l www.glomar.ch
EKM 60 ID-L
6. Technical Data
Weight (incl. battery): approx. 2,5 kg
Crimping force: approx. 30 - 60 kN (two step piston design)
Stroke: 35,5 mm max.
Driving motor: direct-current permanent eld
Battery voltage: 18 V DC
Battery capacity: 1,3 Ah (RAL1/BL1815) or 3 Ah (RAL2/BL1830)
Charging time: 15 min. (RAL1/BL1815) or 22 min. (RAL2/BL1830)
Crimping time: 2 s (with ARS) to 5 s (depending on the connector size)
Crimp per battery: 100 - 300 crimps (depending on the connector size)
Hydraulic oil: Rivolta S.B.H. 11
Environmental temperature: -10°C bis +40°C
Sound level: < 70 dB (A) in 1m distance
Vibrations: < 2,5 m/s²
7. Putting out of action/waste disposal
This unit is subjected to the scope of the European WEEE (2012/19/EU) and RoHS (2011/65/EU) directives.
Battery cartridges must be specially disposed of according to the EEC Battery Guideline.
Attention
Do not dispose of the unit in your residential waste.
Please contact your distributer to find out more how to get your tool recycled environmental friendly.
Remark
Additional instruction manuals are available free of charge. The part # is HE.14820.
33

Mode d’emploi EPG-ULTRA-ID
Glomar AG
l
Seestrasse 11 l CH-9326 Horn l T +41 71 841 70 70 l www.glomar.ch
EKM 60 ID-L
Mode d´emploi sertisseuse
Sommaire
1. Introduction
2. Garantie
3. Description des outils électro-hydrauliques
3.1 Description des composants
3.2 Brève description des principales caractéristiques de l‘appareil
3.3 Description de l‘af chage LED
4. Instructions d‘utilisation conforme à la destination de l‘appareil
4.1 Utilisation de l‘appareil
4.2 Champ d‘application
4.3 Conseils d‘utilisation
4.4 Conseils d‘entretien
5. Marche à suivre en cas de panne de l‘appareil
6. Caractéristiques techniques
7. Mise hors service / au rebut
Symboles
Consignes de sécurité :
A respecter impérativement pour la sécurité des personnes et la protection de l‘environnement.
Instructions techniques d‘utilisation
A respecter impérativement pour éviter tout dommage à l‘appareil .
1. Introduction
Lire attentivement le mode d‘emploi avant la mise en service de l‘outil de pressage.
N‘utiliser cet appareil que pour l‘usage auquel il est destiné.
Le montage et l‘installation de raccords à l‘aide du présent outil ne doit être effectué que par des personnes ayant
des connaissances en matière d‘électro-technique. L‘âge minimum requis est de 16 ans.
Ce mode d‘emploi doit accompagner l‘appareil pendant toute la durée de son utilisation.
L‘exploitant doit • mettre le mode d‘emploi à la disposition de l‘utilisateur et
• s‘assurer que ce dernier a bien lu et compris le mode d‘emploi
34

Mode d’emploi EPG-ULTRA-ID
Glomar AG
l
Seestrasse 11 l CH-9326 Horn l T +41 71 841 70 70 l www.glomar.ch
EKM 60 ID-L
Mode d´emploi sertisseuse
copy
2. Garantie
La garantie s’élève à 24 mois date de la livraison à condition d’une utilisation de l’outil exclusivement pour son
usage déterminé et d’observation des intervalles des maintenance.
Sauf pièces de rechanges qui résultent d’un usage déterminé. Nous réservons le droit de récupérer le produit.
3. Description des outils de sertissage électro-hydrauliques
3.1 Description des composants
Les outils hydrauliques de sertissage sont des appareils manuels qui se composent des éléments suivants :
Tableau 3 (cf. g. 1)
Pos. Désignation Fonction
1 Tête de sertissage Elément permettant de recevoir les matrices de sertissage
2 Touche de rappel Bouton permettant d‘ouvrir les matrices de sertissage
en cas d‘urgence ou d‘erreur
3 LED (rouge) Af cheur de contrôle de l‘état de charge et
d‘autres fonctions de l‘appareil
4 Bouton de déverrouillage de
l‘accumulateur
5 Accumulateur (RAL1/BL1815) Accumulateur rechargeable au Li-Ion 1,3 Ah Li-Ion
6 Af cheur LED (blanche) Pour l’éclairage du local de travail
7 Interrupteur de marche / arrêt Déclenchement de l‘opération de sertissage
8 Étrier mécanisme pour ouvrir/fermer de tête
9 Mandrin Piston étage pour pressage
10 Languette à bascule Mécanisme pour verrouillage ou deverrouiller la téte
Déverrouillage de l‘accumulateur
35

Mode d’emploi EPG-ULTRA-ID
Glomar AG
l
Seestrasse 11 l CH-9326 Horn l T +41 71 841 70 70 l www.glomar.ch
EKM 60 ID-L
Mode d´emploi sertisseuse
copy
3.2 Brève description des principales caractéristiques de l‘appareil tirant
L’appareil possède une fonction de retour automatique, qui ramène automatiquement la matrice en position initiale
après que les sertissage ait atteint la pression maxi requise.
Un arrêt écartement manuel avec ‚Teach-in‘ permet à l‘utilisateur de programmer la position d‘arrêt lors du retour du
piston de sorte que le piston s‘arrête à la position même où le précédent de sertissage / découpage du cycle avait
été arrêté.
Une rétractation manuel permet à l‘utilisateur de remonter le piston dans la position de départ en cas d‘une sertissage incorrecte.
L’appareil est équipé d’une pompe à piston double, caractérisée par une vitesse d’approche rapide et d’une course
lente de sertissage.
Sur l´appareil, il existe un dispositif d‘amorce qui permet de pré-
au monteur la possibilité de modi er ultérieurement la position du sertissage ou de la corriger (cf. g. 19).
L’appareil est équipé d’un dispositif d’arrêt immédiat qui stoppe instantanément l’avance dès que le bouton de sertissage est relâché.
La tête de sertissage peut être tournée de 350° en continu autour de son axe. Ceci permet le sertissage dans des
endroits dif cilement accessibles.
La sertisseuse est équipé d’une commande à microprocesseur qui coupe le moteur lorsque le sertissage est complètement terminé, qui indique la périodicité de la maintenance, ainsi que l’état de charge de l’accumulateur et qui
effectue un diagnostic des défauts.
À chaque cycle de sertissage, la pression atteinte est déterminée au moyen d’un capteur de pression, puis comparée
à la valeur minimale requise. Un signal acoustique et optique paraît lorsque des différences par rapport à la pression
de travail déterminée se produisent (Tab. 1).
Fonction d’évaluation par interface optique et adaptateur USB. (Équipement spéciale).
LED blanche illumine le local de travail en actionnant le commutateur de service et s’éteint après 10 s. Cette fonction
peut être éliminée. (Voir description – page V).
xer le raccord puis de le sertir ensuite, donnant ainsi
36

Mode d’emploi EPG-ULTRA-ID
Glomar AG
l
Seestrasse 11 l CH-9326 Horn l T +41 71 841 70 70 l www.glomar.ch
EKM 60 ID-L
Mode d´emploi sertisseuse
copy
Le corps en plastique bi-matière avec insert souple contribue à une sensation de prise agréable et sûre. La position
2K
optimisée du centre de gravité permet en complément un travail durable et sans fatigue.
Toutes fonctions de l’outil s’effectuent par moyen d’une commande à bouton unique pour une maniement aisée et
un meilleur appui.
Accus lithium-ions 18V puissants avec une capacité complémentaire de 50% et des délais de charge extrêmement
courts. Ces accumulateurs n’ont pas d’effet mémoire et auto-décharge électrique.
Cet outil travaille avec huiles hydrauliques synthétiques. Ces huiles sont facilement biodégradables et ne présentent
aucun danger pour l’eau.
Fonction d’économie d’énergie grâce à l‘arrêt automatique du moteur en n de cycle de sertissage.
37

Mode d’emploi EPG-ULTRA-ID
Glomar AG
l
Seestrasse 11 l CH-9326 Horn l T +41 71 841 70 70 l www.glomar.ch
EKM 60 ID-L
Mode d´emploi sertisseuse
copy
3.3 Description de l’af chage par diode électroluminescente
Voir tableau 1
Contrôlez avant utilisation l‘état de charge de l‘accumulateur. Un état de charge faible peut être reconnu lorsque la
LED reste par exemple allumée pendant 20 secondes après un essai de sertissage.
4. Instructions d‘utilisation conforme à la destination de l‘appareil
Avant de commencer tout travail, il convient de déconnecter l‘ensemble des pièces actives, c‘est à dire toutes les
pièces conductrices de courant se trouvant dans l‘environnement du monteur. Si cette solution n‘est pas applicable, il
y a lieu de prendre les mesures de protection prévues à la Norme DIN EN 50110-1 pour le travail effectué à proximité
d‘éléments sous tension.
Gardez votre zone de travail propre et rangé. Ne pas utiliser cet outil lorsque vous êtes fatigué, sous l‘in uence des
drogues,de l‘acool ou des médicaments.
4.1 Utilisation de l‘outil
Cycle: voir les photos en face
Le tête de sertissage/coupage on devrait tourner de tête en position désirée avant de commencer le cycle. Il est
considérablement plus facile à tourner le tête de sertissage/coupage dans une état sans pression.
Attention
Porter des vêtements appropriés. Ne pas porter de vêtements amples, ni de bijoux. Ecarter les cheveux, les
vêtements et les gants des pièces en mouvement.
Attention
Veiller à une position sûre et garder l‘équilibre à tout moment.
Attention
Porter des équipements de protection personnels et toujours des lunettes de protection.
38

Mode d’emploi EPG-ULTRA-ID
Glomar AG
l
Seestrasse 11 l CH-9326 Horn l T +41 71 841 70 70 l www.glomar.ch
EKM 60 ID-L
Mode d´emploi sertisseuse
copy
4.2 Champ d‘application
La plage d‘utilisation est Cu10/AL50 mm² à 240 mm² pour les cosses et manchons tubulaires du cuivre et aluminium.
Si vous devez sertir d‘autres raccords, il est indispensable de vous entretenir au préalable de ce problème avec
l‘usine.
Attention
Ne jamais sertir des composants sous tension.
Cet appareil est un appareil qui est tenu à la main et ne doit être en aucun cas monté en
ne devez pas l‘utiliser en xe sans un dispositif spécialement certi é.
L’appareil n’est pas destiné à une utilisation en continu. Après environ 30-40 opérations de sertissage, il est nécessaire de marquer une courte pause d’au moins 15 minutes a n que l’appareil puisse refroidir.
Attention
Toute utilisation intensive peut entraîner des dommages à l‘appareil par suite de surchauffe.
Attention
Les moteurs électriques peuvent produire des étincelles pouvant mettre le feu à des matières explosives ou
in ammables.
Attention
L‘appareil électro-hydraulique ne doit pas être utilisé sous l‘eau ou bien en cas de forte pluie.
xe ni utilisé en xe. Vous
4.3 Conseils d‘utilisation
Dans la série R et L de Klauke ainsi que la série des conducteurs ns, le sertissage est réalisé une fois de 10 mm² à
185 mm² et deux fois pour 240 mm². Pour les cosses de câble et connecteurs en aluminium, le sertissage est réalisé
une fois de 50 mm² à 185 mm² et deux fois pour 240 mm².
Si la LED rouge clignote 3x et si, en même temps, 3 signaux sonores sont émis, il y a un défaut grave. Le cycle de
sertissage respectif doit être répété.
Veiller à utiliser l’appareil les matrices adaptées au produit à sertir, et en cas de doute prendre contact avec le fabricant.
39

Mode d’emploi EPG-ULTRA-ID
Glomar AG
l
Seestrasse 11 l CH-9326 Horn l T +41 71 841 70 70 l www.glomar.ch
EKM 60 ID-L
Mode d´emploi sertisseuse
copy
4.4 Conseils d‘entretien
L’appareil doit être nettoyé après chaque utilisation et doit être stocké au sec. Protéger la batterie et le chargeur de
l’humidité et de tous corps étrangers. L’appareil est équipé d’un microprocesseur, qui avertit l’utilisateur de la nécessité des différentes operations de maintenance.
S’il est nécessaire de faire effectuer un entretien après 10.000 compressions, l’appareil doit être envoyé au service
après vente agrée (ASC).
Lors des entretiens de ces appareils les piéces usées sont remplacées et autres composants de sécurité sont egalement testés et si nécessaire remplacés. Cette opération est pour votre sécurité et pour éviter une panne ultérieure.
Attention
Prendre scurpuleusement soin de l‘appareil électrique. Contrôler si les pièces de l‘appareil en mouvement
fonctionnement impeccablement et si elles ne coincent pas, si des pièces sont cassées ou endommagées,
si le fonctionnement de l‘appareil électrique est préjudiciable.
Attention
Ne pas ouvrir l‘appareil! Une détérioration des scellés entraine la perte de la garantie.
Attention
Avant l‘utilisation de l‘appareil électrique, faire réparer les pièces endommagées par des professionnels
quali és ou par une station S.A.V. agrée sous contrat avec Klauke.
5. Marche à suivre en cas de panne de la sertisseuse
a.) Signal lumineux régulier de LED rouge ou signal d’avertissement acoustique.
Voir tableau 1. Si le dérangement ne peut pas être arrêté retourner l’outil au prochain Centre d’assistance
(ASC).
b.) La sertisseuse pert de l‘huile.
Renvoyez l‘appareil à l‘atelier. Ne pas ouvrir l‘appareil, ni retirer les scellés.
c.) 3 fois signal optique par moyen LED et 3 fois signal acoustique en même temps.
Erreur grave! Au cas de répétition de cet erreur retournez l’outil. Ne pas ouvrir l’outil et ne pas enlever le
sceau de garantie. Si cet erreur se produit seul une fois l’utilisateur doit démonter le raccord ou sertir le raccord encore une fois.
40

Mode d’emploi EPG-ULTRA-ID
Glomar AG
l
Seestrasse 11 l CH-9326 Horn l T +41 71 841 70 70 l www.glomar.ch
EKM 60 ID-L
Mode d´emploi sertisseuse
copy
6. Caractéristiques techniques
Poids de l‘appareil avec ‘accumulateur: approx. 2,51 kg
Puissance: approx. 30 - 60 kN (compression à deux étages)
Course: 35,5 mm max.
Moteur d‘entraînement: Moteur à courant continu Champ magnétique permanent
Tension de l‘accumulateur: 18 V DC
Capacité de l‘accumulateur: 1,3 Ah (RAL1/BL1815) ou 3 Ah (RAL2/BL1830)
Temps de charge: 15 min. (RAL1/BL1815) ou 22 min. (RAL2/BL1830)
Temps de sertissage: 2 s (avec ARS) à 5 s (dépendant de la taille du connecteur)
Autonomie: 100 - 300 crimps (dépendant de la taille du connecteur)
Huile hydraulique: Rivolta S.B.H. 11
Température ambiante: -10°C à +40°C
Niveau sonore: < 70 dB (A) à 1 m de distance
Vibrations: < 2,5 m/s²
7. Mise hors service/Mise au rebut
La mise au rebut des différents composants de l‘appareil doit être effectuée séparément. Il faut d‘abord effectuer la
vidange de l‘huile, qui doit être entreposée dans un lieu spéci que.
Attention
Les huiles hydrauliques présentent un danger de pollution pour les nappes phréatiques. Une vidange non
contrôlée et un rejet non réglementaire sont passibles d‘ amendes (Réglementation de la protection de
l‘environnement).
D‘autre part l‘accumulateur doit être éliminé dans le respect de la réglementation relative aux batteries. L‘élimination
des autres composants de l‘appareil, se fera en dans le respect des dispositions de la réglementation de la CE pour
la protection de l‘environnement. Nous recommandons de faire effectuer l‘enlèvement des composants rebutés dans
le respect de la réglementation de la protection de l‘environnement par une entreprise spécialisée et agréée. Une
reprise gratuite par le fabricant, de l‘appareil usagé rebuté peut être assurée.
Remarque: Ce mode d‘emploi peut être obtenu gratuitement sous numéro de référence HE.14820.
41

Glomar AG
l
Seestrasse 11 l CH-9326 Horn l T +41 71 841 70 70 l www.glomar.ch
Bedienungsanleitung / Instruction manual / Mode d’emploi EPG-ULTRA-ID
(D) CE-´13 - Konformitätserklärung. Wir erklären in alleiniger Verantwort-
(N) CE-´13 - Konformitetserklæring. Vi erklærer på eget ansvarlighet
Handgeführtes batteriebetriebenes
Elektrowerkzeug Typ EKM 60 ID-L
lichkeit, daß dieses Produkt mit den folgenden Normen oder normativen
Dokumenten übereinstimmt:
EN 60745-1, EN ISO 12100 Teil 1 + 2, EN ISO 13857, EN 349, EN 602041, EN 28662-1, EN 61000-6-3, EN 61000-6-2, EN 60529, EN 1037 gemäß
den Bestimmungen der Richtlinien 2006/42/EG, 2004/108/EG, 2011/65/EU
at dette produkt er i overensstemmelse med følgende standarder eller
standard-dokumenter:
EN 60745-1, EN ISO 12100 Teil 1 + 2, EN ISO 13857, EN 349, EN
60204-1, EN 28662-1, EN 61000-6-3, EN 61000-6-2, EN 60529, EN 1037
i henhold til bestemmelsene i direktive ne 2006/42/EØF, 2004/108/EØF,
2011/65/EU
(GB) CE-´13 - Declaration of conformity. We declare under our sole responsibility that this product is in conformity with the following standards or
normative documents:
EN 60745-1, EN ISO 12100 Teil 1 + 2, EN ISO 13857, EN 349, EN 602041, EN 28662-1, EN 61000-6-3, EN 61000-6-2, EN 60529, EN 1037 in
accordance with the regulations of directives 2006/42/EG, 2004/108/EG,
2011/65/EU
(F) CE-´13 - Déclaration de conformité. Nous déclarons sous notre seule
reponsabilité que ce produit est en conformité avec les normes ou documents normatifs suivants:
EN 60745-1, EN ISO 12100 Teil 1 + 2, EN ISO 13857, EN 349, EN
60204-1, EN 28662-1, EN 61000-6-3, EN 61000-6-2, EN 60529, EN 1037
conformément aux réglementations des directives 2006/42/EG, 2004/108/
EG, 2011/65/EU
(NL) CE-´13 - Konformiteitsverklaring. Wij verklaren en wij stellen ons
er alleen voor verantwoordelijk dat dit produkt voldoet aan de volgende
normen of normatieve documenten:
EN 60745-1, EN ISO 12100 Teil 1 + 2, EN ISO 13857, EN 349, EN
60204-1, EN 28662-1, EN 61000-6-3, EN 61000-6-2, EN 60529, EN 1037
overeenkomstig de bepalingen van de richtlijnen 2006/42/EG, 2004/108/
EG, 2011/65/EU
(P) CE-´13 - Declaração de conformidade. Declaramos sob nossa exclusiva responsabilidade que este producto cumpre as seguintes normas ou
documentos normativos:
EN 60745-1, EN ISO 12100 Teil 1 + 2, EN ISO 13857, EN 349, EN 602041, EN 28662-1, EN 61000-6-3, EN 61000-6-2, EN 60529, EN 1037 conforme as disposiçoes das directivas 2006/42/EG, 2004/108/EG, 2011/65/EU
(E) CE-´13 - Declaración de conformidad. Declaramos bajo nuestra sola
responsabilidad que este producto està en conformidad con las normas o
documentos normativos siguientes:
EN 60745-1, EN ISO 12100 Teil 1 + 2, EN ISO 13857, EN 349, EN 602041, EN 28662-1, EN 61000-6-3, EN 61000-6-2, EN 60529, EN 1037 de
acuerdo con las regulaciones de las directivas 2006/42/EG, 2004/108/EG,
2011/65/EU
(I) CE-´13 - Dichiarazione di conformità. Dichiariamo sotto la nostra esclusiva responsabilità che questo prodotto è conforme alle seguenti norme e
documenti normativi:
EN 60745-1, EN ISO 12100 Teil 1 + 2, EN ISO 13857, EN 349, EN
60204-1, EN 28662-1, EN 61000-6-3, EN 61000-6-2, EN 60529, EN 1037
conformemente alle disposizioni delle direttive 2006/42/EG, 2004/108/EG,
2011/65/EU
(DK) CE-´13 - Konformitetserklæring. Vi erklærer under almindeligt ansvardt at dette produkt er i overensstemmelse med folgende normer eller
normative dokumenter:
EN 60745-1, EN ISO 12100 Teil 1 + 2, EN ISO 13857, EN 349, EN
60204-1, EN 28662-1, EN 61000-6-3, EN 61000-6-2, EN 60529, EN 1037
i henhold til bestemmelseme i direktiverne 2006/42/EØF, 2004/108/EØF,
2011/65/EU
(FIN) CE-´13 - Todistus slandardinmukaisuudesta. Asiasta vastaavana
todistamme täten, että tämä tuote on seuraavien standardien ja standardoimisasiakirjojen vaatimusten mukainen:
EN 60745-1, EN ISO 12100 Teil 1 + 2, EN ISO 13857, EN 349, EN 602041, EN 28662-1, EN 61000-6-3, EN 61000-6-2, EN 60529, EN 1037 ja
vastaa säädoksiä 2006/42/EG, 2004/108/EG, 2011/65/EU
42

Glomar AG
l
Seestrasse 11 l CH-9326 Horn l T +41 71 841 70 70 l www.glomar.ch
Bedienungsanleitung / Instruction manual / Mode d’emploi EPG-ULTRA-ID
Handgeführtes batteriebetriebenes
Elektrowerkzeug Typ EKM 60 ID-L
(PL) CE-´13 - Zgodnosc z dyrektywami CE. Swiadomi odpowiedzialnosci
oswiadczamy, ze niniejszy produkt jest zgodny z nastepujacymi normami
lub dokumentacja normatywna:
EN 60745-1, EN ISO 12100 Teil 1 + 2, EN ISO 13857, EN 349, EN 602041, EN 28662-1, EN 61000-6-3, EN 61000-6-2, EN 60529, EN 1037 zgodnie z postanowieniami wytycznych 2006/42/EG, 2004/108/EG, 2011/65/EU
(S) CE-´13 - Konformitetsdeklaration. Vi förklarar pá eget ansvar att denna
produkt õverenstämmer med följande normer eller normativa dokument:
EN 60745-1, EN ISO 12100 Teil 1 + 2, EN ISO 13857, EN 349, EN 602041, EN 28662-1, EN 61000-6-3, EN 61000-6-2, EN 60529, EN 1037 enligt
bestãmmelserna i direktiverna 2006/42/EG, 2004/108/EG, 2011/65/EU
(GR) CE-´13 -
EN 60745-1, EN ISO 12100 Teil 1 + 2, EN ISO 13857, EN 349, EN
60204-1, EN 28662-1, EN 61000-6-3, EN 61000-6-2, EN 60529, EN 1037
2006/42/EG, 2004/108/EG, 2011/65/EU
(H) CE-´13 – Megfelelőségi nyilatkozat. Kéziműködtetésű elektromos
kéziszerszámok:
Teljes felelősségel kijelentjük, hogy ezek a termékek a következő szabványokkal és irányelvekkel összhangban vannak: EN 60745-1, EN ISO 12100
Teil 1 + 2, EN ISO 13857, EN 349, EN 60204-1, EN 28662-1, EN 610006-3, EN 61000-6-2, EN 60529, EN 1037; és megfelelnek a rendeltetés
szerinti 2006/42/EG, 2004/108/EG, 2011/65/EU irányelveknek.
(CZ) CE-´13 – Prohlášeni o shode. Prohlašujeme na vlastni zodpovednost,
ze tyto produkty splnuji následujici normy nebo normativni listiny:
EN 60745-1, EN ISO 12100 Teil 1 + 2, EN ISO 13857, EN 349, EN 602041, EN 28662-1, EN 61000-6-3, EN 61000-6-2, EN 60529, EN 1037;
Ve shode se smernicemi 2006/42/EG, 2004/108/EG, 2011/65/EU
(RO) CE-´13 - Declaraţie de conformitate. Noi declarăm pe propria
răspundere că acest produs este în conformitate cu următoarele norme şi
documente normative:
EN 60745-1, EN ISO 12100 Teil 1 + 2, EN ISO 13857, EN 349, EN 602041, EN 28662-1, EN 61000-6-3, EN 61000-6-2, EN 60529, EN 1037; potrivit
dispoziţiilor directivelor 2006/42/EG, 2004/108/EG, 2011/65/EU
Remscheid, den 04.04.2013
___________________________________________
Dipl.-Ing. Joh.-Christoph Schütz, CE-Beauftragter
43
 Loading...