

Page 1
ENGLISH ENGLISH ENGLISH ENGLISH ENGLISH ENGLISH ENGLISH ENGLISH ENGLISH ENGLISH ENGLISH ENGLISH ENGLISH ENGLISH ENGLISH ENGLISH ENGLISH ENGLISH ENGLISH ENGLISH ENGLISH ENGLISH ENGLISH ENGLISH ENGLISH ENGLISH ENGLISH ENGLISH ENGLISH ENGLISH ENGLISH ENGLISH ENGLISH ENGLISH ENGLISH ENGLISH ENGLISH ENGLISH
ENGLISH ENGLISH ENGLISH ENGLISH ENGLISH ENGLISH ENGLISH ENGLISH ENGLISH ENGLISH ENGLISH ENGLISH ENGLISH ENGLISH ENGLISH ENGLISH ENGLISH ENGLISH ENGLISH ENGLISH ENGLISH ENGLISH ENGLISH ENGLISH ENGLISH ENGLISH ENGLISH ENGLISH ENGLISH ENGLISH ENGLISH ENGLISH ENGLISH ENGLISH ENGLISH ENGLISH ENGLISH ENGLISH
POLSKI POLSKI POLSKI POLSKI POLSKI POLSKI POLSKI POLSKI POLSKI POLSKI POLSKI POLSKI POLSKI POLSKI POLSKI POLSKI POLSKI POLSKI POLSKI POLSKI POLSKI POLSKI POLSKI POLSKI POLSKI POLSKI POLSKI POLSKI POLSKI POLSKI POLSKI POLSKI POLSKI POLSKI POLSKI POLSKI POLSKI POLSKI POLSKI POLSKI POLSKI POLSKI POLSKI POLSKI POLSKI POLSKI POLSKI POLSKI
POLSKI POLSKI POLSKI POLSKI POLSKI POLSKI POLSKI POLSKI POLSKI POLSKI POLSKI POLSKI POLSKI POLSKI POLSKI POLSKI POLSKI POLSKI POLSKI POLSKI POLSKI POLSKI POLSKI POLSKI POLSKI POLSKI POLSKI POLSKI POLSKI POLSKI POLSKI POLSKI POLSKI POLSKI POLSKI POLSKI POLSKI POLSKI POLSKI POLSKI POLSKI POLSKI POLSKI POLSKI POLSKI POLSKI POLSKI POLSKI
Digital Cable Receiver
KP 07/2012
ModelID: X2
• Slot for Smart Card
• Support of SD/HD (MPEG2 / MPEG4) DVB-C
systems
• High definion video output - HDMI
• Standard resoluon video output - SCART
• High speed USB 2.0 port
• PVR Ready
• Time Shi (pause, rewind)
• Automac Stand-by
• Low power consumpon in Stand-by mode,
below 1W
• Mullingual menu, including English
• Electronic Program Guide - EPG
• 4 digit LED display on front panel
• Mulmedia Player Full HD 1080p
Quick Start
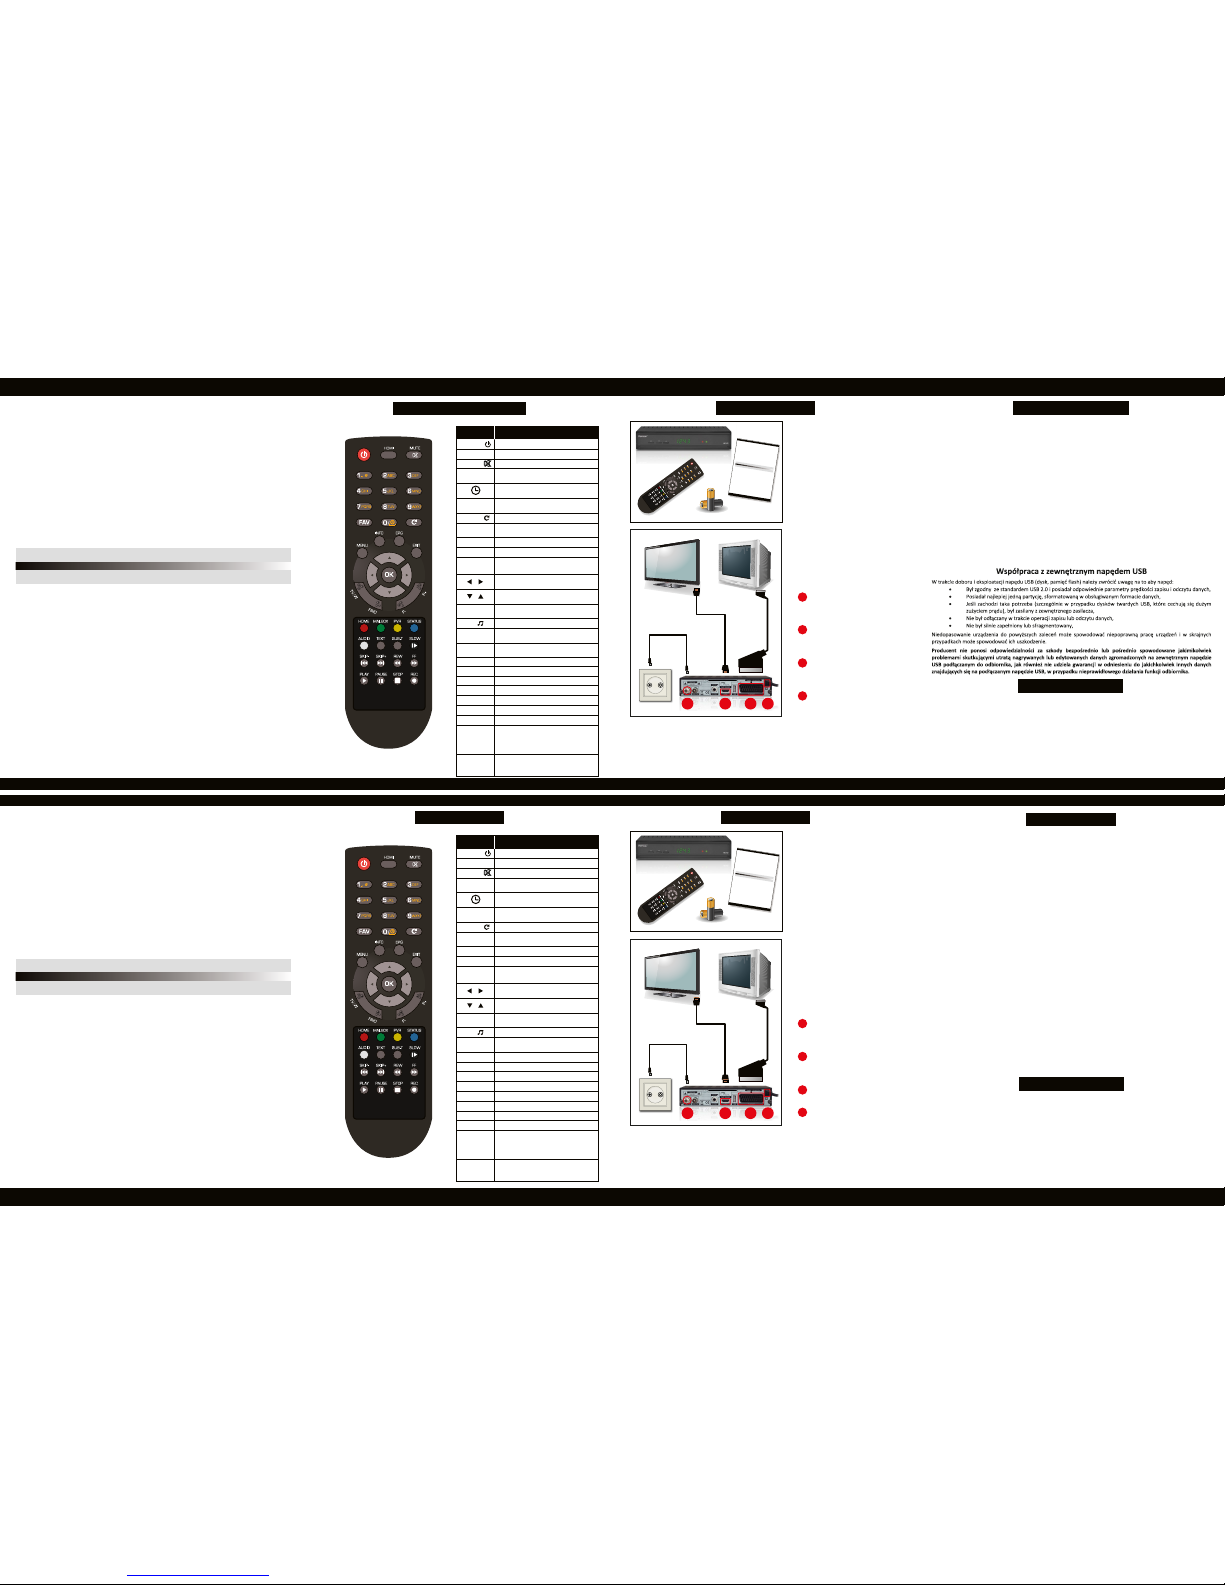
Remote controller
Buon Funcon
POWER -
HDMI
MUTE -
Numeric
buons
LAST -
FAV
INFO
EPG
EXIT
HOME
MAILBOX
PVR
STATUS
AUDIO
TEXT
SUB-T
P- / P+
TV/
/
/
MENU
FIND
SLOW, SKIP-,
SKIP+, REW, FF,
PLAY, PAUSE,
STOP, REC
RED, GREEN,
YELLOW, BLUE,
WHITE, BLACK
OK
Switch receiver on from standby mode.
Select video output resoluon.
Enable or disable the audio.
Switch to the previous channel.
Display informaon bar of current service.
Switch receiver between TV and radio mode.
Move cursor to next or previous page.
Oponal funcon.
Oponal funcon.
Display records list.
Display receiver status window.
Audio channels setup.
Display teletext informaon.
Subtles setup.
Video funcons
(meshi, playing, recording).
Colour buons
(different funcons per menu).
Display Electronic Program Guide on screen.
Cancel the user selecon and return to the
viewing mode from the menu.
Adjust volume level or move cursor le or right
in the menu.
Change channel or move cursor up or down
in the menu.
Enables to find channels by name entered by
numeric buons.
Display channel list on screen.
Select an item in menu.
Select channel or enter programming
parameters.
Switch between Sleep Timer Off
10/30/60/90/120 minutes.
Set receiver to the favourite list mode, display
actual favorite channel list.
Display the Main Menu on the screen or return
to the previous menu or status.
Basic connecon
ENGLISH ENGLISH ENGLISH ENGLISH ENGLISH ENGLISH ENGLISH ENGLISH ENGLISH ENGLISH ENGLISH ENGLISH ENGLISH ENGLISH ENGLISH ENGLISH ENGLISH ENGLISH ENGLISH ENGLISH ENGLISH ENGLISH ENGLISH ENGLISH ENGLISH ENGLISH ENGLISH ENGLISH ENGLISH ENGLISH ENGLISH ENGLISH ENGLISH ENGLISH ENGLISH ENGLISH ENGLISH ENGLISH
ENGLISH ENGLISH ENGLISH ENGLISH ENGLISH ENGLISH ENGLISH ENGLISH ENGLISH ENGLISH ENGLISH ENGLISH ENGLISH ENGLISH ENGLISH ENGLISH ENGLISH ENGLISH ENGLISH ENGLISH ENGLISH ENGLISH ENGLISH ENGLISH ENGLISH ENGLISH ENGLISH ENGLISH ENGLISH ENGLISH ENGLISH ENGLISH ENGLISH ENGLISH ENGLISH ENGLISH ENGLISH ENGLISH
Digital Cable Receiver
KP 07/2012
ModelID: X2
• Slot for Smart Card
• Support of SD/HD (MPEG2 / MPEG4) DVB-C systems
• High definion video output - HDMI
• Standard resoluon video output - SCART
• High speed USB 2.0 port
• PVR Ready
• Time Shi (pause, rewind)
• Automac Stand-by
• Low power consumpon in Stand-by mode,
below 1W
• Mullingual menu, including English
• Electronic Program Guide - EPG
• 4 digit LED display on front panel
• Mulmedia Player Full HD 1080p
Quick Start
1 2 3 4
Aer purchasing receiver,
unpack it and check if all of
the following items are
included:
• Receiver
• Remote controller
• Quick Start manual
• Baeries - 2x AAA (oponal)
To install baeries in the
remote controller remove the
flap protecng the baery
chamber. If there are used
baeries, they must be
removed. Put new baeries
inside according to polarity
descripon drawn inside. Place
protecng flap on its original
posion.
Connect cable from
DVB-C socket to receiver’s
CABLE IN connector.
Using HDMI cable
connect receiver with flat
panel TV or
Using SCART cable
connect it with classic TV.
At the end connect main
cord to the main socket.
1
2
3
4
Turn on the TV Set. Aer a while on TV Set You should see receiver’s OSD . If
the TV Set is not displaying receiver ’s OSD, probably signal source is set
wrong. Check TV Set documentaon for informaon how to change signal
source.
Operang notes
Simple configuraon
Automac Power Down
In accordance with actual European Union requirements, Your receiver is
equipped with funcon “Automac Power Off”. It work by switching the
receiver into standby mode aer a period of 3 hours aer the last acve
use. In pracce this means that if during this me the receiver will not be
given any command by using the remote control or keypad on the front
panel, the receiver turns off. Turning off the receiver will be preceded
(2 minutes previous) by a relevant message on the TV screen. Please also
note that this feature is enabled by deafault, but at Your own request, You
can disable it using the appropriate funcons in the receiver menu.
During the selecon and operaon with USB drive (HDD, flash drive), You
should pay aenon to the following issues:
• Drive is compable with USB 2.0 and has appropriate write and read
speed,
• Drive contain one single paron, formaed in suppoerted format,
• If nessesary, drive should be supplied from an external power supply
(especially for USB hard drives),
• Do not disconnect the drive during a write/read data operaon,
• Do not use very full or fragmented drive.
Aer connecng and turning on the receiver, if there is no default channels
list provided by Your Operator, You can choose search sengs and scan
channels to setup Your own channels list.
In the main menu (MENU buon) using arrow buons select Channel Scan
submenu and enter it using OK buon. Use Auto Search or Quick Search to
input parameters depending on Your Operator cable network. If You do not
have the parameters try Blindscan or contact Your Operator.
Working with External USB Drive
Uwagi eksploatacyjne
Prosta konfiguracja
Zgodnie z aktualnie obowiązującymi wymaganiami zawartymi w dyrektywach Unii Europejskiej, zakupiony przez Państwa odbiornik został
wyposażony w funkcję “Automatycznego Wyłączenia Zasilania”. Jej
działanie polega na przełączeniu odbiornika do stanu czuwania po okresie 3
godzin od ostatniego aktywnego użycia. W praktyce oznacza to, że jeżeli w
ciągu tego czasu do odbiornika nie zostanie wydana żadna komenda za
pomocą przycisków pilota zdalnego sterowania lub klawiatury na panelu
przednim, odbiornik w yłączy się. Moment wyłączenia odbiornika zostanie
poprzedzony (2 minuty wcześniej) stosownym komunikatem wyświetlonym
na ekranie telewizora. Jednocześnie informujemy, że funkcja ta jest
domyślnie aktywna w oprogramowaniu dedykowanym na kraje Unii
Europejskiej, jednak na własne życzenie możecie je Państwo ją wyłączyć za
pomocą odpowiedniej funkcji w menu odbiornika.
Po podłączeniu i włączeniu odbiornika, jeśli nie istnieje gotowa lista
kanałów dostarczona przez Państwa operatora telewizji kablowej, możecie
Państwo ustawić własną listę kanałów.
W głównym menu (przycisk MENU na pilocie) używając przyciski strzałek
wybierz Channel Scan podmenu i wejdź do niego używając przycisku OK.
Używając Automatyczne wyszukiwanie lub Szybkie wyszukiwanie wybierz
parametery zależne od Twojej sieci kablowej. Jeśli nie znasz parametrów,
użyj funckcji Blindscan lub skontaktuj się ze swoim operatorem.
Automatyczne wyłączenie zasilania
Cyfrowy odbiornik telewizji kablowej
KP 07/2012
ModelID: X2
• Czytnik kart dostępu
• Obługa systemów SD/HD (MPEG2 / MPEG4)
DVB-C
• Wyjście video wysokiej rozdzielczości - HDMI
• Wyjście video standardowe - SCART
• Złącze USB w standardzie 2.0
• PVR Ready - nagrywanie na zewnętrzny dysk
• Time Shi (zatrzymywanie i przewijanie obrazu)
• Automatyczny tryb Stand-by
• Niskie zużycie prądu w trybie Stand-by,
poniżej 1W
• Wielojęzyczne menu
• Electroniczny Przewodnik po Programach - EPG
• 4-cyfrowy wyświetlacz LED na przednim panelu
• Odtwarzacz mulmedialny Full HD 1080p
Szybka instalacja
Pilot zdalnego sterowania
Przycisk Funkcja
POWER -
HDMI
MUTE -
Numeric
buons
LAST -
FAV
INFO
EPG
EXIT
HOME
MAILBOX
PVR
STATUS
AUDIO
TEXT
SUB-T
P- / P+
TV/
/
/
MENU
FIND
SLOW, SKIP-,
SKIP+, REW, FF,
PLAY, PAUSE,
STOP, REC
RED, GREEN,
YELLOW, BLUE,
WHITE, BLACK
OK
Włącza/wyłącza odbiornik z/do trybu czuwania.
Przełącza rozdzielczość wyjścia obrazu.
Włącza/wyłącza dźwięk.
Przełącza na poprzednio oglądany kanał.
Wyświetla pasek informacyjny.
Przełącza między trybami TV i radio.
Przenosi kursor na poprzedni lub kolejny kanał lub
stronę w menu.
Funkcja opcjonalna.
Funkcja opcjonalna.
Wyświetla listę nagrań.
Wyświetla okno statusu odbiornika.
Ustawienia audio.
Wyświetla telegazetę.
Ustawienia napisów.
Funkcje wideo
(meshi, odtwarzanie, nagrywanie).
Przyciski kolorowe
(różne funkcje w zależności od menu).
Wyświetla elektroniczny przewodnik po kanałach.
Anuluje wybór użytkownika. Przechodzi w
menu do poziomu wyżej i trybu oglądania.
Ustawia poziom głośności lub poruszanie się po
menu.
Zmienia kanał lub poruszanie się po menu.
Pozwala znaleźć kanał poprzez wpisanie jego
nazwy.
Wyświetla listę kanałów.
Wybiera element z menu.
Wybiera kanał i pozwala na wprowadzenie
wartości parametró w menu.
Przełącza czas automatycznego przejścia w tryb
czuwania na 10/30/60/90/120 minut.
Przełącza listę kanałów na tryb ulubionych,
wyświetla aktualnie wybraną listę ulubionych.
Wyświetla menu głóne na ekranie; w menu
przechodzi do poprzedniego poziomu.
Proste podłączenie
ENGLISH ENGLISH ENGLISH ENGLISH ENGLISH ENGLISH ENGLISH ENGLISH ENGLISH ENGLISH ENGLISH ENGLISH ENGLISH ENGLISH ENGLISH ENGLISH ENGLISH ENGLISH ENGLISH ENGLISH ENGLISH ENGLISH ENGLISH ENGLISH ENGLISH ENGLISH ENGLISH ENGLISH ENGLISH ENGLISH ENGLISH ENGLISH ENGLISH ENGLISH ENGLISH ENGLISH ENGLISH ENGLISH
ENGLISH ENGLISH ENGLISH ENGLISH ENGLISH ENGLISH ENGLISH ENGLISH ENGLISH ENGLISH ENGLISH ENGLISH ENGLISH ENGLISH ENGLISH ENGLISH ENGLISH ENGLISH ENGLISH ENGLISH ENGLISH ENGLISH ENGLISH ENGLISH ENGLISH ENGLISH ENGLISH ENGLISH ENGLISH ENGLISH ENGLISH ENGLISH ENGLISH ENGLISH ENGLISH ENGLISH ENGLISH ENGLISH
Digital Cable Receiver
KP 07/2012
ModelID: X2
• Slot for Smart Card
• Support of SD/HD (MPEG2 / MPEG4) DVB-C systems
• High definion video output - HDMI
• Standard resoluon video output - SCART
• High speed USB 2.0 port
• PVR Ready
• Time Shi (pause, rewind)
• Automac Stand-by
• Low power consumpon in Stand-by mode,
below 1W
• Mullingual menu, including English
• Electronic Program Guide - EPG
• 4 digit LED display on front panel
• Mulmedia Player Full HD 1080p
Quick Start
1 2 3 4
Po zakupie odbiornika,
rozpakuj go i sprawdź czy
w opakowaniu znajdują się:
• Odbiornik
• Pilot
• Instrukcja szybkiej instalacji
• Baterie - 2x AAA
(opcjonalnie)
Aby zainstalować baterie
należy najpierw zdjąć klapkę
zabezpieczającą komorę na
baterie w pilocie. Jeśli znajdują
się w niej baterie, należy je
wymienić. Włóż nowe baterie
zgodnie z oznaczeniami polaryzacji. Załóż z powrotem klapkę.
Podłącz kabel z gniazdka
telewizji kablowej do wejścia
cable-in w odbiorniku.
Używając kabla HDMI
podłącz odbiornik do płaskiego
telewizora lub
Używając kabla SCART
podłącz odbiornik do tradycyjnego telewizora.
Na koniec podłącz
odbiornik do prądu.
1
2
3
4
Uruchom telewizor i włącz odbiornik przyciskiem pilota POWER. Po krótkiej
chwili na ekranie telewizora ukaże się interfejs obsługi odbiornika (OSD).
Jeśli telewizor nie wyświetla OSD, źródło sygnału w telewizorze zostało źle
wybrane. Sprawdź dokumentację telewizora w celu sprawdzenia ustawień.
Page 2
ENGLISH ENGLISH ENGLISH ENGLISH ENGLISH ENGLISH ENGLISH ENGLISH ENGLISH ENGLISH ENGLISH ENGLISH ENGLISH ENGLISH ENGLISH ENGLISH ENGLISH ENGLISH ENGLISH ENGLISH ENGLISH ENGLISH ENGLISH ENGLISH ENGLISH ENGLISH ENGLISH ENGLISH ENGLISH ENGLISH ENGLISH ENGLISH ENGLISH ENGLISH ENGLISH ENGLISH ENGLISH ENGLISH
ENGLISH ENGLISH ENGLISH ENGLISH ENGLISH ENGLISH ENGLISH ENGLISH ENGLISH ENGLISH ENGLISH ENGLISH ENGLISH ENGLISH ENGLISH ENGLISH ENGLISH ENGLISH ENGLISH ENGLISH ENGLISH ENGLISH ENGLISH ENGLISH ENGLISH ENGLISH ENGLISH ENGLISH ENGLISH ENGLISH ENGLISH ENGLISH ENGLISH ENGLISH ENGLISH ENGLISH ENGLISH ENGLISH
POLSKI POLSKI POLSKI POLSKI POLSKI POLSKI POLSKI POLSKI POLSKI POLSKI POLSKI POLSKI POLSKI POLSKI POLSKI POLSKI POLSKI POLSKI POLSKI POLSKI POLSKI POLSKI POLSKI POLSKI POLSKI POLSKI POLSKI POLSKI POLSKI POLSKI POLSKI POLSKI POLSKI POLSKI POLSKI POLSKI POLSKI POLSKI POLSKI POLSKI POLSKI POLSKI POLSKI POLSKI POLSKI POLSKI POLSKI POLSKI
POLSKI POLSKI POLSKI POLSKI POLSKI POLSKI POLSKI POLSKI POLSKI POLSKI POLSKI POLSKI POLSKI POLSKI POLSKI POLSKI POLSKI POLSKI POLSKI POLSKI POLSKI POLSKI POLSKI POLSKI POLSKI POLSKI POLSKI POLSKI POLSKI POLSKI POLSKI POLSKI POLSKI POLSKI POLSKI POLSKI POLSKI POLSKI POLSKI POLSKI POLSKI POLSKI POLSKI POLSKI POLSKI POLSKI POLSKI POLSKI
Channel editor In this manu you can manage your channels
Tv channels list lock, remove, rename TV channels
Radio Channel list lock, remove, rename radio channels
Favorite rename favourite groups
Delete all deletes all channels from all lists
Channel scan In this menu you can scan channels
Quick search scan single frequency at chosen symbol rate and QAM
Auto search scan frequency bandwidth, from 41.0Mhz to 858.0Mhz, at
chosen QAM and symbol rate
Blindscan perform complex scan on all most common QAM and
symbol rates and adjustable frequency - from 41.0MHz to
858.0Mhz
Scan sengs select scan sengs
System sengs In this menu you can find basic receiver sengs
Informaon basic informaon about your receiver
S/W Upgrade by OTA manually check for soware upgrade
A/V Sengs change screen parameters (opons depend on your TV)
Display Sengs adjust video output parameters
Time Sengs set me by adjusng GMT zone, adjust manually or set
your region
Parental Lock secure entrance to menu by password, change level of age
control and change password (default password is 0000)
Language setup change menu language and set preffered audio tracks for
channels
OSD sengs change On Screen Display sengs
Other change sengs for Auto Shut Down, Clock on LED display,
Channle change and Channel list style
Factory sengs load default sengs and delete all the channels
Media player In this menu you can manage your files from USB drive
Your records play, rename, lock, delete or add recordings
Your movies play your movies
Your images display your photos
Your music play your music
Acces card informaons about inserted card and subscripon rights
Subscripon status display subscripon status
Event Status display event status
Tokens status display tokens status (if available)
Change CA PIN change CA PIN
Maturity Rang set maturity lock sengs
About Conax CA display informaons about Conax
External drive In this manu you can change recording opons and check
info about your external USB drive
PVR Storage Informaon informaons about your connected USB drive
PVR Sengs change sengs for PVR
Upgrade by USB upgrade your receiver soware by USB drive
Backup program on backup your receiver soware on USB drive
USB (oponal)
Remove USB device use this funcon to remove USB drive safely
safely
Menu structure and funcons descripon
Menu Funcon
Edycja kanałów W tym menu można zarządzać zainstalowanymi kanałami
Lista kanałów TV przesuń, zablokuj, usuń lub zmień nazwę kanału TV
Lista kanałów radiowych przesuń, zablokuj, usuń lub zmień nazwę kanału radiowego
Ulubione zmień nazwy grup ulubionych
Kasuj wszystko usuń wszystkie kanały TV i radiowe oraz listy ulubionych
Skan kanałów W tym menu możesz zeskanować kanały
Szybkie wyszukiwanie skanuj pojedynczą częstotliwość z wybranym QAM i symbol
rate
Wyszukiwanie skanuj zakres częstotliwości, od 41.0Mhz do 858.0Mhz,
automatyczne z wybranym QAM i symbol rate
Blindscan przeprowadź kompleksowy skan wszystkich popularnych
QAM i symbol rate i częstotliwości - od 41.0MHz do
858.0Mhz
Ustawienia skanowania wybierz ustawienia skanowania
Ustawienia systemu W tym menu znajdują się podstawowe ustawienia
odbiornika
Informacje o odbiorniku podstawowe informacje o odbiorniku
Aktualizacja sprawdź ręcznie dostepność nowego oprogramowania
oprogramowania OTA
Ustawienia wideo i audio zmień parametry ekranu (dostępne opcje zależą od Twojego
telewizora)
Ustawienia wyświetlania dostroj wyświetlanie obrazu wideo
Ustawienia czasu ustaw czas odpowiednio dostrajając strefę GMT, ustawiając
ręcznie lub wybierając swój region
Blokada rodzicielska zabezpiecz wejście do menu hasłem, zmień poziom blokady
wiekowej, ustaw i zmień hasło (domyślne hasło - 0000)
Ustawienia języka zmień język menu oraz ustawienie preferowanych ścieżek
dźwiękowych
Ustawienia OSD zmień podstawowe ustawienia OSD (menu ekranowe)
Inne zmień ustawienia Automatycznego Wyłączenia Zasilania,
Zegara na wyświetlaczu, Zmiany kanału i Stylu listy kanałów
Ustawienia Fabryczne przywróć odbiornik do konfiguracji fabrycznej
Media player W tym menu możesz zarządzać plikami na dysku USB
Twoje nagrania lista nagrań (kolor biały) oraz zaplanowanych nagrań
- merów (kolor czerwony)
Twoje filmy odtwórz swoje filmy
Twoje obrazy wyświetl swoje obrazy
Twoja muzyka odtwórz swoją muzykę
Karta dostępu W tym menu znajdziesz informacje o włożonej karcie, oraz
sprawdzisz prawa do kodowanych kanałów
Status subskrypcji wyświetla status subskpcji
Status zdarzeń wyświetla status zdarzeń
Status żetonów wyświetla informacje o żetonach (opcjonalne)
Zmiana PIN CA zmień PIN CA
Kontrola rodzicielska ustawienia blokady rodzicielskiej
O Conax CA wyświetla informacje o Conax
Dysk USB W tym menu możesz zmienić ustawienia nagrywania oraz
znajdziesz informacje na temat swojego zewnętrznego
dysku USB
Informacje o dysku USB informacje o podłączonym dysku USB
Ustawienia nagrywania zmień ustawienia nagrywania
Aktualizacja przez USB aktualizuj oprogramowanie odbiornika poprzez USB
Backup program on USB backup your receiver soware on USB drive
Bezpiecznie wysuń dysk USB użyj tej funkcji aby bezpiecznie wyjąć dysk USB
Struktura menu i opis funkcji
Menu Funkcja
Look through the trouble shoong informaon. Some simple checks or minor
adjustment of the unit on your part may help resolve the problems. If the problems
prove to be beyond your capability, you had beer hand it over to a professional
qualified technician.
Troubleshoong
No power
Receiver cannot
play scrambled
channels
Remote control
fails to work
Audio sounds and
subtles lsnguage
are not the
chosen items
Cannot scan
programs
No picture
No color
No sound at all
Serious
destorion or
cannot receive
signal normally
The power cord has not been well
connected
Acces card is not inserted , or is not
inserted correctly into card reader slot
Acces card is not acvated
Parameter input incorrectly
Output cord is connected incorrectly
Output cord is connected incorrectly
Baeries are connected incorrectly
The right language channel has not been
chosen
Baeries are exhausted
Beyond the effecve operaon range
Remote sensor is poited to bright light
The unit is in mute status
Volume is set at too low level
Cable is connected incorrectly
The video output mode of the unit is
different from the mode of monitor
The video output mode of the unit is
different from the mode of monitor
Connect the output cord correctly
Connect the output cord correctly
Connect baeries correctly
Replace baeries
Operate within normal range
Place the unit elsewhere
Cancel the mute
Augment the volume
Connect the cable correctly
Set the right language channel in the menu
Reset the working mode
Reset the working mode
Use Acces Card menu to acvated the card.
Input Frequency, SR, QAM parameters
correctly or use Blind Scan mode
Insert smart card according to descripon on
right side of receiver.
Plug the power cord into the outlet ghtly and
turn on the power; if no power sll, turn off the
power again, and turn it on in 5-10 minutes
Troubles Possible causes Suggested soluons
Too much interferenal signal
Change the signal cable to a new one. If it
doesn’t help, contact cable operator.
Informacje zgromadzone w tabeli opisują najczęstsze problemy, z którymi można
się spotkać podczas używania odbiornika. Większość z nich jest możliwa do
prostego zdiagnozowania i rozwiązania. Jeśli próba rozwiązania problemu
w opisany sposób nie przyniesie efektu, naprawę należy powierzyć wykwalifikowanemu serwisowi.
Rozwiązywanie problemów
Brak zasilania
Nie można wyszukać
kanałów
Odbiornik nie
odtwarza
kodowanych
kanałów
Pilot nie działa
Niepoprawny
język dźwięku lub
podpisów
Brak obrazu
Brak koloru
Brak dźwięku
Duże
zniekształcenia
obrazu
Wtyczka przewodu sieciowego nie została
poprawnie podłączona do gniazdka.
Karta dostępu nie jest włożona lub jest
włożona niepoprawnie.
Karta dostępu nie jest aktywowana.
Niewłaściwe parametry wyszukiwania
Przewód wyjścia obrazu jest niepoprawnie
podłączony
Przewód wyjścia obrazu jest niepoprawnie
podłączony
Baterie są źle włożone
W ustawieniach menu jest źle wybrany
język
Baterie są wyczerpane
Pilot jest poza zasięgiem
Czujnik jest zasłonięty
Odbiornik jest w trybie wyciszenia
Głośność jest na bardzo niskim poziomie
Przewód jest niepoprawnie podłączony
Tryb lub wyjście obrazu jest inne
w odbiorniku i w telewizorze.
Tryb lub wyjście obrazu jest inne
w odbiorniku i w telewizorze.
Podłącz przewód poprawnie.
Podłącz przewód poprawnie.
Podłącz baterie poprawnie
Wymień baterie
Użyj pilota w normalnym zasięgu
Zmienić ustawienie odbiornika i usunąć przeszkody
Anuluj wyciszenie
Zwiększ głośność
Podłącz przewód poprawnie
Wybierz poprawny język w ustawieniach
menu
Ustaw poprawne wejście/tryb w telewizorze
Ustaw poprawne wejście/tryb w telewizorze
Użyj menu ACCESS CARD, żeby aktywować kartę.
Ustaw poprawne parametry lub użyj trybu
Blind Scan.
Włóż kartę dostępu zgodnie z opisem na
prawej stronie odbiornika.
Podłącz poprawnie wtyczkę. Jeśli nadal brak
zasilania, rozłącz urządzenie i podłącz je
ponownie po 5-10 minutach.
Problemy Prawdopodobna przyczyna Proponowane rozwiązanie
Odbierany sygnał jest zakłócany lub za
słaby
Wymień przewód kablowy. Jesli to nie
pomoże, skontaktuj się z operatorem.
Safety precauons
CAUTION:
Warning: The lightning flash with arrowhead symbol, within an equilateral triangle, is intended to
alert the user to "dangerous voltage" and to prevent from a risk of electric shock.
Warning: To reduce the risk of electric shock, don't open the cabinet. Refer servicing to qualified
personnel only.
Warning: The exclamaon point within an equilateral triangle is intended to alert the
user to
important operang and maintenance (servicing).
Warning:
Do not use th is receiver where contact with or immersion in water is a possibility. Do not use near flower vase,
washbowls, kitchen sinks, laundry tubs, swimming pools, etc.
Warning: Do not put the candle or lamp stand on the cabinet; otherwise, there is the danger of fire.
Warning: The unit should be connected to a power supply only of the type described in the operang instrucons or as
marked on the unit. If you are not sure of the type of power supply (for example, 120 or 230 V) to your home, consult
your local dealer or
local power company.
Warning: This product install diodes. Do not open the cabinet or touch any parts in the inner mechanism. Consult your
local dealer for technical service if the opening is required.
Note: To ensure proper use of this product, please read this User manual carefully and retain for further reference.
Note: This product install diodes. Do not open the cabinet to avoid the unit direct expos
ure to radiaon.
Unit Cleaning: Aer the unit power is turned off, you can clean the cabinet, panel and remote control with a so cloth
lightly moistened with a mild detergent soluon.
Aachments: Never add any aachments and/or equipment without the manufacturer consent; as such addions may
result in the risk of fire, electric shock, or other personal injury.
Locang: Slots and openings in the cabinet are pr
ovided for venlaon to protect it from overheang. Do not block
these openings or allow them to be blocked by placing the receiver on a bed, sofa, o r other similar surface, nor should it be
placed over a radiator or heat register.
Power-Cord Protecon: Place the power-supply cord out of the way, where it will not be walked on. Please take special
aenons to cords at plugs, convenience receptacles, and the point where they exit from the unit.
Object and Liquid Entry: Never put ob
jects of any kind into this receiver through openings, as they may touch dangerous
voltage points or short-out parts that could result in a fire or electric shock. Never spill any liquid on the receiver.
Note: Moisture may be formed on the l ens when the unit is suddenly moved from a cold environment or an aircondion room to a warm place or immediately aer a heater has been turned on or in a steamy or very humid room.
If the moisture forms inside the unit, it may not operate properly. To correct
this problem, turn on the power and wait
about two hours for the moisture to evaporate.
Parts Replacement: When the unit parts need to be replaced, user should make sure the service technician use the
replacement parts specified by the manufacturer or having the same characterisc s as the original part. Un authorized
replacement may put the unit In the risk of fire, electric shock or other hazards.
Safety
Check: Aer all the maintenances and repairs are done, user is required to request the service technician to
conduct the overall safety check to ensure the machine is In the proper condion.
UWAGA:
Uwaga:
Uwaga:
Uwaga:
Notatka:
:
Notatka:
Notatka:
kondycji.
Uwaga!
elektryczny i ele
utylizacji -
-
Informacje dla
konie
Specyfikacja techniczna
IEC 169-24, FEMALE (F-TYPE)
75 Ω
IEC 169-24, FEMALE (F-TYPE)
QAM
MPEG-2 MP@ML
MPEG-2 MP@HL
MPEG-4 H.264/AVC [email protected]
480i, 576i, 480p, 576p, 720i, 1080i,
1080p
MPEG/MusiCam Layer I & II, MP3
Dolby Digital Downmix
TV SCART, S/PDIF, HDMI, USB
100 ~ 230V, 50/60Hz
7 W
0,7
5 - 40˚C
<95%
<1kg
200mm x 145mm x 35mm
Wtyk wejściowy RF
Impedancja wejściowa
Wtyk pętli RF
Technika modulacji
Dekodowanie obrazu
Rozdzielczość obrazu
Dekodowanie dźwięku
Gniazda we/wy
Napięcie zasilające
Pobór mocy
Pobór mocy w czuwaniu
Temperatura pracy
Wilgotność względna
Waga neo
Wymiary obudowy
Wartości masy i wymiary nie są wartościami
dokładnymi!
Mając na względzie nieustanne podnoszenie
funkcjonalności i jakości, producent zastrzega sobie
prawo do wprowadzenia zmian bez powiadomienia.
Aenon!
Your product Is marked with this symbol. It means that used electrical and electronic products
should not be mixed with general household waste. There is a separate collecon sys tem for these
products.
Informaon on Disposal for Users (private households) in the European Union. Used electrical and
electronic equipment must be treated separately and In accordance with legislaon that requires
proper
treatment, recovery and recycling of used electrical and electronic equipment.
Following the implementaon by member states, private households within the EU states may return their used
electrical and electronic equipment to designated collecon facilies free of charge*. In some countries* your local
retailer may also take back your old product free of charge if you purchase a similar new one. *) Please cont
act your
local authority for further details.
If you r used electrical or electronic equipment has baeries or accumulators, please dispose of these separately
beforehand according to local requirements.
By disposing of this product correctly you will help ensure that the waste undergoes the nec essary treatment, recovery
and recycling and thus prevent potenal negave effects on the environment and human health whi
ch could otherwise
arise due to inappropriate waste handling.
Informaon on Disposal for Business Users
In the European Union. If the product is used for business purposes and you want to discard It: Please contact you r
dealer who will inform you about the take-back of the product. You might be charged for the costs arising from takeback and recycling Small products (and small amounts) might be taken back by your local
collecon facilies,
In other Countries outside the EU . If you wish to discard of this product, please contact your local authories and ask
for the correct method of disposal.
Environmental protecon
Specyfikacja techniczna
IEC 169-24, FEMALE (F-TYPE)
75 Ω
IEC 169-24, FEMALE (F-TYPE)
QAM
MPEG-2 MP@ML
MPEG-2 MP@HL
MPEG-4 H.264/AVC [email protected]
480i, 576i, 480p, 576p, 720i, 1080i,
1080p
MPEG/MusiCam Layer I & II, MP3
Dolby Digital Downmix
TV SCART, S/PDIF, HDMI, USB
100 ~ 230V, 50/60Hz
7 W
0,7
5 - 40˚C
<95%
<1kg
200mm x 145mm x 35mm
RF Input connector
Input impedance
RF Output connector
Waveform
Video decoding
Video resoluon
Audio decoding
Video/Audio connector
Rated voltage
Maximum consumpon
Standby consumpon
Operang temperature
operang humidity
Net weight
receiver measurements
Weight and dimensions are not absolutely exact values.
Specificaons are subject to change (by manufacturer)
without noce.
 Loading...