

Page 1

User manual
High definition digital satellite receiver
Model ID: 7101
English 3/2009 jp
Page 2

User manual
2
Contents
1. Safety precautions .......................................................................................................................... 4
2. Environment protection.................................................................................................................. 6
3. Features .......................................................................................................................................... 7
4. Remote Control ............................................................................................................................... 8
5. Front panel .................................................................................................................................... 10
6. Rear panel ..................................................................................................................................... 11
7. Connecting .................................................................................................................................... 12
8. Getting started .............................................................................................................................. 14
8.1. Easy install ................................................................................................................................................ 14
8.2. Box Setting ............................................................................................................................................... 14
8.3. Install Setting ............................................................................................................................................ 14
9. Menu operations .......................................................................................................................... 14
9.1. Service ...................................................................................................................................................... 14
9.1.1. Organizing services. .......................................................................................................................................... 14
9.1.2. Organizing favourites ........................................................................................................................................ 15
9.2. Installation................................................................................................................................................ 15
9.2.1. Manual installation ........................................................................................................................................... 15
9.2.2. Auto Installation ............................................................................................................................................... 17
9.2.3. Guidance of installing a dish .............................................................................................................................. 18
9.2.4. Factory Default ................................................................................................................................................. 18
9.3. PVR (optional, only for PVR ready receivers) ............................................................................................ 18
9.3.1. File List ............................................................................................................................................................. 18
9.3.2. MP3 Player ....................................................................................................................................................... 19
9.3.3. HDD Format...................................................................................................................................................... 19
9.3.4. Record List ........................................................................................................................................................ 20
9.3.5. Time Shift setting .............................................................................................................................................. 20
9.4. Preference ................................................................................................................................................ 20
9.4.1. Language .......................................................................................................................................................... 20
9.4.2. Parental Control ............................................................................................................................................... 21
9.4.3. Time setting...................................................................................................................................................... 21
9.4.4. A/V Control ...................................................................................................................................................... 22
9.4.5. UHF Setting ...................................................................................................................................................... 22
9.4.6. Miscellaneous Setting ....................................................................................................................................... 22
9.5. System ...................................................................................................................................................... 22
9.5.1. System Information .......................................................................................................................................... 22
9.5.2. Upgrade RS232 ................................................................................................................................................. 23
9.5.3. Upgrade from HDD ........................................................................................................................................... 23
9.5.4. Backup to HDD ................................................................................................................................................. 23
9.5.5. Contact............................................................................................................................................................. 24
9.6. Conditional Access (optional) ................................................................................................................... 24
9.6.1. Smart card ........................................................................................................................................................ 24
9.6.2. Common interface (optional) ............................................................................................................................ 24
9.7. Internet (optional) .................................................................................................................................... 24
9.7.1. Net config ......................................................................................................................................................... 25
9.7.2. Lan Settings ...................................................................................................................................................... 25
9.7.3. Net Manual Upgrade......................................................................................................................................... 25
9.8. Game ........................................................................................................................................................ 25
9.8.1. Sokoban ........................................................................................................................................................... 25
9.8.2. Tetris ................................................................................................................................................................ 26
9.8.3. Landmine ......................................................................................................................................................... 26
9.8.4. Speed ............................................................................................................................................................... 26
10. Function guide .............................................................................................................................. 27
10.1. Ok list ................................................................................................................................................. 27
10.2. EPG ..................................................................................................................................................... 27
10.3. Information Box.................................................................................................................................. 28
10.4. Changing Services ............................................................................................................................... 29
10.5. Volume Control .................................................................................................................................. 29
10.6. Sound track & Multifeed Audio .......................................................................................................... 29
10.7. Teletext & Subtitle .............................................................................................................................. 29
10.8. Pause & Resume ................................................................................................................................. 29
Page 3

User manual
3
10.9. Zoom .................................................................................................................................................. 29
10.10. Time Shift (optional, only for PVR ready receivers) ............................................................................ 29
10.11. Recording, Edit the reserved delayed Rec ording (optional, only for PVR Ready receivers) ................. 30
10.12. Immediate Recording by RECORD button (optional, only for PVR Ready receivers) ...................... 30
10.13. Recording by EPG (optional, only for PVR Ready receivers) ................................................................ 31
10.14. Playback a Recorded Service (optional, only for PVR Rea dy receivers) ............................................... 31
10.15. Slow Motion Playback ........................................................................................................................ 32
10.16. Fast Motion Playback ......................................................................................................................... 32
10.17. MP3 Player ......................................................................................................................................... 32
10.18. JPEG Player ......................................................................................................................................... 33
10.19. Picture In Picture (PIP) ........................................................................................................................ 33
10.20. Multi-Picture Display .......................................................................................................................... 33
11. Software Upgrade ......................................................................................................................... 34
12. Trouble Shooting ........................................................................................................................... 35
13. Specifications ................................................................................................................................ 36
14. Declaration of conformity ............................................................................................................. 38
Page 4
User manual
4
1. Safety precautions
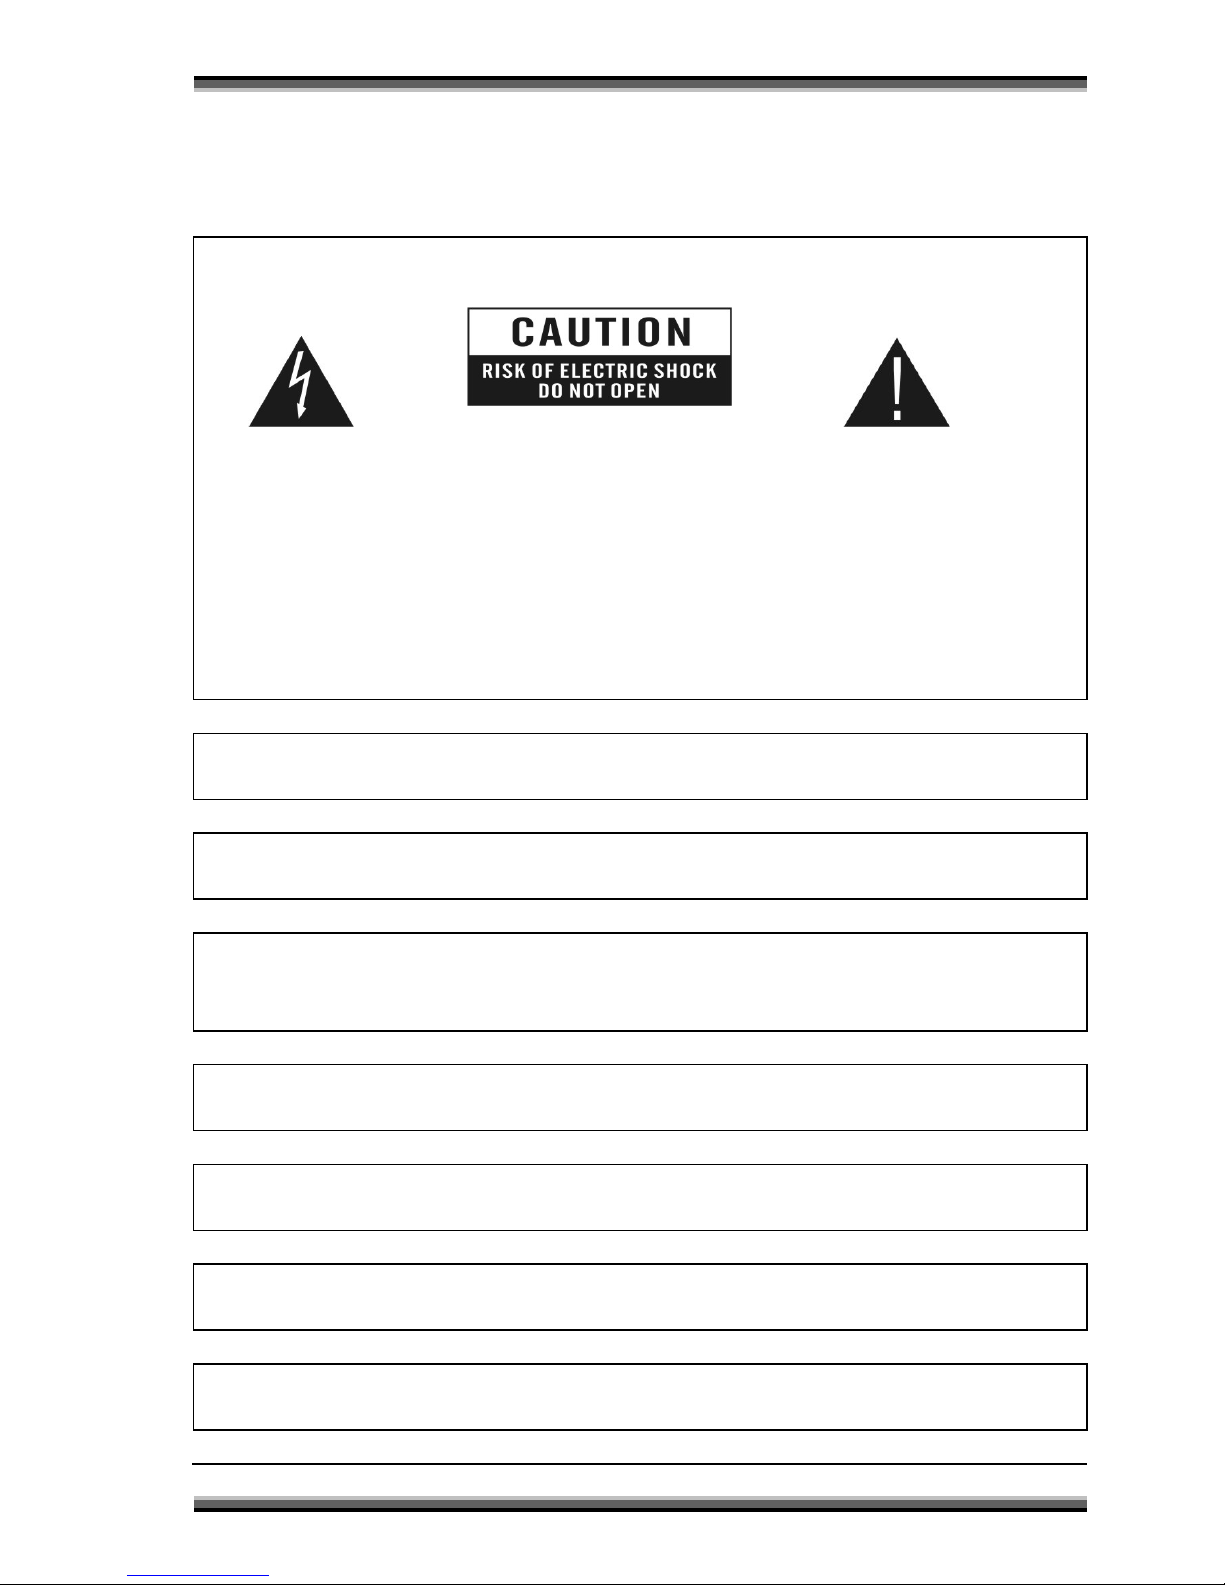
CAUTION:
The lightning flash with
arrowhead symbol,
within an equilateral
triangle, is intended to
alert the user to
"dangerous voltage"
and to prevent from a
risk of electric shock.
Warning:
To reduce the risk of electric
shock, don't open the cabinet.
Refer servicing to qualified
personnel only.
The exclamation point within
an equilateral triangle is
intended to alert the user to
important operating and
maintenance (servicing).
WARNING: Do not use this STB where contact with or immersion in water is a possibility. Do
not use near flower vase, washbowls, kitchen sinks, laundry tubs, swimming pools, etc.
WARNING: Do not put the candle or lamp stand on the cabinet; otherwise, there is the danger
of fire.
WARNING: The unit should be connected to a power supply only of the type described in the
operating instructions or as marked on the unit. If you are not sure of the type of power supply
(for example, 120 or 230 V) to your home, consult your local dealer or local power company.
WARNING:
This product install diodes. Do not open the cabinet or touch any parts in the
inner mechanism. Consult your local dealer for technical service if the opening is required.
Note: To ensure proper use of this product, please read this User manual carefully and
retain for further reference.
Note: This product install diodes. Do not open the cabinet to avoid the unit direct exposure to
radiation.
Unit Cleani ng: After the unit power is turned off, you can clea
n the cabinet, panel and remote
control with a soft cloth lightly moistened with a mild detergent solution.
Page 5
User manual
5
Attachments: Never add any attachments
and/or equipment without the manufacturer
consent; as such additions may result in the risk of fire, electric shock, or other personal injury.
Locating: Slots and openings in the cabinet are provided for ventilation to protect it from
overheating. Do not block these openings or allow them to be blocked by placing the STB on
a bed, sofa, or other similar surface, nor should it be placed over a radiator or heat register.
Power-Cord Protection: Place the power-
supply cord out of the way, where it will not be
walked on. Please take special attentions to cords at plugs, convenience
receptacles, and the
point where they exit from the unit.
Object and Liquid Entry: Never put objects of any kind into this STB through openings, as
they may touch dangerous voltage points or short-out parts that could result in a fire or electric
shock. Never spill any liquid on the STB.
Note: Moisture may be formed on the lens In the following conditions:
• when the unit is suddenly moved from a cold environment or an air-
condition room
to a warm place.
• immediately after a heater has been turned on.
• in a steamy or very humid room.
If the moisture forms inside the unit, it may not operate properly. To correct this problem, turn
on the power and wait about two hours for the moisture to evaporate.
Parts Replacement: When the unit parts need to be replaced, user should make sure the
service technician use the replacement parts specified by the manufacturer or having the
same characteristics as the original part. Unauthorized replacement may put the unit In the
risk of fire, electric shock or other hazards.
Safety Check: After all the maintenances and repairs are done, user is required to request
the service technician to conduct the overall safety check to ensure the machine is In the
proper condition.
Page 6

User manual
6
2. Environment protection
Attention!
Your product Is marked with this symbol. It means that used electrical and electronic products
should not be mixed with general household waste. There is a separate collection system for
these products.
Information on Disposal for Users (private households) in the European Union
Used electrical and electronic equipment must be treated separately and In accordance with
legislation that requires proper treatment, recovery and recycling of used electrical and
electronic equipment.
Following the implementation by member states, private households within the EU states may
return their used electrical and electronic equipment to designated collection facilities free of
charge*. In some countries* your local retailer may also take back your old product free of
charge if you purchase a similar new one. *) Please contact your local authority for further
details.
If your used electrical or electronic equipment has batteries or accumulators, please dispose
of these separately beforehand according to local requirements.
By disposing of this product correctly you will help ensure that the waste undergoes the
necessary treatment, recovery and recycling and thus prevent potential negative effects on
the environment and human health which could otherwise arise due to inappropriate waste
handling.
Information on Disposal for Business Users
In the European Union
If the product is used for business purposes and you want to discard It:
Please contact your dealer who will inform you about the take-back of the product. You might
be charged for the costs arising from take-back and recycling Small products (and small
amounts) might be taken back by your local collection facilities,
In other Countries outside the EU
If you wish to discard of this product, please contact your local authorities and ask for the
correct method of disposal.
Page 7

User manual
7
3. Features
MPEG-Fully DVB-S / DVB-S2 (H.264) HD compliant
8000 channels (TV and Radio) programmable
Multilingual menu text support
Channel switching time less than 1 second
Channel list editing
Favorite channel list editing
True-color On-Screen Display (OSD)
Full Picture In Graphic (PIG) function
Electronic Program Guide (EPG) for on screen channel information
Subtitle supported
Teletext supported by VBI insertion and software emulation
Parental lock facility by channel and program event
Program and Channel information transfer from receiver to receiver
Exciting games embedded
S/PDIF for digital audio or Dolby AC-3 bitstream output
DiSEqC 1.0, 1.1, 1.2 and USALS
HDMI HD Video/Audio Output
Dual Decoding (PIP)
Software update via LAN port
USB 2.0 Host
VFD Display for service information
RTC (Real-Time-Clock)
LAN 10/100 Mbps Ethernet (optional)
Time Shift (optional, only for PVR Ready receivers)
Video Recording (optional, only for PVR Ready receivers)
Recording 2 channels the same time, watching 3rd channel (within 1 transponder)
(optional, only for PVR Ready receivers)
Recording one channel and TimeShifting another channel (optional, only for PVR Ready
receivers)
Recording one channel and PIP another channel within the same transponder (optional,
only for PVR Ready receivers)
Page 8
User manual
8
4. Remote Control
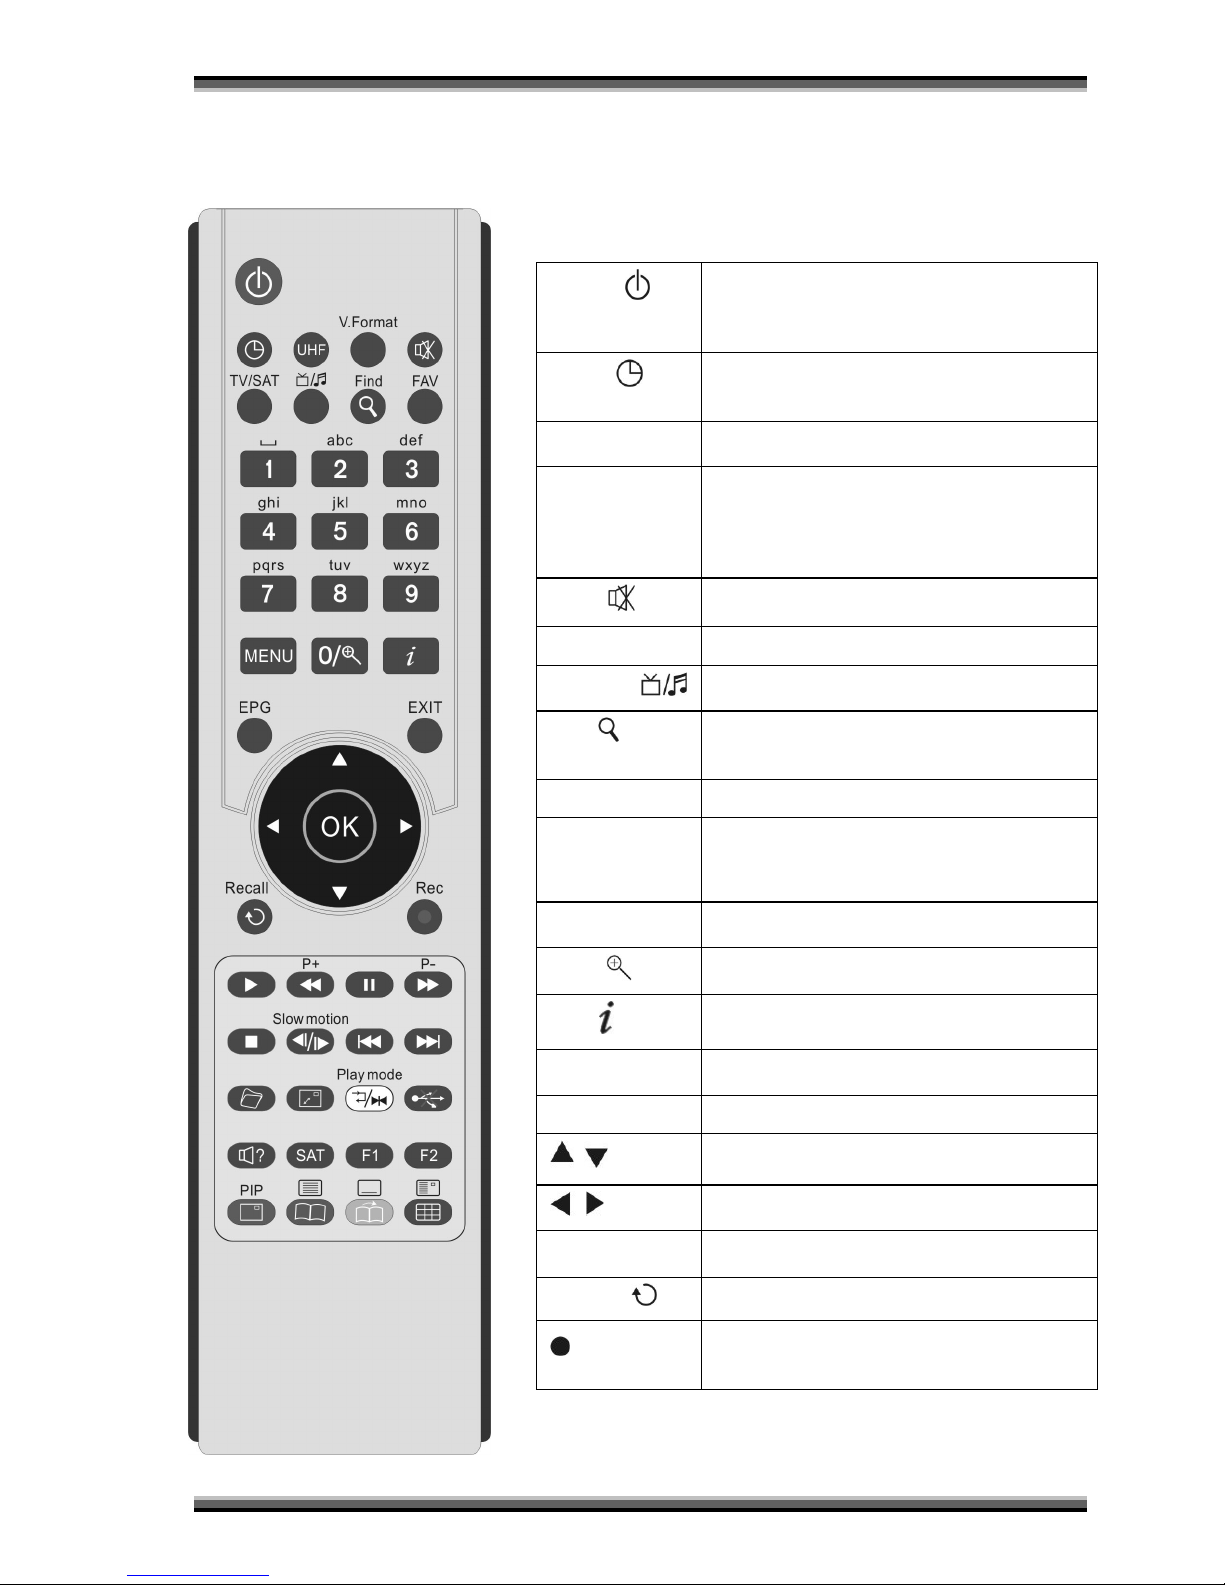
You can power on/off the receiver, operate on screen menu,
and use a variety of hot key function.
POWER
Switch the PVR between Operation and
Standby mode.
Włąc zan ie lu b prz eł ąc zanie w stan
czuwania Standby.
SLEEP
Display the sleep time. At the sleep time,
the power is automatically turn OFF and the
PVR goes to the STANDBY mode.
UHF
Display and alt er the UH F setting in menu.
V.Format
Switch the TV Standard on the Screen. If
you have problem with setting video format,
switch this button between until setting the
best video resolution
MUTE
Enable / Disable the Audio.
TV/SAT
Switch TV or AV mode on the screen.
TV/ Radio
Select the TV/ Radio mode.
FIND
Find s ervice by name in s ervice list,
organizing services, EPG menu and normal
picture mode.
FAV
Display the f av orite servic e list.
(0~9) Numeric
butto ns
Select the TV or Radio services and menu
options.
MENU
Display the Menu on screen or return to
previous menu from submenu.
Zoom
Enable the zoom function.
INFO
Display the program information box on the
screen.
EPG
Display the EPG on screen when available.
EXIT
Return to the screen.
,
Service up or down through the available
services .
,
Adjust the volume (Decrease/ Incr ease).
OK
Display Service List on screen.
Select an item in the menu.
RECALL
Select the previously viewed service.
(Optional, only f or PVR Ready receivers )
To start the rec ording.
Page 9
User manual
9
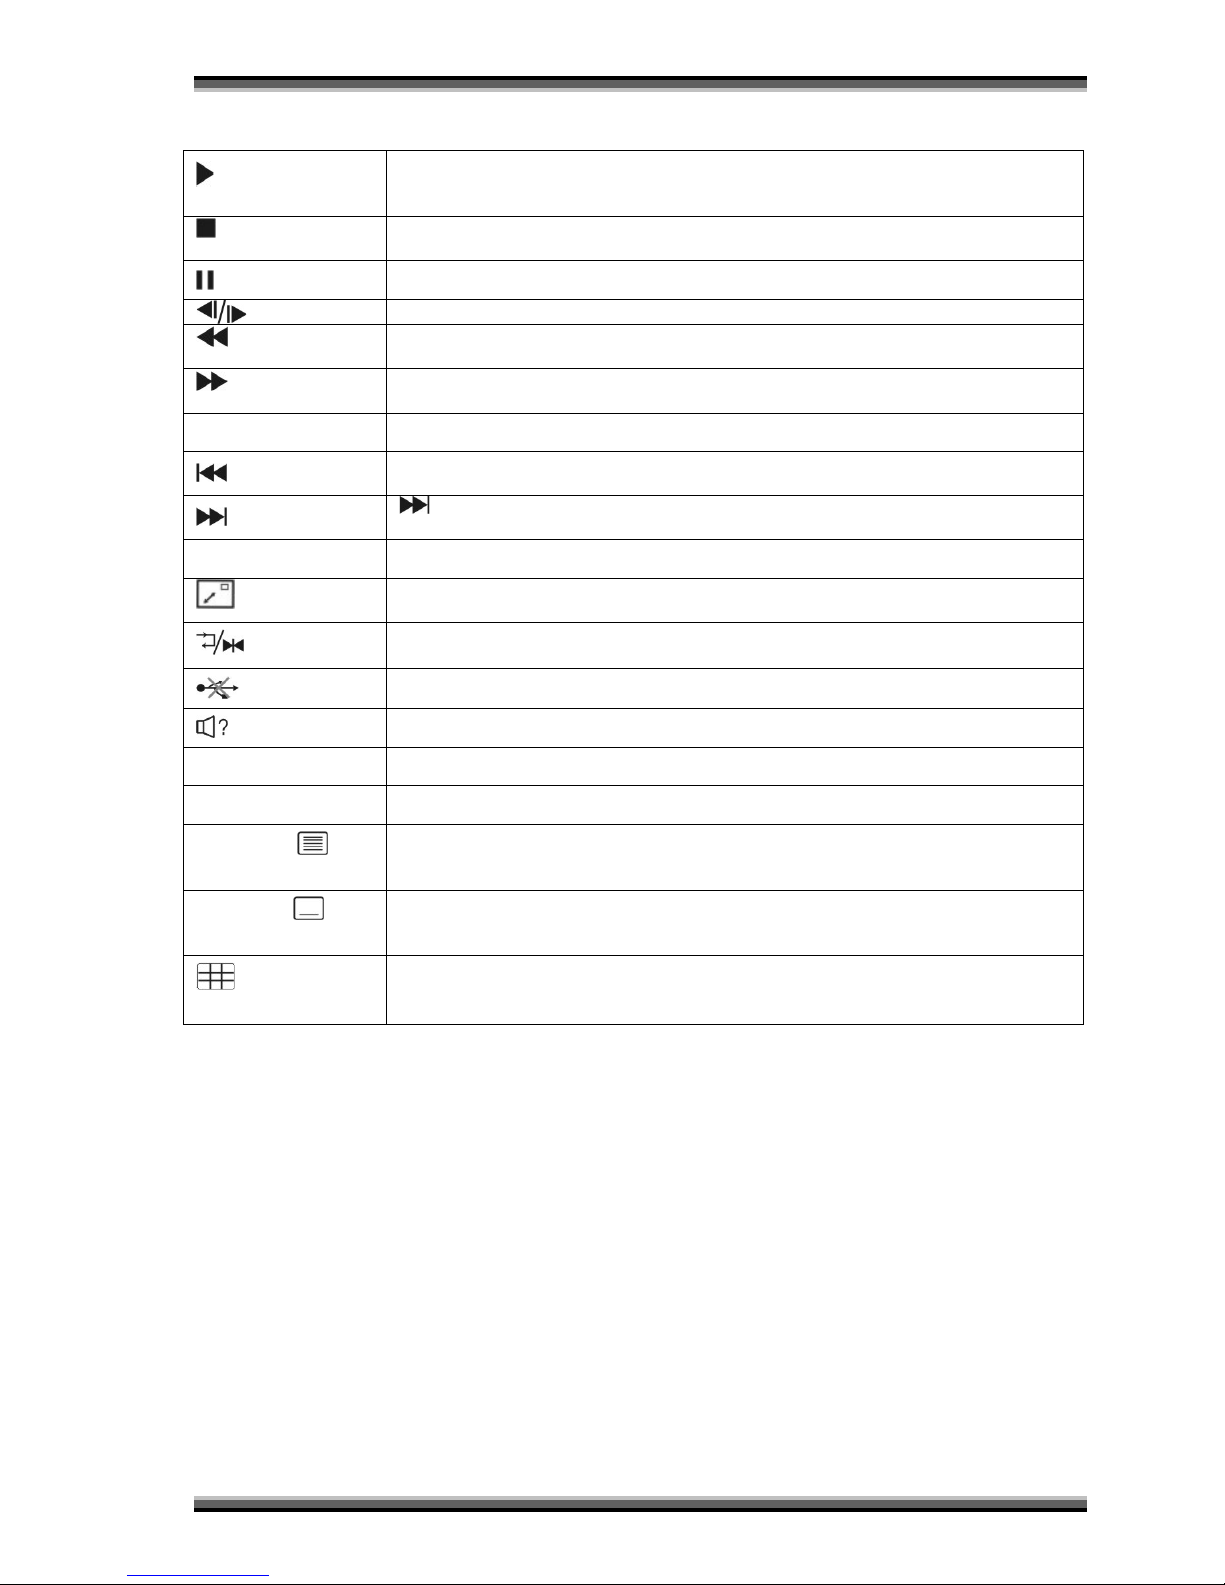
(Optional, only f or PVR Ready receivers ) Dis play the progr ess bar of tim e shift or
playback when no progress bar is displayed.Start playback with normal speed.
Return t o normal speed from trick mode.
(Optional, only f or PVR Ready receivers ) Stop time shift, playback or recording.
Stop the MP3 or JPEG player.
Pause the playback and live pic ture.
(Optional, only f or PVR Ready receivers ) Start slow mot ion playback.
(Optional, only for PVR Ready receivers) Fast rewind when the progress bar is
displayed. St art reverse playback. Change the speed of reverse playback.
(Optional, only f or PVR Ready receivers ) Start fast forw ard or fast motion
playback. Change the speed of forward playback.
P+/ P-
Mov e up or down pages on the menus or service lis t.
(Optional, only f or PVR Ready receivers ) Move the position of Su b-picture at the
PIP by counter clockwise.
Button (Optional, only for PVR Ready receivers) Mov e the position of Sub-
picture at the PIP by c lockwise.
Archiv
Display file list.
Exchange main-picture with sub-pictur e at the PIP. Exchange MP3 Player with
JPEG Player.
(Biały)
Select the play mode in MP3 or JPEG player.
To r em ov e the USB Hard Disk safely.
Select Sound Track and the multilingual if multilingual is available.
SAT
Display the s at el lite list at normal pic ture.
PIP (Czerwony)
Is turning on PIP function
TELETEXT
(Zielony)
Enable the telet ext.
SUBTITLE
(Żółty)
Activate the subtitle selection W indow. Select the subtitle language in the list.
Multi-Picture
(Niebieski)
Display Multi-Picture menu on the screen.
Page 10
User manual
10
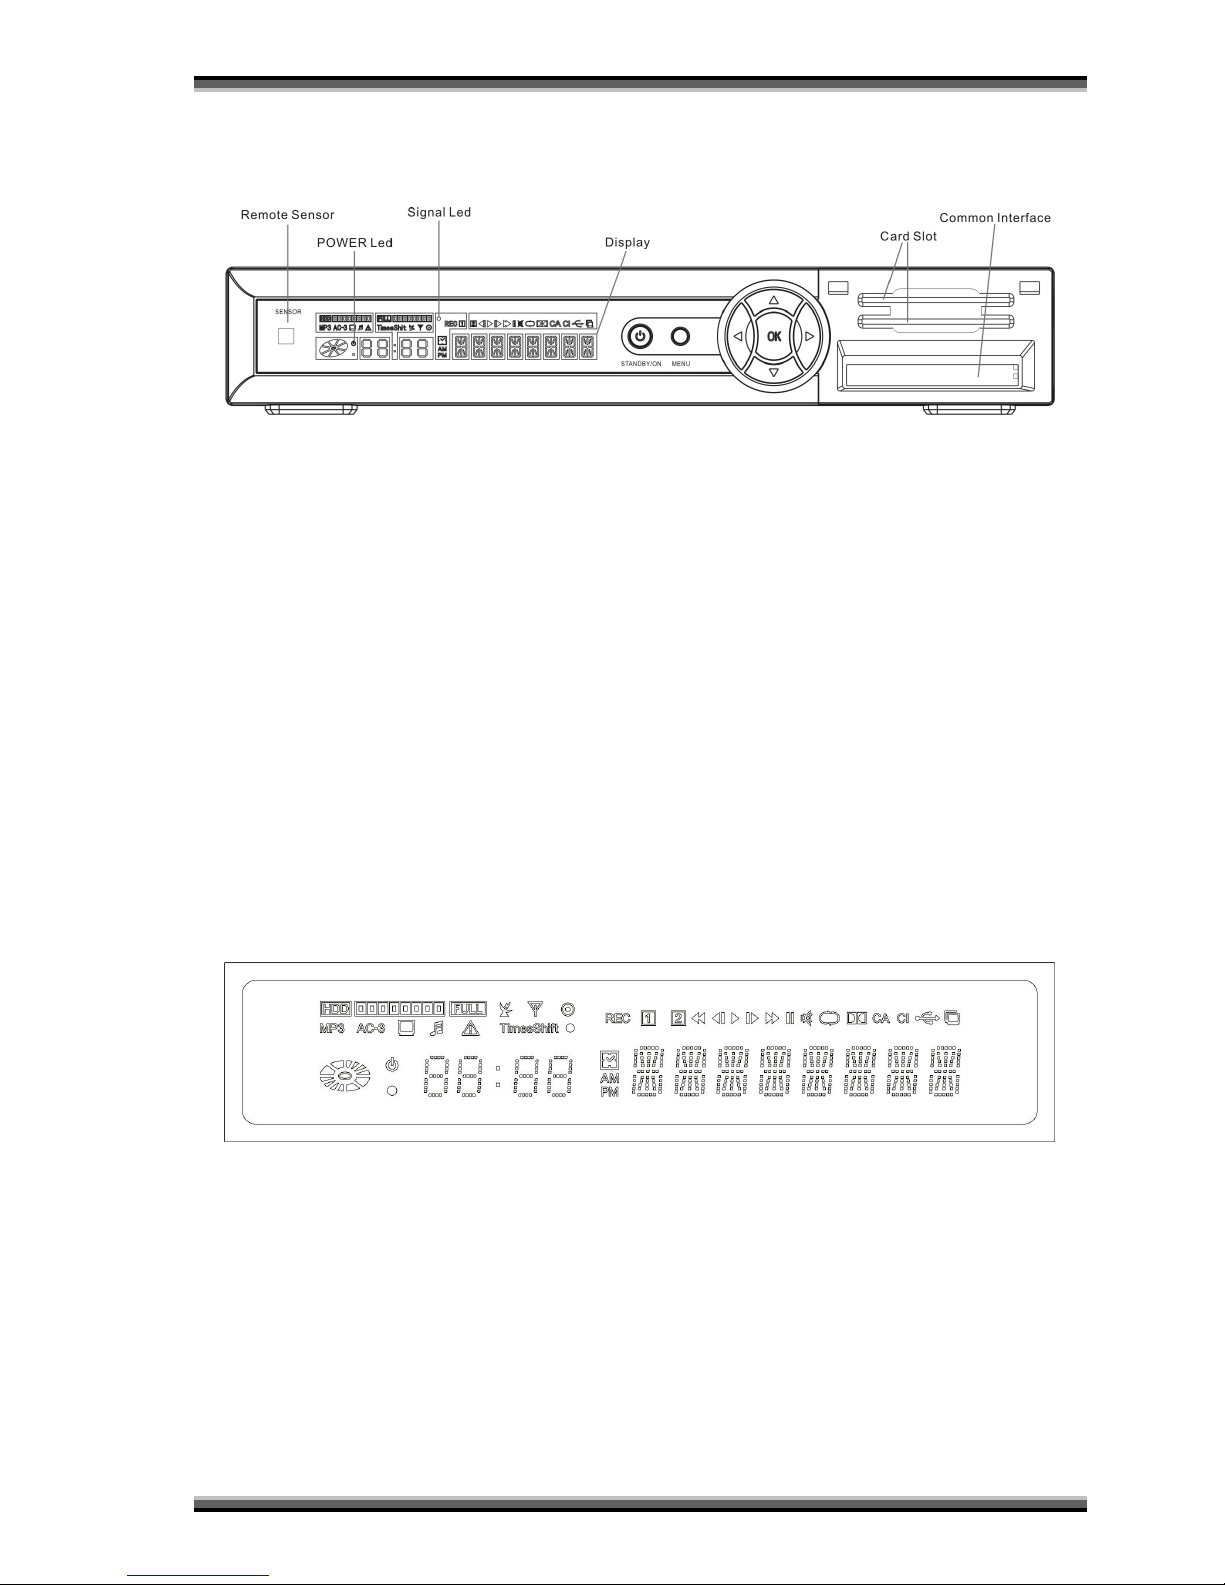
5. Front panel
POWER KEY: To switch the receiver power on/stand by
MENU KEY:To enter into the main menu.
<,> KEY: To adjust volume level, or to move cursor left or right in the menu.
^, v KEY : To change channels, or to move cursor up or down in the menu
OK KEY: To see TV/Radio channel list, or to confirm in the menu.
Remote Sensor: Detects infrared signal from remote control unit
POWER Led: Lights up while the receiver is power on.
Signal Led: When receiving signal is strong, the signal led is lighted.
Card Slot: One or two (optional) slots CA Interface for Conax,
Insert the smart card chip side up!
Common Interface: Two socket for Conditional Access Modules CAM (optional).
Display : (VFD type) Indicates operating status of receiver
VFD Display:
Page 11
User manual
11
6. Rear panel
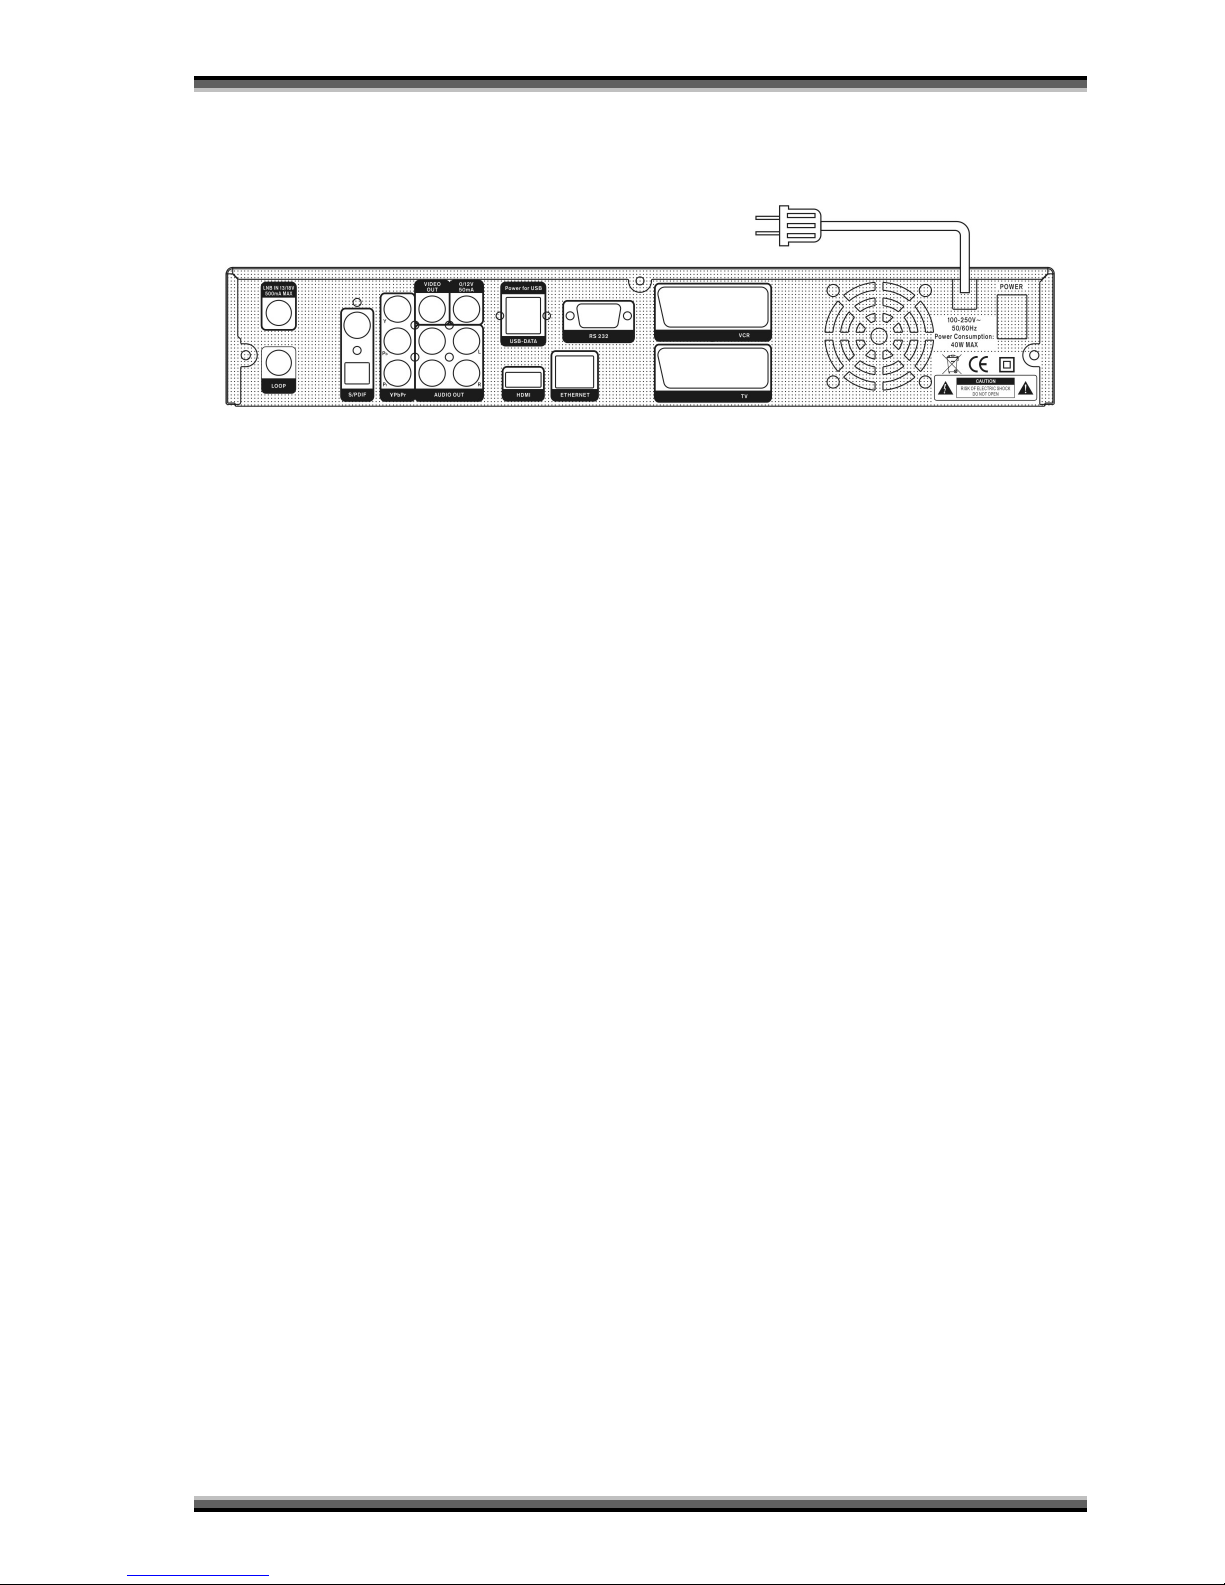
Please refer to the diagram above for all possible connections of your receiver. Do not
connect the unit to the mains socket until all other connections have been made and checked.
Your configuration can vary depending on model
POWER ON/OFF SWITCH: To switch ON/OFF the receiver power supply.
LOOP: This enables the connection of another receiver.
LNB IN 13/18V 500mA MAX: This port is to connect the coaxial cable from LNB of your Dish.
TV : This is used to connect your TV through SCART cable.
VCR: Audio and Video input/output socket for the Video cassette recorder or suchlike.
VIDEO : This RCA connector is used to connect any external video.
0/12V 50mA:This is used to Connect 12V to an external 0V/12V switch.
AUDIO R/L : These RCA connectors are used to connect any external audio amp or system.
S/PDIF: Digital Audio interface, connect to AV amplifier S/PDIF input terminal.
HDMI: Audio and Video output socket for TV set with HDMI Input Jack only.
Power for USB: USB port for additional power only, for some of USB hard disk drives.
WARNING! Do not connect standalone USB devices to this port!
USB-Data: USB 2.0 Host, connect to USB hard disk, or flash disk
RS 232C SERIAL PORT: This is used to connect your receiver to a computer through a serial
cable.
Ethernet: (optional) Network port, you can get a new software updates from this port.
YPbPr: Component video output socket for the television set.
Page 12
User manual
12
7. Connecting
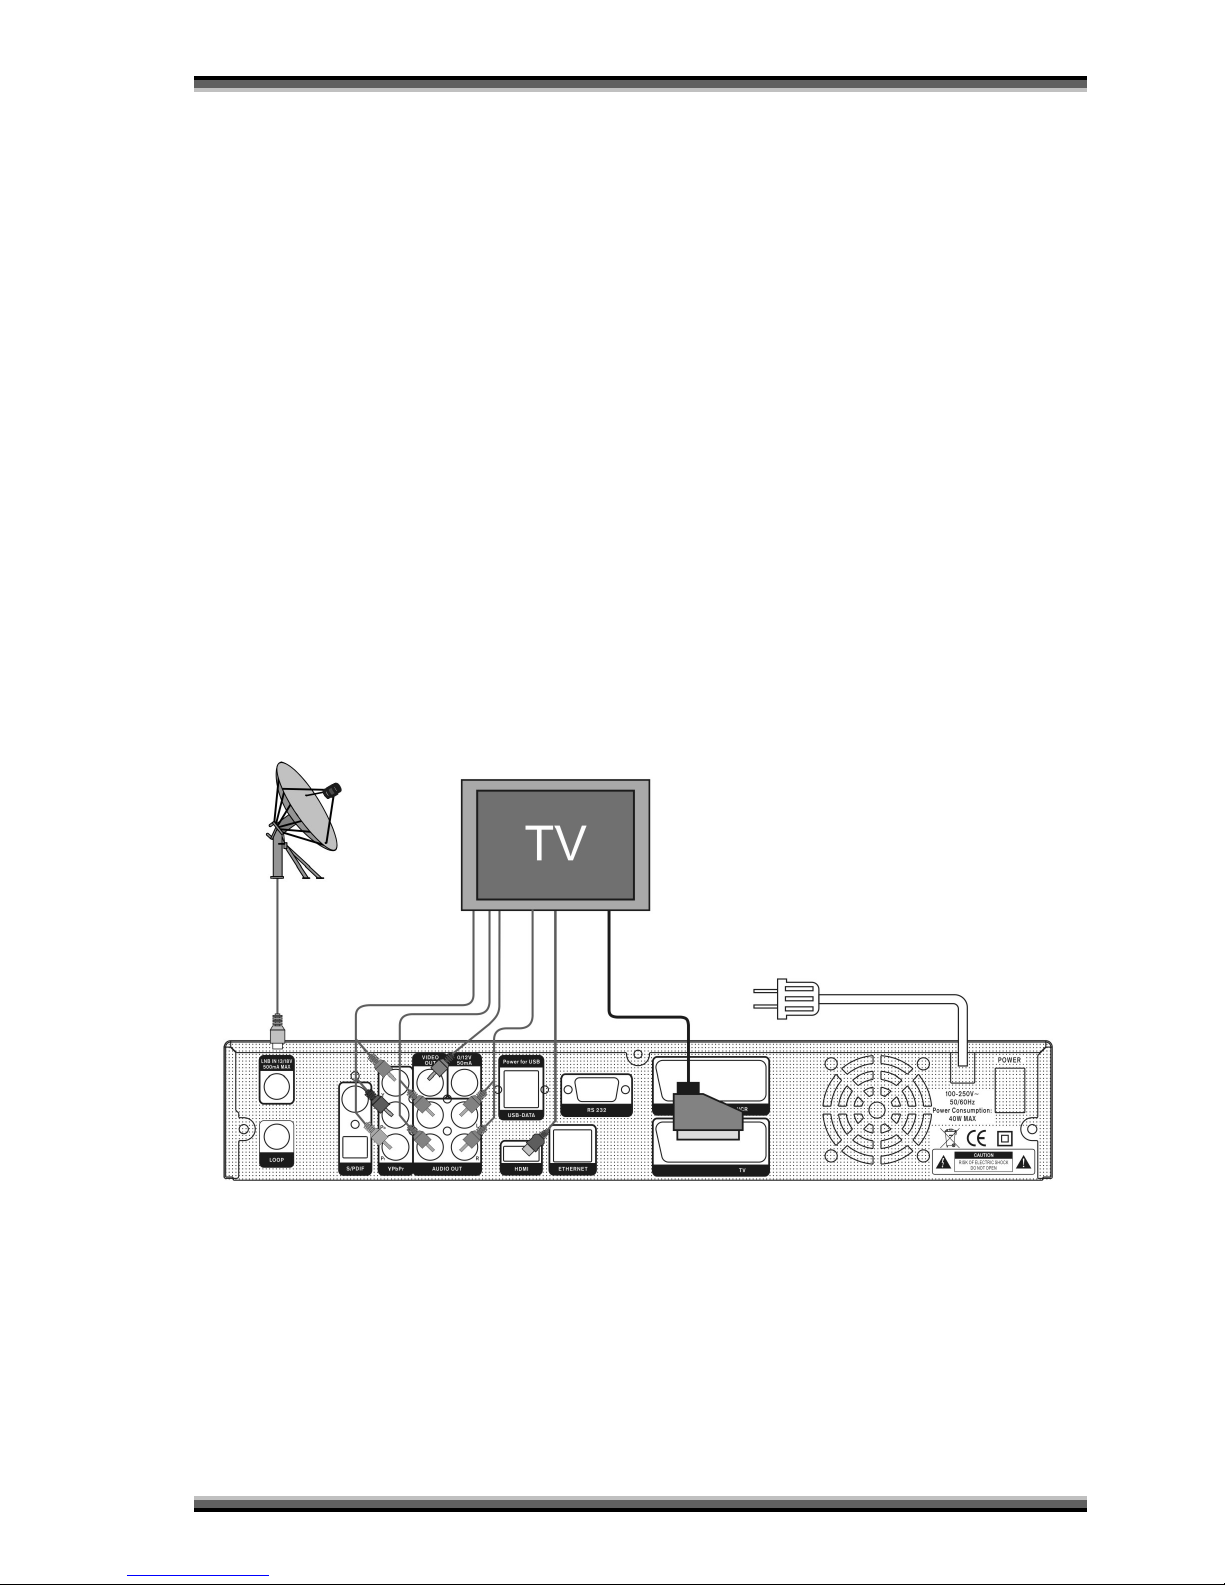
There are four ways to connect the receiver to your existing TV system. W e recommend using
one of the following cases for the best result:
1. If you have a high definition television set, you should use a HDMI cable for best result,
Plug one end of the cable into the HDMI socket on the receiver, and the other end into
the matching socket on your television. In this case, you do not have to make audio
connections because the HDMI connector can output stereo audio or Dolby digital audio.
2. Connect one end of SCART cable to the TV (SCART) jack on the back of the receiver
and the other end to a SCART jack on your TV.
3. Connect one end of RCA cable to the RCA jack on the back of the receiver and the other
end to a RCA jack on your TV.
4. You will need to obtain a component video Cable (RCA cable) to use the component
video connector, Plug one end of the Cables into the Y(Green), Pb(Blue) and Pr(Red)
Sockets on the digital receiver, and the other end into the matching sockets on your
television.
Finally connect the coaxial cable from the LNB to the LNB IN jack on the receiver.
Connecting with external audio / Hi-Fi system
To connect any external Audio Hi-Fi system, the receiver has been provided with two RCA
connectors at the back of the receiver marked with Audio L and R. Connect an RCA stereo
cable from the AUDIO L, R jacks on the back of the receiver to the LINE, AUX, SPARE OR
EXTRA input jacks on your Hi-Fi System.
Page 13

User manual
13
Connecting with Motorized System (DiSEqC 1.2)
Connect one end of your coaxial cable to the LNB IN connector on the receiver and the other
end to the REC or Receiver connector on the DiSEqC 1.2 motor. Connect the coaxial cable
from the LNB to the LNB connector on the DiSEqC 1.2 motor.
All our receivers are designed to be DiSEqC 1.0 and DiSEqC 1.2 compatible. This allows
multiple antennas to be connected to the receiver at the same time.
If you have two or more fixed antennas or LNBs, then we recommend you use a DiSEqC 1.0
switch.
Connect the coaxial cable from the first LNB to the LNB 1 or LNB A input connector of the
DiSEqC switch. Do the same for any other LNBs that you have. Connect one end of a coaxial
cable to the RF output connector of the DiSEqC switch, connect the other end to the LNB IN
socket on the receiver.
To the digital receiver, you can connect either a single satellite antenna directly or LNB of
multi-feed equipment.
Page 14
User manual
14
8. Getting started
8.1. Easy install
Press the button to operate the receiver from
“Standby” mode. If you did not install it before, the
“Easy Install” Menu will be displayed automatically to
guide you to install your box and dish
*Notice: There are two parts, Box Setting and Install
Setting. Please follow the indication in this menu one
step by one.
8.2. Box Setting
Language
Choose Menu Language. Go to next.
Time Setting
Set Current Date and Time. Go to next.
Parental Control
Set Password, Receiver Lock and Censorship
Classification. Go to next to enter in Install Setting.
8.3. Install Setting
Choose one from the following items: “Install your dish”,
“Aut omatic install satellite and search channel” and
“Manually install satellite and search channel”.
Install your dish
Install one satellite, Press
button (Red) to edit it. It
will automatically calculate the elevation and azimuth
for certain satellite according to the local longitude and
latitude you entered. Set the longitude and latitude by
pressing 0~9 and , buttons, and you get the
elevation and azimuth information from the menu. Then
go to next.
Adjust your dish depend on the intensity and quality.
Press
button (Red) to edit satellite as above, press
“ OK ” button to select TP. Then go to next.
Adjust your dish depend on the SNR and BER. Press
button (Red) to edit sat ellite as above, press “ OK
” button to select TP. Then go to next.
Choose one from the following items: “Install another
satellite” and “Complete installing dish and search
channels”. For “Install another satellite”, you need to
install another satellite as the above step by st ep. F or
“Complete installing dish and search channels”, you
need to s et th e Scan Mode and Network, then press “
OK ” button to do scan.
Automatic install satellite and search channel
The receiver will det ect your antenna and search
available signals and download services for you
automatically.
Manually install satellite and search channel
You need to choose your interested satellites and set
right parameters for LNB Type, 22KHz Tone, 12V,
DiSEqC1.0 or Motorized DiSEqC1.2 or USALS items,
then press button (Red) to do scan to complete
install. For more details, please refer to the ch apt er
“Manual Installation” of “Menu Operations”.
9. Menu operations
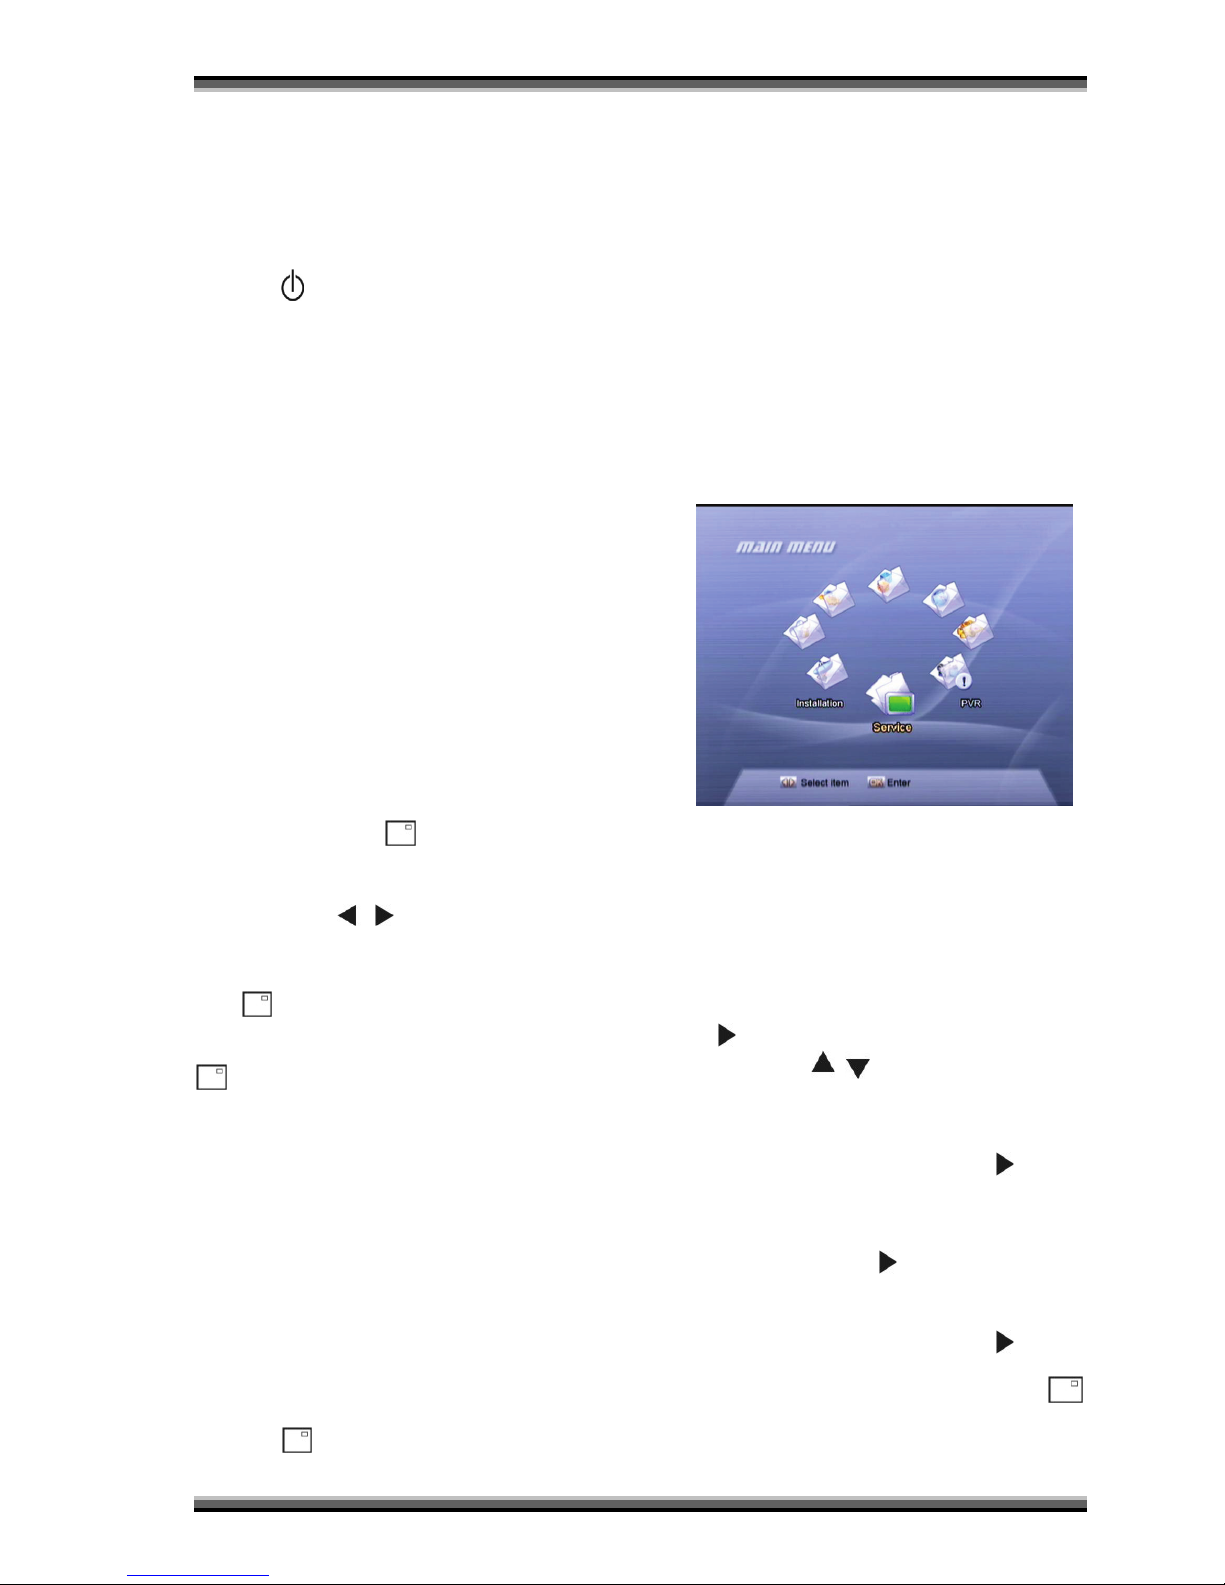
Now this chapter assumes that the HD Receiver system
has been installed correctly, meaning:
The satellite antenna for the HD Receiver has
been installed, connected to the HD Receiver.
The HD Receiver is connected to the TV.
The RCU has batteries and ready to control the
HD Receiver.
If the HD Receiv er has not b een inst alled or connec ted
properly, please refer to the Connecting your equipment
on this manual.
Many of the functions of the HD Receiver are available
from the Main Menu. Press “ MENU ” button to open it.
9.1. Service
9.1.1. Organizing services.
This menu can be used to move, lock, hide, rename
and delete S ervi ces.
Move
You can reorder and move the service to th e preferred
position. Mark the desired services using “ OK ” button,
use button to ch oose Move mode and press “ OK ”
button, then use
, buttons to move and press “
OK ” button to confirm.
Lock
You can restrain and lock the services. Mark the
desired services using “ OK ” button, use
button to
choose Lock mod e and press “ OK ” button to confirm.
Delete
You can delete the s ervices. Mark the desired s ervi ces
using “ OK ” button, use
button to choose Delete
mode and press “ OK ” button to confirm.
Rename
Mark the service you want to rename, use
button to
select Rename item and press “ OK ” button to display
keyboard, and rename it. After renaming it press
(Red) button to save.
Skip
Page 15
User manual
15
You can restrain and Skip (hide) the services. Mark the
desired services using “ OK ” button, use
button to
choose Skip mod e and press “ OK ” button to confirm.
(Red) Group
It is very useful to select services with different Groups.
(Green) Opt ions
It is very convenient function to Mark the desired
services with different options.
Service Found
It is an item to locate certain service by name quickly.
Press
button to display the “Find” submenu, use
keyboard to enter servi ce name and press
button
again to select the desired services.
Press
button to check the detail information if
necessarily.
info display
Press
button to display the detail information about
the selected service.
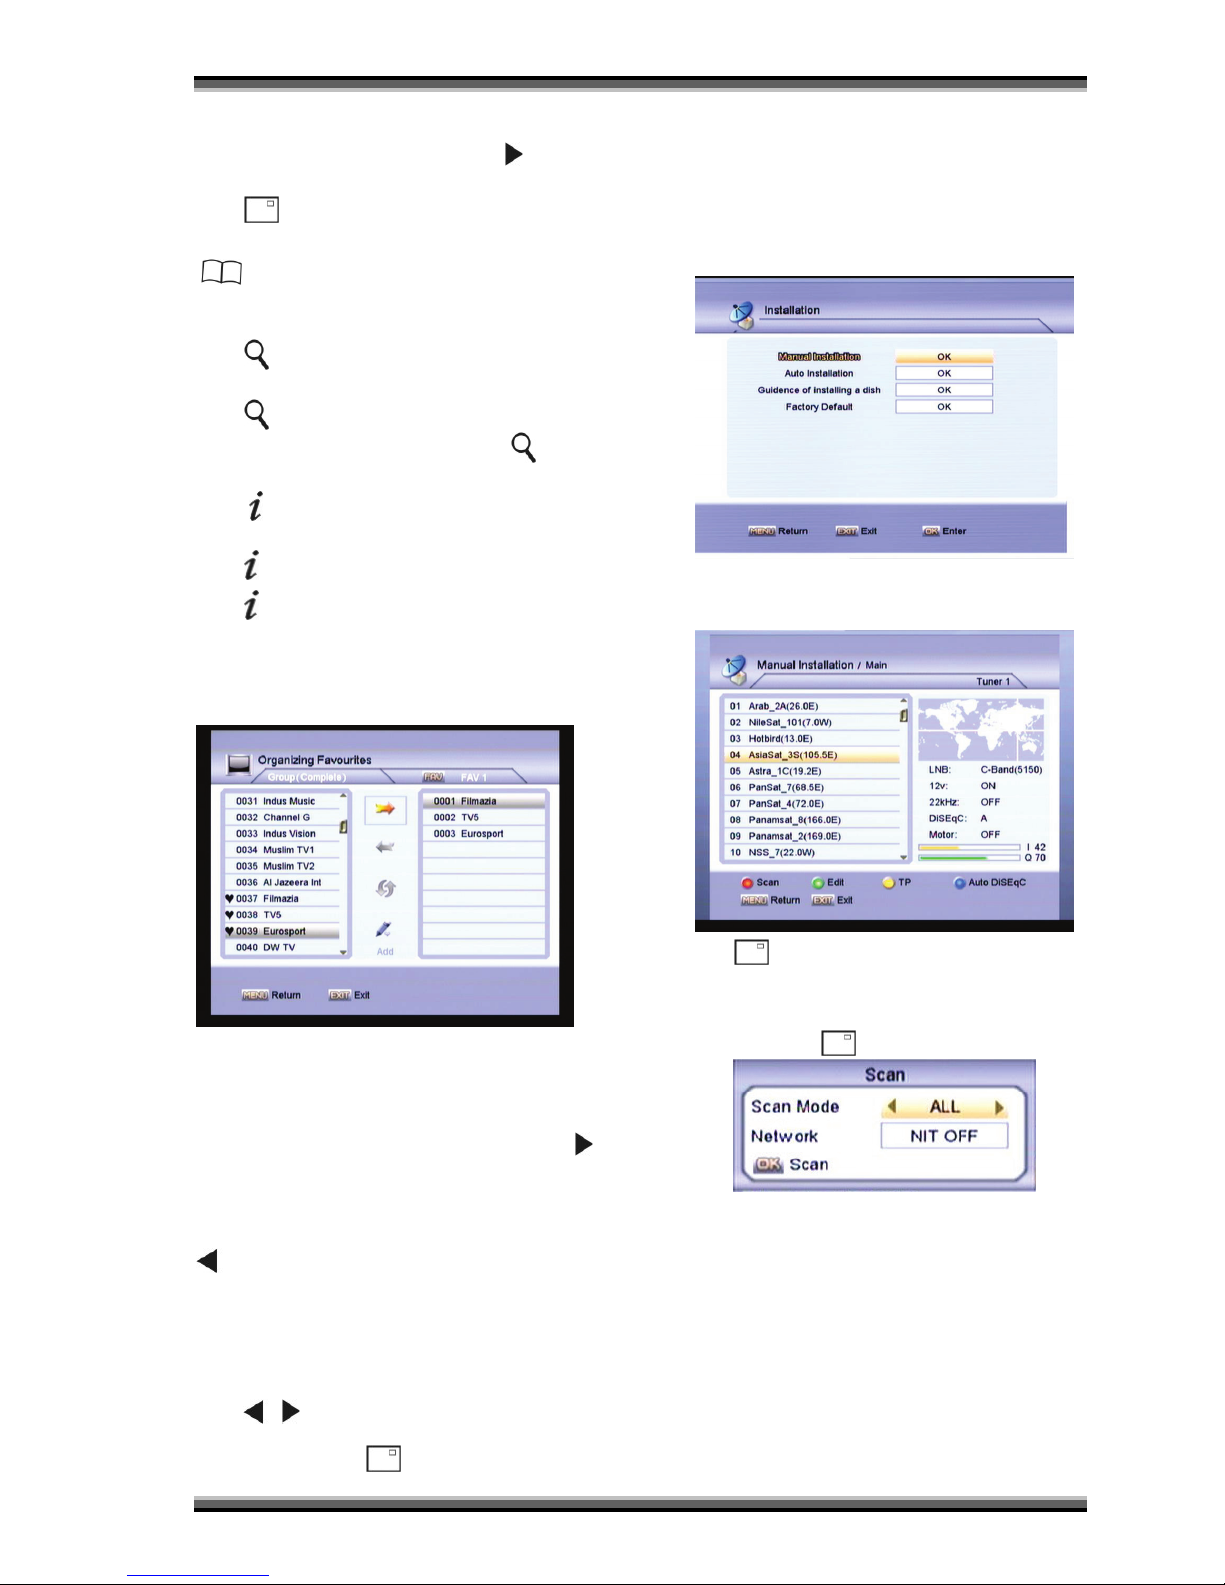
9.1.2. Organizing favourites
This menu is helpful in adding and deleting services to
and from the favorite group.
FAV List
To choose the F AV List by press “FAV” button.
Add
To add services into favorites, Mark the desired
services by press “ OK ” button in Service List, press
to choose Add mode and press “ OK ” button.
Remove
To remove services from favorites, Mark the desired
services by press “ OK ” button in Favorite List, press
to choose Remove mode and press “ OK ” button.
Move
You can reorder and move the service to th e preferred
position in Favorite List.
Rename
Select the desired FAV List by press “FAV” button,
using
, buttons to choose Rename mod e and
press “ OK ” button to display keyboard, and rename it.
After renaming it press
(Red) button to sav e.
Group, Options, Service Found and Detail
Information display
Please refer to the “Organizing Services” part in this
manual.
9.2. Installation
9.2.1. Manual installation
A. (Red) Scan
Select one or mor e satellites which preprogr ammed
corresp ond to the direction of the antenna in the
satellite list by using the “ OK ” button, to go to the Scan
menu by using the button (Red).
Scan Mode
Choose your favorable services you want to search
among ALL, FTA, ALL_TV, FTA_TV, ALL_Radio and
FTA_Radio.
Network
If the Network item is set to On and the NIT (Network
Information Table) is available, the Transponder’s
information can be found.
“ OK ” Scan
To star t th e searching process, press“ OK ” button.
To stop the searching process on the way, press either
the “ MENU ” button or the“ EXIT ”button. This menu
Page 16
User manual
16
will be shown as long as the PVR is searching for
services. All services found will be listed in two columns
on the screen with TV services in one column and
Radio services in the other. Please note that the s earch
procedure may take a few minutes.
When the search procedure is completed, the screen
will show the Confirm info box. Select YES to save the
services.
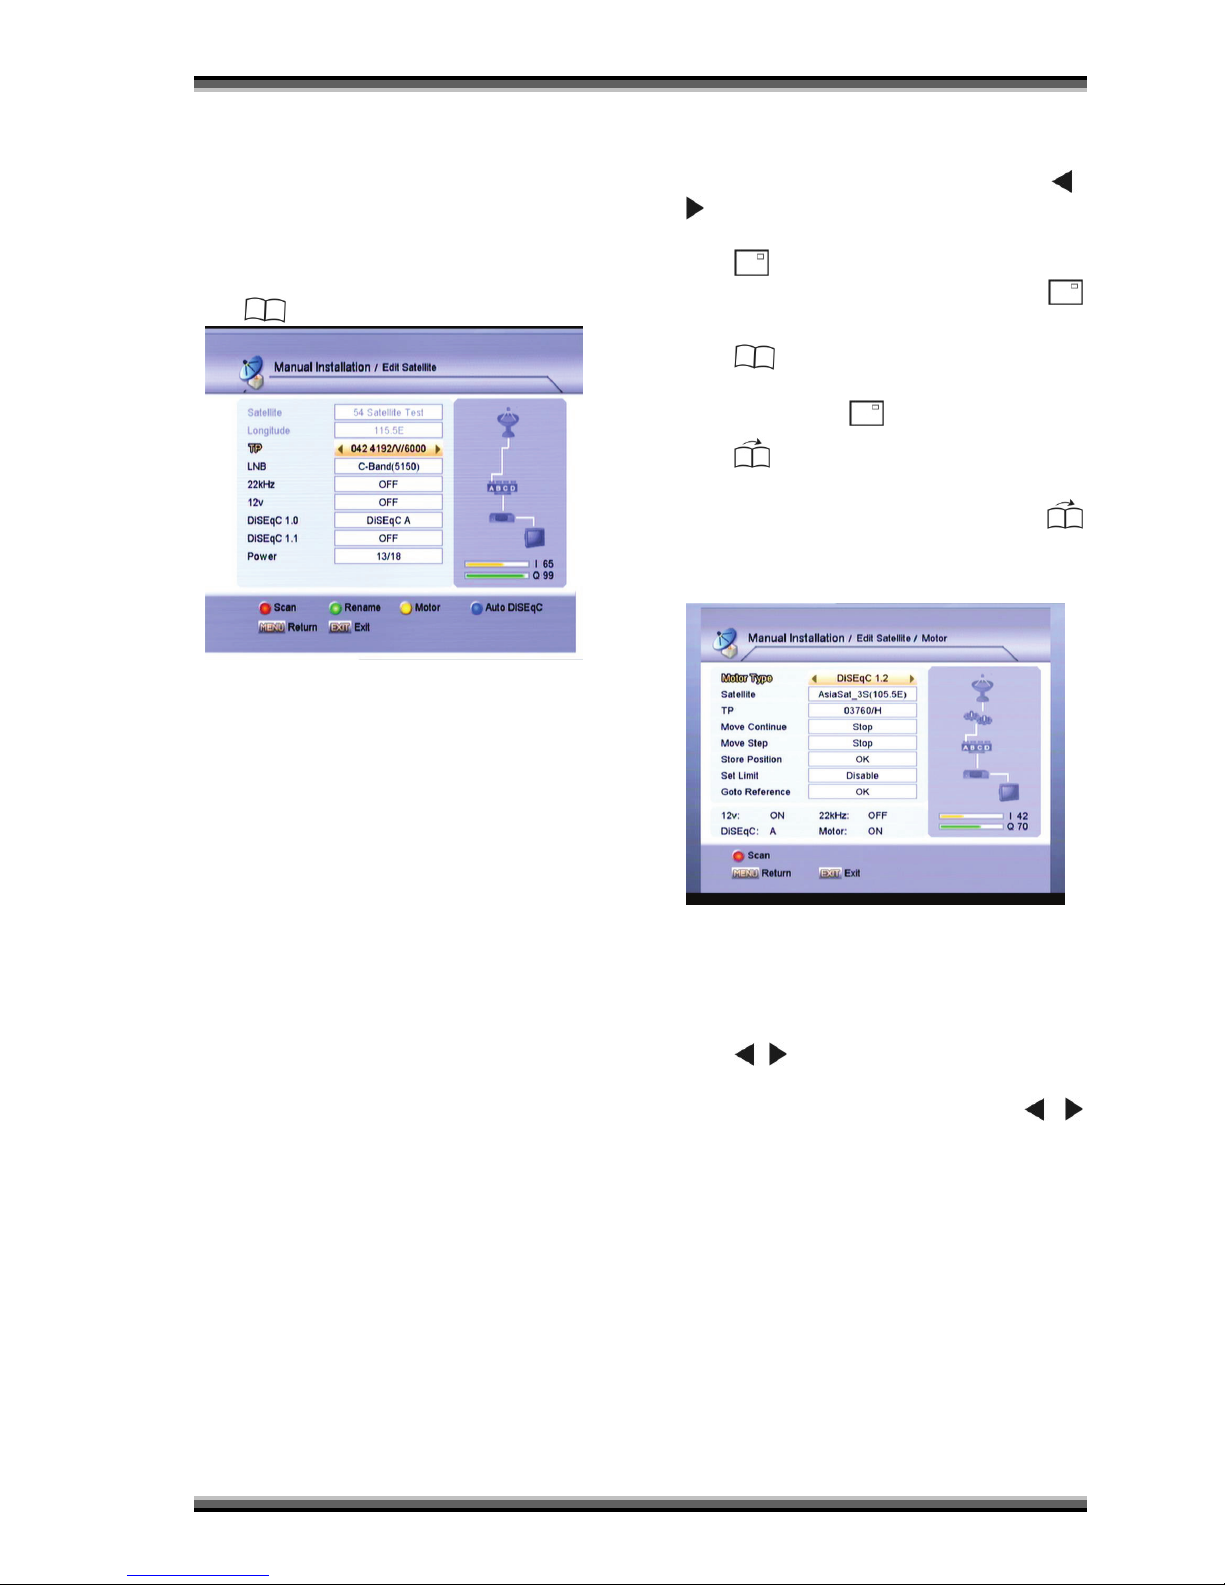
B.
(Green) Edit
TP
Selects the Transponder to catch the strong signal.
LNB
Select the L.O. Frequency of the LNB among CBand(5150), Ku-Band(11300), Universal(9750/10600),
LowBand(9750), HighBand(10600), One Cable L and
One Cable H by using (add left-key and right-key button
icon) buttons.
Also you can insert LNB frequency by using Numeric
key of the RCU when on the User(xxx) item
22kHz
If you are using a 22KHz tone switch box, make 22kHz
tone switch ON or OFF to select LNB or antenna.
NOTE: If the LNB is set to Universal(9750/10600), it is
not possible to set 22kHz because high or low band is
selected by 22kHz.
12V
Switch ON or OFF to enable or disable the 12V DC
power supply.
DiSEqC 1.0
The PVR is designed to be DiSEqC 1.0 compatible.
This allows multiple antenna to be connected to the
PVR at the same time. If you are using two or mor e
fixed antenna or LNBs, then it is recommended to use a
DiSEqC 1.0 switch.
Select one of DiSEqC A, DiSEqC B, DiSEqC C,
DiSEqC D or OFF according to the option or the
configuration of DiSEqC switch box or antenna.
DiSEqC 1.1
The PVR is designed to be DiSEqC 1.1 compatible.
This allows multiple antenna to be connected to the
PVR at the same time. If you are using two or mor e
fixed antenna or LNBs, then it is recommended to use a
DiSEqC 1.1 switch.
It is possible to connect up to 16 antennas. Select one
of 1 to 16 or OFF according to the option or the
configuration of DiSEqC switch box or antenna.
Power
Select the LNB voltage among 13, 18, 13/18, 13.5,
18.5, 13.5/18.5 and OFF by using “ OK ” button or
,
buttons.
(Red) Scan
To go to Scan menu directly from this menu, press
button at this menu.
(Green) Rename
Change the satellite name using keyboard popped on
the scr een, then press
button to Confirm it.
(Yellow) Motor
If you have DiSEqC 1.2 or USALS motorized system,
then you can use their functions by press
button(yellow).
DiSEqC 1.2
− Satellite:Select a satellite that will be used to
identify a motor position.
− TP: Select the transponder to catch the strong
signal.
− Move Continue: To adjust the position of the
antenna using East, West command by press
, buttons.
− Move Step: To adjust the position step by step
using East, West command by press
,
buttons.
− Store Position: To s tore the cu rr ent positi on of
the motor f or the selected satellite.
− Set Limit: Set the limits of East, West position.
− Goto Reference: To go to reference p osition.
− (Red) Scan: To go to Sc an m enu directly from
this menu.
Page 17
User manual
17
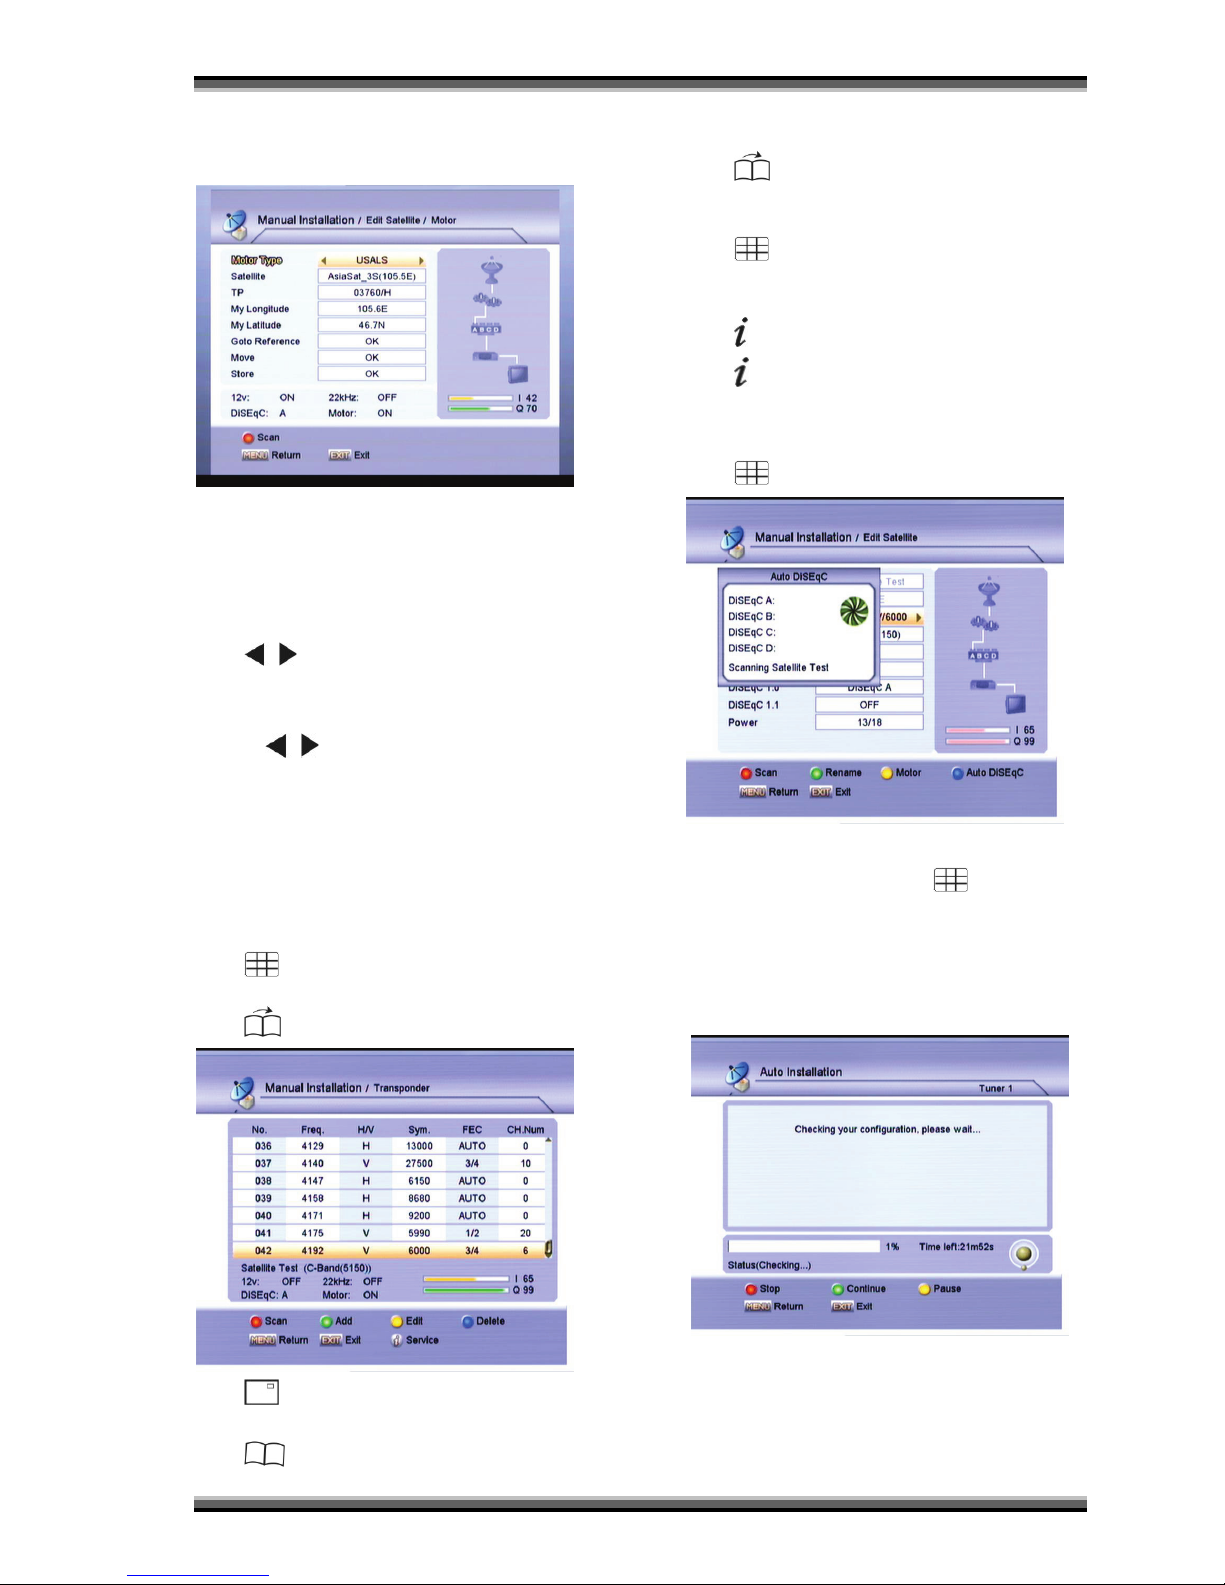
USALS
− Satellite: Select a satellite that will be used to
identify a motor posi tion.
− TP: Select the transponder to catch the strong
signal.
− My Longitude: it means the longitude of your
location. You can use numeric keys of RCU to
enter the an gle. East or West will be selected by
, buttons.
− My Latitude: it means the latitude of your
location. You can use numeric keys of RCU to
enter the angle. South or North will be selected
by
, buttons.
− Goto Reference: to go to reference p osition.
− Move: after setting the Longitude and the
Latitude of the location, press “ OK ” button, the
dish will move to the desired position
automatically.
− Store: to store the current position of the dish.
− (Red) Scan: To go to Scan menu directly from
this menu.
−
(Blue) Auto DiSEqC - Refer to the Auto
DiSEqC in the following.
C.
(Yellow)TP
(Red) Scan
To go to Scan menu directly from this menu.
(Green) Add
To add a new TP to the TP list of the selected satellite.
(Yellow) Edit
To edit the parameters (Frequency , Polarization,
Symbol rate and FEC) of select ed TP.
(Blue) Delete
To delete the TPs selected using (add ok key icon)
button.
Service
Press
button to display the detail information about
the selected TP, all services belonged to the TP will
displayed in the list.
D.
(Blue) Auto DiSEqC
It is a very useful function to easy installing your system
without knowledge of what kind of signal or LNB your
receiver is connected to. Press
button, it will
automatically detect DiSEqC connecting and set the
right configuration of LNB as well. It will show you the
connecting status, you just need to press “ OK ” button
to scan the services of connected satellites.
9.2.2. Auto Installation
“Auto Installation” is a very new and convenient
function. It will automatically detect all dishes
connecting to this machine and scan the available
services belonging to the satellite matched according to
satellites and transponders data in current database.
You don’t have to input any parameter of your antenna
settings. Just press “ OK ” button to enter this “Auto
Page 18
User manual
18
Installation” menu then it starts scanning and shows
you the result at the end of scanning.
(Red)Stop
Stop the automatically checking.
(Green) Continue
Continue the automatically checking
(Yellow) pause
Pause the automatically checking
9.2.3. Guidance of installing a dish
Refer to the “Install your dish” part of the chapter “Easy
Install” in this manual.
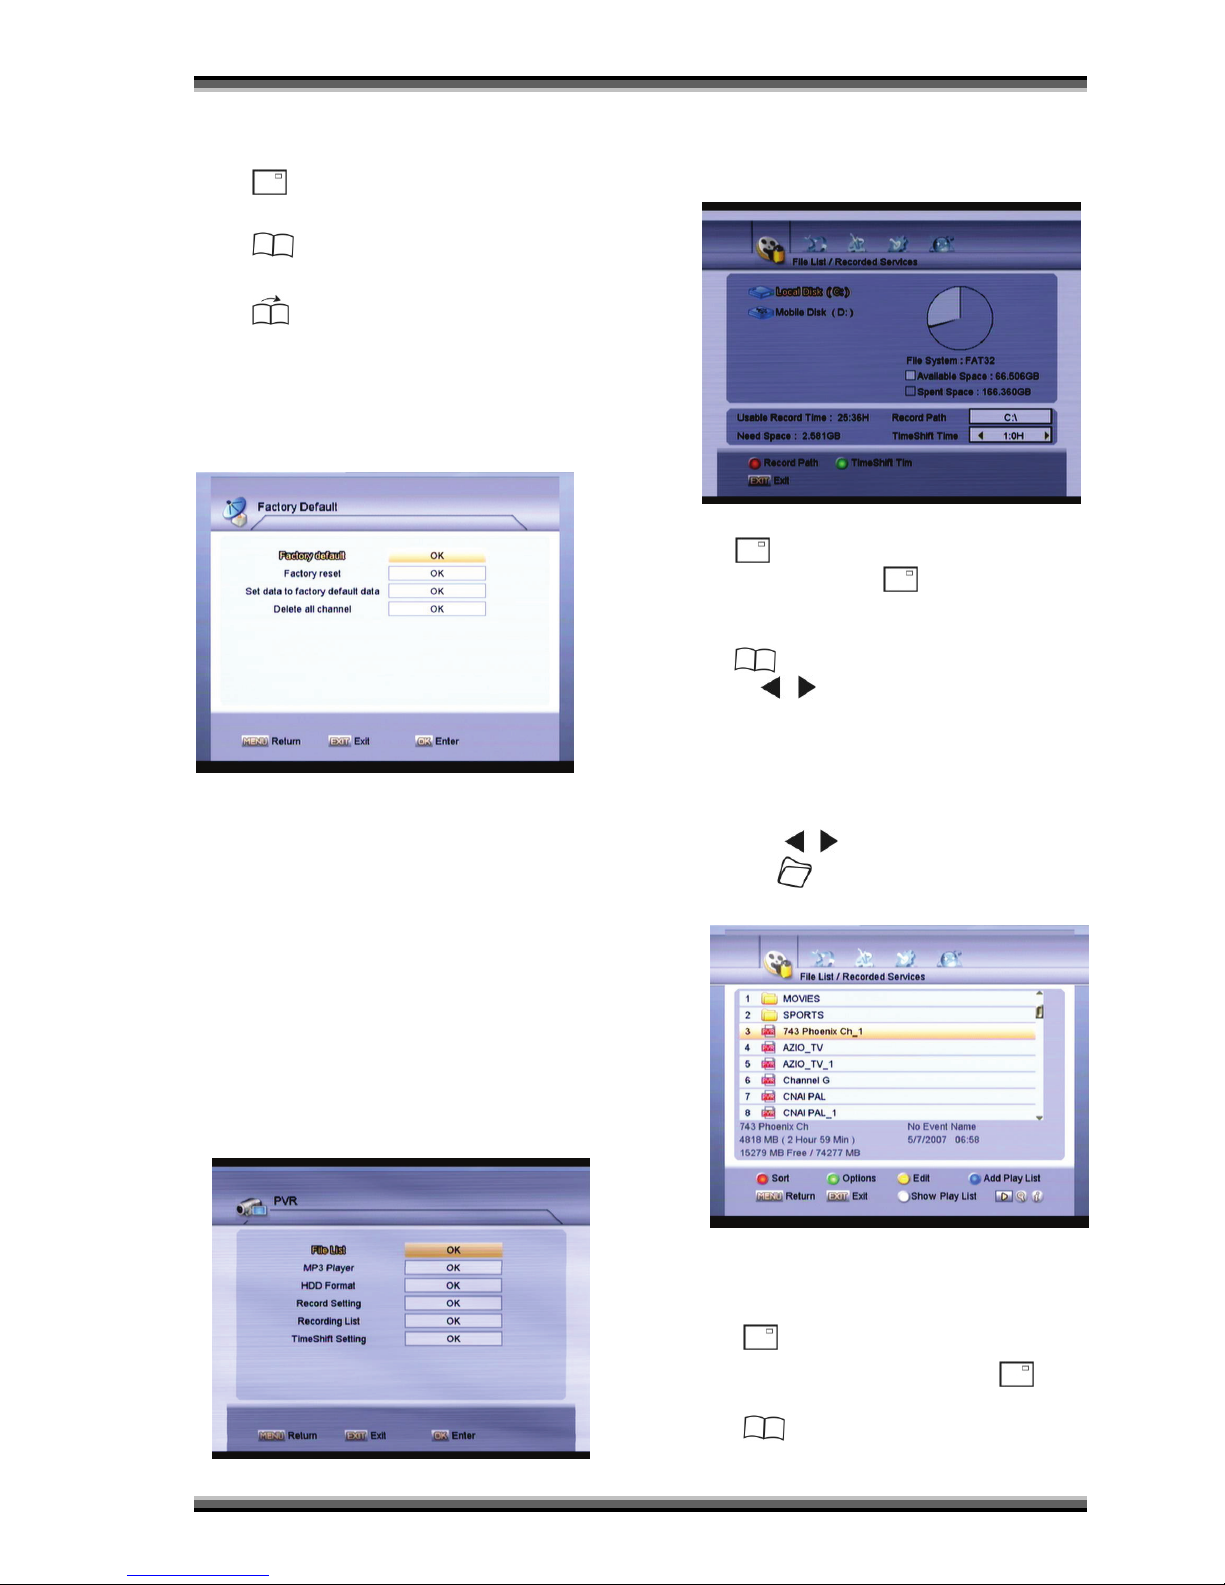
9.2.4. Factory Default
Factory default
It is an item to load the default data to current database
by press “ OK ” button.
Factory reset
Press “ OK ” button it will recover all database to the
same as factory default settings, then it will
automatically go to “Easy Install” menu to re-install your
system.
Set data to factory default data
Press “ OK ” button to set current dat a as default data.
Delete all channel
To delete all channels by using “ OK ” button.
9.3. PVR (optional, only for
PVR ready receivers)
9.3.1. File List
Press “ OK ” button on this item to enter the File List
menu.
Record Path
Press
(Red) button to change the Record Path,
select the path and press (Red) button again to
confirm.
TimeShift Time
Press
(Green) button to select TimeShift Time
item, use , buttons to select the length of Time
Shift time among 0:10H, 0:30H, 1:0H, 1:30H, 2:0H,
2:30H, 3:0H and 4:0H.
Select a disk and press “ OK ” button to enter the file list
submenu. The file list has 5 lists. They are Recorded
Services, MP3, Image, Software and Others. The lists
are select by
, buttons. The File List is displayed
by pressing button.
A. Recorded Services List
You can see the file number, file name, date of
recording, information of scramble, locking, Service
name, event information, file size, HDD information, etc.
i.
(Red) Sort
You can Sort the list by press
(Red)
button.
ii.
(Green) Options
Page 19
User manual
19
It is very convenient function to Mark the
desired services with different options.
iii.
(Yellow) Edit
a) A new folder can be made by select
“New folder” item, the keyboard will
displayed input the name and press
(Red) button to confirm.
b) Select the files you want to move, then
select “Move to folder” item, the list of
Folders will appear. You can select a
folder you want.
c) You can Rename the file or folder by
select “Rename” item.
d) Select “Delete” item after sel ecting the
files (or folders) you want to delete. You
have to confirm it at Confirm box.
e) Select “Lock” item after selecting the files
(or folders) you want to restr ain or lock.
iv.
(Blue) Add P lay List
Mark the desired recorded services by press “
OK ” button, add to the current play list using
(Blue) button.
v. (White) Show Play List
To show the Play List by using
(White)
button.
vi. Playback
To playback the selected file, pr ess button.
Press “ OK ” button to select the servic es
among the recorded services list and press
button to playback the multi-services in
sequence automatically.
B. MP3 File List
The file list is displayed by pressing
button. The
file list of MP3 can be selected by
, buttons from
other list.
i.
(Red) Sort
You can Sort the list by press
(Red)
button.
ii.
(Green) Options
It is very convenient function to Mark the
desired services with different options.
iii.
(Yellow) Edit
a) A new folder can be mad e by select “New
folder” item, the keyboard will displayed
input the name and press (Red)
button to confirm.
b) Select the files you want to mov e, then
select “Move to folder” item, the list of
Folders will appear. You can select a
folder you want.
c) You can Rename the file or folder by
select “Rename” item .
d) Select “Delete” item after selecting the
files (or folders) you want to delete. You
have to confirm it at Confirm box.
iv. Play
To play the selected file, press
button.
Press “ OK ” button to select the files among the MP3
list and press
button to play the multi-files in
sequence automatically.
C. Image File List
The file list is displayed by pressing
button. The
file list of Image can be selected by
, buttons
from other list.
i.
(Red) Sort
You can Sort the list by press
(Red)
button.
ii.
(Green) Options
It is very convenient function to Mark the
desired services with different options.
iii.
(Yellow) Edit
a) A new folder can be mad e by select “New
folder” item, the keyboard will displayed
input the name and press
(Red)
button to confirm.
b) Select the files you want to mov e, then
select “Move to folder” item, the list of
Folders will appear. You can select a
folder you want.
c) You can Rename the file or folder by
select “Rename” item .
d) Select “Delete” item after selecting the
files (or folders) you want to delete. You
have to confirm it at Confirm box.
iv. Play
To play the selected file, press
button.
Press “ OK ” button to select the files among
the Image list and press
button to play the
multi-files in sequence automatically.
D. Software File List
The file list of Software can be sel ected by
,
buttons from other list.
E. Others
Can display all folders and all files of the selected folder
or disk.
9.3.2. MP3 Player
You can start the MP3 Player by pressing the “ OK ”
button on this item if the Player is already used before.
If you first time to use, please refer to the MP3 File List/
Play in this manual.
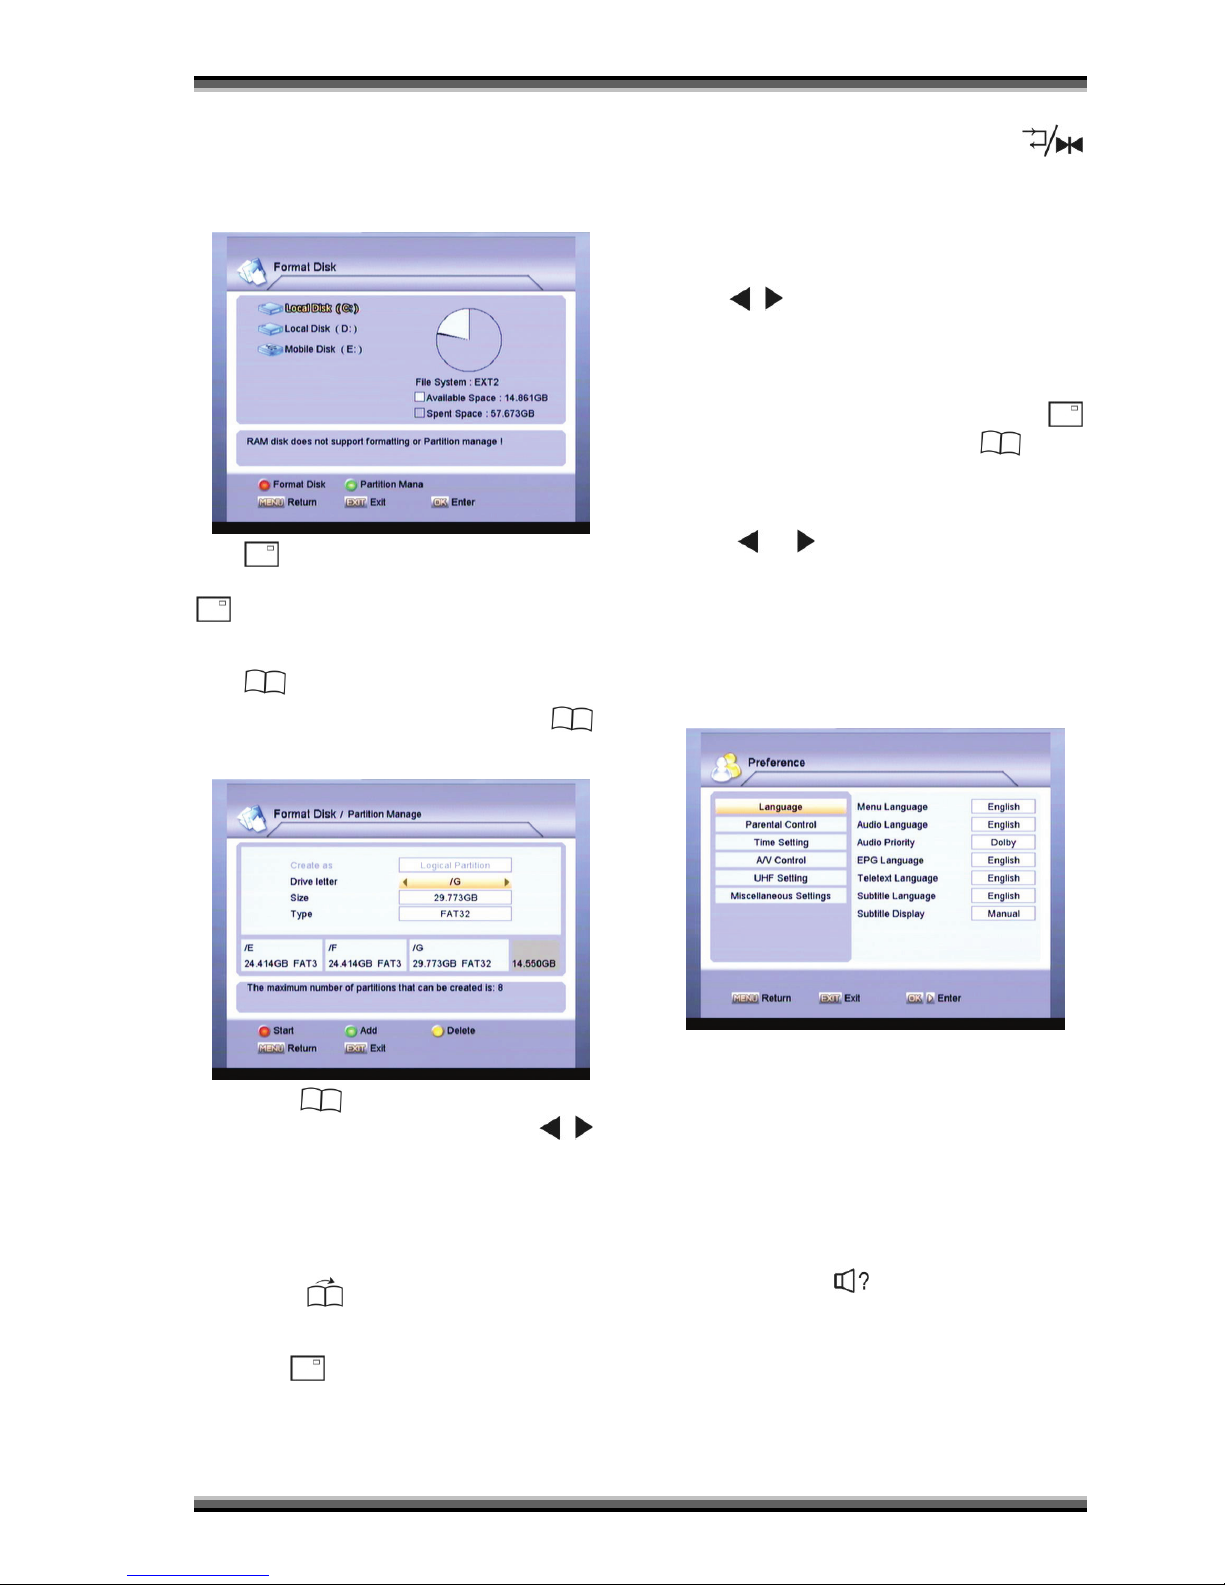
9.3.3. HDD Format
You can Format Disk or Partition Disk in this menu.
Formatting Hard Disk will delete all the data and the
Page 20
User manual
20
files recorded in HDD permanently. If a new HDD is
installed, it should be formatted because the file
structure of PVR is different from others.
You cannot use the Time shift, Recording and playback
functions with an unformatted HDD.
A.
(Red) Format Disk
Select the desired Disk to Format in Disk list and press
(Red) button, select Format Type (FAT32 or
EXT2) in the pop menu, then confirm format by select
‘YES’ item.
B.
(Green) Partition Manage
To enter the Partition Manage submenu, Press
(Green) button in this menu and select the HDD (Local
Disk or Mobile Disk) by press “ OK ” button.
I. Press
(Green) button to Add a partition.
Move the highlight to “Size” item, using
,
or Numeric buttons to change the size of the
partition.
You can select Type (FAT32 or EXT2) of the
partition on “Type” item.
The maximum number of partitions that can be
created is 8.
II. Press
(Yellow) button to Delete the
selected partition.
When completed above settings, it should be
press (Red) button to Start Format.
9.3.4. Record List
You can enter Record List menu directly from
here by press “ OK ” button if the PVR is recording now.
You can also enter this menu by press
(White) button when watching the program.
9.3.5. Time Shift setting
Enable
It is used to turn on or turn off the time shift function by
using
, buttons.
ON: To enable the Time Shift function.
OFF: To disable the Time Shift function.
Time shift path
Press “ OK ” button to select partition and press
(Red) button to save and exit, or press (Green)
button to make a new file in the partition that you
choosed.
Time shift time
Press
or button to select time(0:10H, 0:30H,
1:0H, 1:30H, 2:0H, 2:3H, 3:0H, 4:0H).
9.4. Preference
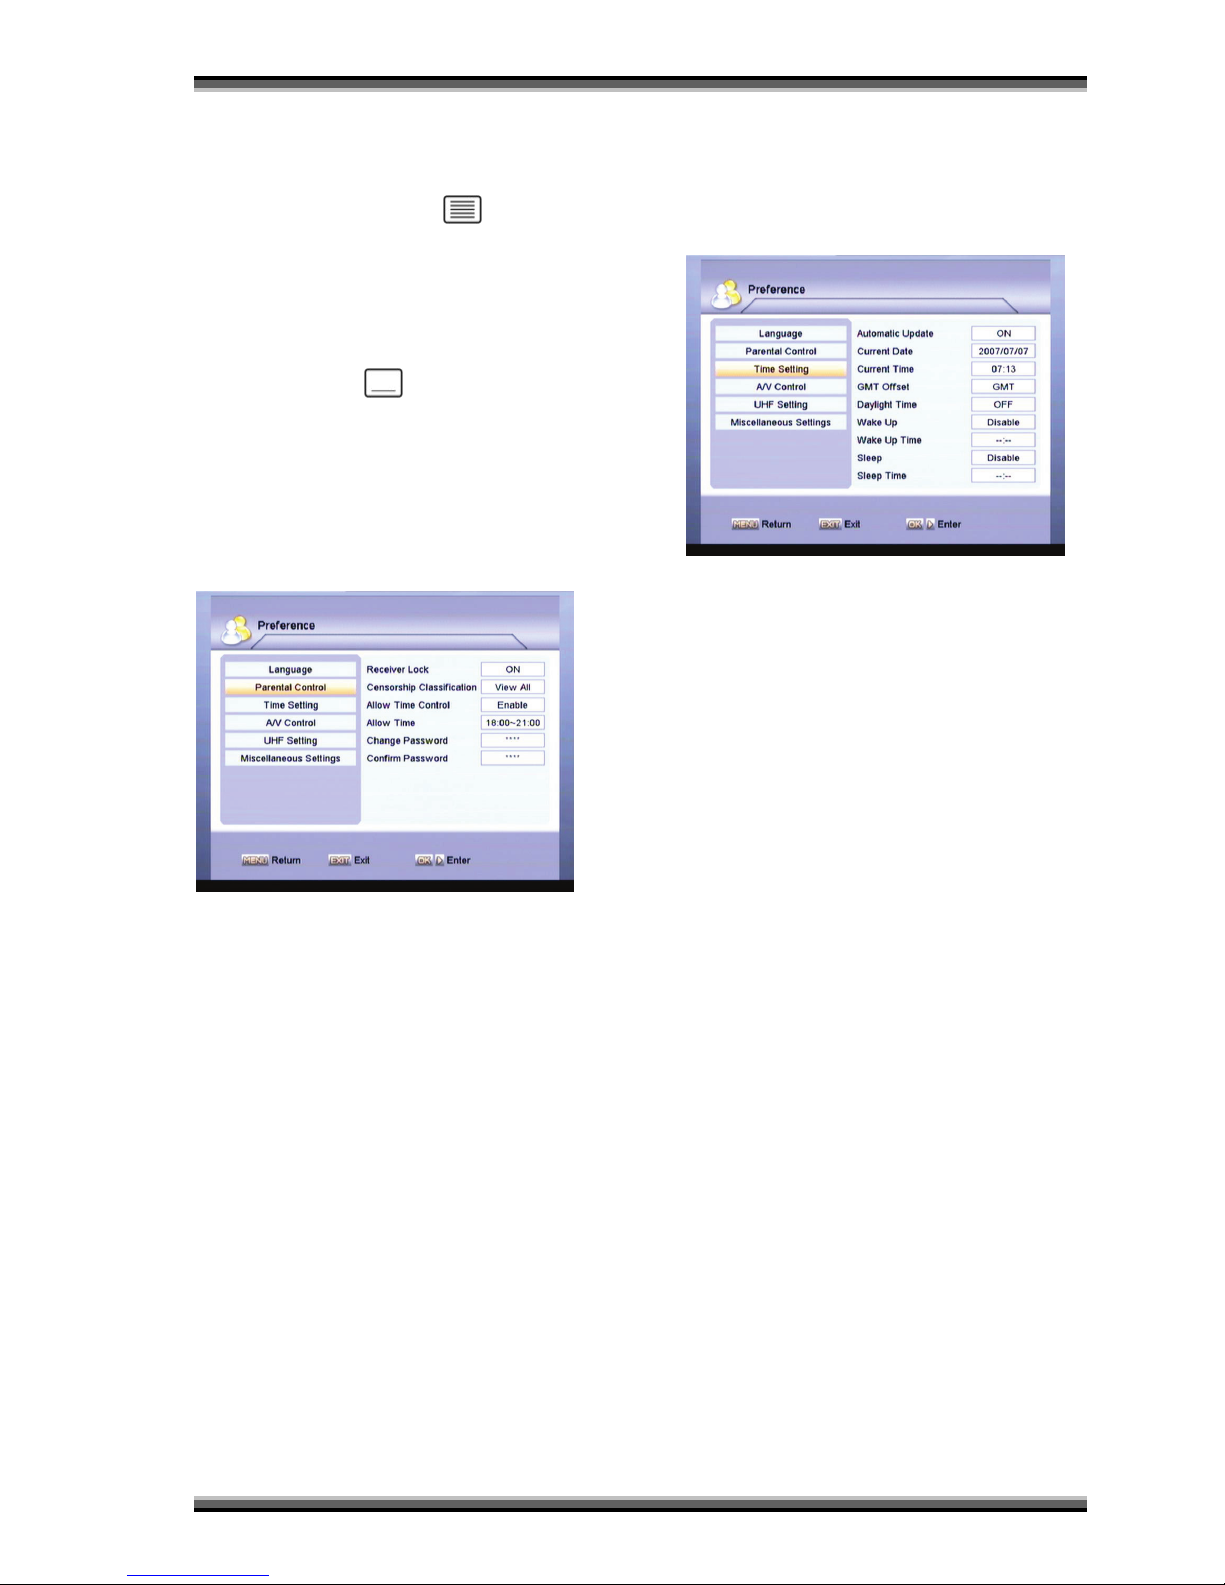
9.4.1. Language
There are m any languages available for the m enu.
Menu Language
It is an item for changing the language of the Main
menu.
Select the language that the menus will be shown in.
The supported language can be changed without any
notice.
Audio language
It is an item for changing the language of the Audio.
If more than one audio language is transmitted, you
may select one language among the language
transmitted by press
button.
The supported language can be changed without any
notice.
Audio Priority
You can select the Audio Priority among Dolby and
language by press ” OK ” button.
EPG Language
It is an item for changing the language of the EPG.
Page 21
User manual
21
Teletext Language
It is an item for changing the language of the Teletext.
As long as the services support it, the Teletext
language is changeable by press
button on your
RCU.
The supported language can be changed without any
notice.
Subtitle Language
It is an item for changing the language of the Subtitle.
As long as the services support it, the Subtitle language
is changeable by press button on your RCU.
The supported language can be changed without any
notice.
Subtitle Display
Select the mode of Subtitle display among Manual and
AUTO by using “ OK ” button.
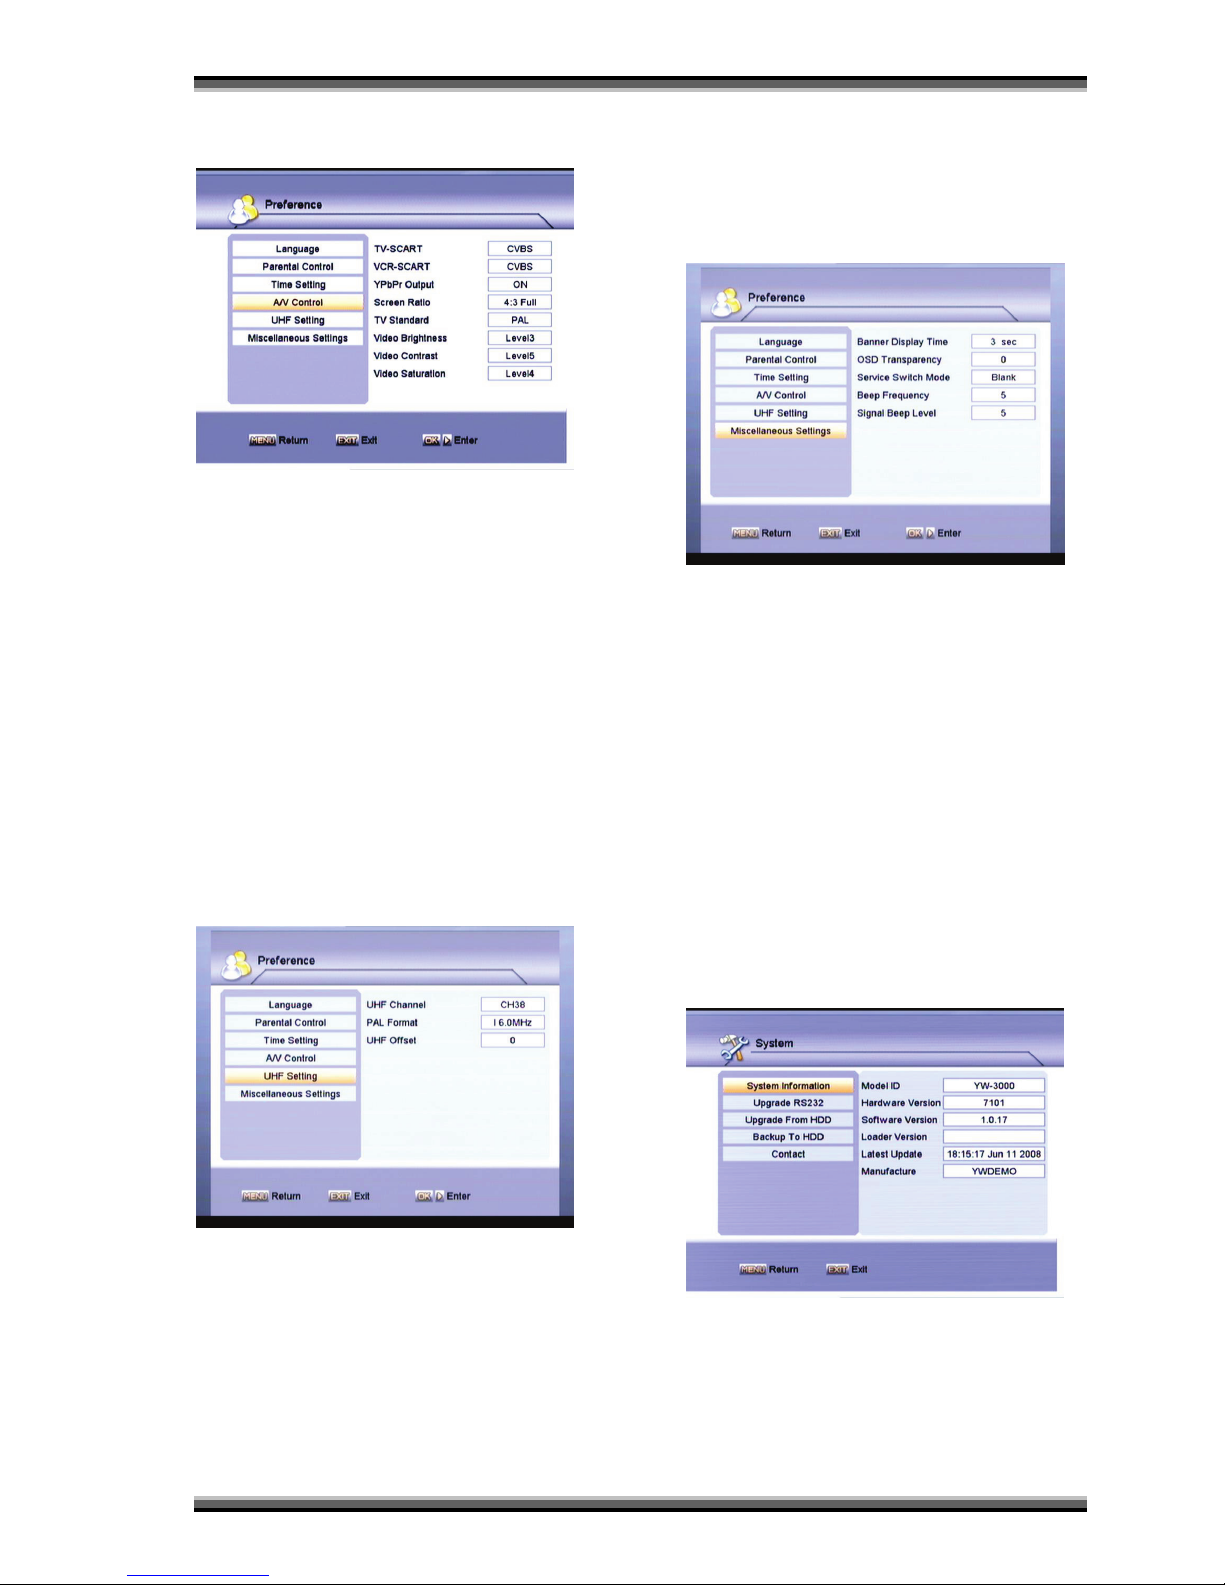
9.4.2. Parental Control
Receiver Lock
It is an item for lock the receiver or not.
OFF: means unlocked.
ON: means controlling the access to the specific menus
with the PIN code system. The default PIN code is
0000.
Censorship Classification
This item blocks programs according to each specific
setting.
Use “ OK ” button to select items below.
View All: Access to every one.
Lock All: Access to no one without PIN code.
7~18: Inaccessible for viewers within each minimum
age limit if a maturing rating of the event is same or
lower than the age limit.
In case of inaccessible, the PVR asks the PIN Code
and check the age limit.
Allow Time Control
This item blocks programs according to each specific
setting.
Disable: Access for all the time.
Enable: Access for specific allow time period.
In case of out the allow time period, the PVR asks the
PIN Code.
Change Password
Go to th e Change P assword item to configure new PIN
Code. Enter the PIN code by using the numeric buttons
on your RCU.
9.4.3. Time setting
The exact local current time can be adjusted by using
the Automatic Update, the GMT Offset and the Daylight
Time sub menus.
Automatic Update
By using “ OK ” button, you can select ON/OFF.
When the Automatic Update is set to ON, it updates the
time settings automatically by the GMT received from
the broadcast and the GMT Offset you have inserted.
The Automatic Update ON mode is recommended.
Current Date/Time
The Current Date/Time is adjustable only when the
Automatic Update is in the ON mode. Adjust the current
date/time by using the numeric buttons.
GMT Offset
The cu rren t time of the local area can be inserted. In
another word, insert the time difference of the local time
zone from the GMT. The time is adjustable by using “
OK ” button.
Daylight Time
Select ON or OFF to turn on or turn off the Summer
Time.
Wake Up Time
It is an item to set the W ake Up Time or not.
Sleep Time
It is an item to set the Sl eep Time or not.
Page 22
User manual
22
9.4.4. A/V Control
TV-SCART
Select the mode of Video output between RGB and
CVBS on TV SCART by using “ OK ” button.
YPbPr Output
ON: Enable the YPbPr output
OFF: Disable the YPbPr output
Screen Ratio
Select your TV screen format among AUT O, 16:9 Full,
4:3 Full, 16:9 Letter Box and 4:3 Letter Box by using “
OK ” button.
TV Standard
Select your TV Standard among PAL, NTSC, SECAM,
720P and 1080i by using “ OK ” button.
Video Brightness/Contrast/Saturation
You can adjust the parameter about the Video image by
using the “ OK ” button. The default value is Level 14.
9.4.5. UHF Setting
When the PVR is connected to the TV by an RF cable,
you may need to selec t th e correct TV st andard syst em.
UHF Channel
Select a RF channel by using “ OK ” button. The default
RF channel is CH38. When you change the RF channel
number, you must also ch ange to the same value on
the TV. If you do not, there will be no picture and sound.
PAL Format
Select the D/K 6.5MHz, B/G 5.5MHz, I 6.0MHz, M
4.5MHz by using “ OK ” button. T he default PAL Format
is I 6.0MHz.
UHF Offset
Change the value of the UHF Offset by using “ OK ”
button. The default value is 0.
9.4.6. Miscellaneous Setting
Banner Display Time
Adjust the time-out of the info Box. S et the period of
time that the info Box is displayed on scr een. The
adjustable time is 1 to 30 seconds.
OSD Transparency
Adjust the OSD Transparency of all the menus. The
available levels are ranging from 0 to 100%.
Service Switch Mode
Select the Service Switch Mode among Blank, Fade
in/out and Unblank by using “ OK ” button.
Beep Frequency
Adjust the Beep Frequency. The adjustable frequency
is 1 to 10.
Signal Beep Level
Adjust the Beep Level of the signal. The adjustable
level is 1 to 8, and OFF.
9.5. System
9.5.1. System Information
Check the HD Receiver’s system information here. It
shows the M odel ID, H ardware Version, Softwar e
Version, Loader Version, Latest Update and
Manufacture
Page 23
User manual
23
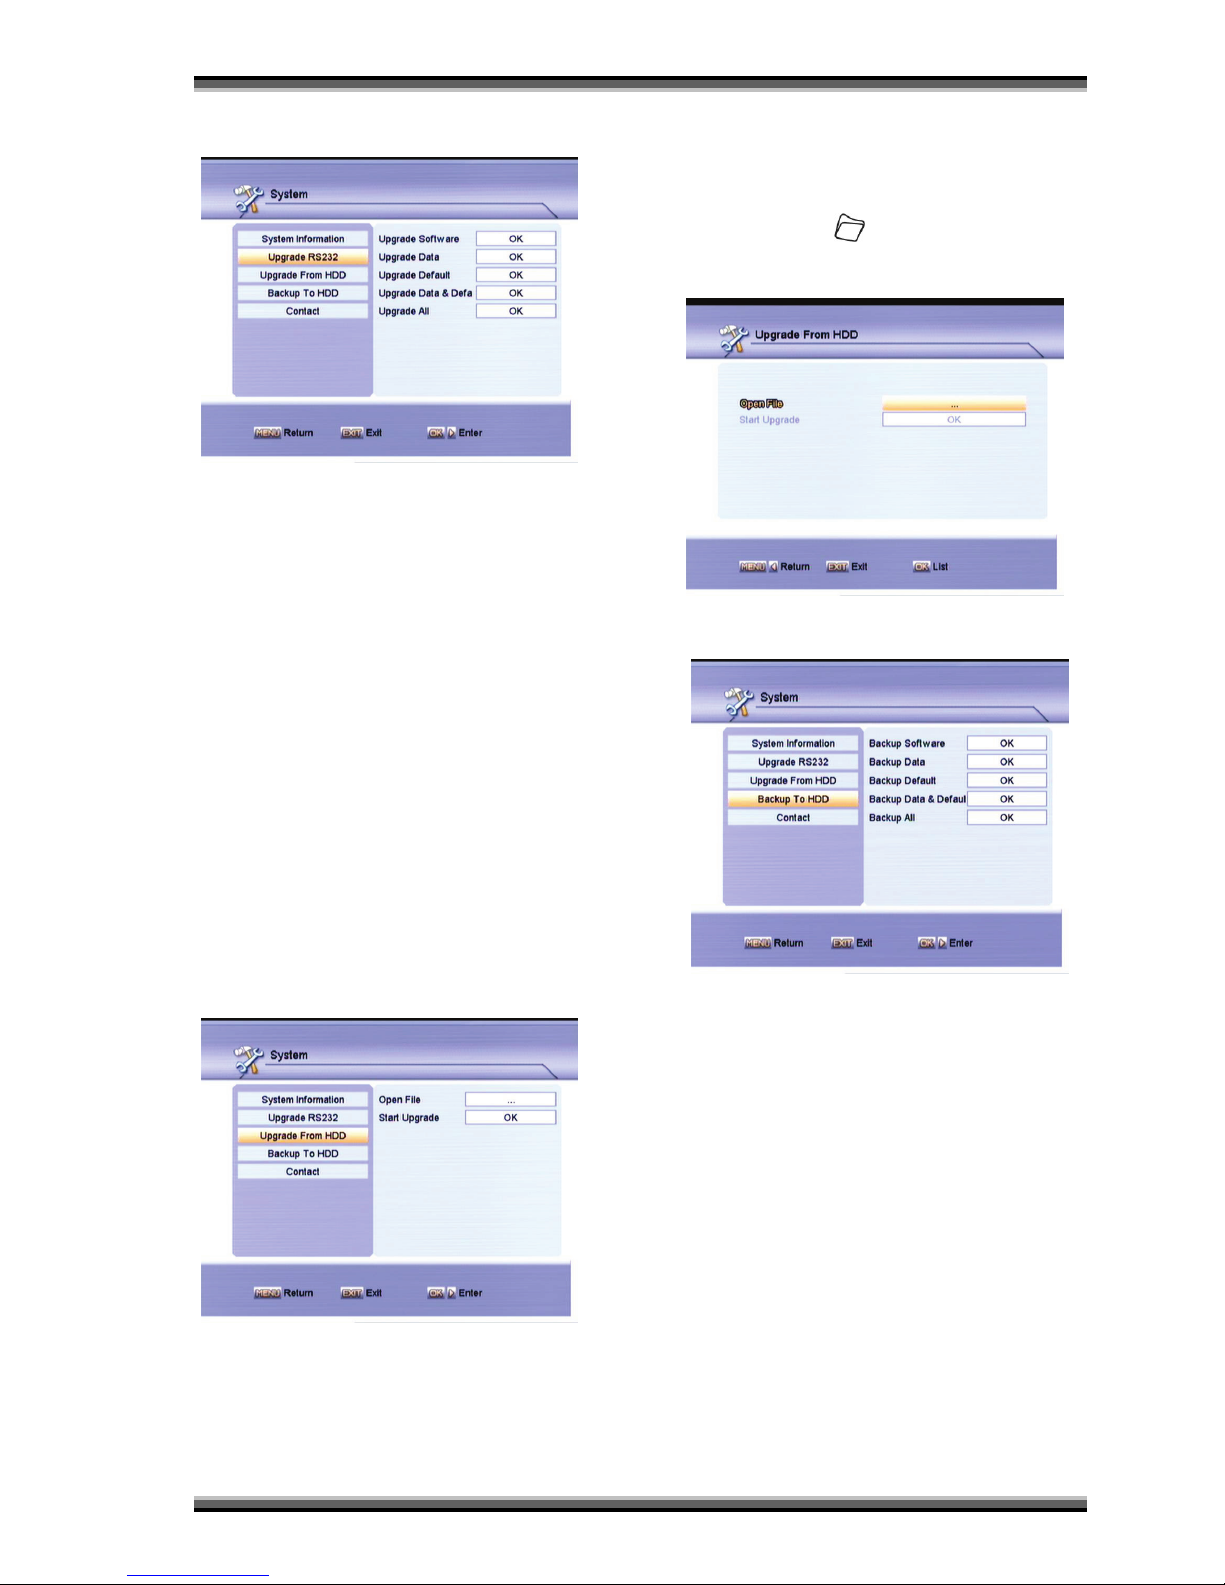
9.5.2. Upgrade RS232
This item is very convenient to transfer HD Receiver
content such as software, dat a or default data to other
HD Receiver for upgrading the HD Receiver via the
RS232.
Upgrade Software
It is used to transfer HD Receiver Software to other HD
Receiver for upgrading the HD Receiver.
Upgrade Data
It is used to transfer HD Receiver Data such as service
information to other HD Receiver for upgrading the HD
Receiver
Upgrade Default
It is used to tr ansf er HD Receiver factory Default d ata t o
other HD Receiver for upgrading the HD Receiver .
Upgrade Data & Default
It is used to transfer HD Receiver current Data and the
factory Default data to other HD Receiver for upgrading
the HD Receiver .
Upgrade All
It is used to transfer HD Receiver All (include software,
data and default data) to other HD Receiver for
upgrading the HD Receiver.
9.5.3. Upgrade from HDD
In this menu you can upgrade the software from USB
hard disk conveniently.
Open file
The open file item is for select the appropriate software
file from USB hard disk.
Start upgrade
After y ou s elect the "Upgrade File", press “ OK ”
button on "Start upgrade" item, the receiver can
upgrade automaticlly.
You can also Press
Archive Button to direct enter
the” upgrade from HDD” meun list
9.5.4. Backup to HDD
Backup Software
It is used to backup software to USB hard disk, select
path and assign the file name then press ' OK ' to start
backup.
Backup data
It is used to backup data to USB hard disk, select path
and assign the file name then press ' OK ' to start
backup.
Backup Default
It is used to backup default to USB hard disk, select
path and assign the file name then press ' OK ' to start
backup.
Backup Data & Default
It is used to backup Data & Default to USB hard disk,
select path and assign the file name then press ' OK ' to
start backup.
Backup all
It is used to backup all to USB hard disk, select path
and assign the file name then press ' OK ' to start
backup.
Page 24
User manual
24
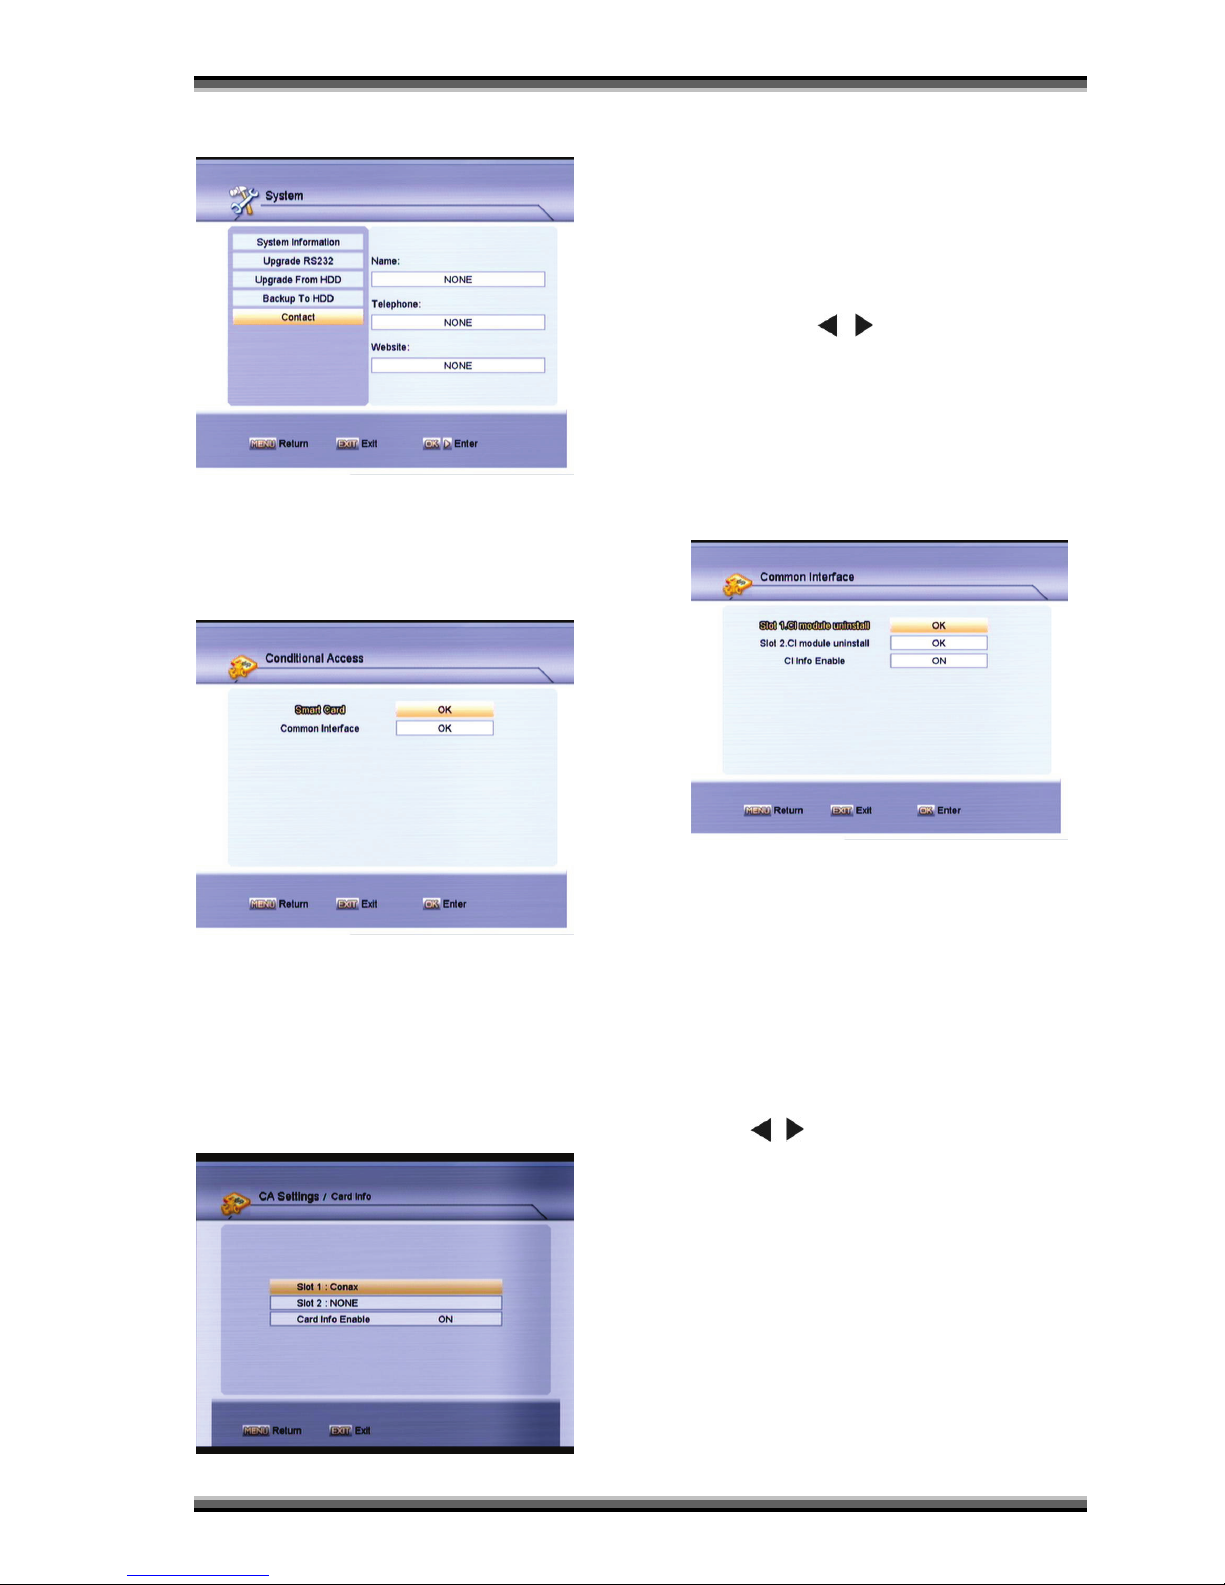
9.5.5. Contact
This menu to show the dealer’s information such as
Name, Telephone and Website.
9.6. Conditional Access
(optional)
9.6.1. Smart card
We provide two CA sl ots for user to use. Receiver has
build in smart card module with CONAX system. By
using cards in this system provided by operators, it is
possible to watch many scrambled channels coded in
this system. This menu shows detailed information
about cord inserted into cord reader module. It allows
inserted according to help messages visible on the
bottom of the scr een.
Note:
All information showed in this menu and submenu are
coming from inserted card. In case if anything is wrong,
it could be card problem. After inserting the card
correctly at any time, a message-box will show on the
screen with message about detecting the card, in "card
info" menu all available information will be displayed.
Card info enable
It is used to turn on or turn off the card info display
function by using
, buttons or “ OK ” button to
select .
ON: To display the card info.
OFF: Don’t display the card info.
9.6.2. Common interface (optional)
We provide two CI slots for user to use. Using different
CAM & cards provided by different CAS operator, user
can view many type or scrambled channels.
We provide this menu to display the detail information
of the CAM & cards inserted in the slots. User can
check all this information according to the help
messag e at the b ottom of each menu.
Note: All information showed in this menu and submenu
is abstract from CAM & card. In case something is
wrong, it may be the problem of CAM or card.
When you insert the CAM correctly at any time, a
message will show in the screen to tell you that which
CAM has been detected by the receiver and is available
now.
CI Info Enable
It is used to turn on or turn off the ci info display function
by using , buttons or “ OK ” button t o select.
ON: To display the ci info.
OFF: Don’t display the ci info.
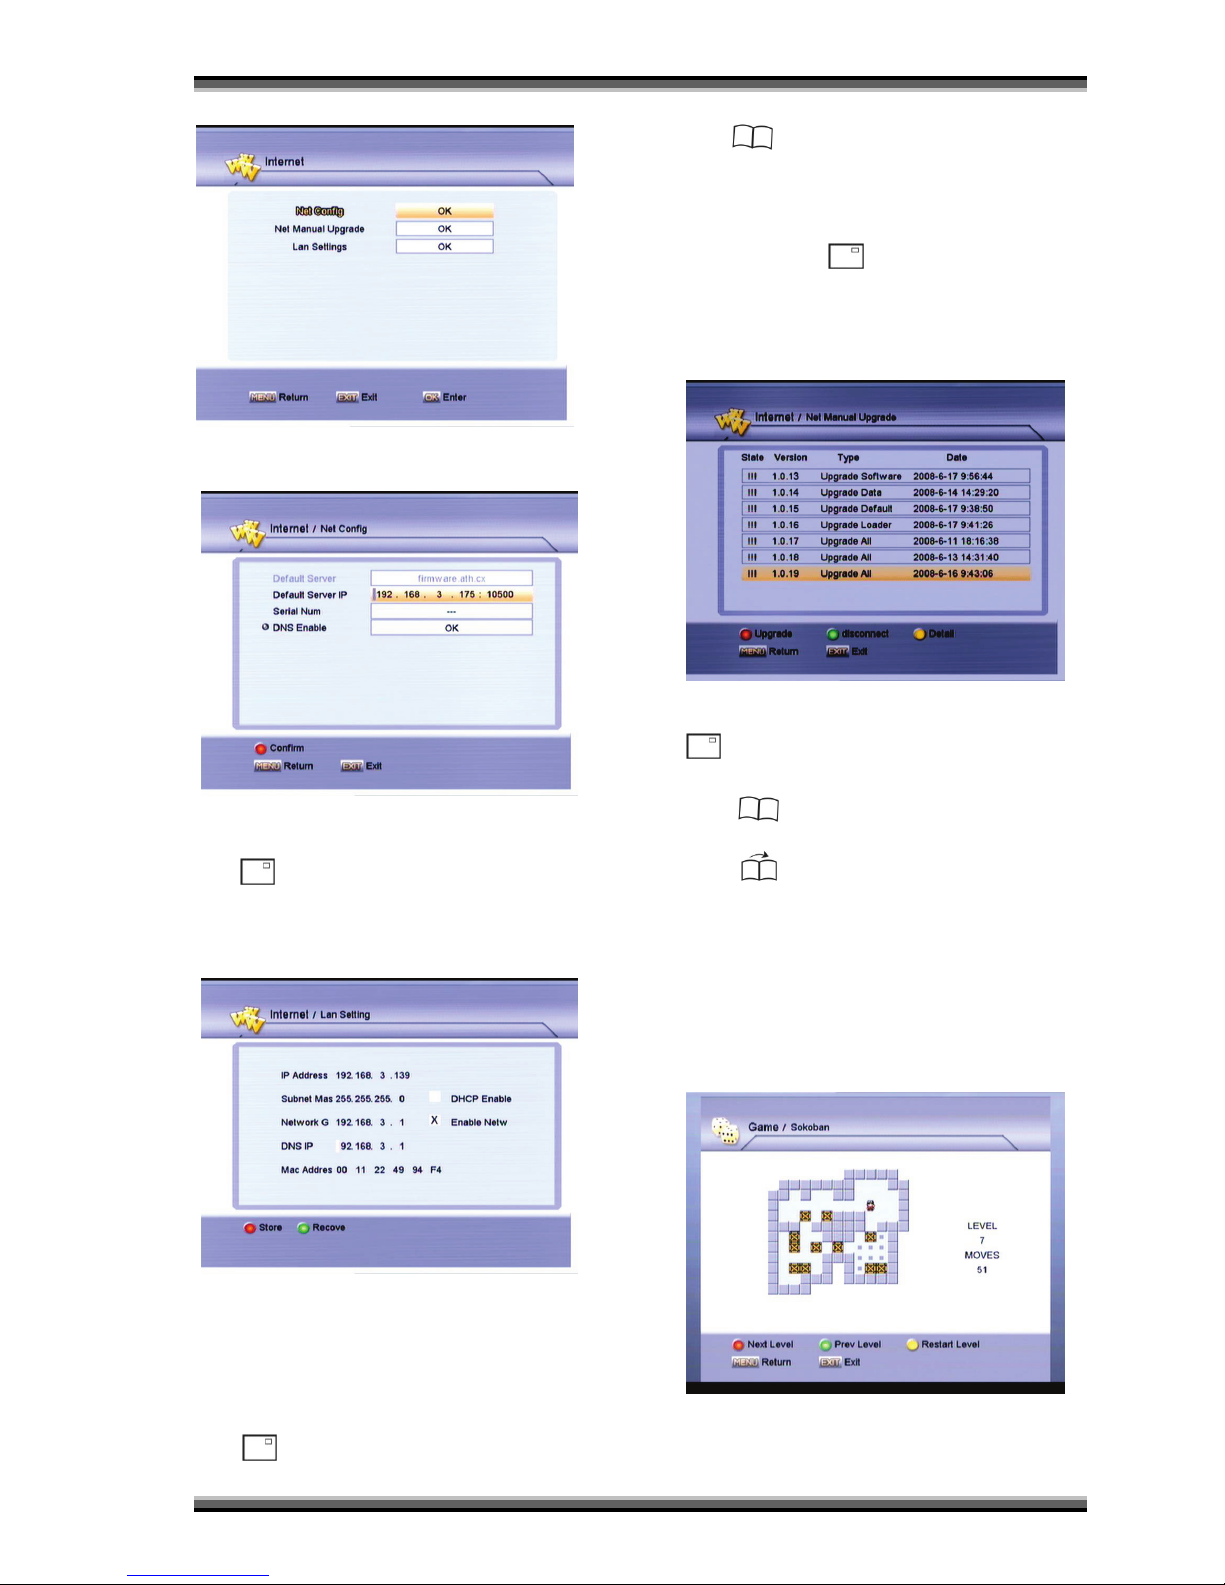
9.7. Internet (optional)
You can get a new software from the network via LAN
port.
Select the Main Menu >Internet menu.
You should see a screen like the following figure.
Page 25
User manual
25
9.7.1. Net config
In this menu you should assign the Server IP or set the
"DNS Enable" On by press “ OK ” button, and maybe
you need assign the "Serial Num" Of the receiver, by
press
button to confirm.
This above informati on y ou can get it from your dealer.
9.7.2. Lan Settings
In this menu you may assign a dynamic IP address to
the digital receiver. To do so, select the DHCP Enable.
If you have a static IP address, unselect the DHCP
Enable, then the IP Address, Subnet Mask and Network
Gateway options become
enabled. You have to set these options according to
your IP address.
Press
(Red)button to Store the modification.
Press (Green) to Recover the p arameters .
9.7.3. Net Manual Upgrade
In this menu press (Red) button to connecting to
the server.
When connected to the server, the available file list will
displayed like the following picture, you can see the
information about the software files, like state, version,
type, d ate.
Then you can choose the file which you need, pressing
button to upgrade the software.
Press Green) button to disconnect from the
server.
Press
(Yellow) button to display the detail
information about th e software files.
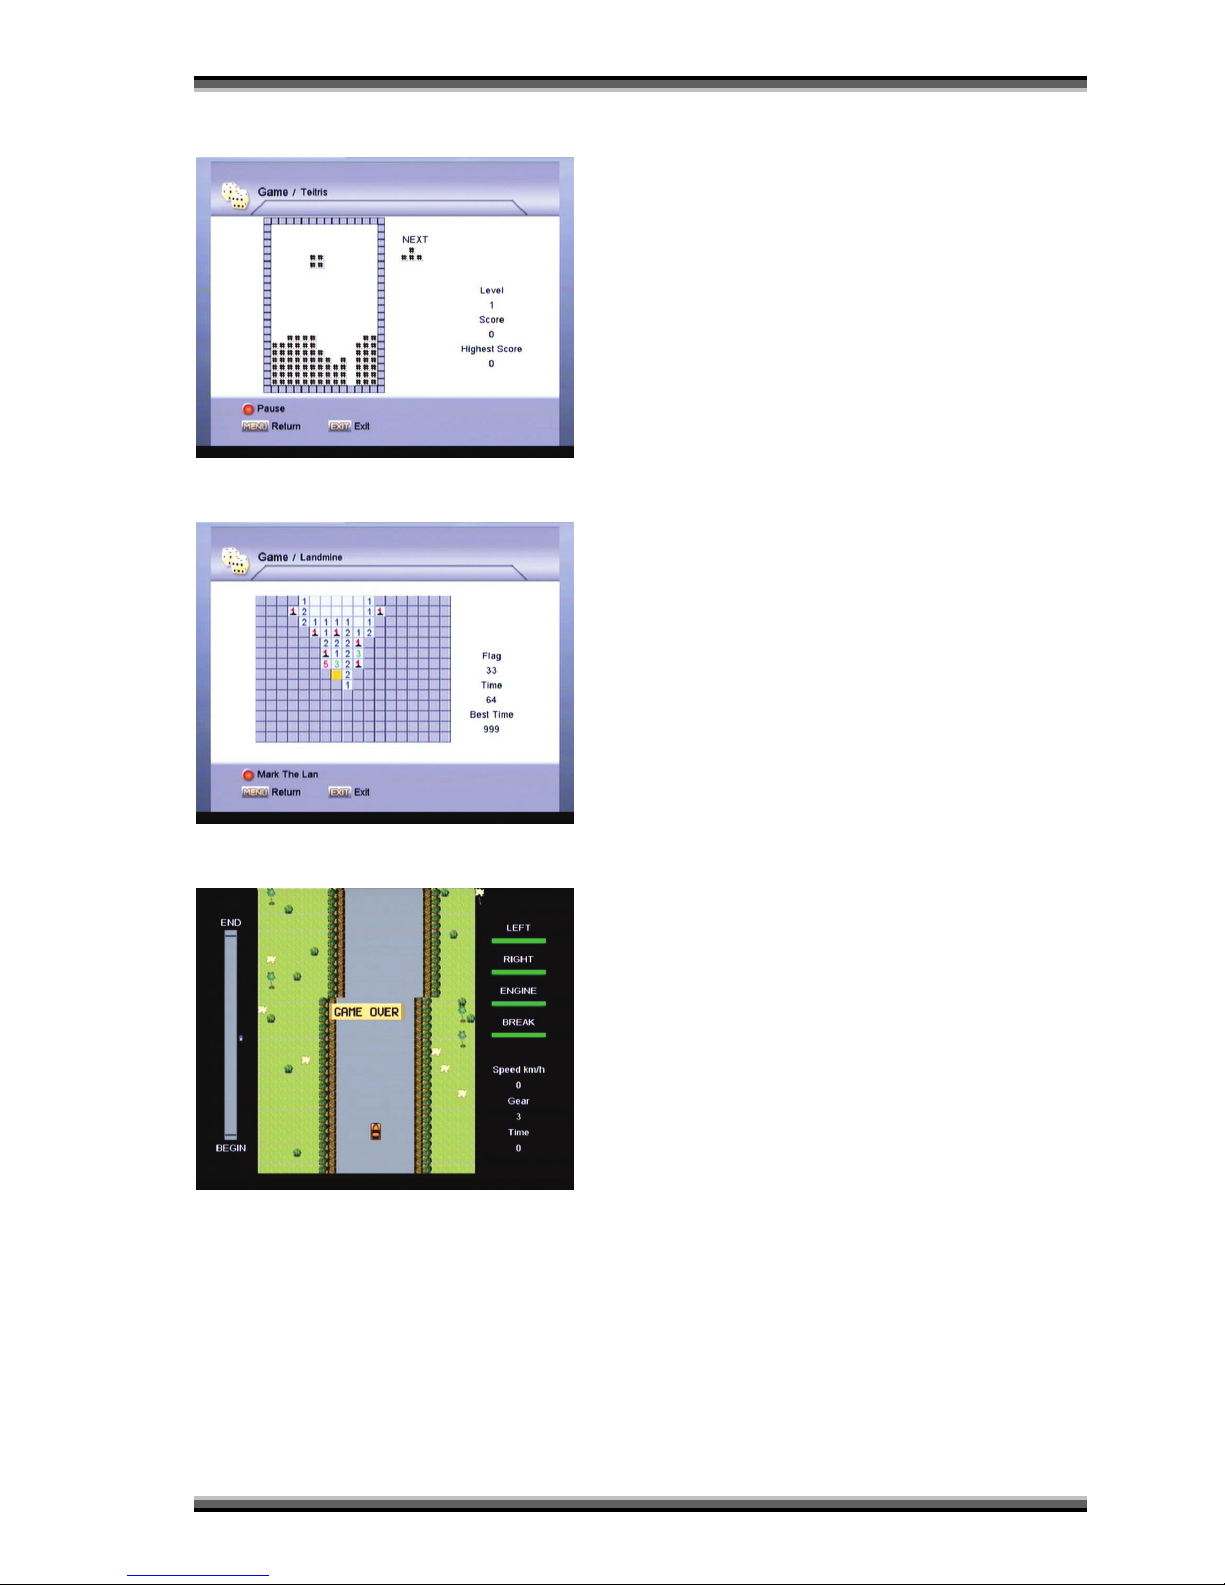
9.8. Game
In this menu, we provide four interesting games for you
to enjoy, please choose one and according the indicate
information to play it.
9.8.1. Sokoban
Page 26
User manual
26
9.8.2. Tetris
9.8.3. Landmine
9.8.4. Speed
Page 27
User manual
27
10. Function guide
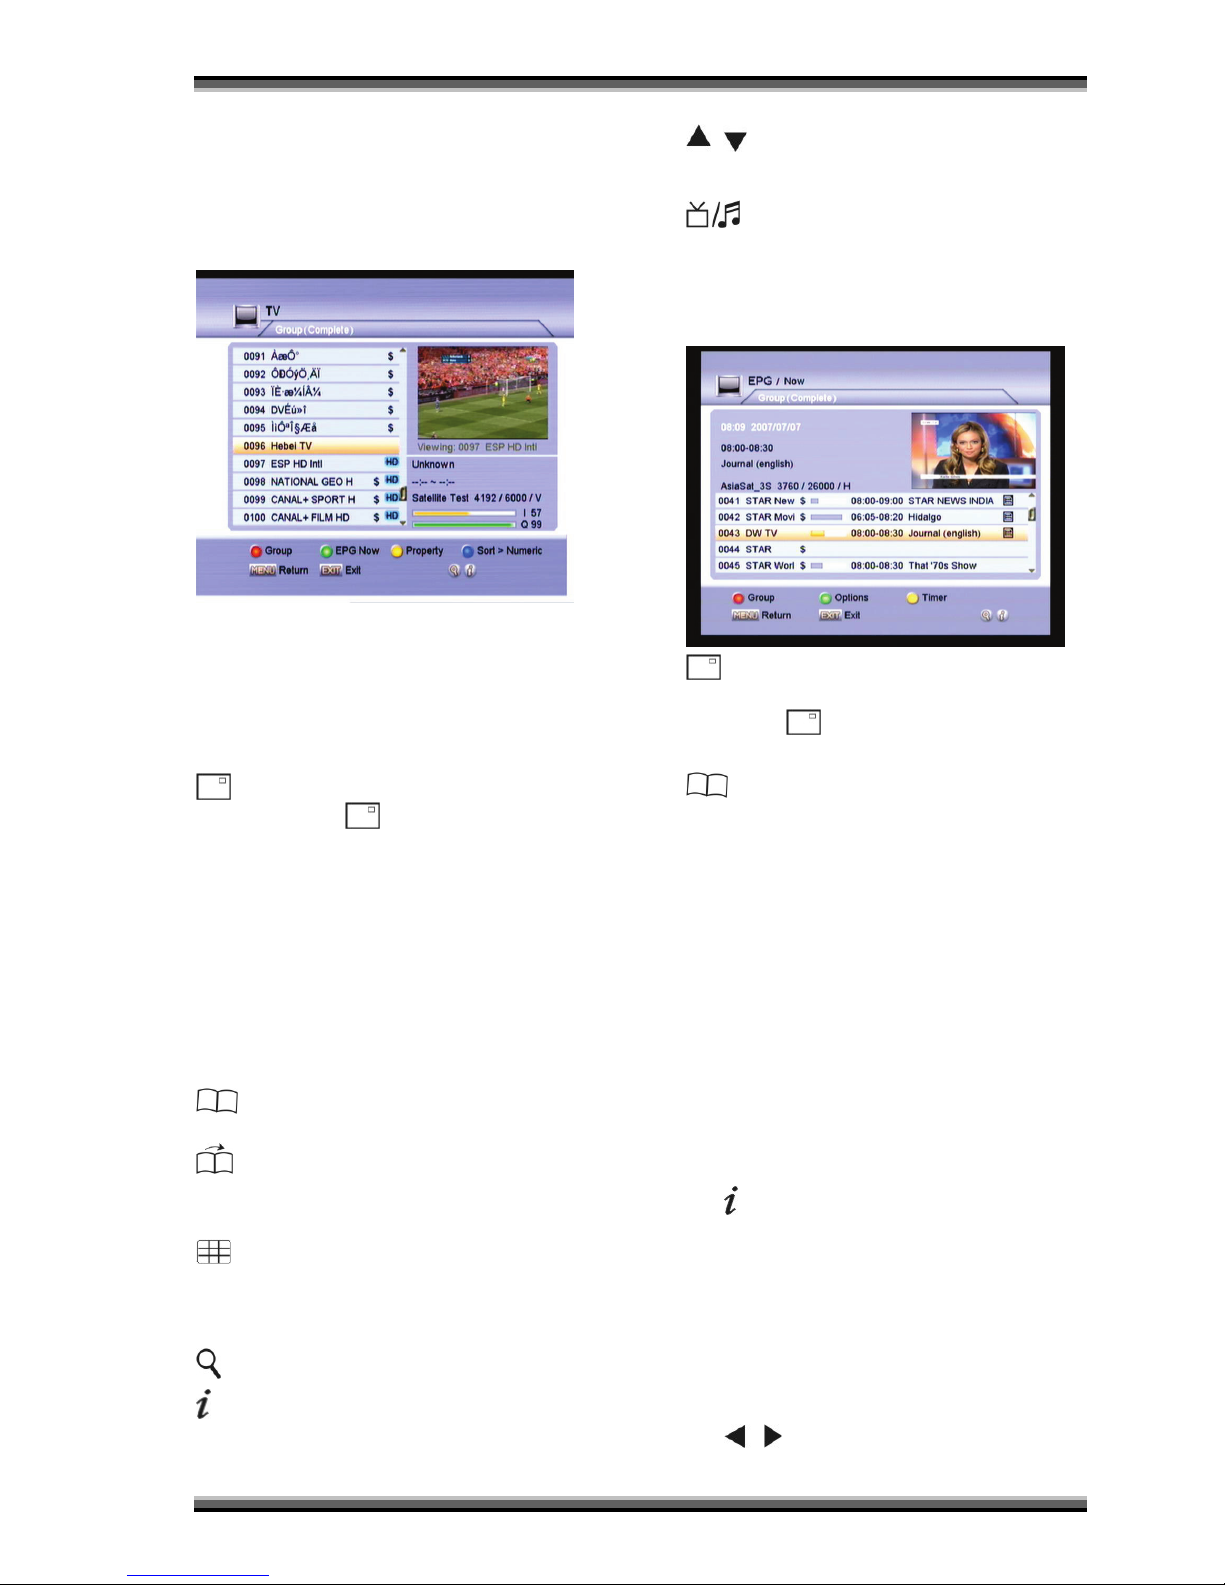
10.1. Ok list
Press “ OK ” to see the OK List. The OK List consists of
services belonging to current group with small video
window and associated information (servi ce name, TP,
satellite, scrambled symbol,HD sambol,current/next
EPG overview information if any) in the middle-right of
the menu.
By using some buttons in the service list, you can use
the functions as foll ows.
(Red) button: You can change the group of
services by pressing (Red) button.
Complete-- means list all services.
Satellite-- means list services belonging to certain
satellite you ch ose only.
Favorite-- means list services belonging to certain FAV
group you chose only.
Provider-- means list services belonging to certain
provider you chose only.
CAS-- means list services belonging to certain CAS you
chose.
HD-- means list services belonging to certain HD group
you chose.
(Green) button: view detail EPG information of
current service.
(Yellow) button: Enter the “Property” submenu,
in this menu you can set current service’s FAV, Lock or
Skip state, also y ou can Delete/Ren ame the current
service.
(Blue) button: Sort service list by service
No.(Numeric), service name(Abc), scrambled services
after free services(Free+CAS), free services after
scrambled services(CAS+Free) or one transponder by
one(TP).
button: Locate certain service by name quickly.
button: Display detail information of current service
(channel name, satellite & transponder, provider name
and CAS name, etc).
, , “ P+ , P- ” buttons: Browse the list, then
press “ OK ” button to switch the viewing service to the
highlight one.
button: change list from TV services to Radio
services or verse.
0~9 buttons: Switch to the certain service directly.
10.2. EPG
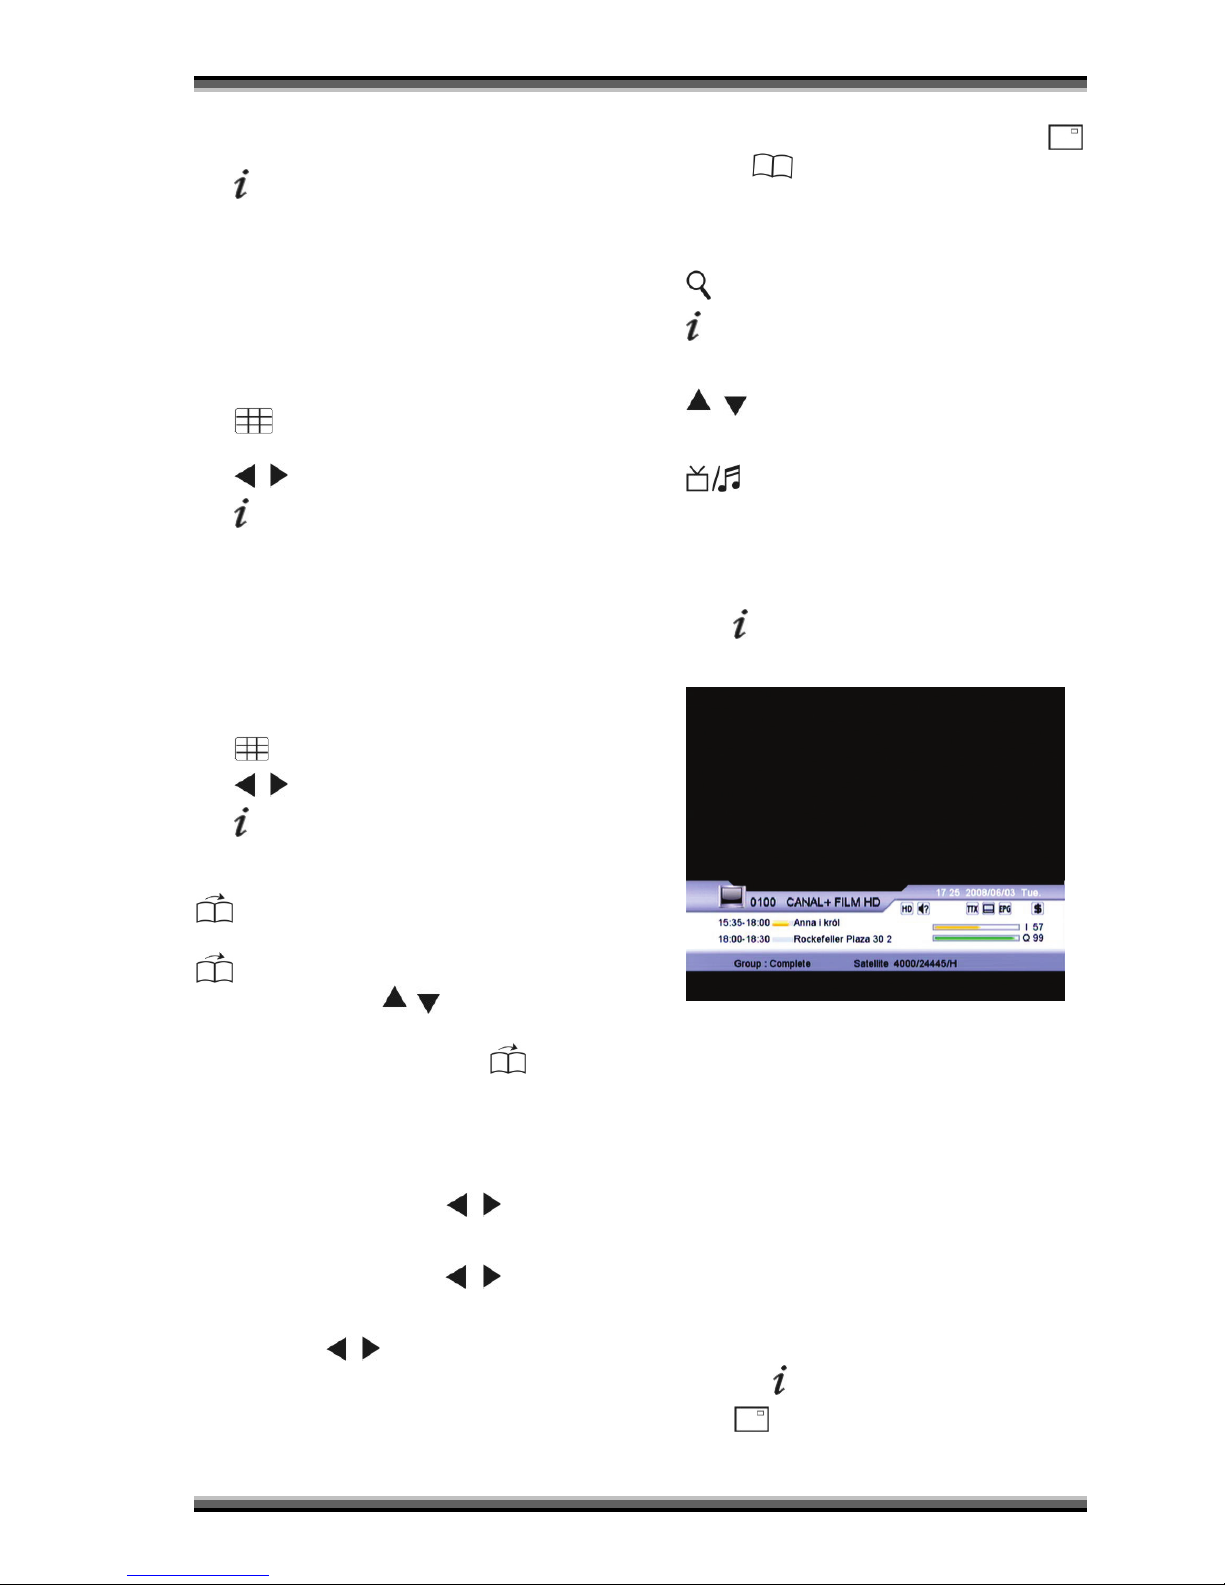
(Red) Group
It is very convenient to select the services by different
Groups using
(Red) button.
(Green) Options
You can selec t display mode of the EP G among Now,
Next, M ore, Sch edule and Genr e.
Now :
The menu displays as the following:
• Service list, Group information
• Current event name, duration, progress bar,
DETAIL icon if detail event information is available
• Small video window
Next:
The menu displays as the following:
• Service list, Group information
• Next event name, duration, DETAIL icon if detail
event information is available
• Small video window
•
button: view event detail information if it has a
DETAIL icon.
More:
The menu displays as the following:
• Service list, Group information
• Time bar with 1 hour as step
• Event name, duration, DETAIL icon if detail event
information is available
•
, button: switch the event information of
current service if any or skip the time with step of
Page 28
User manual
28
1 hours if there is no event information of current
service
•
button: view event detail information if it has a
DETAIL icon.
Schedule:
The menu displays as the following:
• Current service name, Group information
• Day bar for whole week, current day information
• Event name, durati on, DETAIL icon if detail event
information is available
•
button (Blue): select new service belonging
to current group
•
, button: switch current day of one week
• button: view event detail information if it has a
DETAIL icon
Genre:
The menu displays as the following:
• Current service name, Group information
• Day bar for whole week, current day information
• Event name, duration, DETAIL icon if detail event
information is available
•
button (Blue): select new genre
•
, button: switch current day of one week
• button: view event detail information if it has a
DETAIL icon
(Yellow) Timer
A. To insert new entry of Timer Setting, press
(Yellow) button. Select a mod e among Timer list
and HDD Recorder using
, buttons, then press “
OK ” button to enter the timer list .
In the timer list menu you can press
(Yellow)
button enter the timer configuration menu.
Service Name: Select the servi ce t o be reserved for
recording by pressing “ OK ” button.
Event Name: display the Event Name if it is available
on the program
Start Time: Selec t th e start tim e. , buttons and
numeric buttons are available.(consisted of date and
time)
Stop Time: Select the stop time. , buttons and
numeric buttons are available. (Consisted of date and
time)
Repeat: By using , or “ OK ” buttons, select one
among 1X, 1D, 1W, 1-5 and 6-7.
Timer Mode: Select a Timer Mode among VCR and
Service Change
B. In the timer list menu you can Using
(Red) or
(Green) buttons to Delet e or Modify the
entries of Timer selected by pressing “ OK ” button.
C. In the timer list you can Using “ P+ , P- ”
buttons to up or down pages if the Detail Information
more than one page.
button: Locate certain service by name quickly.
button: Display detail information of current service
(channel name, satellite & transponder, provider name
and CAS name, etc).
, , “ P+ , P- ” buttons: Browse the list, then
press “ OK ” button to switch the viewing service to the
highlight one.
button: change list from TV services to Radio
services or verse.
0~9 buttons: Switch to the certain service directly.
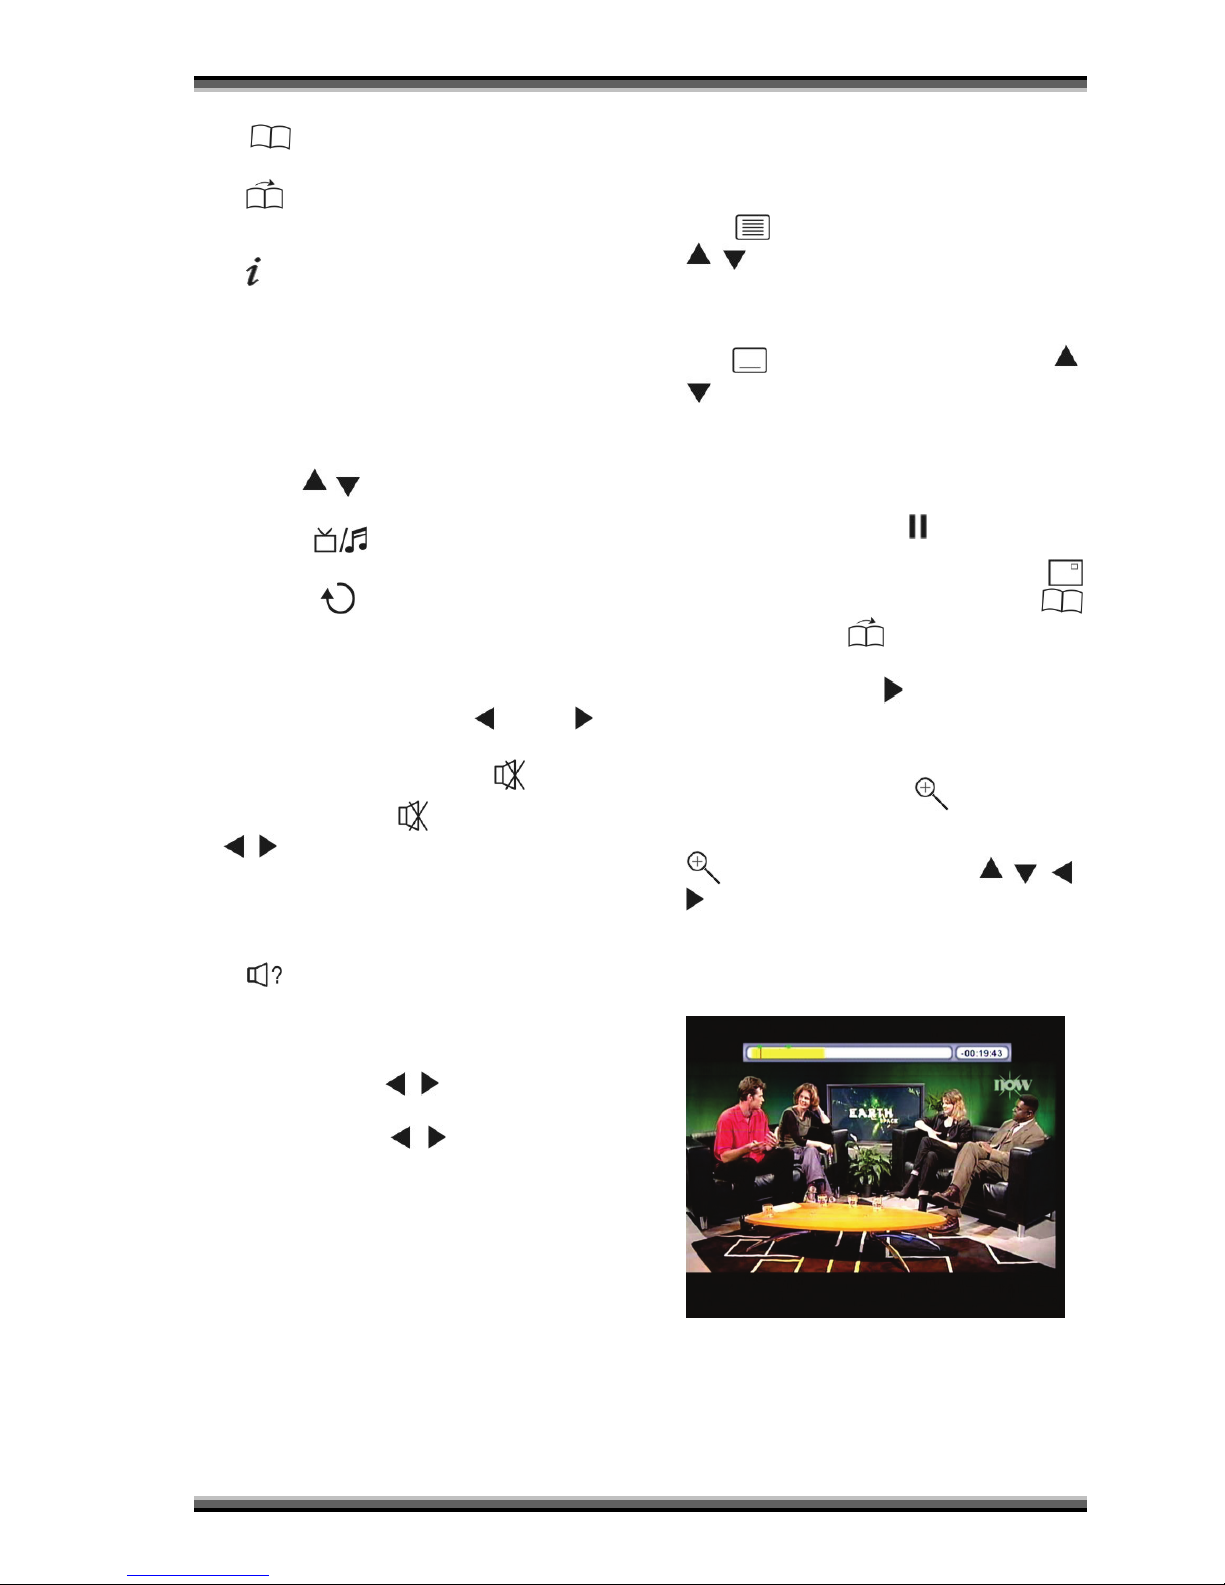
10.3. Information Box
Press button on the RCU or change services to see
the program and EPG information. The Information Box
displays as follows:
• Service Number
• Service Name
• Service Type (TV or Radio)
• Current Group
• Current Time and Date
• Current and Next Event Name
• Signal Level and Signal Quality Bar
• Subtitle, Teletext, EPG, Multifeed Audio,
Scrambling Service Symbol (These are
automatically displayed when the broadcasting
station provides appropriate information)
• Parental Lock
• FAV Symbol
• HD Symbol
If you press
button to enter this “Information Box”:
Press
(Red) button to choose the group to view
service (Complet e, Satellite, Favorite, Provider, CAS
and HD).
Page 29
User manual
29
Press (Green) button to check EPG detail
information page by page.
Press (Yellow) button to enable the “Property”
menu to set current service’s FAV, Lock or Skip state,
delete/rename cu rren t s ervice
Press
button to check service’s detail information
(Transponder, Provider name, CAS name, etc .)
10.4. Changing Services
To change servic es, there are 4 sets of buttons
available:
• Press the 0~9 buttons to input certain service No.
directly
• Press the
, button to browse servic e one by
one
• Press the
button to switch between TV
and Radio services
• Press the button to select th e previous
viewed service
10.5. Volume Control
To adjust the v olume level, use th e button or
button.
To temp orarily stop the v olume, press the
button.
To cancel mute, press the
button again or press
the
, buttons.
10.6. Sound track & Multifeed
Audio
Press button to enter “Audio” menu. You can
choose a language of soundtrack by when the
broadcaster supports various languages of audio. And
also for multifeed available services, it is possible to
choose one of the multilingual audio too.
At “Soundtrack” item, use
, , or “ OK ” button to
choose soundtrack among Left, Right and Stereo.
At “Multilingual” item, use
, or “ OK ” button to
choose the language of multilingual audio if any.
*Be noticed that the above setting is for current service
only. When new service is viewed, the soundtrack and
language settings will return to what was selected in the
viewing service.
10.7. Teletext & Subtitle
If the broadcaster supports Teletext or Subtitle, the
Teletext or Subtitle icon will be displayed on the
“Information Box”. There are VBI insertion mode and
soft emulation mode in Teletext. In the VBI insertion
mode, which is always on, you can watch the Teletext
with your TV using the RCU of your TV. To watch
Teletext with VBI insertion, your TV must support
Teletext. In the software emulation mode, you can
watch the Teletext using the RCU of PVR, event though
your T V does not support Teletext.
Press
button to setup and watch Teletext. Use
, and “ OK ” button to select the language of
multilingual Teletext or disable Teletext display by using
“ EXIT ” or “ MENU ” button.
Press button to setup and watch Subtitle. Use ,
and “ OK ” button to select the language of
Multilingual Subtitle or disable Subtitle display by using
“ EXIT ” or “ MENU ” button.
10.8. Pause & Resume
To pause the live video, press button, you can save
this picture by pressing “ F1 ” button, and th en you can
use this picture as boot background by press
(Red) button or as Radio background by press
(Green) button, press
(Yellow) button to load the
default picture.
To resume the video, press
button.
10.9. Zoom
To zoom the live video, press button. There are
four modes: “Zoom 1X”, “Zoom 4X”, “Zoom 9X” and
“Zoom 16X”. You can switch the modes by pressing
button one by one times and using , , ,
buttons to change the vi ew area.
10.10. Time Shift (optional, only
for PVR ready receivers)
To use Time Shift function, the Time Shift option
should be enable.
To find the Time Shift option menu, follow the steps
below.
Main Menu PVR Time Shift E nable ON
Page 30
User manual
30
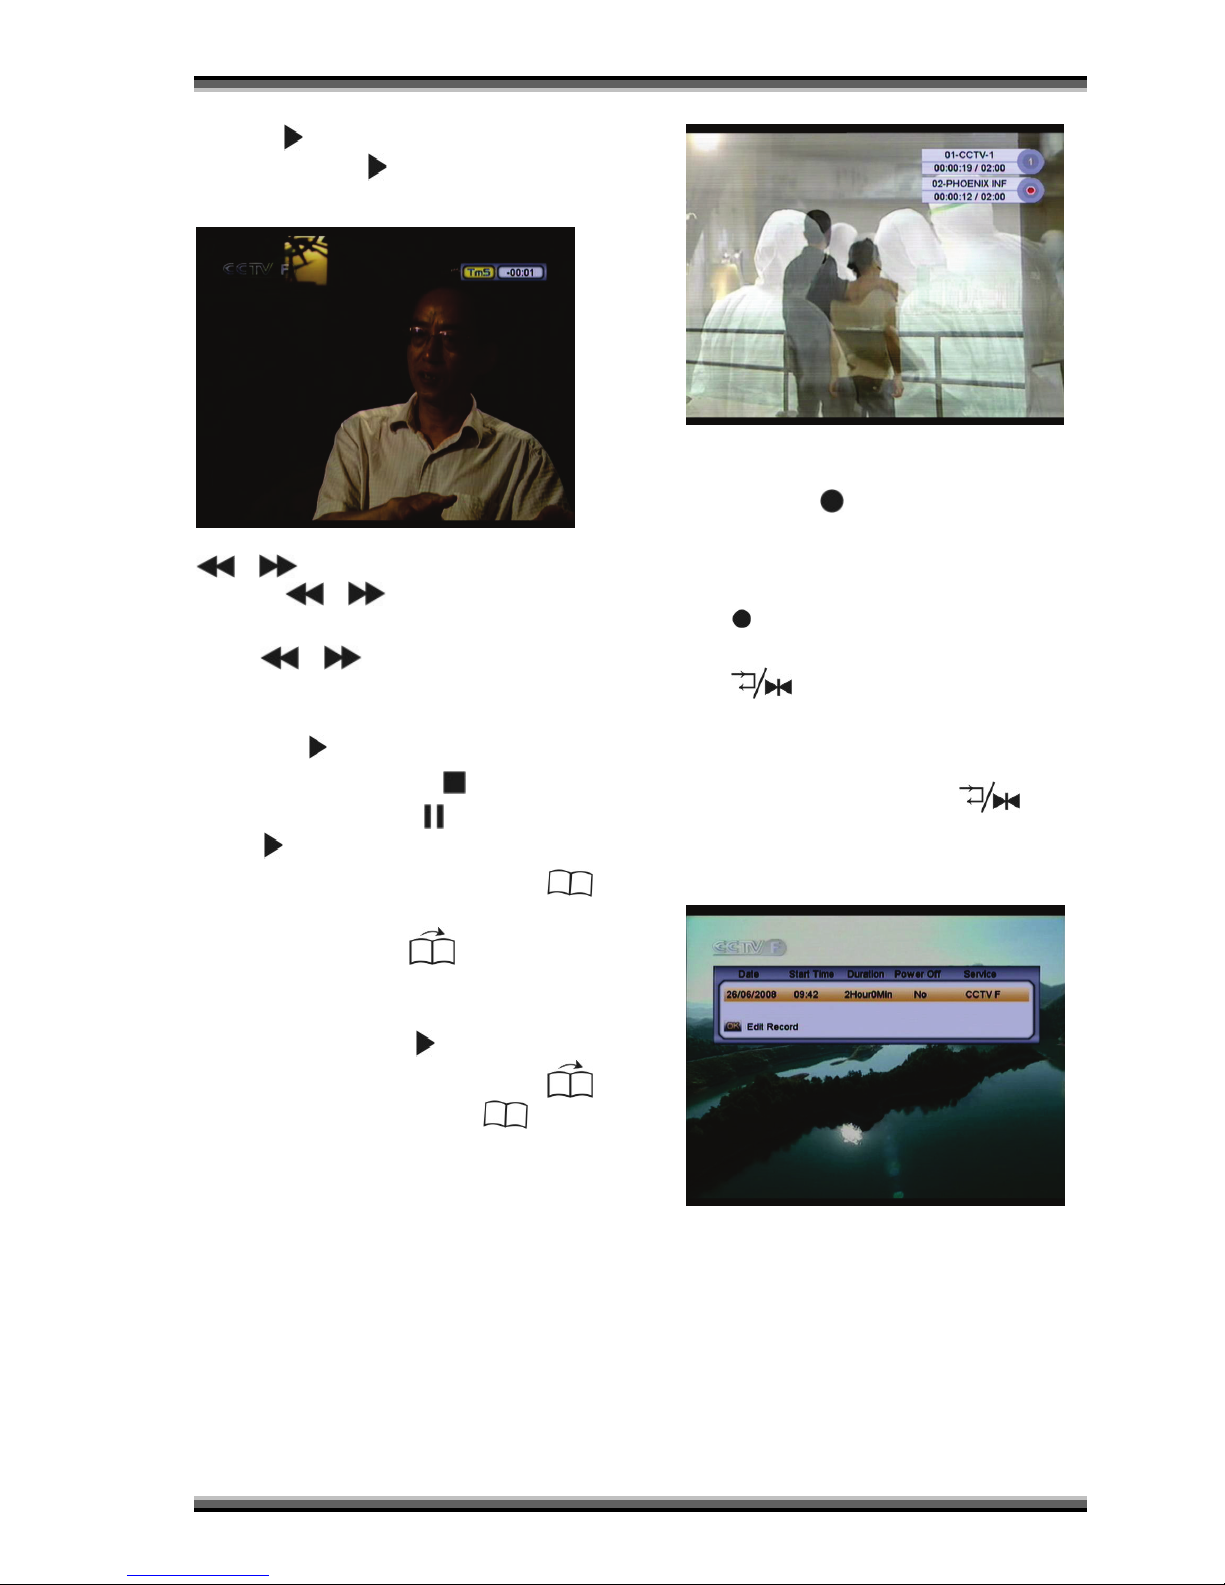
Press button to display Time Shift progress
bar. You have to press
button once more to display
Time Shift progress bar during Trick mode. (such as
Fast F orward, R evers e Pl ayback, Slow m otion)
To go to the desired playback position, press
or button, the PVR plays every 20 seconds
by pressing
or button. This function is valid
while the Time Shift progress bar is long displayed.
When the time shift progress bar is small displayed, you
can use
or button to decelerate or quicken
up playing(-2,-4,-8,-16,-32,-64,-128,2,4,8,16,32,64,128)
than normal.
To remove th e Time Shift progress bar at onc e,
press “EXIT” or button.
To go to the live video, press button.
To Pause the video press button, press ”EXIT”
button or
button to quit pausing.
To add a bookmark, press Bookmark
(Green) button at the position you want to add it.
Press Go to bookmark (Yellow) button to
jump to the next bookmark. Then the PVR plays from
the book marked position.
To remove a bookmark, you have to disp lay the
progress bar by pressing
button. Select the
bookmarked position by Go to bookmark
(Yellow) button and press bookmark (Green)
button.
10.11. Recording, Edit the
reserved delayed Recording
(optional, only for PVR Ready
receivers)
To record services, refer t o the following steps, there
are three kinds of recording references. You can record
maximum 2 services at the same time.
10.12. Immediate Recording by
RECORD button (optional,
only for PVR Ready receivers)
Recording
Press button to record the service you are watching.
To specify the stop time, go to Record Edit window and
modify Duration item. To go to the Record Edit window,
press
(White) button, or go to the record list in
main menu.
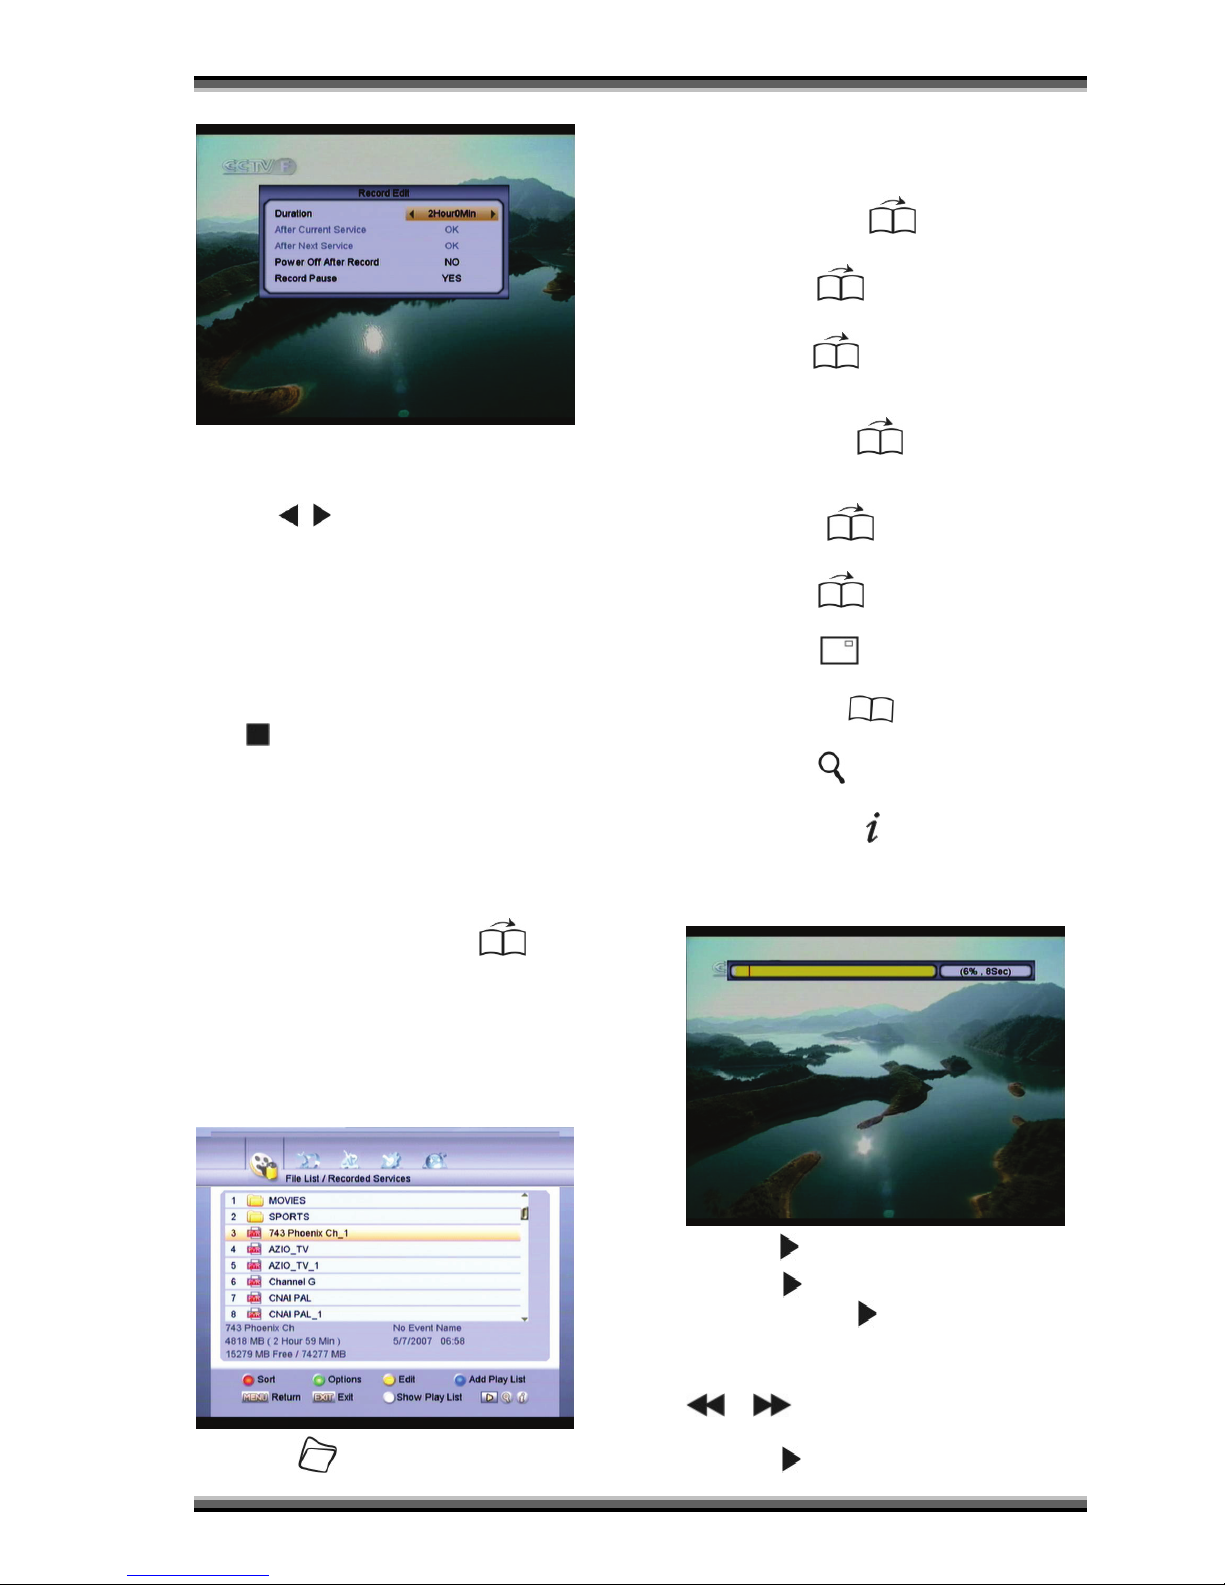
Record Edit
To see Record Edit menu, press (White)
button and than press “OK” button, or g o to th e record
list in main menu. You can modify the parameters of the
recording.
Page 31
User manual
31
A. Duration
To change the duration of the recording time,
press
, or numeric buttons.
B. Power Off After Record
Power off the PVR aft er recording stopped.
C. Record Pause
To pause recording, select YES.
To rest art recording, select NO.
Stop record
Press button and select the service to stop the
Recording by press “OK” button.
10.13. Recording by EPG
(optional, only for PVR Ready
receivers)
Press “EPG” button to display EPG. Select a service
that you w ant to rec ord, and press
(Yellow)
button to enter Timer Configuration menu. For more
information please refer to EPG/ Timer in this manual.
10.14. Playback a Recorded
Service (optional, only for PVR
Ready receivers)
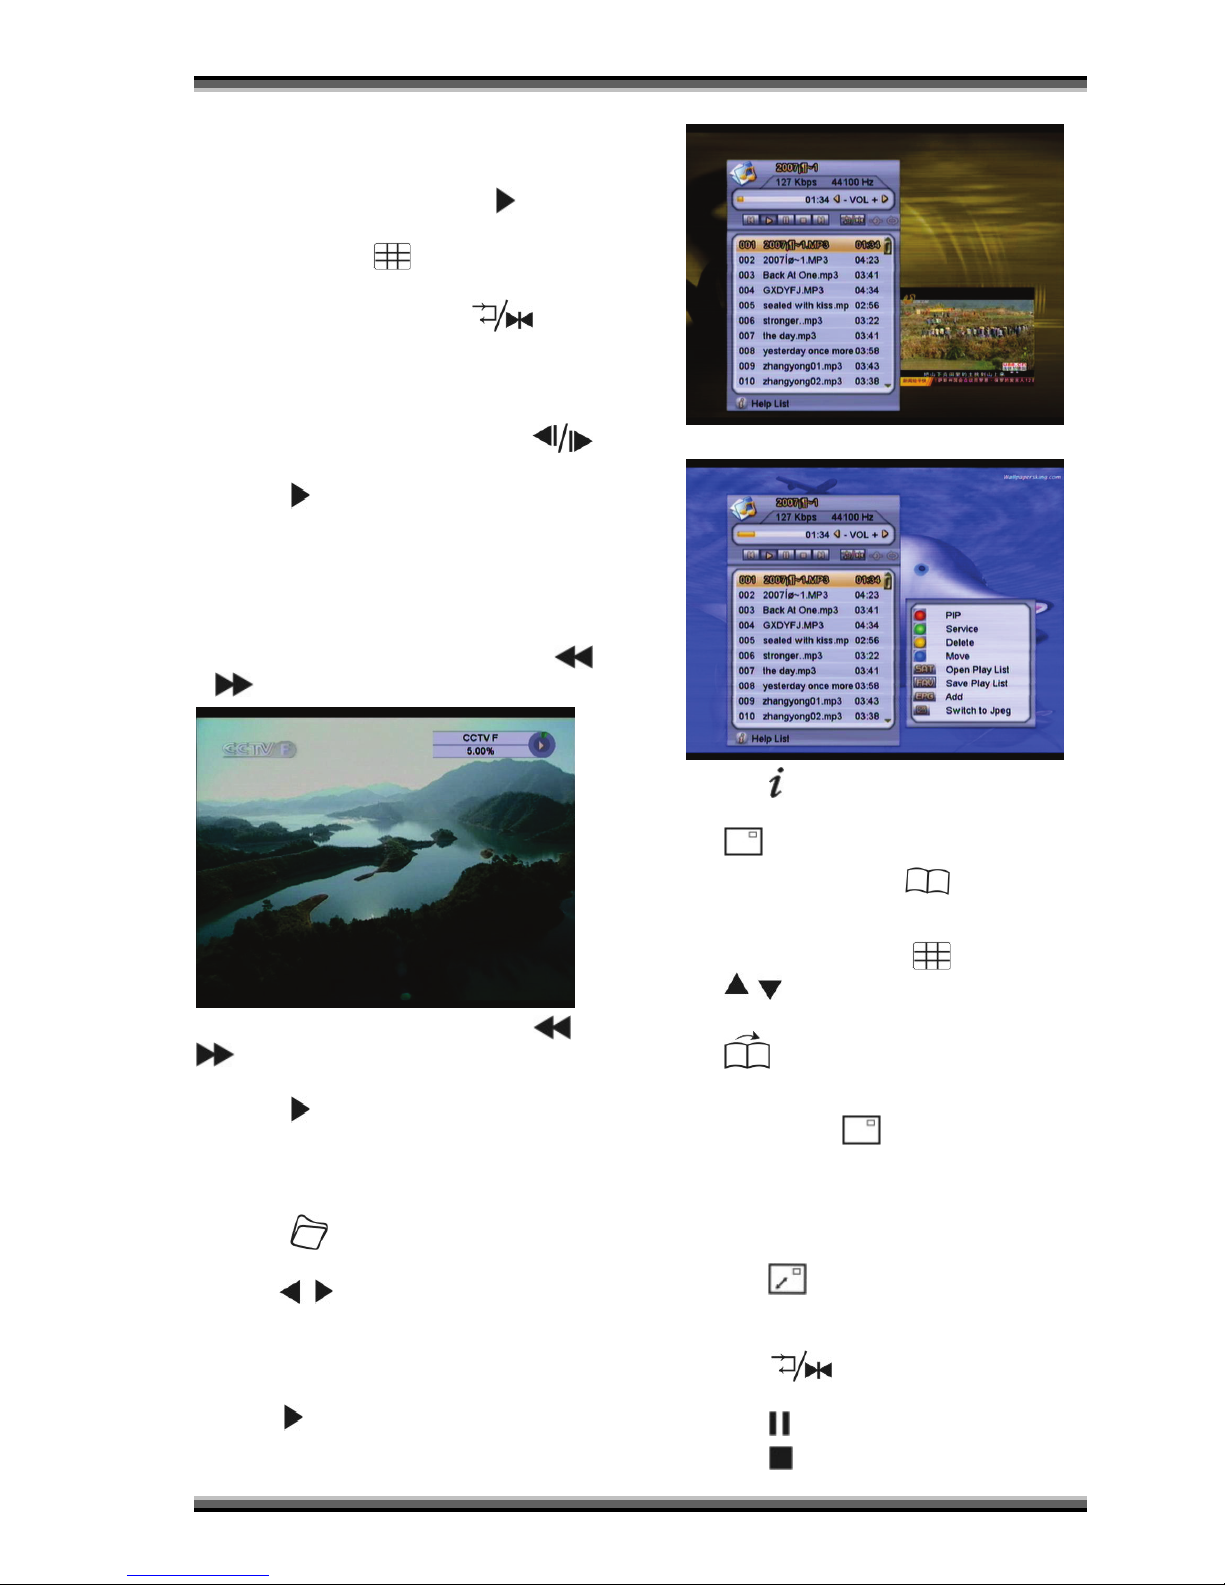
Press button to display the recorded
service list.
You can use several useful editing function at
Recorded Services as followings.
A. New folder: press
(Yellow) button sel ect
New folder to make new folder.
B. Copy:Press (Yellow) button select Copy to
copy the document to other logic disk.
C. Cut: Press
(Yellow) button select Cut to
remove the document to other logic disk(don't
save original document).
D. Rename: Press
(Yellow) button sel ect
Rename to r enam e the recorded servi ce or the
folder.
E. Delete: Press
(Yellow) button select Delete
to delete the recorded services or folders.
F. Lock: Press
(Yellow) butt on sel ect Lock to
lock the recorded services or folders.
G. Sort: Press
(Red) button to Sort by File
Name, Data, Size or L ock.
H. Options: Press (Green) button to select
the record ed services by diff erent typ es.
I. Find: Press
button to found the services by
name.
J. Event Info: Press
button to display extended
event information.
Select a recorded service at the list.
Press button to start playb ack.
Press
button to display Time Shift progress
bar. You have to press
button once more to display
Time Shift progress bar during Trick mode. (such as
Fast F orward, R evers e Pl ayback, Slow m otion)
To go to the desired playback position, press
or button. This function is valid while the
progress bar is displayed.
Press button into Trick mode, you can enter
Page 32
User manual
32
the position by percent with numeric button of RCU, the
playback position will be moved to the point.
Press “OK” button to select th e servi ces among
the rec orded services list and press
button to
playback the multi-services in sequence automatically.
You can press
(Blue) button add the
selected services into Play List.
Show the Play List by press
(White)
button.
10.15. Slow Motion Playback
To playback in slow motion, press the
button.
Press button to resume playback with normal
speed.
The slow motion function is available for the
playback and the time shift playback.
10.16. Fast Motion Playback
If there is a Time Shift or Playback, Press
or
button for fast motion playback.
To change the playb ack speed , press or
button repeatedly, there 7 steps (2, 4, 8, 16, 32,
64, 128) in fast motion playback.
Press button to resume playback with normal
speed.
10.17. MP3 Player
Press button to display the recorded
services list.
Press
, buttons to go to MP3 list.
The useful editing function please refer to above
Playback a Recorded Service.
Select one or more MP3 files by press “OK”
button in the list.
Press
button to start MP3 Player, or press
“OK” button on MP3 Player in the PVR menu.
Press button to display Help Information:
A. PIP--Display the video in sub-picture by press
(Red) button.
B. Service--You can press
(Green) button to
change the service of sub-picture.
C. Move--You can move s elect ed songs to the
desired position by using
(Blue) button and
, buttons.
D. Delete --To delete the selected songs by pressi ng
(Yellow) button.
E. Save Play List -- To save the current list by press
”FAV” button. You can edit the Path, the File
Name and press
(Red) button to save.
F. Open Play List-- Open the Play List saved before
by using “SAT” button.
G. Add-- You can Add the selected songs into
current play list by using “EPG” button.
H. Switch to Jpeg-- Switch to JPEG Player please
press button.
This function is available only the MP3 Player and
the JPEG Player played at the same time.
Press (White) button to change the type
of circulation.
Press
button to pause the MP3 play.
Press button to exit the MP3 player.
Page 33
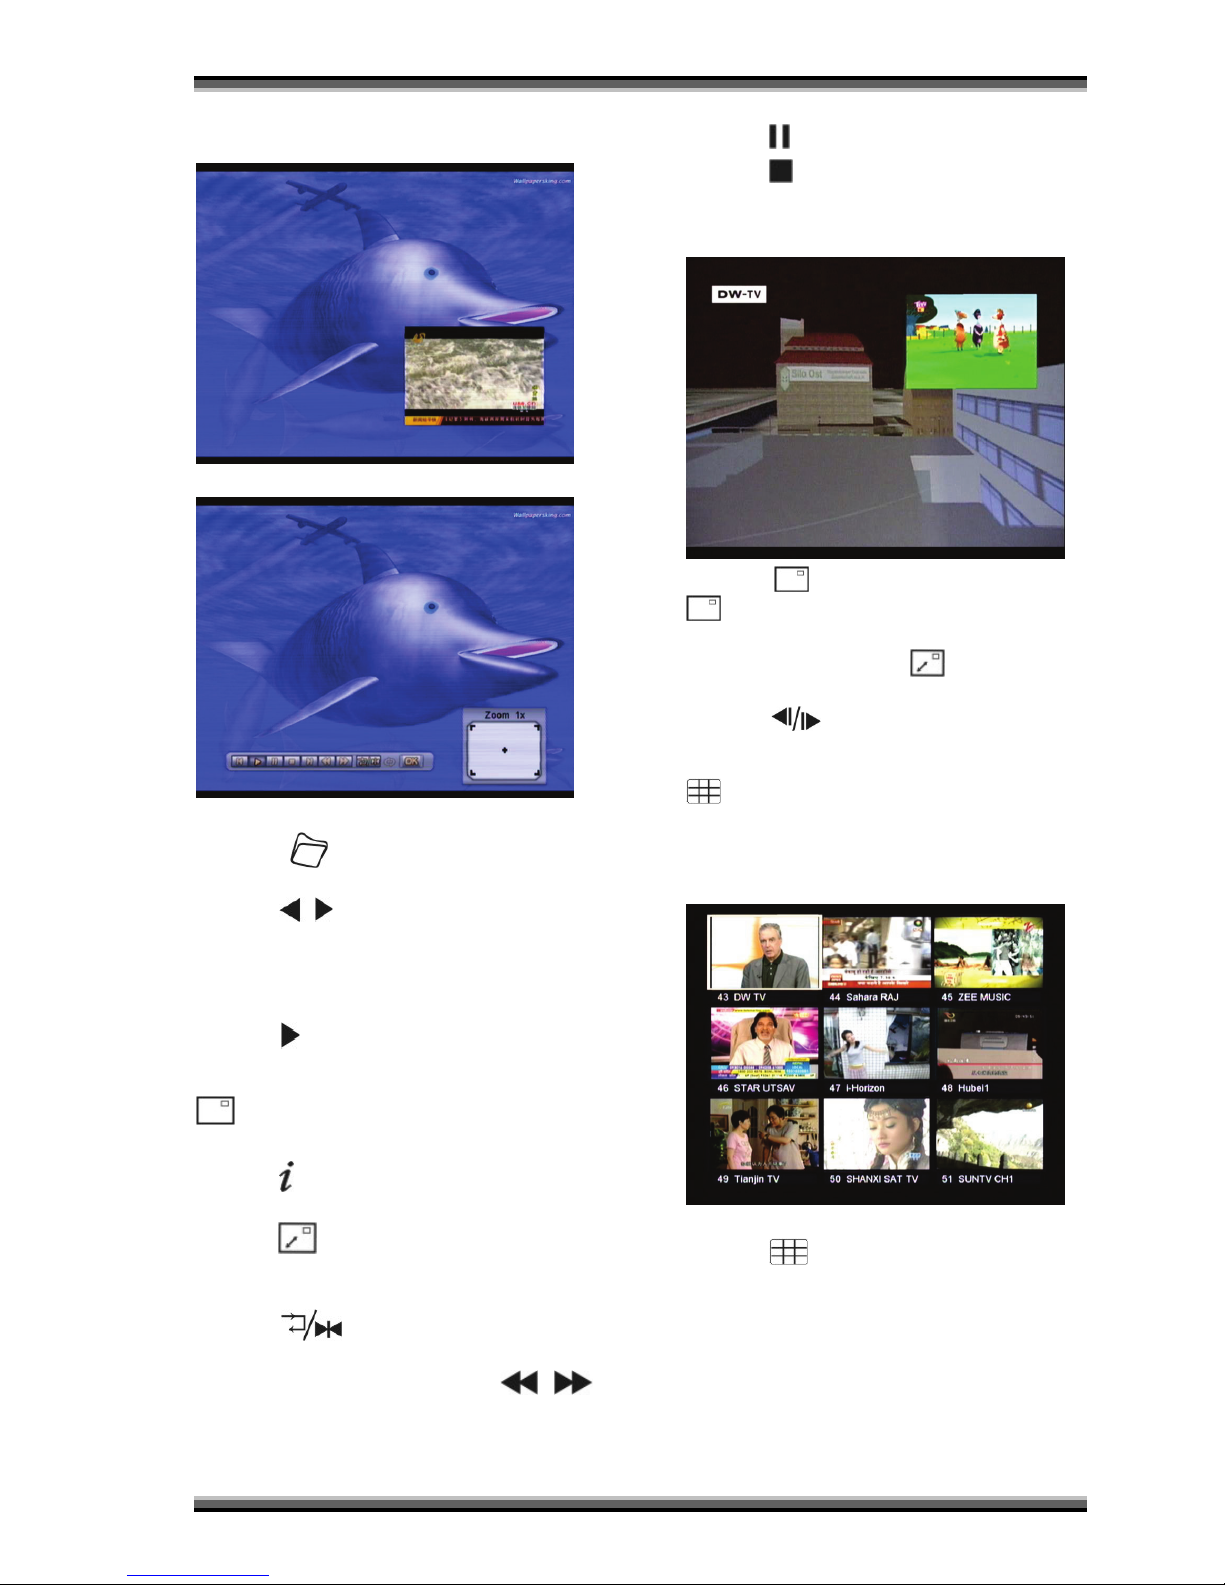
User manual
33
10.18. JPEG Player
Press
button to display the recorded
services list.
Press
, buttons to go to Image list.
The useful editing function please refer to above
Playback a Recorded Service.
Select one or more Image files by press “OK”
button in the list.
Press
button to st art JPEG Player .(add player
picture)
PIP--Display the video in sub-picture by press
(Red) button.
(add player picture)
Press
button to display Help Information:
A. Switch to MP3 --Switch to MP3 Player please
press button.
This function is available only the MP3 Player and
the JPEG Player played at the same time.
B. Press (White) button to change the type
of circulation.
C. To Rotat e the picture, please press
,
buttons.
D. Press “OK” button to zoom the picture(zoom 1x,
zoom 4x, zoom 9x, zoom 16x)
Press
button to pause the JPEG play.
Press button to exit the JPEG player.
10.19. Picture In Picture (PIP)
Press
(Red) button to display PIP. Press
(Red) button repeatedly to change the size of sub-
picture or to remove the sub-picture.
At PIP screen, press
button (Red) to
exchange main-picture with sub-picture.
Press
button to m ove th e posi tion of sub-
picture.
To display the service list of sub-picture, press
(Blue) button.
10.20. Multi-Picture Display
Press
button (Blue) to display Multi-Picture.
There are 4 modes (4 Picture, 9 Picture, 13
Picture, 16 Picture) to be selected.
Press “ EXIT ” button to resume displayed with the
normal mode.
Page 34

User manual
34
11. Software Upgrade
The HD Receiver has stable and convenience software
to use. But, to improve the HD Receiver the new
software of the HD Receiver may be released.
Whenever a problem is found or functions are added or
modified, the software in the HD Receiver has to be
upgraded to enjoy better function.
There are s ome methods to download the new
software.
Receiver to Receiver upgrade via RS232.
It is possible to upgrade the soft ware or service
data from Receiver to another Receiv er.
PC to HD Receiver upgrade via RS232
You need the PC upgrade tool
(AVUpgrade_ST7100.exe) to upgrade the
software.
Start upgrade at PC and turn on the HD Receiver .
Internet
You can upgrade the software from network via
LAN port.
USB Hard Disk
You can upgrade the software from USB hard
disk.
For more information, r efer to the chapter System/
Upgrade in this manual.
Page 35

User manual
35
12. Trouble Shooting
Problem Solution
About HD Receiver
No display VFD on
the front panel.
No power supply
Check the main power cable and check that it is
plugged into a suitable power outlet.
Check whether HD Receiver is in Standby mode.
No Picture
Ensure that the HD Receiver is switched on.
Check the video output port (SCART) is firmly
connected to
the TV or VCR.
Check that you have selected the correct channel or
Video
on your TV.
Check the brightness level of the TV
Poor picture quality
See “No Picture” above.
Check the signal level, if this is low then try adjusting
the alignment of your dish.
No Sound
See “No Picture” above.
Check the volume level of the TV and HD Receiver
Check the mute status of the TV and HD Receiver
Remote Control
does not operate
Point remote control directly towards the receiver.
Check and replace batteries.
Check that nothing blocks the front panel.
On-Screen Error Messages
No or Bad Signal
Check the LNB, replace LNB if necessary.
Check the cable from the LNB.
Check the position of the dish, realign dish if
necessary.
If you are using a DiSEqC 1.0 , check that you have
connected the LNBs to the correct connections on the
switch..
Check the “Signal Level” and “Signal Quality ”.
Service Search
No Signal
See “No or Bad Signal” above.
DiSEqC 1.0
Check that you have connected the LNBs to correct
connections on the switch..
Check that you have set the connected Setting in the
Installation menu.
DiSEqC 1.2
Check that you have selected this in the Installation
menu.
Check that the dish is aimed at the correct satellite.
Page 36
User manual
36
13. Specifications
SYSTEM RESOURCES
Main Processor 400 MIPS based CPU
Flash Memory 8Mbytes
DDR SDRAM 1024+512Mbits
TUNER/CHANNEL
Input Connector F-type, Connector, Female
Loop Through F-type, Connector, Female
Signal Level -65 to -25 dBm
LNB Power &
Polarization
Vertical: +13V/+14V
Horizontal: +18V/+19V
Current: Max. 500mA
Overload Protection
22KHz Tone Frequency: 22±1KHz
DiSEqc Control
Amplitude: 0.6±0.2V
Version 1.0, 1.1 1.2, USALS Available
Demodulation QPSK, 8PSK
Input Symbol Rate
2-45 Mbps, Convolution Code Rate
1/2, 2/3, 3/4, 5/6, 7/8 and Auto
POWER SUPPLY
Input Voltage Free Voltage (100~250V AC, 50/60Hz)
Power Consumption 40W MAX
MPEG TS A/V Decoding
Transport Stream MPEG-2, H.264
Input Rate Max.120Mbit/s
Aspect Radio 4:3, 16:9, Letter Box
Video Decoding 1920X1080i
Video Resolution 720*576[PAL] / 720*480[NTSC]
Audio Decoding MPEG-1 Layers 1/2, Dolby AC-3
Audio Mode Left / Right / Stereo
Sampling Rate 32, 44.1 and 48KHz
Page 37
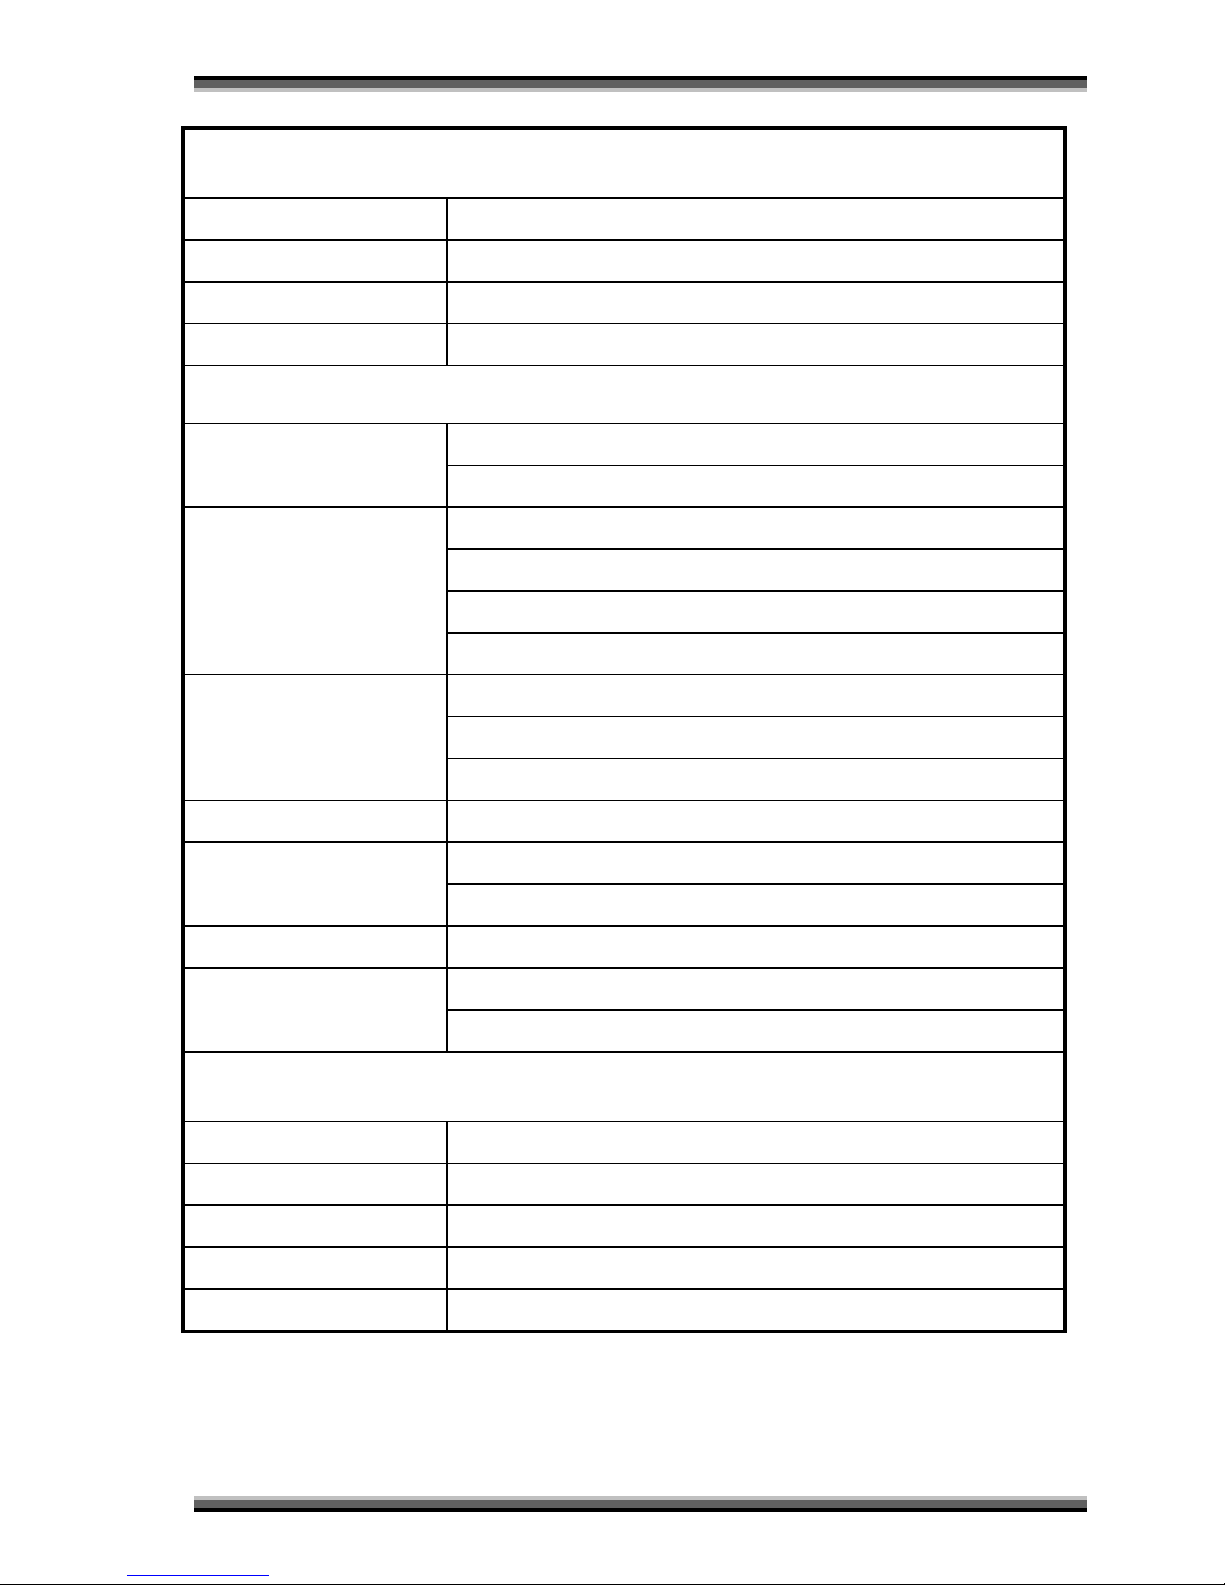
User manual
37
RF-Modulator (Optional)
PLL type CH21~69 for the Demodulation
TV Standard PAL BG/I/DK selectable
RF Connector 75 Ohms, Male/Female
Frequency Range UHF : 470~860MHz
A/V & DATA INPUT/OUTPUT
TV-SCART
Video CVBS/RGB output
Audio L/R output
VCR-SCART
Video CVBS output
Audio L/R output
Video CVBS, RGB input
Audio L/R input
RCA A/V
1x YPbPr output
Video CVBS output
Audio 2x L/R output
S/PDIF Optical Coaxial, Digital Audio or Dolby AC-3 Bit Stream Output
RS-232C
Transfer rate 115.2Kbps
9 pin D-sub Type
USB One USB 2.0 slot Compatible for
HDMI
VER1.2
Type A
PHYSICAL SPECIFICATION
Size[W*H*D] 360mm X 266mm X65mm
Net Weight 2.49 kg
Operation Temperature
0℃~+45℃
Storage Temperature
-10℃~+70℃
Storage Humidity 5%~95% RH (Non-Condensing)
Page 38
User manual
38
14. Declaration of conformity
The manufacturer herewith declares the conformity of that product with the following
directives
and standards:
Low Voltage Directive 2006/95/EG
EN 60065:2002+A1:2006
EMC Directive 2004/108/EG
EN 55 013:2001+A1:2003+A2:2006
EN 55 020:2007
EN 61 000-3-2:2006
EN 61 000-3-3:1995+A1:2001+A2:2005
Model: Digital Satellite Receiver DVB-S
 Loading...