

Globecar motorhome, Globescout, Globescout Style, Roadscout, Campscout Instruction Manual
...
Instruction manual
Motorhome - 02/11-0 - GLO-MJ11-00EN
© 2011 Pössl Freizeit und Sport GmbH, Ainring
Instruction manual
Congratulations
We congratulate you on your new Globecar motorhome and would like to thank you for choosing a quality
product from us.
Whatever journey you are planning - you will always have the perfect companion with a Globecar motorhome:
whether it is a city break, a short trip or a family holiday. The innovative and well-thought out floor plans offer
you a variety of options and the contemporary interior design in all our models gives off a homely atmosphere.
You will be amazed at the high standard of quality and all the variations available - space problems are a thing
of the past in our vehicles. Many practical details will prove extremely useful when on the road and will allow
you to relax even more on your holiday.
Each Globecar vehicle is manufactured with great care and the quality is closely checked. This ensures that
our products have a long service life.
This instruction manual primarily contains information on how to dismantle the living area of your motorhome.
It will give you all important information and tips so that you can enjoy all technical advantages of your
motorhome to the full. We have also included a chapter on maintenance - and thus on the conservation of
value.
In addition, you will find the documents on the base vehicle and the various built-in appliances.
For maintenance work or whenever you need some help, please always get in touch with your Globecar dealer.
They know your vehicle best of all, and will meet all your requests fast and reliably.
We wish you a lot of fun with your motorhome, a relaxing holiday and safe driving at all times.

Motorhome - 02/11-0 - GLO-MJ11-00EN
Instruction manual

3Motorhome - 02/11-0 - GLO-MJ11-00 EN
Contents
1 Records. . . . . . . . . . . . . . . . . . . . . . . 5
1.1 Vehicle document . . . . . . . . . . . . . . . . . 5
1.2 Warranty . . . . . . . . . . . . . . . . . . . . . . . . 5
1.3 Inspection records. . . . . . . . . . . . . . . . . 6
1.4 Inspection plan . . . . . . . . . . . . . . . . . . . 7
2 Introduction. . . . . . . . . . . . . . . . . . . 9
2.1 General . . . . . . . . . . . . . . . . . . . . . . . . 10
2.2 Environmental tips. . . . . . . . . . . . . . . . 10
3 Safety . . . . . . . . . . . . . . . . . . . . . . . . 13
3.1 Fire prevention . . . . . . . . . . . . . . . . . . 13
3.1.1 Avoidance of fire risks . . . . . . . . . . . . . 13
3.1.2 Fire-fighting . . . . . . . . . . . . . . . . . . . . . 13
3.1.3 In case of fire. . . . . . . . . . . . . . . . . . . . 13
3.2 General . . . . . . . . . . . . . . . . . . . . . . . . 13
3.3 Road safety. . . . . . . . . . . . . . . . . . . . . 14
3.4 Towing. . . . . . . . . . . . . . . . . . . . . . . . . 15
3.5 Gas system . . . . . . . . . . . . . . . . . . . . . 15
3.5.1 General information. . . . . . . . . . . . . . . 15
3.5.2 Gas bottles . . . . . . . . . . . . . . . . . . . . . 17
3.6 Electrical system . . . . . . . . . . . . . . . . . 17
3.7 Water system . . . . . . . . . . . . . . . . . . . 17
4 Before the journey . . . . . . . . . . . 19
4.1 Payload . . . . . . . . . . . . . . . . . . . . . . . . 19
4.1.1 Terms . . . . . . . . . . . . . . . . . . . . . . . . . 19
4.1.2 Calculating the payload. . . . . . . . . . . . 20
4.1.3 Loading the vehicle correctly. . . . . . . . 21
4.2 Entrance step . . . . . . . . . . . . . . . . . . . 22
4.2.1 Electrically operated entrance step . . . 22
4.3 Television . . . . . . . . . . . . . . . . . . . . . . 22
4.4 Road safety. . . . . . . . . . . . . . . . . . . . . 23
5 During the journey . . . . . . . . . . . 25
5.1 Driving the motorhome . . . . . . . . . . . . 25
5.2 Driving speed . . . . . . . . . . . . . . . . . . . 25
5.3 Seat belts . . . . . . . . . . . . . . . . . . . . . . 26
5.3.1 Using the safety belt correctly . . . . . . . 26
5.4 Driver's seat and front passenger's
seat . . . . . . . . . . . . . . . . . . . . . . . . . . . 26
5.4.1 Seats (Aguti) . . . . . . . . . . . . . . . . . . . . 27
5.4.2 Seats (ISRI). . . . . . . . . . . . . . . . . . . . . 28
5.5 Seating arrangement. . . . . . . . . . . . . . 29
5.6 External doors. . . . . . . . . . . . . . . . . . . 29
5.7 Filling up with diesel . . . . . . . . . . . . . . 30
6 Pitching the motorhome . . . . . 31
6.1 Handbrake. . . . . . . . . . . . . . . . . . . . . . 31
6.2 Entrance step . . . . . . . . . . . . . . . . . . . 31
6.3 230 V connection . . . . . . . . . . . . . . . . 31
6.4 Refrigerator . . . . . . . . . . . . . . . . . . . . . 31
6.4.1 Absorption refrigerator . . . . . . . . . . . . 31
6.4.2 Compressor refrigerator . . . . . . . . . . . 31
7 Living . . . . . . . . . . . . . . . . . . . . . . . . 33
7.1 External flaps . . . . . . . . . . . . . . . . . . . . 33
7.1.1 Flap for 230 V connection, square . . . . 33
7.1.2 External flap Thetford cassette . . . . . . 34
7.1.3 Cap for the fresh water filler neck . . . . 34
7.2 Ventilation . . . . . . . . . . . . . . . . . . . . . . 35
7.3 Windows . . . . . . . . . . . . . . . . . . . . . . . 35
7.3.1 Hinged window with rotary hinges . . . . 36
7.3.2 Hinged window with automatic hinges. 38
7.3.3 Sliding window without lock . . . . . . . . . 39
7.3.4 Blind and roller insect screen. . . . . . . . 40
7.3.5 Roman shades for driver's window
and front passenger's window . . . . . . . 40
7.3.6 Blind for the windscreen . . . . . . . . . . . 41
7.4 Skylights . . . . . . . . . . . . . . . . . . . . . . . 41
7.4.1 Skylight with snap latch . . . . . . . . . . . . 42
7.4.2 Hinged skylight . . . . . . . . . . . . . . . . . . 42
7.4.3 Wind-up skylight . . . . . . . . . . . . . . . . . 44
7.4.4 Multifunction skylight . . . . . . . . . . . . . . 45
7.5 Rotating the seats . . . . . . . . . . . . . . . . 46
7.6 Bench seat. . . . . . . . . . . . . . . . . . . . . . 47
7.7 Tables . . . . . . . . . . . . . . . . . . . . . . . . . 47
7.7.1 Suspension table with fold-out leg . . . . 47
7.7.2 Suspension table with dismantable
support leg . . . . . . . . . . . . . . . . . . . . . . 48
7.7.3 Fixed table of the rear seating group . . 50
7.7.4 Swivel table . . . . . . . . . . . . . . . . . . . . . 51
7.7.5 Folding table . . . . . . . . . . . . . . . . . . . . 52
7.8 Lamps . . . . . . . . . . . . . . . . . . . . . . . . . 52
7.8.1 Halogen spotlight (movable) . . . . . . . . 53
7.8.2 Halogen spotlight . . . . . . . . . . . . . . . . . 53
7.8.3 Lamp in pop-up roof. . . . . . . . . . . . . . . 54
7.9 Beds. . . . . . . . . . . . . . . . . . . . . . . . . . . 54
7.9.1 Fixed bed . . . . . . . . . . . . . . . . . . . . . . . 54
7.9.2 Bed in the pop-up roof . . . . . . . . . . . . . 56
7.10 Converting seating groups for
sleeping . . . . . . . . . . . . . . . . . . . . . . . . 57
7.10.1 Seating group rear . . . . . . . . . . . . . . . . 57
7.10.2 Front seating group . . . . . . . . . . . . . . . 58
7.10.3 Facing seating unit with extension . . . . 59
7.10.4 Front seating group with extension . . . 60
8 Gas system. . . . . . . . . . . . . . . . . . . 61
8.1 General . . . . . . . . . . . . . . . . . . . . . . . . 61
8.2 Gas bottles. . . . . . . . . . . . . . . . . . . . . . 62
8.3 Changing gas bottles . . . . . . . . . . . . . . 63
8.4 Gas isolator taps . . . . . . . . . . . . . . . . . 63
8.5 Hose break guard (crash sensor) . . . . 64
8.6 DuoControl switching facility . . . . . . . . 65

Contents
4 Motorhome - 02/11-0 - PSL-MJ11-00 EN
9 Electrical system . . . . . . . . . . . . . 67
9.1 General safety instructions . . . . . . . . . 67
9.2 12 V power supply . . . . . . . . . . . . . . . . 67
9.2.1 Living area battery . . . . . . . . . . . . . . . . 67
9.3 Transformer/rectifier (EBL 99) . . . . . . . 69
9.3.1 Battery cut-off switch . . . . . . . . . . . . . . 70
9.3.2 Battery monitoring . . . . . . . . . . . . . . . . 71
9.3.3 Charging the battery . . . . . . . . . . . . . . 71
9.4 Panel LT 410 . . . . . . . . . . . . . . . . . . . . 71
9.4.1 V/tank gauge for battery voltage and
water or waste water levels . . . . . . . . . 72
9.4.2 Battery alarm for the living area
battery . . . . . . . . . . . . . . . . . . . . . . . . . 72
9.4.3 12 V main switch . . . . . . . . . . . . . . . . . 72
9.4.4 12 V indicator lamp . . . . . . . . . . . . . . . 73
9.4.5 230 V indicator lamp . . . . . . . . . . . . . . 73
9.5 230 V power supply . . . . . . . . . . . . . . . 73
9.5.1 230 V connection . . . . . . . . . . . . . . . . . 73
9.6 Fuses . . . . . . . . . . . . . . . . . . . . . . . . . . 74
9.6.1 Main fuse . . . . . . . . . . . . . . . . . . . . . . . 74
9.6.2 12 V fuses . . . . . . . . . . . . . . . . . . . . . . 74
9.6.3 230 V fuse . . . . . . . . . . . . . . . . . . . . . . 76
10 Appliances . . . . . . . . . . . . . . . . . . . 77
10.1 General . . . . . . . . . . . . . . . . . . . . . . . . 77
10.2 Heater . . . . . . . . . . . . . . . . . . . . . . . . . 77
10.2.1 To heat properly. . . . . . . . . . . . . . . . . . 78
10.2.2 Truma Combi hot-air heater. . . . . . . . . 78
10.2.3 Heater for waste water tank and waste
water pipes (winter comfort package) . 81
10.3 Boiler . . . . . . . . . . . . . . . . . . . . . . . . . . 81
10.3.1 Truma Combi boiler . . . . . . . . . . . . . . . 82
10.4 Gas cooker. . . . . . . . . . . . . . . . . . . . . . 84
10.5 Refrigerator . . . . . . . . . . . . . . . . . . . . . 85
10.5.1 Refrigerator ventilation grill . . . . . . . . . 86
10.5.2 Operation (Dometic 4 series) . . . . . . . . 86
10.5.3 Operation (Waeco). . . . . . . . . . . . . . . . 88
10.5.4 Refrigerator door locking mechanism . 89
11 Sanitary fittings . . . . . . . . . . . . . . 91
11.1 Water supply, general . . . . . . . . . . . . . 91
11.2 Water tank . . . . . . . . . . . . . . . . . . . . . . 91
11.2.1 20 l maximum filling . . . . . . . . . . . . . . . 92
11.3 Waste water tank . . . . . . . . . . . . . . . . . 92
11.4 Water system . . . . . . . . . . . . . . . . . . . . 94
11.5 Toilet compartment . . . . . . . . . . . . . . . 95
11.6 Vario toilet compartment . . . . . . . . . . . 96
11.6.1 Converting into a shower cubicle . . . . . 96
11.6.2 Conversion to toilet compartment . . . . 96
11.7 Thetford toilet . . . . . . . . . . . . . . . . . . . . 96
12 Care . . . . . . . . . . . . . . . . . . . . . . . . . .99
12.1 External care . . . . . . . . . . . . . . . . . . . .99
12.1.1 Washing with a high-pressure cleaner .99
12.1.2 Washing the vehicle . . . . . . . . . . . . . . .99
12.1.3 Windows of acrylic glass . . . . . . . . . .100
12.1.4 Waste water tank . . . . . . . . . . . . . . . .100
12.1.5 Entrance step . . . . . . . . . . . . . . . . . . .100
12.2 Internal care . . . . . . . . . . . . . . . . . . . .100
12.3 Winter care . . . . . . . . . . . . . . . . . . . . .101
12.3.1 Winter operation . . . . . . . . . . . . . . . . .102
12.4 Lay-up. . . . . . . . . . . . . . . . . . . . . . . . .102
12.4.1 Temporary lay-up . . . . . . . . . . . . . . . .102
12.4.2 Winter lay-up . . . . . . . . . . . . . . . . . . .103
12.4.3 Starting up the vehicle after a
temporary lay-up or after lay-up over
winter . . . . . . . . . . . . . . . . . . . . . . . . .104
13 Maintenance . . . . . . . . . . . . . . . . .105
13.1 Official inspections . . . . . . . . . . . . . . .105
13.2 Inspection work. . . . . . . . . . . . . . . . . .105
13.3 Maintenance work . . . . . . . . . . . . . . .105
13.4 Replacing bulbs and fluorescent
tubes. . . . . . . . . . . . . . . . . . . . . . . . . .105
13.4.1 Ceiling lamp . . . . . . . . . . . . . . . . . . . .106
13.4.2 Room lamp . . . . . . . . . . . . . . . . . . . . .106
13.4.3 Halogen spotlight (with glass shade) .107
13.4.4 Halogen spotlight (movable). . . . . . . .107
13.4.5 Surface-mounted halogen light
(swiveling). . . . . . . . . . . . . . . . . . . . . .108
13.5 Replacing the battery at the lamp in the
pop-up roof . . . . . . . . . . . . . . . . . . . . .108
13.6 Spare parts . . . . . . . . . . . . . . . . . . . . .109
13.7 Vehicle identification plate . . . . . . . . .109
13.8 Warning and information stickers . . . .110
14 Troubleshooting . . . . . . . . . . . . .111
14.1 Electrical system. . . . . . . . . . . . . . . . .111
14.2 Gas system. . . . . . . . . . . . . . . . . . . . .112
14.3 Cooker . . . . . . . . . . . . . . . . . . . . . . . .113
14.4 Heater/Boiler. . . . . . . . . . . . . . . . . . . .113
14.5 Refrigerator. . . . . . . . . . . . . . . . . . . . .114
14.5.1 Dometic refrigerator without AES . . .114
14.5.2 Waeco refrigerator . . . . . . . . . . . . . . .115
14.6 Water supply. . . . . . . . . . . . . . . . . . . .116
14.7 Body . . . . . . . . . . . . . . . . . . . . . . . . . .116
15 Technical data . . . . . . . . . . . . . . .117
15.1 Weights. . . . . . . . . . . . . . . . . . . . . . . .117
15.2 Dimensions. . . . . . . . . . . . . . . . . . . . .117
15.3 Equipment . . . . . . . . . . . . . . . . . . . . .118

5Motorhome - 02/11-0 - GLO-MJ11-00EN
Records
1
1Records
1.1 Vehicle document
We reserve the right to alter the construction, equipment and the scope of
delivery. Special equipment is also listed that is not included in the standard
scope of delivery. The descriptions and illustrations in this brochure do not
relate to a particular version. For all details, only the respective equipment list
is valid.
1.2 Warranty
1. The legal guarantee and product warranty rights apply for the vehicle.
2. It is advisable to present the vehicle for inspection by a Globecar dealer at
the end of the first year in order to assert any warranty claims that may
arise. The presentation should take place 2 months at the latest after the
anniversary of the initial registration (or delivery).
As proof that the inspection has been completed, the inspection has to be
confirmed on the corresponding page in this operating manual by a stamp,
the date and the signature of the respective Globecar dealer.
3. The costs of the inspection are to be paid by the vehicle owner.
Vehicle data
Model:
Car manufacturer/type of engine:
Serial number:
Initial registration:
Purchased from company:
Key number:
Chassis number:
Customer address
Surname, Christian name:
Street, no.:
Postal code, town:
E-mail:
Dealer's stamp and signature

6 Motorhome - 02/11-0 - GLO-MJ11-00EN
Records
1
1.3 Inspection records
Should it be determined during an inspection that additional work is necessary,
then the carrying out of this work is dependent on the customer commissioning
this to be done. Please also adhere to the service intervals stipulated by the
manufacturers of the individual equipment. Information is included in the
service documents enclosed.
Delivery
Date:
Signature and stamp of the Globecar dealer:
1th year
Date:
Signature and stamp of the Globecar dealer:
No defects found
Found defects:
7Motorhome - 02/11-0 - GLO-MJ11-00EN
Records
1
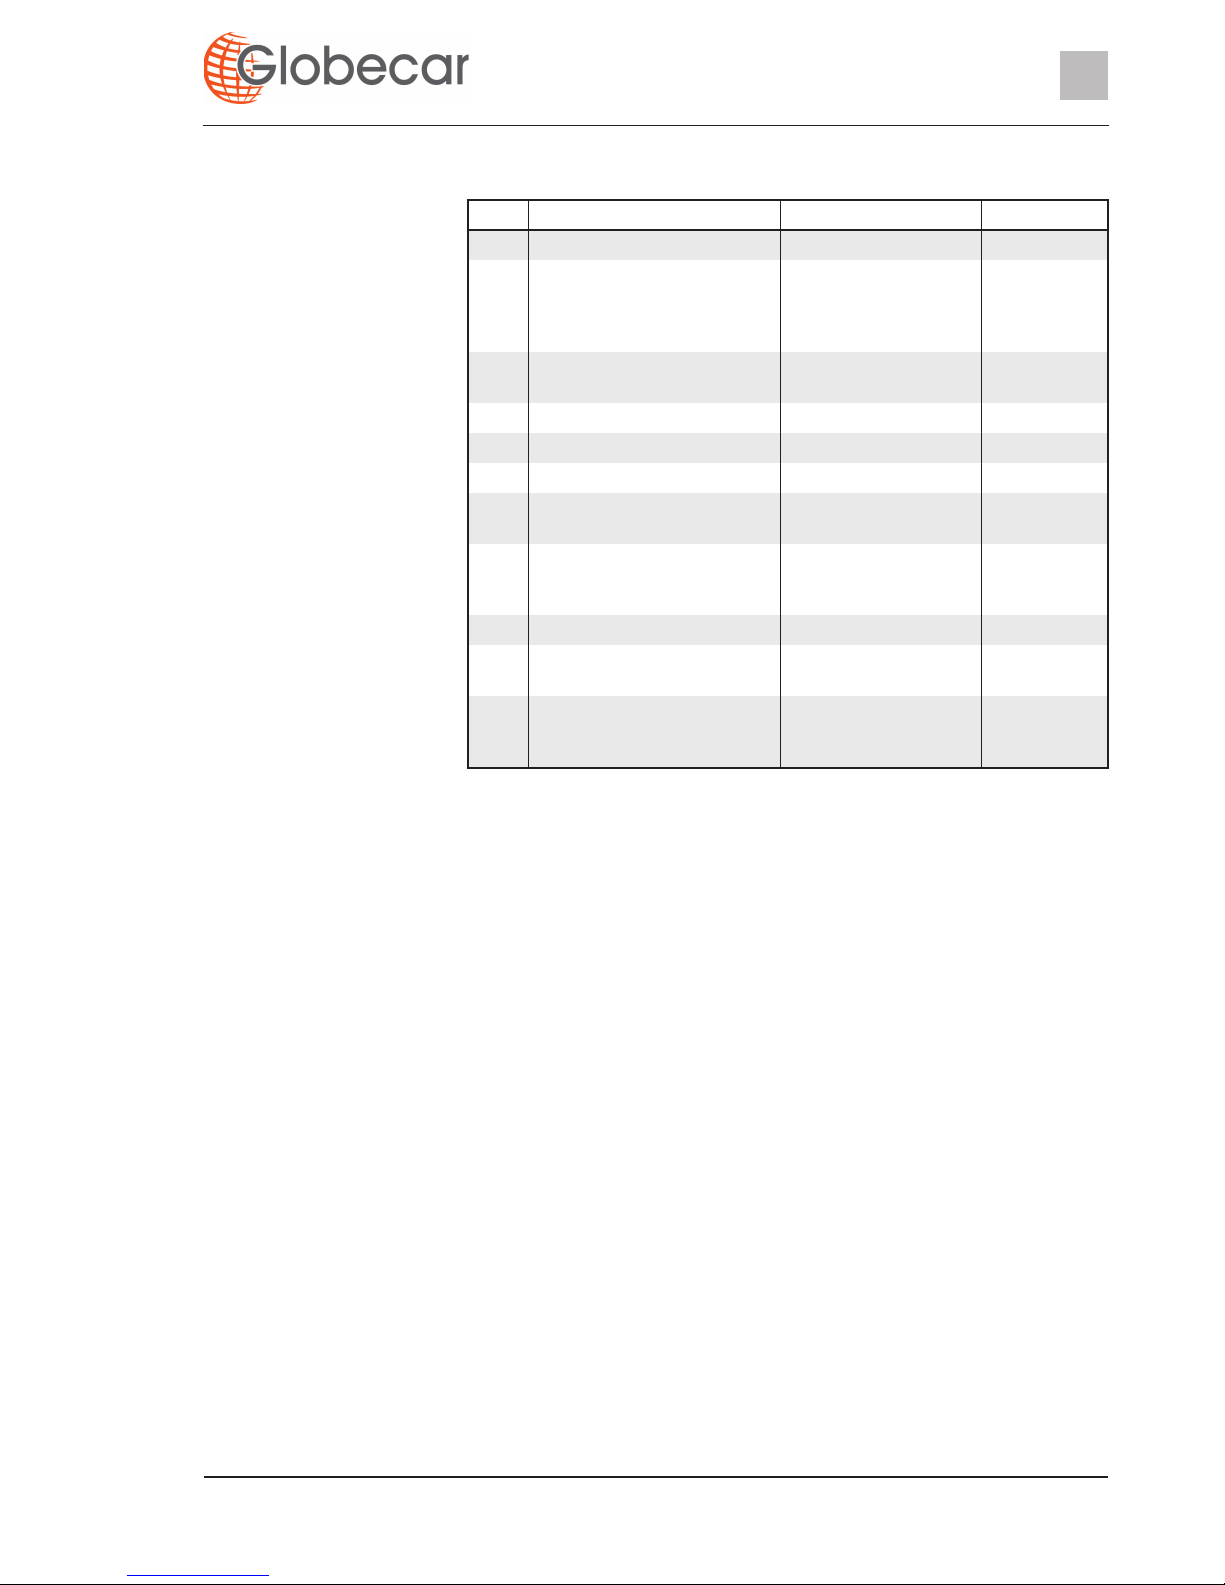
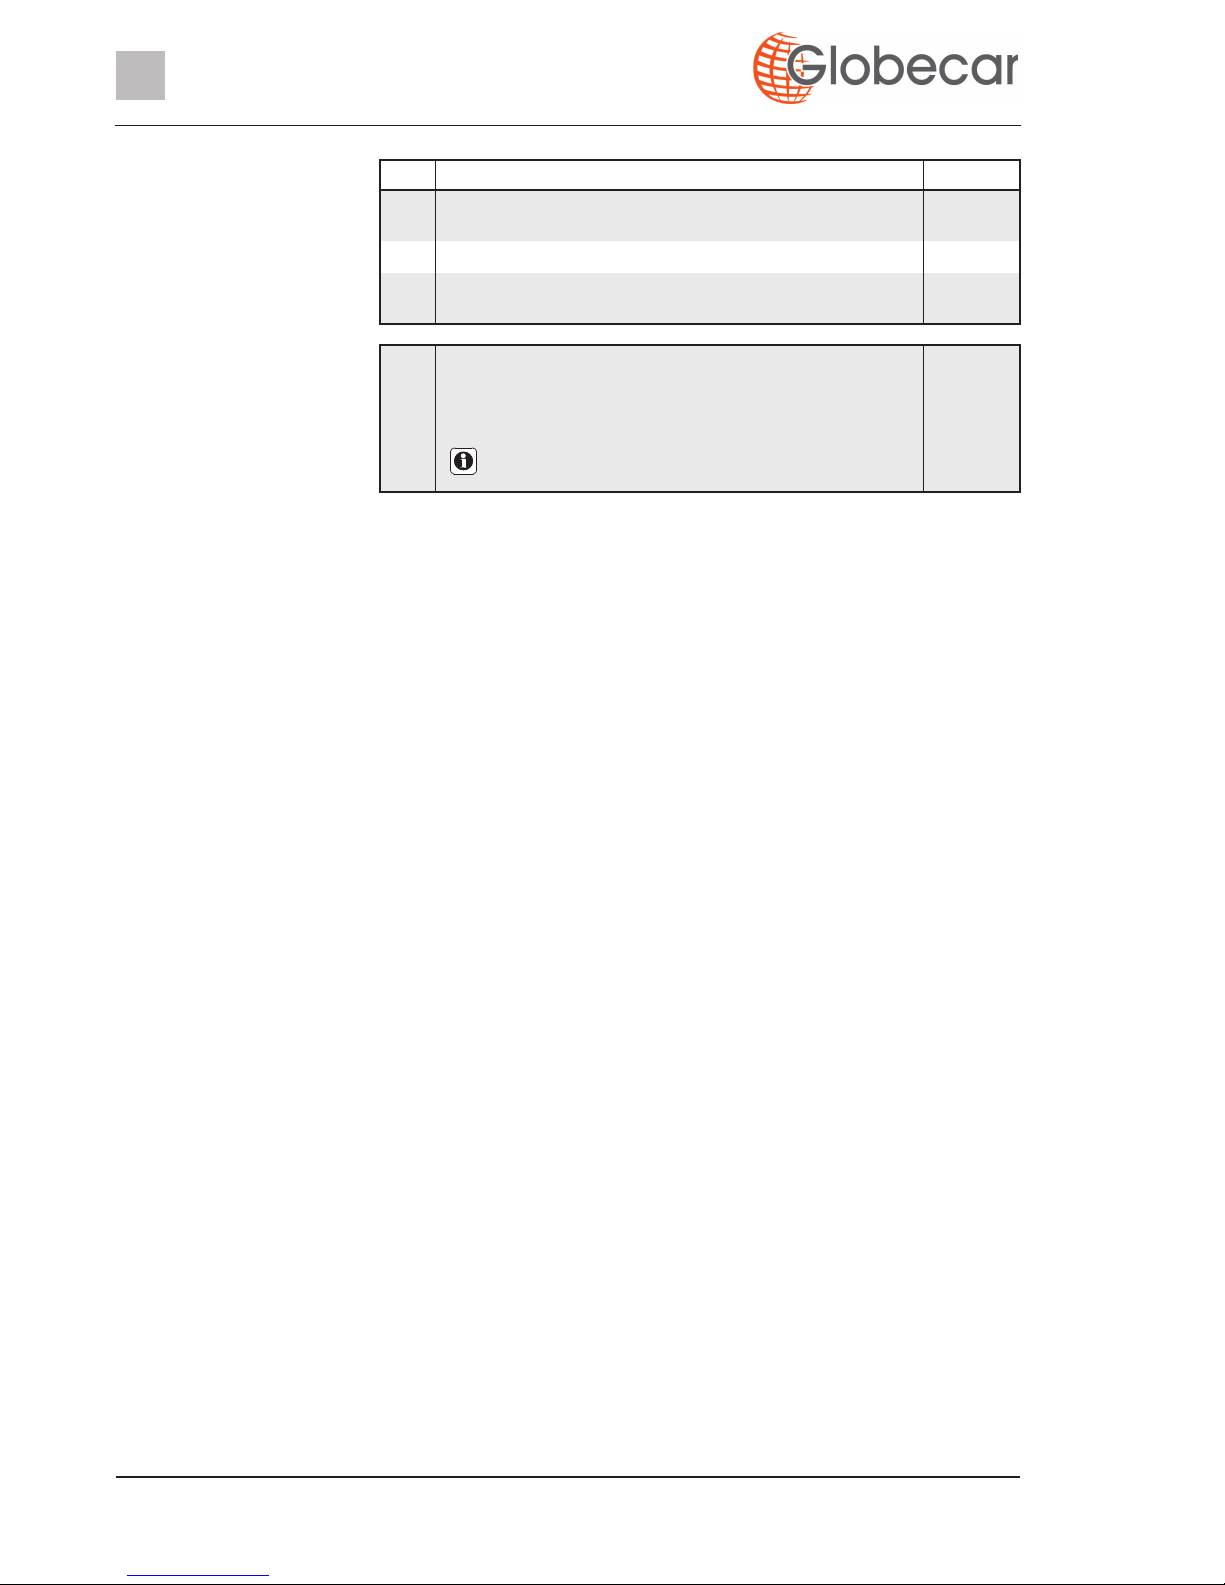
1.4 Inspection plan
We reserve the right to modify the inspection plan.
Pos. Component Activity Interval
Joints, hinges Lubricate Annually
Refrigerator, heater, boiler,
cooker, lighting, storage flap
and door closures, toilet, seat
belts
Function check Annually
Windows, skylights Function check, water
ingress test
Annually
Upholstery, curtains, blinds Visual check Annually
Sealing strips, edges, -rubber Check for damage Annually
Water supply Water ingress test Annually
Hot-air system Function check, clean
fan wheel if necessary
Annually
Underbody protection, fastening of the underbody attachments
Visual check Annually
Electrical system Function check Annually
Gas system Official gas inspection Every two
years
Underbody Visual check, repair
underbody protection if
necessary
Every two
years

8 Motorhome - 02/11-0 - GLO-MJ11-00EN
Records
1
9Motorhome - 02/11-0 - GLO-MJ11-00EN
Introduction
2
2Introduction
Please read this instruction manual completely before
using the vehicle for the first time!
Always keep this instruction manual in the vehicle. Also inform all other users
of the safety regulations.
This instruction manual contains sections which describe model-specific equipment or special equipment. These sections are not specially
marked. It may be that your vehicle has not been fitted with this special
equipment. In some cases, the actual equipment of your vehicle may
therefore be different from that shown in some illustrations and descriptions.
However, your vehicle may be fitted with other special equipment not
described in this instruction manual.
Special equipment is described when an explanation is required.
Adhere to the instruction manuals which are separately enclosed.
Should the vehicle be subjected to damage due to a failure to follow the
instructions in this instruction manual, then the warranty claim is deemed
invalid.
Our vehicles are subjected to continuous development. Please understand
that we reserve the right to alter the form, equipment and technology. Therefore, no claims can be made against the manufacturer as a result of the contents of this instruction manual. The equipment which was known and included
at the time of going to press is described.
The reprinting, translation and copying, including extracts is not permitted
without prior written authorisation from the manufacturer.
X The non-observance of this symbol can lead to personal injury.
Z The non-observance of this symbol can lead to damage being caused to,
or inside the vehicle.
Z This symbol indicates recommendations or special aspects.
Z This symbol indicates actions which lead to environmental awareness.
Z The details "right", "left", "front" and "rear" always refer to the vehicle in
direction of travel.
Z All dimensions and weight details are "approximate".

10 Motorhome - 02/11-0 - GLO-MJ11-00EN
Introduction
2
2.1 General
The vehicle is constructed in accordance with the latest technology and the
recognised safety regulations. Nevertheless, personal injury may result and
the vehicle may be damaged if the safety instructions in this instruction manual
are not followed.
Depending on the configuration, the first-aid kit and hazard warning triangle
are not included as standard. Equip the vehicle with a first-aid kit and hazard
warning triangle before using it for the first time. In case of vehicles with a
gross weight exceeding 3.5 t a flashing hazard warning light has to be carried
additionally on the vehicle.
Only use the vehicle in a technically impeccable condition. Follow the instructions in the instruction manual.
Malfunctions which impair the safety of persons or the vehicle should be
immediately remedied by qualified personnel. To avoid further damages,
observe the duty to avert, minimise or mitigate loss for the user during faults.
Have the vehicle's braking and gas systems inspected and repaired by an
authorised specialist workshop only.
Alterations to the body are only to be carried out with the authorisation of the
manufacturer.
The vehicle is designed for the exclusive transport of persons. Luggage and
accessories may only be transported up to the maximum permissible gross
weight.
Observe the test and inspection periods stipulated by the manufacturer.
2.2 Environmental tips
Z Do not impair the tranquility and spruceness of nature.
Z Remember that: All kinds of waste water and household waste are not to
be disposed of in drains or in the open countryside.
Z Only empty the waste water tank and toilet cassette or sewage tank at dis-
posal stations at the camping or caravan sites, which are especially provided for this purpose. When stopping in towns and communities, observe
the instructions at caravan sites or ask where there are disposal stations.
Z Collect waste water on board only in the waste water tank or, if need be, in
other vessels suitable to this purpose.
Z Empty waste water tank as often as possible, even when it is not com-
pletely full (hygiene).
If possible, flush out waste water tank and, if necessary, drainage pipe with
fresh water every time it is emptied.
Z Never allow the toilet cassette or sewage tank to become too full. Empty
the toilet cassette or sewage tank frequently, at the latest as soon as the
level indicator lights up.
Z Separate household waste according to glass, tin cans, plastic and wet
waste also when on a journey. Enquire at the town or community authority
about disposal points. Household waste is not to be disposed of in waste
paper baskets which are situated at car parks.
Z Empty waste bins as often as possible into the cans or containers that are
provided for this purpose. This helps to avoid unpleasant smells and an
accumulation of rubbish on board.

11Motorhome - 02/11-0 - GLO-MJ11-00EN
Introduction
2
Z When parked, do not allow the engine to run more than necessary. When
running idle, a cold engine releases more contaminants than usual. The
running temperature of the engine is achieved more quickly whilst the
vehicle is in motion.
Z Use an environmentally-friendly WC chemical agent for the WC which can
also be biologically degraded and only use small doses.
Z When staying in towns and communities for longer periods, search for
parking areas which are especially designated for motorhomes. Enquire at
the town or community authority about parking spaces.
Z Always leave the parking places in a clean condition.

12 Motorhome - 02/11-0 - GLO-MJ11-00EN
Introduction
2
13Motorhome - 02/11-0 - GLO-MJ11-00EN
Safety
3
3Safety
3.1 Fire prevention
3.1.1 Avoidance of fire risks
3.1.2 Fire-fighting
3.1.3 In case of fire
3.2 General
X Never leave children in the vehicle unattended.
X Keep flammable materials clear of heating and cooking appliances.
X Lights can get very hot. WHen the light is switched on, a safety distance
of 30 cm to combustible material has to be maintained. Fire hazard!
X Never use portable heating or cooking appliances.
X Only authorised qualified personnel may modify the electrical system,
the gas system or the appliances.
X Always carry a dry powder fire extinguisher in the vehicle. The fire extin-
guisher must be approved, tested and close at hand.
X Have the fire extinguisher tested at regular intervals by authorised qual-
ified personnel. Observe the date of testing.
X The fire extinguisher is not included in the scope of delivery.
X Always keep a fire blanket at hand near the cooker.
X Evacuate all passengers.
X Cut off the electrical power supply and disconnect from the mains.
X Close regulator tap on the gas bottle.
X Sound the alarm and call the fire brigade.
X Fight the fire if this is possible without risk.
Z Keep escape routes clear.
Z Observe the fire extinguisher instructions for use.
X The oxygen in the vehicle interior is used up by breathing and the use of
gas operated appliances. That is why the oxygen needs to be replaced
on a constant basis. For this purpose, forced ventilation options (e.g.
skylights with forced ventilation, mushroom-shaped vents or floor vents)
are fitted to the vehicle. Never cover or block forced ventilations from the
inside or outside with objects such as e.g. a winter mat. Keep forced ventilations clear of snow and leaves. There is a danger of suffocation due
to increased CO
2
levels.
X Observe the headroom of the doors.
X Gas lines and electrical cables are laid in the floor. Never drill holes or
screw screws into the floor. There is danger of a gas explosion or of a
power cut or short circuit due to damage to a line or cable.
14 Motorhome - 02/11-0 - GLO-MJ11-00EN
Safety
3
3.3 Road safety
Z As far as the fitted appliances (heater, cooker, refrigerator, etc.) and the
base vehicle (engine, brakes, etc.) are concerned, the instruction manuals
are authoritative. It is imperative that they be observed.
Z Fitting accessories or special equipment can alter the dimensions, weight
and road behaviour of the vehicle. Some of the parts must be entered in
the vehicle papers.
Z Only use wheel rims and tyres which are approved for the vehicle. Informa-
tion concerning the size of the approved wheel rims and tyres is included
in the vehicle documents or can be obtained from authorised dealers and
service centres.
Z Firmly apply the handbrake when parking the vehicle.
Z When leaving the vehicle, it is imperative that all doors, external flaps and
windows are closed.
Z Hazard warning triangle and first-aid kit conforming to DIN 13164 are pre-
scribed by law and must be carried on the vehicle.
Z Only move the vehicle on the road if the driver has a driver's license valid
for the vehicle class.
Z When selling the vehicle, hand over all instruction manuals for the vehicle
and the fitted appliances.
X Before commencing the journey, carry out a functional check of indi-
cating and lighting equipment, the steering and the brakes.
X If the vehicle has been stationary for a long period (approx. 10 months)
have the braking and gas systems checked by an authorised specialist
workshop.
X Before starting the journey and also after short breaks check whether the
entrance step has been retracted completely.
X Fold in the pop-up roof fully and lock it into place before commencing the
journey.
X Before commencing the journey, open and secure the shades on the
windscreen and on the driver's and front passenger's windows.
X Before starting the journey, rotate the seat in the direction of travel and
lock in position. The rotating seats must remain locked in the direction of
travel during the journey.
X Before starting your journey, remove the television from the support and
store it securely.
X During the journey, persons are only to sit on the permitted seats (see
Chapter 5). The authorised number of seats is stipulated in the vehicle
documents.
X Before starting the journey fasten your seat belt and keep it fastened
during the journey.
X Always secure children with the child-protection equipment that is man-
datory for the respective child's size and weight.
X Factory-set three-point safety belts must be used when attaching child
restraint systems.
X The base vehicle is a commercial vehicle (small truck). Adapt your
manner of driving correspondingly.
15Motorhome - 02/11-0 - GLO-MJ11-00EN
Safety
3
3.4 Towing
3.5 Gas system
3.5.1 General information
X Observe the overall height of the vehicle (including roof loads) at under-
passes, tunnels, etc.
X In winter, the roof must be free of snow and ice before commencing the
journey.
Z Before commencing the journey, distribute the vehicle payload evenly (see
Chapter 4).
Z When loading the vehicle and when taking a rest from driving, in order to
load luggage or food, for example, observe the maximum permissible
gross weight and axle loads (refer to vehicle documents).
Z Before commencing the journey, ensure that all cupboard doors, the toilet
door and all drawers and flaps are secure. Engage the refrigerator door
securing device. Lock the folding wall of the Vario toilet compartment.
Z Before commencing the journey, close windows and skylights.
Z Before commencing the journey, close all external flaps and lock them.
X Care is to be taken when connecting and detaching a trailer. Risk of acci-
dent and injury!
X No persons are to be between the towing vehicle and the trailer during
positioning for connecting and detaching.
X Close all gas isolator taps and the regulator tap before commencing the
journey and when leaving the vehicle.
X No appliance (e.g. heating or refrigerator) that is operated through the
built-in burner may be operational while fuel is being filled up, on ferries
or in the garage. Danger of explosion!
X If an appliance is operated through a burner, do not start the appliance
up in closed areas (e.g. garages). Danger of poisoning and suffocation!
X Have the gas system serviced, repaired or altered by an authorised
workshop only.
X Have the gas system checked by an authorised specialist workshop
before starting up and according to the national regulations. This also
applies for not registered vehicles. For modifications to the gas system
have the gas system immediately checked by an authorised specialist
workshop.
X The gas pressure regulator and the exhaust gas pipes also have to be
checked. The gas pressure regulator has to be replaced at least every
10 years. The vehicle owner is responsible for seeing that this is carried
out.
X In case of a defect of the gas system (gas odour, high gas consumption)
there is danger of explosion! Close the regulator tap on the gas bottle
immediately. Open doors and windows and ventilate well.
X In case of a defect in the gas system: Do not smoke; do not ignite any
open flames, and do not operate electric switches (light switches etc.).

16 Motorhome - 02/11-0 - GLO-MJ11-00EN
Safety
3
X Have the defect in the gas system repaired by an authorised specialist
workshop.
X Open a skylight or a window before taking open sources of combustion
(gas cooker) into service.
X Do not use the gas cooker or gas oven for heating purposes.
X If the vehicle or gas devices are not used, close the regulator tap on the
gas bottle.
X If there are several gas devices, each gas device must have its own gas
isolator tap. If individual gas devices are not in use, close the respective
gas isolator tap.
X Ignition safety valves must close within 1 minute after the gas flame has
extinguished. A clicking sound is audible. Check function from time to
time.
X The installed gas appliances are designed for use solely with propane or
butane gas or a mixture of both. The gas pressure regulator as well as
all installed gas devices are set for a gas pressure of 30 mbar.
X Propane gas is capable of gasification up to -42 °C, whereas butane gas
gasifies at 0 °C. Below these temperatures no gas pressure is available.
Butane gas is unsuitable for use in winter.
X Regularly inspect the gas tube fitted to the gas bottle connection for
tightness. The gas tube must not have any tears and must not be
porous. Have the gas tube replaced by an authorised specialist workshop no later than 10 years after the manufacturing date. The operator
of the gas system must see to it that the parts are replaced.
X Due to its function and construction, the gas bottle compartment is a
space which is open to the exterior. Never cover or block the standard
forced ventilation. Otherwise leaking gas cannot be dispersed to the outside.
X Do not use the gas bottle compartment as storage space as it is not
moisture-proof.
X Secure the gas bottle compartment in order to prevent unauthorised per-
sons opening it. To do so lock the access.
X The regulator tap on the gas bottle must be accessible.
X Only connect gas-operated devices (e.g. gas grill) which have been
designed for a gas pressure of 30 mbar.
X The exhaust gas pipe must be fitted tightly to the heating system and to
the vent and must be sealed. The exhaust gas pipe must not show any
evidence of damage.
X Exhaust fumes must be able to escape into the atmosphere unhindered
and fresh air must be able to enter unhindered. Therefore keep the
waste gas vents and intake openings clean and free (e.g. of snow and
ice). No snow walls or aprons may be allowed to lie against the vehicle.
17Motorhome - 02/11-0 - GLO-MJ11-00EN
Safety
3
3.5.2 Gas bottles
3.6 Electrical system
3.7 Water system
X Gas bottles are only to be transported within the designated gas bottle
compartment.
X Place gas bottles vertically in the gas bottle compartment.
X Tie down gas bottles so that they are unable to turn or tilt.
X If the gas bottles are not connected to the gas tube, always place the
protective cap on top.
X Close the regulator tap on the gas bottle before the gas pressure regu-
lator or gas tube are removed from the gas bottle.
X Use your hands only to connect the gas pressure regulator or the gas
tube to the gas bottles. Do not use any tools.
X Only use special gas pressure regulators with a safety valve designed
for vehicle use. Other gas pressure regulators are not permitted and
cannot meet the demanding requirements.
X Use only 11 kg or 5 kg gas bottles. Camping gas bottles with a built-in
reflux valve (blue bottle with max. 2.5 or 3 kg content) are permitted in
exceptional cases with a safety valve.
X Never block the ventilation openings in the floor under the gas bottles.
X Only allow qualified personnel to work on the electrical system.
X Prior to carrying out work on the electrical system, switch off all devices
and lights, disconnect the battery and disconnect the vehicle from the
mains.
X Only use original fuses with the stipulated values.
X Only replace defective fuses when the cause of the defect is known and
has been remedied.
X Never bridge or repair fuses.
X Water left standing in the water tank or in the water pipes becomes
undrinkable after a short period. For this reason, rinse the water pipes
and the water tank thoroughly with several litres of fresh water before
each use of the vehicle. To do this, open all water taps. After each use
of the vehicle completely empty the water tank and the water pipes.
Z If the vehicle is not used for several days or if it is not heated when there is
a risk of frost, empty the entire water system. Leave the water taps on in
central position. Leave the safety/drainage valve (if available) and all drain
cocks open. Frost damage to appliances, frost damage to the vehicle and
deposits in water-carrying components can be avoided in this way.

18 Motorhome - 02/11-0 - GLO-MJ11-00EN
Safety
3

19Motorhome - 02/11-0 - GLO-MJ11-00EN
Before the journey
4
4Before the journey
4.1 Payload
On loading, make sure that the payload's centre of gravity is as low as possible
(directly above the floor of the vehicle). Otherwise this may affect the driving
characteristics of the vehicle.
4.1.1 Terms
Maximum permissible
gross weight in a laden
condition
The maximum permissible gross weight in a laden condition is the weight that
a vehicle may never exceed.
The maximum permissible overall weight in laden condition consists of the
mass in ready-to-drive condition and of the payload.
The manufacturer has specified the maximum permissible gross weight in a
laden condition in Field F.1 of the vehicle documents.
Mass in ready-to-drive
condition
The manufacturer specifies the mass in ready-to-drive conditions in Field G of
the vehicle documents.
Payload The payload is made up as follows:
z Conventional load
z Additional equipment
z Personal equipment
Explanations of the individual components of the payload are contained in the
following text.
Conventional load The conventional load is the weight specified by the manufacturer for the pas-
sengers.
Conventional load means: 75 kg are calculated for every seat specified by the
manufacturer, regardless of how much the passengers actually weigh. The
driver's seat is already included as part of the mass in ready-to-drive condition
and must not be calculated as part of the conventional load.
The manufacturer specifies the number of seats in Field S.1 of the vehicle documents.
X Excessive payload and the wrong tyre pressure can cause the tyre to
burst. You can lose control of the vehicle.
X Adapt your speed to the payload. The stopping distance is longer when
the payload is higher.
Z The maximum permissible gross weight stated in the vehicle documents is
not to be exceeded by the payload.
Z Built-in accessories and special equipment reduce the payload.
Z Adhere to the axle load stated in the vehicle documents.
Z In technical and scientific texts the term "mass" has replaced the term
"weight". However the term "weight" is still the more common term in general usage. To contribute toward understanding the term "mass" is therefore only used in established phrases in the following passages.

20 Motorhome - 02/11-0 - GLO-MJ11-00EN
Before the journey
4
Additional equipment Additional equipment includes accessories and special equipment. Examples
of additional equipment include:
z Tow coupling
z Roof racks
z Awning
z Bike or motorcycle rack
z Satellite unit
Information about the weights of the various special equipment devices can be
obtained from the manufacturer.
Personal equipment Personal equipment includes all items in the vehicle that are not included in
the conventional load and the additional equipment. For example, personal
equipment can include the following:
z Foodstuffs
z Crockery
z Television
z Radio
z Clothes
z Bedding
z Toys
z Books
z Toiletries
No matter where kept, personal equipment also includes:
z Animals
z Bikes
z Boats
z Surfboards
z Sports equipment
4.1.2 Calculating the payload
The payload (see Section 4.1.1) is the difference in weight between
z Maximum permissible gross weight in a laden condition and
z Vehicle mass complete in a ready-to-drive condition.
X Payload calculation at the manufacturer is partly based on all-inclusive
weights. For safety reasons, the maximum permissible gross weight in
a laden condition must not be exceeded.
X Only the maximum permissible gross weight and the mass in a ready-to-
drive condition, not the actual weight of the vehicle, is stated in the
vehicle documents. For your own safety, we recommend that you have
your loaded vehicle (with passengers) weighed on a public weighbridge
before you set out on your journey.
21Motorhome - 02/11-0 - GLO-MJ11-00EN
Before the journey
4
The calculation of the payload from the difference between the maximum permissible gross weight in laden condition and the mass specified by the manufacturer in ready-to-drive condition is however only a theoretical value.
Only if the vehicle is weighed with full tanks (fuel and water), full gas bottles
and complete additional equipment on a public weighbridge, can the actual
payload be determined.
4.1.3 Loading the vehicle correctly
Mass in kg to be
calculated
Calculation
Example for calculating
the payload
Maximum permissible gross weight according to vehicle documents, Field F.1
3300
Vehicle mass in a ready-to-drive condition, including basic equipment according
to vehicle documents, Field G
- 2720
This results in a permissible payload
of
580
Conventional load, e.g. 3 persons at
75 kg each
- 225
Additional equipment - 40
For the personal equipment this
results in
= 315
X To ensure safety never exceed the maximum permissible gross weight
in a laden condition.
X Distribute the load evenly between the left-hand and right-hand sides of
the vehicle.
X Distribute the load evenly between both axles. Observe the axle loads
specified in the vehicle documents. Additionally observe the permissible
load-carrying capacity of the tyres.
X Securely store all the objects so that they cannot slide or slip.
X Store heavy objects (awning, canned food, etc.) close to the axles. Low-
lying storage compartments whose doors do not open in the direction of
travel are particularly suited for storing heavy objects.
X Store lighter objects (laundry) in the roof storage compartments.

22 Motorhome - 02/11-0 - GLO-MJ11-00EN
Before the journey
4
4.2 Entrance step
4.2.1 Electrically operated entrance step
Operating switch The switch to operate the entrance step is located on the inside of the vehicle
in the area of the conversion door.
Extending: Press the rocker switch (Fig. 1,1) down until the entrance step has
extended completely.
Retracting: Press the rocker switch (Fig. 1,1) up until the entrance step has retracted
completely.
4.3 Television
X Before starting the journey and also after short breaks check whether the
entrance step has been retracted completely.
X Do not stand in the direct range of movement of the entrance step while
the entrance step is being extended or retracted.
X Do not step on the entrance step until it has extended completely. There
is a risk of injury!
X Never raise or lower persons or loads with the entrance step.
Z Clean dust and dirt regularly from the entrance step, do not grease or oil
moving parts.
Fig. 1 Operating switch entrance
step
X Before starting your journey, remove the television from the support and
store it securely.
23Motorhome - 02/11-0 - GLO-MJ11-00EN
Before the journey
4
4.4 Road safety
Before commencing the journey, work through the checklist:
X Check the tyre pressure before a journey and at 2-week intervals. Wrong
tyre pressure causes excessive wear and can lead to damage or even
to tyre burst. You can lose control of the vehicle.
No. Checks Checked
Base vehicle
1 All vehicle documents are on board
2 Tyres in proper condition
3 Vehicle lighting, brake and reversing lights function
4 Oil level at engine, gear unit and power steering checked
5 Coolant and liquid for windshield washer system topped up
6 Breaks function
7 Brakes react evenly
8 When braking, the vehicle remains on track
Housing body, outside
9 Awning completely retracted
10 Roof free of snow and ice (in winter)
11 External connections and lines disconnected and stored away
12 Pop-up roof folded in
13 Entrance step retracted
14 External flaps and doors closed and locked
15 Overall height of the vehicle including roof rack when loaded
measured and noted. Keep the height information close at
hand in the driver's cabin
Housing body, inside
16 Windows and skylights closed and locked
17 Television securely stored
18 Television antenna retracted (if one is built in)
19 Loose parts stored away or fixed in position
20 Open storage spaces empty
21 Refrigerator door secured
22 Refrigerator set to 12 V operation
23 All drawers and flaps closed
24 Living area doors secured
25 Children's seats mounted to seats with three-point safety belts
26 Swivel seat locking device for driver's seat and front passen-
ger's seat locked
27 Curtains hooked into the retaining clips
28 Shades in the driver's cabin opened and secured
24 Motorhome - 02/11-0 - GLO-MJ11-00EN
Before the journey
4
Gas system
29 Gas bottles firmly fixed in the gas bottle compartment so that
they are unable to turn
30 Protective cap set on top of the gas bottle
31 Regulator tap on the gas bottle and gas isolator taps are
closed
Electrical system
32 Check the battery voltage of the starter battery and the living
area battery (see Chapter 9). If the panel indicates that the
battery voltage is too low, the respective battery has to be
recharged. Observe the instructions in Chapter 9
Z Commence the journey with a fully charged starter
battery and living area battery.
No. Checks Checked
25Motorhome - 02/11-0 - GLO-MJ11-00EN
During the journey
5
5During the journey
5.1 Driving the motorhome
5.2 Driving speed
X The base vehicle is a commercial vehicle (small truck). Adapt your
manner of driving correspondingly.
X Before starting the journey and also after short breaks check whether the
entrance step has been retracted completely.
X Always wear a seat belt during the journey at those seats where a seat
belt is mounted.
X Never open the seat belt during the journey.
X Passengers must remain in the seats provided.
X The door lock may not be opened.
X Avoid braking suddenly.
X Only change the destination on the navigation system when the vehicle
is at a standstill. Drive to a car park or stop in a safe area when changing
the destination.
X Do not play a DVD on the monitor of the navigation system during the
journey.
Z Drive slowly on bad roads.
Z If an accident occurs as a result of these instructions not being observed,
the manufacturer will not be responsible for damages caused.
Z The safety measures specified in Chapter 3 have to be observed.
X The vehicle is equipped with a powerful engine. Meaning that you have
sufficient power reserves in difficult traffic situations. This high power
allows a high end speed and requires above-average driving skills.
X The vehicle provides a huge surface exposed to wind. Particular danger
arises when a side wind suddenly occurs.
X Uneven or one-sided loading changes the road behavior.
X On unknown roads the road surface conditions may be difficult and
unexpected traffic situations may arise. Therefore adapt your driving
speed to the respective traffic situation and the ambient situation for your
safety.
X Observe the statutory speed limits that apply in the respective country.
Z The skylights and windows are not designed for high speeds. Excessive
speeds can result in noise development that is too high.
26 Motorhome - 02/11-0 - GLO-MJ11-00EN
During the journey
5
5.3 Seat belts
The vehicle is equipped with automatic three-point seat belts at those seats in
the living area for which a seat belt is stipulated by law. The corresponding
national regulations apply for using a seat belt.
5.3.1 Using the safety belt correctly
The safety belt is applied correctly when a fist still fits between your body and
a safety belt.
5.4 Driver's seat and front passenger's seat
X Before starting the journey fasten your seat belt and keep it fastened
during the journey.
X Do not damage or clamp in the belts. Have damaged seat belts replaced
by an authorised specialist workshop.
X Do not change the belt attachment points, the automatic retractor and
the belt locks.
X Check the screwed connections of the seat belts at intervals in order to
ensure that they are firmly seated.
X Use each seat belt for one adult person only.
X Do not belt up objects together with persons.
X Seat belts are not sufficient for persons who are less than 150 cm tall. In
this case use additional retention devices. Observe the test certificates.
X Factory-set three-point safety belts must be used when attaching child
restraint systems.
X Replace (have replaced) the seat belts that were in use during an acci-
dent.
X Do not tilt the backrest of the seat too far back during the journey. Oth-
erwise the effectiveness of the seat belt is no longer ensured.
X Do not twist the belt. The belt must be positioned smoothly against the
body.
X Before applying the seat belt, adopt the correct sitting position.
X Before starting the journey, rotate the seat in the direction of travel and
lock in position.
X Lock the seats in the direction of travel and do not turn them during the
journey.
Z The driver's and front passenger's seat are a part of the base vehicle,
depending on model and vehicle equipment. In this case the adjustment of
the seats is described in the operating instructions of the base vehicle.
27Motorhome - 02/11-0 - GLO-MJ11-00EN
During the journey
5
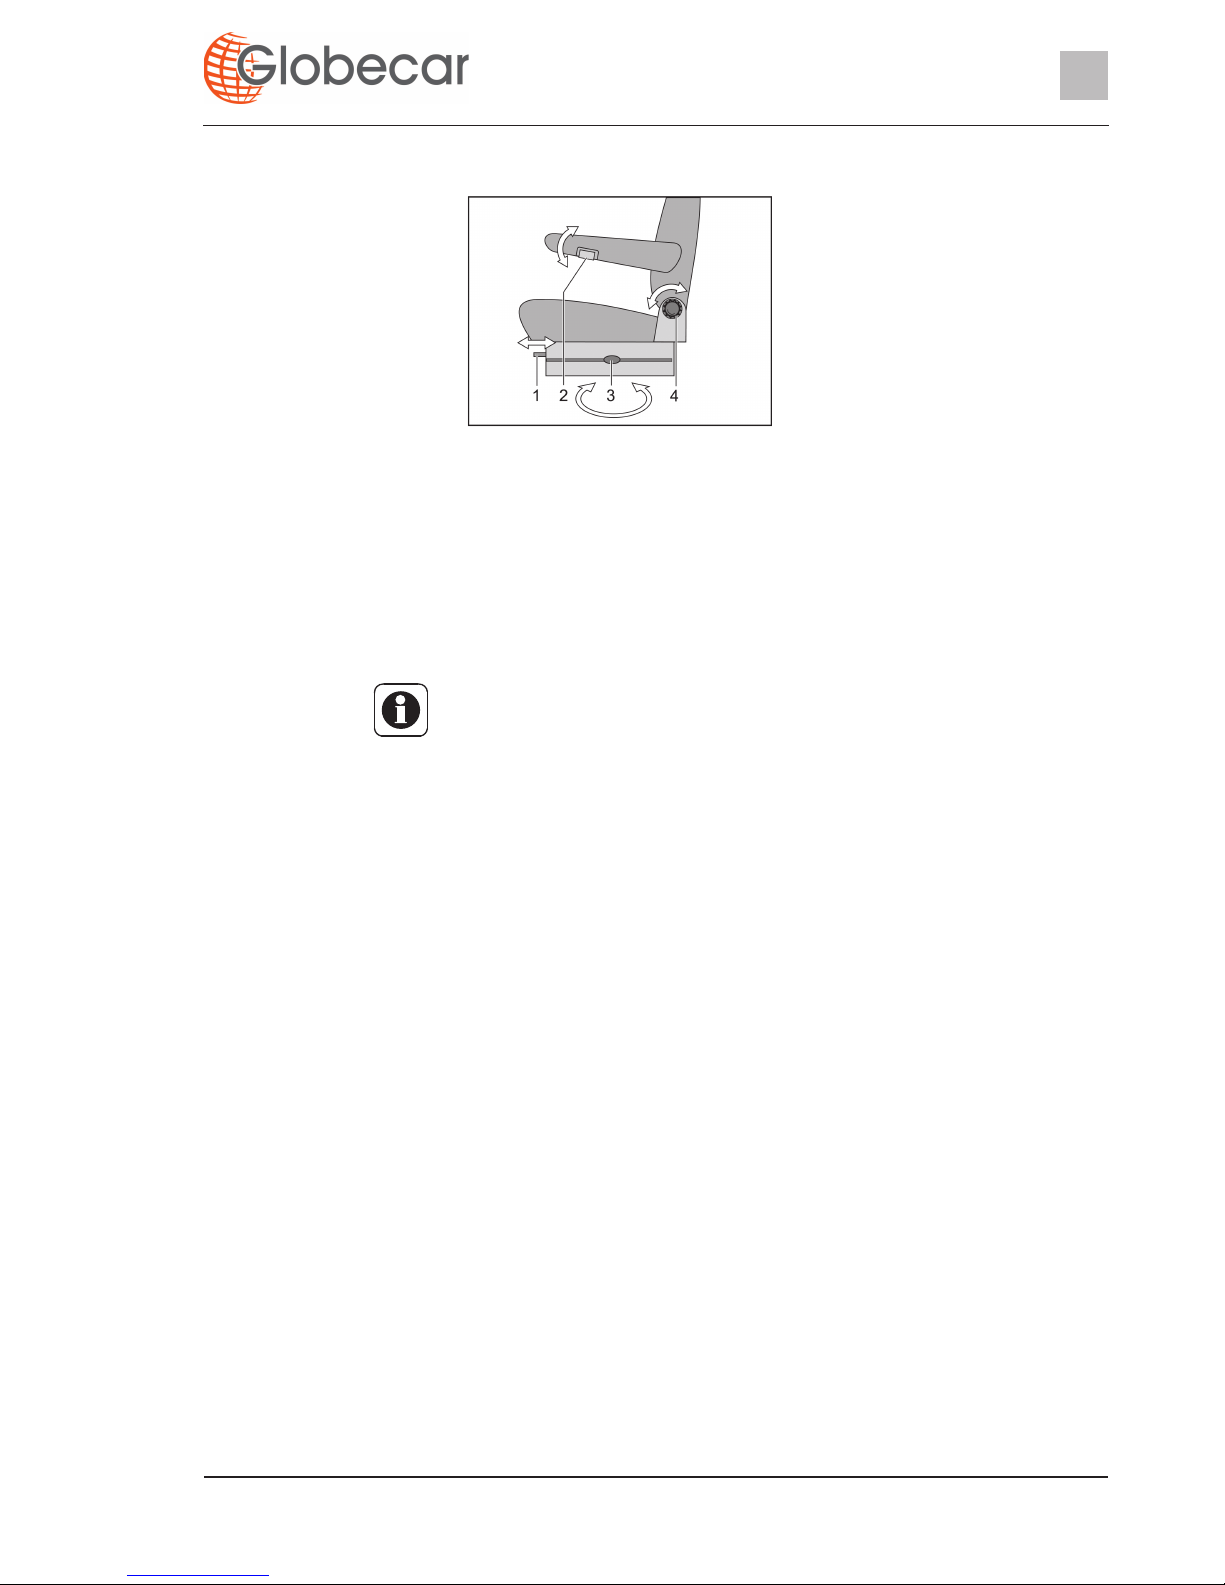
5.4.1 Seats (Aguti)
Rotating seats into
driving position
The seats can be rotated in any direction. The seats can only be locked in position in the direction of travel.
Push both armrests upward.
Push the driver's seat/front passenger's seat backwards or into the central
position.
Rotate the seat in the direction of travel and lock in position.
Adjusting the armrest The height of the armrests is infinitely adjustable.
Turn the knurled wheel (Fig. 2,2) in an anticlockwise direction (when
viewed from the front). The latch of the armrest is released by this.
Move the armrest to the desired position.
Turn the knurled wheel as far as possible in a clockwise direction.
Adjusting an appropriate
seating position
The position of the driver's and front passenger's seats can be adjusted. The
handles which are required for this purpose are positioned to the front, right or
left of the seat.
Pull the handle (Fig. 2,1). The seat can be moved forward or backward.
Turn the knurled knob (Fig. 2,4). The angle of the backrest can be
adjusted.
Fig. 2 Driver's and front passenger's
seats (Aguti)
1 Lengthways adjustment
2 Armrest adjustment
3 Rotating
4 Backrest adjustment
Z Rotating the seats in the stationary vehicle is described in Chapter 7.
Z Move the seats all the way down or forward before turning. Otherwise, the
seats cannot be turned.
28 Motorhome - 02/11-0 - GLO-MJ11-00EN
During the journey
5
Adjusting the seat height Depending on the model, the height of the seat is infinitely adjustable.
Pull the lever (Fig. 3,1) upwards.
Take pressure off or apply pressure to seat. The seat moves up or down.
Release lever when the desired position is reached. The seat is locked.
5.4.2 Seats (ISRI)
Rotating seats into
driving position
The seats can be rotated in any direction. The seats can only be locked in position in the direction of travel.
Push both armrests upward.
Push the driver's seat/front passenger's seat backwards or into the central
position.
Rotate the seat in the direction of travel and lock in position.
Adjusting the armrest The height of the armrests is infinitely adjustable.
For ease in handling, first move the armrest slightly upward.
For fine adjustments, turn the handwheel (Fig. 4,1) upwards or downwards.
Fig. 3 Seat height adjustment
Fig. 4 Driver's and front passenger's
seats (ISRI)
1 Armrest adjustment
2 Lengthways adjustment
3 Height adjustment
4 Rotating
5 Backrest adjustment
5
1
2
3
4
Z Rotating the seats in the stationary vehicle is described in Chapter 7.
29Motorhome - 02/11-0 - GLO-MJ11-00EN
During the journey
5
Adjusting an appropriate
seating position
Both the height and the position of the driver's and front passenger's seats can
be adjusted. The handles which are required for this purpose are positioned to
the front, right or left of the seat.
Pull the handle (Fig. 4,2). The seat can be moved forward or backward.
Pull the handle (Fig. 4,5). The angle of the backrest can be adjusted.
Pull the handle (Fig. 4,3). The seat can be lifted or lowered toward the front.
5.5 Seating arrangement
Seats which may be used during travel are equipped with a sticker (Fig. 5).
5.6 External doors
X The backrest is under strong spring tension. If there is no resistance to
the backrest, it quickly moves forward after unlocking.
Z If the backrest quickly moves forward uncontrolled it can damage the seat-
belt lock.
X During the journey, persons are only to sit on the permitted seats. The
authorised number of seats is stipulated in the vehicle documents.
X Sitting on the divans is forbidden during the journey.
X Wearing of seat belts is compulsory at all seats.
Fig. 5 "Seat" symbol
X Only drive with the external doors locked.
Z Locking the doors can prevent them from opening of their own accord, e.g.
during an accident.
Z Locked doors also prevent forced entry, e.g. when waiting at a set of traffic
lights. However, in an emergency, locked doors make it more difficult for
helpers to enter the vehicle.
Z When leaving the vehicle, always lock the doors.
Z The doors are part of the base vehicle. The opening and closing of the
doors is described in the instruction manual of the base vehicle.

30 Motorhome - 02/11-0 - GLO-MJ11-00EN
During the journey
5
5.7 Filling up with diesel
Refer to the instruction manual for the base vehicle for the position of the fuel
filler neck.
X No appliance (e.g. heating or refrigerator) that is operated through the
built-in burner may be operational while fuel is being filled up, on ferries
or in the garage. Danger of explosion!
 Loading...