

Page 1
Model #:
Serial #:
Date of
Purchase:
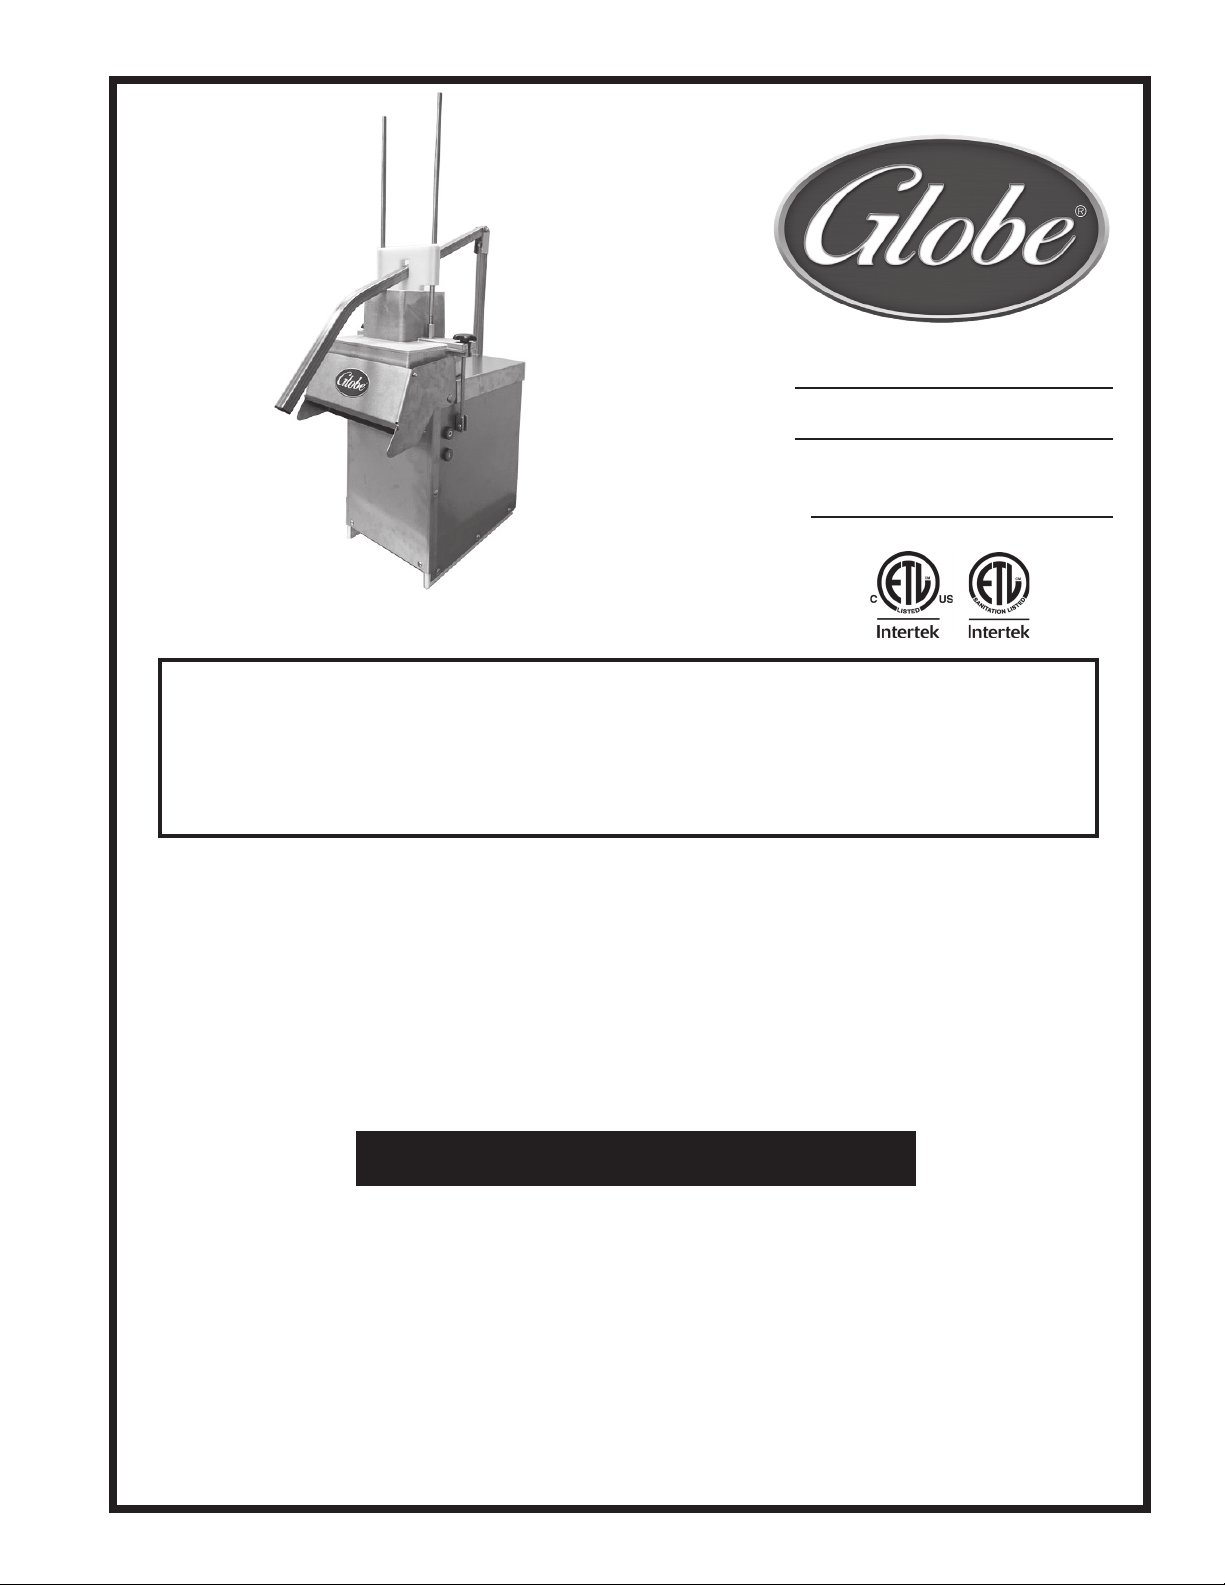
Model GSCS2
Instruction Manual for the Cheese Shredder
Models: GSCS2 & GSCS3
For all after sales support, visit www.globefoodequip.com
• Complete the Warranty Registration
• Find an Authorized Servicer
• View Parts Catalogs
• Download an Electronic Copy of the Owner’s Manual
For additional Technical Support call Globe at 1-866-260-0522.
- IMPORTANT SAFETY NOTICE -
This manual contains important safety instructions which
must be strictly followed when using this equipment.
Maintain and use this manual as a reference for training.
Page 2

Page 3

Index
INDEX ................................................................................................................................................................... 3
ATTENTION OWNERS AND OPERATORS ...................................................................................................... 5
KEY COMPONENTS OF THE GSCS2/GSCS3 .................................................................................................. 6
GLOBE SAFETY TIPS ........................................................................................................................................ 7
UNPACKING & INSTALLATION ......................................................................................................................... 8-10
OPERATING INSTRUCTIONS ........................................................................................................................... 11
CLEANING & SANITIZING ................................................................................................................................. 12-13
TROUBLESHOOTING ........................................................................................................................................ 15
GSCS2/GSCS3 ACCESSORIES ......................................................................................................................... 15
LIMITED GSCS2/GSCS3 WARRANTY ............................................................................................................... 16
GLOBE FOOD EQUIPMENT COMPANY
2153 DRYDEN RD
DAYTON, OH 45439
PHONE: 937-299-5493
TOLL FREE: 800-347-5423
FAX: 937-299-8623
E-MAIL: [email protected]
WEBSITE: www.globefoodequip.com
Printed in the U.S.A. GFE © 2022 vr1 Rev. B 980204 12-2022
Page 4

Page 5
Attention Owners and Operators
This equipment is designed to provide ecient and eective grating of cheeses as long as the equipment is used
in accordance with the instructions in this manual and is properly maintained. Importantly, unless the operator
is adequately trained and supervised there is a possibility of serious injury. Owners of this equipment bear the
responsibility to make certain that this equipment is used properly and safely, to strictly follow all the instructions
contained in this manual and the requirements of local, state or federal law.
Owners should not permit anyone to touch this equipment unless they are over 18 years old, are adequately
trained and supervised, and have read and understand this manual. Owners should also ensure that no
customers, children, visitors or other unauthorized personnel come in contact with this equipment. Please
remember that we cannot anticipate every circumstance or environment in which our equipment will be operated.
It is the responsibility of the owner and the operator to remain alert to any hazards posed by the function of this
equipment and all moving parts. If you are ever uncertain about a particular task or the proper method of operating
this equipment, ask your supervisor or consult a customer service representative.
To prevent illness caused by the spread of food-borne pathogens, it is important to properly clean and sanitize the
entire GSCS2/GSCS3 as any surface of the GSCS2/GSCS3 can become contaminated. It is the responsibility of
the GSCS2/GSCS3 owner/operator to follow all guidelines, instructions and laws as established by your local and
state health departments and the manufacturers of chemical sanitizers.
When cleaning the GSCS2/GSCS3, pay particular attention to cracks, broken seams and any area that may collect
food debris. If the GSCS2/GSCS3, or any of its parts, are damaged or broken, it may become more dicult to
properly clean and sanitize the unit. If the GSCS2/GSCS3 is damaged or needs repair, contact an experienced
service individual immediately to ensure the GSCS2/GSCS3 can be properly sanitized. If you have any questions,
please contact Globe at 866-260-0522.
Throughout the manual you will see warnings to help alert you to potential hazards and to help promote safe use of
this equipment.
Warnings aecting your personal safety are indicated by:
or
Warnings related to possible damage to the equipment are indicated by:
Make certain that the instruction manual is available for easy reference by any operator. English and French
language warning labels have been placed on the GSCS2/GSCS3. If the warning labels or this manual are
misplaced, damaged, or illegible, or if you require additional copies, please contact your nearest representative or
the factory directly for these items at no charge.
Please remember that neither this manual nor the warning labels replace the need to be alert, to properly train and
supervise operators, and to use common sense when using this equipment.
Page 5
Page 6
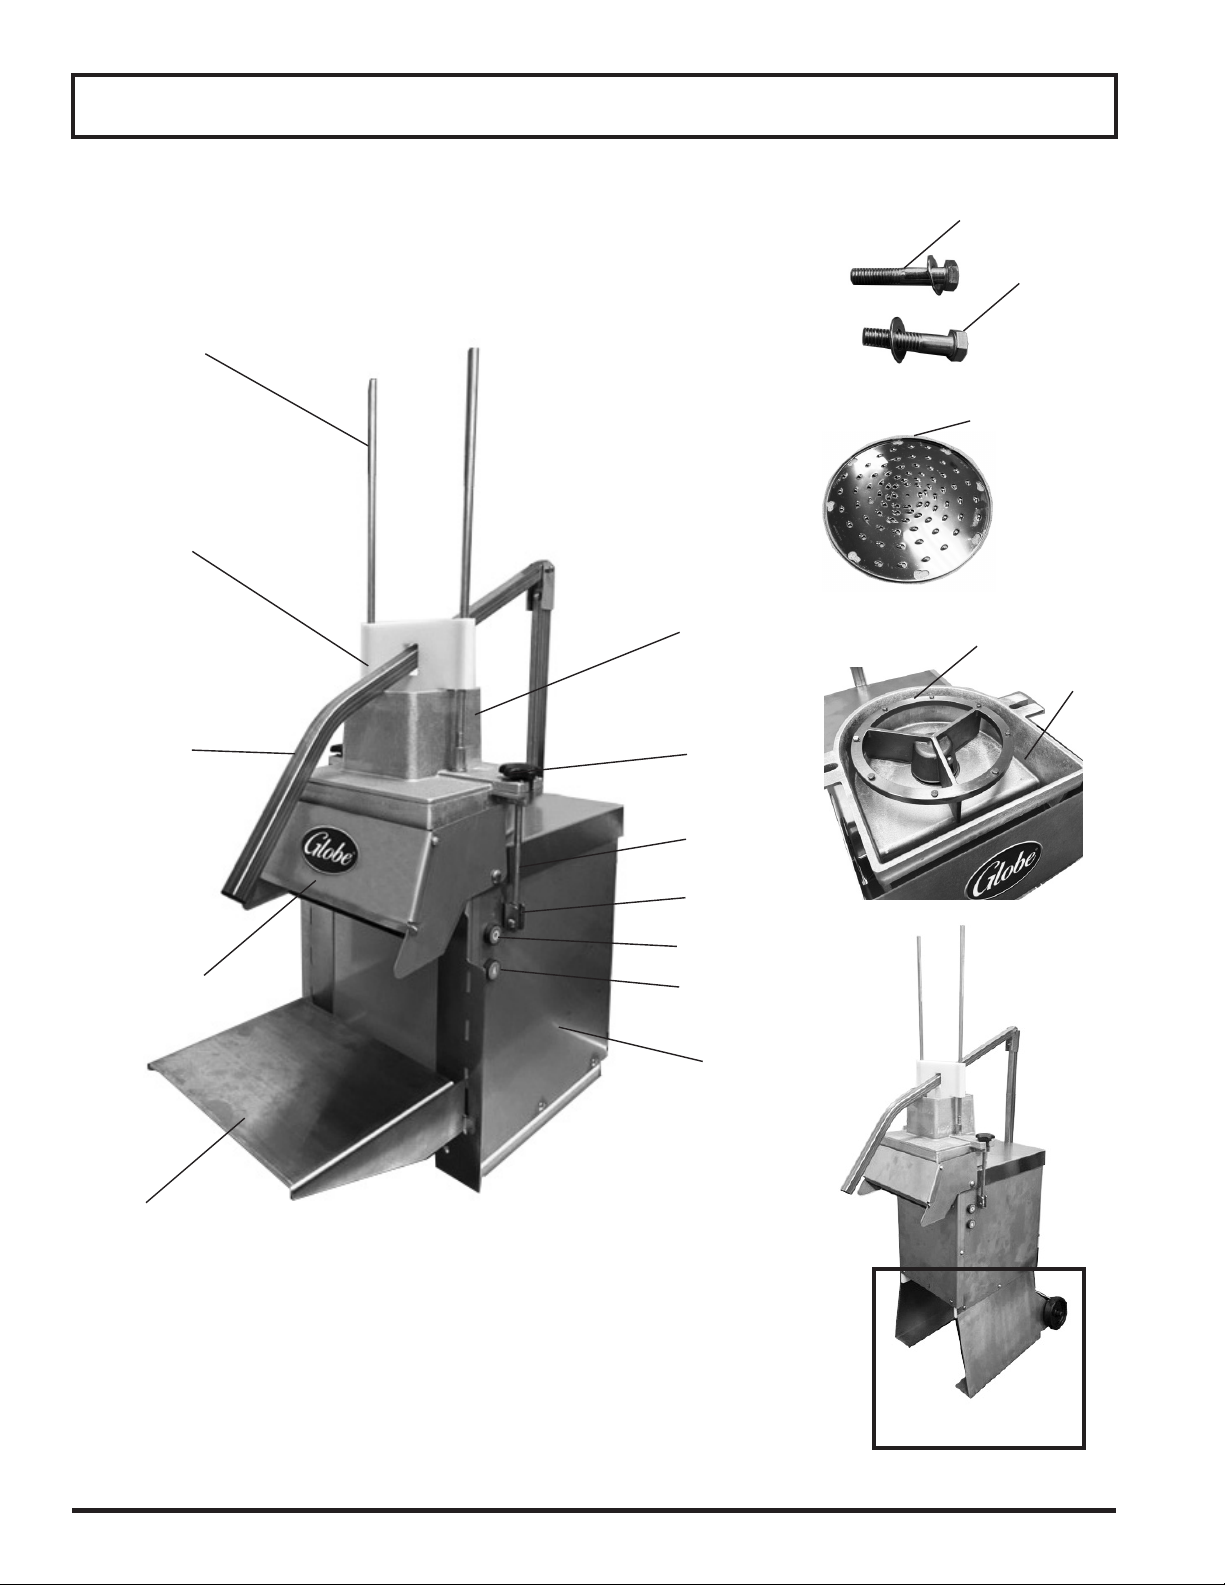
Slider Rod
Plunger
Key Components of the GSCS2 and GSCS3
Bolt/Washer
5/16-18X1.75
Bolt/Washer
5/16-18X1.5
3/16'' Grating
Plate
Arm
Chute
Hopper Lid
Tie Down
Knob
Locking
Knob Shaft
Position
Switch
Stop Button
Start Button
Motor
Housing
Blade Holder
Hopper
Housing
Adjustable Container Shelf
(Accessory Option)
Page 6
Base
(Accessory Option)
GSCS2/GSCS3
Page 7

Globe Safety Tips
TO AVOID SERIOUS PERSONAL INJURY:
• NEVER touch the GSCS2/GSCS3 before reading and completely understanding everything in this
instruction manual. You must be at least 18 years old and have had proper training and authorization
from your supervisor.
• NEVER bypass, alter or modify this equipment in any way from its original condition. Doing so can
create hazards and will void the warranty.
• ALWAYS ground the GSCS2/GSCS3 utilizing proper power source.
• KEEP unit UNPLUGGED when not in use to prevent accidental start up.
• ALWAYS keep hands and arms away from all moving parts.
• BEFORE CLEANING, SERVICING, OR REMOVING ANY PARTS always turn the GSCS2/GSCS3 OFF
and unplug the power cord.
• ALWAYS properly clean and sanitize the GSCS2/GSCS3 to prevent illness or death caused by the
spread of food-borne pathogens.
• USE ONLY PROPERLY INSTALLED GLOBE ACCESSORIES.
Page 7
Page 8
Unpacking & Installation
TO AVOID SERIOUS PERSONAL INJURY, USE
THE GSCS2 & GSCS3 IN A SUFFICIENT WORK AREA
• ALWAYS use equipment in a well-lighted work area with sucient space away from children and visitors.
• NEVER bypass, alter or modify this equipment in any way from its original condition. Doing so can create
hazards and will void the warranty.
• NEVER operate the GSCS2/GSCS3 without all warnings attached.
UNPACKING:
1. Inspect the package carefully before unpacking. Note any damage on the delivery paperwork and take
pictures.
2. Unpack the GSCS2/GSCS3 immediately after receipt. If the machine is found to be damaged, save the
packaging material and take pictures of damage. Contact Globe Food Equipment as soon as possible.
Contact information and further details can be found at https://globefoodequip.com/support/order-returnpolicy.html
3. Contact the factory or your local supplier if you did not receive all of the materials below:
Motor Housing Blade Holder Bolt 5/16-18x1.75 (1)
Hopper Housing 3/16’’ Grating Plate Bolt 5/16-18x1.5 (1)
Hopper Lid Arm Owner’s Manual
Plunger Slider Rod (Qty. 2)
Chute Washer (Qty. 2)
4. Read this manual thoroughly before operation. DO NOT continue with use of the GSCS2/GSCS3 if you have
any questions or do not understand everything in the manual. Contact your local representative or the factory
rst.
5. Remove the GSCS2/GSCS3 from the corrugated box.
6. Make sure warning labels are correctly positioned, legible and instruction manual is available near the
GSCS2/GSCS3.
INSTALLATION:
Note: If using the optional base accessory, see the base assembly instructions in the base
packaging. Refer to the base assembly instructions before setting up the GSCS2/GSCS3.
1. Stand the motor housing up on a level surface.
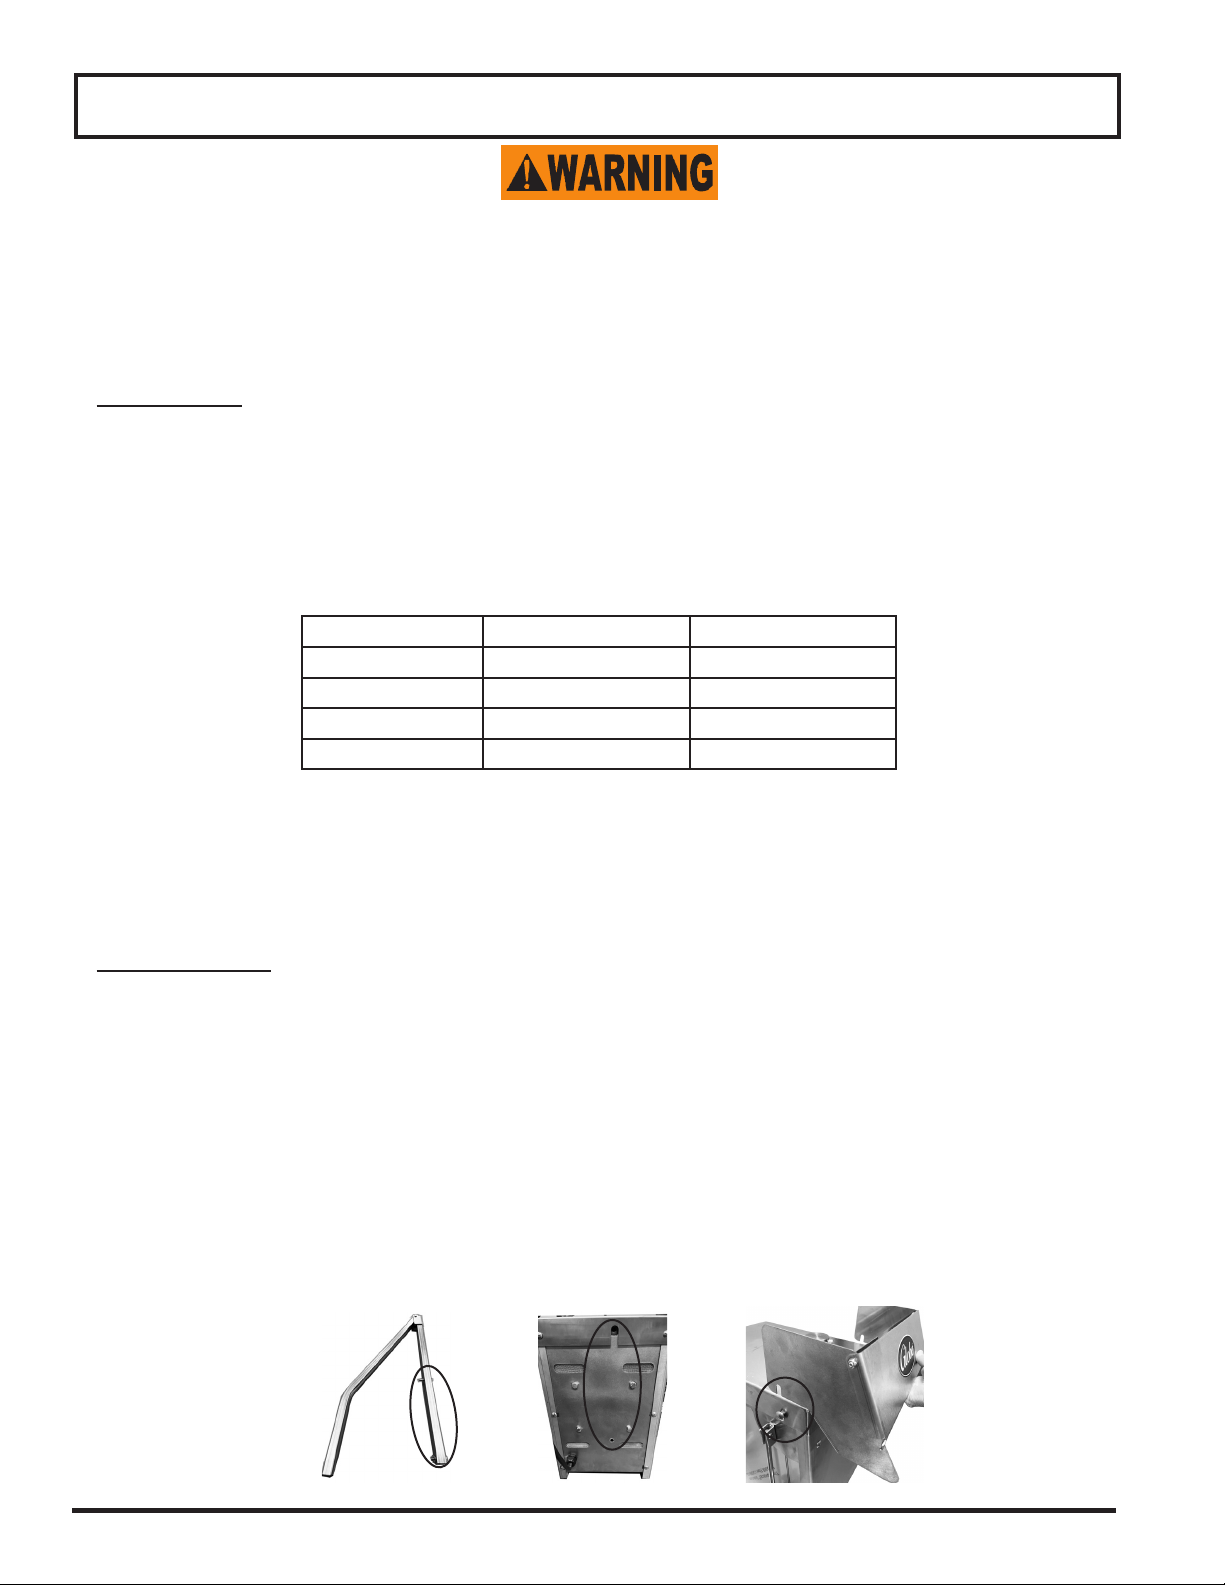
2. Install the arm on back of the motor housing.
a. Install the two washers on the two bolts.
b. Install one bolt 5/16-18 x 1.75 through the top hole on the outside of the arm (Figure 8-1).
c. Install one bolt 5/16-18 x 1.5 through the bottom hole on the outside of the arm.
d. Align the arm holes with the holes on back of the motor housing (Figure 8-2).
e. Tighten the bolts to secure the arm to the motor housing.
3. Attach the chute to the motor housing. Align the slots on the chute with the top bolts on the left and right side
of the motor housing (Figure 8-3).
Page 8
Figure 8-2
Figure 8-3Figure 8-1
Page 9
Unpacking & Installation
INSTALLATION (CONT.):
Note: Use the hopper housing to secure the chute to the motor housing. Make sure the hopper housing
is installed over the chute edge, covering the chute edge with the hopper housing.
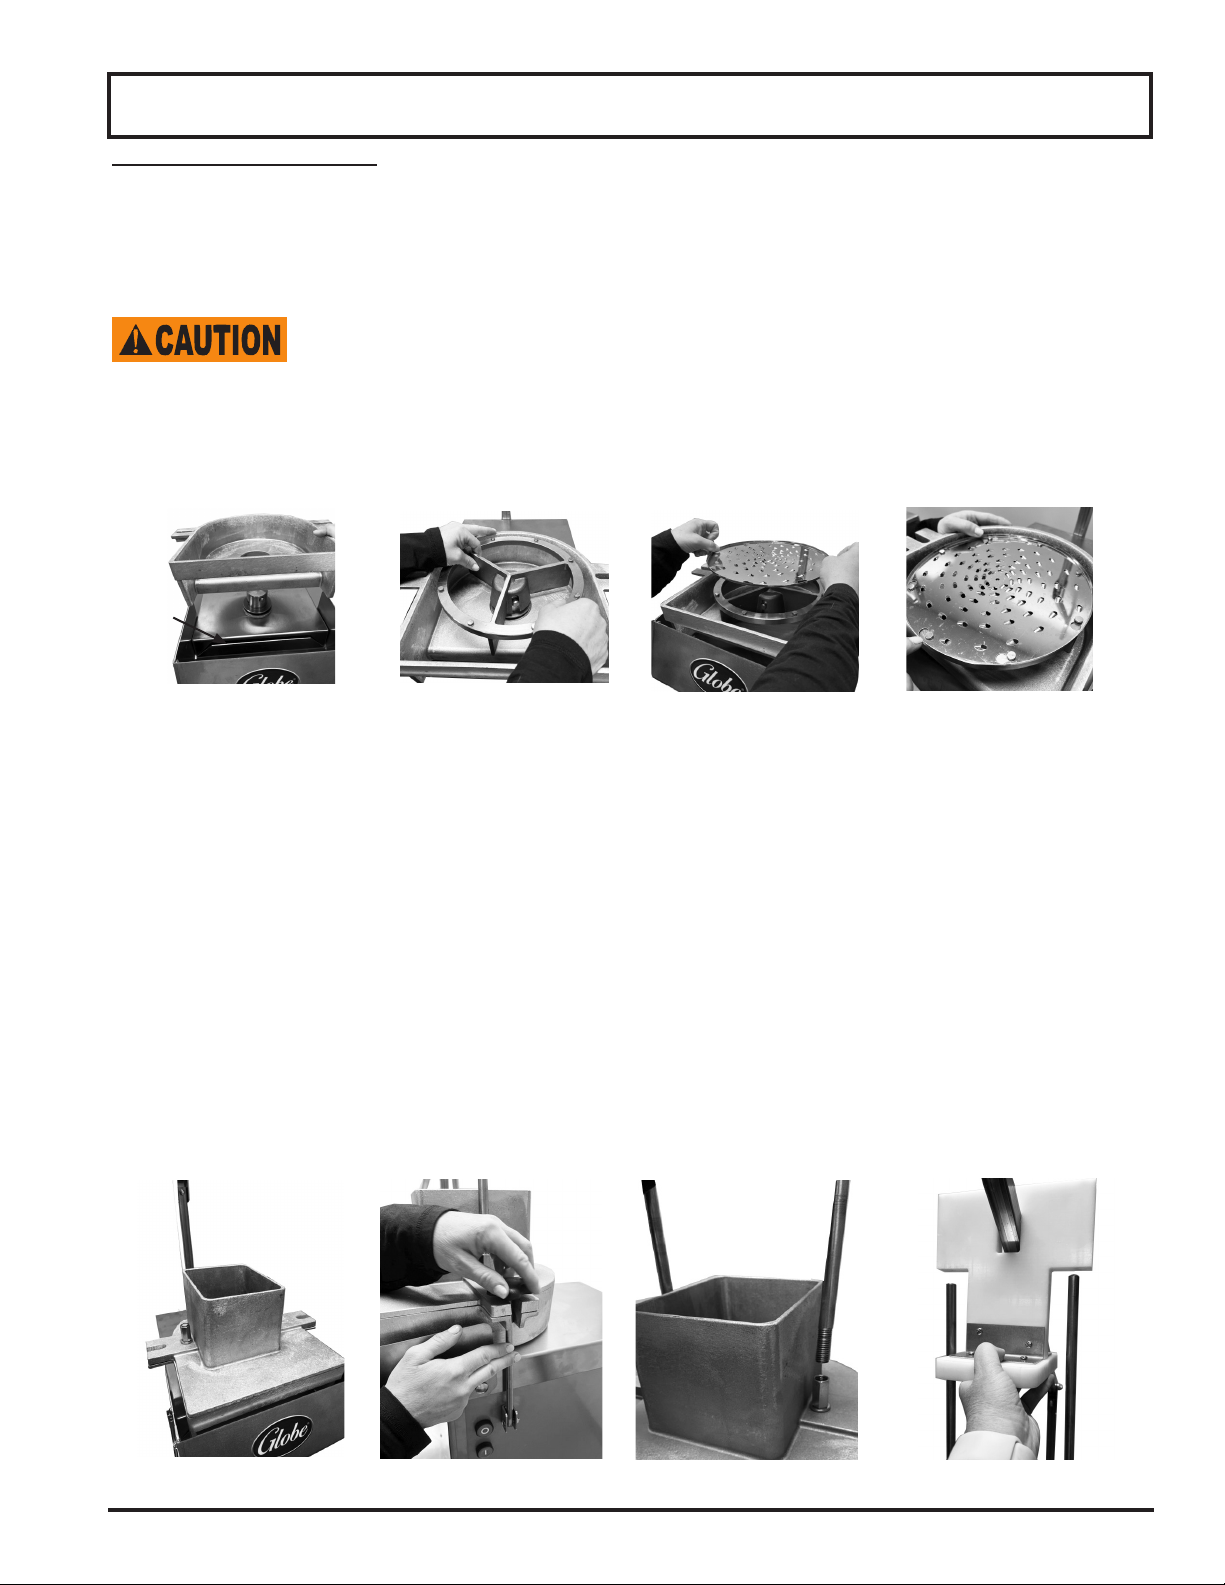
4. Place the hopper housing over the hub making sure to cover the chute edge (Figure 9-1).
5. Use two hands to place the blade holder over the hub (Figure 9-2).
DO NOT FORCE THE BLADE HOLDER ON THE HUB. FORCING THE BLADE HOLDER ON
THE HUB CAN CAUSE DAMAGE TO THE BLADE HOLDER.
6. Place the grating plate on the blade holder. Make sure that the lip on the grating plate is pointing up (Figure 9-3).
7. Align the keyhole slots on the grating plate with the blade holder and turn the grating plate clockwise to lock the
grating plate in place (Figure 9-4).
Chute
Edge
Figure 9-1 Figure 9-2 Figure 9-3
8. Place the hopper lid on top of the hopper housing (Figure 9-5).
Note: In order to engage the position switch within the motor housing, make sure that the locking knob
shafts are securely in place and tightened.
9. Swing the locking knob shafts up to secure the hopper lid (Figure 9-6).
10. Hand tighten the tie down knobs in place.
11. Install the slider rods on the left and right side of the motor housing. Hand tighten (Figure 9-7).
12. Place the arm through the hole on the plunger and bring the arm to the front (Figure 9-8).
13. Align the two guide holes on the plunger with the two slider rods.
Note: Raise and lower the arm to ensure the plunger moves up and down freely.
14. Refer to the procedures outlined in Cleaning & Sanitizing section to clean the cheese shredder before use.
15. Contact your local representative, or Globe directly, if you have questions or problems with the installation or
operation of the cheese shredder.
Figure 9-4
Figure 9-5
Figure 9-6
Figure 9-7 Figure 9-8
Page 9
Page 10
Unpacking & Installation
CONNECTING TO ELECTRICAL POWER
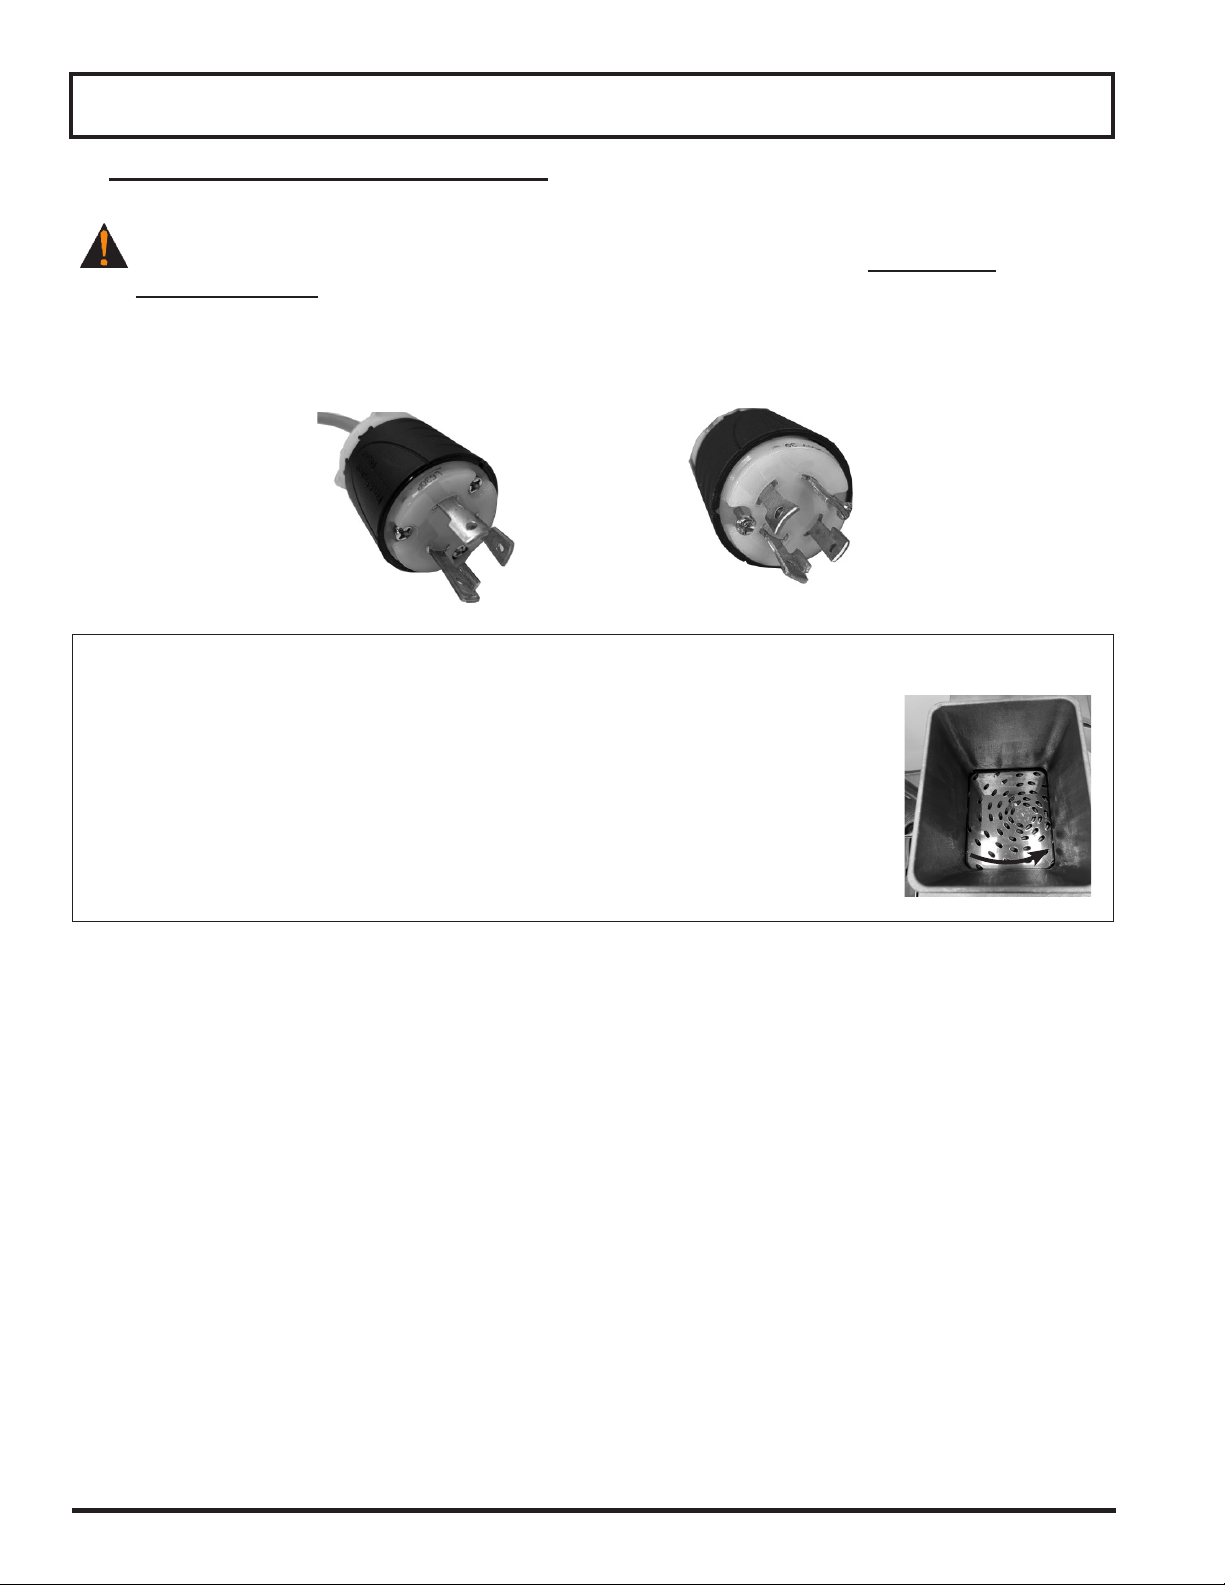
CORD CONNECTED UNITS: THIS MACHINE IS PROVIDED WITH A GROUNDING PLUG. THE OUTLET
THAT THIS PLUG IS CONNECTED TO MUST BE PROPERLY GROUNDED. IF THE RECEPTACLE IS NOT
THE PROPER GROUNDING TYPE, CONTACT AN ELECTRICIAN. DO NOT UNDER ANY
CIRCUMSTANCES CUT OR REMOVE THE PRONGS FROM THE POWER CORD OR USE AN ADAPTER
PLUG. NEVER USE AN EXTENSION CORD. LOW POWER SUPPLY COULD DAMAGE THE GSCS2/
GSCS3 AND/OR CAUSE A FIRE (FIGURE 10-1 & FIGURE 10-2).
Figure 10-1 Single Phase Plug
Three Phase Units:
Before use, conrm proper rotation of all 3 phase GSCS2/GSCS3. There
is a 50% chance your 3 phase GSCS2/GSCS3 is properly rotating if using it on
3 phase power.
1. Make sure there is no cheese in the hopper opening.
2. Select the green ON button to turn the unit on.
3. Lift the arm to raise the plunger and look in the hopper as the grating plate rotates.
Make sure the grating plate is going in a counter-clockwise direction. If it is traveling in
the wrong direction, have a licensed electrician switch the electrical connection and
retest.
1. Complete the online warranty/registration at:
www.globefoodequip.com/support/warranty-registration-form.
2. Before use, clean and sanitize the GSCS2/GSCS3. Refer to Cleaning and Sanitizing section of this manual.
3. Contact your local representative, or the factory directly, if you have any questions or problems with the operation
of the GSCS2/GSCS3.
Figure 10-2 Three Phase Plug
Page 10
Page 11
Operating Instructions
TO AVOID SERIOUS PERSONAL INJURY:
• NEVER touch the GSCS2/GSCS3 without training and authorization from your supervisor or if you are
under 18 years old. Read the instruction manual rst.
• ONLY use the GSCS2/GSCS3 in a clean, well-lit work area with sucient space away from children
and visitors.
• NEVER put hands or ngers into the GSCS2/GSCS3 during operation.
• BEFORE CLEANING, SERVICING, OR REMOVING ANY PARTS, always turn the GSCS2/GSCS3
OFF and unplug unit.
• KEEP unit UNPLUGGED when not in use to prevent accidental start up.
OPERATION
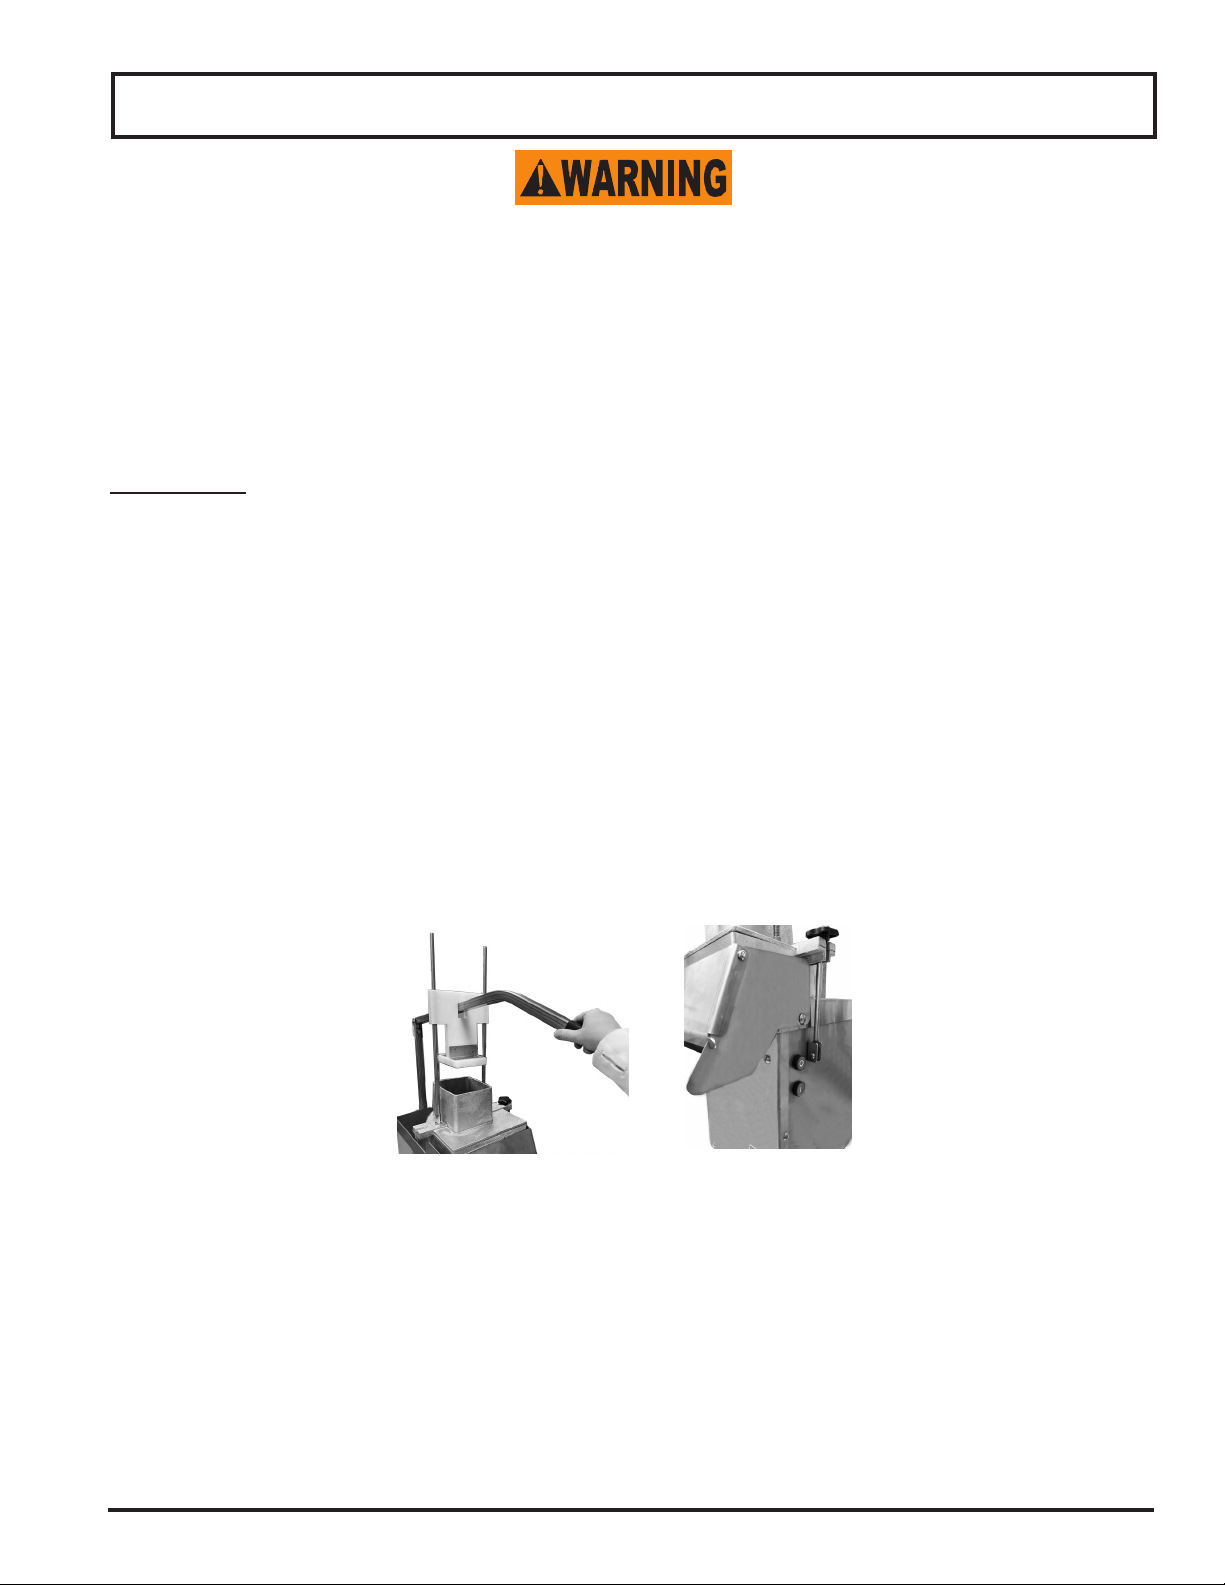
1. Lift arm to raise the plunger (Figure 11-1).
2. Place cheese in the hopper opening and bring the plunger back to rest on the cheese.
3. Push the green button on the right side of the motor housing to turn ON the GSCS2/GSCS3 (Figure 11-2).
4. Press down on the arm to apply pressure to the cheese until the plunger stops (Figure 11-1).
Note: The plunger will stop before reaching the grating plate, leaving a small amount of cheese in the
hopper.
5. Repeat steps 1-4 for each additional block of cheese.
6. Push the red button on the right side of the motor housing to turn OFF the GSCS2/GSCS3 and unplug the unit
(Figure 11-2).
Figure 11-1
Figure 11-2
Page 11
Page 12
Cleaning & Sanitizing
TO AVOID SERIOUS PERSONAL INJURY:
• BEFORE CLEANING, SERVICING, OR REMOVING ANY PARTS, always turn the GSCS2/GSCS3 OFF
and unplug unit.
• NEVER attempt to clean the GSCS2/GSCS3 while the GSCS2/GSCS3 is in operation.
• Dilute detergent per supplier’s instruction. Products containing sodium hypochlorite should not be
used on the GSCS2/GSCS3.
• DO NOT hose down, pressure wash, or pour water on the GSCS2/GSCS3.
• NEVER use a scrubber pad, steel wool, or abrasive material to clean the GSCS2/GSCS3.
To prevent illness or death caused by the spread of food-borne pathogens, it is important
to properly clean and sanitize the GSCS2/GSCS3 as any surface of the GSCS2/GSCS3
can become contaminated. It is the responsibility of the GSCS2/GSCS3 owner/operator to
follow all guidelines, instructions and laws as established by your local and state health
departments and the manufacturers of chemical sanitizers.
Once the GSCS2/GSCS3 makes contact with food product, the entire GSCS2/GSCS3, including
removable parts, must be thoroughly cleaned and sanitized. This process is to be repeated at
least every 4 hours using these procedures and information; and must comply with additional
laws from your state and local health departments.
As with all food contact surfaces, it is extremely important to properly sanitize the entire GSCS2/
GSCS3 and to closely follow the instructions on your quaternary sanitizer container to make sure
proper sanitation is achieved to kill potentially harmful bacteria.
IMPORTANT: If a chemical sanitizer other than chlorine, iodine or quaternary ammonium is
used, it must be applied in accordance with the EPA-registered label use instructions. Excessive
amounts of sanitizer and use of products not formulated for stainless steel or aluminum can
damage the equipment and VOID your warranty.
Sanitizer concentration must comply with section 4-501.114, Manual and Mechanical
Warewashing Equipment, Chemical Sanitization - Temperature, pH, Concentration, and Hardness
of the FDA Food Code.
For more information on proper kitchen and equipment sanitation,
visit www.servsafe.com provided by the National Restaurant Association (NRA).
Page 12
Page 13

Cleaning & Sanitizing
• ALWAYS turn the GSCS2/GSCS3 OFF and unplug the power cord BEFORE cleaning.
• It is extremely important to follow the instructions on the sanitizer container to make sure proper
sanitation is achieved. Allow the parts to air dry before placing them back on the GSCS2/GSCS3!
CLEANING AND SANITIZING
1. Make sure the GSCS2/GSCS3 is turned OFF and unplugged.
2. Lift the arm to raise the plunger (Figure 13-1).
3. Remove the plunger from the two slider rods (Figure 13-2).
4. Lift the arm up and away to move out of the way.
5. Loosen the two tie down knobs and swing the locking knob shafts down to unlock the hopper lid from the
hopper blade housing (Figure 13-3).
Figure 13-2Figure 13-1 Figure 13-3
6. Remove the hopper lid from the motor housing (Figure 13-4).
7. Remove the grating plate, blade holder and the hopper housing from the GSCS2/GSCS3 (Figure 13-5).
8. Remove the chute from the two bolts on the top sides of the motor housing (Figure 13-6).
9. Remove the excess cheese from the GSCS2/GSCS3 parts.
Note: If the grating plate is hard to remove from the blade holder, soak the grating plate and the blade
holder in cold water overnight to loosen the dairy fat.
10. Hand wash or place the hopper lid, grating plate, blade holder, hopper housing and chute into the dish washer.
11. Sanitize the GSCS2/GSCS3 following the instructions on your quaternary sanitizer container. Allow the GSCS2/
GSCS3 to air dry.
12. Make sure that all surfaces are dry before reassembling the unit.
Figure 13-5Figure 13-4 Figure 13-6
Page 13
Page 14

Page 15

Troubleshooting
ISSUE CAUSE SOLUTION
GSCS2/GSCS3 does not
start.
GSCS2/GSCS3 stops
running.
If problem continues and the above solution does not remedy the issue, please call Globe’s Service Department
at 866-260-0522.
GSCS2/GSCS3 is unplugged. Plug in the GSCS2/GSCS3. Push the
green ON button to start.
Position Switch not fully engaged. Push tie down knobs in towards center
and tighten.
Push the green ON button to start.
If the GSCS2/GSCS3 does not start call
a Service Technician.
Position switch not fully engaged. Push tie down knobs in towards center
and tighten.
Push the green ON button to start.
If the GSCS2/GSCS3 does not start call
a Service Technician.
GSCS2/GSCS3 has overheated. Allow time for the auto-reset to reset the
GSCS2/GSCS3.
Push the green ON button to start.
If the GSCS2/GSCS3 does not start call
a Service Technician.
GSCS2/GSCS3 Accessories
XSP316 3/16 Shredding Plate
XSP332 3/32'' Shredding Plate
XSP14 1/4'' Shredding Plate
XSP516 5/16'' Shredding Plate
XSP112 1/2'' Shredding Plate
XSP316-HD 3/16'' Heavy Duty Shredding Plate
GSCS-SHELF Adjustable Container Shelf
GSCS-BASE Base
Page 15
Page 16

Limited GSCS2/GSCS3 Warranty
Globe Food Equipment Company (“GFE”) warrants to the original purchaser of new equipment that said equipment,
when installed in accordance with our instructions within North America and subjected to normal use, is free from
defects in material or workmanship. Should any part thereof become defective as a result of normal use within the
period and limits dened below, then at the option of GFE such parts will be repaired or replaced by GFE or its
Authorized Service Agency. This warranty is subject to the following conditions:
Repairs under this warranty are to be performed by a GFE Authorized Service Agency. GFE cannot be responsible
for charges incurred or service performed by non-GFE Authorized Agencies. In all cases the closest GFE Authorized
Service Agency must be used.
TIME PERIOD:
One (1) year on parts (excludes wear/expendable parts) and labor from the date of shipment or installation. Proof
of purchase may be required.
THIS WARRANTY IS IN LIEU OF ALL OTHER WARRANTIES, WHETHER EXPRESSED OR IMPLIED. GFE
EXPRESSLY DISCLAIMS ANY IMPLIED WARRANTY OF MERCHANTABILITY OR EXPRESSED OR IMPLIED
WARRANTY OF FITNESS FOR A PARTICULAR PURPOSE.
GFE’S OBLIGATION AND LIABILITY UNDER THIS WARRANTY IS EXPRESSLY LIMITED TO REPAIRING AND
REPLACING EQUIPMENT WHICH PROVES TO BE DEFECTIVE IN MATERIAL OR WORKMANSHIP WITHIN
THE APPLICABLE WARRANTY PERIOD. ALL REPAIRS PURSUANT TO THIS WARRANTY WILL BE PERFORMED
BY AN AUTHORIZED DESIGNATED GFE SERVICE LOCATION DURING NORMAL WORKING HOURS. IN NO
EVENT SHALL GFE BE LIABLE FOR INCIDENTAL OR CONSEQUENTIAL DAMAGES TO BUYER OR ANY THIRD
PARTY, INCLUDING, WITHOUT LIMITATION, LOSS OF PROPERTY, PERSONAL INJURY, LOSS OF BUSINESS
OR PROFITS OR OTHER ECONOMIC LOSSES OR STATUTORY OR EXEMPLARY DAMAGES, WHETHER IN
NEGLIGENCE, WARRANTY, STRICT LIABILITY OR OTHERWISE.
This warranty is given only to the rst purchaser from a retail dealer. No warranty is given to subsequent transferees.
Example of items not covered under warranty, but not limited to just these items:
• Acts of God, re, water damage, burglary, accident, theft.
• Freight damage.
• Improper installation, alteration, neglect, or failure to maintain
• Residential installations
• Use of generic or after-market parts.
• Repairs made by anyone other than a GFE designated servicer, or not pre-authorized by GFE.
• Lubrication or periodic maintenance
• Expendable normal wear parts such as knife, rubber boots, blown fuses, lamps.
• Cleaning of equipment.
• Misuse or abuse.
Service under this warranty is not in force until such time as a properly completed, digitally signed, Installation/
Warranty Registration has been received by GFE within thirty (30) days from the date of installation. Complete
warranty registration at: www.globefoodequip.com/support/warranty-registration-form.
THE FOREGOING WARRANTY PROVISIONS ARE A COMPLETE AND EXCLUSIVE STATEMENT BETWEEN
THE BUYER AND SELLER. GFE NEITHER ASSUMES NOR AUTHORIZES ANY PERSONS TO ASSUME FOR
IT ANY OTHER OBLIGATION OR LIABILITY IN CONNECTION WITH SAID EQUIPMENT.
WARRANTY REGISTRATION
GO TO WWW.GLOBEFOODEQUIP.COM
TO FILL OUT AND SUBMIT YOUR WARRANTY REGISTRATION.
WWW.GLOBEFOODEQUIP.COM/SUPPORT/WARRANTY-REGISTRATION-FORM
Page 16
 Loading...