

Page 1
Limited One Year Warranty
(Commercial Applications)
T&S warrants to the original purchaser (other
than for purposes of resale) that such product is
free from defects in material and workmanship for
a period of one (1) year from the date of purchase.
During this one-year warranty period, if the product
is found to be defective, T&S shall, at its options,
repair and/or replace it. T o obtain warranty service,
products must be returned to...
T&S Brass and Bronze Works, Inc.
Attn: Warranty Repair Department
2 Saddleback Cove
Travelers Rest, SC 29690
Shipping, freight, insurance, and other
transportation charges of the product to T&S and
the return of repaired or replaced product to the
purchaser are the responsibility of the purchaser.
Repair and/or replacement shall be made within a
reasonable time after receipt by T&S of the returned
product. This warranty does not cover Items which
have received secondary fi nishing or have been
altered or modifi ed after purchase, or for defects
caused by physical abuse to or misuse of the
product, or shipment of the products.
Any express warranty not provided herein, and
any remedy for Breach of Contract which might
arise, is hereby excluded and disclaimed. Any
implied warranties of merchantability or fi tness
for a particular purpose are limited to one year in
duration. Under no circumstances shall T&S be
liable for loss of use or any special consequential
costs, expenses or damages.
Some states do not allow limitations on how
long and implied warranty lasts or the exclusion or
limitation of incidental or consequential damages,
so the above limitations or exclusions may not apply
to you. Specifi c rights under this warranty and other
rights vary from state to state.
Installation and
Maintenance
Instructions
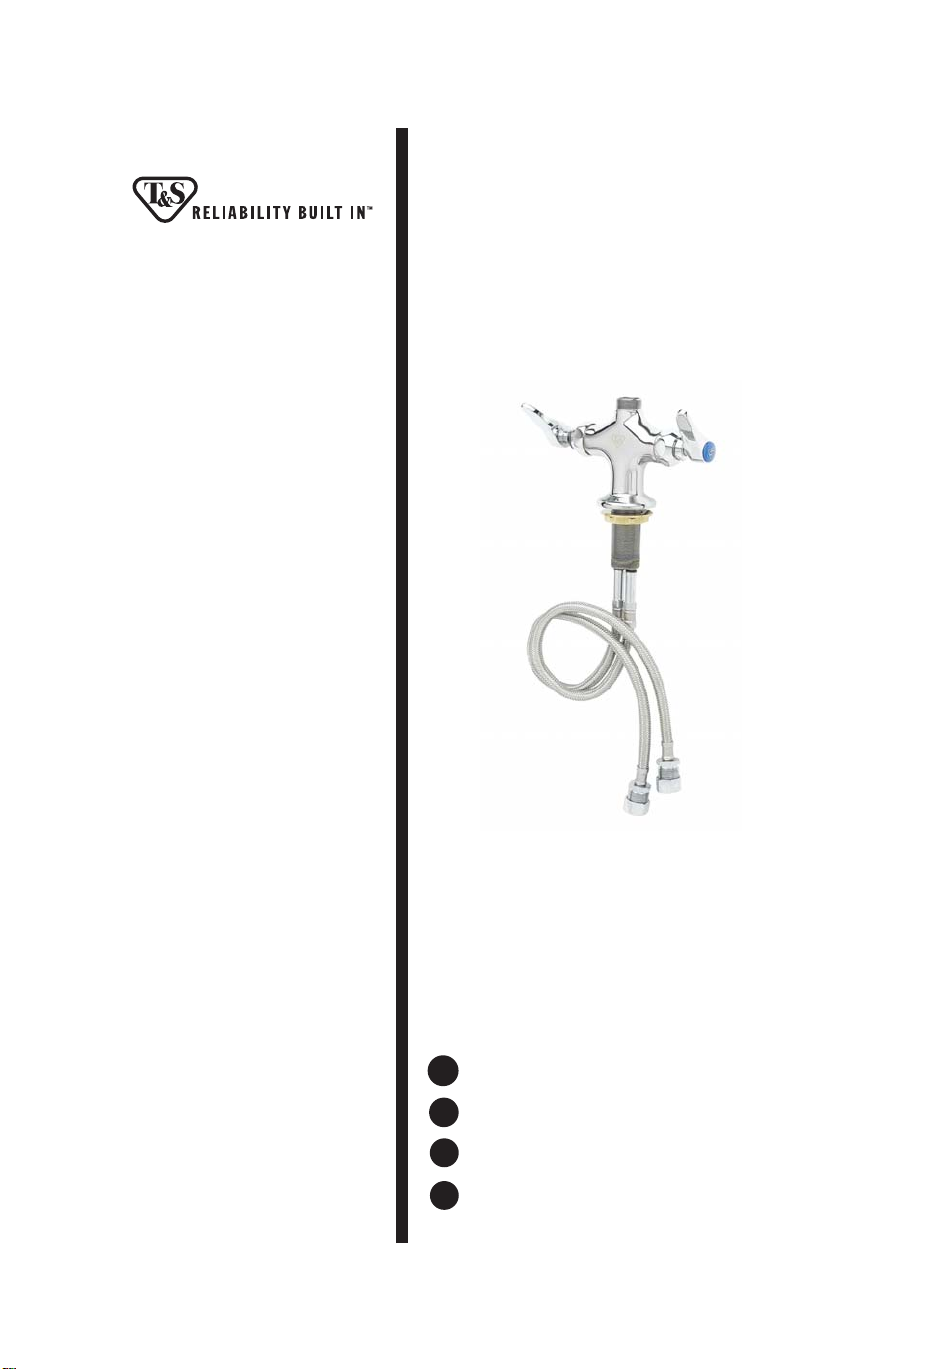
BASE FAUCET
ASSEMBLY
Attention California Residents:
“WARNING: This product contains chemicals
known to the State of California to cause cancer,
and birth defects or other reproductive harm.”
P/N: 098-005241-45 Rev.6
Date: 09-13-17
Drawn: TEH
Checked: DMH 09-20-17
Approved: JHB 10-09-17
Español:
ES
Instrucciones de instalación y mantenimiento
Français:
FR
Instructions pour l’installation et la maintenance
Deutsch:
DE
Installations- und Wartungsanleitungen
中文:
CN
安装与维护说明
Page 2
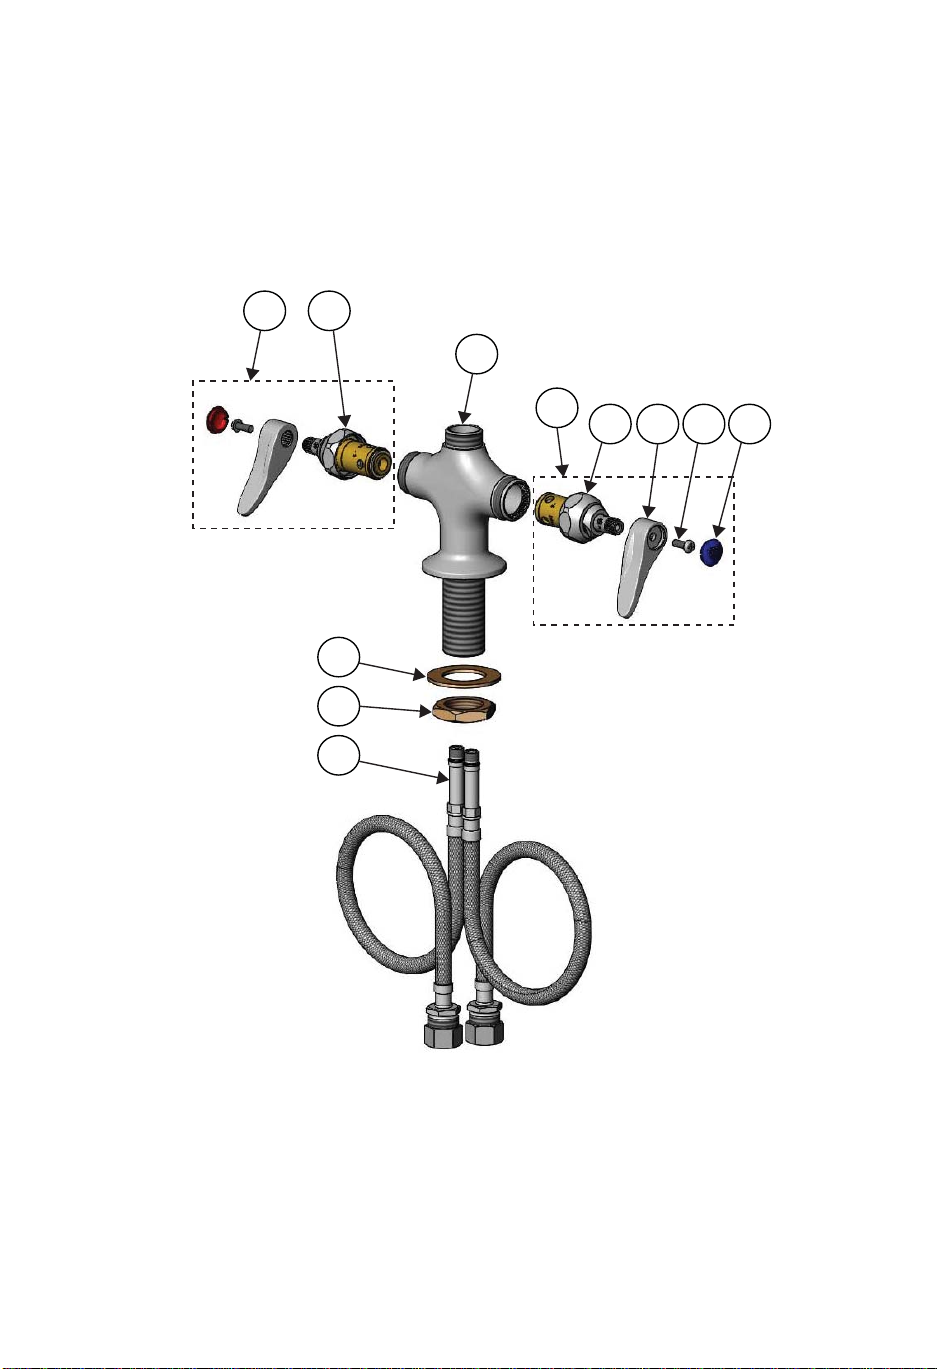
Exploded View
4
5
9
10
11
1
2
3
6 7 8
2
Page 3

Part Number Guide
Base Faucet Assembly
11 Base Faucet N/A
2 Asm, Quarter-Turn Eterna Cartridge, LTC (new style) 002711-40NS
2 Asm, Quarter-Turn Cerama Cartridge, LTC (new style) 012447-25NS
3 C
2 Cartridge Only, Cerama w/ Check Valves, LTC 012395-25NS
4 A
3 Asm, Quarter-Turn Cerama Cartridge, RTC (new style) 012446-25NS
5 Cartridge Only, Eterna w/ Spring Checks, RTC 012443-40NS
3 Cartridge Only, Cerama w/ Check Valves, RTC 012394-25NS
6 Handle
Handle, Wrist Action B-WH4-NS
7 Screw, Handle 000925-45
8 Index, Button noted below
Cold (Blue) 018506-19NS
Hot (Red) 001193-19NS
9 Washer, Body 002290-45
10 Locknut, Shank 000965-45
11 Flexible Supply Hoses (2) 012534-45
artridge Only, Eterna w/ Spring Checks, LTC 012442-40NS
sm, Quarter-Turn Eterna Cartridge, RTC (new style) 002712-40NS
, Lever 001638-45NS
3
Page 4

1
9
10
11
Faucet Installation:
EN
1. Shut o water supply and drain lines. Drill a hole approximately 1-1/2” diameter in countertop
where you are installing no.1.
2. Remove no.10 and no.9 from no.1.
3. Place no.1 through hole in sink, align hot and cold sides parallel to sink line.
4. Install no.9 and no.10 on no.1, tighten no.10.
5. Install no.11 into threaded holes of no.10. Tighten by hand.
6. Connect supply lines and check for leaks.
Instalación de la canilla:
ES
1. Cierre el suministro de agua y líneas de drenaje. Perfore un agujero de aproximadamente 3,81 cm
de diámetro en el mostrador donde va a instalar el no. 1.
2. Remueva el No. 10 y el No. 9 del no. 1.
3. Coloque el no. 1 entre al agujero en el fregadero, alinee los lados calientes y fríos paralelo a la
linea del fregadero.
4. Instale el No. 9 y el No. 10 en el no. 1; cierre el No. 10.
5. Instale el No. 11 entre los agujeros roscados del No. 10. Apriete por mano.
6. Conecte las lineas de suministro y revisa por fugas.
Installation du Robinet:
FR
1. Fermez l’arrivée d’eau et vidanger les tuyauteries. Percez un trou d’environ 3,81 cm de diamètre
dans le comptoir où vous installez le No. 1.
2. Retirez le No.10. et No.9. du No.1.
3. Placez le No.1. dans le trou de l’évier, alignez les cotés chauds et froids parallèles à la ligne de
l’évier.
4. Installez le No.9. et No.10. sur No.1., serrez le No.10.
5. Installez le No.11. dans les trous letés du No.10. Serrez à la main.
6. Raccordez les conduites d’alimentation et véri ez qu’il n’y ai aucune fuite.
4
Page 5

Wasserhahn Installation:
DE
1. Wasserzufuhr ausschalten und Rohre entleeren. An der Stelle in der Arbeits äche, wo Nr. 1
installiert werden soll, wird eine Ö nung mit einem Durchmesser von 3,81 cm gebohrt.
2. Nr. 10 und Nr. 9 von Nr. 1 entfernen.
3. Nr. 1 durch die Ö nung im Becken einführen und Heiß- und Kaltwasserleitungen parallel zur
Beckenleitung ausrichten.
4. Nr. 9 und Nr. 10 an Nr. 1 installieren. Nr. 10 festziehen.
5. Nr. 11 in den Gewindeö nungen von Nr. 10 installieren. Von Hand festziehen.
6. Wasserleitungen erneut anschließen und auf undichte Stellen prüfen.
龙头安装:
CN
1.关闭供水和排水阀门,在你需要安装1号的地方钻一个直径约1-1/2”的孔。
2.从1号上取下9号和10号。
3.将1号放入水槽开孔中,确保冷热水的两侧与水槽平行。
4.将9号和10号装到1号,并拧紧10号。
5.将11号安装到10号的螺纹孔中,用手拧紧。
6.连接供水管并检查是否漏水。
5
Page 6

RELATED T&S BRASS PRODUCT LINE
B-20K
Parts Kit
B-0330-LN
Double Pantry
8” Wall-Mount Base
Faucet Less Nozzle
T&S BRASS AND BRONZE WORKS, INC.
A fi rm commitment to application-engineered plumbing products
2 Saddleback Cove, P.O. Box 1088, T & S Brass-Europe
Travelers Rest, SC 29690 ‘De Veenhoeve’
Phone: (864) 834-4102 Oude Nieuwveenseweg 84
Fax: (864) 834-3518 2441 CW Nieuwveen
E-mail: tsbrass@tsbrass.com The Netherlands
 Loading...