

GlobalTime Electronic GTD368-4SR, GTD368-4SW, GTD368-6SW, GTD368-6SR, GTD368-4SB User Manual
...
User Manual
NTP Clock, GTD368
GlobalTime Electronic Co., Limited
Web: www.ntpclock.com
Tel:+86-21-36531186
Fax:+86-21-36531185
Ad d ress: No.399 Dakang Road, Room A2-1, Daliu Industrial Building,
Baoshan District, Shanghai, China
1
Double-sided Display

2
Contents
1. Introduction
................................................................................................................................................................
3
2. Technical Specification
................................................................................................................................................
3
3. Installation
...................................................................................................................................................................
4
3.1 Packing List
........................................................................................................................................................
4
3.2 Power Supply
.....................................................................................................................................................
4
3.3 Configuration Button
........................................................................................................................................
4
3.4 Installation Instructions of Double-sided clock
.................................................................................................
5
3.5 Wall Mounting
...................................................................................................................................................
7
3.6 Cantilever Mounting and Double-sided Display
................................................................................................
8
3.7 Pendant Mounting and Double-sided Display
..................................................................................................
8
4. Operation Sta tus
..........................................................................................................................................................
10
4.1 Self-Check
........................................................................................................................................................
10
4.2 IP A ddress
........................................................................................................................................................
11
4.3 Time Display
....................................................................................................................................................
11
5. Management Software
................................................................................................................................................
11
5.1 IP Search
.............................................................................................................................................................
11
5.2 Basic Information and Settings
..........................................................................................................................
12
5.2.1 Version Information
................................................................................................................................
12
5.2.2 Time Zone and Time Format
...................................................................................................................
13
5.2.3 Static IP
....................................................................................................................................................
13
5.2.4 NTP Setting
..............................................................................................................................................
14
5.2.5 Countdown Setting(optional)
..................................................................................................................
14
5.2.6 Energy Saving and Brightness Control
.....................................................................................................
14
5.2.7 Daylight Saving Time
...............................................................................................................................
15
5.2.8 Batch Modify
...........................................................................................................................................
15
5.3 System Information
............................................................................................................................................
16
5.3.1 Password Setting
.....................................................................................................................................
16
5.3.2 Update Control
........................................................................................................................................
16
6. Troubleshooting
...........................................................................................................................................................
17
6.1 The clock shows incorrect time.
......................................................................................................................
17
6.2 The display remain s unchanged.
.....................................................................................................................
17
6.3 Display the default IP address
.........................................................................................................................
17
6.4 Some LED segments are dark.
.........................................................................................................................
18
6.5 The user's software fails to track the clock.
....................................................................................................
18
6.6 The clock can not synchronize with any time server.
.....................................................................................
18
6.7 The clock face is dark.
.....................................................................................................................................
18
6.8 The light at the bottom right corner illuminates nonstop.
.............................................................................
18
7. Warranty and Maintenance
.........................................................................................................................................
18
3
1. Introduction
NTP (Network Time Protoc o l) is a highly-precise and convenient way to transfer time via the
network. NTP time source is available for free on the Internet, or can be bought for
independent use.
POE (Power Over Ethernet) utilizes the technology that delivers DC power to Ethernet
connected devices. POE enables data and power transfer simultaneou s ly through one
standard network cable, which makes the deployment of network equipment more
cost-effective.
GTD368 of GlobalTime brings together all the advantages of PoE technology and real-time
synchronized system to the market: get precise time source from the Internet, and receive
data and power over the same set of wires, which guarantees high precision and low cost.
Moreover, GTD368 double-sided display is available. With an extra screen( rather than an
extra GTD368 device), the double-sided display effect is achieved. This innovation facilitates
installation and reduces costs.
2. Technical S pecification
Accuracy +/- approximately 20 milliseconds
Operating Temperature -10 ℃ to 60 ℃
Viewing Distance 50 meters
Operating Humidity 90% maximum, non-condensing
Installation options Surface, Pendant, Cantilever
Certifications CE/FCC
Power Supply
IEEE 802.3af Compliant,less than 13watts, Power over
Ethernet(PoE)
DC power adapter
Network interface 10M RJ45
Warranty One year
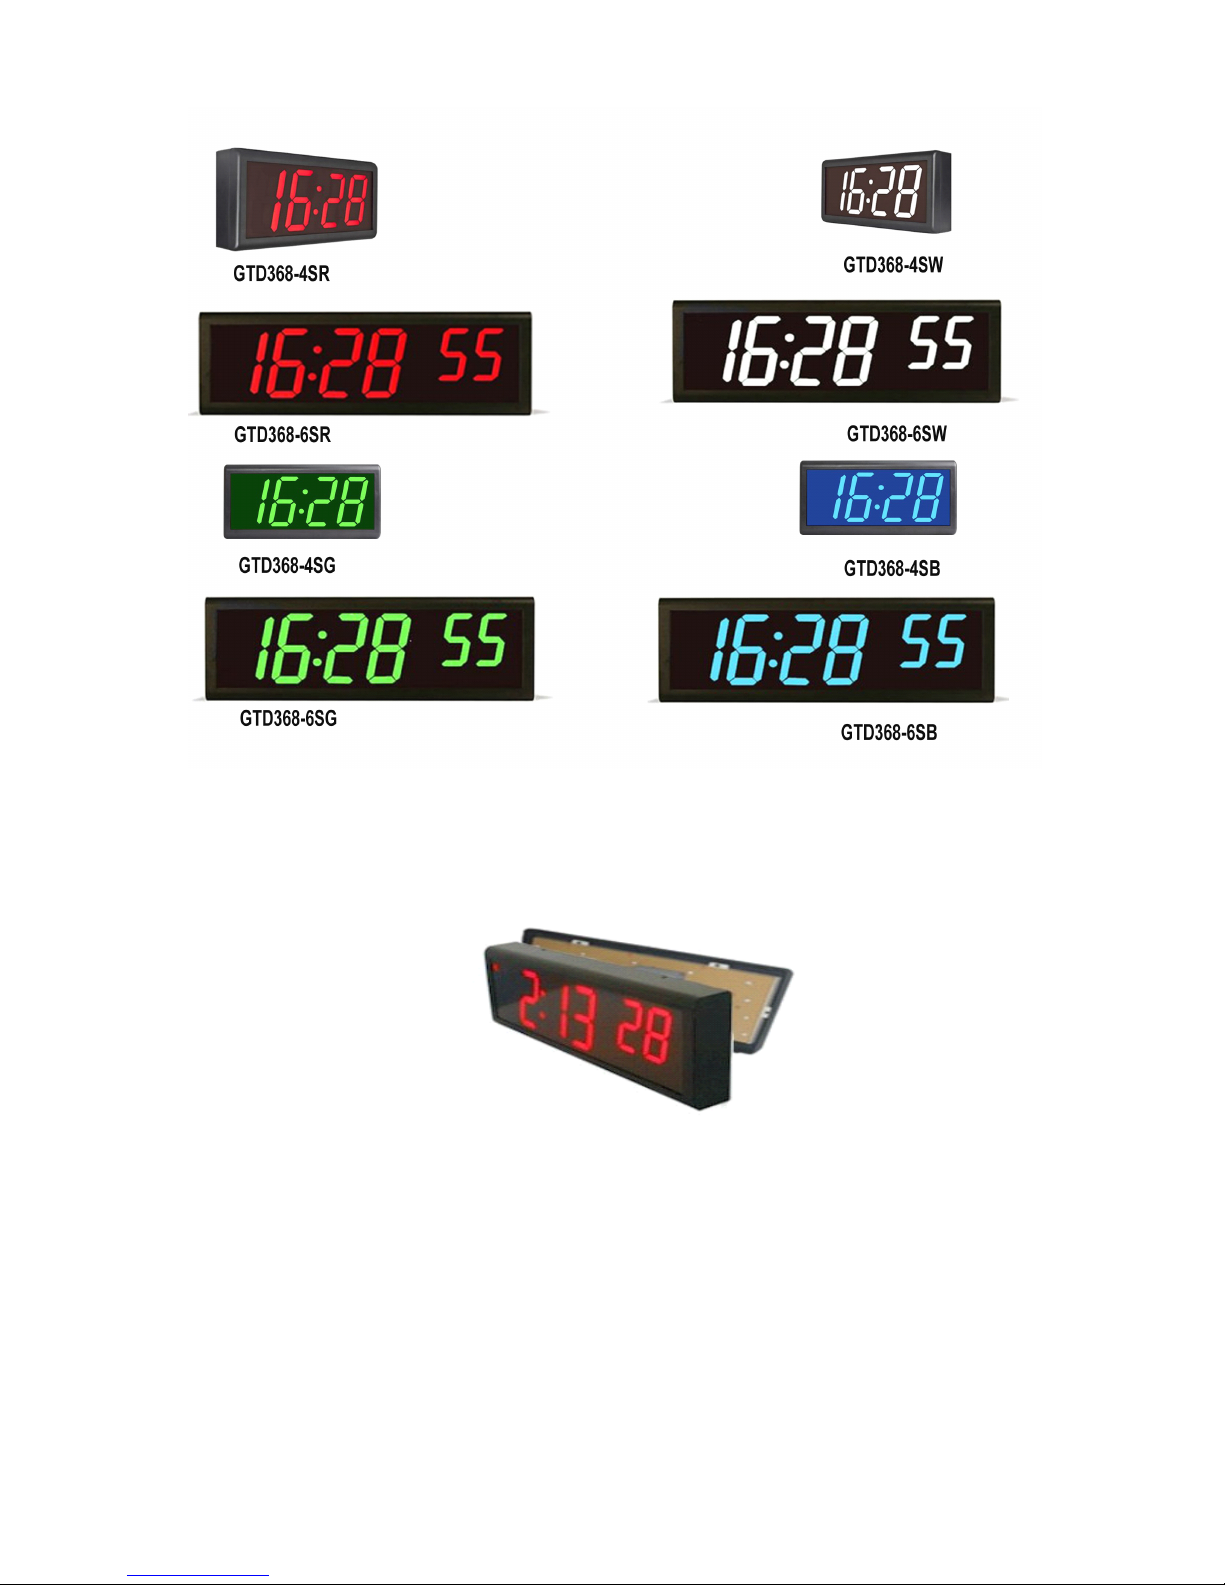
Display Face 4-digit / 6-digit, 7-segment LEDs
MTBF 50 thousand hours
4-digit Single-sided 4-digit Double-sided
Dimensions 3 02 mm × 15 7 mm × 60 mm Dimensions 3 02 mm × 15 7 mm × 80mm

4
Cabinet high-strength black plastic Cabinet high-strength black plastic
Weight 0.7kg Weight 1.2kg
6-digit Single-sided 6-digit Double-sided
Dimensions 4 27 mm × 15 7 mm × 60 mm Dimensions 4 27 mm × 15 7 mm × 80mm
Cabinet high-strength black plastic Cabinet high-strength black plastic
Weight 0.9kg Weight 1.55kg
3. Installation
3.1 Packing List
Single-sided: One device of GTD368
Double-sided: One device of GTD368, one display screen, a set of pendant connector
3.2 Power Supply
1)If the local network supports P o E , One network cable is needed.
2) If not , power adapter is available.
3.3 Configuration Button
One red control button for you to realize following configuration:
A. Time format
In the state of time display, press the button for 3 seconds, the screen will display 12 or 24;
Loose the button and then press again, it will switch between 12 and 24. The configuration
will take effect in 5 seconds after loosing the button, and the screen will display time
accordingly.
B. Re-boot
P ress the button for 3 seconds, when screen display s 12 or 24 , press the button two times in a
row,
the clock will display E5, then the clock will reboot.
C. Time zone
In the same state, press the button for 6 seconds, the screen will display the present time zone .
One press one time zone added, till it reaches +14:00, then switch to -12:00 and mount t o UTC
time.

5
3.4 Installation Instructions of Double-sided clock
The detailed installation instructions are shown as below.
a. Remove the hole on the top of the single-sided clock.
b. Install the metal accessories, then make the network cable go through the hole. Meanwhile,
connect the multiple connector with another screen, as shown in the picture below.
Note:
(1) The GlobalTime digital clock can be powered by two ways . One is PoE while another is
adapter . Y ou may select any one as you like. With P o E available, only one network cable is
needed. Otherwise, both the network cable and an adapter are necessary.
(2) When connecting the multiple connector with another screen, please pay attention to the
red line. It can not be put to the opposite direction.

6
c. There are three plastic hooks on the rear of the clock. Put the hooks into the corresponding
holes on the clock and close it.
d. After the installation being finished the double-sided clock will just like what is shown
below:
The
The
The
The red
red
red
red line
line
line
lineThe
The
The
The red
red
red
red line
line
line
line
The
The
The
The hook
hook
hook
hook
The
The
The
The hook
hook
hook
hook

7
Note: In case you would like to separate the screen and the single-sided clock, please use
special tools since the plastic hooks may not bear rough force. Any damage in that case is on
the user ' s account.
3.5 Wall Mounting
Only screws are needed. See the picture below:
There is 248 millimeters between the two hanging holes on the clock
rear.
The diameter of the
cantilever screw head should be within6-12 millimeters, and
the diameter of the screw stem less than 6 millimeters. Work will be done by hanging the
clock on the screws.
If the wall is newly decorated, please make sure that the cable required has been led out from
where the clock screen is to be installed; If not, we suggest leading in the cable through the
hole above the clock screen, and connect with the corresponding port.
8
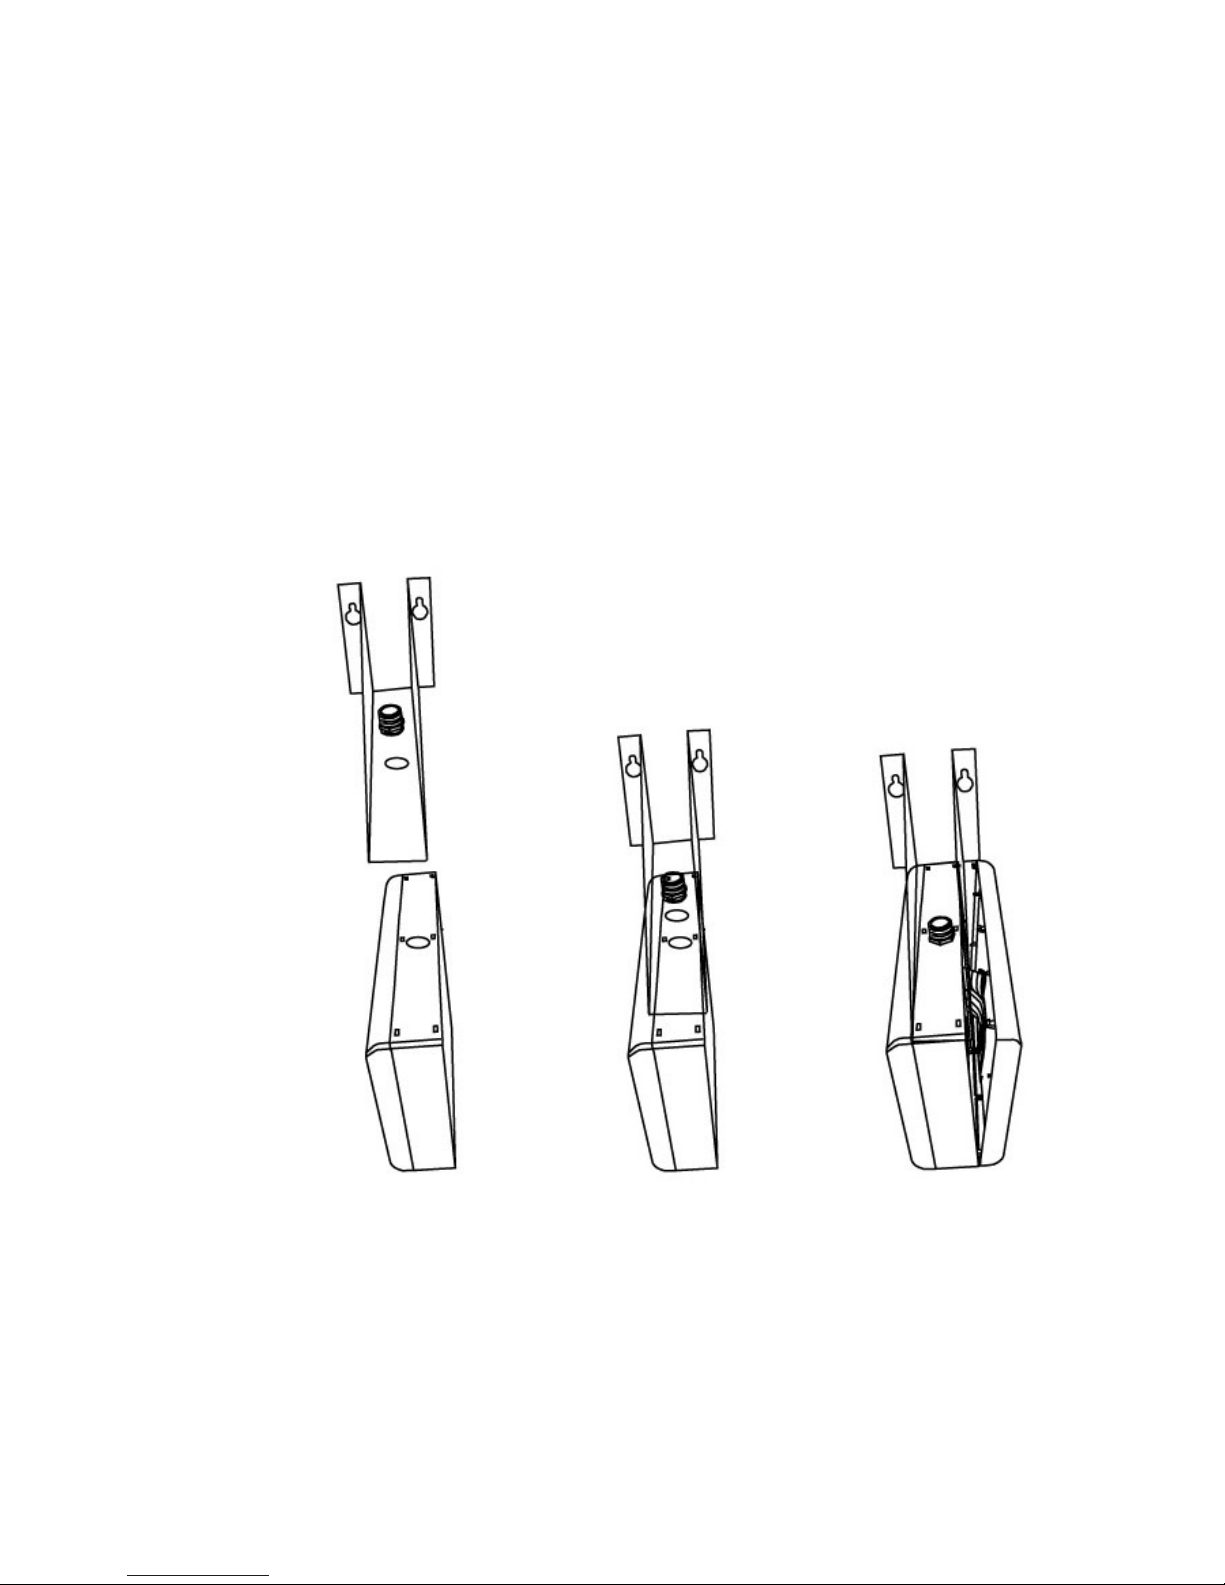
3.6 Cantilever Mounting and Double-sided Display
The following steps are to be followed:
a. Remove the hole on the top of the single-sided clock.
b.Use the mental coupling of srew thread to fix the mental bracket on the top of the clock.
c. Make the cable go through the mental coupling to connect with the interface.
d. For double-sided display in this type, another display screen is needed.
Please observe the instruction in 3.4 (Watch the direction of the wire).
The following pictures are shown for reference.
3.7 Pendant Mounting and Double-sided Display
In this type, the following steps are to be followed:
a. Remove the hole on the top of the single-sided clock.

9
b.
Take
out the metal coupling and the nut at first, and install them on the top of the clock.
c. Then make the network cable pass through the pendant tube and the metal coupling;
connect the cable with the interior interface of the clock screen.
d. For double-sided display in this type, another display screen is needed.
Please observe the instruction in 3.4( Watch the direction of the wire)

10
4. Operation Sta tus
When power ed up , the clock will go through:
● Self-Check
● IP address
● Time display
4.1 Self-Check
Self-check status aims to inspect whether all LED segments are in good condition.
The status lasts 10 seconds, showing 99:99,88:88...to 00:00.

11
4.2 IP A ddress
The clock is both DHCP and static IP addressable, and it is DHCP addressing in default way.
When powered up,
The clock shows “ dHCP ” first before getting the IP address.
If it fails to track DHCP server within the scheduled time, the screen will automatically display IP
address as 192.168.2. 55 .
4.3 Time Display
At first the time is displayed as: 00:00+ time zone. If it is not synchronized
with the external time source, it will keep running based on this time zone.
After synchronizing with the network time server, it will display the correct local time.
5. Management Software
Please download the client software to manage the clock.
5.1 IP Search
GlobalTime client software supports both Broadcast( 255.255.255.255 ) and Unicast way to search
online client clocks. Broadcast is the default way of search.
Broadcast
Select
Broadcast
, and click S
earch,
the software will automatically search online clock in the subnet,
and group IPs based on different subnets. The number in the Brackets shows the number of online
clocks searched.
Unicast
Select
Unicast
, and input initial IP you want in the
bar,
then click
Search
, the software will search from
the initial IP to the last one. For example, to search all clocks in subnet 192.168.3.0 , you can input
192.168.3.0 01, and the software will search one by one till 192.168.3. 254.

12
5.2 Basic Information and Settings
Click one IP on the left window , you can view basic information of each clock, and start necessary
settings.
To
effect each setting, you need to input password. Default user password is “ admin”.
Global password is for batch modification. Default password is “ globalpw ”
The software will pop out a dialog to remind you a successful modification.
5.2.1 Version Information
Check the version and SN(serial number) of each clock.

13
5.2.2 Time Zone and Time Format
Choose your time zone and time format 12/24.
5.2.3 Static IP
GlobalTime clocks work with default DHCP mode. If you want to assign static IP for each clock, click
S
tatic
IP,
and input the IP you want to assign. Then, click
Search,
you will see the new
IP.

14
5.2.4 NTP Setting
You can view NTP server information.
5.2.5 Countdown Setting(Optional)
GlobalTime clocks support countdown function. Please specify it with GlobalTime if you need this
function.
5.2.6 Energy Saving and Brightness Control
There are two modes to save energy, display dim or off . That happens after you specify a time
period.
Besides, energy saving in specified period, you can control display brightness at 5 levels.

15
5.2.7 Daylight Saving Time
Effect DST
bar,
you can configure
DST.
5.2.8 Batch Modify
If you want to batch modify all online clocks, you can select one IP on the left window , do a
setting(for example, time format as 24h format), then input global password “ globalpw
”
, and click
batch modify, all clocks under the same subnet will respond to the same setting.
The software will remind you how many clocks are successfully modified.

16
5.3 System Information
5.3.1 Password Setting
Select a clock
IP,
you can modify the default password under
User Password Setting and Global
Password Setting.
If you click
Batch Modify
, passwords of all clocks under the same subnet will be modified. The
software will remind you how many clocks are modified.
5.3.2 Update Control
GlobalTime clocks support update through software.
Click U
pdate Control,
and select the IP of the clock you want to update, then click
“
...
”
and find the
update file we provide. After clicking
Modify
, this update process can not be stopped until it
finishes. The software will remind you whether the update is successful.
�
If you want to update all online clocks, you can choose the subnet, or the first IP under the subnet,
and click
Batch Modify, the software will update downward one by one.
you can click
Break
on the right to break down the batch update process, , the software will stop
update task after it finishes the present one.

17
6. Troubleshooting
6.1 The clock shows incorrect time.
Check the host IP configuration and make sure the network can communicate with the time server
preset.
6.2 The display remain s unchanged.
Check the condition of the button.
6.3 Display the default IP address
The host configuration is
DHCP.
Make sure the network support DHCP server . If the clock can not get
the IP address from DHCP server for a long time, it will resort to the default IP: 192.168.2.121.

18
6.4 Some LED segments are dark.
Re-power the device. Check whether there are dark segments under self-check state. If there
were,the clock needs to be returned to the manufacturer for repairing.
6.5 The client software fails to search the clock.
To
make sure that the user ’ s computer and the cl ock are in the same subnet, and the firewall is set
correctly.
6.6 The clock can not synchronize with any time server.
User should make sure that his network can visit Internet time source, and the time server has run its
NTP service successfully.
We have a software to help user check whether a server has run its NTP service successfully.
6.7 The clock face is dark.
The clock applies POE technology, which get s power through the network. Make sure that the switches
support POE.
6.8 The light at the bottom right corner illuminates nonstop.
This status indicates that the clock can not synchroni z e with the time server preset. Check the network
configuration and the operation status of the time server.
7. Warranty and Maintenance
Warranty stretches for one-year. If necessary, please ship the product back within the Warranty to the
following address:
A2-1 ,No.399 Dakang Road, Daliu Industrial Park, Shanghai200443, China
 Loading...