

Page 1
Globalstar Sat-Fi2 User Guide
This guide is based on the Globalstar Sat-Fi2 and Sat-Fi2 Apps. Software changes may have
occurred after this printing.
Globalstar reserves the right to make changes in technical and product specifications without prior
notice.
Globalstar Inc.
300 Holiday Square Blvd.
Covington, LA 70433
Copyright
©
2018 Globalstar
®
Incorporated.
All rights reserved.
Globalstar
®
is a registered trademark of Globalstar Incorporated.
Sat-Fi2
©
is a registered trademark of Globalstar Incorporated.
Android
®
is a registered trademark of Google Incorporated.
iPhone® is a registered trademark of Apple Incorporated
All other trademarks and registered trademarks are properties of their respective owners.
Printed in the United States of America.
Page 2

Globalstar Sat-Fi2 User Guide
Table of Contents
WELCOME ....................................................................................................................................................................... 1
WHAT’S IN THE BOX? .................................................................................................................................................... 1
ACTIVATING THE SAT-FI2 .............................................................................................................................................. 1
OWNER AND GUEST ACCOUNTS .................................................................................................................................... 1
REGISTERING A MY ACCOUNT PROFILE .................................................................................................................... 2
USER REGISTRATION .................................................................................................................................................... 2
GETTING STARTED ........................................................................................................................................................ 3
SAT-FI2 DEFAULT USERNAME & PASSWORDS................................................................................................................ 3
STEP 1 CHARGE THE SAT-FI2 .................................................................................................................................. 3
STEP 2 INSTALL THE SAT-FI2 APP ON A SMARTPHONE .............................................................................................. 3
STEP 3 POWER ON THE SAT-FI2 AND OPEN THE SAT-FI APP .................................................................................... 3
STEP 4 CONFIGURING THE SAT-FI2 APP AS AN OWNER ............................................................................................ 4
CONFIGURING THE SAT-FI2 APP AS A GUEST ................................................................................................................. 4
STEP 6 TEST SAT-FI2 CONFIGURATION AND CONNECTION ........................................................................................ 5
BEST PRACTICE USES................................................................................................................................................... 5
SAT-FI2 OVERVIEW ........................................................................................................................................................ 6
SAT-FI2 AT A GLANCE ................................................................................................................................................... 6
SAT-FI2 LEDS .............................................................................................................................................................. 6
SAT-FI2 APP HOME SCREEN ......................................................................................................................................... 7
LOGGING INTO THE SAT-FI2 APP ................................................................................................................................... 7
LOGGING OUT OF THE SAT-FI2 APP ............................................................................................................................... 8
CLOSING THE SAT-FI2 APP ........................................................................................................................................... 8
VOICE COMMUNICATIONS ............................................................................................................................................ 9
OVERVIEW ................................................................................................................................................................... 9
MAKING A VOICE CALL .................................................................................................................................................. 9
RECEIVING A VOICE CALL ............................................................................................................................................ 10
VOICEMAIL .................................................................................................................................................................. 10
Voicemail using a Sat-Fi2 Connected Smartphone ........................................................................................... 10
Voicemail using a Landline/Mobile Phone .......................................................................................................... 10
SMS/TEXT MESSAGING ............................................................................................................................................... 12
SENDING SMS/TEXT MESSAGES TO MULTIPLE CONTACTS ........................................................................................... 12
DELETING MESSAGE THREADS .................................................................................................................................... 12
SENDING AN SMS/TEXT MESSAGE .............................................................................................................................. 12
RECEIVING AND REPLY TO AN SMS/TEXT MESSAGE .................................................................................................... 12
DELETING INDIVIDUAL MESSAGES ................................................................................................................................ 13
EMAIL ............................................................................................................................................................................. 14
OVERVIEW ................................................................................................................................................................. 14
Inbox Screen ...................................................................................................................................................... 14
Compose Message Screen ................................................................................................................................ 14
View Email Screen ............................................................................................................................................. 14
CONFIGURING EMAIL ACCOUNTS ................................................................................................................................. 15
Email Accounts – Gmail, Yahoo, iCloud, Outlook, Hotmail & AOL .................................................................... 15
Email Accounts – Exchange .............................................................................................................................. 16
Email Accounts – IMAP & IMAPS ...................................................................................................................... 17
VIEWING EMAIL .......................................................................................................................................................... 18
COMPOSING AND SENDING EMAIL ............................................................................................................................... 18
ATTACHING IMAGES TO AN EMAIL ................................................................................................................................ 19
HIBERNATION MODE: ............................................................................................................................................ 19
S.O.S. / GEOS ................................................................................................................................................................ 20
INITIATING AN S.O.S. .................................................................................................................................................. 20
S.O.S. From the Device ..................................................................................................................................... 20
S.O.S. from the Sat-Fi2 App .............................................................................................................................. 20
Communicating with GEOS via text ................................................................................................................... 21
CANCELLING AN S.O.S.: ............................................................................................................................................. 22
S.O.S. From the Device ..................................................................................................................................... 22
S.O.S. from the Sat-Fi2 App .............................................................................................................................. 22
SAT-BROWSE ............................................................................................................................................................... 23
OVERVIEW ................................................................................................................................................................. 23
WEB BROWSING ........................................................................................................................................................ 23
INITIAL CONFIGURATION OF SAT-BROWSE ................................................................................................................... 23
SOCIAL MEDIA .............................................................................................................................................................. 24
Facebook & Twitter ............................................................................................................................................ 24
Configuring the Sat-Fi2 App for Facebook and Twitter...................................................................................... 24
Posting to Facebook and Twitter ....................................................................................................................... 25
WEATHER ...................................................................................................................................................................... 26
CURRENT WEATHER SCREEN ..................................................................................................................................... 26
FORECAST WEATHER SCREEN.................................................................................................................................... 26
Weather Configuration ....................................................................................................................................... 26
VIEW CURRENT WEATHER .......................................................................................................................................... 27
WEATHER RADAR....................................................................................................................................................... 27
QUEUE ........................................................................................................................................................................... 28
QUEUE SCREEN ......................................................................................................................................................... 28
DELETE A MESSAGE FROM THE QUEUE ....................................................................................................................... 28
ADD MESSAGES TO THE QUEUE .................................................................................................................................. 29
APP SETTINGS .............................................................................................................................................................. 30
APP SETTINGS SCREEN .............................................................................................................................................. 30
THE SETTINGS SCREEN ON THE IPHONE APP DISPLAYS THE FOLLOWING INFORMATION: ................................................. 31
GENERAL ............................................................................................................................................................ 31
VIEWING THE APP SETTINGS SCREEN ......................................................................................................................... 31
FIRMWARE UPDATE .................................................................................................................................................... 32
DEVICE SETTINGS ....................................................................................................................................................... 33
Page 3

Globalstar Sat-Fi2 User Guide
VIEWING THE DEVICE SETTINGS .................................................................................................................................. 33
ADMIN CONSOLE ......................................................................................................................................................... 33
USERS ....................................................................................................................................................................... 34
WI-FI CONFIGURATION ............................................................................................................................................... 34
Wi-Fi Configuration – Settings Tab .................................................................................................................... 34
FIREWALL ................................................................................................................................................................... 35
Firewall – Domains Tab ..................................................................................................................................... 35
Firewall – Ports Tab ........................................................................................................................................... 35
Firewall – IP Tab ................................................................................................................................................ 36
DEVICE CONFIGURATION ............................................................................................................................................. 36
Status ................................................................................................................................................................. 36
Hibernation Mode Configuration: ........................................................................................................................ 37
GLOBALSTAR MY ACCOUNT ...................................................................................................................................... 38
LOGGING IN TO MY ACCOUNT ...................................................................................................................................... 38
MY DEVICES MAIN SCREEN ......................................................................................................................................... 39
Filtering Devices ................................................................................................................................................. 39
View Device Details ............................................................................................................................................ 40
View/Edit ............................................................................................................................................................ 40
MY ACCOUNT – MY DEVICES ....................................................................................................................................... 41
Sat-Fi My Devices Overview .............................................................................................................................. 41
Name Tab .......................................................................................................................................................... 42
S.O.S. Tab.......................................................................................................................................................... 42
Voice/Text Blocker Tab ...................................................................................................................................... 43
Support Tab........................................................................................................................................................ 44
Factory Reset Tab .............................................................................................................................................. 45
MY ACCOUNT – SETTINGS & BILLING ........................................................................................................................... 45
Overview ............................................................................................................................................................ 45
Username Settings ............................................................................................................................................ 46
Password Settings ............................................................................................................................................. 46
Credit Card Information ..................................................................................................................................... 47
Customer Information ........................................................................................................................................ 47
Monitor Message Usage .................................................................................................................................... 48
Billing History ..................................................................................................................................................... 50
SAT-FI SPECIFICATIONS ............................................................................................................................................. 53
SAT-FI2 CERTIFICATIONS ........................................................................................................................................... 54
FCC COMPLIANCE STATEMENT ................................................................................................................................... 54
FCC Part 15 Clause 15.21 ................................................................................................................................. 54
ISED RF Exposure Guidance Statement (in English and French): ................................................................... 54
Radio & Television Interference ......................................................................................................................... 54
INDUSTRY CANADA CERTIFICATION ............................................................................................................................. 54
RADIO ASTRONOMY SITE ............................................................................................................................................ 54
DÉCLARATION DE CONFORMITÉ AVEC LA FCC .............................................................................................................. 55
FCC: SECTION 15 CLAUSE 15.21 ............................................................................................................................... 55
ISED RF DÉCLARATION D'ORIENTATION SUR L'EXPOSITION .......................................................................................... 55
INTERFÉRENCE RADIO ET TÉLÉVISION ......................................................................................................................... 55
CERTIFICATION D’INDUSTRIE CANADA .......................................................................................................................... 55
SITE DE RADIO ASTRONOMIE ...................................................................................................................................... 55
SAT-FI2 GENERAL WARNINGS ................................................................................................................................... 57
Page 4
Globalstar Sat-Fi2 User Guide Page 1
WELCOME
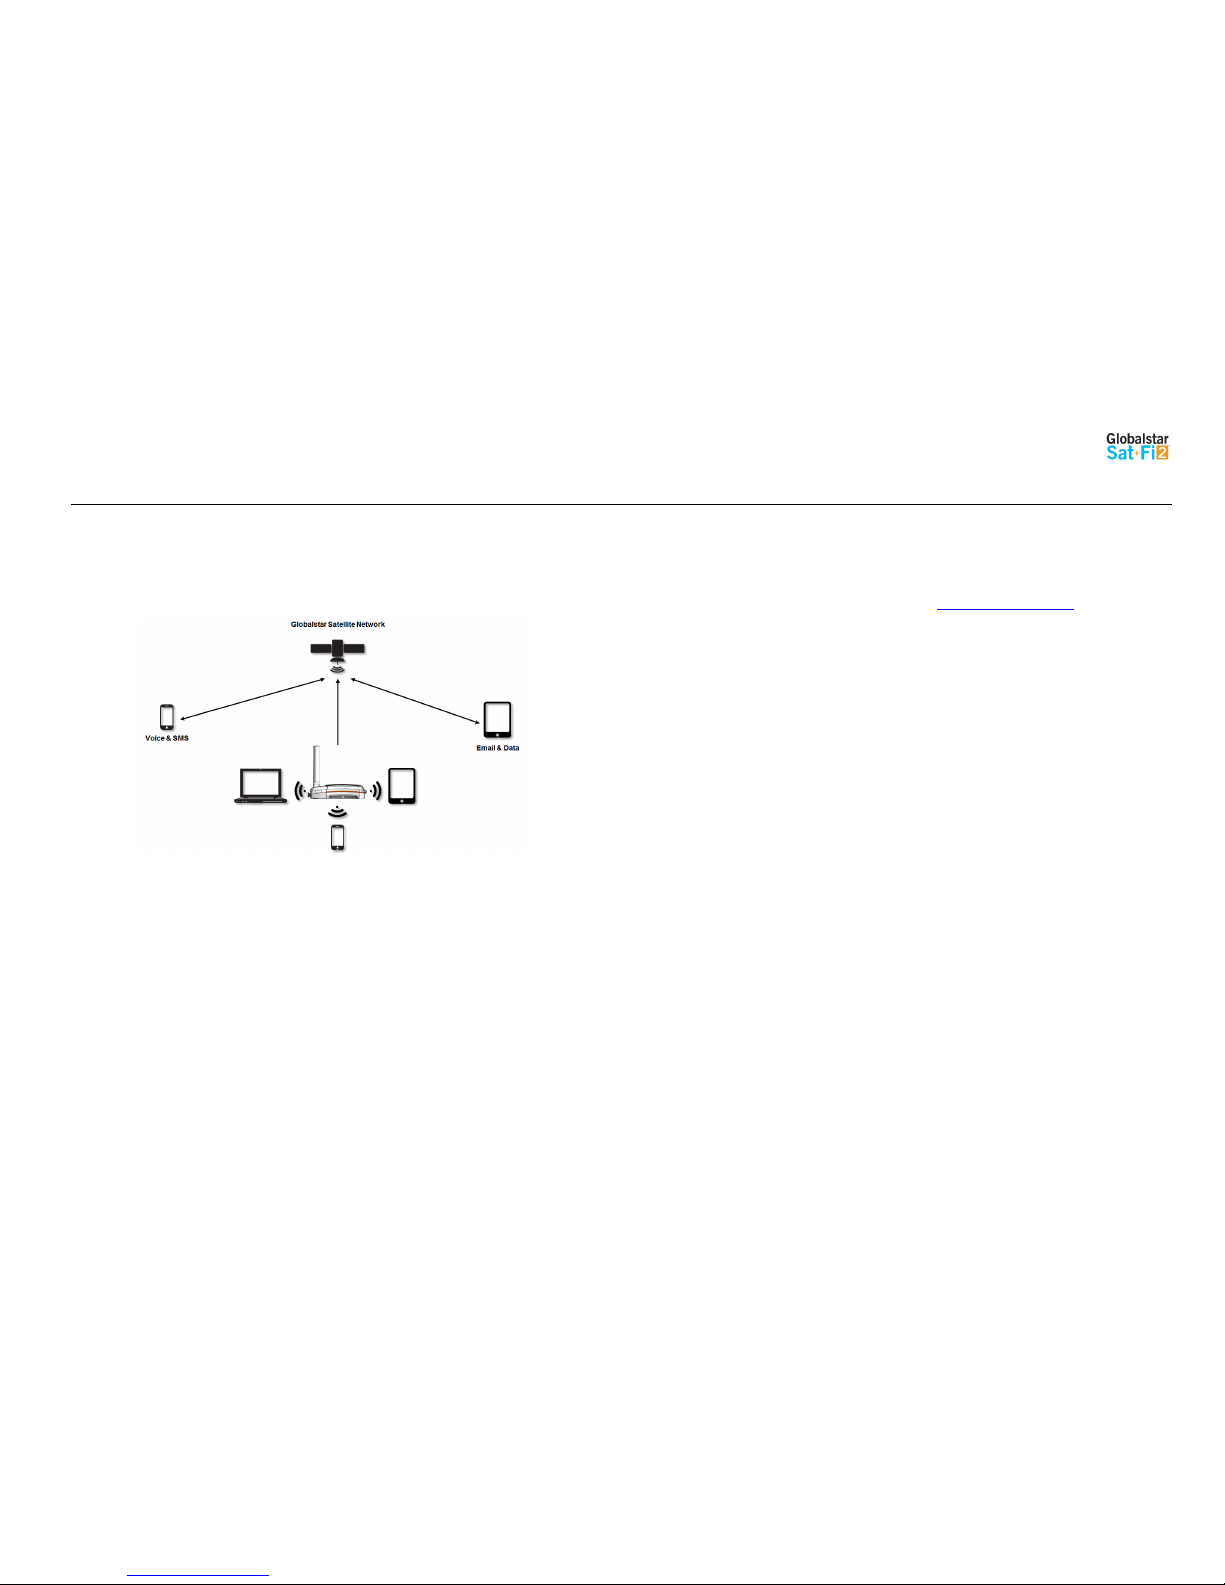
No matter how far off the grid you go, Globalstar’s Sat-Fi2 satellite Wi-Fi hotspot keeps you connected to what
matters. Sat-Fi2 fills the gap when your cellular or radio coverage is gone, keeping voice and data communication
channels open when you need it the most. With Sat-Fi2, you can use your personal Wi-Fi enabled devices and stay
connected over the newest and most modern mobile satellite network with data speeds up to 72 kbps! Up to 8
different users can connect to a single Sat-Fi2 for web browsing, email, 2-way texting, voice calls, data, weather
updates and much more. Sat-Fi2 is lightweight, water & impact resistant and fits right in the palm of your hand. Sat-Fi2
is the last device you’ll ever need to stay in touch with family, friends, business contacts and emergency services.
NOTE: Before using the Sat-Fi2, Globalstar recommends spending a few minutes reading through this
User Guide prior activation ensuring a successful Sat-Fi2 configuration. Complete each step
before moving on to the next step.
What’s in the Box?
Sat-Fi2 Unit
18” Micro USB Data/Power Cable
AC (Wall) Power Adapter
GEOS Reference Guide
Quick Start Guide
Warranty Card
Activating the Sat-Fi2
In order to begin using the Sat-Fi2, please ensure you have an active subscription. Please check to see if you have
received a Globalstar Activation Submission email from [email protected]. This email will have the
Account Number (i.e. AC00123456), needed for registering a My Account Profile. If you do not have an active
subscription or encounter any issues with your device please visit Globalstar.com/Sat-Fi2Support for assistance.
Owner and Guest Accounts
There are two types of user accounts associated with the Sat-Fi2:
Owner Account – Actual owner or designated administrator of the Sat-Fi device
o Voice calls - Make voice calls
o Text messaging – Send and receive text messages
o Email – Access personal email account
o Social Media – Send posts to individual Facebook or Twitter accounts
o Weather – View local weather conditions
o Administrative privileges
Change Sat-Fi Wi-Fi password
Delete messages from Queue
o My Account access
Guest User Account – Uses Owner’s voice minutes, text messages allotment and data to perform the
following:
o Voice calls - Make voice calls using the Owner’s Sat-Fi Mobile Device Number
o Text messaging – Send and receive texts using the Owner’s Sat-Fi 2 Mobile Device Number
o Email – Access personal email account
o Social Media – Send posts to individual Facebook or Twitter accounts
o Weather – View local weather conditions
Page 5

Globalstar Sat-Fi2 User Guide Page 2
REGISTERING A MY ACCOUNT PROFILE
User Registration
In order to access the Sat-Fi2, users will have to first register their account. Perform the following steps for new user registration.
1. In a web browser enter https://mysatfi.globalstar.com/
2. Select Register
3. Enter e-mail address used when activating the device and Globalstar Account Number located on the activation email confirmation
4. Select Confirm
5. Select Language Preference
6. Create username, password and secret question information
7. Select Register
8. My Account registration is complete.
Page 6
Globalstar Sat-Fi2 User Guide Page 3
GETTING STARTED
The following instructions are for iOS and Android users only. If you are not an iOS or Android user, please visit
Globalstar.com/Sat-Fi 2Support for setup instructions.
Sat-Fi2 Default Username & Passwords
Sat-Fi2 Wi-Fi
o Username: No username by default
o Password: satfi1234
Sat-Fi2 Admin
o Username: admin
o Password: admin
Step 1 Charge the Sat-Fi2
The Sat-Fi2 must have a sufficient charge before it can be configured for use. Perform the following steps to charge
the Sat-Fi2 battery:
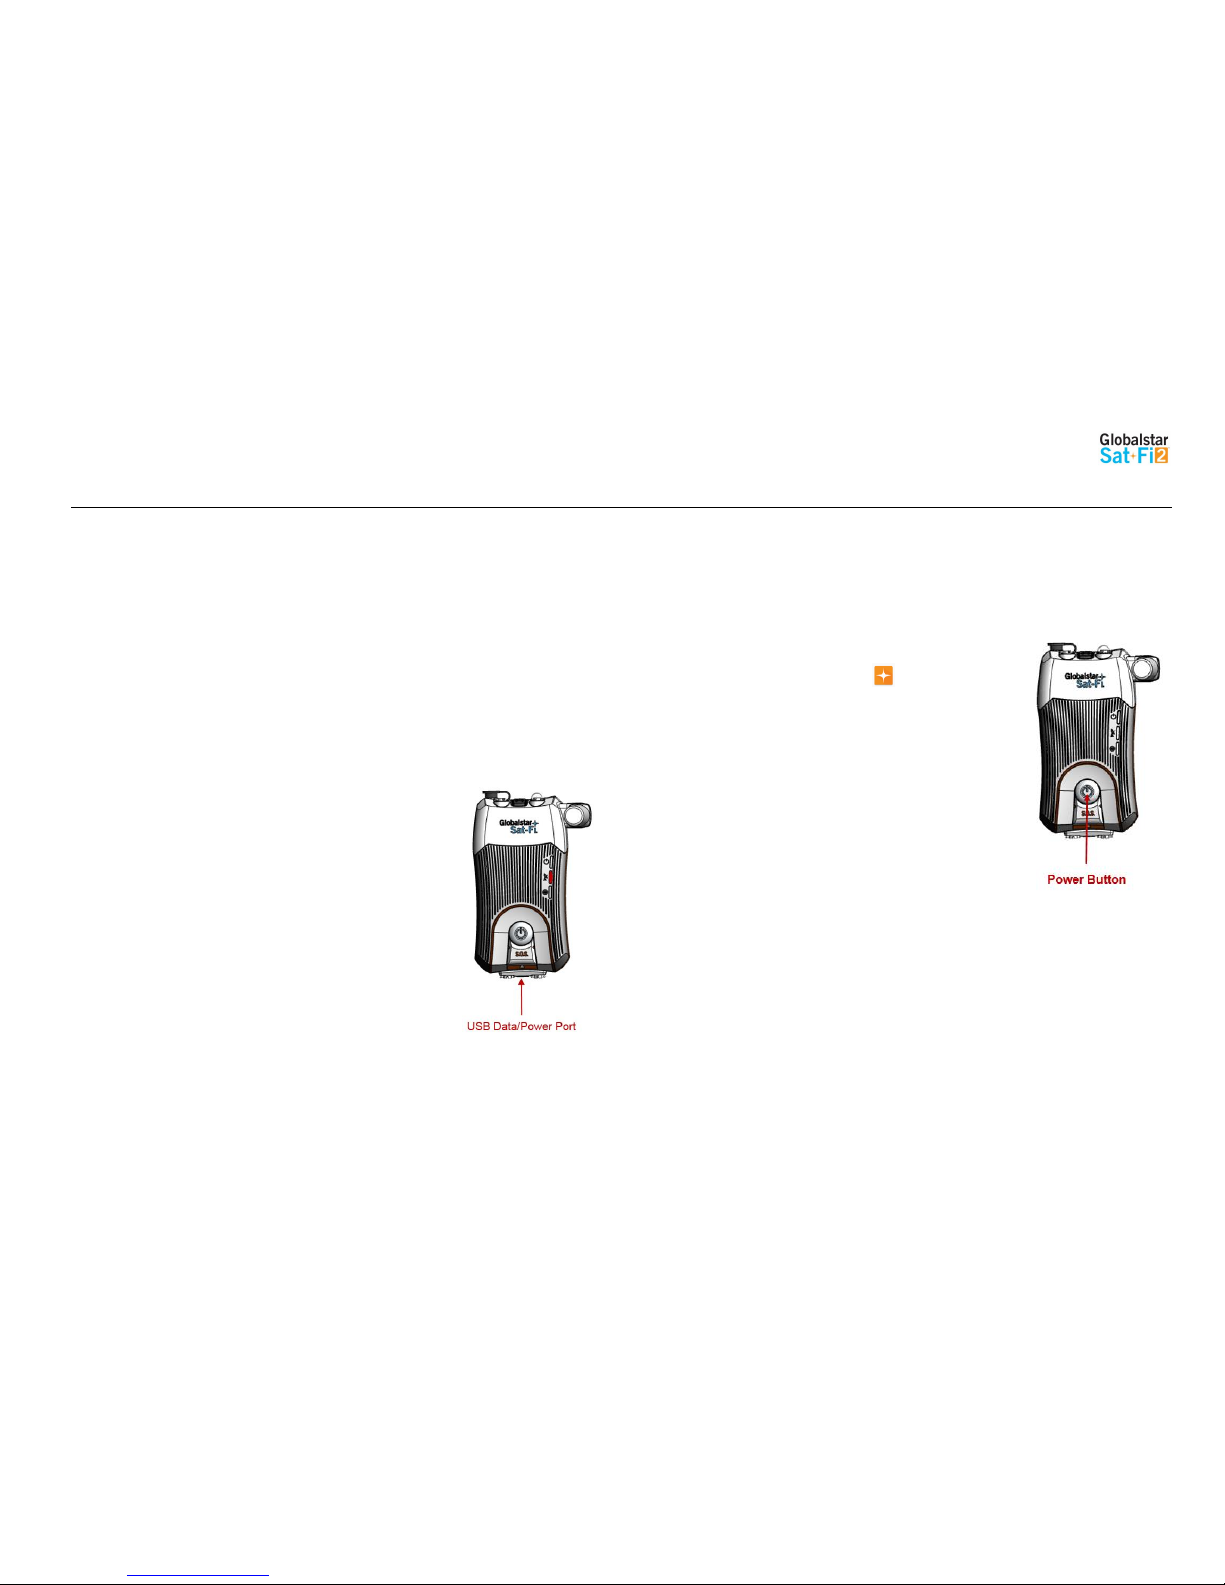
1. Remove the USB Data/Power Port cover by turning the D-Ring screws
counter-clockwise. Place the USB Data/Port cover in a secure location.
2. Connect the Micro USB Data/Power Cable to the Sat-Fi2 USB
Data/Power port and plug into either a computer or the AC Power
Adapter (included in the box.) The Sat-Fi2 will perform a self-test (the
LEDs will blink in a right-to-left then left-to-right sequence) If the Power
LED is blinking RED, the battery requires further charging.
3. Let the Sat-Fi2 charge until the Power LED turns Solid GREEN.
4. Disconnect the Micro USB Data/Power Cable and re-connect the USB
Data/Power cover on the Sat-Fi2 by turning the D-Ring screws
clockwise.
NOTE: The USB/Data Power Port cover needs to be properly installed
to ensure water resistant integrity.
Step 2 Install the Sat-Fi2 App on a Smartphone
1. Using an Internet or cellular connection, download and install the Sat-Fi2 App from the Google Play
Store or the Apple Store.
Step 3 Power on the Sat-Fi2 and Open the Sat-Fi2 App
1. Power on the Sat-Fi2.
2. Ensure the smartphone has a cellular or Wi-Fi Internet connection.
3. Open the Sat-Fi2 app by selecting .
NOTE: The Sat-Fi2 App will download a few files necessary for
setup/configuration. Do not close the Sat-Fi2 App during the
process
Sat-Fi
Page 7

Globalstar Sat-Fi2 User Guide Page 4
Step 4 Configuring the Sat-Fi2 App as an Owner
Perform the following to configure the Sat-Fi2 App as an Owner:
1. Select the Sat-Fi2 icon
2. Select Allow for the following steps:
Taking photos, alternate GPS locations, sending and attaching photos, access contacts, talk when making
a voice call, and make a phone call.
3. Select I’M THE OWNER
4. Enter My Account username and password
5. Configure Social Accounts
6. Turn on Sat-Fi2
7. Turn on the smartphone’s Wi-Fi and select the Sat-Fi2 Wi-Fi – Default name is: satfi2_ <xxxxxx>
8. Enter the default Sat-Fi2 password: satfi1234
9. Go back to the Sat-Fi2 app
10. Select CONNECT
11. Enter the default admin password: admin
12. Select VALIDATE
For Android: A background battery usage message will be displayed, select OK. Then select NO when
prompted to ignore battery optimizations
13. Creating an Owner Account is complete
Configuring the Sat-Fi2 App as a Guest
Guest accounts give Sat-Fi2 owners the ability to allow guests to sign on and use the Sat-Fi2. Perform the
following steps to create a Sat-Fi2 Guest Account
- Follow steps from 1-2 on the Set up as Owner guide
1. Select WI-FI SETTINGS
2. Turn on the smartphone’s Wi-Fi
3. Select the Sat-Fi2 Wi-Fi – The default Wi-Fi name is satfi2 _<xxxx>
4. Enter the default Sat-Fi2 password: satfi1234
5. Select CONNECT/JOIN
6. Select I’M A GUEST
7. Create a Guest account by completing the form and selecting SUBMIT
8. Creating a Guest Account is complete
Page 8
Globalstar Sat-Fi2 User Guide Page 5
Step 6 Test Sat-Fi2 Configuration and Connection
Perform the following to make a satellite call, send a text message, receive a call or browse and confirm the Sat-Fi2 is
configured and operational:
1. Verify the following:
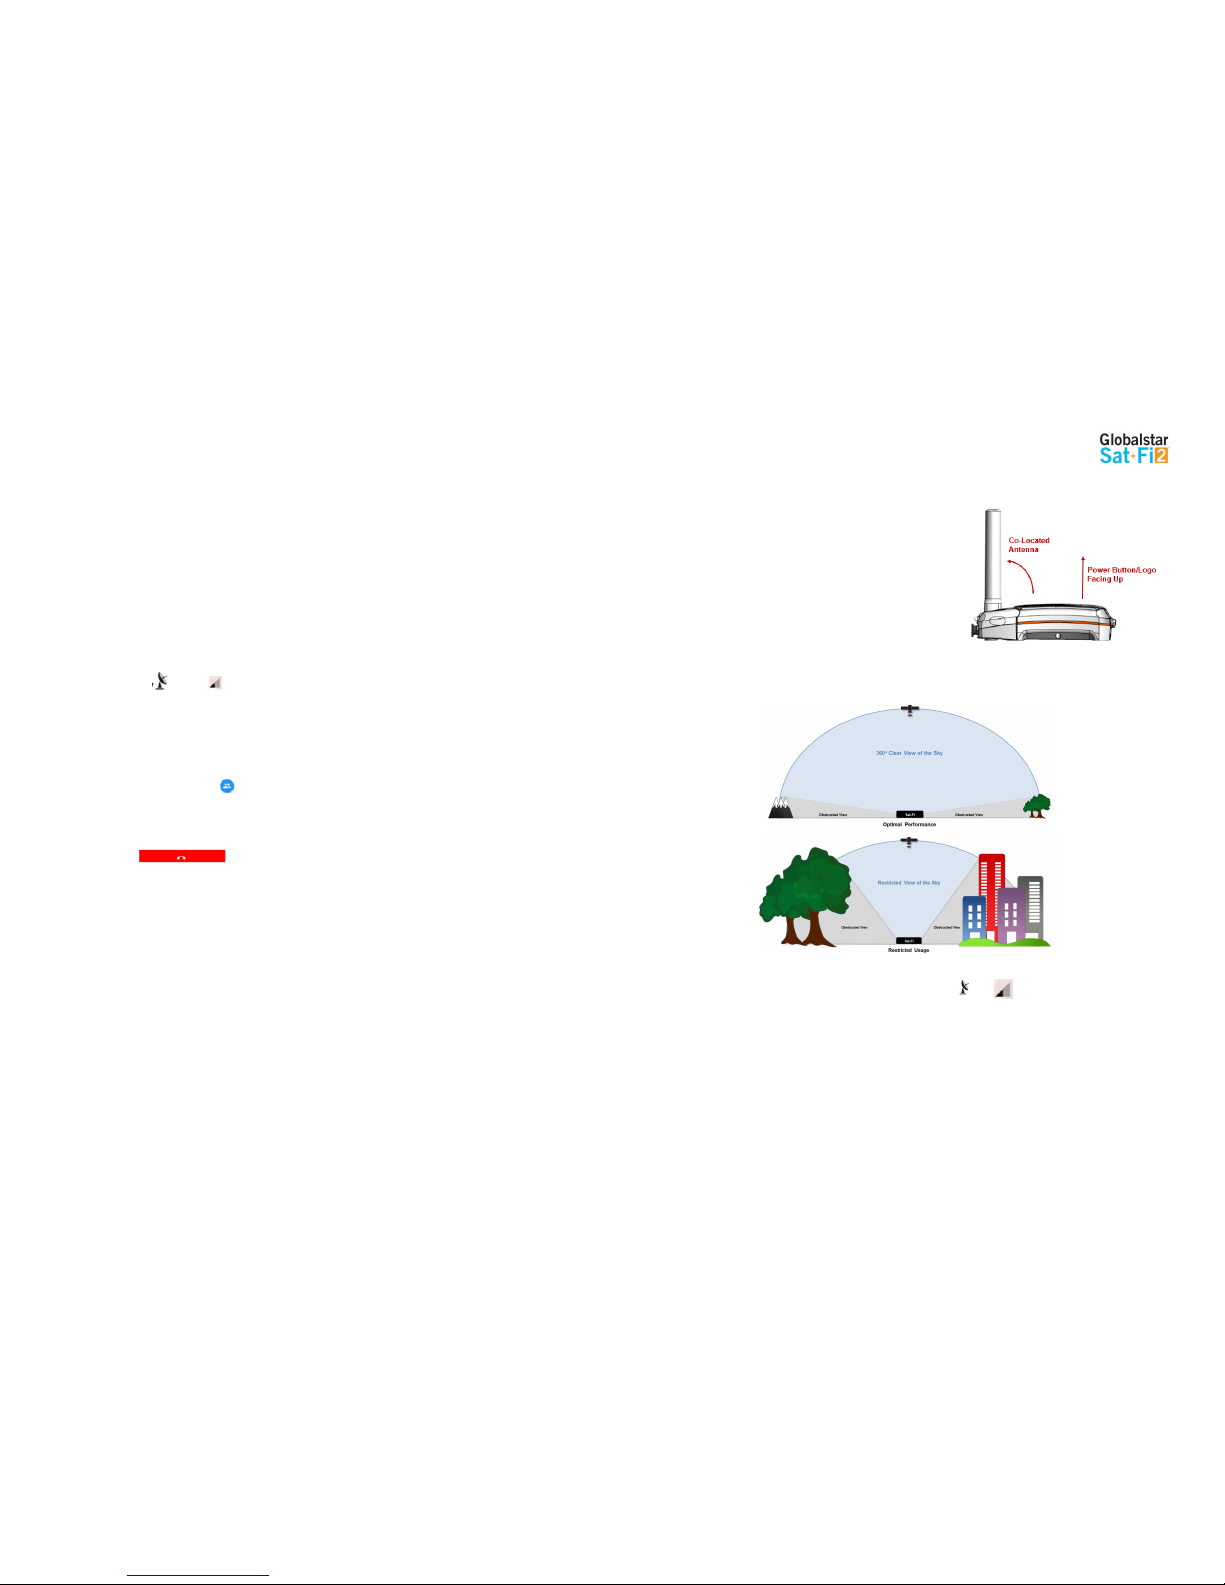
- The Sat-Fi2 is outside with 360 clear view of the sky with no obstructions (buildings, trees, etc.)
- The Sat-Fi2 is facing up – logo/power button facing up
- The Sat-Fi2 co-located antenna is fully extended in the upright position and powered on
2. Verify the and the are displayed on the Sat-Fi2 app indicating the Sat-Fi2 has a good satellite
connection.
3. Select the Phone icon
4. On the telephone key pad either:
- Enter a telephone number
- Select a contact
5. Select the phone icon to place the call
6. Within a few seconds you will hear a dial tone and be connected
7. Select to disconnect/hang-up
8. The Sat-Fi2 is now configured and operational
Best Practice Uses
The Sat-Fi2 WILL NOT work indoors and needs to be outside
(Indoor use will require a Remote Antenna and Mobile
Docking Station – Sold Separately)
The Sat-Fi2 co-located antenna needs to be fully extended in
the upright position
Power On the Sat-Fi2 prior to use – The Sat-Fi2 can take up
to 5 minutes to boot up and acquire a GPS fix
For optimal performance:
o The Sat-Fi2 needs a clear 360° view of the sky with
no obstructions (buildings, trees, etc.)
o The Sat-Fi2 should be placed on a flat surface with the Power Button and Sat-Fi2 Logo facing up
towards the sky
Ensure all users download and install the Sat-Fi2 App prior to leaving Internet/Cellular service
Before making a voice call or sending a text message, ensure and are displayed on the Status Bar of
the Sat-Fi2 App, indicating that the Sat-Fi2 has a good satellite connection
Page 9
Globalstar Sat-Fi2 User Guide Page 6
SAT-FI2 OVERVIEW
Sat-Fi2 at a Glance
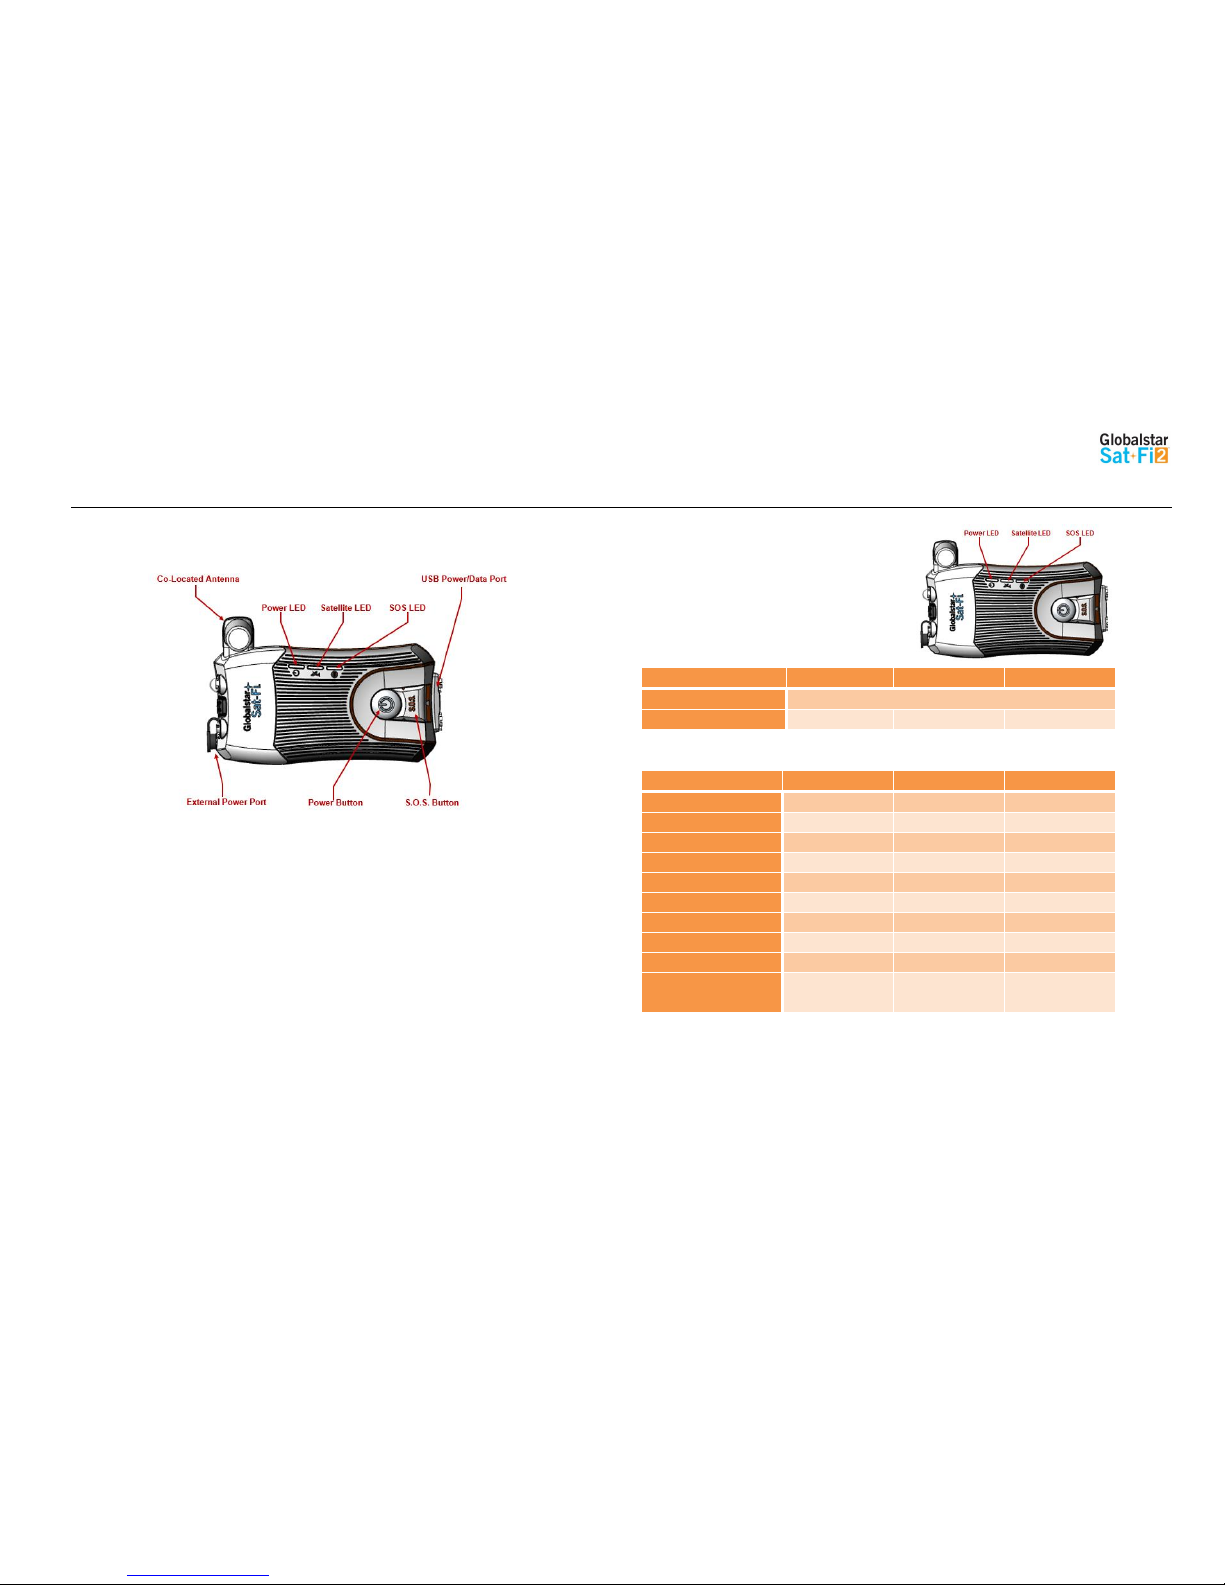
Co-Located Antenna – Must be fully extended and pointing straight to the sky for optimal performance
Power LED – Displays Power status
Satellite LED – Displays Satellite connectivity status
S.O.S. LED – Displays S.O.S. status
USB Power/Data Port
o Remove cover to access USB Power/Data Port
o Use port to charge the battery and connect the device to a computer
External Power Port – Use with 12V charger (sold separately)
Power Button
o Power On – Press and hold for 1 second
o Power Off – Press and hold for 3 seconds
S.O.S. Button
o Initiate S.O.S. with GEOS – Press and hold S.O.S. button until S.O.S. LED blinks GREEN
o Cancel S.O.S. with GEOS – Press and hold the S.O.S. button until S.O.S. LED blinks RED
Sat-Fi2 LEDs
Powering On/Powering Off the Sat-Fi2
LED Status
Power LED
Satellite LED
SOS LED
Powering On/Self-Test
LEDs Blink in Forward/Reverse Direction until Sat-Fi2 Powers On
Powering Off
Fast Blink ORANGE
Fast Blink ORANGE
Fast Blink ORANGE
Operational/Status
LED Status
Power LED
Satellite LED
SOS LED
Powered On
Normal Blink GREEN
-
-
Powered Off
No LED
No LED
No LED
Battery Full – 100%
Solid GREEN
-
-
Battery Charging
Double Blink GREEN
-
-
Battery <25%
Fast Blink RED
-
-
Connected to Satellite
-
Normal Blink GREEN
-
Not Connected to Satellite
-
Normal Blink RED
-
SOS Mode
-
-
Normal Blink GREEN
Cancel SOS Mode
-
-
Normal Blink RED
Hibernation Mode
GREEN + ORANGE
Bright/Dims/Off
No LED
No LED
LED Pattern Definitions
1. Normal blink: Blinks in slow rate
2. Fast blink: Blinks in fast rate
3. Double blink: Blinks twice and off
4. Forward Reverse: The boot up LED pattern scrolls green from the power to the S.O.S. then all 3 blink green.
5. Solid ON: Stays ON continuously
6. Power Mode dimming: LED slowly dims / turns OFF & t urns ON /s lowly brightens in slow smooth pace
Page 10
Globalstar Sat-Fi2 User Guide Page 7
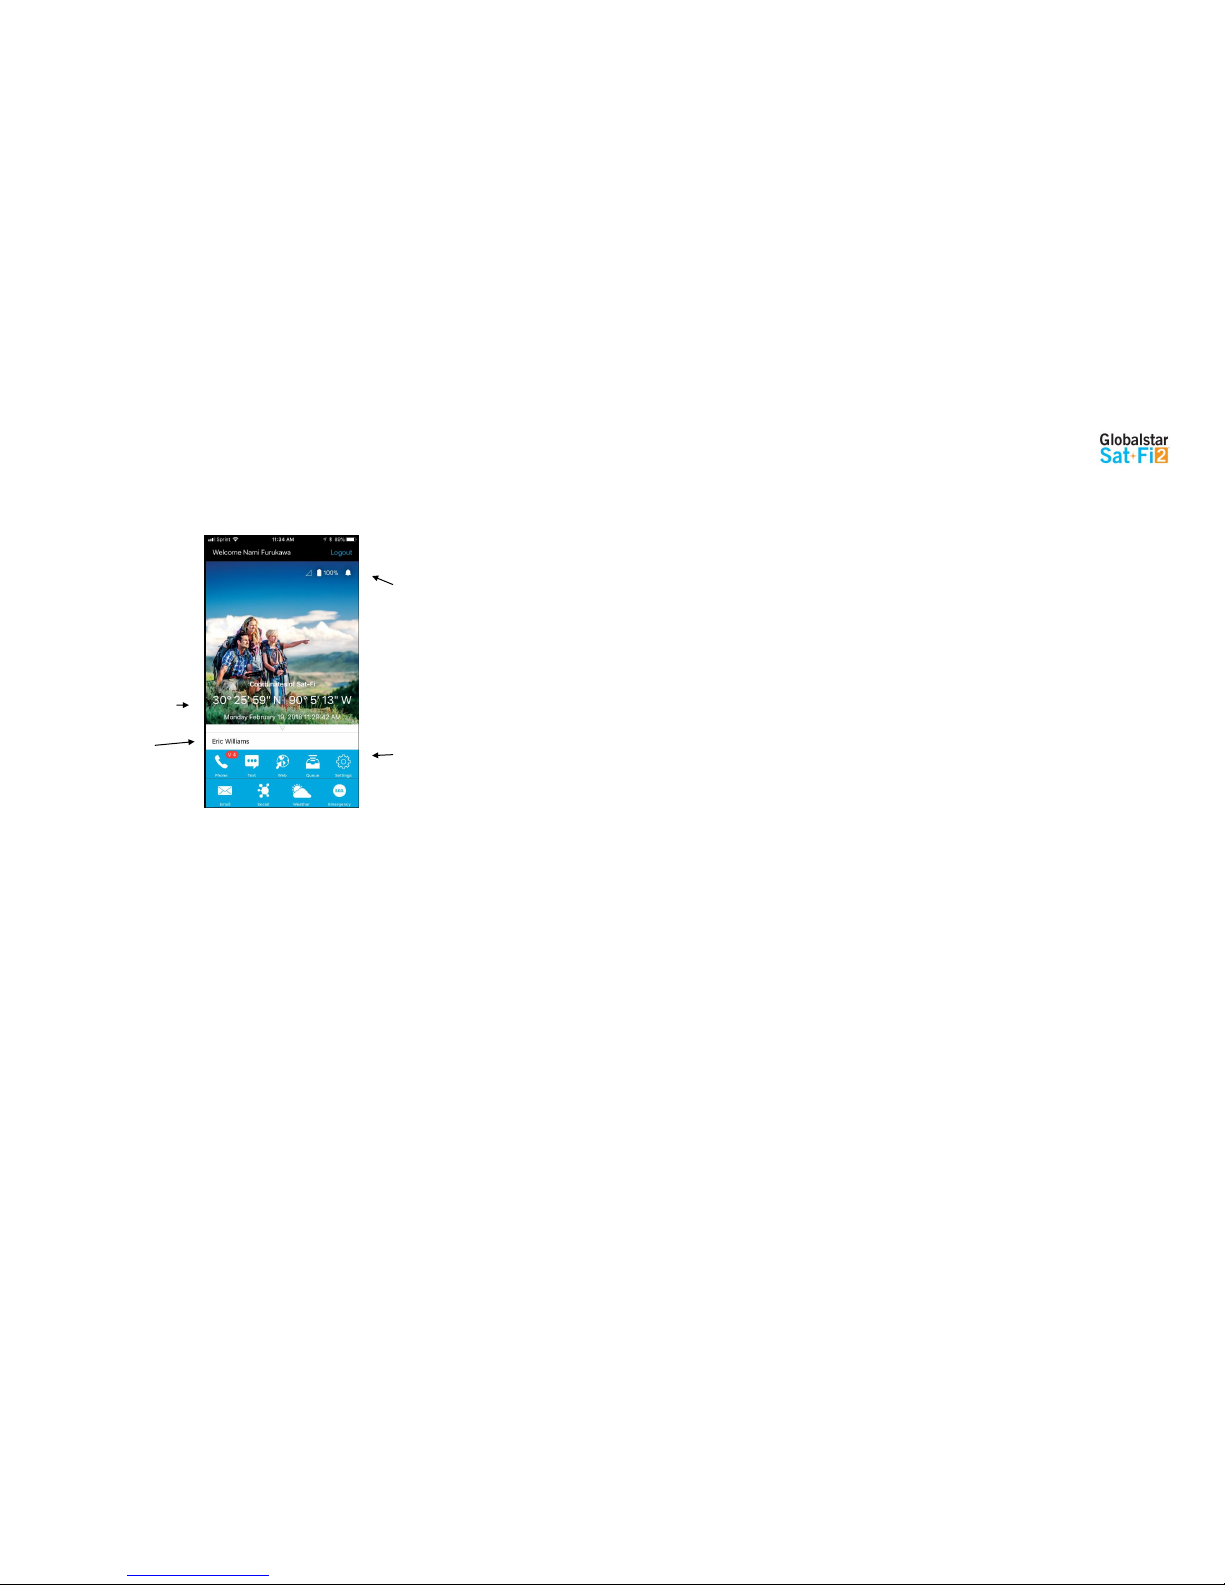
Sat-Fi2 App Home Screen
Application Menu
Phone – Make and receive phone calls to friends, family and contacts
Text – Send and receive SMS/Text messages to friends, family and contacts
Web – Browse the Internet using Sat-Browse
Email – Send and receive emails from personal or corporate email accounts
Social – Share photos and post updates to linked social media accounts
Weather – View local weather conditions anywhere in the world
Emergency – Initiate an S.O.S. with direct 2-way voice and text communications with GEOS Emergency
Response Coordination Center
Queue – View a list of messages in the queue that are waiting to be sent
Logging Into the Sat-Fi2 App
NOTE: The configuration of the Sat-Fi2 App as an Owner or the creation of a Guest User Account is
mandatory before being able to log into the Sat-Fi2 App.
Perform the following steps to log into the Sat-Fi2 App:
Current GPS Location
Connected Users
Status Bar
Application Menu
For Android:
1. Open the Sat-Fi2 App
2. Select WI-FI SETTINGS
3. Select the Sat-Fi2 Wi-Fi – The default Wi-Fi name is: satfi2_<xxxxx>
4. Go back to the Sat-Fi2 App
5. Select RECONNECT
6. Enter username
7. Enter Password
8. Select Sign in
9. Login is complete
NOTE: If the phone has its Wi-Fi on, but isn't connected to anything, it will go to the
Sat-Fi2 app login page. The user must enter username and password then hit Sign
in. The reconnect page will appear. This is where you select WI-FI SETTINGS,
choose the Sat-Fi2's Wi-Fi, and then the app will automatically connect and go to the
main app screen.
For iPhone:
1. Open the Sat-Fi2 App
2. Select WI-FI SETTINGS
3. Select the Sat-Fi2 Wi-Fi – The default Wi-Fi name is: satfi2_<xxxxx>
4. Go back to the Sat-Fi2 App
5. Re-enter your login credentials if you did not select auto login when setting up the
app
6. Select RECONNECT
7. Login is complete
NOTE: If credentials have already been entered before, the phone will auto-login and go
straight to the reconnect screen. Here the user needs to select WI-FI SETTINGS, choose
the Sat-F2i's Wi-Fi, and then the app will automatically connect and go to the main app
screen.
Page 11

Globalstar Sat-Fi2 User Guide Page 8
Logging Out of the Sat-Fi2 App
NOTE: If logged out of the Sat-Fi2 App, the smartphone will not receive any Sat-Fi2 voice calls, emails and
texts until logged back into the Sat-Fi2 App.
Perform the following steps to log out of the Sat-Fi2 App:
Closing the Sat-Fi2 App
NOTE: To receive voice calls and texts, the Sat-Fi2 App needs to remain running in the background. If
the Sat-Fi2 App is closed, the smartphone will not receive any Sat-Fi2 voice calls, emails and
texts until logged back into the Sat-Fi2 App.
Globalstar recommends closing the Sat-Fi2 App only if powering off the Sat-Fi2 device.
Perform the following steps to close the Sat-Fi2 App:
For Android:
1. Select the Menu icon
2. Select close app
3. Confirm you want to close the app by selecting Yes
4. The Sat-Fi2 app will close and the smartphone will be brought to its home screen.
5. Press the multitasking button (usually a square next to the home button)
6. Swipe left or right or tap the X to close the app.
For iPhone:
1. Double press the circular button on the bottom of your iPhone
2. The screen will shrink
3. Slide up.
1. From the main menu screen:
Select the Menu icon (For Android)
Select the Logout icon (For iPhone)
2. Select Logout (For Android) / Confirm (For iPhone)
3. The Login screen will be displayed and logging out is complete
Page 12
Globalstar Sat-Fi2 User Guide Page 9
VOICE COMMUNICATIONS
Overview
Making a Voice Call
Perform the following steps to make a voice call on the Sat-Fi2.
1. Open the Sat-Fi2 app and log in as Owner or Guest
2. Select the
3. Verify and are displayed indicating the Sat-Fi2 has a good satellite connection
4. Enter a phone number on the telephone key pad or select a contact
5. Press the green phone icon to dial. Within a few seconds you will hear a dial tone and be connected
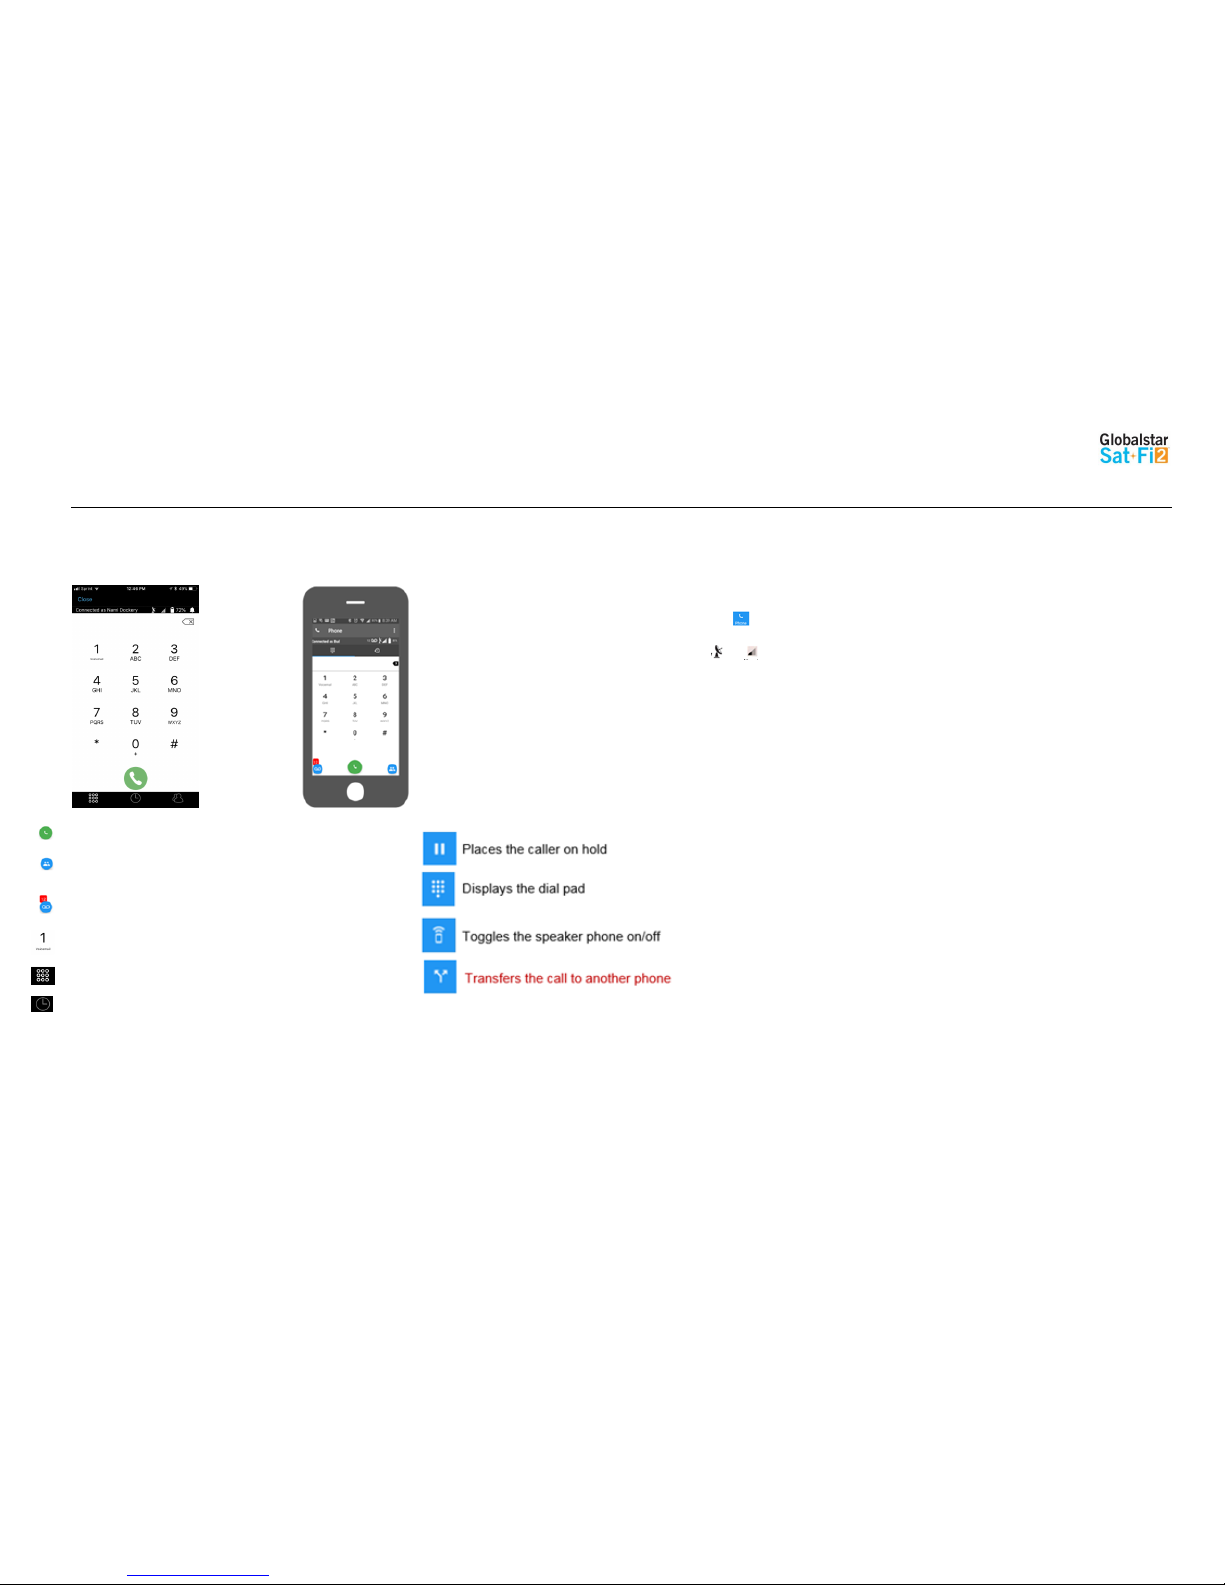
Dials the smartphone’s contact list
Displays the smartphone’s contact list
Displays the number of voicemails and dials voicemails (Android only)
Dials voicemail while pressing and holding down (Android and iPhone)
Displays the dialing pad
Displays the call history
Page 13

Globalstar Sat-Fi2 User Guide Page 10
Receiving a Voice Call
Perform the following to receive a voice call on the Sat-Fi2:
1. An incoming call will be displayed on the screen.
2. Answer the phone by selecting the green phone icon on Android or
the accept icon on iPhone
Voicemail
With voicemail you can check your messages from your Sat-Fi2 connected smartphone at standard airtime rates.
There is no connection fee from Globalstar to receive a message or check your messages from a landline/mobile
phone (local carrier fees may apply).
Store up to 25 messages
Callers can record a message up to 3 minutes in length
Once a message has been played it will only be stored for 30 days
Voicemail using a Sat-Fi2 Connected Smartphone
Voicemail Setup & Configuration using the Sat-Fi2
Perform the following steps to setup and configure voicemail using a Sat-Fi2 connection:
1. On the main screen, select the phone icon .
2. The telephone keypad on the Android will display the voicemail icon, press and hold. For the iPhone
press and hold the 1.
3. At the voice prompt, enter the Sat-Fi2 telephone number.
Example: 1-254-555-1234 (<Country Code>+<Telephone Number>)
4. At the voice prompt, select your desired language.
5. At the voice prompt, setup/configure the following voicemail settings:
Voicemail Greeting
Voicemail Pass Code
6. At the voice prompt, select 4 to manage the following greetings:
Name
Unavailable
Temporary
7. When finished, select to disconnect/hang-up. Setup and configuration of
voicemail is complete.
NOTE: Hibernation mode does not affect voicemail. Hibernation shuts down a lot of processes to save battery
and just prevents the user from receiving calls and push notifications.
Accessing Voicemail using the Sat-Fi2
Perform the following steps to setup and configure voicemail using a Sat-Fi2 connection:
1. On the main screen, select phone icon .
2. The telephone keypad on the Android version will display the voicemail icon which can be selected to
access voicemail. On the iPhone, voicemail can be accessed by pressing and holding the 1. .
3. At the voice prompt, select your desired language.
4. At the voice prompt, enter the Sat-Fi2 telephone number.
Example: 1-254-555-1234 (<Country Code>+<Telephone Number>)
5. At the voice prompt, enter your Pass Code. Then follow the audible instructions.
Voicemail using a Landline/Mobile Phone
Voicemail Setup & Configuration using a Landline/Mobile Phone
Perform the following steps to setup and configure voicemail using a landline/mobile phone:
1. On a landline/mobile phone, dial:
North America 1-877-426-0308
Caribbean & Latin America Call the Sat-Fi2’s number
Europe +353-828-80420
Africa +353-1-290-9505
2. At the voice prompt, select your desired language.
3. At the voice prompt, enter the Sat-Fi2 telephone number.
Example: 1-254-555-1234 (<Country Code>+<Telephone Number>)
4. At the voice prompt, select your desired language.
5. At the voice prompt, setup/configure the following voicemail settings:
Voicemail Greeting
Voicemail Pass Code
6. At the voice prompt, select 4 to manage the following greetings:
Name
Unavailable
Temporary
7. When finished, hang up and voicemail will be setup and configured.
Page 14

Globalstar Sat-Fi2 User Guide Page 11
Accessing Voicemail using a Landline/Mobile Phone
Perform the following steps to access voicemail using a landline/mobile phone”
1. On a landline/mobile phone, dial:
North America 1-877-426-0308
Caribbean & Latin America Call the Sat-Fi2’s number
Europe +353-828-80420
Africa +353-1-290-9505
2. At the voice prompt, select your desired language.
3. At the voice prompt, enter your Sat-Fi2 telephone number/MDN followed by #
Example: 254-555-5555#.
4. A voice prompt, enter your pass code.
5. At the voice prompt, select 1 to listen to voicemail messages.
Page 15

Globalstar Sat-Fi2 User Guide Page 12
SMS/TEXT MESSAGING
Sending an SMS/Text Message
Perform the following steps to send an SMS/Text message using the Sat-Fi2:
1. From the main menu, select Text
2. On Android phones, select the + sign to create a new message
On iPhone, select the compose icon to create a new message
3. Select contacts or enter a text number on the Android
Select the plus sign to add a contact
4. Enter text message and send
5. The text message will be sent and displayed as a message thread
Receiving and Reply to an SMS/Text Message
Perform the following steps to receive and reply to an SMS/Text message using the Sat-Fi2:
1. When an incoming text message arrives, the following will be displayed:
An incoming text message pop up
The number of unread text messages received
2. To view the text messages, select text
3. Select the text threat to view
4. To reply, type the text message and select send when finished
Sending SMS/Text Messages to Multiple Contacts
NOTE: Sending SMS/text messages to multiple contacts is not group texting. When sending SMS/Text to multiple
contacts the Sat-Fi2 App will create individual message threads for each individual contact and send
multiple messages. You will be charged for each SMS/Text message that is sent.
Perform the following steps to receive and reply to an SMS/Text message using the Sat-Fi2:
1. From the main menu, select Text
2. On Android phones, select the + sign to create a new message
On iPhone, select the compose icon to create a new message
3. On Android select SEND TO MULTIPLE CONTACTS
On iPhone, select the contact by pressing the plus sign. Once a contact is selected, press the plus sign and repeat
again to add more.
4. After selecting the contacts, type the text message, then send.
*On the Android, it will show a disclaimer asking you if you are sure you want to send the message to multiple
contacts. Select OK to proceed.
5. The message will be sent and the Sat-Fi2 App will create two separate message threads for each contact.
Deleting Message Threads
Perform the following steps to delete a message thread:
1. On the Android, select and press down on the message thread to be deleted
On the iPhone, select and slide to the left and the word delete will appear
2. On Android, you will be asked if you want to delete the conversation
On iPhone, you will select “delete”
3. The selected message thread will be deleted
1. The selected message will be deleted
Page 16

Globalstar Sat-Fi2 User Guide Page 13
Deleting Individual Messages
Perform the following steps to delete an individual message within a message thread:
Android:
1. Select and press down on the individual message to be deleted
2. Select Yes when asked if you want to delete the message
3. The selected message will be deleted
iOS:
1. Select and slide to the left and the word delete will appear
2. Select delete
Page 17
Globalstar Sat-Fi2 User Guide Page 14
EMAIL
Overview
Sat-Fi2 allows for the use of most personal and corporate email accounts including:
Gmail
Yahoo
Exchange
iCloud
Outlook
Hotmail
AOL
Other IMAP and IMAPS Accounts
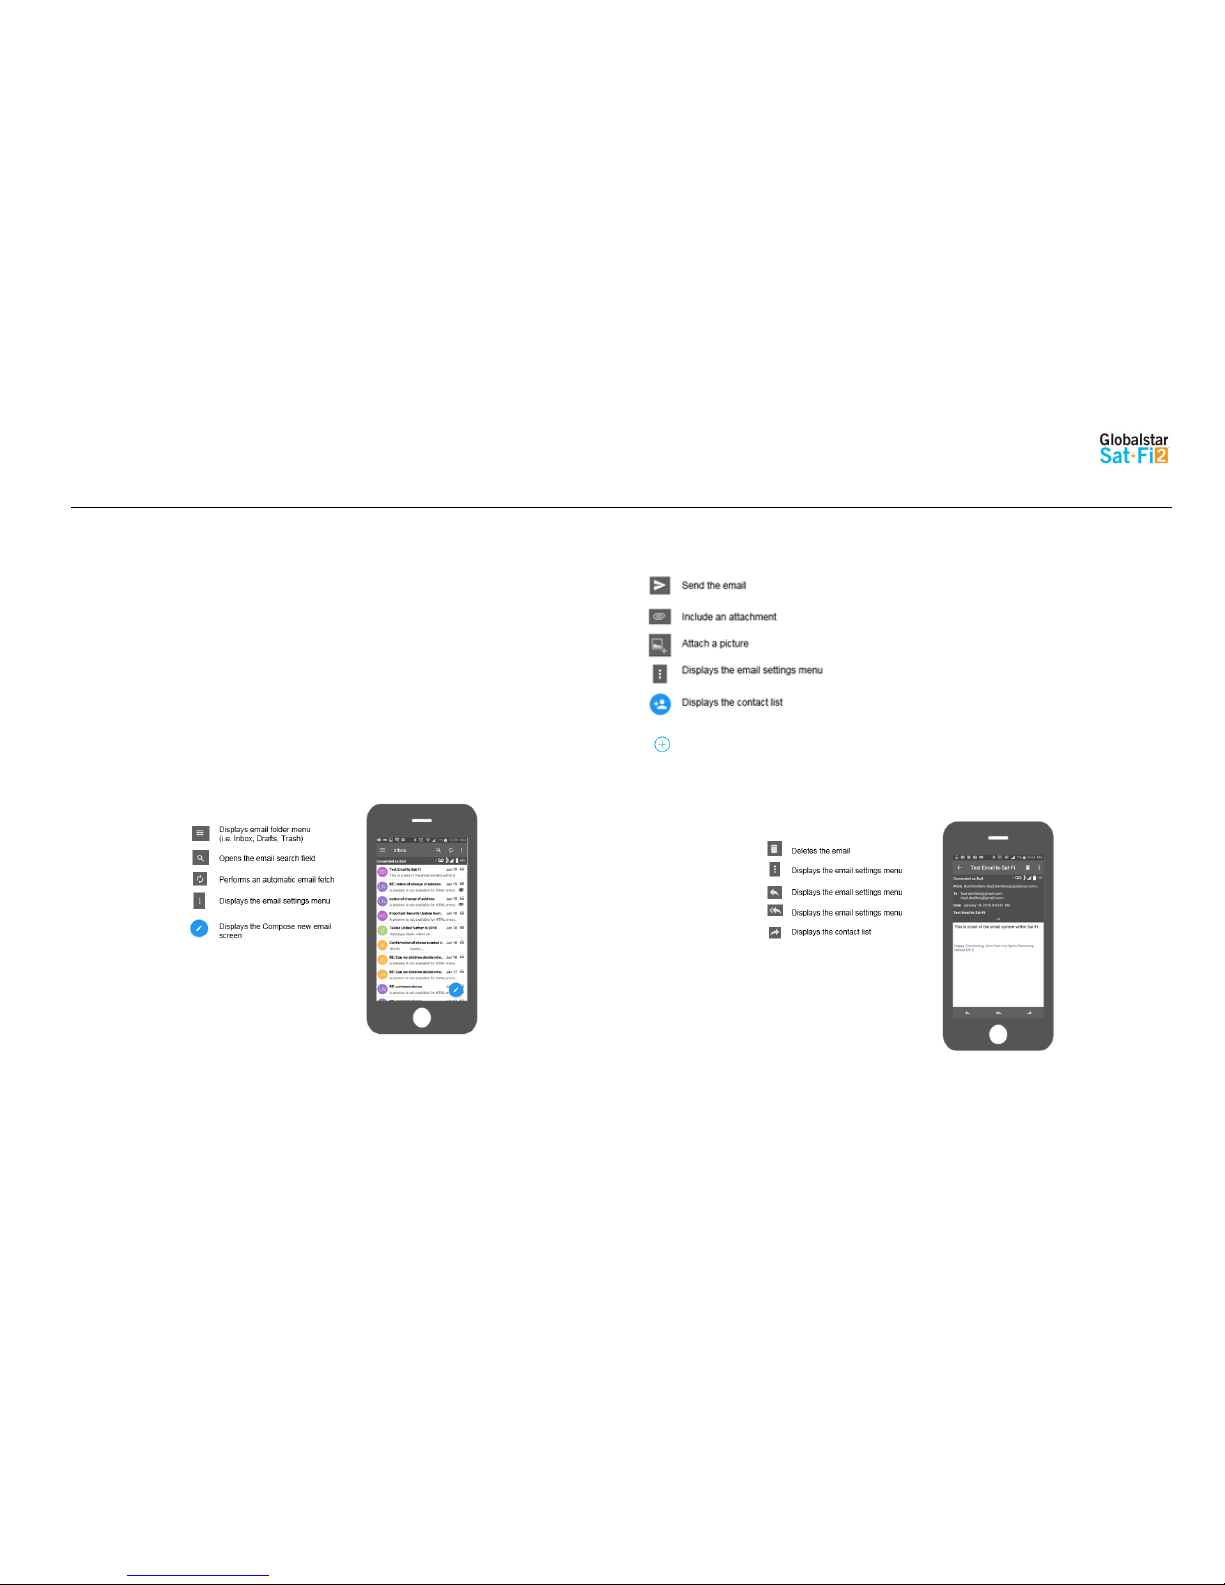
Inbox Screen
Compose Message Screen
View Email Screen
Dispays the contact list on iPhone
Page 18

Globalstar Sat-Fi2 User Guide Page 15
Configuring Email Accounts
Email Accounts – Gmail, Yahoo, iCloud, Outlook, Hotmail & AOL
Perform the following to configure personal email using the Sat-Fi2 App:
For Android:
1. Select Email icon
2. Select the Menu icon
3. Select Account Settings
4. Select the plus icon
5. Enter the Account Name to be displayed within the Sat-Fi2 App
6. Select the Email type to be used with Sat-Fi2
7. Enter the Email address to be used with Sat-Fi2
8. Enter the Username associated with the Email address
9. Enter the Password associated with the Email address
10. Email defaults to Text Email Format- To display Email in HTML format and/or display HTML
Images, place a checkmark in the appropriate checkboxes
(NOTES: Displaying Email and/or images in HTML will use more data)
11. Select and choose the number of Email messages to be fetched and displayed
12. Select and choose the Email Fetch Start Date
(NOTE: Selecting this option will bring up a calendar so the user can select from what day to start fetching emails.)
13. Select to verify the account settings are correct – If not, repeat Step 5 through Step 12
14. Select to save the Email account settings
15. The Email account will be configured and ready for use
For iPhone:
1. Select Email icon
2. Select the Plus icon at the bottom left corner
3. Enter the Account Description to be displayed within the Sat-Fi2 App
4. Enter the Email address to be used with Sat-Fi2
5. Enter the Username associated with the Email address
6. Enter the Password associated with the Email address
7. Select the Email type to be used with Sat-Fi2
8. Select the number of Email messages to be displayed
9. Select the number of Days to Sync
10. Turn on or turn off Auto Sync
11. Turn on or turn off Text Only
(NOTE: Displaying Email and/or images in HTML will use more data)
12. Turn on or turn off Load Images
13. Select the number of Retries on Error
14. Select Save
15. The Email account will be configured and ready for use
Page 19

Globalstar Sat-Fi2 User Guide Page 16
Email Accounts – Exchange
Perform the following to configure personal email using the Sat-Fi 2 App:
For Android:
1. Select Email icon
2. Select the Menu icon
3. Select Account Settings
4. Select the plus icon
5. Enter the Account Name to be displayed within the Sat-Fi2 App
6. Select the Email type to be used with Sat-Fi2
7. Enter the Email address to be used with Sat-Fi2
8. Enter the Username associated with the Email address
9. Enter the Password associated with the Email address
10. Enter the Exchange Active Directory Domain
11. Email defaults to Text Email Format- To display Email in HTML format and/or display HTML
Images, place a checkmark in the appropriate checkboxes
(NOTES: Displaying Email and/or images in HTML will use more data)
12. Select and choose the number of Email messages to be fetched and displayed
13. Select and choose the Email Fetch Start Date
(NOTE: Selecting this option will bring up a calendar so the user can select from what day to start fetching emails.)
14. Select to verify the account settings are correct – If not, repeat Step 6 through Step 12
15. Select to save the Email account settings
16. The Email account will be configured and ready for use
For iPhone:
1. Select Email icon
2. Select the Plus icon at the bottom left corner
3. Enter the Account Description to be displayed within the Sat-Fi2 App
4. Enter the Email address to be used with Sat-Fi2
5. Enter the Username associated with the Email address
6. Enter the Password associated with the Email address
7. Select the Email type to be used with Sat-Fi2
8. Select the number of Email messages to be displayed
9. Select the number of Days to Sync
10. Turn on or turn off Auto Sync
11. Turn on or turn off Text Only
(NOTES: Displaying Email and/or images in HTML will use more data)
12. Turn on or turn off Load Images
13. Select the number of Retries on Error
14. Enter the Exchange Domain Information
15. Select Save
16. The Email account will be configured and ready for use
Page 20

Globalstar Sat-Fi2 User Guide Page 17
Email Accounts – IMAP & IMAPS
Perform the following to configure personal email using the Sat-Fi2 App:
For Android:
1. Select Email icon
2. Select the Menu icon
3. Select Account Settings
4. Select the plus icon
5. Enter the Account Name to be displayed within the Sat-Fi2 App
6. Select the Email type to be used with Sat-Fi2
7. Enter the Email address to be used with Sat-Fi2
8. Enter the Username associated with the Email address
9. Enter the Password associated with the Email address
10. Enter the IMAP Server information
11. Enter IMAP Server Port number
12. Enter SMTP Server Information
13. Enter SMTP Sever Port number
14. Email defaults to Text Email Format- To display Email in HTML format and/or display HTML
Images, place a checkmark in the appropriate checkboxes
(NOTES: Displaying Email and/or images in HTML will use more data)
15. Select and choose the number of Email messages to be fetched and displayed
16. Select and choose the Email Fetch Start Date
(NOTES: Selecting this option will bring up a calendar so the user can select from what day to start fetching emails.)
17. Select to verify the account settings are correct – If not, repeat Step 6 through Step 12
18. Select to save the Email account settings
19. The Email account will be configured and ready for use
For iPhone:
1. Select Email icon
2. Select the Plus icon at the bottom left corner
3. Enter the Account Description to be displayed within the Sat-Fi2 App
4. Enter the Email address to be used with Sat-Fi2
5. Enter the Username associated with the Email address
6. Enter the Password associated with the Email address
7. Select the Email type to be used with Sat-Fi2
8. Select the number of Email messages to be displayed
9. Select the number of Days to Sync
10. Turn on or turn off Auto Sync
11. Turn on or turn off Text Only
(NOTES: Displaying Email and/or images in HTML will use more data)
12. Turn on or turn off Load Images
13. Select the number of Retries on Error
14. Enter the Email Server
15. Email Port
16. SMTP Server
17. SMTP Port
18. Select Save
19. The Email account will be configured and ready for use
Page 21

Globalstar Sat-Fi2 User Guide Page 18
Viewing Email
Perform the following steps to view an email:
For Android:
1. Select the email to be viewed
2. Select Download Email
3. The Sat-Fi2 will fetch the selected message
4. The selected message will be downloaded and ready to be viewed
NOTE: If there are attachments to the e-mail, they can be downloaded individually or all at once by selecting
the paper clip icon. The attachments will not show how big the file is unless the email has been downloaded.
For iPhone:
1. Select the email to be viewed
2. Select Download Email
3. The Sat-Fi2 will fetch the selected message
4. The selected message will be downloaded and ready to be viewed
NOTE: If there are attachments to the e-mail, they can be downloaded individually or all at once by selecting
the paper clip icon.
Composing and Sending Email
Perform the following steps to compose and send an email:
1. On Android, select
On iPhone, select
2. Enter an email address or select a contact
3. Enter a subject
4. Enter email message text
5. On Android, select to send
On iPhone select Send
6. The email will be sent and a Email message sent message will be displayed
NOTE: If the Sat-Fi2 does not have a satellite connection, the email message will be placed in the
message Queue and sent when the Sat-Fi2 reconnects to the satellite.
Page 22

Globalstar Sat-Fi2 User Guide Page 19
Attaching images to an Email
Follow steps 1 – 4 from Composing and Sending Email
Hibernation Mode:
As a default setting, the Sat-Fi2 will go into hibernation mode after 15 minutes of no activity. During hibernation, the Sat-Fi2 will power off the satellite modem to increase battery life.
The hibernation timer can be configured from the settings menu in the app or web console.
When the Sat-Fi2 is in hibernation mode, the power LED does a dimming blink in orange and green colors.
To wake up the Sat-Fi2 from hibernation mode, access the app and a notification will be displayed showing that the Sat-Fi2 is waking up from hibernation. You will also see the green lights scrolling through the Sat-Fi2 LED’s. Additionally, pressing the
power button for 7 seconds will start the power off sequence.
NOTE: To initiate S.O.S. while in hibernation mode, press and hold down the S.O.S. button for 3 seconds on the device. This will wake up the device and initiate S.O.S. once a connection has been established.
For Android:
1. Select to choose the image
(NOTE: The bottom left lets the user take a photo with the camera; bottom right lets the user choose from
existing photos
2. Once a photo is selected, there is an option to rotate as well as changing the pixel size.
3. Select the check mark at the top right corner of the app to attach the photo to the email
For iPhone:
1. Select Attach Image
2. Tap on Select a Photo. The photos can be selected from the camera or from the phone’s Photo Library
3. If needed, adjust the size. Select resize & Compress
4. Image will be attached to the email
Page 23
Globalstar Sat-Fi2 User Guide Page 20
S.O.S. / GEOS
IMPORTANT: S.O.S. MODE SHOULD ONLY BE USED DURING LIFE THREATENING EMERGENCIES.
SENDING FALSE S.O.S. MESSAGES MAY SJUBJECT YOU TO LIABILITY FOR ADDITIONAL
CHARGES.
Activate the S.O.S. mode to begin communicating and sending alerts directly to GEOS International Emergency
Response Coordination Center (IERCC). GEOS will notify the appropriate emergency responders based on your
Sat-Fi2’s GPS location and your emergency situation. Responders may include local police, Coast Guard, or Search
and Rescue teams. Please note that you may be liable for expenses related to your rescue.
Once S.O.S. is initiated, the Sat-Fi2 will continuously send GEOS your GPS position every 5 minutes until the S.O.S. is
canceled or the device is powered off. While S.O.S. is active, the Sat-Fi2 should remain outside where it has a 360
clear view of the sky with no obstructions in order to maintain network connectivity.
Initiating an S.O.S.
S.O.S. From the Device
Perform the following steps to initiate an S.O.S. from the Sat-Fi2 device:
1. Ensure the following:
The Sat-Fi2 is outside with a 360 clear view of the sky with no
obstructions (buildings, trees, etc.)
The Sat-Fi2 is powered on with the co-located antenna fully
extended in the up-right position
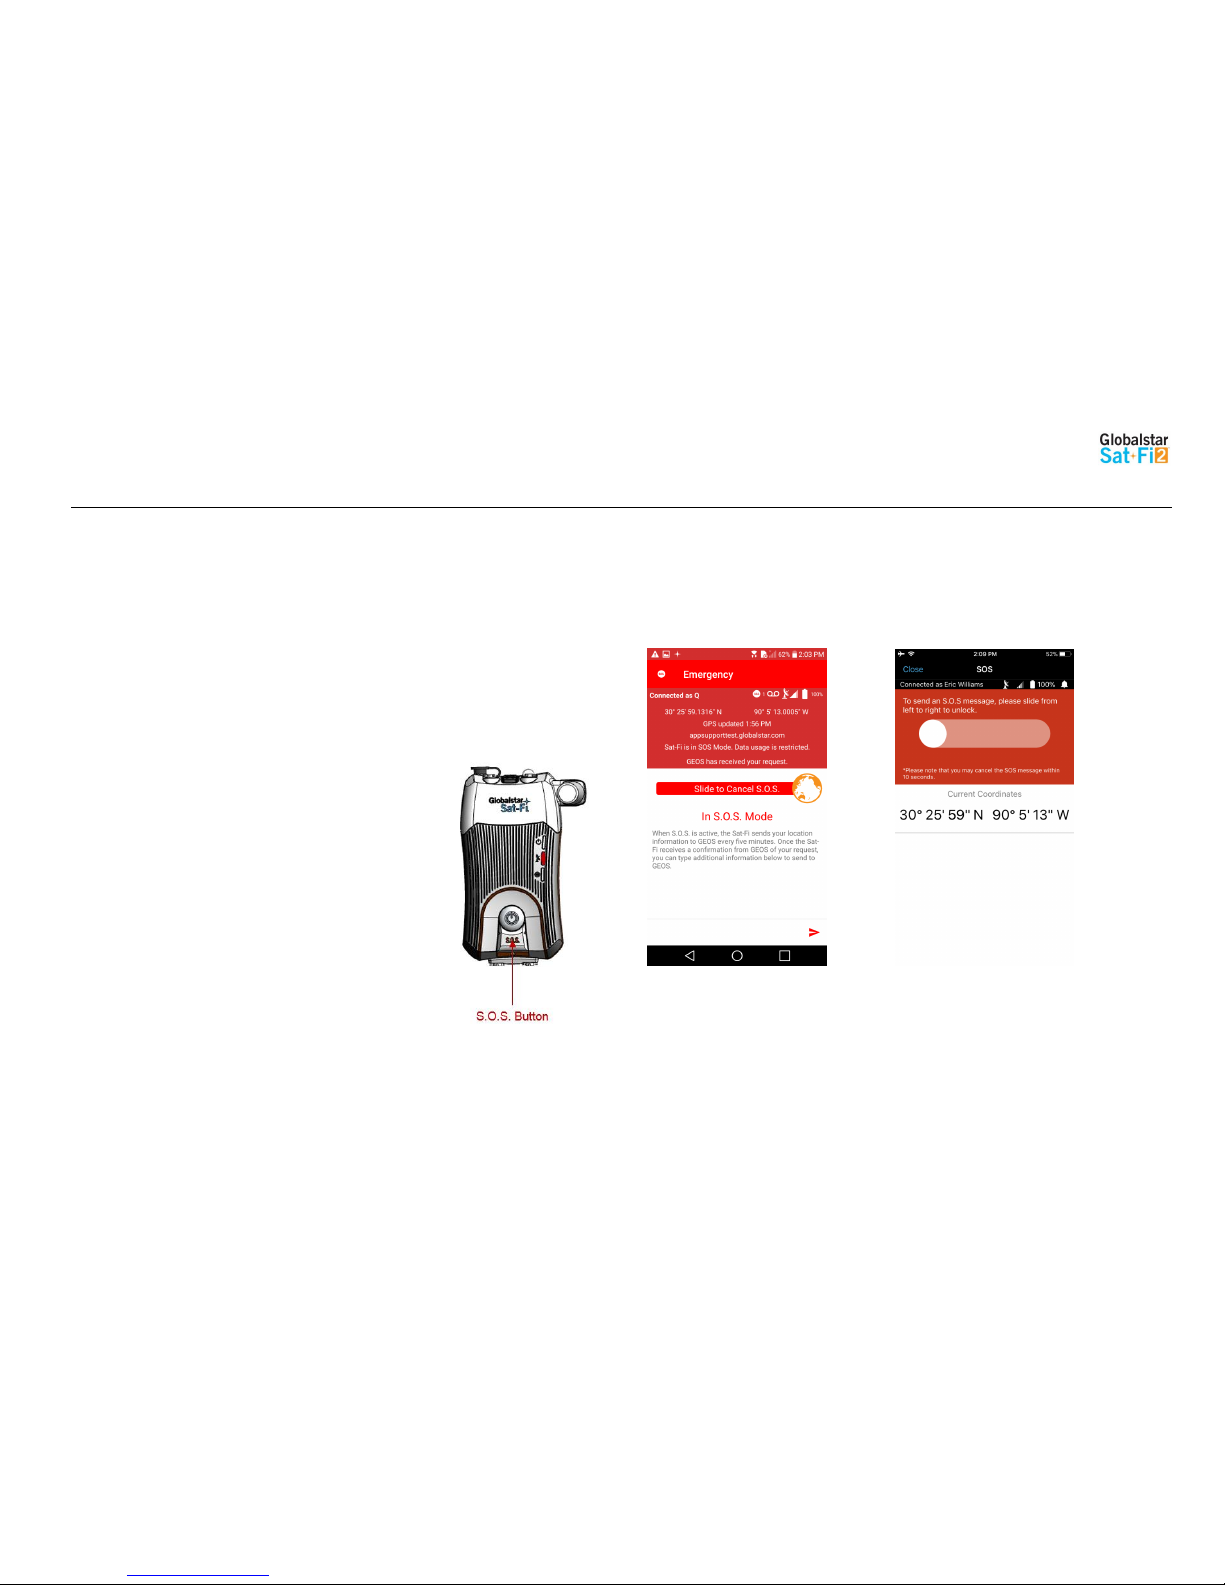
2. Open the Sat-Fi2 S.O.S. protective cover and press and hold the
S.O.S. button for 3 seconds until the S.O.S. LED blinks GREEN.
While the Sat-Fi2 is trying to establish a connection with GEOS, the
S.O.S LED will stay a solid GREEN. After a connection has been
established, the LED will do a double blink.
NOTE: If the Satellite LED is blinking RED, move the Sat-Fi2 to a
location with a better view of the sky. Keep looking for a better
location until the Satellite LED starts to blink GREEN.
3. Once the Sat-Fi2’s GPS location is determined, Sat-Fi2 will send an
S.O.S. notification with GPS location to GEOS every 5 minutes until the
S.O.S. is cancelled or the Sat-Fi2 is powered off.
S.O.S. from the Sat-Fi2 App
Perform the following steps to initiate an S.O.S. from the Sat-Fi2 App:
1. From the Sat-Fi2 App home screen select the S.O.S.
2. Press and hold the white circle and slide from left to right to unlock
Android iPhone
Page 24
Globalstar Sat-Fi2 User Guide Page 21
Communicating with GEOS via text
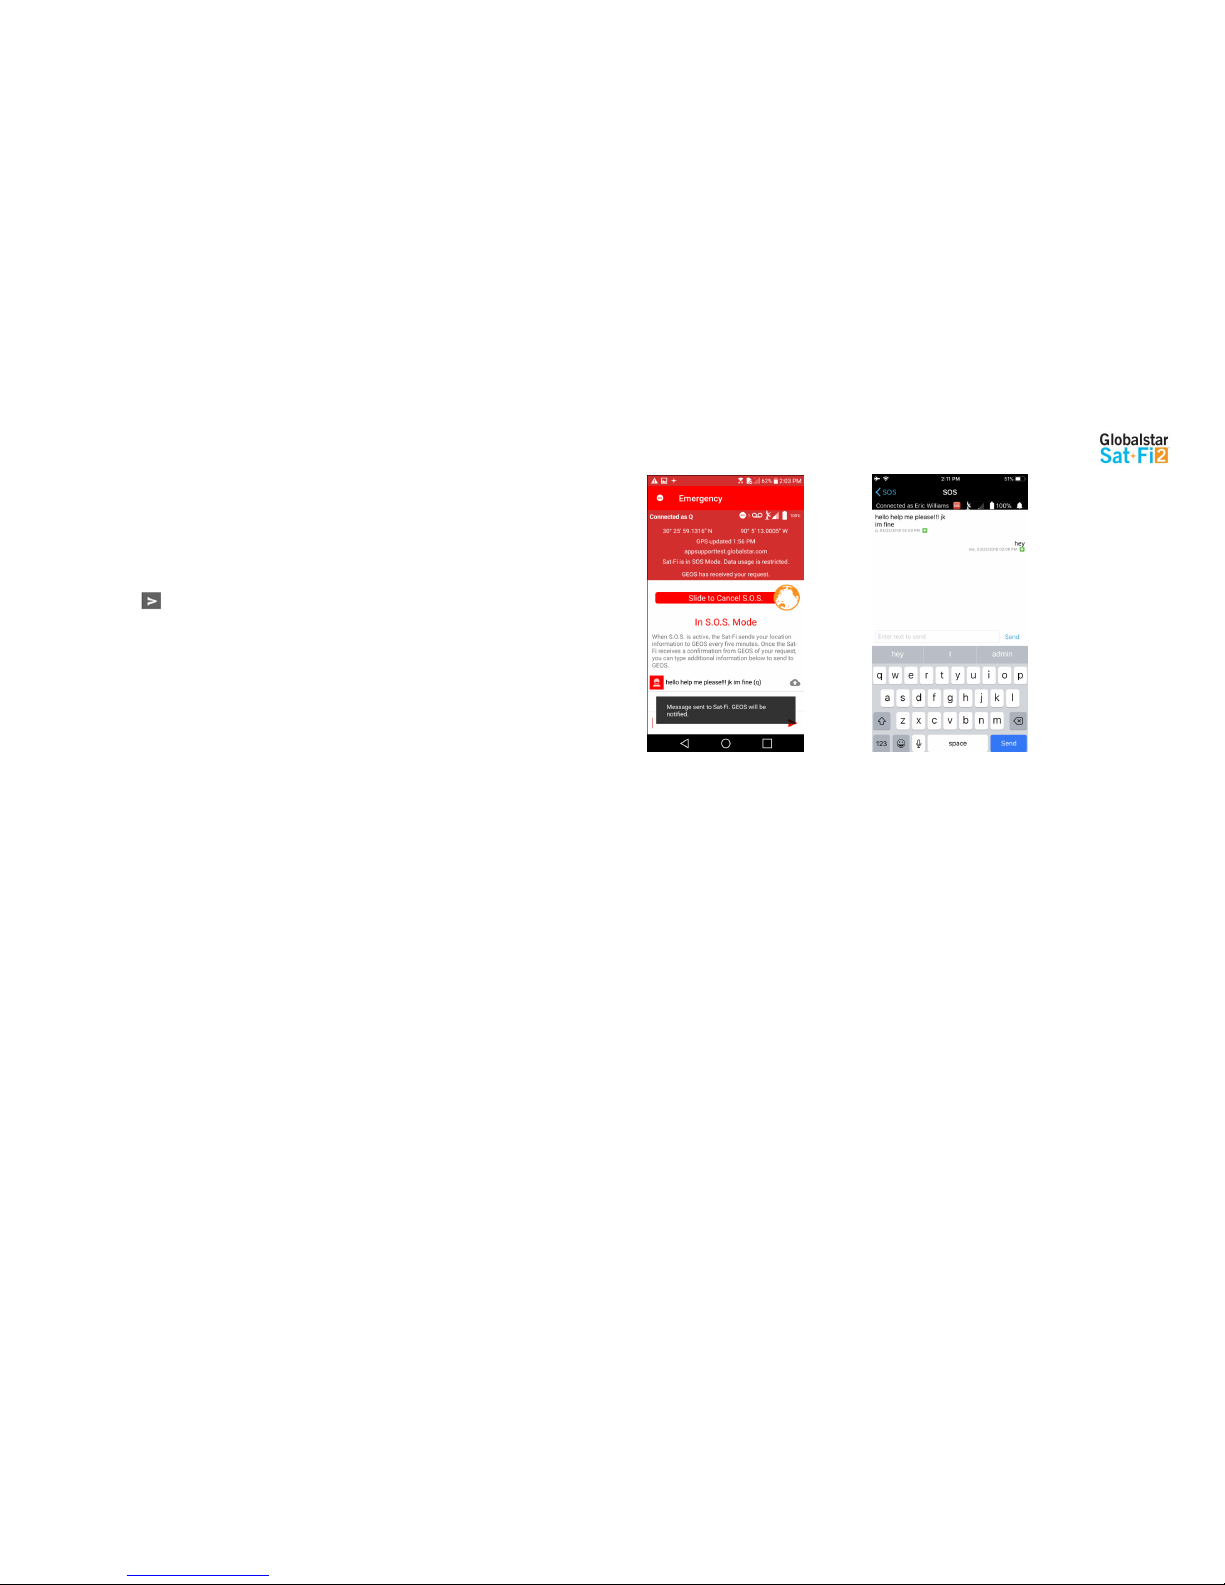
Perform the following steps to communicate with GEOS via text:
For Android:
1. Once the S.O.S. has been initiated, the Sat-Fi2 app will show that it is in S.O.S. Mode
2. At the bottom of the screen, there will be a field to type in the message to send to GEOS
3. Select to send the message
4. A message will be displayed saying the Message was sent to Sat-Fi2 and GEOS will be notified.
For iPhone:
1. Once the S.O.S. has been initiated, the Sat-Fi2 app will show that it is in S.O.S. Mode
2. Select Send Message
3. Type in the message to send to GEOS
4. Select Send
5. A message will be displayed saying the Message was sent to Sat-Fi2 and GEOS will be notified.
Page 25
Globalstar Sat-Fi2 User Guide Page 22
Cancelling an S.O.S.:
IMPORTANT: THE SAT-FI2 WILL REMAIN IN S.O.S. MODE UNTIL CANCELED BY THE USER. THE S.O.S.
NOTIFICATION TO GEOS WILL NOT BE CANCELED IF THE DEVICE IS POWERED OFF OR IF
THE SAT-FI2 APP IS TURNED OFF.
S.O.S. From the Device
Perform the following steps to cancel an S.O.S. from the Sat-Fi2 device:
1. Ensure the following:
The Sat-Fi2 is outside with a 360 clear view of the sky with no
obstructions (buildings, trees, etc.)
The Sat-Fi2 is powered on with the co-located antenna fully
extended in the up-right position
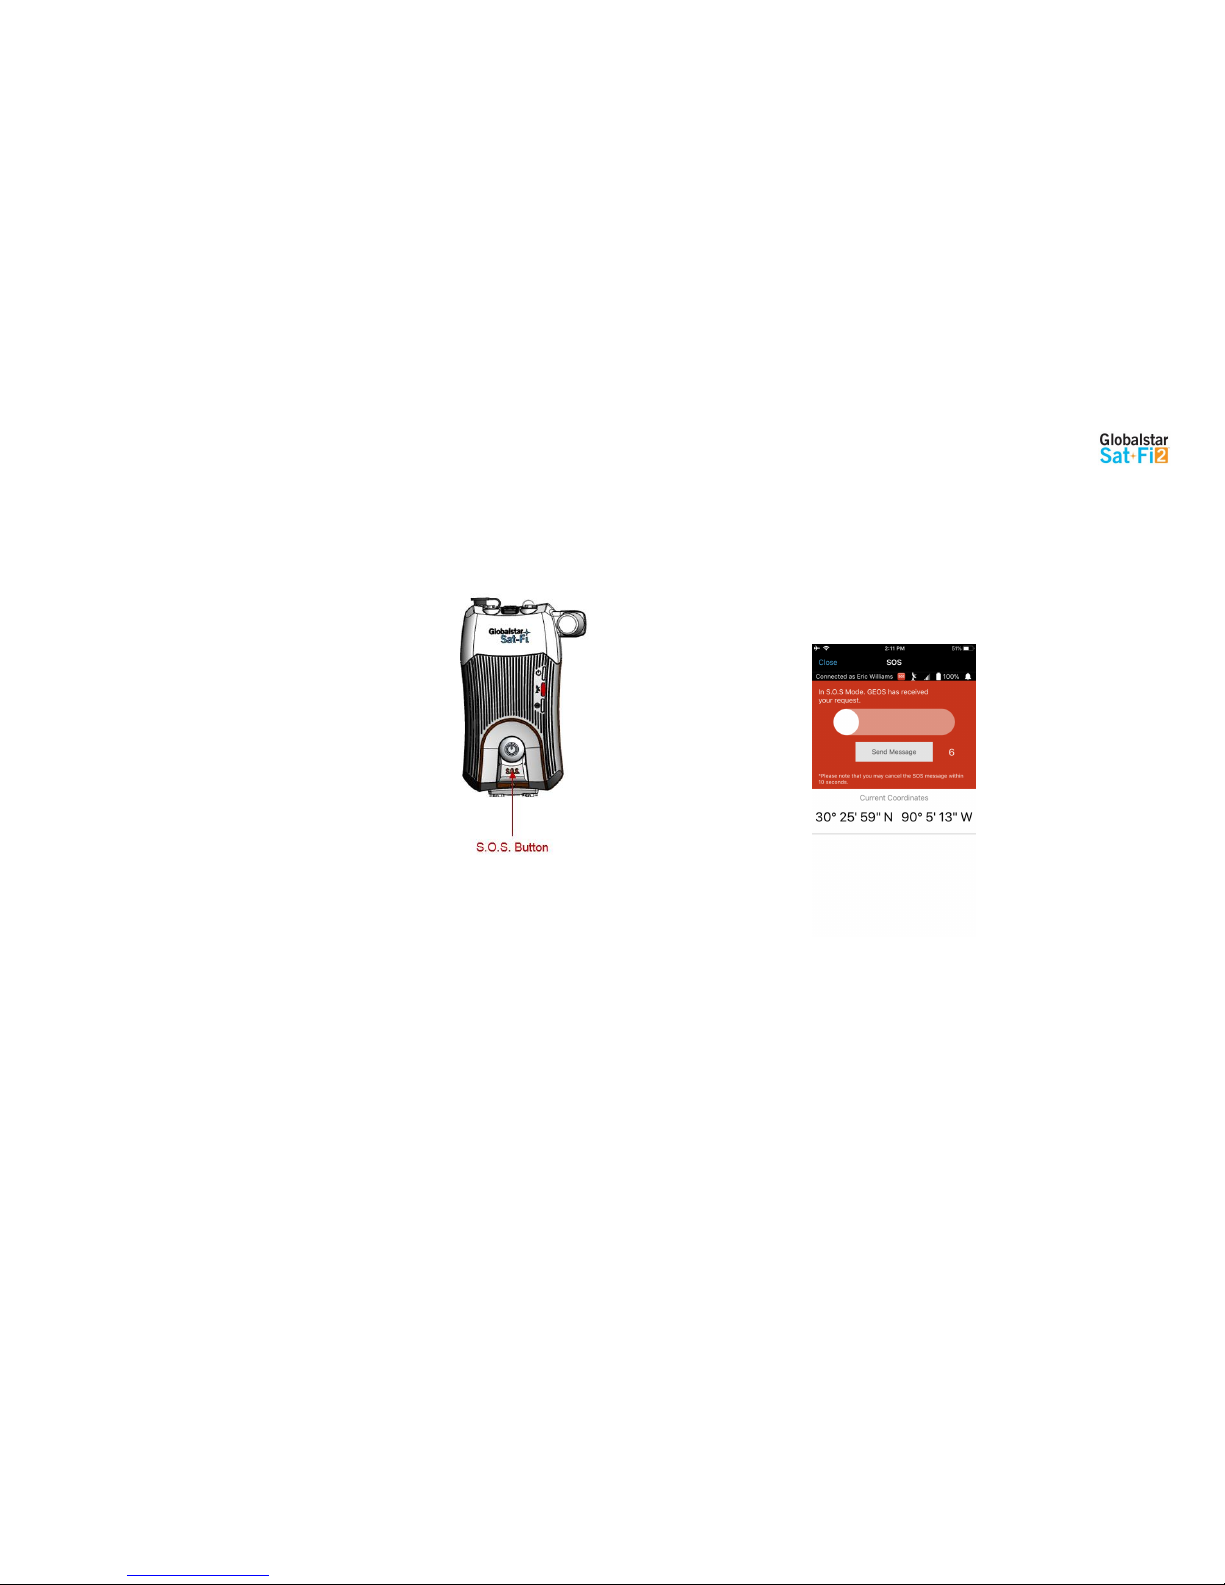
2. Select the S.O.S. function from the main menu and slide from left to
right to unlock
3. The Sat-Fi2 will send a cancellation message to GEOS notifying them
that the Sat-Fi2 has entered S.O.S. cancelation mode
S.O.S. from the Sat-Fi2 App
Perform the following steps to cancel an S.O.S. from the Sat-Fi2 App.
1. Ensure the following:
The Sat-Fi2 is outside with a 360 clear view of the sky with no obstructions (buildings, trees, etc.)
The Sat-Fi2 is powered on with the co-located antenna fully extended in the up-right position
2. Within 10 seconds from initiating the S.O.S. mode, slide from right to left to cancel the alert.
3. The Sat-Fi2 will send a cancellation message to GEOS notifying them that the Sat-Fi2 has entered
S.O.S. cancelation mode.
Page 26

Globalstar Sat-Fi2 User Guide Page 23
SAT-BROWSE
Overview
Initial Configuration of Sat-Browse
Perform the following steps to configure Sat-Browse:
1. Select Web
2. Select Sat-Browse
3. Select Login
4. Enter you Globalstar My Account Username and Password
5. Enter Login
6. Check the Yippy Customer Agreement
7. Select Continue
8. Select Continue when the screen says “Agreement is Required”
9. Configuration of Sat-Browse is complete
Sat-Browse provides a dedicated optimized search engine powered by Yippy. Yippy compresses
web sites and removes advertisements, banners and graphics, greatly reducing the amount of data
usage. Sat-Browse is not designed for banking and secure sites (https), shopping sites and
streaming services.
Web Browsing
Perform the following steps to browse the web:
1. Select Web
2. Select Sat-Browse
3. Select Login
4. Enter you Globalstar My Account Username and Password
5. Enter Login
6. Enter search request
7. Select Search
8. The search results will be displayed – Select the orange search result to view
(NOTE: Selecting [Standard Version] will download a non-optimized web page, resulting in large data
consumption and possible overage costs
9. The optimized web page will be displayed
Page 27

Globalstar Sat-Fi2 User Guide Page 24
SOCIAL MEDIA
Facebook & Twitter
Configuring the Sat-Fi2 App for Facebook and Twitter
NOTE: Globalstar recommends configuring Facebook and/or Twitter accounts over an Internet/Cellular connection. Configuring Facebook and/or Twitter over the Sat-Fi2 will consume data.
Perform the following steps to link the Sat-Fi2 App to Facebook and Twitter:
FACEBOOK:
1. On the Sat-Fi2 app, select Social
2. Select Facebook
3. Enter Facebook’s account user information
4. Select Login
5. A message will display saying “Globalstar Sat-Fi2 will receive your public profile and email address.” Select Continue
6. Select who can see the Sat-Fi2 Facebook posts:
Public
Friends
Only me
7. Select OK – Configuring the Sat-Fi2 for Facebook is complete
TWITTER:
1. Select Social
2. Select Twitter
3. Enter Twitter username
4. Enter Twitter password
5. Select Sign In
6. The Sat-Fi2 Twitter screen will be displayed – Configuring the Sat-Fi2 for Twitter is
complete
Page 28
Globalstar Sat-Fi2 User Guide Page 25
Posting to Facebook and Twitter
Perform the following steps to post to Facebook and Twitter using the Sat-Fi2 App:
FACEBOOK:
1. Select Social
2. Select Facebook
3. Enter Facebook post
4. On Android, select
On iPhone, select Post
5. The Facebook post will be sent
TO POST A PICTURE:
1. Select Social
2. Select Facebook
3. Enter Facebook post
4. On Android, select
On iPhone select Attach Image
5. On Android, select the camera icon to take a photo or select a photo
On iPhone
6. Select the camera icon to take a picture
7. Select OK to accept the photo or select RETRY to take another photo
8. Select to attach the phot to the Facebook post.
9. On Android, select
On iPhone, select Post
10. The Facebook post will be sent
NOTE: Multiple photo uploads are not supported at this time, they will have to be uploaded one by
one.
TWITTER:
1. Select Social
2. Select Twitter
3. Enter Tweet
4. On Android, select
On iPhone, select Post
5. The Tweet will be sent
TO POST A PICTURE:
1. Select Social
2. Select Twitter
3. Enter Tweet
4. On Android, select to add photo
On iPhone,
5. Select the to take a photo or select to select a photo
6. On Android, (Optional) Select
On iPhone
7. On Android, Select OK to accept
On iPhone
8. Select OK to accept the photo or select RETRY to take another photo
9. Select to attach the phot to the Facebook post.
10. On Android, select
On iPhone, select Post
11. The Tweet will be sent
Page 29
Globalstar Sat-Fi2 User Guide Page 26
WEATHER
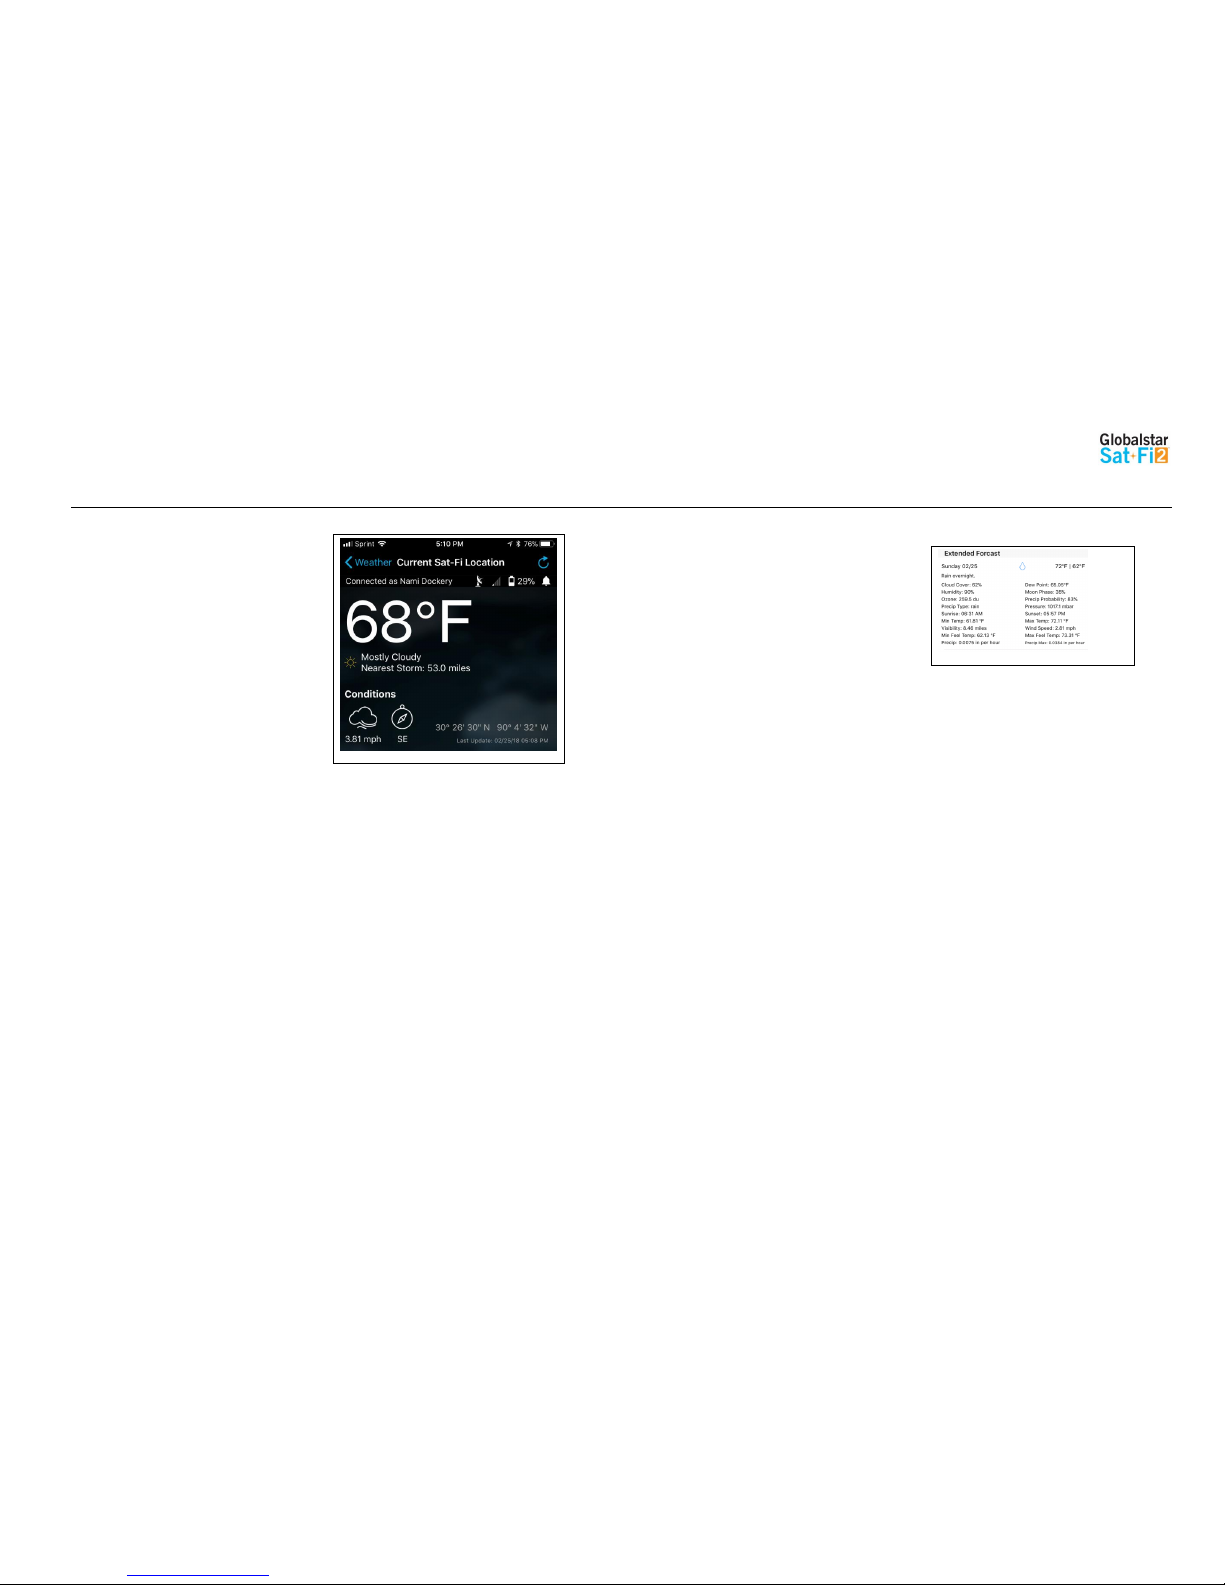
Current Weather Screen
The Weather screen displays the following information
Weather radar (not active by default)
Sat-Fi2’s current GPS location
Current weather condition
Current temperature
High and low temperature for the day
Current “Feels Like” temperature
Wind speed & direction
More Weather Information
More Details Screen
The More Details screen displays the following information:
Weather summary
Maximum and minimum “Feels Like” temperature for the day
Precipitation probability percentage for the day
Sunrise and sunset times
Visibility distance
Ozone level
Atmospheric pressure
Percentage of cloud cover
Precipitation type
Dew point temperature
Forecast Weather Screen
The Forecast screen displays the following information:
Weather forecast for the next 7 days
o Day of the Week
o Forecasted Weather conditions
o High & low temperatures
Weather Configuration
The Weather Configuration allows making the following changes:
Weather units can be changed to SI, U.S., Canada, or U.K.
Enable or Disable Radar
Enable or Disable Animate Radar
Change the Radar Radius
Page 30

Globalstar Sat-Fi2 User Guide Page 27
View Current Weather
Perform the following steps to view the weather for the current location:
1. Select Weather
2. Select Current Sat-Fi2 location
3. A message will come on asking if you want to load data, select Yes or Load Data
4. The current weather location weather will be displayed
Weather Radar
Perform the following steps to enable and display weather radar:
For Android:
1. Select Settings from the Weather Menu
2. Check Download Radar and Animated Radar
3. Exit out of Settings
4. Select Current Sat-Fi2 Location
5. The app will ask if you want to download weather,
select Yes
6. Select the radar icon
(NOTE: Downloading weather radar will incur
data usage)
7. The radar map will be displayed
For iPhone:
1. Select the Settings icon from the Main Menu
2. Under Weather Configuration, tap on Enable Radar and
Animate Radar
3. Exit out of Settings select Close
4. Select the Weather icon
5. Select Current Sat-Fi2 Location
6. Select Load Data when the app asks if you would like to
load latest weather Data
7. Select the world icon
(NOTE: Downloading weather radar will incur data usage)
Page 31
Globalstar Sat-Fi2 User Guide Page 28
QUEUE
Queue Screen
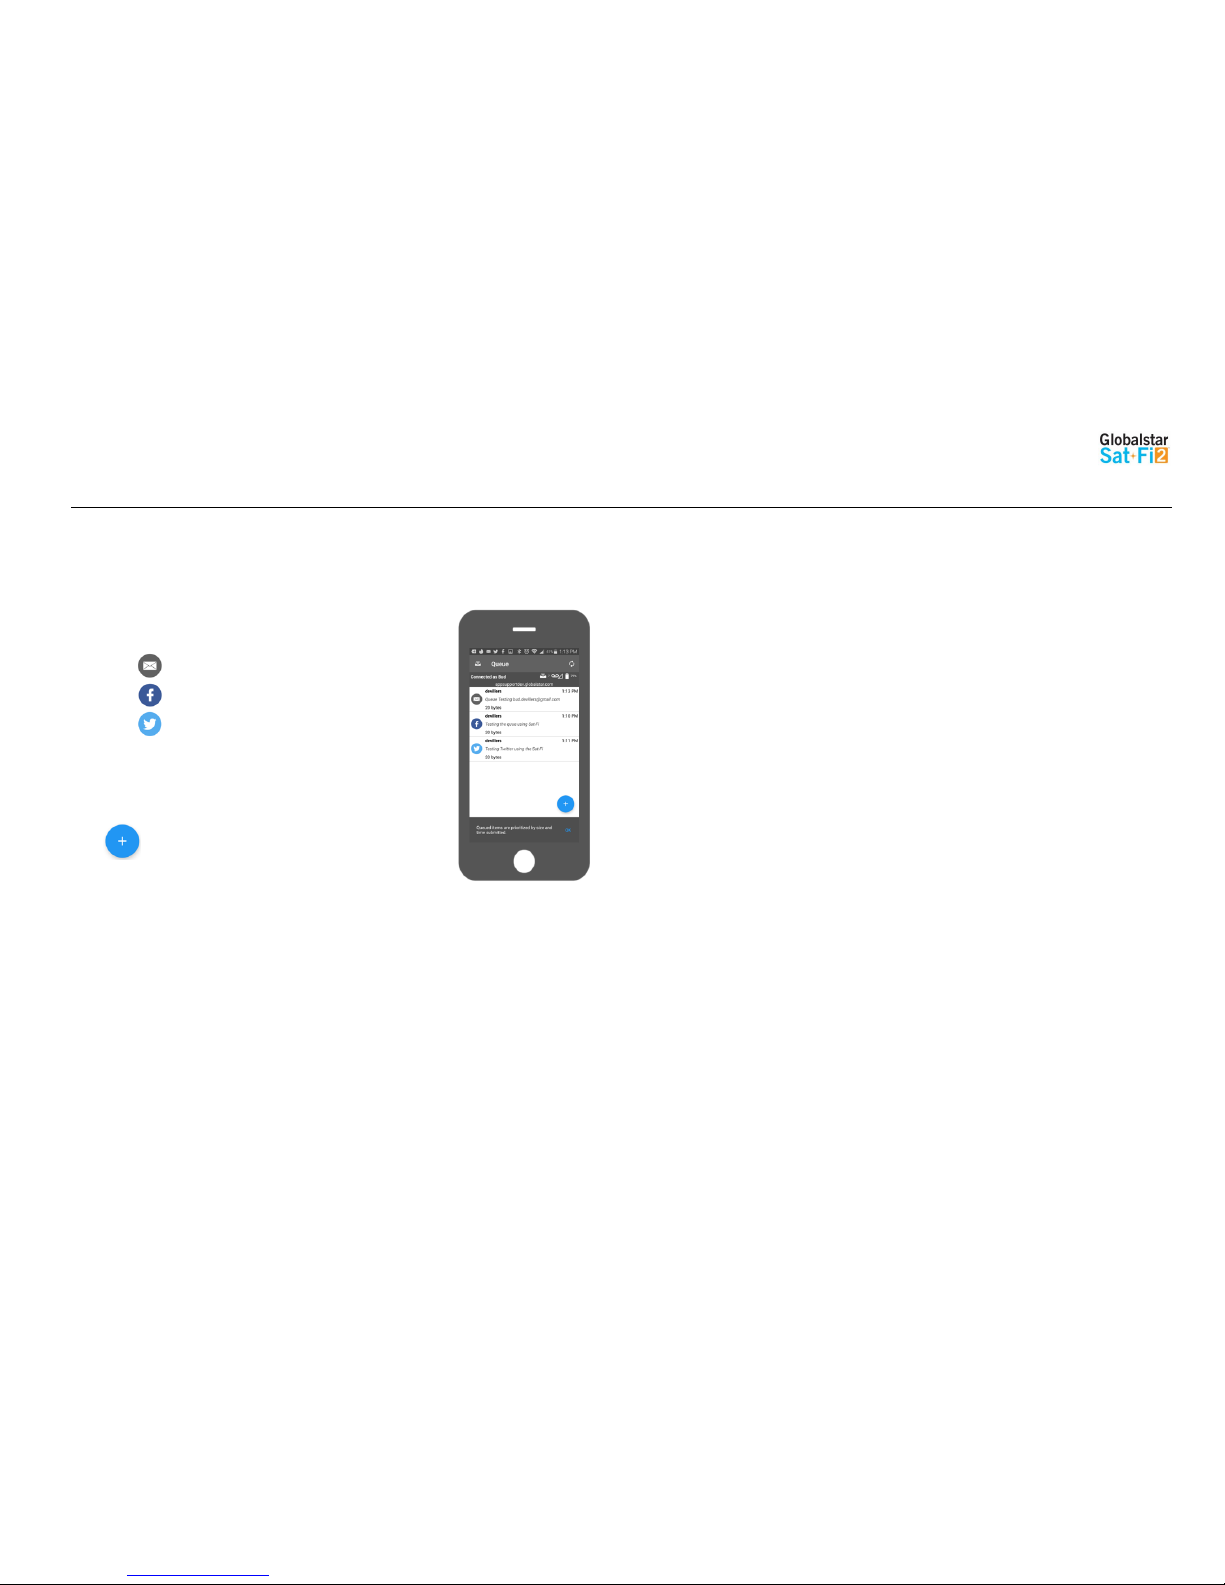
The Queue screen displays messages residing in the Sat-Fi2 Queue waiting to be sent. All Queued messages are
prioritized first by size and then time submitted. Queued message priority cannot be edited, but individual Queued
messages can be deleted.
The Queue screen displays the following information:
Message Type
o Email
o Facebook
o Twitter
Sender of the message
Subject or brief summary
Date/Time placed in Queue
Adds a message to the Queue (Email, Facebook or Twitter)
Delete a Message from the Queue
Perform the following steps to delete a message from the Queue:
For Android:
1. Select the queued message to be
deleted
2. Select delete
3. When asked if you want to remove the
message from the queue, select Yes
4. The queued message will be deleted
For iPhone:
1. Select the queued message to be deleted
2. Select and hold the queued message that
needs to be deleted
3. When asked to select an action, select
Delete
4. The queued message will be deleted
Page 32

Globalstar Sat-Fi2 User Guide Page 29
Add Messages to the Queue
Perform the following steps to add messages to the Queue:
For Android:
1. Select the Queue icon
2. Select the plus sign
3. Select the message type to add to the Queue.
The options are:
Facebook
Twitter
Email
Download
For iPhone:
1. Select Queue icon
2. Select Add New Queue Item
3. Select the message type to add to the Queue:
4. The options are:
Facebook
Twitter
Email
Download
(NOTE: To download a file, select “View Downloads” from
the Queue menu. Then tap the + at the top right and then
enter a URL into the first bar and the name in the second
bar. Then tap “Add to Queue”
Page 33
Globalstar Sat-Fi2 User Guide Page 30
APP SETTINGS
App Settings Screen
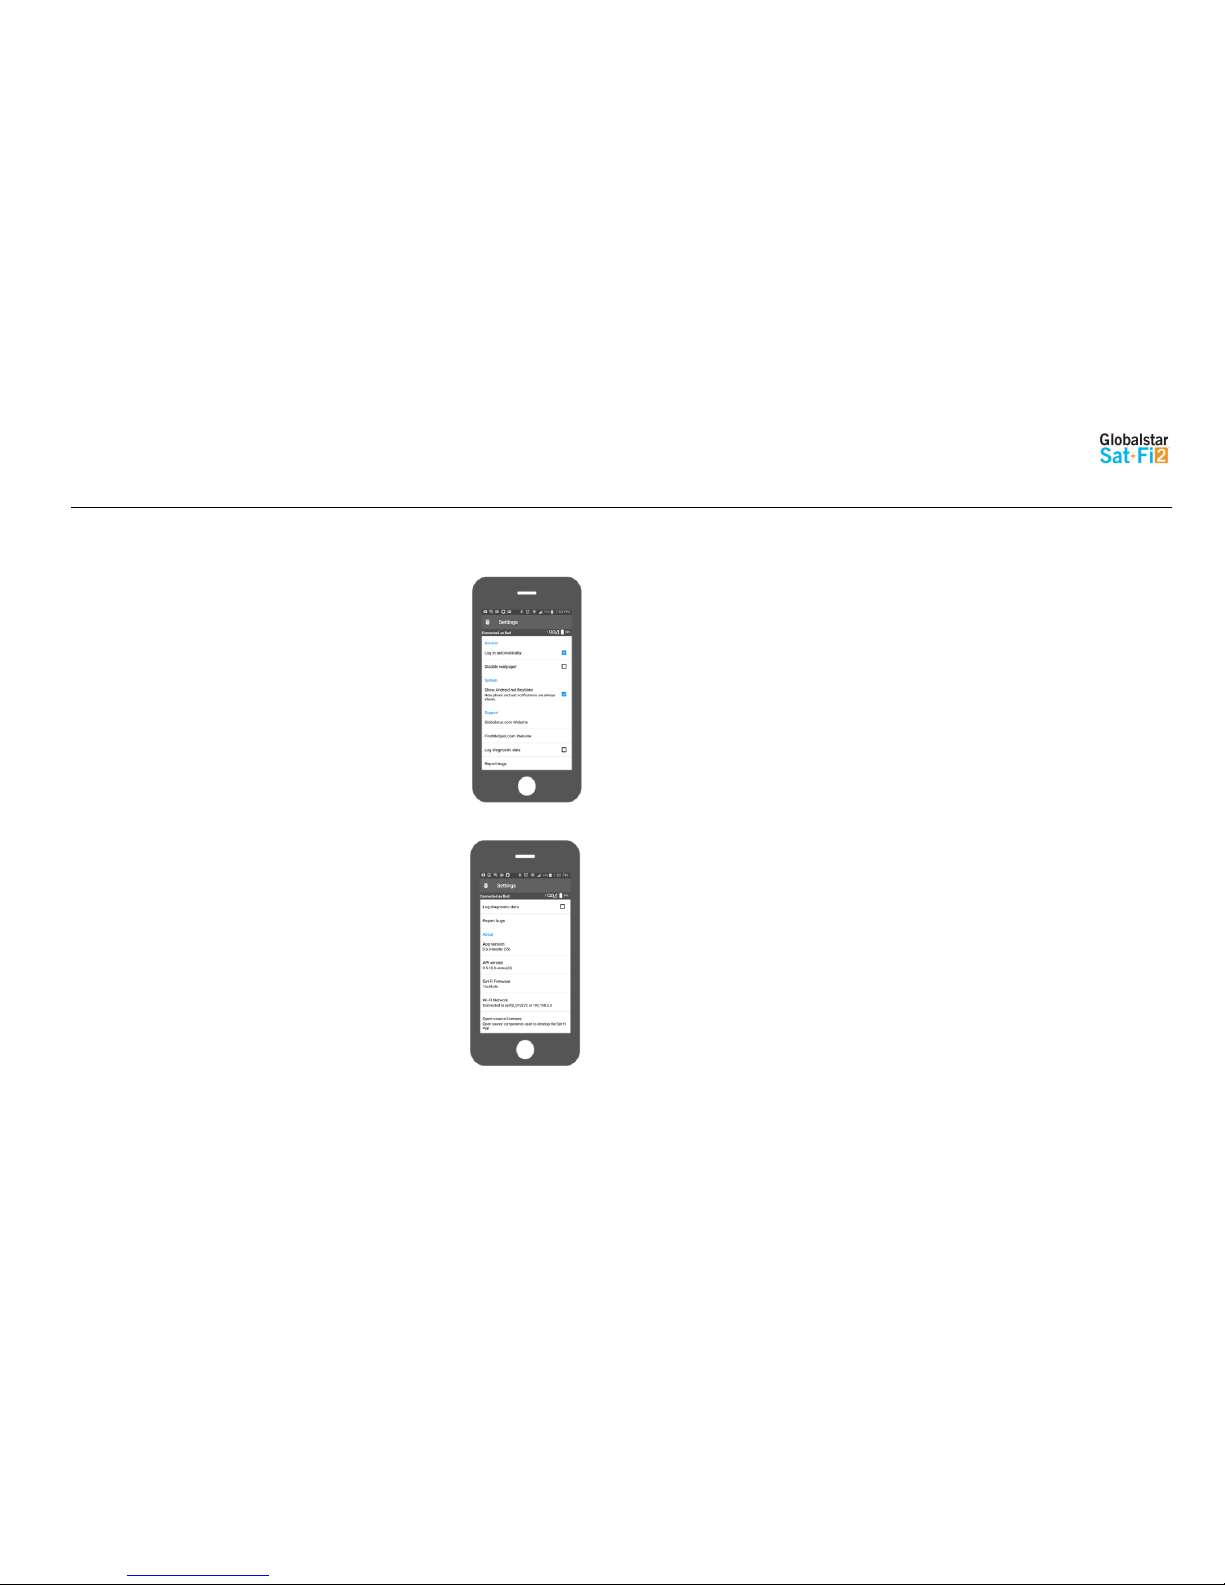
The Settings screen on the Android App displays the following information:
General
o Log in automatically – Selecting the checkbox toggles on/off the ability
to log in automatically to the Sat-Fi2 App
o Disable wallpaper – Selecting the checkbox toggles on/off the wallpaper
display
System
o Show Android notifications - Selecting the checkbox toggles on/off
Android notifications (i.e. Email, Social Media)
Support
o Globalstar.com Website – Selecting Globalstar.com Website displays
the Globalstar website using an Internet connection or using the Sat-Fi2
o FindMeSpot.com Website - Selecting FindMeSpot.com Website
displays the FindMeSpot website using an Internet connection or using
the Sat-Fi2
o Log diagnostic data - Selecting the checkbox toggles on/off the ability
for the Sat-Fi2 App to automatically create diagnostic logs
o Report bugs - Selecting the checkbox toggles on/off the ability for the
Sat-Fi2 App to automatically report bugs logs and notify the user that
the logs are being sent
About
o App version – Display the current Sat-Fi2 App version number on the
smartphone
o API version – Displays the current Sat-Fi2 API version number on the
smartphone
o Sat-Fi2 firmware – Displays the current firmware module version
residing on the Sat-Fi2 device
o Wi-Fi Network – Displays the connection name of the Wi-Fi network
(i.e. satfi2_XXXXXX)
o Open source licenses – Selecting Open source licenses displays the
Open Source projects used in the development of the Sat-Fi2 App
Page 34
Globalstar Sat-Fi2 User Guide Page 31
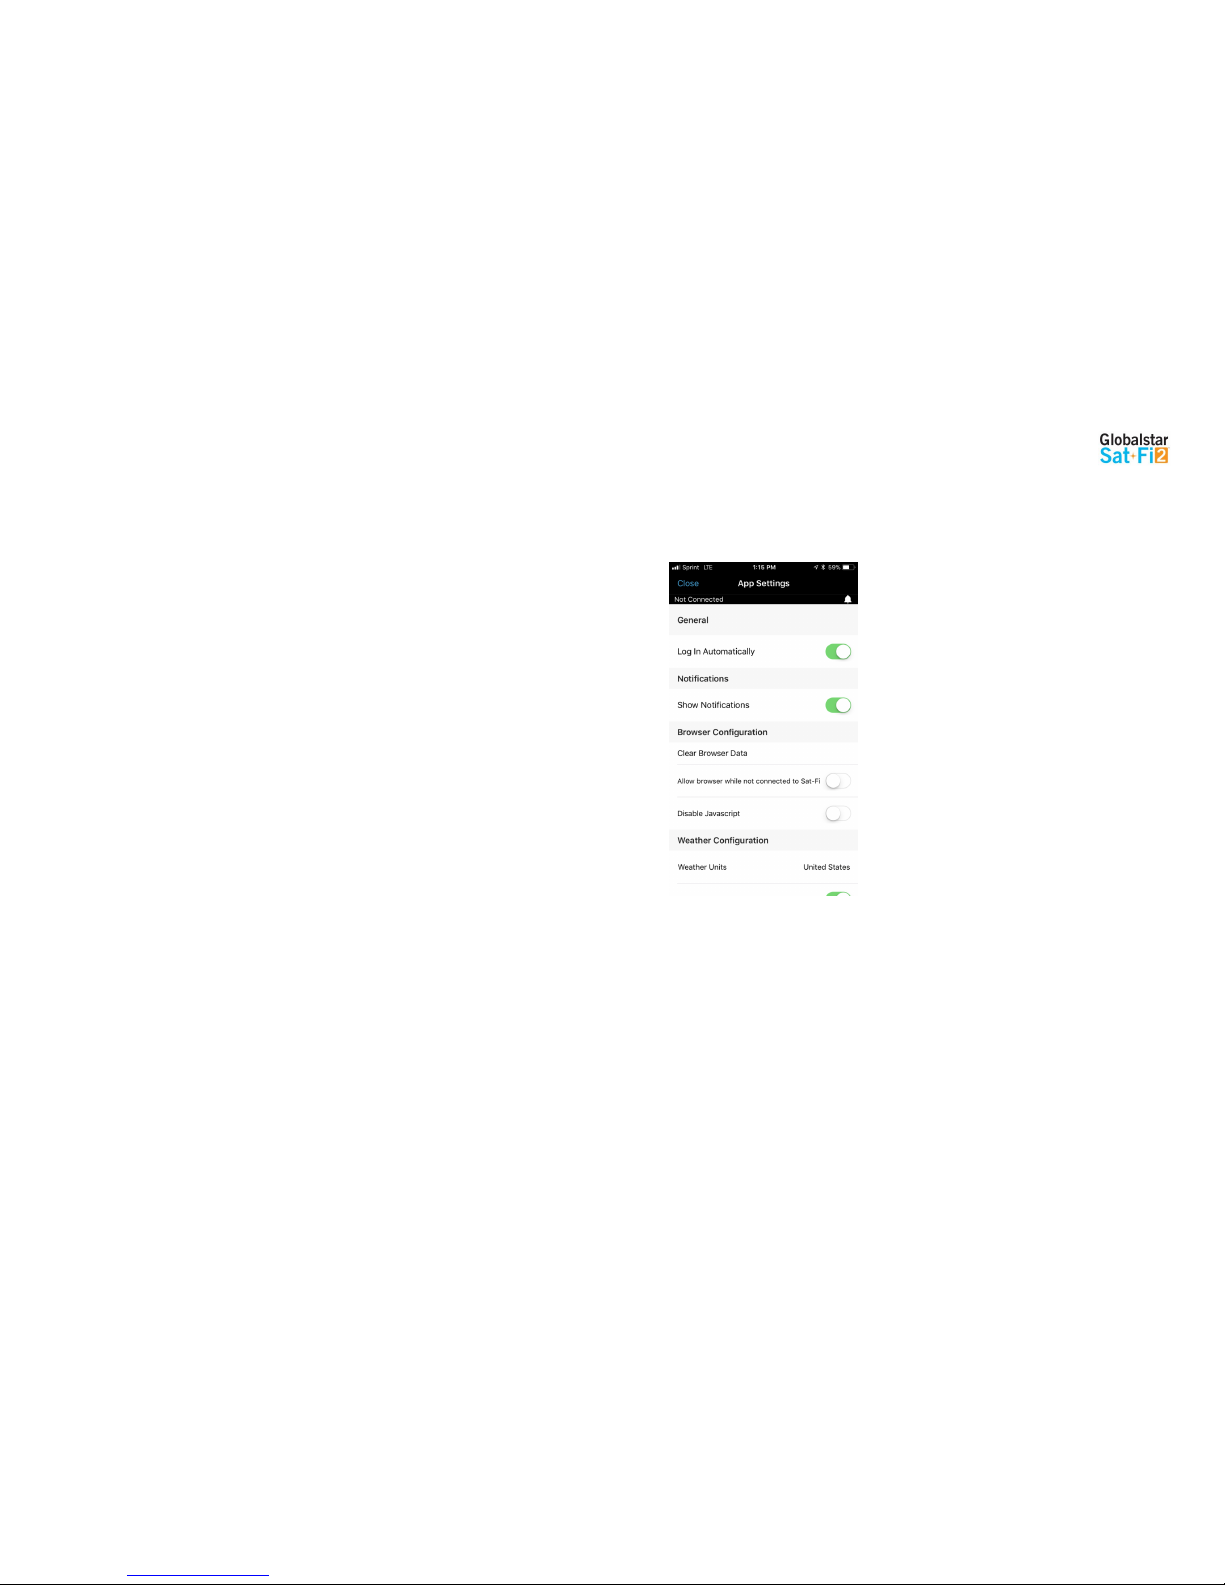
The Settings screen on the iPhone App displays the following information:
General
o Sat-Fi2 IP Address
o Log in Automatically – Enable or disable the ability to log in automatically to the Sat-Fi2 App
o Reset Network – Reset app to default Sat-Fi2 address
o API to Use – Select from Test, Production and Dev
o Allow Email Without Sat-Fi2 Connection
o Enable Logging
o View Logs
Notifications
o Show Notifications – Enabling and disabling iPhone notifications (i.e. Email, Social Media)
Browser Configuration
o Clear Browser Data
o Allow browser while not connected to Sat-Fi2
o Disable Javascript
Weather Configuration
o Weather Units - Select from SI, United States, Canada or United Kingdom
o Enable Radar
o Animate Radar
o Radar Radius (in nm)
About
o App Version
o Sat-Fi2 Firmware Version
o Open Source Information
o Globalstar Website - Selecting Globalstar Website displays the Globalstar website using an Internet
connection or using the Sat-Fi
o FindMeSPOT Website - Selecting FindMeSpot Website displays the FindMeSpot website using an
Internet connection or using the Sat-Fi2
Device Configuration
o Launch Setup Wizard
o Allow FW Download Over Cellular
o Firmware Update
User Configuration
o Clear Social Configuration
o Register Facebook
o Register Twitter
Viewing the App Settings Screen
Perform the following steps to view the Settings screen:
For Android:
1. Select the Menu button and select App
settings
2. The Settings screen will be displayed
For iPhone:
1. Select the Settings icon on the main menu
2. The Settings screen will be displayed
Page 35

Globalstar Sat-Fi2 User Guide Page 32
Firmware Update
Perform the following steps to update the firmware on your Sat-Fi2:
For Android:
1. Select in the top right corner
2. Select “App Settings”
3. Scroll down to “Check for New Firmware”
4. Select Download
5. Select “Start Download”
6. There will be two options available: “Start Update” or Run Update Later.”
“Start Update” will begin the firmware update. If “Update Later” is selected, then the option
to reconnect to the Sat-Fi2 Wi-Fi will be available, then a green bar will be displayed. Select
it at any time and continue to Step 7.
7. Wait for the firmware to upload to the Sat-Fi2. After the firmware is uploaded, the Sat-Fi2
will reboot showing, so the LEDs will begin their scrolling sequence.
(NOTE: When the user reconnects to the Sat-Fi2 via the app, there will be a notification telling
the user that “The Sat-Fi2 was previously shutdown to complete a Firmware Update.”
For iPhone:
1. Select Settings icon on the main menu
2. Select Firmware Update, then the following message will be displayed: “Fetching currently running
Sat-Fi2 firmware version”
3. Select Download Update once the following message appears: “A message then will show saying a
New Update is available”
4. Select OK when the Sat-Fi2 App displays a message asking to disconnect from the Sat-Fi2 before
downloading the update
5. Select OK when prompt to connect to a broadband Wi-Fi connection to download the firmware
update or allow download over cellular in the Settings menu
6. On Settings enable Allow FW Download Over Cellular if no Wi-Fi connections are available
7. Select Firmware Update in order to begin the download
8. After the update has been downloaded, connect to the Sat-Fi2 and press Update Sat-Fi2 to continue.
While the Sat-Fi2 is updating, please do not close the app
9. The Sat-Fi2 will reboot, so the LEDs will begin their scrolling sequence and disconnects the phone
from its Wi-Fi. This indicates that the Sat-Fi2 updated
10. Updating Sat-Fi2 firmware update
(NOTE: When the user reconnects to the Sat-Fi2 via the app, there will be a notification telling the user
that the firmware was downloaded successfully. If it was interrupted or did not download successfully,
then the app will give a notification saying the firmware update was interrupted
Page 36

Globalstar Sat-Fi2 User Guide Page 33
DEVICE SETTINGS
Viewing the Device Settings
The Device Settings screen can only be accessed while logged in as the Sat-Fi2 Owner. Perform the following steps to access the Device Settings screen:
Admin Console
Select to display the Users screen
Select to display the Wi-Fi Configuration screen
Select to display the Firewall screen
Select to display the Device Info screen
For Android:
1. Select the Menu button and
select Device Settings
2. Enter your My Account
username and password
3. The Admin Console screen will
be displayed
For iPhone:
1. Select the Settings button on the Main Menu
2. Select Configure Device Setting
3. Enter your My Account username and
password
4. The Admin Console screen will be displayed
Page 37
Globalstar Sat-Fi2 User Guide Page 34
Users
The user section identifies all usernames that have been created on the Sat-Fi 2, including Owner and Guests accounts. It is editable
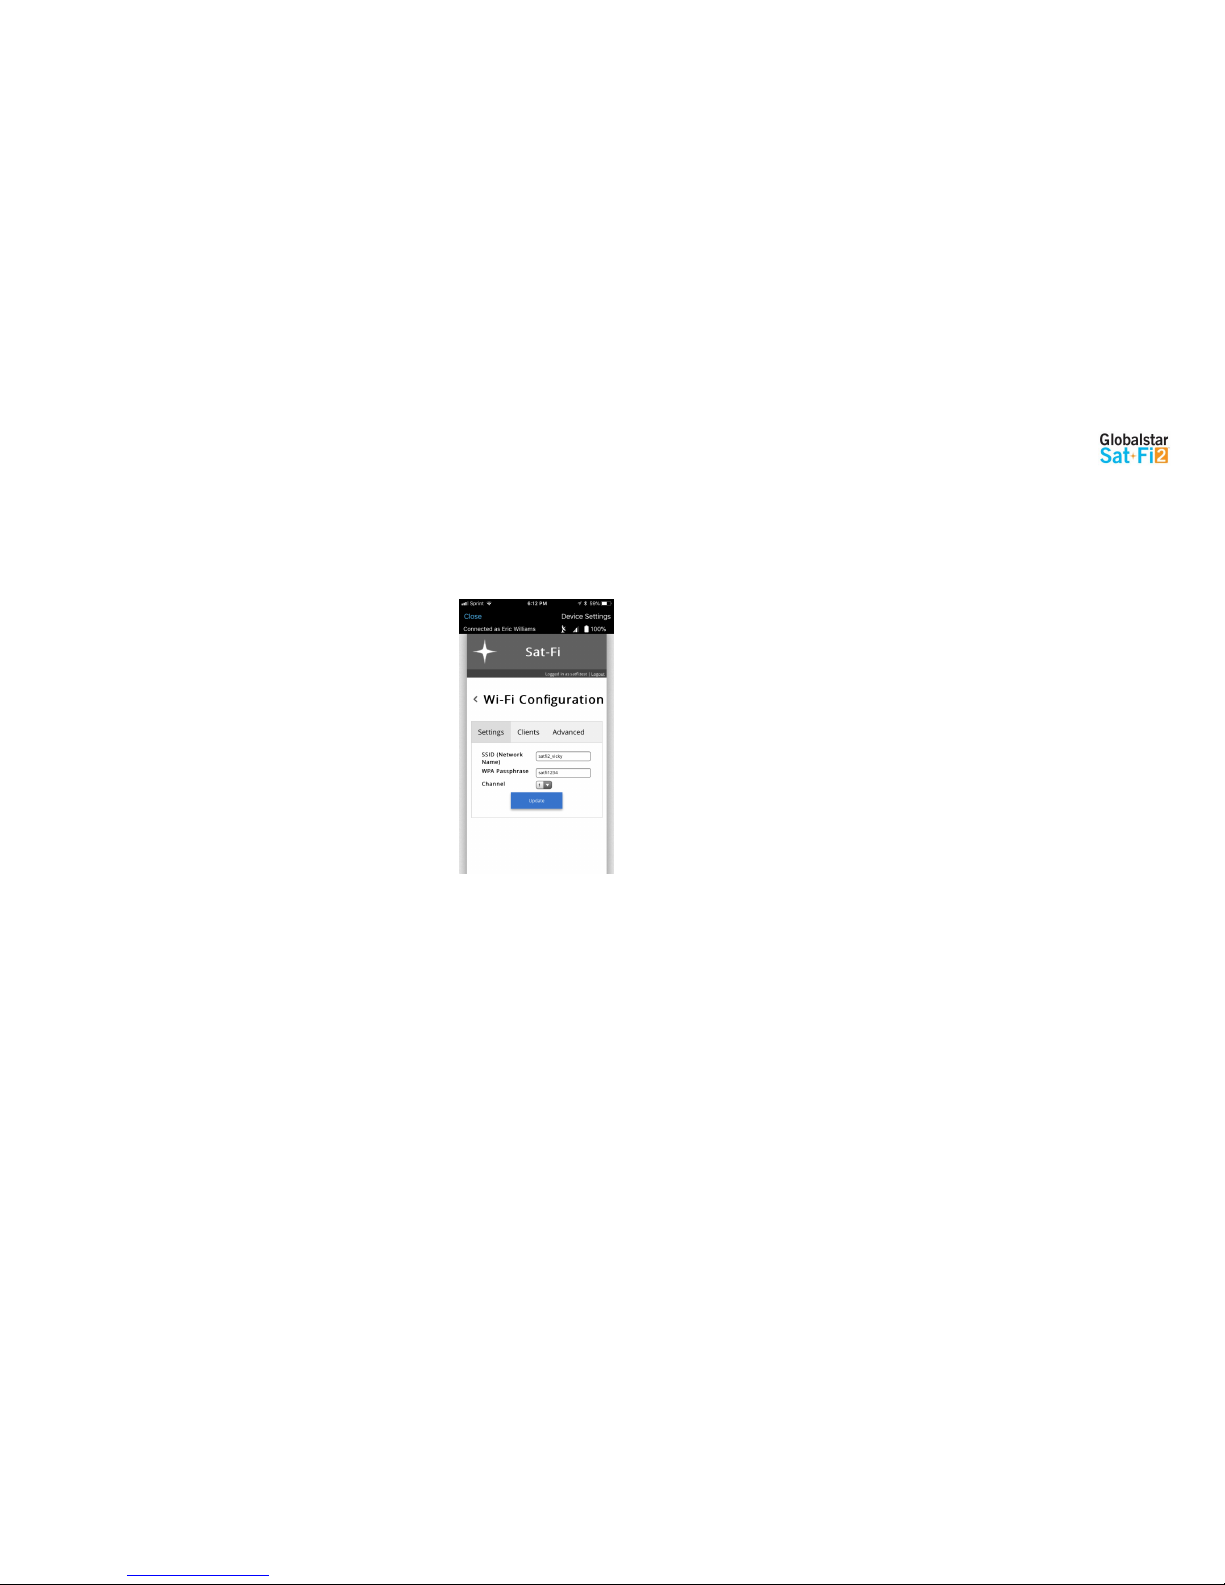
Wi-Fi Configuration
Wi-Fi Configuration – Settings Tab
The Settings Tab identifies the Wi-Fi network name and password.
Page 38
Globalstar Sat-Fi2 User Guide Page 35
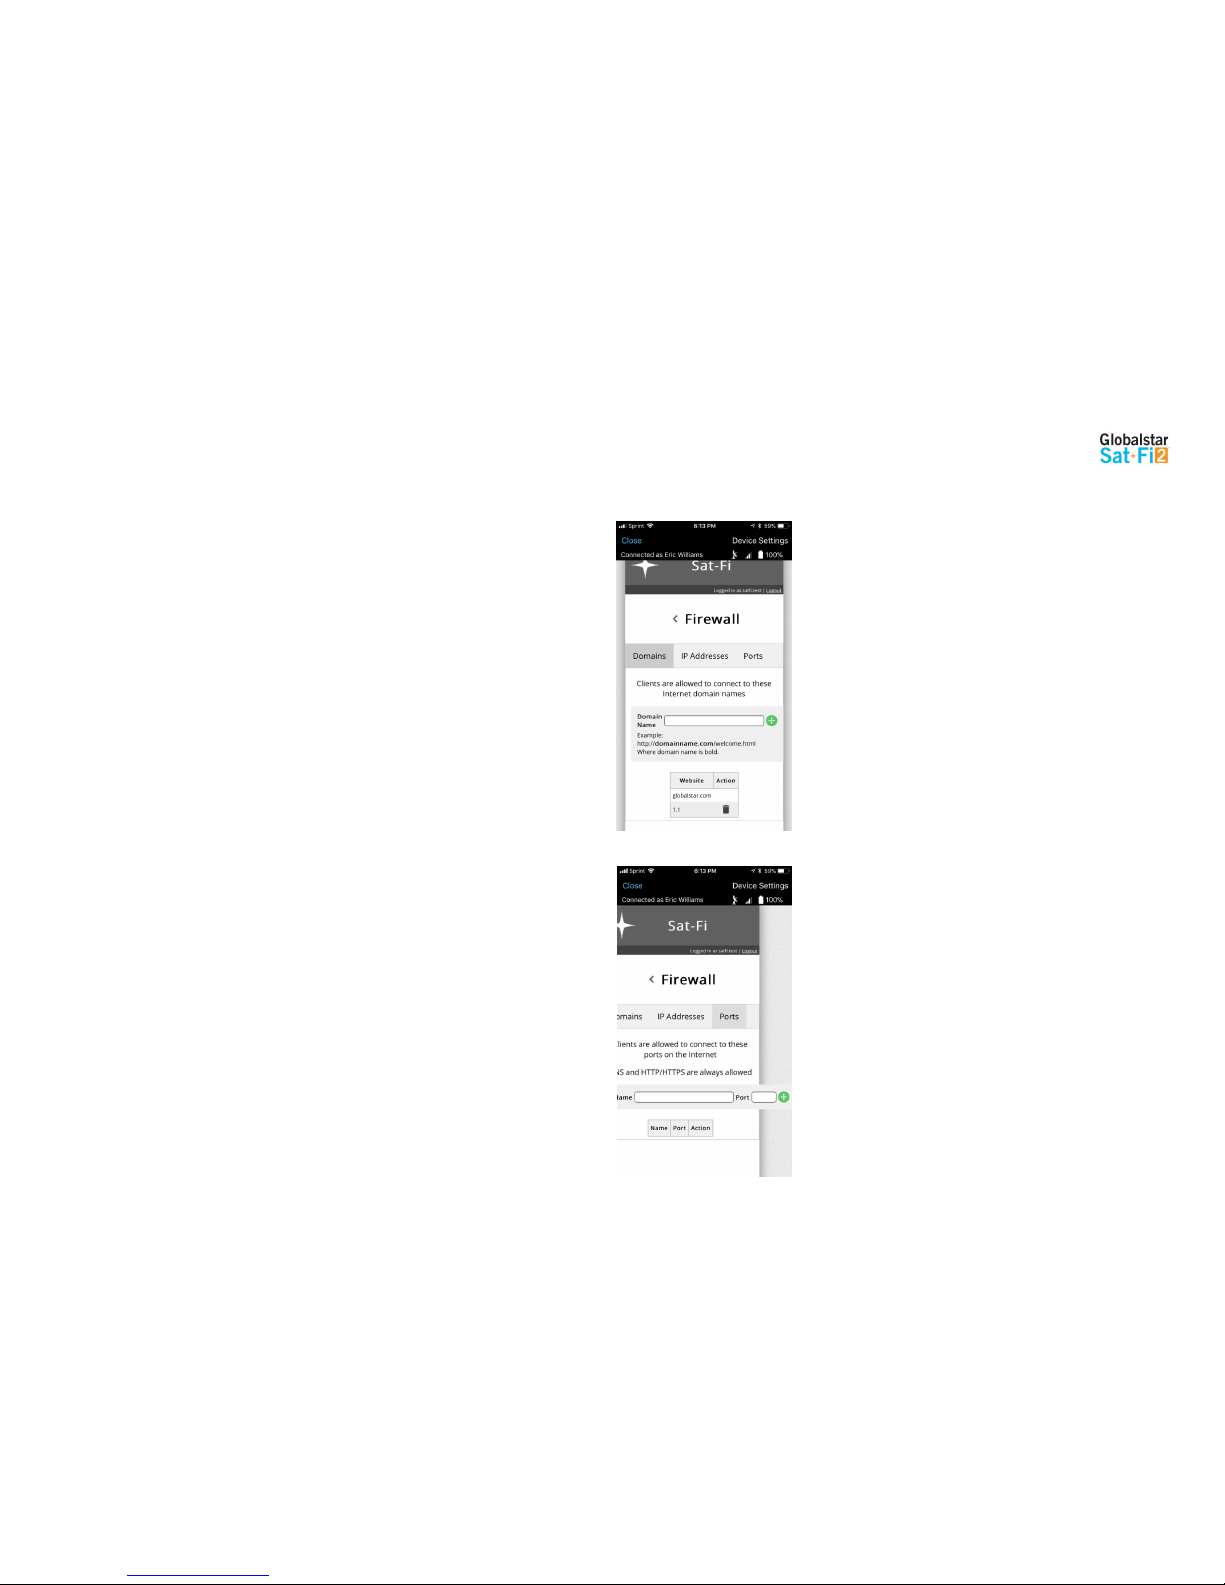
Firewall
Firewall – Domains Tab
Users are allowed to allow access to specific domains to pass through firewalls if so desired
Firewall – Ports Tab
Users are allowed to allow access to specific ports to pass through firewalls if so desired
Page 39
Globalstar Sat-Fi2 User Guide Page 36
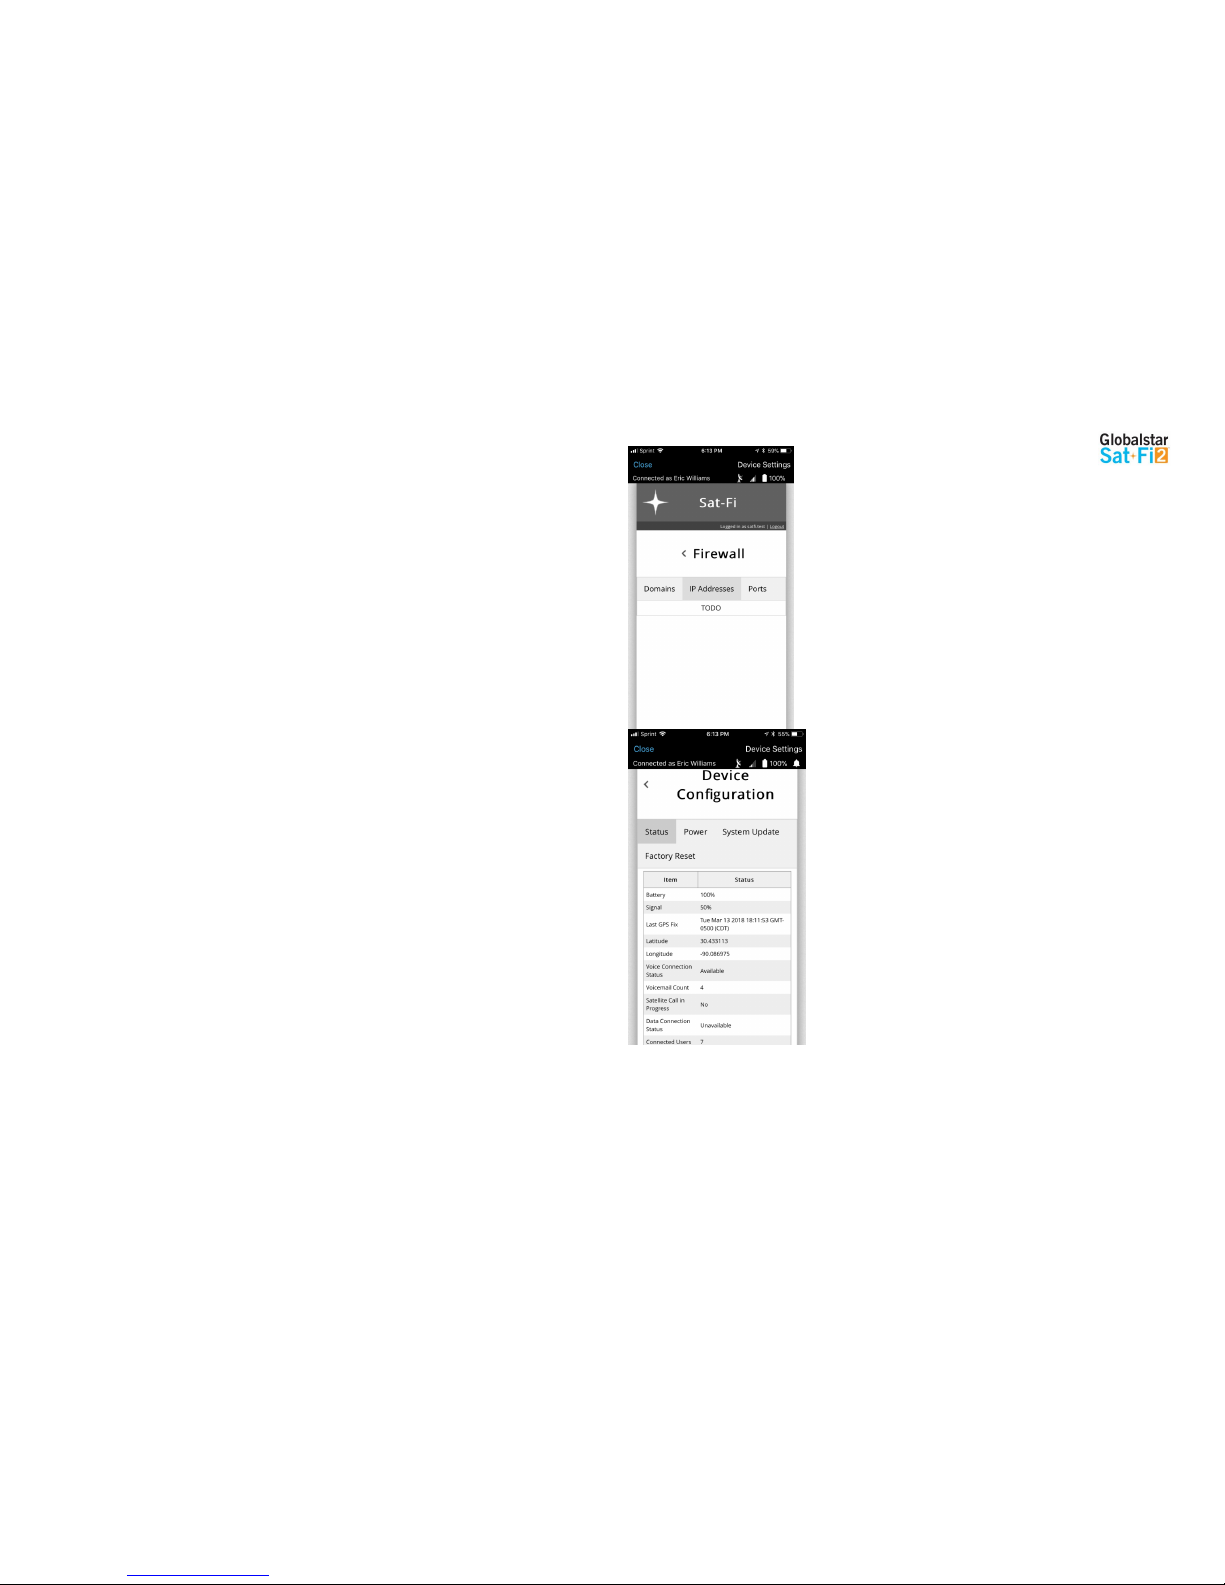
Firewall – IP Tab
Users are allowed to allow access to specific IP addresses through firewalls if so desired
Device Configuration
Status
The Device Info screen displays the following information:
Battery – Displays the current battery strength percentage
Signal – Displays the current satellite signal strength percentage
Last GPS Fix – Displays the date/time of the latest GPS fix
Latitude – Displays the latest latitude of the current GPS fix
Longitude – Displays the latest longitude of the current GPS fix
Voice Connection Status – Displays the current status of the Voice Connection
Satellite Call in Progress – Displays if a satellite call is in progress
Data Connection Status – Displays the current status of the data connection
Connected Users – Displays the number of current connected users to the Sat-Fi2
Page 40
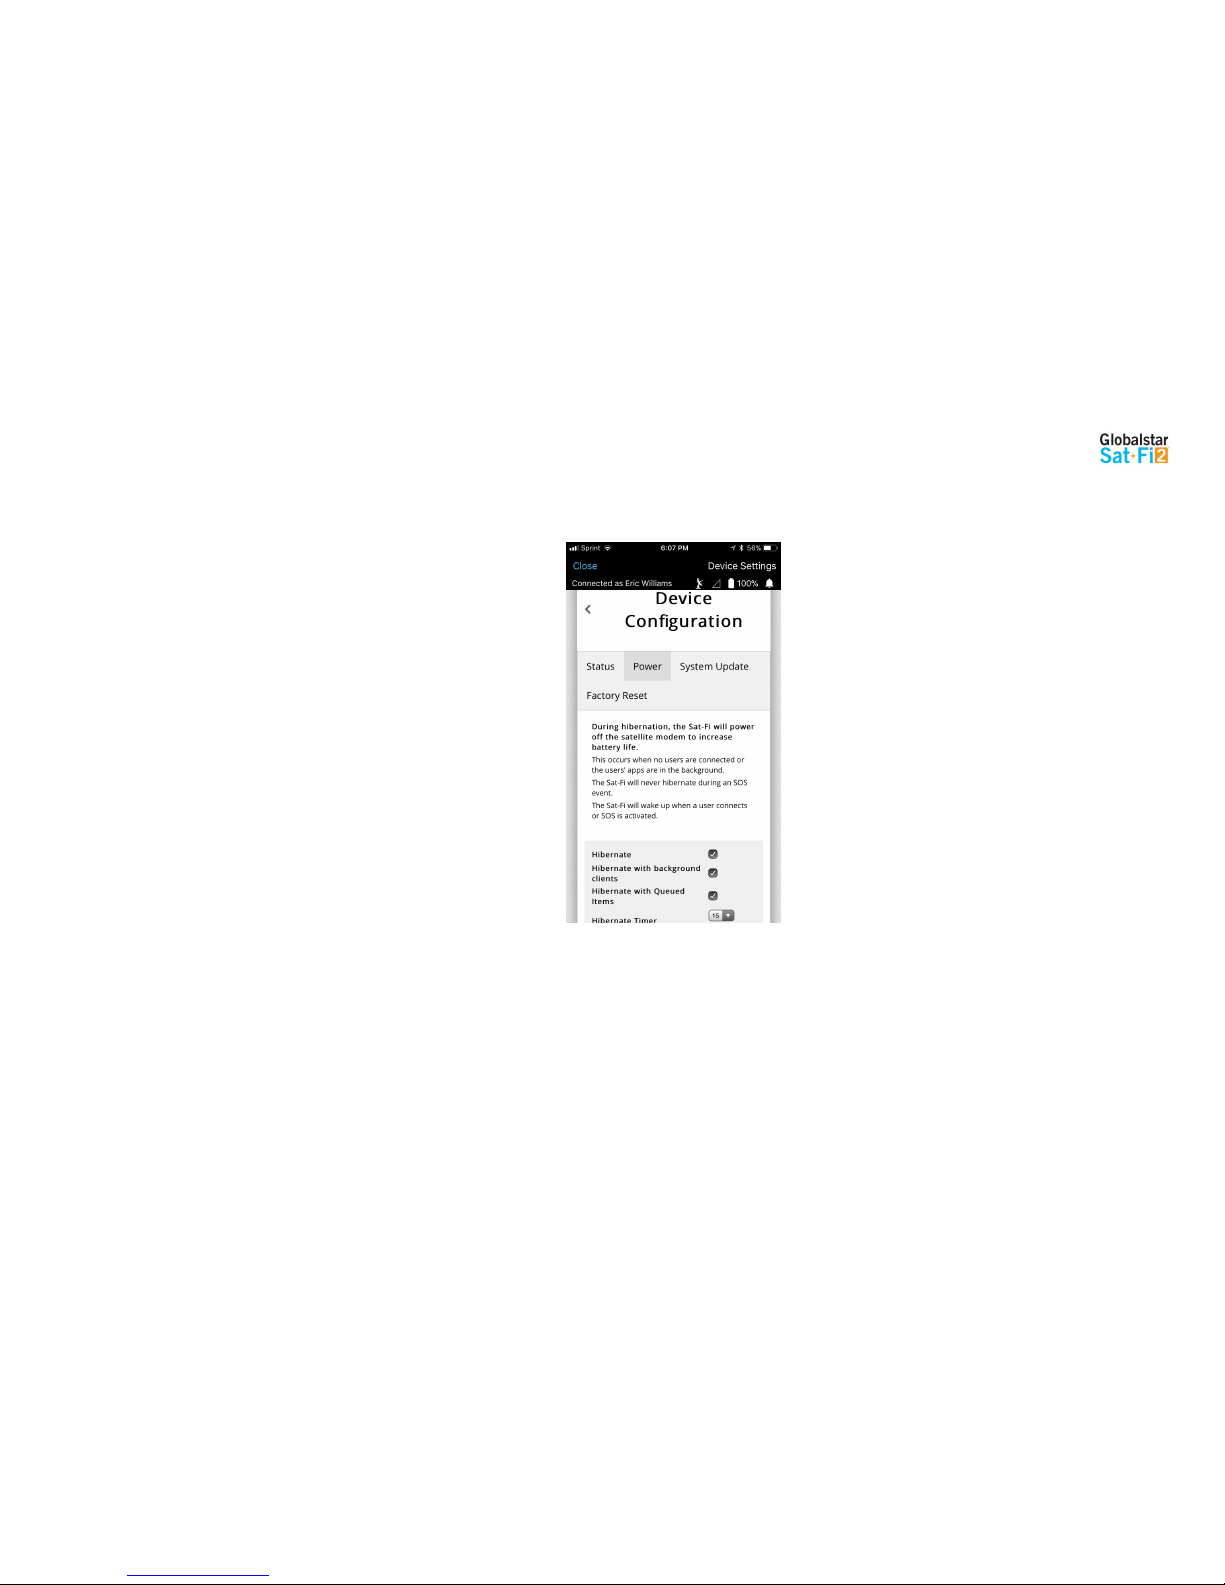
Globalstar Sat-Fi2 User Guide Page 37
Hibernation Mode Configuration:
To make these changes, the user must be logged in as the owner.
For iPhone:
1. Select the Settings button from the Main Menu
2. Select Configure Device Settings
3. Select Device Configuration
4. Select Power
5. In this section, the following options can be enabled or disabled:
Hibernate
Hibernate with background clients
Hibernate with Queued Items
Hibernate Timer – Select from 15, 30, 45 or 60 minutes
6. Select Save
Page 41

Globalstar Sat-Fi2 User Guide Page 38
GLOBALSTAR MY ACCOUNT
The Globalstar My Account website is a quick and easy way to manage a Sat-Fi Account:
View and update S.O.S. Emergency Contacts
Configure Voice/Text Blocking
Access User Guides and Sat-Fi2 Apps
View instructions on how to perform a Factory Reset
Update User Information
Display Usage Reports on texts used, Voice minutes used and data used
Logging In to My Account
Perform the following steps to login to My Account
1. In a web browser enter MySatFi.Globalstar.com
2. Enter your login credentials
3. Select LOGIN
Page 42
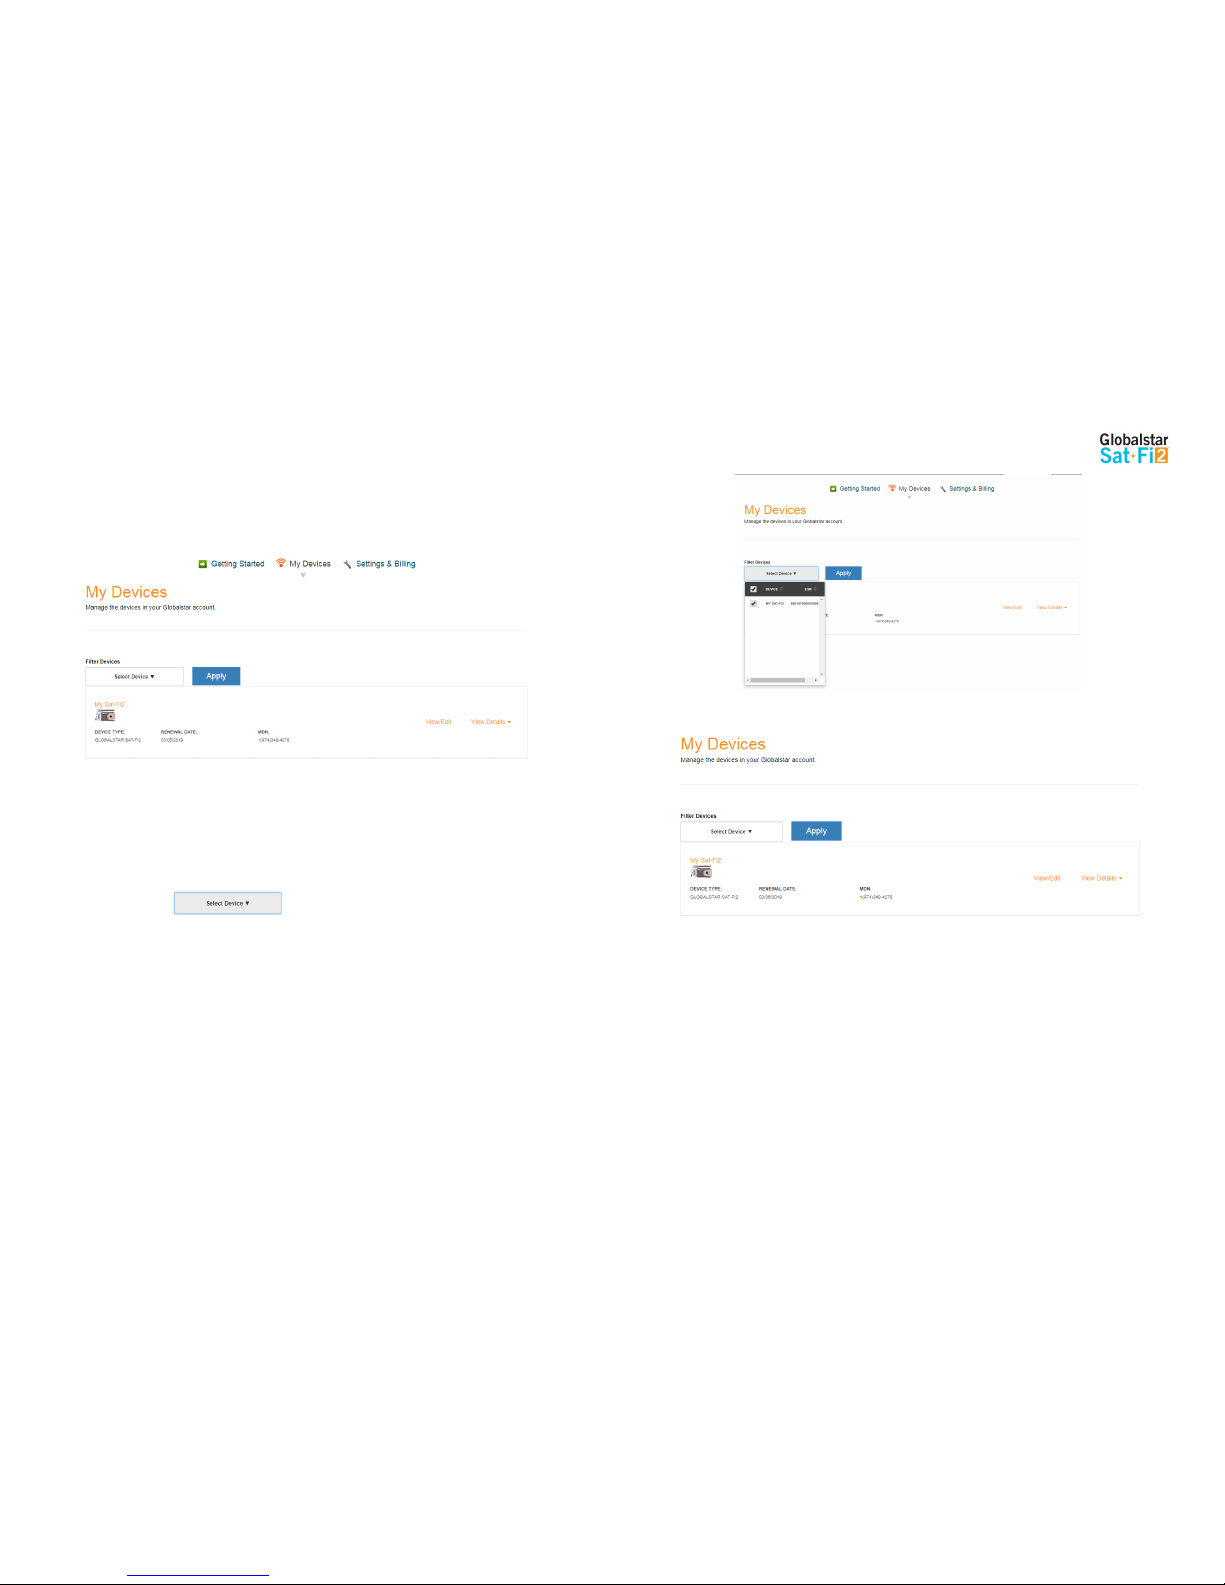
Globalstar Sat-Fi2 User Guide Page 39
My Devices Main Screen
The My Device Main screen displays all of the Globalstar satellite devices registered within My Account, allowing for
the navigation to individual Globalstar devices for management.
Filtering Devices
Filtering devices allows for a quick search and navigation to a Globalstar device. Perform the following steps to filter
for a specific Globalstar device:
1. Click on .
2. A Filter drop-down menu will be displayed. Select the Globalstar device(s) to View.
3. The selected Globalstar device(s) will be displayed and all other devices will be hidden from view:
Page 43
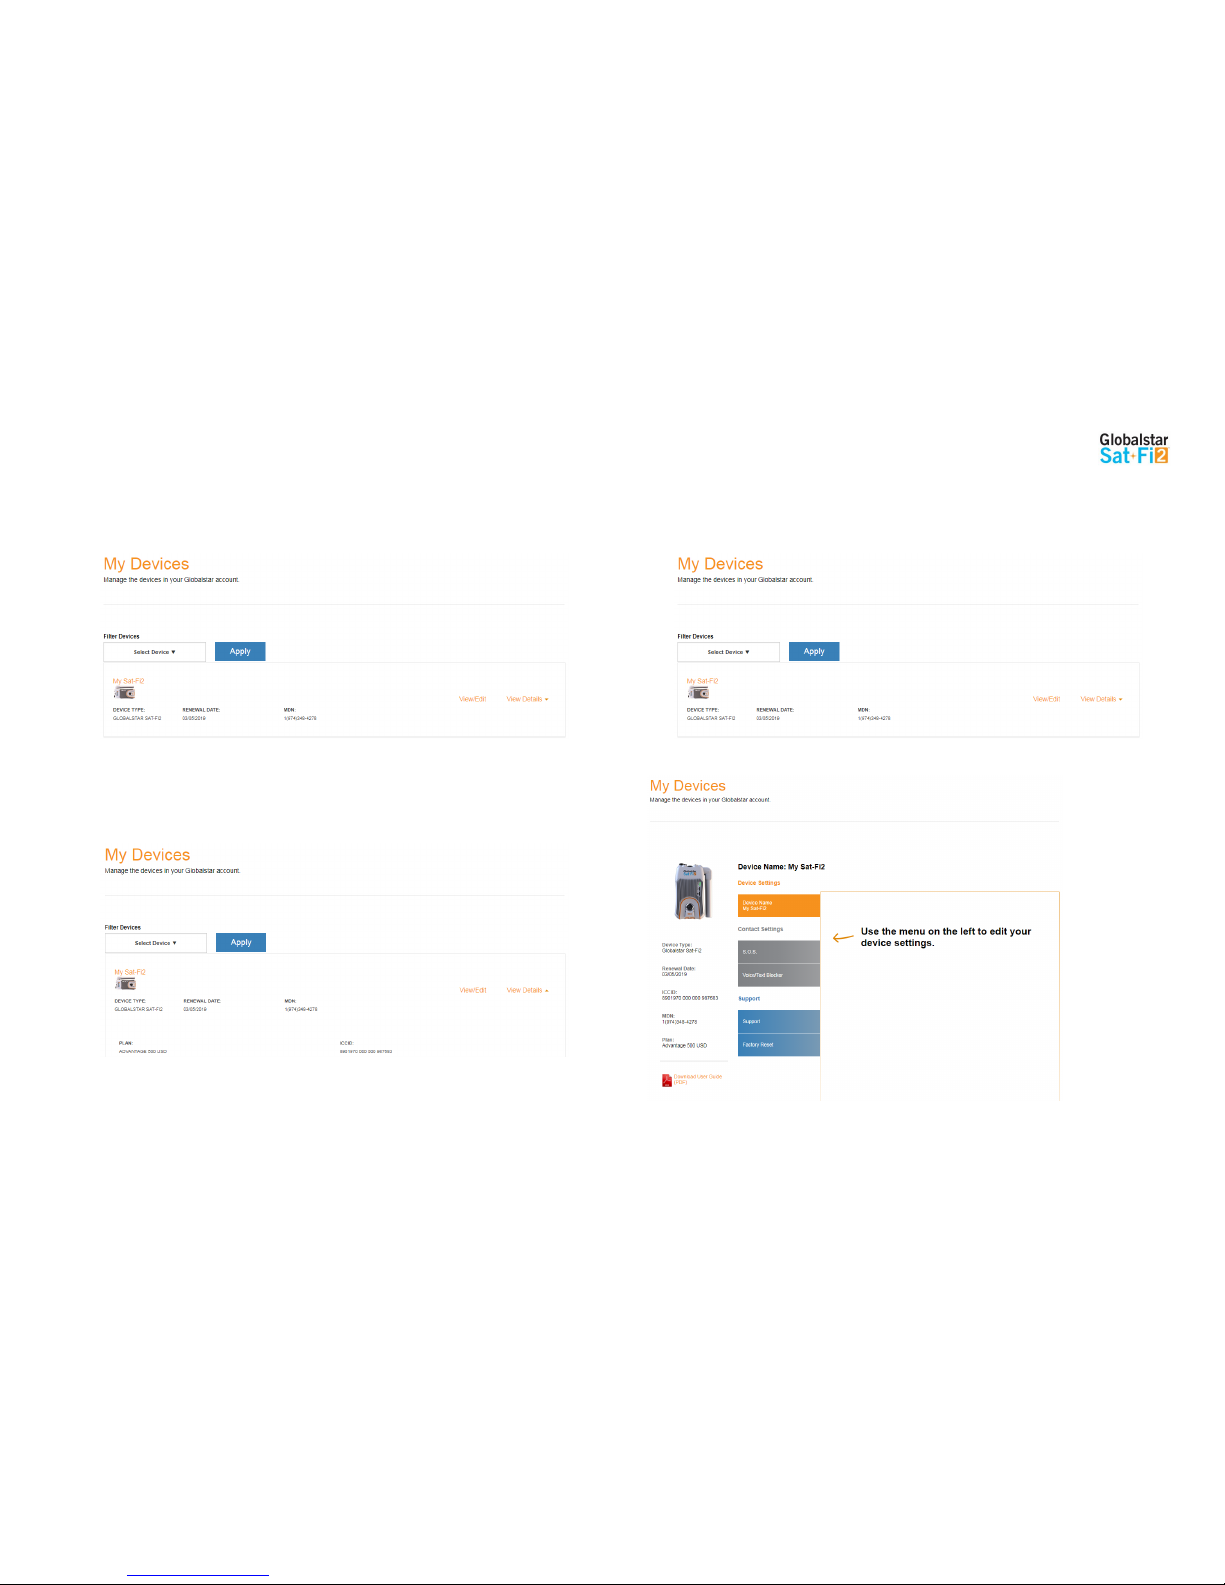
Globalstar Sat-Fi2 User Guide Page 40
View Device Details
Perform the following steps to view the Globalstar device details
1. Select View Details to the right of the Globalstar device to be viewed..
2. A Detail section will appear directly below displaying the following:
Plan – Displays the plan name associated with the current Globalstar device
ICCID - Displays Integrated Circuit Card Identifier of the Sat-Fi2 SIM card – This number is
used for identifying and registering the Sat-Fi2
Services – Displays any services associated with the Globalstar device
View/Edit
Perform the following steps to view and manage the Globalstar device:
1. Select View/Edit, located to the right of the Globalstar device to be viewed..
2. The selected Globalstar devices’ screen will be displayed:
Page 44
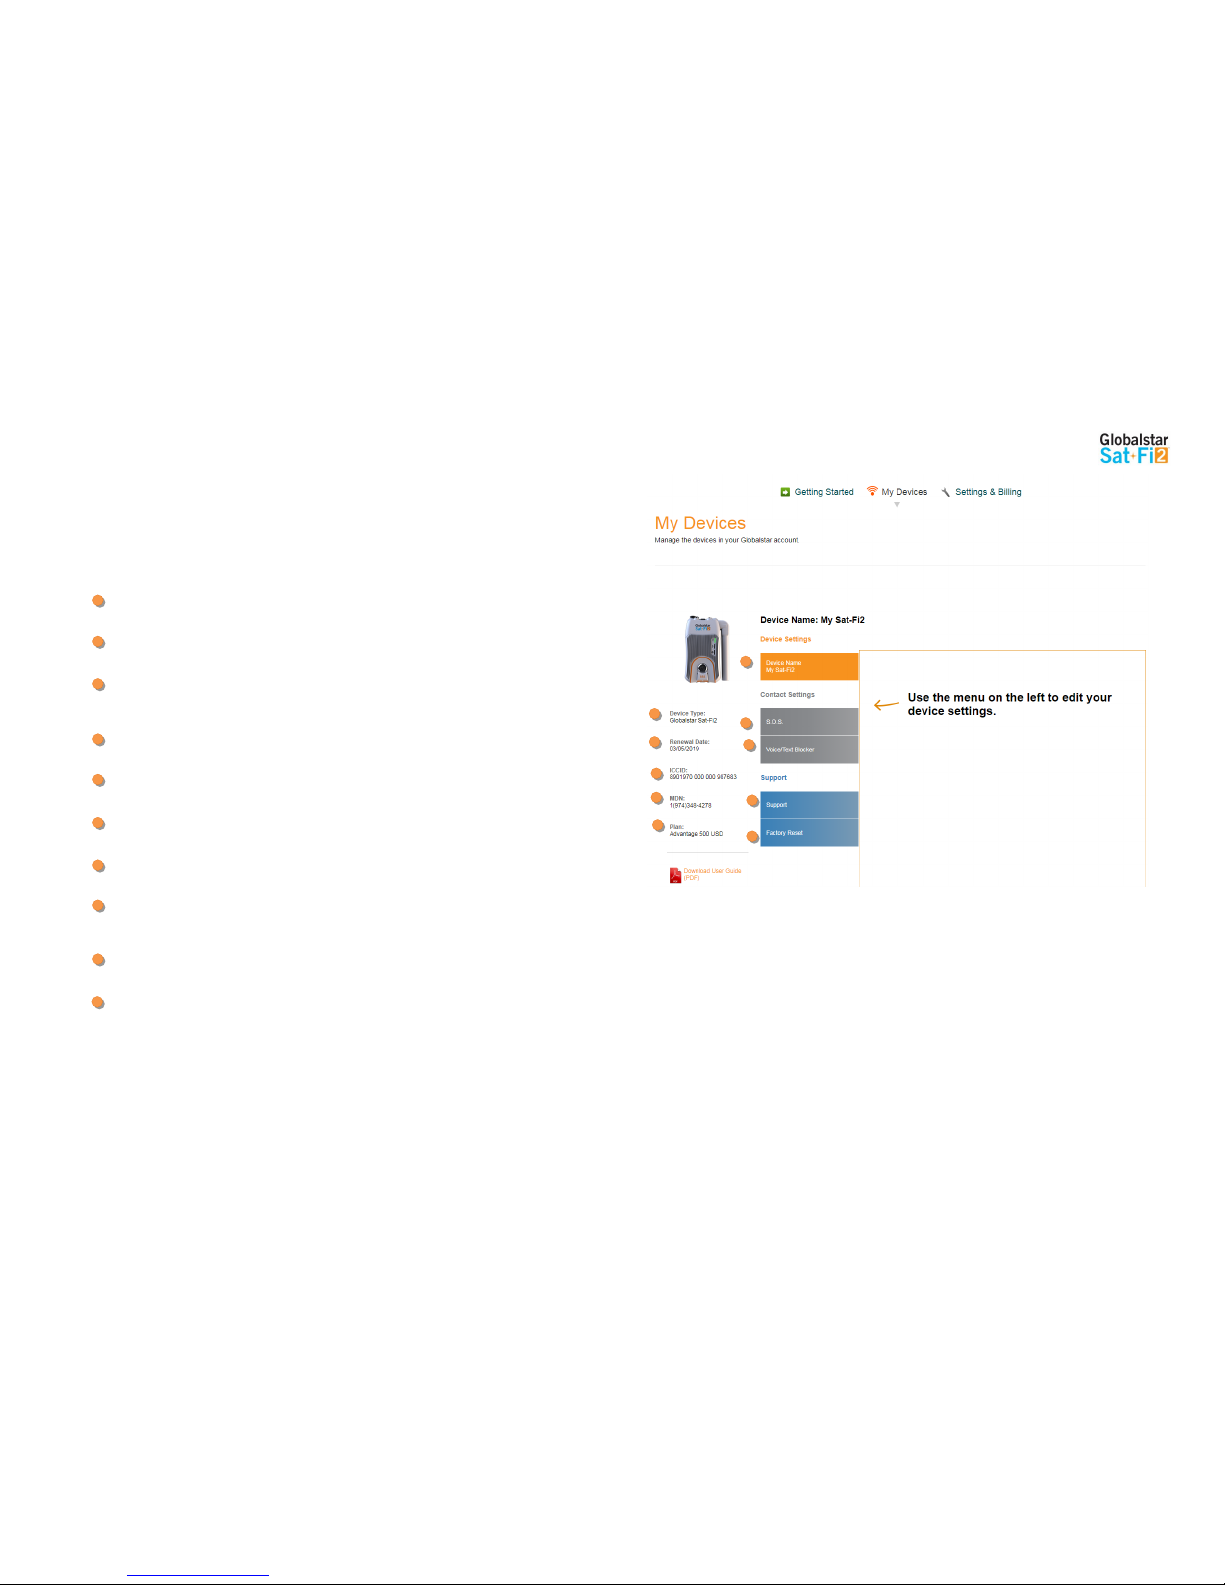
Globalstar Sat-Fi2 User Guide Page 41
My Account – My Devices
Sat-Fi2 My Devices Overview
The Sat-Fi2 My Devices screen displays key information and allows for the management of the Sat-Fi2.
Device Type - Displays the Globalstar device type, i.e. Sat-Fi2
Renewal Date - Displays the date the Sat-Fi2 Service plan will automatically be renewed
ICCID- Displays Integrated Circuit Card Identifier of the Sat-Fi2 SIM card – This number is used for identifying
and registering the Sat-Fi2
MDN - Displays Mobile Device Number assigned to the Sat-Fi2 – The MDN is the Sat-Fi2’s telephone number
Plan - Displays the plan name associated with the current Sat-Fi2
Name Tab – Used to change the name of the Sat-Fi2 that is displayed throughout My Account
S.O.S. –Displays the Primary and Secondary Emergency Contact information
Voice/Text Blocker – Used to control who can call and send text messages to the Sat-Fi2 – Defaults to
Accept All
Support – Used to download the Sat-Fi2 App and User Guides for supported wireless devices
Factory Reset – Used to restore your Sat-Fi2 to its original system settings
1 1 2 2 3 7 4 8 5 6 6 7 8
9
10
3
4 5 9
10
Page 45
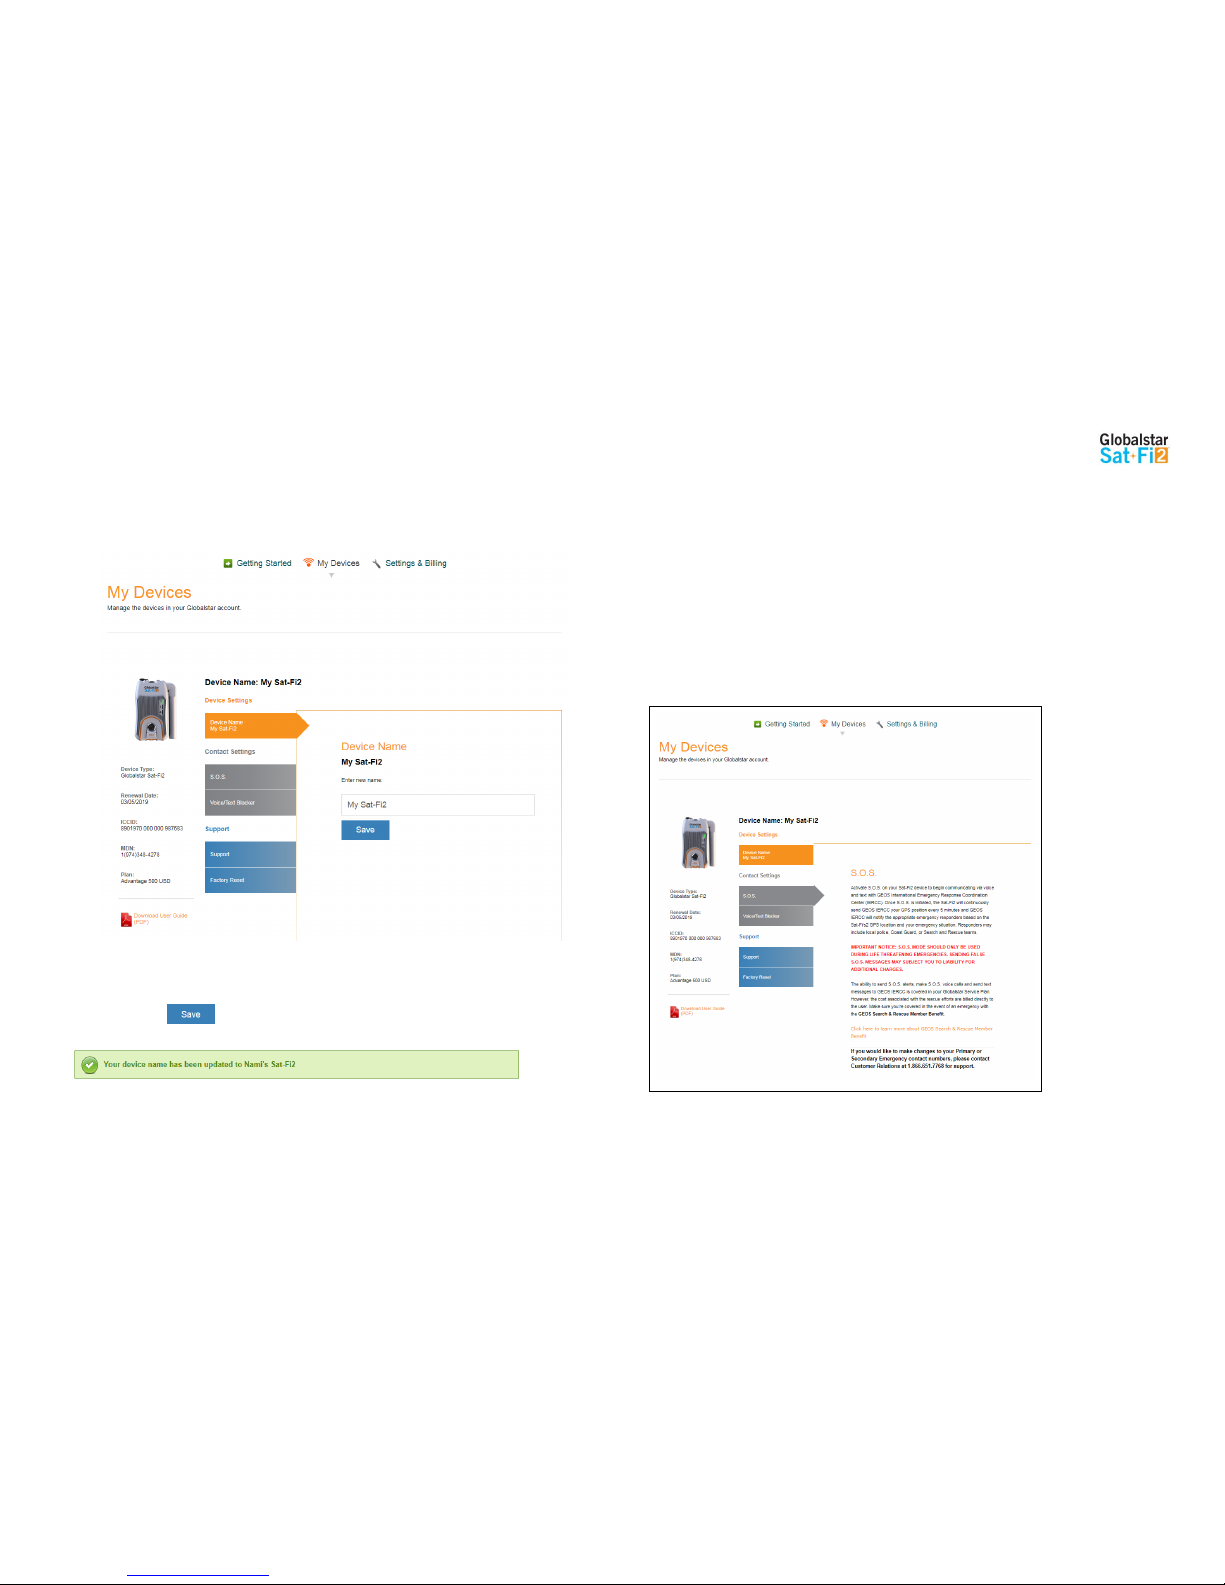
Globalstar Sat-Fi2 User Guide Page 42
Name Tab
Give a unique name to the Sat-Fi2. The Sat-Fi2 name will automatically default to the MDN. For accounts with
multiple Sat-Fi2’s or other Globalstar devices, giving a unique name to the device will make it easier to identify and
select the Sat-Fi2.
Perform the following steps to change the Sat-Fi2’s display name:
3. In the Name field enter the new name of the Sat-Fi2.
4. Select .
5. My Account will change the name of the Sat-Fi2 and the following message will be displayed:
S.O.S. Tab
While S.O.S. is active, two way communications with GEOS International Emergency Response Coordination Center
(IERCC) is available directly from your Sat-Fi2 via the Sat-Fi2 App.
The S.O.S. Tab displays Primary and Secondary Emergency Contact names and telephone numbers that GEOS
contacts when an S.O.S. is initiated.
The Primary Emergency Contact information must be different from the Secondary Emergency Contact information.
This is required to provide GEOS with additional points of contact in case of an S.O.S./911 emergency.
NOTE: If you would like to make changes to your Primary or Secondary Emergency contact information,
please call Globalstar Customer Relations at:
North America 1-877-452-5782
Caribbean & Latin America 1-985-327-7511
Europe +353-1-296-2525
Africa +353-1-290-9505
Page 46
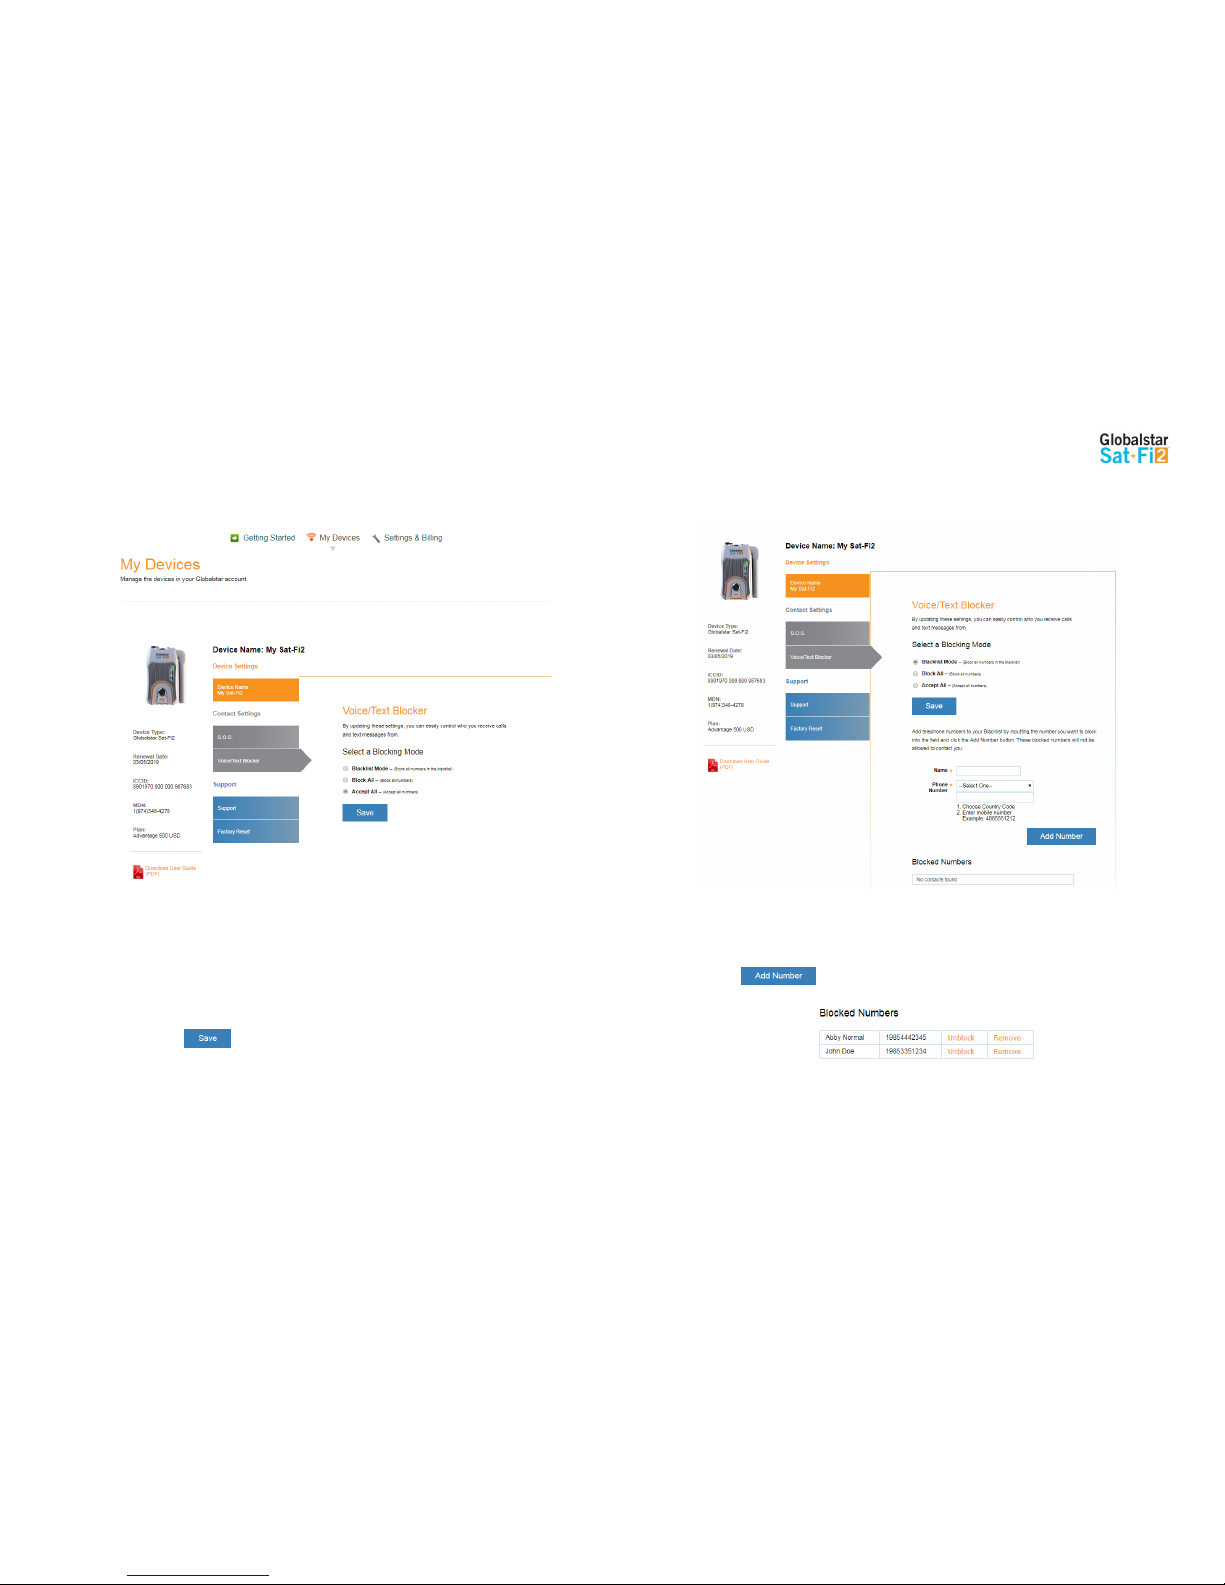
Globalstar Sat-Fi2 User Guide Page 43
Voice/Text Blocker Tab
Easily control incoming voice and text messages
Selecting a Blocking Mode
Perform the following steps to select a voice/text blocking mode:
1. In the Select a Blocking Mode section, select one of the following:
Blacklist Mode – (Block all numbers in your blacklist)
Block All – (Block all numbers – No incoming calls allowed)
Accept All – (Accept all numbers)
2. Select .
NOTE: If Blacklist Mode was selected, an add telephone numbers to the blacklist section will be
displayed below the Save button.
Adding a Number to the Blacklist
Perform the following to add a number to the blacklist:
1. In the Name field enter the name of the person that will be added to the blacklist.
2. In the Phone Number section perform the following:
Click on the Phone Number drop-down arrow and select the appropriate Country Code
In the Phone Number field, enter the phone number to be blocked
3. Select .
4. The name and phone number entered above will be displayed in the Blocked Numbers section.
5. Repeat Step 1 through Step 3 for additional phone numbers to be blocked.
Page 47
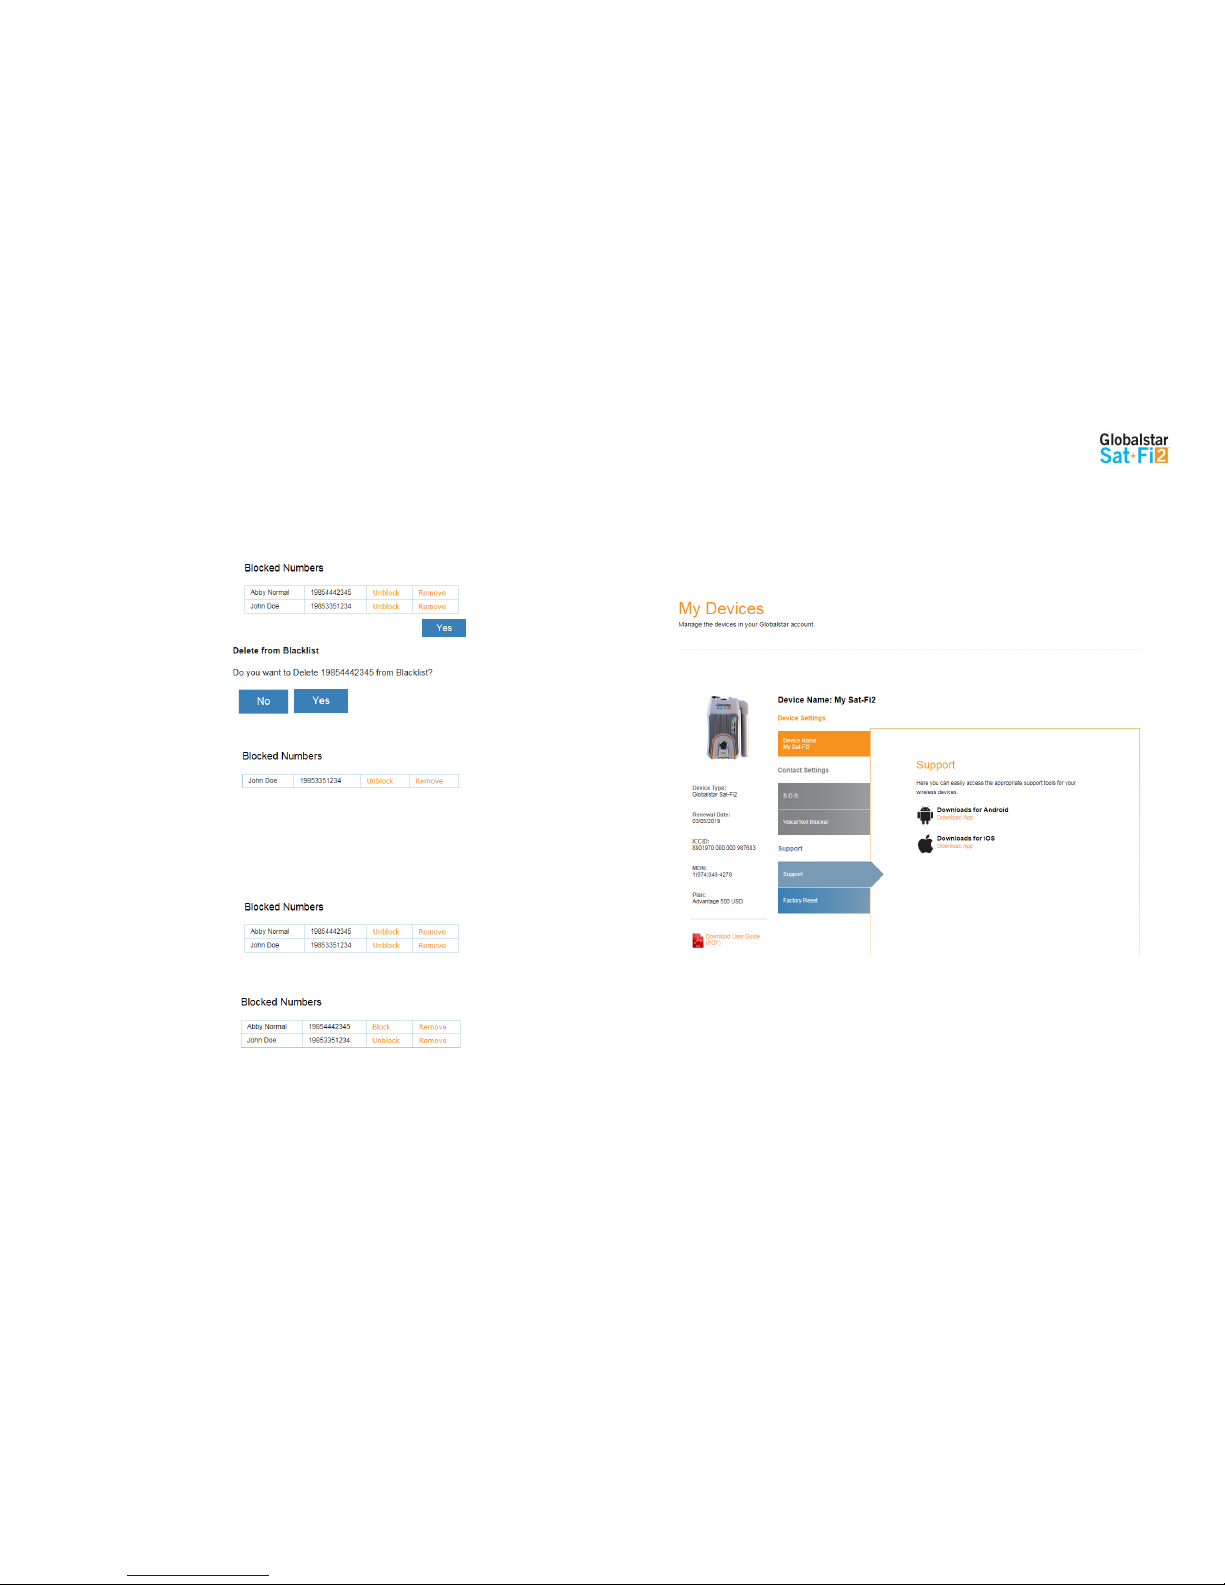
Globalstar Sat-Fi2 User Guide Page 44
Removing a Number from the Blacklist
Perform the following to remove a number to the blacklist:
1. In the Blocked Numbers section, select Remove next to telephone number.
2. A Delete from Blacklist pop-up message will be displayed, select .
3. The selected telephone number will be removed from the blacklist.
4. Repeat Step 1 through Step 3 for additional phone numbers to be removed from the blacklist.
Unblocking a Blacklisted Number
Perform the following to temporarily unblock a number to the blacklist:
1. In the Blocked Numbers section, select Unblock next to telephone number.
2. Unblocked will change to Block next to the telephone number. The telephone number will remain
unblocked until Block is selected.
3. Repeat Step 1 through Step 2 for additional phone numbers to temporarily unblock a number from the
blacklist.
Support Tab
The Support Tab provides the ability to download the Sat-Fi2 App for the appropriate wireless device. Simply click on
the appropriate link and download the Sat-Fi2 App.
Page 48
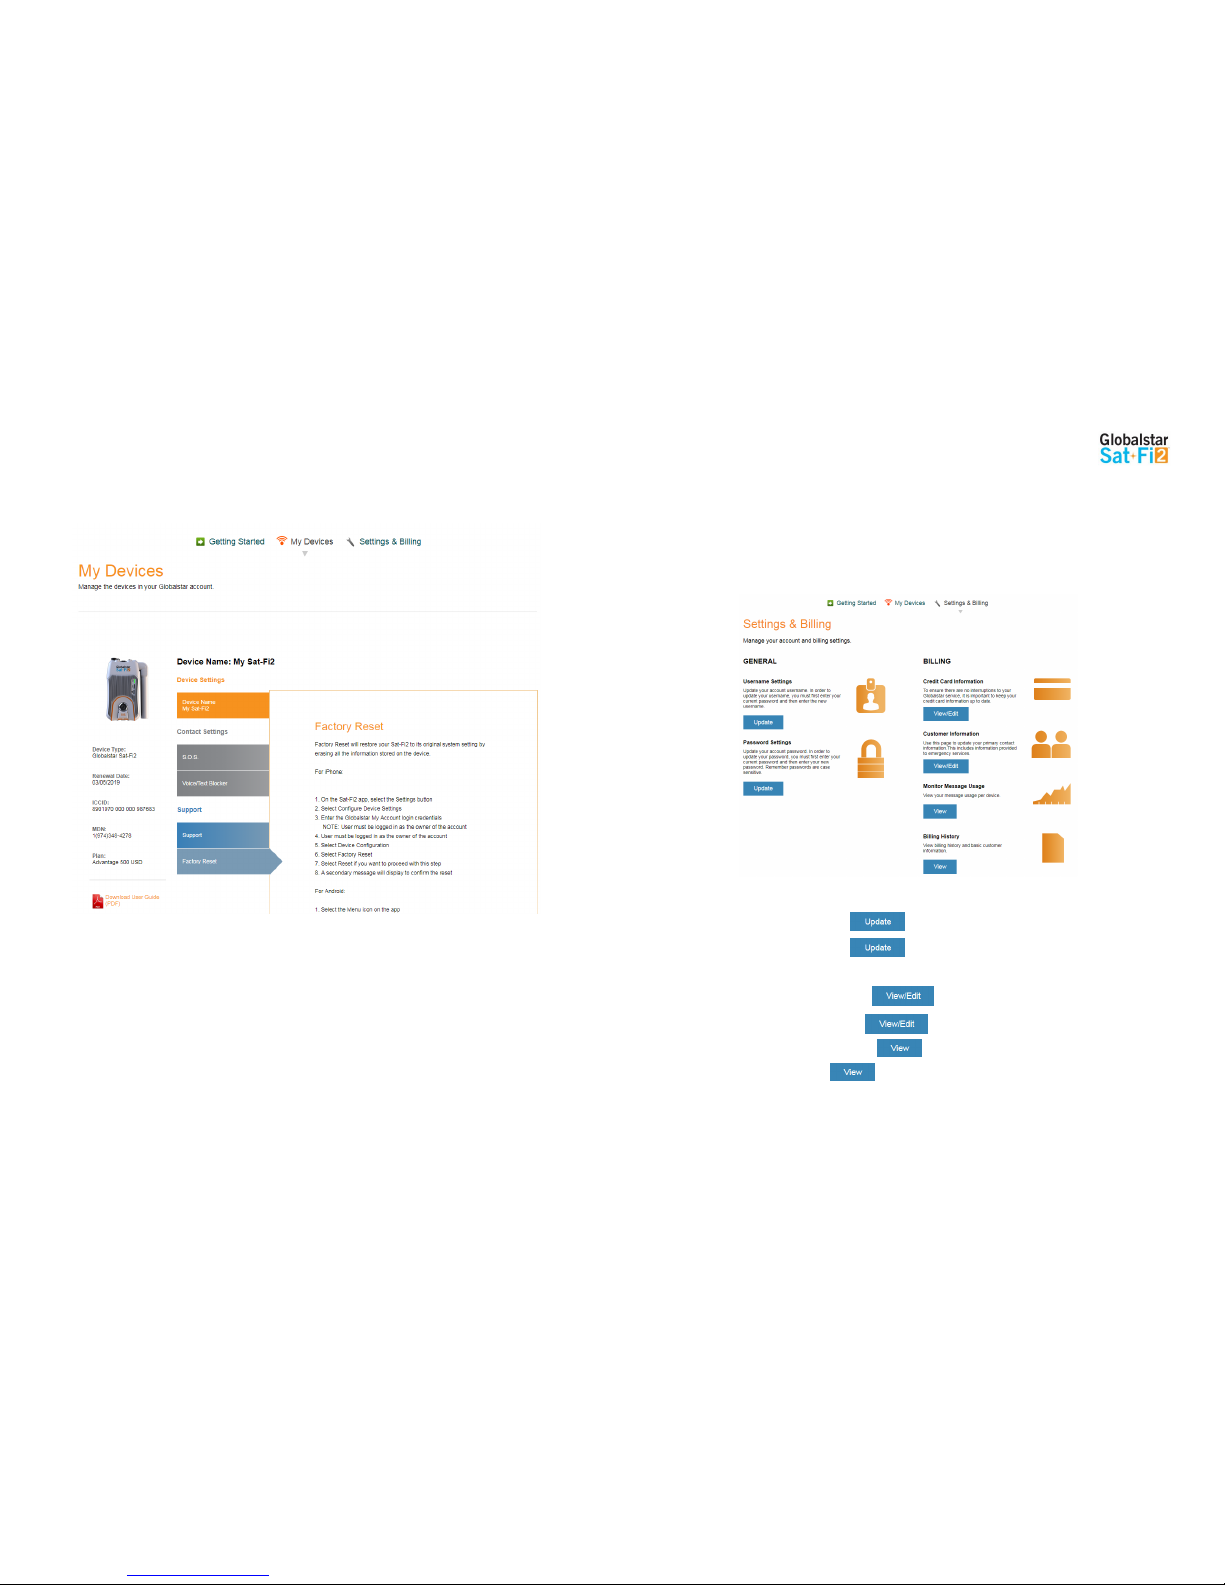
Globalstar Sat-Fi2 User Guide Page 45
Factory Reset Tab
The Factory Reset Tab provides instructions on how to perform a factor reset of the Sat-Fi2.
My Account – Settings & Billing
Overview
The Settings & Billing section allows for the management of account and billing settings
GENERAL SECTION
o Username Settings – Select to change account username
o Password Settings – Select to change account password
BILLING SECTION
o Credit Card Information - Select to update or change credit card information
o Customer Information – Select to update primary contact information
o Monitor Message Usage – Select to view the current billing cycle Sat-Fi2 message usage
o Billing History - Select to view billing history/invoices and basic customer information
Page 49
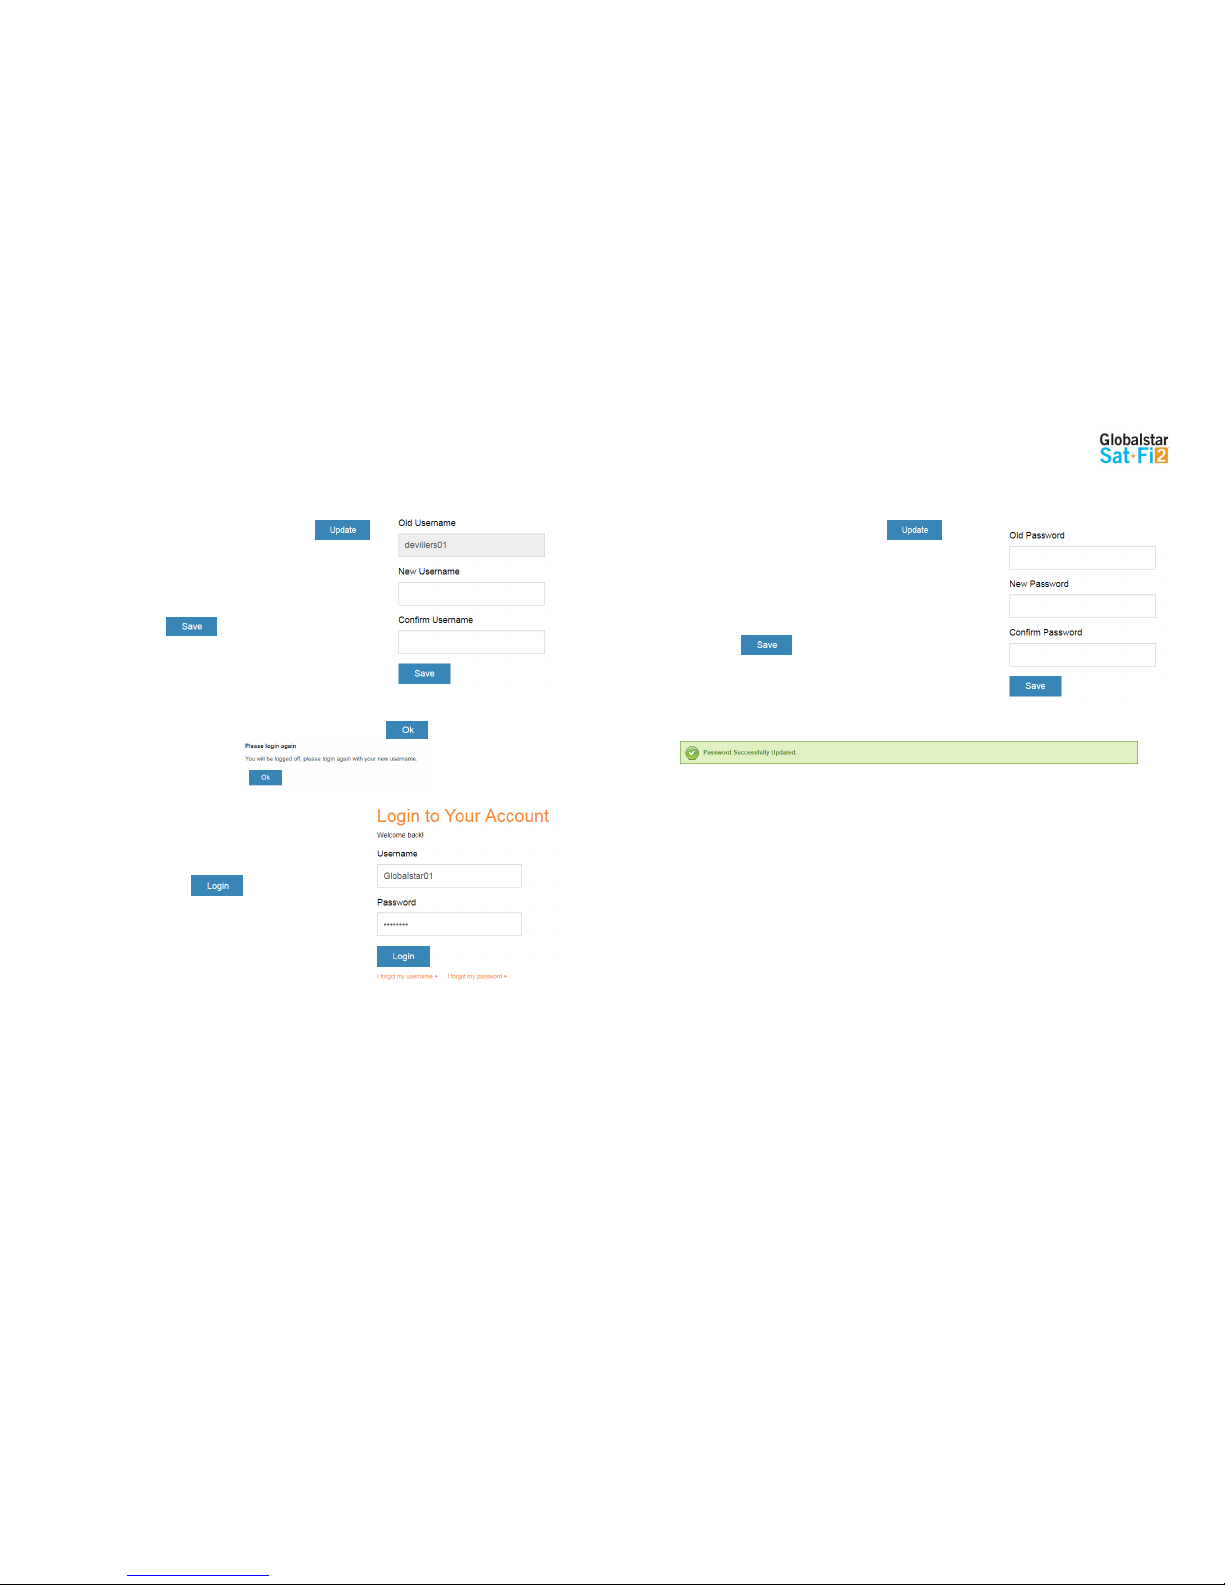
Globalstar Sat-Fi2 User Guide Page 46
Username Settings
Perform the following steps to update/change the My Account username:
1. In the Username Settings section, select .
2. The Username Settings fields will be displayed, perform
the following:
In the New Username field, enter a new username
In the Confirm Username field, re-enter the new
username
3. Select .
4. A Please Login again message will be displayed. Select .
5. The Login to Your Account screen will be
displayed. Perform the following:
In the Username field, enter the new
Username
In the Password field, enter the password
Select
6. The My Devices screen will be displayed and
updating/changing the username is complete.
Password Settings
Perform the following steps to change the My Account password
1. In the Password Settings section, select .
2. The Password Settings fields will be displayed, perform the
following:
In the Old Password field, enter the password to be
changed
In the New Password field, enter the new password
In the Confirm Password field, re-enter the new password
3. Select .
4. A Password Successfully Updated message will be displayed.
Page 50
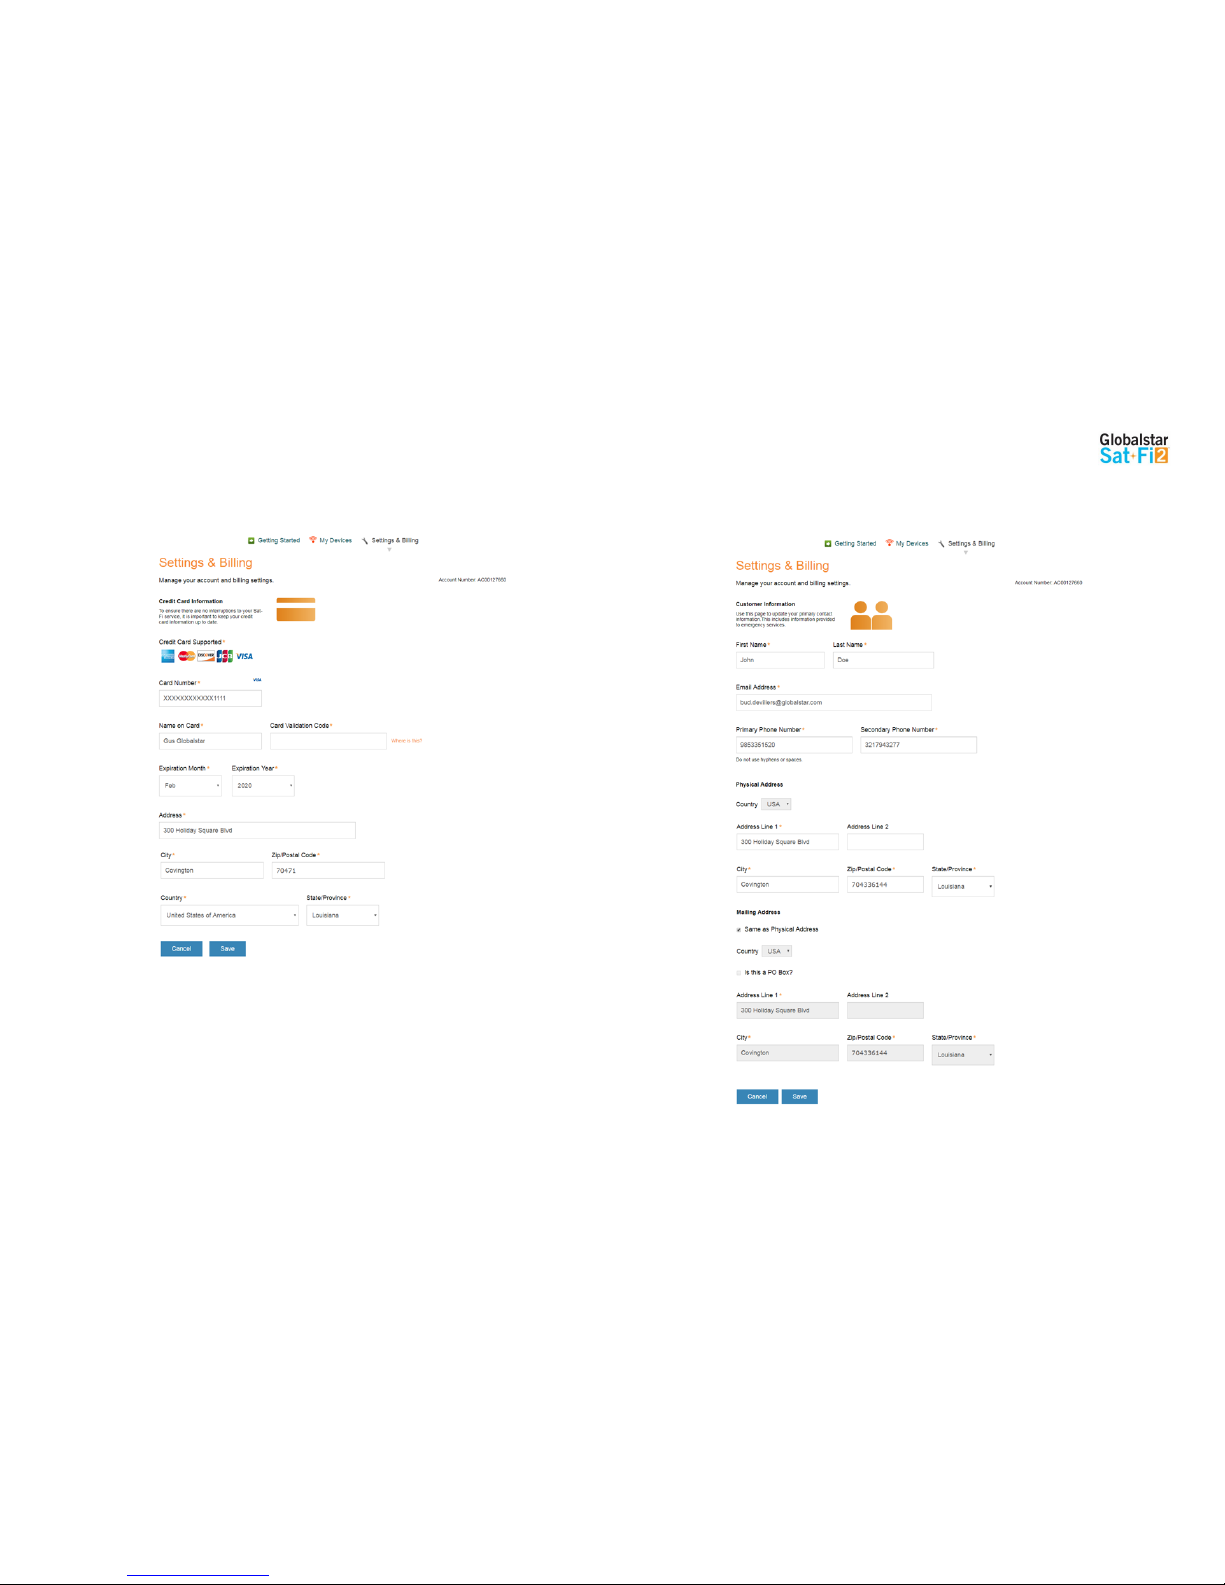
Globalstar Sat-Fi2 User Guide Page 47
Credit Card Information
To ensure there are not interruptions to Sat-Fi2 service, it is important to keep credit card information up-to-date.
Customer Information
The Customer Information page is used to update primary contact information, including information provided to
emergency services (GEOS).
Page 51
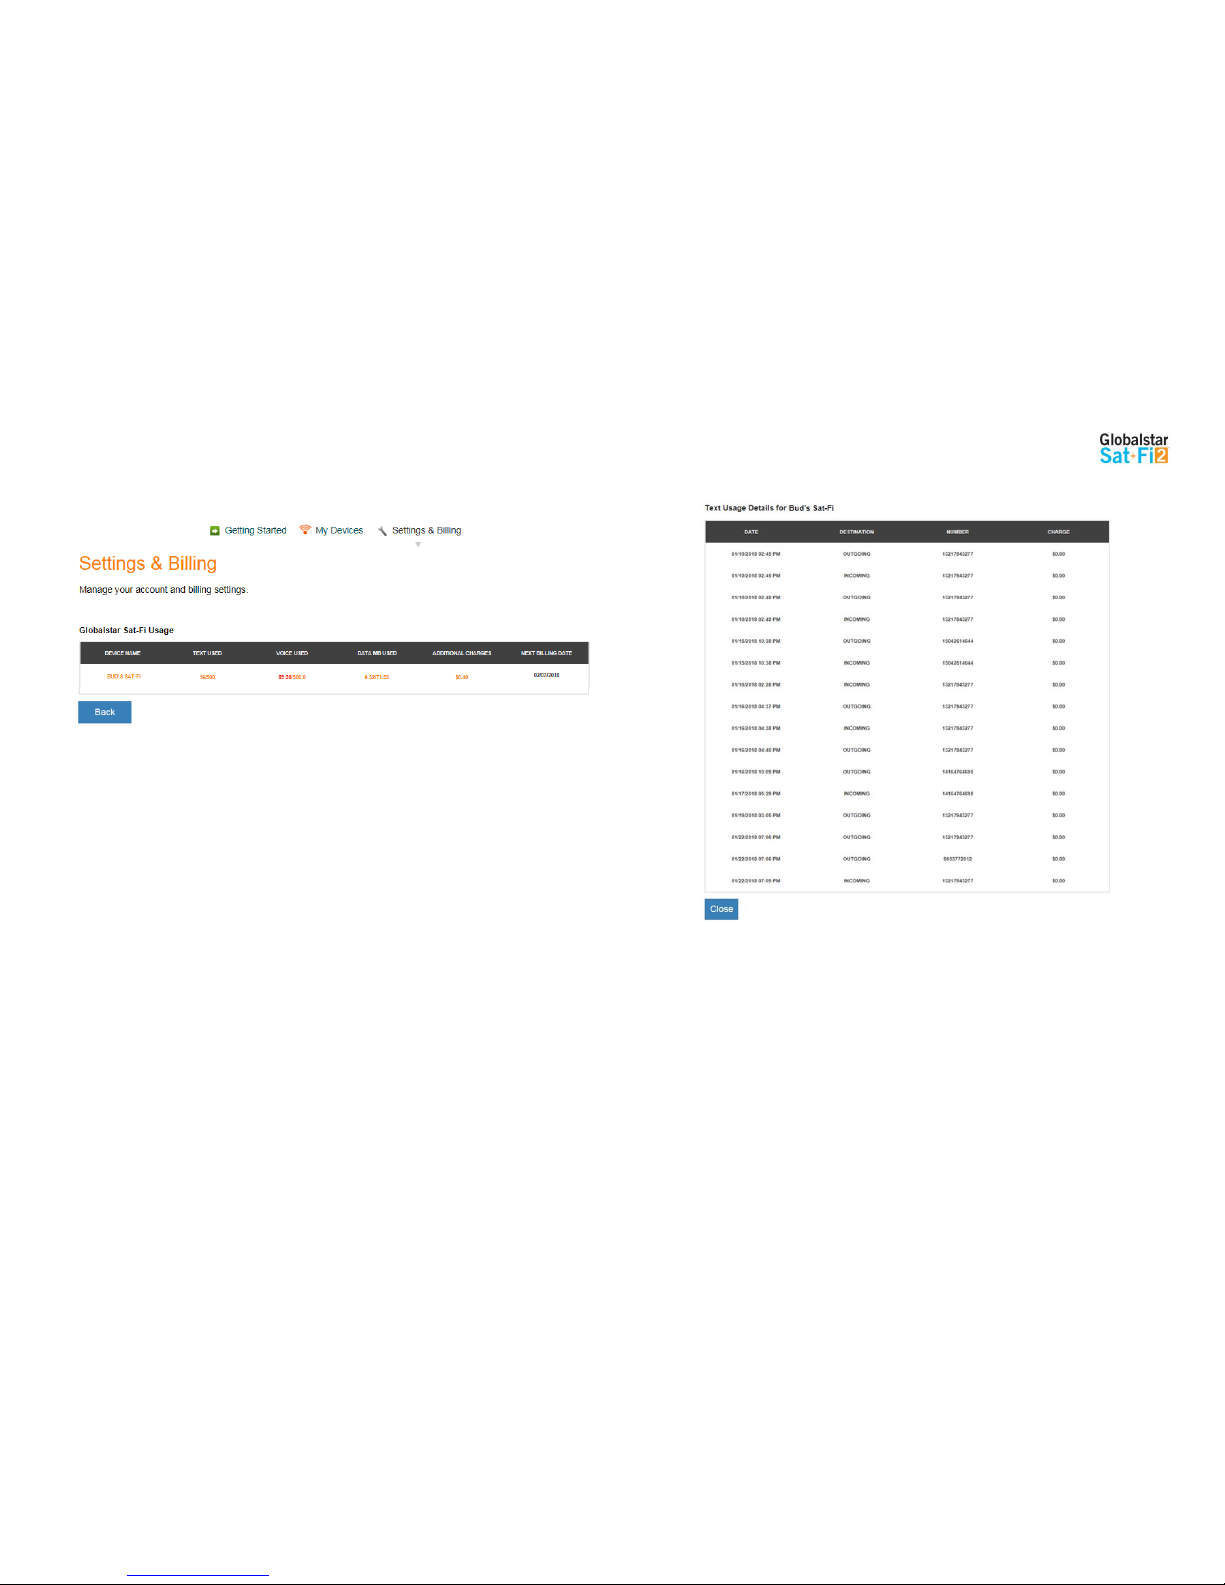
Globalstar Sat-Fi2 User Guide Page 48
Monitor Message Usage
Select individual Text, Voice, Data and Additional Charges links to view detailed report of Sat-Fi2 usage.
DEVICE NAME - Displays the My Account name of the Sat-Fi2 device
TEXT USED - Displays the number of text messages used (sent and received) and the maximum number
of text messages allowed before overages will be incurred – Click the link to view a detailed usage report
Example: 16/500 where 16 is the current total of text messages used and 500 is the maximum
number allowed before overages will be incurred
VOICE USED - Displays the number of voice minutes used and the maximum number of voice minutes
allowed before overages will be incurred – Click the link to view a detailed usage report
Example: 83.50/500 where 83.50 is the current total of voice minutes used and 500 is the
maximum number allowed before overages will be incurred
DATA MB USED – Displays the amount of data used, in MB, and the maximum amount of data allowed
before overages will be incurred – Click the link to view a detailed usage report
Example: 6.23/71.53 where 6.23 is the current amount of data used and 71.53 is the maximum
amount allowed before overages will be incurred
ADDITIONAL CHARGES - Displays the current total of all additional charges (overages, long distance,
roaming) before overages will be incurred – Click the link to view a detailed usage report
Example: $0.40 is the current total of additional charges
NEXT BILLING DATE – Displays the date of the next billing cycle begins
Text Usage Detail Report
DATE - Displays the date and time the text was sent/received
DESTINATION – Displays if the text was sent (OUTGOING) or received (INCOMING)
NUMBER - Displays the mobile number of where the text originated
CHARGE - Displays the amount of the additional charge (overages)
Page 52
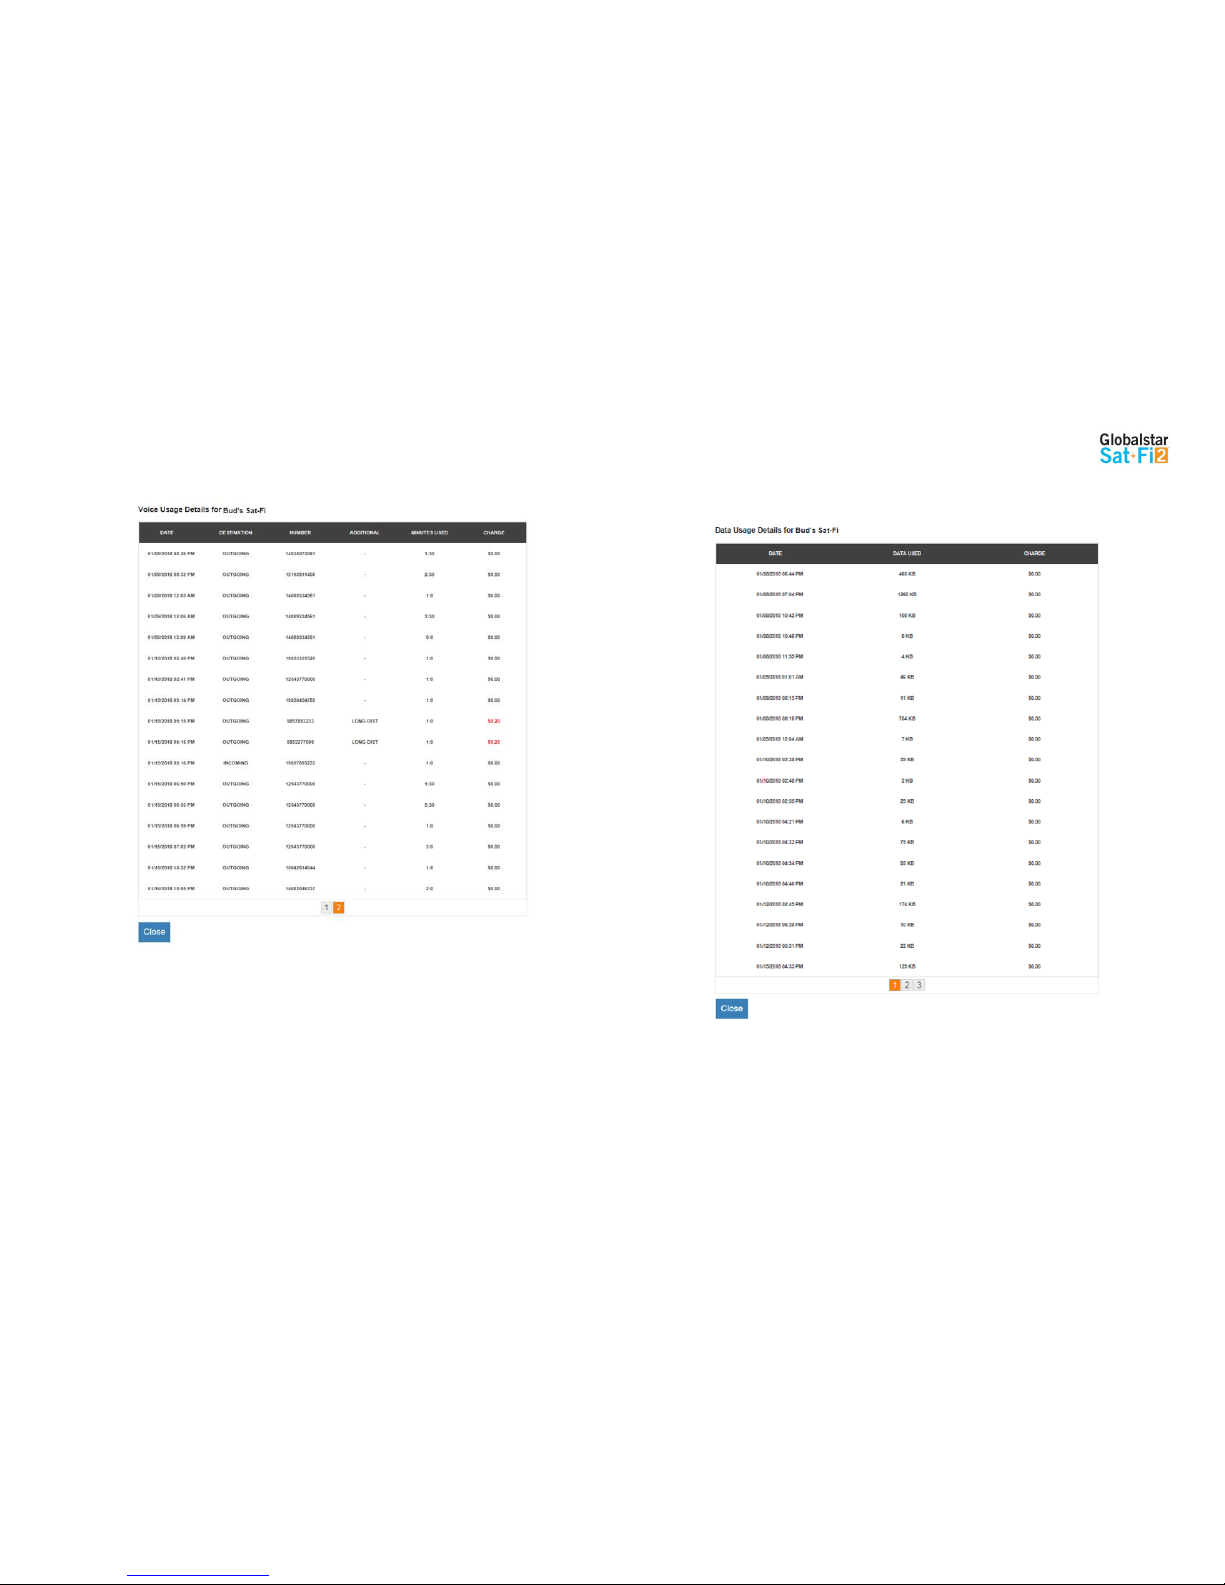
Globalstar Sat-Fi2 User Guide Page 49
Voice Usage Detail Report
DATE - Displays the date and time the voice call was sent/received
DESTINATION – Displays if the voice call was sent (OUTGOING) or received (INCOMING)
NUMBER - Displays the mobile number of where the voice call originated
ADDITIONAL – Displays the additional charge
MINUTES USED – Displays the duration of the voice call
o Voice calls within Home Zone will be billed first minute then 30 second increments
o Roaming and Long Distance Calls will be billed in 60 second increments
CHARGE - Displays the amount of the additional charge (Long Distance, Roaming, Overage)
Data Usage Detail Report
DATE - Displays the date and time that data was used
DATA USED – Displays if the amount of data used during that time period (minimum billing increment is
1KB)
CHARGE - Displays the amount of the additional charge (overages)
Page 53
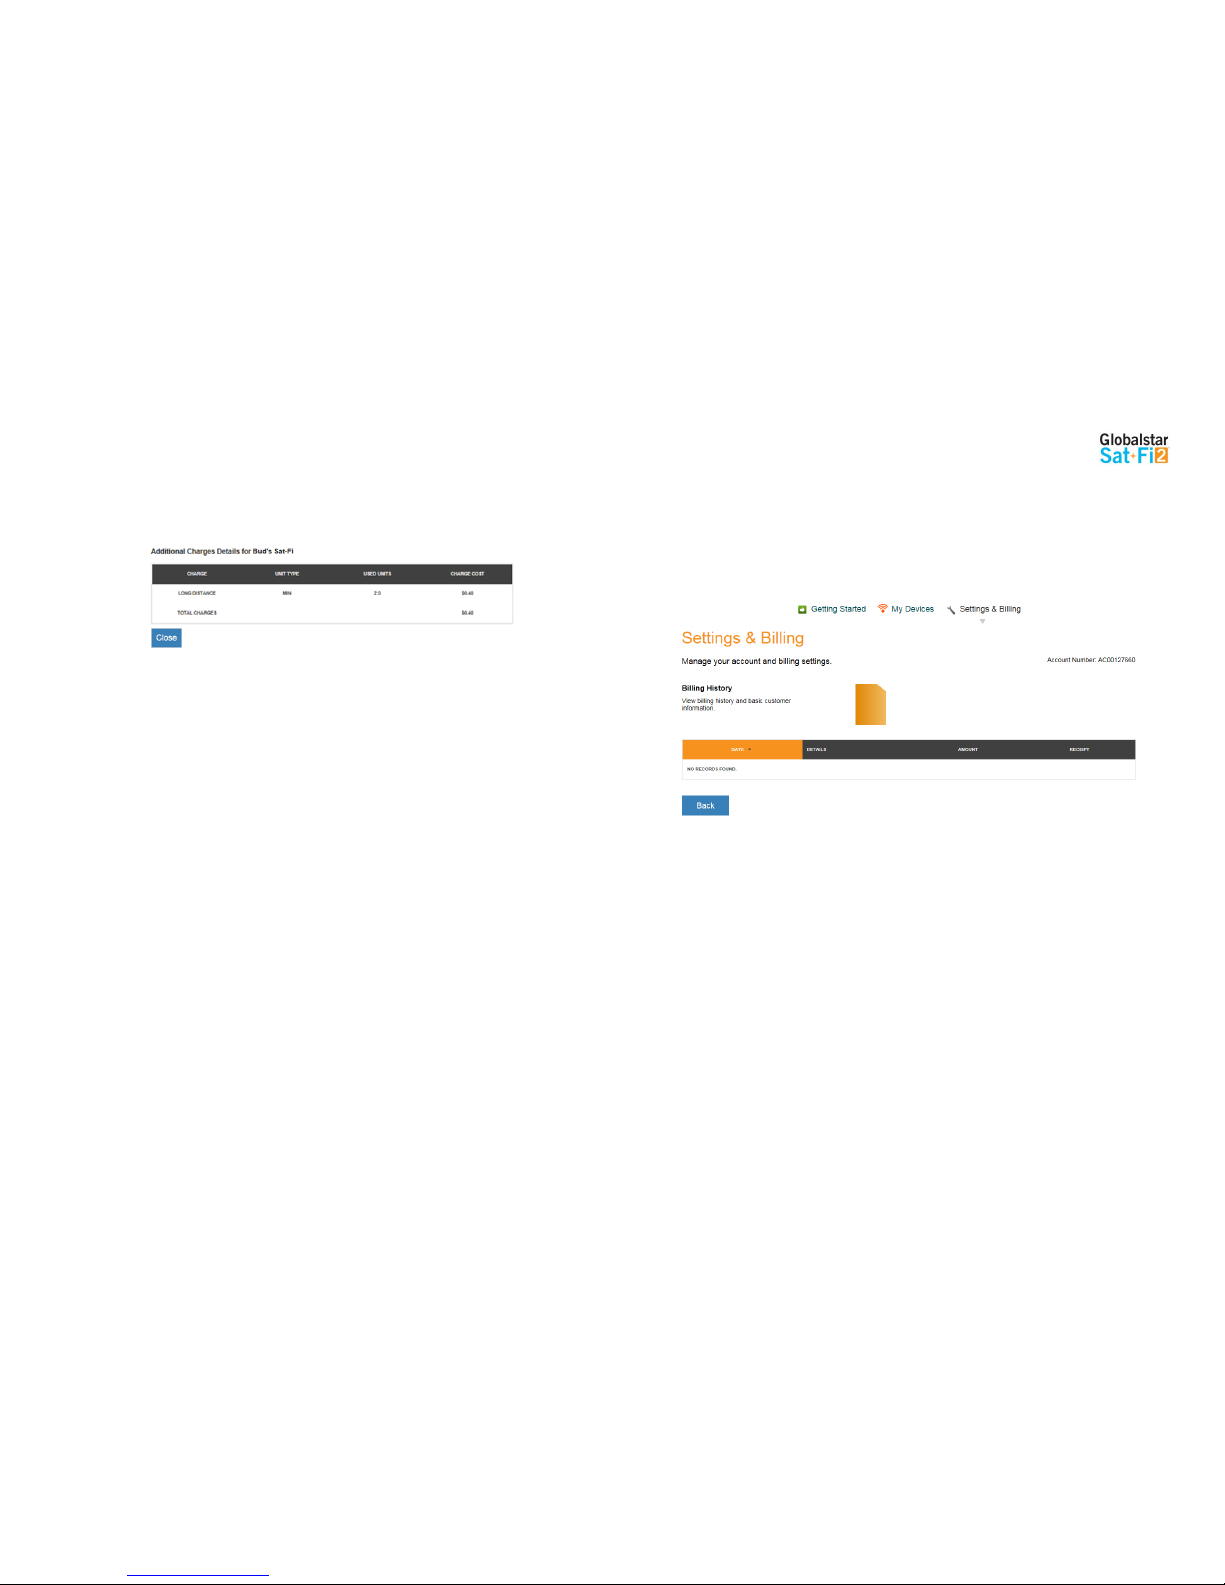
Globalstar Sat-Fi2 User Guide Page 50
Additional Charges Detail Report
CHARGE - Displays the charge type:
o LONG DISTANCE
o ROAMING
o OVERAGE
UNIT TYPE – Displays if the unit type that was charged
o MIN
o TEXT
o MB
UNITS USED - Displays the amount of units used
CHARGE COST - Displays the amount of the additional charge
Billing History
View billing history and basic customer information.
Page 54
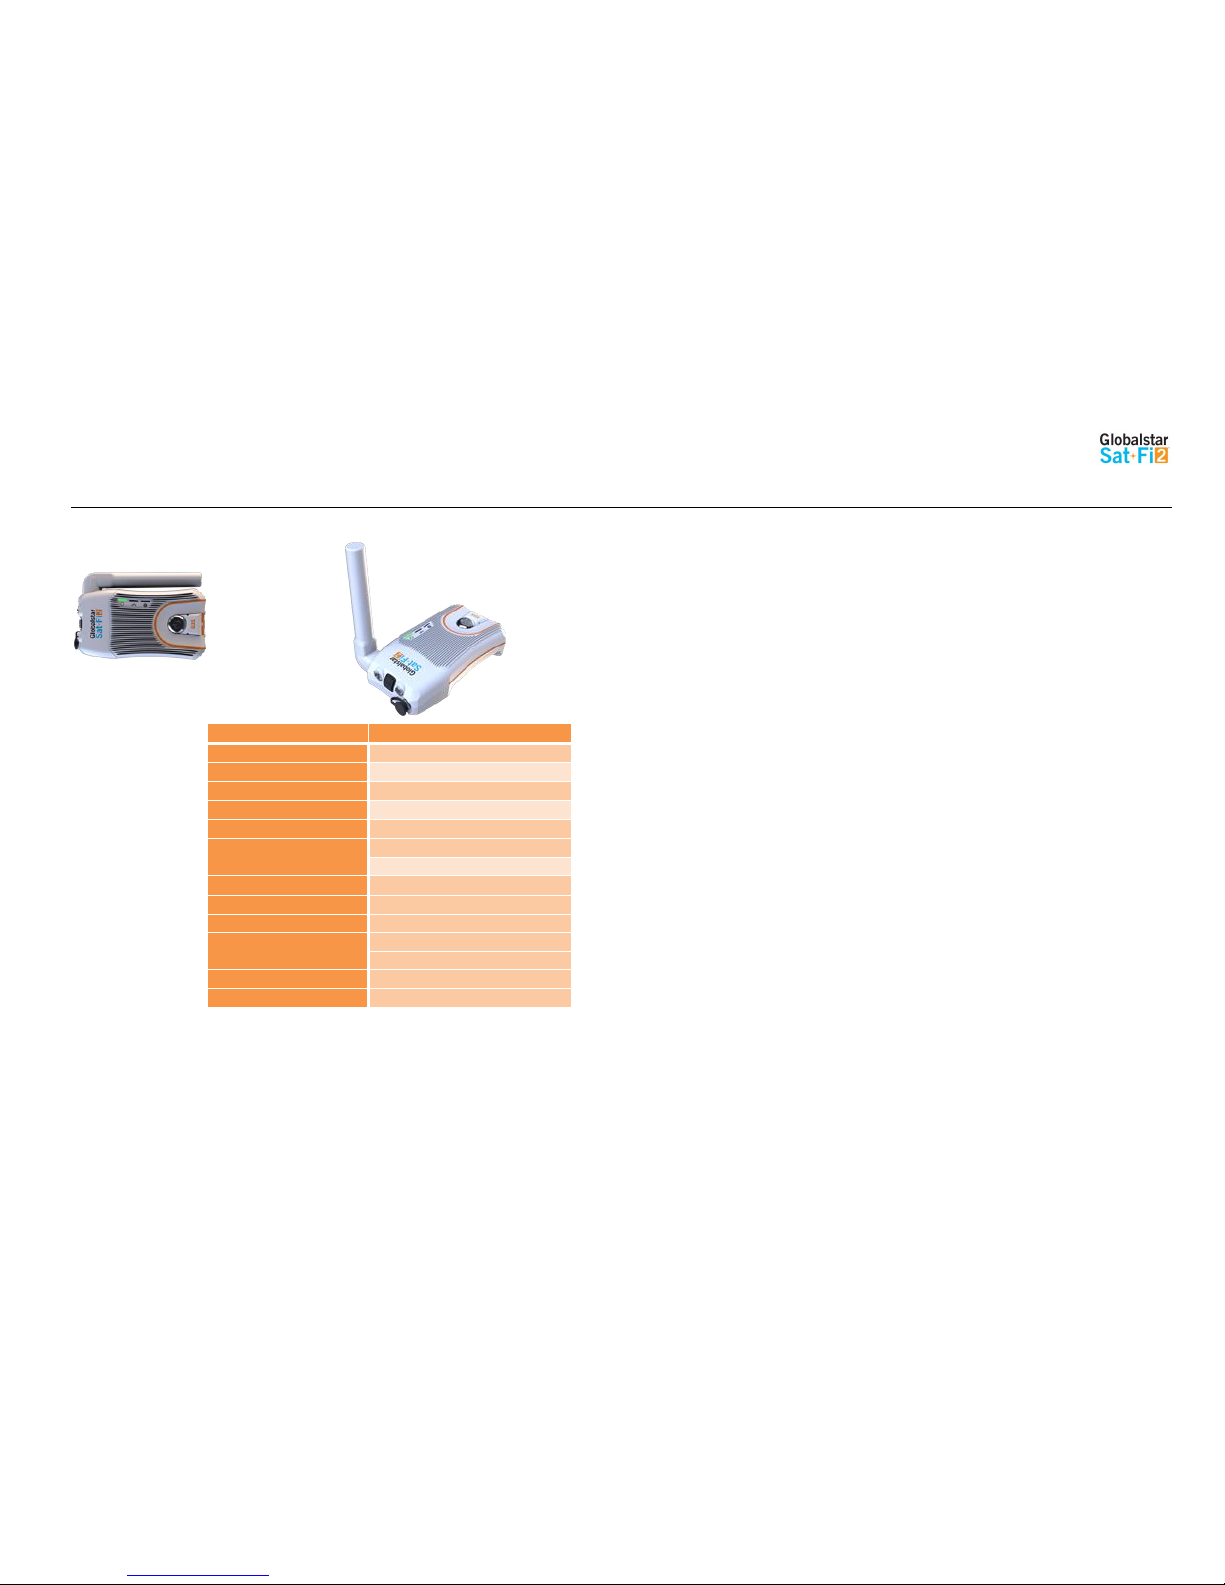
Globalstar Sat-Fi2 User Guide Page 53
SAT-FI2 SPECIFICATIONS
Height
1.5 in (36.9 mm)
Width
2.9 in (74.8 mm)
Length
5.8 in (147.32 mm)
Height with Antenna Deployed
5.3 in (134.62 mm)
Weight
12.6 oz (357.2 g)
Battery Type
Rechargeable Lithium Polymer Battery
Impact Resistance
Mil-STD-810 G for Shock
Operational Temperature
-4 F to 140 F (-20 C to +60 C)
Storage Temperature
-4 F to 140 F (-20 C to +60 C)
Operating Altitude
-328 ft to 21,320 ft (-100 m to 6,500 m)
Globalstar Antenna Operating
Frequency
Transmit (TX) 1610 – 1626 MHz
Receive (RX) 2483.5 – 2500 MHz
Wi-Fi Operating Frequency
2400 – 2500 MHz
Input Power
10-48 VDC
Page 55

Globalstar Sat-Fi2 User Guide Page 54
SAT-FI2 CERTIFICATIONS
FCC Compliance Statement
This device complies with part 15 of the FCC Rules. Operation is subject to the following two conditions: (1) This
device may not cause harmful interference, and (2) This device must accept any interference received, including
interference that may cause undesired operation.
This equipment has been tested and found to comply with the limits for a Class B digital device, pursuant to Part 15 of
the FCC Rules. These limits are designed to provide reasonable protection against harmful interference in a residential
installation.
FCC Part 15 Clause 15.21
Changes or modifications not expressly approved by the party responsible for compliance could void the user's authority to
operate the equipment
ISED RF Exposure Guidance Statement (in English and French):
In order to comply with FCC/ISED RF Exposure requirements, this device must be installed to provide at least 20 cm separation
from the human body at all times.
Radio & Television Interference
This equipment generates, uses, and can radiate radio frequency energy and, if not installed and used in accordance
with the instructions, may cause harmful interference to radio communications. However, there is no guarantee that
interference will not occur in a particular installation. If this equipment does cause harmful interference to radio or
television reception, which can be determined by turning the equipment off and on, the user is encouraged to try to
correct the interference by one or more of the following measures: a) Reorient or relocate the receiving antenna. b)
Increase the separation between the equipment and receiver. c) Connect the equipment into an outlet on a circuit
different from that to which the receiver is connected. d) Consult the dealer or an experienced radio/TV technician for
help.
Industry Canada Certification
This Class B digital apparatus complies with Canadian ICES-003.
This device complies with Industry Canada license-exempt RSS standard(s). Operation is subject to the following two
conditions: (1) this device may not cause interference, and (2) this device must accept any interference, including
interference that may cause undesired operation of the device.
This device complies with the requirements for Radio Astronomy Site avoidance as specified by the Globalstar
National Science Foundation agreement of 2001. It is compliant with CFR25.213.
This device automatically adjusts its transmission frequency according to its location and is compliant with international
regulatory requirements.
Radio Astronomy Site
This device complies with the requirements for Radio Astronomy Site avoidance as specified by the Globalstar
National Science Foundation agreement of 2001. It is compliant with CFR25.213.
This device automatically adjusts its transmission frequency according to its location and is compliant with international
regulatory requirements.
Page 56

Globalstar Sat-Fi2 User Guide Page 55
Déclaration de conformité avec la FCC
Cet appareil est conforme à la section 15 des règles de la FCC. Son fonctionnement est assujetti aux deux conditions
suivantes: (1) Ce dispositif ne doit pas causer d'interférences nuisibles, et (2) Cet appareil doit accepter toute
interférence reçue, y compris les interférences pouvant entraîner un fonctionnement indésirable. Cet équipement a été
testé et s'est avéré conforme aux limites pour un appareil numérique de classe B, conformément à la section 15 des
règlements de la FCC. Ces limites sont conçues pour fournir une protection raisonnable contre les interférences
nuisibles dans une installation résidentielle.
FCC: Section 15 Clause 15.21
Les changements ou modifications non expressément approuvés par la partie responsable de la conformité peuvent annuler
l'autorité de l'utilisateur à utiliser l'équipement.
ISED RF Déclaration d'orientation sur l'exposition
Afin de se conformer aux exigences d'exposition RF FCC / ISED, cet appareil doit être installé pour fournir au moins 20 cm du
corps humain en tout temps.
Interférence Radio et Télévision
Cet équipement produit, utilise et peut émettre de l'énergie radioélectrique. S’il n’est pas installé et utilisé
conformément aux instructions, il peut causer des interférences nuisibles aux communications radio. Toutefois, il n'y a
aucune garantie que l'interférence ne se produira pas dans une installation particulière. Si cet appareil provoque des
interférences nuisibles à la réception radio ou télévision, ce qui peut être déterminée en éteignant et rallumant
l'équipement, l'utilisateur est encouragé à essayer de corriger ces interférences en appliquant une ou plusieurs des
mesures suivantes: a) Réorienter ou déplacer l'antenne de réception. b) Accroître la séparation entre l'équipement et
le récepteur. c) Brancher l'équipement à une prise sur un circuit différent de celui auquel le récepteur est branché. d)
Consulter le revendeur ou un technicien radio/TV.
Certification d’Industrie Canada
Cet appareil numérique de classe B est conforme à la norme canadienne ICES‐003. Cet appareil est conforme avec
Industrie Canada RSS standard exemptes de licence(s). Son fonctionnement est soumis aux deux conditions
suivantes: (1) cet appareil ne peut pas causer d’interférences et (2) cet appareil doit accepter toute interférence, y
compris des interférences qui peuvent provoquer un fonctionnement indésirable du périphérique.
Site de Radio Astronomie
Cet appareil respecte les exigences de Radio Astronomie de limitation d’émission d’onde définies par l'accord de la
Foundation Nationale de Science Globalstar de 2001. Il est compatible avec CFR25.213
Cet appareil ajuste automatiquement sa fréquence de transmission en fonction de son emplacement et est conforme
aux exigences réglementaires internationales
Page 57

Globalstar Sat-Fi2 User Guide Page 57
SAT-FI2 GENERAL WARNINGS
Warning – Modifications: Changes or modifications not expressly approved by the party responsible for
compliance could void the user’s authority to operate the equipment.
Warning – Internal Battery: The rechargeable battery inside the Sat-Fi2 is not designed to be replaced by
the consumer. If replacement is needed, have an authorized service person replace the battery with one of the
same size and type
Warning – Blasting Area: To avoid interference with blasting operations, turn your Sat-Fi2 off when in a
“Blasting Area” or in areas posted “Turn off two-way radio.” Obey all signs and instructions.
Warning – Potential Explosive Atmosphere: Turn off the Sat-Fi2 when in any area with a potentially
explosive atmosphere and obey all signs and instructions.
Warning – Driving: Always follow safe driving practices and local rules and regulations regarding the use of
wireless devices while driving. Always park safely prior to using the Sat-Fi2.
Warning – Pacemakers: The Health Industry Manufacturers Association recommends that a minimum
separation of six (6”) inches be maintained between the Sat-Fi2 and a pacemaker to avoid potential
interference with the pacemaker.
Warning – Pacemakers: Some digital wireless devices may interfere with some hearing aids. In order to
prevent such interference, you may want to consult the manufacturer of your hearing aid.
 Loading...