

Page 1
GNV-101
Sound Level Meter
(with data logging)
Class 2
User Manual
Page 2

Global Specialties
Table of Contents
Safety..................................................................................................2
Compliance and Certications............................................................3
Features.............................................................................................4
Specications.....................................................................................5
Instrument Description.......................................................................6
Display Functions...............................................................................7
Operating Instructions..................................................................8-10
Power....................................................................................8
Max/Min Hold........................................................................8
Frequency Weighting............................................................8
Battery Replacement and Indicator.......................................9
Calibration.............................................................................9
Measurement......................................................................10
Operating Precautions........................................................10
Data Logging Set-up........................................................................11
Installation...........................................................................12
Main Menu..........................................................................12
Graph..................................................................................13
Toolbar.................................................................................13
Zoom...................................................................................14
Datalogger...........................................................................14
Quick Start Tutorial..............................................................15
Warranty/Service Information..........................................................16
1 globalspecialties.com
Page 3

Global Specialties
Safety
To avoid personal injury and/or product damage, review and comply with
the following safety precautions. These precautions apply to both operating
and maintenance personnel and must be followed during all phases of
operation, service, and repair of this probe.
Dry Conditions
Hands, shoes, oor, and work bench must be dry. Avoid making
measurements under humidity, dampness, or other environmental
conditions that might affect safety.
Cleaning
Use a soft cotton cloth lightly moistened with a mild solution of
detergent and water. Do not allow any portion to be submerged
at any time. Dry thoroughly before attempting to make voltage
measurements. Do not use solvents or expose to solvent fumes as
they may cause deterioration or damage
Do not operate:
• In the presence of noxious, corrosive, flammable fumes,
gases, vapors, chemicals, or finely-divided particulates.
• In environments where there is a danger of any liquid being
spilled on the probe.
• In air temperatures exceeding the specified operating
temperatures.
• In atmospheric pressures outside the specified altitude limits or
where the surrounding gas is not air.
© 2018 Global Specialties (a brand of Cal Test Electronics). All rights reserved.
Unauthorized duplication of Global Specialties documentation materials is strictly prohibited.
Customers are permitted to duplicate and distribute Global documentation for internal educational
purposes only.
globalspecialties.com
2
Page 4
Global Specialties
Compliance and Certications
CE Compliance
This product meets the essential requirements of the applicable
European Directives as follows:
• 2014/30/EU: Electromagnetic Directive (EMC)
• 2011/65/EU: Restriction of Hazardous Substances
Directive (RoHS)
Safety
This product meets the follow standard(s) of safety for electrical
equipment for measurement, control and laboratory use:
• IEC/EN 61672-1:2013
Disposal
(Applicable in the European Union and other European
countries with separate collection systems). This
product is subject to Directive 2012/19/EU of the
European Parliament and the Council of the European
Union on waste electrical and electronic equipment
(WEEE), and in jurisdictions adopting that Directive, is
marked as being put on the market after August 13,
2005, and should not be disposed of as unsorted
collection facilities in the disposition of this product.
municipal waste. Please utilize your local WEEE
Caution! Refer to the operating instructions.
3 globalspecialties.com
Page 5

Global Specialties
Features
• Meets IEC 61672-1 Class 2 requirements
• Records up to 64,000 data points
• Recorded data exportable to EXCEL via a USB interface
• Fast and slow time weighting
• 60 dB dynamic range
• A and C frequency weighting
• AC and DC outputs available from standard 3.5 mm coaxial socket for
use with a frequency analyzer, level recorder, FFT analyzer, etc..
• Min/max function
• Battery capacity indicator
• Analog bar graph and digital display
• Manual and auto range functionality
• Tripod mount for long term monitoring
• Includes windscreen, battery and hard carrying case
globalspecialties.com
4
Page 6
Global Specialties
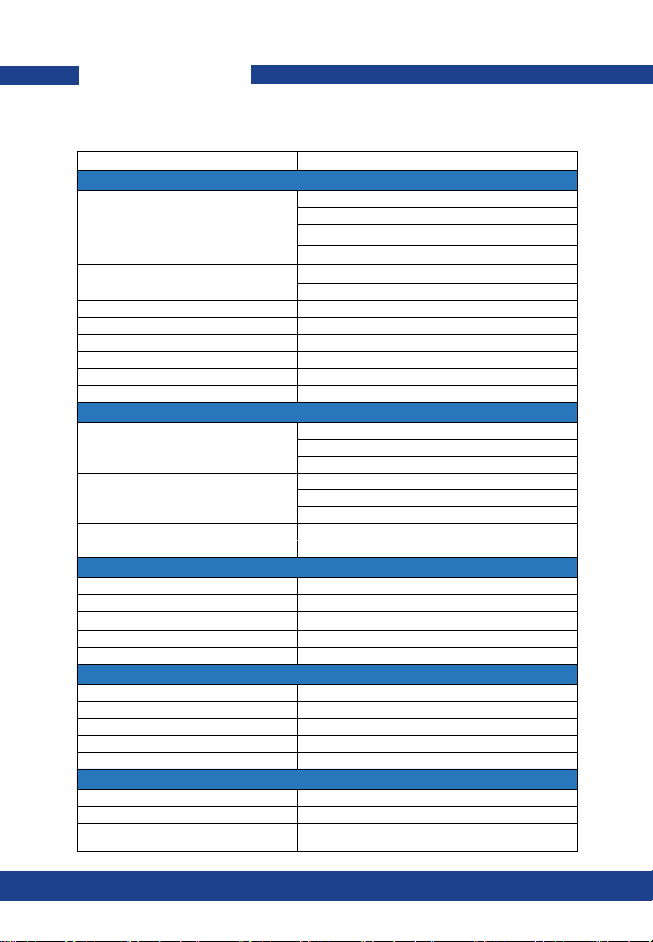
Specications
Safety Standard Applied IEC 61672-1 Class 2
Measuring Level Ranges Low: 30 to 90 dB
Sample Rate Fast 125 ms
Accuracy ± 1.4 dB @ 94 dB, 1 kHz
Dynamic Range 60 dB
Frequency Range 20 Hz to 8 kHz
Frequency Weighting A / C
Microphone 1/2 Inch electret condenser
Data Logging Capacity 64,000 records
Digital Display 4 Digit display
Analog Display 30 Segment bar graph
Alarm Functions OVER and UNDER alarm functions indicating
AC Ouput 1 Vrms at full scale
DC Output 10 mV/dB
Power Supply 4 AAA batteries: NEDA 24A, IEC LR03
Battery Life Approx. 24 hours
External Power Supply 5 VDC (micro USB plug)
Operating Temperature 0 to 40 °C (32 to 104 °F)
Operating Humidity 10 to 90% Relative humidity
Storage Temperature -10 to 60 °C (14 to 140 °F)
Storage Humidity 10 to 75% Relative humidity
Altitude Up to elev. of 2000 meters (~6,500 ft.)
Dimensions 264 x 63 x 29 mm (10.4 x 2.5 x 1.1”)
Weight Approx. 245g (8.6 oz)
Included Accessories
Operating Limits and Functions
Med: 50 to 110 dB
High: 70 to 130 dB
Auto: 30 to 130 db
Slow 1000 ms
Displays
Resolution: 0.1 dB
Display Update: 0.5 sec
Resolution: 2 dB
Display Update: 100 ms
when sound level is outside the set range
Electrical Specifications
Environmental Specifications
Mechanical Specifications
4 AAA batteries, User manual, windscreen,
carrying case, USB cable
5 globalspecialties.com
Page 7

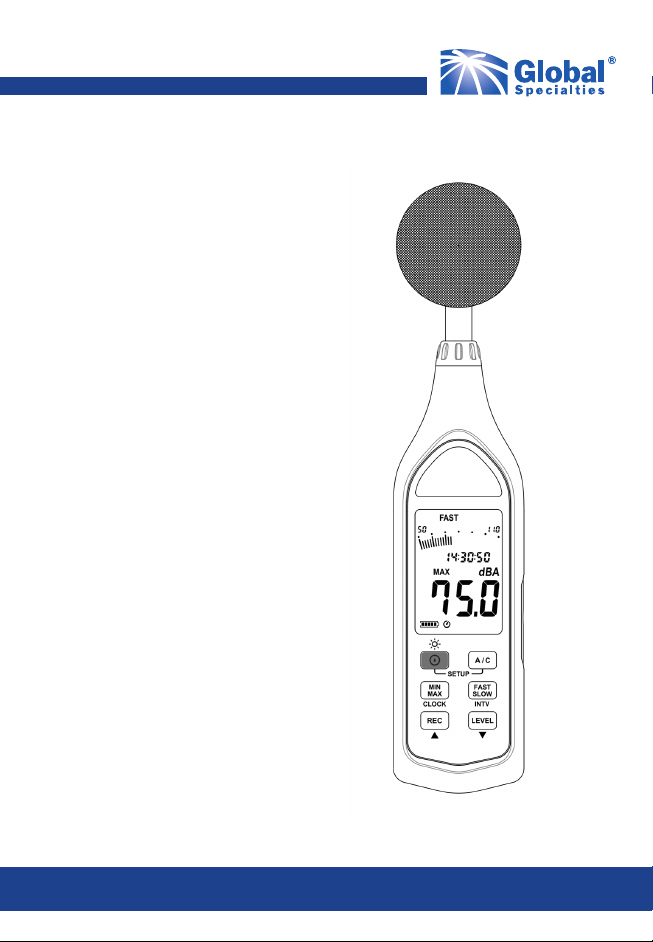
Instrument Description
1. Windscreen
2. LCD display
3. Power button
4. Level range increase
5. Level range decrease
6. “A” or “C” freq. weighting
7. MIN/MAX hold button
Global Specialties
8. Time weighting select
9. Microphone
10. AC/DC output terminal
11. USB Interface
12. Tripod mounting screw
13. Battery Cover
globalspecialties.com
6
Page 8

Global Specialties
Display Functions
:
:
REC FULL
Symbol
Symbol
:
REC
FULL
:
Function
Function
Battery capacity indicator
Battery capacity indicator
Auto power off indicator
Auto power off indicator
Maximum/Minimum inidcator
Maximum/Minimum inidcator
Time weighting indicator
Time weighting indicator
Level range indicator
Level range indicator
Bar graph
Bar graph
Date
Date
Level reading
Level reading
Frequency weighting indicator
Frequency weighting indicator
Recording datalogger indicator
Recording datalogger indicator
Memory full indicator
Memory full indicator
Under-range indicator
Under-range indicator
Over-range indicator
Over-range indicator
7 globalspecialties.com
Page 9

Global Specialties
Operating Instructions
Power
The button turns the sound level meter on with a single push.
Press and hold the same button for 2 seconds to turn off the power.
By default, when the meter is powered on, it is under auto power off
mode. The meter will shut itself down after 30 minutes if no key is
pressed. To disable this, press and hold until the symbol is
no longer visible.
Max/Min Hold
First adjust the meter to the correct level range and sample rate
prior to using this function. Press the button to start the
maximum and minimum measurement mode.
1. Press the button once and “MAX” will display on the
screen. This indicates that the maximum value is being
updated and recorded.
2. Press again and “MIN” will display on the screen. This
indicates that the minimum value is being updated and
recorded.
3. Press once more and “MIN MAX” will blink on the display.
This indicates that both the minimum and maximum values are
being updated and recorded.
Frequency Weighting
A: Weighting for volumes below 50 dB (dBA)
C: Weighting for volumes above 50 dB (dBC)
globalspecialties.com
8
Page 10

Global Specialties
Battery Replacement and Indicator
Remove the battery cover from the back, and insert four AAA
batteries. The onboard display will indicate when the battery needs
to be replaced.
Batteries Good Batteries Partly Depleted Replace Batteries
Calibration
1. First ensure that the device is turned off. Then press and
hold . Next, press the button and release both. The
meter will display a ashing “CAL 94 dB”.
2. Gently insert the microphone housing into the calibrator* as
depicted below.
3. Press or to increase or decrease the number
displayed until it matches the value 94.0 dB
4. Press to nish calibration. To abort the process, press
the button to cancel.
*GNV-102 sound level callibrator sold separately
9 globalspecialties.com
Page 11

Global Specialties
Measurement
1. Turn on the meter and select the desired response time and
frequency weighting. If sound source consists of short bursts,
set response to “FAST”. To measure the average sound level,
use the “SLOW” setting.
Both A and C weighting model how the human ear perceives
sound, dependent on frequency. A is best suited to volumes
below 50 dB and C for volumes above 50 dB.
2. Next select the desired decibel range.
3. Hold the instrument comfortably in hand or attach it to a tripod
via the tripod mount.
4. When MAX/MIN (maximum and minimum hold mode) is
chosen. The instrument records and updates the maximum
and minimum noise level over long periods of time. Press
and hold for 2 seconds to clear the MAX/MIN reading.
5. Turn off the instrument.
Operating Precautions
• Wind blowing across the microphone will bring additional
extraneous noise and will be reduced by use of the provided
windscreen.
• Calibrate the instrument before operation if the instrument was
not in use for a long time or was operated beyond or near the
environmental specication limits.
• Do not store or operate the instrument in high temperature or
high humidity environments.
• Take out the battery and keep the instrument in low humidity
when not in use.
globalspecialties.com
10
Page 12

Global Specialties
Data Logging Set-up
Interval Set-up
1. Press and hold button and then power on
the meter.
2. Press INTV ( ) button, “Int” appears for the
interval, as well as a ashing second display.
3. Now set the desired recording interval in minutes and seconds. Press and
to increase or decrease the number. The
maximum value is 1 minute and the minimum
is 1 second. To abort the process at any time
press button to cancel.
Data Storage
To store data using the auto store function press the button
which will begin saving the measured values. Press the
again to stop recording.
A/C
REC
REC
If you want to clear the memory, first power off the unit. Next press
and hold the button and then press button and hold for 5
REC
seconds. Finally, the display will show “CLr” and “SURE” to clear
memory.
Setting the Date and Time
1. Turn off the unit.
2. Enter SETUP mode by pressing and holding
11 globalspecialties.com
button and then press button to turn on the unit.
“SEt” blinks on the screen.
3. Press CLOCK ( ) button to set the clock.
4. Press or to adjust year, and press
CLOCK again to adjust the next value (month, day,
hour, minute, second)
5. When finished, press CLOCK button to exit SETUP
mode.
Page 13

Global Specialties
USB Interface Software
Requirements: Windows XP / Vista / 7 / 8 / 10 with at least 50 MB of
hard disk space
Installation
1. Insert set-up CD disk to your CD disk drive. Windows will
automatically run setup.exe.
2. If Windows fails to run setup.exe automatically, then click the
Start button on the Taskbar and select Run. Type E:\SETUP
and select OK.
3. Follow the on screen instructions to nish the installation.
4. Installed onto your computer will be the program SE323.exe in
program les.
Main Menu
File: Open or retrieve les.
Save: Save the active window data to le.
Print: Print the graph in the active window.
Printer Setup: Select a printer.
File | Exit: Terminates SE323 program.
View | Control: By opening the Panel Window, the user can control
the meter via the button in this window.
View | Real-Time Graph: Open Real-Time Graph display to graph
the present data.
Stop: Stop collectiong real time data.
DataLogger: By opening the Datalogger window, the user can load
recorded data of the meter to the PC in this window.
globalspecialties.com
12
Page 14

Global Specialties
Graph
Tool Bar
Display or hide Statistic1
Display or hide Statistic2
Normal Cursor
When selected, the mouse cursor will become a cross sign.
When moving to the graph, click on the graph to mark a
cross sign on the graph.
Whe selected, the mouse cursor will become an “I” sign.
When moving to the graph, click on it to annotate.
13 globalspecialties.com
Page 15

Global Specialties
Zoom
1. Press the left mouse button and drag the cursor to select the
contents you wish to zoom in on.
2. Releasing the left mouse button will automatically zoom in on
the selection.
To undo the zoom, press the button in the tool bar.
Data Logger
When datalogger is selected from the top menu bar, displayed
will be a list of data sets, including there operating parameters.
Selecting an individual set will display it on the graph at hand.
globalspecialties.com
14
Page 16

Global Specialties
Quick Start Tutorial
Recording real time data:
1. Power on the Sound Level Meter rst and connect it to a PC
USB port with the provided cable.
2. Start the SE323 program.
3. If the connection is successful, the computer panel will display
the same information as the Sound Level Meter display. If it
fails to connect the PC display will read “No Connection”.
4. When the connection is successful, click to start recording
real time data and the waveform will be displayed on the Real
Time Graph window.
5. Click to stop recording.
How to save recorded real time data to a le:
1. Click the graph window you want to save and the graph will
become active.
2. Choose File | Save from the main menu, or click from the
tool bar.
3. A prompt will be given for you to save the information under a
given name. You can choose to save your le as a binary le
(*.ghf), a text le (*.txt) or an EXCEL le (*.csv).
How to load data from the memory of the Sound Level Meter:
1. Power on the Sound Level Meter
2. Press the button of the meter to begin recording data.
3. Press the same button again to stop recording data.
4. Connect the Sound Level Meter to the PC.
5. Start the SE323 program.
6. Choose Data Logger from the main menu and your recorded
data will be listed as an indivdual set.
REC
15 globalspecialties.com
Page 17

Global Specialties
Limited One-Year Warranty
Global Specialties warrants these products to be free from defective
material or workmanship for a period of 1 year from the date of
original purchase. Under this warranty, Global Specialties is limited
to repairing the defective device when returned to the factory,
shipping charges prepaid, within the warranty period.
Units returned to Global Specialties that have been subject to
abuse, misuse, damage, or accident, or have been connected,
installed, or adjusted contrary to the instructions furnished by Global
Specialties, or that have been repaired by unauthorized persons,
will not be covered by this warranty.
Global Specialties reserves the right to discontinue models, change
specications, price, or design of this device at any time without
notice and without incurring any obligation whatsoever.
The purchaser agrees to assume all liabilities for any damages
and/or bodily injury which may result from the use or misuse of this
device by the purchaser, his employees, or agents.
This warranty is in lieu of all other representations or warranties
expressed or implied and no agent or representative of Global
Specialties is authorized to assume any other obligation in
connection with the sale and purchase of this device.
Service
If you have a need for calibration or repair services, technical, or sales
support, please contact us:
Global Specialties
22820 Savi Ranch Parkway Yorba Linda, CA 92887
800-572-1028 or 714-221-9330
globalspecialties.com
globalspecialties.com
16
Page 18

Global Specialties
Notes:
17 globalspecialties.com
Page 19

Global Specialties
globalspecialties.com
globalspecialties.com 18
18
Page 20

Global Specialties
450940-001 globalspecialties.com
Rev B
 Loading...