


GlobalSCAPE® DMZ Gateway v3.1
User Guide
Module for
EFT Server
6.3

GlobalSCAPE, Inc. (GSB)
Address:
4500 Lockhill-Selma Road, Suite 150
San Antonio, TX (USA) 78249
Sales:
(210) 308-8267
Sales (Toll Free):
(800) 290-5054
Technical Support:
(210) 366-3993
Web Support: http://www.globalscape.com/support/
© 2004-2011 GlobalSCAPE, Inc. All Rights Reserved
Last Updated: April 1, 2011

Table of Contents
Introduction to GlobalSCAPE DMZ Gateway ................................................................................................ 5
How Does it Work? .................................................................................................................................... 5
Technical Details ....................................................................................................................................... 6
DMZ Gateway Initialization and Connection Diagrams ................................................................................ 7
What's New in DMZ Gateway ..................................................................................................................... 12
Installing DMZ Gateway .............................................................................................................................. 13
System Requirements for DMZ Gateway v3 ........................................................................................... 13
Installing DMZ Gateway on a Windows System ..................................................................................... 14
Installing DMZ Gateway on a non-Windows System .............................................................................. 17
Installing DMZ Gateway on RedHat or SuSE Linux 32-Bit or 64-Bit ................................................... 18
Installing DMZ Gateway on Ubuntu Linux 32-Bit or 64-Bit .................................................................. 18
Solaris x86 32-Bit or 64-Bit .................................................................................................................. 19
Example of Installation Process ........................................................................................................... 19
Activating DMZ Gateway ......................................................................................................................... 21
Manually Registering and Deregistering the DMZ Gateway Server Daemon ......................................... 21
RedHat Enterprise Linux ...................................................................................................................... 21
SuSE Linux .......................................................................................................................................... 21
Ubuntu Linux ........................................................................................................................................ 22
Solaris .................................................................................................................................................. 22
Upgrading or Repairing DMZ Gateway ................................................................................................... 22
Uninstalling DMZ Gateway ...................................................................................................................... 24
Uninstalling DMZ Gateway on a Windows System ............................................................................. 24
Uninstalling DMZ Gateway on a non-Windows System ...................................................................... 24
RedHat Enterprise Linux, SuSE Linux, or Solaris x86 32-Bit or 64-Bit ........................................... 25
Ubuntu Linux 32-Bit or 64-Bit ........................................................................................................... 25
Example of Uninstallation Process on Solaris ................................................................................. 25
Administering DMZ Gateway ...................................................................................................................... 27
DMZ Gateway Components .................................................................................................................... 27
DMZ Gateway Server .......................................................................................................................... 27
DMZ Gateway Server Service ............................................................................................................. 27
DMZ Gateway Administration Interface ............................................................................................... 27
DMZ Gateway System Files .................................................................................................................... 28
The DMZ Gateway Interface ................................................................................................................... 28
Starting the DMZ Gateway Server Service ............................................................................................. 29
Specifying the Listening IP Addresses .................................................................................................... 30
What Does This Mean for the Peer Server Listeners? ........................................................................ 30
What Does This Mean for the Client Listeners? .................................................................................. 30
Creating a Profile ..................................................................................................................................... 31
Renaming a Profile .................................................................................................................................. 33
Deleting a Profile ..................................................................................................................................... 33
Editing a Profile ....................................................................................................................................... 34
Controlling Access by IP Address ........................................................................................................... 35
iii

DMZ Gateway User Guide
Managing the DMZ Gateway Server Service .......................................................................................... 36
Viewing Statistics ..................................................................................................................................... 36
Peer Notification Channels .................................................................................................................. 37
Client Listeners .................................................................................................................................... 37
Statistics ............................................................................................................................................... 38
DMZ Gateway Logging ............................................................................................................................ 39
DMZ Gateway Communications Activity Logging ................................................................................ 39
DMZ Gateway Server Diagnostics Logging ......................................................................................... 40
DMZ Gateway Server Service Diagnostics Logging ............................................................................ 40
DMZ Gateway Statistics Logging ......................................................................................................... 40
DMZ Gateway Server Event Viewer (Windows Operating Systems Only) .......................................... 41
DMZ Gateway Server Syslog (Solaris/Linux-based Operating Systems Only) .................................. 41
DMZ Gateway Administration Interface Logging ................................................................................. 42
DMZ Gateway Administration Diagnostics Logging ......................................................................... 42
DMZ Gateway AdminLauncher Diagnostics Logging ...................................................................... 42
Communicating with EFT Server or Mail Express Server ........................................................................... 43
Enabling DMZ Gateway in EFT Server ................................................................................................... 43
Configuring the DMZ Gateway Connection in Mail Express ................................................................... 45
Routing AS2 Traffic through DMZ Gateway ............................................................................................ 47
Using DMZ Gateway as an Outbound Proxy .......................................................................................... 47
Testing the Configuration ........................................................................................................................ 53
Troubleshooting DMZ Gateway Communication .................................................................................... 54
Interface Reference ..................................................................................................................................... 55
IP Access Exception Entry Dialog Box .................................................................................................... 55
New Profile Wizard--Profile name ........................................................................................................... 55
New Profile Wizard--Peer Server Access................................................................................................ 56
New Profile Wizard--Configuration .......................................................................................................... 56
Frequently Used Commands (non-Windows) ......................................................................................... 57
License, Copyrights, and Release Notes .................................................................................................... 61
Copyright Information .............................................................................................................................. 61
DMZ Gateway Release Notes ................................................................................................................. 61
DMZ Gateway EULA ............................................................................................................................... 61
iv
Introduction to GlobalSCAPE DMZ Gateway
GlobalSCAPE® DMZ Gateway is designed to reside in the demilitarized zone and provide secure
communication with a server behind intranet firewalls without requiring any inbound firewall holes
between the internal network and the DMZ, and with no sensitive data stored in the DMZ, even
temporarily. DMZ Gateway supports connections from the server through the use of Profiles (depending
on the license purchased).
How Does it Work?
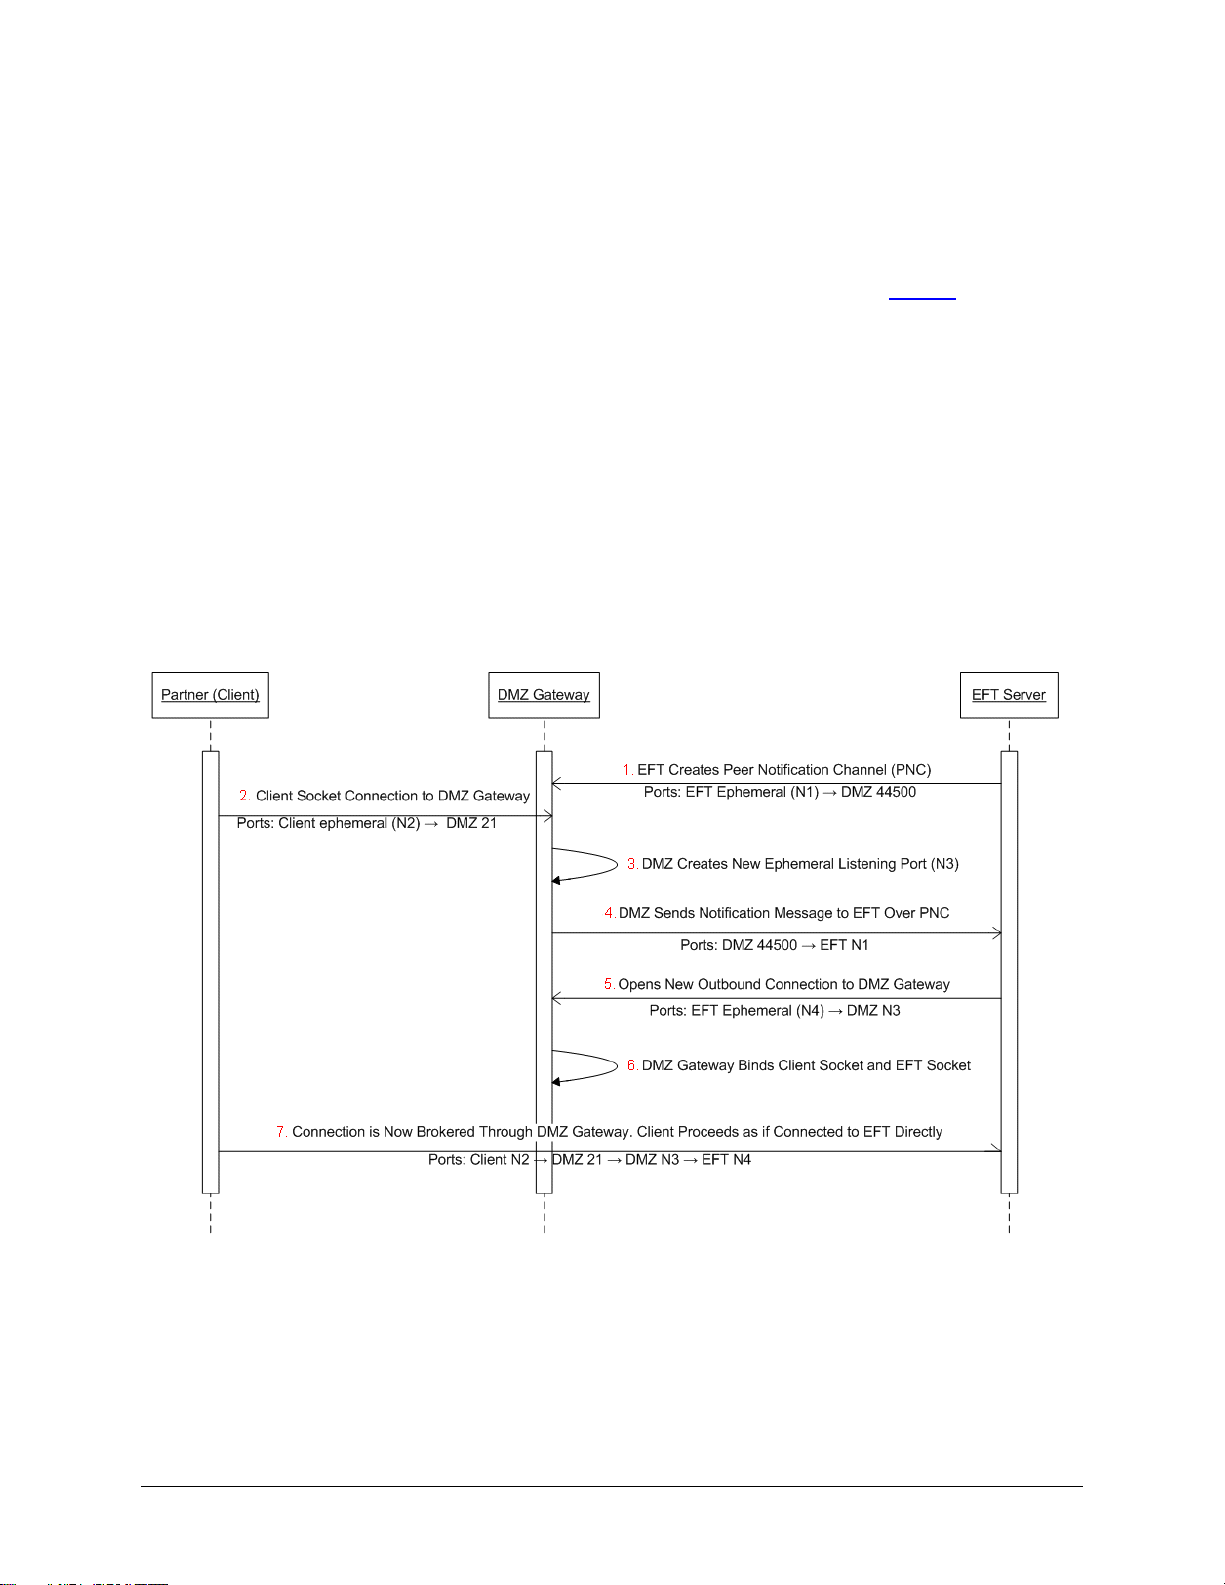
Using EFT Server as an example of the server as illustrated below, when a Site is started, EFT Server
establishes an outbound connection to the DMZ Gateway (1). This proprietary, non-encrypted connection
is called the Peer Notification Channel (PNC). EFT Server and DMZ Gateway use the PNC to setup
subsequent communications between EFT Server and incoming client connections.
When a client (web browser, FTP client, etc.) connects to the DMZ Gateway (2) on the pre-approved
ports (21, 22, 80 443, etc.), DMZ Gateway creates a new “listener” (3), called an ephemeral port, and
gives this port and other relevant information to EFT Server over the PNC (4).
EFT Server then generates a new outbound connection (5) to the ephemeral port created by the DMZ
Gateway. Next, the DMZ Gateway "glues" the incoming client connection together with EFT Server’s new
connection (6), and from that point forward, the client’s communications are streamed through the DMZ
Gateway to EFT Server over this connection (7).
5

DMZ Gateway User Guide
Technical Details
The DMZ Gateway routes all client data to the server over the server-initiated socket without any
translation or modification to the packet’s payload. Thus, if the client is using HTTPS, then HTTPS traffic
goes over that streaming connection. Unlike a network hardware bridge/router device, the DMZ Gateway
does not "pass through" modified packets. The DMZ Gateway reads in a buffer full of data from the client
TCP/IP stream (~4KB) and then sends that data over the server's TCP/IP socket. They are completely
different TCP/IP packets with different source and destination locations; however, the payload is NOT
changed at all.
The DMZ Gateway does not forward client requests. The Peer Notification Channel (PNC) is used for
brokering new incoming client connections using the process outlined above. Once the incoming client
connection and the server connection are "glued" together, the client’s requests are streamed through the
DMZ Gateway to the server.
Both external (DMZ Gateway cloud facing) and internal (server-network facing) listening ports are
specified from within the server for each supported (and enabled) protocol. These ports can be the same
or different (even for the same protocol).
Once configured to work with the DMZ Gateway, the server (when running) will always attempt to initiate,
maintain, and if necessary reconnect to the DMZ Gateway server. No further administrative action is
required in the server to establish or maintain communications after the initial setup. From the DMZ
Gateway server perspective, if the PNC channel is broken, it will refuse new (and existing) client
connections until the server re-establishes a connection.
The server periodically queries the DMZ Gateway. If a reply is not received within 10 seconds, the server
considers the connection lost, severs the current connection, and then attempts to reconnect. The DMZ
Gateway also maintains its own awareness (ping/pong) of whether the server is connected. Every 30
seconds, DMZ Gateway determines whether it has received a pong message from the server since the
last ping. If it has, it will ping again; if not, it drops the connection. This allows it to free up ports if the
server is not available (no longer responds to ping) and for error reporting. (Refer to the Knowledge Base
article "How do EFT Server and DMZ Gateway Server communicate with each other?" for information
about changing these defaults in EFT Server 6.2 and later and DMZ Gateway 3.0 and later.)
DMZ Gateway performs client impersonation, which means none of the sockets created via the DMZ
Gateway have the DMZ Gateway IP address and port; instead, all sockets created through the DMZ
Gateway have the IP address and port of the client connection. This results in the server’s logs showing
the actual connecting client IP addresses and ports, rather than those of the DMZ Gateway.
Because the client connection is streamed through the DMZ Gateway to the server, user authentication is
handled by the server, as if the client were logging in directly to the server from the internal network.
With EFT Server, the DMZ Gateway can restrict incoming server PNC connections based upon IP
address. The DMZ Gateway can also restrict incoming client connections via the IP address ban feature.
Any IP addresses banned (manually or automatically) in EFT Server will also be banned by the DMZ
Gateway.
The server and DMZ Gateway PNC connection does not employ username and password credentials.
There is nothing sensitive contained in the PNC notifications that requires encryption.
6
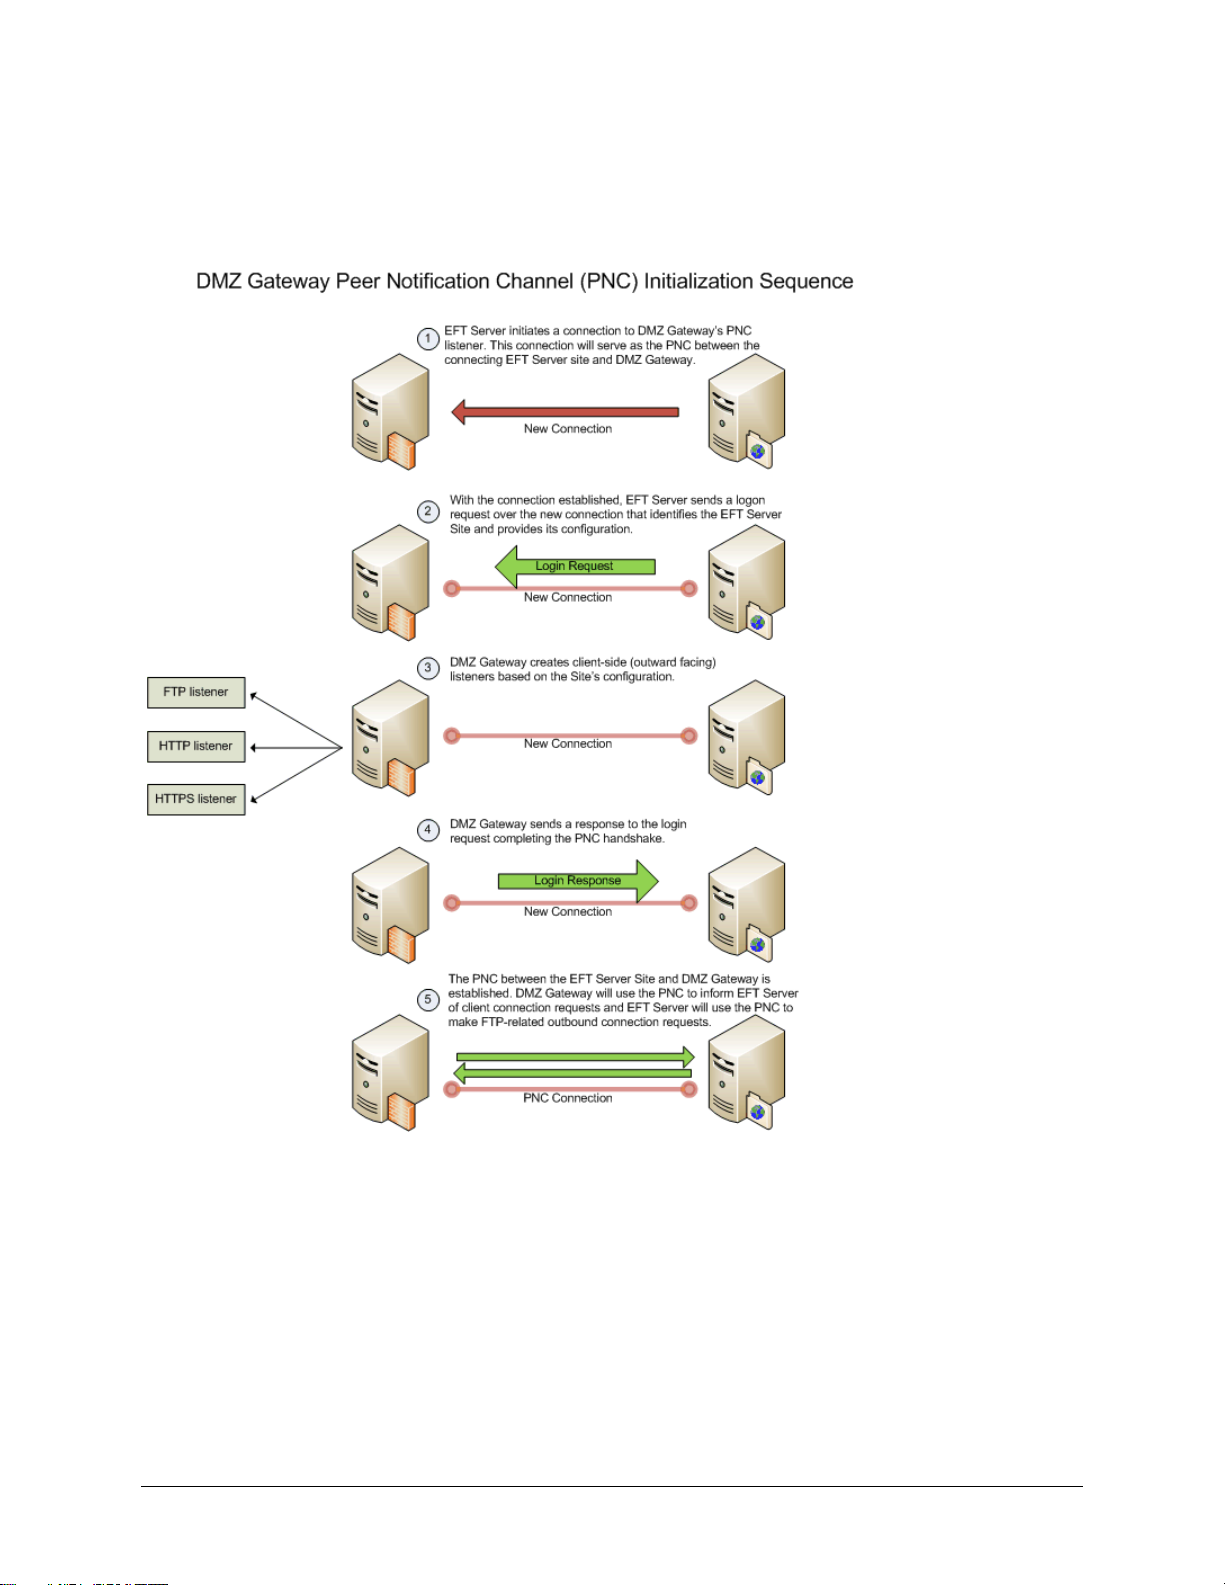
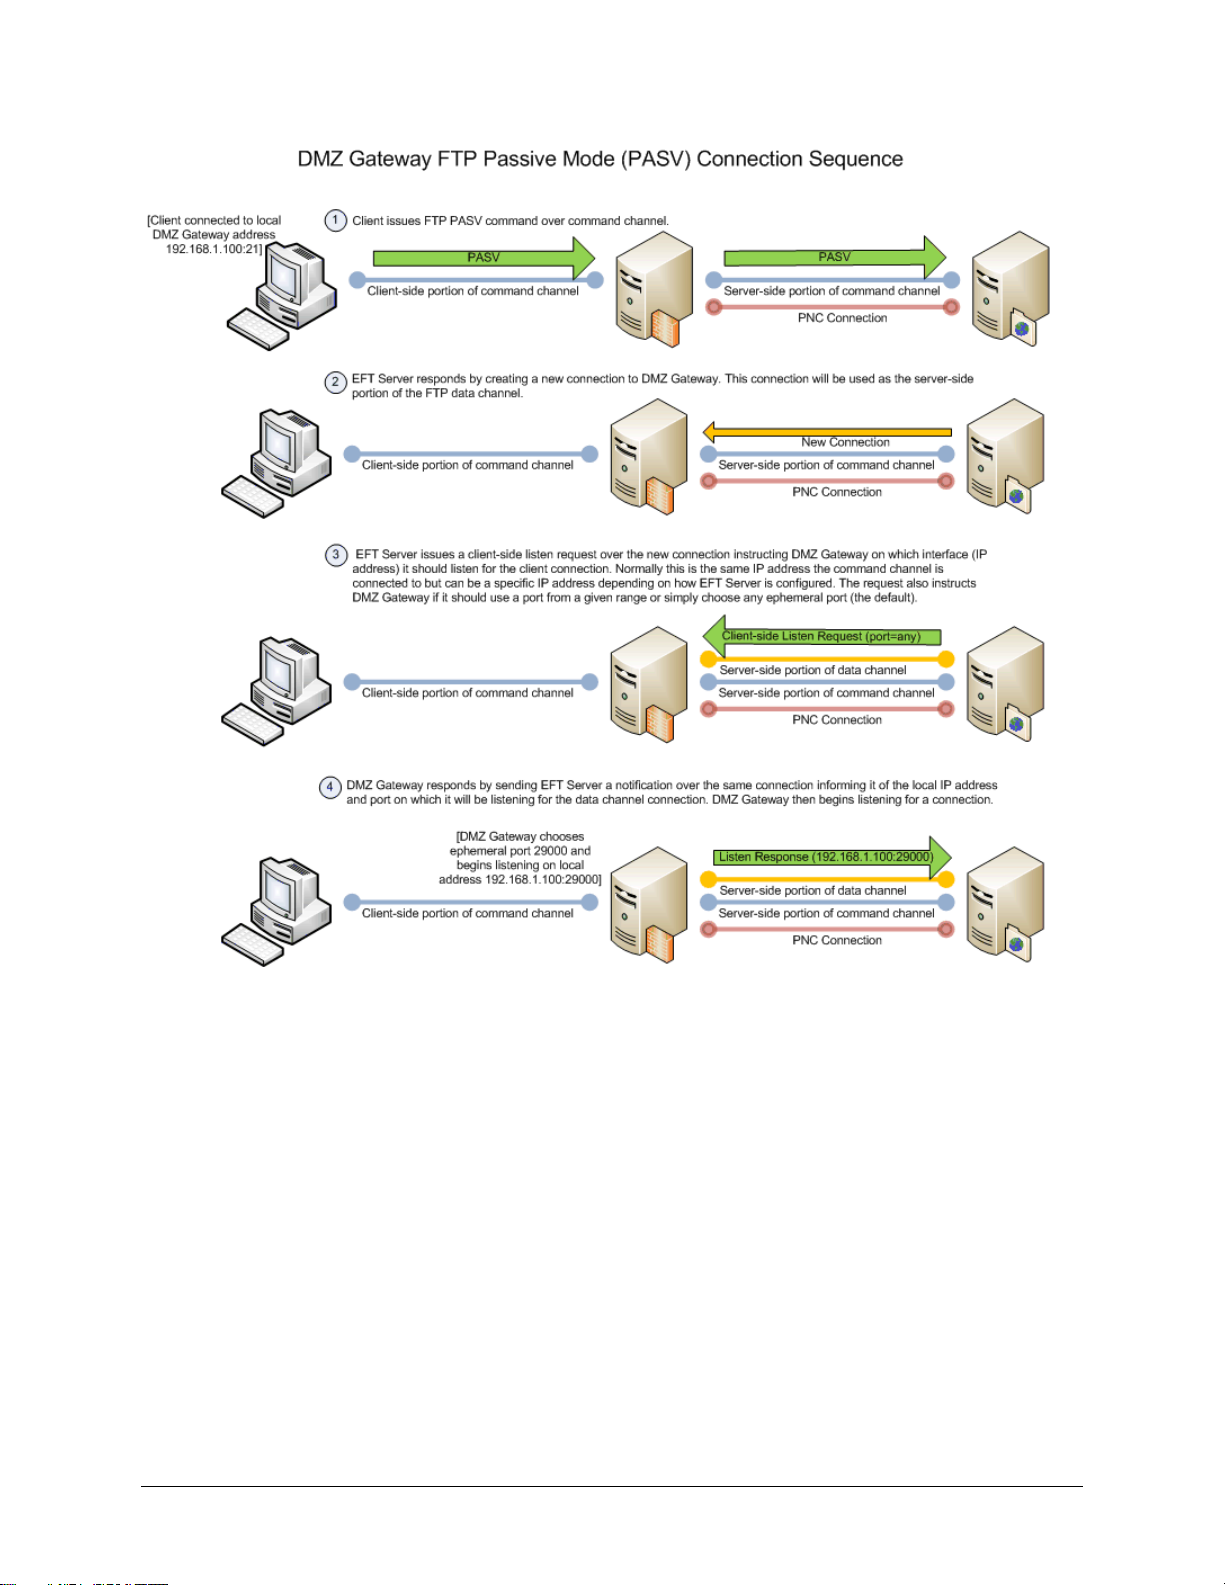
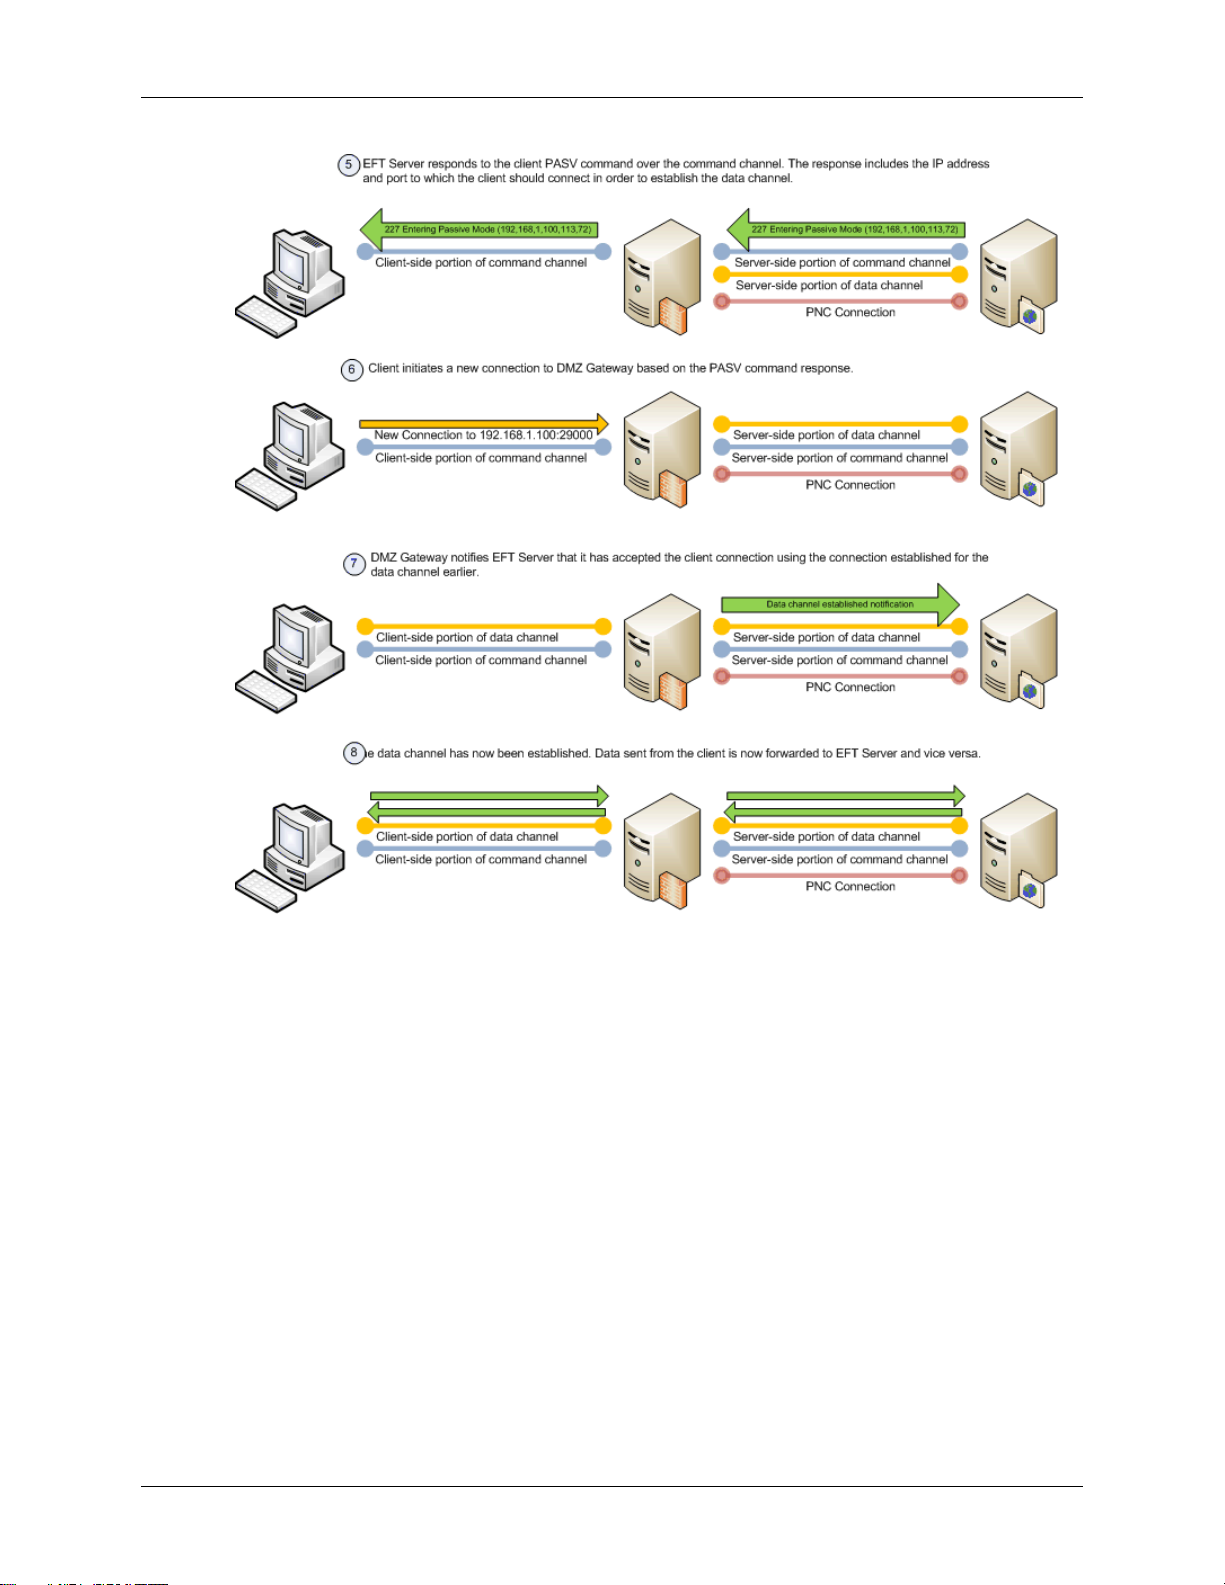
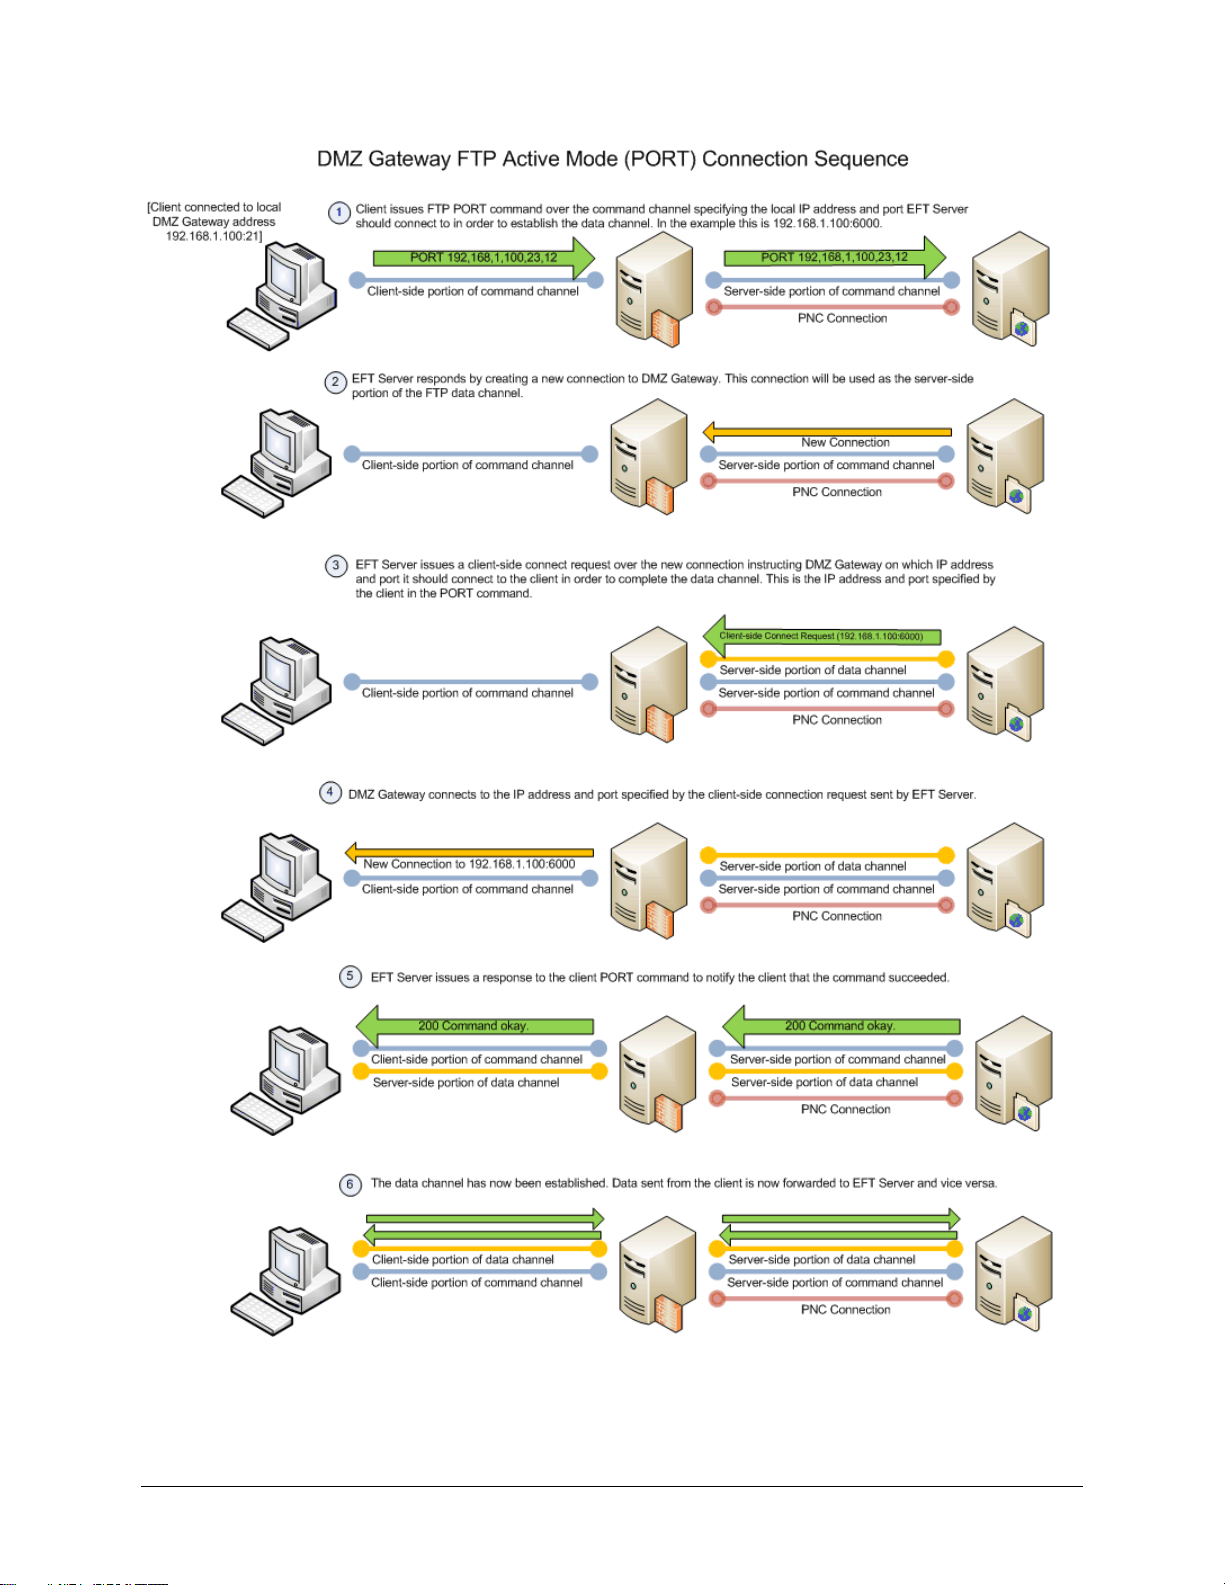
DMZ Gateway Initialization and Connection Diagrams
The diagrams below illustrate the initialization and connection sequences for DMZ Gateway and EFT
Server communication.
7

DMZ Gateway User Guide
8
What's New in DMZ Gateway
9
DMZ Gateway User Guide
10
What's New in DMZ Gateway
11

DMZ Gateway User Guide
What's New in DMZ Gateway
DMZ Gateway was completely rebuilt for version 3. DMZ Gateway can now be installed not only on
Windows, but also on RedHat, SuSE Linux, and Solaris, on 32-Bit or 64-Bit operating systems. (For a list
of supported operating systems, refer to System Requirements for DMZ Gateway.)
Other changes include:
Can connect to up to 15 EFT Server Sites simultaneously
Can connect to Mail Express Server
IP address access policy changes are now automatically propagated to DMZ Gateway when the
policy is modified in EFT Server whether in the EFT Server interface or by the auto-ban logic
DMZ Gateway's interface was completely redesigned to accommodate multiple profiles and
extended communication information
Moved DMZ Gateway licensing to the server to simplify DMZ Gateway installation and activation
Logging was improved and expanded
Hardened to better withstand attacks from several Denial of Service (DoS) attack tools
12

Installing DMZ Gateway
The topics in this section provide instructions for installing DMZ Gateway.
System Requirements for DMZ Gateway
Installing DMZ Gateway on Windows Systems
Installing DMZ Gateway on non-Windows Systems
Activating DMZ Gateway
Manually Registering and Deregistering the DMZ Gateway Server Daemon
Upgrading or Repairing DMZ Gateway
Uninstalling DMZ Gateway
System Requirements for DMZ Gateway v3
The GlobalSCAPE Quality Assurance team tests our products with a variety of operating systems,
software, and hardware. It is possible for DMZ Gateway to function with other operating systems,
software, and hardware, but is only tested and approved for use with the following:
Accepts incoming connections from EFT Server Enterprise v6.2 and later, and EFT Server 6.2
and later. (Versions prior to v6.2 require DMZ Gateway v2)
Accepts incoming connections from Mail Express Server v3 and later
Supported operating systems:
o Windows Server 2003 32-bit and 64-bit
o Windows Server 2008 R1&R2 32-bit and 64-bit
o Red Hat Enterprise Linux release 5.4 32-bit and 64-bit
o SuSE Linux Enterprise Server release 11 32-bit and 64-bit
o Ubuntu 8.04LTS Server Edition 32-bit and 64-bit
o Solaris 10 10/09 32-bit and 64-bit
x86-compatible processor (Itanium 64-bit processors are not supported)
1GB memory
1024x768 resolution or higher display (headless computer supported on non-Windows systems)
Remote administration must be available.
On Solaris and Linux-based systems, the administration interface will operate locally; therefore,
you must:
o Export the display to a remote X-Server to access the user interface.
o Make available on the DMZ Gateway computer the subset of X11 libraries necessary for
exporting the display.
o Properly configure a remote X11 server. The DMZ Gateway Server may be manually
configured without the use of the administration interface.
13

DMZ Gateway User Guide
Installing DMZ Gateway on a Windows System
DMZ Gateway and the connecting server must be installed on separate computers. For details of
installing DMZ Gateway in a cluster configuration, refer to
http://help.globalscape.com/help/guides/InstallingDMZGatewayInCluster.pdf. If a previous product version
is installed, the installer prompts you to uninstall the previous version before installing the new version.
To install DMZ Gateway
1. Close all unnecessary applications so that the installer can update system files without rebooting
the computer.
2. Start the installer. The Welcome page appears.
3. Click Next. The License Agreement appears.
4. Read the license, then click I Agree.
14
Installing DMZ Gateway
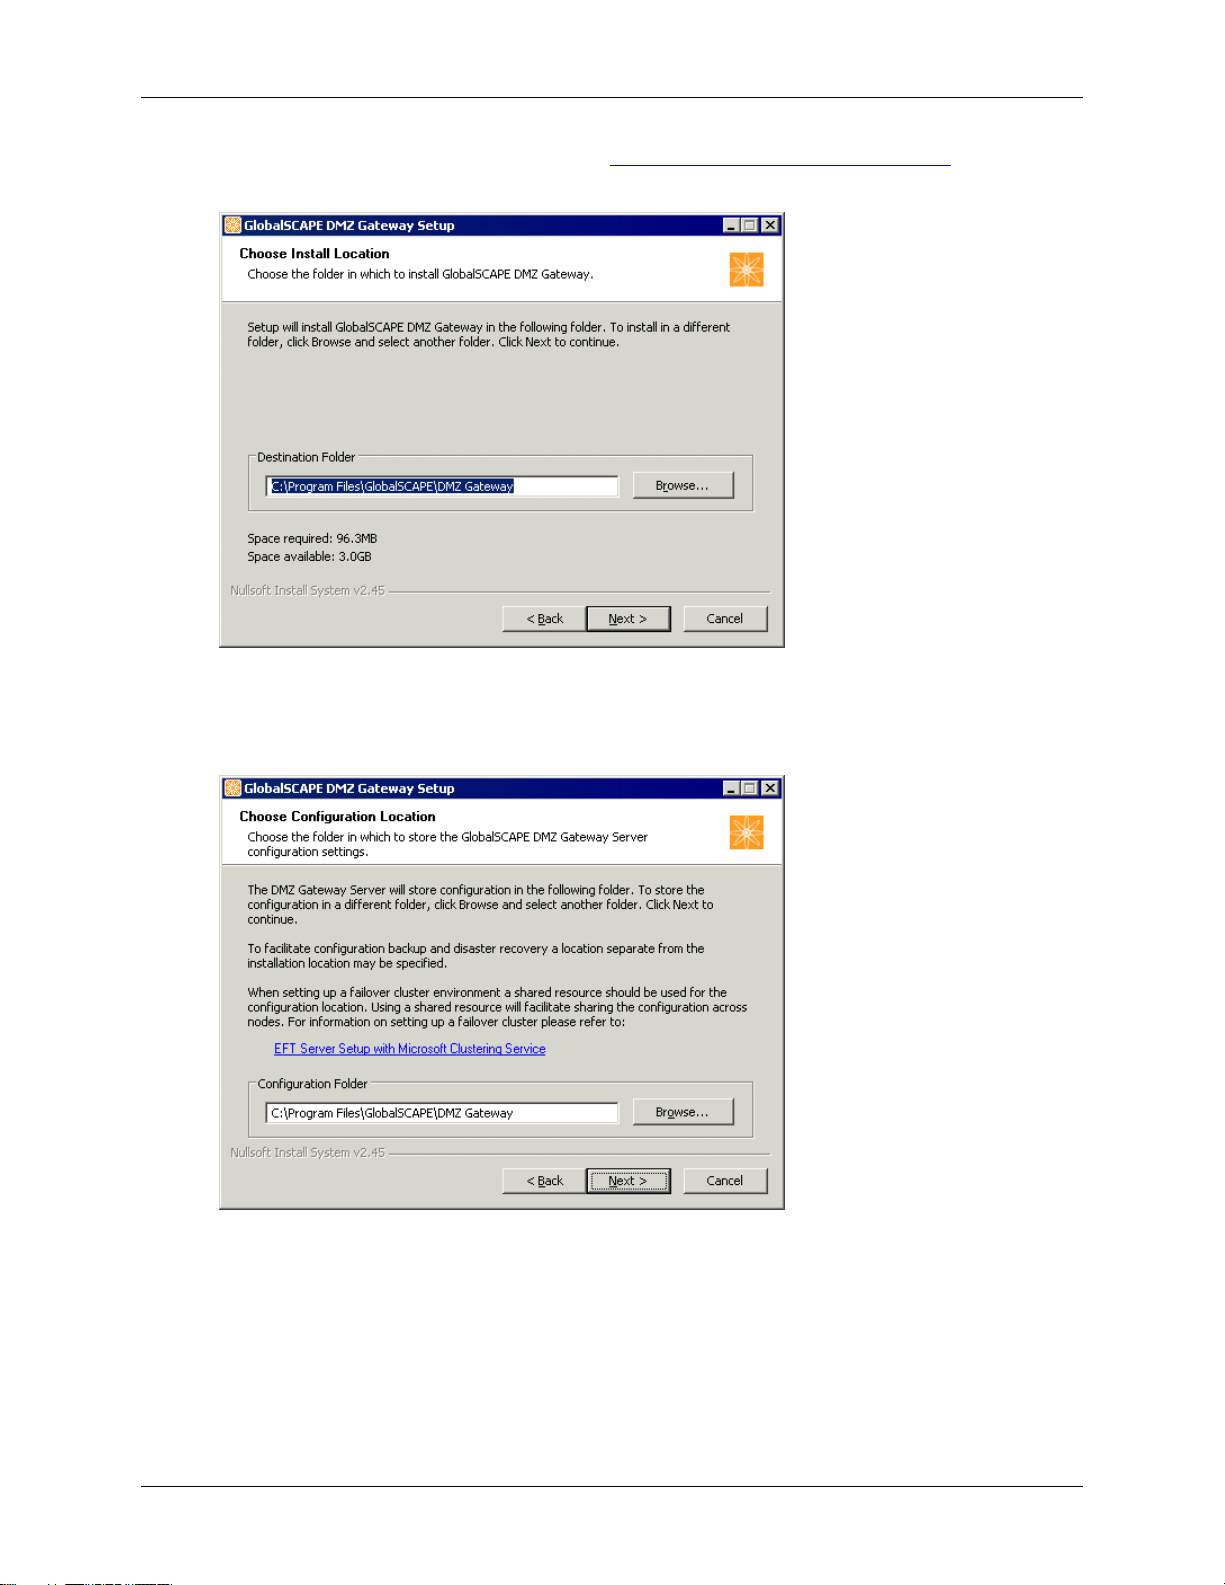
5. If an existing installation is detected, refer to Upgrading or Repairing DMZ Gateway. Otherwise,
the Choose Installation Location page appears.
6. The Destination Folder box displays the default location. Keep the default displayed in the box
or click Browse to specify a different location. Also displayed is the amount of hard drive space
required to install the program.
7. Click Next. The Choose Configuration Location page appears.
8. In the Configuration Folder box, specify the path at which to store configuration files for DMZ
Gateway. The installation location is specified by default, but you can specify a separate location
for backup and disaster recovery or for shared resources, such as with a cluster environment.
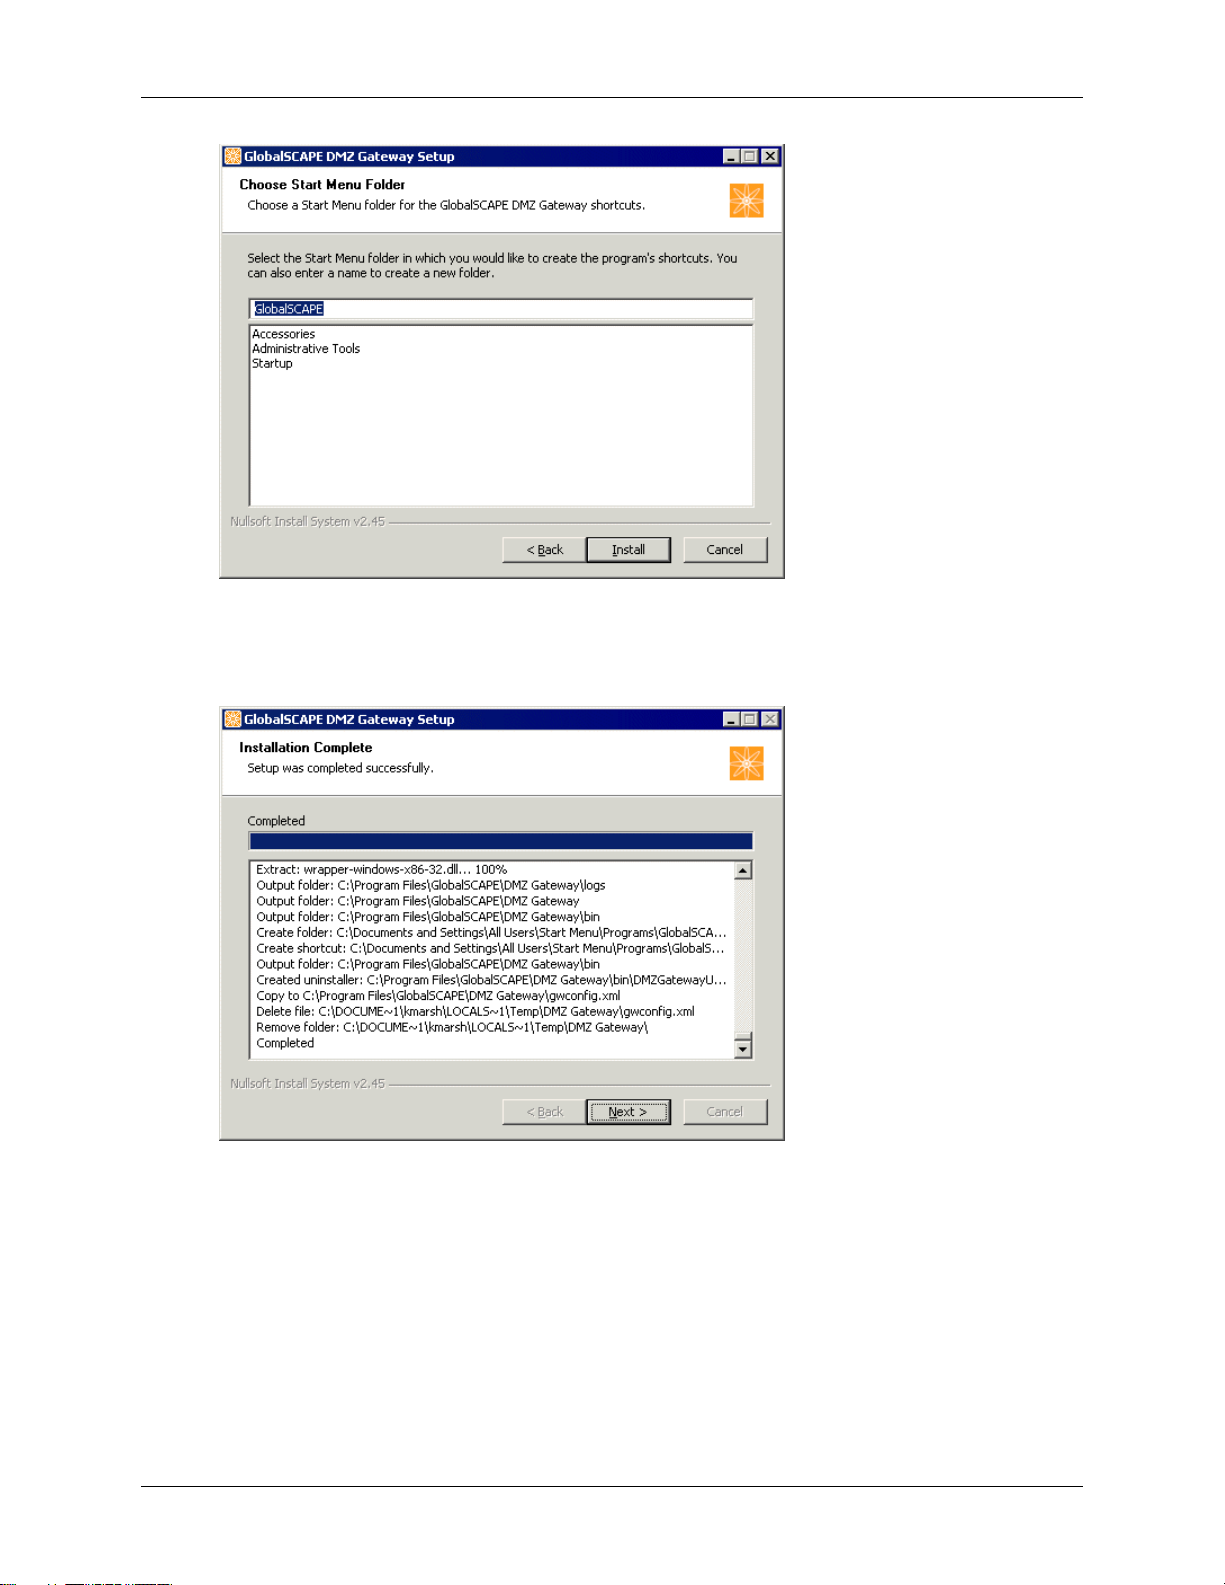
9. Click Next. The shortcuts page appears.
15
DMZ Gateway User Guide
A shortcut to open the DMZ Gateway interface will be installed on the Start menu in a folder
called GlobalSCAPE. You can keep this default location or specify a different location in which to
install the shortcut.
10. Click Install. The product is installed and the installation log appears.
11. Click Next. The completed page appears.
16
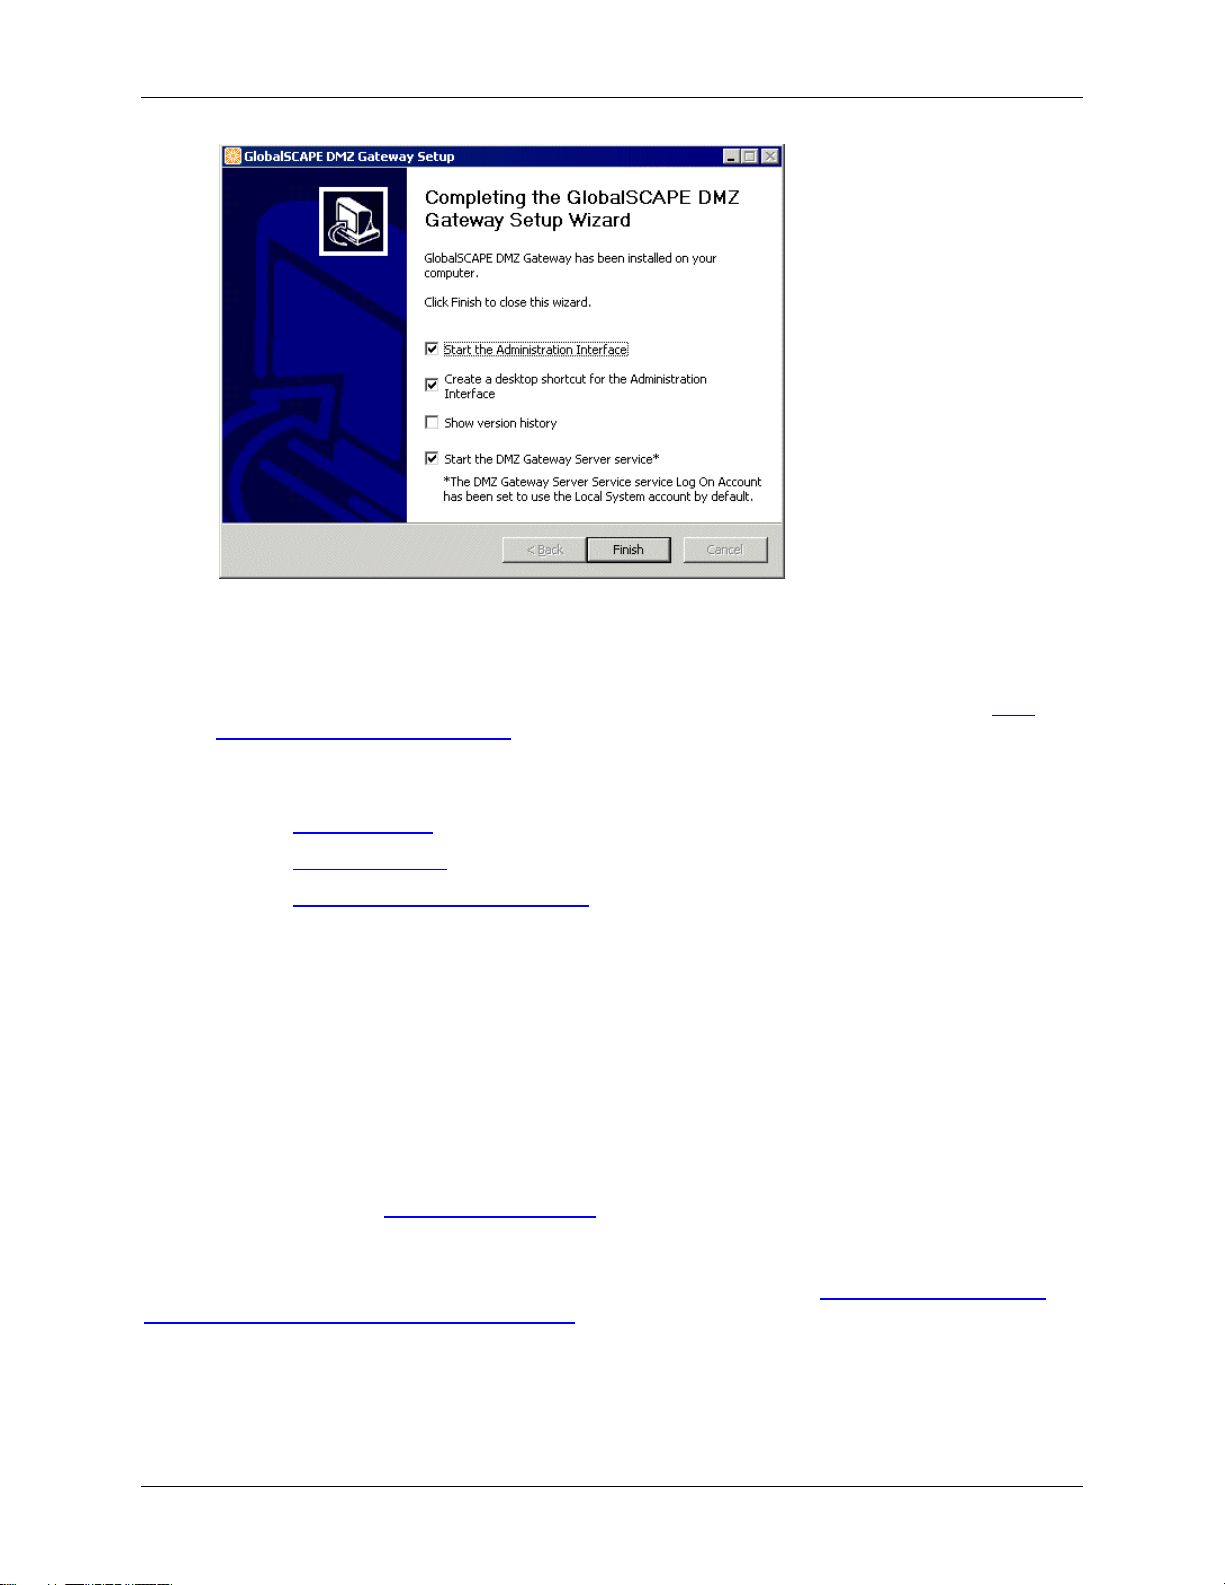
Installing DMZ Gateway
The Start the Administration Interface, Create a desktop shortcut, and Start the DMZ
Gateway Server service check boxes are selected by default. Select the Show version history
check box if you want to read the release notes. (You can also access the release notes in the
installation folder.)
11. Click Finish. If you left the Start the Administration Interface check box selected, the DMZ
Gateway Administration Interface appears.
A default Profile is defined using the IP address of the computer on which you installed DMZ Gateway
and the default port of 44500.
Refer to Editing a Profile to change the IP address/port assignments.
Refer to Creating a Profile to create new/additional Profiles.
Refer to Controlling Access by IP Address to specify which IP addresses or IP masks are allowed
or denied connections.
Installing DMZ Gateway on a non-Windows System
The installation process on each non-Windows operating system is basically the same with a few minor
differences. The basic process of installation can be described as follows:
1. Copy the appropriate installer archive file (.tgz) to the target machine.
2. Extract the contents of the installer archive. The archive contains 2 files: an installation script and
an archive of the actual program files.
3. Run the installation script as root and follow the prompts.
The process for supported non-Windows operating systems is described below. (For installation on
Windows systems, refer to Installing DMZ Gateway.)
The installation script includes registering and starting the DMZ Gateway server daemon (configuring it to
auto-start on system start and auto-stop on system stop). Alternately, you can start the server manually
using the command <InstallDir>/bin/dmzgatewayd start. Refer to Manually Registering and
Deregistering the DMZ Gateway Server Daemon if you decide not to register the daemon during the
installation process.
17

DMZ Gateway User Guide
Installing DMZ Gateway on RedHat or SuSE Linux 32-Bit or 64-Bit
To install DMZ Gateway
1. Transfer the DMZ Gateway Linux x86 installer archive to a convenient directory on the target
machine.
2. On the target machine, open a terminal window. The installation package must be run with root
privileges. If not already logged on as the root user, change to root using the su command in the
terminal window:
su
3. Change to the directory containing the installer archive and perform the following:
On 32-bit systems:
gunzip dmz-gateway-linux-x86-32.tgz
tar xvf dmz-gateway-linux-x86-32.tar
./Install.sh
On 64-bit systems:
gunzip dmz-gateway-linux-x86-64.tgz
tar xvf dmz-gateway-linux-x86-64.tar
./Install.sh
4. Follow the prompts to complete the installation.
o You will be prompted to accept the license agreement, and to specify the installation and
configuration directories (e.g., /opt/dmzgateway), etc.
o After everything is installed, you will prompted to register and start the DMZ Gateway
daemon service.
o If you start the service, you can execute the DMZ Gateway Administration interface script
(e.g., type: /opt/dmzgateway/bin/DMZGatewayAdmin).
Refer to the example below for details of the installation process.
Installing DMZ Gateway on Ubuntu Linux 32-Bit or 64-Bit
To install DMZ Gateway
1. Transfer the DMZ Gateway installer archive into a convenient directory on the target machine.
2. On the target machine, open a terminal window.
3. Change to the directory containing the installer archive and perform the following:
gunzip dmz-gateway-linux-x86-32.tgz (or dmz-gateway-linux-x86-64.tgz)
tar xvf dmz-gateway-linux-x86-32.tar (or dmz-gateway-linux-x86-64.tar)
sudo ./Install.sh
4. Follow the prompts to complete the installation.
18
o You will be prompted to accept the license agreement, and to specify the installation and
configuration directories (by default, /opt/dmzgateway), etc.
o After everything is installed, you will prompted to register and start the DMZ Gateway
daemon service.

Installing DMZ Gateway
o If you start the service, you can execute the DMZ Gateway Administration interface script
(e.g., type: /opt/dmzgateway/bin/DMZGatewayAdmin).
Refer to the example below for details of the installation process.
Solaris x86 32-Bit or 64-Bit
To install DMZ Gateway
1. Transfer the DMZ Gateway installer archive to a convenient directory on the target machine.
2. On the target machine, open a terminal window. The installation package must be run with root
privileges. If not already logged on as the root user, change to root using the su command in the
terminal window:
su
3. Change to the directory containing the installer archive and perform the following:
gunzip dmz-gateway-solaris-x86-32.tgz
tar xvf dmz-gateway-solaris-x86-32.tar
./Install.sh
4. Follow the prompts to complete the installation.
o You will be prompted to accept the license agreement, and to specify the installation and
configuration directories (e.g., /opt/dmzgateway), etc.
o After everything is installed, you will prompted to register and start the DMZ Gateway
daemon service.
o If you start the service, you can execute the DMZ Gateway Administration interface script
(e.g., type: /opt/dmzgateway/bin/DMZGatewayAdmin).
Refer to the example below for details of the installation process.
Example of Installation Process
Below is an example of executing the Install.sh script on a Solaris x86 32-bit computer.
== License Agreement ==
OMITTED – End-user License Agreement
Do you agree to the above license terms? [yes or no]: yes [ENTER]
== Choose Install Location ==
Please specify the path into which the DMZ Gateway program files will be installed or press "Enter" to
accept the default.
Specify installation directory [/opt/dmzgateway]: [ENTER]
== Choose Configuration Location ==
Please specify the path in which to store the DMZ Gateway Server configuration settings or press "Enter"
to accept the default.
Specify configuration directory [/opt/dmzgateway]: /export/home/appdata [ENTER]
== Choose Installation Owner ==
Please specify the user account name to use as the owner of the installed files.
Specify owner [root]: [ENTER]
== Choose Installation Group ==
Please specify the user group name to use as the group of the installed files.
19

DMZ Gateway User Guide
Specify group [root]: [ENTER]
== Confirm Settings ==
Installation directory: /opt/dmzgateway Configuration directory: /export/home/appdata Installation owner:
root Installation group: root
Are these settings correct? [yes or no]: yes [ENTER]
Creating directory "/opt/dmzgateway"
Creating directory "/export/home/appdata"
Unpacking archive...
Extracting files...
OMITTED - Extracted Program File List
Unpacking JRE...
Extracting JRE...
OMITTED - Extracted Java Runtime Environment File List
Removing temporary files...
Updating permissions...
Updating ownership...
Updating configuration file...
== Register Service ==
The installation script can attempt to register the DMZ Gateway Server daemon service (dmzgatewayd)
for automatic startup and shutdown.
Register the DMZ Gateway Server daemon service? [yes or no]: yes
Creating symbolic link "/etc/init.d/dmzgatewayd"...
Registering system daemon...
ln -sf /etc/init.d/dmzgatewayd /etc/rc0.d/K99dmzgatewayd
ln -sf /etc/init.d/dmzgatewayd /etc/rc1.d/K99dmzgatewayd
ln -sf /etc/init.d/dmzgatewayd /etc/rc2.d/S99dmzgatewayd
ln -sf /etc/init.d/dmzgatewayd /etc/rc3.d/S99dmzgatewayd
== Start Service ==
The installation script can attempt to start the DMZ Gateway Server daemon service (dmzgatewayd).
Start the DMZ Gateway Server daemon service? [yes or no]: yes [ENTER]
Executing: /etc/init.d/dmzgatewayd start
-n Starting DMZ Gateway Server...
== Installation Complete ==
The GlobalSCAPE, Inc. DMZ Gateway is now installed.
The DMZ Gateway Server daemon service may be controlled using the "dmzgatewayd" script:
/opt/dmzgateway/bin/dmzgatewayd
The DMZ Gateway Administration Interface may be started using the script:
/opt/dmzgateway/bin/DMZGatewayAdmin
20

Installing DMZ Gateway
Activating DMZ Gateway
DMZ Gateway licensing is activated in the connecting server, not DMZ Gateway, which accepts
connections from any licensed server. For example, a Single-Site license enables one EFT Server Site or
a Mail Express Server to connect to any available DMZ Gateway. A Multi-Site license enables one or
more Sites from EFT Server Enterprise to connect to any available DMZ Gateway. DMZ Gateway allows
up to 15 Profile definitions to manage connections, but the license installed on the connecting server
determines how many connections the server is allowed to make to DMZ Gateway.
After the 30-day trial has expired, you must activate DMZ Gateway by activating the serial number in the
connecting server's administration interface. Refer to the EFT Server or Mail Express documentation for
details of activating DMZ Gateway.
Manually Registering and Deregistering the DMZ Gateway Server
Daemon
During the installation process, you are prompted to register the DMZ Gateway server daemon
(configuring it to auto-start on system start and auto-stop on system stop). If you choose not to register
the daemon during the installation process, use the procedure below to add or remove the DMZ Gateway
Server daemon script, dmzgatewayd, from automatic system startup and shutdown.
There are multiple methods of configuring a daemon script for automatic startup/shutdown on
Linux/Solaris. Ultimately, whatever method is used typically results in the creation of symbolic links in the
/etc/rc* directories. These scripts are called at different startup and shutdown run levels of the operating
system to start and stop the daemon.
RedHat Enterprise Linux
After creation of the /etc/init.d/dmzgatewayd symbolic link, the chkconfig command can be used to
register and deregister the script for system startup/shutdown.
To register the script
The following command may be used as root:
chkconfig --add dmzgatewayd
(there are 2 dashes before add)
To deregister the script
The following command may be used as root:
chkconfig --del dmzgatewayd
(there are 2 dashes before del)
SuSE Linux
After creation of the /etc/init.d/dmzgatewayd symbolic link, the insserv command can be used to
register and deregister the script for system startup/shutdown.
To register the script
The following command may be used as root:
insserv dmzgatewayd
To deregister the script
The following command may be used as root:
insserv -r dmzgatewayd
21

DMZ Gateway User Guide
Ubuntu Linux
After creation of the /etc/init.d/dmzgatewayd symbolic link, the update-rc.d command can be used to
register and deregister the script for system startup/shutdown.
To register the script
The following command may be used as root:
update-rc.d dmzgatewayd defaults
To deregister the script
The /etc/init.d/dmzgatewayd symbol link must first be removed using the following command as
root:
rm /etc/init.d/dmzgatewayd
To deregister the daemon
The following command may be used as root:
update-rc.d dmzgatewayd remove
Solaris
On Solaris, after creation of the /etc/init.d/dmzgatewayd symbolic link you typically manually create the
appropriate symbolic links in the /etc/rc* directories.
To register the script
The following commands may be used as root:
ln -sf /etc/init.d/dmzgatewayd /etc/rc0.d/K99dmzgatewayd
ln -sf /etc/init.d/dmzgatewayd /etc/rc1.d/K99dmzgatewayd
ln -sf /etc/init.d/dmzgatewayd /etc/rc2.d/S99dmzgatewayd
ln -sf /etc/init.d/dmzgatewayd /etc/rc3.d/S99dmzgatewayd
To deregister the script
Remove the symbolic links as root:
rm /etc/rc0.d/K99dmzgatewayd
rm /etc/rc1.d/K99dmzgatewayd
rm /etc/rc2.d/S99dmzgatewayd
rm /etc/rc3.d/S99dmzgatewayd
Upgrading or Repairing DMZ Gateway
Upgrades from version 2.x to version 3 of the DMZ Gateway are supported on Windows systems only.
To upgrade or repair DMZ Gateway on non-Windows systems
Perform the standard installation process for the target operating system and use the same
settings for installation path and configuration path. If the DMZ Gateway Server daemon service
is running, you are prompted to stop it; if you do not stop it, the installer will abort.
To upgrade from DMZ Gateway 2.x on Windows systems
1. Close the Administration interface.
2. As a precaution, back up the existing installation directories and any other files you may have
installed elsewhere.
22

3. Launch the installer. The installer will detect an existing installation.
After accepting the End-User License Agreement the following dialog box appears:
Click one of the following, then click Next:
Installing DMZ Gateway
o Keep existing configuration and uninstall the older version
o Use a default configuration and uninstall the older version
Follow the prompts to finish the upgrade. Refer to Installing DMZ Gateway, if necessary.
During the upgrade process, the DMZ Gateway service Log On As account is set to use
the Local System account.
To upgrade from DMZ Gateway 3.x on Windows systems
1. Close the Administration interface.
2. Launch the installer. The installer will detect an existing installation.
3. After accepting the End-User License Agreement the following dialog box appears:
23

DMZ Gateway User Guide
4. Click Upgrade DMZ Gateway, then click Upgrade.
5. Follow the prompts to finish the upgrade. Refer to Installing DMZ Gateway, if necessary.
To reinstall DMZ Gateway 3.x on Windows systems
1. Close the Administration interface.
2. Launch the installer. The installer will detect an existing installation.
After accepting the End-User License Agreement the following dialog box appears:
3. Click Reinstall DMZ Gateway, then click Reinstall.
4. Follow the prompts to finish the reinstall. Refer to Installing DMZ Gateway, if necessary.
Uninstalling DMZ Gateway
The DMZ Gateway will prompt you if a previous version of DMZ Gateway is installed and needs to
uninstalled.
Uninstalling DMZ Gateway on a Windows System
Uninstall DMZ Gateway using Windows' Add/Remove Programs tool or via the shortcut on the Start
menu.
Uninstalling DMZ Gateway on a non-Windows System
The installation process on each non-Windows operating system is basically the same with a few minor
differences. The basic process of installation can be described as follows:
Run the uninstallation script as root and follow the prompts. (The script is created during
installation and is <InstallDir>/bin/Uninstall.sh)
24

Installing DMZ Gateway
RedHat Enterprise Linux, SuSE Linux, or Solaris x86 32-Bit or 64-Bit
You can uninstall DMZ Gateway using the Uninstall.sh script located in the <InstallDir>/bin
directory.
To uninstall DMZ Gateway
1. On the target machine, open a terminal window. The uninstall script must be run with root
privileges. If not already logged on as the root user, change to root using the su command in the
terminal window:
su
2. Run the Uninstall.sh script:
/<InstallDir>/bin/Uninstall.sh
For example:
/opt/dmzgateway/bin/Uninstall.sh
3. Follow the prompts to complete uninstalling.
Ubuntu Linux 32-Bit or 64-Bit
You can uninstall DMZ Gateway using the Uninstall.sh script located in the <InstallDir>/bin directory.
To uninstall DMZ Gateway on Ubuntu Linux
1. On the target machine, open a terminal window.
2. Run the Uninstall.sh script:
sudo /<InstallDir>/bin/Uninstall.sh
For example:
sudo /opt/dmzgateway/bin/Uninstall.sh
3. Follow the prompts to complete uninstalling.
Example of Uninstallation Process on Solaris
The following printout is a sample execution of the Uninstall.sh installation script run on Solaris x86 32bit.
== Confirm Uninstallation == The uninstallation script will now uninstall the DMZ Gateway from the
following installation directory:
/opt/dmzgateway
Proceed with uninstallation? [yes or no]: yes [ENTER]
== Stop Service == The installation script has detected that the DMZ Gateway Server daemon service
(dmzgatewayd) is currently running. The service must be stopped before proceeding. The script can now
attempt to stop the service.
Stop the DMZ Gateway Server daemon service? [yes or no]: yes [ENTER]
25

DMZ Gateway User Guide
Executing: /etc/init.d/dmzgatewayd stop Stopping DMZ Gateway Server... Stopped DMZ Gateway Server.
== Deregister Service == The installation script can attempt to deregister the DMZ Gateway Server
daemon service (dmzgatewayd) from automatic startup and shutdown.
Deregister the DMZ Gateway Server daemon service? [yes or no]: yes [ENTER]
Removing /etc/init.d/dmzgatewayd symbolic link...
Deregistering system daemon:
rm /etc/rc0.d/K99dmzgatewayd rm /etc/rc1.d/K99dmzgatewayd rm /etc/rc2.d/S99dmzgatewayd rm
/etc/rc3.d/S99dmzgatewayd
Removing installation files...
== Uninstallation Complete ==
26

Administering DMZ Gateway
The topics in this section provide instructions for administering DMZ Gateway.
DMZ Gateway Components
DMZ Gateway System Files
The DMZ Gateway Administration Interface
Starting and Stopping the DMZ Gateway Server Service
Specifying the Listening IP Addresses
Creating a Profile
Renaming a Profile
Deleting a Profile
Editing a Profile
Controlling Access by IP Address
Managing the DMZ Gateway Server Service
Viewing Statistics
DMZ Gateway Logging
DMZ Gateway Components
DMZ Gateway consists of the following components:
The main server component, the DMZ Gateway Server
A launch and monitoring component, the DMZ Gateway Server Service
A configuration and monitoring component, the DMZ Gateway administration interface
DMZ Gateway Server
The DMZ Gateway Server is the main Java-based functionality. An embedded Java Runtime Environment
(JRE) is used to execute this functionality. (The JRE is installed with DMZ Gateway--you do not need to
install or maintain the JRE.) The DMZ Gateway Server component is never executed directly, but rather
controlled and monitored using the DMZ Gateway Server Service component.
DMZ Gateway Server Service
The DMZ Gateway Server Service component is responsible for properly initializing the JRE and
launching the DMZ Gateway Server component. It then stays resident and provides watchdog monitoring
functionality over the DMZ Gateway Server component. It also provides logging and diagnostic
capabilities to facilitate troubleshooting any possible issues that may occur during server startup. (Refer
to DMZ Gateway Logging for detailed information.)
DMZ Gateway Administration Interface
The DMZ Gateway Administration Interface is a Java-based thick client that provides graphical
administration capabilities for the DMZ Gateway Server. The interface communicates with the DMZ
Gateway Server via a local-only TCP/IP administration port.
The administration capabilities include:
Creating and Configuring Profiles
Viewing Statistics
27

DMZ Gateway User Guide
You can view all running DMZ Gateway executables by typing:
ps –ef | grep DMZGateway
Controlling the Server Service/Daemon
DMZ Gateway System Files
The following file names can be observed when running DMZ Gateway:
On Windows Systems:
In the Windows Services dialog box:
o DMZ Gateway Server is the DMZ Gateway service.
In the Task Manager:
o DMZGatewayServerService.exe launches and monitors the DMZ Gateway Server.
o DMZGatewayServer.exe is the DMZ Gateway Server.
o DMZGatewayAdmin.exe is the administration interface.
On Non-Windows Systems:
dmzgatewayd is the DMZ Gateway daemon.
DMZGatewayServer is the DMZ Gateway Server.
DMZGatewayAdmin is the DMZ Gateway administration interface.
The DMZ Gateway Interface
The DMZ Gateway interface is used for mapping and viewing DMZ Gateway connections. Profiles are
used to define connections to DMZ Gateway.
To open the interface
On Windows systems, double-click the DMZ Gateway shortcut on the desktop or Start menu.
On non-Windows systems, after the server service has started, execute the DMZ Gateway
administration interface script (e.g., /opt/dmzgateway/bin/DMZGatewayAdmin).
The left pane displays each of the defined Profiles in an expandable/collapsible tree view. DMZ
Gateway has a default Profile for which you define the listening IP address and port of the
connecting server, and the IP address ban list. When DMZ Gateway connects, only the default
Profile is displayed. The interface displays the configuration for the last Profile modified or viewed
the last time the interface was opened or the first (default) Profile if no "last viewed" profile value
is available.
28

Administering DMZ Gateway
In the default view, with All Profiles selected, the right pane displays the status of the DMZ
Gateway service and the status of the Profile selected in the tree.
When a Profile is selected, the right pane displays configuration information in addition to status.
Refer to Creating a Profile for information about Profile configuration.
Refer to Controlling Access by IP Address for information about granting or denying access to a
specific IP addresses or an IP mask.
Refer to Managing the DMZ Gateway Server Service for details of stopping and starting the DMZ
Gateway server service.
Refer to Viewing Statistics for details of each of the tabs in the Status pane.
Starting the DMZ Gateway Server Service
Typically, the DMZ Gateway server service is configured to start automatically when the computer is
started. When the DMZ Gateway administration interface is launched, it determines whether the DMZ
Gateway server service is running. If the DMZ Gateway server service is not running, a prompt appears
asking if you like to start the DMZ Gateway service.
On Windows systems:
When you install DMZ Gateway, the service is configured to start automatically. You can start and stop
the service in the Windows Services dialog box and in the DMZ Gateway Administration Interface.
On non-Windows systems:
The installation script includes registering and starting the DMZ Gateway server daemon (configuring it to
auto-start on system start and auto-stop on system stop). Alternately, you can start and stop the server
manually using the commands <InstallDir>/bin/dmzgatewayd start and
<InstallDir>/bin/dmzgatewayd stop.
29

DMZ Gateway User Guide
In the DMZ Gateway administration interface, you can start and stop the service from the Server menu or
using the toolbar controls.
Specifying the Listening IP Addresses
For each DMZ Gateway Profile, you specify 2 IP addresses:
1. One address is used by client programs to connect. This is typically an external-facing address.
When a Site configured at a peer server connects to the DMZ Gateway over the PNC, the DMZ
Gateway reads the list of client ports configured in the Site. These ports are then combined with
the client IP Address and it is on these client IP address/Site port combinations that the DMZ
Gateway will listen for client connections.
2. The other address specifies the IP address on which to listen for connections from peer servers.
The communications established using this address is known as the Peer Notification Channel or
PNC. Typically this IP Address will be an internal-facing address. This address is combined with
the configured port value and it is on this IP Address/port combination that the DMZ Gateway will
listen for connections from peer servers.
Each address is configured by selecting the IP address to use from a drop-down list in the Profile
Configuration. The list of IP address includes all IPv4 addresses present on the computer. Additionally,
the list includes an All Available setting.
IMPORTANT:
All Available means that DMZ Gateway will listen on the IP address/port combination ONLY IF
that IP address/port combination is not already being used by another Profile. Profiles configured
with an explicit IP address have precedence over Profiles configured with All Available.
What Does This Mean for the Peer Server Listeners?
Suppose you have 3 IP addresses on the computer: IP 1, IP 2, and IP 3, and you have 2 Profiles: Profile
1 and Profile 2.
Both Profiles are configured to use the same Peer Server Listener Port 54321.
Profile 1 is set to use All Available.
Profile 2 is set to use IP 2.
Profile 1 will listen on IP 1:54321 and IP 3:54321, and Profile 2 will listen on IP 2:54321.
Now, suppose you delete Profile 2, making IP 2:54321 available. The DMZ Gateway will detect this and
update the communications listeners so that Profile 1 will now listen on IP 1:54321, IP 2:54321, and IP
3:54321.
What Does This Mean for the Client Listeners?
Suppose you have 3 IP addresses on the computer: IP 1, IP 2, and IP 3, and you have 2 Profiles: Profile
1 and Profile 2. Profile 1 is set to use All Available and Profile 2 is set to use IP 2.
Now suppose you have 2 Sites configured on EFT Server. Both Sites are configured to connect to the
DMZ Gateway and use FTP port 21. Site 1 is set to connect to Profile 1, and Site 2 is set to connect to
Profile 2.
Once both Sites are connected, the DMZ Gateway will establish client listeners for Site 1 on IP 1:21 and
IP 3:21 (because Site 1 used Profile 1, which uses all available IP/port combinations not currently in use).
For Site 2 the DMZ Gateway will establish a client listener on IP 2:21.
30

Administering DMZ Gateway
Now, if Site 2 should disconnect for some reason (perhaps it was deleted), IP 2:21 is now considered
available. The DMZ Gateway will detect this and update the communications listeners so that Profile 1 will
listen for client connections on IP 1:21, IP 2:21, and IP 3:21.
Refer to Creating a Profile or Editing a Profile for more information.
Creating a Profile
Creating a new Profile includes specifying the listening IP address for incoming clients, specifying the
listening IP addresses and port for the connecting server, and specifying the IP addresses that are
allowed or denied access.
To create a new Profile
1. Do one of the following:
In the Profiles tree, right-click then click New Profile.
On the toolbar, click New Profile.
On the main menu, click Profile > New.
The New Profile Wizard appears.
2. In the Profile Name box, provide a unique name for this Profile. The name will appear in the
interface, logs, error messages, and reports.
3. Click Next. The Configuration page of the wizard appears.
31

DMZ Gateway User Guide
The connection will be refused if the port is being used by another DMZ Gateway/Site or if
the IP address is on the IP address ban list.
4. In the Listening IP for incoming Clients box, click the down arrow to select an IP address or All
Available. (Only the IP addresses defined on this computer appear in this box.)
5. In the Listening IP for Server box, click the down arrow to select an IP address or All Available.
(Only the IP addresses defined on this computer appear in this box.)
(All Available means that DMZ Gateway will listen on the IP address/port combination ONLY IF
that IP address/port combination is not already being used by another Profile. Profiles configured
with an explicit IP address have precedence over Profiles configured with All Available.)
6. In the Port box, provide the port number over which connections are allowed.
7. Click Next. The Peer Server Access page appears.
8. All IP addresses are granted access by default. To grant or deny access to specific IP addresses
(optional):
9. Click Granted access or Denied access.
o If most IP addresses are allowed access, click Granted access, then add the exceptions.
o If most IP addresses are denied access, click Denied access, then add the exceptions.
32

Administering DMZ Gateway
For example, if you want to allow only 192.168.174.159 and block every other IP
address, click Denied access, click Add, then type 192.168.174.159 in the IP
Mask box. This will deny access to all IP addresses except 192.168.174.159.
9. Click Add. The New IP Access Exception Entry dialog box appears.
10. Specify the IP address or range of IP addresses to which you are denying or granting access.
You can use wildcards to select ranges of IP addresses.
11. Click OK to close the dialog box.
12. Click Finish. The IP Mask appears in the exception list.
When you make changes to DMZ Gateway Server, you must stop and restart any Site connected to DMZ
Gateway.
Renaming a Profile
The Profile name appears in statistics, logs, messages, and reports. You can change the name in the
DMZ Gateway interface.
To change the name of a Profile
1. Click the Profile in the tree, then do one of the following:
Click the Profile name again.
Right-click the Profile name, then click Rename Profile.
On the toolbar, click Rename Profile.
On the main menu, click Profile > Rename.
The name in the tree becomes editable.
2. Type a new name for the tree, then press ENTER.
Deleting a Profile
You can configure multiple Profiles. You can delete Profiles that you no longer use, but you cannot delete
a Profile if it is the only Profile.
To delete a Profile
Click the Profile in the tree, then do one of the following:
o Right-click the Profile name, then click Delete Profile.
o On the toolbar, click Delete Profile.
o On the main menu, click Profile > Delete Profile.
The Profile is deleted from the tree.
33

DMZ Gateway User Guide
Editing a Profile
When you create a new Profile, you define the listening IP address for remote connecting clients, the
listening IP address and port for the server inside your network, and any IP addresses exceptions. After
the Profile is created, you can edit the Profile's configuration as necessary. You can also rename or
delete the Profile. When you make a change to a Profile, before you click Apply, an asterisk appears in
the tree next to the Profile that you are editing.
To edit a Profile
1. In the Navigation pane, click the Profile that you want to edit.
2. In the Configuration pane, click the General tab.
3. Do one or more of the following:
In the Listening IP for incoming Clients box, click the down arrow to select a different
IP address or All Available. (Only the IP addresses defined on this computer appear in
this box.)
In the Listening IP for Server box, click the down arrow to select a different IP address
or All Available.
(Only the IP addresses defined on this computer appear in this box.)
In the Port box, provide the port number over which connections are allowed.
(All Available means that DMZ Gateway will listen on the IP address/port combination ONLY IF
that IP address/port combination is not being used by another Profile. Profiles configured with an
explicit IP address take precedence over Profiles configured with All Available.)
You must define a unique IP address/port combination for each Profile.
4. In the Configuration pane, click the Access tab.
34

Administering DMZ Gateway
If you have made multiple edits, you can revert to the last-saved state by clicking Revert Changes
(undo) before clicking Apply Changes. However, once you click Apply Changes, you cannot go
back.
For example, if you want to allow only 192.168.174.159 and block every other IP address, click
Denied access, click Add, then type 192.168.174.159 in the IP mask box. This will deny access
to all IP addresses except 192.168.174.159.
5. Specify the IP addresses or IP mask of servers that are allowed or denied access.
6. In the toolbar, click Apply Changes. If the IP address and port pair are not unique, an error
message appears; otherwise, the DMZ Gateway will allow the server to connect.
Controlling Access by IP Address
By default, all IP addresses are granted access to DMZ Gateway. You can grant access to only one
specific IP address or a range of IP addresses, or deny access to one specific address or a range of
addresses. You can define up to 100 IP address masks.
To grant/deny access by IP Address
1. In the Profile tree, click the default Profile or create a new profile.
2. In the Configuration pane, click the Access tab. The exception list appears.
3. The Access tab displays the IP addresses that are granted or denied access. By default, all IP
addresses are granted access, and no exceptions are displayed in the list.
35

DMZ Gateway User Guide
4. To configure exceptions, click Granted access or Denied access.
If most IP addresses are allowed access, click Granted access, then add the exceptions
(IP addresses that are not allowed access).
If most IP addresses are denied access, click Denied access, then add the exceptions
(IP addresses that are allowed access).
5. Click Add. The New IP Access Exception Entry dialog box appears.
6. Specify the IP address or range of IP addresses to which you are denying or granting access.
You can use wildcards to select ranges of IP addresses.
7. Click OK The IP address/mask appears in the exceptions list.
8. Click Apply Changes to save the changes on DMZ Gateway.
Managing the DMZ Gateway Server Service
The status of the DMZ Gateway server service appears in the status bar at the bottom of the interface.
(e.g., "DMZ Gateway is running.") You can start, pause, restart, or stop the DMZ Gateway service on the
DMZ Gateway main menu or toolbar.
To start the DMZ Gateway
On the DMZ Gateway main menu, click Server > Start or click Start on the toolbar.
To restart the DMZ Gateway
On the DMZ Gateway main menu, click Server > Restart or click Restart on the toolbar.
To stop the DMZ Gateway
On the DMZ Gateway main menu, click Server > Stop or click Stop on the toolbar.
Viewing Statistics
In the DMZ Gateway administration interface, you can view a variety of statistics. Whether you click All
Profiles or a specific Profile, the Status area displays information about Peer Notification Channels and
Client Listeners, as well as the size and speed of server and client data being transferred.
Your selections persist across Profiles; that is, if you click the Client Listeners tab in Profile 3, then click
Profile 2, the Client Listeners tab is selected in Profile 2 also.
The status "bubbles up" to the All Profiles node. For example, if there is a problem in Profile 1 causing
the icon to turn yellow, the All Profiles icon is also yellow.
In the Profile tree:
A red icon indicates that an error exists (e.g. port conflict from external application, IP address
no longer exists, etc).
A yellow icon indicates that the DMZ Gateway service is running, but port conflicts exist
between connected sites, when at least 2 Sites are connected.
36

Administering DMZ Gateway
A green icon indicates that the DMZ Gateway Service is running and at least one Site is
connected.
A gray icon indicates that there are no errors and no Servers are connected.
Peer Notification Channels
The Peer Notification Channels tab of the Status panel displays the IP address, port, active sites, active
connections, status, and status message for a selected Profile or All Profiles. If All Profiles is selected,
a Profile column displays the name of the applicable Profile. (For more about Peer Notification, refer to
Introduction to GlobalSCAPE DMZ Gateway.)
The following icons provide an indication of status:
Listening
Inactive
Warning
Error
The following columns displayed on the tab can be sorted by clicking the column header:
IP address - IP address on which Peer Notification Channels communicate
Port - Port on which Peer Notification Channels communicates
Active Sites - Number of Sites connected to DMZ Gateway
Active Connections - Number of active connections to DMZ Gateway
Status - Active, Inactive, Warning
Message - More information regarding status (e.g., Listening for connections, Port already in use)
Client Listeners
The Client Listeners tab of the Status panel displays the PNC address, server IP address, server name,
Site name, listener IP address/port, status, and status message. If All Profiles is selected, a Profile
column displays the name of the applicable Profile.
37

DMZ Gateway User Guide
The following icons provide an indication of status:
Listening
Inactive
Warning
Error
The following columns displayed on the tab can be sorted by clicking the column header:
PNC Address - IP address on which connecting clients connect to DMZ Gateway
Server IP Address - IP address on which the server listens
Server Name - user-assigned name of Server
Server Type - Type of server, e.g., EFT Server, EFT Server Enterprise, Mail Express Server
Site - User-assigned name of Site
Listener IP Address - IP address of Listener (i.e., EFT Server Site or Mail Express)
Listener Port - Port of Listener (i.e., EFT Server Site or Mail Express)
Status - Active, Inactive, Error, Warning
Message - More information regarding status (e.g., Listening for incoming connections, Unable to
bind to port, Listener creation failure, Closed, Inactive, Listener IP/Port address already assigned)
Statistics
The Statistics tab of the Status panel displays the size and speed of server and client data being
transferred. When All Profiles is selected, the aggregated data sizes are displayed, and a Profile column
displays the name of the applicable Profile.
The Statistics tab is configured by default to refresh automatically every 15 seconds. You can change
the refresh frequency or configure the interface to not refresh automatically. You can also refresh the
display manually.
To change the refresh frequency, in the Refresh Interval box, provide a new interval, in seconds,
then click Apply Refresh Interval.
To prevent the interface from refreshing automatically, clear the Enable automatic refresh check
box.
To manually refresh the interface, click Refresh Now.
The following columns displayed on the tab can be sorted by clicking the column header:
Client Bytes Read/sec - Number of bytes received from Clients
38

Administering DMZ Gateway
Client Bytes Written/sec - Number of bytes sent to Clients
Server Bytes Read/sec - Number of bytes received from Servers
Server Bytes Written/sec - Number of bytes sent to Servers
Accepted Client Connections - Number of successful client connections.
Rejected Client Connections - Number of client connections attempted that were rejected.
DMZ Gateway Logging
All logging functionality in DMZ Gateway comes preconfigured with the optimal settings. The information
below is provided to help you understand what is in the logs. When necessary, modifying the
configuration for the logging functionality should only be performed with the aid of GlobalSCAPE
Customer Support.
The following logs are created and populated during the operation of DMZ Gateway:
DMZ Gateway Communications Activity Log (DMZActivity.log)
DMZ Gateway Server Diagnostics Log (DMZGatewayServer.log)
DMZ Gateway Server Service Diagnostics Log (DMZGatewayServerService.log)
DMZ Gateway Statistics Log (DMZStatistics.log)
DMZ Gateway Server Event Viewer (Windows Operating Systems Only)
DMZ Gateway Server Syslog (Solaris/Linux-based Operating Systems Only)
DMZ Gateway Communications Activity Logging
The DMZ Gateway communications activity logging records messages relating to communications to a
W3C Extended Log File-formatted file. By default, this log file is created as <installation
directory>\logs\DMZActivity.log. The format of the log file consists of a header at the beginning of the
file and subsequent lines for each communications message generated by the DMZ Gateway Server.
(Not all fields will be populated for every message. More information on the W3C Extended Log File
format is available on the W3C Web site at http://www.w3.org/TR/WD-logfile.html.)
(The examples below are for illustration only and do not necessarily reflect your version or installation of
DMZ Gateway.)
The header is of the format:
#Software: DMZ Gateway Server Version: 3.0.0 build 4
#Version: 3.0
#Date: 2009-09-28 07:31:48
#Fields: time status rs-ip rs-comment s-ip s-comment c-ip c-comment
where:
Software – Identifies the application that generated the log file. In this case, the DMZ Gateway
Server. This line will also contain the application version and build number of the DMZ Gateway
Server.
Version – The version of the extended log file format used.
Date – The date and time the log file was initially created.
Fields – The field names for the fields included in each log message. The fields are defined as:
o time – The date and time the log message was generated
39

DMZ Gateway User Guide
o status – The status of the message where a value of 0 indicates a failure or error and a
value of 1 indicates success.
o rs-ip – The remote server IP Address and Port number. This represents the peer server
connected to the Peer Notification Channel. This will typically be the EFT Server.
o rs-comment – Textual status message related to the remote server.
o s-ip – The server IP Address and port. This represents the DMZ Gateway Server.
o s-comment – Textual status message related to the DMZ Gateway Server.
o c-ip – The client IP Address and port. This represents the FTP client connection.
o c-omment – Textual status message related to the client.
The verbosity of messages written to the communications activity log is configurable via the DMZ
Gateway administration interface. By default, verbose logging is not enabled. When set to false, only
basic communications initialization and de-initialization messages are logged to the activity log. This
includes messages concerning Peer Notification Channel listener startup and stops. When verbose
logging is enabled, additional communications messages concerning client connections are logged.
Essentially, messages that may occur throughout the course of operating the DMZ Gateway Server are
governed by the "Verbose Activity Logging" setting whereas messages that only occur during initial
startup and shutdown are always logged. The log will be appended during each run of the DMZ Gateway
Server.
The log file will automatically archives itself when reaching 10 MB in size and maintains the last 10 log
files in the form DMZActivity.<X> where X is a number from 1 to 10, with 1 being the most recently
archived log file and 10 being the oldest.
DMZ Gateway Server Diagnostics Logging
The DMZ Gateway Server diagnostics logging functionality provides diagnostic-level messages for the
operation of the DMZ Gateway Server. This diagnostic information may be used to identify errors,
warning, and other information of interest that occur during the operation of the DMZ Gateway Server.
By default this functionality logs to the file <installation directory>\logs\DMZGatewayServer.log.
The log will be appended during each run of the DMZ Gateway administration interface. The log file
automatically archives itself when reaching 10 MB in size and maintains the last 10 log files in the form
DMZGatewayAdmin.<X> where X is a number from 1 to 10, with 1 being the most recently archived log
file and 10 being the oldest.
DMZ Gateway Server Service Diagnostics Logging
This logging records diagnostic information generated by the DMZ Gateway Server service executable.
The diagnostic information may be used to identify errors or warnings that occur during startup of the
DMZ Gateway Server.
By default this functionality logs to the file <installation
directory>\logs\DMZGatewayServerService.log.
The log is appended during each run of the DMZ Gateway Server. The log file automatically archives
itself when it reaches 10 MB in size and maintains the last 10 log files in the form
DMZGatewayServerService.log.<X> where X is a number from 1 to 10, with 1 being the most recently
archived log file and 10 being the oldest.
DMZ Gateway Statistics Logging
Statistics logging is disabled by default, because statistics are typically viewed through the DMZ
Gateway administration interface. When enabled, this functionality records various statistical data in CSV
format to the log file <installation directory>\logs\DMZStatistics.log. A header row is generated at the
beginning of each file and then data rows are periodically added for each Profile/Peer Server connection.
40

Administering DMZ Gateway
The statistical data includes the following fields:
Timestamp – the date and time the row was generated
Profile – the Profile to which the row of statistical data pertains
Server – the Peer Server (e.g. EFT Server) to which the row of statistical data pertains
Client Received (B) – the total number of bytes received from clients for the specified
Profile/Server.
Client Sent (B) – the total number of bytes sent to clients for the specified Profile/Server.
Server Received (B) – the total number of bytes received from the Server for the specified
Profile/Server.
Server Sent (B) – the total number of bytes sent to the Server for the specified Profile/Server.
Client Receive Rate (Bps) – the number of bytes per second received from clients for the
specified Profile/Server.
Client Send Rate (Bps) – the number of bytes per second sent to clients for the specified
Profile/Server.
Server Receive Rate (Bps) – the number of bytes per second received from the Server for the
specified Profile/Server.
Server Send Rate (Bps) – the number of bytes per second sent to the Server for the specified
Profile/Server.
Connections Accepted – the total number of connections allowed for the specified Profile/Server.
Connections Refused – the total number of connections refused for the specified Profile/Server.
The log is appended during each run of the DMZ Gateway service. The log file automatically archives
itself when reaching 10 MB in size and maintains the last 10 log files in the form
DMZGatewayServerService.log.<X> where X is a number from 1 to 10, with 1 being the most recently
archived log file and 10 being the oldest.
DMZ Gateway Server Event Viewer (Windows Operating Systems Only)
On, Windows operating systems, DMZ Gateway records significant events to the Windows Event Log.
Events originating from the DMZ Gateway are recorded in the Application Event Log and by default
include the following types of events:
DMZ Gateway Service start
DMZ Gateway Service stop
DMZ Gateway Service restart
DMZ Gateway Service startup failures
All FATAL and ERROR level diagnostic log messages recorded in the DMZ Gateway Server
Diagnostics Log
Additionally, the startup and shutdown activities originating from the Windows Service Control Manager
are recorded in the System Event Log.
DMZ Gateway Server Syslog (Solaris/Linux-based Operating Systems Only)
On Solaris and Linux-based operating systems, DMZ Gateway can record significant events in the local
Syslog. By default, messages will be logged with an indent of “DMZ Gateway Server” to the LOG_USER
facility and include the LOG_PID option. (Refer to http://www.kernel.org/doc/man-
pages/online/pages/man3/syslog.3.html for information on the syslog functionality or type “man syslog” in
a terminal window.)
41

DMZ Gateway User Guide
On Solaris systems, it may be necessary to configure the syslog daemon to include logging of the
LOG_USER facility. Typically, you can edit the /etc/syslog.conf file as root and add a line such as:
user.info /var/admin/message
Replace <tab> with an actual TAB character. This will instruct the syslog daemon to log LOG_USER
facility messages to the /var/admin/message log file. After saving your changes, you will need to restart
the syslog daemon as root with a command such as:
svcadm restart system-log
DMZ Gateway Administration Interface Logging
The following log files are created and populated during the operation of the DMZ Gateway administration
interface:
DMZ Gateway Admin Diagnostics Logging
DMZ Gateway Admin Launcher Diagnostics Logging
DMZ Gateway Administration Diagnostics Logging
The DMZ Gateway administration diagnostics logging provides diagnostic-level messages for the
operation of the DMZ Gateway administration interface. This diagnostic information may be used to
identify errors or warnings that occur during the operation of the administration interface.
By default this functionality records to the file:
<installation directory>\logs\DMZGatewayAdmin.log
The log is appended during each run of the DMZ Gateway administration interface. The log file
automatically archives itself when reaching 10 MB in size and maintains the last 10 log files in the form
DMZGatewayAdmin.<X> where X is a number from 1 to 10, with 1 being the most recently archived log
file and 10 being the oldest.
DMZ Gateway AdminLauncher Diagnostics Logging
This logging records diagnostic information generated by the DMZ Gateway AdminLauncher executable,
<installation directory>\bin\DMZGatewayAdminLauncher(.exe). This executable is responsible for
starting the Java Virtual Machine and launching the DMZ Gateway administration interface. The
diagnostic information may be used to identify errors or warnings that occur during startup of the
administration application. By default this functionality logs to the file <installation
directory>\logs\DMZGatewayAdminLauncher.log. This file is overwritten during every execution of the
utility.
42

Communicating with EFT Server or Mail Express Server
The topics in this section provide details of communication between DMZ Gateway and EFT Server or
Mail Express Server.
DMZ Gateway in EFT Server
DMZ Gateway in Mail Express
Routing AS2 Traffic through DMZ Gateway
Using DMZ Gateway as an Outbound Proxy
Testing the Configuration
Troubleshooting DMZ Gateway Communication
Enabling DMZ Gateway in EFT Server
You can enable DMZ Gateway when you create the Site or enable it later in the EFT Server
administration interface. In the Site Setup wizard for both standard and High Security Sites, EFT Server
displays the Perimeter Security configuration page that asks whether you will be using DMZ Gateway,
and allows you to enter the DMZ Gateway IP address and port number. If Connect this site to EFT
Server's DMZ Gateway is selected when you are creating a Site in the Site Setup wizard, EFT Server
attempts to establish a socket connection to DMZ Gateway when you click Next.
If the socket connection fails, a message appears in which you are allowed to provide the DMZ
Gateway information again or disable DMZ Gateway and continue without it. (You can attempt to
configure it again later.)
If the socket connection is successful, EFT Server applies the settings and continues with Site
setup.
To enable DMZ Gateway in EFT Server administration interface
1. In the EFT Server administration interface, connect to EFT Server and click the Server tab.
2. Expand the node of the Site you want to connect to DMZ Gateway, then click the Gateway node.
3. In the right pane, the DMZ Gateway tab appears.
43

DMZ Gateway User Guide
4. Select the Enable the DMZ Gateway as a proxy check box.
5. In the DMZ Gateway address box, specify the IP address of the DMZ Gateway to which you are
connecting.
6. In the Port box, specify the port number over which EFT Server is to connect to DMZ Gateway.
The default port is 44500.
The connection will be refused if the port is being used by another DMZ Gateway/Site or if the IP
address is on the server's IP Access\Ban list.)
7. In the Protocols area, select the check boxes for the protocols and the ports that DMZ Gateway
will use. This is a separate configuration from the ports that EFT Server uses. For example, you
could use port 21 for FTP traffic for EFT Server, but port 14421 for FTP traffic through the DMZ
Gateway.
8. If you are using DMZ Gateway with a PASV mode IP address, click PASV settings. The
Firewall/NAT Routing dialog box appears.
a. Select the Assign PASV mode IP address check box, then specify the IP address and
port range.
b. Click OK.
9. Click Apply to save the changes on EFT Server. If the settings are correct and the DMZ Gateway
is configured properly, the connection status changes to Connected with a green icon.
44

Communicating with EFT Server or Mail Express Server
If EFT Server cannot connect to DMZ Gateway, ensure that the EFT Server computer can
connect to the DMZ Gateway computer by pinging it. Verify that the DMZ Gateway firewall is
not blocking incoming connections.
10. You may need to establish a new connection with EFT Server by stopping and restarting
connected Sites.
a. In the left pane, click the Site node.
b. In the right pane, click the General tab.
c. Click Stop. The Site Status area displays "Stopped" with a red ball icon.
d. Click Start. The Site Status area displays "Running" with a green ball icon.
Configuring the DMZ Gateway Connection in Mail Express
Version 3.1 of Mail Express Server can connect to a network protected by DMZ Gateway v3.0.1 and later.
Using DMZ Gateway with the Mail Express Server allows administrators to limit access by allowing only
outbound connections from the Mail Express Server via the firewall configuration. DMZ Gateway is
designed to reside in the demilitarized zone and provide secure communication with the Mail Express
Server behind intranet firewalls without requiring any inbound firewall holes between the internal network
and the DMZ, and with no sensitive data stored in the DMZ, even temporarily. When configured to use
DMZ Gateway, Mail Express functions normally, giving no indication to end users of the system that the
additional piece has been added to the network.
The connection between Mail Express and DMZ Gateway is configured in the Mail Express administration
portal. You must enable an outbound port from Mail Express Server to DMZ Gateway over which Mail
Express Server is to connect to DMZ Gateway. The default port is 44500. Mail Express only
communicates over HTTPS, which uses port 443 by default.
In the DMZ Gateway interface, the Mail Express Server is considered a "Server" and the Mail Express
DMZ Protocol Handler is considered a "Site" (e.g., in the DMZ Gateway Status pane). In the DMZ
Gateway version 3.1.0, when communicating with Mail Express Server, "Mail Express Server" appears in
the Server Type column. In earlier releases of DMZ Gateway, “[Unknown]” appears in the Server Type
column.
45

DMZ Gateway User Guide
DMZ Gateway events are logged in the Mail Express Event log.
Before you can use DMZ Gateway with Mail Express Server, you have to provide Mail Express with the
DMZ Gateway connection information.
To configure the DMZ Gateway information
1. In the Mail Express left navigation pane or on the Mail Express Status page, click DMZ Gateway.
The DMZ Gateway Configuration page appears.
2. Select the Enable the DMZ Gateway as a proxy check box. The page expands to display more
options.
3. In the DMZ Gateway address box, specify the hostname or IP address of the DMZ Gateway.
4. In the Server Port box, specify the port number used by DMZ Gateway (44500 by default).
5. In the Client HTTPS Port box, specify the port on which DMZ Gateway listens for incoming client
connections. In the case of Mail Express, client connections will typically include external
recipients picking up files via the Pick-Up portal and external users dripping off files via the DropOff portal.
While the DMZ Gateway supports use of client ports other than port 443, it is highly
recommended to use the default HTTPS port of 443 as this is the industry standard for
HTTPS communications. When using the standard port, users will not have to specify a
port value in the browser's URL if they are manually typing the URL to connect to a portal
such as the Drop-Off portal.
Using a non-standard client HTTPS listener port will require either adding the port to the
General Configuration Hostname so that the port is included on links generated by the
Mail Express system, or the networking infrastructure must be configured using portforwarding to redirect external HTTPS traffic to the configured Client HTTPS port on the
DMZ Gateway computer.
6. Click Save to save the changes or click Restore to return to the previous settings.
46

Communicating with EFT Server or Mail Express Server
Using the DMZ Gateway as proxy is available only in EFT Server Enterprise.
Using the DMZ Gateway as proxy is available only in EFT Server Enterprise.
If the connection to DMZ Gateway was lost (e.g., due to network errors), you can click Reconnect or wait
30 seconds for the Mail Express Server to automatically try to reconnect.
Routing AS2 Traffic through DMZ Gateway
You can configure Event Rules to cause AS2 traffic to route through the DMZ Gateway using the AS2
Send file to host Action. You can use the AS2 Send File to host Action in the Folder Monitor, Timer,
and all file-based Events.
To route AS2 traffic through DMZ Gateway
1. Create a new Event Rule, such as a File Uploaded event. (If necessary, refer to "Creating Event
Rules" in the EFT Server documentation.)
2. Add the AS2 Send file to host Action to the Rule, then click the file or host link. The AS2 Send
File dialog box appears.
3. In the AS2 Send File dialog box, specify trading partner profile to use or define the trading
partner options.
4. Add the Copy/Move File to Host Action to the Rule.
5. In the Rule pane, click one of the undefined parameters (e.g., '%FS.PATH%'). The Offload
Action Wizard appears.
6. Follow the instructions in Using DMZ Gateway as an Outbound Proxy to define the Rule.
Using DMZ Gateway as an Outbound Proxy
DMZ Gateway's primary use is as an inbound proxy. Outbound connections that originate from EFT
Server Enterprise will route through normal network mechanisms to reach the destination; however, it is
possible to configure EFT Server's Event Rules using the Copy/Move file to host Action to use the DMZ
Gateway Enterprise as an outbound proxy.
To configure an Event Rule to use DMZ Gateway Enterprise as an outbound proxy
1. In EFT Server, follow the procedure in Creating Event Rules, or select the rule to which you want
to add the Action. For example, create a Scheduler (Timer) Event.
2. In the right pane, in the Actions list, click Copy/Move (push) file to host.
3. In the Rule pane, click one of the undefined parameters (e.g., '%FS.PATH%').
The Offload Action Wizard appears.
47

DMZ Gateway User Guide
4. On the Offload method box, specify a protocol type for the connection: Local (Local File or LAN),
FTP (standard File Transfer Protocol), FTP SSL/TLS (AUTH TLS), FTP with SSL (Explicit
encryption), FTP with SSL (Implicit encryption), SFTP using SSH2 (Secure Shell), HTTP
(HyperText Transfer Protocol), HTTPS (Secure HTTP access).
5. If you chose anything but Local do the following; otherwise, skip to step 12.
a. In the Host address box, type the IP address.
b. The Port number for the selected protocol changes automatically based on the offload
method. Provide a different port number, if necessary.
c. Provide the Username and Password needed to establish the connection.
6. Select the Use connected client's login credentials to authenticate check box if you want to
use the local system account to authenticate.
7. If you chose SFTP:
a. In the SFTP Public Key File Path box, type the path or click the open icon to browse to
and select the path.
b. In the SFTP Private Key File Path box, type the path or click the open icon to browse to
and select the path.
c. In the SFTP Key Passphrase box, provide the key's passphrase.
8. If are connecting to a remote host through a SOCKS server, click SOCKS.
48

Communicating with EFT Server or Mail Express Server
a. Specify the Socks Type (SOCKS4 or SOCKS5).
b. Specify the Host name and Port.
c. If you specified SOCKS5 and the server requires authentication, select the Use
Authentication check box, then provide a Username and Password.
d. Click OK to return to the Offload Action Wizard.
9. Click Proxy.
10. Select the Use proxy settings below when connecting to remote host check box, click Use
EFT Server's DMZ Gateway as the proxy, then click OK to close the Proxy Settings dialog
box.
11. To specify transfer options and time stamps, click Advanced. The Advanced Options dialog box
appears.
49

DMZ Gateway User Guide
a. In the General transfer options area, you can provide more control over Max
concurrent transfer threads, Connection timeout, Connection retry attempts, and
Delay between retries. When files are being transferred with Event Rules (copy/move),
if there are connection problems (e.g., the network is unavailable), the Server will attempt
to establish a connection the number of times specified in Connection retry attempts.
When the Server is able to re-establish the connection, it continues to transfer the file
even if there are multiple interruptions.
b. Select the Validate file integrity after transfer check box to specify that the Server
should double check binary files to ensure the files downloaded completely and correctly.
c. In the Data port mode box, click the drop-down list and select one of the following:
Auto - (selected by default) the Server initially makes connections in PASV
mode. If the PASV connection fails, the Server attempts to connect in PORT
mode automatically.
PASV - Helps avoid conflicts with security systems. PASV support is necessary
for some firewalls and routers, because with PASV, the client opens the
connection to an IP Address and port that the Server supplies.
PORT - Use PORT when connections or transfer attempts fail in PASV mode, or
when you receive data socket errors. When a client connects using PORT, the
Server opens a connection to an IP address and port that the client supplies. If
you select Port, specify the Port range.
d. In the ASCII transfer mode area, specify the file types that can be transferred. TXT, INF,
HTML, and HTM are specified by default.
e. In the Time stamps area, select one of the following:
Select the Preserve remote time stamp for downloaded files check box to
keep a downloaded file's time stamp the same on the local computer as it is on
the Server.
Select the Preserve the local time stamp for uploaded files if the Server
allows MDTM check box to keep an uploaded file's time stamp the same on the
Server as it is on the local computer.
50
f. Click OK.

Communicating with EFT Server or Mail Express Server
12. Click Next. The Source File Path page appears.
13. In the Source path box, provide the path to the file(s) that you want to offload. (No validation is
performed.) For example, type:
/pub/usr/jsmith/file.txt or \\mydomain\common\jsmith\file.txt
14. If you want to Delete source file after it has been offloaded, select the check box.
15. Click Next. The Destination File Path page appears.
51

DMZ Gateway User Guide
16. In the Destination path box, click the open icon and specify the location in which to save the
offloaded file. (No validation is performed.)
You can also specify variables, such as
\pub\usr\%USER.LOGIN%\%FS.FILE.NAME%.
In the Variables box, double-click the variable(s) that you want to add to the path.
17. Click Finish then click Apply to save the changes on the Server and/or add other Actions and
Conditions to the Rule.
If you are copying or moving the file to another location, and the file upload is a regularly occurring event
with a file of the same name, in the Offload Action wizard, add the variables %EVENT.DATESTAMP%
and/or %EVENT.TIMESTAMP% to the path so that the date (YYYYMMDD) and/or time (HHMMSS) are
added to the filename when it is moved/copied. Do not use %EVENT.TIME%, because the colon (e.g., 28
Aug 07 10:01:56) makes it unsuitable for file naming.
For example, in the Offload Action wizard, in the Destination path box, provide the path and variables.
For example, type:
C:\Documents and Settings\Administrator\My
Documents\upload/%EVENT.DATESTAMP%_%EVENT.TIMESTAMP%_%FS.FILE_NAME%
With this path and variables, when a file is uploaded to the monitored folder, the file is moved to \My
Documents\upload and the date and time are prepended to the filename. For example,
20080422_101212_mydailyprogress.doc.
To create a custom authentication method for a proxy server
1. In the Advanced Proxy Settings dialog box, click Custom, then specify the login sequence in
the text box using the following variables:
%host% - sends the host name you typed in the Proxy server options dialog box.
52

Communicating with EFT Server or Mail Express Server
Contact your system administrator for the proper Host name, Port, User name, Password,
and proxy type, as well as any required advanced authentication methods.
%user% - sends the user name you typed in the Proxy server options dialog box.
%pass% - sends the password you typed in the Proxy server options dialog box.
%port% - sends the port number you typed in the Proxy server options dialog box.
%fire_pass% - sends the password you typed in the Proxy server options dialog box as
authentication for the firewall.
%fire_user% - sends the user name you typed in Proxy server options dialog box as
authentication for firewall.
2. Type each variable with percent signs before and after.
3. Press ENTER to separate commands.
4. Type any other commands and variables, separating commands with a line break (press
ENTER).
5. Click OK.
Testing the Configuration
After you have installed DMZ Gateway, created and configured a Profile, and enabled DMZ Gateway in
EFT Server or Mail Express, you can test your configuration by connecting to the server via DMZ
Gateway and transferring a few files.
To test your configuration
Suppose your server is at IP address 192.168.174.176 and DMZ Gateway is at IP address
192.168.174.142, and you have configured DMZ Gateway in the server to allow connections over the
HTTPS port 443.
1. Open a browser and in the address bar type https://192.168.174.142 (the IP address of
DMZ Gateway), then press ENTER.
2. You should be prompted to log in. Type the login credentials from a user defined on the server to
which you want to connect.
3. Transfer a few files.
4. On the Status tab, you should see the numbers increase in the Client Bytes Read, Client Bytes
Written, Server Bytes Read, and Server Bytes Written columns. Click Refresh, if necessary.
(Note that if you connect to the server's IP address to transfer files, you are not going through the
DMZ Gateway and, therefore, will not see any statistics change.)
With EFT Server, in the folder for the account that you used to log in (e.g.,
C:\Inetpub\EFTRoot\GSSite\Usr\<username>), you should see the files that you
transferred.
With Mail Express, your recipient should receive a link to the files you uploaded to Mail
Express.
5. If you are not able to connect, refer to Troubleshooting DMZ Gateway Communication.
53

DMZ Gateway User Guide
Troubleshooting DMZ Gateway Communication
There are a variety of configurations that can prevent the server and DMZ Gateway from communicating.
For example, if the DMZ Gateway computer's firewall is blocking connections, the server will not be able
to connect to DMZ Gateway.
If the status icon in DMZ Gateway does not change color to green indicating a successful
connection, verify the following:
1. Verify that the services for the server and DMZ Gateway are started.
2. If you make changes in DMZ Gateway, make sure to click Apply Changes. If necessary, in the
server, stop and then restart the service (and/or the Site in EFT Server) after making changes.
3. If you made configuration changes in EFT Server, especially connection settings (protocols
allowed, ports, etc.), make sure to stop and then restart the EFT Server service. Once restarted,
make sure EFT Server is running (listening for new connections) and that DMZ Gateway remains
enabled.
4. Verify that the IP address for the server is not blocked in DMZ Gateway's IP Access
Exception list. By default, all IP addresses are granted access until you block or allow specific
addresses. (Refer to Controlling Access by IP Address for the procedure for blocking/unblocking
IP addresses.)
5. Verify that the DMZ Gateway settings in the server have the proper IP address and port and that
the allowed protocols and ports have been defined for allowed incoming client connections.
6. Try pinging from the server computer to the DMZ Gateway computer and from the DMZ Gateway
computer to the server computer. If you cannot connect, verify that there is no firewall that would
block connections.
If a connection between the server and DMZ Gateway is indicated, but clients cannot connect to
the server through DMZ Gateway:
Verify that you can connect to the server using a client account from within your network.
o If connection is successful, but clients cannot connect, something is not configured
properly in the DMZ Gateway settings, either in DMZ Gateway or in the server. Verify that
the server and DMZ Gateway are connected (see above) and that, in the server<--> DMZ
Gateway configuration settings, the correct protocols and ports are specified for incoming
client connections to the Gateway. These are the ports on which external clients will
connect to DMZ Gateway. If no protocol is enabled or the wrong port is defined, clients
will not be able to connect.
o If connection fails, there is a configuration issue in the server. Review your configuration
of user accounts and connection settings.
54

For example, if you want to allow only 192.168.174.159 and block every other IP address, click
Denied access, click Add, then type 192.168.174.159 in the IP mask box. This will deny access
to all IP addresses except 192.168.174.159.
Interface Reference
The topics in this section describe the dialog boxes in DMZ Gateway that have Help buttons and provides
a list of frequently used commands.
IP Address Mask Dialog Box
New Profile Wizard--Profile name
New Profile Wizard--Peer Server Access
New Profile Wizard--Configuration
Frequently Used Commands
IP Access Exception Entry Dialog Box
Use the New IP Access Exception Entry dialog box and the Edit IP Access Exception Entry dialog
box to provide a specific IP address (e.g., 192.168.43.201) or an IP address mask using wildcards (e.g.,
192.168.43.*).
To specify the IP address or mask
1. In the IP Mask box, specify the IP address or range of IP addresses to which you are denying or
granting access. You can use wildcards to select ranges of IP addresses.
2. Click OK The IP address/mask appears in the exceptions list on the Access tab.
New Profile Wizard--Profile name
The New Profile Wizard is used to define a new Profile.
55

DMZ Gateway User Guide
In the Profile Name box, provide a unique name for this Profile. The name will appear in the interface,
logs, error messages, and reports.
New Profile Wizard--Peer Server Access
Use the Peer Server Access page to specify the IP addresses or IP masks of peer servers who are
allowed or denied access to DMZ Gateway. All IP addresses are granted access by default. Refer to IP
Address Mask for details.
New Profile Wizard--Configuration
Use the Configuration page of the wizard to specify which IP address/port combination on the DMZ
Gateway computer should be used as the listening IP addresses.
To specify the client side and server side listening addresses
1. In the Listening IP boxes, click the down arrow to select the IP address or leave the default of All
Available.
(All Available means that the communications code will listen on the IP address/port combination
ONLY IF that IP address/port combination is not already being used by another Profile. Profiles
configured with an explicit IP address have precedence over Profiles configured with All
Available.)
2. In the Port box, specify the port on which DMZ Gateway communicates with the server. The
default is 44500. The connection will be refused if the port is being used by another DMZ
Gateway/Site or if the IP address is on the IP address ban list.
56

Interface Reference
Purpose
Platform
Command example (your file and path names may differ)
Install
All
gunzip dmz-gateway-linux-x86-32.tgz
tar xvf dmz-gateway-linux-x86-32.tar
./Install.sh
Register the script
Redhat
chkconfig --add dmzgatewayd
Suse
insserv dmzgatewayd
Ubuntu
update-rc.d dmzgatewayd defaults
Solaris
ln -sf /etc/init.d/dmzgatewayd
/etc/rc0.d/K99dmzgatewayd
ln -sf /etc/init.d/dmzgatewayd /etc/rc1.d/K99dmzgatewayd
ln -sf /etc/init.d/dmzgatewayd /etc/rc2.d/S99dmzgatewayd
ln -sf /etc/init.d/dmzgatewayd /etc/rc3.d/S99dmzgatewayd
Deregister the script
Redhat
chkconfig --del dmzgatewayd
Suse
insserv -r dmzgatewayd
Ubuntu
rm /etc/init.d/dmzgatewayd
update-rc.d dmzgatewayd remove
Solaris
rm /etc/rc0.d/K99dmzgatewayd
rm /etc/rc1.d/K99dmzgatewayd
rm /etc/rc2.d/S99dmzgatewayd
rm /etc/rc3.d/S99dmzgatewayd
Uninstall
All
/opt/dmzgateway/bin/Uninstall.sh
Open the DMZ
Gateway Interface
All
/opt/dmzgateway/bin/DMZGatewayAdmin
Start DMZ Gateway
Server service
All
/opt/dmzgateway/bin/dmzgatewayd start
Stop DMZ Gateway
Server service
All
/opt/dmzgateway/bin/dmzgatewayd stop
Frequently Used Commands (non-Windows)
The table below describes several commands that you use to administer DMZ Gateway on non-Windows
platforms. The commands are described in the applicable procedures in more detail; this table is provided
only as a quick reference.
57

DMZ Gateway User Guide
58

License, Copyrights, and Release Notes
The topics in this section provide information about licenses, copyrights, and release notes.
Copyright Information
DMZ Gateway Release Notes
DMZ Gateway EULA
Copyright Information
This help file is copyrighted confidential property of GlobalSCAPE, Inc. Copying, use, or disclosure
without the express written consent of GlobalSCAPE, Inc. is prohibited.
DMZ Gateway Copyright © 2005-2011 GlobalSCAPE, Inc. All rights reserved.
DMZ Gateway Release Notes
The DMZ Gateway release notes document is available in the installation folder.
DMZ Gateway EULA
The license agreement is available in the installation folder as license.txt.
59

DMZ Gateway User Guide
60
 Loading...